
AM-3738 - Lawn mower DOLMAR - Free user manual and instructions
Find the device manual for free AM-3738 DOLMAR in PDF.


| Product Type | Cordless Lawn Mower |
| Brand | Dolmar |
| Model | AM-3738 |
| Mowing Width | 380 mm |
| No Load Speed | 3,700 min⁻¹ |
| Operating Dimensions (L x W x H) | 1,145 mm x 465 mm x 1,023 - 1,070 mm |
| Stored Dimensions (L x W x H) | 680 mm x 470 mm x 505 mm |
| Rated Voltage | DC 36 V |
| Net Weight | 15.0 kg (with battery, according to EPTA-Procedure 01/2003) |
| Battery Compatibility | AP-183, BL1830, BL1840, BL1840B, BL1850, BL1850B, LG-184, DC18RC |
| Mowing Height Adjustment Range | 25 mm - 75 mm |
| Sound Pressure Level | 81 dB(A) |
| Sound Power Level | 93 dB(A) |
| Vibration Emission (a_h) | 2.5 m/s² or less |
| Blade Type | 380 mm steel blade (replaceable) |
| Grass Basket Capacity | Approximately 50 L (not specified, estimated based on size) |
| Power Switch | Interlock switch with lock key, switch button, and switch lever |
| Safety Features | Lock key, blade brake, rear guard, grass level indicator, handle switch |
| Handle Type | Folding upper and lower handle for compact storage |
| Maintenance | Clean underside regularly; check bolts; use only mild soap and damp cloth |
Frequently Asked Questions - AM-3738 DOLMAR
User questions about AM-3738 DOLMAR
0 question about this device. Answer the ones you know or ask your own.
Ask a new question about this device
Download the instructions for your Lawn mower in PDF format for free! Find your manual AM-3738 - DOLMAR and take your electronic device back in hand. On this page are published all the documents necessary for the use of your device. AM-3738 by DOLMAR.
USER MANUAL AM-3738 DOLMAR


1

2

3

4

5
6

7
8

9

1 0

1 1

1 2

1 3

1 4

1 5





ENGLISH (Original instructions)
Explanation of general view
| 1-1. Battery cover locking lever | 13-1. Battery cover | 19-2. Wrench |
| 1-2. Battery cover | 14-1. Battery cover | 19-3. Loosen |
| 2-1. Battery cover | 14-2. Pivot point | 19-4. Lumber |
| 2-2. Battery cartridge | 14-3. Battery cover locking lever | 20-1. Blade support |
| 3-1. Battery cartridge | 15-1. Lower handle | 20-2. Blade |
| 3-2. Lock key | 15-2. Clamping screw | 20-3. Flat washer |
| 4-1. Star marking | 15-3. Tighten | 20-4. Spring washer |
| 5-1. Battery indicator | 15-4. Loosen | 20-5. Bolt |
| 6-1. Indicator lamps | 15-5. Groove | 22-1. Groove |
| 6-2. Check button | 16-1. Lower handle | 22-2. Hook |
| 7-1. Battery cartridge | 16-2. Upper handle | 22-3. Grass basket |
| 7-2. Lock key | 16-3. Holes | 24-1. Grass basket |
| 8-1. Switch button | 17-1. Clamping nut | 24-2. Handle |
| 8-2. Switch lever | 17-2. Curl washer | 24-3. Rear guard |
| 9-1. Mowing height adjusting lever | 17-3. Screw | 26-1. Clamping screw |
| 9-2. Pins | 17-4. Tighten | 26-2. Clamping nut |
| 11-1. Grass level indicator | 18-1. Holder | 27-1. Handle |
| 12-1. Battery cover | 18-2. Upper handle | 27-2. Clamping nut |
| 12-2. Hole | 18-3. Cord | |
| 12-3. Protrusion | 19-1. Blade |
SPECIFICATIONS
| Model | AM-3738 | |
| Mowing width 380 mm | ||
| No load speed 3,700 min | -1 | |
| Dimensions (L x W x H) | during operation 1,145 mm x 465 mm x 1,023 mm - 1,070 mm | |
| when stored 680 mm x 470 mm x 505 mm | ||
| Rated voltage D.C. 36 V | ||
Standard battery cartridge(s) Warning: Use only the battery cartridge(s) described. Warning: Use only the battery cartridge(s) described. | AP-183, BL1830, BL1840, BL1840B, BL1850, BL1850B / LG-184, DC18RC | |
| Net weight 15.0 kg | ||
- Due to our continuing program of research and development, the specifications herein are subject to change without notice.
- Specifications and battery cartridge may differ from country to country.
- Weight, with battery cartridge, according to EPTA-Procedure 01/2003
END016-5
Symbols
The following show the symbols used for the equipment. Be sure that you understand their meaning before use.


• Take particular care and attention.
- Read instruction manual.
- Danger; be aware of thrown objects.
The distance between the tool and bystanders must be at least 15 m.
- Never put your hands and feet near the blade under the mower.
- Remove the lock key before inspecting, adjusting, cleaning, servicing, leaving and storing the mower.

Cd Ni-MH Li-ion
- Only for EU countries
Do not dispose of electric equipment or battery pack together with household waste material!
In observance of the European Directives, on Waste Electric and Electronic Equipment and Batteries and Accumulators and Waste Batteries and Accumulators and their implementation in accordance with national laws, electric equipment and batteries and battery pack(s) that have reached the end of their life must be collected separately and returned to an environmentally compatible recycling facility.
Noise
The typical A-weighted noise level determined according to 2000/14/EC:
Sound pressure level ( LpA ): 81 dB (A)
Sound power level ( LWA ): 93 dB (A)
Uncertainty (K) : 3 dB (A)
Wear ear protection
ENG900-1
Vibration
The vibration total value (tri-axial vector sum) determined according to EN60335:
Vibration emission ( ah ): 2.5 m/s 2 or less
Uncertainty (K) : 1.5 m/s 4
ENG901-1
- The declared vibration emission value has been measured in accordance with the standard test method and may be used for comparing one tool with another.
- The declared vibration emission value may also be used in a preliminary assessment of exposure.
WARNING:
- The vibration emission during actual use of the power tool can differ from the declared emission value depending on the ways in which the tool is used.
- Be sure to identify safety measures to protect the operator that are based on an estimation of exposure in the actual conditions of use (taking account of all parts of the operating cycle such as the times when the tool is switched off and when it is running idle in addition to the trigger time).
ENH223-2
For European countries only
EC Declaration of Conformity
Makita declares that the following Machine(s):
Designation of Machine:
Cordless Lawn Mower
Model No./ Type: AM-3738
Specifications: see "SPECIFICATIONS" table.
Conforms to the following European Directives:
2000/14/EC, 2006/42/EC
They are manufactured in accordance with the following standard or standardized documents:
EN60335
The technical file in accordance with 2006/42/EC is available from:
Makita, Jan-Baptist Vinkstraat 2, 3070, Belgium
The conformity assessment procedure required by Directive 2000/14/EC was in Accordance with annex VI. Notified Body:
TÜV Rheinland LGA Products GmbH
Tillystraße 2
90431 Nürnberg, Germany
Identification number 0197
Measured Sound Power Level: 93 dB (A)
Guaranteed Sound Power Level: 94 dB (A)
1.7.2015

000331
Yasushi Fukaya
Director
Makita, Jan-Baptist Vinkstraat 2, 3070, Belgium
GEB091-7
IMPORTANT SAFETY INSTRUCTIONS
⚠ WARNING! Read all safety warnings and all instructions. Failure to follow the warnings and instructions may result in electric shock, fire and/or serious injury.
Save all warnings and instructions for future reference.
- Do not insert key into mower until it is ready to be used.
- This appliance is not intended for use by persons (including children) with reduced physical, sensory or mental capabilities, or lack of experience and knowledge, unless they have been given supervision or instruction concerning use of the appliance by a person responsible for their safety.
- Children should be supervised to ensure that they do not play with the appliance.
- Never allow children or people unfamiliar with these instructions to use the machine. Local regulations can restrict the age of the operator.
- Never operate the machine while people, especially children, or pets are nearby.
- Keep in mind that the operator or user is responsible for accidents or hazards occurring to other people or their property.
- While operating the machine always wear substantial footwear and long trousers. Do not operate the machine when barefoot or wearing open sandals. Avoid wearing clothing or jewelry that is loose fitting or that has hanging cords or ties. They can be caught in moving parts.
- Operate the machine only in daylight or in good artificial light.
- Avoid operating the machine in wet grass.
- Never operate the mower in the rain.
- Battery tool use and care
- Recharge only with the charger specified by the manufacturer. A charger that is suitable for one type of battery cartridge may create a risk of fire when used with another battery cartridge.
- Use power tools only with specifically designated battery cartridges. Use of any other battery cartridges may create a risk of injury and fire.
- When battery cartridge is not in use, keep it away from other metal objects, like paper clips, coins, keys, nails, screws or other small metal objects, that can make a connection from one terminal to another. Shorting the battery terminals together may cause burns or a fire.
- Under abusive conditions, liquid may be ejected from the battery; avoid contact. If contact accidentally occurs, flush with water. If liquid contacts eyes, additionally seek medical help. Liquid ejected from the battery may cause irritation or burns.
-
Always keep a firm hold on the handle.
-
Always be sure of your footing on slopes.
-
Walk, never run.
-
Don't grasp the exposed cutting blades or cutting edges when picking up or holding the appliance.
-
Physical condition - Do not operate mower while under the influence of drugs, alcohol, or any medication.
-
KEEP GUARDS IN PLACE and in working order.
-
Keep hands and feet away from rotating blades. Caution - Blades coast after turn off.
-
Remove key before servicing, cleaning or removing material from the gardening appliance.
-
Use only the manufacturer genuine blades specified in this manual.
-
Check the blades carefully for cracks or damage before operation. Replace cracked or damaged blades immediately.
-
Be sure the area is clear of other people before mowing. Stop mower if anyone enters the area.
-
Remove foreign matters such as rocks, wire, bottles, bones and large sticks from the work area before mowing to prevent personal injury or damage to the mower.
-
Stop operation immediately if you notice anything unusual. Switch off the mower and remove the key from the appliance. Then inspect the mower.
-
Never attempt to make wheel height adjustments while mower is running.
-
Release switch lever and wait for blade rotation to stop before crossing driveways, walks, roads, and any gravel-covered areas. Also remove key if you leave it, reach to pick up or remove something out of your way, or for any other reason that may distract you from what you are doing.
-
Objects struck by the lawn mower blade can cause severe injuries to persons. The lawn should always be carefully examined and cleared of all objects prior to each mowing.
-
If lawn mower strikes a foreign object, follow these steps:
- Stop the mower, release the switch lever and wait until the blade comes to a complete stop.
- Remove the lock key and the battery cartridge.
- Thoroughly inspect the mower for any damage.
- Replace the blade if it is damaged in any way. Repair any damage before restarting and continuing to operate the mower.
-
Check the grass basket frequently for wear or deterioration. For storage, always make sure the grass basket is empty. Replace a worn grass basket with a new factory replacement one for safety.
-
Stop the motor and remove key whenever you leave the equipment, before cleaning the mower housing, and before making any repairs or inspections.
-
Use extreme caution when reversing or pulling the machine towards you.
-
Stop the blade(s) if the machine has to be tilted for transportation when crossing surfaces other than grass, and when transporting the machine to and from the area to be used.
-
Never operate the machine with defective guards or shields, or without safety devices, for example deflectors and/or grass collector, in place.
-
Switch on the motor carefully according to instructions and with feet well away from the blade(s).
-
Do not tilt the machine when switching on the motor, except if the machine has to be tilted for starting. In this case, do not tilt it more than absolutely necessary and lift only the part, which is away from the operator.
-
Do not start the machine when standing in front of the discharge opening.
-
Do not put hands or feet near or under rotating parts. Keep clear of the discharge opening at all times.
-
Do not transport the machine while the mower is turned on.
-
Stop the machine, and remove the disabling device. Make sure that all moving parts have come to a complete stop
- whenever you leave the machine,
- before clearing blockages or unclogging chute,
- before checking, cleaning or working on the machine,
- after striking a foreign object. Inspect the machine for damage and make repairs before restarting and operating the machine;
- If the machine starts to vibrate abnormally (check immediately)
- inspect for damage,
- replace or repair any damaged parts,
- check for and tighten any loose parts.
- Be careful during adjustment of the machine to prevent entrapment of the fingers between moving blades and fixed parts of the machine.
- Mow across the face of slopes, never up and down. Exercise extreme caution when changing direction on slopes. Do not mow excessively steep slopes.
- Do not wash with a hose; avoid getting water in motor and electrical connections.
- Check the blade mounting bolt at frequent intervals for proper tightness.
- Keep all nuts, bolts, and screws tight to be sure the equipment is in safe working condition.
- Always allow the machine to cool down before storing.
- When servicing the blades be aware that, even though the power source is switched off, the blades can still be moved.
- Replace worn or damaged parts for safety. Use only genuine replacement parts and accessories.
SAVE THESE INSTRUCTIONS.
⚠ WARNING:
DO NOT let comfort or familiarity with product (gained from repeated use) replace strict adherence to safety rules for the subject product. MISUSE or failure to follow the safety rules stated in this instruction manual may cause serious personal injury.
ENC011-1
IMPORTANT SAFETY INSTRUCTIONS
FOR BATTERY CARTRIDGE
- Before using battery cartridge, read all instructions and cautionary markings on (1) battery charger, (2) battery, and (3) product using battery.
- Do not disassemble battery cartridge.
- If operating time has become excessively shorter, stop operating immediately. It may result in a risk of overheating, possible burns and even an explosion.
- If electrolyte gets into your eyes, rinse them out with clear water and seek medical
attention right away. It may result in loss of your eyesight.
- Do not short the battery cartridge:
(1) Do not touch the terminals with any conductive material.
(2) Avoid storing battery cartridge in a container with other metal objects such as nails, coins, etc.
(3) Do not expose battery cartridge to water or rain.
A battery short can cause a large current flow, overheating, possible burns and even a breakdown.
- Do not store the tool and battery cartridge in locations where the temperature may reach or exceed 50° C (122° F).
- Do not incinerate the battery cartridge even if it is severely damaged or is completely worn out. The battery cartridge can explode in a fire.
- Be careful not to drop or strike battery.
- Do not use a damaged battery.
- Follow your local regulations relating to disposal of battery.
SAVE THESE INSTRUCTIONS.
⚠️ CAUTION: Only use genuine Makita/Dolmar batteries.
Use of non-genuine Makita/Dolmar batteries, or batteries that have been altered, may result in the battery bursting causing fires, personal injury and damage. It will also void the Makita/Dolmar warranty for the Makita/Dolmar tool and charger.
Tips for maintaining maximum battery life
- Charge the battery cartridge before completely discharged.
Always stop tool operation and charge the battery cartridge when you notice less tool power.
- Never recharge a fully charged battery cartridge.
Overcharging shortens the battery service life. - Charge the battery cartridge with room temperature at 10° C - 40° C ( 50° F - 104° F). Let a hot battery cartridge cool down before charging it.
- Charge the battery cartridge if you do not use it for a long period (more than six months).
FUNCTIONAL DESCRIPTION
Installing or removing battery cartridge
CAUTION:
- Always switch off the tool before installing or removing the battery cartridge.
- Make sure that you lock the battery cover before use. Otherwise, mud, dirt, or water may cause damage to the product or the battery cartridge.
- Always install the battery cartridge fully until the red indicator cannot be seen. If not, it may accidentally fall out of the tool, causing injury to you or someone around you.
- Do not install the battery cartridge forcibly. If the cartridge does not slide in easily, it is not being inserted correctly.
NOTE:
- The tool does not work with only one battery cartridge.
To install the battery cartridge;
- Pull the battery cover locking lever toward yourself and open the battery cover.
Fig.1
- To install the battery cartridge, align the tongue on the battery cartridge with the groove in the housing and slip it into place. Insert it all the way until it locks in place with a little click. If you can see the red indicator on the upper side of the button, it is not locked completely.
Fig.2
- Insert the lock key in the place shown in the figure as far as it will go.
Fig.3
- Close the battery cover and push it on until it is latched with the locking lever.
To remove the battery cartridge from the mower;
- Pull the battery cover locking lever toward yourself and open the battery cover.
- Slide it from the tool while sliding the button on the front of the cartridge.
- Pull out the lock key.
- Close the battery cover.
Battery protection system
The tool is equipped with a tool/battery protection system. This system automatically cuts off power to the motor to extend tool and battery life.
The tool will automatically stop during operation if the tool or battery is placed under one of the following conditions. In some conditions, the indicators light up.
Overload protection
When the tool is operated in a manner that causes it to draw an abnormally high current, the tool automatically stops without any indication. In this situation, turn the tool off and stop the application that caused the tool to become overloaded. Then turn the tool on to restart.
Overheat protection
When the tool or battery is overheated, the tool stops automatically without any indications. The tool does not start even if turning on the tool. In this situation, let the tool or battery cool before turning the tool on again.
NOTE:
The battery overheat protection works only with a battery cartridge with a star marking. The tool overheat protection system works with any battery cartridges.
Fig.4
Overdischarge protection
Fig.5
When the remaining battery capacity gets low, the battery indicator blinks on the applicable battery side. By further use, the tool stops and the battery indicator lights up about 10 seconds. In this situation, charge the battery cartridge.
Indicating the remaining battery capacity
(Only for battery cartridges with "B" at the end of the model number.)
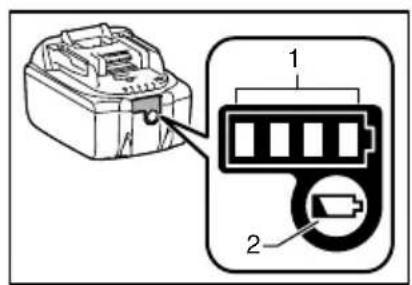
Fig.6
Press the check button on the battery cartridge to indicate the remaining battery capacity. The indicator lamps light up for few seconds.
| Indicator lamps | Remaining capacity | ||
| Off | BlinkingLighted | ||
| 75% to 100% | |||
| 50% to 75% | |||
| 25% to 50% | |||
| 0% to 25% | |||
| Charge the battery. | |||
| The battery may have malfunctioned. | |||
015658
NOTE:
- Depending on the conditions of use and the ambient temperature, the indication may differ slightly from the actual capacity.
Power switch action
WARNING:
- Before installing the battery cartridge in the tool, always check to see that the switch lever actuates properly and returns to the original position when released. Operating a tool with a
switch that does not actuate properly can lead to loss of control and serious personal injury.
NOTE:
- Trying to mow much grass at a time may not allow the motor to start due to the overload. At this time, change the mowing height to higher level to restart.
- The mower does not start without pressing the switch button even if the switch lever is pulled.
This mower is equipped with the interlock switch and handle switch. If you notice anything unusual with either of these switches, stop operation immediately and have them checked by your nearest Dolmar Authorized Service Center.
- Install the battery cartridges. Insert the lock key into the interlock switch and then close the battery cover.
Fig.7
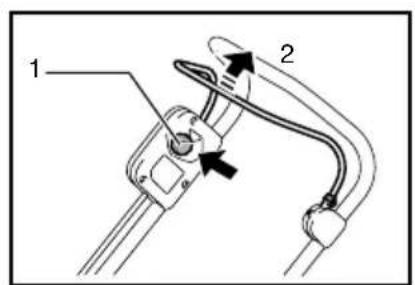
- Press the switch button.
- Pull the switch lever toward you while pressing the switch button.
Fig.8
- Release the switch button as soon as the motor starts running. The mower will continue to run until you release the switch lever.
- Release the switch lever to stop the motor.
- When not in use, remove the lock key. Store the lock key in a safe place out of reach of children.
Adjusting the mowing height
WARNING:
- Never put your hand or leg under the mower unit when adjusting the mowing height.
- Always make sure that the lever fits in the groove properly before operation.
Fig.9
The mowing height can be adjusted in the range of between 25 mm - 75 mm.
- Remove the lock key.
- Pull the mowing height adjusting lever toward A side. Move it to your desired mowing height level. Make sure that the pins on the mowing height adjusting lever fit in the holes and the lever returns to B side.
NOTE:
- The mowing height figures should be used just as a guideline, as the state of the lawn or ground may cause lawn height to be slightly different to the set height figure.
- Try a test mowing of grass in a less conspicuous place to get your desired height.
- It is easier to move the mowing height adjusting lever with holding the tool firmly.
Fig.10
Grass level indicator
Fig.11
Grass level indicator shows the volume of caught grass.
- When the grass basket is not full, the indicator floats during mowing.
- When the grass basket is full, the indicator does not float during mowing. In this case, stop mowing immediately and empty the basket. After emptying the basket, clean it so that its meshwork vents the air.
NOTE:
- This indicator is rough guide. Depending on the conditions of inside of the basket, this indicator may not work properly.
ASSEMBLY
WARNING:
· Always be sure that the lock key and battery cartridge are removed before carrying out any work on the mower. Failure to remove the lock key and the battery cartridge may result in serious personal injury from accidental start-up.
- Never start the tool unless it is completely assembled. Operation of the tool in a partially assembled state may result in serious personal injury from accidental start-up.
Installing the battery cover
WARNING:
- Do not insert the lock key and battery cartridge before installing the battery cover. Failure to do so may cause a serious injury.
Install the battery cover completely before operating the tool to protect the tool and battery cartridge from mud, dirt, or water.
- Place the battery cover on the tool with aligning the protrusions on the tool and the holes of the battery cover.
Fig.12
- Place your hands in the middle of the battery cover and depress it.
Fig.13
- Before the first operation, check that the pivot point of the battery cover is assembled properly. To check it, pull the battery cover locking lever toward yourself and open the battery cover.
Fig.14
Installing the handle
WARNING:
- When installing handles, position the wires so that they are not caught by anything in between the handles.
- Loosen the clamping screws (two pcs).
Fig.15
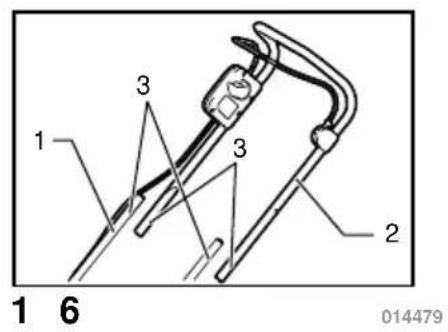
- Expand the lower handle to its both sides and with it expanded in that position pivot it backward and then fit it in the groove in the deck.
Fig.16
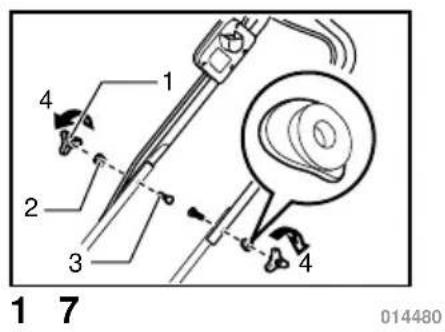
- Tighten the clamping screws on both sides to secure the lower handle.
Fig.17
- Raise the upper handle and align the screw holes in the upper handle with those in the lower handle. Secure them with the supplied screws, curl washers and clamping nuts.
NOTE:
- At this time, keep a firm grip on the upper handle so that it does not drop off your hand.
Fig.18
NOTE:
- Install the upper handle so that the direction of the upper handle and the power supply cord are positioned as shown in the figure.
Removing or installing the blade
WARNING:
- Always remove the lock key and battery cartridge when removing or installing the blade. Failure to remove the lock key and battery cartridge may cause a serious injury.
- The blade coasts for a few seconds after releasing the switch. Make sure that the blade has come to a complete stop.
• Always wear gloves when handling the blade.
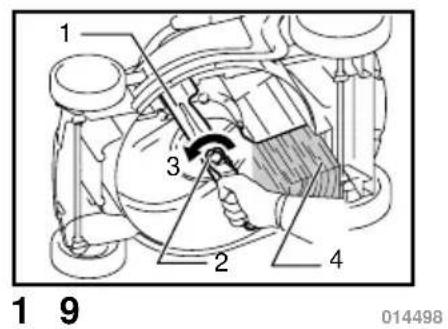
Fig.19
- Put the mower on its side so that the mowing height adjusting lever is placed on the upper side.
- To lock the blade, insert a lumber or similar into the mower.
- Loosen the bolt counterclockwise with the box wrench.
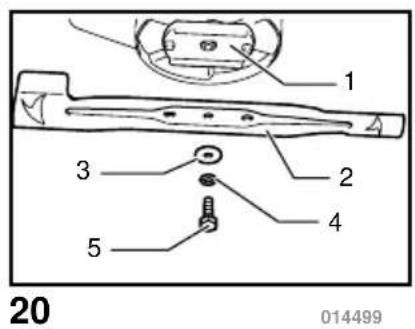
Fig.20
- Remove the bolt, spring washer, flat washer, and blade in order.
To install the blade, take the blade removal procedure in reverse.
WARNING:
- Install blade carefully as they have a top/bottom facing.
- Tighten the bolt clockwise firmly to secure the blade.
- Put the blade so that the blade side with a rotational direction arrow faces outward.
- Make sure that the blade is installed securely.
Installing the grass basket
Remove the lock key.
Fig.21
Raise the rear guard of the mower unit.
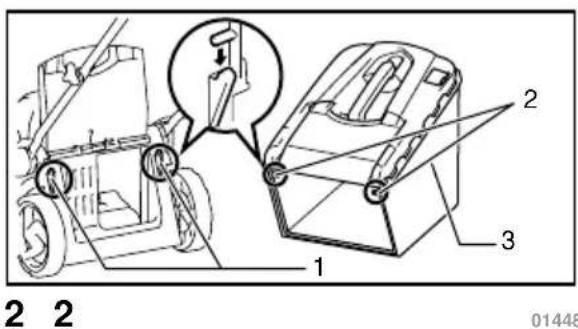
Fig.22
Hook the grass basket on the groove of the mower unit.
OPERATION
Mowing
WARNING:
- Before mowing, clear away sticks and stones from mowing area. Furthermore, clear away any weeds from mowing area in advance.
• Always wear the safety goggles or safety glasses with side shields when operating the mower.
Firmly hold the lawn mower handle with both hands when mowing.
The width between the middle of the front wheels shows the guideline of the mowing range. For even mowing, overlap the mowing area partially to the previous mowed area.
Periodically check the level of the grass basket, and empty before it becomes full. Before every periodical check, be sure to stop the mower and remove the lock key and the battery cartridge.
NOTE:
- Using the lawn mower with the grass basket full prevents smooth blade rotation and places an extra load on the motor, which may cause breakdown.
Mowing a long-grass lawn
Fig.23
Do not try to cut long grass all in one go. Instead, mow the lawn in stages, leaving it for a day or two between mows, until the lawn is evenly short.
NOTE:
- Mowing long grass to a short length all in one go may cause the grass to die and/or block up the inside of the main unit.
Emptying the grass basket
WARNING:
- To reduce a risk of accident, regularly check the grass basket for any damage or weakened strength and replace it if necessary.
- Release the switch lever.
- Remove the lock key.
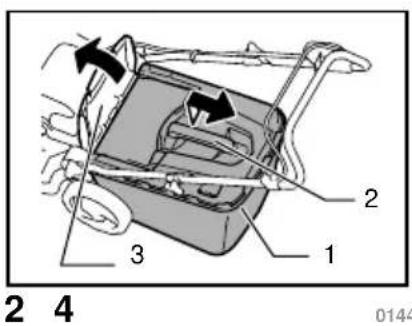
Fig.24
- Open the rear guard and take out the grass basket with its handle.
- Empty the grass basket.
• Always be sure that the lock key and battery cartridge are removed from the mower before storage or attempting to perform inspection or maintenance.
- Wear gloves when performing inspection or maintenance.
CAUTION:
- Never use gasoline, benzine, thinner, alcohol or the like. Discoloration, deformation or cracks may result.
MAINTENANCE
- REMOVE THE LOCK KEY. Store it in a safe place out of the reach of children.
- Clean your mower using only mild soap and a damp cloth. Do not spray or pour water on your mower when cleaning.
- Turn mower on its side and clean grass clippings that have accumulated on the underside of mower deck.
- Check all nuts, bolts, knobs, screws, fasteners etc. for tightness.
- Inspect moving parts for damage, breakage, and wear. Have repairs made on any damaged or missing parts.
- Before storing the mower, remove the battery cartridge from it.
- Store mower indoors in a cool, dry and locked place. Don't store the mower and charger in locations where the temperature may reach or exceed 40° C ( 104° F).
STORAGE
WARNING:
- When carrying or storing the mower, hold both the handle and front grip of the mower. Only holding the handles may cause a serious injury or damage to the mower.
Fig.25
- Loosen the clamping screw, expand the lower handle to both sides and then move down the handle forward. At this time, keep a firm grip on the front grip so that it does not fall down to the far side from the tool.
Fig.26
- Loosen the clamping nut and pivot the upper handle back.
Fig.27
To maintain product SAFETY and RELIABILITY, repairs, any other maintenance or adjustment should be performed by DOLMAR Authorized Service Centers, always using DOLMAR replacement parts.
TROUBLE SHOOTING
Before asking for repairs, conduct your own inspection first. If you find a problem that is not explained in the manual, do not attempt to dismantle the tool. Instead, ask Dolmar Authorized Service Centers, always using Dolmar replacement parts for repairs.
| Malfunction status | Cause | Action |
| Mower does not start. | Two battery cartridges are not installed. | Install the charged battery cartridges. |
| Battery problem (under voltage) | Recharge the battery cartridge. If recharging is not effective, replace battery cartridge. | |
| The lock key is not inserted. | Insert the lock key. | |
| Motor stops running after a little use. | Battery's charge level is low. | Recharge the battery cartridge. If recharging is not effective, replace battery cartridge. |
| Cutting height set is too low. | Raise the height. | |
| It does not reach maximum RPM. | Battery cartridge is installed improperly. | Install the battery cartridge as described in this manual. |
| Battery power is dropping. | Recharge the battery cartridge. If recharging is not effective, replace battery cartridge. | |
| The drive system does not work correctly. | Ask your local authorized service center for repair. | |
| Cutting tool does not rotate: stop the machine immediately! | Foreign object such as a branch is jammed near the blade. | Remove the foreign object. |
| The drive system does not work correctly. | Ask your local authorized service center for repair. | |
| Abnormal vibration: stop the machine immediately! | Blade is imbalanced, excessively or unevenly worn. | Replace the blade. |
014546
OPTIONAL ACCESSORIES
CAUTION:
- These accessories or attachments are recommended for use with your Dolmar tool specified in this manual. The use of any other accessories or attachments might present a risk of injury to persons. Only use accessory or attachment for its stated purpose.
If you need any assistance for more details regarding these accessories, ask your local Dolmar service center.
- Blade
- Makita/Dolmar genuine battery and charger
NOTE:
- Some items in the list may be included in the tool package as standard accessories. They may differ from country to country.
2000/14/WE, 2006/42/WE
2000/14/EC, 2006/42/EC
2000/14/EK, 2006/42/EK
DÔLEŽITÉ BEZPEČNOSTNÉ POKYNY
TIETO POKYNY USCHOVAJTE.
⚠️VAROVANIE:
DÔLEŽITÉ BEZPEČNOSTNÉ POKYNY
PRE JEDNOTKU AKUMULÁTORA
TIETO POKYNY USCHOVAJTE.
2000/14/ES, 2006/42/ES
TYTO POKYNY USCHOVEJTE.
⚠️VAROVÁNÍ:
TYTO POKYNY USCHOVEJTE.
VOLITELNÉ PŘÍSLUŠENSTVÍ
⚠POZOR:



- SYMBOLS
- NOISE
- WEAR EAR PROTECTION
- VIBRATION
- WARNING
- FOR EUROPEAN COUNTRIES ONLY
- EC DECLARATION OF CONFORMITY
- MAKITA DECLARES THAT THE FOLLOWING MACHINE(S)
- CONFORMS TO THE FOLLOWING EUROPEAN DIRECTIVES
- IMPORTANT SAFETY INSTRUCTIONS
- SAVE ALL WARNINGS AND INSTRUCTIONS FOR FUTURE REFERENCE
- SAVE THESE INSTRUCTIONS
- ⚠ WARNING
- FOR BATTERY CARTRIDGE
- TIPS FOR MAINTAINING MAXIMUM BATTERY LIFE
- FUNCTIONAL DESCRIPTION
- INSTALLING OR REMOVING BATTERY CARTRIDGE
- CAUTION
- NOTE
- TO INSTALL THE BATTERY CARTRIDGE
- FIG.1
- FIG.2
- FIG.3
- TO REMOVE THE BATTERY CARTRIDGE FROM THE MOWER
- BATTERY PROTECTION SYSTEM
- OVERLOAD PROTECTION
- OVERHEAT PROTECTION
- FIG.4
- OVERDISCHARGE PROTECTION
- FIG.5
- INDICATING THE REMAINING BATTERY CAPACITY
- FIG.6
- POWER SWITCH ACTION
- FIG.7
- FIG.8
- ADJUSTING THE MOWING HEIGHT
- FIG.9
- FIG.10
- GRASS LEVEL INDICATOR
- FIG.11
- ASSEMBLY
- INSTALLING THE BATTERY COVER
- FIG.12
- FIG.13
- FIG.14
- INSTALLING THE HANDLE
- FIG.15
- FIG.16
- FIG.17
- FIG.18
- REMOVING OR INSTALLING THE BLADE
- FIG.19
- FIG.20
- INSTALLING THE GRASS BASKET
- FIG.21
- FIG.22
- OPERATION
- MOWING
- MOWING A LONG-GRASS LAWN
- FIG.23
- EMPTYING THE GRASS BASKET
- FIG.24
- MAINTENANCE
- STORAGE
- FIG.25
- FIG.26
- FIG.27
- TROUBLE SHOOTING
- OPTIONAL ACCESSORIES
- DÔLEŽITÉ BEZPEČNOSTNÉ POKYNY
- TIETO POKYNY USCHOVAJTE
- ⚠️VAROVANIE
- PRE JEDNOTKU AKUMULÁTORA
- TYTO POKYNY USCHOVEJTE
- ⚠️VAROVÁNÍ
- VOLITELNÉ PŘÍSLUŠENSTVÍ
- ⚠POZOR
Brand : DOLMAR
Model : AM-3738
Category : Lawn mower