
AH-3756 - Lawn mower DOLMAR - Free user manual and instructions
Find the device manual for free AH-3756 DOLMAR in PDF.


| Product Type | Cordless Hedge Trimmer |
| Model | AH-3756 |
| Blade Length | 550 mm |
| Strokes per Minute | 1,000 - 1,800 min⁻¹ |
| Overall Length | 1,065 mm |
| Rated Voltage | DC 36 V |
| Net Weight (without battery) | 5.1 kg |
| Battery Requirement | Two compatible 36 V battery cartridges (not included) |
| Intended Use | Trimming hedges and shrubs |
| Handle Adjustment | 45° and 90° positions on left or right |
| Speed Settings | 6 levels (dial 1 to 6) |
| Safety Features | Dual switching (lock-off button + two triggers), blade cover, overheat/overload protection |
| Cutting Capacity | Up to 10 mm branch diameter |
| Vibration Emission | ≤ 2.5 m/s² (K=1.5) |
| Sound Pressure Level | 81.5 dB(A) (K=2.1) |
| Sound Power Level (measured/guaranteed) | 91.0 dB(A) / 93 dB(A) |
| Blade Maintenance | Oil before and during use, clean with wire brush, apply low-viscosity oil |
| Carbon Brush Replacement | Check regularly, replace when worn to limit mark |
| Accessories (optional) | Chip receiver, replacement shear blade assembly, blade cover, battery & charger |
| Storage | Remove battery, fit blade cover, hang using hook hole, store in dry place |
Frequently Asked Questions - AH-3756 DOLMAR
User questions about AH-3756 DOLMAR
0 question about this device. Answer the ones you know or ask your own.
Ask a new question about this device
Download the instructions for your Lawn mower in PDF format for free! Find your manual AH-3756 - DOLMAR and take your electronic device back in hand. On this page are published all the documents necessary for the use of your device. AH-3756 by DOLMAR.
USER MANUAL AH-3756 DOLMAR
GB Cordless Hedge Trimmer INSTRUCTION MANUAL
MANUAL DE INSTRUCTIUNI


1

2

3
4
5
6

7

8

9

10

11
12

13
014629

14
009290

15
009291

16
009292
17
009293

18
011157

19
014772

20
011159

21
011256

22
011257

23
011258
24
011259

2 5
009302

2 6
014773

27
2 8

2 9
014630

30

3 1
001145
ENGLISH (Original instructions)
Explanation of general view
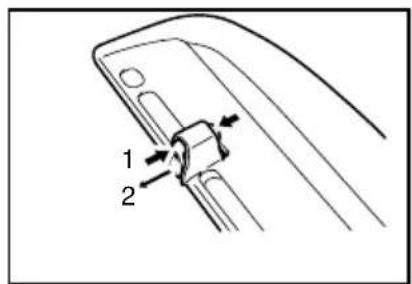
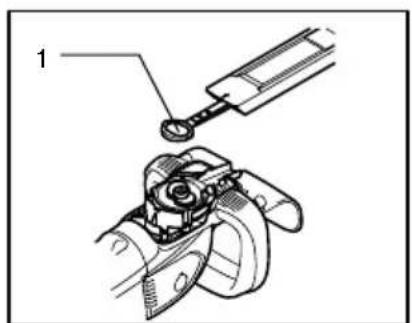
| 1-1. Red indicator | 14-2. Chip receiver | 20-1. Plate |
| 1-2. Button | 14-3. Nut | 21-1. Crank |
| 1-3. Battery cartridge | 14-4. Shear blade | 22-1. Screws |
| 2-1. Star marking | 15-1. Nut | 22-2. Shear blade |
| 3-1. Battery indicator | 15-2. Branch catcher | 23-1. Crank |
| 4-1. Knob | 16-1. Hooks | 24-1. Oval hole of shear blade |
| 4-2. Housing | 16-2. Fit the hooks into groove | 26-1. Oval hole of shear blade |
| 5-1. Switch trigger B | 16-3. Grooves | 26-2. Crank |
| 5-2. Switch trigger A | 17-1. Press the levers on both sides | 26-3. Screws |
| 5-3. Lock-off button | 17-2. Unlock the hooks | 27-1. Crank |
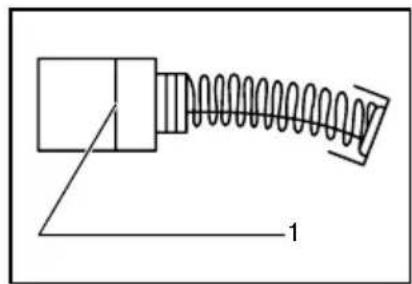
| 6-1. Adjusting dial | 18-1. Blade cover | 28-1. Limit mark |
| 9-1. Trimming direction | 18-2. Screws | 29-1. Holder cap cover |
| 9-2. Hedge surface to be trimmed | 19-1. Under cover | 29-2. Slotted screwdriver |
| 9-3. Tilt the blades | 19-2. Blade cover | 30-1. Brush holder cap |
| 14-1. Press | 19-3. Screws | 30-2. Slotted screwdriver |
SPECIFICATIONS
| Model | AH-3756 | AH-3766 |
| Blade length 550 mm 650 mm | ||
| Strokes per minute (min -1 ) 1,000 - 1,800 | ||
| Overall length 1,065 mm 1,135 mm | ||
| Rated voltage D.C. 36 V | ||
| Net weight 5.1 kg 5.2 kg | ||
- Due to our continuing program of research and development, the specifications herein are subject to change without notice.
- Specifications and battery cartridge may differ from country to country.
- Weight, with battery cartridge, according to EPTA-Procedure 01/2003
| Noise Sound pressure level Sound power level | Applicable standard or directive | ||||
| Model | LPA (dB(A)) | Uncertainty K(dB(A)) | LPA (dB(A)) | Uncertainty K(dB(A)) | |
| AH-3756 | 81.5 | 2.1 | 91 | 1.5 | 2000/14/EC |
| AH-3766 | 82 | 1.4 | 91.1 | 1.5 | |
- Wear ear protection.
| Vibration | Declared emission (m/s 2 ) | Uncertainty K (m/s 2 ) | Applicable standard or directive |
| Model | |||
| AH-3756 / AH-3766 | ≤ 2.5 | 1.5 | EN60745 |
ENG901-1
- The declared vibration emission value has been measured in accordance with the standard test method and may be used for comparing one tool with another.
• The declared vibration emission value may also be used in a preliminary assessment of exposure.
⚠ WARNING:
- The vibration emission during actual use of the power tool can differ from the declared emission value depending on the ways in which the tool is used.
- Be sure to identify safety measures to protect the operator that are based on an estimation of exposure in the actual conditions of use (taking account of all parts of the operating cycle such as
the times when the tool is switched off and when it is running idle in addition to the trigger time).
END013-4
Symbol
The following show the symbols used for the equipment. Be sure that you understand their meaning before use.


- Read instruction manual.
Do not expose to rain.
• Only for EU countries
Do not dispose of electric equipment or battery pack together with household waste material!
In observance of the European Directives, on Waste Electric and Electronic Equipment and Batteries and Accumulators and Waste Batteries and Accumulators and their implementation in accordance with national laws, electric equipment and batteries and battery pack(s) that have reached the end of their life must be collected separately and returned to an environmentally compatible recycling facility.
ENE014-1
Intended use
The tool is intended for trimming hedges.
ENH033-3
For European countries only
EC Declaration of Conformity
The undersigned, Rainer Bergfeld, as authorized by Dolmar GmbH, declares that the DOLMAR machine(s):
Designation of Machine:
Cordless Hedge Trimmer
Model No./ Type: AH-3756, AH-3766
Specifications: see "SPECIFICATIONS" table.
are of series production and
Conforms to the following European Directives:
2000/14/EC, 2006/42/EC
And are manufactured in accordance with the following standards or standardised documents: EN60745
The technical documentation is on file at:
Dolmar GmbH,
The conformity assessment procedure required by
Directive 2000/14/EC was in Accordance with annex V.
Model AH-3756
Measured Sound Power Level: 91.0 dB (A)
Guaranteed Sound Power Level: 93 dB (A)
Model AH-3766
Measured Sound Power Level: 91.1 dB (A)
Guaranteed Sound Power Level: 93 dB (A)
8.8.2013
Rainer Bergfeld
Managing Director
000326
GEA010-1
General Power Tool Safety Warnings
⚠ WARNING Read all safety warnings and all instructions. Failure to follow the warnings and instructions may result in electric shock, fire and/or serious injury.
Save all warnings and instructions for future reference.
GEB062-5
CORDLESS HEDGE TRIMMER SAFETY WARNINGS
-
Keep all parts of the body away from the cutter blade. Do not remove cut material or hold material to be cut when blades are moving. Make sure the switch is off when clearing jammed material. A moment of inattention while operating the hedge trimmer may result in serious personal injury.
-
Carry the hedge trimmer by the handle with the cutter blade stopped. When transporting or storing the hedge trimmer always fit the cutting device cover. Proper handling of the hedge trimmer will reduce possible personal injury from the cutter blades.
-
Hold the power tool by insulated gripping surfaces only, because the cutter blade may contact hidden wiring. Cutter blades contacting a "live" wire may make exposed metal parts of the power tool "live" and could give the operator an electric shock.
-
Do not use the hedge trimmer in the rain or in wet or very damp conditions. The electric motor is not waterproof.
-
First-time users should have an experienced hedge trimmer user show them how to use the trimmer.
-
The hedge trimmer must not be used by children or young persons under 18 years of age. Young persons over 16 years of age may be exempted from this restriction if they are undergoing training under the supervision of an expert.
-
Use the hedge trimmer only if you are in good physical condition. If you are tired, your attention will be reduced. Be especially careful at the end of a working day. Perform all work calmly and carefully. The user is responsible for all damages to third parties.
-
Never use the trimmer when under the influence of alcohol, drugs or medication.
-
Work gloves of stout leather are part of the basic equipment of the hedge trimmer and must always be worn when working with it. Also wear sturdy shoes with anti-skid soles.
-
Before starting work check to make sure that the trimmer is in good and safe working order. Ensure guards are fitted properly. The hedge trimmer must not be used unless fully assembled.
- Make sure you have a secure footing before starting operation.
- Hold the tool firmly when using the tool.
- Do not operate the tool at no-load unnecessarily.
- Immediately switch off the motor and remove the battery cartridge if the cutter should come into contact with a fence or other hard object. Check the cutter for damage, and if damaged repair immediately.
- Before checking the cutter, taking care of faults, or removing material caught in the cutter, always switch off the trimmer and remove the battery cartridge.
- Switch off the trimmer and remove the battery cartridge before doing any maintenance work.
- When moving the hedge trimmer to another location, including during work, always remove the battery cartridge and put the blade cover on the cutter blades. Never carry or transport the trimmer with the cutter running. Never grasp the cutter with your hands.
- Clean the hedge trimmer and especially the cutter after use, and before putting the trimmer into storage for extended periods. Lightly oil the cutter and put on the cover. The cover supplied with the unit can be hung on the wall, providing a safe and practical way to store the hedge trimmer.
- Store the hedge trimmer with the cover on, in a dry room. Keep it out of reach of children. Never store the trimmer outdoors.
SAVE THESE INSTRUCTIONS.
⚠ WARNING:
DO NOT let comfort or familiarity with product (gained from repeated use) replace strict adherence to safety rules for the subject product. MISUSE or failure to follow the safety rules stated in this instruction manual may cause serious personal injury.
ENC007-8
IMPORTANT SAFETY INSTRUCTIONS
FOR BATTERY CARTRIDGE
- Before using battery cartridge, read all instructions and cautionary markings on (1) battery charger, (2) battery, and (3) product using battery.
- Do not disassemble battery cartridge.
- If operating time has become excessively shorter, stop operating immediately. It may
result in a risk of overheating, possible burns and even an explosion.
- If electrolyte gets into your eyes, rinse them out with clear water and seek medical attention right away. It may result in loss of your eyesight.
- Do not short the battery cartridge:
(1) Do not touch the terminals with any conductive material.
(2) Avoid storing battery cartridge in a container with other metal objects such as nails, coins, etc.
(3) Do not expose battery cartridge to water or rain.
A battery short can cause a large current flow, overheating, possible burns and even a breakdown.
- Do not store the tool and battery cartridge in locations where the temperature may reach or exceed 50 °C (122 °F).
- Do not incinerate the battery cartridge even if it is severely damaged or is completely worn out. The battery cartridge can explode in a fire.
- Be careful not to drop or strike battery.
- Do not use a damaged battery.
- Follow your local regulations relating to disposal of battery.
SAVE THESE INSTRUCTIONS.
Tips for maintaining maximum battery life
- Charge the battery cartridge before completely discharged.
Always stop tool operation and charge the battery cartridge when you notice less tool power.
- Never recharge a fully charged battery cartridge.
Overcharging shortens the battery service life. - Charge the battery cartridge with room temperature at 10° C - 40° C ( 50° F - 104° F). Let a hot battery cartridge cool down before charging it.
- Charge the battery cartridge once in every six months if you do not use it for a long period of time.
FUNCTIONAL DESCRIPTION
CAUTION:
- Always be sure that the tool is switched off and the battery cartridge is removed before adjusting or checking function on the tool.
Installing or removing battery cartridge
Fig.1
CAUTION:
- Always switch off the tool before installing or removing of the battery cartridge.
- Hold the tool and the battery cartridge firmly when installing or removing battery cartridge. Failure to hold the tool and the battery cartridge firmly may cause them to slip off your hands and result in damage to the tool and battery cartridge and a personal injury.
To remove the battery cartridge, slide it from the tool while sliding the button on the front of the cartridge.
To install the battery cartridge, align the tongue on the battery cartridge with the groove in the housing and slip it into place. Insert it all the way until it locks in place with a little click. If you can see the red indicator on the upper side of the button, it is not locked completely.
CAUTION:
- Always install the battery cartridge fully until the red indicator cannot be seen. If not, it may accidentally fall out of the tool, causing injury to you or someone around you.
- Do not install the battery cartridge forcibly. If the cartridge does not slide in easily, it is not being inserted correctly.
NOTE:
- The tool does not work with only one battery cartridge.
Tool/ battery protection system
The tool is equipped with a tool/battery protection system. This system automatically cuts off power to the motor to extend tool and battery life.
The tool will automatically stop during operation if the tool or battery are placed under one of the following conditions. In some conditions, the indicators light up.
Overload protection
When the tool is operated in a manner that causes it to draw an abnormally high current, the tool automatically stops without any indication. In this situation, turn the tool off and stop the application that caused the tool to become overloaded. Then turn the tool on to restart.
Overheat protection for tool/ battery
When the tool/ battery is overheated, the tool stops automatically without any indication. The tool does not start even if pulling the switch trigger. In this situation, let the tool/ battery cool before turning the tool on again.
NOTE:
The battery overheat protection works only with a battery cartridge with a star marking.
Fig.2
Overdischarge protection
Fig.3
When the remaining battery capacity gets low, the battery indicator blinks on the applicable battery side. By further use, the tool stops and the battery indicator lights up about 10 seconds. In this situation, charge the battery cartridge.
Handle mounting positions
CAUTION:
- Always make sure that the handle is locked in the desired position before operation.
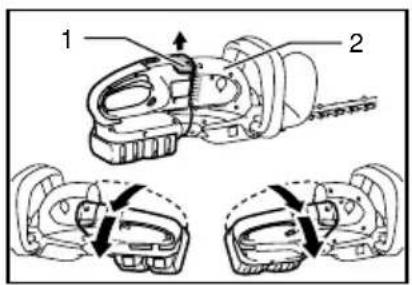
Fig.4
Depending on the operations, you can set the angle of the handle either 45° or 90° position on left or right. To turn the handle, pull the knob and turn the handle as shown in the figure. The handle is locked in 45° position. To turn the handle to 90° position, pull the knob again and turn the handle more.
Switch action
CAUTION:
- Before inserting the battery cartridge into the tool, always check to see that the switch trigger actuates properly and returns to the "OFF" position when released.
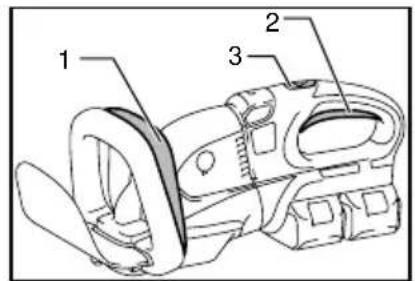
Fig.5
For your safety, this tool has a dual switching system. To turn on the tool, press the lock-off button and press the switch trigger A and B. To turn off the switch, release either one of the switch triggers. The tool only starts when pulling the both switch triggers.
Speed change
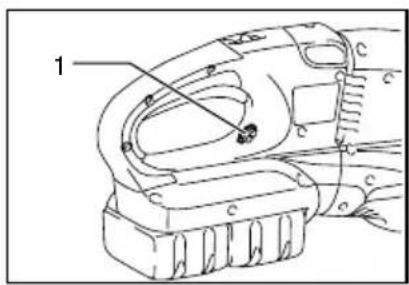
Fig.6
The strokes per minute can be adjusted just by turning the adjusting dial. This can be done even while the tool is running. The dial is marked 1 (lowest speed) to 6 (full speed).
Refer to the table below for the relationship between the number settings on the adjusting dial and the strokes per minute.
| Number on adjusting dial Strokes per minute (min )1 | |
| 6 | 1,800 |
| 5 | 1,750 |
| 4 | 1,650 |
| 3 | 1,500 |
| 2 | 1,300 |
| 1 | 1,000 |
011264
CAUTION:
- The speed adjusting dial can be turned only as far as 6 and back to 1. Do not force it past 6 or 1, or the speed adjusting function may no longer work.
- The strokes per minute vary by the conditions of battery cartridge and shear blades.
OPERATION
CAUTION:
- Be careful not to accidentally contact a metal fence or other hard objects while trimming. The blade will break and may cause serious injury.
• Overreaching with a hedge trimmer, particularly from a ladder, is extremely dangerous. Do not work from anything wobbly or infirm.
Fig.7
Do not attempt to cut branches thicker than 10 mm diameter with this trimmer. These should first be cut with shears down to the hedge trimming level.
CAUTION:
- Do not cut off dead trees or similar hard objects. Failure to do so may damage the tool.
Fig.8
Hold the trimmer with both hands and pull the switch trigger A or B and then move it in front of your body.
Fig.9
As a basic operation, tilt the blades towards the trimming direction and move it calmly and slowly at the speed rate of 3 - 4 seconds per meter.
Fig.10
To cut a hedge top evenly, it helps to tie a string at the desired hedge height and to trim along it, using it as a reference line.
Fig.11
Attaching the chip receiver (optional accessory) on the tool when trimming the hedge straight can avoid cut off leaves' being thrown away.
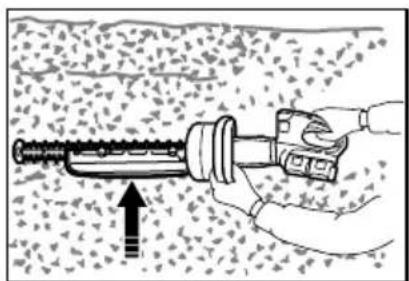
Fig.12
Rotate the handle for your easy handling before operation. Refer to the section titled "Handle mounting position".
To cut a hedge side evenly, it helps to cut from the bottom upwards.
Fig.13
Trim boxwood or rhododendron from the base toward the top for a nice appearance and good job.
Installing or removing chip receiver (optional accessory)
CAUTION:
- Always be sure that the tool is switched off and the battery cartridge is removed before installing or removing chip receiver.
NOTE:
- When replacing the chip receiver, always wear gloves so that hands and face does not directly contact the blade. Failure to do so may cause personal injury.
- Always be sure to remove the blade cover before installing the chip receiver.
- The chip receiver receives cut-off leaves and alleviates collecting thrown-away leaves. This can be installed on either side of the tool.
Fig.14
Press the chip receiver on the shear blades so that its slits overlap with the nuts on the shear blades. At this time, make sure that the chip receiver does not contact branch catcher at the top of the shear blades.
Fig.15
At this time, the chip receiver needs to be installed so that its hooks fit into grooves in the shear blade unit.
Fig.16
To remove the chip receiver, press its lever on both sides so that the hooks are unlocked.
Fig.17
CAUTION:
- The blade cover cannot be installed on the tool with the chip receiver being installed. Before carrying or storing, uninstall the chip receiver and then install the blade cover to avoid blade exposure.
NOTE:
- Check the chip receiver for secure installment before use.
- Never try to uninstall the chip receiver by an excessive force with its hooks locked in the blade unit grooves. Using the excessive force may damage it.
MAINTENANCE
CAUTION:
- Always be sure that the tool is switched off and the battery cartridge is removed before attempting to perform inspection or maintenance.
- Never use gasoline, benzine, thinner, alcohol or the like. Discoloration, deformation or cracks may result.
Cleaning the tool
Clean out the tool by wiping off dust with a dry or soap-dipped rag.
Blade maintenance
Smear the blade before and once per hour during operation using machine oil or similars.
NOTE:
- Before smearing the blade, remove the chip receiver.
After operation, remove dust from both sides of the blade with wired brush, wipe it off with a rag and then apply enough low-viscosity oil, such as machine oil etc. and spray-type lubricating oil.
CAUTION:
- Do not wash the blades in water. Failure to do so may cause rust or damage on the tool.
Removing or installing shear blade
CAUTION:
- Before removing or installing shear blade, always be sure that the tool is switched off and the battery cartridge is removed.
- When replacing the shear blade, always wear gloves without removing blade cover so that hands and face does not directly contact the blade. Failure to do so may cause personal injury.
NOTE:
- Do not wipe off grease from the gear and crank. Failure to do so may cause damage to the tool.
- For specific way of removing and installing shear blades refer to the reverse of a package for accessory shear blades.
Removing the shear blades
Reverse the tool and loosen four screws.
Fig.18
NOTE:
- Be careful not to get your hands dirty as grease is applied in the shear blade driving area.
Remove the under cover.
Fig.19
Remove the plate.
Fig.20
Set the crank at the angle as shown in the figure with a slotted screwdriver.
Fig.21
Remove two screws from the shear blades and the shear blade unit will be taken out.
Fig.22
CAUTION:
- Return the gear to the original position in such a manner as it was installed if it should be taken away by mistake.
Installing the shear blades
Prepare 4 removed screws (For under cover), 2 screws (For shear blade), plate, under cover, and new shear blades.
Adjust the crank position as shown in the figure. At this time, apply some grease provided with new shear blades to the periphery of the crank.
Fig.23
Overlap the oval hole in the upper blade with that in the lower one.
Fig.24
Take out the blade cover from the old shear blades and fit it onto the new ones for easy handling during the replacement of blades.
Fig.25
Place the new shear blades on the tool so that the oval holes in the shear blades fit onto the crank. Overlap the holes in the shear blades with the screw holes in the tool and then secure them with two screws.
Fig.26
Check the crank for smooth turn with a slotted screwdriver.
Fig.27
Install the plate, under cover on the tool. Tighten the screw firmly.
NOTE:
- There is no distinction between the top and bottom of the plate.
Remove the blade cover and then turn on the tool to check it for proper movement.
NOTE:
- When the shear blades does not operate properly, there is a poor fit between the blades and crank. Redo from the beginning.
Replacing carbon brushes
Fig.28
Remove and check the carbon brushes regularly. Replace when they wear down to the limit mark. Keep the carbon brushes clean and free to slip in the holders. Both carbon brushes should be replaced at the same time. Use only identical carbon brushes.
Fig.29
Insert the top end of slotted screwdriver into the notch in the tool and remove the holder cap cover by lifting it up.
Fig.30
Use a slotted screwdriver to remove the brush holder caps. Take out the worn carbon brushes, insert the new ones and secure the brush holder caps. Reinstall the holder cap cover on the tool.
Storage
The hook hole in the bottom of the blade cover is convenient for hanging the tool from a nail or screw on the wall.
Fig.31
Remove the battery cartridge and put the blade cover on the shear blades so that the blades are not exposed. Store the tool out of the reach of children carefully.
Store the tool in the place not exposed to water and rain. To maintain product SAFETY and RELIABILITY, repairs, any other maintenance or adjustment should be performed by DOLMAR Authorized Service Centers, always using DOLMAR replacement parts.
OPTIONAL ACCESSORIES
CAUTION:
- These accessories or attachments are recommended for use with your Dolmar tool specified in this manual. The use of any other accessories or attachments might present a risk of injury to persons. Only use accessory or attachment for its stated purpose.
If you need any assistance for more details regarding these accessories, ask your local Dolmar service center.
- Blade cover
- Shear blade assembly
• Dolmar genuine battery and charger - Chip receiver
NOTE:
- Some items in the list may be included in the tool package as standard accessories. They may differ from country to country.
2000/14/WE, 2006/42/WE
2000/14/EK, 2006/42/EK
2000/14/ES, 2006/42/ES
TIETO POKYNY USCHOVAJTE.
⚠️VAROVANIE:
DÔLEŽITÉ BEZPEČNOSTNÉ POKYNY
PRE JEDNOTKU AKUMULÁTORA
TIETO POKYNY USCHOVAJTE.
TYTO POKYNY USCHOVEJTE.
⚠️VAROVÁNÍ:
TYTO POKYNY USCHOVEJTE.
VOLITELNÉ PŘÍSLUŠENSTVÍ
⚠POZOR:



- ⚠ WARNING
- SYMBOL
- INTENDED USE
- FOR EUROPEAN COUNTRIES ONLY
- EC DECLARATION OF CONFORMITY
- CONFORMS TO THE FOLLOWING EUROPEAN DIRECTIVES
- GENERAL POWER TOOL SAFETY WARNINGS
- CORDLESS HEDGE TRIMMER SAFETY WARNINGS
- SAVE THESE INSTRUCTIONS
- IMPORTANT SAFETY INSTRUCTIONS
- FOR BATTERY CARTRIDGE
- FUNCTIONAL DESCRIPTION
- CAUTION
- INSTALLING OR REMOVING BATTERY CARTRIDGE
- FIG.1
- NOTE
- TOOL/ BATTERY PROTECTION SYSTEM
- OVERLOAD PROTECTION
- OVERHEAT PROTECTION FOR TOOL/ BATTERY
- FIG.2
- OVERDISCHARGE PROTECTION
- FIG.3
- HANDLE MOUNTING POSITIONS
- FIG.4
- SWITCH ACTION
- FIG.5
- SPEED CHANGE
- FIG.6
- OPERATION
- FIG.7
- FIG.8
- FIG.9
- FIG.10
- FIG.11
- FIG.12
- FIG.13
- INSTALLING OR REMOVING CHIP RECEIVER (OPTIONAL ACCESSORY)
- FIG.14
- FIG.15
- FIG.16
- FIG.17
- MAINTENANCE
- CLEANING THE TOOL
- BLADE MAINTENANCE
- REMOVING OR INSTALLING SHEAR BLADE
- REMOVING THE SHEAR BLADES
- FIG.18
- FIG.19
- FIG.20
- FIG.21
- FIG.22
- INSTALLING THE SHEAR BLADES
- FIG.23
- FIG.24
- FIG.25
- FIG.26
- FIG.27
- REPLACING CARBON BRUSHES
- FIG.28
- FIG.29
- FIG.30
- STORAGE
- FIG.31
- OPTIONAL ACCESSORIES
- TIETO POKYNY USCHOVAJTE
- ⚠️VAROVANIE
- DÔLEŽITÉ BEZPEČNOSTNÉ POKYNY
- PRE JEDNOTKU AKUMULÁTORA
- TYTO POKYNY USCHOVEJTE
- ⚠️VAROVÁNÍ
- VOLITELNÉ PŘÍSLUŠENSTVÍ
- ⚠POZOR
Brand : DOLMAR
Model : AH-3756
Category : Lawn mower