
BRIGGS & STRATTON 303700 - Engine BRIGGS & STRATTON - Free user manual and instructions
Find the device manual for free BRIGGS & STRATTON 303700 BRIGGS & STRATTON in PDF.
| Product Type | 4-stroke gasoline engine |
| Brand | Briggs & Stratton |
| Model | 303700 (Vanguard series 300000) |
| Displacement | 479 cm³ (29.23 in³) |
| Bore | 68 mm (2.677 in) |
| Stroke | 66 mm (2.598 in) |
| Oil capacity | 1.36 - 1.42 L (46 - 48 oz) |
| Recommended oil | SAE 30 (above 4°C) or 10W-30 (between -18°C and 27°C) |
| Fuel | Unleaded gasoline, min. 87 octane (91 RON), up to 10% ethanol |
| Fuel tank capacity | Not specified (fill to 38 mm below top of filler neck) |
| Spark plug gap | 0.76 mm (0.030 in) |
| Spark plug torque | 20 Nm (180 lb-in) |
| Valve clearance (intake and exhaust) | 0.10 - 0.15 mm (0.004 - 0.006 in) |
| Armature air gap | 0.20 - 0.30 mm (0.008 - 0.012 in) |
| Air filter | Element type (ref. 394018 except model 380000) |
| Oil filter | Optional (ref. 492932 for 6 cm or 491056 for 9 cm) |
| Fuel filter | With fuel pump (ref. 691035) or without pump (ref. 298090) |
| Spark plug | Resistor type recommended (ref. 491055) or long life platinum (ref. 5066) |
| Lubrication system | Wet sump with oil pump |
| Cooling | Forced air (fan and fins) |
| Starting | Manual (recoil starter) or electric (optional) |
| Warranty | 2 years for domestic use, 1 year for commercial use (Vanguard model) |
| Weight | Not specified (approximately 30-40 kg for an engine of this displacement) |
Frequently Asked Questions - BRIGGS & STRATTON 303700 BRIGGS & STRATTON
User questions about BRIGGS & STRATTON 303700 BRIGGS & STRATTON
0 question about this device. Answer the ones you know or ask your own.
Ask a new question about this device
Download the instructions for your Engine in PDF format for free! Find your manual BRIGGS & STRATTON 303700 - BRIGGS & STRATTON and take your electronic device back in hand. On this page are published all the documents necessary for the use of your device. BRIGGS & STRATTON 303700 by BRIGGS & STRATTON.
USER MANUAL BRIGGS & STRATTON 303700 BRIGGS & STRATTON
Briggs & Stratton is a registered trademark of Briggs & Stratton Corporation
© 2008 Briggs & Stratton Corporation, Milwaukee, WI, USA. All rights reserved.
Form No. 277107EST A
| English | Бъларски | Čestina | eesti keel | Hrvatski | Magyar | Lietuviç | Latviešu | Polski | Română | Pyccskii | Slovenščina |
| en | bg | cs | et | hr | hu | It | lv | pl | ro | ru | sl |

General Information
For replacement parts or technical assistance, record below the engine model, type, and code numbers along with the date of purchase. These numbers are located on your engine (see the Features and Controls page).
Date of purchase:
MM/DD/YYYY
Engine model:
Model:
Type:
Code:
Engine Power Rating Information
The gross power rating for individual gas engine models is labeled in accordance with SAE (Society of Automotive Engineers) code J1940 (Small Engine Power & Torque Rating Procedure), and rating performance has been obtained and corrected in accordance with SAE J1995 (Revision 2002-05). Torque values are derived at 3060 RPM; horsepower values are derived at 3600 RPM. Actual gross engine power will be lower and is affected by, among other things, ambient operating conditions and engine-to-engine variability. Given both the wide array of products on which engines are placed and the variety of environmental issues applicable to operating the equipment, the gas engine will not develop the rated gross power when used in a given piece of power equipment (actual "on-site" or net power). This difference is due to a variety of factors including, but not limited to, accessories (air cleaner, exhaust, charging, cooling, carburetor, fuel pump, etc.), application limitations, ambient operating conditions (temperature, humidity, altitude), and engine-to-engine variability. Due to manufacturing and capacity limitations, Briggs & Stratton may substitute an engine of higher rated power for this Series engine.
Operator Safety
SAFETY AND CONTROL SYMBOLS

Fire

Moving Parts

Oil

Toxic Fumes

Slow

Fast

Stop

Explosion

Shock

Fuel

Choke

On Off

Fuel Shutoff

Kickback

Wear Eye
Protection

Hazardous
Chemical

Read Manual

Hot Surface

Frostbite
The safety alert symbol is used to identify safety information about hazards that can result in personal injury. A signal word (DANGER, WARNING, or CAUTION) is used with the alert symbol to indicate the likelihood and the potential severity of injury. In addition, a hazard symbol may be used to represent the type of hazard.

DANGER indicates a hazard which, if not avoided, will result in death or serious injury.

WARNING indicates a hazard which, if not avoided, could result in death or serious injury.

CAUTION indicates a hazard which, if not avoided, might result in minor or moderate injury.
CAUTION, when used without the alert symbol, indicates a situation that could result in damage to the product.

WARNING
The engine exhaust from this product contains chemicals known to the State of California to cause cancer, birth defects, or other reproductive harm.

WARNING
Briggs & Stratton does not approve or authorize the use of these engines on 3-wheel All Terrain Vehicles (ATVs), motor bikes, fun/recreational go-karts, aircraft products, or vehicles intended for use in competitive events. Use of these engines in such applications could result in property damage, serious injury (including paralysis), or even death.
CAUTION: This engine was shipped from Briggs & Stratton without oil. Before you start the engine, make sure you add oil according to the instructions in this manual. If you start the engine without oil, it will be damaged beyond repair and will not be covered under warranty.

WARNING
Gasoline and its vapors are extremely flammable and explosive. Fire or explosion can cause severe burns or death.
When Adding Fuel
- Turn engine off and let engine cool at least 2 minutes before removing the fuel cap.
- Fill fuel tank outdoors or in well-ventilated area.
- Do not overfill fuel tank. Fill tank to approximately 1.5 inches (38 mm) below top of neck to allow for fuel expansion.
- Keep gasoline away from sparks, open flames, pilot lights, heat, and other ignition sources.
- Check fuel lines, tank, cap, and fittings frequently for cracks or leaks. Replace if necessary
If fuel spills, wait until it evaporates before starting engine.
When Starting Engine
- Ensure that spark plug, muffler, fuel cap and air cleaner (if equipped) are in place and secured.
- Do not crank engine with spark plug removed.
- If engine floods, set choke (if equipped) to OPEN/RUN position, move throttle (if equipped) to FAST position and crank until engine starts.
When Operating Equipment
- Do not tip engine or equipment at angle which causes gasoline to spill.
- Do not choke the carburetor to stop engine.
- Never start or run the engine with the air cleaner assembly (if equipped) or the air filter (if equipped) removed.
When Changing Oil
- If you drain the oil from the top oil fill tube, the fuel tank must be empty or fuel can leak out and result in a fire or explosion.
When Transporting Equipment
- Transport with fuel tank EMPTY or with fuel shut-off valve OFF.
When Storing Gasoline Or Equipment With Fuel In Tank
- Store away from furnaces, stoves, water heaters or other appliances that have pilot light or other ignition source because they can ignite gasoline vapors.

WARNING

Starting engine creates sparking.
Sparking can ignite nearby flammable gases.
Explosion and fire could result.
If there is natural or LP gas leakage in area, do not start engine.
- Do not use pressurized starting fluids because vapors are flammable.

WARNING
Engines give off carbon monoxide, an odorless, colorless, poison gas.
Breathing carbon monoxide can cause nausea, fainting or death.
Start and run engine outdoors.
- Do not start or run engine in enclosed area, even if doors or windows are open.

WARNING
Rapid retraction of starter cord (kickback) will pull hand and arm toward engine faster than you can let go.
Broken bones, fractures, bruises or sprains could result.
- When starting engine, pull the starter cord slowly until resistance is felt and then pull rapidly to avoid kickback.
- Remove all external equipment/engine loads before starting engine.
- Direct-coupled equipment components such as, but not limited to, blades, impellers, pulleys, sprockets, etc., must be securely attached.

WARNING

Rotating parts can contact or entangle hands, feet, hair, clothing, or accessories.
Traumatic amputation or severe laceration can result.
- Operate equipment with guards in place.
- Keep hands and feet away from rotating parts.
- Tie up long hair and remove jewelry.
- Do not wear loose-fitting clothing, dangling drawstrings or items that could become caught.

WARNING

Running engines produce heat. Engine parts, especially muffler, become extremely hot.
Severe thermal burns can occur on contact.
Combustible debris, such as leaves, grass, brush, etc. can catch fire.
- Allow muffler, engine cylinder and fins to cool before touching.
- Remove accumulated debris from muffler area and cylinder area.
- Install and maintain in working order a spark arrester before using equipment on forest-covered, grass-covered, brush-covered unimproved land. The state of California requires this (Section 4442 of the California Public Resources Code). Other states may have similar laws. Federal laws apply on federal land.

WARNING
Unintentional sparking can result in fire or electric shock.
Unintentional start-up can result in entanglement, traumatic amputation, or laceration.
Fire hazard

Before performing adjustments or repairs:
- Disconnect the spark plug wire and keep it away from the spark plug.
- Disconnect battery at negative terminal (only engines with electric start.)
Use only correct tools. - Do not tamper with governor spring, links or other parts to increase engine speed.
- Replacement parts must be the same and installed in the same position as the original parts.
- Do not strike the flywheel with a hammer or hard object because the flywheel may later shatter during operation.
When testing for spark:
Use approved spark plug tester.
- Do not check for spark with spark plug removed.
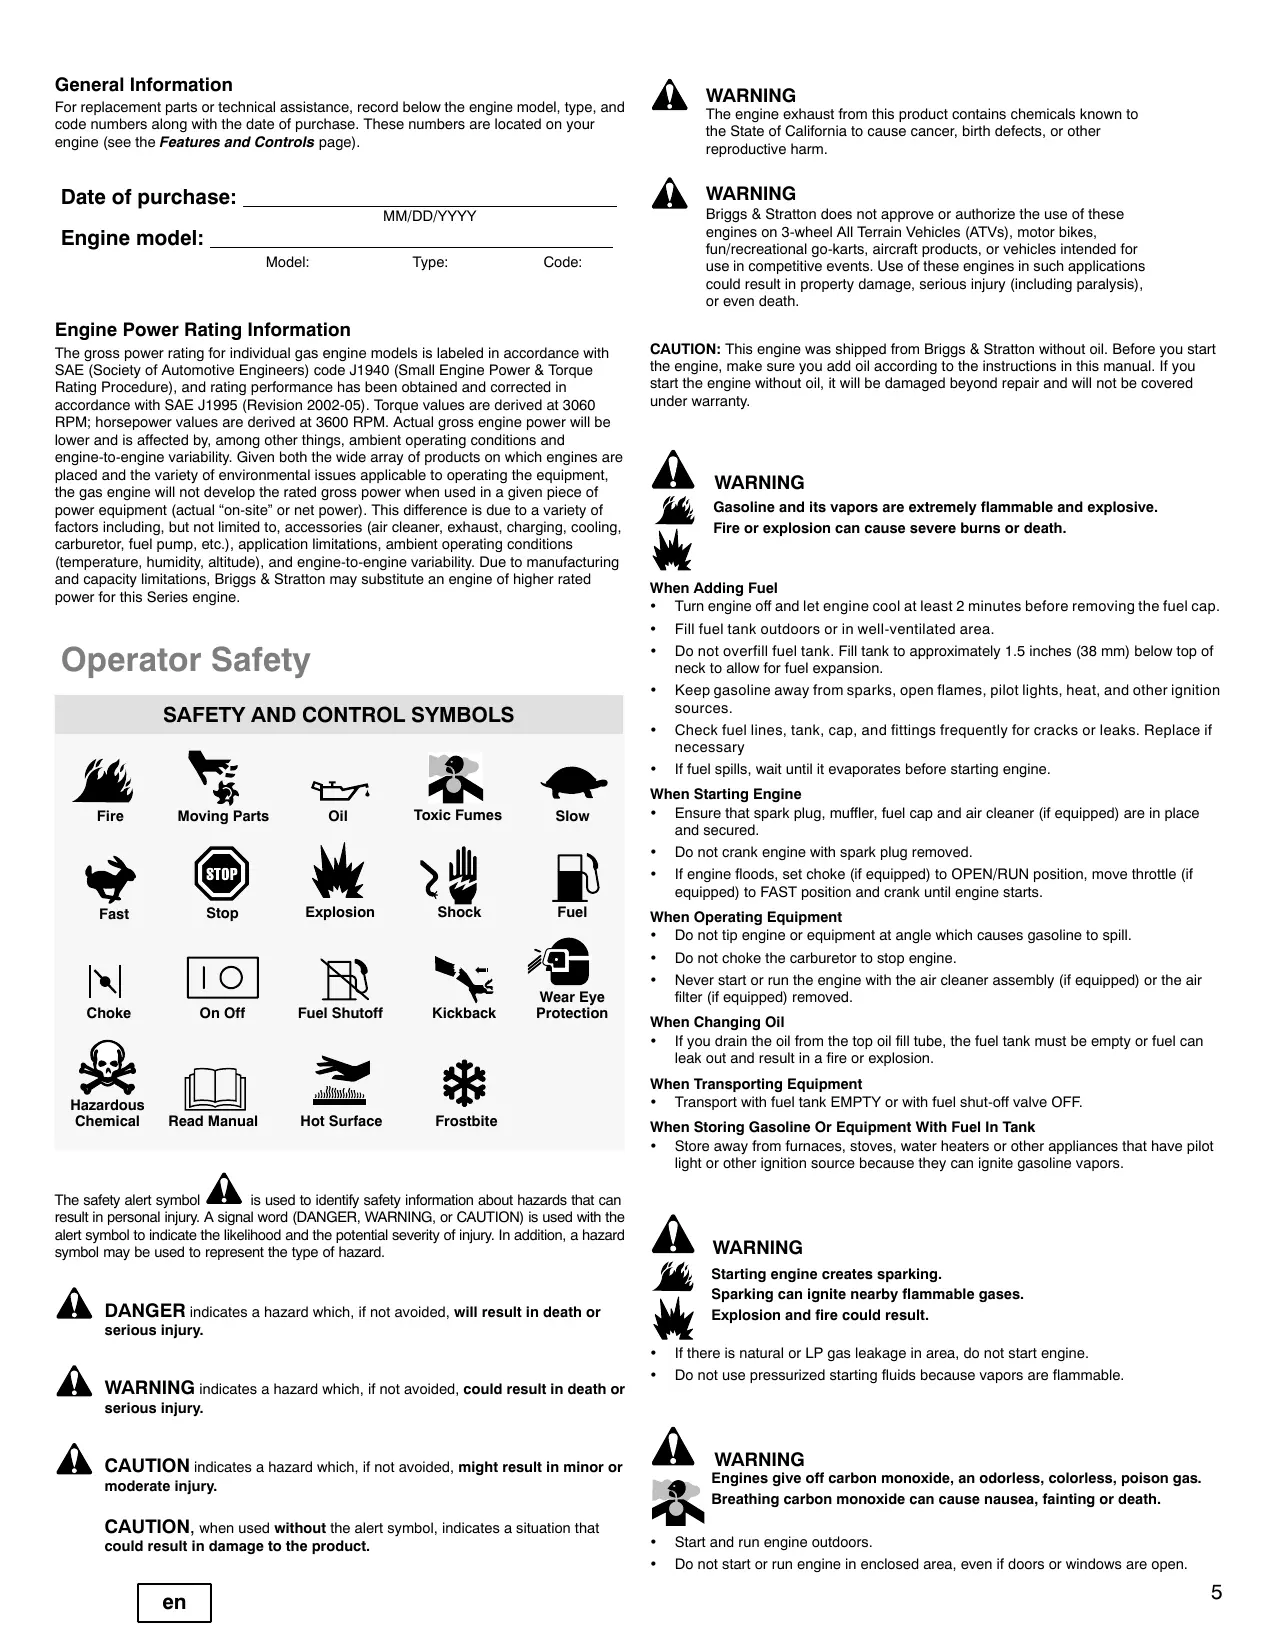
Features and Controls
Compare the illustration 1 with your engine to familiarize yourself with the location of various features and controls.
A. Engine Identification Model Type Code
B. Spark Plug
C. Air Cleaner
D. Dipstick/Oil Fill
E. Oil Filter
F. Oil Drain Plug
G. Oil Pressure Sensor
H. Finger Guard / Rotating Screen
I. Electric Starter
J. Rewind Starter (optional)
K. Carburetor
L. Exhaust Manifold
M. Fuel Pump
N. Fuel Filter (optional)
O. Oil Cooler (optional)
P. Muffler
Operation
Oil capacity (see the Specifications section)
Oil Recommendations
We recommend the use of Briggs & Stratton Warranty Certified oils for best performance. Other high-quality detergent oils are acceptable if classified for service SF, SG, SH, SJ or higher. Do not use special additives.
Outdoor temperatures determine the proper oil viscosity for the engine. Use the chart to select the best viscosity for the outdoor temperature range expected.
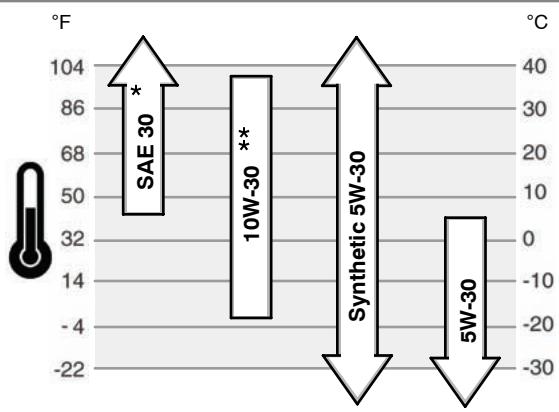
* Below 40^ (4^) the use of SAE 30 will result in hard starting.
** Above 80^ ( 27^ ) the use of 10W-30 may cause increased oil consumption. Check oil level more frequently.
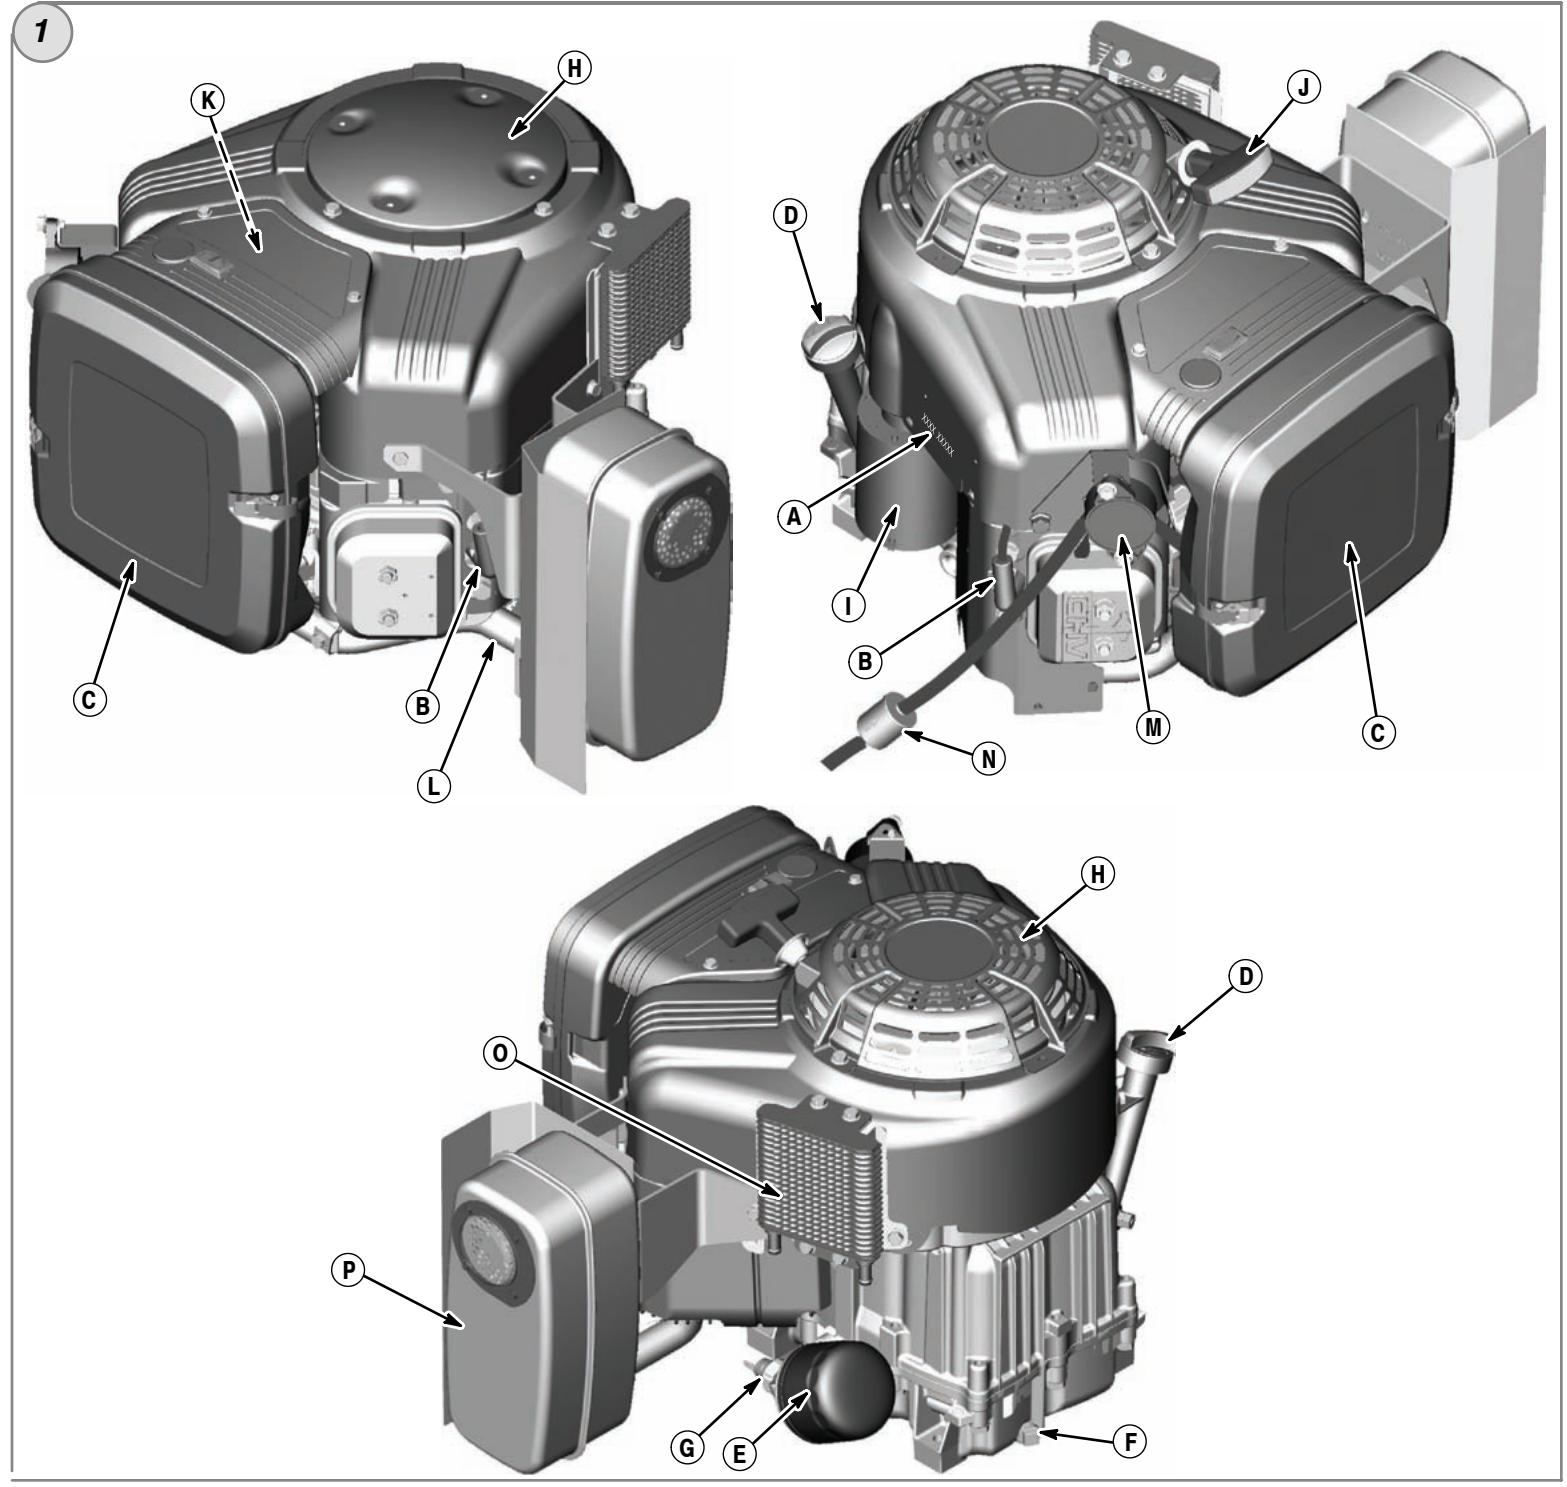
How To Check/Add Oil - Figure ②
Before adding or checking the oil
- Place engine level.
Clean the oil fill area of any debris. - Remove the dipstick (A) and wipe with a clean cloth (Figure 2).
- Fully insert the dipstick.
- Remove the dipstick and check the oil level. It should be at the FULL mark (B) on the dipstick.
- If low, add oil slowly into the engine oil fill (C). Do not overfill. After adding oil, wait one minute and then recheck the oil level.
- Fully insert the dipstick.
Oil Pressure
If the oil pressure is too low, a pressure switch (if equipped) will either stop the engine or activate a warning device on the equipment. If this occurs, stop the engine and check the oil level with the dipstick.
If the oil level is below the ADD mark, add oil until it reaches the FULL mark. Start the engine and check for proper pressure before continuing to operate.
If the oil level is between the ADD and FULL marks, do not start the engine. Contact an Authorized Briggs & Stratton Dealer to have the oil pressure problem corrected.
Fuel Recommendations
Fuel must meet these requirements:
- Clean, fresh, unleaded gasoline.
A minimum of 87 octane/87 AKI (91 RON). High altitude use, see below.
Gasoline with up to 10% ethanol (gasohol) or up to 15% MTBE (methyl tertiary butyl ether) is acceptable.
CAUTION: Do not use unapproved gasolines, such as E85. Do not mix oil in gasoline or modify the engine to run on alternate fuels. This will damage the engine components and void the engine warranty.
To protect the fuel system from gum formation, mix a fuel stabilizer into the fuel. See Storage. All fuel is not the same. If starting or performance problems occur, change fuel providers or change brands. This engine is certified to operate on gasoline. The emissions control system for this engine is EM (Engine Modifications).
High Altitude
At altitudes over 5,000 feet (1524 meters), a minimum 85 octane/85 AKI (89 RON) gasoline is acceptable. To remain emissions compliant, high altitude adjustment is required. Operation without this adjustment will cause decreased performance, increased fuel consumption, and increased emissions. See a Briggs & Stratton Authorized Dealer for high altitude adjustment information.
Operation of the engine at altitudes below 2,500 feet (762 meters) with the high altitude kit is not recommended.
How To Add Fuel - Figure 3

WARNING
Gasoline and its vapors are extremely flammable and explosive. Fire or explosion can cause severe burns or death.
When Adding Fuel
- Turn engine off and let engine cool at least 2 minutes before removing the fuel cap.
- Fill fuel tank outdoors or in well-ventilated area.
- Do not overfill fuel tank. Fill tank to approximately 1.5 inches (38 mm) below top of neck to allow for fuel expansion.
- Keep gasoline away from sparks, open flames, pilot lights, heat, and other ignition sources.
- Check fuel lines, tank, cap, and fittings frequently for cracks or leaks. Replace if necessary.
If fuel spills, wait until it evaporates before starting engine. - Clean the fuel cap area of dirt and debris. Remove the fuel cap (A) (Figure 3).
- Fill the fuel tank (B) with gasoline. To allow for expansion of the gasoline, do not fill above the bottom of the fuel tank neck (C).
- Reinstall the fuel cap.
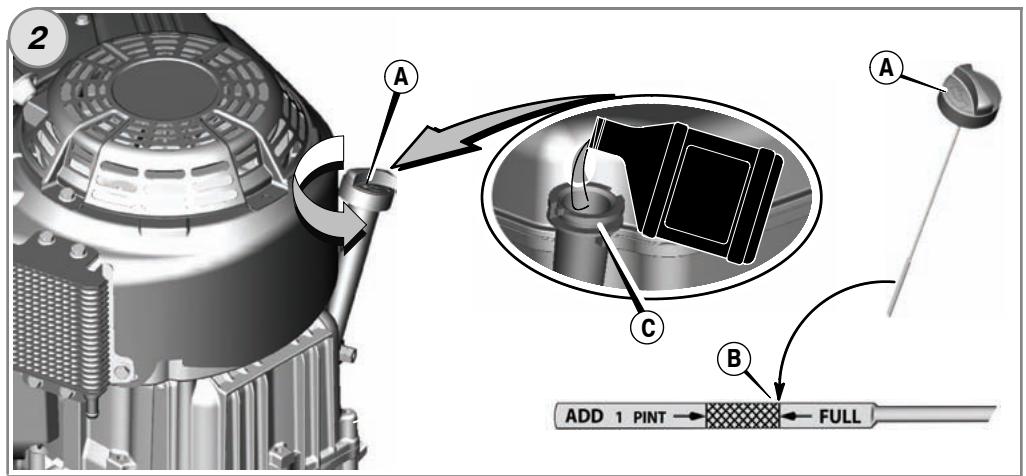
How To Start The Engine - Figure 4

WARNING

Rapid retraction of starter cord (kickback) will pull hand and arm toward engine faster than you can let go.
Broken bones, fractures, bruises or sprains could result.
- When starting engine, pull the starter cord slowly until resistance is felt and then pull rapidly to avoid kickback.

WARNING

Gasoline and its vapors are extremely flammable and explosive. Fire or explosion can cause severe burns or death.
When Starting Engine
- Ensure that spark plug, muffler, fuel cap and air cleaner are in place and secured.
- Do not crank engine with spark plug removed.
- If engine floods, set choke (if equipped) to open/run position, move throttle (if equipped) to fast position and crank until engine starts.

WARNING

Engines give off carbon monoxide, an odorless, colorless, poison gas. Breathing carbon monoxide can cause nausea, fainting or death.
- Start and run engine outdoors.
- Do not start or run engine in enclosed area, even if doors or windows are open.
CAUTION: This engine was shipped from Briggs & Stratton without oil. Before you start the engine, make sure you add oil according to the instructions in this manual. If you
start the engine without oil, it will be damaged beyond repair and will not be covered under warranty.
Note: Some engines and equipment have remote controls. See the equipment manual for location and operation of remote controls.
- Check the oil level. See the How To Check/Add Oil section.
- Make sure equipment drive controls, if equipped, are disengaged.
- Turn the fuel shut-off valve (A), if equipped, to the on position (Figure 4).
- Push the stop switch (F), if equipped, to the on position.
- Move the throttle control (B) to the fast position. Operate the engine in the fast

position.
- Move the choke control (C) to the choke position.
Note: Choke is usually unnecessary when restarting a warm engine.
- Rewind Start: Turn the key switch (D), if equipped, to the run position.
- Rewind Start: Firmly hold the starter cord handle (E). Pull the starter cord handle slowly until resistance is felt, then pull rapidly.
Note: If the engine does not start after three attempts, go to BRIGGSandSTRATTON.COM or call 1-800-233-3723 (in USA).

WARNING: Rapid retraction of the starter cord (kickback) will pull your
hand and arm toward the engine faster than you can let go. Broken bones, fractures, bruises or sprains could result. When starting engine, pull the starter cord slowly until resistance is felt and then pull rapidly to avoid kickback.
- Electric Start: Turn the electric start switch (D) to the on/start position.
Note: If the engine does not start after three attempts, go to BRIGGSandSTRATTON.COM or call 1-800-233-3723 (in USA).
CAUTION: To extend the life of the starter, use short starting cycles (five seconds maximum). Wait one minute between starting cycles.
- As the engine warms up, move the choke control (C) to the run | position.
How To Stop The Engine - Figure 4

WARNING
Gasoline and its vapors are extremely flammable and explosive.
Fire or explosion can cause severe burns or death.
-
Do not choke the carburetor to stop engine.
-
With the throttle control (B) in the slow position, turn the key switch (D) to the off position (Figure 4). Remove the key and keep in a safe place out of the reach of children.
- Push the stop switch (F) to the off position.
- After the engine stops, turn the fuel shut-off valve (A), if equipped, to the closed position.
Maintenance
Use only original equipment replacement parts. Other parts may not perform as well, may damage the unit, and may result in injury. In addition, use of other parts may void your warranty.
We recommend that you see any Briggs & Stratton Authorized Dealer for all maintenance and service of the engine and engine parts.
CAUTION: All the components used to build this engine must remain in place for proper operation.
Emissions Control
Maintenance, replacement, or repair of the emissions control devices and systems may be performed by any non-road engine repair establishment or individual.
However, to obtain "no charge" emissions control service, the work must be performed by a factory authorized dealer. See the Emissions Warranty.

WARNING
Unintentional sparking can result in fire or electric shock.
Unintentional start-up can result in entanglement, traumatic amputation, or laceration.
Fire hazard
Before performing adjustments or repairs:
-
Disconnect the spark plug wire and keep it away from the spark plug.
Use only correct tools. -
Do not tamper with governor spring, links or other parts to increase engine speed.
- Replacement parts must be the same and installed in the same position as the original parts.
- Do not strike the flywheel with a hammer or hard object because the flywheel may later shatter during operation.
When testing for spark:
Use approved spark plug tester.
- Do not check for spark with spark plug removed.
Maintenance Chart
First 5 Hours
Change oil
Every 8 Hours or Daily
Check engine oil level
Clean area around muffler and controls
Every 100 Hours or Annually
Clean air filter *
- Clean pre-cleaner (if equipped) *
- Change engine oil and filter
- Replace spark plug
- Check muffler and spark arrester
- Check valve clearance **
Every 400 Hours or Annually
- Change air filter
- Replace fuel filter
-
Clean air cooling system *
Clean oil cooler fins * -
In dusty conditions or when airborne debris is present, clean more often.
** Not required unless engine performance problems are noted.
Carburetor Adjustment
Never make adjustments to the carburetor. The carburetor was set at the factory to operate efficiently under most conditions. However, if adjustments are required, see a Briggs & Stratton Authorized Dealer for service.
CAUTION: The manufacturer of the equipment on which this engine is installed specifies the top speed at which the engine will be operated. Do not exceed this speed.
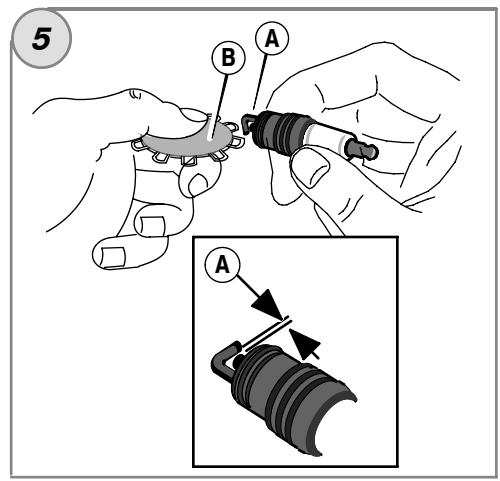
How To Replace The Spark Plug - Figure 5
Check the gap (A, Figure 5) with a wire gauge (B). If necessary, reset the gap. Install and tighten the spark plug to the recommended torque. For gap setting or torque, see the Specifications section.
Note: In some areas, local law requires using a resistor spark plug to suppress ignition signals. If this engine was originally equipped with a resistor spark plug, use the same type for replacement.
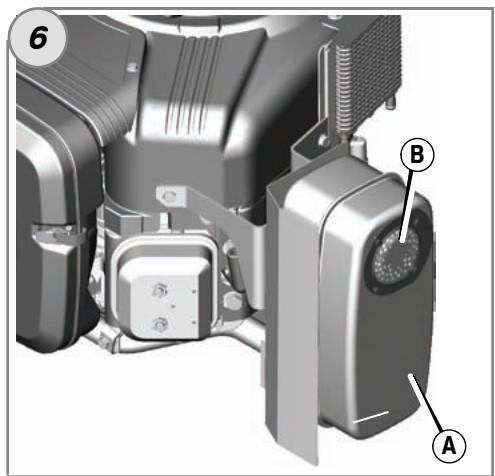
Inspect Muffler And Spark Arrester - Figure 6

WARNING

Running engines produce heat. Engine parts, especially muffler, become extremely hot.
Severe thermal burns can occur on contact.
Combustible debris, such as leaves, grass, brush, etc. can catch fire.
- Allow muffler, engine cylinder and fins to cool before touching.
- Remove accumulated debris from muffler area and cylinder area.
- Install and maintain in working order a spark arrester before using equipment on forest-covered, grass-covered, brush-covered unimproved land. The state of California requires this (Section 4442 of the California Public Resources Code).
Other states may have similar laws. Federal laws apply on federal land.
Inspect the muffler (A, Figure 6) for cracks, corrosion, or other damage. Remove the spark arrester (B), if equipped, and inspect for damage or carbon blockage. If replacement parts are required, make sure to use only original equipment replacement parts.

WARNING: Replacement parts must be the same and installed in the same
position as the original parts or fire could result.
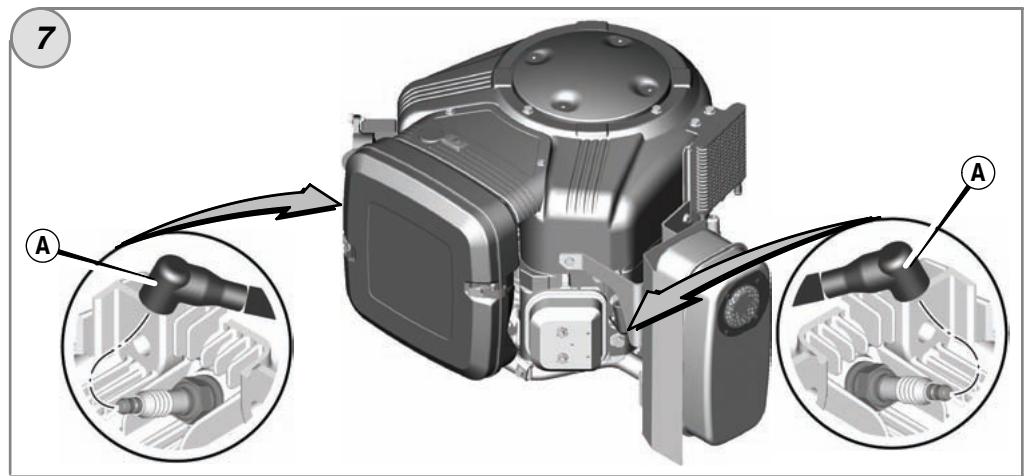
How To Change The Oil - Figure 7 8 9 10
CAUTION: Used oil is a hazardous waste product and must be disposed of properly. Do not discard with household waste. Check with your local authorities, service center, or dealer for safe disposal/recycling facilities.
Remove Oil
- With engine off but still warm, disconnect the spark plug wire (A) and keep it away from the spark plug (Figure 7).
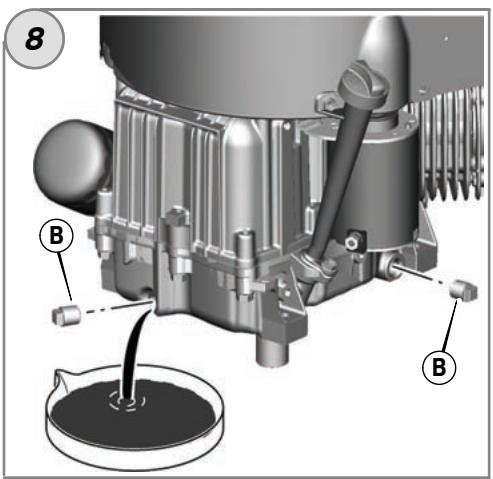
- Remove the oil drain plug (B, Figure 8). Drain the oil into an approved container.
- After the oil has drained, install and tighten the oil drain plug.
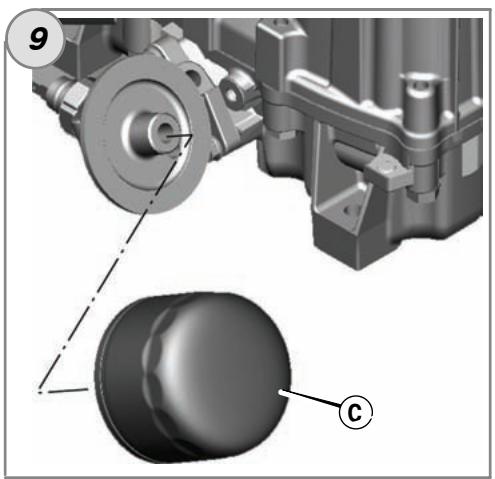
Change The Oil Filter (if equipped)
Some models are equipped with oil filter. For replacement intervals, see the Maintenance chart.
- Drain the oil from the engine. See Remove Oil section.
- Remove the oil filter (C) and dispose of properly. See Figure 9.
- Before you install the new oil filter, lightly lubricate the oil filter gasket with fresh, clean oil.
- Install the oil filter by hand until the gasket contacts the oil filter adapter, then tighten the oil filter 1/2 to 3/4 turns.
- Add oil. See Add Oil section.
- Start and run the engine. As the engine warms up, check for oil leaks.
- Stop the engine and check the oil level. It should be at the FULL mark on the dipstick.
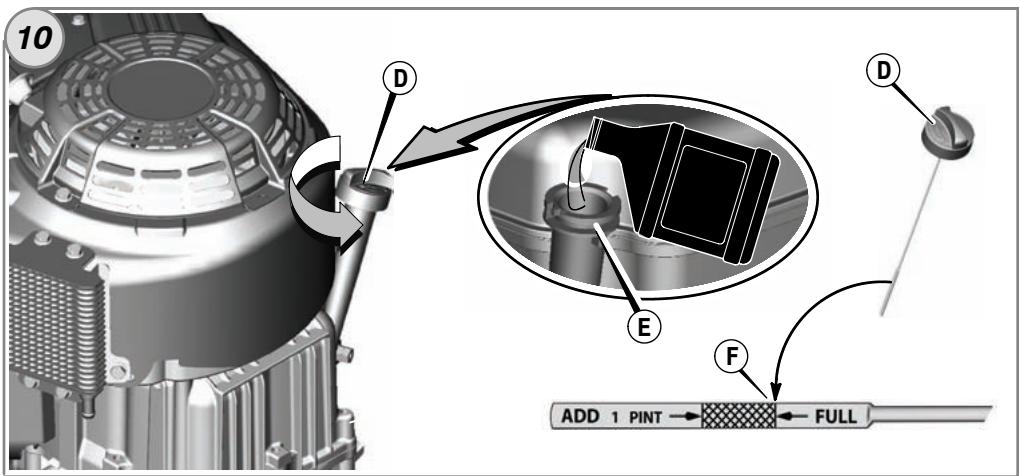
Add Oil
- Place engine level.
Clean the oil fill area of any debris.
See the Specifications section for oil capacity. - Remove the dipstick (D) and wipe with a clean cloth (Figure 10).
- Pour the oil slowly into the engine oil fill (E). Do not overfill. After adding oil, wait one minute and then check the oil level.
- Install and tighten the dipstick.
- Remove the dipstick and check the oil level. It should be at the FULL mark (F) on the dipstick.
- Install and tighten the dipstick.
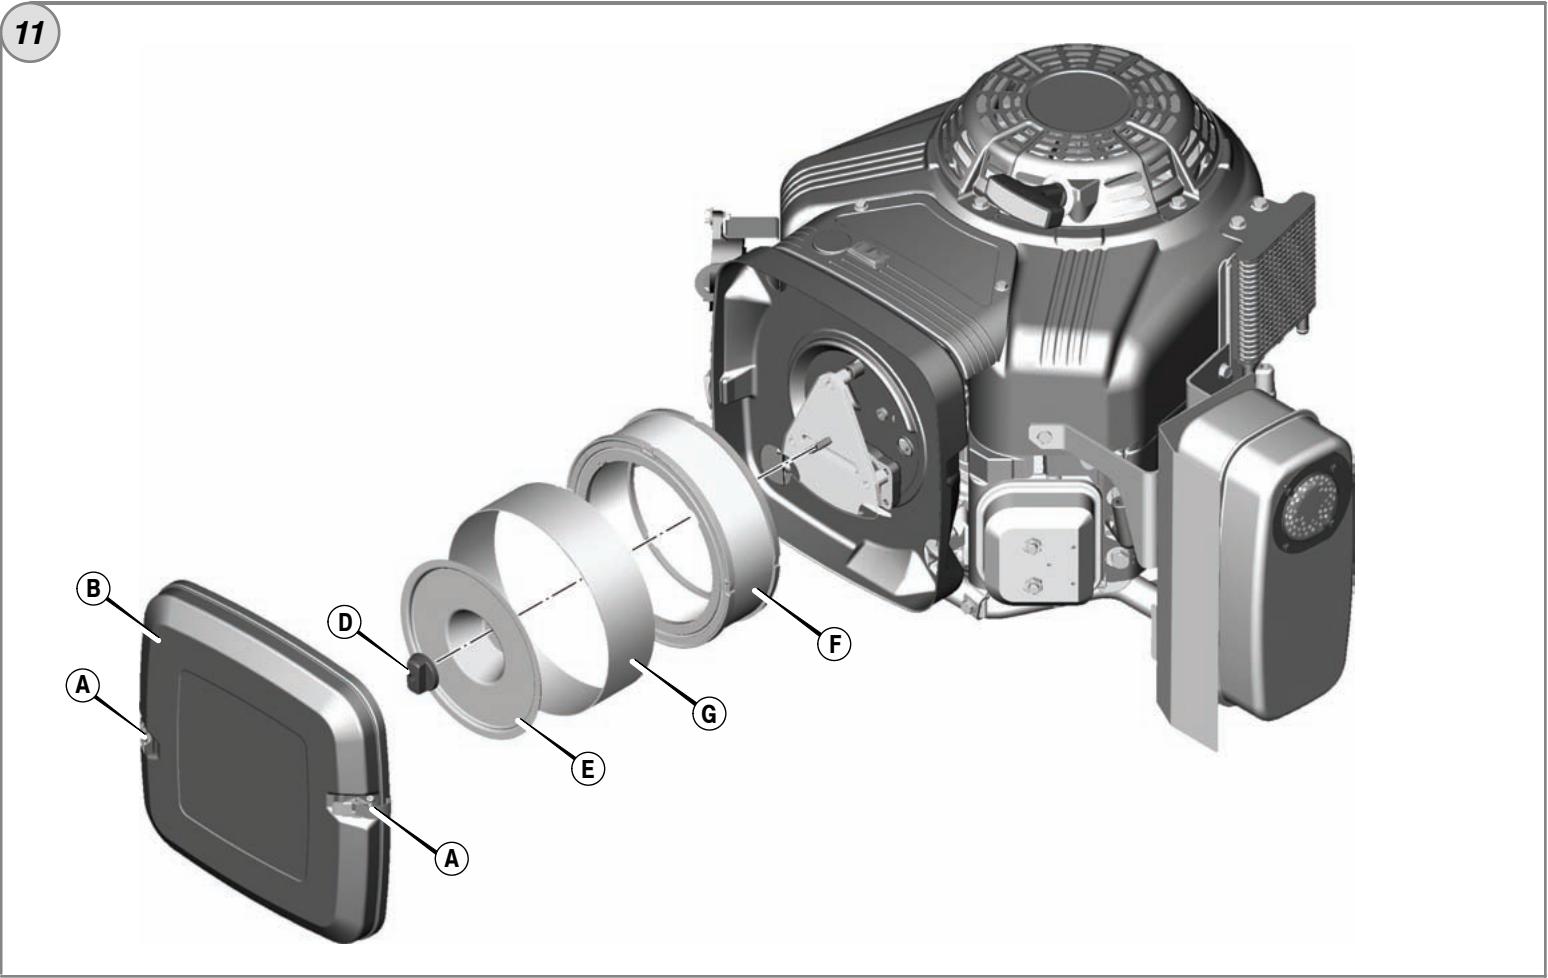
How To Service The Air Filter - Figure 11

WARNING
Gasoline and its vapors are extremely flammable and explosive. Fire or explosion can cause severe burns or death.
- Never start or run the engine with the air cleaner assembly or the air filter removed.
CAUTION: Do not use pressurized air or solvents to clean the filter. Pressurized air can damage the filter and solvents will dissolve the filter.
See the Maintenance Chart for service requirements.
- Open the latches (A) and remove the cover (B). See Figure 11.
- Remove the nut (D) and the retainer (E).
- Remove the air filter (F).
- Remove the pre-cleaner (G), if equipped, from the air filter.
- To loosen debris, gently tap the air filter on a hard surface. If the air filter is excessively dirty, replace with a new air filter.
- Wash the pre-cleaner in liquid detergent and water. Then allow it to thoroughly air dry. Do not oil the pre-cleaner.
- Assemble the dry pre-cleaner to the air filter.
- Install the air filter and secure with retainer and nut.
- Install and secure the cover.
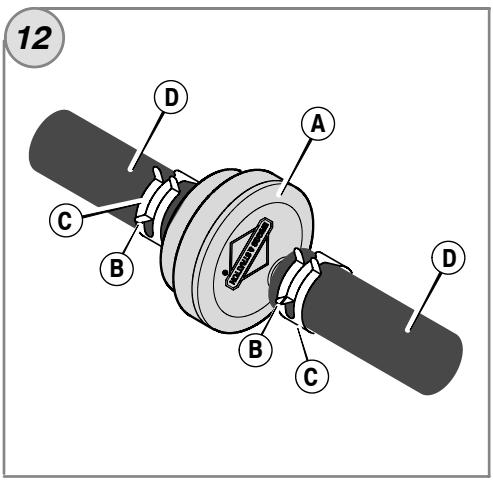
How To Replace The Fuel Filter - Figure 12

WARNING
Gasoline and its vapors are extremely flammable and explosive. Fire or explosion can cause severe burns or death.
- Keep gasoline away from sparks, open flames, pilot lights, heat, and other ignition sources.
- Check fuel lines, tank, cap, and fittings frequently for cracks or leaks. Replace if necessary.
Before replacing the fuel filter, drain the fuel tank or close the fuel shut-off valve. - Replacement parts must be the same and installed in the same position as the original parts.
If fuel spills, wait until it evaporates before starting engine. - Before replacing the fuel filter (A, Figure 12), if equipped, drain the fuel tank or close the fuel shut-off valve. Otherwise, fuel can leak out and cause a fire or explosion.
- Use pliers to squeeze tabs (B) on the clamps (C), then slide the clamps away from the fuel filter. Twist and pull the fuel lines (D) off the fuel filter.
- Check the fuel lines for cracks or leaks. Replace if necessary.
- Replace the fuel filter with an original equipment replacement filter.
- Secure the fuel lines with the clamps as shown.
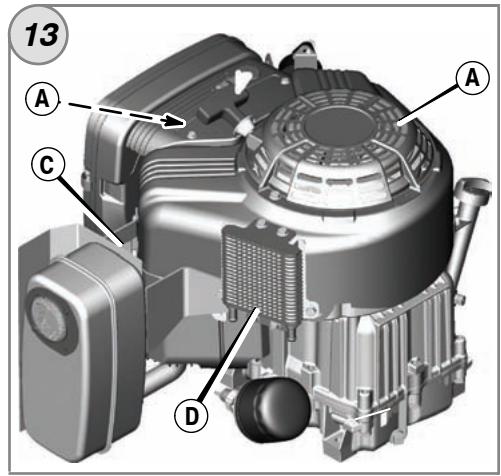
How To Clean The Air Cooling System - Figure 13

WARNING
Running engines produce heat. Engine parts, especially muffler, become extremely hot.
Severe thermal burns can occur on contact.
Combustible debris, such as leaves, grass, brush, etc. can catch fire.
- Allow muffler, engine cylinder and fins to cool before touching.
- Remove accumulated debris from muffler area and cylinder area.
CAUTION: Do not use water to clean the engine. Water could contaminate the fuel system. Use a brush or dry cloth to clean the engine.
This is an air cooled engine. Dirt or debris can restrict air flow and cause the engine to overheat, resulting in poor performance and reduced engine life.
Use a brush or dry cloth to remove debris from the finger guard/rotating screen (A). Keep linkage, springs and controls (B) clean. Keep the area around and behind the muffler (C) free of any combustible debris (Figure 13). Make sure that the oil cooler fins (D) are free of dirt and debris.
Storage

WARNING
Gasoline and its vapors are extremely flammable and explosive. Fire or explosion can cause severe burns or death.
When Storing Gasoline Or Equipment With Fuel In Tank
- Store away from furnaces, stoves, water heaters or other appliances that have pilot lights or other ignition sources because they can ignite gasoline vapors.
Fuel System
Fuel can become stale when stored over 30 days. Stale fuel causes acid and gum deposits to form in the fuel system or on essential carburetor parts. To keep fuel fresh, use Briggs & Stratton FRESH START® fuel stabilizer, available as a liquid additive or a drip concentrate cartridge.
There is no need to drain gasoline from the engine if a fuel stabilizer is added according to instructions. Run the engine for 2 minutes to circulate the stabilizer throughout the fuel system. The engine and fuel can then be stored up to 24 months.
If gasoline in the engine has not been treated with a fuel stabilizer, it must be drained into an approved container. Run the engine until it stops from lack of fuel. The use of a fuel stabilizer in the storage container is recommended to maintain freshness.
Engine Oil
While the engine is still warm, change the engine oil.
Troubleshooting
Need Assistance? Go to BRIGGSandSTRATTON.COM or call 1-800-233-3723.
Specifications
| Engine Specifications | |
| Model | 290000 |
| Displacement | 29.23 ci (479 cc) |
| Bore | 2.677 in (68 mm) |
| Stroke | 2.598 in (66 mm) |
| Oil Capacity | 46 - 48 oz (1.36 - 1.42 L) |
| Engine Specifications | |
| Model | 300000 |
| Displacement | 29.23 ci (479 cc) |
| Bore | 2.677 in (68 mm) |
| Stroke | 2.598 in (66 mm) |
| Oil Capacity | 46 - 48 oz (1.36 - 1.42 L) |
| Engine Specifications | |
| Model | 350000 |
| Displacement | 34.78 ci (570 cc) |
| Bore | 2.835 in (72 mm) |
| Stroke | 2.756 in (70 mm) |
| Oil Capacity | 46 - 48 oz (1.36 - 1.42 L) |
| Engine Specifications | |
| Model | 380000 |
| Displacement | 38.26 ci (627 cc) |
| Bore | 2.972 in (75.5 mm) |
| Stroke | 2.756 in (70 mm) |
| Oil Capacity | 46 - 48 oz (1.36 - 1.42 L) |
| Tune-up Specifications * | |
| Model | 290000, 300000 |
| Spark Plug Gap | 0.030 in (0.76 mm) |
| Spark Plug Torque | 180 lb-in (20 Nm) |
| Armature Air Gap | 0.008 - 0.012 in (0.20 - 0.30 mm) |
| Intake Valve Clearance | 0.004 - 0.006 in (0.10 - 0.15 mm) |
| Exhaust Valve Clearance | 0.004 - 0.006 in (0.10 - 0.15 mm) |
- Engine power will decrease 3.5% for each 1,000 feet (300 meters) above sea level and 1% for each 10^ F( 5.6^ C) above 77^ F( 25^ C) . The engine will operate satisfactorily at an angle up to 15^ . Refer to the equipment operator's manual for safe allowable operating limits on slopes.
| Tune-up Specifications * | |
| Model | 350000, 380000 |
| Spark Plug Gap | 0.030 in (0.76 mm) |
| Spark Plug Torque | 180 lb-in (20 Nm) |
| Armature Air Gap | 0.008 - 0.012 in (0.20 - 0.30 mm) |
| Intake Valve Clearance | 0.004 - 0.006 in (0.10 - 0.15 mm) |
| Exhaust Valve Clearance | 0.004 - 0.006 in (0.10 - 0.15 mm) |
| Common Sc | |
| Service Part | Part Number |
| Air Filter - except model 380000 | 394018 |
| Air Filter - model 380000 | 692519 |
| Air Filter Pre-cleaner - except model 380000 | 272490 |
| Air Filter Pre-cleaner - model 380000 | 692520 |
| Oil - SAE 30 | 100028 |
| Oil Filter - 6 cm long | 492932 |
| Oil Filter - 9 cm long | 491056 |
| Service Parts √ | |
| Service Part | Part Number |
| Fuel Filter - with fuel tank | 808116 |
| Fuel Filter - with fuel pump | 691035 |
| Fuel Filter - without fuel pump | 298090 |
| Fuel Additive | 5041 |
| Resistor Spark Plug | 491055 |
| Long Life Platinum Spark Plug | 5066 |
| Spark Plug Wrench | 19374 |
| Spark Tester | 19368 |
We recommend that you see any Briggs & Stratton Authorized Dealer for all maintenance and service of the engine and engine parts. Use only genuine Briggs & Stratton parts.
LIMITED WARRANTY
Brigs & Stratton Corporation will repair or replace, free of charge, any part(s) of the engine that is defective in material or workmanship or both. Transportation charges on product submitted for repair or replacement under this warranty must be borne by purchaser. This warranty is effective for and is subject to the time periods and conditions stated below. For warranty service, find the nearest Authorized Service Dealer in our dealer locator map at BRIGGSandSTRATTON.COM, or by calling 1-800-233-3723, or as listed in the 'Yellow PagesTM'.
There is no other expressed warranty. Implied warranties, including those of merchantability and fitness for a particular purpose, are limited to one year from purchase, or to the extent permitted by law and all implied warranties are excluded. Liability for incidental or consequential damages are excluded to the extent exclusion is permitted by law. Some states or countries do not allow limitations on how long an implied warranty lasts, and some states or countries do not allow the exclusion or limitation of incidental or consequential damages, so the above limitation and exclusion may not apply to you. This warranty gives you specific legal rights and you may also have other rights which vary from state to state and country to country.
STANDARD WARRANTY TERMS * ▲
| Brand/Product Type | Consumer Use | Commercial Use |
| VanguardTM | 2 years | 2 years |
| Extended Life SeriesTM, I/C®, IntekTM I/C®, IntekTM Pro | 2 years | 1 year |
| Snow Series MAXTM with Dura-BoreTM Cast Iron Sleeve | 2 years | 1 year |
| All Other Briggs & Stratton Engines | 2 years | 90 days |
- These are our standard warranty terms, but occasionally there may be additional warranty coverage that was not determined at time of publication. For a listing of current warranty terms for your engine, go to BRIGGSandSTRATTON.COM or contact your Authorized Briggs & Stratton Service Dealer.
Engines used on Home Standby Generator applications are warranted under consumer use only. This warranty does not apply to engines on equipment used for prime power in place of a utility. Engines used in competitive racing or on commercial or rental tracks are not warranted.
The warranty period begins on the date of purchase by the first retail consumer or commercial end user, and continues for the period of time stated in the table above. "Consumer use" means personal residential household use by a retail consumer. "Commercial use" means all other uses, including use for commercial, income producing or rental purposes. Once an engine has experienced commercial use, it shall thereafter be considered as a commercial use engine for purposes of this warranty.
No warranty registration is necessary to obtain warranty on Briggs & Stratton Products. Save your proof of purchase receipt. If you do not provide proof of the initial purchase date at the time warranty service is requested, the manufacturing date of the product will be used to determine the warranty period.
About Your Warranty
Briggs & Stratton welcomes warranty repair and apologizes to you for being inconveniently. Any Authorized Service Dealer may perform warranty repairs. Most warranty repairs are handled routinely, but sometimes requests for warranty service may not be appropriate.
If a customer differs with the decision of the Service Dealer, an investigation will be made to determine whether the warranty applies. Ask the Service Dealer to submit all supporting facts to his Distributor or the Factory for review. If the Distributor or the Factory decides that the claim is justified, the customer will be fully reimbursed for those items that are defective. To avoid misunderstanding which might occur between the customer and the Dealer, listed below are some of the causes of engine failure that the warranty does not cover.
Normal wear: Engines, like all mechanical devices, need periodic parts service and replacement to perform well. Warranty will not cover repair when normal use has exhausted the life of a part or an engine. Warranty would not apply if engine damage occurred because of misuse, lack of routine maintenance, shipping, handling, warehousing or improper installation. Similarly, warranty is void if the serial number of the engine has been removed or the engine has been altered or modified.
Improper maintenance: The life of an engine depends upon the conditions under which it operates, and the care it receives. Some applications, such as tillers, pumps and rotary mowers, are very often used in dusty or dirty conditions, which can cause what appears to be premature wear. Such wear, when caused by dirt, dust, spark plug cleaning grit, or other abrasive material that has entered the engine because of improper maintenance, is not covered by warranty.
This warranty covers engine related defective material and/or workmanship only, and not replacement or refund of the equipment to which the engine may be mounted. Nor does the warranty extend to repairs required because of:
1 Problems caused by parts that are not original Briggs & Stratton parts.
2 Equipment controls or installations that prevent starting, cause unsatisfactory engine performance, or shorten engine life. (Contact equipment manufacturer.)
3 Leaking carburetors, clogged fuel pipes, sticking valves, or other damage, caused by using contaminated or stale fuel.
4 Parts which are scored or broken because an engine was operated with insufficient or contaminated lubricating oil, or an incorrect grade of lubricating oil (check and refill when necessary, and change at recommended intervals). OIL GARD may not shut down running engine. Engine damage may occur if oil level is not properly maintained.
5 Repair or adjustment of associated parts or assemblies such as clutches, transmissions, remote controls, etc., which are not manufactured by Briggs & Stratton.
6 Damage or wear to parts caused by dirt, which entered the engine because of improper air cleaner maintenance, re-assembly, or use of a non-original air cleaner element or cartridge. At recommended intervals, clean and/or replace the filter as stated in the Operator's Manual.
7 Parts damaged by over-speeding, or overheating caused by grass, debris, or dirt, which plugs or clogs the cooling fins, or flywheel area, or damage caused by operating the engine in a confined area without sufficient ventilation. Clean engine debris at recommended intervals as stated in the Operator's Manual.
8 Engine or equipment parts broken by excessive vibration caused by a loose engine mounting, loose cutter blades, unbalanced blades or loose or unbalanced impellers, improper attachment of equipment to engine crankshaft, over-speeding or other abuse in operation.
9 A bent or broken crankshaft, caused by striking a solid object with the cutter blade of a rotary lawn mower, or excessive v-belt tightness.
10 Routine tune-up or adjustment of the engine.
11 Engine or engine component failure, i.e., combustion chamber, valves, valve seats, valve guides, or burned starter motor windings, caused by the use of alternate fuels such as, liquified petroleum, natural gas, altered gasolines, etc.
Warranty service is available only through authorized service dealers by Briggs & Stratton Corporation. Locate your nearest Authorized Service Dealer in our dealer locator map on BRIGGSandSTRATTON.COM or by calling 1-800-233-3723, or as listed in the 'Yellow Pages™'.
Briggs & Stratton Corporation (B&S), the California Air Resources Board (CARB) and the United States Environmental Protection Agency (U.S. EPA) Emissions Control System Warranty Statement (Owner's Defect Warranty Rights and Obligations)
California, United States and Canada Emissions Control Defects Warranty Statement
The California Air Resources Board (CARB), U.S. EPA and B&S are pleased to explain the Emissions Control System Warranty on your small off-road engine (SORE). In California, new small off-road engines model year 2006 and later must be designed, built and equipped to meet the State's stringent anti-smog standards. Elsewhere in the United States, new non-road, spark-ignition engines certified for model year 1997 and later must meet similar standards set forth by the U.S. EPA. B&S must warrant the emissions control system on your engine for the periods of time listed below, provided there has been no abuse, neglect or improper maintenance of your small off-road engine.
Your emissions control system includes parts such as the carburetor, air cleaner, ignition system, fuel line, muffler and catalytic converter. Also included may be connectors and other emissions related assemblies.
Where a warrantable condition exists, B&S will repair your small off-road engine at no cost to you including diagnosis, parts and labor.
Briggs & Stratton Emissions Control Defects Warranty Coverage
Small off-road engines are warranted relative to emissions control parts defects for a
period of two years, subject to provisions set forth below. If any covered part on your engine is defective, the part will be repaired or replaced by B&S.
Owner's Warranty Responsibilities
As the small off-road engine owner, you are responsible for the performance of the required maintenance listed in your Operating and Maintenance Instructions. B&S recommends that you retain all your receipts covering maintenance on your small off-road engine, but B&S cannot deny warranty solely for the lack of receipts or for your failure to ensure the performance of all scheduled maintenance.
As the small off-road engine owner, you should however be aware that B&S may deny you warranty coverage if your small off-road engine or a part has failed due to abuse, neglect, improper maintenance or unapproved modifications.
You are responsible for presenting your small off-road engine to an Authorized B&S Service Dealer as soon as a problem exists. The undisputed warranty repairs should be completed in a reasonable amount of time, not to exceed 30 days.
If you have any questions regarding your warranty rights and responsibilities, you should contact a B&S Service Representative at (414) 259-5262.
The emissions warranty is a defects warranty. Defects are judged on normal engine performance. The warranty is not related to an in-use emissions test.
Briggs & Stratton Emissions Control Defects Warranty Provisions
The following are specific provisions relative to your Emissions Control Defects Warranty Coverage. It is in addition to the B&S engine warranty for non-regulated engines found in the Operating and Maintenance Instructions.
1. Warranted Parts
Coverage under this warranty extends only to the parts listed below (the emissions control systems parts) to the extent these parts were present on the engine purchased.
a. Fuel Metering System
Cold start enrichment system (soft choke)
- Carburetor and internal parts
Fuel pump
Fuel line, fuel line fittings, clamps
- Fuel tank, cap and tether
- Carbon canister
b. Air Induction System
Air cleaner
Intake manifold
- Purge and vent line
c. Ignition System
- Spark plug(s)
- Magneto ignition system
d. Catalyst System
Catalytic converter
- Exhaust manifold
Air injection system or pulse valve
e. Miscellaneous Items Used in Above Systems
Vacuum, temperature, position, time sensitive valves and switches
- Connectors and assemblies
2. Length of Coverage
B&S warrants to the initial owner and each subsequent purchaser that the Warranted Parts shall be free from defects in materials and workmanship which caused the
failure of the Warranted Parts for a period of two years from the date the engine is delivered to a retail purchaser.
3. No Charge
Repair or replacement of any Warranted Part will be performed at no charge to the owner, including diagnostic labor which leads to the determination that a Warranted Part is defective, if the diagnostic work is performed at an Authorized B&S Service Dealer. For emissions warranty service contact your nearest Authorized B&S Service Dealer as listed in the "Yellow Pages" under "Engines, Gasoline," "Gasoline Engines," "Lawn Mowers," or similar category.
4. Claims and Coverage Exclusions
Warranty claims shall be filed in accordance with the provisions of the B&S Engine Warranty Policy. Warranty coverage shall be excluded for failures of Warranted Parts which are not original B&S parts or because of abuse, neglect or improper maintenance as set forth in the B&S Engine Warranty Policy. B&S is not liable to cover failures of Warranted Parts caused by the use of add-on, non-original, or modified parts.
5. Maintenance
Any Warranted Part which is not scheduled for replacement as required maintenance or which is scheduled only for regular inspection to the effect of "repair or replace as necessary" shall be warranted as to defects for the warranty period. Any Warranted Part which is scheduled for replacement as required maintenance shall be warranted as to defects only for the period of time up to the first scheduled replacement for that part. Any replacement part that is equivalent in performance and durability may be used in the performance of any maintenance or repairs. The owner is responsible for the performance of all required maintenance, as defined in the B&S Operating and Maintenance Instructions.
6. Consequential Coverage
Coverage hereunder shall extend to the failure of any engine components caused by the failure of any Warranted Part still under warranty.
Look For Relevant Emissions Durability Period and Air Index Information On Your Engine Emissions Label
Engines that are certified to meet the California Air Resources Board (CARB) Emissions Standard must display information regarding the Emissions Durability Period and the Air Index. Briggs & Stratton makes this information available to the consumer on our emissions labels. The engine emissions label will indicate certification information.
The Emissions Durability Period describes the number of hours of actual running time for which the engine is certified to be emissions compliant, assuming proper maintenance in accordance with the Operating & Maintenance Instructions. The following categories are used:
Moderate:
Engine is certified to be emissions compliant for 125 hours of actual engine running time.
Intermediate:
Engine is certified to be emissions compliant for 250 hours of actual engine running time.
Extended:
Engine is certified to be emissions compliant for 500 hours of actual engine running time. For example, a typical walk-behind lawn mower is used 20 to 25 hours per year. Therefore, the Emissions Durability Period of an engine with an intermediate rating would equate to 10 to 12 years.
Briggs & Stratton engines are certified to meet the United States Environmental Protection Agency (USEPA) Phase 2 emissions standards. For Phase 2 certified engines, the Emissions Compliance Period referred to on the Emissions Compliance label indicates the number of operating hours for which the engine has been shown to meet Federal emissions requirements.
For engines less than 225 cc displacement.
Category C = 125 hours, Category B = 250 hours, Category A = 500 hours
For engines of 225 cc or more displacement.
Category C = 250 hours, Category B = 500 hours, Category A = 1000 hours
06nCbeHn
3a pe3eepBHN qactn INI texHuecka NMOOJ 3aNIOWE TE NO-dONY HOMepa HA MODeNA, TINa I KOda Na DbRnateTEn Bn, 3aeDNo C daTata Ha KnyBaHeto. TeNs HOpema ceHAMPAT BByPX DbRnateTEn Bn (BHXTE cTpaHnuDTa POKa3eTeN u YnpabNeHH).
| Даара на Кунувае: МM/ДД/ГТГ | ||
| Мо德尔 на Двигатуля: Мо德尔: | Тип: | КoД: |
HOpMaun 3a HOMHaJIHaTa MOUHOCT Ha DBVaTeJIte
Пьлната мошноct Вьрху OTДелиноct moelen 6eH3nOBu DBinatelen e OT6eH3aHa B CbOTBETCTBNE c5c C3daDEhen OTRSAE(DpyKecTBO Ha INXKeHepnte OT ABTOMObnHATA npOMUwHEoCT n TpaHcnOpTa) ПrabINHk 3a TeXHnuecka ECKnloatauaJ1940(MeToDnka 3a OnpeJeIae HOMHNaHHTA MOCHOCT N BpTrTHMMA MOMENT Ha ManIKN DBInATeNTa), a HOMHNaHHTA m IOMHOCHT 6e IOnyHeHa KOpIRnepaHa B CbOTBETCTBNE C BepCnTA Ha PpABUNHnKa 3a TeXHnuecka ECKnloatauaJ1995 HA SAE (PeJaKuiaorOT 2002-05 r.). CToHocHTne Ha BpTrHsma MOMENT ca n3BeDeHni prn 3060 6b/Mm.; cToHocHTne Ha MOUHOCTTa -prn 3600 06/MnH. DeIcTBnENTaHa pblHa MooHocHT Ha DBInatelTe NTle 6bDeNo-HnCKHa Ce BnJIe, MeKdy DpyROTO, OT OKONHATA cPeda, B KOrTO o6OpbyDAHTo cEKCnIOaTnpa IOT XapAKTEPcTtNke Ha BcEKnOTdENH DBInATeR. Ptpr SinPOKHA Na6OpOT MaunHH, BByxKOINTO CE NOCTABAT DBInATeNTe N prn pa3HOo6pa3NeTo Ha EOKONYHnTE N3CKBAHn, B KOrTO o6OpuyDAHTo PObOt, 6e3HNOBHT DBInATeN HMa Da PA3BVE Yka3AHATA OT pONIBOHTeN PbLNa MooHOCT, KORAto E MOHTpanHa Ha daDEHo EhePrnHO o6OpuyBaHe (DeIcTBInELHATA MOUHOCT"Ha O6EkTa"N In eFekTbNHAta MOnHOCT). Ta3n pa3NlkaCe dtNkx HoIrafBoPn, BKIOHTeNHa HO akCEcoAPrte KbM DBInATeN (Bv3dUwen FInITbp, ayCnYx, CNCTema 3a 3apeJxDaHe, CNCTema 3a OXnaJdaHe, Kapbypatop, ropNBHa NOMHa n T. H.), Ha xapAKTEPHnte ORpAHueHHe 3a n3NOJ3BAHETO My, Ha yCNOBVHa B OKONHATA cPeda, B KOrTO DBInATeN pAbToN (TEMnepatya, BlaxXHOCT, HAdMOPcka BVCouHHa), Ha pa3NIuHrTa BvB BcEKnOTdENH DBInATen. IopadnTexHOLOrOuHyn n IpnO3BOvCTBeHn ORpaHNHeH HPMMaTa Briggs & Stratton MoE To dZamEcTu DAeHN DBInATeN c No-BvNCoka HOMHaJIHa MOUHOCT C DBInATen OT Tez cepnn.
Texnka 3a 6e3oNaChOCT Ha onepaTopa
CIMBOJN 3A BE3OJANCHOCT N UYPABJIEHNE
I3ropeJIte rA3OBE ot TO3m IyBnIaTeR cBbDpKAT XIMMueCKN CBeIeHNEHN, 13BcETHn Ha 7aTate KaIINΦOpHn KaTO npuHInHTEN pa HAp, YBpeJdaHn pnpaJxDaHe, INIpyrYypeKdHaHn, CbBp3aHc PEPNOyKTMBHOCTTa.
PNEUINPEKDEHNE
KopnpaBrigs & Stratton He oDobpBa n He no3BolBa n3non3BaHeTo Ha Te3n DVBatEn Bbpxy BcBdxOan H 3 KOJena (ATVs), MOTOUKnetn, yBeceJIteHn KOnuKn/3a KapnHr, JTeaTeHn anapatn nn TpaHCnoptn CpeDCTBa 3a YuaTbne B cBcte3aTeHn MeOpnpnTn. H3non3BaHeTo Ha Te3n DVBatEn H aTakIne MaunHn MOKeJa da OboDe do MaTePnaHn mEttn, cepno3Hn HapaRaBaan (BkNIOHTenHO npaHn3a) n DoPi Do CMbpt.
BHMHAHNE: HactoIaHT DnIraTe CE doCTBa OT Briggs & Stratton 6e3 macNo. IpeNa DA TATE DnIraTeA CE yBepTe, Yce CT HeNenMACNO CnopeD INHCTpyKUnte B TOBA pkoBOdCTBO.AKO rO cTAPtate 6e3 MacNo, Toi se CE noBpeDn, 63 da MoKe da 6bJe nonpAbEH n rapaHmTa HA Ma da ro NOKPnBA.

PPEyPExEHE
Béh3nHbT N HEROBNTe napi ca n3KJIQUHTeJHo ORHeONaChN n36yXnBn.
Ioxkap nIIN B3PnB MORAT da npuHrT cepno3Hn o6rapnHn IIN cmbpt.
PndoJmbaHeHaTropnBO
I3KIOHOTe DIBrAteN I RO OCTabe T a Ce OXnI Hn HmJKO 2 MNHyTn, npEIN da CBANTIE KANA-KATA h Pe3eBpOABA t 3a ROpNb.
-Пьн electe pe3epBOapa 3a roPnBO Ha OTkpIto nBdope BeHTnInpaH omeueHne.
He npenbnae pe3epboapa 3a ronpBO. TbIhTe ro np6n3ntenHO 1,5Hua (38 mm) no-HNcKO t o npHnra p6 ha TbpNOBnHaTa, 3a da nO3BOJnTe pa3wnpeHne H a ropMBOTo.
-ДрьжteбeнинадауETОСКРИ,OTKpTNПЯMbU,CINHANHJAMN,TOПИHA nДPyrI3aJIaTIENHnI3TOHnI.
- PpOBePbBaIte YeCTo rOpBONpOBoJnte, pe3epBoapa, kanaqKaTa n CbeDInHeHnra 3a NyKHaTnHn TeOBe. 3aMeHnTe rN aKO e Heo6xOdmo.
- Ako ropmboto ce pa3nee, n3aKaIte dokato TO ce n3napi, npedn da cTaptnape Dbratena.
Pn cTaptnpahe Ha dBmraTeJIa
- Yepepe Ce,Ye 3anaIteHATA Cbeu, WymO3aIyUWmTeHN, KanaUkata Ha pe3epBoapA 3a rOpBIO bB3dUHIN HnTTbp (aKO hMa TaKbB) Ca HA MCTOTOCn ca o6e3oNaC6H.
He pa3BbptaTe DnBaTeNc n3BaDena 3anaTEnHa Cbeu. - Ako DBNATeJIrCe 3aJaBn, NOCTabeTe CMyKaHa (aKO IMa TaKbB) Ha N03IuHr OPEN/Run, pNeMeTeTEpHHTaTa3 (aKO IMa TaKaba) Ha N03IuHr FAST n pa3BbTae, DOkATO DBNATeJIrCT aTtura.
Ppi pa6oTea MaunHa
He haknahnyTe Dniratena IIn MaunHaTa NOD bTbN, KOITOBIN DO pa3JIbAhe Ha 6eH3nHa.
He 3anyuBaIe Kap6ypaTopa, 3a da cnpeTe DnurTaTeJ.
Hikora He cTapnape H he paBOTe C dBVaTeN, Ha KOITo Bb3DyHnIaHnTbpeH (ako IMa TaKbB) KOMJIeKT e CBaIeH.
Korato cmeHbATE macnoto
- AkO n3TOuBaTe MaCOnTo Ipe3 rOpHata TpB6a 3a HAniBaHe,pe3ePBoApT 3a roPbIbOTo TpA6Ba Da 6bDe npa3eH,3aIoTO B npotuBcH cyuA mOKe da hMa TeH na RoPbIO, BOeUdo noXapKnn EKcN03n.
IyckaHTo Ha IbVraTeHa c3daBa mckpeHe.
NckpeheTo moKe da Bb3nIaMeHn HAMIPAuTe ce HaOKoI O3aJIIMn ra3Obe.
ToBa MoXe Da DoBeDe Do ekCnNo3n I noXap.
- Ako mma n3TnueHa Hn npirodeH nIn BteuHn ra3 nponaB nomueHneTo, He cTaptnaTe Dniratela.
He n3no3BaIte ropnBa 3a NaaIHO 3aIaJIbaHe NOd HauIraHe, 3aIoTO napTe IM ca 3aIaNITeJIH.

PPEyPPEXDEHNE
Ibratatele NTncyckat Bbrrpeoeh OKnc, KOIO e OTPOBEH ra3,663 MIMcN CzBrt.

BdmbaHeTo Ha BbIepeOHe OKc MoKe Da npuHn raeHe, npnaDbK nIn Cmpt.
- Cтатирашtenpa60TeCdbnrgaTeJIHaBbH.
He cstaptnaTe He paBoTeTe C Dniratela B 3aTboPeHo NomeeHne, dOpu npn OTbOepen Brpatu nn np030pU.

PNEyPPEKDEHNE

БьрзоTO OTTERJIHe Na NycKOBTo BbXe (OobateH yIap) Ie npuIbPna 3nJIPO pKaTa Bn KbM DnBraTeIa No-6bP3O, OTKoJIKOTo Bn MOKe Ta rOTdPbnHete.
TOBa MoXe Da npUHH CUYneH N KOCTn, FpaKtypN, KOHTy3nn HABXAbaHr.
Korato cTaptnipate DnBnraTeHn, n3TeRnete 6abHo bXkTo Ha cTapTepa, Dokato yCETnTE cbnpotmbneHne, a noce pR3KO dpbHnTe, 3a da n36erHte O6paTHnYdap.
-ИЗкlioуete BCЯКО BьншнооборудbaHe/3aДвиЖВаHo OT ДИгател,прди на ro CTapТирate.
ДиркнTO рпкачehNTe Кьм DBИгATEнmaшини eнemENTN KATO HOKOBe,пркIn,лебекn,зьбн Икелena,ЗадвЖВаши Верги n Дугri,Tрбba DA bБдТСИурноприкретени.

PNEyPPEKDEHNE

BbptTnTe Ce Yactn Morat Da Donpat NIm 3axBaHaT PbCe, KpaKa, Koca, 6bnKJIO NIM PpHAdneXHOCTN.
Mоже да се достиг themselves amnTyataи nlin cepno3H noHapahBahe.
Pa6oTeTe C DnBraTeJI npI NoCTaBeH 3aunTHn Kanaun.
-Дрьктурсetimeи Краката си далоч OT Вьртauthи ce actn.
- PnBp3BaIe TdJIrTe Kocn CbAJIte yKpaSeHnraTa.
He hocete no c6e cn wipoko oBneKno, BnCraun uHypoBe nIn Beu, KOnTo MoRaT da 6bDat 3axBaHaTn.

PNEyPEXKDEHNE

Pa6oteuite DnirateTei OTdIeT TOnnHa. Yactne Ha DnirateTeiTe, OocboHo Wymo3arLyuWnteIe, CTaBt NkLIOHTeJIHO ropeu.

Pnp dOnnp moKe da noJyUte cepno3Ho n3rapHe.

TOpMnTe OTnabu, KaTo JInCTa, TpeBn, XpactaIak N npyrn, Morat da ce 3anaJIaT.
OCTABETe 7yM03aRnyuTEnI, uINHDbpaHa DnBraTeI np6pata da ce OXJaIrT, ppei Da rN DOKOCBATE.
- OTCTpaHete HATpyuHaHTe OTJLOMKN OKOJU Wymo3aIyUWNTeJI N cJINHdbpa.
- MohtnpaIte n pOdIbpxkaIte B pa6oTHo CbCTOHNHe NcKporacnTeJI, npEi da m3PON3BaTe DVBaTeJIH a 3aJIeCEHn MeCTA, 3aTpeBENn PLOUIN, PLOUIN c XpactN I He6oPa6oTEHn MeCTA. LJIaTb KAIinOpHNn N3cCKBa TOBa (B Pa3dEe 4442 Ha KaIIINOpHNckn IpaBUNHk 3a O6IeCTBeHn pecypcn). Bb3MoxHO eDpyrN IaTn da IMAT NOIO6Hn 3aKOHn. FedePAJInHE T aKOHn ce npIlaRat Ha fpeDEpaIIHa TepITOPIA.

PNEyPPEXDEHNE
CnyauHIO nCKpeHe moKe da IOBeDe do NOxap NIN Nopa3raBaHe OT eJIeKtpuYeCKn TOK.
HeBONHO CTAPTnpaHMe MoKe da DOBepe Do 3axBaUaHe, TpaBMaTuHa amnyTaun Hn Do paHbAe.
Onachoct OT noxkap
IpeDn n3BbPwBaHe Ha NaCTpoiKn I nonpaBKn:
- Otkayete kaeba ha 3anaIteJHaTa Cbeu ng dpbXte daJeO Hea.
- O Tkauhe Te M nHyc-Knlemata Ha akymyIaTopa (cAmO npn DnIraTeN C eJeKtpuYeckn cTapTep).
- I3noI3BaIte cAmo IOxOJaUINHCTpymENTN.
He 3actonopraBaiTe IocTobIne CnCTemn C peryIinaata npjxHa, nIi C npyrn qactn, 3a da nobuIne o6oPOnTe Ha DbratEn. - Pe3epBnHte qactn Tp6Ba da 6bDat CbC cbto KAueCTBO n da CE MOHTnpaT B cBzata N03u7A, KAKTO opunHaHnTe qactn.
- He ydprrte maxobnka c uyk nIIN TBbpr nppeMET, 3aTOTo TOn MoKe da ce cTpoi no Bpeme Ha pa6ota.
PnH3npo6BaHe 3a NcKpa:
- I3noI3BaIte Oo6peH TIN TeCTep 3a CBeU.
He npabete npoBepka 3a nckpa npn n3BaDeHa 3aapanTeHa Cbeu.
Elenentnyynpablenya
CpaBHeTe NIOCTpaunTa 1 C BaAINa DnRAteN, 3a Da Ce 3anO3HaTe C pa3noJooXeHHeTo Ha pa3nInHNe EneMeHTn UynpaBHeHn.
A. Mapknupobka ha dBirataTeia Moen Tn Koid
B. 3anaJIteHa CbeU
C. Bb3dyeuenФnntTp
D. HbONoka3aTeN/OTBOp 3a HaJIbAHe Ha MaCIO
E. MacNeHФЛТьр
F. Побба ззTOЧВане Ha macJIoTO
G.ДатчИК 3a HANЯгHe Ha MacJNTo
H. IpeIpaIaIteI 3a npbctn / BbptTae cE ekpan
I. EneKtpnueckn cTapTeP
J. Pbyen CTapTeP (no onua)
K. Kap6ypatop
L.ИЗнуckeTeNeH KOJIeKTop
M. Помпа за подавае на горивOTO
N. ΦπΠ Tb 3a ropno (no onua)
O. OxnaIaNTeHa macIoTo(IIo ONua)
P. Ljymo3aInyuHTeN
Pa6ota
Bmectnmoct 3a maclo (hanpaBeTe cnpaBa B pa3JeTexHueckn daHHN)
Ppenopbkn 3a macnoto
3a nonyuaBaHe ha hai-dobpn Texnueckn nokaatenn npenopbUbaMe n3no3BaHTo Ha maCnata Ha Briggs & Stratton c rapaHmua n cepTnФKAT 3a kaueCTBO. DpyrB BcOKOKaYeCTBeHm Macla C Mneu npicaKn ca npEeMnBn, ako Ca KlaacmnpaHn 3a pa60THn peXmm SF, SG, SH, SJ nn No-BcOKn. Da he ce n3noN3bat CneuaHn do6abKn.
BbHnHTe TEmpeaTpyn ONpeDenr npabINHHB BnCKo3HTet Ha MacIto 3a DnBtateN. H3noJ3BaIte Ta6nIcaTa, 3a Da n36epete Hau-dO6pRn BnCKo3HTet 3a OyaKaBHnDmIaONH a BbHNHTe Tmemepatypy.
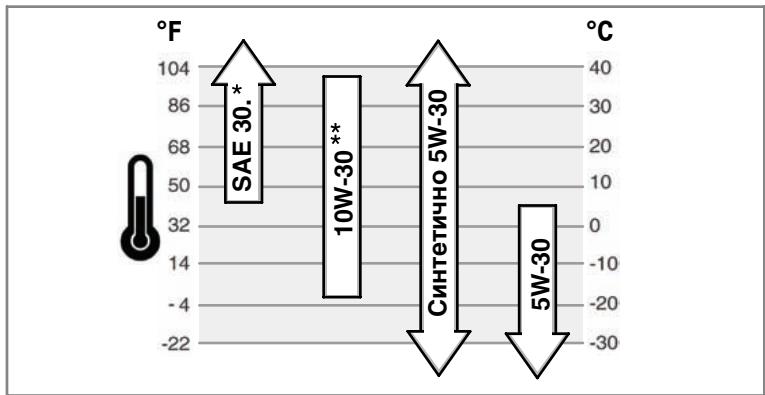
* Ako npn TemnepaTpyn no4 40^ (4^) ce n3non3ba macno SAE 30, toBa ue doBeDe do TpydNo cTaptnpaHe na Dbratela.
** Пит emtnepatypn ha80°F (27°C) Изнорьанeto ha macno 10 W-30 може д поши Консуmaцята ha macno. Поберразип сю често НИВОТо MY.
Kak ce npOBepraBa/haJIbBa macNo - Fmrypa

IpeiHaHbAe HnnpOBepBaHe Ha MacJIoTO
Pa3noJoxTe xOpn3oHTaJIHO dBVaTeJIa.
- Почистете мостOTО OKOJO OTbopa 3a HaJIbAhe Ha MACNo OT BCNUKNI OTJOMKN.
1. CbaIeTe HnBONoka3aTeTn 3a MacIoTO (A) n ro n36bPweTe C uNCT PnIaT (FInrpya 2).
2. HanbHIO BMbKHeTe HBNOkA3aTeJIra 3a rOpBOTO.
3. CbaleTe HNBONOKa3aTeIe I npOBepeTe HNBOTo Ha MacnOTo. To Tp6Ba Da 6bJe do MapKnPOBkata FULL (B) Ha HNBONOKa3aTeIe.
- Ane Hncko, Hanie Te BnHmATEHNO MacNo npe3 OTbopa 3a IIbHHe (C). He npenbIbAte. Cne HnBaHe Na Ma McNo, NcKaaiTe eHa MNHyTa I nOcNe naK npOBepete HNBOTo My.
- HanbHOBmBkHete HBNO1OKa3aTeJIA 3a rOpNBOTO.
HaIrahe Ha MacIoto
AKO HNBO T O H M A C I O E M H O O H N C K E D H J A T U H K 3A H A J R A H E (A K O I M A T A K B), INI N CE CNPE D B N I R A T E N, INI N CE 3A E D E C T B A apaMehOTo My yCTPOI CTBO. AKO TO BA T C L Y N, C N P ETE D B N I R A T E N I N P O B E P E T E H N B O T O H A M C I O T O H C H N B O N O K A 3A T E N J.
Ako HIBOTO ha macnoTo e noI mapknpoBkata ADD, IobabTe macNo, doKato doCTnHRe MapknpoBkata FULL. CtapnpaIte DniratJIe n npOBepTe HaJraHeto, npedn da npOdbJnxITE da pa6OTne.
Ako HnBOTO Ha macnoTo e mexy MapknpoBknte ADD n FULL he cTaptnaTe Dniratena. O6bHete Ce kblm YnbJHOMoUe npedctabuTe Ha Briggs & Stratton, 3a da OTCTpaHnte npOBeMa c HanraHaTe Ho MacNoTO.
ПpenopькизогрИВОТо
Topnboto Tp6ba Da OTROBAPn Ha CneHnTe N3NCKBaHHa:
- YnCT, npecen, 6e3oJOBen 6eH3nH.
MIMIMAMINO OKTaHOBO YINCSIO OT 87/87 AKI (91 RON).3a roJMaHaDmOpcka BnCOUHa, BIXTe NO-DOJy. - Бенин сбс сьдьрхаиме на не поеве от 10% etahonl (бенистул) улдо 15% MTBE (tpn-metnil 6ytniob etep) e npneemnib.
BHMHAHVE: He nIIOON3aIte HeOIO6peHn 6e3HNiKo E85. He cMECBaIte 6e3NHaC mCaNO, He ro MoINΦuIpaTe 3a paObaTc aIANTepHnatNBn rOpBa. ToBa Ie IOBpeDn KOMIOENTHTe Na DBInaTeNa I ne aHyInpra rapaHnIa My.
3a da npednanaTe ropuBnata CnCTema Ot obpa3yBaHe Ha cmOJI,do6aBeTe cTaeH3aTOB HApBaTe cnPabKa B CKnadnpaHe. TOpBaTa He ca eHNb CbU. Ako HAcTbnI npo6Ie McC CTaPtnpAHeTo IIN TeXHmEeCKNte NOKa3aTeJIM, CMeHETe DOCTaBnIuNTe IIN MapKnte Ha rOpBTO.HactoIurT DBrAteJIM acepHfNkAT 3a pa6Ota C 6EHsN.CnCTeMaTAt 3a 606a C bpeDnHe EMcsn 3a To3n DbrAten e EM (MoDnFnkauNHa DBrAteJInTe).
TolmaHaMopckaBncouHa
Принадморск виcoуни над 5000 Фута (1524 Метра), 6eнзин C минимално OKтаново чсno 85/85 AKI (89 RON), e пиемлв. 3а д остах Сьвмесгимс m3ИСКВАИТА за ИНБОТ на EMICNITE, ce habага Нстpoиka на ДВИТЕРЯВ CBOTВETCTBVE C roлмATA нанморск виcoуна. Pa6obota 6e3 takaba Нстpoиka ще doBoDEdo NOHЖаве на Тхнчеснite ПOKAZATEпн LOHIMUHA Na copINBO u bELHUNH BpeDN Hapabete cnpabka рр NtblHOMOUIEN ppeCSTaBHTEN Ha Briggs & Stratton 3a cbeDhen OTHOCHO HACPoRKaTа 3a roLMAннморSCA виcoуни.
He ce npenopbya pa60ta Ha dBnraTeJc perynnapaKOMPJIeKT 3a roJMa Hndmorpcka BncoUHa npi BncoUHn eo2500 cyTa (762 metpa).
Kak ce haJInBa macNo - FInypa

PPEyPPEXDEHNE

BeH3nHbT n HerOBnTe napu ca n3KnIOHTeJIHO orHeonacn n 136yXnBn.
Ioxkap IIN B3PbB MOraT da npuHrT cepno3n ObrapHHN IIN cMbpt.
Ppi DJIINBaHe Ha rOpNBo
- ɪЗклоче Двигатели ng octabete da ce oxlaшин haŋ-maɪko 2 MnHytn,прдида CBaJIte KanaykaTaHa pe3epBoapa 3a roPINO.
- Пьнete pe3epboapa 3a ropuho ha OTkpnto nIn B do6pe BeHTnnpaH oNOMEseHne.
He npenbIbnapeeepboapa 3a ronpBO. IbnheTe ro np6bn3nHIO 1,5 Hua (38 mm) no-HnCKO OT ropnna p6 Ha rplOBnHaT, 3a da n03BOnTe pa3uipene Ha ropBOTo.
ДрьжтбенинадауOTNCKP,OTKpTNПлambu,CINHANHnIamn,TOIIHnAnDpyr3anaJIteHnI3TOHnU. - PpOBePbBaIe YecTo rOpBONpOBoJnte, pe3epBoapa, kanaKata n cBeINHeHnTa 3a NyKHaTnHn TeOBe. 3aMeHnTe rN aKO e Heo6xOdmo.
- Ako ropmboto ce pa3nee, n3aKaTe dokato To ce n3napi, npedn da cTapnpate Dbratena.
1.Почистете пострданьо Okono калачкata на pezeервараза за рогив оtmpbсotи и насноявань.Сваши Калчкata (A) (Фигура 3). - HanbIhHe pe3epBoaapa 3a ronpBO (B) c6eH3nH. 3a da no3boInTe pa3uipHe nhe 6eH3nHa, He nbJIhETe na dOJHaTa OCHOBa Ha TbpIOBnHaTa 3a HAnBaHe Ha ronpBO (C).
- Ioctabete o6paTHo kanaKaKata.

PNEyPPEKDEHNE
БьрзоTO npnterJIHHe Na NycKOBTo BxJxe (ObpaTeH ydap) npnIbPnBa pBkata KbM DBNrAteJINo-6b3O, OTKoNkoT BoE MoKTe DaЯ OTdpHnHete.
TOBa MoKe Da npuHHn CUYeHn KOCTn, FpaKtypn, KOHTy3nn HABXBAHn.
- PnCtApTnepaHa NdBnATeJIa, n3TeRnTe BnHmATEIHO BbXeTo Ha pUHNia CTapTep,doKcTHe cNpOTnBHeNe, a CneT ToBa dPbHnTe P3KO, 3a da n36Berhe 06patTHy ydap.


Iopxap nIbB3pNB MOraT da npuHnHT cepno3Hn obrapnna IIN Cmbpt.
PnCstapTnpaHe Ha DBrTaTeJr
- YbepeTe ce, Ye 3anaJInteHATA cBeue, WymO3aIyUWNTeHЯ, KanaYcATA ha pe3epBoapa 3a ropmbn Bb3dUShnfa nTbp ca Ha MCTOTo Cn n Ca o6e3OnacEHN.
He pa3BbptaTe DnIraTeN C n3BaIeHa 3aIaJIteJIHcBecU. - Ako DBuRatEnT Ce 3aDaBn, NOCTabete CmyKaHa (aKo NMa TaKbB) Ha no3Nua open/ru, npuDnBxKeTe pUHaTa ra3 (aKo NMa TaKaba) Ha no3Nu"fast" pa3BbPTaIte, DOKATO DBuRatEnT CTapTupa.


IPEDYIPPEXDEHNE
Kak da ce 6cbnykBa Bb3dywnnHnФnIITbp - FnIpya 11

IPEDYIPPEXDEHNE

BéH3nHbT n HéroBnTe napi ca n3KJIIOuHTeIHO orHeonaChn n 136yXnBn.

Ioxkap uIN B3pNB MOraT da npuHnT cepNo3Hn ObrapnHn uIN Cmpt.
- HnKora He cIstapTpaIte n He pa6oTe T C DnIraTeI npI OTcPaHEn KOMIIeKT Ha Bb3duHnIaФmITbP.
BHMMAHME: He n3n03BaIte CbCTeH Bb3dYx IIN pa3TbOpNTeI, 3a da noNCTBaTeФmIbpa. CbCTeHnIAT Bb3dYx MOKe DA NOBpeI dΦnITbPa, a pa3TbOpNTeIro pa3TbApIr.
Hanpabete cnpaBka OTHOCHO n3nCKBaHnraTa 3a cepBn3HO o6cnyXbaHe B KapTara 3a texHHueCKOTO o6cnyXbaHe.
- OTbOpTe ФИКСATOPINTE (A)иCBANe TE KANAKA (B).BnKTe ΦIgrypa 11.
- CbaIeTe raIkaTa (D) u ckObaTa (E).
- Cbane Bb3dyuHnA pInTbp(F).
4.AKo nMa npednntbp (G),CBanete ro OT Bb3duHnA qnTbp. - 3a da OTCTpaHNTe HACNOBaHnHTa, BHIMATEHNO NOyKBaIte Bb3dyuHnH FInTbp Bbpy TBbpda NOBbpXHOCT. Ako e npEkaJIeHO 3aMbpcEH, CMeHeTe ro C HOB FInTbp.
-
Поминту п dedфпгьра ввь boDEн pa3TBOP на поисвац npenapat. Octabete ro doбpeда се n3cuи на Вьзdyx. He cma3BaIte п dedфпгьра.
-
MoHTnpaIte n3CyueHn npedcunTbp KbM Bb3dyuHnH pInTbp.
- MoHTnpaIe Bb3dUwHnI qunIb np Iro 3akpenete cbc ckobata n raikata.
- MoNTnpaIte n 3aTeHete Kanaka.
Kak ce cmeHa qnIbpa 3a rOpNBo - Fnrpya 12

NPEDYNPEXKDEHNE


BeH3nHbT N HEROBNTe napu ca n3KJIIOHTeJIHO orHeonacn N 36yXnBn.
Ioxkap uIN B3pNB MOraT da npuHnHT cepno3Hn O6rapHHN uIN CMbpt.
-Дьжteбeнина далуOTИСКРи,OTkpTnПлambuzi,CrHaNnIЯMnI,TOIIHa nДpyr3aIaJIITENHnI3TOUHnI.
- PpOBePbBaIe YecTo rOpBnPoBoOAnTe,pe3epBoapa,KanauKaTa n CbeDInHeHnra 3a NyKHaTnHn TeOBe.3aMeHnTe n aKO e Heo6xOdmo
- PpEi nCMHa HaΦIITbpa 3a roPnBO, I3TOUeTe pe3epBoap a 3a roPnBO nIIN 3aTbOpTe KpaHcETo 3a IOnDaBaHe Ha roPnBO.
- Pe3epBnHTe qactn Tp6Ba da bdaT cbc CbIOTO KaueCTBO n da CE MOHTnPAT B CbUaT a N03uH, KAKTO opunHaHnHTe qactn.
- Ako ropmboto ce pa3nee, n3aKaaiTe dokato To ce n3napi, npedn da cTaptnape Dbratena.
1. Ппеди сма на за ра заюв (A, Фгура 12), посят bь, n3toчete pe3eрьогараза за ровото пллсторе канчeto за поаване на ровоть.В npOTINBEN CNYaI, ровото можда пoteчe, сьдадыкOn onachocT OT noxapmikn EKCLN03N.
2.Ииэлбайе плоски КLEЕпд за ринсн electпл actinite (B) Ha ckobite (C), cneToBa пьзhte сбokntе Habtpa nO tФинтba pa 3a roрвLo.усуete И nI3terneteRopBoPONBODITE (D) OtФинтba ta 3ra PovIo.
3. Поберете chopиьоровдente 3а пукотини плп Тechов.Заменг.Tа ке Heo6xoДИМо.
4. CmeHeTe Tbpa 3a roPnBO cOpunHaJIeH pe3epBeH Tb p
5. 3akpenete ronpBONPOBOJTE cbc ckO6n, kaKTo e noka3aHO.
3a6eJexKa: DInrataTeIte, O6OpyDbAHn CbC pe3epBoap 3a rOpNBO, MOHTnpaB B 3aBoJa, MoKe Ja ImaФinTbPna ZeIka 3a rOpNBOTo (E), BInKTe FInrupa 3.
Kak ce nouchta Bb3dyuho-OxlaunHeHaTa
CnCTema - Hnrypa 13

PNEyPPEKDEHNE


Pa60teuHtne DBnIATENOTdJIaTOnLIHa.4actHte Ha DBnIATEJInTe,OCoBHeO wUmo3arLyuHTe,CTaBt N3KlIOHTeNHO ropeu.
PnD onOpM oMeX da NOnyHTe cepNo3HO m3rApHe.
TOpHmTe OTnabTu, KaTo IInCTa, TpeBn, XpactaIak N dpyrN, MoRaT da ce 3anaJIaT.
OCTaBeTe 7yM03aRn7uNtTeIa, 7nHbpaHa DnBraTeIa n pe6paTa da ce oxlaJrT, npEi Da rN DOKOCBaTe.
- OtctpaHETe HATpynAHNTe OTNOMKIN OKOLO Wymo3aIyWNTeJI NcIIINHbpa.
BHMAHHE: He n3non3BaIte BOa, 3a da noocntBaTe dBiratien. BodaTMOKe da 3Ambpcn TropNBATA CNTTEM.A3non3BaiTe YcK TaCyn PnAT, 3a da ro noocntTE.ToBa e DBIRAT CB3dyuH OXnaJxDAHe. HeNCTOTnNE u HACLOBAHnTA MoT a Da ORpAHuAT Bb3duHINOTOK N da pnnHrT pnerpaHeto My, KOeTO BOIN DO HAAMARHA HE NOKa3ATENI E IPODblNXITENHOCTTA H XJIBOTMAY.
3nnon3bavte yeTka nIin cyu IaT, 3a da OTCTpaHnte HacnoBaHnraT a TpeJa3nteHa npbCTne/BbPrtuaCe ekpah (A). Pa3ete NcCTIn NoCTobata CnCTema, npyKHHnte u npabLeHnTa (B). P3aTe npocTpaHCTBOTo OKoNo n3ad yMoO3aRnuHnTe (C) Cbo6oJHO oBcKaKbN 3anaJIIMn HacNoBaHnna (Фиура 13). V6eTe ce, ye pIaNtHe 3a oxJaXdAne Ha macNoTO (D) ca noHCTeHn O T 3ambpcaBaHe n HacNoBaHn.
Cklaipahe

PNEyPEXKDEHNE
BéH3nHbT n HéroBnTe napi ca n3KJIIOuHTeIHO orHeonaChn n 36vXJIbN.
Iopxap nnn B3pmb MORaT da npnHnT cepno3n o6rapnna nn CmbpT.
Korato cKJaIupaTe 6eH3nH nJn o6OpyDbaHe c rOpNBo B pe3epBoapa
CknaIpaIe TaIaIeO Tneu,NeuK,BOoHArpeBaTeN IIN npyIn eEKeTpueckn npin6Opn, KOnTO IMAT CnIbNn IaMnn IN npyIn 3aIaNITeNn N3TOHnU, 3aIoTO TE MOrTa DA Bb3nIaMeHrT 6eH3nHOBtme Napr.
TopuBHa CnCTema
TropBOTO octapBa CneIcknaIipaHe 3a noBee O T 30 dH. OctapAnoto ropnBO BoNIO do 6Opa3aYBaHe Ha KcEJIHHN I CMONECTN OTJNOKeHN B TropNBATA CmCTeMa IINI NO OCHOBHTe AuctHa KapbypaToPA. 3a da 3aana3te RopBTO CBEXO, n3noJ3BaIte CTa6nH3aTopa 3a ropBTO FRESH START Ha Briggs & Stratton, KoITo e DoCTbIeH NOd foPMAtA TeUHa Do6abKa IINI fKnKO BnDabaHe.
Ako ce do6abra cta6nln3aTopa 3a ropnbOTc bflacHO IHCTpykunTe, Hma Hyjda 6eb3nHbT da ce n3TOyBa. Octabete DbrnateIa Da pa6Otn OkONo 2MHyTN, 3a da cnpkynipa cta6nln3aTopb T B ropNBHata CnCTema. Toraba DbrnateIa I ropnbOTo MORat Da ce cbxpaHbAT Do 24 Meeca.
Ako 6eH3nHbT B DnBnraTeJI He e 6nI o6pa60TaBn CbC CTa6nI3aTOp, TOn TpR6Ba da 6bJe n3ToChE N DoXoDnI 3a cEnTa cBd. Octabe T DnBnreT Ja pa6OIT, DOKATO cnpe npaDi N3ePrBaHe Na ropnBOTo. 3a Da nOdaPjxale CBxeCTT ha RopnBOTo npri CkNAdnpaHETo My, npenOpB'baMe n3NoI3BaHeTo Ha cStaN3atOp.
MacnotoHaDnrgateTna
ДOKATO DBNATeTЯ BCE OUe TOnbI CmEHETe MacJOTO.
OTkpmbaHe n OTcTaHaBaHe Ha Hen3npaBHOCTN
Hyckaete n ce ot nmoou? Iocetete BRIGGSandSTRATTON.COM nnc ce obaede Ta 1-800-233-3723.
TexHnueckn daHHN
Pries jjungiant varikli
Extended Life Series™, I/C®, Intek™ I/C®, Intek™ Pro
Snow Series MAX™ z tulejaŽeliwna Dura-Bore™
Benzina s升值 and the euro is expected to rise by 1% in 2014.
Cand alimentati cu combustibil
O6pa3OBaHne NCKpbIMoKET BbI3BaTbBOcPnAmHeHne roIpOuNXra3OB.
3To MoXeT npBcEtn K B3pbIbY nIOxApy.
He 3anyckaIte DnIraTeIb B TOM MeCTe, rIe npOnCxOJIT yTeHka npnpOHO rnn CxNKeHHOro ra3a.
He nCnoB3yIte npckOBbie xNdkoCTn B aep03OJbHO ynaKOBKe, TaK KaK IN Napbl orHeonacHbI.

OCTOPOXHO
BbIXIONHbIe ra3bl cOdePkaT OKncb yrIepoda - 6ecuBeTHbI n He HMeHOUs 3anaXa IdoBVtBu r3.
Bbixhne okncy yrnpoda (yraphoro ra3a) moxet Bbl3BaTb pBOTy, notepio co3HaHn nn daKe cmeptb.
3anyckaite n 3KcnpyaTnpyIte DnBraTeIb BHe NOMEueHna.
He 3anyckaite DnirateIb B nomeeHn daJpe npit OKpbItbIX Okhax INDBepx.

OCTOPOXHO
- 3NeKtpnueckm cTapep: NOBepHnTe pyky BbIKJIOaTeJIr 3NeKtpnueckOrO cTapep (D) B noLoKeHne ON (Bkn)/START (Iyck).
Ппмеанно:ЕсдИнДВИРATEЛБеЗларуСКАТСЯСЕТХТРEXNONБТOK,TONOCETHTe, no��anyu'ta,Web-сай:BRIGGSANDSTRATTON.COM ИИ NOSTBOHHTe NO teleponу:1-800-233-3723(bCUHA).
Kakdbie 8 yacob pa6oTbI nn exeJeHBeBHO
- IpoBepka ypoBHa macna B dBiratene
Ochntka 30hbl BOKpy rnyuHTeIa n opraHOB ynpabneHn
Kaxdbie 100 yacob paobtbi nn exeroaHO
OuNTka BO3dUshHoro dNlbTpata
OuNTka npedBaupntelbHoro OouCTnTeJIa (ecnn nMeETcra)
3aMeHaMaCnaNΦnIbTpα
3ameha Cbeu 3axnraHn
- PpOBepka rJyUHTeJI N uCKPOyIOBNTeJI
- Поверка 3а3ора Кларанов**
Kaxkblie 400 yacob pa6oIbI uJIN exjeroIHO
3aMeHa BO3dUshHOro 1nJIbTpa
3aMeHHTe TOIINBHybI cHbTp
OuNTKa CnCTembl BO3dyuHOrO OXJaXdEHHa
OuNTka PnlaCTH MaCLHaHOro paDnAtopa*
- B ycnobnax CnblhOJ 3aIbIeHNOCTn nn HAnuNBA Bo3dyXe qactueK copa, OuchTky CneDyET BbInONHrTb 6oJIee qacto.
** He tpe6yETc, noka he 6ydyT 3ameuHbI npo6nmbi pa60Tb I DBIrataTeHa.
PerylnpoBka Kap6Iopatopa
HkoIgHa He BbIOnIHnIe peryNIpOBKn Ha Kap6IpaTope. Kap6IpaTOp
npEBApNTBnHO tOrpeyInpOBOAH n 3a2oJe-n3rTOBnTeJe dnn 3epKcTNBHO pa0BoTbl
dJI 60JIbUnHCTBa YcNOBn EKcPnlyatauIm. PnI Heo6XoDMocTn peryNIpOBKn
6obpaauTeCb, noKaanycta, K yOJIoHOMOeHHOMy DInnepy KomnaHm Briggs & Stratton
dJI npOBeDEHn TexHnecKOro 06CnyXBnA.H.
3aMeHHTeMacJHbIΦnJIbTp (ecJn yCTaHOBJIeH)
HekotopbIe moJenMoOpyDobAHbI MaCJIbHbIM fNJIbTpOM. IaI INHTepBaIbO 3aMeHbI
6paTInTeCb K Tabnue OcLnyKuBaHne.
- CneIte macno n3 dBVaTeJr. Cm. pa3JeN CInb Macna.
- CHINMITE MaCJIHbI ΦJIbTp (C) n yTNIIN3IpyIe COOTBETCTBYIOUM O6pa3OM. Cm. PnC. 9.
3.Пелетусановков_HOBOROMacnHOrOФильтраHemHOrOcmaЖьTe npOKnaKу MacnHOrOФильтра CBEXIMYCTbIMMACIOM. - YctaHOBtme MacJIHbIe IInIbTp, 3aTnHyB eRO pyKoT Tak, YTO6bI npOKnaJa cIInIbTpcaOpNKaIacAbcS aadAnTePOM MacJrHOrO IInIbTpau 3aTeM 3aTnHITe fInIbTp eHe Ha 1/2 nn 3/4 o6oPoTa.
5.Доелte macno.Cm.pa3dEлДоивka macna. - 3anyctnte Dniratentb n daite emy npa6oTaB. IIO mepe nporpeBa DniratentnpoBeprTe Ha OTCYCTBne yTEeK.
- OctahOBITE DnurateIb I npOBepe Te ypOBeHb MaCna. OH DoJIKeH 6bITb Ha OTMeTke FULL (3aONHeHo) uyna.
Dobabntb MacNo
- YctaHOBtE DnBaTaeNb B Trop3OHTaJIbHoe NIOJOxHeHne.
OuHCTnTE 30Hy MACNo3aJIbHOrO OTBepCTnA OT JIO6oMycopa. - CMOTPnTE pa3dEJI TexHueckne xapaKtepncTkn OTHOCITeIbHO KOINcHCTBa Macna.
- BbItaunite uyn dlya n3mepenhy ypoBna macna (D) n o6oTpne ero YnCTOn TpnoKo (Pnc. 10).
- Меленно 3алвайе MacNo чepe3 MacNoHajNHyIO roPNObHy (E). He nepenolnHaTe. Пocne doJIbBkIM MaCna loDOKdTe OdHy MmHyTu n 3aTeM npOBeBte YpOBeHb MaCna.
- BCTaBbTe I 3aTahHInTe uyn IJn IImpeHnI yPOBnI macJa.
4.ИЗБЕКITE uynиnpobepeTe ypoBeHb macla.OHdoJxeh6bITbHaOTMeTKeFULL (3aONHeHO) (F) uyna. - BCTaBbTe n 3aTaNHTe uyn dIy I3MepeHn ypOBHa macna.
Kak BbINOJIHHTb TexHnueCKoe 06cIyJXnBaHne BO3dUshoro cnIbTpA-Pnc. 11

OCTOPOXHO

Бeнзи и erо napbyчpe3BbUaHNo orHeonacHbI n B3pbIBOONacHbI.
BocPnAmeHne nNn B3pbIB MOryT npNBecTN K CnJIbHbIM OXORAM nNn
cMeptelbHomY nCXOy.
HnkOrJa He 3aynckaIte N He 3KcnIyauNpyTe DnurateIb 6e3 yCTaHOBneHHoro y3na BO3dyXooHnCTnTeTEn IIN B03dyuHoro qnIbTpTa.
BHMMAHME: He nCnObl3yIe CxAbyB IO3dYH IIN pACTBOpHTeI IaI YIcTKn ФИЛТра. CxAbyB IO3dYMOKET NOBpeDITbФINlbTp, a pACTBOpHTeIM MOrTy erO pactBOpNTb.
Tpe6oBaHnK OcbLyXKBaHnIO CMOpTne B Ta6Iuue texHnueckoro 0cbLyXbHaHn.
- OTKpoIte pIkuCaTOpbl (A) n CHIMMTe KpbIuKy (B). Cm. Pnc. 11.
- Ckpynte raiky (D) n cHmnte depkaTeIb (E).
- CHIMMTE BOZdyuHbI qnIbTp (F).
4.ИЗБЕКИТЕи3 BOЗДУSHОТФИЛБТРапгдВарNTeNBHбочNTeNB(G),ecл.TAKOBО IMEETCJ.
5.Диу ydaHnH copa octopoXHo nOCTyUHTe BO3dyuHbIM fNtBpOM IO TBepdo NOBepxHOCTNo.EcII N0B3dyuHbI fNtBtPO OHeH cINbHO 3aqr3HEn,TO 3aMeHNTe Ero Ha HOBII. - BbIMoTe IpeDbapnteBbHbO HcNtTeB b BOe C XnKIM MOIOUHM CpECTBOM. 3aTeM NIOHocTbI npocuSyIe EHOaKpITOM Bo3dXe. He donyckaetc MCA3bIBatMbACmON IpeDbapnteBbHbO OChTtTeBb.
- YctaHOBInTe npocyuweHbI ppeDbapnteHbI OCHNTeNB B 03dyuHbI qnlbTp.
- YctaHOBInTe Ha MeCTO BO3dUshbI ΦnIbTp n 3aKpeINTe erO dePxATEm I raIKoI.
- YctaHOBIne 3aФИKcIpyIte KpbIshKy.

OCTOPOXHO
Benzn ero napbI ype3BbIaHIO orHeonacHbI n B3pbIBOONacHbI.
BocnnaMeHne Hn B3pbB MOryT npNBecTu K CnIbHbIM OXoRam nn CmeptelbHomU nCxOy.
B6n3n6eH3nHa n B 30He ero nCnapeHm He oJxHo 6bItb NCKpeHn, OTKpbIToRTO pIaMeHn, ropeNok, HaraBeTaTeen in DpyuXn MCTOHNKOB BocnPnAmehn.
Peynnpno npOBepnTe TOnnBONpOBoD,6ak, npO6ky nΦHTnHn Ha HnUne Tpeunn yteuek. Pn Heo6xOIMOCtN, 3aMeHnTe Detan.
- Пешд заменю толлвого Фпьта, сеite толлвови 3 толлвого бака плзakpoite кран подач толлва.
3aIacHbIe qactn IOnKHbI 6bIT nIeHTNcHbIMn yCTaHaBnBaTbCra Ha To Xe CaMOe MecTo, YTO INepBOHaCaHbIe DetaII.
B cnyuae npolnBa tonlmba,doxkntecb ero noHoro nCnapenra,npexde yem 3anyctntb Dbratelb.
1. Пелд заменю толиного Фпьта (A, Puc. 12), ecmн OH yctahOBнeH, cneite ToTOnIbOи толиного baka Илз akpoITE кран почд� толинba.В ротимбOM ClyuacheToNIOBMO MOKET BblntlbcR n pmbecTe K NOXAPy INI INB3pbBy.
2. IcnoNb3yIe IIOCKOBy6Ubl IaR cXaTnB BbCTynOB (B) Ha xOMyTaX (C), 3aTeM CdbHbTe XoMYbTB CTOpOHy OT TOnJIbHOrO QInbTpA. CkpyTtne n CTAnHtE TOnJIbHbIe naTpy6Kn (D) C tOnJIbHOrO qInbTpA.
3. ПюоверьтToTOnIINBbIe ЛINHmИ y6eДNTecb B OTCyTCTBn TpeuH nIи yTeueK.При Heo6xOdNMOCTn,ЗamEHnTE.
4. 3amehnte TOIINBHyI ΦnIbTp Ha opunHaIbHbI 3anaCHOI nIbTp.
5. 3akpeHnTe TOpINBHeI JInHn Ipn NMOU XOMyTOB, KaK nOKa3aHO Ha pncyHKe.
KaBbINOJIHHTb OUHCTKy CnCTeMbI BO3dUshoro
OxJaXdEHH-PnC. 13

OCTOPOXHO

Bo BpempaobtIbBnraTeIN BbIeJIaOT TEnNo. DeTANI DnBaTeJIa, BOcOBeHNOCTn IJyUnTeN, CTaHOBAtcOueHb rOpAIMN.
- General Information
- Date of purchase:
- Engine model:
- Engine Power Rating Information
- Operator Safety
- SAFETY AND CONTROL SYMBOLS
- WARNING
- When Adding Fuel
- When Starting Engine
- When Operating Equipment
- When Changing Oil
- When Transporting Equipment
- When Storing Gasoline Or Equipment With Fuel In Tank
- Before performing adjustments or repairs:
- When testing for spark:
- Features and Controls
- Operation
- Oil Recommendations
- How To Check/Add Oil - Figure ②
- Before adding or checking the oil
- Oil Pressure
- Fuel Recommendations
- High Altitude
- How To Add Fuel - Figure 3
- How To Start The Engine - Figure 4
- How To Stop The Engine - Figure 4
- Maintenance
- Emissions Control
- Maintenance Chart
- First 5 Hours
- Every 8 Hours or Daily
- Every 100 Hours or Annually
- Every 400 Hours or Annually
- Carburetor Adjustment
- How To Replace The Spark Plug - Figure 5
- Inspect Muffler And Spark Arrester - Figure 6
- How To Change The Oil - Figure 7 8 9 10
- Remove Oil
- Change The Oil Filter (if equipped)
- Add Oil
- How To Service The Air Filter - Figure 11
- How To Replace The Fuel Filter - Figure 12
- How To Clean The Air Cooling System - Figure 13
- Storage
- Fuel System
- Engine Oil
- Troubleshooting
- Specifications
- LIMITED WARRANTY
- About Your Warranty
- Briggs & Stratton Corporation (B&S), the California Air Resources Board (CARB) and the United States Environmental Protection Agency (U.S. EPA) Emissions Control System Warranty Statement (Owner's Defect Warranty Rights and Obligations)
- California, United States and Canada Emissions Control Defects Warranty Statement
- Briggs & Stratton Emissions Control Defects Warranty Coverage
- Owner's Warranty Responsibilities
- Briggs & Stratton Emissions Control Defects Warranty Provisions
- Warranted Parts
- b. Air Induction System
- c. Ignition System
- d. Catalyst System
- e. Miscellaneous Items Used in Above Systems
- Length of Coverage
- No Charge
- Claims and Coverage Exclusions
- Maintenance
- Consequential Coverage
- Look For Relevant Emissions Durability Period and Air Index Information On Your Engine Emissions Label
- Moderate:
- Intermediate:
- Extended:
- 06nCbeHn
- HOpMaun 3a HOMHaJIHaTa MOUHOCT Ha DBVaTeJIte
- Texnka 3a 6e3oNaChOCT Ha onepaTopa
- CIMBOJN 3A BE3OJANCHOCT N UYPABJIEHNE
- PNEUINPEKDEHNE
- PPEyPExEHE
- PndoJmbaHeHaTropnBO
- Pn cTaptnpahe Ha dBmraTeJIa
- Ppi pa6oTea MaunHa
- Korato cmeHbATE macnoto
- PPEyPPEXDEHNE
- PNEyPPEKDEHNE
- PNEyPEXKDEHNE
- PNEyPPEXDEHNE
- IpeDn n3BbPwBaHe Ha NaCTpoiKn I nonpaBKn:
- PnH3npo6BaHe 3a NcKpa:
- Elenentnyynpablenya
- Pa6ota
- Ppenopbkn 3a macnoto
- Kak ce npOBepraBa/haJIbBa macNo - Fmrypa
- IpeiHaHbAe HnnpOBepBaHe Ha MacJIoTO
- HaIrahe Ha MacIoto
- ПpenopькизогрИВОТо
- Topnboto Tp6ba Da OTROBAPn Ha CneHnTe N3NCKBaHHa:
- TolmaHaMopckaBncouHa
- Kak ce haJInBa macNo - FInypa
- Ppi DJIINBaHe Ha rOpNBo
- PnCstapTnpaHe Ha DBrTaTeJr
- IPEDYIPPEXDEHNE
- Kak da ce 6cbnykBa Bb3dywnnHnФnIITbp - FnIpya 11
- Kak ce cmeHa qnIbpa 3a rOpNBo - Fnrpya 12
- NPEDYNPEXKDEHNE
- Kak ce nouchta Bb3dyuho-OxlaunHeHaTa
- CnCTema - Hnrypa 13
- Cklaipahe
- Korato cKJaIupaTe 6eH3nH nJn o6OpyDbaHe c rOpNBo B pe3epBoapa
- TopuBHa CnCTema
- MacnotoHaDnrgateTna
- OTkpmbaHe n OTcTaHaBaHe Ha Hen3npaBHOCTN
- TexHnueckn daHHN
- Pries jjungiant varikli
- Cand alimentati cu combustibil
- OCTOPOXHO
- Kakdbie 8 yacob pa6oTbI nn exeJeHBeBHO
- Kaxdbie 100 yacob paobtbi nn exeroaHO
- Kaxkblie 400 yacob pa6oIbI uJIN exjeroIHO
- PerylnpoBka Kap6Iopatopa
- 3aMeHHTeMacJHbIΦnJIbTp (ecJn yCTaHOBJIeH)
- Dobabntb MacNo
- Kak BbINOJIHHTb TexHnueCKoe 06cIyJXnBaHne BO3dUshoro cnIbTpA-Pnc. 11
- KaBbINOJIHHTb OUHCTKy CnCTeMbI BO3dUshoro
Brand : BRIGGS & STRATTON
Model : BRIGGS & STRATTON 303700
Category : Engine