
BRIGGS & STRATTON 117400 - Gasoline engine BRIGGS & STRATTON - Free user manual and instructions
Find the device manual for free BRIGGS & STRATTON 117400 BRIGGS & STRATTON in PDF.
| Product Type | 4-stroke gasoline engine |
| Brand | Briggs & Stratton |
| Model | 117400 (Vanguard series) |
| Maximum power | Approximately 6.5 hp (at 3600 rpm) |
| Maximum torque | Approximately 13.5 Nm (at 3060 rpm) |
| Displacement | 11.11 cu in (182 cm³) |
| Bore | 68 mm |
| Stroke | 50 mm |
| Oil capacity | 0.65 to 0.71 L (22-24 oz) |
| Spark plug gap | 0.76 mm (0.030 in) |
| Spark plug tightening torque | 20 Nm (180 lb·in) |
| Intake valve clearance | 0.05 to 0.10 mm (0.002-0.004 in) |
| Exhaust valve clearance | 0.05 to 0.10 mm (0.002-0.004 in) |
| Armature air gap | 0.30 to 0.51 mm (0.012-0.020 in) |
| Fuel type | Unleaded gasoline 87 octane min. |
| Cooling | Air |
| Starting | Recoil starter (electric option) |
| Weight (dry) | Approximately 12 kg (estimated) |
| Maintenance | Oil change every 50 h, air filter every 25 h |
| Spare parts | Available from authorized Briggs & Stratton dealers |
Frequently Asked Questions - BRIGGS & STRATTON 117400 BRIGGS & STRATTON
User questions about BRIGGS & STRATTON 117400 BRIGGS & STRATTON
0 question about this device. Answer the ones you know or ask your own.
Ask a new question about this device
Download the instructions for your Gasoline engine in PDF format for free! Find your manual BRIGGS & STRATTON 117400 - BRIGGS & STRATTON and take your electronic device back in hand. On this page are published all the documents necessary for the use of your device. BRIGGS & STRATTON 117400 by BRIGGS & STRATTON.
USER MANUAL BRIGGS & STRATTON 117400 BRIGGS & STRATTON
Briggs & Stratton is a registered trademark
of Briggs & Stratton Corporation
© 2009 Briggs & Stratton Corporation,
Milwaukee, WI, USA. All rights reserved.
Form No. 278407EST A
General Information
For replacement parts or technical assistance, record below the engine model, type, and code numbers along with the date of purchase. These numbers are located on your engine (see the Features and Controls page).
Date of purchase:
MM/DD/YYYY
Engine model:
Model:
Type:
Code:
Engine Power Rating Information
The gross power rating for individual gas engine models is labeled in accordance with SAE (Society of Automotive Engineers) code J1940 (Small Engine Power & Torque Rating Procedure), and rating performance has been obtained and corrected in accordance with SAE J1995 (Revision 2002-05). Torque values are derived at 3060 RPM; horsepower values are derived at 3600 RPM. Actual gross engine power will be lower and is affected by, among other things, ambient operating conditions and engine-to-engine variability. Given both the wide array of products on which engines are placed and the variety of environmental issues applicable to operating the equipment, the gas engine will not develop the rated gross power when used in a given piece of power equipment (actual "on-site" or net power). This difference is due to a variety of factors including, but not limited to, accessories (air cleaner, exhaust, charging, cooling, carburetor, fuel pump, etc.), application limitations, ambient operating conditions (temperature, humidity, altitude), and engine-to-engine variability. Due to manufacturing and capacity limitations, Briggs & Stratton may substitute an engine of higher rated power for this Series engine.
Operator Safety
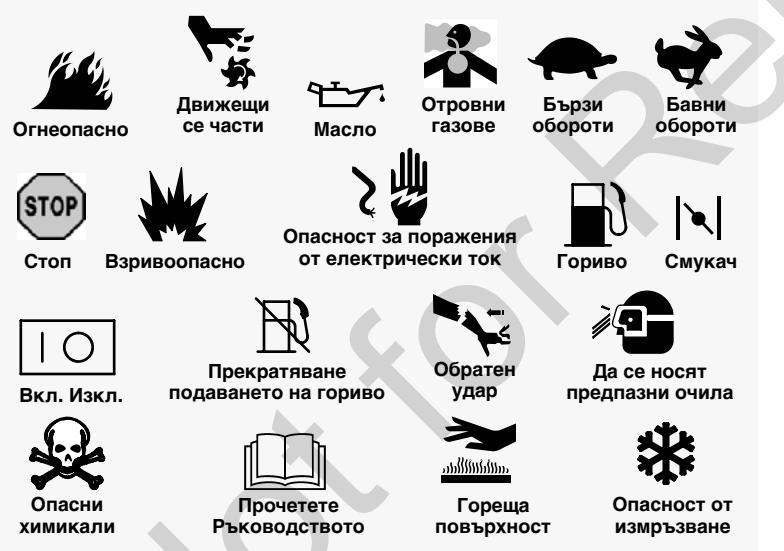
SAFETY AND CONTROL SYMBOLS

Fire

Moving Parts

Oil

Toxic Fumes

Slow

Fast

Stop

Explosion

Shock

Fuel

Choke

On Off

Fuel Shutoff

Kickback

Wear Eye
Protection

Hazardous
Chemical

Read Manual

Hot Surface

Frostbite
The safety alert symbol is used to identify safety information about hazards that can result in personal injury. A signal word (DANGER, WARNING, or CAUTION) is used with the alert symbol to indicate the likelihood and the potential severity of injury. In addition, a hazard symbol may be used to represent the type of hazard.

DANGER indicates a hazard which, if not avoided, will result in death or serious injury.

WARNING indicates a hazard which, if not avoided, could result in death or serious injury.

CAUTION indicates a hazard which, if not avoided, could result in minor or moderate injury.
NOTICE indicates a situation that could result in damage to the product.

WARNING
Certain components in this product and its related accessories contain chemicals known to the State of California to cause cancer, birth defects, or other reproductive harm. Wash hands after handling.

WARNING
The engine exhaust from this product contains chemicals known to the State of California to cause cancer, birth defects, or other reproductive harm.

WARNING
Briggs & Stratton does not approve or authorize the use of these engines on 3-wheel All Terrain Vehicles (ATVs), motor bikes, fun/recreational go-karts, aircraft products, or vehicles intended for use in competitive events. Use of these engines in such applications could result in property damage, serious injury (including paralysis), or even death.
NOTICE: This engine was shipped from Briggs & Stratton without oil. Before you start the engine, make sure you add oil according to the instructions in this manual. If you start the engine without oil, it will be damaged beyond repair and will not be covered under warranty.

WARNING
Gasoline and its vapors are extremely flammable and explosive.
Fire or explosion can cause severe burns or death.
When Adding Fuel
- Turn engine off and let engine cool at least 2 minutes before removing the fuel cap.
- Fill fuel tank outdoors or in well-ventilated area.
- Do not overfill fuel tank. To allow for expansion of the gasoline, do not fill above the bottom of the fuel tank neck.
- Keep gasoline away from sparks, open flames, pilot lights, heat, and other ignition sources.
- Check fuel lines, tank, cap, and fittings frequently for cracks or leaks. Replace if necessary
If fuel spills, wait until it evaporates before starting engine.
When Starting Engine
- Ensure that spark plug, muffler, fuel cap and air cleaner (if equipped) are in place and secured.
- Do not crank engine with spark plug removed.
- If engine floods, set choke (if equipped) to OPEN/RUN position, move throttle (if equipped) to FAST position and crank until engine starts.
When Operating Equipment
- Do not tip engine or equipment at angle which causes gasoline to spill.
- Do not choke the carburetor to stop engine.
- Never start or run the engine with the air cleaner assembly (if equipped) or the air filter (if equipped) removed.
When Changing Oil
- If you drain the oil from the top oil fill tube, the fuel tank must be empty or fuel can leak out and result in a fire or explosion.
When Transporting Equipment
When Storing Gasoline Or Equipment With Fuel In Tank
- Transport with fuel tank EMPTY or with fuel shut-off valve OFF.
- Store away from furnaces, stoves, water heaters or other appliances that have pilot light or other ignition source because they can ignite gasoline vapors.

WARNING

Starting engine creates sparking.
Sparking can ignite nearby flammable gases.
Explosion and fire could result.
If there is natural or LP gas leakage in area, do not start engine.
- Do not use pressurized starting fluids because vapors are flammable.

WARNING

Engines give off carbon monoxide, an odorless, colorless, poison gas.
Breathing carbon monoxide can cause nausea, fainting or death.
Start and run engine outdoors.
- Do not start or run engine in enclosed area, even if doors or windows are open.
Rapid retraction of starter cord (kickback) will pull hand and arm toward engine faster than you can let go.
Broken bones, fractures, bruises or sprains could result.
- When starting engine, pull the starter cord slowly until resistance is felt and then pull rapidly to avoid kickback.
- Remove all external equipment/engine loads before starting engine.
- Direct-coupled equipment components such as, but not limited to, blades, impellers, pulleys, sprockets, etc., must be securely attached.

WARNING

Rotating parts can contact or entangle hands, feet, hair, clothing, or accessories.
Traumatic amputation or severe laceration can result.
- Operate equipment with guards in place.
- Keep hands and feet away from rotating parts.
- Tie up long hair and remove jewelry.
- Do not wear loose-fitting clothing, dangling drawstrings or items that could become caught.

WARNING

Running engines produce heat. Engine parts, especially muffler, become extremely hot.
Severe thermal burns can occur on contact.
Combustible debris, such as leaves, grass, brush, etc. can catch fire.
- Allow muffler, engine cylinder and fins to cool before touching.
- Remove accumulated debris from muffler area and cylinder area.
- It is a violation of California Public Resource Code, Section 4442, to use or operate the engine on any forest-covered, brush-covered, or grass-covered land unless the exhaust system is equipped with a spark arrester, as defined in Section 4442, maintained in effective working order. Other states or federal jurisdictions may have similar laws. Contact the original equipment manufacturer, retailer, or dealer to obtain a spark arrester designed for the exhaust system installed on this engine.
Before performing adjustments or repairs:
- Disconnect the spark plug wire and keep it away from the spark plug.
- Disconnect battery at negative terminal (only engines with electric start.)
Use only correct tools. - Do not tamper with governor spring, links or other parts to increase engine speed.
- Replacement parts must be the same and installed in the same position as the original parts.
- Do not strike the flywheel with a hammer or hard object because the flywheel may later shatter during operation.
When testing for spark:
Use approved spark plug tester.
- Do not check for spark with spark plug removed.
Features and Controls
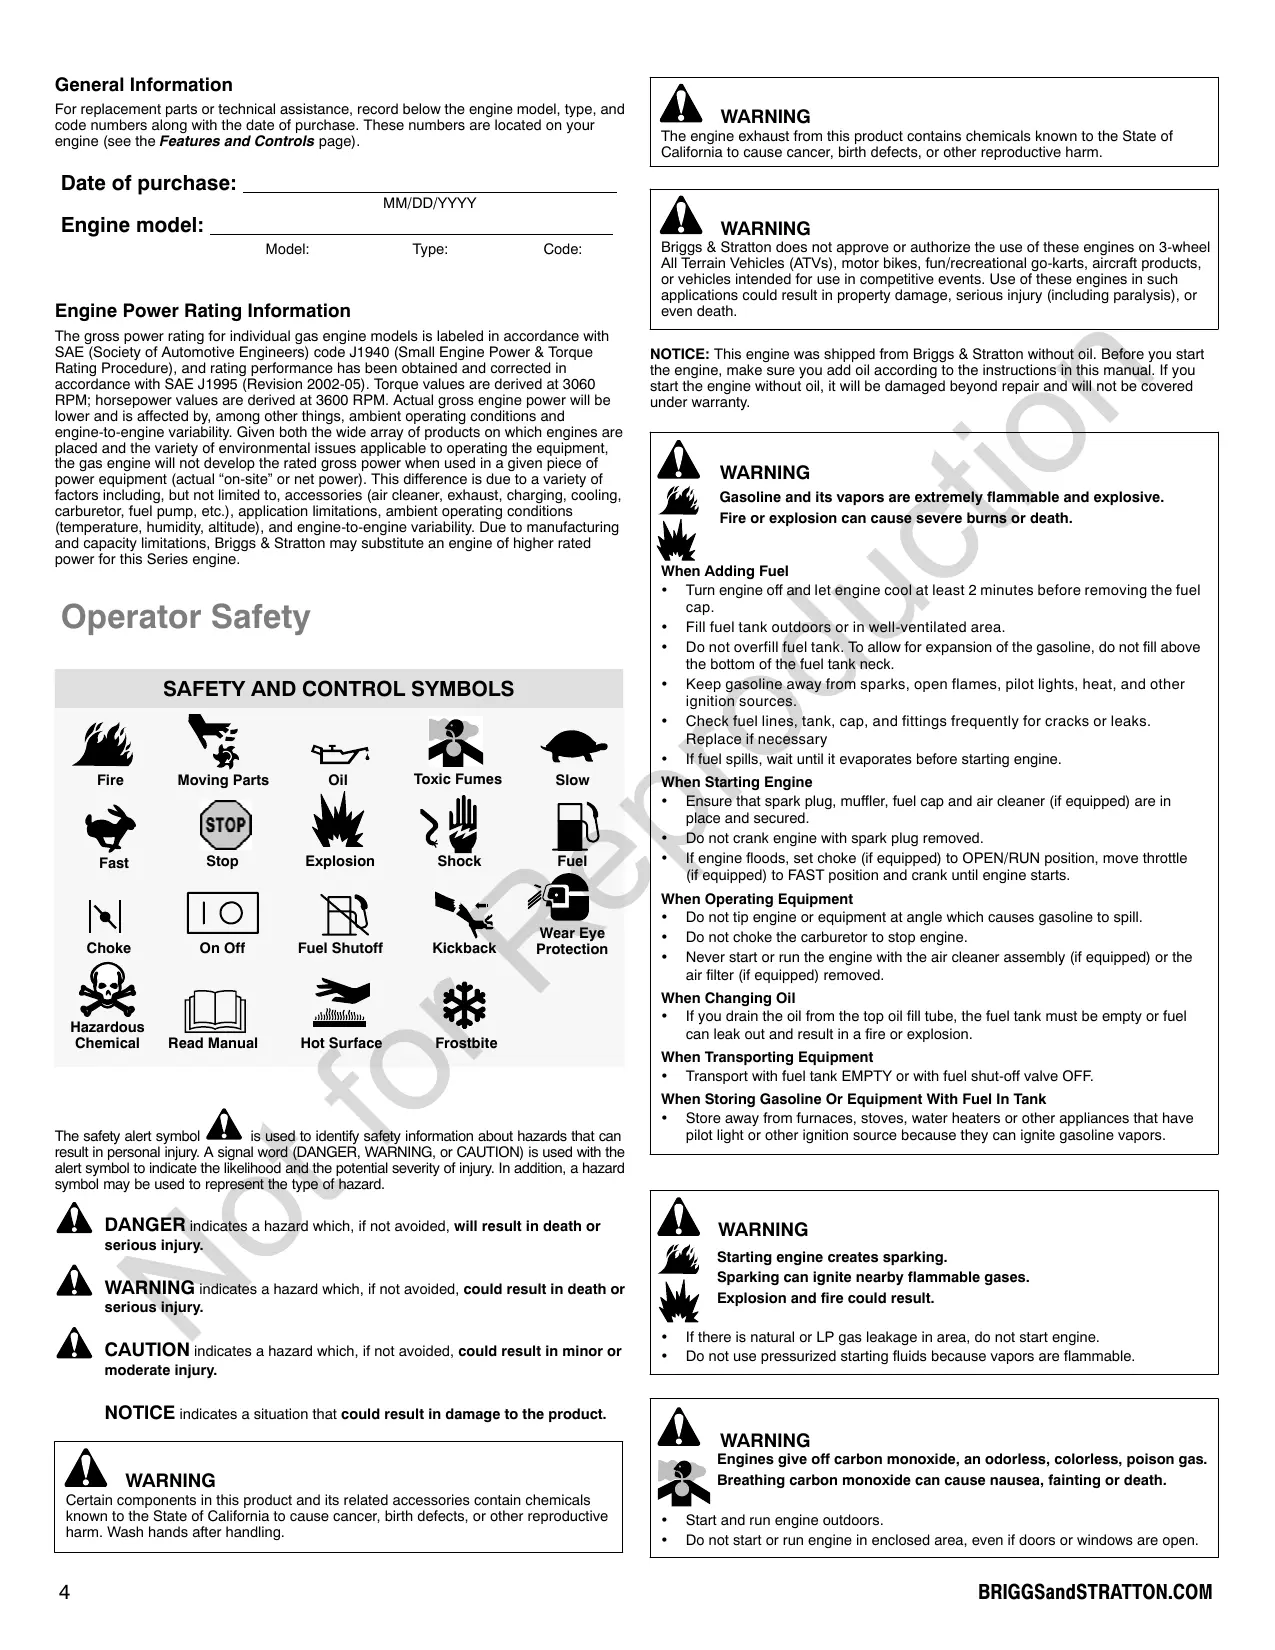
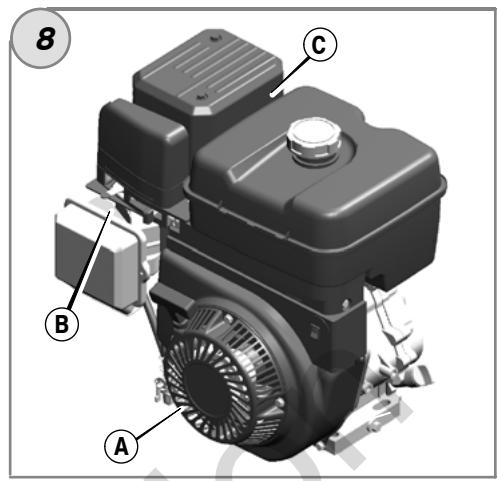
Compare the illustration ① with your engine to familiarize yourself with the location of various features and controls.
A. Engine Identification
Model Type Code
B. Spark Plug
C. Air Cleaner
D. Choke Control
E. Fuel Shut-off Valve (optional)
F. Starter Cord Handle
G. Finger Guard
H. Throttle Control (optional)
I. Stop Switch (optional)
J. Fuel Tank and Cap
K. Extended Dipstick (optional)
L. Short Dipstick (optional)
M. Oil Drain Plug
N. Oil Fill
O. Muffler
Muffler Guard (optional)
Spark Arrester (optional)
P. Electric Start Switch (electric start models) *
- Equipment may have remote controls. See the equipment manual for location and operation of remote controls.
Operation
Oil capacity (see the Specifications section)
Oil Recommendations
We recommend the use of Briggs & Stratton Warranty Certified oils for best performance. Other high-quality detergent oils are acceptable if classified for service SF, SG, SH, SJ or higher. Do not use special additives.
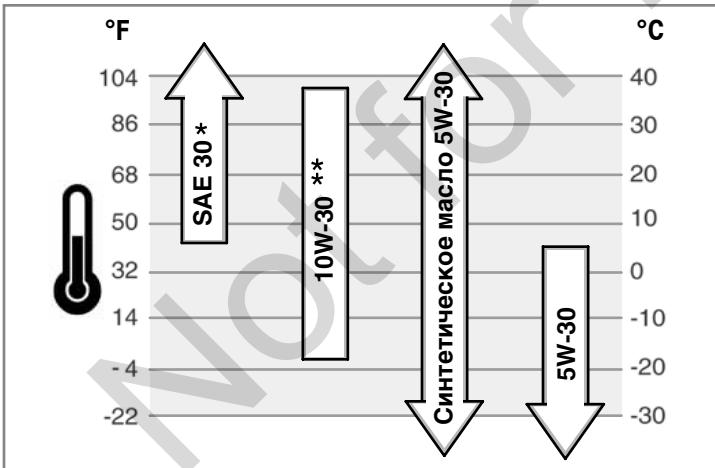
Outdoor temperatures determine the proper oil viscosity for the engine. Use the chart to select the best viscosity for the outdoor temperature range expected.

* Below 40^ (4^) the use of SAE 30 will result in hard starting.
** Above 80^ ( 27^ ) the use of 10W-30 may cause increased oil consumption. Check oil level more frequently.
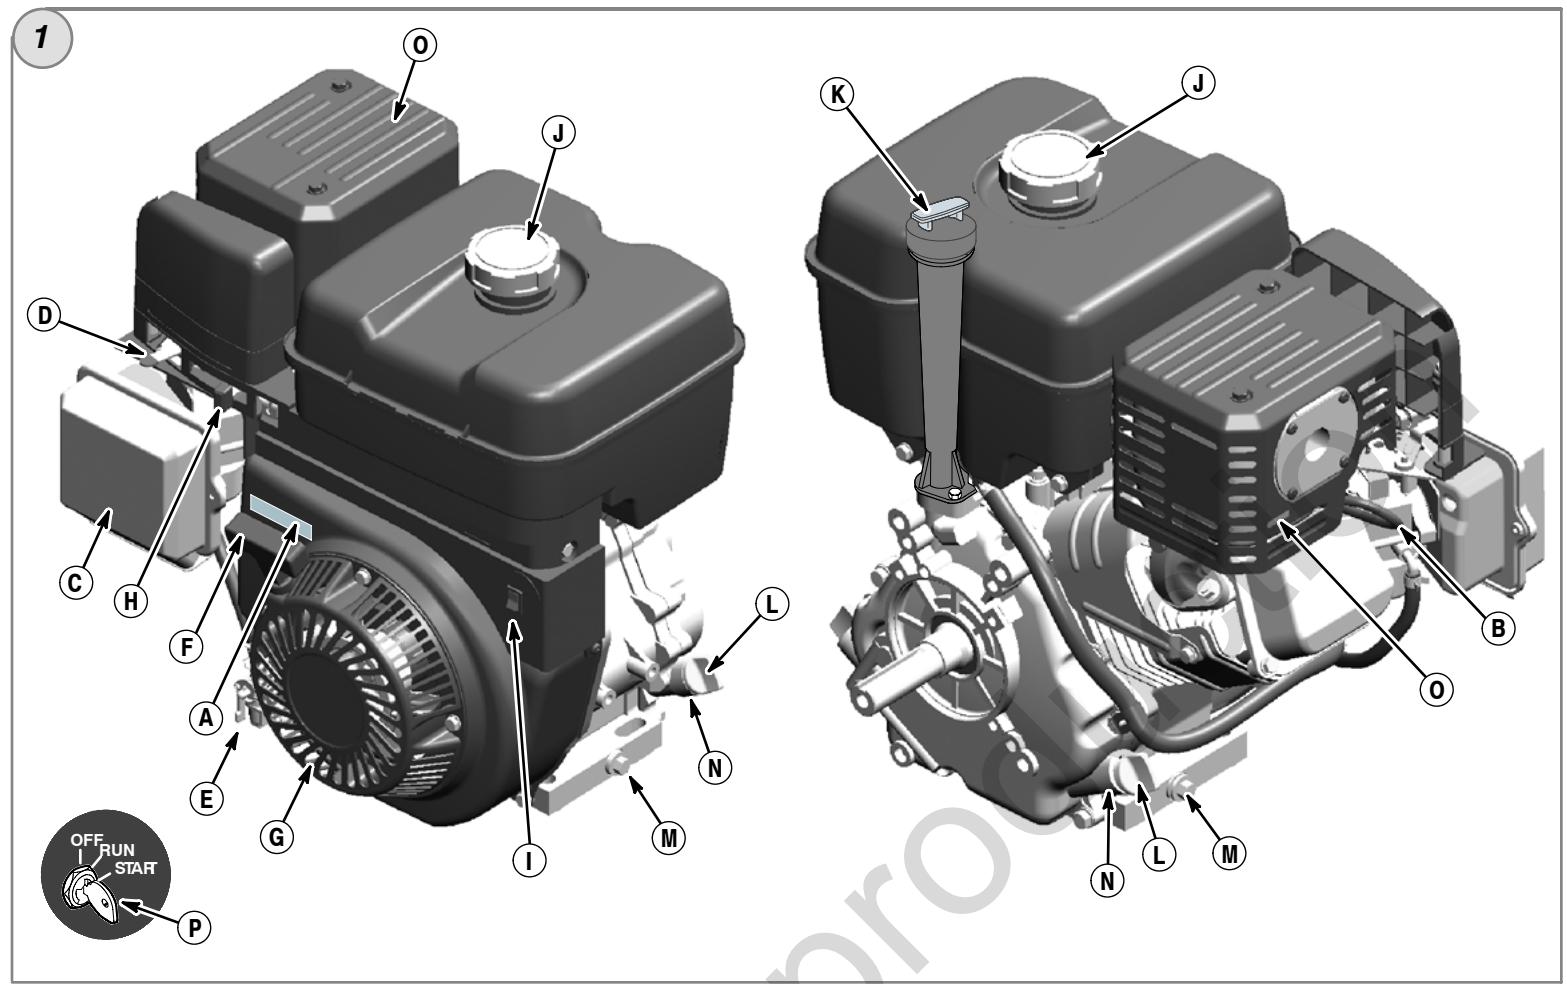
How To Check/Add Oil - Figure ② ④
Before adding or checking the oil
- Place engine level.
Clean the oil fill area of any debris.
Models with short dipstick (Figure 2)
- Remove the dipstick (C) and wipe with a clean cloth.
- Insert the dipstick but do not screw in. Oil level should be at FULL mark (D).
- To add oil, pour the oil slowly into the engine oil fill (B). Fill to point of overflowing.
- Replace and tighten the dipstick.
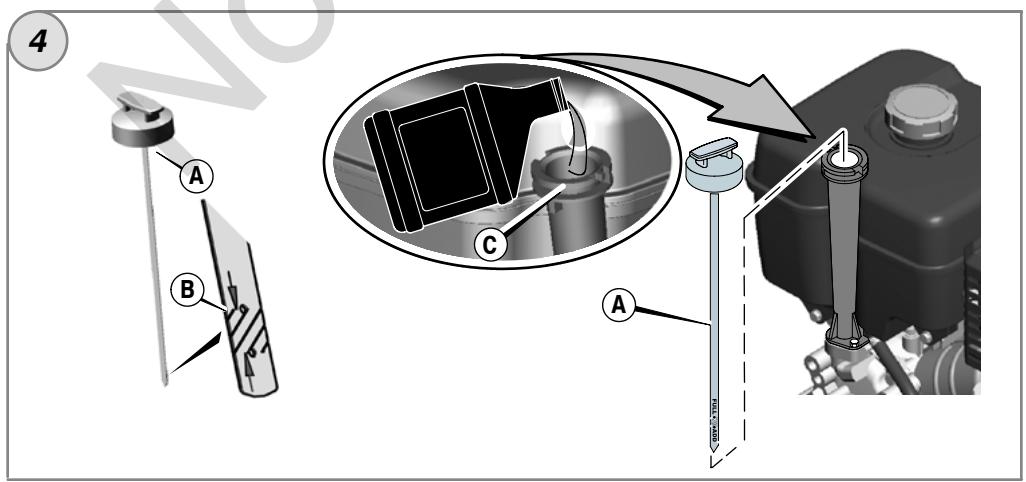
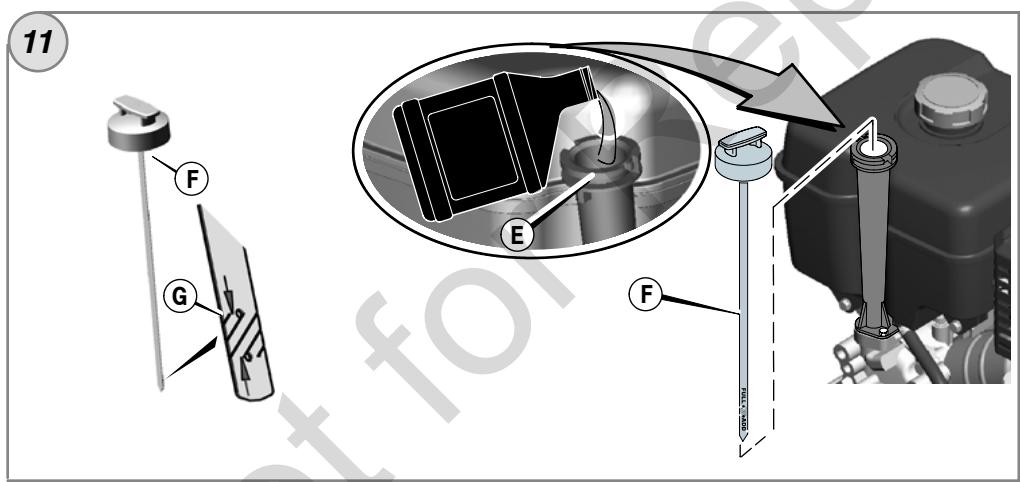
Models with extended dipstick (Figure 4)
- Remove the dipstick (A) and wipe with a clean cloth.
- Insert and tighten the dipstick.
- Remove the dipstick and check the oil level. It should be at the top of the full indicator (B) on the dipstick.
- To add oil, pour the oil slowly into the engine oil fill (C). Do not overfill. After adding oil, wait one minute and then recheck the oil level.
- Replace and tighten the dipstick.
Fuel Recommendations
Fuel must meet these requirements:
Clean, fresh, unleaded gasoline.
A minimum of 87 octane/87 AKI (91 RON). High altitude use, see below.
Gasoline with up to 10% ethanol (gasohol) or up to 15% MTBE (methyl tertiary butyl ether) is acceptable.
CAUTION: Do not use unapproved gasolines, such as E85. Do not mix oil in gasoline or modify the engine to run on alternate fuels. This will damage the engine components and void the engine warranty.
To protect the fuel system from gum formation, mix a fuel stabilizer into the fuel. See Storage. All fuel is not the same. If starting or performance problems occur, change fuel providers or change brands. This engine is certified to operate on gasoline. The emissions control system for this engine is EM (Engine Modifications).
High Altitude
At altitudes over 5,000 feet (1524 meters), a minimum 85 octane/85 AKI (89 RON) gasoline is acceptable. To remain emissions compliant, high altitude adjustment is required. Operation without this adjustment will cause decreased performance, increased fuel consumption, and increased emissions. See a Briggs & Stratton Authorized Dealer for high altitude adjustment information.
Operation of the engine at altitudes below 2,500 feet (762 meters) with the high altitude kit is not recommended.
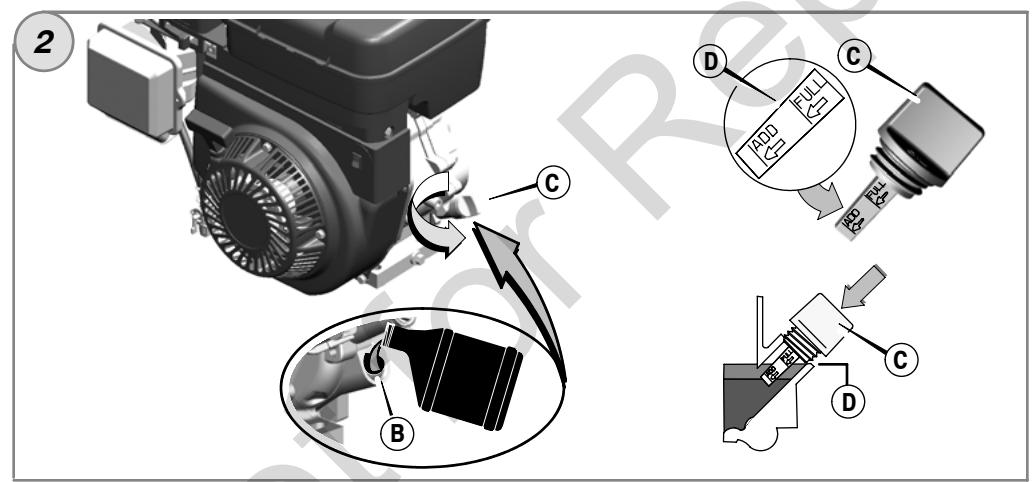
How To Add Fuel - Figure 3

WARNING
Gasoline and its vapors are extremely flammable and explosive.
Fire or explosion can cause severe burns or death.
When Adding Fuel
- Turn engine off and let engine cool at least 2 minutes before removing the fuel cap.
- Fill fuel tank outdoors or in well-ventilated area.
- Do not overfill fuel tank. To allow for expansion of the gasoline, do not fill above the bottom of the fuel tank neck.
- Keep gasoline away from sparks, open flames, pilot lights, heat, and other ignition sources.
-
Check fuel lines, tank, cap, and fittings frequently for cracks or leaks. Replace if necessary
If fuel spills, wait until it evaporates before starting engine. -
Clean the fuel cap area of dirt and debris. Remove the fuel cap (A) (Figure 3).
- Fill the fuel tank (B) with gasoline. To allow for expansion of the gasoline, do not fill above the bottom of the fuel tank neck (C).
- Reinstall the fuel cap.
How To Start The Engine - Figure 5

WARNING
Rapid retraction of starter cord (kickback) will pull hand and arm toward engine faster than you can let go.
Broken bones, fractures, bruises or sprains could result.
- When starting engine, pull the starter cord slowly until resistance is felt and then pull rapidly to avoid kickback.

WARNING
Gasoline and its vapors are extremely flammable and explosive.
Fire or explosion can cause severe burns or death.
When Starting Engine
- Ensure that spark plug, muffler, fuel cap and air cleaner (if equipped) are in place and secured.
- Do not crank engine with spark plug removed.
-
If engine floods, set choke (if equipped) to OPEN/RUN position, move throttle (if equipped) to FAST position and crank until engine starts.
-
Start and run engine outdoors.
- Do not start or run engine in enclosed area, even if doors or windows are open.
NOTICE: This engine was shipped from Briggs & Stratton without oil. Before you start the engine, make sure you add oil according to the instructions in this manual. If you start the engine without oil, it will be damaged beyond repair and will not be covered under warranty.
Note: Equipment may have remote controls. See the equipment manual for location and operation of remote controls.
- Check the oil level. See the How To Check/Add Oil section.
- Make sure equipment drive controls, if equipped, are disengaged.
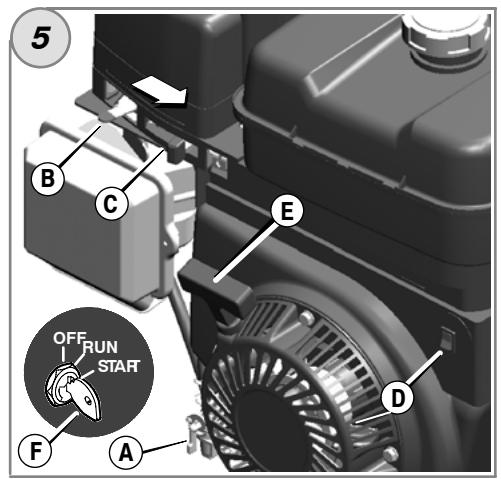
- Turn the fuel shut-off valve (A), if equipped, to the on position (Figure 5).
- Move the choke control lever (B) to the choke position.
Note: Choke is usually unnecessary when restarting a warm engine.
- Move the throttle control lever (C), if equipped, to the fast position. Operate the engine with the throttle control lever in the fast position.
- On engines equipped with a stop switch (D), move the switch to the on position.
- Rewind Start: Firmly hold the starter cord handle (E). Pull the starter cord handle slowly until resistance is felt, then pull rapidly.
Note: If the engine does not start after repeated attempts, go to BRIGGSandSTRATTON.COM or call 1-800-233-3723 (in USA).

WARNING: Rapid retraction of the starter cord (kickback) will pull your
hand and arm toward the engine faster than you can let go. Broken bones, fractures, bruises or sprains could result. When starting engine, pull the starter cord slowly until resistance is felt and then pull rapidly to avoid kickback.
- Electric Start: Turn the electric start switch (F) to the on/start position.
Note: If the engine does not start after repeated attempts, go to BRIGGSandSTRATTON.COM or call 1-800-233-3723 (in USA). - As the engine warms up, move the choke control (B) to the run position.
How To Stop The Engine - Figure 5

WARNING
Gasoline and its vapors are extremely flammable and explosive. Fire or explosion can cause severe burns or death.
Do not choke the carburetor to stop engine.
- Electric Start: With the throttle control (C) in the slow position, turn the electric start switch (F) to the off position (Figure 5). Remove the key and keep in a safe place out of the reach of children.
- Rewind Start: Push the stop switch (D) to the off position,
Move the throttle control (C) to the stop position.
- After the engine stops, turn the fuel shut-off valve (A), if equipped, to the closed position.
Maintenance
Use only original equipment replacement parts. Other parts may not perform as well, may damage the unit, and may result in injury. In addition, use of other parts may void your warranty.
We recommend that you see any Briggs & Stratton Authorized Dealer for all maintenance and service of the engine and engine parts.
NOTICE: All the components used to build this engine must remain in place for proper operation.
Emissions Control
Maintenance, replacement, or repair of the emissions control devices and systems may be performed by any non-road engine repair establishment or individual.
However, to obtain "no charge" emissions control service, the work must be performed by a factory authorized dealer. See the Emissions Warranty.

WARNING
Unintentional sparking can result in fire or electric shock. Unintentional start-up can result in entanglement, traumatic amputation, or laceration.

Fire hazard

Before performing adjustments or repairs:
- Disconnect the spark plug wire and keep it away from the spark plug.
- Disconnect battery at negative terminal (only engines with electric start.)
Use only correct tools. - Do not tamper with governor spring, links or other parts to increase engine speed.
- Replacement parts must be the same and installed in the same position as the original parts.
- Do not strike the flywheel with a hammer or hard object because the flywheel may later shatter during operation.
When testing for spark:
Use approved spark plug tester.
- Do not check for spark with spark plug removed.
Maintenance Chart
First 5 Hours
Change oil
Every 8 Hours or Daily
Check engine oil level
Clean area around muffler and controls
Clean finger guard
Every 25 Hours or Annually
- Clean air filter *
- Clean pre-cleaner *
Every 50 Hours or Annually
- Change engine oil
- Check muffler and spark arrester
Annually
- Replace air filter
- Replace pre-cleaner
- Replace spark plug
Clean fuel filter
Clean air cooling system * -
Check valve clearance **
-
In dusty conditions or when airborne debris is present, clean more often.
** Not required unless engine performance problems are noted.
Carburetor Adjustment
Never make adjustments to the carburetor. The carburetor was set at the factory to operate efficiently under most conditions. However, if adjustments are required, see any Briggs & Stratton Authorized Dealer for service.
NOTICE: The manufacturer of the equipment on which this engine is installed specifies the top speed at which the engine will be operated. Do not exceed this speed.
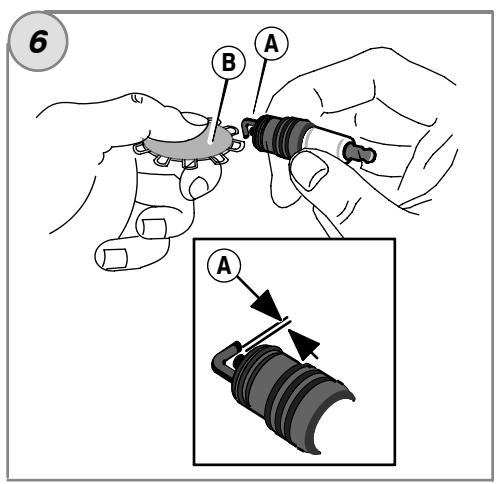
How To Replace The Spark Plug - Figure 6
Check the gap (A, Figure 6) with a wire gauge (B). If necessary, reset the gap. Install and tighten the spark plug to the recommended torque. For gap setting or torque, see the Specifications section.
Note: In some areas, local law requires using a resistor spark plug to suppress ignition signals. If this engine was originally equipped with a resistor spark plug, use the same type for replacement.

WARNING

Running engines produce heat. Engine parts, especially muffler, become extremely hot.
Severe thermal burns can occur on contact.
Combustible debris, such as leaves, grass, brush, etc. can catch fire.
- Allow muffler, engine cylinder and fins to cool before touching.
- Remove accumulated debris from muffler area and cylinder area.
- It is a violation of California Public Resource Code, Section 4442, to use or operate the engine on any forest-covered, brush-covered, or grass-covered land unless the exhaust system is equipped with a spark arrester, as defined in Section 4442, maintained in effective working order. Other states or federal jurisdictions may have similar laws. Contact the original equipment manufacturer, retailer, or dealer to obtain a spark arrester designed for the exhaust system installed on this engine.
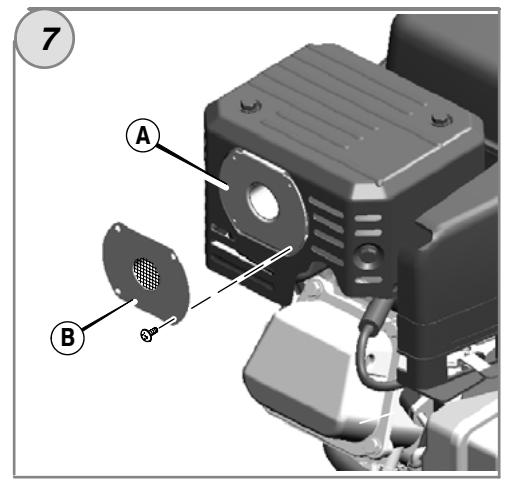
Inspect the muffler (A, Figure 7) for cracks, corrosion, or other damage. Remove the spark arrester (B), if equipped, and inspect for damage or carbon blockage. If replacement parts are required, make sure to use only original equipment replacement parts.

WARNING: Replacement parts must be the same and installed in the position as the original parts or fire could result.
How To Change The Oil - Figure 9 10 11
Used oil is a hazardous waste product and must be disposed of properly. Do not discard with household waste. Check with your local authorities, service center, or dealer for safe disposal/recycling facilities.
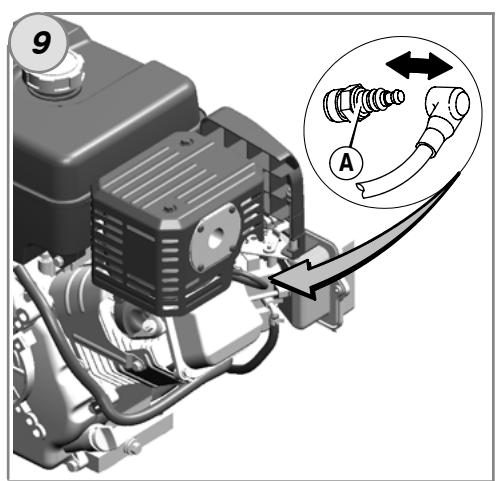
Remove Oil
- With engine off but still warm, disconnect the spark plug wire (A) and keep it away from the spark plug (Figure 9).
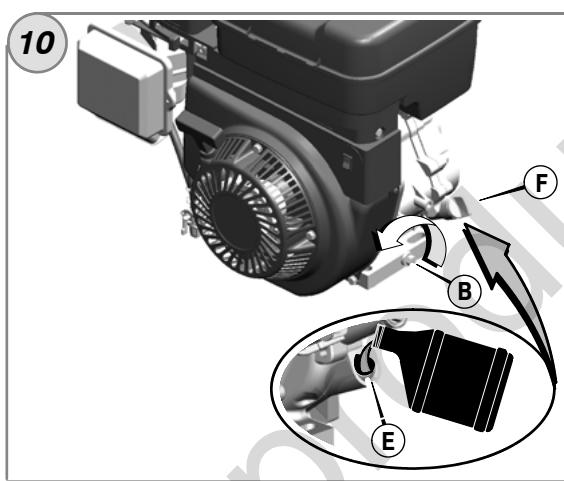
- Remove the oil drain plug (B, Figure 10). Drain the oil into an approved receptacle. Note: Any of the oil drain plugs shown below may be installed in the engine.


- After the oil has drained, install and tighten the oil drain plug.
Add oil
- Place engine level.
Clean the oil fill area of any debris.
See the Specifications section for oil capacity.
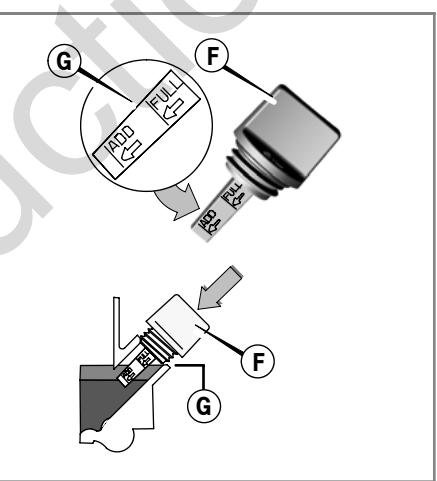
Models with short dipstick
- Remove the dipstick (F, Figure10) and wipe with a clean cloth.
- Pour the oil slowly into the engine oil fill (E). Fill to point of overflowing.
- Install the dipstick but do not screw in. Remove and check the oil level. Oil level should be at the FULL mark (G) on the dipstick.
- Install and tighten the dipstick
Models with extended dipstick
- Remove the dipstick (F, Figure 11) and wipe with a clean cloth.
- Pour the oil slowly into the engine oil fill (E). Do not overfill. After adding oil, wait one minute and then recheck the oil level.
- Install and tighten the dipstick.
- Remove the dipstick and check the oil level. It should be at the top of the full indicator (G) on the dipstick.
- Install and tighten the dipstick.
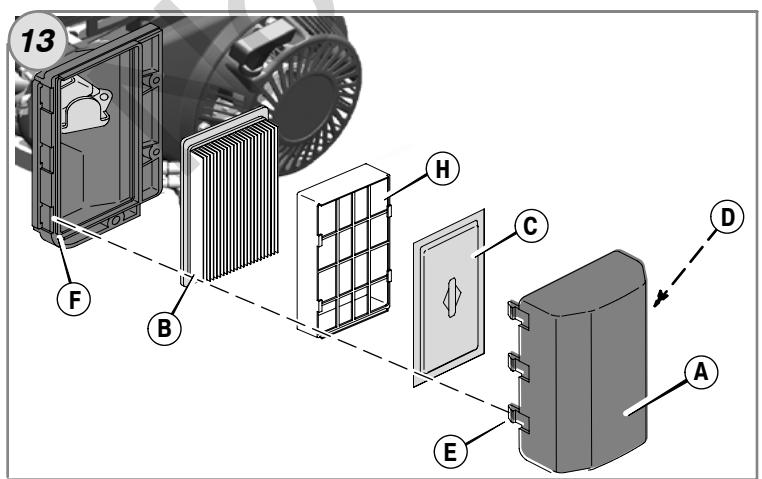
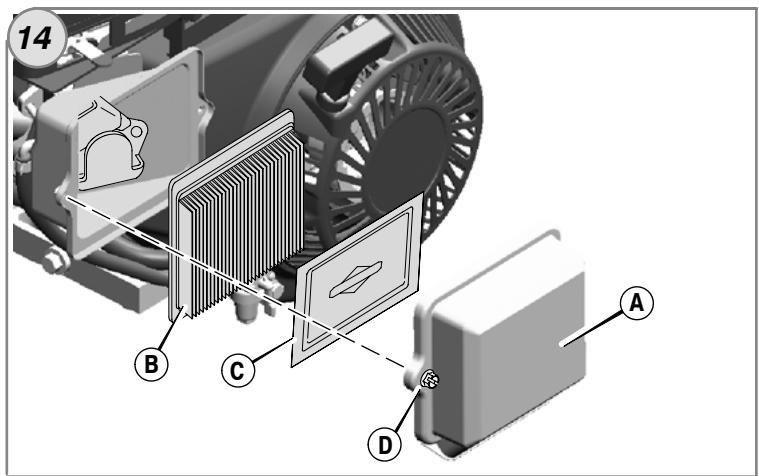
How To Service The Air Filter - Figure 13 14

WARNING
Gasoline and its vapors are extremely flammable and explosive. Fire or explosion can cause severe burns or death.

- Never start or run the engine with the air cleaner assembly or the air filter removed.
NOTICE: Do not use pressurized air or solvents to clean the filter. Pressurized air can damage the filter and solvents will dissolve the filter.
The air cleaner system uses a pleated filter with an optional pre-cleaner. The pre-cleaner can be washed and reused.
-
Loosen the fasteners (D) that hold the cover (A).
-
Open the cover and remove the pre-cleaner (C), the filter retainer (H), if equipped, and the filter (B). See Figure 13 and 14..
- To loosen debris, gently tap the filter on a hard surface. If the filter is excessively dirty, replace with a new filter.
- Wash the pre-cleaner in liquid detergent and water. Then allow it to thoroughly air dry. Do not oil the pre-cleaner.
- Install the dry pre-cleaner, the filter retainer (if equipped), and the filter.
- On models equipped with air filter shown in Figure 13, install the cover tabs (E) into the slots (F).
- Install cover and secure with the fasteners. Make sure the fasteners are tight.
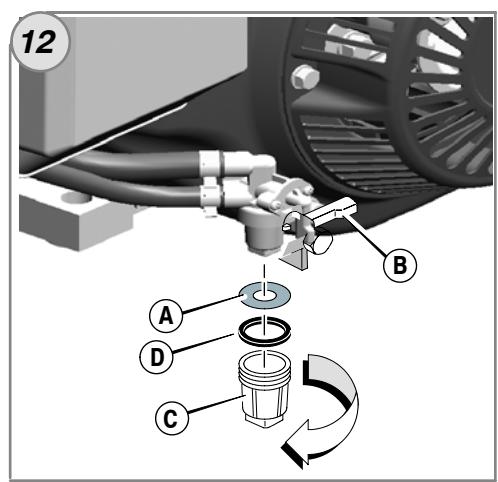
How To Clean The Fuel Filter - Figure 12

WARNING
Gasoline and its vapors are extremely flammable and explosive. Fire or explosion can cause severe burns or death.

- Keep gasoline away from sparks, open flames, pilot lights, heat, and other ignition sources.
- Check fuel lines, tank, cap, and fittings frequently for cracks or leaks. Replace if necessary.
- Before cleaning or replacing the fuel filter, drain the fuel tank or close the fuel shut-off valve.
-
Replacement parts must be the same and installed in the same position as the original parts.
If fuel spills, wait until it evaporates before starting engine. -
Close the fuel shut-off valve (B, Figure 12) and let the engine run until it stops. Otherwise, fuel can leak out and cause a fire.
- Remove the bowl (C) with a wrench. Clean debris from the filter (A) and the bowl.
- Check the filter and bowl for cracks or other damage. Replace if necessary.
- Install the filter, the gasket (D), and bowl. Tighten with a wrench.
- Open the fuel shut-off valve and check for leaks.
How To Clean The Air Cooling System - Figure 8

WARNING

Running engines produce heat. Engine parts, especially muffler, become extremely hot.
Severe thermal burns can occur on contact.
Combustible debris, such as leaves, grass, brush, etc. can catch fire.
- Allow muffler, engine cylinder and fins to cool before touching.
- Remove accumulated debris from muffler area and cylinder area.
NOTICE: Do not use water to clean the engine. Water could contaminate the fuel system. Use a brush or dry cloth to clean the engine.
This is an air cooled engine. Dirt or debris can restrict air flow and cause the engine to overheat, resulting in poor performance and reduced engine life.
Use a brush or dry cloth to remove debris from the finger guard (A) (Figure 8). Keep linkage, springs and controls (B) clean. Keep the area around and behind the muffler (C) free of any combustible debris.
Storage

WARNING
Gasoline and its vapors are extremely flammable and explosive. Fire or explosion can cause severe burns or death.
When Storing Gasoline Or Equipment With Fuel In Tank
- Store away from furnaces, stoves, water heaters or other appliances that have pilot lights or other ignition sources because they can ignite gasoline vapors.
Fuel System
Fuel can become stale when stored over 30 days. Stale fuel causes acid and gum deposits to form in the fuel system or on essential carburetor parts. To keep fuel fresh, use Briggs & Stratton FRESH START® fuel stabilizer, available as a liquid additive or a drip concentrate cartridge.
There is no need to drain gasoline from the engine if a fuel stabilizer is added according to instructions. Run the engine for 2 minutes to circulate the stabilizer throughout the fuel system. The engine and fuel can then be stored up to 24 months.
If gasoline in the engine has not been treated with a fuel stabilizer, it must be drained into an approved container. Run the engine until it stops from lack of fuel. The use of a fuel stabilizer in the storage container is recommended to maintain freshness.
Engine Oil
While the engine is still warm, change the engine oil.
Troubleshooting
Need Assistance? Go to BRIGGSandSTRATTON.COM or call 1-800-233-3723.
Model 50000 *
| Displacement | 4.94 ci (81 cc) |
| Bore | 2.047 in (52.00 mm) |
| Stroke | 1.496 in (38.00 mm) |
| Oil Capacity | 13.5 oz (0.4 L) |
| Spark Plug Gap | 0.025 in (0.64 mm) |
| Spark Plug Torque | 180 lb-in (20 Nm) |
| Armature Air Gap | 0.012 - 0.020 in (0.30 - 0.51 mm) |
| Intake Valve Clearance | 0.004 - 0.008 in (0.10 - 0.20 mm) |
| Exhaust Valve Clearance | 0.004 - 0.008 in (0.10 - 0.20 mm) |
| Rectangular Air Filter | 711459 |
| Rectangular Air Filter Pre-cleaner | 711460 |
| Fuel Additive | 5041, 5058 |
| Resistor Spark Plug | 711252 |
| Spark Plug Wrench | 19576 |
| Spark Tester | 19368 |
Model 80000 *
| Displacement | 7.75 ci (127 cc) |
| Bore | 2.441 in (62.00 mm) |
| Stroke | 1.654 in (42.00 mm) |
| Oil Capacity | 18 - 20 oz (0.54 - 0.59 L) |
| Spark Plug Gap | 0.030 in (0.76 mm) |
| Spark Plug Torque | 180 lb-in (20 Nm) |
| Armature Air Gap | 0.012 - 0.020 in (0.30 - 0.51 mm) |
| Intake Valve Clearance | 0.002 - 0.004 in (0.05 - 0.10 mm) |
| Exhaust Valve Clearance | 0.002 - 0.004 in (0.05 - 0.10 mm) |
| Square Air Filter | 491588 |
| Square Air Filter Pre-cleaner | 491435 |
| Rectangular Air Filter | 710265 |
| Rectangular Air Filter Pre-cleaner | 710267 |
| Fuel Additive | 5041, 5058 |
| Resistor Spark Plug | 711252 |
| Spark Plug Wrench | 19576 |
| Spark Tester | 19368 |
Model 110000 *
| Displacement | 11.11 ci (182 cc) |
| Bore | 2.677 in (68.00 mm) |
| Stroke | 1.969 in (50.00 mm) |
| Oil Capacity | 22 - 24 oz (0.65 - 0.71 L) |
| Spark Plug Gap | 0.030 in (0.76 mm) |
| Spark Plug Torque | 180 lb-in (20 Nm) |
| Armature Air Gap | 0.012 - 0.020 in (0.30 - 0.51 mm) |
| Intake Valve Clearance | 0.002 - 0.004 in (0.05 - 0.10 mm) |
| Exhaust Valve Clearance | 0.002 - 0.004 in (0.05 - 0.10 mm) |
| Square Air Filter | 491588 |
| Square Air Filter Pre-cleaner | 491435 |
| Rectangular Air Filter | 494511 |
| Rectangular Air Filter Pre-cleaner | 492889 |
| Fuel Additive | 5041, 5058 |
| Resistor Spark Plug | 711252 |
| Spark Plug Wrench | 19576 |
| Spark Tester | 19368 |
Model 130000 *
| Displacement | 13.18 ci (216 cc) |
| Bore | 2.835 in (72.00 mm) |
| Stroke | 2.087 in (53.00 mm) |
| Oil Capacity | 30 - 32 oz (0.89 - 0.95 L) |
| Spark Plug Gap | 0.030 in (0.76 mm) |
| Spark Plug Torque | 180 lb-in (20 Nm) |
| Armature Air Gap | 0.012 - 0.020 in (0.30 - 0.51 mm) |
| Intake Valve Clearance | 0.005 - 0.008 in (0.13 - 0.20 mm) |
| Exhaust Valve Clearance | 0.005 - 0.008 in (0.13 - 0.20 mm) |
| Square Air Filter | 491588 |
| Square Air Filter Pre-cleaner | 491435 |
| Fuel Additive | 5041, 5058 |
| Resistor Spark Plug | 491055 |
| Spark Plug Wrench | 19576 |
| Spark Tester | 19368 |
Model 180000*
| Displacement | 18.12 ci (297 cc) |
| Bore | 3.150 in (80.00 mm) |
| Stroke | 2.323 in (59.00 mm) |
| Oil Capacity | 30 - 32 oz (0.89 - 0.95 L) |
| Spark Plug Gap | 0.030 in (0.76 mm) |
| Spark Plug Torque | 180 lb-in (20 Nm) |
| Armature Air Gap | 0.012 - 0.020 in (0.30 - 0.51 mm) |
| Intake Valve Clearance | 0.002 - 0.004 in (0.05 - 0.10 mm) |
| Exhaust Valve Clearance | 0.002 - 0.004 in (0.05 - 0.10 mm) |
| Square Air Filter | 491588 |
| Square Air Filter Pre-cleaner | 491435 |
| Rectangular Air Filter | 710266 |
| Rectangular Air Filter Pre-cleaner | 710268 |
| Fuel Additive | 5041, 5058 |
| Resistor Spark Plug | 491055 |
| Spark Plug Wrench | 19576 |
| Spark Tester | 19368 |
Model 230000, 240000
| Displacement | 23.92 ci (392 cc) |
| Bore | 3.504 in (89.00 mm) |
| Stroke | 2.480 in (63.00 mm) |
| Oil Capacity | 30 - 32 oz (0.89 - 0.95 L) |
| Spark Plug Gap | 0.030 in (0.76 mm) |
| Spark Plug Torque | 180 lb-in (20 Nm) |
| Armature Air Gap | 0.008 - 0.012 in (0.20 - 0.30 mm) |
| Intake Valve Clearance | 0.004 - 0.006 in (0.10 - 0.15 mm) |
| Exhaust Valve Clearance | 0.004 - 0.006 in (0.10 - 0.15 mm) |
| Rectangular Air Filter | 710266 |
| Rectangular Air Filter Pre-cleaner | 710268 |
| Fuel Additive | 5041, 5058 |
| Resistor Spark Plug | 491055 |
| Spark Plug Wrench | 19576 |
| Spark Tester | 19368 |
LIMITED WARRANTY
Brigs & Stratton Corporation will repair or replace, free of charge, any part(s) of the engine that is defective in material or workmanship or both. Transportation charges on product submitted for repair or replacement under this warranty must be borne by purchaser. This warranty is effective for and is subject to the time periods and conditions stated below. For warranty service, find the nearest Authorized Service Dealer in our dealer locator map at BRIGGSandSTRATTON.COM, or by calling 1-800-233-3723, or as listed in the 'Yellow Pages'.
There is no other expressed warranty. Implied warranties, including those of merchantability and fitness for a particular purpose, are limited to one year from purchase, or to the extent permitted by law and all implied warranties are excluded. Liability for incidental or consequential damages are excluded to the extent exclusion is permitted by law. Some states or countries do not allow limitations on how long an implied warranty lasts, and some states or countries do not allow the exclusion or limitation of incidental or consequential damages, so the above limitation and exclusion may not apply to you. This warranty gives you specific legal rights and you may also have other rights which vary from state to state and country to country.
STANDARD WARRANTY TERMS ▲
| Brand/Product Type | Consumer Use | Commercial Use |
| VanguardTM | 2 years | 2 years |
| Extended Life SeriesTM; I/C®; IntekTM I/C®; IntekTM Pro; Professional SeriesTM with Dura-BoreTM Cast Iron Sleeve; 850 SeriesTM with Dura-BoreTM Cast Iron Sleeve; Snow Series MAXTM with Dura-BoreTM Cast Iron Sleeve | 2 years | 1 year |
| All Other Briggs & Stratton Engines | 2 years | 90 days |
- These are our standard warranty terms, but occasionally there may be additional warranty coverage that was not determined at time of publication. For a listing of current warranty terms for your engine, go to BRIGGSandSTRATTON.COM or contact your Authorized Briggs & Stratton Service Dealer.
Engines used on Home Standby Generator applications are warranted under consumer use only. This warranty does not apply to engines on equipment used for prime power in place of a utility. Engines used in competitive racing or on commercial or rental tracks are not warranted.
The warranty period begins on the date of purchase by the first retail consumer or commercial end user, and continues for the period of time stated in the table above. "Consumer use" means personal residential household use by a retail consumer. "Commercial use" means all other uses, including use for commercial, income producing or rental purposes. Once an engine has experienced commercial use, it shall thereafter be considered as a commercial use engine for purposes of this warranty.
No warranty registration is necessary to obtain warranty on Briggs & Stratton Products. Save your proof of purchase receipt. If you do not provide proof of the initial purchase date at the time warranty service is requested, the manufacturing date of the product will be used to determine the warranty period.
About Your Warranty
Briggs & Stratton welcomes warranty repair and apologizes to you for being inconvenienceed. Any Authorized Service Dealer may perform warranty repairs. Most warranty repairs are handled routinely, but sometimes requests for warranty service may not be appropriate.
If a customer differs with the decision of the Service Dealer, an investigation will be made to determine whether the warranty applies. Ask the Service Dealer to submit all supporting facts to his Distributor or the Factory for review. If the Distributor or the Factory decides that the claim is justified, the customer will be fully reimbursed for those items that are defective. To avoid misunderstanding which might occur between the customer and the Dealer, listed below are some of the causes of engine failure that the warranty does not cover.
Normal wear: Engines, like all mechanical devices, need periodic parts service and replacement to perform well. Warranty will not cover repair when normal use has exhausted the life of a part or an engine. Warranty would not apply if engine damage occurred because of misuse, lack of routine maintenance, shipping, handling, warehousing or improper installation. Similarly, warranty is void if the serial number of the engine has been removed or the engine has been altered or modified.
Improper maintenance: The life of an engine depends upon the conditions under which it operates, and the care it receives. Some applications, such as tillers, pumps and rotary mowers, are very often used in dusty or dirty conditions, which can cause what appears to be premature wear. Such wear, when caused by dirt, dust, spark plug cleaning grit, or other abrasive material that has entered the engine because of improper maintenance, is not covered by warranty.
This warranty covers engine related defective material and/or workmanship only, and not replacement or refund of the equipment to which the engine may be mounted. Nor does the warranty extend to repairs required because of:
1 Problems caused by parts that are not original Briggs & Stratton parts.
2 Equipment controls or installations that prevent starting, cause unsatisfactory engine performance, or shorten engine life. (Contact equipment manufacturer.)
3 Leaking carburetors, clogged fuel pipes, sticking valves, or other damage, caused by using contaminated or stale fuel.
4 Parts which are scored or broken because an engine was operated with insufficient or contaminated lubricating oil, or an incorrect grade of lubricating oil (check and refill when necessary, and change at recommended intervals). OIL GARD may not shut down running engine. Engine damage may occur if oil level is not properly maintained.
5 Repair or adjustment of associated parts or assemblies such as clutches, transmissions, remote controls, etc., which are not manufactured by Briggs & Stratton.
6 Damage or wear to parts caused by dirt, which entered the engine because of improper air cleaner maintenance, re-assembly, or use of a non-original air cleaner element or cartridge. At recommended intervals, clean and/or replace the filter as stated in the Operator's Manual.
7 Parts damaged by over-speeding, or overheating caused by grass, debris, or dirt, which plugs or clogs the cooling fins, or flywheel area, or damage caused by operating the engine in a confined area without sufficient ventilation. Clean engine debris at recommended intervals as stated in the Operator's Manual.
8 Engine or equipment parts broken by excessive vibration caused by a loose engine mounting, loose cutter blades, unbalanced blades or loose or unbalanced impellers, improper attachment of equipment to engine crankshaft, over-speeding or other abuse in operation.
9 A bent or broken crankshaft, caused by striking a solid object with the cutter blade of a rotary lawn mower, or excessive v-belt tightness.
10 Routine tune-up or adjustment of the engine.
11 Engine or engine component failure, i.e., combustion chamber, valves, valve seats, valve guides, or burned starter motor windings, caused by the use of alternate fuels such as, liquified petroleum, natural gas, altered gasolines, etc.
Warranty service is available only through authorized service dealers by Briggs & Stratton Corporation. Locate your nearest Authorized Service Dealer in our dealer locator map on BRIGGSandSTRATTON.COM or by calling 1-800-233-3723, or as listed in the 'Yellow Pages'.
California, U.S. EPA, and Briggs & Stratton Corporation Emissions Control Warranty Statement Your Warranty Rights And Obligations
The California Air Resources Board, U.S. EPA, and Briggs & Stratton (B&S) are pleased to explain the emissions control system warranty on your Model Year 2008 and later engine/equipment. In California, new small off-road engines must be designed, built, and equipped to meet the State's stringent anti-smog standards. B&S must warrant the emissions control system on your engine/equipment for the periods of time listed below provided there has been no abuse, neglect, or improper maintenance of your small off-road engine.
Your emissions control system may include parts such as the carburetor or fuel injection system, fuel tank, ignition system, and catalytic converter. Also included may be hoses, belts, connectors, sensors, and other emissions-related assemblies.
Where a warrantable condition exists, B&S will repair your engine/equipment at no cost to you including diagnosis, parts, and labor.
Manufacturer's Warranty Coverage:
Small off-road engines are warranted for two years. If any emissions-related part on your engine/equipment is defective, the part will be repaired or replaced by B&S.
Owner's Warranty Responsibilities:
- As the small engine/equipment owner, you are responsible for the performance of the required maintenance listed in your owner's manual. B&S recommends that you retain all receipts covering maintenance on your engine/equipment, but B&S cannot deny warranty solely for the lack of receipts or your failure to ensure the performance of all scheduled maintenance.
- As the engine/equipment owner, you should however be aware that B&S may deny you warranty coverage if your engine/equipment or a part has failed due to abuse, neglect, improper maintenance, or unapproved modifications.
- You are responsible for presenting your engine/equipment to a B&S distribution center, servicing dealer, or other equivalent entity, as applicable, as soon as a problem exists. The warranty repairs should be completed in a reasonable amount of time, not to exceed 30 days. If you have any questions regarding your warranty rights and responsibilities, you should contact B&S at (414) 259-5262.
Briggs & Stratton Emissions Control Warranty Provisions
The following are specific provisions relative to your Emissions Control Warranty Coverage. It is in addition to the B&S engine warranty for non-regulated engines found in the Operator's Manual.
- Warranted Emissions Parts
Coverage under this warranty extends only to the parts listed below (the emissions control systems parts) to the extent these parts were present on the engine purchased.
a. Fuel Metering System
Cold start enrichment system (soft choke)
- Carburetor and internal parts
Fuel pump
Fuel line, fuel line fittings, clamps
- Fuel tank, cap and tether
- Carbon canister
b. Air Induction System
Air cleaner
Intake manifold
- Purge and vent line
c. Ignition System
- Spark plug(s)
- Magneto ignition system
d. Catalyst System
Catalytic converter
- Exhaust manifold
Air injection system or pulse valve
e. Miscellaneous Items Used in Above Systems
Vacuum, temperature, position, time sensitive valves and switches
- Connectors and assemblies
- Length of Coverage
For a period of two years from date of original purchase, B&S warrants to the original purchaser and each subsequent purchaser that the engine is designed, built, and equipped so as to conform with all applicable regulations adopted by the Air Resources Board; that it is free from defects in material and workmanship that could cause the failure of a warranted part; and that it is identical in all material respects to the engine described in the manufacturer's application for certification. The warranty period begins on the date the engine is originally purchased.
The warranty on emissions-related parts is as follows:
- Any warranted part that is not scheduled for replacement as required maintenance in the owner's manual supplied, is warranted for the warranty period stated above. If any such part fails during the period of warranty coverage, the part will be repaired or replaced by B&S at no charge to the owner. Any such part repaired or replaced under the warranty will be warranted for the remaining warranty period.
- Any warranted part that is scheduled only for regular inspection in the owner's manual supplied, is warranted for the warranty period stated above. Any such part repaired or replaced under warranty will be warranted for the remaining warranty period.
- Any warranted part that is scheduled for replacement as required maintenance in the owner's manual supplied, is warranted for the period of time prior to the first scheduled replacement point for that part. If the part fails prior to the first scheduled replacement, the part will be repaired or replaced by B&S at no charge to the owner. Any such part repaired or replaced under warranty will be warranted for the remainder of the period prior to the first scheduled replacement point for the part.
-
Add on or modified parts that are not exempted by the Air Resources Board may not be used. The use of any non exempted add on or modified parts by the owner will be grounds for disallowing a warranty claim. The manufacturer will not be liable to warrant failures of warranted parts caused by the use of a non exempted add on or modified part.
-
Consequential Coverage
Coverage shall extend to the failure of any engine components caused by the failure of any warranted emissions parts.
- Claims and Coverage Exclusions
Warranty claims shall be filed according to the provisions of the B&S engine warranty policy. Warranty coverage does not apply to failures of emissions parts that are not original equipment B&S parts or to parts that fail due to abuse, neglect, or improper maintenance as set forth in the B&S engine warranty policy. B&S is not liable for warranty coverage of failures of emissions parts caused by the use of add-on or modified parts.
Look For Relevant Emissions Durability Period and Air Index Information On Your Engine Emissions Label
Engines that are certified to meet the California Air Resources Board (CARB) Emissions Standard must display information regarding the Emissions Durability Period and the Air Index. Briggs & Stratton makes this information available to the consumer on our emissions labels. The engine emissions label will indicate certification information.
The Emissions Durability Period describes the number of hours of actual running time for which the engine is certified to be emissions compliant, assuming proper maintenance in accordance with the Operating & Maintenance Instructions. The following categories are used:
Moderate:
Engine is certified to be emissions compliant for 125 hours of actual engine running time. Intermediate:
Engine is certified to be emissions compliant for 250 hours of actual engine running time. Extended:
Engine is certified to be emissions compliant for 500 hours of actual engine running time. For example, a typical walk-behind lawn mower is used 20 to 25 hours per year.
Therefore, the Emissions Durability Period of an engine with an intermediate rating would equate to 10 to 12 years.
Briggs & Stratton engines are certified to meet the United States Environmental Protection Agency (USEPA) Phase 2 emissions standards. For Phase 2 certified engines, the Emissions Compliance Period referred to on the Emissions Compliance label indicates the number of operating hours for which the engine has been shown to meet Federal emissions requirements.
For engines less than 225 cc displacement.
Category C = 125 hours, Category B = 250 hours, Category A = 500 hours
For engines of 225 cc or more displacement.
Category C = 250 hours , Category B = 500 hours , Category A = 1000 hours
Osha mHΦopMaζη
3a pe3epBHN qactn IIN TExHuecka nOMOu 3aNNuTe OTdOny MoDena Ha DbVraTeJRA, TIna HKOOBITE HOMepa C dAtata HA KynyBaHeTo MY. TeNt Homepa CE HAMnPAT BByPxY DbratrEbn. (Hanpabete cnpabka Ha cTpaHncaTa c pazden Elenementn UnpableneHna).
Data Ha KynyBaHe:
MM/AA/TTT
Moden ha Dbratela:
Moden:
Tun:
KoA:
HOpMaun3a HOMHaHnHaTa MoUHOCT Ha DBuRatEnIte
TbHnata MOUHOCCT Bbpyx OTdennhte MoDenIb6hen3HOBn DVBrAteN e Ot6en3aHa BCbOETCTBNE CbC3daDeneHN oSAE (DpyjckcBo HA INXHEepnTe ot ABTOMObnHATA pOMmJIneOHCT n TpaHcnpota) PpaBNHnK 3kA TExMHccka EeknloaantuaJr1940 (MeToDMa3a OnpeDnE HnHOHMnHnATMAoHocHT n BbPTaunM MOMENT Ha MaIKN DVBrAteN), a HOMnHJHATA MMoUHOCCTBe NOyHea N KOpRnHPaBA B CbOETCTBNE C bpcnraT ha PpaBNHnka 3a TeXHuecka EeknloaantuaJr1995 Ha SAE (PeJaCNuOT 2002-05 r). CToHOnCtNTe Ha BbPrtaunMOMENT Ca n3BeDeHN npri 3060 06/MnH; cToHOnCtNTe Ha MOnUHOCCTTA - npri 3600 06/MnH. DeiEcbTNEnHATA PbNlMa HOCHT Ha DBVrAteNITE qe 6bJe NO-HMCKa n Ce BnIe, MeJdy dpyroTO, ot OKoJIHATA cpeBa, B KOrTO obOpYDaHbeto CE ekCnloaTnpa Iot XapAKTEpnuKNTe Ha BcKei OTdelen HDBrAteI. Ppi WIpOKn HA6OP OT MaunHn, BbPyX KOnTO ce NoCTABT DVBrAteNITe n npri pa3NoOpBa3NeHo HA EKOInOrNHHT N3NCKBAHN, B KOrTO o6OpYDaHbeto PAboTI, 6EH3MHOBnT DVBrAteI HMA da Pa3Bn YkazahATA OT pON3BOJNTeIN PBlnHa MOUHOCCT, KORaTO E MOHTnpaHn Ha daJeHO EhePmIO HObOPyDAbe (DeiCBNTeHATA MOUHOC"Ha ObekTa" mIe FpeKTmbhata MOUHOCCT). Ta3ni Pa3NIkaCe DEblKnHa HONMbpOjPakTOpN, BKLIouChENHO Ha AKCEcoAPnte KbM DVBrAteN (Bb3dUweH fPHIbtp, acnyx, CmTeMa 3a 3apeJxdaHe, CmTEMa OXJxAkJaDE, KAp6ypaTOp, RopNBHa NOMPa n T. H.), Ha xapAKTEpNHTE OrpanuHEnra 3a n3NON3BaHToEo My, Ha yCNOBnTa B OKoJIHATA CpeDa, B KOrTO DVBrAteIET pAOTo (TemnePAtypa, BlaxxHOCT, NaDMOPCA BINOCHHa), Ha pa3NIuHTa BB BCEkn OTdelen DVBrAteI. PopaNiTexHOLOUHn H npOIN3BOCTBEHn ORpaUNHeHHF PhMpata Briggs & Stratton Moege da ZmeCT Daedn DVBrAteI C no-BvCOKA HOMHaJIHa MOUHOCCT C dBVrAteI ON Te3n cepnn.
Texnka 3a 6e3onacnoct ha onepaTopa
CIMBOJIN3ABE3ONACHOCT INYNPABJEHNE
IpeDynpTeHnHT CmB0n 3a OAnCHOCT OpeDJIe IpeOxpaHNTenHa HnFOPMaUH 3a PnCKOBe, KOITo MOrAT Da DObEaT DO HapAHBaHE Na IepCOHana. CnHnAImNpuAa Dyma (OpACHO, PDEUYPEXKDEHNE uIN BHIMAHIE) ce noctabra 3aeHNO C npDynpTeHnEH CmB0n, 3a Da NOCOH BepoTHOCTTA NOTEHnAlHaTa cepHO3CHT Ha HapAHBaHTo. DoTbHnTEHNO, EInH CmB0n 3a OAnCHOCT MoKe da nOKa3Ba BVda HA OAnCHOCTTa.

ONACHO nocuBa OnaCHOCT, KOTo, aKO He 6bIe n36erHaTa, ue doBeDe Do cMbpt Nn cepno3Ho HapaHraBaHe.

IPEDyPEXKDEHNE NOOCUba ONaCHOCT, KOrTO, aKO He 6bJe n36erHata, MOKe da DoBeDe IO CmBPT NJI CepNo3HO HapaHaBaHe.

BHIMAHNE NOOCOVA ONaCHOCT, KOrTo, aKO He 6bJe N36eHata, MoXe da DOBeDe Do MaNka HIn CpeHa CTenEH Ha HapaHraBaHe.
PNEyPExKDeHNE noocuBa cHTyaun, KOrTO 6n MOrna da doBede do nobpeXdaHe Ha npodykta.

PNEyPPEKDEHNE
HЯКОN O T CbCTaBHNTE ELEMEHTN Ha TO3N IpoDyKT N CBp3aHNTe C THX npINcNOOJIeHnA CbIbPxAt XMHUCh N BSeCTBa, IN3EcTHN B UcTata KAnIpOpHnRA KATo IpnuHInTe Hn pAk, YbpeDa HA HOBOPoHEnTe INn Dpyr yBpeDn Ha penPOyDKTNBHATA cnOC6HOCT. Cne Pa6Ota C THX, INMnBaIte PbIcete cN.

PNEyPPEXDEHNE
H3ropeIe r3a0be OTE TO3n IBvIaTeR cBbDpKAT XMMUeCKN CBeIINHeHH, N3BeCTHn Ha ⅢaTc KaIInfOpHnKaTO npuHNHTe n paA, YbpeJdaHn ppaXdHaene, INI dpyrY bYePdHaHn, Cb5bp3aN c PENPOyKTMBHOCTTa.

PNEyPPEKDEHNE
KopnpaBn Briggs & Stratton He oOobpBa n He no3BoJbA n3no3BaHTo Ha Te3n DBVrataN Bbpxy BcBdxOAn h3 K0JIeNa, MOTUKNLeTn, YBecenTIeHN KONHKn/kaTnH, JETaTeHN anapatu nn TpaCnOPTH CpeCTBa 3a yuaCTne B cbTe3aTeHN MeponpnaTn. N3no3BaHTo Ha Te3n DBVrataE H a TaKnBa MauHH MoKeJa DoDBeDe Do MaTePnAHN uTeN, cepNo3Hn HapaHBAHn (BKJIOHTeHn Napaln3a) n DOp n Do cmbpt.
PNEpyPExKHeHne:HaCToAunrT DnuratEn Ce doctabn OTr Briggs & Stratton 6e3 macNo. Pnep Da cTAPtnate DeBniratEnCe yEpeTe, ye CTe HaneNm BAC No Hcero cnpoe INtCTpykUnte ToBa TpkoBDCTBO.AKO rO CTAPtnate 6e3 macNo,ToJe ce nobPeDn,6e3 da 6Be De Bb3MOxHO da Ce pemOnHTpu n 6e3 NOKpNTHeOT rapaunrtta.

PNEyPPEKDEHNE

BcH3nHbT N HEROBNTe napn ca n3KKnOHTeHNO orHeonacn N 36yXJIbN.
Ppi DJIIMBaHe Ha rOpINBO
- ɪnəkʌŋoʊteɪeɪdɪrəgɪaɪeɪŋɪnɪrəgɪaɪeɪŋɪnɪrəgɪaɪeɪŋɪnɪrəgɪaɪeɪŋɪnɪrəgɪaɪeɪŋɪnɪrəgɪaɪeɪŋɪnɪrəgɪaɪeɪŋɪnɪrəgɪaɪeɪŋɪnɪrəgɪaɪeɪŋɪnɪrə
- Пьнete pe3epboapa 3a ropuho ha OTkpnto nB do6pe BENTnnpaHO nOmeueHne.
He npenbIbainpe pe3epboapa 3a ropnBO.3a da no3BONITE pa3uipene Ha 6eH3nHa, He pIbnHeTe Hd doJNHaT OCHOBA Ha IbpNOBHATA 3a HAnBaHe Ha ropnBO.
-ДрьжтебензидалачOTИСКРИ,OTКРNTINПамьцIN,CИГHAJIHNJAMNITONJIHnIДугИЗANAJIENTHIN3TOUHNU. - PpOBePbAaTe YeCTo rOpBONPoBOAnTe, pe3epBoapa, KaNaKkTa n CbeDInHeHnTa 3a NyKHATnH NII TEoBe. 3aMeHeTe n, Ako e Heo6xOdmo.
- Ako ropnboto ce pa3nee, n3yaKaaiTe dokato To ce n3napn, npedn da cTaptnpate Dbratela.
PnCstaptnpaHe Ha DBrTaTeJIa
- Yeepete Ce, 3e 3anaNTenHata Cbeu, Wymo3arLywnTeN, kanaykata ha pe3epBoapa 3a ronpBO n Bb3dyuHnHa fNtBp (ako Ima TaKnBa) ca Ha MRCTOTO cn N ca Ob63onAcEH.
He pa3BbptaTe DnBaTeMa C n3BaTeHa 3anaTneJa Cbeu. - Ako DnBnATEENrCe 3aDnBn, NoCTabete CmYkaHa (aKO Ima TaKbB) Ha N03uNnOPEN/RUN, npDnBnTe pBnHaTa r3 (aKO Ima TaKaba) Ha no3uNn FAST npa3BbPtaIe, DoKATO DnBnATEENr CTapTnpa.
Ppi pa6oteua MaunHa
He haklahaite Dniratela Nm MaunHata noD bI, KOITO BOIN DO pa3nBahe Ha 6eH3nHa.
He 3anyuwaTe kamepaTa Ha Kap6ypaTopa, 3a da cnpeTe Dniratena.
HnKora He cTatnpaIte N He pa6OTe T C Dnuratene npo OTCTpaHeN KOMnKeT Na B3dyuHna PnITbP (aKO NMa TaKbB) IIN npi OTCTpaHeN B3dyuH e PnITbP (aKO NMa TaKbB).
Pn CmHa Ha MacNoto
- Ako n3TOBATE macnOTo OT rOpHATA Tp6b6a 3a PbJIHeHc MacnIO, pe3epBOAp8t 3a roPBO TpRb6a Da 6b6e npa3eH, INI To MOKeJa nOTeH e I da pNUnHHNoXapar INI INKcINo3IN.
PnTpaHcnpOptnpaHeHaMaunHaTa
- TpahncnpTnpaIe c PPA3EH pe3epBoap, nIc KpaH 3a noJaBaHe ha roPnBO Ha no3nU OFF.
Korato ckaJauPate 6eH3n HnO6OpyDaBaHe c rOpNBO B pe3epBoapa
CknAmpaIte TaaneOy Tnei,neKu,BODoHaRpeBaTeNn nIn npYn eJeKtpnueckn npBOpn, KOTo IMaT CnHnHa N lamMa nDpy 3anaJIteHeN mTOOHTe MoRAT Da B3IpaMeHrE 6b3HNOBnTe nap.
Ako mHa n3TuHaHe Ha npirodeH nnBteuHEn ra3 npOnaH B nomueHneTo, He cTApTnpaTe DnRatela.
He n3noI3BaIte roPnBa 3a hauJIHo 3anaJIbaHe noI hauIraHe, 3aOTo napITE mC sa 3anaJIteJIHn.

NPEyPPEXDEHNE

TolmaHaMOPcKaBnCOnHa
Принаиморск Висуни над 5000 Фута (1524metа), 6EH3н C минимално OKТАНОВУСЮ 85/85 AKI (89 RON), e пгелл. 3а д оctане сьБМЕСТIMс ИЗСКВАИРЯТа 3a НИROTO на EMCSNITe, с HaNAra NaHCTPOnka Ha DBrAteYn B CBOTBTCTBNe C rOJMAТа наДМОрSCA ВисCU. Ra6bToTа 6e3 kabaa HAcTPOKa Ze DOBeDEdo NOHIXKABaHe Na TExHNUeCKNte NOKa3aTeN, NOBNIsaBaHe Na KOHcymaUNrTa Na GROpIBu YbEINuYeHn BpeDn EmCmN. HanpaBete CnpabKa npi YbJIbNOMOUe npEcdTabTeN Ha Briggs & Stratton 3a cBeDeHn OTHOCH noHCTPOKaTa 3a rOJMaHa NAMOPSCA BcOUsHnA.
He c npenopbya paobota ha dbratena c perynipaK OMnIeK 3a roJMa haamopcKa BvcoHna npn BvcoHn no2500 cyta (762 metpa).
Kak ce haJIbMa macNo -ФИгура ③

PNEyPEXKDEHNE
BHe3nHbT N HerOBnTe nap ca n3KlIOuHTeIHO orHeoNaChn N 36yXnBn.
Tóxap NIN B3PMB MOraT Da npuHnT cepNo3Hn ObrapHHN NIN CMBPT.
PpIdoJImbaHeHa roPbBO
ИЗкlioочete Двигателги n FO octabete Da ce oxlaцn haN-MaNKO 2 MInHTN,празд СВалite Kanaykata Ha pe3epBoapa 3a rOpINBO.
-Пьн electe pe3epBoapa 3a ropuBO ha OTkpTuTo nIn B do6pe BeHTnIupaH oNomeuHne.
- He npenbIbIaIte pe3e9pBoaap3a rOpINb. 3a da no3B0JIte pa3uHpeHne ha 6eH3nHa, He nbIhETe Ha nd oJHata OCHOba Ha rbpNObHata 3a HauMbAhe Ha rOpINb.
- DpbjxTe 6eH3nHa daJIeH OT Ickpn,OTKpntn IJaMbIcN, CInHaJIHn IaMnI, TOnIIHaHn I dpyrN 3anaJIteJIHn n3ToCHnI.
- PpOBePbAaTe YeCTo rOpBONpOBoDnTe, pe3epBoapa, KaNaKaTa n CbeHHeHnraTa 3a nyKHaTnHn nn TeObe. 3aMeHeTe n, aKe o Heo6xOdmo.
- Ako ronpBOTO ce pa3nee, n3yakaaiTe dokaTo TO ce n3napn, npedn da cTaptnPate DBratEJIa.
1.Почистете пострданьо Okono калачкata на peЗервараза за роримо打死 Мльботи и насноовань.Сва对接еkanчкata(A)(Фигура3).
2. HanbIhHe pe3epBoapa 3a ropInBO (B) c 6eH3nH. 3a da nO3boJInTe pa3uHpeHne Ha 6eH3nHa, He IblHeTe Hd oOJIHATA OCHOBA Ha TbprOBHnA t3a HAIINBaHe Ha roPINO (C).
3. NocTabete o6paTHo KaNAyKaTa.
Kak ce cTaptnpa DbBraTeJIA - Φnrgpa 5

PNEyUNPEXKDEHNE
HaBcekn25yacaunnexxeroDno
Ja ce nouchTa Bb3duHnIe qntbP
Ja ce nouchTba npedpntbpa*
HaBceKu50yacaunjEeXeRoDHo
-Да ce CMEHЯ MacNOTO Ha DBiRaTeHa
-Да се пэрlexдатшутоаглuyштели инckporacntelг.
ExeroaHo
Ja ce cmeHb3duHHnHp.
Ja cce cmehn npednTbpa
- Da ce cmeha 3anaIHTeHaTa Cbeu
- Piounctete pfntbpa 3a ropnBO
Ja ce nouHCTn Bb3dyuHaT OXJaDInTeJHa CnCTema
-Да ce npobepr mekdHaHa KJIanaHInTe**
* PnHaJIuHne Ha 3aIpaWHeOCT HIN HOceUc Ce B OKOIHOTo pOcTpaHCTBO OTJOMKn, Da ce NOpHCTBa No-YeCTO.
** He ce hana, ocehen ako He 6bdat 3a6en7aHn npo6nemC texhuecknte nokaataHn Ha Dbratena.
PerynnpaHe Ha Kap6ypatopa
HnKora He npaBeTe hAcTpoiKn Ha KapbypaTopa. KapbypaTopbTe peryInpaB H 3aOda, 3a da paBoTn efeKTNbHO pnIObeHeTo ycNoBn. Bce nak, aKO ce HanaRat HAcTpoiKn, 3a cepBn3Ho 06CnyXBAHe CE o6bPHeTe KbM HrKOy YpblHomooJe npdctBaHTen Ha Briggs & Stratton.
PNEyNPEXKDEHNE: PmO3BOJNTeRnT Ha 06OpYBaHcTe, Ha KOEtO To3n DnBiratEn 16bJe MOHTnAp, ONpDena MaCImaMJIHe Te OOBOTn, pRn KOnTO Ue paObOTn DnBirATenr. He NAdBniWabaiTe Te3n OOBOTn.
Kak ce cmeHra3anaJIHTenHaTa CBeue - FIngamma 6
IpoBepBaIte MekDInHATA (A,Φnrgpa 6) c nomouTa ha KaIb6bp 3a TeN (B). Ako e Heo5OxIDMO, perylnpArte MeKdInHATA. MoNTIpaTe Ia3eTHe TCEuTc a PnpenOpBbAHIN BpTRMaMOMENT. 3a perylnpHaNe Ha MekDInHATA nIN OTHOCHO BByrTHnIMOMENT 3a 3aTfRaHe, HanpAbete CnpBaKa B pa3JeN TexHnueckn DaHHN.
3a6eJekKa:Ha HnKoN MeCA,MeCTHnT 3aKOH n3NCBA yN0TpEba Ha pe3NCTOpHa CBEu,3a Da ce NoDTCHAT paNDOCMuyueHnTa. Ako HactoTnIAT DbratEn T e fapBnHTHOO60pyDBAH cP3EOTOPHa CBEu,INON3BaHTbC5uH TIN CBEU 3a CMHA.
MoeJInc Kbc HNBONoka3aTeI
-
CbaleTe HbONoka3aTeJIa 3a MacNoTo (F, FInpya10) n ro n36bpeTe c uCT nIaT.
-
Hanneite BnHmATEIHO MaCIO B DnBrAteJI npE3 OTbopa 3a HAnBaHe (E). HanbHnTe Do Toykata Ha npEnBaHe.
- NocCTaBete HbONOKa3aTeJIH, Ho He ro 3aTraIaTe. CbaneTe ro npOBepeTe HbOTO Ha MaCnTo. HbOTO Ha MaCnTo TpRbBa da 6bJe Do MapKnIpOBkata FULL (G) Ha HbONOKa3aTeJIH.
- MoHTpaIaTe n 3aTeHHeTe HbONOKa3aTeJIa.
ModenC ydbJxKeH HbONOKa3aTeI
- Cbane HnBOnoka3aTeIa MacNoTo (F, FInrypa 11) n ro n36bpwe Tc uNCT nIaT.
- HanneTe BHMMATEHMO MACNTO ppe3 OTBOPa 3a nbHHeE (E). He npenbIbaTe. Cned naibahe Ha macno, nuchakte eHa MNHyTa n nocne nak npOBepe HMBOTO MY.
- MoHTpaaTe n 3aTeHHeTe HbONOKa3aTeJIa.
- Cbajete HNBONOKa3aTeH IN PNOBepeTe HNBOTo HA MACNOTO.To Tp6Ba Da 6bJe DO Hau-BnCOKn3Akap 3a HauJIbaHe (G) Ha HNBONOKa3aTeHa.
- MoHTpaaTe n 3aTeHHeTe HbONOKa3aTeJIa.
Kak da ce o6cnykBa Bb3duyHnHnФnIytp - FnIpya 13 14

PNEyPEXKDEHNE

Béh3nHbT N HEROBNTe napu ca n3KlIOHTeHNO orHeoNaChn N 136yXnBn.
Iopkap nIbB3pNB MOraT da npuHnT cepno3n o6rapnna CMBPT.
Hikora He cTapTpaIte n He pa6oTe c Dniratena npn OTcPaHeN KOMnKeT Ha Bb3duHnA FInlTp.
PNEyPENXDEHHE: He 3nON3BaIte CbCTeH Bb3dYx INn pa3TBOpNTeIN, 3a da NOChTBeA DfJIbTa. CbCTeHInr Bb3dYx MOKe da nobpeDn fNlITbpa, a pa3TBOpNTeI rO pa3BtBapr.
CCTemata Ha b3dUHHH pNITbP n3nON3Ba pNITbP oHaBnAT pNITbPEN mATEpMnA pNeDpNNITbP no OOnu. PneDpNNITbPbT MoKe da 6bDe npOMBaH nOJ3BAH NOBTPOHO.
- Pa3xIa6eTe cKo6nte (D), KOnTo 3aIbpxaT Kanaka (A), aKO nMa TaKiBa.
- OTbOpTe Kanaka n Cbane npednItba (C) n pfntbphna IbpXaTeI (H), ako mtaKbB n pfntbpa (B). BxkTe Fmrgpa 13.
- 3a da nouchte HacnoBaHnraT, neko nouykBaIte fInbpa Bbpy TBbpda NOBbpxHOCT. Ako fInlbpt e npekomepHO 3ambcen, 3ameheTe rC HOB.
4.ПомиITE npedfntbpa BbB BOEN pa3TBOP ha noocTbaa npenapat.OctabeTe ro do6pe da ce n3cyuHa NB3dyx.He cma3BaIte npedfntbpa. - MoHTnpaIte cyxN IpeIeIeIbIbp, IbIpbXaTeIa Ha IeITbpa (aKO IMa TaKbB), n IeITbpa.
- Пи модени, оборудан в bздуншen рилтbp, поka3ан ha Фигура 13, поста bete yшпета наkanaka (E) вшлuntte (F).
- Nocabete Kanaka n ro 3akpenete cbc fikcatopite.Ybepete ce,ye fikcatopite ca 3aterHatn.
Kak ce nouchTba qnlTbpa 3a ropuBO - Hnpya 12

PNEyPPEKDEHNE

BHe3nHbT N HcROBNTe nap ca N3KJIIOHTeJIHO ORHeONaCHN N36yXJIINB.
Ioxkap uIN B3pNB MOraT da npuHnT cepNo3n ObrapnHn IIN CMbpt.
-ДрьжтебенидалачуOTИСКРИ,OTKрTNПамьсИ,CИгналнлamnI, TOnJIInHaNДpyrN3aJaNTeHINN3TOHnU.
- PpOBePRAaTe YeCTo rOpBONpOBoJnte, pe3epBoapa, kanauchKaTa n CbeDInHeHnra 3a NyKHaTnHn TeOBe. 3aMeHnTe rN aKO e Heo6xOdmo.
- Ppei noocTbaHe iHn CmHa Ha φnIbTa 3a rOpNbO, n3ToUeTe pe3epBoapa Hn 3aTbOpTe KpaHcTe 3a nOdaBaHe Ha roPbO.
- Pe3epBnHTe TaCTn TpR6Ba Da 6bDaT CbC CbIOTO KaYeCTBO N Da CE MOHTnpaT B CbUata Na0uNIA, KAKTO OpiunHAnHInTe YaCTN.
- Ako ronpBoto ce pa3nee, n3yaKaaiTe dokato To ce n3napn, npedn da cTaptnape DbIrataTeJ.
- 3aTbOpete KpaHcTe 3a noDaBaHe na rOpuBO (B,Фmrgpa 12) n octabete DeIbratela da paBoTH,doKato cnpe.B npotmben cnyau, rOpMBOTo MoKe da npoteHe, pnuHHBaBkn nOxkap.
2.Демонтпаite кожуха ha Фиntьра ha roрив (C)c raeueн Клioч.Почисте OTLOMKNITEOTФиNTьра(A)иOTКожуха ha Фиntьра. - Поберете за пькатини сплтбра за горю в кожухma My. Ако e Heo6xoДМо ГСмehete.
- MoHTnpaIte fIJIITbpa 3a rOpINBO, rapHNTypata (D) u Koxyxa My. 3aTeHHeTe ro c rauehen KJIIOU.
- OTbOpTe KpaHcyTo 3a IpoDaBaHe Ha roPnBO n npOBepTe 3a TeOBe.

IPEDyIPEXKDEHNE

PaboteuTe DBratEn OToJIaT TOnJIHa. Yactnte Ha DBratEnIte,
oc6eHO wymo3arnyuHTen,CTaBATnKIOUHTeHNO Ropeu.
Pnp dOnnp moKe da noJyHte cepNo3Ho n3rapHe.
TOpMnTe OTnabu, KATO JnCTa, TpeBn, XpactaIak N npyrn, Morat da ce 3anaJrT.
Octabete uymo3aIyunTeIa, uinHbpaHa DnirataI np6pata da ce oxlaJrT, npdeI da rN DOKOCBATE.
- OtctpaHHe HATpynAHIne OTNOMKn OKOLO Wymo3aIyWntTeJn IuINHdbpa.
PNEyPEXKDEHHe: He n3non3BaIte BOa, 3a da noocntBaTe dBnraTeJI. BODaT MoKeJa 3ambpcn ropnbHata cnCTema. N3non3BaIte YeTKa IIN cyx PnAT, 3a da ro noocHTne.
ToBa e BnBraTeI C b3dUyH0 OXnAaDHe. NcHcTOnTHne I HacNOrBAHnRA T Maor Da orpaHnat Bb3dyuHnI NOtOK I da pNCHHT npePBAHETO My, KOEt BOiD IO HAAMARBAHa Hn OKa3aTeJNTe I npOdbJnxjTeJIHOCTTA HxJIBOTMa.
I3non3baIte YeTka HnI cyx Inat, 3a da OTCpaHITe HaCIOBAHNATA OT npeJna3aIHTe Na npCTtne (A) (Fpyra 8).Pi3eTe NIOCTOBATA CNTema, npyXHHITE u npYABENHITe (B).Pi3eTe npocTaHCTBO TO OKO NO 3ad yMoO3aRyuHHTe (C) Cb6oDHO TO BCNkAKBn 3anaIIMn HAcNOBAHHa.
Cknaipahe

PNEyPPEXKDEHNE
BéH3nHbT N HEROBnTe napu ca n3KnIOUHTeIHO orHeoNaChn N 136yXnBn.
Itoxap nB3pNB MOraT da npuHnT cepno3n ObrapnHn NmCBpT.
Korato cKJaIpaTe 6eH3nH nIu o6OpyDaBaHe c rOpNBo B pe3epBoapa
CknAaPbAaTe daneOT nneu, neeKn, BODoHarpeBaTeHn Hn npyn eJeKTPueckn npBopn, KOTo IMaT cMnHaJIHn lamnn Hn npdyr3 aNaJIteHn mTOOHN, 3auOTo TE Morat Da Bb3nAmEHT bEh3nHOBITe Napm.
TopuBha CnCTema
TropBOTO octapBa CneIcknaIipaHe 3a noBeue OT 30 dH. OctapAIOTO ropIBO BOI NO O6bpa3yBaHe HcKcEJIHHN cMOJeCTn OTJIOKeHN B TropNBaTa CNTeMa IIN N O OCHOBHTe CaTHn HA Kap6pyaTopa. 3a Da 3aZanTe ROPIBO CBExo, n3IOn3BaIte CTa6mN3atopA 3a ropIBO FRESH START Ha Briggs & Stratton, KoTo e eoCTbNeH NoD fOpMaTATEuHa Do6abKa nn PhaKoH 3a KAnKO BnoNoDaBaHe.
Ako ce do6abra cta6nln3atopora 3a ropnBOTO cflracho IHCTpykunTe, Hma Hjxda BeH3nHbT da ce n3oYBa. Octabe T DBnIaTeJrT da pa6Otn OKOJ 2 MHNyTn, 3a da CnPKynipa cta6nln3aTOpbT B ropnBHaTcNCTema. Toraba DnIaTeJrT I ropnBOTMOrAT da ce cbxpaHnBAt Do 24 Meceua.
Ako 6eH3nHbT B dBiratene He e 6bn Obpa6oTBaH cbc Cta6bn3aTOp, TOn Tp8Ba da bIbe n3TOeH NdoXOJNa 3a ceta CBd. OCTabe Dbratene Da p60Tn, DOkATO cnpe npaoi HneepBnaE ha rnpBOTo. 3a Da npDlbPxAte CBxeCTTA ha ropnBoto npKnadipapHeTo My, npenopbBaMe n3IOJ3BaHeTo Ha cTa6bn3aTOp.
MacIoto Ha DBrTaTeNa
Pries jjungiant varikli
Pries jjungiant varikli
O6pa3oBaHne NcKpbI MoKET BbI3BaTb BOCJIaMeHeHne roIoux ra3OB.
3To MoXeT npNBecTn K B3pbIbY nIOxApy.
He 3anyckaTe Dniratentb B Tom MceTe, rJe npocxodnt yteka npnpoHoro nIu CxKxehHoro ra3a.
He nCnoB3yIe nycOBbIe XnDkoCTn B a3pO3oNbHoi ynpaKOBKe, TaK KaKnx napbl orHeonacHbl.

IPDEyIPEXKDEHNE
BbIXoNbHBe ra3b coOpKAT OKCb yrIepoA - 6ecuBtHb n He mIeOoIa 3anaX aIOBtBu r3.
Bbixhme okncy yrnpoda (yraphoro ra3a) moxet Bbl3BaTb pBOTy, notepu co3HaHnI nn CmepTb.
3anyskaite n 3knpyaTpyte Dnrgatelb BHe NOMEeHna.
He 3anyckaaiTe Dniratelb B NOMEeHnn daxe npu OTKpbItbIX OKhAX nDbepx.

PPEyPExEHE

BbCTpe BTAIRBAHHe WHPa CTapTePA (OTaJa) MOxET npITRHYt bpyK K DBrAteIIO b6CTpee, Yem Bbl yCneete OOTyCTMb pyKu SHypa. 3TO MOxET pNBEcT K NepelomAM, yun6am nnn pactRKeHHnM.
- Pnp 3ayncpe DnBraTeTn, NotHnTe ChauJa 3a pyChy uHypoBOrO cTApTePa MDoJIeHNO, a 3aTeM, KOrJa NoYbCTByeTe CoPOTnBHeHne, NotHnTe bIcTpo, T06BoI N36EkaTb OTdAn.
- Pered 3aynckom DbiraTeJIa, CHMMITE BCE BHeuHne Harpy3Kn Ha o6OpdyoBaHne/DbiraTeJIb.
HeNocpeCTBENHO NOcOeINHEnHHbIe 3JIeMeHTbl O6OpyDoBaHnI, HAnpIMep, JIe3BnI, KpbJIbUaTKn, IuKbbl, 3Be3JDOuKNi T.N., HO He ORpaHmUHaBaCb IMN, DIOJXbHbIb HAdExo3aKePENHbIe.

PNEyYPKDEHNE

Bpaauouece TaMOny BoTn B KOHTaKt C pyKaMn,Horamn, BOLOcamu, OdekDn ee akceccyapamn n3xBaNTb nx.
TO MOXET npBecTN K TpaBMaTHueCKo AMnTyauN NIN TReKeIbIM pBaHbIM paHAM.
He 3KcPnyatpyuTe o6OpuyoBaHne 6e3 yCTaHOBJIeHHbIX 3aUHTbIX npncnOco6IeHni.
He np6njkaite pykn HnK Bpaazaoumca Detanam.
IoB83bBaIte DInHHbIe BOIOcbl CHIMaTe IOBeINpHbIe N3DeJIa.
He hocnte Cbo6oHyo OJexy, 6oTaoUmeCe shyprkn nppeMTebl, KOtOpbIe MOrYt 6bIb 3axBaueHb DmKxuIMnCra dTeTAMn.

PNEyIPEXKDEHNE

BoBpempaobtIbDnIaTeJIbBldJeHOT TeNIO.KeTJIbDnIaTeJIa, Boc6eHnoCTnIywnTeJIb, ctaHOBATcOueHb ropAmm.
PpNKoCHOBEHnE K Hm MoXeT PpNBcTeN K CnJbHbIM OXOrAM.
BocnnaMeHembmyCOP,HaNPmep Jnctb,tpaba,XbopoCT nT.I. Moryr 3aropetbcra.
JaTe rIywnTeIIO, cIIINHpy upepaam cIIINHnpa ocTbItb, npexJeem doTpaNBAtBcAdo HIX.
OuCTnte 30Hy BOKpy rIyUHTeIa IcJIINHpA OT CKONBweroCBOCIIaMeHReMo MYCopa.
IcnoIb3ObaHnne nIeKcNpyataaJdBiratTeJHa JIOBOI TeppITOpnn, pOKpbTOn IeLecom, KcytapHnKOM nIIN TpAB0B, 6e3 YCTaHOBNEHHORo NCKporacntTeNa HcCTMe BixIONhIXra3OB, ABNTcHApUHeHem 3aKOHa KAnIpocpnO6 o6BcCTBeHNbIX pecypcaX, CTaN4422. COrnaCHO CStbN 4442 NCKporacntTeBdoJONJH eHXoDHTCBaR BpaOChEcoSTOHn. DpyrIn WtATbI nnPfepaJIbHbI eOpCDAkUNMOrY IMETb CXOHNbE 3aKOHbI. O6patNTeBc NKpON3BOmTeJNO opIRnHbHOO6OpyDOBaHn, PPOaBuNy nI INJepey dNprNo6pTeHnckPcAorTeJn, PpeHa3HaehHOHO dN BixIONHO CNCTeMbI, yCTAHOBNEHHOI Ha 3TOM DNBtATEJNe.

PNEyPEXKDEHNE
CnyaHoe 6bOBAHne NCKpbMOKET npBecT K NOXAPy IINI nopaxHeHIO 3NeKTpUeCKM TOKOM.

CnyaHbIy3aYcCK MoKET npBBeCTN K 3aXBaTbIbAHMo, TpaBMaTHueckO amNyTaun pa3nUhBix cAteM TeA nII K o6p3OBaHIO pBaHbIX paH.

Puck BO3HnKHOBeHnI NOXapa
Ipeed BbINOJIHeHem peryInpOBOK nIpeMOHTa:
OTcoeINHnTe npOBd CBeyn3axinraHn ydaInTe ero OT CBeHn.
- OToeMHnHe OToPiaTeIbHbB BbBOd aKKyMnyTopa (ToIbKO dIraDbIrataNei c 3JIeKtPoCTapTePOM).
- IcnoIb3yIte TOnIbKO noIOxOJaIuIe INHCTpyMeHTbl.
He MeHnTe HaCTpoiKy npKnHbI, TAR nnnnHbIX DeTanee peryIaTopa dnyyBeJIuHnHaCtObI BpaueHnBaI dBiratela.
3aIacHbIyactnIOJXKbIbITbIeHTNHyBIMnYcTaHaBnBaTbCnHaToXe camOe MeCTo, YTO INepBOHaunbHbIe DeTaJI.
He yadapIte no maxobky moJOTKOM nIN TBepdbIM npEmdetom, T.K. maxobk MOKET no3Ke pa3OpBaTbCBA BO BpEma 3KcPnyatauun DnBiratJIe.
Pnp npOBepKe cncTeMbI 3aXnraHnA:
IcnoJb3yIte pa3peuHHH TeCTep CNTeMb 3aXnraHNA.
He npOBepRte NCKpy C BbHyToi CBeOy 3axnraHna.
y3JIbI DvIrataTeI N opraHbI ynpaBJeHnA
CpaBnHTe pncyHOK CO CBOHM DvIraTEnEM, YTO6bI O3HaKOMITbc Ca pacnOIOJXeHNMe pa3NJuYbIX y3IOB DvIRaTeNn I orpaHOB UnpaJIeHN.
A. Денихимашидогателл Морель Тин Кд
B. Cbea 3axnraHna
C. Bo3duuHbHΦnIbTp
D. Pучka упраьени ВОзdyшон 3acnoнков
E. TOnnBbI 3aOpHbI KJIanah (Onu)
F. Puyka shypoboro cTaptepa
G. Koxyx dπaπntbπaJIbueB
H. Pbyar ynpablenia npoccelem (onua)
I. BbIKIOUaTeIb OCTaHOBa (ONZnA)
J. TOnJIINBHyIb 6aQoK I KpbIiKa
K. YdInnHeHHbI uyn (Onu)
L. Kopotkniu np (onua)
M. Побka синвого OTьерстma macna
N. MaclohanBHOH nATpy60K
0. flyuunTeIb 3aunTHoe yctpoiCTBO flyuunTeIa (onu) NckporacnTeIb (onua)
P. Bыклочаель үлүйтүческого үлүсka (модени сүлүйтүческам үлүсokm)*
*ObopyoBaHne MoKET bOpraHbI dNCTaHcIOHOrO ynpaBLeHn. OIncaHne paacnoJIoKHeHn i paObToI pOraHbO mDcTaNIOHO typaBJeHn CMOTpnte B pykoBOCTBe NO KcNpyaTaUIN oObpyoDaBHn.
3Kcπlyaataza
KoJIuYeCTBO macJa (CMOTpnte pa3JeI TexHnueckne daHHbIe)
PeKOMeHndaцnnoNcNoJIb3OBaHHIO MacJa
Mby peKOMeHdyem nCnOJIb3OBAtB pa3peWSeHHbIe KOMmaHnei Briggs & Stratton Macna IaIIOCTNkEHN HnIyUHnx 3KnIpyatauONHbIX xapakTePncTnK. DpyrIe BbICOKoKaeeCTBeHHbIe DetepreHTbIe MaCna dOnyCKaOTcB TOM Cnyae, eCNI OH NkAcssFmIpoBaHbI KaK "For Service SF, SG, SH, SJ" mI IN bIwe. 3anpeaaetc nCNOJIb3OBAHne CNEUHaIBhIX Do6aBok.
Temnepatypa IApuyxHoro BO3Dxa OnpeJeAeT HaINeJxauyIO Br3KoCTb MOTOPHO Macna. BocnoJb3yTeCb TabIiuei dnn BblOopa COOTBETCTBYUoi EBR3KoCTn Dn OXnJaEMOrIO HInTePbana TemnpatypbI HApuyxHoro BO3Dxa.
- IcnoIb3OBAHnE Macna SAE 30 npn TempepaTypax HnXe 40^ (4^) npuBeTeK 3aTpduHHeHOMy 3aIpyDInrataTn.
** IcnoIb3ObaHne Macna 10W-30 npI TeMnepaTpyax BblIe 80^ (27^) npBBeTe K noBbIeHNOMy nOTpe6JIeHIO macna. YaIe npOBePraIte ypOBeHb macna.
Kak npOBepntb ypoBeHb Macna/JoNTb MacNo-Pnc. ② 4песдобаJIeHem nI npOBeKoI yPOBHa Macna
- YctahOBtte DniratJIb B Trop3OHTaJIbHOe NIOJOKeHne.
Ochntte 3ohy maclo3aJINBHO OTBepCTnO TIO6o Mycopa.
Moden C KopotKmUynom (Pnc.2)
1.ИЗВЕКITEцун ИЗМЕРЕНЯ уровь (С)и потраве erо чICTОТТРANOЧКО.
2. Bctabte uynI nIa I3MepeHn yPoBHa Macla, Ho He 3aTyrBaIe. YpoBeHb Macla doJxhendoXoOHTb do OTMeTKn FULL (3aOnJIHeHo) (D) Ha uyne.
3. 3aIbAteMacNoMeDHeHBO MacloHaIBHO ntpy6ok Dniratena(B). DoabBte MacNo do ypoBn nepenBa.
4. Bctabbte obpatHO n 3aTAHnTe uyn dIy I3MepenH yPOBHa macna.
MoeJIc ydJIHHeHHbIM yIynom (Pnc. 4)
1.ИЗВЛЕКИТЕ УП ИЗМЕРЕНЯ урOBн MaCna (A)и obOTprte erOЧSTоТ ТрЯнок.
2. BCTaBbTe n 3aTaNHTe uyn dIy IaN3MepeHn yPOBHa macna.
3.ИЗБЕКЛТЕУПИnpОВЕРТЕурOBeHMaCla.OHdoJIXe COOTBETCTBOBaTb BepxHNeЧАСТИнДИКATOPAЗANOHNHeHn(B)HaUyne.
4.При добavenи Macna,залвашие сю Мделноь MacnoHAnBnHoi nATpy6ok DBinatate (C). He donyckaite nepenolneHn. Поссд дobaveni macna, NOdoJxDte Ody MInHTy, a 3aTeM CHOBA npOBepbTe yPOBEh macna.
5. BctabbTe o6paTHo n 3aTaNHe Te yuN dIy I3MepeHn yPOBHa Macna.
PekomeHdaunnoNCnOJB3OBaHIO TOnJIbBa
TOnnBO DoJXHO COOTBETCTBOBAtcJeIyIOUm Tpe6OBaHnM:
- YnCTbI, CBexH, He3TuInpOBAHHbI 6eH3H.
- Мнимальhoe oktahooboe Yncno 87/87 AKI (91 RON = nccneobatebckoe OKtaHOBE Yncno). Пп рбote на боьwo ВсOTe над урOBHem MOPa, CMOTpITe yka3aHnH NIXe.
-Ду新股аетсббнHc coedрханemdo 10%3taHOLa (6eH3ocnnpTa) nIIN do 15%MTBE(TpeTnHbI MeTNb6TyNIOBbI eФиp).
OCTOPOXKHO: He donyckaetcna nCnoIb3oBaHne hepA3peuHnHO 6eH3nHa, HanpIMep, E85. He donyckaETcnpMeUbnAaHeMacna B6EH3n, ININMOndPkaunB DnIRatela I na paoTbHa aIbTepeHaNTBbIX BnDax TOIpNtBA. 3TO MoKet nobPeDntB KOMNOHEHTb DnIRatela anhHyIpObaTb rapaHTHO Ha DnIRatela.
Длгзашипь тОПЛИВНССТЕМБI OTOBa3OBAHнCMOLы,пIMeшиBaHTe CTaBnIN3ATOP TOnJIbA KToIIbY.CMOTPte pa3dEN XpaHeHne.TOnJIbBO MOKET OTMHATbNo COCTABy N KaCCTBy.EcNbl Bt cankMbAeTecb C TrpyDIOCTHMn pRi 3Anycke nInB bPa6Ote BaWero DBaTeTEn,TO CMeHnTe NOCTaBnIka TOnJIbA nN NOMeHnTe TOrOByO MAPky ToJIbNAr.Даннbl Dbratelb CeTpNФmUropoBAn dNЯ pa6OtBJHa6EH3HNe.DBratelb IMeET CNTCTMy KOHTPONJ TOKCnHOCHTBbIyCKHBIX ra3OB,KOTopar IMeET O6O3HaueHne EM (MOmФnKaunn DBiratela).
IcnoJb3OBAHHe Ha 6oJbwoB bICote HaD ypoBhem MOpA
Пп рабoting ha bИcoTax habуypOBHem MOPR cBbIe 5,000ФуTOB (1524 MeTPOB),doNYcKaETC6 Be3HN CHMIMNAMJIbM OKTAnOBtM YICOM 85/85 AKI (89 RON).Дпra COOTBETCTBn TpeBOBaHnM NO 3MWCnN, Tpe6yETe peryNIpOBka ДЯ рабToHa 6OblWbYbICOTe NaD yUpOBHem MOPR. Pabota 6E 3ToIeyPnyIpOBKt CTAHTEN pnyHnHOUxHydEHHN 3KcPnIyatauOnHbIX xapakTePrcNTIK, NObIbSeHnHO r pacXoJa TOnJIbNA uByeHnEHn BpeDhIX bIb6pOCB. KacateIbNo HnΦopMaun no peryIpOBKe DЯ pabToHa 6OblWbYbICot He yUpOBHem MOpR o6paJAtIEcb, NOxAJyIcTa, K yOnlHMOeHHHomy cepBcHOMy dInepy OT kOmpanHn Briggs & Stratton.
3Kcnpnyataaia DnBraTeTna HbBcote NaI yPoBHem MOpR HnKe 2500 cyTob (762 MeTp) C KOMJIeKTOM IaI paBToI Ha 6OJbIoi BbICoTe NaI yPoBHem MOpR He peKOMeHdyETc.
Kak do6abntb TOnJnBO-Pnc. 3

PNEyYPEXKDEHNE
BeH3nH ero napbI ype3BbIaHaNo HO orHeONaChbI n B3pblBOOnaChbI. BocnIameHeHne nn B3pbl MOrYT npnbecTH K cnIbHbIM OXOrAM nn CmeptelbHomy NcXody.
Ppi do6abJIeHN TOnJIbBa
-
PpexJe Yem OTKpbTb KpbIbky TOnIIbHoro 6aKa, BbIKIOuHTe DnIRaTeIb n daTe Emy OCTbTb TEueHHe, NO MeNbWeMpe, 2 MNHT.
3aONHnTe TOIINBbIb 6aOk, IIOHO HA OTKpbITOM Bo3dyXe, IIOBO XopoOo npOBeTpBaem0 3OHe.
He donnyckaIte nepenonHennr ToTnIMBHoro 6aka. Ira donyueHnna pacuHneHn6e3nHa, He 3aONHnTe BbIe HxKHeJtacIn TropOBHHbToTnIMBHoro 6aka.
B6n3n6eH3nHa n B 30He ero nCnapenHn He DoJNkHO 6bItb NCKpeHHn, OTKpbIitoro IpanMeHn, ropeJok, HaraBeTaTeNe i npyrrnx nctOHTNKOB BocPnAmEHeHHn.
Peynapno npobepaTe TOONBONpOBOd,6ak,KpbIbUky uΦHTnHnHa HauuHne TpeunH yteueK.Pnp Heo6xOdmocTn,BblOnHnTe 3amEny.
B cnyuae npoINbA toPnIBa,doxDntecb erO noHoro nCnapeHna, npexJe cem 3anyctntb Dbratelb. -
OuCTInTe KpbIbKy HAIINBHOI ROPIOBnHbI 3OHy BOKpyr Hee OT IIO6oB rpa3n I OCTaTKOB Mycopa.CHIMnTe KpbIbKy TOIIINBO3anpABOCHoro NaTpy6ka (A) (Pnc.3).
- 3aONHnTe TOJINBbI b6ak (B) 6eH3nHOM. IJIa DOnyUeHNpaCUnpeHn6eH3nHa, He 3aONHnTe BbIe HIXHe Yactn TropOBnbl ToJINBHOTo 6aka (C).
- YctaHOBInTe Ha MeTo KpbIshky ToTnIMBHOrO 6aKa.

PNEyPEXDEHNE
BHIMAHHE: N3rOToBHTeNb 60bpyDobAHnHa, Ha KOTOpM UCTaHOBNeH DBrIaTeNb, ONpeDenHeT MAKcMaIbHJyIO pa6oHy cKOpOCTb DBrIaTeN. He donyckaTe npBeBlyeHn EToI cKOpOCTn.
Kak 3aMeHnItb CBevy 3axnHaHH - Pnc. 6
IpoBepBe 3a3Op (A, Pnc.6) c nOMOuBo npBOLOUHOro kaInbpa (B).PnI Heo6xOJIIMMCTOny,yCTaHOBnTE 3a3Op. YCTaHOBnTE 3aTINHTe CBEHy 3aXKurHnC peKOMeHIOBaHHbIM MOMENTM 3aTAKKn. KacaTeJIbHO yCTaHOBKn 3a3Op aNIMOMeHTa 3aTAKKn CMOTpne Pa3dEn TexNHueCKMe DAnHbIe.
Приемаиме:В некотых районх мостные зakони тгбуOT Испьзовая pe3ntopно CBeyn 3axiragHЯ Дд NOdabHINI NOMEX OT CHRHOB 3axirHЯ.Есин Ha daHOMДвгATEЛБыл n3naчаль HO yCTaHOBlaHa pe3ntopHЯ CBeya 3axirHЯ,TOДгЗamBy HeO6xOIMIO INCpNb3OBAbCBeY 3axirHЯ TOrO JTe TIna.
IpoBepbTe rnyuHnteIn uNckpOuyNoBHTeIn - Pnc.

PNEyYPEXKDEHNE

Bo BpempaobtI DnBraTeIN BbIeJeHOT TeNIO. DeTann DnBraTeIN, B Oc06EHoCTn TnyuHTenB, CtaHOBATC OueHb ropyMM.
PpIKoCHObeHne K Hm MoXeT npBecTu K CNbHbIM OXOrAM.
BocnIaMeHReMbI MycOp, HApPImep IInCTbA, TpaBa, XBOpOCT nT.I., Moryr 3arOpTeBC.
Дайтглшпелю,циинду и peбамцииндра octbIb,пржde чмdoTpaRnBaTbСАdo HIX.
OuHCTnTe 30Hy BOKpy rIyUHTeY IuJIINHpa OT CKONNBWeroCBOcPnAmEHemOro Mycopa.
IcnoIb3OBAHnE nIeKcPnyataaJMy DnBraTeTNeHa JIO6oB TeppntOpnn, nOKpbIToI JECOM, KcyCTAPNkOM nIITpABo, 6e3 yCTaHOBNEHORO nCKporACNTeHa Na CTMe TBe BxHONbX Ra3OB, AByJIeTc HApUeHNem 3aKOHa KAnIpocpnf O6 oBceCTBeHHbX pecypcaC, CTbA4442. CornaCHO CtTaBn 4442 nckporacnteBdoJHekn HaxOdHTbcraBpaOohem COCTOHN. Dpyrne WtATbI nIe PdepeAIBHe IOpNCdIKuMOry IMeTb CXODHbe 3aKOhbl. O6patNTeC k NpOIN3BOJNTeNO opINHnABHO O6OpUdOBANH, npOdaBuY nIi dInepy dnnpno6pTeHnN cNpocrACNTeH, ppeHn3aHeHHO dIb BxIXIOHO CNCTeMbI, YCTAOHBNEHO HA 3OT DMnBtAEJe.
Поверяпглшть (A, PnC. 7) Ha OTCYCTBne TpeuIN, Koppo3m IN INpyrNx NOBPEXDEH.N CHMNTe NCKPOyNOBtTeB (B), ecIn TaKOB0 INMeETcN, INPovEBpTeHa
OTCYCTBnE n3HOCa nn 3aKynOpKn caxKe. Ecnn Notpe6yOTc 3anaChbte aactn,TO 063aTeIbNo IcNol3yUe ToJbKO opRnHaJIbHbIe 3anaChbte aactn O6OpdyObaHn.

PNEpyPExKDeHne: 3aanaChbIe qactn doJxhbl 6bItb
IeHTNtHbIMn UYCTaHaBnBaTbCn Ha TO Xe CaMOe MeCTO, YTO INepBOHaJaNbHbIe DeTaJIIN, B IpOTnBHom CnyuHae, MOXET BO3NHKHyTB Noxkap.
Kak BbINOJIHHTb 3aMeHy MacJa - Pnc. ⑨ ⑩ ⑪
BHIMAHME: Otpa60taHHoe MaCNo IpeDCTabnIeT c6oBOnaChbI npOdyKT nOJXHO 6bIty yTNi3n8pOBAHO HaJIneJxAunm CnOc6OBM. BByHCHTe MeCtOHaXOXDeHMe NyHKTOB 6e3OAnchoy yTNi3u3aun/NOBtOPHNepepa60TK y MecTHbIX BnactE, B cepBnCHOM CEHTpe nn y DInnepa.
CnB Macna
- Пи Вькlioочим, HOеш TeNlOM DBuRatete OTOcoeINHte npOBoD CBEU 3axnraHnA (A) nOTBeNTe ERO BCTOPOHy OT CBEHn 3axnraHn (Pnc.9).
- BbIkyTTE np6kY cInBa macLa (B, Pnc. 10). CJeTe MaCNo B noDxOJaHyo EMKoCTb.
IpymueaHHe: IIO6aH3 MaCNOcJIbHBxI pO6oK, NOKa3aHHbIX Ha HnXHem PnCyHKe, MoXET 6bITb YCTaHOBNeHa B DnurateJe.


- Посlete тoro, кak macno 6ydet cInTO, yctaHOBnTe n 3aTnHTe np6ky OTBepCTnA cnIbMa macna.
Долв Macla
- YctaHOBnTe DnIraTeNb B Trop3OHTaIbHoE NOIOXeHne.
OuHCTnTE 30HY macNo3aJIbHOrO OTBepCTnO OT JIObO MyCopa. - CMOTPnTe pa3dien TexHuecKne xapaKTepnCTnKn OTHOCHTeNbHO KOnuYeCTBa Macna.
Moden C KOPOTKIM ΚυρΟ
B. Bityaunite uyn dny n3mepeHHy yOBH MaCna (F, Pnc.10) u npotpnte ero chctOY TpaonKoI.
2. 3aJIbAaIte MaCNo MeJIneHNO B MaCIOHaJIbBHO nATpy6OK DvIRaTeNa (E). 1o6abBeMaCNo do yPOBnpePJIbBa.
3. BCTaBbTe 7yI m3mepeHn ypOBH MaCna, Ho HE BkpyuBaHTe. BbTaUHTe 7yI n npOBePbTe ypOBeHb MaCna. YpOBeHb MaCna doJxKeH doXoDntB do OTMeTKN FULL (3aONHeO) (G) Ha 7yIne.
4. Bctabte n 3aTAHnte uyn dIy I3MepeHn ypoBHa macna.
Moden ydlnneHHbIM yynom Inyn3mepeHna ypOBHa macla
- BbItaunte uyn dny n3mepenna ypOBnMa macna (F, Pnc. 11) npotpnte ero qncton TpnoKoN.
- Меленно 3алвайе MacNo чepe3 MacNoHajNHyI roPnoBHy (E). He nepenolnHaTe. Пocne doJINbKIM macna loDoxdTe Ondy MInHyTu n CHOBA npOBepeByte UPOBEb HMaCnA.
- BCTaBtTe n 3aTHeHte Uy nI IIN3MepeHnry yPoBHaMaCna.
4.ИЗВЕКИТЕУПИnpОБЕРТЕурOBЕньMACСА.ОДЛЖЕн COOTBETCTBOВАТВЕРХЕЧАCTNинДИКATOPAЗANOЛ themselves (G)Ha uyne. - BCTaBbTe n 3aTaNHTe uyn dIy nI3MepeHn yPOBHa macna.
Kak BbINOJIHnIb TexHnueckoe 06cIyJXnBaHne BO3dUshoro Фильтpa - Pnc. 13 14

PNEyYPKXDEHNE
BeH3nH eero npabI qpe3BbIyaHIO orHeoNaChbI n B3pbIBOOnaChbI. BocnAmeHeHne nn B3pbIB MOrYT npNBecTn K CNlbHbIM OXORAM nn CmeptelbHomy NcXody.
HnkOrJa He 3aNyckaIte N He 3KcIIyATnpyIte DbIraTeIb 6e3 yCTaHOBJIeHHoro y3Ja BO3dYooCHNTeIe IIN Bo3dYuHoroФnIbTpa.
BHMMAHME: He nCnoB3yIe CxAbyB Bo3dYx IIN paCTbOpNTEn IJN CHCTKnФInbTpa.CxAbyB Bo3dYX MoKeT NOBPeDITbΦInbTp, a pACTbOpNTEn MOrYT erO pactbOpNTb.
B CHCTEME 03dyXooHCTNTeRIN CNOJb3yETCR OoPpnoBaHHb FnJIb TpyOuHmI 3JeMENT CdoONHHTeBLHbIM PnpEBaPnteBLHbOM OoCTNTeEM. PnpEBaPnteBLHbOHTeNBJMOxHO HIOHIOBtBIOPOH
- Ocna6bTe 3aT8Kky KpeNexHbIX 3nEmeHTOB (D), KOtOpBie yIepXnBaIO T KpbIuKy(A).
- OtkpoTe KpbIshky u ydaJIte npEdbaPnteJIbHbI OChTtJIb (C), fNlbTp-OTcToHnK (H), ecIn ycTaHOBHeN u fNlbTp (B). Cm. Pnc. 13.
3.Диуаленя copa octopoxho NOCTyHnE ΦINbTpOM NO TBepDoI NOBepxHOCTN.EcInΦINbTpOueHcINbHO 3aRpa3HeN,TO 3aMeHnTe ERO HOBbIM ΦINbTpOM. -
BbIMoTe IpeDbapnteBbIy OHCTNTeB B BOe C XIKKIM MOIOUIM CpEICTBOM. 3aTeM NIOHcTbI y pOcuYtme EHO kTbITOM Bo3dye.He donyckaetc CMA3bBAT MaONJ MpeDbapnteBbHbI OOHCTNTeB.
-
YctahOBHTe cyxO npEaBapntbHbI ONUCTNTeB, OTCTOHNK fNtpa (ecnncnoJIb3yETcR) n fNtbp.
- Ha moDeIaX, o6OpyIOBaHbIX Bo3dUyHbIM qINJIbTpOM, nOKa3aHHbIM Ha Pnc. 13, yCTaHOBnTe BbICTynbl KpbIuKN (E) B n3bl (F).
- YctahOBHTe KpbIbIky n 3aKpeHnTe fHKcnpyIOUmm NEmeHTamN. Y6eIHTecB B XopoWei fIKCaum KpeEcxhblx 3JEMeHTOB.
Kak nouchntb TOJIINBHyI ΦnIbTp - Puc. 12

PNEyYPEXKDEHNE
BéH3nH néro napbl ype3bIHaH OOrHeONaChb I B3pIBOONaChb. BocPnaMeHHe NIN B3pIB MORYT pNBeCTN K CInbHbIM OXORAM nIN CmEpTeBbOMY hCXOyD.
B6n3n6e3nHa n 30he efo nCnapenH He oJNkHO bItb NCKpeHH, OTKpblToro PnAmEH, rOpENok, HArpeBaTeNei ndpyrnx nctOuHKOB BOCPnAmEHn.
Peynnpno npobepaTe TOpblbONpOBoD,6ak, npo6ky n pHTnHn Ha NaIyHe TpeunH uYteuk. Ppi Heo6xoDMocTn, 3aMeHnTe DeTaN.
- Pered uctkoi nn 3ameho ToPnBHOTo pntbtpa, cneite ToTnIMBO n3 ToPnBHOto baka nn 3akpoTe KpaH noDaH ToTnIMBa.
3aIacHbIe qactn IOnKbI 6bIT NdeHTNHyBIMN yCTaHaBImBaTbCra Ha To Xe camOe MeCTO, YTO INepBOHaaylbHBe DeTaJIN.
B cnyuae npolnba tonlmba,doxkntecb ero noJHoro nCnapenra, npexKe yem 3anyctntb Dbraratelb.
- 3aKpOHe KpaH NODaHn TOnJIbBa (B, Pnc. 12) n daIte DbIrTaTeIIO npa6oTaTb Doero octahOBKn. B IpOToBHOM Cnyae ToNIIbBO MoXET BblntbCn npInBeCTn K noXkapy.
- CHIMITE CTAKAH TOINIBHORO FOINbTpa (C) npn NMOUHN RAeHOrO KJIoua. YdAMITc MYCOP n3 FOINbTpa (A) IN CTAKAH TOINIBHORO FOINbTpa.
- Поберьтей сд takан Фильста и убдпесь в осутствен指导下 Heo6xOДIMOCHT, замен'te.
- YctaHOBtE TOIINBHy BnBtp, npOKJaKy (D) n CTaKaH ToNIIIBHO rO pInbTpa. 3aTHeTp nPi NOMOu raeHOrO KJIouya.
- OtkpoTe KpaH noaun TOnnBa n y6eJntEcB OTCyTCTBn yTeueK.
KaBbINOJIHnTb OUHCTKy CnCTeMbI BO3dUshoro
OxJaXdEHH-Pnc. 8

PNEyYPEXKDEHNE

BoBpempaobtIbDnBATEJIb BbIDeJIaHOTTeNJO.KeTANI DnBATeJIa, BOCo6eHHOCTIgLyWHTeJIb,CTaHOBRTcOueHbTOPaYMMI.
PpIKoCHOBEHne K Hm MoXeT PpNBecT N CnIbHbIM OXOrAM.
BocnnaHemreM MycOp, HapnmeP JIeCTbR, TpaBa, XbOpoCT N.T.I., Moryr 3aoropetcb.
JaTte rnyuHTenIO, cunHnHpy npe6pam cunHnHpa 0ctbIb, npexde HcDMTOparNBAcbdo HIX.
OuCTnTe 30Hy BOKpy rIyUHTeTnI n CININHpa OT CKONHBWeroC8 BOCnIaMeHHemOro Mycopa.
BHUMAHME: He donyckaetca nCOnb308aTb Body dny ONUCTKN DBIRATEN. Boda MoKET nonactb TOnJIINBHyO CnCTeMy. NcOnb3yTe 9eTKy nn CyxHy ToRnKy dny ONUCTKN DBIRATEN.
3TOT dBniratelb IMeet BO3duhHyo CNTeMy OXnaJcHnra. rpa3b nIIN cop MOKTe BOCPNENATCTBOBAtb NOTOKy BO3duYa h CTaTB pNCHNO nepePepBa DBniratEn, YTO npBVEdet K yUdSeHIO paOChx XapakTePncTIK N cokpaueHIO cPoka cnjXkbI DBniratEn.
Pn nOMOuI uETKn uIN cyXoY tKaHn ydaNITe MycOp u3 3aunTHoro 3kpaHa dna naIbueB (A) (Pnc.8). OcNCTte CcienHe, npyKInbI oprAnbI ynpabJeHn (B).
OuHCTnTe yUaCtOK BOKpy n C3aI n TnyuHInTeJIa (C) OT IIObOro rOpUoyero Mycopa.
XpaHeHne

PNEyYPEXKDEHNE
BeH3nH ero napbI ype3BbIaHaHO orHeONaChbI n B3pblBOOnaChbI. BocnAmHeHne Hnn B3pbl MOrYT npNBecTH K cnIbHbIM OXOrAM nn CmeptelbHomy NcXOdy.
Ppi xpaheHH 6eH3nHa nIIObOpydoBaHnC TOnJIINBOM B 6aKe
Bo 136bexahme BocnIaMeHEnHa napo 6b3nHa xpaHITe erO bdaIOn OT KOTIOB, neeH, BOdoHarpeBaTeTene I npOxH npri6OBpB, B KOTOpbIX MCNOB3yETcRTopelKa ININ IHN NCTOHNK BOCnIaMeHEnH.
TOnJIuBHaCnCTema
TOnJIbBO MoKET cTaTB HeCBExKIM, ecNIO OHO xpaHnTc6 60nee 30 dHei. HecBexKee TOnJIbBO Bt3bIbaE o6p3OBAHne KICNOThbIX N CMOLJHbIX OTJOXeHN B ToJIbBHOI CNTeMe IIN HA BaxhBIX DeTalnx Kap6OpaTopa. YTo6bl CoXpaHnTb TOnJIbBO CBEXHM, IcNoJIb3yIte cStaBNsA3atop TOnJIbBa FRESH STARTOT kOMNaHN Briggs & Stratton, npeJaIraeMbI B vInde XnIKo PrnpCaKn IIN KAPtrnDxa C KOHcHTpRPOBaHHOI XnIKoCTbIO N C KaJIeBbHnCeI.
He Tpe6yETc CnBaTb 6eH3nH N3 TOINBHOI CNCTeMb I BnRAteJI, ECnn CTa6bn3ATOp TOINBBA DO6abJIeTcC ORNACHO IHCTpyKUIM. DaIte DBnRatelIO npo6oTaB T B TEChE H2 MNHT DAnI KpKUJIuN Do6ABKn Yepe3 TOINBHYO CNCTeM. PIoCe 3TOr ODBnRatE h TOINBIO MOYxpaHtCBdo 24 MecHueB.
Ecnn 6eH3nH He 6bln 6bpa60TaH c NOMOuBIO CTaBUNI3aTopa TOnJIbA, To 6eH3nH DonJxH 6blr b CNT IN 3DbraTeR B NOXoDAnUy KANICTpy. DaIte DBNrAtenIO npo60TaTb, nOKa OH NE octaHOBnTCN 13-3a OTCYtCTBn TOnJIbA. PeKoMeHnyETcN cONJbBOBaHme CTaBUNI3aTopa TOnJIbBA B KaHNCTpe dIy XpAHENH c CEJIbIO COxPAHEnH erO CBExeCTn.
MOTOPHOE MACNO
3aMeHnTe MoTOpHoe MaCNo, KOrDa DvBraTeNb eIe TeNbl.
YctpaHHeHne HeucnpaBHOCTe
Bam Tpe6yeTcI pmoos? Pocetnte, noxayncta, Web-cait: BRIGGSandSTRATTON.COM IIN IO3BOHInTe NO TelefoHy: 1-800-233-3723.
Modèle 50000*
| Равочи объем | 4,94 куб. Дюм (81 куб. см) |
| Диаметрцлиндара | 2,047 дюм (52,00 MM) |
| Хов пошя | 1,496 дюм (38,00 MM) |
| Колочевто масla | 13,5 унция (0,4 Л) |
| Зазор сөчөдөхлүгагань | 0,025 дюм (0,64 MM) |
| МоSENTаөжки д借贷 сөчөдөхлүгагань | 180 Фунт сильп на дюм (20 Нм) |
| Воздунный зазор катушkin | 0,012 - 0,020 дюм (0,30 - 0,51 MM) |
| Зазор вүскного клалana | 0,004 - 0,008 дюм (0,10 - 0,20 MM) |
| Зазор вүскного клалana | 0,004 - 0,008 дюm (0,10 - 0,20 MM) |
| Приимоуrolыний Воздунный Фильтр | 711459 |
| Приимоуrolыний Воздунный Фильтр | 711460 |
| пөдөрдөнгөдөчөдөнгөдөчөдөчөдөчөдөчөдөчөдөчөдөчөдөчөдөчөдөчөдөчөдөчөдөчөдөчөдөчөдөчөдөчөдөчөдөчөдөчөдөчөдөчөдөчөдөчөдөчөдөχнг | 7041, 5058 |
| Торлinasнайdoesabвka | |
| РөзICTорная сөча зашигань | 711252 |
| Клоч д借贷 сөчөдөхлүгагань | 19576 |
| Төстэр зашигань | 19368 |
MoeJIb 80000*
- General Information
- Engine Power Rating Information
- Operator Safety
- SAFETY AND CONTROL SYMBOLS
- WARNING
- When Adding Fuel
- When Starting Engine
- When Operating Equipment
- When Changing Oil
- When Transporting Equipment
- When Storing Gasoline Or Equipment With Fuel In Tank
- Before performing adjustments or repairs:
- When testing for spark:
- Features and Controls
- Model Type Code
- Operation
- Oil Recommendations
- How To Check/Add Oil - Figure ② ④
- Before adding or checking the oil
- Models with short dipstick (Figure 2)
- Models with extended dipstick (Figure 4)
- Fuel Recommendations
- Fuel must meet these requirements:
- High Altitude
- How To Add Fuel - Figure 3
- How To Start The Engine - Figure 5
- How To Stop The Engine - Figure 5
- Maintenance
- Emissions Control
- Maintenance Chart
- First 5 Hours
- Every 8 Hours or Daily
- Every 25 Hours or Annually
- Every 50 Hours or Annually
- Annually
- Carburetor Adjustment
- How To Replace The Spark Plug - Figure 6
- How To Change The Oil - Figure 9 10 11
- Remove Oil
- Add oil
- Models with short dipstick
- Models with extended dipstick
- How To Service The Air Filter - Figure 13 14
- How To Clean The Fuel Filter - Figure 12
- How To Clean The Air Cooling System - Figure 8
- Storage
- Fuel System
- Engine Oil
- Troubleshooting
- LIMITED WARRANTY
- About Your Warranty
- California, U.S. EPA, and Briggs & Stratton Corporation Emissions Control Warranty Statement Your Warranty Rights And Obligations
- Manufacturer's Warranty Coverage:
- Owner's Warranty Responsibilities:
- Briggs & Stratton Emissions Control Warranty Provisions
- Look For Relevant Emissions Durability Period and Air Index Information On Your Engine Emissions Label
- Osha mHΦopMaζη
- Data Ha KynyBaHe:
- Moden ha Dbratela:
- HOpMaun3a HOMHaHnHaTa MoUHOCT Ha DBuRatEnIte
- Texnka 3a 6e3onacnoct ha onepaTopa
- CIMBOJIN3ABE3ONACHOCT INYNPABJEHNE
- PNEyPPEKDEHNE
- PNEyPPEXDEHNE
- Ppi DJIIMBaHe Ha rOpINBO
- PnCstaptnpaHe Ha DBrTaTeJIa
- Ppi pa6oteua MaunHa
- Pn CmHa Ha MacNoto
- PnTpaHcnpOptnpaHeHaMaunHaTa
- Korato ckaJauPate 6eH3n HnO6OpyDaBaHe c rOpNBO B pe3epBoapa
- NPEyPPEXDEHNE
- TolmaHaMOPcKaBnCOnHa
- Kak ce haJIbMa macNo -ФИгура ③
- PNEyPEXKDEHNE
- PpIdoJImbaHeHa roPbBO
- Kak ce cTaptnpa DbBraTeJIA - Φnrgpa 5
- PNEyUNPEXKDEHNE
- HaBcekn25yacaunnexxeroDno
- HaBceKu50yacaunjEeXeRoDHo
- ExeroaHo
- PerynnpaHe Ha Kap6ypatopa
- Kak ce cmeHra3anaJIHTenHaTa CBeue - FIngamma 6
- MoeJInc Kbc HNBONoka3aTeI
- ModenC ydbJxKeH HbONOKa3aTeI
- Kak da ce o6cnykBa Bb3duyHnHnФnIytp - FnIpya 13 14
- Kak ce nouchTba qnlTbpa 3a ropuBO - Hnpya 12
- IPEDyIPEXKDEHNE
- Cknaipahe
- PNEyPPEXKDEHNE
- TopuBha CnCTema
- MacIoto Ha DBrTaTeNa
- Pries jjungiant varikli
- IPDEyIPEXKDEHNE
- PPEyPExEHE
- PNEyYPKDEHNE
- PNEyIPEXKDEHNE
- Ipeed BbINOJIHeHem peryInpOBOK nIpeMOHTa:
- Pnp npOBepKe cncTeMbI 3aXnraHnA:
- y3JIbI DvIrataTeI N opraHbI ynpaBJeHnA
- 3Kcπlyaataza
- PeKOMeHndaцnnoNcNoJIb3OBaHHIO MacJa
- Kak npOBepntb ypoBeHb Macna/JoNTb MacNo-Pnc. ② 4песдобаJIeHem nI npOBeKoI yPOBHa Macna
- Moden C KopotKmUynom (Pnc.2)
- MoeJIc ydJIHHeHHbIM yIynom (Pnc. 4)
- PekomeHdaunnoNCnOJB3OBaHIO TOnJIbBa
- TOnnBO DoJXHO COOTBETCTBOBAtcJeIyIOUm Tpe6OBaHnM:
- IcnoJb3OBAHHe Ha 6oJbwoB bICote HaD ypoBhem MOpA
- Kak do6abntb TOnJnBO-Pnc. 3
- PNEyYPEXKDEHNE
- Ppi do6abJIeHN TOnJIbBa
- PNEyPEXDEHNE
- Kak 3aMeHnItb CBevy 3axnHaHH - Pnc. 6
- IpoBepbTe rnyuHnteIn uNckpOuyNoBHTeIn - Pnc.
- PNEpyPExKDeHne: 3aanaChbIe qactn doJxhbl 6bItb
- Kak BbINOJIHHTb 3aMeHy MacJa - Pnc. ⑨ ⑩ ⑪
- CnB Macna
- Долв Macla
- Moden C KOPOTKIM ΚυρΟ
- Moden ydlnneHHbIM yynom Inyn3mepeHna ypOBHa macla
- Kak BbINOJIHnIb TexHnueckoe 06cIyJXnBaHne BO3dUshoro Фильтpa - Pnc. 13 14
- PNEyYPKXDEHNE
- Kak nouchntb TOJIINBHyI ΦnIbTp - Puc. 12
- KaBbINOJIHnTb OUHCTKy CnCTeMbI BO3dUshoro
- OxJaXdEHH-Pnc. 8
- XpaHeHne
- TOnJIuBHaCnCTema
- MOTOPHOE MACNO
- YctpaHHeHne HeucnpaBHOCTe
Brand : BRIGGS & STRATTON
Model : BRIGGS & STRATTON 117400
Category : Gasoline engine