
BRIGGS & STRATTON 589447 - Gasoline engine BRIGGS & STRATTON - Free user manual and instructions
Find the device manual for free BRIGGS & STRATTON 589447 BRIGGS & STRATTON in PDF.
| Product type | Gasoline engine |
| Brand | BRIGGS & STRATTON |
| Model | 589447 |
| Dimensions (L x W x H) | approx. 40 x 30 x 30 cm |
| Weight | approx. 15 kg |
| Fuel | Unleaded gasoline |
| Starting type | Recoil starter |
| Tank capacity | 1.5 liters |
| Recommended engine oil | SAE 30 or 10W-30 |
| Main functions | Powering garden tools, lawn mowers, generators |
| Routine maintenance | Oil change, air filter cleaning, spark plug replacement |
| Cleaning | Clean cooling fins with a brush |
| Safety | Emergency stop via button or lever, protective cover |
| Common spare parts | Spark plug, air filter, fuel filter, crankcase gasket |
| Repairability | Easy to repair with standard parts |
| Usage | Outdoor use, avoid water and moisture |
Frequently Asked Questions - BRIGGS & STRATTON 589447 BRIGGS & STRATTON
User questions about BRIGGS & STRATTON 589447 BRIGGS & STRATTON
0 question about this device. Answer the ones you know or ask your own.
Ask a new question about this device
Download the instructions for your Gasoline engine in PDF format for free! Find your manual BRIGGS & STRATTON 589447 - BRIGGS & STRATTON and take your electronic device back in hand. On this page are published all the documents necessary for the use of your device. BRIGGS & STRATTON 589447 by BRIGGS & STRATTON.
USER MANUAL BRIGGS & STRATTON 589447 BRIGGS & STRATTON
Briggs & Stratton is a registered trademark
of Briggs & Stratton Corporation
© 2009 Briggs & Stratton Corporation,
Milwaukee, WI, USA. All rights reserved.
Form No. 277108EST C
01999-B8010

General Information
For replacement parts or technical assistance, record below the engine model, type, and code numbers along with the date of purchase. These numbers are located on your engine (see the Features and Controls page).
Date of purchase:
MM/DD/YYYY
Engine model:
Model:
Type:
Code:
Engine Power Rating Information
For 3/LC engines, gross power ratings are based on SAE J1995 criteria and net power ratings are based on SAE J1349 criteria. Actual power output of production engines installed in applications may vary depending on a number of factors, including the engine RPM limit of the application, environmental conditions, engine/equipment maintenance, and other variables.
Operator Safety
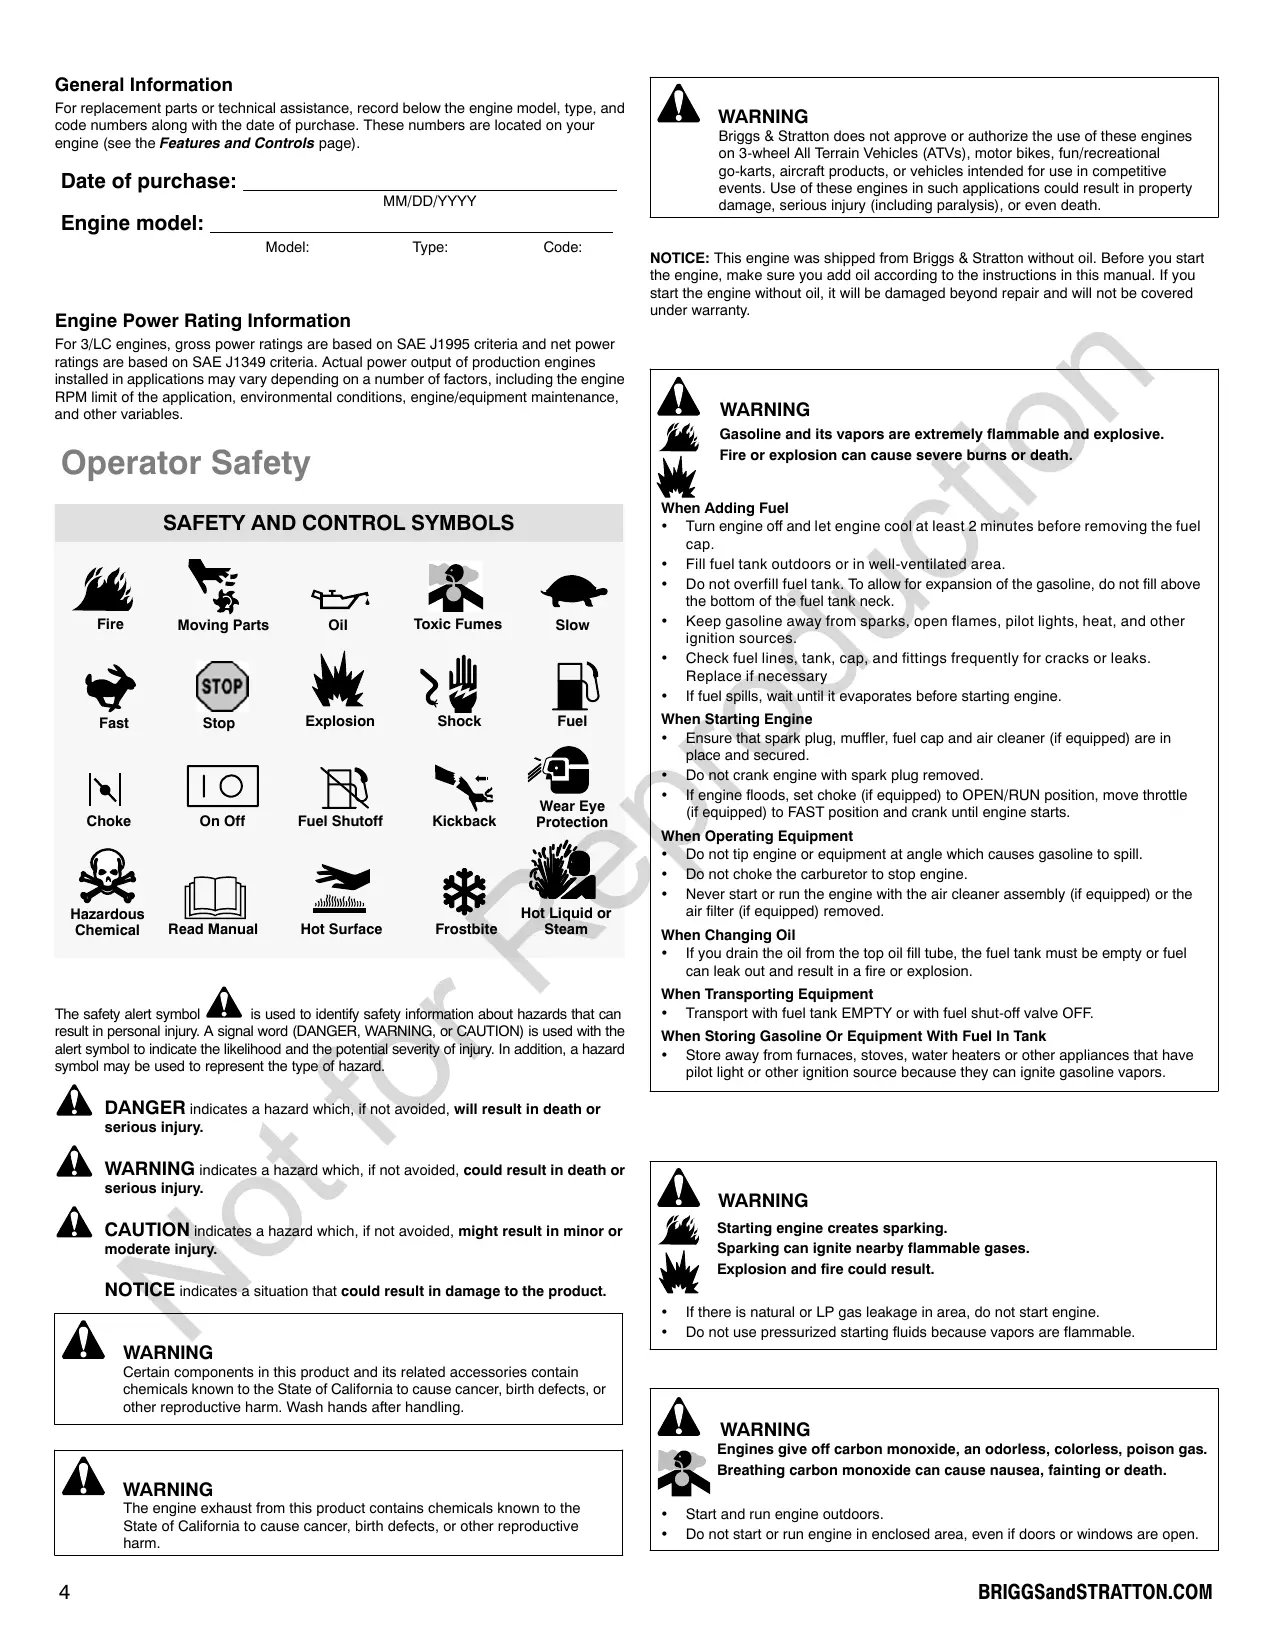
SAFETY AND CONTROL SYMBOLS

Fire

Moving Parts

Oil

Toxic Fumes

Slow

Fast

Stop

Explosion

Shock

Fuel

Choke

On Off

Fuel Shutoff

Kickback

Wear Eye Protection

Hazardous Chemical

Read Manual

Hot Surface

Frostbite

Hot Liquid or Steam
The safety alert symbol is used to identify safety information about hazards that can result in personal injury. A signal word (DANGER, WARNING, or CAUTION) is used with the alert symbol to indicate the likelihood and the potential severity of injury. In addition, a hazard symbol may be used to represent the type of hazard.

DANGER indicates a hazard which, if not avoided, will result in death or serious injury.

WARNING indicates a hazard which, if not avoided, could result in death or serious injury.

CAUTION indicates a hazard which, if not avoided, might result in minor or moderate injury.
NOTICE indicates a situation that could result in damage to the product.

WARNING
Certain components in this product and its related accessories contain chemicals known to the State of California to cause cancer, birth defects, or other reproductive harm. Wash hands after handling.

WARNING
The engine exhaust from this product contains chemicals known to the State of California to cause cancer, birth defects, or other reproductive harm.

WARNING
Briggs & Stratton does not approve or authorize the use of these engines on 3-wheel All Terrain Vehicles (ATVs), motor bikes, fun/recreational go-karts, aircraft products, or vehicles intended for use in competitive events. Use of these engines in such applications could result in property damage, serious injury (including paralysis), or even death.
NOTICE: This engine was shipped from Briggs & Stratton without oil. Before you start the engine, make sure you add oil according to the instructions in this manual. If you start the engine without oil, it will be damaged beyond repair and will not be covered under warranty.

WARNING
Gasoline and its vapors are extremely flammable and explosive. Fire or explosion can cause severe burns or death.
When Adding Fuel
- Turn engine off and let engine cool at least 2 minutes before removing the fuel cap.
- Fill fuel tank outdoors or in well-ventilated area.
- Do not overfill fuel tank. To allow for expansion of the gasoline, do not fill above the bottom of the fuel tank neck.
- Keep gasoline away from sparks, open flames, pilot lights, heat, and other ignition sources.
- Check fuel lines, tank, cap, and fittings frequently for cracks or leaks. Replace if necessary
If fuel spills, wait until it evaporates before starting engine.
When Starting Engine
- Ensure that spark plug, muffler, fuel cap and air cleaner (if equipped) are in place and secured.
- Do not crank engine with spark plug removed.
- If engine floods, set choke (if equipped) to OPEN/RUN position, move throttle (if equipped) to FAST position and crank until engine starts.
When Operating Equipment
- Do not tip engine or equipment at angle which causes gasoline to spill.
- Do not choke the carburetor to stop engine.
- Never start or run the engine with the air cleaner assembly (if equipped) or the air filter (if equipped) removed.
When Changing Oil
When Transporting Equipment
When Storing Gasoline Or Equipment With Fuel In Tank
- If you drain the oil from the top oil fill tube, the fuel tank must be empty or fuel can leak out and result in a fire or explosion.
- Transport with fuel tank EMPTY or with fuel shut-off valve OFF.
- Store away from furnaces, stoves, water heaters or other appliances that have pilot light or other ignition source because they can ignite gasoline vapors.

WARNING

Starting engine creates sparking.
Sparking can ignite nearby flammable gases.
Explosion and fire could result.
If there is natural or LP gas leakage in area, do not start engine.
- Do not use pressurized starting fluids because vapors are flammable.

WARNING
Engines give off carbon monoxide, an odorless, colorless, poison gas. Breathing carbon monoxide can cause nausea, fainting or death.
Start and run engine outdoors.
- Do not start or run engine in enclosed area, even if doors or windows are open.

WARNING

Rotating parts can contact or entangle hands, feet, hair, clothing, or accessories.
Traumatic amputation or severe laceration can result.
- Operate equipment with guards in place.
- Keep hands and feet away from rotating parts.
- Tie up long hair and remove jewelry.
- Do not wear loose-fitting clothing, dangling drawstrings or items that could become caught.

WARNING

Running engines produce heat. Engine parts, especially muffler, become extremely hot.
Severe thermal burns can occur on contact.
Combustible debris, such as leaves, grass, brush, etc. can catch fire.
- Allow muffler, engine cylinder and fins to cool before touching.
- Remove accumulated debris from muffler area and cylinder area.
- It is a violation of California Public Resource Code, Section 4442, to use or operate the engine on any forest-covered, brush-covered, or grass-covered land unless the exhaust system is equipped with a spark arrester, as defined in Section 4442, maintained in effective working order. Other states or federal jurisdictions may have similar laws. Contact the original equipment manufacturer, retailer, or dealer to obtain a spark arrester designed for the exhaust system installed on this engine.

WARNING

Severe thermal burns can occur by escaping steam or hot coolant.

- DO NOT remove radiator cap or reservoir cap if engine is warm or running.
- Stop engine and allow it to cool before removing radiator cap or reservoir cap and before changing or adding coolant.

WARNING
- Unintentional sparking can result in fire or electric shock.
- Unintentional start-up can result in entanglement, traumatic amputation, or laceration.
- Fire hazard

Before performing adjustments or repairs:
- Disconnect the spark plug wire and keep it away from the spark plug.
- Disconnect battery at negative terminal (only engines with electric start.)
- Use only correct tools.
- Do not tamper with governor spring, links or other parts to increase engine speed.
- Replacement parts must be the same and installed in the same position as the original parts.
- Do not strike the flywheel with a hammer or hard object because the flywheel may later shatter during operation.
When testing for spark:
Use approved spark plug tester.
- Do not check for spark with spark plug removed.
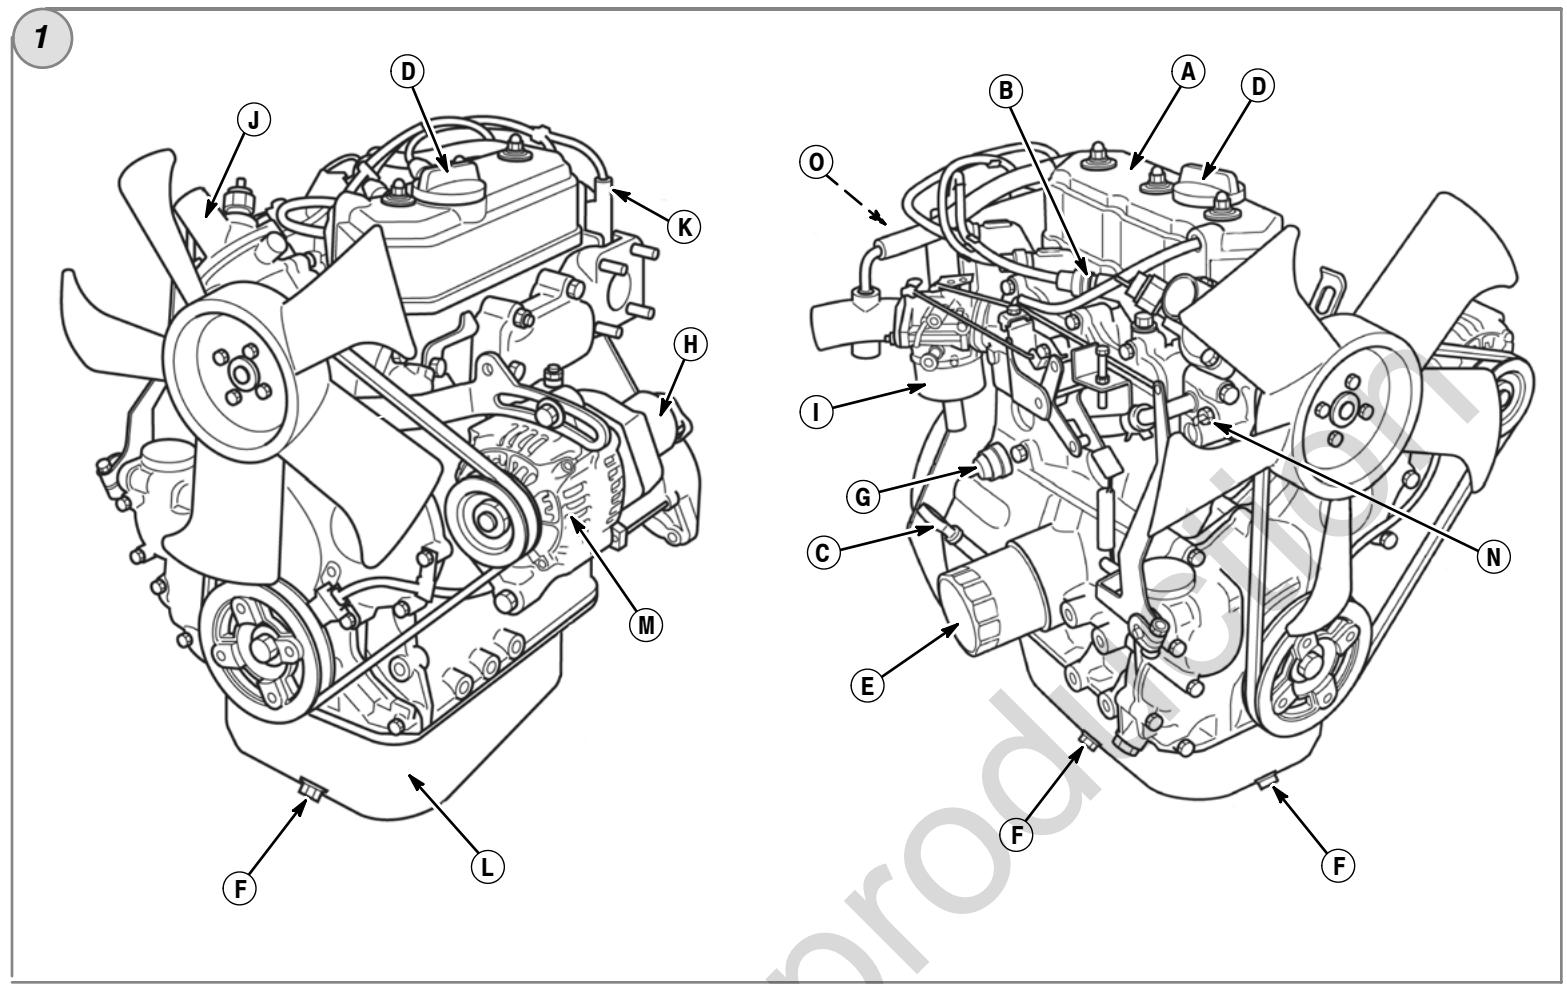
Features and Controls
Compare illustration 1 with your engine to familiarize yourself with the location of various features and controls.
A. Engine Identification
Model Type Code
B. Spark Plug
C. Dipstick
D. Oil Fill
E. Oil Filter
F. Oil Drain Plug
G. Oil Pressure Sensor
H. Electric Starter
I. Carburetor
J. Thermostat
K. Ignition Coil
L. Oil Pan
M. Alternator
N. Coolant Temperature Sending Unit
O. Engine Date Code
Operation
Oil capacity (see the Specifications section)
Oil Recommendations
We recommend the use of Briggs & Stratton Warranty Certified oils for best performance. Other high-quality detergent oils are acceptable if classified for service SF, SG, SH, SJ or higher. Do not use special additives.
Outdoor temperatures determine the proper oil viscosity for the engine. Use the chart to select the best viscosity for the outdoor temperature range expected.
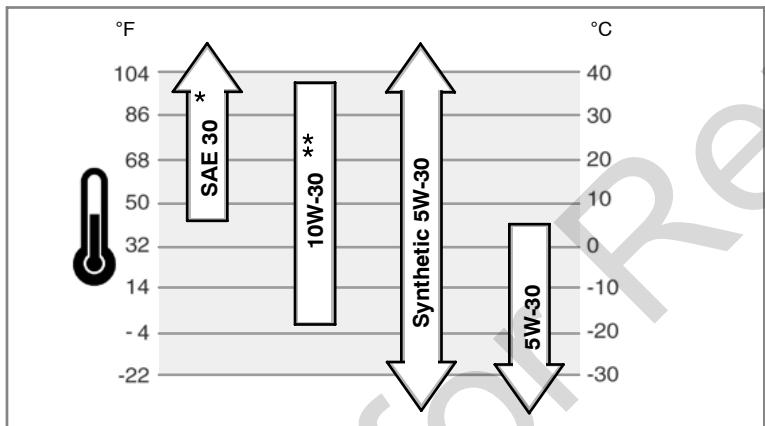
* Below 40^ (4^) the use of SAE 30 will result in hard starting.
** Above 80^ ( 27^ ) the use of 10W-30 may cause increased oil consumption. Check oil level more frequently.
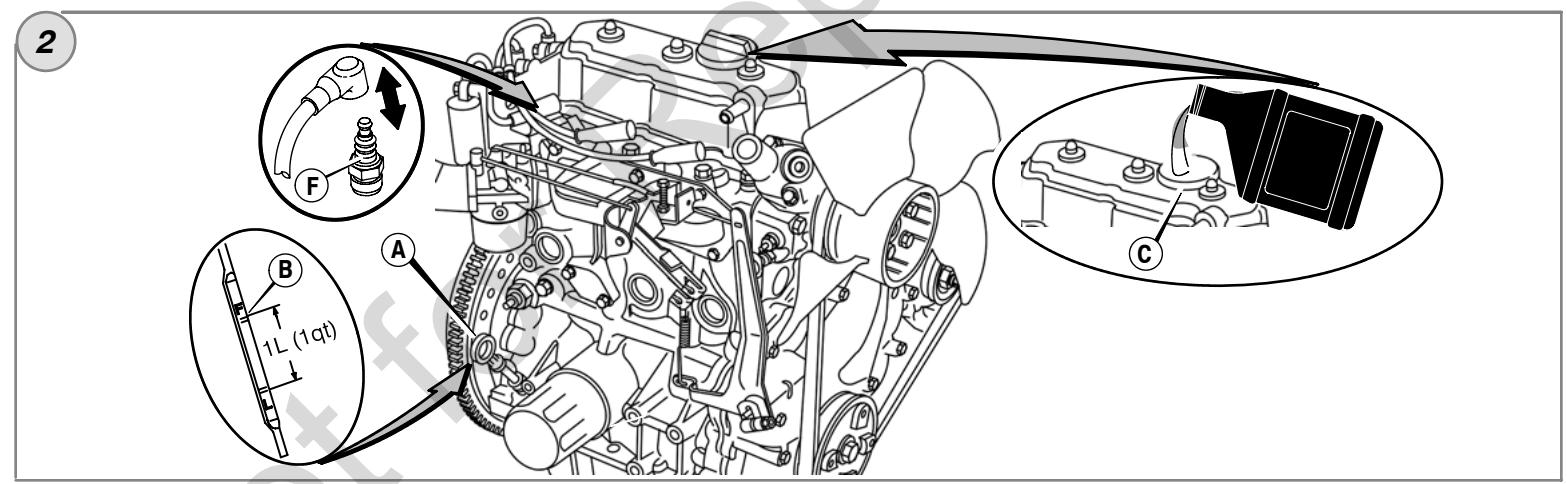
How To Check/Add Oil - Figure ② ③
Before adding or checking the oil
- Place engine level.
Clean the oil fill area of any debris. - Remove the dipstick (A) and wipe with a clean cloth (Figure 2).
- Completely insert the dipstick.
- Remove the dipstick and check the oil level. It should be at the FULL mark (B) on the dipstick.
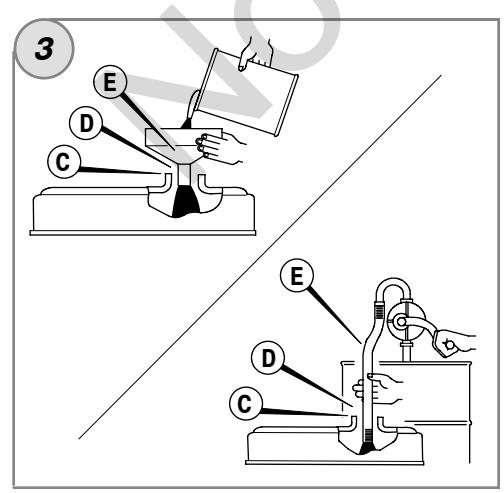
- If low, remove the dipstick and add oil slowly into the engine oil fill (C). Do not overfill.
Important: When adding oil, adequate venting is required as follows:
- Remove the dipstick.
- Make sure adequate clearance (D) is maintained between the oil fill device (E) and the engine oil fill (C). See Figure 3.
NOTICE: Before starting the engine, wipe the engine clean of any spilled oil.
- After adding oil, install the dipstick. Start and run engine at idle for five minutes. See the How To Start The Engine section. Shut off engine. Wait three minutes and check oil level. If required, add oil to bring oil level to the FULL mark (B) on the dipstick (Figure 2).
- Install the dipstick.
Oil Pressure
If the oil pressure is too low, a pressure switch (if equipped) will either stop the engine or activate a warning device on the equipment. If this occurs, stop the engine and check the oil level with the dipstick.
If the oil level is below the ADD mark, add oil until it reaches the FULL mark. Start the engine and check for proper pressure before continuing to operate.
If the oil level is between the ADD and FULL marks, do not start the engine. Contact any Briggs & Stratton 3/LC Authorized Dealer to have the oil pressure problem corrected.
Fuel Recommendations
Fuel must meet these requirements:
Clean, fresh, unleaded gasoline.
A minimum of 87 octane/87 AKI (91 RON). High altitude use, see below.
Gasoline with up to 10% ethanol (gasohol) or up to 15% MTBE (methyl tertiary butyl ether) is acceptable.
CAUTION: Do not use unapproved gasolines, such as E85. Do not mix oil in gasoline or modify the engine to run on alternate fuels. This will damage the engine components and void the engine warranty.
To protect the fuel system from gum formation, mix a fuel stabilizer into the fuel. See Storage. All fuel is not the same. If starting or performance problems occur, change fuel providers or change brands. This engine is certified to operate on gasoline. The emissions control system for this engine is EM (Engine Modifications).
High Altitude
At altitudes over 3,000 feet (900 meters), a minimum 85 octane/85 AKI (89 RON) gasoline is acceptable. To remain emissions compliant, high altitude adjustment is required. Operation without this adjustment will cause decreased performance, increased fuel consumption, and increased emissions. See a Briggs & Stratton 3/LC Authorized Dealer for high altitude adjustment information.
Operation of the engine at altitudes below 2,500 feet (762 meters) with the high altitude kit is not recommended.
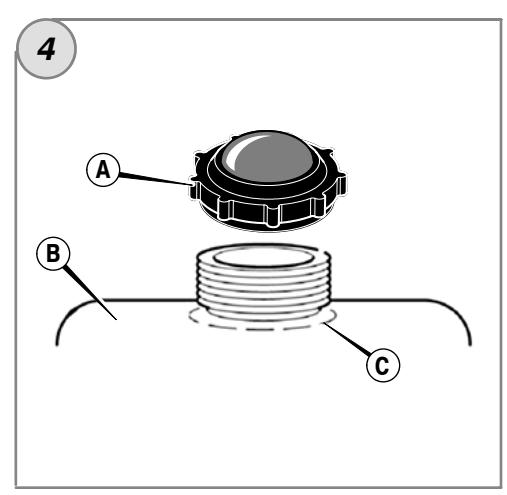
How To Add Fuel - Figure 4

WARNING
Gasoline and its vapors are extremely flammable and explosive.
Fire or explosion can cause severe burns or death.
When Adding Fuel
- Turn engine off and let engine cool at least 2 minutes before removing the fuel cap.
- Fill fuel tank outdoors or in well-ventilated area.
- Do not overfill fuel tank. To allow for expansion of the gasoline, do not fill above the bottom of the fuel tank neck.
- Keep gasoline away from sparks, open flames, pilot lights, heat, and other ignition sources.
-
Check fuel lines, tank, cap, and fittings frequently for cracks or leaks. Replace if necessary
If fuel spills, wait until it evaporates before starting engine. -
Clean the fuel cap area of dirt and debris. Remove the fuel cap (A, Figure 4).
- Fill the fuel tank (B) with gasoline. To allow for expansion of the gasoline, do not fill above the bottom of the fuel tank neck (C).
- Reinstall the fuel cap.
Coolant Recommendations
Coolant capacity (see the equipment manufacture's manual)
NOTICE: This is a liquid-cooled engine. A 50 / 50% mixture of phosphate-free antifreeze and tap water is required for cooling, rust resistance, and lubrication of the water pump.
How To Check/Add Coolant

WARNING
Severe thermal burns can occur by escaping steam or hot coolant.
DO NOT remove radiator cap or reservoir cap if engine is warm or running.
- Stop engine and allow it to cool before removing radiator cap or reservoir cap and before changing or adding coolant.
-
Before operating, check the coolant level. The coolant level must be between the FULL and the LOW/ADD marks on the coolant reservoir. If the coolant level is low, add a 50 / 50% coolant mixture of phosphate-free antifreeze and tap water to the reservoir.
-
To remove the reservoir cap after engine is cool, place a thick cloth over the reservoir cap. Slowly turn the reservoir cap counterclockwise to remove.
- If the reservoir is dry, then add coolant to both the reservoir and to the radiator. See the equipment manual for location, operation, and maintenance of the coolant reservoir and the radiator.
- To remove the radiator cap after engine is cool, place a thick cloth over the radiator cap. Slowly turn the radiator cap counterclockwise to the first stop. If pressurized steam escapes from the cap, stand back to avoid injury. After all pressure is released, push down and turn the radiator cap counterclockwise to remove.
Gauges And Lights
The gauges and lights shown are typical and represent various options that can be used. See the equipment manual for location and operation of gauges and lights.

Coolant Temperature Gauge
Indicates coolant temperature when the electric start switch is in
the ON position.
Normal range 80^ - 90^ C (175^ - 195^ F
Dangerous range above 105^ (220^)

Hour Meter Gauge
Indicates the total number of operating hours.

Fuel Gauge
Indicates the fuel remaining in the fuel tank. To minimize condensation, keep the fuel tank full.

Temperature Light
If the temperature light comes on, the engine is overheating. Stop the engine and check the coolant level (see the How To Check Coolant section). Check the radiator for debris that could restrict air flow.

Ignition Light
When the electric start switch is turned to the ON position, the ignition light should be on. When the engine is running, the ignition light should go out.
If the ignition light is out when then electric start switch in the ON position, check for a blown fuse.

Engine Oil Pressure Light
When the electric start switch is turned to the ON position, the engine oil pressure light should be on. When the engine is running, the engine oil
pressure light should go out. If the engine oil pressure light comes on when the engine is running, immediately stop the engine. First, check the oil level (see the How To
Check/Add Oil section). Next, check the electrical system.

Charge Light
When the electric start switch is turned to the ON position, the charge light should be on. When the engine is running, the charge light should go out. If
the charge light comes on when the engine is running, check the electrical system.
How To Start The Engine - Figure 5

WARNING
Gasoline and its vapors are extremely flammable and explosive.
Fire or explosion can cause severe burns or death.
When Starting Engine
- Ensure that spark plug, muffler, fuel cap and air cleaner (if equipped) are in place and secured.
- Do not crank engine with spark plug removed.
- If engine floods, set choke (if equipped) to OPEN/RUN position, move throttle (if equipped) to FAST position and crank until engine starts.

WARNING
Starting engine creates sparking.
Sparking can ignite nearby flammable gases.
Explosion and fire could result.
If there is natural or LP gas leakage in area, do not start engine.
- Do not use pressurized starting fluids because vapors are flammable.

WARNING
Engines give off carbon monoxide, an odorless, colorless, poison gas. Breathing carbon monoxide can cause nausea, fainting or death.
- Start and run engine outdoors.
- Do not start or run engine in enclosed area, even if doors or windows are open.
NOTICE: This engine was shipped from Briggs & Stratton without oil. Before you start the engine, make sure you add oil according to the instructions in this manual. If you start the engine without oil, it will be damaged beyond repair and will not be covered under warranty.
Note: Some engines and equipment have remote controls. See the equipment manual for location and operation of remote controls.
- Check the oil level. See the How To Check/Add Oil section.
- Make sure equipment drive controls, if equipped, are disengaged.
- Turn the fuel shut-off valve (A), if equipped, to the on position (Figure 5).
- Move the throttle control (B) slightly past the slow position.
- Turn the electric start switch (D) to the on/start position (Figure 5).
NOTICE: To prolong starter life, use short starting cycles, not to exceed 15 seconds per minute. Extended cranking can damage the starter motor.
- If the engine does not immediately start, pull out the choke control (C), if equipped, to the choke position.
Note: Choke is usually unnecessary when restarting a warm engine. - As the engine warms up, move the choke control (C) to the run | position.
How To Stop The Engine - Figure 5

WARNING
Gasoline and its vapors are extremely flammable and explosive.
Fire or explosion can cause severe burns or death.
-
Do not choke the carburetor to stop engine.
-
Move the throttle control (B) to the slow position. Turn the key switch (D) to the off position (Figure 5). Remove the key and keep in a safe place out of the reach of children.
- After the engine stops, turn the fuel shut-off valve (A), if equipped, to the closed position.
Maintenance
Use only original equipment replacement parts. Other parts may not perform as well, may damage the unit, and may result in injury. In addition, use of other parts may void your warranty.
We recommend that you see any Briggs & Stratton 3/LC Authorized Dealer for all maintenance and service of the engine and engine parts.
NOTICE: All the components used to build this engine must remain in place for proper operation.
Emissions Control
Maintenance, replacement, or repair of the emissions control devices and systems may be performed by any non-road engine repair establishment or individual.
However, to obtain "no charge" emissions control service, the work must be performed by a factory authorized dealer. See the Emissions Warranty.

WARNING
Unintentional sparking can result in fire or electric shock. Unintentional start-up can result in entanglement, traumatic amputation, or laceration.
Fire hazard

Before performing adjustments or repairs:
- Disconnect the spark plug wire and keep it away from the spark plug.
- Disconnect battery at negative terminal (only engines with electric start.)
Use only correct tools. - Do not tamper with governor spring, links or other parts to increase engine speed.
- Replacement parts must be the same and installed in the same position as the original parts.
- Do not strike the flywheel with a hammer or hard object because the flywheel may later shatter during operation.
When testing for spark:
Use approved spark plug tester.
- Do not check for spark with spark plug removed.
Maintenance Chart
Every 8 Hours or Daily
Check engine oil level
- Check coolant level
First 50 Hours (initial Break-In)
- Change engine oil *
Every 100 Hours or Annually
- Check fan belt tension
Clean radiator
Clean air filter - Check muffler and clean spark arrestor (if equipped)
Every 150 Hours or Annually
Change engine oil *
- Replace oil filter
Every 600 Hours or Annually
- Replace air filter
- Check valve clearance
- Replace fuel filter
- Replace spark plugs
Annually
-
Change coolant
-
Service more often when operating under heavy load or in high temperature.
Not required unless engine performance problems are noted.
Carburetor Adjustment
Never make adjustments to the carburetor. The carburetor was set at the factory to operate efficiently under most conditions. However, if adjustments are required, see a Briggs & Stratton 3/LC Authorized Dealer for service.
NOTICE: The manufacturer of the equipment on which this engine is installed specifies the top speed at which the engine will be operated. Do not exceed this speed.
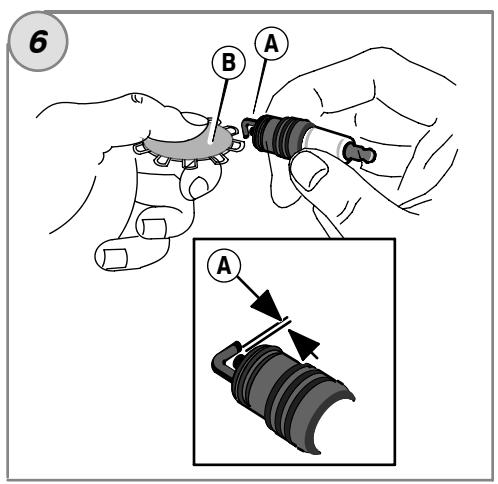
How To Replace The Spark Plug - Figure 6
Check the gap (A, Figure 6) with a wire gauge (B). If necessary, reset the gap. Install and tighten the spark plug to the recommended torque. For gap setting or torque, see the Specifications section.
Note: In some areas, local law requires using a resistor spark plug to suppress ignition signals. If this engine was originally equipped with a resistor spark plug, use the same type for replacement.
Inspect Muffler And Spark Arrester

WARNING

Running engines produce heat. Engine parts, especially muffler, become extremely hot.

Severe thermal burns can occur on contact.
Combustible debris, such as leaves, grass, brush, etc. can catch fire.
- Allow muffler, engine cylinder and fins to cool before touching.
- Remove accumulated debris from muffler area and cylinder area.
- It is a violation of California Public Resource Code, Section 4442, to use or operate the engine on any forest-covered, brush-covered, or grass-covered land unless the exhaust system is equipped with a spark arrester, as defined in Section 4442, maintained in effective working order. Other states or federal jurisdictions may have similar laws. Contact the original equipment manufacturer, retailer, or dealer to obtain a spark arrester designed for the exhaust system installed on this engine.
Inspect the muffler for cracks, corrosion, or other damage. Remove the spark arrester, if equipped, and inspect for damage or carbon blockage. If replacement parts are required, make sure to use only original equipment replacement parts.

WARNING: Replacement parts must be the same and installed in the
same position as the original parts or fire could result.
How To Check Coolant
NOTICE: This is a liquid cooled engine. A 50 / 50% coolant mixture of phosphate-free antifreeze and tap water is required for cooling, rust resistance, and lubrication of the water pump.

WARNING
Severe thermal burns can occur by escaping steam or hot coolant.

DO NOT remove radiator cap or reservoir cap if engine is warm or running.
- Stop engine and allow it to cool before removing radiator cap or reservoir cap and before changing or adding coolant.
- Check the coolant level. The coolant level must be between the FULL and LOW, or ADD, marks on the coolant reservoir. If the coolant level is low, add a 50/50% coolant mixture of phosphate-free antifreeze and tap water to the reservoir.
- To remove the reservoir cap after engine is cool, place a thick cloth over the reservoir cap. Slowly turn the reservoir cap counterclockwise to remove.
- If the reservoir is dry, add coolant to both the reservoir and to the radiator. See the equipment manual for location, operation, and maintenance of the coolant reservoir and of the radiator.
- To remove the radiator cap after engine is cool, place a thick cloth over the radiator cap. Slowly turn the radiator cap counterclockwise to the first stop. If pressurized steam escapes from the cap, stand back to avoid injury. After all pressure is released, push down and turn the radiator cap counterclockwise to remove.
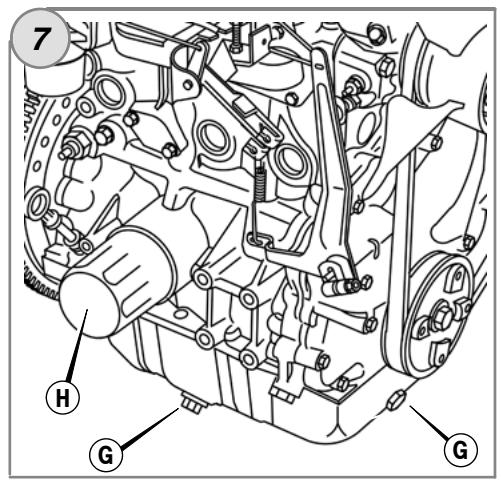
How To Change The Oil - Figure ② ⑦
Used oil is a hazardous waste product and must be disposed of properly. Do not discard with household waste. Check with your local authorities, service center, or dealer for safe disposal/recycling facilities.
Remove Oil
- With engine off but still warm, disconnect the spark plug wires (F, Figure 2) and keep them away from the spark plugs.
- Remove the oil drain plug (G, Figure 7). Drain the oil into an approved container.
- After the oil has drained, install and tighten the oil drain plug.
Change The Oil Filter
For replacement intervals, see the Maintenance chart.
- Drain the oil from the engine. See Remove Oil section.
- Remove the oil filter (H, Figure 7) and dispose of properly.
- Before you install the new oil filter, lightly lubricate the oil filter gasket with fresh, clean oil.
- Install the oil filter by hand until the gasket contacts the oil filter adapter, then tighten the oil filter 1/2 to 3/4 turns.
- Add oil. See Add Oil section.
Add Oil
-
Pour the oil slowly into the engine oil fill (C). Do not overfill.
-
Place engine level.
Clean the oil fill area of any debris.
See the Specifications section for oil capacity. - Remove the dipstick (A, Figure 2).
Important: When adding oil, adequate venting is required as follows:
- Remove the dipstick.
- Make sure adequate clearance (D) is maintained between the oil fill device (E) and the engine oil fill (C). See Figure 3.
NOTICE: Before starting the engine, wipe the engine clean of any spilled oil.
- After adding oil, install the dipstick. Start and run engine at idle for five minutes. Check for leaks. Shut off engine. Wait three minutes and check oil level. If required, add oil to bring oil level to the FULL mark (B) on the dipstick (Figure 2).
- Install the dipstick.
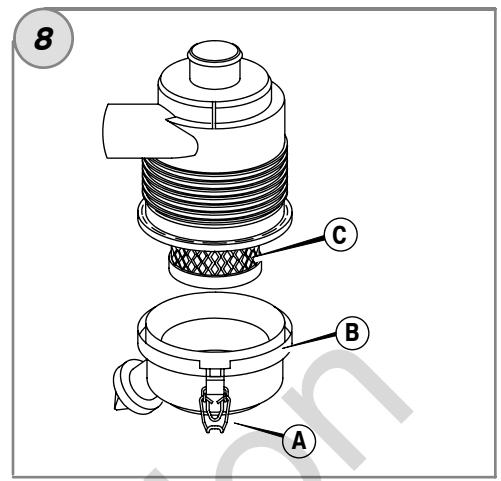
How To Service The Air Filter - Figure 8

WARNING
Gasoline and its vapors are extremely flammable and explosive. Fire or explosion can cause severe burns or death.
- Never start or run the engine with the air cleaner assembly or the air filter removed.
NOTICE: Do not use pressurized air or solvents to clean the filter. Pressurized air can damage the filter and solvents will dissolve the filter.
See the Maintenance Chart for service requirements.
- Open the latches (A) and remove the cover (B). See Figure 8.
- Remove the air filter (C).
- To loosen debris, gently tap the air filter on a hard surface. If the air filter is excessively dirty, replace with a new air filter.
- Install the air filter.
- Install the cover and close the latches.
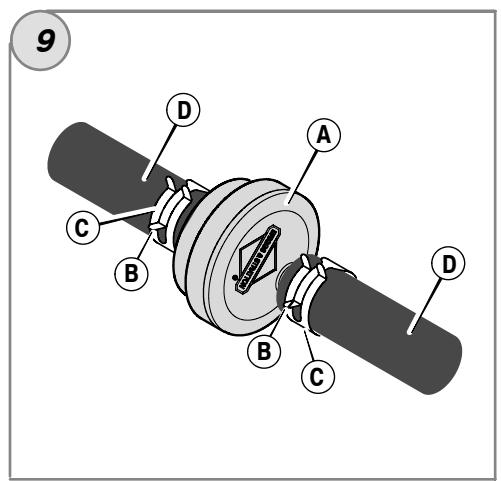
How To Replace The Fuel Filter - Figure 9

WARNING
Gasoline and its vapors are extremely flammable and explosive. Fire or explosion can cause severe burns or death.
- Keep gasoline away from sparks, open flames, pilot lights, heat, and other ignition sources.
- Check fuel lines, tank, cap, and fittings frequently for cracks or leaks. Replace if necessary.
Before replacing the fuel filter, drain the fuel tank or close the fuel shut-off valve. -
Replacement parts must be the same and installed in the same position as the original parts.
If fuel spills, wait until it evaporates before starting engine. -
Before replacing the fuel filter (A, Figure 9), if equipped, drain the fuel tank or close the fuel shut-off valve. Otherwise, fuel can leak out and cause a fire or explosion.
- Use pliers to squeeze tabs (B) on the clamps (C), then slide the clamps away from the fuel filter. Twist and pull the fuel lines (D) off of the fuel filter.
- Check the fuel lines for cracks or leaks. Replace if necessary.
- Replace the fuel filter with an original equipment replacement filter.
- Secure the fuel lines with the clamps as shown.
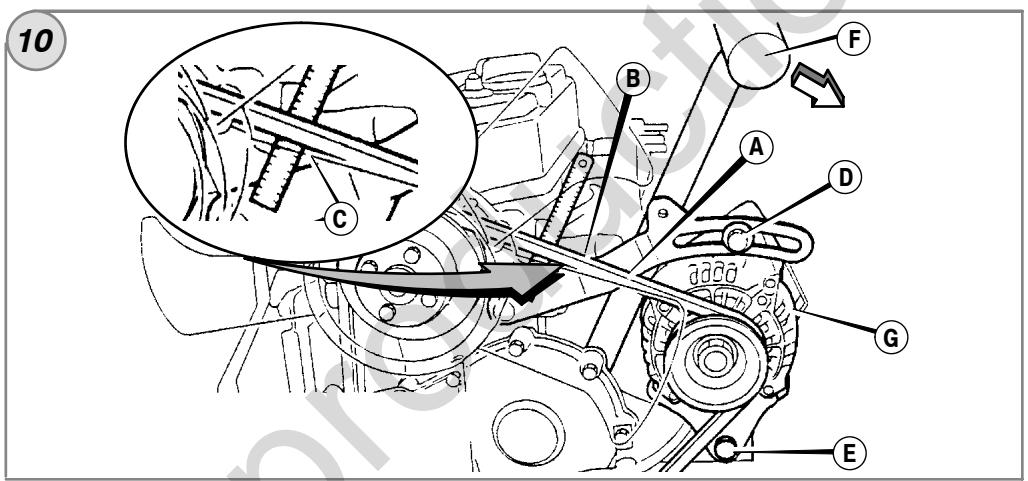
How To Check/Adjust The Fan Belt - Figure 10
Check Fan Belt
- Check the condition of the fan belt (A, Figure 10). If the fan belt has cracks or is damaged, replace with a new belt.
- Check the tension (B) of the fan belt. Press on the center (C) of the fan belt. If tension is correct, the belt will move 3/8 - 1/2 in (10 - 12mm) if 22 lbs (10kg) of force is applied to the center of the belt. If the tension is too loose, adjust as follows.
Adjust Fan Belt Tension
- Loosen the alternator mounting bolts (D) and (E). See Figure 10).
-
Position a pry bar (F) against the alternator (G) and the side of the engine block. To tighten the fan belt, pull on the pry bar. Temporarily tighten the alternator mounting bolts.
-
Check the tension of the fan belt. See Check Fan Belt section. If necessary, repeat the procedure.
- Tighten the alternator mounting bolts. Torque bolt (D) to 14 ft-lbs (19 Nm). Torque bolt (E) to 45 ft-lbs (61 Nm).
Gasoline and its vapors are extremely flammable and explosive. Fire or explosion can cause severe burns or death.
When Storing Gasoline Or Equipment With Fuel In Tank - Store away from furnaces, stoves, water heaters or other appliances that have pilot lights or other ignition sources because they can ignite gasoline vapors.
Fuel can become stale when stored over 30 days. Stale fuel causes acid and gum deposits to form in the fuel system or on essential carburetor parts. To keep fuel fresh, use Briggs & Stratton FRESH START® fuel stabilizer, available as a liquid additive or a drip concentrate cartridge.
There is no need to drain gasoline from the engine if a fuel stabilizer is added according to instructions. Run the engine for 2 minutes to circulate the stabilizer throughout the fuel system. The engine and fuel can then be stored up to 24 months.
If gasoline in the engine has not been treated with a fuel stabilizer, it must be drained into an approved container. Run the engine until it stops from lack of fuel. The use of a fuel stabilizer in the storage container is recommended to maintain freshness.
While the engine is still warm, change the engine oil.
Need Assistance? Go to BRIGGSandSTRATTON.COM or call 1-800-233-3723. - Engine power will decrease 3.5% for each 1,000 feet (300 meters) above sea level and 1% for each 10^ F( 5.6^ C) above 77^ F( 25^ C) . The engine will operate satisfactorily at an angle up to 15^ . Refer to the equipment operator's manual for safe allowable operating limits on slopes.
Check when engine is cold.
^+ We recommend that you see any Briggs & Stratton 3/LC Authorized Dealer for all maintenance and service of the engine and engine parts. Use only genuine Briggs & Stratton parts.
Storage

WARNING
Fuel System
Engine Oil
Troubleshooting
Specifications
Engine Specifications
| Model | 580000 |
| Displacement | 58.16 ci (953 cc) |
| Bore | 2.835 in (72 mm) |
| Stroke | 3.071 in (78 mm) |
| Oil Capacity | 3.5 qt (3.3 L) |
Tune-up Specifications *
| Model | 580000 |
| Spark Plug Gap | 0.030 in (0.76 mm) |
| Spark Plug Torque | 180 lb-in (20 Nm) |
| Intake Valve Clearance▲ | 0.007 in (0.18 mm) |
| Exhaust Valve Clearance▲ | 0.007 in (0.18 mm) |
Common Service Parts
| Service Part | Part Number |
| Air Filter | 820263 |
| Oil Filter | 491056 |
| Fuel Filter | 821026 |
| Fuel Additive | 5041 |
| Resistor Spark Plug | 496055, 5066 |
| Spark Plug Wrench | 19374 |
| Spark Tester | 19400 |
| V-Belt (940 mm) | 821075 |
| V-Belt (970 mm) | 820893 |
LIMITED WARRANTY
Briggs & Stratton Corporation will repair or replace, free of charge, any part(s) of the engine that is defective in material or workmanship or both. Transportation charges on product submitted for repair or replacement under this warranty must be borne by purchaser. This warranty is effective for and is subject to the time periods and conditions stated below. For warranty service, find the nearest Authorized Briggs & Stratton 3/LC Service Dealer in our dealer locator map at BRIGGSandSTRATTON.COM, or by calling 1-800-233-3723, or as listed in the 'Yellow Pages'.
There is no other expressed warranty. Implied warranties, including those of merchantability and fitness for a particular purpose, are limited to one year from purchase, or to the extent permitted by law and all implied warranties are excluded. Liability for incidental or consequential damages are excluded to the extent exclusion is permitted by law. Some states or countries do not allow limitations on how long an implied warranty lasts, and some states or countries do not allow the exclusion or limitation of incidental or consequential damages, so the above limitation and exclusion may not apply to you. This warranty gives you specific legal rights and you may also have other rights which vary from state to state and country to country.
OUR PRODUCT
Warranty Period
Consumer and Commercial Use
Vanguard™ 3/LC
2 years
Major Parts Warranty *
3 years
Parts & Labor *
2 years
- Note the following special warranty periods: For purposes of this warranty policy, Parts & Labor coverage is 2 years. Major parts only coverage is extended through the third year of operation. Major Parts Warranty (M.P.W.) covers but is not limited to or exclusive to cylinder block, cylinder head, crankshaft, camshaft, gears, pistons, rods, flywheel, flywheel housing, oil pump, fan, pulleys, mechanical governor, intake manifold, and oil pan. M.P.W. does not cover and is not limited to piston rings, replaceable bearings, water pump, any electrical component, valve train components, accessory parts, seals, gaskets, carburetors, exhaust manifold, hoses, all fuel system components, injectors, injector pump, turbocharger, muffler, any filters, radiator, thermostat, spark plugs, glow plugs, and fuel transfer pumps. The warranty period begins on the date of purchase by the first retail consumer or commercial end user and continues for the period of time stated in the table above.
No warranty registration is necessary to obtain warranty on Briggs & Stratton products. Save your proof of purchase receipt. If you do not provide proof of the initial purchase date at the time warranty service is requested, the manufacturing date of the product will be used to determine the warranty period.
About Your Warranty
Briggs & Stratton welcomes warranty repair and apologizes to you for being inconvenient. Any Authorized Briggs & Stratton 3/LC Service Dealer may perform warranty repairs. Most warranty repairs are handled routinely, but sometimes requests for warranty service may not be appropriate. For example, warranty would not apply if engine damage occurred because of misuse, lack of routine maintenance, shipping, handling, warehousing or improper installation. Similarly, warranty is void if the serial number of the engine has been removed or the engine has been altered or modified.
If a customer differs with the decision of the Service Dealer, an investigation will be made to determine whether the warranty applies. Ask the Service Dealer to submit all supporting facts to his Distributor or the Factory for review. If the Distributor or the Factory decides that the claim is justified, the customer will be fully reimbursed for those items that are defective. To avoid misunderstanding which might occur between the customer and the Dealer, listed below are some of the causes of engine failure that the warranty does not cover.
Normal wear: Engines, like all mechanical devices, need periodic parts service and replacement to perform well. Warranty will not cover repair when normal use has exhausted the life of a part or an engine. Warranty would not apply if engine damage occurred because of misuse, lack of routine maintenance, shipping, handling, warehousing or improper installation. Similarly, warranty is void if the serial number of the engine has been removed or the engine has been altered or modified.
Improper maintenance: The life of an engine depends upon the conditions under which it operates, and the care it receives. Some applications, such as tillers, pumps and rotary mowers, are very often used in dusty or dirty conditions, which can cause what appears to be premature wear. Such wear, when caused by dirt, dust, spark plug cleaning grit, or other abrasive material that has entered the engine because of improper maintenance, is not covered by warranty.
This warranty covers engine related defective material and/or workmanship only, and not replacement or refund of the equipment to which the engine may be mounted. Nor does the warranty extend to repairs required because of:
1 Engines that are not properly applied to equipment. It is strongly recommended that the factory be contacted prior to applying a B&S 3/LC engine to equipment that did not originally use a B&S 3/LC engine.
2 Problems caused by parts that are not original Briggs & Stratton parts.
3 Equipment controls or installations that prevent starting, cause unsatisfactory engine performance, or shorten engine life. (Contact equipment manufacturer.)
4 Leaking carburetors, clogged fuel pipes or injectors, sticking valves, contaminated injector pumps, or other damage, caused by using contaminated or stale fuel. Use clean, fresh fuel (lead free gasoline, diesel fuel) and Briggs & Stratton fuel stabilizer, Part No. 5041.
5 Parts which are scored or broken because an engine was operated with insufficient or contaminated lubricating oil, or an incorrect grade of lubricating oil (Check oil level daily or after every 8 hours of operation. Refill when necessary and change oil and oil filter at recommended intervals). OIL GARD may not shut down running engine. Engine damage may occur if oil level is not properly maintained. Read Operator's Manual.
6 Repair or adjustment of associated parts or assemblies such as clutches, transmissions, remote controls, etc., which are not manufactured by Briggs & Stratton.
7 Damage or wear to parts caused by dirt, which entered the engine because of improper air cleaner maintenance, re-assembly, or use of a non-original air cleaner element or cartridge. At recommended intervals, clean and/or replace the filter as stated in the Operator's Manual.
8 Parts damaged by over-speeding, or overheating caused by grass, debris, or dirt, which plugs, clogs radiator or air cooling access openings, or damage caused by operating the engine in a confined area without sufficient ventilation. Engine damage caused by not using accurate mix of anti-freeze and tap water, or water entering the engine due to any cause.
9 Engine or equipment parts broken by excessive vibration caused by a loose engine mounting, loose cutter blades, unbalanced blades or loose or unbalanced impellers, improper attachment of equipment to engine crankshaft, over-speeding or other abuse in operation.
10 Routine tune-up or adjustment of the engine.
11 Engine or engine component failure, i.e., combustion chamber, valves, valve seats, valve guides, or burned starter motor windings, caused by the use of alternate fuels such as, liquified petroleum, natural gas, altered gasolines, etc.
Warranty service is available only through authorized service dealers by Briggs & Stratton Corporation. Locate your nearest Authorized Briggs & Stratton 3/LC Service Dealer in our dealer locator map on BRIGGSandSTRATTON.COM or by calling 1-800-233-3723, or as listed in the 'Yellow Pages'.
California Emission Control Warranty Statement
Your Warranty Rights and Obligations
and
United states Emission Control Warranty Statement
Your Warranty Rights and Obligations.
The California Air Resources Board (CARB), U.S. EPA and B&S are pleased to explain the Emission Control System Warranty on your model year 2009 and later off-road spark-ignition engine. In California, new off-road large spark-ignition engines must be designed, built and equipped to meet the State's stringent anti-smog standards.
Elsewhere in the United States, new Non-road spark-ignition engines certified for model year 2009 and later, must meet similar standards set forth by the U.S. EPA. B&S must warrant the emission control system on your engine for the period of time listed below, provided there has been no abuse, neglect or improper maintenance of your engine.
Your emission control system may include parts such as the carburetor or fuel injection system, the air cleaner, ignition system, muffler, and catalytic converter. Also included may be hoses, belts, connectors and other emission related assemblies.
Where a warrantable condition exists, B&S will repair your engine at no cost to you including diagnosis, parts and labor.
Briggs & Stratton Corporation Warranty Coverage
The 2009 and later off-road spark-ignition engines are warranted for two years. If any emission-related part on your engine is defective, the part will be repaired or replaced by B&S.
Owner's Warranty Responsibilities
As the engine owner, you are responsible for the performance of the required
maintenance listed in your Operating & Maintenance Instructions. B&S recommends that you retain all your receipts covering maintenance on your engine, but B&S cannot deny warranty solely for the lack of receipts or for your failure to ensure the performance of all scheduled maintenance.
As the engine owner, you are responsible for the performance of the required maintenance listed in your Operating & Maintenance Instructions.
B&S recommends that you retain all your receipts covering maintenance on your engine, but B&S cannot deny warranty solely for the lack of receipts or for your failure to ensure the performance of all scheduled maintenance. As the engine owner, you should however be aware that B&S may deny you warranty coverage if your engine or a part has failed due to abuse, neglect, improper maintenance or unapproved modifications. You are responsible for presenting your engine to an Authorized B&S Service Dealer as soon as a problem exists.
The warranty repairs should be completed in a reasonable amount of time, not to exceed 30 days. If you have questions regarding your warranty rights and responsibilities, you should contact a B&S Service Representative at 1-800-233-3723.
EMISSION COMPLIANCE PERIOD: 1000 HOURS
General Emissions Warranty Coverage
B&S warrants to the ultimate purchaser and each subsequent purchaser that the off-road engine is: designed, built and equipped so as to conform with all applicable regulations; and free from defects in materials and workmanship that cause the failure of a warranted part to be identical in all material respects to that part as described in B&S's application for certification. The warranty period begins on the date the off-road engine is delivered to an ultimate purchaser or first placed into service. The warranty period is two years.
Subject to certain conditions and exclusions as stated below, the warranty on emission-related parts is as follows:
- Any warranted part that is not scheduled for replacement as required maintenance in the written instructions supplied, is warranted for the warranty period stated above. If the part fails during the period of warranty coverage, the part will be repaired or replaced by B&S according to subsection (4) below. Any such part repaired or replaced under warranty will be warranted for the remainder of the period.
- Any warranted part that is scheduled only for regular inspection in the written instructions supplied is warranted for the warranty period stated above. Any such part repaired or replaced under warranty will be warranted for the remaining warranty period.
- Any warranted part that is scheduled for replacement as required maintenance in the written instructions supplied is warranted for the period of time before the first scheduled replacement date for that part. If the part fails before the first scheduled replacement, the part will be repaired or replaced by B&S according to subsection (4) below. Any such part repaired or replaced under warranty will be warranted for
the remainder of the period prior to the first scheduled replacement point for the part.
- Any warranted part that is scheduled only for regular inspection in the written instructions supplied is warranted for the warranty period stated above. Any such part repaired or replaced under warranty will be warranted for the remaining warranty period.
- Notwithstanding the provisions herein, warranty services or repairs will be provided at all of our distribution centers that are franchised to service the subject engines or equipment.
- The off-road engine owner will not be charged for diagnostic labor that is directly associated with diagnosis of a defective, emission-related warranted part, provided that such diagnostic work is performed at a warranty station.
- B&S is liable for damages to other engine or equipment components proximately caused by a failure under warranty of any warranted part.
- Throughout the off-road engine warranty period stated above, B&S will maintain a supply of warranted parts sufficient to meet the expected demand for such parts.
- Any replacement part may be used in the performance of any warranty maintenance or repairs and must be provided without charge to the owner. Such use will not reduce the warranty obligations of B&S.
- Add-on or modified parts that are not exempted by the Air Resources Board may not be used. The use of any non-exempted add-on or modified parts by the ultimate purchaser will be grounds for disallowing a warranty claims. B&S will not be liable to warrant failures of warranted parts caused by the use of a non-exempted add-on or modified part.
Warranted Parts
a. Fuel Metering System
- Carburetor and internal parts (if applicable)
Cold start enrichment system (if applicable) - Fuel injection system (if applicable)
Air/fuel ratio feedback control system (if applicable)
Fuel pump
Fuel filter
b. Air Induction System
Air cleaner
Intake manifold
Throttle body (if applicable)
c. Ignition System
Spark plug
Ignition coil
- Ignition processor (if applicable)
d. Exhaust System
- Exhaust manifold (if applicable)
e. Catalyst System
Catalytic converter (if applicable)
f. Miscellaneous Items Used in Above System
Pressure, temperature, position, speed sensitive devices
Electronic controls
- Connectors and assemblies
Hoses
Osha Hhopmaia
3a pe3epBHN qactn IIN TeXHuecka nMOU 3aNNuTe OTdOly MoDena Ha DbVraTeJRA, TIna H KOIOBITE HOMPe a C dATata HA KcYBaHETo MY. TeIe HOMpe a CE HAMnP aT Bbpy DbrnTaTBA. (HaNPabete cnpabka Ha cTpaHncaTa c pazdeI EneMeHTN UnpaBLeHn).
Data Ha KynyBaHe:
MM/DD/TTT
ModenHaDburatela:
MoeI:
Tun:
KoIa:
HOpMaIg 3a HOMHaIHaT a MoUHOCT Ha DBVaTeJIte
3aДигателNTe 3/LC (3-цииндровс bOнdo oxnackdaine)пьлнata мошноct ce OCHOBABA HA KPNTEPINITE CBflnacHO Правинka J1995 ha SAE (ДужесТВОТHa HINHEPENTE OT ABTomOБИнHLATA pOMIshneHOT n TpaHcNopta), a NOLE3HATA MOUHOCCT - cblnacho КPNTEPINITE OT J1349 hA SAE. ПОLE3HATA пpo3BODCTBEHa MошноCT Ha DBINrTeHIM,MOHTnpAHn 3a pa3JIuHn npinJoxEHHa,MOXe Да BapINA 3aBmCIMoCT OT rOIMM bOPOI phakTOpIN, BKIOHUTeHNO rpaHnYHITe O6Obotn Ha npINOxHn MEXAHn3bM, YCNoBnHTa Ha OKONHATA cpeDA,poDpBxKkata Ha DBinrTeHn/O6OpyDbaHeTo n DpyrN npOMEHNBi.
Texhika 3a 6e3oNaChOCT Ha onepaTopa
CIMBOJIN 3A BE3ONACHOCT IN YNPPABJEHNE

Orheonacho

Двнжеци
Ce yactn

Macno

OTPOBHN
ra30Be

Бьрзи
6opotn

BaBn
obopotn

(

BzPbBOoNacHO

Onachoct 3a nopaxeHn
OT eNeKtpnueckn TOK

TopuBO

Cmyka

Bkn. N3kn.

PpeKpaTBAHe
NODaBaHaTo Ha TOp

ObpaTeH
y4

Dace HocAT
npedna3Hn OuHa

Onachn
XHMMKaJIu

PpOyETe
PbKOBOdCTBOTO

Topeusa
NOBbpxHOCT

OnachoctOT
U3Mpb3BaHe

Topeeta
TEUHOCT
nnpa
IpeDynpEiTeHnHT CmBON 3a ONaCHOCT

OppeJeI npoeoxpahnteHa
HΦopMaun3a pNCKOBe, KOITMOrAT da DObEdaTdo HapAHBaHe Ha nepcoHaJa. CnHAnmuaa dma (OANACHO, PNEUYPTPEXJEHEIe nn BHIMAHIE) ce noCTaB 3aeJNO C npDynpEnTeJeCNMBo1, 3a da NOCOH BepoTHOCTTa n NOTEHMaJIHaTa cepNo3HOCT Ha HApAHBaHETo. DoJIbHNtELHo, eINH CNMBo1 3a ONACHOCT MoKe da NOKa3Ba BNDA HA ONACHOCTTa.

ONACHO nocohba onachoct. KOHTo, aKO He sbde n36eHaTa, ue doBeDe
DO CMBPT NIN cepno3HO HapaHBAhe.

PNEpyPExKDeHne nocOyBa onaCHOCT, KOrTO, aKO He 6bJe
136eHaTa,MOKe Da IOBeDe Oc CmbpT Nn CepNo3Ho HapaHbAhe.

BHIMAHNE nocouba onaCHOCT, KOrTo, aKo He 6bJe u36eHaTa, MoXe da
IOBede Do MaIka NIIcpeHa CTeEN Ha HapaHBAhe.
PNEyPExKDEHNE NOCOHBA CHTyaUaY, KORTO 6M MOrna da doBepe
do NOBpeKdahe Ha npOdyKta.

PNEyPPEXDEHNE
HAKON OT cBCTABHNTe ENEMENTn HA TO3N pOdyKT N CBp3aHNTe C TAX npncnocO6JIeHnC bDbPcxT XMHmUHn BceCTBa, n3BeCTNH B caTa KaInOpHn KATO pNnuHnHTeN H a paK, yBpeDa HHObOPoHnTe INI dpyrYypeHa npenpoykTNBHATA cnOCo6HOCT. CnePa6Ota C THX, mMnBAite PbCte CN.

PNEyPPEXDEHNE
MropeiHne ra3oBe OTE TO3n DnIaTeRcBcbPkAT XmMHeCKs CbeDInHeHH, N3BeCTHn Ha 7aTa KaIinfOpHn KaTO npuHnHTeN a paK, YpBeJdaHn npa PaxDaHe, INy dpyrN ypeKdHaNN, CbPb3aN cPenpoDyKTMBHOCTT.

PNEyPPEKDEHNE
KopnpaBn Briggs & Stratton He oOobpBa n He no3BoJbA n3no3BaHTo Ha Te3n DBVrataIeN Bbpxy BcBdexOHa 3 KOJIeNa, MOTUKNLeTn, YBecenTIeHN KONHKn/kaTHnI, JETaTeHN anapatn Hn TpaHCNOPTN CpeCTBa 3a yuaCTne B CbCTe3aTeHN MeOpnpaTn. N3no3BAHo H a Te3n DBVrataEi Ha TaKInBa MAnHH MoKeJa dOBe6 Do mATEpnaHn IeTn, CepNo3Hn HapaHbHnA (BKJIOHTeHn Napaln3a) n DOp n Do cmbpt.
PNEpyPExKHeHne:HaCToAHTBnATDBnATeTcEdoCTaBOnBriggs& Stratton 6e3 macNo. Pnepi Da cSTpIaTe DnBraTeJIeCe yBepeTe, ye CTe HaneNl MacNo B Hero cOpene IHCTpykUInTe TOBa pBkoBDCTBO.AKO rO cTApIpaTe 6e3 macNo, ToH ce NObpEni, 6e3 Da bSe Bb3MOxHO da Ce peMoHTnpu n 6e3 NOKpnIThe O raapAnrta.

PNEyPEXKDEHNE

BéH3nHbT N HEROBNTe napi ca n3KnIOuHTeJIHO orHeONaChN n 36yXnBn.
Pn doJIbAhe Ha ropIbO
I3KIOUOTe DnIraTeJI N IO OCTaBeTe Da ce OXlaI HAI-MaIKO 2 MInyTN, npEIN da CBAInTE KAnaYKaTHa Ha pe3epBoapa 3a rOpNBO.
IbHte pe3epBOapa 3a rOpBnHO hOtKpnto nIN B do6pe BeHTnnpaHO nOMEeHne.
He npenbnaBte pe3epBoapara 3a ronpBO.3a da no3boInTe pa3uHpeHne Ha 6eH3nHa, He nbHete Hnd donHata OCHOBa Ha rplnoBHnHaTa 3a haJIbBaHe Ha ronpBO.
-ДрьжteбенидалачOTИСКР,OTКРТПлamьц,CINHAJIHnIaMnI, TOnJIHaNnIpyrN3anaJInteHInN3TOUHnI.
- PIOBOPBAIteYeCTOROPBOPBOOInTe,pe3epBOapa,kanaqKaTa n CbeDINHeHnraT3aNyKHaTnHnNIIeTcOBe.3aMeHeTe rA,akoE Heo6xOdmo.
Ako ronpboTo ce pa3nee, n3yakaiTe DOkato To Ce n3napn, npdei da CTaptnape Dniratela.
PnCstapTnpaHe Ha DBrTaTeIa
- Vbepete Ce, Ye 3anaJIteNHaTcBaEi#, UyMo3aIyUWITeRn, KanaUcKaTa Ha pe3epBOpa 3a roPINO BvB3dyuHnHΦINTp (ako IMa TaKuBA) ca Ha MRCTO Cn i Ca O63ONaCEHn.
He pa3BbptaIte DnBaTeTcN 3BaDHa 3anaIITeHa CBeU. - Ako DBnraTeTne 3e aadabn, noCTabeTe Cmykaa (aKO Ima TaKbB) Ha nO3uNRA OPEN/RUN, npDnBmke Tpe bHaTa raz (aKO Ima TaKaBa) Ha nO3uNRA FAST n pa3BbPntte, dokato DBnratEnr CTaptnpa.
Ppi pa6oteua MaunHa
He NaKAnHnTe DBIgATEIe IIN MauIHHaTATA NOd bTbn, KOITo BOI Do pa3nIbAHe Ha 6e3Ha.
He 3anyuBaTe KaMepaTa Ha Kap6yapToPA, 3a Da cnpeTe DniratTeIa.
HnKORA He CTaTpnaIte n He pa6OTeTe C Dnuratene Ipn OTCTpaHEK KOMNKeT H a Bb3dUynH pA kO hMa TaKbB) IIN npI OTCTpaHE Nb3dyuWe HmTTbp (AKo hMa TaKbB).
Pn CMHa Ha MacJlOTo
Ako n3TOBATE MACNOTO OT rOpHATA Tpb6a 3a IIbIHeC MACNO,pe3epBOApBT 3a rOpBIO TpR6Ba da bIbe Ipa3eH, INI TO MOKe Da NOTeH na prnHHIN POxap INI EKcIIIO3rN.
Pn TpaHcnpOpTnpaHe Ha MaunHaTa
- TpahcnpTupaTe c PPA3EH pe3epBoap, nIi C kpaH 3a noJaBaHe Ha rOpmboHa no3nua OFF.
Korato cKlaIpaTe 6eH3n HnO6OpyDaBaHe c rOpNBo B pe3epBoapa
CklaIpaIteJaIeOuTneU,neUH,BoDoHarpeBateNnInnDpyTN eJeKTPnuecknPiNoBOpn,KoTOImATcNHaNAJMaNnINnDpyr3aNaJIteHeN h3TOUHKn,3aUToTeMOrTaBb3PnAmEHOt6b3HnOBTe Napi.

PNEyPPEKDEHNE
IyckaHToHaDburatEnCb3daBaNCKpeHe.
UckpeheTo MoKe Da Bb3PnAmEH HAMnpaunTe ce HaOKoI0 3anaJIIMn ra3OBe.
Toba moXe da doBeDe do ekCnNo3nI noXap.
- Ako Ima n3TnueHa Na npnpOeH nIIN BTeUHe rA3 npOnaH B NOMEeHneTo, He cTApTnpaTe DBrAteJIa.
He n3noI3BaIte roPbBa 3a hauJIHo 3anaJIbAhe noI hauIraHae, 3aOTo napITE mC a 3anaJIteJIHn.

NPEdynPEXKDEHNE
Дигателп'te n3nyckat BbyrlepoDeH OKnC, KoITo e OtpoBeH ra3, 6e3 MInPnc N CbRT.
BdmbaHTo Ha BbIepeoH Okc MoKe da npuHH raJeHe, npnaBk nn Cmpt.
- CtaptnpaaiTe npa6oTeC DnBraTeJI HaBBH.
He cnapaIte n He pa6oTeTc C DnIraTeJI B 3aTbOpEn OmeJeHne, dopu npO TbOpEn Brpatn nn Inpzopuz.

PNEyPEXKDEHNE
Bbptaunite ce cachtn morat da donpat nnn 3axbaHAT pbc, KpaKa, Koca, oIeKnIO nnn npnHaadneKHOCTN.
MoKe da ce doCTnRhe do TpaBMaTnHa amnyTaunu nn cepNo3Ho HapaHraBaHe.
Pa6oTeTe cDbIrataTeI npi NocTaBeHn 3aunTHn Kauna.
-Дрьктpe рьцeteи Кракета си далец OT Вьртуи се чс.
- Пивьрзай Te дыгпte КОси CBалгпу украшеният.
He hocete no c6e cn unpoko o6neKno, Bucraun uHypoBe nIn Beun, KOITOMorat da 6bDat 3axBaHaTn.

IPEDyPEXKDEHNE
Pa6oteuite DBratEn OTeJrTOnnHa. Yactne Ha DBratEnTeNt, OocboHo wymo3arLywnTeJr, CTaBAT NkIouHteJHropeu.
PpI dOpnp MoXe da noJyUte cepno3Ho n3rapAne.
TOpMnTe OtnaDbu, KaTo JnCTa, TpeBn, XpactaJaK n npytn, Morat da ce 3anaJr.
Octabete uymo3aflnyuhtenla, uinHbpaHa Dnirata n pe6pata da ce oxlaanT, npdei da rN DOKOCBaTe.
- OtctpaheTe HaTpynaHnTe OTNOMKo OKONo 8yMOnTEnI NmInnDbpa.
- I3noI3baHTo IIN pa60TaTcA DnBraTeJI, nO 3aIaceHn C ropi, xpaCTn IIN c TpeBn PINOu, CNopeI PrabInNHa KaNIOpOHn 3a 0bUeCTBeHnTE pecypcn, Pa3dE 4442, nePcIaTbIA H a npHeHne, OCBH aKO DnBraTeJIr He e ChABdEe N C KcPOrAcITeN, NODbPxKan B eDfNkCaHO paBOTHo CbCTOJHne, KaKTO e ONpeJeHeno B Pa3dEJI 4442. B DpyrIte qatn N fepedapHn IOpcDnKm MoKe Da Ima NIOIoBH N 3akOnH. CbPjXeTe Ce c Ipom3BOHTeJI, PPOdaBaVa h Na Dpe6Ho IIN dNtCp6yTopa H opTNHAnHOTo CbOpBXeHne, 3a Da NpOlyHNe NCKPOrAcITeN, PPOEKTIpaH 3a MOHTnpaHaHata H TO3N DnBraTeI IN3nyckaTeJIHa CnCTema.

PNEyPPEKDEHNE
Morat da ce noJyat cepno3Hn n3rapnO rO c0b6oxdaBaAaata ce napa nn ot ropeuata OXnaJaAaTeuHOCT.

PNEpyPEXKDEHNE
HE CBALIYTE KanaquKITE OT paDnATOpa uIN pe3epBoapa, aKO DniratTeIe ropeu nn pa6oTn.
CnpTe DmRatEnI rO octaBeTe Da ce OxnaDN, npEi CBAJIHe Ha KanauKHTe Ha padnATopa IIN pe3epBOap a IN pEi CMHaHATA IIN HANBaHETo HA oxJaXdauTa TeNoCT.

HeBONHO CTAPTIPaHc MoKe Ja DOBede Do 3axBaUaHe, TpaBMaTuHa amnytauHn IIN Do paHbAhe.
Onachoct ot noxap
Ipeu n3BbPwBaHe ha peryunpoBkn nonpaBKn:
- Otkaute Ka6eHa Ha 3anaHteHaTa CBeu n ro DpBxTe daNeU OT He.
- OTKaueTe MmHyc-Knemata Ha akymyIaTopa (cAmO npN DnBraTeN C eJeKtpnueeCKn CTapTep).
- I3noI3BaIte cAmo IOxOJaUINHCTpyMeHTN.
He 3actonopbaute c perynnapata npyknha, loctobute cnctemn nIc npyru actn, 3a da noBniutte oobopnte Ha dBiratena.
Pe3epBnHTe TaCTn Tp6Ba Da 6bDat CbC CbIOTO KaHcTBO N da CE MOHTnpat B CbUata No3uNIA, KAKTO OpiunHaJIHnTe TaCTN.
He ydprrte maxobnka c uyk nnn TBbpnpedmet, 3aioTO to moke da ce cTPOuIN NO Bpeme Ha pa60ta.
Pn m3npo6BaHe 3a nckpa:
- I3non3BaIte OdopeH TnT TecTe 3a CBeuN.
He npabete npobepka 3a nckpa npu n3baedha 3anaJIteHa Cbeu.
Elenentnyynpablenya
CpaBHeTe NIOCTpaunrTa CbaaHn DburaTeN, 3a da Ce 3ano3Haete C pa3noJooKeHneTo Ha pa3nnHnTe eIeMeHTn UynpaBJIeHn.
A. Mapknupobka Ha dBiratela Moen Tn Koid
B. 3anaJIteJIHa CBeU
C. HbONOKa3aTeJ
D. OTBOP 3a HajiBaHe Ha MacNo
E. MacJenФнлтbp
F. Побka 3a ИЗTOUBAHe Ha MacNoTo
G.ДатчИК 3a HaJIЯгHe Ha MacJIoTO
H. Enektpuecken CTapTep
I. Kap6ypatop
J. Tepmoctat
K. 3aapanTeHa 606Ha
L. KapTeP 3a macNoTo
M. AntepHaTop
N.Датукза Temпература на Oхлaxдаша areHT
O.Дигател Дата Кд
Pa60Ta
Bmectmoct 3a maclo (hanpaBeTe cnpaBa B pa3JeTexHueckn daHHN)
Ppenopbkn 3a MacNoTo
3a nonyuaBaHe Ha haJ-dobpi TeXnueckn Poka3aTei npenOpbVbame n3PON3BaHTo Ha Macnata Ha Briggs & Stratton c rapaHmI N cepTnFkAT 3a KaueCTBO. DpyrN BVCOKOKaeeCTBeHm MaCna C Mneu npicaKn Ca npEeMInB, Ako Ca KlaCmPcnpaHn 3a pa60THn Pexmm SF, SG, SH, SJ nn No-BvCOKn. Da He ce n3PON3Bat CneuaHn Do6abKn.
BbHnHTe TmepaTynpoJenr npabINHn BnCKo3HTet Ha MacNoto 3a Dbratena. H3no3BaIte Ta6ncaTa, 3da n36epete Hau-dO6pRn BnCKo3HTet 3a OyaKaBHn DaiaanOH b HbNHHTe TmepaTyPi.
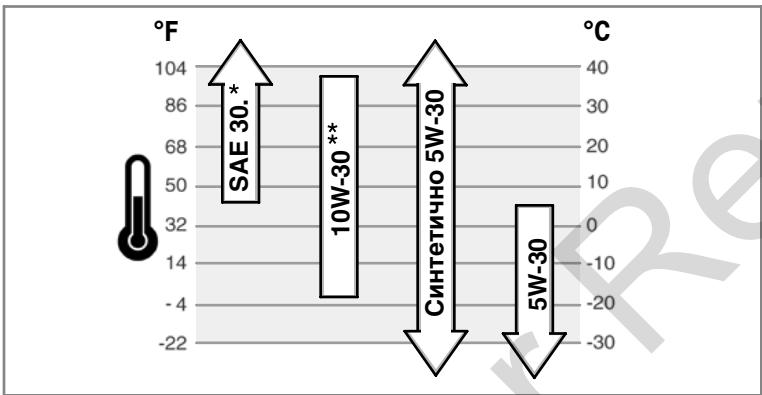
Ako npi TemnepaTpyn no4 40^ (4^) ce n3no3ba macno SAE 30, toBa ue doBede do Tpydno CTaptnpahe Ha dBiratela.
** Питtemператунин 80°F (27°C) Излобанeto на масло 10 W-30 може на пошнионсимацята на масло. Поверразиные по чесу НВОТо м.
Kak ce npOBepBa/HaJIbMa MacNo -FHypTa 2 3
IpeiHaHbAe HnnpOBepBaHe Ha MacNoTo
Pa3noJIOXeTe xOp3oHTaJIHO DnBraTeJIa.
- Почистете мостOTO OKОLO OTBopa 3a Налваху Масно DT BCNUK NTJOMKN.
1. Cbane HnBOnoka3aTeIa MacIoTO (A) I rO n36bPwe Tc NCT PnAT (FInypa 2).
2.ИЗЦАЛО ВМьКНЕТЕ HИВОПОКАЗТЕЛА 3A TOPИВOTO.
3. Cbajete HNBOJOKa3aTeI I npOBepeTe HNBOTo Ha macnOTo. To TpR6Ba da 6bJe do MapKnPOBkata FULL (B) Ha HNBOJOKa3aTeIa.
4. Ako e HnCKO, CBAIeTe HNBONOKa3aTeJI n HAIeJIte BHNMaTeJIHO MaCJO npE3 OTBOPa 3a IIbJIHeHe Na DIBrAteJIa (C). He ro npenbIbaiTe.
Baxho:Korato HauBaTe MaCNo, npaBnHOb BeHTnIpaHe ce n3nCKBa, KaKTo CneDbA:
CbaTe HNBONOKa3aTeJIra 3a MACJOTO.
- V6eTeTe Ce, 4e NDoBpKATE HxHtO paaCToHHe (D) MExNy FyHnIa 3a HnIbAbe Ha mAcNo (E) n CteHata Ha OTbopa 3a NbJIHeHe Ha DnBiratEna (C). BnXTe ΦNyrpa 3.
-
Cnéд нальbaheTo ha macnoto, noctabete HNBONOKa3aTeJI. CTaptnpaIte n octabete DBNATeJIЯда paobTuNET MmHTu Ha npa3EH XoJ. N3KJIIOUcTe DBNATeJIЯ.N3kaKeTte TpIn MmHTu IN ppoBepete HNBOTO Ha macnoto.AKO ce HanaIra, HnaJIeTe Ose macNo, 3aДа doCTnHn HNBOTO Mydo MapKnipOBkATA FULL. (B) Bbpxy HNBONOKa3aTeJIa (ФИгур2).
-
NocTabete HNBONOKa3aTeJIHa MACJATO.
HaIrahe Ha MacNoTo
AKO HNBO T O H M A C N O T O E M H O R O E M H O K O E D H N DA T H N K 3a H A N L R A H E (A K O I M A T K B B), INI I I CE cnpE dBnRAten, INI I I CE 3aDcECTBA anapMeHOT My U cypoNTBO. A KO TOBA ce CJUYH, CNPTE DBNrATEN I PNOBepETe HNBO T O H M A C N O T C H NBO NOKA3aTENJ.
Ako NHBOTO ha Macnoto E noI mapKnpOBkata ADD,do6abeTe MaCIO,doKATO doCTHReMapKnpoBkata FULL. CtapTupaTE DniratelaN npOBepete HnraHetaO, npEi Da npDblXnite da pabotITE.
Ako HNBO TAO HA MCNO T O M E M K Jy MaK PnOBK NT E ADD N FULL He cTAPnpaTe DnBtateJI. O6bPHTe C kBm HNKOJ YbTNMOHOpEN pNeCTaBNTeH Na Briggs & Stratton 3a DnBtateN 3/LC, 3a Da OTCTpAnHe Ipo6Lema C hAnraHETo HA MCNoT.
Ppenopbkn 3a ronpBOTO
TopNBTO Tp6Ba Da otROBapHa cJIeHNHe N3NCKBAHn:
- YnCT, npcecen, 6e3oJOBen 6eH3nH.
MIMHIMANO OKTaHOBO YnCNo OT 87/87 AKI (91 RON).3a roJMa HaDMOpcka BnCOuHa, BnKTe No-DoJy. - Бенин сбс сьдьрхаиме на не поеве от 10% eтанол (бенистор) улд do 15% MTBE (trn-metnil 6bytnoB etep) e npneimlb.
PNEyPPEKJDEHME:He n3noJI3BaIte He Odo6peHn 6eH3mHn KaTO E85.He CMEcBAIte 6eH3HaC MaCIO, He rO MoDInΦuIpaIte 3a pa0ToA c aITePHTaBn HropBa. Toba ige NOpeDN KOMNoHEHTIte Ha DBrIraTeN I ue aHynpa rapaunraTa MY.
3a da npednanaite ronpbHata cnctema ot obpa3ybahe Ha cmolni,do6abete ct6nna3atop B ropBOto.HanpabeTe cnpabKaB CKnadnpaHe. TOpNBata He ca eHNb Cbui. Ako HacTbnPiO6bEM CbC CTapTnPAHE ToN INTexMHcEeNTe NOKa3aTeJIN, CMEHETe DOCTaBnUHTe NIM MapKnte HA ropBOTO. HAcToIaIr TDbIrataeIma cePTnFkKat 3a pa6oTa C b6EHNI.CNCTeMaTAt 3a 606a C bpeHnTe EMcNIn 3a TO3n DBrarateIe EM (MoDnFkauHa n DaBirateJIte).
TolmaHaMOPcKa BnCOuHa
Пин haДморск BiСочини hab 3 000 Фут a (900 mETа) e рпиемл b6eH3ин c МИнмално oktaюв НусLO 85/85 AKI (89 RON). 3a за отоане CBMEТMС ИЗИСКВАНЯ са НИБОТа Ha BpeDHTe EMCSIN, се нараз hAcTpoKa Ha DBrAteYEN B сьOTВЕТСВЕ с rОЛМаТа haДморрSCBa HбОчи纳. Pa6OТаТа My 6e3 Takава HabTePoKa и Ze ДовеDEdo NOHIXKABAHe Ha TExHmYeCKNTE NOKa3ATENi, NOBnUbaVeHa КоHCMyaцида Na Г罗Ю В yBEJIuHEn BpeDHTe EMCSIN. HanpABeTe CnpВaKbПр УтьнIHOMOSeH npECTaBHTe Ha Briggs & Stratton 3a CbeDEHn OTHOc p6oTHaTа HacTpoKa Ha DBrAteJel 3/LC prn roLIMa haДморрSCBa HбОчи纳.
He c npenopbya pa60ta Ha dBnraTei n C perynpau KOMnIeK 3a roJMa Hndmorpcka BncoOnHa npn BncoOnHn pOd 2500 cyTa (762 metpa).
KaK ce HauBa MaCNo - ΦnYpTa 4

PNEДУПЕЖDEHNE
PnDolmbaHeHa ropmbo
-ИЗклочeteДвигатели n ro octabete Да ce oxlaци ha-NaMko 2 MInHyTN,празда CBaJIte KanaykaTа Ha pe3epBoapa 3a rOpINBO.
- Пьн electe pe3epboapa 3a ropuBO ha OTkpTuTo uIn B do6pe BeHTnInpaH oNOMEuEHeNe.
He npentbIbIaTe pe3epBoapara 3a ropnBO.3a da no3BOnJIte pa3uHpeHne Ha 6eH3mHa, He nIhHTe Hnd doJNHaTc OCHOBa Ha rbpNObHata 3a haJImbaHe Ha ropnBO.
-ДрьжтбензинадалачOTИСКР,OTКРТПлamьц,CINHAJIHnIaMnI, TOnIIHaNnI dpyrN3anaJIteJIHn N3TOUHnI.
- PpOBePbAaTe YeCTo rOpBONPoBOAnTe, pe3epBoapa, KanayKaTa n CbeHHeHnTa 3a NyKHaTnHn NII TeOBe. 3aMeHeTe n, aKe o Heo6xOdmo.
- Ako ronpBoto ce pa3nee, n3yakaaiTe dokaTo To ce n3napn, npdei da cTaptnPate DbrataleJ.
1.Почистете постранстото OKОп Калачкata Ha pe3eрвараза 3a roриво OT МьсOTИ И Наслговань.Сыалеше калчкata (A,Фитура 4).
2. HanbIhHe pe3epBoapa 3a ropInBO (B) c 6eH3nH. 3a da nO3boJInTe pa3uHpeHne Ha 6eH3nHa, He IblHeTe Hd oOJIHATA OCHOBA Ha TbprOBHnA t3a HAIINBaHe Ha roPINO (C).
3. NocTabete o6paTHo KaNAyKaTa.
Ppenopbkn 3a oxlaekdaeta Teuhoct
BmecTmOcT 3a oxJaxJaauTa TeuHoc (BnXTe PbKoBOdCTBTO 3a pa60Ta Ha npOn3BDoNTeHa na o6OpyDbaHeTo)
Baxho: Toba e DniratEn, Oxlanqan C Oxlanqdaa TeHocT. 50/50% cmeoT HeCbDpXaaO fccpaTn aHTnOprn3 n BOIOPOBOHa BODa e HEO6XoIma 3a Oxlanqdahe, OcnpyBaHe yCTOnuMBOCTTa Ha KOpO3nI n Cma3BaHeTo Ha BOHaTa NOMna.

IPEdUnPEXKeHNE
Morat da ce nojuyat cepno3n n3rapaHn OT oCbo6xdaBaauata ce napa nn ot ropeuata oxlaJdaua TeHocT.

HE CBAJIAYTE KanaayKeTe OT paDnAtOpa IIn pe3epBoapa, aKO DBrIgAteJIeT e ropeu nn pa6oTu.
CnpTe DmrgateTn I ro octabete Da ce OxnaDn, npde CBAJHHe Ha KaanKHTe Ha padnatoa nnpe3epBOapa n npde CmHaTa nn HAnBaHeTo HA oxJaDaauTa TeuHOCT.
- Праздаху МаркпорькгЕ FULLI LOW/ADD, OTблзани На pe3epboapara 3a oxlaqdaц TeHOCr. Ako HbTo u e HnCKO, HanEe Tpe3epboapa 50/50% Cmec ot aHTnpn3, KOTNo He cIbprka focpaTN BOa DT BDOchAnTeHnata Mpexa.
- 3a da cbai nte kaanukata na Hpe3epb0apaa, cnqkato dBnratenrE oxnaedn, noctabete naphe de6eBn IaT Bbyx HeR. BHmAtenHO r OTBnTE B nocoka, obaPATHa Na DvnkeHneTO Ha cAcOBHNKOBATA CTpenka.
- Ako pe3epeboapbTe npa3en,doJeIte B Hero N B paJmaTopa oxJaaTa TeHOCr. HanpaBeTe cnPabKa B PkBOOCTBTO 3a pa60ta C o6OpyDbaHeTo OTHOCHO pa3IOLOXeHMeTo,po60TaTAt N IOdRpJxKkaTHa pe3eepBoapaN paJmaTopa 3a oxJaXDaauTa TEHOCr.
- 3a da cbaJIte KanauKaTa ha paJaIaTopa, cNeI KaTo DnBraTeIeIe OxlaJeH, noCTabete Bbpyx HeN napYe De6en IaT. BnImaTeIHO r OTbnITE B NOcoka, oBaatha Ha dBNxKHeIeTO Ha YacOBnIKoBATA CTpeNka DO pIpbBOTo n CnIPAe. Ako npO h N3JIn3a npa NpO HaNrAe, 3actaHete Ha3aD, 3a Da N36BerHeTe HapaYBaHe. CneI KaTo HaNrAHeTo cNaIHe, HATncHete KanauKaTa Ha paJaIaTopa HADOny I a OTbnITE B NOcoka, oBaatha Ha DnBxKeHneTO Ha cacOBnIKoBATA CTpeNka.
I3mepBaTeJIHn ypeDN u CBeTJIuHHN nHdNKaTOPN
Ioka3aHnTe m3MePbATEHnHypeDn iCBETlnHHn HnDnKaTOpn caCTaHapTHn IcbueCTByBAT B pa3nHnOuN, KOITOMoF a da 6bDat n3no3BaHn. 3a pa3noJooHexHeTO nФyHKUHOHPaHETO nHnPaBae TcnpabKa B PbkOBodCTBOTo 3a pa6ota.

TepMometbpo 3a OXJaKaDaauata TeuHOCT
Ioka3Ba TemnepaTypata Ha oxnaXdaaata TeHocT, KOrato
KoHTaKTnIaT KJIoue ha no3uIGN ON (Bkn.).
HopmaJIeH 06XbaT - 80^ - 90^ C (175° - 195° F)
OnaceH 06XbaT - HaD 105^ (220°F)

Yacob6pory
OTHTa cymapnH6pO pa60THuacObE.

I3mepBaTeIeH ypeI 3a HauHNo ropBO
Ioka3Ba ocTabaOTo B pe3epBoapa rOpB0. 3a da hamaTne KOHdEn3aunTa ha BOa, BnHar NiDlbpxaIte nbJeH pe3epBoap.

CBeTInHeHnDnKaTop 3a TemnepaTypa
AKO CBTNIHHNHT INMIDKATOP 3a TEmnepatypata CbETHe, 3Nau, YDEBnATEIeT e nperpJ. CnpTe DnIRATEJIa N npObeTe HNBOTo HA OXNAkDaIATA TeHOCCT (NXKe tpaDzen KaK ce npOBepRa
OxnaKaDaTaTeuHocT).IPOBepaBte paHaTOpa 3a HaCIOBAHnA, KOITOMoRat Da orpAHnUaT B3dUshnA NOTOK.

CBeTmHEn HmKAtop 3a 3anaBaHe
Korato KOHTaKTTHnT KJIoueHa No3uON (BKn.),CBETJINHHnT INHnKaTOp 3a 3anaJBaHe TpR6Ba Da CBetn. Uom DbIraTeNt 3apa60tn,
INHdkaTOpbT Tp8Ba Da n3rache. Ako INHdkaTOpbT He CBETn npu KOHTaKTeH KJIou Ha no3nua ON (BKn). npoBepe Te 3a n3ropan pepda3nten.

CBeTInHeHnDnKaTop 3a HaJaRaHe Ha MacIoto B DnIraTeJr
Korato KOHTaKTTHIAT KJIIOUe Ha N03UNIaON (BKnL).CBETINHHaT INHdkatop 3a HANrAHeTo Ha MaCNoTO TpA6Ba Da CBeTN. LcOM
Дигателт ЗаразOTN, CBETINHнгИнДИКATOP 3a HANIHAHETO HA MACNOTO TPR6Ba da 3araCHE. Ак CBETINHнгИнДИКATOP 3a HANIHAHETO HA MACNOTO CBETN пр pa6oteu Дигател, He3a6abHOr cnpete. ПьрBO npOBepeTe HnBOTO Ha MACNOTO (HanpabeTe спразВ в раздел Кakсе npOBeРBA/HANIBa MacNo).След Тoba npOBepeTe eJekTpueckata CICCTema.

CBeTInHeH mHdNkAtop 3a 3apeKdaHe
Korato KOHTaKTTHNAT KJIoueHa N03nON (BKn.),CBETINHHNt INHdkatop 3a 3apeXdahe Tp6Ba Da CBTe. LOM DInrataTeT 3apa60tn,
INHIMKATOPbT rAe6BaIa I3rache.AKO cBETNIHHIRN INHIMKATOP 3a 3aCBETn pAnoBcTeu DBNrAten, npOBepete ENEKTPUeCKATA CTCTEM.

PNEyPPEXKDEHNE

BéH3nHbT N HEROBnTe napu ca n3KnIOUHTeIHO orHeONaChN n 36yXnBn.
Iopkap nIbB3pNB MOraT da npuHnT cepno3Hn obrapnna IIN CMBPT.
PnCstaptnpaHe Ha DBrarTeJIa
- Vébepète Cé, Εe 3aapaniteta Tata Cbeiu, ΜγMθ3aŋlyuŋTENH, KanačuKaTа ha peερboapá 3a ropnBO n Bb3dUyHnI ΦɪntBp (aKo Ima Taɪkɪba) ca Ha MACTOTO cn i ca O6E03NaCEHN.
He pa3BbptaIte DnIraTeIe C n3BaIeHa 3anIITeHa CBeI. - Ako DBVrAteTnT Ce 3aJdBn, NOCTabeTe cMyKaHa (aKO Ima TaKbB) Ha N03uNPA OPEN/RUN, npIiDbNBe TpHHaTa r3 (aKO Ima TaKaba) Ha N03uNFAST n pa3BbPtaIe, DOkATO DBVrAteTnT cTApTnpa.

NPEdynPEXKDEHNE

TyskaheTo Ha DnRaTeIa Cb3daBa NCKpeHe.
NCKPENETO MOXe Da Bb3JIaMeHn HAMIPAuHTe Ce HAOKOJI 3aJIaJIIMI rAIOBE.
ToBa moXe da doBeDe do ekCnlo3nI noXap.
Ako mna n3Tuahe Ha npnpoJe HnBteUHe ra3 npOnaH B nomueHneTo, He cTaptnpaTe Dnrgatela.
He n3pON3BaIte roPbBa 3a hauJIHo 3anaJIBaHe noJ hauJaHHe, 3aOTo napITE mC a 3anaJIInTeHn.

PNEyPEXKDEHNE
HaBceKn 150 yaca nIe exKeoDoH
- Да ce смени MacJIoTO HaДигatelen*
- Dacce CmehMaCneHnHnФntbP
Ha Bcekn 600 yaca nIe xkeoDnO
Ja cecmeHb3dyuHHnФntTp.
Ja ce npOBepBa MekdHaTa Ha KlaNaHnTe
-Да ce cmeнфитбра 3a ropIBO
-Да ce cmeHAT 3anaJIteJIHHTe CBeuN
ExkeroaNo
- Dae CmeHr OXnaJdaaTa TeuHOCT
* Da ce npobexka no-yeceTo o6cnyxbane, KOrato pa60THnT pexm e TeXbK nIe ce pa60Tu npu BvCOKn TemnepaTypr.
He ce hana, ocebe n ako He 6bdat 3a6eHa3an npo6Iemn c TexHuecknte nokaataen Ha Dbratena.
PerynnpaHe Ha KapbypaTopa
HnKora He npaBete hacTpoKn Ha Kap6ypatopa. Toe e perynnapan B 3aboJa da pa6oTn
eDfekTNBO npn NoBcyeTo yCNOBNA.Bce nak, Ako ce hanaarat hacTpoKn Ha DbrgATeJI
3/LC, ce obbPheTe KbM YbIhOMOseh cepBzEn npedctabNTen Ha Briggs & Stratton.
PNEyUPPEXDEHEN: PpOn3BOAnTEJrHa o6OpyDaBaHeTo, Ha KoTo TOni DbrgAten
ue 6bJe MOHTnpaH, OnpEeJMa maxCmAJInHte 6opOTn, npu KOnTO ue pa60tN
Dbiratent. He naDbuabaBte Te3n o60ptN.
Kak ce cmeHra 3anaJntenHaTa CBeue - Fmrypa 6
IpoBepBaIte MeJdnHata(A,ФIpypa 6)c nOmoUta Ha KaIb6bp 3a TeI (B).Ako e Heo6xoDIMO,perynipaiTe MeJdnHata.MontnpaiTe n3aterHete CbeuTa c npenOpBvAHn BbptTuMOMENT.3a perynipaeHaMeJDNHATA nnOTHOCH BpTuaN MOMENT 3a 3aTHeAne, HapnPabe TcnpabKa bPaedienTexnueckn daHH. 3aBeJExka:Ha HkON MeTAA,MeCTHnT 3akOH n3NcKBA yInOTpeBaHa pe3nCTOPha Cbeu,3a Da ce NoDTncHAT pAdIOOCMyUeHNrA. Ako HactOuaHn DmRatEn e fAp6pnHo 06opuyDaBnCpe3nCTOPHa CBeu, n3POn3BaIte CbUaN TnT CBeu 3a CMHa
Ja ce npOBepraBa BHIMaTeHNo yMOn3aRJyUHTeJI NCKporacnteJI

PNEyPPEKDEHNE

Pa6oteuite DnBraTeJN OTdEnrT TOnnHa. Yactne Ha DnBraTeJIne, Ooc6eNo wymo3arnyuWnteJ, CTaBt N3KKnUOHTeJIHO ropeu.
PpI DoOpM MoXe Da noJyUHe cepNo3Ho n3rapAHe.
TOpMnTe OTnabTu, KaTo Nucta, TpeBn, Xpactanak N npytn, Morat da ce 3anaJrT.
OCTabete uymo3aŋyuηnnte, uynHHa na Dbna rTaTeNna pe6paTaa de OXlaJtA, npdeI da IyDOKOCBATE.
- Otctpahe HeatpynahHe OTJOMKn OKONO yMOn3aJyImTeN nCJINHdbpa.
I3noI3BaHTo IIN pa6oTaTc aDbIrata c DbrarTeJI, no 3aIaceHn c rOp, xpaCTn IIN C TpeBn PINOOni, Cnpoe I PrabuNInKa h KaNIOpOHHa 3a 06ueCTBeHNte pecypcn, Pa3dien 4442, npEcdTaNbRA H apHyHeHne, OCBEN AKO DbrarTeJrHt He e ChABDeH c NcKporacITeN, NOdIbPxKH a EepNkAcHO pa6TOHc bCTOHNHe, KaKTo e onPeJeHEno B Pa3dien 4442. B DpyHTe qATn H fepdepaHn HOpNCdIKm MoKe Da Ima NoD6Hn 3aKOHn. CbPjxTe Ce c npON3BOIDTeJI, npOdaBaHa Na dpe6HO nIN dInCTpn6TyTopa H opINHAnHOTo cbOpBXHeHne, 3a Da nOlyHTe INckPoracITeN, IpoeKTIpaH 3a MOHTnpaHaTa H TO3N DbrarTeI m3NYCKaTeHNA CNTTEM.
IpoBepe 7yM03aIyuHNTe 3a NyKHaTINH, KOpO3nI IIN dpy BnD NOBpeA. Cbane NCKPoraCTeN, Ako IMA TaKbI, Iro npOBepe 3a NOBpeA IIN 3aynBaHe Cb caxJd. Ako Ce Hana IINoJ3BaHTo Ha pe3epBn Yactn Ce y6eDeTe, Ye ue BbDat MOHTnpAHn EENHCTBENO OPMrHNAHn P3e3pBN MaunHHN YaCTn.

PNEyPExKDeHHe:Pe3epBnTe TaCTn Tpa6Ba da 6bDat CbIte
KATO CMEHRABaHNTe I Da CE MOHTnPaT B CbSata TIO3nIg KAKTO OPuRHaHnHTe TAKBa, NopadOnaCHOCT OT Bb3NKBaHe Ha NoXap.
Kak ce npOBepBa OXnaJkaTa TeuHOCT
Baxho: Toba e Dnbratc n oxnaJdaa TeHocT. 3a oxnaKdahe, OcnpyBaHe yctOuNbOCCTHa KOpO3nI CMA3BaHe Ha BOdHaTaNOMNA e HooBXoDima CMEC 50/50% oAHTnOph3, KOTo He cblbPka foocpatn I BODa OT BOoOCh6DInTeHnata mpeka.

PNEyPEXDEHNE

NMaT Da ce NOnyat cepno3nM3rApRnHnOCT oC0B6oKDaBaUaTcAe cnaPapaOToI rOpoeTaaXkDaTaueNtHoCT.

HE CBAJIAYTE kanaayknte ot paanatopa nI nppeepboapa, aKO dBnraTeJrT e ropew nn pa60tn.
CnpTe DmRatEnI nO octaBeTe Da ce OxnaDN, npEi CBAJIHe Ha KanauKNTe Ha padnATopa nn pe3epBOap a npeDcMHaTATA nn HAnBaHTo HA oxJaDaTa TteHOCT.
- Поверете НВОТо Ha oxлждааata TeHOCr.НВОТо trp6Ba Da sbde MeJyMapKIpOBkITe FULL n LOW, nIII ADD, OT6eJI3aHI Na pe3epBoapar 3aoxlajdaata TeHOCr.Ако HВОТо u e HNcKO, haJIeTe Bpe3epBoapar Cmec50/50% ot aHTnФрИЗ, кOTо He cIbIpbXa foocpatn I BOJa OTBOOCHa6dITeHNTa МЕЖа.
- 3a da cba nite kaana kata Na pe3epboapa, cne KaTO dBnraTeIeT e OXnaIeH, noctabete naphe de6eben Inat Bbyx Hye. BHmAteHIO A OTBnTE B NOcOKA, o6paTHa Ha dVbIXeHMeTO Ha YCaOBHKnObATA CTpeNKa.
- Ako pe3eepboapbTe npa3eH,doJeIte oxlaJdaaTaeuHocB Hero n B paiaatopa. OTHOCHO p3nIOJooKHeMTo,paobotaA NIOdRpXkata Ha pe3eepboaPa n paiaatopa 3a oxlaJdaaTaTeuHocT, HanpabeTe cnpaBaK a PbKOBOCTBOTo 3a pa6oTa C o60pyDaHeto.
- 3a da cbaJIte KanauKaTHa paIaIatopa, cJeI KaTO DnIraTeIe OXlaIeH, noCTabete napye de6en IpiAT Bbpy He. BHIMATEJIHO rO TBNIte B nocoka,
ObpaHa Ha DnBxKeHEnTo Ha YacOBHnKOBaTa CTpeIka Do IIpbBoto U CnnpaHe. Ako NOd Hne N3n3a npa Noi HaJIraHe, 3actaHete Ha3a,I, 3a Da n36BerHeTe HapaHbaHe. CneI KaTO HaJIraHEt O cnaIHe, HATncHete KanaUkKaTa Ha paNaIatopa HaOny I a OTBnIe B nocoka, ObpaHa Ha DnBxKeHEnTo Ha YacOBHnKOBaTa CTpeJka.
Kak ce cmeHra MaCJIoTO - Φnrgpa 2 7
Otpa6otnoto MacNo e onaceH OtnaIbUeH npOdyKT n TpRbBa da ce cKlaIpa no oNdoanuHa. He roN3XbPbnIte C domAkhCknte OTnabSly. PpOBepeTe CBMCTHOc 6oBnHcknTe Bnactn, 3a 6ocLykBa uent Htbp N3 a npEctabTneH naHCTanaun 3a 6e3onacHo denOnHPaHe/peLeknnpaHe HA oTp6otnoto MacNo.
N3TOUBAHe Ha MacJIoTO
- Pn n3KIOueH, HO BCE OSe TOnbI DnBraTe, OTKaueTe KaBeInTe 3a CBeuInTe (F, FInrgpa 2) n rN dpBxTe daJeue ot TReX.
- Cbane np6kata ot OTbopa 3a n3TOUbahe Ha macnTo (G, Fmrypa 7). N3TOeTe ro B noDxOJaKoHTeHep.
- CJIeKATO MACNOTO e n3TOUeHO, NOCTABETe n 3aTERHTe npo6kata.
CmHa Ha MacJIeHnФЛТьр
OTHOCHO INTEPBALNTe 3a CMHATA MY HANpABete CNPABKa B KApTata TexHuecko 06cIyXBaHe.
1.ИЗТОУBAнеHaMACЛOTOOTДВИАТЕН.HanpaBeteCnpaBkaВpa3дeNIM3TOUBAHeHaMACIOTO.
2. CbaneMacEnHnФntbp(H,Phrpya7) n ro denohnpaTe no noxoadnna HauHH.
3. Ппдд монтура te HOBN MacJENHФЛТьр, ЛКО Cмжete ФИNTьрhaTa rapHNTypa c HOBO, YNCTO MACJO.
4. MoThnpaIte MaIcHEnHaФnTbp Ha pbKa, DOKaTO raphNtypata OnPe BbBФnTbpHnaAaIaTpE, cIeJ KOETO ro 3aTeHete C oIe 1/2 do 3/4 obOpota.
5. HajiBaHe Ha macNo. Hanpabete cnpaBka B pa3JeHajiBaHe Ha macNo.
HaJIbAHe HaMaCJo
Pa3noJIOXeTe xOpn3oHTaJIHO DnBraTeJIa.
- Почистете мястOTO OKОЛТВОпа за налваши На MacNo OT BCnUKN OTJLOMKN.
- HanpaBete cnpaBka B pa3dien TexHnueckn daHHN OTHOCHO BmecTmOCCTta 3a MacNoTO.
1. CbaIeTe HbONOKa3aTeNa (A, FInrpya 2).
2. HaneiTe BHNMaTeIHO MaCIOTo B DnBraTeIa Ppe3 OTbOpa 3a NJIHeHe (C). He npenbIbaiTe.
BaxHo: Korato HauNbATE MacNo, npabInHO BeHTINIpaHe ce NsICKBa, KaKTo cJeDbA;
CbaIe HbONOKa3aTeIaMaCnTo.
-
Y6eTe CE, Ye NOIdbpxkate HxKyHOTo pa3cTOrHHe (D) MEKdy FyHnraTa 3a NaHbAne Ha maCNo (E) n CTehata Ha OTbopa 3a NbJIHeHe Ha Dnuratena (C). BNxTe ΦNyrpa 3.
-
CnéД haɪnɪbaHETO ha MaCnTo, NOCTaBéTe HbONOKa3aTeJIr. CTapɪnpaɪteɪ octabete De bɪrataJIeɪ Da paBOTu net MhUHTy Ha npA3eH XOD. ПрOBepeTe 3a TeObe. I3KlIQUeTe DbrAteJIeR. I3sAkaiTe TpM MhUTy n IpoBepeTe HbOTO ha MaCnTo. Ako ce HaJIarA, HaneiTe Oüe MaClNo, 3a Да DCtOmH He NbOTo My Do MapKnipOBkata FULL (B) Bbpxy HbONOKa3aTeJIr (Фиура 2).
- NocTabete HNBONOKa3aTeJIHa MACJOTO.
KaDa ce 6cbnykBa Bb3duhnaФnTbp-Фnpya 8

PNEyPPEKDEHNE
BeH3nHbT N HerOBnTe napu ca n3KJIIOUHTeJIHO orHeONaChN n 36yXnBn.
Poxkap NJI B3pNB MORaT Da npuHnT cepNo3Hn ObrapHnN nIIN Cmblr.
Hikora He cTaptnape H e pa6oTe C Dniratena npn OTcpanen KOMIneKT Ha B3dyuHn4 pntbP.
PNEpyPEXKDEHNE:He n3no3BaIte CrBCTEN Bb3dux NIN pa3TbOpNTeni, 3a da noCHCTBATE cHnITbpa.CrBCTENHAT Bb3dux MoKe Da NOBpeN dHJTbpa,a pa3TBOPHTeTIneTo ra p3TaB4pT.
OTHOCHO N3NCKBaHnra 3a cepBn3Ho 06cnyXbaHe, HnpaBeTe cnpaBka B Kaprata 3a TEXHnueckOTo 06cnyXbaHe.
- OTbOpTe uKcAtpuTe (A) n cBaJIeTe kanaka (B). BnXKe TnIpya 8.
- CbaneTe Bb3dUshnAФиТьр (C).
- 3a da OTCTpaHNTe hacNoRbAHNtA, BHNMaTeHNO noyKbaTte Bb3duYHnIaФnITbP bByx Tbbpda NOBbpxHOCT.AKO e npEkaJIeO 3ambpcEN, CmEHEToC HOB fHnTbp.
- MoHTnpaIte Bb3dUwHnI qInTbp.
- Поставете калаи и 3atbopete Фнкаторite.

PNEДУПЕЖDEHNE
BEN3Hnht NHEROBNTe napn ca n3KNIQUHTeHNO ORHeONaCHN N36VXnHBM.
Iopkap NJI B3pNB MOraT Da npuHnT cepNo3n ObrapHnN IJI CMbpt.
-ДрьжтебензидалачOTИСКРИ,OTКРNTIПамьц,CИГHAJIHINJAMNITONJIHINaIpyTN3anaJIHTENHnI3TOCHNIZ.
- PpOBePbBaIe Te cecto rOpBONpOBoJnte, pe3epBoapa, kanaqKaTa n CbeHHeHnra 3a nyKHaTInn I TeOBe. 3aMeHnTe rN aKO e Heo6xOJMo.
- Ptei noHCTBaHe iHcMHa Ha φHITbpa 3a rOpHBO, n3TOUeTe pe3epBoapa Hn 3aTbOpeTe KpaHcHTo 3a NODaBaHe Ha rOpHBO.
- Pe3epBnHTe TaCTn Tp86Ba Da 6bDaT CbC CbIOTO KaHcTBO N Da CE MOHTnpaT B CbUata Na3uNIA, KAKTO OpiunHaJIHnTe YaCTN.
- Ako ronpboTo ce pa3nee, n3uakaaiTe dokato To ce n3napn, npedn da cTaptnpate DbHraTeIa.
- Ппени Смени на чиньра за рогиво (A, Фгура 9), пома тахь, ИЗточete peзерboaши за рогивOTO по за Тбовете Кранчeto за пода вене на рогиво.В потувен сныан, рогивото можда пOTеч, сьдавайки onaCHOCT OT noxap илій ekfcno3и.
- Июнзайе плоск КLEЕДа рпгинсөт e ПИСТИНе (Б) Ha ckOBиTe (C), cLED TOBA пььзөдүхын actраноу ot Филлрba 3a rolрво.Усчete и n3terlneTe rolрбоюрдэ (D) ot Филлрba 3a rolрво.
- Поберете chopьовозулеса пухатини лп Точь. 3amehet re, akо e Heo6xOdmo.
- Cmehe Te qnntbpa 3a ropu Bo c opunhaen pe3epBeH qinTbp.
- 3akpenete ropuBONpOBOIDTe cbc cKo6n, KaKTo e noka3aHO.
Kak ce npOBeRbA/peryInpa peMbKa Ha BeHTnlaTopa -ФИrgpa 10
Поберван ha pemьka Ha BeHTnlaTopa
- Поверете сбстониeto (A,Фиура 10).Ако по ремьka на BeHTиларopa Иma pyн��атии Или e NOВpeDEн, cmeHETe rO C HOB.
- Поберете onьанeto (В) на ремьka на BeHTnIaTopa.На TCHEte cpeData (С) на ремьka на BeHTnIaTopa. Ако отьанeto e npabuINHO, cpeData на ремьka щe ce пемecTeBA c 3/8 - 1/2 Инчa (10 - 12 mm) ппnpилагану 22 пayнда (10 kg) сива Вьрху НÉ. Ако onьанeto e сnafo, ренираите ro kaKTо сneДBA.
PeryIipaHe Ha onbBaHeTo Ha pembKa Ha BeHTnlaTopa
- Pa3xJa6Te MoNTaxHnTe 6OJTOBe Ha aIANTepHaTopa (D) n (E). BuxTe ΦIrpya 10).
- NocCTABeTe MOHTaXHa ⅢaHaRa (F) Cpeu yAntepHaTopa (G) n CTpaHaTa Ha 6noka Ha DnirataJIa. 3a da oBtERHeTe peMbKa ha BcHTNaTopa, n3TertHeTe MOHTaXHATA aHaHa. 3aTterHeTe BpeMHeHO MOHTaXHITe 6OINTObe Ha aNTepHaTopa.
- Поверете onьванену ha peMbka Ha BeHTnIaTopa. HanpaBete cnpaBka B paZdelenповерка ha peMbka Ha BeHTnIaTopa. Ako ce hana, noBtopete npOeDypata.
- 3aterheTe MOnTaxHnTe BoIToBe HaAnTePHaTope. 3aterHeTe 60Ta (D) C bBpTaU MOMeHT O14 naHyndpyTa (19 Nm). 3aterHeTe 60Ta (E) C bBpTaU MOMeHT O14 naHyndpyTa (61 Nm).
Cknaipahe

PNEyPEXKDEHNE

BHe3nHbT NHEROBnTe napn ca n3KJIIOuHTeINHO orHeonacn N 136yXJIINBn.
Ioxkap uIN B3pNB MOraT da npuHnT cepNo3Hn ObrapHnN uIN CmbpT.
Korato cKlaIpaTe 6eH3nH nIb o6OpyDaBaHe c rOpNBo B pe3epBoapa
CknAmpaTe Daney OTE NnEeN, NcHKn, BDOHarpeBATEEN INn dpyIn eJeKTPnueckn PnpbOpn, KOIO TmAT CnHAnHn lamnn IIN npdytn 3anaJntEnHn mTOO HnC, 3auoTO Te MOrat Da Bb3nAmHeHT 6EH3nHOBte Napr.
TopuBHa CnCTema
TropBOTO octapBa CneIcknaIipaHe 3a noBue O T 30 dH. OctapAIO TO ropINBO BoNIO DO6pa3yBaHe H KcEJIHHN I CMOeCTn OTJIOXeHN B TropBNATA CNTeMa IINI NO OCHOBHTe CaHnHa Kap6bypaToP. 3a da 3aana3te TropBO CBEXO, n3no13BaIte CTaBmNt3atopA 3a rOpBIO FRESH START Ha Briggs & Stratton, KoTO e DoCTbIeH IOd fOpMaTa TeUHa Do6abKa IINI fNaKOH 3a KAnKO BO NoDaBaHe.
Ako ce do6abra cta6nln3aTopa 3a ropnbOTc bflnacHO IHCTpykunTe, Hma hyka da 6b3nHbT da ce n3OyBa. Octabe TDBrataeT a pa60TN OKOLO 2 MHNUTI, 3a da cnpkynipa cta6nln3aTopb T B ropNBHTa CNTema. Toraba DBrataeT m ropnbOTo MORaT da ce cbxpaHbATdo 24 Meseca.
Ako 6eH3nHbT B dBiratene He e 6bn Obpa60TBaH cbc Cta6bn3aTOp, TOn Tp8Ba da bIbe n3TOueH B NOdOJHOu 3a ceta CBd. Octabe TeBiratene Ta p6oTn, DOKATO cnpe npaoi N3eepbaHe H a npuroBO. 3a Da noDlbpxe CBeXecTTHa ropBOTO npKnadipapHeTo My, npenOpbBaMe I3NOI3BaHeTo Ha cTa6bn3aTOp.
Macnoto Ha DnBraTeIa
Дokato DBIrataTeT e BCE OSe TOnbI CMeHete MacIoTO.
TexHnueckn daHHN
3aIINHIO INbproBcKO Nn3BaHe
Двигateл Vanguard™ 3/LC
2TOINH
TapaHnIa 3a OCHOBn Yactn\*
3roDHH
Pe3epBn qactn n BlaarAn Tpyd
2TODNH
* Ot6eJekTe cIeHnTe cIeUaJIHn rapaHIOHn Iepno: 3a ceHnTe Ha ta3n rapaHIOHn IONHTK, nOKPnTHeO 3a pe3eBHnTe qactn BnlaHnT 3a 3AMnHaTm E a 3a nepNOd O T 2 oDNI. Camo 3a ocOBHnTe pe3ePBn CHaCTn rapaHIOHnTO pOKNTne e paoHpeHO u 3a TpTeTAta pa60THa ROINa.
rapaHnTa 3a ocOBHnTe cTu (F.O.4) npKpBa, Ho He CE oropHauBa EHNCTBHeo n CMO D O NUINIDPOBBA 6Ok, NUINIDPOBaT a RJaBa, KOENHATM BaI, PA3npEeHnTEHNb HAI, 3b6NHte npdeAusb, BytaNaIe, MOTOBNtKe, MAXObNka, KoxyXa 3a maxOBbKa, Maceheta NOMA, BEHTNAtopA, pEmbHnITE shiob,
MeXAumHHn perynatop, CMyKaTeHN HONKTOp n MacJeHn KaTep. F.O.4 He noKpnBa n He CE oropHauBa EHNCTBHeo n CAMo 3a 6yTAHnTE cerMeHTN,
CmEHemite Naepri, BODHaTaNOMHa, BCKn EmeENT OT eNEKTPueeCKATA Nc7aLauZna, 3aDBNKBaunTe EmeENTn 3a KlanAHnTE CNOMarATEHNTE qACTn,
YNlbTHeHNrA, rapHTypTe, KApbyaTOPNe, KOKEPOTra 3a hropeJIe TAOBE, TBKBaNTe PNOBODi, BCNUKN EmeENTN HA rOPBbATA CNTeMa,
pa3npbckBaunTe dOzhi, HargetateNHLa TOMNa, TybOkoMnpecopa, Uymo3aIpyuTEnIa, BcUYKn fInItpn, padNaTOpA, TepMoCTata, 3anaTIenHnTE CBeuNi,
HarpeBaTeHNrCeBeuNi andomNITae 3a NoDaabe Ha roPBo. GapanHIOHnT PeIOoD 3anoCbAOT daTata Ha KynBaHe OT PbBnnotpeBntel Ha dp6Ho nIOT
KynyBaHa 3a TpbROBcNcEeN andpOdbLnjKabaa 3a nepIOda O TbpeMe, ZIKCupan B ropHaTa Ta5nua.
He e Heo6xOIMHa pernctpaunHa rapaHUnrta, 3a da ce nOnyHr rapaHcHNO HOB cNyKBaHe 3a npOyKTnTe Ha Briggs & Stratton. Na3eTe 3a doka3aTeNCTBO KNTAHkTa OT nOKynKaA. Ako HE oChryptne DOKa3aTeNCTBO 3a HauhNaTb Da Ta H KyuBaHe, pR NiONCKBaHe Ha rapaHcHNOHO bCnyKBAHe, daTata Ha npOn3BODCTBO Ha npOyKtIe 6bJe 3nON3BaHa 3a OnpeJelHe HA rapaHcHIOHH NepiOHD.
OTHOCHO BaaTa rapaHnA
Briggs & Stratton npHemAT c roTOBHOCT rapaHUNOHnRA pMOHT n CE n3BnHBat 3a npHInHETO Bn Heyo6CTBO. BCEKn OToPnIHpaN cepBn3EN nepOCTaBnTEI Ha Briggs & Stratton moKeJa de OCbseCTBn rapaHIOHNHTe pMOHTn Ha DBrAteJIte3/LC. NobeHTo rapaHIOHN HPEMOHTn Ce npOBExdAT pyTHNO, HO NoHKAORA e B3MOXHO nCKAnHra 3a rapaHIOHNHO cepBn3HO o6cLyXbAHe n He ca ONpaBdAn. HanpIMep, rapaHnI HA da ce npIN3Hae, aKO nobpeDaT B DVBaTeIe Na dblJxN Ha HEnpaBnIHa yOnTpeBa, na IINCA na peDobHO TEXMHcECKo 06cLyXbAHe, Ha HEnpaBnIHO tPaHCnOpTtPAne, MaHEbpinae n CKlaDIPAhe Nn Ha HeKaueCTBeH MOHTax. CbIo Taka, rapaHNIaCe rgyu, aKO cepRmHNT HOMep Ha DVBaTeIe oOTCTpAHen Nn ca npaBEN npOMEHn NO CAMn DBrAten.
Ako kynbvaht he cbrnaceh c peweheneto Ha Cepbn3Hna npdctabnten, ue ce hanaBn pnoybahe, 3a da ce yctahOBn dani rapaHnHTa ne pniH3A. HsickBaTte OT Cepbn3Hna npdeCTabnten ha npdoctabn 3a npereN BcnuKn DoIbHnHTeHN
paKtn Ha cboi DnCTp6byTop nH a 3a0Da. Ako duCrtpn6byTopb nH 3a0BbT peuH,
ye TOBA iCKaHe e OnpabdaHo, Kynbvaht 3e 6bJe HapblHO o63uTeH 3a
deFekTHnHe qactn. 3a da ce n36eHne HeDoparzMyMeHHTo, KOeTO MOKeJa Bb3HKnHe
MkJy KynbVau n npdeCTabNTen, no-Dony ca n36poEHn HnKOn ot npnuHHnTe 3a NOBpeDa B DbratEn, KONTO rapaHnTnHa TE NOKPbMa.
HopmaHIO n3HocBaHe: DnBraTeIe, KaKTO BCNUKIMexAHuNHy UcTPOCTBA, Ce HJxJaT O TEPNOIDHuHa 3aMHa Ha cactN IO BCNUKBaHe, 3a Da pa6oTt DObpe. FapauNHTe He NOKPBA pEMOHTA, KORA To npHOPMAHO N3HOCBaHae DAeHa CT uNl DnBraTeIaT Ca N3eHepnAn JXWBToCt. FapauNHTe He ce pInnara, Ako B DnBraTeJIe Ce Cnyu NOBPeDA, InpaDi HENpabINHO NON3BaHe NNOTCBCTBE Na pyTHHNA NODpBkKa, TPAHCNPtIpaHE, MAnHyNJnPaHE, CbXpaHRABe HIN HEnpabINHe MOHTax. CbToTa, rapaunHrTaCe ry6n, Ako cepinHrHrHomep Ha DnBraTeJIe e OTCTPaHEN NI No Hero Ce naPBAEHn POMEHN.
Henpabnno noodbpxahe: XIBOTbHa na daen DVBATeN 3aBNCN OT yCNOBnTA, npn KONTO paobotn I ON TPOKNTe, KOtO nOlyuaba. HKaON pInIOXeHnA, KaTO KUYTBAToPOn, NOMIN, INOTAUMHN KOCaCkN, MHORO cTeO CE N30No3BAT B nPaSHA n 3ambpceha CpeDa, KOETO MOKeJa da OBOeDo npEdbapntEhOTo IM N3HOCBaHe. TaKOBa mHOCBaHe He CE NOKPbNA OT rapaHnITa, KORA To CE dFJxN HA MPbCOTn, npax, abpa3Nb 3a NoCHTBaHe Ha CBeTaHa nIpyr An6ba3nBn MaTepnAIn, nonaHaJIb N DBVIRATeN NOpaDn HEKAeCTBEHo NODbPxAHe.
Ta3n rapaunna NOKPbBa cAmO yNtpeBcH B DnRaTeJIeDeEkeKTeH MaTePnAn n/Nnn Inpa60Tka, a He 3aMnHaTa nn Bb3ctAHOBBaHETo Ha MaunHata, KbM KOrTO DnRbIeTAT MoKeJa da bJde MOHTnpaH. RapaunraTHe NOKPbBa n NONCKAHPeMOPTNI NOPaN:
1 IbIrataJI, KOITo He ca npabInHO MOHTnpaHn KbM 3aDbNkBaHaTa MaunHa. HactoYuBO ce npenOpBvBa npEdBaPntHeO da ce o6bPheTe KbM 3aBoDa, KORAto ue MoHTnpaTe 3-UINHIDpOB dBIRaTeC BOHO OXnaxJaBe B&S 3/LC KbM MaunHa, KOJITo He nIbnON3Ba, no Haanyo, DbIRatEn B&S 3/LC.
2Ipo6nEMNI, pnpuHHeHNo t qactN, KOIO He ca opunHnAHn Hqactn Ha Briggs & Stratton.
3 YcTpoiCTBa 3a ynpabIeHne Ha maunHATA nIe CbOpjXeHHn, KOtO npceHa T CTApTIPaHETo Ha DnIgATeN, BOJIT Do He3aDobONHTENHaTMy paBota HnCkbCBAT XJBOTMa TY. (KOHcyNTpAte Ce c npm3BOdIeNHa YcTPOiCTBa.)
4 KapbpaTOpn c TeObe, 3aIpbCTeHn npOBOn nIN pa3npbCKBaun IIO3n 3a roPBOTO, 3aJIENHAni KJanaHn, 3aMbpcEn HnHaTeTEnN NOMn INn Dpyra nobpeDa, innHHeNAOT 3aMbpcEHO nIN pIeCToNro RopBO. YnTope6RaBte NtO, nprCHO rOpBO (Be3HN bE3 cbIbpxAnHe na ONoBO, nI3eNoBO rOpBO) n CTabnn3aTOp HnRopBO Briggs & Stratton c KATAJoxen No 5041.
5 7actn, KOnTO ca HaIpaHn IIN ChyHEn, 3aIoTO dBnIRateT e pa6OTn C HeIOCTaTHO IIN 3aMbpCEHO MACNo, IIN c MacNO c HENoDxHOaIO KaueCTBO (PiPoEBRAIte EexJEHbEO HNBOTo HA macNtO IO NcIe BceKN 8 cHa cpaOta. Korato e Heo6XoDNMO, DOJIbAaIte Ic McHNeIte MACNTo I MacNHeNHa fItpbHa npEopbYBaHNTIHTPBAAIOT O BpeMe). ABapInHO tycPOJcTBO OIL GARD MOKe Da He cnppe paoTeUNIbRAten. Ako HnBOTo HA macNTo HE ce NOIbPjka TOHO, DBrATeTANT MoKe da Ce NobpeDen. PpOeHTe PtKOBODCTBO T a paOta.
6 PEmOH NTn peryunpaHe Na MOHTnpaHn qactn IINr arperaTu KaTO CbEHNHTeN, npedabATEHm MEXaHN3Mn, DNTaHNUOHH ynpabLeHnI nDp., KOnTO He ca npo3BeHnOri BrqGs & Stratton.
7 NOBpeHa IINI IN3HOCBaHe Ha Yactn, npuHHeHn OT HeNCTOTn, nOaHnA B DVBrAteJI, NOpaIe HKeAeCTBeHO IOJbPxAHe HA B3dUyHnIA FInITbP, HKeAeCTBHe NOBTopeH MoTAn JIKn OT IN3IOJ3BaHe HA HeOpinHaHNi EJEMeHTn 3a FInITpa. Ha IpenOpbYBaHnTe INHEpBaIIOn OT Bpeme NouchBaIe N/INI CMeHBaIte FInITbPa, KAKTO e NocOeHn B PbKOBODCTBTO 3a pa6OTA.
8 7actn, noBpeHEn npaHn HaDbHsEHN MaKcMmaHn OobopTN nIi npaDN pnpRbAHe, nbJxhaOe Ca H TeBn, HACNoBaHmN IIN 3AmPcBaHe, KOIT0 3aNyubat, 3aDpCTBat pAdnAtopn An OTbOpTBe 3 aDOctbHa N OXlaJxDaHn Bb3dyx, nIi NoBpeDa, nbJxhaaCa Ce ha pa6oTa B 3aTbOpEHO npocTpaHCTBO C HeDoCTaBtBuVA BeHTuHa. POBepa Ha DvrgateN, nbJxhaaCe Ha HeCnPa3BaHeto Ha ToHOTo CbOtHoWHeNe Ha aHTnФpN3 nIInTeHa BOda IIN Ha npOnHKBaHTo HA BOda B Hero NO HRAkKaB pnuHna.
9 9actnHaDbvraTeIyIIMaMHNHATA,CyUneHOnOTPpeKOMepHaBbpaIa, DJIIXauaCe HxIxaabMOHTXHaDbvraTeIY,IxAbaBNPeXeuaHOxOBe, XnaabNIIpACTmN IxIxaabNIMI3Je6BaNAHCpAaPiBaOToTHKnOLeNa,Ha HeNoDbo KynPiPaHeMaMauHATAKbM KOENHATNaBnHaDbvraTeIy,Ha CbpBXBnCOkINOBOpOTnIInDpyra3OnyOnTpE6a npn pa6ota.
10 PyTHHnHa HAcTPOKa n peryInpOBKa Ha DbVraTeJIa.
11 Поврета на дыгателя на неюв сlementт.T.e. ropиьна камера,Кларани, Кларанни Легл, Кларанни Ворадун, Или Исторелу Намотки на стапета пораздпИЗолзав教职工 на Достigated<|im_start|>assistant
Тимлбага Калчессы и Т.Н.
Гараноностбунговае edoctыног endcthehoуpe3 Otpииранite срвизни рпсдtabintelna Ha Kopnpaia Briggs & Stratton. Hamepete nai-6mknry Otpinapan cрвизener pndctabintel 3a dbnrateinte 3/LC b hauata yka3atela Kapta 3a npdctabintelneHa adpec BRIGGSandSTRATTON.COM, Или кato ce obajnte ha tel. 1-800-233-3723, inn KaKTo e nocoyeo B „Жьltnte CTpaHniu".
Vseobecné informace
Pries jjungiant variklj
Pries jjungiant varikli
O6pa3oBaHne NcKpbI MoKet BbI3BaTb BOCJIaMeHeHne roIoux ra3OB.
3To MoXeT npBecTu K B3pbIBy nNoxApy.
He 3anyckaIte Dniratentb B Tom MceTe, rJe npocxOuT yTeKa npnpoHoro nJIN CxKxHOrO ra3a.
He nCnoB3yTe npckOBbIe XnDkoCTn B a3pO3oJbHNo ynpaKOBKe, TaK KaK nx napbl orHeonacHbl.

NPEДУПЕЖDEHNE
BbIXIONHbIe ra3b coepKxat Okbc yrIepoJa -6ecuBtHb n He mIeOIOI 3anaXa IdoOBtBu r3.
Bbixahne OKcN yrIepoJa (YrapHOro Ra3a) MoKET Bb3BaT bPOTy, notePbO Co3HaHn HIN cMPeTb.
3anyckaite n 3Kcnpnyatnpyte DnBraTeB BHe NOMEeHna.
He 3anyckaIte DnIraTeIb B NOMEueHIn daxe npu OTKpbIbIX OKhAX nDbepx.

PNEyYPKDEHNE

BpaaoUneecn deTann MoryT BOHTN B KOHTaKT C pyKaMn, HORAMn, BOLOcamn, OeJdoN ee akCECCyapamn NIn 3axBATNTb IX.
3To MoKET npBeCTN K TpaBMATueCKO amnytauN IN TAnKeJIbIM
PbaHbIM paHAM.
HeeknnyaHTpyeIe 6oepyOBOAHne 6e3 yctanOBJIeHNbIX 3aunTHbIX pncnOCsbln
He np6njkaite pykn HnK BpaazaouzmcA Detajam.
IoB83bBaIe TdINHHbIe BOIOcbl CHIMaIe IOBENHPbIe N3DeJIa.
He hocnte Cbo6oHyu OeKdy, 6oTaoUneCeA HhyprKn IIN PpeMetbl, KOtOpbIe MOrYt 6bIb 3axBaueHb I BxkyuIMMCr DeTaNAMN.

PNEyYPKDEHNE
Даite rIyIuIeJIIO,UININHpy upepaM UININHpa OCTbITb,npexKe YEM dOtpaIBaTbCn DO HIX.
OuHCTIte 30Hy BOKpy rIyUHTeY IuINHpa OT CKONBweroCBOcPnAmEHemOro Mycopa.
IcnoIb3ObaHnne nIeKcnIyataunI DnBraTeTner Ha IIOboI TeppntOpnn, nOKpbItoN IeLcOM, KcytapHnKOM nIITpABoI, 6e3 YCTaHOBNEHHORO nCKporacNTenHa NCtEme BvIXONHbX Ra3OB, ABJNTcH AhpUeHHem 3aKOHa KAnIpocpn06 o6ObceCTBeHNbIX pecypcax, CTaTB 4442. COrnaCHO CStbN 4442 nckporacntel bOnJxeh HaxOAnTbC BpaOChem COCTOHn. DpyrHe WtATbI nnPfepaJIbHbI OIPcDInKuIMyOT IMETb CXOdHbe 3aKOHbI. O6patnteC k PnO3BOHnTeHOpINHaBHoO6OpUdoBaanH, npOaBuY nII dJepe DnnpO6pTeHn NckporacNTen, PpeNa3HaeeHHoro dI BvIXONHO CNCTeMbl, yCTaHOBNEHHOI HA 3TOM DnBtAEteJe.

PNEyIpyEKDEHNE
3To MoKTe IpnBecTn K Cepbe3HbIM TeIIOBbIM OXoRam Bpe3yJbTaTe Bb6pOca napa nnrnpaey OxJaKaDaIOSe JxNkOCTn DBrAteTEn.
HE cHIMaIte KpbIshky paIaNatOpa IIN EMKoCTN,ecn DBIrataTeIb rOpyuN IIN pa60taET.
- Pered Chrtnem KpbIshKn paDnaTopa nnn KpbIshKn paCsiNpRteNbHorO 6aKa n nepeI zameHoi nn DIOJIbKO OXIAJdaOuei JxIKoCTN OCTaHOBITe DBIgatel n daIte Emy OCTbl.

PNEyPPEKDEHNE
CnyaHoe o6pa3OBAHne NCKpbI MOKET npNBecT K NOXAPy IINn nopaxHeHIO 3JIeKTpNUeCKM TOKOM.

CnyaHbI aanyck MOKET npNBecTN K 3axBbTaBHAnIO, TpaBMATueCeOk amNytaun pa3nUHbIX ChTeJ TeA mN K o6p3aBoHNo pBAHbX pan.
Pnck BO3HnKHOBHeHn NOXapa
Ipeed BbINOJIHeHEm peryInpOBoK nIpeMOHTa:
- OToeHNHTe npoBOD cBeHn3aXnraHn n ydaIInTe erO oT CBeHn.
- OToeDmHnTe OTPuCaTeNbBbY BbBOd aKKyMnyToppa (ToIbKO dIra DvIRaTeNe c 3JIeKtPoCTapTePOM).
IcnoIb3yIeToIbKOIOxOJaIeHCTpyMeHTbl.
He MeHnTe HaCTpoiKy npKnHbI, TAR nnnnHbIX DeTanee peryIaTopa dnyyBeJIuHnHaCtObI BpaueHnBaI dBIRaTeJIa.
3aIacHbIe qactn IOnKhbl 6bITbIeHTNHybIMn UyCTaHaBnBaTbcra HTo JxecamOe MeCTo, YTO INepBOHaayJIbHbIe DeTaJIN.
He yadapnTe no maxOBky MOJOTKOM INI TBepdbIM npEIMeTOM, T.K. MAXOBK MoKET No3Ke pa3OpBaTbCBA BVPem 3KcPnyatauIN DBIrAteJIr.
Pnp npOBepKe cHCTeMbI 3aXnraHnA:
IcnoJb3yIte pa3peuHHH TeCTep CNTeMb 3aXnraHNA.
He npOBepRte NCKpy C BbHyToi CBeYoi 3axnraHaHa.
y3nbI dBnraTeJI n opraHbI ynpabJeHna
CpaBNHTe pncyHOK CO CBOIM DnuratEnm, YTObI O3HaKOMITbcra c paacnoJIOXeHNEM pa3NJuHbIX y3NOB DnuratEnn I orpaHOB ynpaBHeHH.
A. ΜεθητινρκαμηούηHΟΕ ΜΟδηλη Μβυγατέλη Μόπελν Σπι Κόδ
B. Cbea 3axnraHna
C. Lüynpobhma
D. MaclohanBho natpy6ok
E. MacJHbI ΦnIbTp
F. Пюбka сльвого OTberpctma macla
G.ДатчИКдавлЕнгЯ Macna
H. 3neKtpocTapTeP
I. Kap61opatop
J. Tepmoctat
K. Katyuka 3axirahan
L. MacJHbI NOdOH
M. TenehepaTop
N. BLOK OTnpaBKn DaHHbIX TemnepaTpybl OxnaJdaIoUe JxNdkOCTN
0. KoДаТыВынуСкдИгагелЯ
3Kcnpnyataza
KoJIuYeCTBO macna (CMOTpnte pa3JeT TexHnueckne daHHbIe)
PeKOMeHndaцnnoNcNoJIb3OBaHHIO MacJa
MblpeKOMeHdyem NcNoJIb3ObA Tb pa3peWHeBle KOMnAHne Briggs & Stratton Macla IaIIOCTNKeHnHaHnyUHnx 3KnClyATAuONHbIX XapAKTePncTnK. IpyrIe BbICOKoKaJcEChTBHeBHeIe DeTpreHtBle MaCna DOnyCKaIOTcB TOM CNYae, ecNI OHN KlaccnFpUInpoBaHbI KaK "For Service SF, SG, SH, SJ" mII bIwe. 3anpeaetcR nCNOJIb3OBAHne CneuaJIbHbIX Do6aBOK.
TemnepaTpya HApxyHoro BO3Dxa OnpeJeAeHT HaJIeKxauyBO3KoCTb MOTOPHO Mmaca. BoCOnIb3yIteB Ta5uiey dNBA6OOPa COOTBeTCTBYUoei B3KocTn dN OxnaeMOrO INtEPBaNA TEmnpaTpyb HApxyHoro BO3Dxa.
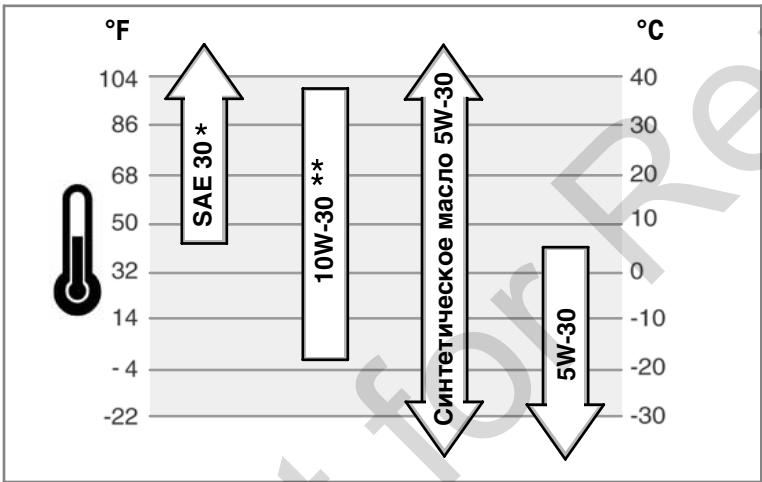
IcnoIb3ObaHne Macna SAE 30 npu Tempeatypax HnXe 40^ (4^) npuBeTeK 3aTpUdHeHOMy 3aIyCKy DInrataJI.
** IcnoIb3ObaHne Macla 10W-30 npT TempepaTyax Bblue 80^ (27^) npBBeTe K noBbIeHNOMy nTope6JIeHIO Macla. Yaune npOBePnTe ypOBeHb Macna.
Kak npoBepuTb ypoBeHb Macna/DoJntb MacNo - Pnc. 2 3
IpeepdoabAenemnnpOBepKoynpOBMa
YctaHOBtE DbIaTeIb B rOpI3OHTaIbHoe nIOJoxeHne.
OuHCTIe 30Hy MaCNo3aJIINBHorO OTBepCTnO T IIO6o Mycopa.
- BbItaunte uyn dny n3mepenhy ypoBna Macna (A) n o6oTpne ero YnCTOJ TpnoKoN (Pnc. 2).
- Понноctью BCTabTe uyn Ддг Измерену уровна macna.
3.ИЗБЕКITEУПи ИПрОВЕРБЕТУРОBEHb Macla.ОнdoЛжен6ыт ha OTMeTKe FULL (Залонно) (B) Uya. - Ecni ypoBeHnKe, n3BJIeKInTe uynI mMeJIeHNo 3aJIbAte MacNo uepe3 macNoHaJIbHyIO rOpIOBHy (C). He nepenolHne.
BhimaHne: PnI DOJIbKe Macla Heo6XoJMo OBeCneHTb HAnEkaUHOBEHTNJIaIcIO CJeDyIooM 6pa30m:
- N3BVeKeIte ⅢyI.
-
Y6eIITecb B HauNHyM DoCTaTOHOro 3a3opa (D) MEXky yCTpoiYCTBOM 3aINBkMacna (E) n 3aINBHOH roPNOBHOJ DnRatEnA (C). Cm. Pnc. 3.
-
Nocne doJINBKn Macna yctaHOBnTe uyn. 3abeNte DbrarateInb n daIte Emy npao60TaTb nTb MmHT Ha xOJIocTbX o6OpToax. BByKIOuHnTe DbrarateInb. PdoJxDn Tp mNHytbl n pOBeBpTe yOpeBHe macna. Pn HEO6xoDMoCTn, dOJeTne Macno Do OTMeKN FULL (3anOnHeNo) (B) Na uyne (Pnc.2).
- YctaHOBInTe Uyn.
DABJIEHNE MACJIA
ECNn DabNHHe MACNA CNIHKOM HN3KOE, PENE DABNEHIN (ECN NMMEETCA) OCTAHOBINT DBIATeNB I N60 BKNIOHT CRIHbHOE yCTPOCTBO HA OOBpyOBOAHN. B 3TOM cnyae OCTAOBNT DEBnATENB IN POBOpEBy TPOBEHBM Macna pni NOMOUI uyna.
Ecnn ypOBeHb macna HnXe OTMeTkn ADD,do6aBbTe macno do OTMeTkn FULL. 3aNyCTte Dbratelb n npOBepeIe daJIeHe me cna, npExJe che m npOdoJxab pa60Ty.
Ecnn ypOBeHb Macna HAOJNTC MExJy OTMeKAMn ADD n FULL, He 3aanyckaTe DIBrAteNB. ObpatnteBc KIO6OMy OfniabNbHO MyDInepy KomNaHm Briggs & Stratton 3/LC nIy aYCTaHEHn HEnCpBaHOCTn, Bbl3BaWbHn Hn3Koe DaBnHe MeCAJa.
PekomeHdaqun no nCNoJb3OBaHNIO TOnJIbBa
TOnnBO DoJXHO COOTBETCTBOBATcJeIyUoM Tpe6OBaHm:
- UnCTbI, CBexN, He3TnIupoBaHbI 6eH3nH.
- Мнимальhoe OKТАнбоe YHCNo 87/87 AKI (91 RON = nccneObaTeBbCKoe OKТАнбоe YHCNo). Пр павOTE на 6Оьш ВсOTe NaД урOBHem MOPa, CMOTpNTe yka3aHnH NIXe.
-Ду新股аетсббнИСcodepжанHemdo10%3taHOLa(6eH3OcnpTa)илdo 15%MTBE(TpeTnHbI MeTn6yTnOBbI eФиp).
BHIMAHNE: He donyckaetcncnolb3obahne hepazpeweHHoro 6eH3nHa, Hanpimep, E85. He donyckaetcnpmewuBaHne Macna B 6eH3nH, nnMOnDfNkauaDN DBIrAteTEnI dnn paOboTb Ha anJIbTePahNTBbX BnDax TonlNa. 3TO MOKET NOBpeDTb KOMNOHEHTb DInrataTeN nAnHyIpnoBaTb rapaHNo H daRbrateN.
Длгзашипь тОнлИВ"HОСNTeMbI OTOBa3OBAHINСMOиь,пIMmeшьaite ТабБИЗATOPТОЛИВКУК.TОЛИВ.СМOTРпараздENХаNEH.ТОЛПВо может OTNtHbTcBn NOCTABYNKAECHETy.EcINn BStaIGNKBaTeBc TpyDIOCTAMNпр 3AnyCke ИИВ pa6Ote BaWero DBIratEnTo,TO CmEHnte NOCTabUWkaТОЛПИВЯ nIM nOMeHNeTse TOPOBByO MAPky TOJIINIA.DaHbI DBIratEnB cEPrTfMnIPPOBAHДЯ pa6OttHa b6Eh3nHe.DIBrAteYbMEeNTCMeY KOHTPOnI TOKChuHOCTN BbIyCKHbIX ra3OB,KOTparAIMeET O6O3HaEHeEM (MOdMgKpAkuZm DBIratEnTo)
IcnojIb3OBAHHe Ha 6oJIbwoB BbICote HaD yPobHem MOpA
HdNkaTop TempeatpybI
CbeHHe HnDkaTopa TEmnepaTypb CBnTeBbCTByET O npepeBe BnIraTeJI. BblKIOUHTe DnIraTeJI N npOBepbTe ypoBEnb
oxnaqdaioe xndkoctn (secm. pa3den PpOBepka oxnaqdaioe
KnKocnt).Y6eIITecb B OTCyTCTBm Mycopa Ha paImaTope, npenrTCTByuOero NOTOKY BO3dyxa.

HdkaTop 3aXnraHn
Pn yctaHOBKe BbIKIOUaTeJIa 3JeKtpuueCKOrO 3aNyckaB nIoXeHne
BKNI INDnKaTOp 3axnraHnI DoJXeH CBETnTbCn. Pnp pa6Ote DnurTaTeJI
HnDnKaTOp 3aXnRanH He OJxhen CBETnBc. Ecnn npn yCTaHOBe BbIKNIOuTeIe IeKtpnckoro 3aynca B noLoXeHne BKJI nDnKaTOp H cbETnTC, npOBepbTe npDeoxparrntb.

HdkaTop daBleHnMaCna dbraTeJr
PnyuCTaHOBKe BbIKJIOUaTeJIa 3JeKtpueeCKOrO 3aNyckaB NOJIOXeHne
BKN INDnKATOP DaBHeH MaCnBa DnBraTeJe DoJKeH CBETNbC. Pp
pa6oTe DnuratEn HnDnKATOp DaBHeHn MaCna B DnuratEne He DoJnxKe CBETbC.
Ecnn npa pa6oTe DnuratEn Haan CBETbCn HnDnKATOp DaBHeHn MaCna,
HemeJnEHNO BbIKNIOHTe DnIRATeB. B nepBYo OHepeBt npOBepTe UpOBeHb Macna (cm. pa3dien KaK npOBepTa/bdoINBaTb macNo). 3aTEM npOBepTe 3JIeKtpueckyo CNTEMy.

INdukatop3apAdkn
Ppi yctaHOBKe BbIKIIOUaTeJIa 3NEKtpuYeCKOrO 3aNyckaB NIOLOXeHne
BKN INDnKaTOp 3apAKn DOJXeH CBETbCn. Pnp pa6Ote DnurTaTeJIa
HnDnKaTOp 3apRKn He DoJnxEn CBetntbC. Ecnn HnDnKaTOp 3apRKn HaunHaet
CBETNbC npn pa6ote DnBraTeJna, npOBepbTe 3neKtpnueckyIO CNTeMy.
Kak 3anyctntb DnBraTeIb-PnC. 5

PNEyPEXKDEHNE
Beshn eropapbIype3BbIayHoOrHeonacHbN B3pbIBOONacHbl.
BocnnaMeHHeNe HJN B3pbIb MOrYT npNBecTu K cnJIbHbIM Oxoram HJN CmeptelbHomy NcXOy.
Pn 3anycke DbrataTeJr
V6dntecb,ФTO C8e7a 3axgrrnna,flyunTeB, KpbIka TOnPiINBHOrO 6aka N BozduhnyΦJIbTp (ecN yCTaHOBnEH) HAXOJATCn H CBOX MecTax N NaDeJxH0 3aKpenJIeHb.
He npobepaIte nckpy C BbInyToi CBeuee 3axnraHna.
B Cnyae nepenbta tonnba B kapbiopatope Dbrateta, yctahobnte Bo3duhyo 3acnohky (ecnn taKOBaI NMeetc) B noLoxehme OPEN/RUN (OtkbTa/Pa60ta), nepemectne npocceIHyo 3acnohky (ecnn taKOBa IMeETc) B noLoxehme FAST (5bictpo) n 3abOnTe Dbrateta, noka OH He 3anyctntc.

IPEDYIPEXDEHNE
Pn3aynycke Dbratela npocxoanT o6pa3oBaHne nckpbI.
06pa30BaHne NCKpbIMoKxET Bbl3BaTb BOCnJaMeHeHne roIounx ra3OB.
3To MoXeT npBecTu K B3pbBy nNoxapy.
He 3anyckaIte DnBraTeIb B Tom MceTe, rIe npOnCxOJIT yTeUka npnpoHoro nIN CxNKeHHOrO ra3a.
He nCnoB3yIe nycKOBbIe XnDkoCTn B a3pO3oJbHOn ynaKOBKe, TaK KaK IN npbl orHeONaChbl.

PNEyPEXKDEHNE
BbIOnHbIe ra3bI cOepKaT Okncb yrIpepa - 6ecuBeTHbI n He MeoJn 3anaxa JdoBVtbn ra3.
Bbixhme okncy yrnpoda (yraphoro ra3a) moxet Bbl3BaTb pBOTy, notepio co3HaHnI nn CmepTb.
3anyckaaiTe n 3KcnnyatpyuTe DnurTaTeIb BHe NOMEeHnA.
He 3anyckaIte Dniratelb B NOMEeHnn daxke npu OTKpbItbIX OKhAX n DBepx.
BHMMAHNE:Данньдвогател nobctabnreTcKompannei Briggs & Stratton 6e3 macna.петад залуckOMдвогател,обзатelho 3azeTme macno cornaCHO nHTpykцИМ hactoIgero rykoBODCTBa.EcIn Bby 3aynctnte DBvrgaTeIb 6e3 macna, TO dBvrgaTeIb 6ydet HeBOcCTaHOBIMNo nobpeXdE,и 3TOT cnuyaH he 6ydet nOKpbBaTcR rapaTnei.
Примочанe: HeKOTOpbIe DnBraTeNIn OobopydObaHne Cha6KeHbI opraHAMn dIctaunOnHOro ynpabJIeHnA. KacateJbHO paCNoJoxEHHa n pa60TbI orpaHOB dIcTaHauONHOro YnpaBLeHnCMOTpTE pyKOBoDCTBO NIO 3KcPnyatauINДЯ KOHKPETHOrO OOBpyDoHAnH.
- Поверпгуовь macna. CMOTPnTe pa3dien KaK npovepntb ypoBeHb macna/ДоЛNTb macno.
- Y6eHITecb, YTO pbyaHn ynpabJIeHn npuBOom o6OpyIOBaHn, ecNI OHN YCTaHOBJIeHbl, OTKIIOcHbI.
- ПовернITE ручк Крана подач ТОПЛВА (A), ecл.TakOBа IMeETС, B пожженье On (ОТКръTO) (Puc. 5).
- Перемechтente рыаг уравлесеня дросселм (В) Немого сольшем поожени slow (medlenho).
- UctaHOBITE BbIKIOUaTeJIb 3eKTPuueCKOrO 3aNycka (D) B noIooKeHne on (BKn)/start (nyck) (Pnc. 5).
BHIMAHNE:Bce KOMNOHEThbI,INcNoIb3yeMbIe IaNc6OpKn DaHnHO DnBraTeIa, OJXhblOCTaBaTbCnHa CBOEM MeCTe Iraero HAnJeXaue Pa60TbI.
YCTPOICTBO DnA CHNXEHN TOKCNHOCTN BbIXNONA
06cnykubHne,3aMeHa nI IN pEMOHT yCTPOIcTB N CNTTEM KOHTPOJI 3MnCCNI MORYT BbIOnHrTaC JIO6oB MaTEpCKoN IIN CNEuAnlntCMTO pEMOHTY HE ABTomO6NJbXbIhB DnITaRteNei. OJnako,IДN"6ecnIaTHORO"6cNYkUBAHN KOMNoHEHOB CNTEmbl IOHNKeHnTORKCHUHOCTN BbIXNoA,3TN paOBtI DOJXHbI BbIOnHOHB TaIIePOM,CETpNCuIMPoBAHbIM 3aBODm-IMrTOBOTeHem.CMOTnPte rapaHTIO HA yCTPOIcTBO IIN CHINKHeHn TOKCNHOCHTN BxIHNoA.

PNEyPEXDEHNE
CnyaHoe 6bOBAHHe NCKpbI MOXET PnBecT K NOxApy IIN nopaxhenIO 3Jektpueckm TOKOM.
CnyuHbIy3aynck MoKET npNBcTeN K 3axBaTbIbAHIO, TpaBmTaUeCKoAMnYtaun pa3nMHybIX cAteN TeN IIN K o6p3aOBaHIO pBaHbIX paH.
Puck Bo3HKnHOBeHH noXapa
Ipeed BbINOJIHeHEm peryJInpOBoK nI npemOnTa:
- OtcoeHNHTe npOBd Cbeu 3axnraHn ydaJIte erO oT Cbeu.
- OToeMHnHe OtpuataHbB BbBOd aKKyMnyTopa (ToIbKO dIraDburatene C 3JIeKtpoCTapTePOM).
IcnoIb3yIteToJbKOIOxOJauneHnCTpyMeHTbl.
He MeHnTe HaCTpoKy npKxNbI, TAR nnn nHbIX DeTanei peryIaTopa dnyBvEJIuHnHaCtObI BpaueHnBaJDbIRaTeJIr.
3anaChbIe qaTnDolNhbIb6bTbIEHNTUHbIMN yCTaHABINBaTcBA H TO JXe CAMOE MeTO,OTu NEpBOHaAJIbHbIe DetANI.
He yadapIte no maxobky MOJOTKOM INI TBEpbIM ppeMeTOM, T.K. maxobk MOKETno3Ke pa3OpBaTbCBO BVPem 3KcPnyatauIN DBIratela.
Pp npOBepKe cHCTeMbI 3aXnraHnA:
- IcnoJb3yIe pa3peweHHbI TecTe p CnCTeMbI 3aXnraHnA.
He npOBepRnTe NCKpy C BbHytOcBeyo3axnraHa.
Tabnca BbInOJIHeHn TeXnueckOro 06cIyXnBaHn
KaKdbie 8 yacob pa6oTbI nn exKeDHeBHO
- PpOBePKa yPbONH MaCnBa B DnBraTeNe
- Поберптуовень oxлajдюшей кидкости
PepBbIe 50 yacob (nepBOHaayabHna npupa6oTKa)
3aemeHTeMaCNoBDbIrTaTeNe*
Yepe3 kaxdbie 100 yacob pa6oTbI nn exeroaHO
- Поберпту натуженье ремь вентURAtopа
- Понистпес радиатор
- PoiuCTnTE BO3dyuHbI qInlbTp
- IpoBoepeIeIyuHInTeJIbIIOuHcTHeNCKpOraCInTeJIb (ecJIN yCTaHOBnE)
Yepe3 kaxdble 150 yacob pa6oTbI nIe exeroDHO
3aMeHHTeMaCNOBDbnIraTeJe
3aemeHNTeMaCLnHbIΦJIbTp
KaKdIe 600 yacob pa6oTb Inn EKeeroJHO
3aMeHa BO3dUshHoroФиЛьТра
- Поберпгдзлркллпа -
3aMeHHTe TOJIINHBHbI QnJbTp
3aMeHHTe CBeu3aXnraHn
ExeroaNo
3aMeHHe OXnaKdaIOUyIO JxNkoCTb
- 06cIyJxNbAte DnBraTeJIb YaIe npi pa6Ote C 6OJIbShIMn Harpy3Kamn IJIb VcIIOBIAx BbICOKNX Tempeatyp.
He tpe6yetca, noka He 6dyt 3ameeHb npo6JeMb paobTb Dniratena.
Perylnpobkakap6iopaTopa
Hknorda He BbInonHnrepeylnopBkn Ha Kap6opatope. Kap6opatop npdeBapinTebno OtperynupoBaN ha 3a0eNo-3r0ToBnTeJe dna e4fKeTnBHO pa6Ot bI da 60blshnCTBa ycNobn 3cknnyaTaun. Ondako, ecn notpe6bycra perynipBOKa, To o6paauTeCb, noKanycta, K yOnlHomoeHNOMy dInepy KomnHn Briggs & Stratton 3/LC dna npOBeDHH TeXmueckoro obcnjxmbaHnA.
BHMMAHNE: IaTOBOTeINb OobpyOBAHn, HA KOTOPOM YcTaHOBJIeN DBIraTeNB, ONpeJenaT MaKcMajlbHyIO pa6OyIO CKOpOCTb DBIraTeNB. He donyckaTe npbeBIIeHe 3ToI CKoPOTI.
Kak 3aMeHHTb CBeuy 3axnraHnA - Pnc. 6
PerylnpOBKa HaTaeKeHH peMH BeHTnIaTopa
- Ocna6bTe yCTaHOBOUHbIe 6oJIbI rHepeTaTopa (D) n (E). Cm. Pnc. 10).
- UctahOBHTe MOHTIPOBKY (F) Ha tHehepaTope (G) c 60KOBo CTOpHOH Ha 6IIOKe DBiRatJIa. IIN HATrUBaHnA PEHNA BENTIHApota NOTAHTE MOHTIPOBKY. BPEMeHO 3aHTIHcY eCTAHBOO'HbE 60NTbI tHeOPaTOpA.
- Поберпе натужени ремна BeHTINITOPa.Cm.pa3deJ Поберka pemнь BeHTINITOPa.Ppr Heo6xOdMOCtN, NOBTopte npOeDpy.
- 3aTaNHTe yCTAHOBOCHIbe 6oNTbI rHeHepaTOpA. 3aTaNHTe 6oNT (D) c ycInnEM 14Fy-ФyHT (19 Hm). 3aTaNHTe 6oNT (E) c ycInnEM 45 Fy-ФyHT (61 Hm).
Xpahenne

PNEyPEXDEHNE
BeH3nH eero napbI ype3BbIaHaNo OOrHeoNaChbI b3pbIBOOnaChbI. BocnAmeneHne HmB3pBIB MoryT npnbecrK CnJbHbIM Oxoram HmCmeTeJIbHomy NcXody.
PnXpaHEnn 6eH3nHa nIbO6OpyDobAHnC TOnJIINBOM B 6ake
Bo 36eJahne BOCIaHMeHENH naopB 6e3nHa xpaHInTe erO bAanOT KOTIOB, neeB, BOHOaHpeBaTeTene I npOxN npbOpB, B KOTOpBix nC0JIb3yETCr FopeNka mIN HIOH OCTOHNK BOCIIaMeHENH.
TOnnBHaR CnCTema
TOnJIbBO MOxET CTaTB HcBcEgXM, ECNI OHO xpaHnTcB 6Ooe 30 DHeI. HeCBeJeeK TOnJIbBO Bb3bIaBcE oBa3oBaHne KNCNtHbIX N CMONJIbIX OTOLOKeHNI B TOnJIbHO CnCTeME INA BaxKbHbX DetalAnk Kap6IoPataO. YTo6bI CoXPaHnTb TOnJIbBO CBexIMM, IcNoJIb3yIte CTaBnIINa3aTOp TOnJIbNA FRESH START 忍 OTompanHI Briggs & Stratton, PnpLaIaBAeBI INBVEe JNuKoI pnpCaKn INI KAPrIaJa c KOHeHTpRpOBaHNO XnuKoKoCTbIO n C KanJIbNHueIe.
He tpe6yETc cIbAaBb 6eH3nH n3 TOIINBH OCHCTeMb I DInrATeH, eCnn CTaBnIMaTOp TOniMaBa DO6abJIaETc COrnaCHO HcTepKUaMn. DaIte DInrAteHo NopapoTaTb B ToeHne 2 MHyT dAunpKyuJauN IO6abKn Yepe3 TOIINBHYO CNTeMy. Pocne 3TO rDinrAteH b TOINPiBO MOrYt XpaHITcBdo 24 MecuueB.
Ecn6eH3nH He 6bl O6pa60taH C nOmoIbIO CTa6nIIN3aTopa TOIINBa,TO 6eHN HONJcHb cNIT N3 DBInrAteJI B NOxOAnuYO KaHnCTpy. DaJIte DBrInatEnIO
npo60TaB, noka OH HE OCTaHOBNTCA I3-3a OTCyTCTBnA TOINBa.PekOMeHnyETcH
ncNoJIb3OBAHne CTa6nIIN3aTopa TOINBa B KaHnCTpe dIra XpAHENH C cIeJIbIO
COXPAHENH erO CBExeCTNI.
MOTOPHOE macJIO
3aMeHnTe MoTOpHoe MaCNo, KOrDa DvBraTeNb eue TeNJIb.
YctpaheHne HencnpaBHOtei
HuxdaTeB CdoeICTBm? 3aIITe Ha web-caT BRIGGSandSTRATTON.COM nIIN NO3BOHnTE 1-800-233-3723.
TexHnueckne daHHbIe
- General Information
- Engine Power Rating Information
- Operator Safety
- SAFETY AND CONTROL SYMBOLS
- WARNING
- When Adding Fuel
- When Starting Engine
- When Operating Equipment
- When Changing Oil
- When Transporting Equipment
- When Storing Gasoline Or Equipment With Fuel In Tank
- Before performing adjustments or repairs:
- When testing for spark:
- Features and Controls
- Operation
- Oil Recommendations
- How To Check/Add Oil - Figure ② ③
- Before adding or checking the oil
- Oil Pressure
- Fuel Recommendations
- Fuel must meet these requirements:
- High Altitude
- How To Add Fuel - Figure 4
- Coolant Recommendations
- How To Check/Add Coolant
- Gauges And Lights
- Coolant Temperature Gauge
- Hour Meter Gauge
- Fuel Gauge
- Temperature Light
- Ignition Light
- Engine Oil Pressure Light
- Charge Light
- How To Start The Engine - Figure 5
- How To Stop The Engine - Figure 5
- Maintenance
- Emissions Control
- Maintenance Chart
- Every 8 Hours or Daily
- First 50 Hours (initial Break-In)
- Every 100 Hours or Annually
- Every 150 Hours or Annually
- Every 600 Hours or Annually
- Annually
- Carburetor Adjustment
- How To Replace The Spark Plug - Figure 6
- Inspect Muffler And Spark Arrester
- How To Check Coolant
- How To Change The Oil - Figure ② ⑦
- Remove Oil
- Change The Oil Filter
- Add Oil
- How To Service The Air Filter - Figure 8
- How To Replace The Fuel Filter - Figure 9
- How To Check/Adjust The Fan Belt - Figure 10
- Check Fan Belt
- Adjust Fan Belt Tension
- Storage
- Fuel System
- Engine Oil
- Troubleshooting
- Specifications
- LIMITED WARRANTY
- OUR PRODUCT
- Warranty Period
- Vanguard™ 3/LC
- Major Parts Warranty *
- Parts & Labor *
- About Your Warranty
- California Emission Control Warranty Statement
- Your Warranty Rights and Obligations
- United states Emission Control Warranty Statement
- Your Warranty Rights and Obligations.
- Briggs & Stratton Corporation Warranty Coverage
- Owner's Warranty Responsibilities
- General Emissions Warranty Coverage
- Warranted Parts
- Osha Hhopmaia
- Data Ha KynyBaHe:
- ModenHaDburatela:
- HOpMaIg 3a HOMHaIHaT a MoUHOCT Ha DBVaTeJIte
- Texhika 3a 6e3oNaChOCT Ha onepaTopa
- CIMBOJIN 3A BE3ONACHOCT IN YNPPABJEHNE
- PNEyPPEXDEHNE
- PNEyPPEKDEHNE
- PNEyPEXKDEHNE
- PnCstapTnpaHe Ha DBrTaTeIa
- Ppi pa6oteua MaunHa
- Pn CMHa Ha MacJlOTo
- Pn TpaHcnpOpTnpaHe Ha MaunHaTa
- Korato cKlaIpaTe 6eH3n HnO6OpyDaBaHe c rOpNBo B pe3epBoapa
- NPEdynPEXKDEHNE
- IPEDyPEXKDEHNE
- PNEpyPEXKDEHNE
- Elenentnyynpablenya
- Pa60Ta
- Ppenopbkn 3a MacNoTo
- Kak ce npOBepBa/HaJIbMa MacNo -FHypTa 2 3
- IpeiHaHbAe HnnpOBepBaHe Ha MacNoTo
- HaIrahe Ha MacNoTo
- Ppenopbkn 3a ronpBOTO
- TopNBTO Tp6Ba Da otROBapHa cJIeHNHe N3NCKBAHn:
- TolmaHaMOPcKa BnCOuHa
- KaK ce HauBa MaCNo - ΦnYpTa 4
- PNEДУПЕЖDEHNE
- Ppenopbkn 3a oxlaekdaeta Teuhoct
- IPEdUnPEXKeHNE
- I3mepBaTeJIHn ypeDN u CBeTJIuHHN nHdNKaTOPN
- TepMometbpo 3a OXJaKaDaauata TeuHOCT
- Yacob6pory
- I3mepBaTeIeH ypeI 3a HauHNo ropBO
- CBeTInHeHnDnKaTop 3a TemnepaTypa
- CBeTmHEn HmKAtop 3a 3anaBaHe
- CBeTInHeHnDnKaTop 3a HaJaRaHe Ha MacIoto B DnIraTeJr
- CBeTInHeH mHdNkAtop 3a 3apeKdaHe
- PNEyPPEXKDEHNE
- PnCstaptnpaHe Ha DBrarTeJIa
- HaBceKn 150 yaca nIe exKeoDoH
- Ha Bcekn 600 yaca nIe xkeoDnO
- ExkeroaNo
- PerynnpaHe Ha KapbypaTopa
- Kak ce cmeHra 3anaJntenHaTa CBeue - Fmrypa 6
- Ja ce npOBepraBa BHIMaTeHNo yMOn3aRJyUHTeJI NCKporacnteJI
- Kak ce npOBepBa OXnaJkaTa TeuHOCT
- PNEyPEXDEHNE
- Kak ce cmeHra MaCJIoTO - Φnrgpa 2 7
- N3TOUBAHe Ha MacJIoTO
- CmHa Ha MacJIeHnФЛТьр
- HaJIbAHe HaMaCJo
- KaDa ce 6cbnykBa Bb3duhnaФnTbp-Фnpya 8
- Kak ce npOBeRbA/peryInpa peMbKa Ha BeHTnlaTopa -ФИrgpa 10
- Поберван ha pemьka Ha BeHTnlaTopa
- PeryIipaHe Ha onbBaHeTo Ha pembKa Ha BeHTnlaTopa
- Cknaipahe
- TopuBHa CnCTema
- Macnoto Ha DnBraTeIa
- Двигateл Vanguard™ 3/LC
- TapaHnIa 3a OCHOBn Yactn\*
- Pe3epBn qactn n BlaarAn Tpyd
- OTHOCHO BaaTa rapaHnA
- Vseobecné informace
- Pries jjungiant variklj
- Pries jjungiant varikli
- NPEДУПЕЖDEHNE
- PNEyYPKDEHNE
- PNEyIpyEKDEHNE
- Ipeed BbINOJIHeHEm peryInpOBoK nIpeMOHTa:
- Pnp npOBepKe cHCTeMbI 3aXnraHnA:
- y3nbI dBnraTeJI n opraHbI ynpabJeHna
- 3Kcnpnyataza
- PeKOMeHndaцnnoNcNoJIb3OBaHHIO MacJa
- Kak npoBepuTb ypoBeHb Macna/DoJntb MacNo - Pnc. 2 3
- IpeepdoabAenemnnpOBepKoynpOBMa
- DABJIEHNE MACJIA
- PekomeHdaqun no nCNoJb3OBaHNIO TOnJIbBa
- TOnnBO DoJXHO COOTBETCTBOBATcJeIyUoM Tpe6OBaHm:
- IcnojIb3OBAHHe Ha 6oJIbwoB BbICote HaD yPobHem MOpA
- HdNkaTop TempeatpybI
- HdkaTop 3aXnraHn
- HdkaTop daBleHnMaCna dbraTeJr
- INdukatop3apAdkn
- Kak 3anyctntb DnBraTeIb-PnC. 5
- Pn 3anycke DbrataTeJr
- IPEDYIPEXDEHNE
- YCTPOICTBO DnA CHNXEHN TOKCNHOCTN BbIXNONA
- Ipeed BbINOJIHeHEm peryJInpOBoK nI npemOnTa:
- Pp npOBepKe cHCTeMbI 3aXnraHnA:
- Tabnca BbInOJIHeHn TeXnueckOro 06cIyXnBaHn
- KaKdbie 8 yacob pa6oTbI nn exKeDHeBHO
- PepBbIe 50 yacob (nepBOHaayabHna npupa6oTKa)
- Yepe3 kaxdbie 100 yacob pa6oTbI nn exeroaHO
- Yepe3 kaxdble 150 yacob pa6oTbI nIe exeroDHO
- KaKdIe 600 yacob pa6oTb Inn EKeeroJHO
- ExeroaNo
- Perylnpobkakap6iopaTopa
- Kak 3aMeHHTb CBeuy 3axnraHnA - Pnc. 6
- PerylnpOBKa HaTaeKeHH peMH BeHTnIaTopa
- Xpahenne
- PnXpaHEnn 6eH3nHa nIbO6OpyDobAHnC TOnJIINBOM B 6ake
- TOnnBHaR CnCTema
- MOTOPHOE macJIO
- YctpaheHne HencnpaBHOtei
- TexHnueckne daHHbIe
Brand : BRIGGS & STRATTON
Model : BRIGGS & STRATTON 589447
Category : Gasoline engine