
RE2000 - Wi-Fi repeater LINKSYS - Free user manual and instructions
Find the device manual for free RE2000 LINKSYS in PDF.
| Product Type | Dual-Band Wi-Fi Extender |
| Brand | Linksys |
| Model | RE2000 |
| Dimensions (L x W x H) | 125 x 92 x 33 mm |
| Weight | 280 g |
| Power Supply | Internal AC/DC 100-240 V, 50/60 Hz, 0.5 A |
| Wireless Standards | IEEE 802.11a/b/g/n |
| Frequency Bands | 2.4 GHz and 5 GHz |
| Ports | 1 Fast Ethernet port (RJ45) with green LED |
| Antennas | 2 internal (non-removable) |
| Wireless Security | WPA2, WPA, WEP; encryption up to 128-bit |
| LEDs | Power/WPS, Ethernet (link and activity) |
| Buttons | Power (EU model), Reset, WPS |
| Configuration | CD-ROM, Web utility, Wi-Fi Protected Setup (WPS) |
| Operating Temperature | 0 to 40 °C |
| Operating Humidity | 10 to 80% non-condensing |
| Certifications | FCC, CE, UL/cUL, ICES-003, RSS210, Wi-Fi |
| Key Features | Wi-Fi signal amplification, dual-band, site survey, WPS |
| Care and Cleaning | Clean with a dry, soft cloth; do not use liquid or abrasive products |
| Usage Safety | Keep away from sources of interference (metal, mirrors, electronic devices) |
| Spare Parts and Repairability | Not user-serviceable; contact Linksys support for assistance |
Frequently Asked Questions - RE2000 LINKSYS
User questions about RE2000 LINKSYS
0 question about this device. Answer the ones you know or ask your own.
Ask a new question about this device
Download the instructions for your Wi-Fi repeater in PDF format for free! Find your manual RE2000 - LINKSYS and take your electronic device back in hand. On this page are published all the documents necessary for the use of your device. RE2000 by LINKSYS.
USER MANUAL RE2000 LINKSYS
J 1 J 1 J 1 J 1 J 1 J 1 J 1 J 1 J 1 J 1 J 1 J 1 J 1 J 1 J 1 J 1 J 1 J 1 J 1 J 1 J 1 J 1 J 1 J 1 J 1 J 1 J 1 J 1 J 1 J 1 J 1 J 1 J 1 J 1 J
Wi-Fi aaiia yaoaill sclx aloc n S Loaic Wi-Fi aiaia yaoaill sclx l x Lcog .n iiaaa oal (Lirai jinuii li) 5) chb gaiy aag .abii
sgaiy aag .laiy gaiy gaiy aaiiy aaiy .Wi-Fi aaiia yaoaill
.0gaiy aajgLaojjg Jzaij
a0
aLl l 1sL 1 Lg c s 1 g 1 1 1 1 1 1 1 1 1 1 1 1 1 1 1 1 1 1 1 1 1 1 1 1 1 1 1 1 1 1 1 1 1 1 1 1 1 1 1 1 1 1 1 1 1 1 1 1 1
Lg
a a a a a a a a a a a a a a a a a a a a a a a a a a a a a a a a a a a a a a a a a a a a a a a a a a a a a a a a a a a a a

J
aJyI J 151 yjg21 15c21 Wf-Fi aiai yaaall 15c21 j
Wi-Fi aiaia yaaal 15c21 aei iSLwL wLb Lio JAc
SLwU 15a1y jWFi aiaia yaaal 15c21 plssuwl ci:Q
Jr.Wi-Fi aiaia yaaal 15c21 plssuwl LiLai aSLwU 15c21
7 aaiJg "Wi-Fi aiiai gaoai jil aicj1 plssiu"

a_i = 70%
pgs. (as s w Ls) Ethernet 1sL psswL (s) Ethernet
aLwUJc≤, Ethernet aS. ojogj Uo Ethernet aio

Ihui jg iiaiJIig Ethernet JgJgjic jgi 1gai
J 1 J L J 1 1 1 1 1 1 1 1 1 1 1 1 1 1 1 1
Jgilll alks Jl ala liu g wogolal aoei. (yll) Next gjzai 6
Jgoggl abai g aagol jLj 1 1 1 1 1 1 1 1 1 1 1 1 1 1 1 1 1 1 1 1 1 1 1 1 1 1 1 1 1 1

(1JJI)Nextggejai jolalw yjill 4
.(g)OK gjg jai aclc< aLJ gajal aL5 5
-9
My network is hidden 日 日
.(gfo)OK gfo r a l c< L oLogLo Jg. (afo y aolJl aL)
aalalaae aee
LwJU JLaJI AaJI JJI Next gJrJrJrJrJrJrJrJrJrJrJrJrJrJrJrJrJrJrJrJrJrJrJrJrJrJrJrJrJrJrJrJrJrJrJrJrJrJrJrJr
JLJI JI JI LJI JI JI JI JI JI JI JI JI JI JI JI JI JI JI JI JI JI JI JI JI JI JI JI JI JI JI JI JI JI JI
Joo Joo Joo Joo Joo Joo Joo Joo Joo Joo Joo Joo Joo Joo Joo Joo Joo Joo Joo Joo Joo Joo Joo Joo Joo Joo Joo Joo Joo Joo Joo Joo Joo Joo Joo Joo Joo Joo Joo Joo Joo Joo Joo Joo Joo
.7 aaiiJIy "Wi-Fi aiiai yaoJIy Iaclplai" jai .LogeJI
SLWJgws5 plnwnl
1
gJyJL (jJL JSL) Password g (jJWJ, wJ) User Name jJL JSL JSL JSL JSL JSL JSL JSL JSL JSL JSL JSL JSL JSL JSL JSL JSL JSL JSL JSL JSL JSL JSL JSL JSL JSL JSL JSL JSL JSL JSL JSL JSL JSL JSL JSL JSL JSL JSL JSL JSL JSL JSL JSL JSL JSL JSL JSL JSL JSL JSL JL WJ WJ WJ WJ WJ WJ WJ WJ WJ WJ WJ WJ WJ WJ WJ WJ WJ WJ WJ WJ WJ WJ WJ WJ WJ WJ WJ WJ WJ WJ WJ WJ WJ WJ WJ WJ WJ WJ WJ WJ WJ WJ WJ WJ WJ WJ WJ WJ WJ WJ W
gJU JI (jJ)
admin aJgJL User Name 4
Jdaiwajdclwajdai Jjduauiu (gfo) OK gfo 5
gagall:olilill joei
a
jolgogoll jn . (logiooJl yal all lc gogall) 1sclyI cyolipwL gogall scl!
gogJl aol
201 1
:SLw jgws plnwnl
jS<Jb g wgJl jwgl Jn aJ (aL) Ethernet Js S
aIwJgWJgJgJgJgJgJgJgJgJgJgJgJgJgJgJgJgJgJgJgJgJgJgJgJgJgJgJgJgJgJgJgJgJgJgJgJgJgJgJgJgJgJgJgJgJgJgJgJgJgJgJ
gagJL gJL

admin aee aee eae 1e 1e (peaae) User Name .3
gogoljduoljiljoei
:Vista gj Windows 7 gj Microsoft Windows 8 pLhJ Jg jgS
念 LALJ o) File Explorer) (Windows o) Windows Explorer 1.1
RE1000/RE2000 45. (A) Network ((Windows 8
jgssll jgsjg 1 LaaLL aLaoJl Jgssll Jgssll Jgssll
Lalalejll adjecl yolll jiei jil pblai calej gjl .a.
g Properties RE1000/RE2000 2
(9gJ 4L)Password g (pssuJ)Name
LgJgJgJgJgJgJgJgJgJgJgJgJgJgJgJgJgJgJgJgJgJgJgJgJgJgJgJgJgJgJgJgJgJgJgJgJgJgJgJgJgJgJgJgJgJgJgJgJgJgJg
.(g)OK 4
Wi-Fi aiaaee
Wi-Fi Protected SetupTM
Use one of the following for each Wi-Fi Protected Setup supported device
- If your router has a Wi-Fi Protected Setup button, click or press that button and then click the button on the right.

A.Lc Ieolg gogall Lc goggWi-Fi aiaa yaaJfaoJfaoJj ggejai 1
Wi-Fi aaiy yJ/ 1cY/ aaiy gagjGjWl Wi-Fi aaiy gaoaJgai j ggejai 2
Wi-Fi aaii jaojll sclj jgcjaiwly biol g (aygoo ciL [i]) aagJlu aas
Wi-Fi aaii yaoJI slxI g s yJLaiJ JaoSI iag. aiil oai jaoJI Ic gog
1
(2) OK g jai J. W- Fi a/1/2/1
JLd JUd UUd
jbiJgssuJyJyJyJyJyJyJy
Ji i j 100000000000000000000000000000000000000000000000000000
.Wi-Fi aaiy jaoJdUaia
- If your router asks for the clients PN number, enter this number 1472703 in your router device.
i 1
JLJI JLIJI. (J) Register jgjai jai jai jai JcWi-Fi
JiaWuLgagajLcogagjWi-Fi aaiy
.(g)OKg
gagll gaii jaiil piau wyl Jla
gagall gaiill aegll jaeell jglll llo 1a aal oio pao
- If your client asks for the Router's PN number, enter this number 76201195 in your client device.
Wi-Fi aaiy i j j j J 1 J 1 J 1 J 1 J 1 J 1 J 1
Wi-Fi Protected SetupTM
Use one of following for each Wi-Fi Protected Setup™ supported device:
- If your client device has a Wi-Fi
Protected SetupTM button click or press
that button and then click the button on the right.

A.Lc IaIgJ JgJgJlC gagWi-Fi aaiy aaiy j ggejai 1
Wi-Fi aaiy j/1/2cY/ aaiLw gJgJ Wl-Fi aaiy jaiy aaiy JJJ 2
Ji JI Wi-Fi aai jaoaill aiaj j jaoaui bai g
Wi-Fi aai: gaoJl JcXg s y JLaX JLoSicg adi d oJ gagll
1
JLgagll Aal JI W-Fl aaiy y/ajy Aaiu (jfo) OK gge jai 3
JzJI JgU gaiuuiyjplauuJla
aaii jai i aaiuui uusuiee eae ai yaiuill jglal jglal jll aaijai jai oia
.Wi-Fi
- If your client device has a Wi-Fi Protected SetupTM PNI number, enter that number
and then click Register
aJ/12c2y/ aLWg sgsagJ LJI g JqJI jg> 00
gogjI Jwi-Fi i
iGgogJy aLJI Wi-Fi aaiy gaoJ/1cY/ aLw (Jw) Register gjg jai 2
Jiaowu gaggajl Jc aggajl Wi-Fi aaiy iayaiy yaiy jaiy jaiy jaiy jaiy
JLg gGJy JI Wl-Fi a/1/a/2/ a/0 0k 0
:4gog adgjog Jgog alai gagJl
aai jg<1 lgolai ai jn 11 gai aai (SSID) gaouL a<1wU u<1 w
2000 1581 1591 1601 1601 1601 1601 1601 1601 1601 1601 1601 1601 1601 1601
goc g wlll jjglg fghg jy jll l (SSID) 2.2
Select
a≤LwUla,1JnJauuuaaJauuJauuJauuJauuJauuJauuJauuJauuJauuJauuJauuJauuJauuJauuJauuJauuJauuJauuJauuJauuJauuJauuJauuJauuJauuJauuJauuJauuJauuJauuJauuJauuJauuJauu
LwUJ LooI Jauo a Iooa oio g aagoo
gJgJgJgJgJgJhazaiuLJI

LaleJgS Save Settings ggs jgall al.4 JgogJ alai: gogJ alj gjgJ LwJdagJgJ 10c! qgol dLwJ
.
eogallwospss
JgJgJgJgJgJgJgJgJgJgJgJgJgJgJgJgJgJgJgJgJgJgJgJgJgJgJgJgJgJgJgJgJgJgJgJgJgJgJgJgJgJgJgJgJgJgJgJgJgJgJ
gglb
: (gj) Site Survey
a≤LwUJ a≤LjLjLj (jzLjLj) ≤LwUJ s2s2s2s2s2s2s2s2s2s2s2s2s2s2s2s2s2s2s2s2s2s2s2s2s2s2s2s2s2s2s2s2s2s2s2s2s2s2s2s2s2s2s2s2s2s2s2s2s2s2s2
View Available Wireless Networks
Change WindowsFirewall settings
Open Network Connections
Lg> Lg
PLO
aLcdoLsJxgIzjL2.4ssRE1000
j5 523 Lg j2.4 24 L RE2000 Jz.
saae gagall jee
gagagagagogoo
gagall 129 gagall no yjll gagall gog jcln d oJgJ slacJ all J
gill gagll alai gla
gagagagagagagagagagagagagagagagagagagagagagagagagagagagagagagagagagagagagagagagagagagagagagagagagagagagagagagagagagagagagagagagagagagagagagagagagagag
aessll 11 11 11 11 11 11 11 11 11 11 11 11
LJJgJzJJ Joo
J 1
.

JLJWi-Fi 1aJ/3c/1p/1w/JL
JUJI JIgJUJGJUcWi-Fi aaii: gooJlJLdXj
.
:Mac pLih: Jooj jll jgssJbjg jlc aL Jc
pLwUuL L 1. AirPort j, gge j. A.LuJ Igaj J
L< Lw Lc Cisco Connect
JimsRouter aLw2 aLb jol Jol.
J. J. J. J. BronceEagle g. Linksys E-Series

jIbllggoI jaiygl aagollaaLlalwUaS 2
gge gge jai jyjgl a15 Jzj g (JLoXl cia) aLswuA Lc:Jyogao 0s1.3

aill aclwll 1 J JgssJl c Jd j 5j g 4c JJJg05JJ
JbIJIgWgBqDgAeIJIgRrnnn
aeBao JLai JSLio aIgi
100% 60% jLjLg
.1
joooJ Juaol jaoJ Jiaoi Jiaojgfoa jao. 3
BronzeEagle gag. aasall aS, JimsRouter gaw sJ
1.1200.JIJI1

4
JLai jgjai a 5cui liao 5iui liao

aJooJI aocJooJI oJ J JgOoJI Jc Jc Jc Jc Jc Jc Jc Jc Jc Jc Jc Jc
Jblll jw w y
aill lheol
(33×92×125) 1.29×3.62×4.92
#
(Lolj 280) aajg9.9
J
y1 1/1
aolb
0.5 jz 50/60 100-240
154
CEgRSS210gICES-003UL/cULfCC
9 Wi-Fi (IEEE 802.11b/g/n)
Wi-Fi Protected SetupTM 9 WMM® 9 WPA2TM
(42040J0)L104J32
1 1
(a+60J-20)140J-4
juii jy
80% J1 10
J 1sllgagbJ
15 90% J5
jssll 4gbs
Jiei 100000000000000000000000000000000000000000
Lgall
Linksys RE1000
Linksys RE1000
N-aill lheol
saae gagall jee
gagagagagogoo
gagall 129 gagall no yjll gagall gog jcln d oJgJ slacJ all J gill gagll alai gla gagagagagagagagagagagagagagagagagagagagagagagagagagagagagagagagagagagagagagagagagagagagagagagagagagagagagagagagagagagagagagagagagagagagagagagagagagag aessll 11 11 11 11 11 11 11 11 11 11 11 11 LJJgJzJJ Joo J 1 .  JLJWi-Fi 1aJ/3c/1p/1w/JL JUJI JIgJUJGJUcWi-Fi aaii: gooJlJLdXj . :Mac pLih: Jooj jll jgssJbjg jlc aL Jc pLwUuL L 1. AirPort j, gge j. A.LuJ Igaj J L< Lw Lc Cisco Connect JimsRouter aLw2 aLb jol Jol. J. J. J. J. BronceEagle g. Linksys E-Series  jIbllggoI jaiygl aagollaaLlalwUaS 2 gge gge jai jyjgl a15 Jzj g (JLoXl cia) aLswuA Lc:Jyogao 0s1.3  aill aclwll 1 J JgssJl c Jd j 5j g 4c JJJg05JJ JbIJIgWgBqDgAeIJIgRrnnn aeBao JLai JSLio aIgi 100% 60% jLjLg .1 joooJ Juaol jaoJ Jiaoi Jiaojgfoa jao. 3 BronzeEagle gag. aasall aS, JimsRouter gaw sJ 1.1200.JIJI1  4 JLai jgjai a 5cui liao 5iui liao  aJooJI aocJooJI oJ J JgOoJI Jc Jc Jc Jc Jc Jc Jc Jc Jc Jc Jc Jc Jblll jw w yaill lheol
(33×92×125) 1.29×3.62×4.92 # (Lolj 280) aajg9.9 J y1 1/1 aolb 0.5 jz 50/60 100-240 154 CEgRSS210gICES-003UL/cULfCC 9 Wi-Fi (IEEE 802.11b/g/n) Wi-Fi Protected SetupTM 9 WMM® 9 WPA2TM (42040J0)L104J32 1 1 (a+60J-20)140J-4 juii jy 80% J1 10 J 1sllgagbJ 15 90% J5 jssll 4gbs Jiei 100000000000000000000000000000000000000000Lgall
Linksys RE1000
Linksys RE1000 N-Wi-Fi Protected SetupTM 9 WMM® 9 WPA2TM
(40J0)L304J 32
(a+60J-20)140J-4
80% J1 10
15 90% J5
1 1
juii jy
Jie 1sIgJ
jzjj 1a1b, a
J 1
Linksys RE2000
Linksys RE2000
jLJI jLJI jN-<LJUJI jLJI Jg
RE2000
802.3ug 802.11b802.11g 802.11nIEEE 802.11a
JJI JJI JCLgJ LLaJC7 .Fast Ethernet
jg+1 20 gol
jLJI) aLLJI,Wi-Fi Protected SetupTM 9 jLJI Lc
(1)
IJLa/Wi-Fi Protected Setup (IcJ, IaWi-Fi).
jji(12jjLb.1jjj)
CAT 5e
(,)2
X
.(WPA2) Wi-Fi Protected AccessTM 2
WEP.(WPA)™Wi-Fi Protected Access
128
j1bJ
jdl
jI
1
:
1j81
1g
gJgJ 1
(2) (a.e.) Jauill Jlae
LwUJ L
Loo
jIgJJIgJgAclll, JgJgJgJgJgJgJgJgJgJgJgJgJgJgJgJgJgJgJgJgJgJgJgJgJgJgJgJgJgJgJgJgJgJgJgJgJgJgJgJgJgJgJgJgJgJgJgJgJgJgJg

Jgjg jg jg jg jg jg jg jg jg jg jg jg jg jg jg jg jg jg jg jg jg jg jg jg jg jg jg jg jg jg jg jg jg jg jg jg jg jg jg jg jg jg jg jg jg jg jg jg jg jg jg

Wi-Fi Protected SetupTM
Use one of the following for each Wi-Fi Protected Setup supported device:
- If your router has a Wi-Fi Protected Setup button, click or press that button, and then click the button on the right.

- Μρακητε Bbpxu Μιν ΜaΠcHεte 6yToHa Wi-Fi Protected Setup (3aΨιTeHo KOHΦηrγριραne Ha 6e3χιηua Bpb3ka) Na pa3ψιπιTeλ.
- ⅡpakHeTe Bbpxy 6yToHa Wi-Fi Protected Setup (3aunTeHO KOHfIpyPapaHe Ha 6e3xNnHa Bpb3ka) Ha ekpaHa Wi-Fi Protected Setup (3aunTeHO KOHfIpyPapaHe Ha 6e3xNnHa Bpb3ka) Ha pyTepa (aKO e HAIuEn) IIN HA tncHe T 3aDpBxTe 6yToHa 3a 3aunTeHO KOHfIpyPapaHe Ha 6e3xNnHa Bpb3ka Ha pyTepa 3a eNHa cekynda. Korato Cbbp3BaHeTO pniklOuy yCneuHO, CBETNIHHNt INdNKATOp 3a 3aunTeHO KOHfIpyPapaHe Ha 6e3xNnHa Bpb3ka Ha pa3wnpTeJra 3anOvBa da CBETn HENpeKbchATo.
- Ako cTe n3nOJI3BaJIn ekpaHa Wi-Fi Protected Setup (3aIINTeHO KOHΦnHyprnPapHe Ha 6e3KInuHa Bp3Ka) Ha pa3IINpuTJIa, IpaKHeTe Bbpxy OK B TO3N eKpaH B paMKITe Ha DBe MInHyTu.
Cbbp3BaHe uepe3\PH Ha pa3wnpuTeJHa dnaana3OHa
ПИH (персон�алниг.TиДENTиФИКацнон Homep) 3a Wi-Fi Protected Setup (3aштэн конфигурране Ha 6e3ЖИЧа Врьзka) ce hammpa Ha etikete Ha pa3шрптей. Можete Дд ДИЗПОЛЗВATE TO3N MeTOД само akO NOMOUIHATA npORpaMa 3a adMHNICTPURAHe Ha Baшnerspyтep pa3ПONILA c MeHIO 3aшИТЕН KOHФIGYрранe Ha 6e3ЖИЧа Врьзka.
-
If your router asks for the client's PIN number, enter this number 14727030 in your router device.
-
BbBeTe TINH Ha pa3wnpnteB cbOTBeTHOTo nOle Ha ekpaHa Wi-Fi Protected Setup (3aunTeHO KOHnrgupnaHe Ha 6e3KmHa Bpb3ka) Ha pyTePa u npakheT Ebpxy Register (PertcnpaHe). Korato CbBp3BaHeTo npukIoun ycneuHo, CBETNIHHaT INDkAtoP 3a3aunTeHO KOHnrgupnaHe Ha 6e3KmHa Bpb3ka Ha pa3wnpnteJ 3anOyBa da CBETn HnpeKbchato.
- HATNCHeTe OK.
Cbbp3BaHe ha yctpoiCTBa KbM BaShaTa Mpeka qpe3 pa3shnPntela
Ako nMaTe MpeKobu yctPoIcTba, KaTo Hnnp. 6e3KunH npInHTepn, KOnTO nOndbPkaT 3aUnTeHO KOhFngpyrupaHe Ha 6e3KunHa Bpb3Ka, MoKeTe Da n3NON3BaTe Ta3n ONUma 3a CBbp3BaHeTO IM KbMaBaaTa MpeKa. N36epeTe eDnH OT CneDnTe MeToOn 3a CBbp3BaHe Ha yCTpoIcTBO KbMa BaWaTa MpeKa
3ABEJIEXKA
Wi-Fi Protected Setup (3aünteHo KOHfngpnpaHe Ha 6e3xuHa Bpb3ka) KOHfngpnpa KJIeENTCKnTe yCTpoiCTBa caMo eHNo no eHNo. NOBTOpeTe DeiCTBnraTa 3a BCaKo KJIeENTCKO yCTpoiCTBO, KOeTo POnDbPjA 3aUNTeHO KOHfngpnpaHe Ha 6e3xuHa Bpb3ka.
Cbbp3BaHe ype3 6yToH 3a Wi-Fi Protected Setup (3aunTeHo KOHfNrgpnpaHe Ha 6e3xuHa Bpb3ka)
Използваши.To3n MeToD,akOBaшetoКЛи entcSO yCTpoIcTBO mtaTakb6yTOH.
Wi-Fi Protected SetupTM
Use one of following for each Wi-Fi Protected Setup™ supported device:
- If your client device has a Wi-Fi
Protected SetupTM button, click or press
that button and then click the button on the right.

- ΚιρακHeTe Bbpxu Nn NaTnCHeTe 6yToHa Wi-Fi Protected Setup (3aIHTeHo KOHΦIpyPnPapHe Ha 6e3KmUHa Bpb3Ka) Ha KInEHTCKOTO yCTpOietBO.
- ⅡpakHeTe Bbpxy 6yToHa Wi-Fi Protected Setup (3aunTeHO KOHcHypnpaHe Ha 6e3KnuHa Bpb3ka) Ha ekpaHa Wi-Fi Protected Setup (3aunTeHO KOHcHypnpaHe Ha 6e3KnuHa Bpb3ka) Ha pa3UnPnteHa (ako e HauNueH) INI HAtnCHeTne I 3aDpBkTe 6yToHa 3a3aUnTeHO KOHcHypnpaHe Ha 6e3KnuHa Bpb3ka Ha rOpHnapeJHa pa3UnPnteJ. Korato CBbp3BaHeTO npNKluOuYcNeUHO, CBeTINHHnIHTNHdkaTop 3a3aUnTeHO KOHcHypnpaHe Ha 6e3KnuHa Bpb3ka Ha pa3UnPnteJ 3aNoUBa Da CBETn HENpeKbCHaTO.
- ⅢpaKHeTe BbpxO KHa eKpaHa Wi-Fi Protected Setup (3aIHTeHO KOHfNpyPpHa He 6e3KmHa Bpb3Ka) Ha pa3IupnteJI B paMKITe Ha DBe MmHyTN.
Cbbp3BaHe uep3 NIN Ha KIneHTCKOTO yCTpoiCTBO
I3PON3BaIte To3n MeToD, aKO BaIeTe KJIeHrTcKo yCTpoJrCTBO nMa PIIH (nepcoHaJIeN IJeHTnΦnKaUHOHe HOMep) 3a Wi-Fi Protected Setup (3aIuTeHO KOHfNpypNaHe Ha6e3XnUHa Bpb3Ka).
- If your client device has a Wi-Fi Protected SetupTM PIN number, enter that number
here
and then click
Register
- BbBeTeIINH KOAOTKIneHTCKOTO yCTpoiCTBO B nOJeTo Ha ekpaHa Wi-Fi Protected Setup (3aunTeHO KOHnpynpaHe Ha 6e3mUHa Bpb3Ka) Ha pa3uPnten.
- Μιρακητεν Bβpxγ Register (PerictpnpaHe) Ha εκραHa Wi-Fi Protected Setup (3aιnteHo KOHΦηrρuρaHe Ha 6e3χnUHa Bp3ka) Ha pa3ψnpuTeJλ. Korato CBbp3BaHeTO πρικλιουγ yCπeUHO, CBetπiHHNt iHπKaTOp 3a 3aιnteHo KOHΦηrρuρaHe Ha 6e3χnUHa Bp3ka Ha pa3ψnpuTeJλ aNoUBA da CBETn HεπpeKbCHaTo.
- ΜιρακHeTe BbpxO KHa εκρaHa Wi-Fi Protected Setup (3aιnteHo KOHΦηγριpaHe Na 6e3xMnHa Bpb3ka) Ha pa3uπpnteЯ B paMKnte Ha dBe MmHytn.
Cbþr3BaHe ype3 ΠH Ha pa3shnPurTeJia
Използваши.To3и MeToД,akOBaшetoКлпентскоустpoiCTBOинckBaПИH ha pa3ширпелЯ.
3axpaHbAne/3aunTeHO nHCTaInpaHe Ha Wi-Fi, Ethernet (Bpb3ka,akTnBHOCT)
Tynokajbahe
CAT5e
AHTeHn
2(BbTpewHn)
CotdeneHe (da/He)
He
BezkunHa 3aunTa
Wi-Fi Protected Access™ 2 (WPA2),
Wi-Fi Protected Access™ (WPA), WEP
BntOBe Ha 3aunTHnKliou
128-6nTOBO uΦpOBAHe
Ona3BaHe Ha OKoJIHaTa cpeDa
Pazmepn 4,92" x 3,62" x 1,29" (125 x 92 x 33 MM)
Tero 9,9 yHun (280 r)
Moohoc T BtpseHNO AC/DC 3axpaHbaHe 100-240 V,50/60 Hz,0,5A
Ceptnfokaia FCC,UL/cUL,ICES-003,RSS210,CE, Wi-Fi (IEEE 802.11a/b/g/n),WPA2TM,WMMWi-Fi Protected SetupTM
Pa6oTha TemnepaTypa 32do 104^ (0do 40^)
Tempepatya Ha cxbpahene -4 do 140^ (-20 do 60^)
Pa6OTha BlnaxKHOCT 10do 80% 6e3 KOHdEHaZua
BlaJxocT ha cxbxaHHe 5do 90% 6e3 KOHdEHaZaIy
Texnuecknte napametprn nojlexkat ha npomehn 6ez ppein3BeCTne.
IoceteTe Haunr Otnuueh C nHarpaN caT 3a KIneHTcKa NOpDpbXka 24 Yaca/7 DnH B CeMnUcaTa Ha aDpec linksys.com/support

Cisco, em6nemaHa Cisco n Linksys ca TbproBckn MapKn nn peinctpnapn TbproBckn MapKn Ha Cisco n/nn Herobnte fHmAln B CbeHHeHte aatn npjxabn. CnncbK ha TbproBcknte MapKn Ha Cisco's moke da ce hamepi Ha anpc www.cisco.com/go/trademarks. BcnuKn dpyrTbproBckn MapKn, ynomehatn To3n DokyMeHT, ca 6cbTeBHeOCT na CbOTBeTHne IM npntexkatei.

Wi-Fi Protected SetupTM
Use one of the following for each Wi-Fi Protected Setup supported device:
- If your router has a Wi-Fi Protected Setup button, click or press that button, and then click the button on the right.

Wi-Fi Protected SetupTM
Use one of following for each Wi-Fi Protected Setup™ supported device:
- If your client device has a Wi-Fi
Protected SetupTM button, click or press that button and then click the button on the right.

Wi-Fi Protected SetupTM
Use one of the following for each Wi-Fi Protected Setup supported device
- If your router has a Wi-Fi Protected Setup button, click or press that button and then click the button on the right.

Wi-Fi Protected SetupTM
Use one of following for each Wi-Fi Protected Setup supported device:
- If your client device has a Wi-Fi
Protected SetupTM button, click or press
that button and then click the button on the right.

- Klik eller tryk på Wi-Fi Protected Setup-knappen på klienthenheden.
- Klik på Wi-Fi Protected Setup-knappen på extenderens Wi-Fi Protected Setup-skærmibillede, ELLER tryk på og hold Wi-Fi Protected Setup-knappen overst på extenderen nede i et sekund. När tilslutningen er gennemført, vil Wi-Fi Protected Setup-lyset på extenderen lyse konstant.
- Klik på OK på extenderens Wi-Fi Protected Setup-skærbillede inden for to minutter.
For at abne Site Survey-siden:
For at Ise problemet pa Mac-computere:
Wi-Fi Protected SetupTM
Use one of the following for each Wi-Fi Protected Setup supported device
- If your rower has a Wi-Fi Protected Setup button, click or press that button and then click the button on the right.

Wi-Fi Protected SetupTM
Use one of following for each Wi-Fi Protected Setup™ supported device:
- If your client device has a Wi-Fi
Protected SetupTM button, click or press
that button and then click the button on the right.

Xpńoŋ tou Wi-Fi Protected Setup. 7
Wi-Fi Protected SetupTM
Use one of the following for each Wi-Fi Protected Setup supported device:
- If your router has a Wi-Fi Protected Setup button, click or press that button, and then click the button on the right.

Wi-Fi Protected SetupTM
Use one of following for each Wi-Fi Protected Setup™ supported device:
- If your client device has a Wi-Fi
Protected SetupTM button, click or press
that button and then click the button on the right.

Aovpuatn aopalεia Wi-Fi Protected AccessTM 2 (WPA2), Wi-Fi Protected AccessTM (WPA), WEP
Bit kεiδio uασρaεiaç Kpuπtovpáφηοι ὀεως και 128 bit
FCC, UL/cUL, ICES-003, RSS210, CE, Wi-Fi (IEEE 802.11b/g/n), WPA2™, WMM®, Wi-Fi Protected Setup™
0 EwC 40°C (32 EwC 104°F)
aiooKeuoc -20 eC 60°C (-4 eC 140°F)
Yypaia etoupyiac 10% EwC 80% wpiocuunkwn
Yypoa anaOthkeuoc 5% EwC 90% xwpic oupiukvwon
Opiopdiaypapecvdexetai va aalaxovxwpi npoeioinon.
Linksys RE2000
'Ovouma oovéλou
Linksys RE2000
πeipyaρnμovtéλou
Enavapopac, Wi-Fi Protected SetupTM, Tpovodooia (movo oTo eupwniakó mvTeLo)
Auxviεc LED
Tpofoosia/Wi-Fi Protected Setup, Ethernet (ouvdeon, dpaotnpiotnta)
Tunoc kaawio
CAT5e
Kεραίες
2 (EOWTEPIKec)
Anooanewo (va/oxi)
Ox1
Aovpuatn aopαλει
Wi-Fi Protected Access™ 2 (WPA2), Wi-Fi Protected Access™ (WPA), WEP
Bit kεiδiou ασραλεiac
Kpuntoypaqnon 電 cak 128 bit
FCC, UL/cUL, ICES-003, RSS210, CE, Wi-Fi (IEEE 802.11a/b/g/n), WPA2™, WMM®, Wi-Fi Protected Setup™
0 40^ (32 104^
Oeprukpaia aToθnkeuonc
-20 60^ (-4 140^)
Yypaioia etioupyiac
This Getting Started guide can help you connect the extender to your network and solve common setup issues. You can find more help from our award-winning, 24/7 customer support at Linksys.com/support.
Contents
Overview 1
How to install the range extender 2
How to access the browser-based utility 5
Using Wi-Fi Protected Setup 7
How to use Site Survey 9
Troubleshooting 10
Specifications 13
Overview
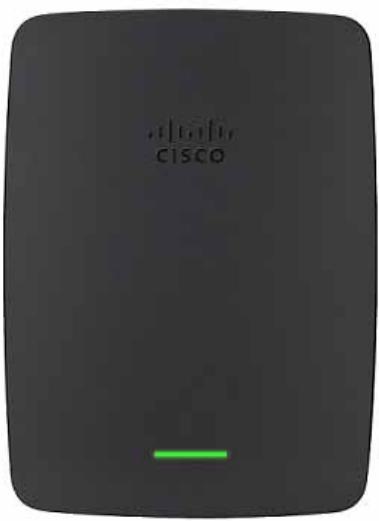
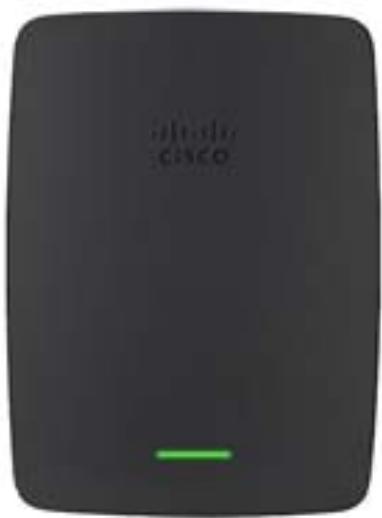
Front
This light indicates the power and the Wi-Fi Protected Setup status. After initial setup, if you have client devices, such as wireless printers, that support Wi-Fi Protected Setup, then you can use Wi-Fi Protected Setup to automatically configure wireless security for your wireless network.
Power When the extender is powered on, resets to factory defaults, or upgrades its firmware, the light flashes slowly (about every three seconds). When the extender is ready for use, the light is continuously lit. If there is an error, the light flashes quickly (about every second); disconnect the extender from the wall mount socket, wait two seconds, and then reconnect it.
Wi-Fi Protected Setup When the Wi-Fi Protected Setup process is active, the light flashes slowly (about every two seconds) for two minutes. When the Wi-Fi Protected Setup is successful, the light is continuously lit. If there is an error, the light flashes quickly (about every second) for two minutes; please wait and try again.
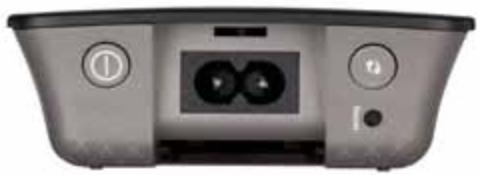
Top
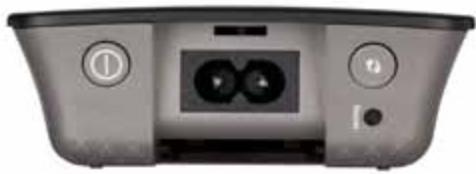

Power Switch featured only in the European versions of the extender.

Reset Press and hold this button for about five seconds to reset the extender to its factory defaults. You can also restore the defaults from the Administration >Factory Defaults screen in the extender's browser-based utility.

Wi-Fi Protected Setup Button After initial setup, if you have client devices, such as wireless printers, that support Wi-Fi Protected Setup, then you can use Wi-Fi Protected Setup to automatically configure wireless security for your wireless network. To use Wi-Fi Protected Setup, refer to "Using Wi-Fi Protected Setup" on page 7.
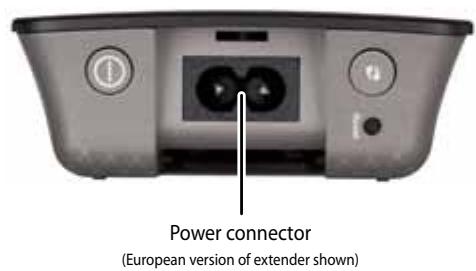
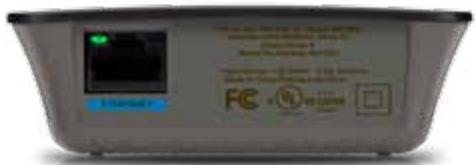
Bottom
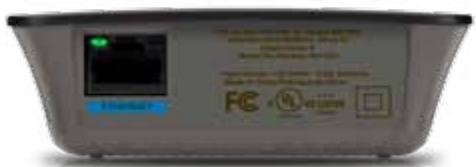

Ethernet (green) Using Ethernet cables (also called network cables), this Ethernet port connects Ethernet network devices to your wireless network.
The green light turns on when an Ethernet device is connected and active on this port. The light flashes when the extender is sending or receiving data over the Ethernet port.
How to install the range extender
- Insert the Setup CD into a computer that is connected to the network router. You will need to be near the router or access point and have access to a networked computer.
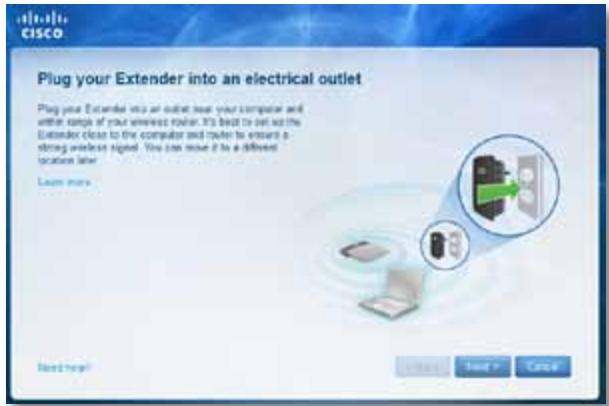
IMPORTANT
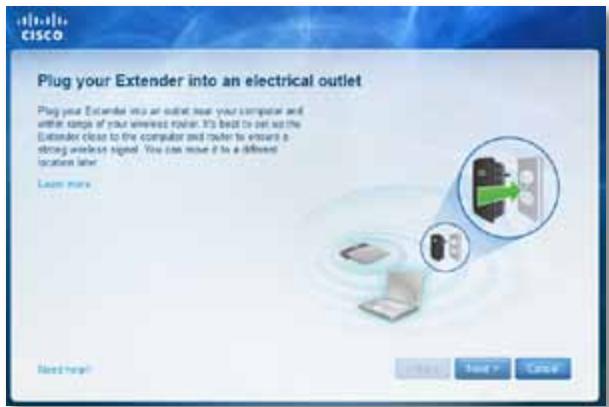
Set up the extender close to the computer and router to ensure a strong wireless signal. You can move it to a different location later.
- When the Setup utility starts, read the license terms, then click Next. You are prompted to plug your extender into an electrical outlet.
-
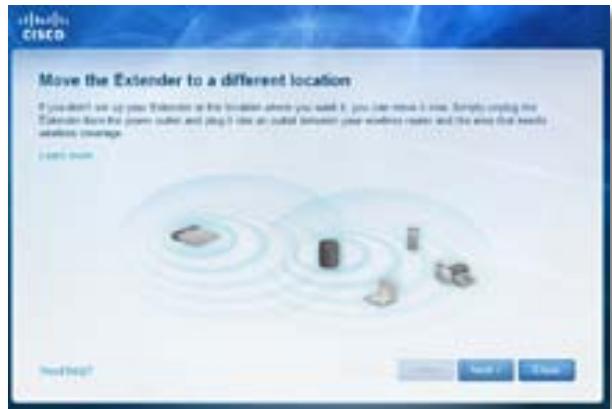
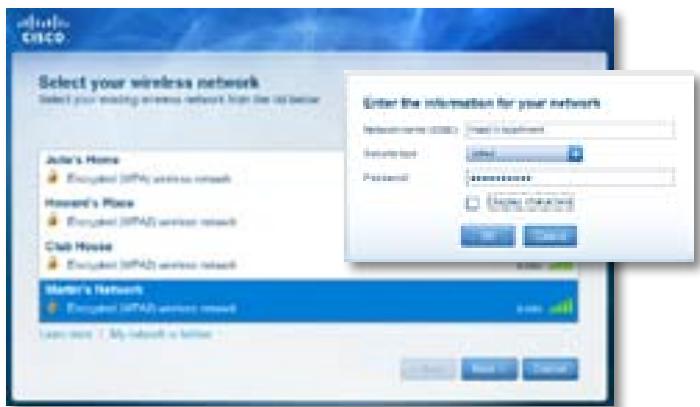
Connect your extender to an AC power outlet. Your extender searches for wireless networks. The list of networks is displayed.
-
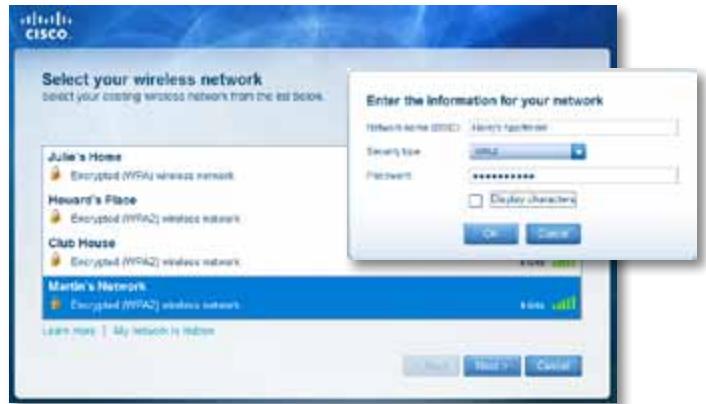
Select the network to use, then click Next.
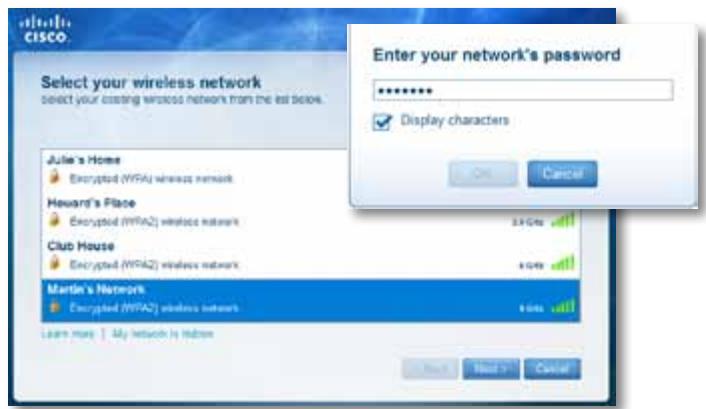
- Type your network's password, then click OK.
-OR-
If your network is hidden (your router does not broadcast its name), click My network is hidden, enter your network's information, then click OK.

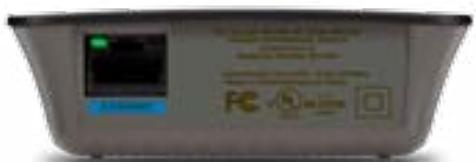
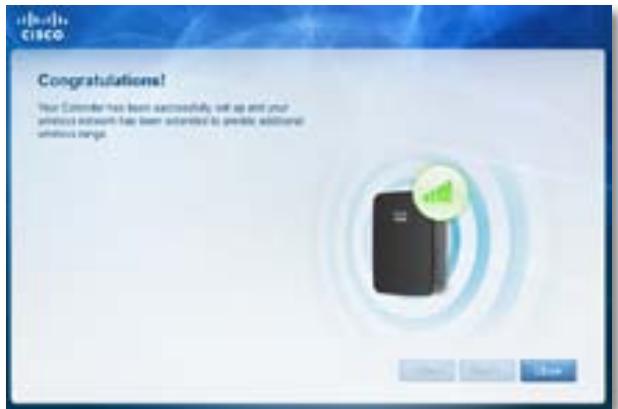
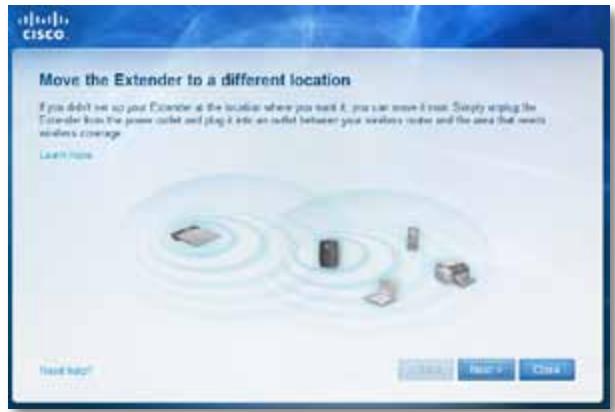
- Click Next. Your extender is set up, and you are prompted to move the extender to its final location.
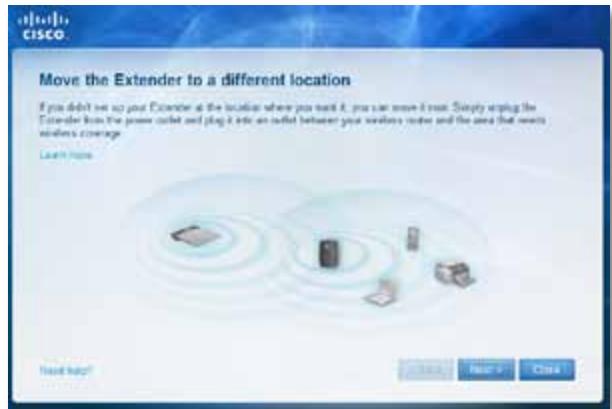
TIP
For best performance, position the extender where the wireless signal of your router or access point is reliably strong (at least 60% strength).

- Move the extender to its primary location, then click Next. Your router tests the wireless connection to your relocated extender and prompts you if it needs further adjustment.
TIP
You can also connect the range extender by using Wi-Fi Protected Setup. For more information, see "Using Wi-Fi Protected Setup" on page 7.
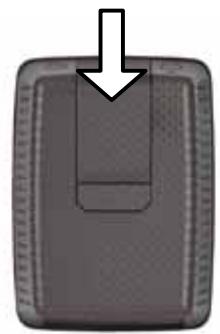
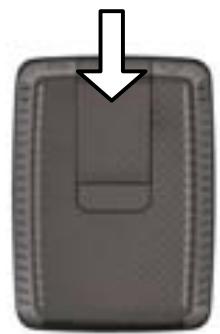
How to change the power plug configuration
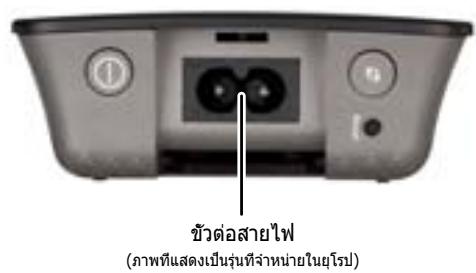
You can connect the extender's built-in power plug directly to a wall power outlet. For a desktop or table-top setup, you can also remove the built-in plug and use an AC cable instead.
To attach the AC power plug:
- Press the plug release latch, then slide the AC plug off the extender.
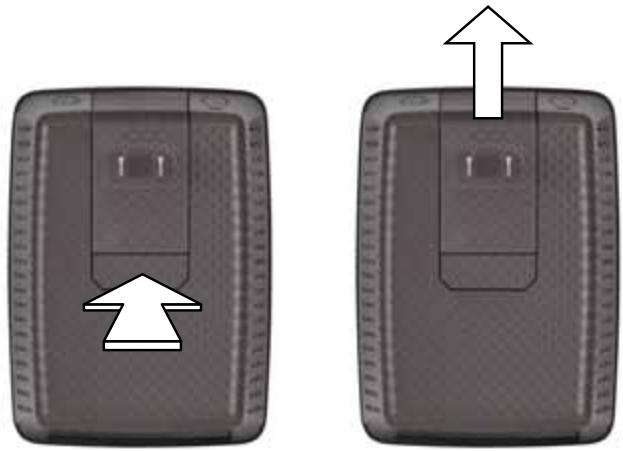
- Slide the clip cover into the slot that held the AC plug, then connect the AC cable to the power connector.
How to access the browser-based utility
After setting up the extender with the setup software (located on the CD), the extender will be ready for use. If you would like to change its advanced settings, use the extender's browser-based utility.
If the extender has not been set up yet
Using a wired computer:
- Use the included Ethernet (network) cable to connect your extender to your computer.
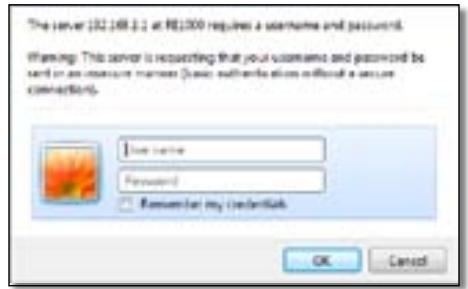
- Open a web browser. If you have defined a default startup page in your browser, the extender's User Name and Password dialog box automatically opens. If your browser's home or default page is blank, enter any valid web address and the extender's User Name and Password dialog box opens.
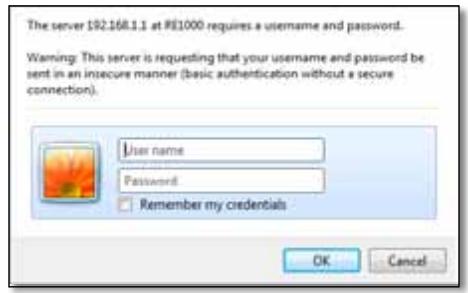
- Leave the User Name blank, then enter the default password admin.
- Click OK. You are logged in to your extender's browser-based utility.
Using a wireless computer:
- Locate the extender's wireless network name (SSID). The extender comes with a pre-configured SSID showing as LinksysExtenderxxxxxx in the wireless site survey of your computer, with xxxxx being the last five digits of your extender's serial number.
- Connect your computer to the extender's wireless network. Refer to your computer's operating system documentation or online help for instructions.
- Open a web browser. If you have defined a default startup page in your browser, the extender's User Name and Password dialog box automatically opens. If your browser's home or default page is blank, enter any valid web address and the extender's User Name and Password dialog box opens.
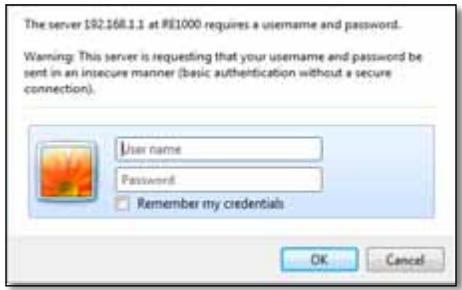
- Leave the User Name blank, then enter the default password admin.
- Click OK. You are logged into your extender's browser-based utility.
If the extender has already been set up
On a Microsoft Windows XP computer:
TIP
To follow these instructions, UPnP needs to be enabled in Windows XP. To enable UPnP:
- Click Start, Control Panel, Add or Remove Program, then click Add/Remove Windows Components.
- Select Network Services, then click Details.
-
Select UPnP User Interface, then click OK.
-
Open Windows Explorer, then click My Network Places on the left panel. The RE1000/RE2000 icon appears on the right panel. (You might be required to change the firewall settings to allow the display of networked computers. Refer to your operating system's help for instructions.)
- Double-click the RE1000/RE2000 icon. Your web browser opens and you are prompted for your User Name and Password.
- Leave the User Name field blank, then enter the password you created during Setup.
- Click OK.
On a Microsoft Windows 8, Windows 7, or Vista computer:
- Open Windows Explorer (File Explorer in Windows 8), then click Network. The RE1000/RE2000 icon appears on the right panel. (You might be required to change the firewall settings to allow the display of networked computers. Refer to your operating system's help for instructions.)
- Right-click the RE1000/RE2000 icon, then click Properties. Click on the address link in Device webpage. Your web browser opens, and you are asked for a User Name and Password.
- Leave the User Name blank, and enter the password you have created.
- Click OK.
On a Mac OS X computer:
Every Mac computer has Bonjour networking technology, which a Mac uses to communicate with basic devices such as cell phones and iPods.
- Open Safari, click the book icon, then click Bonjour on the left panel. The RE1000/RE2000 icon appears on the bottom right panel.
- Double-click the RE1000/RE2000 icon. You are asked for a User Name and Password.
- Leave the User Name blank, and enter the password you have created.
- Click OK.
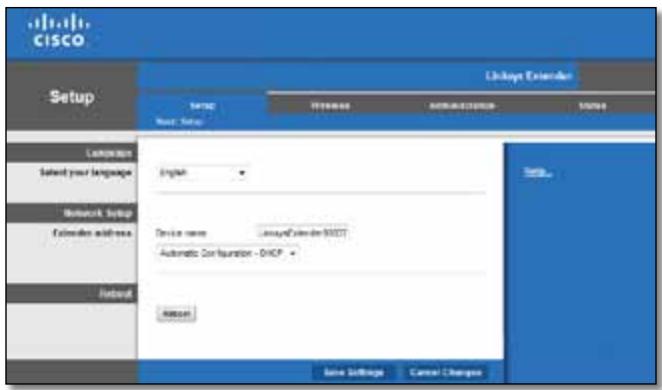
How to use the browser-based utility
If you change any settings on a screen, you must click Save Settings to apply your changes, or click Cancel Changes to clear your changes. These controls are located at the bottom of each screen. Click Help on the right side of the screen for additional information on the screen's options.
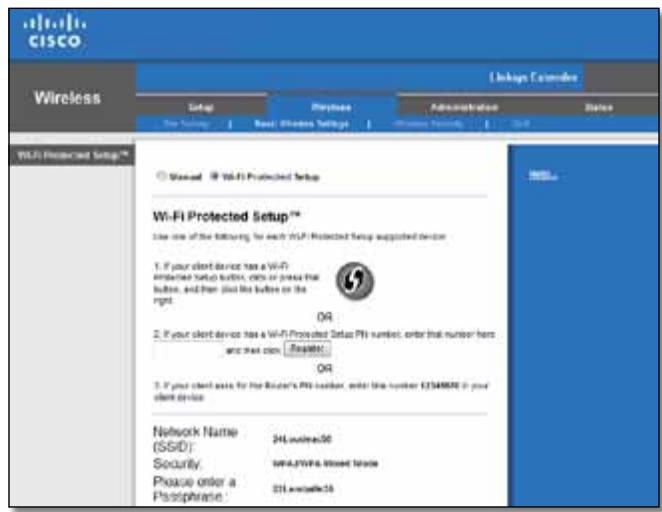
Using Wi-Fi Protected Setup
Wi-Fi Protected Setup™ makes it easy to connect your extender to your network, then connect other devices to your network through the extender.
Wi-Fi Protected Setup light activity
- When the Wi-Fi Protected Setup process is active, the light flashes slowly.
- When the Wi-Fi Protected Setup is successful, the light is continuously lit.
- If there is an error, the light flashes quickly for two minutes; please wait and try again.
- Wait until the light is continuously lit before starting the next Wi-Fi Protected Setup session.
Connecting the extender to an existing access point
If your access point or router supports it, you can use Wi-Fi Protected Setup to connect the range extender to the access point or router. Choose from the setup methods below to connect the extender.
NOTE
If you have an access point or a router that do not support Wi-Fi Protected Setup, note the wireless settings, and then manually configure the extender.

Connecting with the Wi-Fi Protected Setup Button
Use this method if your router or access point has a Wi-Fi Protected Setup button.
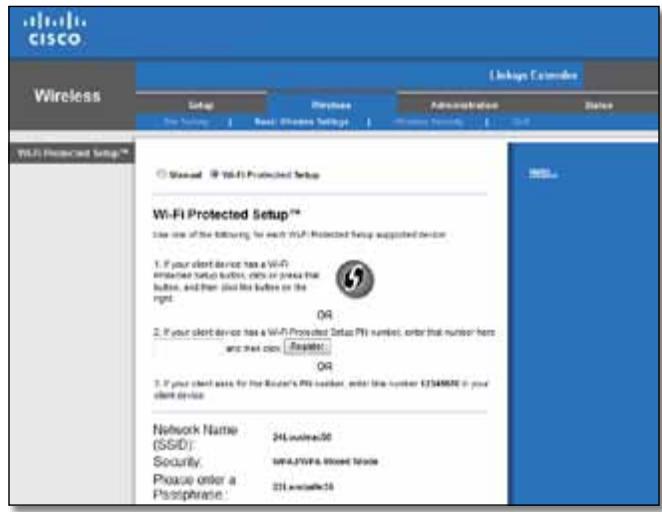
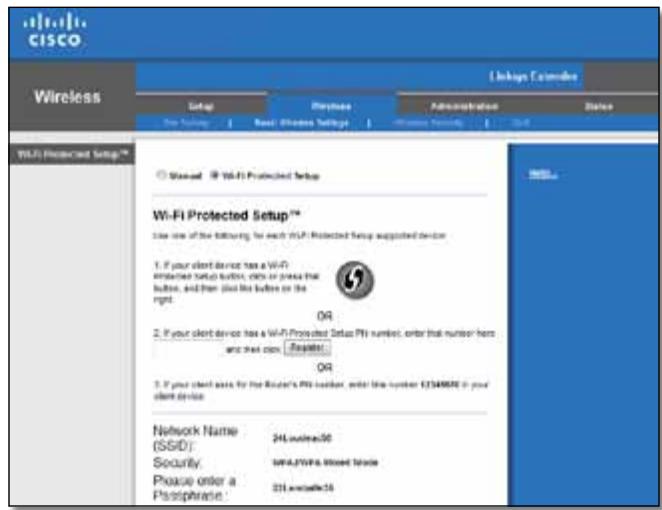
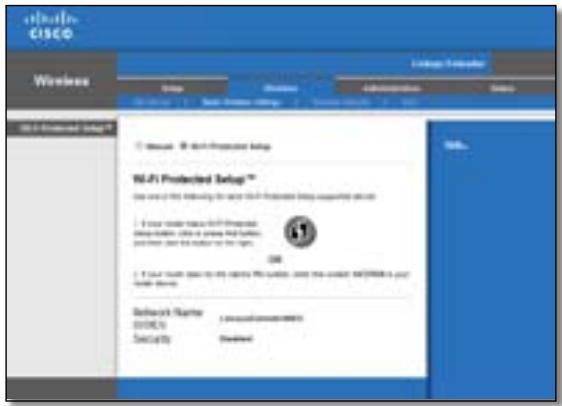
Wi-Fi Protected SetupTM
Use one of the following for each Wi-Fi Protected Setup supported device:
- If your router has a Wi-Fi Protected Setup button, click or press that button, and then click the button on the right.

- Click or press the Wi-Fi Protected Setup button on the extender.
- Click the Wi-Fi Protected Setup button on the router's Wi-Fi Protected Setup screen (if available), OR press and hold the Wi-Fi Protected Setup button on the router for one second. When the connection is complete, the Wi-Fi Protected Setup light on the extender is continuously lit.
- If you used the extender's Wi-Fi Protected Setup screen, click OK in that screen within two minutes.
Connecting with the range extender's PIN
The Wi-Fi Protected Setup PIN (Personal Identification Number) can be found on the product label of the extender. You can use this method only if your router's administration utility has a Wi-Fi Protected Setup menu.
-
If your router asks for the client's PIN number, enter this number 14727030 in your router device.
-
Enter the extender's PIN into the appropriate field on the router's Wi-Fi Protected Setup screen, then click Register. When the connection is complete, the Wi-Fi Protected Setup light on the extender is continuously lit.
- Click OK.
Connecting devices to your network through the extender
If you have network devices, such as wireless printers, that support Wi-Fi Protected Setup, then you can use Wi-Fi Protected Setup to connect them to your wireless network. Choose from the methods below to connect the device to your network.
NOTE
Wi-Fi Protected Setup configures only one client device at a time. Repeat the instructions for each client device that supports Wi-Fi Protected Setup.
Connecting with the Wi-Fi Protected Setup Button
Use this method if your client device has a Wi-Fi Protected Setup button.
Wi-Fi Protected SetupTM
Use one of following for each Wi-Fi Protected Setup™ supported device:
- If your client device has a Wi-Fi
Protected Setup™ button, click or press
that button and then click the button on the right.

- Click or press the Wi-Fi Protected Setup button on the client device.
- Click the Wi-Fi Protected Setup button on the extender's Wi-Fi Protected Setup screen, OR press and hold the Wi-Fi Protected Setup button on the top panel of the extender for one second. When the connection is complete, the Wi-Fi Protected Setup light on the extender is continuously lit.
- Click OK on the extender's Wi-Fi Protected Setup screen within two minutes.
Connecting with the client device's PIN
Use this method if your client device has a Wi-Fi Protected Setup PIN (Personal Identification Number).

- Enter the PIN from the client device in the field on the extender's Wi-Fi Protected Setup screen.
- Click Register on the extender's Wi-Fi Protected Setup screen. When the connection is complete, the Wi-Fi Protected Setup light on the extender is continuously lit.
- Click OK on the extender's Wi-Fi Protected Setup screen within two minutes.
Connecting with the extender's PIN
Use this method if your client device asks for the extender's PIN.
-
If your client asks for the Router's PIN number, enter this number 76201196 in your client device.
-
On the client device, enter the PIN listed on the extender's Wi-Fi Protected Setup screen. (It is also listed on the bottom of the extender.) When the connection is complete, the Wi-Fi Protected Setup light on the extender is continuously lit.
- Click OK on the extender's Wi-Fi Protected Setup screen within two minutes.
TIP
If you have client devices that do not support Wi-Fi Protected Setup, note the wireless settings, and then manually configure those client devices.
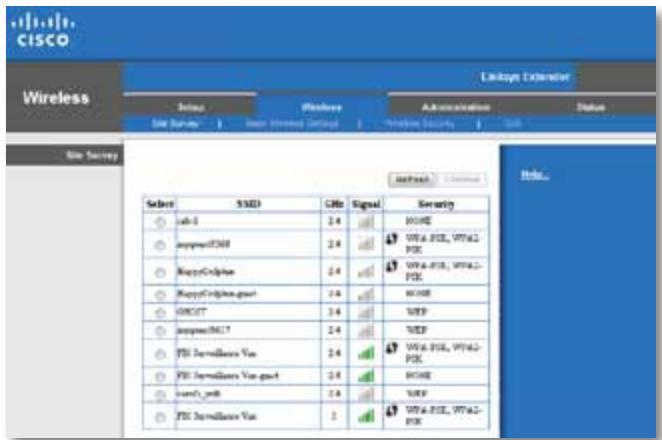
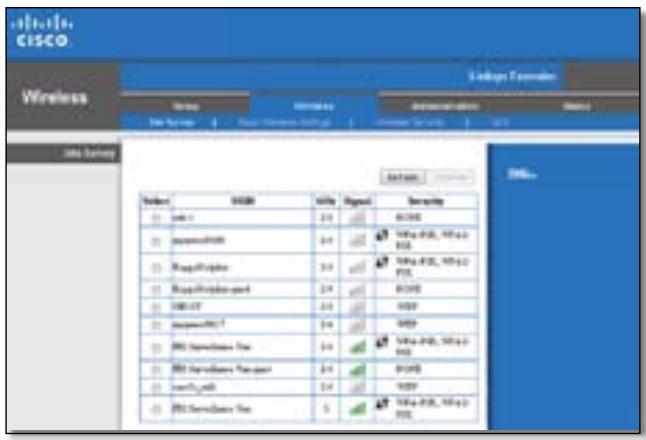
How to use Site Survey
The Site Survey gives a snapshot of all neighboring access points and wireless routers within range of the extender.
To open the Site Survey page:
- Log into the browser-based utility (see "How to access the browser-based utility" on page 5).
- Click the Wireless tab, then click the Site Survey page.
Select-To connect to a wireless network, click the button next to the wireless network name (SSID) in the Select column, then click Connect.
SSID—Displays the name of neighboring wireless networks.
GHz—Displays the radio band (in GHz) of the neighboring wireless networks. (This column is available only with the RE2000.)
Signal Strength—Displays the relative position of the neighboring APs by indicating the power of the wireless signal received: 1 bar=20%, 2 bars=40%, 3 bars=60%, 4 bars=80%, 5 bars=100%. If no bar is displayed, the extender is located too far away from the upstream AP. Try to keep the signal strength between 60% and 100% for optimum performance. A careful site survey will help in keeping this value within acceptable range to benefit from optimum performance.
Security—Displays the mode of security in use by the neighboring APs. If a network supports Wi-Fi Protected Setup, the Wi-Fi Protected Setup icon is also displayed.
To associate your extender with your known access point or router:
- Make a note of the SSID and the security passphrase that your access point or wireless router is actually configured with. This information will be useful to carry on setup after the site survey is done.
- Select the network name (SSID) that you want to repeat with your extender by clicking the corresponding button in the Select column.
- Click Connect. You are prompted for the passphrase used to secure your wireless network. The type of security information required in this screen needs to match your access point or router's wireless security settings.
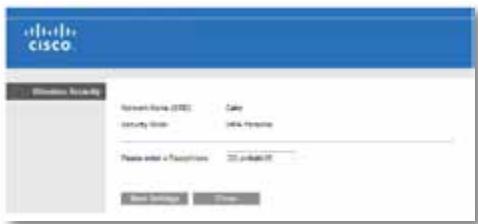
- Enter the passphrase, then click Save Settings. Your extender wireless parameters should be configured. The wireless interface restarts, and the extender associates with the access point or router you have chosen.
Troubleshooting
NOTE
Your RE1000 works only on the 2.4 GHz network and cannot be used on a 5 GHz network. Your RE2000 works on either a 2.4 GHz or 5 GHz network.
You cannot get your extender connected
Check the position of your router and extender
- For first-time setup, you may need to place the extender closer to the router. After you've set up your extender, you can unplug it and move it to the final location.
- To reduce signal obstructions, you can try alternate locations for the router and extender.
- Avoid placing the router and extender near metal objects, masonry walls, and reflective surfaces such as glass or mirrors.
- Avoid placing the router and extender near other electronics that may be causing signal interference.

If you're using Wi-Fi Protected Setup to connect
- Wait until the Wi-Fi Protected Setup indicator stops blinking before trying to make the connection again.
You cannot access your range extender
To access your range extender, you must be connected to your own network. If you currently have wireless Internet access, the problem may be that you have accidentally connected to a different wireless network.
For Mac instructions, see "To fix the problem on Mac computers:" on page 12.
To fix the problem on Windows computers:
- On your Windows desktop, right-click the wireless icon in the system tray.

- Click View Available Wireless Networks. A list of available networks appears.
| Disable |
| Status |
| Repair |
| View Available Wireless Networks |
| Change Windows Firewall settings |
| Open Network Connections |
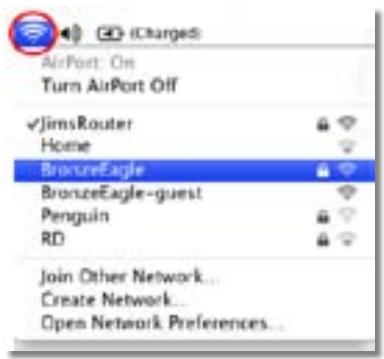
- Click your own network name, then click Connect. In the example below, the computer was connected to another wireless network named JimsRouter. The name of the correct network, BronzeEagle in this example, is shown selected.
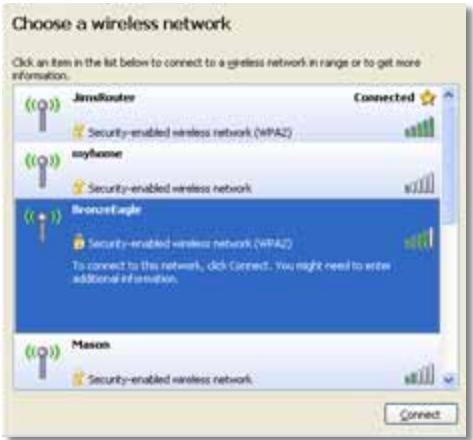
- If you are prompted to enter a network key, type your password (Security Key) into the Network key and Confirm network key fields, then click Connect.
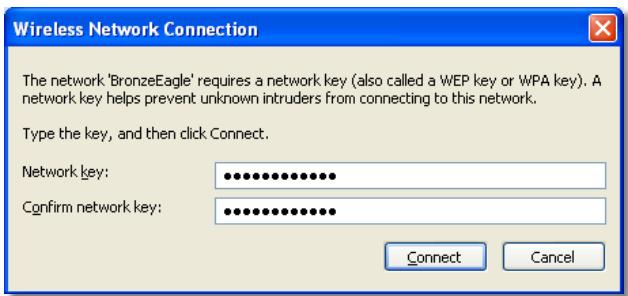
Your computer connects to the network, and you should now be able to access the range extender's browser-based utility.
To fix the problem on Mac computers:
- In the menu bar across the top of the screen, click the AirPort icon. A list of wireless networks appears. Cisco Connect has automatically assigned your network a name.
In the example below, the computer was connected to another wireless network named JimsRouter. The name of the Linksys E-Series network, BronzeEagle in this example, is shown selected.
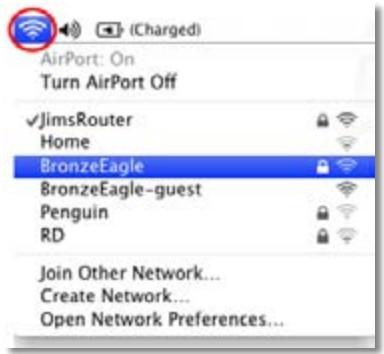
- Click the wireless network name of the router your range extender is connected to.
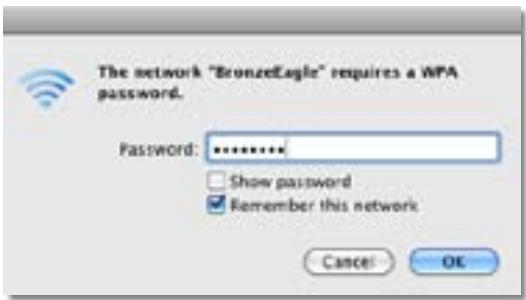
- Type your wireless network password (Security Key) into the Password field, then click OK.
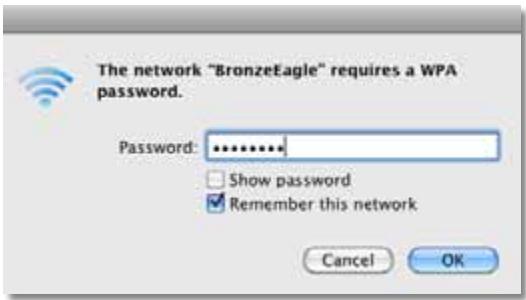
Your computer connects to the network, and you should now be able to access the range extender's browser-based utility.
You have intermittent connection problems
When you position your range extender, place it in a location where the signal strength can be kept between 60% and 100% for optimum performance.
Specifications
RE1000
Model Name Linksys RE1000
Model Description Wireless-N Range Extender
Model Number RE1000
Standards IEEE 802.11n, 802.11g, 802.11b, 802.3u
Ports Fast Ethernet, C7 connector for localized AC cable or clip
Reset, Wi-Fi Protected Setup™, Power (European model only)
LEDs Power/Wi-Fi Protected Setup, Ethernet (link, activity)
Cabling Type CAT 5e
Antennas 2 (internal) Detachable (y / n) No
Wireless Security Wi-Fi Protected Access™ 2 (WPA2), Wi-Fi Protected Access™ (WPA), WEP
Security Key Bits Up to 128-bit encryption
Environmental
Dimensions 4.92^ × 3.62^ × 1.29^ (125× 92× 33mm)
Weight 5.5 oz (155 g)
Power Internal AC/DC power supply 100-240V, 50/60Hz, 0.5A
Certification FCC, UL/cUL, ICES-003, RSS210, CE, Wi-Fi (IEEE 802.11b/g/n), WPA2™, WMM®, Wi-Fi Protected Setup™
Operating Temperature 32 to 104^ (0 to 40^ )
Storage Temperature -4 to 140^ (-20 to 60^ )
Operating Humidity 10 to 80% noncondensing
Storage Humidity 5 to 90% noncondensing
Specifications are subject to change without notice.
RE2000
Model Name Linksys RE2000
Model Description Dual-band Wireless-N Range Extender
Model Number RE2000
Standards IEEE 802.11a, 802.11n, 802.11g, 802.11b, 802.3u
Ports Fast Ethernet, C7 connector for localized AC cable or clip
Reset, Wi-Fi Protected Setup™, Power (European model only)
LEDs Power/Wi-Fi Protected Setup, Ethernet (link, activity)
Cabling Type CAT 5e
Antennas 2 (internal) Detachable (y / n) No
Wireless Security Wi-Fi Protected Access™ 2 (WPA2), Wi-Fi Protected Access™ (WPA), WEP
Security Key Bits Up to 128-bit encryption
Environmental
Dimensions 4.92^ × 3.62^ × 1.29^ (125× 92× 33mm)
Weight 5.4 oz (152 g)
Power Internal AC/DC power supply 100-240V, 50/60Hz, 0.5A
Certification FCC, UL/cUL, ICES-003, RSS210, CE, Wi-Fi (IEEE 802.11a/b/g/n), WPA2™, WMM®, Wi-Fi Protected Setup™
Operating Temperature 32 to 104^ (0 to 40^ )
Storage Temperature -4 to 140^ (-20 to 60^)
Operating Humidity 10 to 80% noncondensing
Storage Humidity 5 to 90% noncondensing
Specifications are subject to change without notice.
Visit linksys.com/support for award-winning 24/7 technical support

Cisco, the Cisco logo, and Linksys are trademarks or registered trademarks of Cisco and/or its affiliates in the United States and other countries. A listing of Cisco's trademarks can be found at www.cisco.com/go/trademarks. All other trademarks mentioned in this document are the property of their respective owners.

Guía del usuario
Linksys
Extensor de alcance
Introducción
Wi-Fi Protected SetupTM
Use one of the following for each Wi-Fi Protected Setup supported device:
- If your router has a Wi-Fi Protected Setup button, click or press that button, and then click the button on the right.

Wi-Fi Protected SetupTM
Use one of following for each Wi-Fi Protected Setup™ supported device:
- If your client device has a Wi-Fi
Protected SetupTM button, click or press
that button and then click the button on the right.

Wi-Fi Protected SetupTM
Use one of the following for each Wi-Fi Protected Setup supported device:
- If your router has a Wi-Fi Protected Setup button, click or press that button, and then click the button on the right.

Wi-Fi Protected SetupTM
Use one of following for each Wi-Fi Protected Setup™ supported device:
- If your client device has a Wi-Fi
Protected SetupTM button, click or press that button and then click the button on the right.

- If your client device has a Wi-Fi Protected SetupTM PIN number, enter that number
here
and then click
Register
Wi-Fi Protected SetupTM
Use one of the following for each Wi-Fi Protected Setup supported device:
- If your router has a Wi-Fi Protected Setup button, click or press that button, and then click the button on the right.

Wi-Fi Protected SetupTM
Use one of following for each Wi-Fi Protected Setup™ supported device:
- If your client device has a Wi-Fi
Protected Setup™ button, click or press
that button and then click the button on the right.

Wi-Fi Protected SetupTM
Use one of the following for each Wi-Fi Protected Setup supported device:
- If your router has a Wi-Fi Protected Setup button, click or press that button and then click the button on the right.

Wi-Fi Protected SetupTM
Use one of following for each Wi-Fi Protected Setup™ supported device:
- If your client device has a Wi-Fi
Protected SetupTM button, click or press
that button and then click the button on the right.

Wi-Fi Protected Access™ 2 (WPA2), Wi-Fi Protected Access™ (WPA), WEP
Configuration binaire
Wi-Fi (IEEE 802.11a/b/g/n), WPA2™, WMM®, Wi-Fi Protected Setup™
Wi-Fi Protected SetupTM
Use one of the following for each Wi-Fi Protected Setup supported device:
- If your router has a Wi-Fi Protected Setup button, click or press that button, and then click the button on the right.

Wi-Fi Protected SetupTM
Use one of following for each Wi-Fi Protected Setup™ supported device:
- If your client device has a Wi-Fi
Protected SetupTM button, click or press that button and then click the button on the right.

Wi-Fi Protected Access™ 2 (WPA2), Wi-Fi Protected Access™ (WPA), WEP
Wi-Fi (IEEE 802.11a/b/g/n), WPA2™, WMM®, Wi-Fi Protected Setup™
Temperatures de
Wi-Fi Protected SetupTM
Use one of the following for each Wi-Fi Protected Setup supported device:
- If your router has a Wi-Fi Protected Setup button, click or press that button, and then click the button on the right.

Wi-Fi Protected SetupTM
Use one of following for each Wi-Fi Protected Setup supported device:
- If your client device has a Wi-Fi Protected Setup button, click or press that button and then click the button on the right.

Wi-Fi Protected SetupTM
Use one of the following for each Wi-Fi Protected Setup supported device:
- If your router has a Wi-Fi Protected Setup button, click or press that button, and then click the button on the right.

Wi-Fi Protected SetupTM
Use one of following for each Wi-Fi Protected Setup™ supported device:
- If your client device has a Wi-Fi
Protected Setup™ button, click or press
that button and then click the button on the right.

Wi-Fi Protected SetupTM
Use one of the following for each Wi-Fi Protected Setup supported device:
- If your router has a Wi-Fi Protected Setup button, click or press that button, and then click the button on the right.

Wi-Fi Protected SetupTM
Use one of following for each Wi-Fi Protected Setup™ supported device:
- If your client device has a Wi-Fi
Protected SetupTM button, click or press
that button and then click the button on the right.

- If your client device has a Wi-Fi Protected SetupTM PIN number, enter that number
here
and then click
Register
Wi-Fi Protected Access™ 2 (WPA2), Wi-Fi Protected Access™ (WPA), WEP
FCC, UL/cUL, ICES-003, RSS210, CE, Wi-Fi (IEEE 802.11a/b/g/n), WPA2™, WMM®, Wi-Fi Protected Setup™
Wi-Fi Protected SetupTM
Use one of the following for each Wi-Fi Protected Setup supported device:
- If your router has a Wi-Fi Protected Setup button, click or press that button, and then click the button on the right.

Wi-Fi Protected SetupTM
Use one of following for each Wi-Fi Protected Setup™ supported device:
- If your client device has a Wi-Fi
Protected SetupTM button, click or press that button and then click the button on the right.

WLAN-beveiling Wi-Fi Protected Access™ 2 (WPA2), Wi-Fi Protected Access™ (WPA), WEP
Bveiligingssteutelbits Max. 128-bits versleuteling
Omgeving
Afmetingen 125 × 92 × 33 ~mm
Gewicht 280g
Voeding Interne AC-/DC-stroomvoorziening 100-240 V, 50/60 Hz, 0,5 A
Certificering FCC, UL/cUL, ICES-003, RSS210, CE, Wi-Fi (IEEE 802.11b/g/n), WPA2™, WMM®, Wi-Fi Protected Setup™
Wi-Fi Protected SetupTM
Use one of the following for each Wi-Fi Protected Setup supported device
- If your router has a Wi-Fi Protected Setup button, click or press that button and then click the button on the right.

Wi-Fi Protected SetupTM
Use one of following for each Wi-Fi Protected Setup supported device:
- If your client device has a Wi-Fi
Protected SetupTM button, click or press
that button and then click the button on the right.

Wi-Fi Protected SetupTM
Use one of the following for each Wi-Fi Protected Setup supported device:
- If your router has a Wi-Fi Protected Setup button, click or press that button, and then click the button on the right.

Wi-Fi Protected SetupTM
Use one of following for each Wi-Fi Protected Setup™ supported device:
- If your client device has a Wi-Fi Protected SetupTM button, click or press that button and then click the button on the right.

| 2. If your client device has a Wi-Fi Protected SetupTM PIN number, enter that number here and then click Register |
| 3. If your client asks for the Router's PIN number, enter this number 76201196 in your client device. |
FCC, UL/cUL, ICES-003, RSS210, CE, Wi-Fi (IEEE 802.11a/b/g/n), WPA2™, WMM®, Wi-Fi Protected Setup™
Temp. prac
od 0 do 40^ (od 32 do 104^ )
Temp.przechowyania
od -20 do 60^ (od -4 do 140^ )
Wi-Fi Protected SetupTM
Use one of the following for each Wi-Fi Protected Setup supported device:
- If your router has a Wi-Fi Protected Setup button, click or press that button, and then click the button on the right.

Wi-Fi Protected SetupTM
Use one of following for each Wi-Fi Protected Setup™ supported device:
- If your client device has a Wi-Fi Protected SetupTM button, click or press that button and then click the button on the right.

Wi-Fi Protected SetupTM
Use one of the following for each Wi-Fi Protected Setup supported device:
- If your router has a Wi-Fi Protected Setup button, click or press that button, and then click the button on the right.

Wi-Fi Protected SetupTM
Use one of following for each Wi-Fi Protected Setup™ supported device:
- If your client device has a Wi-Fi Protected SetupTM button, click or press that button and then click the button on the right.

- If your client device has a Wi-Fi Protected SetupTM PIN number, enter that number
here
and then click
Register
Wi-Fi Protected SetupTM
Use one of the following for each Wi-Fi Protected Setup supported device:
- If your router has a Wi-Fi Protected Setup button, click or press that button, and then click the button on the right.

Wi-Fi Protected SetupTM
Use one of following for each Wi-Fi Protected Setup™ supported device:
- If your client device has a Wi-Fi
Protected SetupTM button, click or press that button and then click the button on the right.

- If your client device has a Wi-Fi Protected SetupTM PIN number, enter that number
here
and then click
Register
IcnoJb3OBaHne yHKuN "Wi-Fi Protected Setup"
(3aunueHHa HacTpoKa Wi-Fi) 7
KaK nCNoJb3OBAt b yHKcIIO 6cIeIoBaHnro6beKeTa..9
Ponckи устараенье Нецчправност … 10
TexHHuecknex xapaKTepeNCTNIKn 13
0630p
LiuceBaJnHeJIb
3TOI INDnKATOp yka3bIbAet COCTOAHNIE NITAHIN IyHKU Wl-Fi Protected Setup. Pocne nepBOHaayalbHOYcTaHOBKN, eCNI B cETN IMeIoTc KIneHTCKNe YcTPOiCTBa, HAnpIMep 6ecnpoBOdHbIe pInHTepbl, NODepXnBAIOUJIe OyHKUIO "Wi-Fi Protected Setup" (3aunuHnHa JAcTpojKa Wi-Fi), To 3Tu OyHKUIO MOJHO nCNOBtB, UTo6bl ABTOMaTHueCKn HAcTPOuTb NapaMeTpbl ObecneueHn 6eONACHOCTB INCNOb3yeMoB 6ecnpoBOdHO cTeN.
Питанne Bo Врема BKЛIOUeHЯ NOBTopuTeЯ, BOCCTaHOBJIeHЯ 3aBOdCKnX HAcTpoE ИлОБHOBJIeHЯ ПPoWbIKN uHДNKaTOp peKo Mmraet (PpI6JIIN3HTeMbHO KaxkDble Tprc cekyHdbI). EcIn NOBtopuTeIb ROTOB KpaOte, INHДNKaTOp RopIT HeNpepbIBHO. Ppi BO3HNIKHOBeHIM OwN6Kn INHДNKaTOp qacto Mriaet (PpI6JIIN3HTeMbHO KaKdYIO cekyHdy); OTKJIIOHTe NOBtopuTeIb OT HAcTeHHoR pO3eTKN, NODOXdIte DBe CekyHDbI n CHOBA BKJIIOUHTe erO.
"Wi-Fi Protected Setup" Bo Bpempa60bI yHKcHn "Wi-Fi Protected Setup" B TeueHne DByx MInHy T INDInKaTOp peKo MInraet (Pnp6In3NtEhNo KaKdBiE DBe CeKyHdbI). Pocne ycpeHoro 3aBepseHn HAcTpoKn Pn NOMOu cYHKcHn "Wi-Fi Protected Setup" INDInKaTOp 6yEd T Ropetb HnpepbIBHO. Pn BO3NHKHOBeHm OOn6Kn INDInKaTOp qacto MInAeT (Pnp6In3NtEhNo KaKdUo ceKyHdy) B TeueHne DByx MInHyT; NOdoXJNTe N IOBOTpnte NOnblTKy.
BepxHnaHeIb

IpeekluoyateIb nItaHn IMeetc TOnbKO B BepCnax NOBTopnteI dIe EBponbl.

C6poc Haxmnte u ydepknaBte 3Ty KhoNky B TeueHne npn6n3ntbHo nTn cekynd, T06bl BOCCTaHOBtB 3aBODcKne HaCTPOKn NOBTOPTeJn. Bt Takke MOKeTe BOCCTaHOBtB HAcTPOKn No yMOnuAHHo Ha 3KpaHe Administration >Factory Defaults (AdmnHcTpnpoBaHne > 3aBOdckne NaCTPOKn) yTnNTbI NOBTopTeJn, DoctynHou uepe3 Be6-6pay3ep.

Khonka "Wi-Fi Protected Setup" ПосLEпервонально установки, ecIN B cETn ИмeOTcя KIneHTCKne uCTpoiCTBa, Hanprimep 6ecnpoBOdHbIe npInTepbl, pOndepxNBAIOUne ΦyHKCNUO "Wi-Fi Protected Setup" (3aunuHnaHЯн acTpoiKa Wi-Fi),To 3Tu ΦyHKCNUO MOxHNo IcnoJb3OBaTb, UTObI abTomatNueCKn HAcTpoNTb napameTpbl o6ecNeueHЯ 6e3OpacHocTn B INcNoJb3yeMoHб 6ecnpoBODHO cETn.ДЯ nCnoJb3OBaHЯФyHKCNU "Wi-Fi Protected Setup" (3aunuHnaHЯн acTpoiKa Wi-Fi)"Ha cTp.7.
HuxhnaHeIb

Ethernet (3enehbi) 3TOT nopT Ethernet nCnoJIb3yETcIЯ nOdkIIOUeHnA ceTeBbix yCTpoiCTB Ethernet K 6ecnpoBOdHoi cTeI npI nOmoIu Ka6eJIe Ethernet (TaKxHe Ha3bIAeMbIX cTeBbIMn Ka6eJIaMn).
3eJHbI INDnKaTOp 3aropaetc npi nOdkHoueHn aKTHBHO yCTpoiCTBa Ethernet K 3ToMg nopTy. 3ToT INDnKaTOp MnaeT, KOrda NOBtOpntel nepeDaet nn npinHnMaet daHbIe uepe3 nopT Ethernet.
YCTaHOBka NOBTOpuTeJa
- BCTaBbTe UcmaHOBOChbI KOMnakm-duck B npINBOd KOMMbHTepa, KOtOpbI NOdkJIoueH K cETn MapuPyTu3aTopa. Bbl DOJXHbI HaxoDITcbr B6II3N MapuPyTu3aTopa INI TOUKN DOCTyNa I IMeTb DOCTyn K NOdkJIIOueHHOMy K cETn KOMMbHTepy.
BHIMAHHE!
UcTaHOBnTe NOBtOpntEnb B6IIm3N KOMMbTopea N MapuPyTu3aTopa, UTo6bl o6ecNeuHTb BbICOKn yPoBeH bCnHaJb 6eCnpoBOJHO CETn. BnocneJeCTBn erO MOxHO 6yJeT UcTaHOBnTb B DpyROM MeCTe.
- Поссе заусякayутлntы Setup (Hac troйka) npочиайteусноялпценho Horo corlaшени, 3aTeM haxmnte kHonky Next (Даinee).Систema npedloxint nodkliouchtn nobTOPuTEnb Kэльктуческо розтke.
-
Поdkлочип NOBTOPITeNь к розтке сети поемен HorO тoka. NOBTOPITeNь Нанhaet NGSCбсрpoBOHbIX сетe. OTo6paKaetcncoc cetei.
-
BbI6epInTe 6ecnpoBOHyIO ceTb, K KOtopoI CO6npaTeCb IOkKnHouNtbcA, IN HaxMnTe KHOJNKy Next (Jaane).

- BVeIte napoiB 6ecnpoBOdHOcTe n HaxMnTe KhoNkOk OK.
-ⅡN-
Ecni Ba7a CeTb AByIeTcA CkpItOi (MapwpyTu3aTOp He nepeaet CBoE nM), Bb6epnte My network is hidden (MoA CeTb CkpTa), BBeIte INHΦopMaunIO o BaWei CETn, 3aTEM HaxMNTE KONKy OK.
- Haxmte KhoNky Next (Jaee). HacpoiKa Baawero NOBToIeY BbIOJIHeHa, IN CNTema PpeJIOXHT NepeMeCTNb ERO B OKOHaTeJbHOE MeCTOnIOJOKeHne.
COBET
Wi-Fi Protected SetupTM
Use one of the following for each Wi-Fi Protected Setup supported device:
- If your router has a Wi-Fi Protected Setup button, click or press that button, and then click the button on the right.

- Haxmnte KhoNky Wi-Fi Protected Setup Ha noBTOpeJe.
- Haxmte KhoNky "Wi-Fi Protected Setup" Ha 3kpaHe Wi-Fi Protected Setup (3aunuennha nactpoiKa Wi-Fi) MappyTu3aTopa (ecn OH mMeetc) JIN5O Haxmte u ydepXuBaIe Keonky "Wi-Fi Protected Setup" Ha mappyTu3aTope B TeueHne OndoN ockynbl. Pocne 3abepseHnnoqKlUoyenHnDnKaTOp "Wi-Fi Protected Setup" Ha mappyTu3aTope 6ydt ropeb HnpepbBHO.
- EcnBbI nCnObl3OBaJIIn 3KpaH Wi-Fi Protected Setup (3aunuHna HacTpoKa Wi-Fi) NOBTopuTeJ, haxMnTE OK Ha 3OM 3KpaHe B TeueHne DByx MInHyT.
IopknloueHne cncnoB3ObaHnem PIN-koJa nobTopuTeJIa
Персоньний undenttuksaioHbH Homep "Wi-Fi Protected Setup" (PIN-кoД) уka3ан на захковпюворел.отot сноб мохно IncnoIb3OBAt, tolbko ecn yTuInnta adMHNHCTprupobAHnmaPspTyu3aTopa MeeT MeHIO "Wi-Fi Protected Setup".
-
If your router asks for the client's PIN number, enter this number 14727030 in your router device.
-
BVeIte PIN-KoI B COOTBeTCTBHyOuEe noJIe 3KpaHa Wi-Fi Protected Setup MapIpyTu3aTopa, 3aTeM HaxMITE Register (3aperIcTpnpoBaTb). Iocne 3aBepSeHnIOpKJIouEHHdIkAToP "Wi-Fi Protected Setup" Ha MapIpyTu3aTope 6yDet ropeTb HenpepbIBHO.
- Haxmnte KhoNkOy OK.
PoiKJIouHne yCtpoiCTB K CeTn Chepe3 NOBTOpNTeJb
EcIn B cetn ImeIoTc CeTeBbIe yctpoiCTBa, Hapnpimep 6ecnpoBOdHbIe npInHTepbl, POndepKINBAIOUne cyHKUIO "Wi-Fi Protected Setup", To MoxHo NcNoJIb3ObaTb 3Ty cyHKUIO IJN POnKIIouHeHn IN K 6ecnpoBOdHO n CETn. Bbl6epnte POnXoJaIcn CnOCo6 POnKIIouHeHn yCTPOICTB K cETn.
ПОНМЕЧАНИС
Функця"Wi-Fi Protected Setup"no3BOLЯТнactpaNBaTb yctpoiCTBa noочepedNo.Повторе Heo6xOДмьcle DeiCtBNI dNIA KaJdOrO KIneHTcKOrO yctpoiCTBa,poДepeXnBAIoUeToФункци"Wi-Fi Protected Setup".
Повлоченье ри помоши Кнорки "Wi-Fi Protected Setup"
Wi-Fi Protected SetupTM
Use one of following for each Wi-Fi Protected Setup™ supported device:
- If your client device has a Wi-Fi
Protected SetupTM button, click or press
that button and then click the button on the right.

- HαχΜιTe KΗΝΚγι Wi-Fi Protected Setup Na KJIηΕΝΤΚΟΥ ΚΥΤρΟΙΝΤΒe.
- Haxmte KhoNky "Wi-Fi Protected Setup" Ha 3kpaHe Wi-Fi Protected Setup (3aunuennha hactpoikka Wi-Fi) nobTopntela JINBO haxmte u yepxmbaTe KhoNky "Wi-Fi Protected Setup" Ha bepxne nahein nobTopntela B teueHne OJHO cekyndbl. Iocne 3abepseHnnoKJIIOUeHn nHdNKaTOp "Wi-Fi Protected Setup" ha Mapupyrtn3aTope 6ydet ropeb HenpepbIBHO.
- Haxmnte OK Ha əkpaHe Wi-Fi Protected Setup nobTopnten B TeueHne bByx MInHyT.
He ydaetcnodknouchTb noBTOpuTeIb
Ipoepe me mecmonoloxene Mapupymuzamopa u noemopumenla
- Пи первональнон有很大 поюкpekomeнуетсnomecntь nobotntelb 6лзп OT mapшутinasotaport. Посlete завршени有很大сго можно otknioчпь nobotntelb иnomecntь ergВ hyхhoe mectO.
- UTo6bI yUcTpaHnITb npErpaIbI Ha IpyTn CnIHana, MoXHO NOMEcTb IIOBTOpIeJIb I MapuTyI3aTOP B dpyrOe MeCTo.
He pekomeHnyetcnpomeaTb MapuTy3aTop n noBToPntjpbraDM C MeTaJIInueckmN 06BeKtAmn, 6eTOHHbIMn CTeHaMn n 3epKaJIbHbIMn NOBepXHOCTaMn, HApnPImep, CTeKJaMn n 3epKaJAMn.
He pekomehnyeTcI NOMEuTaB MapuTyN3aTop I NOBToPteJIb pAOM C npyHMN 3JIeKTPoHHbIMn PnIbOpamN, KOToPbIE MOrY TbI3BaTb NOMEXN.

Ipu ucnolb3oBaHuu fynKuuu "Wi-Fi Protected Setup" don noDkLIOUeHua:
Khoipkn Reset (C6poc), Wi-Fi Protected SetupTM, Power (PntaHne) (ToIbko Ha MoJeJx DnE Ebponbl)
ИндikaToPbI Power (ПиТаHne)/Wi-Fi Protected Setup, Ethernet (порклочен,akTINBHOCTb)
Tin Ka6eIeI CAT 5e
AHTeHHbI 2(BHyTpEHHne)
CbeMHbI (Ja/HeT) HeT
Be30napoctb 6ecnpoBODno Cetn
Pa3pHocTb KIIOUa
6e3oNaChOCTn 101286nt
CAT5e
2 (BHyTpEHHne)
Het
Wi-Fi Protected Access™ 2 (WPA2), Wi-Fi Protected Access™ (WPA), WEP
10 1286nt
FCC, UL/cUL, ICES-003, RSS210, CE, Wi-Fi (IEEE 802.11a/b/g/n), WPA2™, WMM®, Wi-Fi Protected Setup™
Pa6o7a TempepaTpa OTo 0do 40^
Tempepatypxpanenno O-20do 60^
Pa6oua BnaJxHocTb 10...80% (6e3 KOHdeHcaun)
BlaJxHocTb xpaHeHHa 5 ... 90% (6e3 KOHdEHaCUN)
Texnueckne xapaktepcntkmoTy 6bItb n3MeHebl 6e3 npedBapuTeJIbHoro yBeDOMJeHn.
Iocetnte Be6-caT linksys.com/support, yTo6bl BOCnOlb3OBAbTcR npu3HaHHo TeXHuecko noDepKko 24/7

Cisco, norotin Cisco u Linksys aBnTcTbOpHbIMn 3aKaMn nI 3apeNCTpnpoBaHHbIMn ToabHbIMn 3aKaMn Cisco nI/nn ee fMaJIIOB CUSA nApYnx cTpaHax. CncoK ToBapHyx 3aKaOB Cisco doctyne no aepcy: www.cisco.com/go/trademarks. Bce npOue ToBapHbte 3aKa, yPOMAHTbE B HactOaMe DOKmuTe, ABnTcTc Co6CTBeHooCTbO COOTBeTcTBUox BnaDeIbceB.

Navodila za uporabo
Linksys
Razširitveni adapter Linksys RE1000
Uvod
Wi-Fi Protected SetupTM
Use one of the following for each Wi-Fi Protected Setup supported device:
- If your router has a Wi-Fi Protected Setup button, click or press that button, and then click the button on the right.

- Kliknite ali pritisnite gumb Wi-Fi Protected Setup na razsritvenem adapterju.
- Kliknite gumb Wi-Fi Protected Setup na zaslonu Wi-Fi Protected Setup usmerjevalnika (ce je na voljo) ALI pritisnite in sekundo držite gumb Wi-Fi Protected Setup na usmerjevalniku. Ko je povezava vzpostavljena, lučka Wi-Fi Protected Setup na razširitvenem adapterju sveti neprekinjeno.
- Če ste uporabili zaslon Wi-Fi Protected Setup razširitvenega adapterja, kliknite OK (V redu) na tem zaslonu v dveh minutah.
Wi-Fi Protected SetupTM
Use one of following for each Wi-Fi Protected Setup™ supported device:
- If your client device has a Wi-Fi
Protected SetupTM button, click or press
that button and then click the button on the right.

- Kliknite ali pritisnite gumb Wi-Fi Protected Setup na odjemalski napravi.
- Kliknite gumb Wi-Fi Protected Setup na zaslonu Wi-Fi Protected Setup razsritvenega adapterja ALI pritisnite in sekundo drzite gumb Wi-Fi Protected Setup na zgornji strani razsritvenega adapterja. Ko je povezava vzpostavljena, lučka Wi-Fi Protected Setup na razsritvenem adapterju sveti neprekinjeno.
- V dveh minutah kliknite OK (V redu) nazaslonu Wi-Fi Protected Setup razsritvenega adaptorja.
Anvanda Wi-Fi Protected Setup. 7
Wi-Fi Protected SetupTM
Use one of the following for each Wi-Fi Protected Setup supported device:
- If your router has a Wi-Fi Protected Setup button, click or press that button, and then click the button on the right.

Wi-Fi Protected SetupTM
Use one of following for each Wi-Fi Protected Setup™ supported device:
- If your client device has a Wi-Fi
Protected SetupTM button, click or press that button and then click the button on the right.

Sakerhet for tradlost Wi-Fi Protected Access 2 (WPA2), Wi-Fi Protected Access (WPA), WEP
Certificering FCC, UL/cUL, ICES-003, RSS210, CE, Wi-Fi (IEEE 802.11b/g/n), WPA2™, WMM®, Wi-Fi Protected Setup™
Wi-Fi Protected Setup 7
19
nunuiu . 10
13
W
nui
- 1AACnAeAAeAAeAAeAAeAAeAAeAAeAAeAAeAAeAAeAAeAAeAAeAAeAAeAAeAAeAAeAAeAAeAAeAAeAAeAAeAAeAAeAAeAAeAAeAAeAAeAAeAAeAAeAAeAAeAAeAAeAAeAAeAAeAAeAAeAAeAAeAAeAAeAAeAAe
1
aunnnae aen nnnnne anennnne nnnnne nnnnne nnnnne nnnnne nnnnne nnnnne nnnnne nnnnne nnnnne nnnnne nnnnne nnnnne nnnnne nnnnne nnnnne nnnnne nnnnne nnnnne nnnnne nnnnne nnnnne nnnnne nnnnne nnnnne nnnnne nannnee
Wi-Fi Protected Setup
Wi-Fi Protected Setup 1uunnnnnaaannnnnnaeauanennnneau anee nnnnnnnaaannnnnnaa aannnnnnaaannnnnnaa
Wi-Fi Protected Setup
- TAI'n Cisco www.nwu.edu.cn/ncs/ncs/ncs/ncs/ncs/ncs/ncs/ncs/ncs/ncs/ncs/ncs/ncs/ncs/ncs/ncs/ncs/ncs/ncs/ncs/ncs/ncs/ncs/ncs/ncs/ncs/ncs/ncs/ncs/ncs/ncs/ncs/ncs/ncs
Wi-Fi Protected Setup wwnwnu WwWnWu Wi-Fi Protected Setup wauunwau Wwauwau - 1
- W LED Wi-Fi Protected Setup
a
Wi-Fi Protected Setup waiuauuaaunauuuuuyuynu uynu uynu uynu uynu uynu uynu uynu uynu uynu uynu uynu uynu uynu uynu
#
Wuwnnnaaannnnnnaanennnnaanennnnaanennnnaanennnnaanennnnaanennnnaanennnnaanennnnaanennnnaanennnnaanennnnaanennnnaanennnnaanennnnaanennnnaanennnnaanennnnaanennnnaanennnnaanennnnaanennnnaanennnnaanennnnaanennnnaanannnnnnaanannnnnnaanannnnnnaanannnnnnaanannnnnnaanannnnnnaanannnnnnaanannnnnnaanannnnnnaanannnnnnaanannnnnnaanannnnnnaanannnnnnaanannnnnnaanannnnnnaanannnnnnaanannnnnnaanannnnnnaanannnnnnaanannnnnnaanann
nuiuuiuuiu Wi-Fi Protected Setup (nuuuiuuiuWi-Fi)
Wi-Fi Protected SetupTM
Use one of the following for each Wi-Fi Protected Setup supported device
- If your router has a Wi-Fi Protected Setup button, click or press that button and then click the button on the right.

- 1 Wi-Fi Protected Setup (nwiwiWi-Fi)
- 2019 Wi-Fi Protected Setup (nwnnnn nn nnnn Wi-Fi) 2019 Wi-Fi Protected Setup (wnnnn nn nnnn Wi-Fi) 2019 Wi-Fi Protected Setup (wnnnn nn nnnn Wi-Fi)
- wwnuunwunwai Wi-Fi Protected Setup wovvauu uon OK (wnu)
PIN 1
PIN (wnuunnuunnu) wv Wi-Fi Protected Setup aunnuunnuuwa nnuu uuuuauu uuuuuuuuuuuuuuuuuuuuuuuuuuuuuuuuuuuuuuuuuuuuuuuuuuuuuuuuuuuuuuuuuuuuuuuuuuuuuuuuuuuuuuuuuuuuuuuuuuuuuuuuuuuuuuuuuuuuuuuuuuuuuuuuuuuuuuuuuuuuuuuuuuuuuuuuuuuuuuuuuuuuuuuuuuuuuuuuuuuuuuuuuuuuuuuuuuuuuuuuuUU
Wi-Fi Protected Setup wwnuauauauauauauauauauauauauauauauauauauauauauauauauauauauauauauauauauauauauau
nuiuuiuuiu Wi-Fi Protected Setup (nuuuiuuiuWi-Fi)
WuWuWuWuWuWuWuWuWuWi-Fi
Wi-Fi Protected SetupTM
Use one of following for each Wi-Fi Protected Setup™ supported device:
- If your client device has a Wi-Fi
Protected SetupTM button, click or press
that button and then click the button on the right.

- 1 WFi- Fi Protected Setup (nwiwiwiWi-Fi)
- 2014 Wi-Fi Protected Setup (nurnuu uuuuauu Wi-Fi)
2014 Wi-Fi Protected Setup (nurnuu uuuuauu uuuuauu Wi-Fi)
2014 Wi-Fi Protected Setup (nurnuu uuuuauu uuuuauu uuuuau Wi-Fi)
2014 Wi-Fi Protected Setup (nurnuu uuuuau uuuuau uuuuau uuuuau Wi-Fi) - nON OK (nAn) uu nuWa Wi-Fi Protected Setup wavauuauu uuyunuunuua
nlaanannnn PIN naaannnaa
Pnt Pn nnnnnaa aannnnn nn PIN (nnnnnnnnnn) nn Wi-Fi Protected Setup

- iau PIN nannnnaa aauu wwnnnnna Wi-Fi Protected Setup
- Register (wnuu) wnuu Wi-Fi Protected Setup wv Ww Wi-Fi Protected Setup wuunw
- nON OK (nN) uunuwa Wi-Fi Protected Setup uauaunauu uauu
PIN
iunnnnnaaannnnaaennnnnnnnnnnnnnnnnnnnnnnnnnnnnnnnnnnnnnnnnnnnnnnnnnnnnnnnnnnnnnnnnnnnnnnnnnnnnnnnnnnnnnnnnnnnnnnnnnnnnnnnnnnnnnnnnnnnnnnnnnnnnnnnnnnnnnnn
-
If your client asks for the Rauler's PN number, enter this number 76201196 in your client device.
-
1 W-Wi-Fi Protected Setup 1W Wi-Fi Protected Setup 1W Wi-Fi Protected Setup 1W Wi-Fi Protected Setup 1W Wi-Fi Protected Setup 1W Wi-Fi Protected Setup 1W Wi-Fi Protected Setup 1W Wi-Fi Protected Setup 1W Wi-Fi Protected Setup 1W Wi-Fi Protected Setup 1W Wi-Fi Protected Setup 1W Wi-Fi Protected Setup 1W Wi-Fi Protected Setup 1W Wi-Fi Protected Setup 1W Wi-Fi Protected Setup 1W Wi-Fi protected Setup 1W Wi-Fi protected Setup 1W Wi-Fi protected Setup 1W Wi-Fi protected Setup 1W Wi-Fi protected Setup 1W Wi-Fi protected Setup 1W Wi-Fi protected Setup 1W Wi-Fi protected Setup 1W Wi-Fi protected Setup 1W Wi-Fi protected Setup 1W Wi-Fi protected Setup 1W Wi-Fi protected Setup 1W Wi-Fi protected Setup 1W Wi-Fi protected Setup 1W Wi-Fi protected Setup
- nON OK (nN) Wunwna Wi-Fi Protected Setup wauanuun
山
wnnnnnaaunnnaaennnnnnaaannn nn nnnnnnnnnnnnnnnnnnnnnnnnnnnnnnnnnnnnnnnnnnnnnnnnnnnnnnnnnnnnnnnnnnnnnnnnnnnnnnnnnnnnnnnnnnnnnnnnnnnnnnnnnnnnnnnnnnnnnnnnnnnnn
#
Signal Strength (namnuuuyauy)—nunnuuauyAP nnnnuuauuuuauuuuauuuuuuuuuuuuuuuuuuuuuuuuuuuuuuuuuuuuuuuuuuuuuuuuuuuuuuuuuuuuuuuuuuuuuuuuuuuuuuuuuuuuuuuuuuuuuuuuuuuuuuuuuuuuuuuuuuuuuuuuuuuuuuuuuuuuuuuuuuuuuuuuuuuuuuuuuuuuuuuuuuuuuuuuuuuuuuuuuuuuuuuuuuuuuuuuuuuuuuuuuUU
Security (nannnnnaaannnnn) --nnnnnnnnnnnnnnnnnnnnnnnnnnnnnnnnnnnnnnnnnnnnnnnnnnnnnnnnnnnnnnnnnnnnnnnnnnnnnnnnnnnnnnnnnnnnnnnnnnnnnnnnnnnnnnnnnnnnnnnnnnnnnnnnnnnnnnnnnnnnnnnnnnnnnnnnnnnnnnnnnnnnnnnnnnn nn nannn nn nannn nn nannn nn nannn nn nannn nn nannn nn nannn nn nannn nn nannn nn nannn nn nannn nn nannn nn nannn nn nannn nn nannn nn nannn nn nannn nn nannn nn nannn nn nannn nn nannn nn nannn nn nannn nn nannn nn nannn nn nennn nn nannn nn nannn nn nannn nn nannn nn nannn nn nannn nn nannn nn nannn nn nannn nn nannn nn nannn nn nannn nn nannn nn nannn nn nannn nn nannn nn nannn nn nannn nn nannn nn nannn nn nannn nn nannn nn nannn nn nannn nn n ann
Wi-Fi Protected Setup
Wuaunwuaanwua Wifi Protected Setup wnuuwnwau nauuunnnaa uauuau
y
Jn JimsRouter Jn Jn Jn Jn Jn Jn Jn Jn Jn Jn Jn Jn Jn Jn Jn Jn Jn Jn Jn Jn Jn Jn Jn Jn Jn Jn Jn Jn Jn Jn Jn Jn Jn Jn Jn Jn Jn Jn Jn Jn Jn Jn Jn Jn Jn Jn Jn Jn Jn Jn J n Jn J n J n J n J n J n J n J n J n J n J n J n J n J n J n J n J n J n J n J n J n J n J n J n J n J n J n J n J n J n J n J n J n J n J n J n J n J n
- 2
- WwWvWwWuWuWuWuWuWuWuWuWuWuWuWuWuWuWuWuWuWuWuWuWuWuWuWuWuWuWuWuWuWuWuWuWuWuWuWuWuWuWuWuWuWuWuWuWuWuWuWuWuWuWwOk
y
ACgucprizinitakmakicin:
Wi-Fi Protected SetupTM
Use one of the following for each Wi-Fi Protected Setup supported device:
- If your router has a Wi-Fi Protected Setup button, click or press that button, and then click the button on the right.

Wi-Fi Protected SetupTM
Use one of following for each Wi-Fi Protected Setup™ supported device:
- If your client device has a Wi-Fi
Protected SetupTM button, click or press
that button and then click the button on the right.

Wi-Fi Protected SetupTM
Use one of the following for each Wi-Fi Protected Setup supported device:
- If your router has a Wi-Fi Protected Setup button, click or press that button, and then click the button on the right.

- Hatncitb ekpaHny a6o fi3nHy KhoNky Wi-Fi Protected Setup (3axueneBCTaHOBLeHHa Wi-Fi) ha po3wnpOBUaYi.
- HaTnCHiB KNONky Wi-Fi Protected Setup (3axnuehe πidKloueHnry Wi-Fi) Ha ekpaHi Wi-Fi Protected Setup (3axnuehe πidKloueHnry Wi-Fi) MappyTu3aTopa (Akuo taKn eKpaH nauBn) ABO HATnCHiB i yTpMuyte BnpOdoBx odHiei cekynk Ky Wi-Fi Protected Setup (3axnuehe BCTaHOBLeHnry Wi-Fi) Ha mappyTu3atopi. Picna πidKloueHnry Ha po3wnpObayi 6e3nepePBHO CBiTnUmTe bCra iNDnKaTOp Ctany BVIOHaHHaYHKcii Wi-Fi Protected Setup (3axnuehe πidKloueHnry Wi-Fi).
3.Якwo BnKOpNtOByBaCry ekpaH Wi-Fi Protected Setup (3axuiehe BCTaHOBJIeHHa Wi-Fi) po3wnpIbAca,HaTncHITb KhoNkY OK Ha cIbomy ekpaH IbnpoJIOBX DBOX XBNJINH.
Wi-Fi Protected SetupTM
Use one of following for each Wi-Fi Protected Setup ^TM supported device:
- If your client device has a Wi-Fi
Protected SetupTM button, click or press
that button and then click the button on the right.

- Hataichietyekpanny a6o fi3nHy KhoNky Wi-Fi Protected Setup (3axuhe BCTaHOBJIeHHaWi-Fi)Ha npicTpoi-KJIeHTI.
- Hatncitb KhoNky Wi-Fi Protected Setup (3axnuehe niklouenry Wi-Fi) ha ekpani Wi-Fi Protected Setup (3axnuehe niklouenry Wi-Fi) po3wnipobaya ABO hatncitb i ytpmmyte Bnpodox ondhi cekynn KhoNky Wi-Fi Protected Setup (3axnuehe bctanohBleHna Wi-Fi) naBexni nahei po3wnipobaya. nicra nikloueHna hpo3wnipobaui 6e3nepepbHO cBtntImetbcra iNDkaTOp ctahy BVkOHaHHy fynKcii Wi-Fi Protected Setup (3axnuehe nikloueHna Wi-Fi).
- Hatncitb KhoNky OK ha ekpaHi Wi-Fi Protected Setup (3axuhe BCTaHOBJIeHHa Wi-Fi) po3wnpOBUaBa BnpoDObX DBox XBUNH.
Пдклоченя за дономою PIN-кody пистою-Kліента
LIMCnOc6oM MoXHa cKOpNCtAtnCra, JaKIO npNCTpii-KJIeHT MaE PIN-KoD (nepcoHaNbHn iJeHTnΦiKauiHn HmOp) dIa fynKci Wi-Fi Protected Setup (3axuene BCTaHOBHeHHaWi-Fi).
- If your client device has a Wi-Fi Protected SetupTM PIN number, enter that number
here
and then click
Register
- BveiItb PIN-koI npictpoIO-KJIeHTa y BiINObiNe nOle ha ekpaHi Wi-Fi Protected Setup (3axuiehe BCTaHOBLeHnR Hi-Fi) po3wnpUobaya.
- Hatnchit kHONky Register (3apecctpyBaTu) Ha ekpaHi Wi-Fi Protected Setup (3axnuehe BCTaHOBLeHnry Wi-Fi) po3wnpOBAu. Picna nikluoyenHa hapo3npiOBUaHi 6e3nepeepBHO CBITNTMmEcbr iHNkAToP cTaHy BnKOHaHHaYHKU Hi-Fi Protected Setup (3axnuehe nikKluoyenHaWi-Fi).
- Hatnchitb KhoNky OK ha ekpaHi Wi-Fi Protected Setup (3axuenehe BCTaHOBJIeHHa Wi-Fi) po3wnpOBUaBa BnpoDObX DBOX XBUNH.
Пдключенна за дономою PIN-кody розширьау
CkopnctaItecaIcM cno6oBm AkuO npicrtpi-KJIeHT 3aHNTae PIN-koD po3wnipUbaa.
-
If your client asks for the Router's PIN number, enter this number 76201196 in your client device.
-
BBeiItb Ha npicStpoi-KlieHti PIN-koD, HabeHeHn Ha ekpaHi Wi-Fi Protected Setup (3axuIeHe BCTaHOBLeHHra Wi-Fi). (LcEi KOd TAKoX HabeDeHO Ha HxNhbOMy 6oCi po3wnpHObaay.) Picna iNDKIOUeHHHa po3wnpOBAci 6e3nepeBHO CBiTtIMetbCry IHINkATOp cTahy BNKOHaHHa fynKcii Wi-Fi Protected Setup (3axuIeHe iNDKIOUeHHra Wi-Fi).
- Hatachitb KhoNkOy OK ha ekpaHi Wi-Fi Protected Setup (3axuene He BCTaHOBJIeHHa Wi-Fi) po3wnpHOBaHa BnpoD0BX DBOX xBNnH.
IOPADA
Як soo haayBhi npictpoi-KniEHTn He niTpmyoTb fynKciio Wi-Fi Protected Setup (3axuene BcTaHOBlenHaWi-Fi), 3aNwiTb 3naeHnnnapaMeTpib 6e3dpoToBoro 3B'ay, a notim ypyuHy hanaWtuTe zi npictpoi-KniEHTn.
Ctanhaptn IEEE802.11n,802.11g,802.11b,802.3u
Портушвдкн Ethernet,po3'EM C7 Дя lokaьногokabelenko 3minHoro cTpymy a6o kpinlenHHa
KhoPkn Reset (CkndaHn),Wi-Fi Protected SetupTM (3axuene BCtaHOBHeHHaWi-Fi), XNBHeHHa (Iiwe e BponecBki moeNi)
CbitnoioDihi iHnKaTopu XnBneHHa/Wi-Fi Protected Setup, Ethernet (3B'ra3OK,aKTnBHiCTb)
Tn Ka6eIbHOro 3'EnHaHHa CAT 5e
AHTeH 2(BhTypiuHi)
MoxlinBicb BiD'EdHaHHa HeMa
3axnct 6e3npoToBOrO 3b'ay3ky Wi-Fi Protected Access™ 2 (WPA2), Wi-Fi Protected Access™ (WPA), WEP
PozpKaKJIoua 3axnCTy Do 128-po3pIHorO IuIpyBaHHa
3obhihiΦakTopn
Pozmipu 4,92x3,62x1,29IouIma(125x92x33MM)
Bara 9,9 ynii (280 r)
ЖИВЛЕнгЯ BNYTpIiHEnДжеретоЖИВЛЕнгЯ 3MiHHIM/ NOCTIINM CTrpymOM 100—240B,50/60T4,0,5A
Ceptnphiacij FCC,UL/cUL,ICES-003,RSS210,CE, Wi-Fi (IEEE 802.11b/g/n),WPA2TM,WMMWi-Fi Protected SetupTM
Poboua tempepatypa 32—104°F (0—40°C)
TempepatyaДЯ 36epirahan -4-140°F (-20—60°C)
Po6ooua BoIorictb 10—80%6e3 KOHNHeCauii
Bolorictb dnia 36epirahan 5—90% 6e3 KOHdeHcaui
TexhiHi xaapakTepeNtKMOxTyb 6ytu 3mHeHi 6e3 nonepdKeHHa.
Linksys RE2000
Ha3Ba mojeni Linksys RE2000
CbitIoioHi iHnKaTopn XnBneHHa/Wi-Fi Protected Setup, Ethernet (3B'a3OK, aKTHbHicTb)
Tn Ka6eIbHOro 3'EnHaHHa CAT 5e
AHTeHn 2(BhTypiuHi)
MoxJIbIcIb BiI'EDHaHHa HeMa
3axnct 6e3dpoToBOrO 3B'ay3ky Wi-Fi Protected Access™ 2 (WPA2), Wi-Fi Protected Access™ (WPA),WEP
Pozpnd kIIOUa 3axnCTy Do 128-pozprHOro IINΦpyBaHHA
3oBhiHi oakTopu
Pozmipu 4,92x3,62x1,29IouMa(125x92x33MM)
Bara 9,9 ynii (280 r)
ЖИВЛЕHЯ BNYTpIshEДжереJOЖИВЛЕHЯ 3MiHHIM/ NOCTiHIM CTrpymOM 100—240B,50/60Tc,0,5A
CeptniΦiKaizj FCC,UL/cUL,ICES-003,RSS210,CE, Wi-Fi (IEEE 802.11a/b/g/n),WPA2TM,WMMWi-Fi Protected SetupTM
Poboua tempepatypa 32—104°F (0—40°C)
TempepatyaДЯ 36epirahan -4-140°F (-20—60°C)
Po6ooua BoIorictb 10—80%6e3 KOHNHeCauii
BolorictbIy36epirahan 5—90%6e3 KOHdeHcaaii
TexhihixapaKtepcntkmoKytb6tN3mHeH6e3nonepdkeHHn.
BidbndaTe cToPiHKy linksys.com/support, 06bkopncTaTnca nocnyramn BucokoeΦeKTHBHOi ziNoo6OBOi TexHicHoi NiTpumKn, kpaqioe 6e3 BuxiDnX.

Cisco, norottn Cisco Ta Linksys e ToprobMn MapkAm a60 3apecctpobAHm ToprobMn MapkAm KomnaHc Cisco Ta (a6o) II douphix KOMpaHy CUSA ta iHux KpaHax. Cnscok Toprobx Mapok Cisco MoKHa 3HaTn 3a aIpecoO www.cisco.com/go/trademarks. Yci iHsi Toprobi MapKn, 3raHani B cObmy DOKyMeHTi, HalejXb BiIDnoBIMn BlaChnKaM.

Huong dan su dung
Gói thieu
Huóng dān Buóc dàu lām quen nay có thegup bān két néi bó mo róng voi mang cúa minh va giai quyét cac su co cai dāt huǒng GAP. Ban có the tim them tro giúp tú nhím hōtro kháché hang dā giàngh giai thuǒng cúa chung tói trong 24 giò miǒ ngay va 7 ngay mòi tuàn tāi dia chi Linksys.com/support.
Nói dung
Tongquan. 1
Cach cai dāt bó mo róng pham vi. 2
Wi-Fi Protected SetupTM
Use one of the following for each Wi-Fi Protected Setup supported device:
- If your router has a Wi-Fi Protected Setup button, click or press that button, and then click the button on the right.

- Bám hoac nhán nút Wi-Fi Protected Setup (Thiet lâp Bao mát WiFi) trèn bó mo róng.
- Bam nut Wi-Fi Protected Setup (Thiet lap Bao mát WiFi) trân khác Ni-Fi Protected Setup (Thiet lap Bao mát WiFi)一则 thiet bi dinh tuyen (néu có) HOAC nhan và giú nut Wi-Fi Protected Setup (Thiet lap Bao mát WiFi) trân thiet bi dinh tuyen trong mô gy. Khi két giá doan tát,den Wi-Fi Protected Setup (Thiet lap Bao mát WiFi) trân bóRAND sang lien tuc.
- Néu ban su dung man hinh Wi-Fi Protected Setup (Thiet lap Bao mat WiFi) cua bô mo róng, bam OK trong man hinh dostrong vong hai phút.
Két não bäng PIN Croatia bo mo róng pham vi
Wi-Fi Protected SetupTM
Use one of following for each Wi-Fi Protected Setup™ supported device:
- If your client device has a Wi-Fi
Protected SetupTM button, click or press that button and then click the button on the right.

- Bám hoac nhán nút Wi-Fi Protected Setup (Thiet lâp Bao mát WiFi) trèn thiet bj khách.
- Bam nut Wi-Fi Protected Setup (Thiet lap Bao mat WiFi) tren man hinh Wi-Fi Protected Setup (Thiet lap Bao mat WiFi) cua bo mo rong HOAC nhán và giū nut Wi-Fi Protected Setup (Thiet lap Bao mat WiFi) nám ò ngǎn trèn cung cúa bo mo róng trong mòt giāy. Khi két não hoàn tát, den Wi-Fi Protected Setup (Thiet lap Bao mat WiFi) trèn bo mo róng s é sang lièn tuc.
- Bám OK trânmerican hinh Wi-Fi Protected Setup (Thiet lap Bao mát WiFi) cúa bó mo róngtron vong hai phút.
Den LED Nguon/Wi-Fi Protected Setup, (lien két Ethernet, hoat dong)
Loai cap CAT 5e
Ang-ten 2 (trong)
Báo mát khòngday Wi-Fi Protected AccessTM 2 (WPA2), Wi-Fi Protected AccessTM (WPA), WEP
Thong so ky thuaat co the thay dai khong bao truc.
Linksys RE2000
| Tên mäu sân phám | Linksys RE2000 |
| Mô tã mäu sân phám | Bô mù róng pham vi khùngiday Wireless-N bäng tân kép |
| Só mäu sân phám | RE2000 |
| Chuan | IEEE 802.11a, 802.11n, 802.11g, 802.11b, 802.3u |
| Cộng | Fast Ethernet, dêu néi C7arness cho cáp AC hoac kép cuc bó |
| Nút | Reset, Wi-Fi Protected SetupTM, Nguàn (chî kiếu chau Àu) |
| Đen LED | Nguàn/Wi-Fi Protected Setup, (lién két Ethernet, hoat dông) |
| Loai cap | CAT 5e |
| Âng-ten | 2 (trong) |
| Khà nang tháo ròi (c/k) | Khòng |
| BáoMZ mát khùngiday | Wi-Fi Protected AccessTM 2 (WPA2), Wi-Fi Protected AccessTM (WPA), WEP |
| Só bit)cua mã khói bǎoMZ | Mã hóa lên此時 128 bit |
Mói truncong
| Kích thucoc | 4,92" x 3,62" x 1,29" (125 x 92 x 33 mm) |
| Trùng lúng | 9,9 oz (280 g) |
| Nguôn diên | Nguôn diên AC/DC bèn trong 100-240V, 50/60Hz, 0,5A |
| Chùng khác | FCC, UL/cUL, ICES-003, RSS210, CE, Wi-Fi (IEEE 802.11a/b/g/n), WPA2TM, WMM®, Wi-Fi Protected SetupTM |
| Nhiêt do hoat dong | 32 dén 104°F (0 dén 40°C) |
| Nhiêt do bao quán | -4 dén 140°F (-20 dén 60°C) |
| Dô am hoat dong | 10 dén 80% không ngung tu |
| Dô am bao quán | 5 dén 90% không ngung tu |
Thong so ky thuaat co the thay dai khong bao truc.
Truy cap linksys.com/support dénhān duoc hó tro ký thuàt 24/7 dā giàngh giai thuong

Cisco, logo Cisco và Linksys là thuong hiê huac thuong hiê dā dang ky cua Cisco và /hoac cac cóng tv lien két cua Cisco tai Hoa Ky và cac quoc gia khac. Ban có the tim tháy dans sach cac thuong hiê cua Cisco tai www.cisco.com/go/trademarks. Tát ca cac thuong hiê khac duoc de cap déntrongh tai liu nay la tãi san cua cac chu sô húu tuong ng.