
NEXT - Stroller JANE - Free user manual and instructions
Find the device manual for free NEXT JANE in PDF.
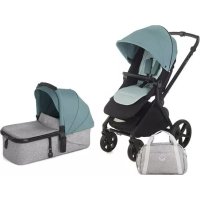
| Product type | Stroller |
| Brand | JANE |
| Model | NEXT |
| Maximum child weight | 15 kg |
| Recommended age | From 6 months (usable from birth with approved accessories) |
| Attachment system | PRO-FIX for car seats (Rebel, Matrix Light) and bassinet (Capazo Micro) |
| Safety harness | 5-point, adjustable |
| Brake | Parking brake acting on both rear wheels |
| Front wheels | Swivel with directional lock |
| Backrest recline | 4 positions, automatic return |
| Leg rest | 4 positions, automatic return |
| Push handle | 7 adjustable positions |
| Canopy | Adjustable with anchoring system and hooks |
| Bumper bar | Removable with safety covers |
| Storage basket | Maximum load: 4 kg |
| Folding | Compact with side lock and carrying handle |
| Care | Clean plastic parts with warm soapy water; removable fabric cover washable |
| Precautions | Do not leave child unattended; check locks; do not use for jogging |
Frequently Asked Questions - NEXT JANE
User questions about NEXT JANE
0 question about this device. Answer the ones you know or ask your own.
Ask a new question about this device
Download the instructions for your Stroller in PDF format for free! Find your manual NEXT - JANE and take your electronic device back in hand. On this page are published all the documents necessary for the use of your device. NEXT by JANE.
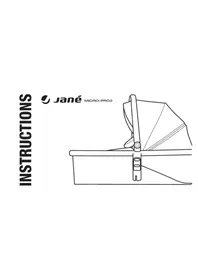
USER MANUAL NEXT JANE
Read these instructions carefully before use and keep them for future reference. Your child's safety may be affected if you do not follow these instructions.
This vehicle is intended for children from 6 months and up to 15kg
Suitable for children under 6 months old only with accessories approved by JANÉ.
Keep this instruction book for future reference.
WARNING: It may be dangerous to leave your child unattended.
WARNING: Ensure that all the locking devices are engaged before use.
WARNING: Use a harness as soon as your child can sit unaided.
WARNING: This seat is not suitable for children under 6 months.
WARNING: Any load hanging from the handlebar will
affect the stability of the pushchair.
WARNING: Always use the crotch strap in combination with the waist belt.
WARNING: Check that the pram body or seat unit attachment devices are correctly engaged before use.
WARNING: This seat is not suitable for running or skating.
The maximum amount carried in the basket must never exceed the weight indicated on the basket (4 kg).
This pushchair may only be used by a child.
Never use accessories that have not been approved by JANE, S.A.
The two side fastening points of the seat can be used to fasten a supplementary harness (see section 5).
WARNING: The child should be kept away from the mobile parts
when the responsible adult is handling these. The appearance of cutting, compression and pinch points are inevitable during these operations.
WARNING: It is important to make sure that the child is kept away from the pushchair while it is being folded or unfolded. The appearance of cutting, compression and pinch points are inevitable during these operations.
WARNING: Never leave the child in the pushchair when going up or down stairs or when travelling in any mode of transport.
WARNING: Never allow the child to stand up on the footrest or footboard.
WARNING: Do not put weight on top of the hood.
WARNING: When the brake is on make sure that the pushchair has braked correctly. It may be necessary to push the pushchair slightly for the brake to be fully activated.
1.- UNFOLDING THE PUSHCHAIR
To unlock your Next pushchair release the lever situated on the right rear leg pressing it as far as it will go.
Pull the handlebar upwards unfolding the pushchair. 1A
To finish unfolding it correctly, press the rear pedal while holding the handlebar as shown in the diagram. Make sure that the rear crosses are in the horizontal position, as shown in the diagram, this means the pushchair has been unfolded correctly. 1B
Once this has been done, fasten the locking lever to the correct part. 1C
WARNING: It is important to make sure that the child is kept away from the pushchair while it is being folded or unfolded.
WARNING: The appearance of cutting, compression and pinch points are inevitable during these operations.
2.- PRO-FIX SYSTEM
The chassis of your pushchair includes the PRO-FIX system, ready to incorporate both the Capazo Micro, as well as the baby carriers Rebel, Matrix Light. The PRO-FIX system makes it easy to fasten and remove these accessories onto and off the chassis, in a quick, simple and safe way, with them securely fastened onto the chassis. To do this, follow the instructions for these accessories carefully.
To access the PRO-FIX system area, lift up the upholstery on the armrests releasing it from the two rivets.
2A 2B
3.- SWIVEL WHEELS
Your Next has front swivel wheels that can be steered or the steering can be locked. To unlock the steering, pull the lever upwards.3A
To lock it, push the lever downwards once the wheels are aligned with the longitudinal axle of the pushchair.3B
4.- BRAKE
Your Next has a braking system that acts simultaneously on both rear wheels. Use it as a parking brake whenever you can, it is an important safety element.
To put the brake on, push the lever downwards. 4A
To release the brake, pull the lever upwards.48
WARNING: When the brake is on make sure that the pushchair has braked correctly. It may be necessary to push the pushchair slightly for the brake to be fully activated.
5.- SEAT BELT
Your Next has a safety harness so that your child is always safe. 5
Your Next has a system making it possible to adjust the position of the handlebar to use it more comfortably.
Press the button and keep it pressed while you adjust the position of the handlebar. It has 7 positions so you can choose
the one that suits you best. 6
The backrest of the Next can be reclined to make the child more comfortable. The reclining system has 4 positions. Pull the rear lever while you lower the backrest. To raise it there is
no need to press the lever, simply push the backrest as it is fitted with a free movement mechanism. 7
8.-ADJUSTING THE FOOTREST
The position of the footrest can also be adjusted to suit the child's position. It has 4 different positions.
Press button A situated on the footboard on both sides of the pushchair while you move the footrest downwards. To move it upwards you don't need to press the button as it has a free movement mechanism. 8A 8B
9.-PROTECTOR
To get the protector out, press the button situated on the lower part of the armrest. 9A 9B
Once it is out, put the covers in place designed to cover up the holes of the protector. 9C
These covers have two functions, an aesthetic one as they hide the hole and a safety one as they prevent the child from putting his fingers in the hole.
WARNING: The child should be kept away from the mobile parts when the responsible adult is handling these. The appearance of cutting, compression and pinch points are inevitable during these operations.
10.- REMOVING THE BACKREST
This function gives you extra space to be able to use the pushchair more conveniently with the different baby carriers. To remove the backrest, first remove the upholstery from the armrest. 10A
Press the button situated on the both sides of the base of the backrest while you take the tube of the backrest out of its fastening. 10B
Then release the reclining adjusters from the backrest by pushing upwards gently. 10C
11.- FOLDING THE PUSHCHAIR
Simultaneously pull the 2 levers upwards situated on the handlebar. 11A
Raise the pedal of the lower compass as shown in the diagram 11B
Then lightly press the folded pushchair and fasten the side catch so that it is easy to carry and move the pushchair. 11C
WARNING: It is important to make sure that the child is kept away from the pushchair while it is being folded or unfolded.
WARNING: The appearance of cutting, compression and pinch points are inevitable during these operations.
12.- TRANSPORTING THE PUSHCHAIR
The Next chassis has a carrying handle that also serves as a lock when folded. 12
13.- FITTING THE HOOD
Place the hood on the handlebar tubes, line the hood fastener up with the socket on the handlebar. Adjust the hood catch until it clicks. 13A
Then fasten the clasps on the upholstery to fit the hood correctly. 13B
WARNING: Do not put weight on top of the hood.
14.- MAINTENANCE
Do not expose the cover to sunlight for long periods.
Wash the plastic parts with warm water and soap and carefully dry all the components after.
The cover can be removed for washing.
INDEX
AVERTISSEMENTS 32
1.-POUR DEPLIER LA POUSSETTE 34
2.-SYSTÈME PRO-FIX 34
3.-ROUESPIVOTANTES 34
4.- FREIN 35
5.- CEINTURE DE SECURITE 35
6.- RÉGLAGE DE LA POSITION DE LA POIGNée 35
7.- RÉGLAGE DU DOSSIER 35
8.- RÉGLAGE DU REPOSE-JAMBES 36
9.-GARDE-CORPS 36
10.- DEMONTAGE DU DOSSIER 36
11.- POUR PLIER LA POUSSETTE 37
12.- TRANSPORT 37
13.- INSTALLATION DE LA CAPOTE 37
14.-ENTRETIEN 38
AVERTISSEMENT
WARNING: This is an attempt to make the discussion more clear. We do not intend to be a source of information about this, but rather we are interested in the fact that it is possible to find a solution for the problem.
Ha nC syHKe,3To n3O6paKeHNe IpaBnIbHOro packlaIbBaHnA KOLaKc.1B
CéIaB 3To, 3aΦnKcnpyTe pbyar 6nKnupOBKn.10
PINEJYTPREJKENHE:Heo6xOIMOy6eHNtC8,HTo pe6EHaHET pRdOM C KOJIACKO, KOrda cKJaIbIbAeTcNIMI paKJaIbIbAeTcR KOJIACKA.
PNEyIYPEKJDEHIE: NOBAnBEHnE ToeK CKaTMy N 3aXbata HeN63ExHy BO Bpemr TAKx OnepAcl.
2.-Cnctema Pro-FIX
Lsacc Baueoi Kojlckn ImeHOT cNCTemy PRO-FIX, npdehaaehenHy
3aTEM 3ACTHNETHE 3ACTEKKN, IMEOUOUEC HAOBKE, YTObI pRanabINbO yCTAHOBNTB KANT.13B
ПЕДУПЕЖДEHWE: He Knaactb TЯжelve BeuHa KaIaNT.
14.-yXoD
O6NIBKa HeNoJHAnHaXHbAaTbIOn pIpbMIMoCJHHeHMnYyAmu DNITbIbHO BPEM.
Пл actokobte chefto moite TeTNOB BOODcMbIOM, 3aTeM TQTaeTbHO BbCyWBnAbe BCE DcTANI.
06NBky MoXHO CHaTb DJIa CTnPK.
INDHOLDSFORTEGNELSE
ADVARSEL: Barnet违法犯罪 Barnet maybe he's a criminal. He's been charged with a crime involving the police. The man is probably an acquaintance with the police.

- 1.- UNFOLDING THE PUSHCHAIR
- 2.- PRO-FIX SYSTEM
- 3.- SWIVEL WHEELS
- 4.- BRAKE
- 5.- SEAT BELT
- 8.-ADJUSTING THE FOOTREST
- 9.-PROTECTOR
- 10.- REMOVING THE BACKREST
- 11.- FOLDING THE PUSHCHAIR
- 12.- TRANSPORTING THE PUSHCHAIR
- 13.- FITTING THE HOOD
- 14.- MAINTENANCE
- INDEX
- AVERTISSEMENTS 32
- AVERTISSEMENT
- 2.-Cnctema Pro-FIX
- 14.-yXoD
- INDHOLDSFORTEGNELSE
Brand : JANE
Model : NEXT
Category : Stroller