
HM-480X - Microwave FAGOR - Free user manual and instructions
Find the device manual for free HM-480X FAGOR in PDF.
| Product type | Built-in microwave oven |
| Brand | FAGOR |
| Model | HM-480X |
| Electrical supply | 220-240 V ~ 50 Hz, 16 A |
| Maximum power | Not specified (estimated 2500-3000 W) |
| Dimensions (W x H x D) | Standard built-in (estimated 595 x 595 x 550 mm) |
| Weight | Approximately 30 kg |
| Cooking type | Hot air, combined cooking, Turbo Grill, natural convection, single/double grill, defrost, preheating |
| Included accessories | Support grid, enamelled drip tray, rotisserie (skewer, 2 forks, removable handle, support cradle) |
| Lighting | Bulb 15 W, 220-240 V, 300 °C, E14 base |
| Programmer | Digital display, independent timer, delayed cooking, programmable end of cooking |
| Safety | Door lock, thermal protection, mandatory grounding |
| Maintenance and cleaning | Manual cleaning, avoid abrasive powders and steel wool |
| Spare parts and repairability | User-replaceable bulb (E14 base); other parts: after-sales service |
| General information | Manual available in several languages; FAGOR technical support |
Frequently Asked Questions - HM-480X FAGOR
User questions about HM-480X FAGOR
0 question about this device. Answer the ones you know or ask your own.
Ask a new question about this device
Download the instructions for your Microwave in PDF format for free! Find your manual HM-480X - FAGOR and take your electronic device back in hand. On this page are published all the documents necessary for the use of your device. HM-480X by FAGOR.
USER MANUAL HM-480X FAGOR
Chere Client, Cher Client
Safety recommendations P.86
How to install your oven
Electrical connections P.87-88
Dimensions for installation use P.89
Changing bulb P.90
How to use your oven
The oven programmer P.91
How to set the clock P.92
How to cook straightaway P.93
How to programme the cooking P.93-96
How to use the timer P.97
Cooking methods P.98-99
Looking after your oven P.100
Troubleshooting P.100
Throughout this manual,

indicates safety recommendations,
indicates advice to help you make the best use of your oven
Introduction
Dear Customer,
Thank you for buying a FAGOR oven.
Our design staff have produced a new generation of kitchen equipment, to make everyday cooking a pleasure.
You will find that the clean lines and modern look of your FAGOR oven blends in perfectly with your kitchen décor. It is easy to use and performs to a high standard.
FAGOR also makes a range of products that will enhance your kitchen such as hobs, extractor hoods, built-in dishwashers and refrigerators. There are models to complement your new FAGOR oven.
Of course, we make every effort to ensure that our products meet all your requirements, and our Customer Relations department is at your disposal, to answer all your questions and to listen to all your suggestions (see back cover of manual).
FAGOR has always been a leader in the development of new products, thus enhancing the quality of everyday life by providing increasingly efficient products, that are easy to use, respect the environment, and are attractive and reliable.
The FAGOR name.
Your oven

OVEN FEATURES
1 Temperature control
4 Light
2 Timer
5 Rail positions
3 Programme selector
6 Hole for rotisserie
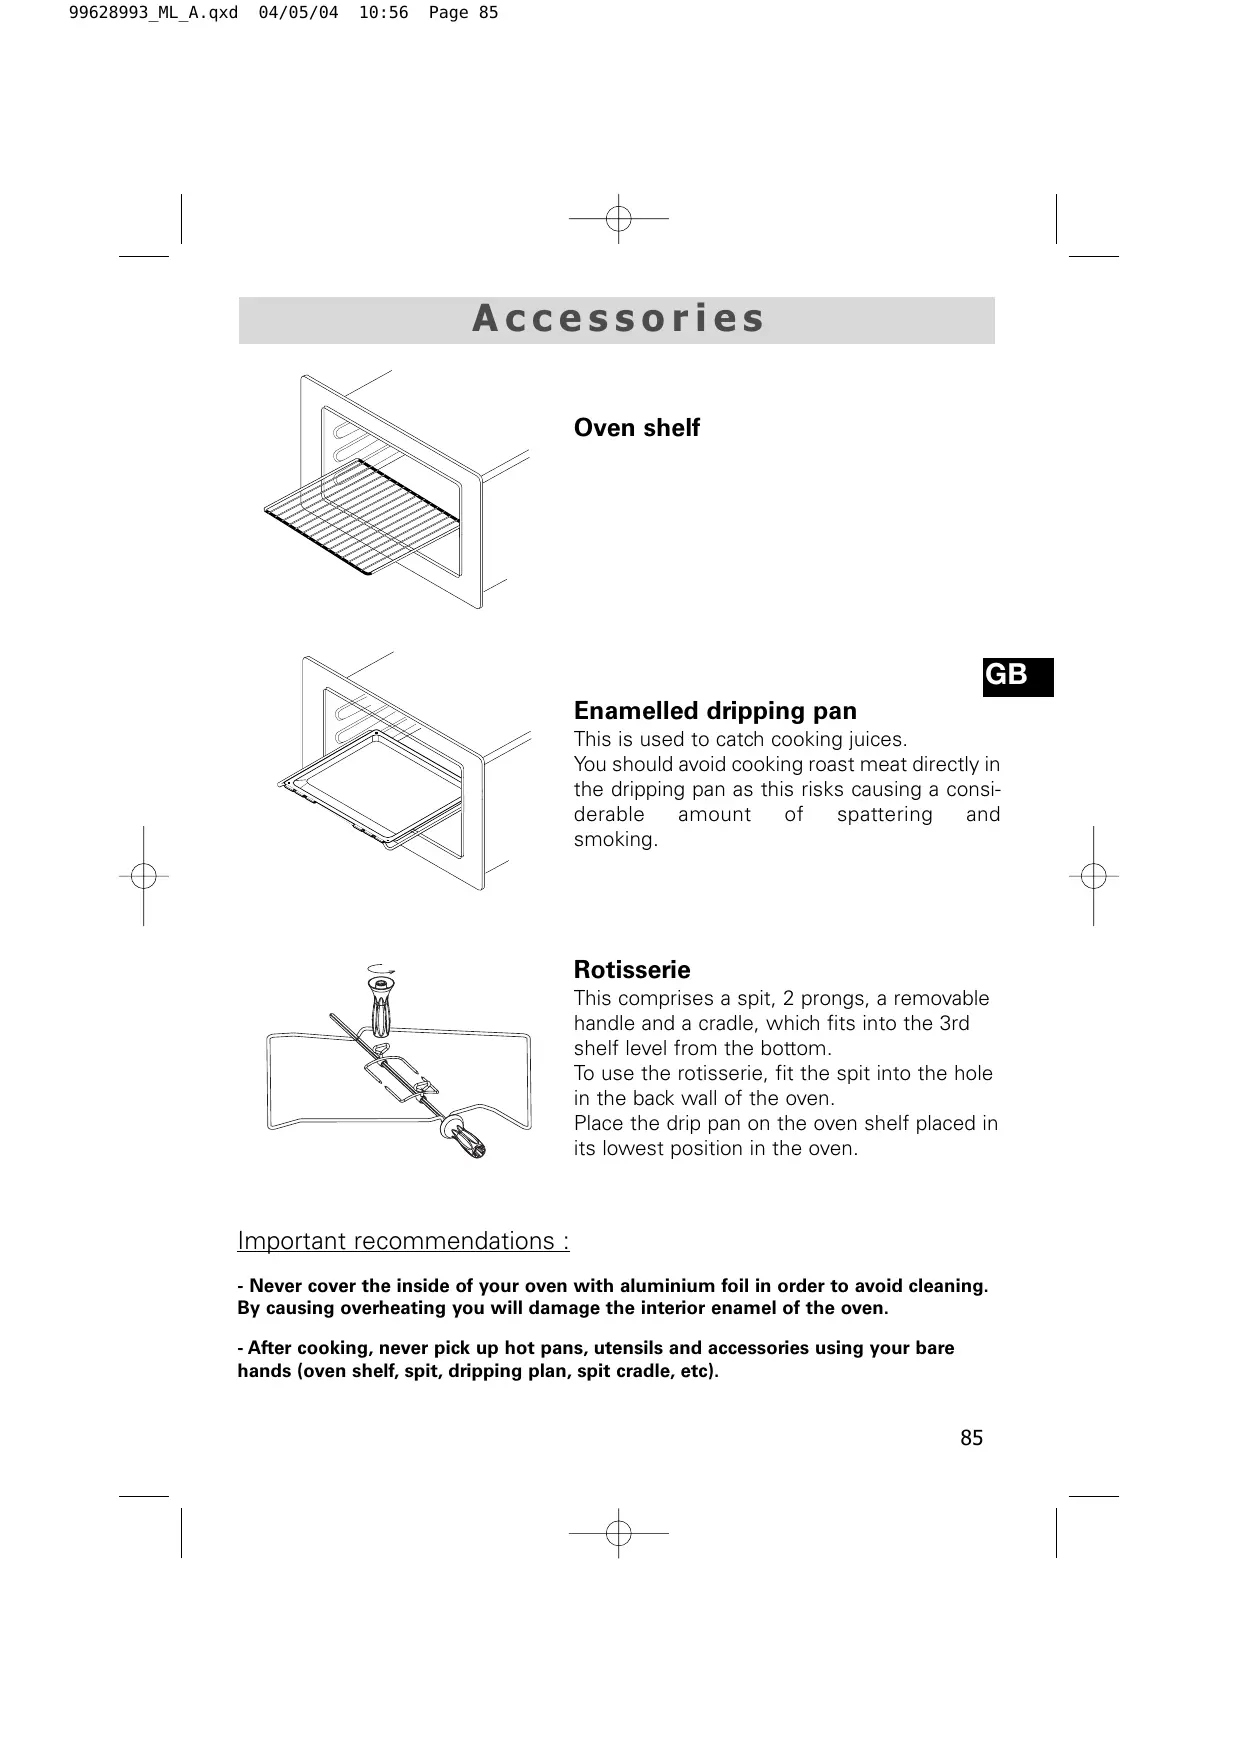
Accessories
Oven shelf
GB
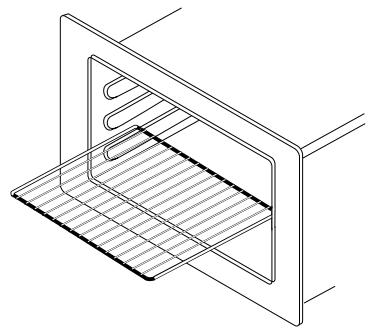
Enamelled dripping pan
This is used to catch cooking juices.
You should avoid cooking roast meat directly in the dripping pan as this risks causing a considerable amount of spattering and smoking.
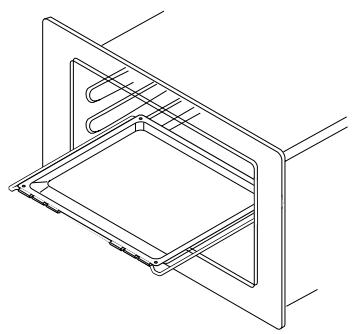
Rotisserie
This comprises a spit, 2 prongs, a removable handle and a cradle, which fits into the 3rd shelf level from the bottom.
To use the rotisserie, fit the spit into the hole in the back wall of the oven.
Place the drip pan on the oven shelf placed in its lowest position in the oven.
Important recommendations :
- Never cover the inside of your oven with aluminium foil in order to avoid cleaning. By causing overheating you will damage the interior enamel of the oven.
- After cooking, never pick up hot pans, utensils and accessories using your bare hands (oven shelf, spit, dripping plan, spit cradle, etc).

Safety recommendations
Please read these instructions before installing and using your oven.
The oven has been designed for domestic use only for cooking food. No asbestos has been used in its construction.
USING FOR THE FIRST TIME:
Before you use your oven for the first time, leave it empty and, with the door closed, turn it on to maximum temperature and let it heat up for 15 minutes. This "runs the oven in". During this time there may be some smell from the mineral wool that insulates the oven and there could be some smoke. This is perfectly normal.
NORMAL USE:
- Always close the door properly. The oven is fitted with a seal designed to work with a closed door.
- Never lean or let anyone sit on the oven door when it is open.
- Do not use the grill when the door is half open as the accessible parts or the outer surfaces may get hot. As a safety measure, keep children well away.
- When the oven is on it will get hot. Take care not to touch the heating elements inside the oven.
- Always protect your hands with oven gloves or something similar when removing food, accessories or containers from the oven.
- Do not line your oven with kitchen foil. The metal will increase the heat produced and could ruin the food and damage the enamel.
- Never use a spray or a high-pressure washer to clean the oven.
- During the cleaning cycle accessible surfaces become much hotter than during normal cooking. Keep children at a distance.
How to install your oven
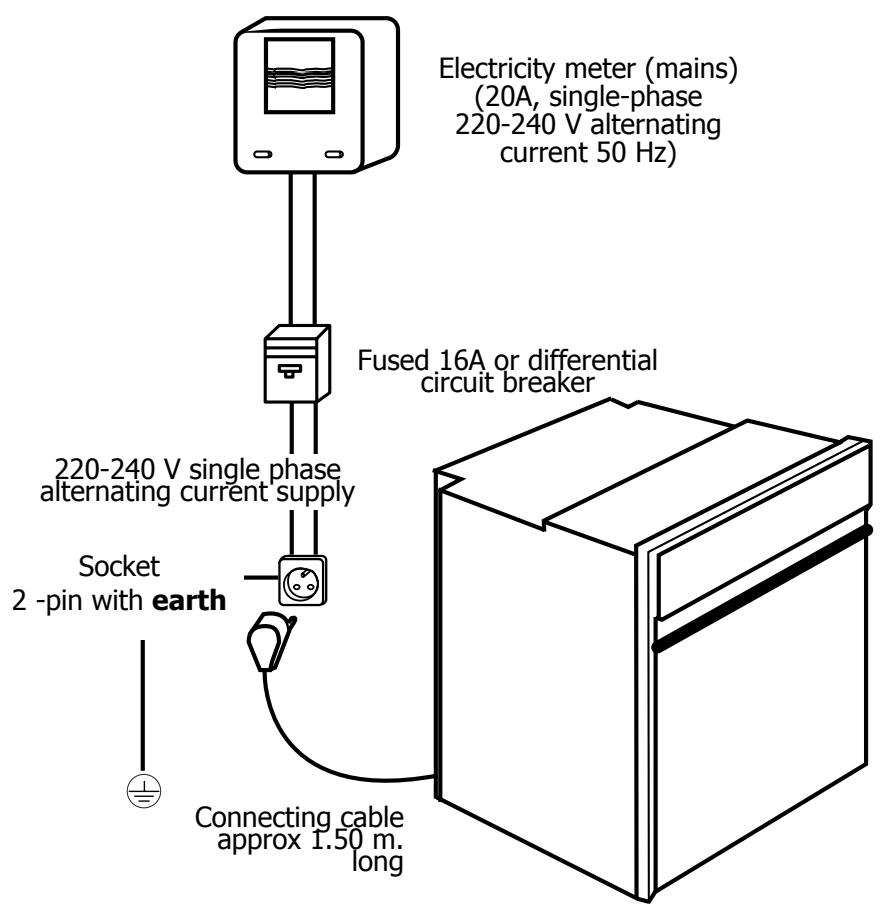
Electrical connections
GB
- Before connecting your oven, make sure you are using the correct size cable. The cross-section should be the same as the cable connected to the oven. Use a 16-amp fuse.
How to install your oven
Connecting up
As a specialist, you alone are competent to install and connect up Fagor appliances.
Our guarantee therefore applies only and exclusively to appliances which have been installed and connected up by you in accordance with the provisions of current regulations.
Failure to meet this requirement would incur the fitter's liability and release the Fagor company from any liability.
Electrical connections must be made as per the connection plate fixed to the back of the appliance, by an electrical fitter. Who must ensure that the appliance has been connected up in accordance with fitting instructions and local regulations.
Where the appliance is not connected to the mains electricity supply by a plug, an omni polar cutout device (with a contacts gap of at least 3mm ) must be fitted on the supply side of the connection to meet safety requirements.
NOTE: When power is connected, the electronics of the oven are initialised; this neutralizes the lighting for a few seconds.
If the oven is connected to the power supply by a plug, this must remain accessible once the oven has been fitted.
We cannot accept any liability in the event of an accident resulting from non-existent or faulty earthing.
If the power cable is damaged, it must be replaced by the manufacturer, his after-sales service department or similarly qualified personnel in order to avoid all risks of danger.

We cannot accept any liability in the event of an accident resulting from non-existent or faulty earthing.
How to install your oven
Dimensions for installation use
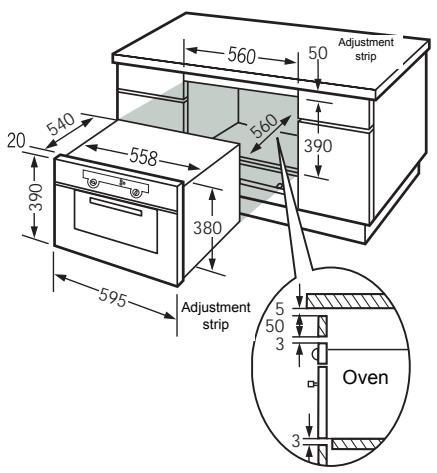
The oven has an high-performance air circulation system which gives remarkable results for cooking and cleaning, as long as the following points are applied:
- The oven may be fitted either underneath a work surface or in a suitable sized column unit. Cut a hole measuring 50 ~mm × 50 ~mm in the back wall of the insert space for the electric cable to pass through (please see diagram above).
- Centre the oven in the unit, and make that it is at least 2mm from any other unit beside it.
- The unit must be heat-resistant (or covered with heat-resistant material).
- The oven must be disconnected from the power supply while it is being installed in the unit.
- For greater stability, fix the oven in the unit with 2 screws in the holes on the side uprights (see diagram). Make a 3mm diameter hole in the side of the unit first to prevent the wood from splitting.

If you are unsure about fitting this oven yourself please use a qualified electrician.
Changing a bulb
- The light bulb is housed in the ceiling of your oven.

Warning! Switch off the power at the main switch before attempting to change the bulb. Leave the oven to cool if necessary.
a) Unscrew the protective shade (see diagram).
b) Unscrew the bulb, turning it to the left.
A bulb is used:
-15W
- 220-240 V
- 300^
- E 14 fitting
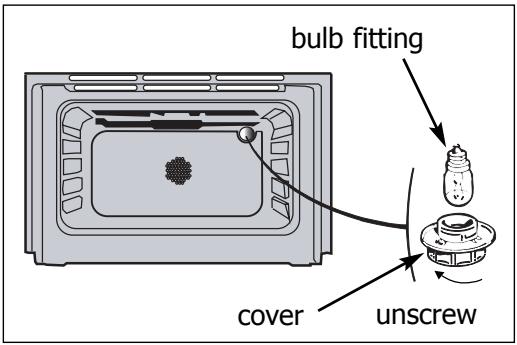
c) Change the bulb, replace the shade and switch your oven back on at the mains.

Using a rubber glove makes it easier to unscrew the cover and the bulb.
How to use your oven
1. The oven programmer
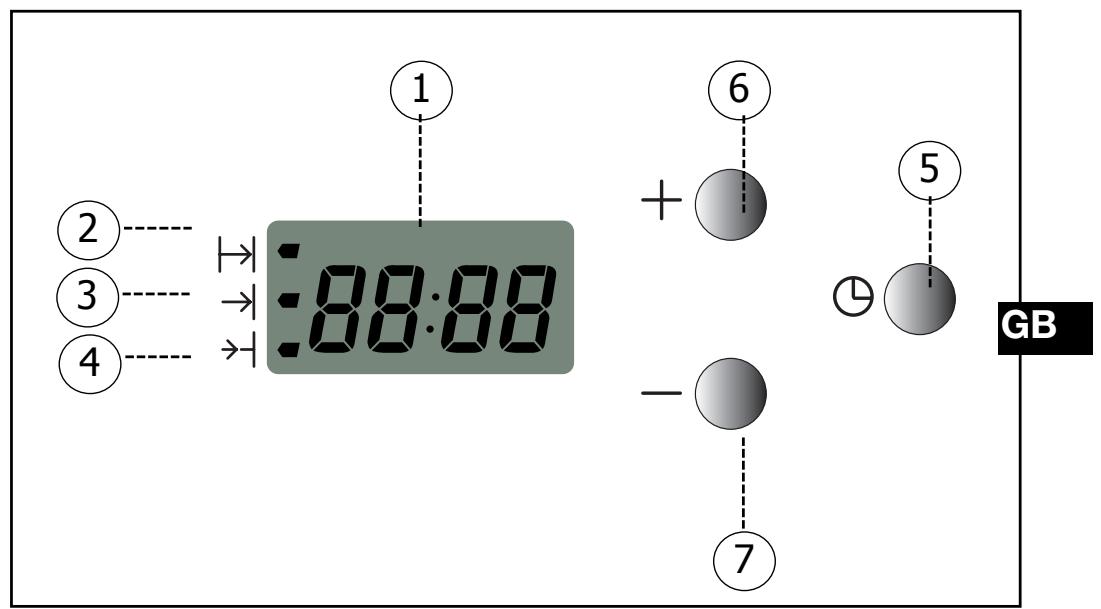
DESCRIPTION OF THE PROGRAMMER
Time and duration display
2 Cooking time symbol
3 Cooking complete symbol
4 Independent timer
5 Button providing access to the various time setting programmes
6 7 Time adjustment buttons
How to use your oven
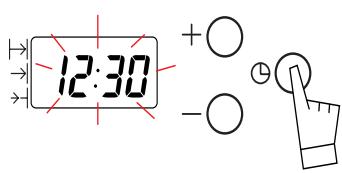
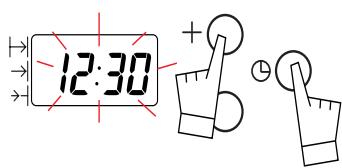
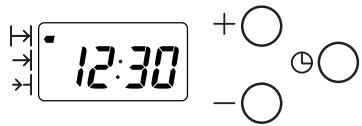
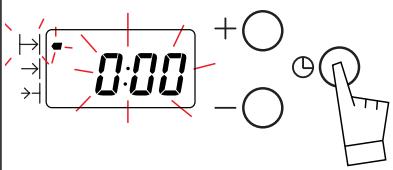
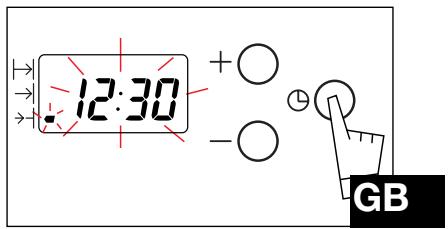
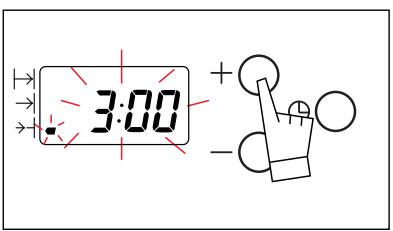
2. How to set the clock
a) When the oven is first switched on at the mains
- The display blinks.
- Press on the + and - buttons until the correct time is shown (Keeping a finger on the button, rather than tapping it, is quicker).
- Press button to confirm the time.
The example shows 12.30.
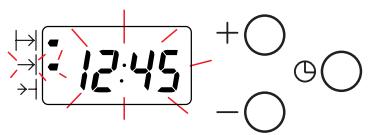
b) Altering the clock
- Press on both + and - buttons together for a few seconds until the display blinks.
- Adjust the time using the + and - buttons.
- Confirm the time by pressing .

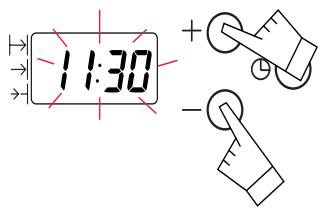
If you forget to confirm the time by pressing button , the oven will do it automatically after a few seconds.
How to use your oven
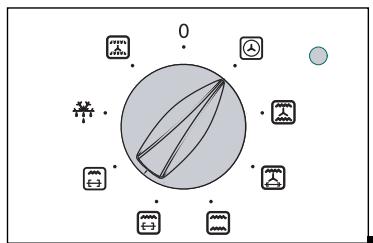
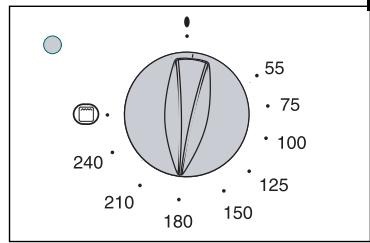
3. How to cook straightaway
The timer display only shows the time of day. It should not be blinking.
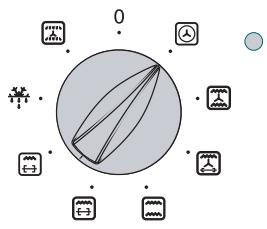
- Choose the cooking method:
- Turn the dial until it is indicating your choice.
- Example: position "④".
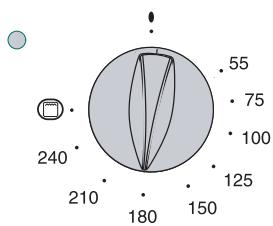
- Choose the cooking temperature
- Turn the dial (thermostat) to the temperature recommended for the food you are cooking.
- Example: 180^ temperature mark.
- When you have done both these the oven heats up and the temperature light glows.
GB
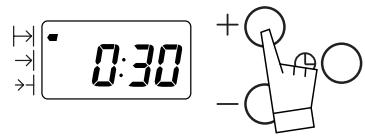
4. How to programme the cooking
a) To delay cooking :
- Choose the cooking method.
Turn the dial until it is indicating your choice. Example: position "④" - Choose the cooking temperature.
Turn the dial (thermostat) to the temperature recommended for the food you are cooking. Example: 180^ temperature mark.
How to use your oven
- Choose the cooking time.
Press once on the button.
The clock shows 0:00 and the cooking time symbol blinks. You can now instruct the oven how long to cook for. It is possible to select your chosen cooking time.
Press the + and - buttons until your chosen time is shown.
The example shows 30 minutes.
The count-down starts as soon as you stop pressing the + and - buttons.
- The oven heats up and the temperature light glows.
The cooking time symbol glows steadily and the time of day is displayed again.
When the cooking time is over (the pre-programmed time ends),
- The oven switches off,
- The cooking time symbol goes out,
- The display shows 0:00
- The oven gives a series of bleeps for several minutes.
To stop the bleeper, press any button on the oven front. The time is displayed again.

How to use your oven
b) Delayed cooking with a pre-selected cooking time: (you decide when cooking will stop)
- Set the temperature and select the cooking method.
Example: position "人"
180^ temperature mark.
Now press once on the button.
The clock shows 0:00 and the cooking time symbol blinks. You can now instruct the oven how long to cook for 23h59.
- Press the + and - buttons to enter the length of time the food is to cook for.
The example shown is 25 minutes. As soon as you press the + button the blinking stops.
- Press the button until the end of cooking time blinks with its associated symbol. Adjustment is now possible.

How to use your oven
- Set the end of cooking time required by pressing the + or - buttons.
Example shown: end of cooking at 1 pm (13:00)
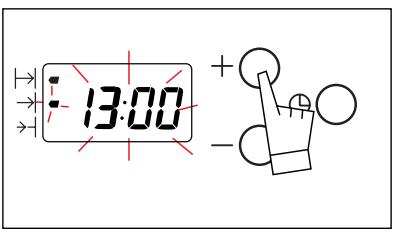
The end of cooking is automatically recorded after a few seconds.
Following these operations, the heating of the oven is delayed so that cooking ends at the set time (e.g. : 13h00).
When the cooking starts the end of cooking symbol is off.
When the cooking time is over (the pre-programmed time ends),
- The oven switches off,
- The cooking time symbol goes out,
- The display shows 0:00
- The oven gives a series of bleep for several minutes.
To stop the bleeping, press any of the buttons on the panel. The time of day will then be displayed again.

Warning! At this point you must switch the temperature and method controls off; otherwise the oven will start warming up again.
It is possible to :
- Change the cooking time at any moment.

- Consult the remaining cooking time at any moment by
pressing on the button.
- Cancel the programmed cooking cycle at any moment by
button pressed in until you hear a beep.
How to use your oven
5. Using the timer?
Your oven is also equipped with a timer which operates fully independently of the oven, making it possible to "count down" a chosen amount of time.
- Press several times on the button until the timer indicator and the corresponding display start flashing .
- Set the chosen time by pressing the + or - buttons. Adjustment is in 30-second increments and the time displayed is in minutes/seconds.
Holding the button pressed in makes it possible to rapidly scroll through the times.
The countdown begins several seconds after adjustment has been carried out and is permanently visible on the display.
When the timer has finished counting down the chosen time, it issues a series of beeps (displaying 0:00).
You can turn off the beeps by pressing once on the button of your choice.

It is possible to modify or cancel the programmed timer setting at any time.
6. Cooking methods
| Symbol | Feature | Descr |
| Fan oven A heater element at the back of the oven and the fan help cook the food. | Oven rapidly reaches the selec Some dishes can start off in | |
| Combined Cooking is carried out by the lower and upper elements, at the bottom of the oven, and also by the air circulation device. | Three combined heat sources the bottom of the oven, a little and a slight heat from the gril food. | |
| Turbo grill Cooking is done alternately by the top element and by the fan. | This mode combines the effects the grill. The grill directs infrared and the air movement created l enhances this effect. | |
| Conventional convection Food is cooked by a top and bottom element. No fan. | Pre-heating needed to reach temperature. | |
| Single and double grill Cooking is carried out by the upper element. | The double grill covers the fu oven shelf. The single grill is equally effie smaller area. | |
| Defrosting The defrosting function is provided by the fan, which circulates ambient air around the food product to be defrosted. | The temperature never exceeds 50°C, thereby providing optimum defrosting conditions. | |
| Preheating | To be used before placing ce oven |
Cooking methods
ription
lected temperature. the cold oven.
Recommendations
Recommended to prevent meat drying out, and for cooking vegetables and fish and food placed on up to 2 shelves.
s: lots of heat attle ambient heatill to brown your
Recommended for juicy quiches, pies and fruit tarts.
GB
s of the turbine and ed energy at the food by the turbine
Recommended for sealing red and white meat and cooking it through and through. Also for gently cooking poultry up to 2kg.
the required
Recommended for food requiring slow, careful cooking such as game and braising joints. Ideal for sealing red meat joints and simmering lidded casseroles whose contents have been partially cooked on the hob first.
ull surface of the
icient, but covers a
Recommended for grilling cutlets, sausages, slices of bread and Mediterranean prawns placed on the oven shelf.
certain dishes in the
Recommended for defrosting meat and poultry. Use the shelf with the dripping pan placed below it, or the pastry tray. Never use the juice from defrosted meat, as this is not edible.
Thermostat adjusted to the cooking temperature. At the end of the preheating cycle, do not forget to turn the cooking selector to the chosen cooking position.
Looking after your oven
Cleaning the inside the oven area
Before cleaning your oven by hand, be sure to allow the appliance to cool down.
Generally, abrasive scouring powders, metal cleaning pads/sponges or sharp objects should not be used.
- The door surrounds and the oven cavity must always be kept clean. If these surfaces become damaged as a result of a build up of soiling, call a specialised technician before using your appliance.
Troubleshooting
If you're not sure that your oven is working properly, it doesn't necessarily mean that there's a problem. In all cases, check the following points:
If you realize that..
The oven isn't heating.
Possible causes
- The oven isn't connected to the power supply.
The fuse has blown. - The temperature selected is too low.
- The thermostat is faulty.
What should you do?
- Connect to power supply.
- Change the fuse, checking that it is 16A.
- Increase the temperature selected.
- Contact the After-Sales Service.
The T^ (temperature) indicator remains permanently lit up.
The light inside the oven isn't working.
The cooling fan keeps working after the oven is turned off.
- The thermostat is faulty.
- The lamp is unusable.
- The oven isn't connected to the power supply or the fuse has blown.
The fan can keep working for up to an hour after cooking has finished, -
If it has not stopped after 1 hour.
-
Contact the After-Sales Service.
- Change the bulb.
- Connect to power supply or change fuse.
- Open the door to help the oven cool down more quickly.
- Contact the After-Sales Service.
Copy here the details that are on your oven manufacturer's plate:
100
FAGOR
MADE IN EU
220 - 240V 50 Hz

N° SER.
REF.
TYPE
CONS.N°214
DE
Inhalt
Vorwort S.103
- How to install your oven
- How to use your oven
- Introduction
- Your oven
- OVEN FEATURES
- Accessories
- Enamelled dripping pan
- Rotisserie
- Safety recommendations
- USING FOR THE FIRST TIME:
- NORMAL USE:
- Dimensions for installation use
- If you are unsure about fitting this oven yourself please use a qualified electrician.
- Changing a bulb
- The oven programmer
- DESCRIPTION OF THE PROGRAMMER
- How to set the clock
- How to cook straightaway
- How to programme the cooking
- It is possible to :
- Using the timer?
- Cooking methods
- Cooking methods
- ription
- Recommendations
- GB
- Looking after your oven
- Cleaning the inside the oven area
- Troubleshooting
- If you realize that..
- Possible causes
- What should you do?
- Inhalt
Brand : FAGOR
Model : HM-480X
Category : Microwave