CH-ARG90X - Basket FAGOR - Free user manual and instructions
Find the device manual for free CH-ARG90X FAGOR in PDF.
| Product type | Range hood |
| Brand | FAGOR |
| Model | CH-ARG90X |
| Dimensions (W x D x H) | 90 cm x 50 cm x 30 cm (estimation) |
| Weight | ~15 kg (estimated) |
| Electrical supply | 220-240 V, 50/60 Hz (check rating plate) |
| Suction power | Up to 650 m³/h (estimated) |
| Lighting | 2 halogen lamps 12V 20W max GU4 (30° Ø35) |
| Controls | Touch buttons: light on/off, 4 speeds (low, medium, high, intensive), motor stop, filter reset |
| Grease filter | Washable metal filter in dishwasher (monthly cleaning) |
| Activated carbon filter | Optional for recirculation mode, washable every 2 months, replacement every 3 years |
| Operating modes | External extraction (ducted) or internal recirculation (filtered) |
| Installation | Wall-mounted, with telescopic chimney. Minimum distance: 50 cm (electric) / 65 cm (gas/mixed) |
| Energy consumption | ~250 W (estimated) |
| Noise level | ~55 dB (estimated) |
| Safety | Disconnect power before maintenance, emergency stop, fire protection (do not flambé under the hood) |
| Maintenance | Clean interior/exterior monthly. Panel washable with neutral detergent. No alcohol. |
| Included accessories | Telescopic chimney, decorative panel, fixing kit (plugs, screws), deflector (for recirculation) |
| Optional accessories | Activated carbon filter, exhaust hose, fixing clamps |
| Warranty | Standard manufacturer's warranty (check according to country) |
| Repairability | Spare parts available (lamps, filters, motor) from after-sales service |
Frequently Asked Questions - CH-ARG90X FAGOR
User questions about CH-ARG90X FAGOR
0 question about this device. Answer the ones you know or ask your own.
Ask a new question about this device
Download the instructions for your Basket in PDF format for free! Find your manual CH-ARG90X - FAGOR and take your electronic device back in hand. On this page are published all the documents necessary for the use of your device. CH-ARG90X by FAGOR.
USER MANUAL CH-ARG90X FAGOR
EN - Instruction on mounting and use
Consult the designs in the front pages referenced in the text by alphabet letters.
Closely follow the instructions set out in this manual. All responsibility, for any eventual inconveniences, damages or fires caused by not complying with the instructions in this manual, is declined.
Note: the elements marked with the symbol (*) are optional accessories supplied only with some models or elements to purchase, not supplied.

Caution
WARNING! Do not connect the appliance to the mains until the installation is fully complete.
Before any cleaning or maintenance operation, disconnect the hood from the mains by removing the plug or disconnecting the home mains switch.
The appliance is not intended for use by children or persons with impaired physical, sensorial or mental faculties, or if lacking in experience or know-how, unless they are under supervision or have been trained in the use of the appliance by a person responsible for their safety.
Children should be monitored to ensure that they do not play with the appliance.
Never use the hood without effectively mounted grating!
The hood must NEVER be used as a support surface unless specifically indicated.
The premises must be sufficiently ventilated, when the kitchen hood is used together with other gas combustion devices or other fuels.
The suctioned air must not be conveyed into a conduit used for the disposal of the fumes generated by appliances that combust gases or other fuels.
The flaming of foods beneath the hood itself is severely prohibited.
The use of exposed flames is detrimental to the filters and may cause a fire risk, and must therefore be avoided in all circumstances.
Any frying must be done with care in order to make sure that the oil does not overheat and burst into flames.
As regards the technical and safety measures to be adopted for fume discharging it is important to closely follow the relations provided by the competent authorities.
The hood must be regularly cleaned on both the inside and outside (AT LEAST ONCE A MONTH, it is in any event necessary to proceed in accordance with the maintenance instructions provided in this manual)..
Failure to follow the instructions as concerns hood and filter cleaning will lead to the risk of fires.
Do not use or leave the hood without the lamp correctly mounted because of the possible risk of electric shocks.
We decline any responsibility for any problems, damage or fires caused to the appliance as the result of the non-observation of the instructions included in this manual.
This appliance is marked according to the European directive 2002/96/EC on Waste Electrical and Electronic Equipment (WEEE). By ensuring this product is disposed of correctly, you
will help prevent potential negative consequences for the environment and human health, which could otherwise be caused by inappropriate waste handling of this product.

on the product, or on the documents product, indicates that this appliance may usehold waste. Instead it should be taken collection point for the recycling of electrical component. Disposal must be carried out in local environmental regulations for waste
For more detailed information about treatment, recovery and recycling of this product, please contact your local council, your household waste disposal service or the shop where you purchased the product.
Use
The hood is designed to be used either for exhausting or filter version.
Ducting version
The hood is equipped with a top air outlet B for discharge of fumes to the outside (exhaust pipe and pipe fixing clamps not provided).
Attention!
If the hood is supplied with carbon filter, then it must be removed.
Filter version
Should it not be possible to discharge cooking fumes and vapour to the outside, the hood can be used in the filter version, fitting an activated carbon filter and the deflector F on the support (bracket) G, fumes and vapours are recycled through the top grille H by means of an exhaust pipe connected to the top air outlet B and the connection ring mounted on the deflector F (exhaust pipe and pipe fixing clamps not provided).
Attention!
If the hood is not supplied with carbon filter, then it must be ordered and mounted.
The models with no suction motor only operate in ducting mode, and must be connected to an external suction device (not supplied).
Installation
The minimum distance between the supporting surface for the cooking vessels on the hob and the lowest part of the range hood must be not less than 50cm from electric cookers and 65cm from gas or mixed cookers.
If the instructions for installation for the gas hob specify a greater distance, this must be adhered to.

Electrical connection
The mains power supply must correspond to the rating indicated on the plate situated inside the hood. If provided with a plug connect the hood to a socket in compliance with current regulations and positioned in an accessible area. If it not fitted with a plug (direct mains connection) or if the plug is not located in an accessible area apply a bi-polar switch in accordance with standards which assures the complete disconnection of the mains under conditions relating to overcurrent category III, in accordance with installation instructions.
Warning: Before re-connecting the hood circuit to the mains supply and checking the efficient function, always check that the mains cable is correctly assembled.
Mounting
Before beginning installation:
- Check that the product purchased is of a suitable size for the chosen installation area.
To facilitate installation, remove the fat filters and the other parts allowed and described here, dismantle and mount it.
To remove see also the relative paragraphs.
- Remove the active carbon (*) filter/s if supplied (see also relative paragraph). This/these is/are to be mounted only if you want to use the hood in the filtering version.
- Check (for transport reasons) that there is no other supplied material inside the hood (e.g. packets with screws (), guarantees (), etc.), eventually removing them and keeping them.
- If possible, disconnect and move freestanding or slide-in range from cabinet opening to provide easier access to rear wall/ceiling. Otherwise put a thick, protective covering over countertop, cooktop or range to protect from damage and debris. Select a flat surface for assembling the unit. Cover that surface with a protective covering and place all canopy hood parts and hardware in it.
- Disconnect the hood during electrical connection, by turning the home mains switch off.
- In addition check whether near the installation area of the hood (in the area accessible also with the hood mounted) an electric socket is available and it is possible to connect a fumes discharge device to the outside (only suction version).
- Carry out all the masonry work necessary (e.g. installation of an electric socket and/or a hole for the passage of the discharge tube).
Expansion wall plugs are provided to secure the hood to most types of walls/ceilings. However, a qualified technician must verify suitability of the materials in accordance with the type of wall/ceiling. The wall/ceiling must be strong enough to take the weight of the hood. Do not tile, grout or silicone this appliance to the wall. Surface mounting only.
Attention! The chimney is predisposed for installation of the filter Version.
In certain models where it is required to use the cooker hood in the suction version then it is possible to overturn the upper section of the chimney
and insert it inside the lower section of the chimney so that the air-exit perforations are not visible.
The chimneys in which this operation is possible are recognizable by their bracket fixing points G which are repeated also in the lower side of the upper section of the chimney.
Installation wall model
Fig. 5
- Using a pencil, draw a line on the wall, extending up to the ceiling, to mark the centre. This will facilitate installation.
- Rest the drilling template against the wall: the vertical centre line printed on the drilling template must correspond to the centre line drawn on the wall, and the bottom edge of the drilling template must correspond to the bottom edge of the hood.
- Place the lower support bracket on the perforation diagram making it coincide with the traced triangle, mark the two external holes and perforate. Remove the perforation diagram, insert two wall-dowels and fix the support bracket of the hood with two 5 × 45 ~mm screws.
- Hang the hood onto the lower bracket.
- Adjust the distance of the hood from the wall.
- Adjust the horizontal position of the hood.
- Using a pencil mark the cooker hood permanent drill hole inside the suction group (2 fixing points are necessary for permanent mounting).
- Remove the hood from the lower bracket.
- Drill at the point marked (Ø8mm).
- Insert 2 wall screw anchors.
- Apply the flues support bracket G to the wall adherent to the ceiling, use the flues support bracket as a perforation diagram (if present, the small slot on the support must coincide with the line drawn previously on the wall) and mark two holes with a pencil. Make the holes (Ø8mm), and insert 2 dowels.
- Fix the chimney support bracket to the wall using two 5 × 45 ~mm screws.
- Hook the hood onto the bottom bracket.
- Fix the hood into its final position on the wall (ABSOLUTELY ESSENTIAL).
- Connect a pipe (pipe and pipe clamps not provided, to be purchased separately) for discharge of fumes to the connection ring located over the suction motor unit. If the hood is to be used in ducting version, the other end of the pipe must be connected to a device expelling the fumes to the outside. If the hood is to be used in filter version, then fix the deflector F to the chimney support bracket G and connect the other extremity of the pipe to the connection ring placed on the deflector F.
- Connect the electricity.
-
Insert the flue into its housing over the hood to cover the suction unit completely.
-
Fix the lower section of the chimney with two screws.
- Fix them above with 2 screws (19a) to the G flues support bracket (19b).
Remount the carbon filter frame and the fat/s filter/s and check the perfect functioning of the hood.
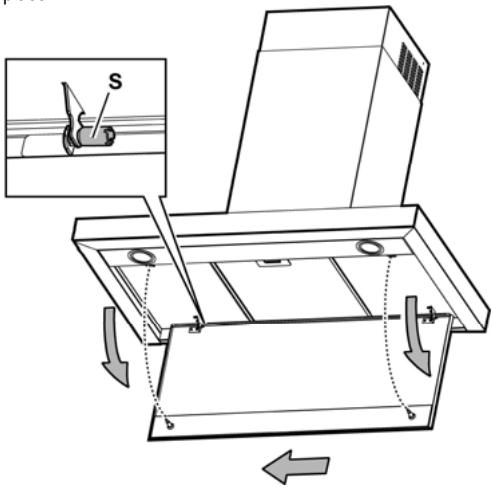
Installing the panel
(number and form of the panels can vary on the basis of the model)
The panel is supplied dismounted.
Hook the panel onto the pins of the hood and fix with the supplied latch S (the number varies on the basis of the model - safety-fixing compulsory!).
Rotate the panels to cover the suction area and hook to the pins, pressing with decision.
Check that the panel is blocked in position. Fig. 6
Description of the hood
Fig. 1
- Control panel
- Grease filter
- Grease filter release handle
- Halogen lamp
- Vapour catcher
- Telescopic chimney
- Air outlet (used for filter version only)
- Panel
Operation
Use the high suction speed in cases of concentrated kitchen vapours. It is recommended that the cooker hood suction is switched on for 5 minutes prior to cooking and to leave in operation during cooking and for another 15 minutes approximately after terminating cooking.
Control panel
To select the functions of the hood just touch the commands.

Light key ON/OFF

Intensive speed selection key (suction power) - duration 5 minutes - press again to return to previous setting.

High-speed selection key (suction power).

Medium-speed selection key (suction power) - when flashing it indicates the need to wash or

replace the carbon filter. This signal is normally deactivated. Press keys 1 and 2 at the same time to activate it. At first only key 1 will flash and then both keys 1 and 2 to indicate activation. Repeat the operation to deactivate the signal. At first keys 1 and 2 will flash and then only key 1 to indicate deactivation.
1
Low-speed selection key (suction power) -- when flashing it indicates the need to wash the fats filter.

Motor key OFF (stand by) - excludes the electronics - reset wash/replace filters signals.
MOTOR OFF
Press briefly to switch the motor off.
RESET FILTERS SIGNALS
After having carried out maintenance of the filters, press the key for 3 seconds. Flashing led 1 (fats filter) or 2 (carbon filter) will stop flashing.
EXCLUDING THE ELECTRONICS
Press the key for 3 seconds. The hood command electronics will be excluded.
This function can be useful during the product cleaning operations.
Just repeat the operation to reinsert the electronics.
If the hood fails to operate correctly, briefly disconnect it from the mains power supply for almost 5 sec. by pulling out the plug. Then plug it in again and try once more before contacting the Technical Assistance Service.
Maintenance
ATTENTION! Before performing any maintenance operation, isolate the hood from the electrical supply by switching off at the connector and removing the connector fuse.
Or if the appliance has been connected through a plug and socket, then the plug must be removed from the socket.
Cleaning
The cooker hood should be cleaned regularly (at least with the same frequency with which you carry out maintenance of the fat filters) internally and externally. Clean using the cloth dampened with neutral liquid detergent. Do not use abrasive products. DO NOT USE ALCOHOL!
WARNING:
Failure to carry out the basic cleaning recommendations of the cooker hood and replacement of the filters may cause fire risks.
Therefore, we recommend oserving these instructions.
The manufacturer declines all responsibility for any damage to the motor or any fire damage linked to inappropriate maintenance or failure to observe the above safety recommendations.
Panel
Attention! Hold the panel with both hands when dismantling and re-mounting in position to avoid it falling and causing damage to people or things.
Dismantling:
pull the panel (FRONT SIDE) downward with decision, unscrew safety knob S and unhook it from the rear hinge.
Cleaning:
Clean the suction panel with the same frequency as the fats filter using a cloth soaked in neutral liquid detergents.
Avoid the use of products containing abrasives. DO NOT USE ALCOHOLS.
Montage:
The panel must be hooked at the back and fixed in front fitted into the pins for the purpose on the surface of the hood.
Attention! always check that the panel is well fixed in its place.
Grease filter
Fig. 2
This must be cleaned once a month (or when the filter saturation indication system - if envisaged on the model in possession - indicates this necessity) using non aggressive detergents, either by hand or in the dishwasher, which must be set to a low temperature and a short cycle.
When washed in a dishwasher, the grease filter may discolour slightly, but this does not affect its filtering capacity.
To remove the grease filter, pull the spring release handle.
Charcoal filter (filter version only)
Fig. 3
It absorbs unpleasant odours caused by cooking.
The charcoal filter can be washed once every two months (or when the filter saturation indication system - if envisaged on the model in possession - indicates this necessity) using hot water and a suitable detergent, or in a dishwasher at 65^ (if the dishwasher is used, select the full cycle function and leave dishes out).
Eliminate excess water without damaging the filter, then put it in the oven for 10 minutes at 100^ to dry completely. Replace the mattress every 3 years and when the cloth is damaged.
Remove the filter holder frame by turning the knobs (g) 90^ that affix the chimney to the cooker hood.
Insert the pad (i) of activated carbon into the frame (h) and fit the whole back into its housing (j).
It is possible to use a traditional carbon filter, neither washable nor regenerable, to be replaced every 3 - 4 months.
The filter holder frame of the carbon filter is welded together; the eventual frame supplied with the hood is not, therefore, to be used.
Insert it into its housing and fix it turning the 2 plastic knobs.
Replacing lamps
Fig. 4
Disconnect the hood from the electricity.
Warning! Prior to touching the light bulbs ensure they are cooled down.
Use a small screwdriver as a lever on the borders of the lamp in order to remove the lightbulb.
- Slide out the lightbulb to be replaced and replace with a new 12V 20W MAX 30^ Ø35 12V GU4.
- Carry out the replacement and mount the new lightbulb by following instructions in the reverse.
If the lights do not work, make sure that the lamps are fitted properly into their housings before you call for technical assistance.
He octabte deTei be3 npncmToPa, UTO6bI OHn He irpaJIc np6opom.
He nCnoIb3yIte BbITaKky, ecIn peIeTka HnpaBnIbHO CMOHTnpoBaHa!
Kateropnueckn 3anpeuetaTcNIOJIb3OBAb BbITJkky KaueCTBe OONPHIPOCKoCTN,ecnI 3TO CNEuaJIbHO He OROBOpEO.
Oe6ceyte HaIeKaun Bo3DyXoo6MeH NomeuHnA, KOrDa BbI cNoJIb3yIe BbITaKky B KxHHe OJHOBpeMeHHo C dpyrMn np6obapm Cra30bIM CkIgraHnEM nIi C pIITAHm EpyrMn ropUHMN.
BbITrMaBEmbBo3DyH DeOnJHe BbI6PcBaTbCn HApkyUepe3 Bo3DyXOBOD,NCIOJIb3yEmbIMnBbIBpOca DmOBOTnpi6OpOB Cra30BbIM CxNtAHmE mNnC nHTaHmE dpYmMnTopoymn.
Kateropnueckn 3anpeaetcra roTOBn6bnoa "noi nIaMeHem, NOKoJIbky CBO6OdHoe IINAMr MOxET NOBpeINt bФInbTpbl n CTaTb npuHnOH noXapa; no3TOMy, BO3depKJBauTeCb ot 3TOR B LIO6om clyae.
KapenbB O bHbHom Macne DOnJxHO PpOIN3BODITbCnIOI NOCToHHbIM KOHTPOJIEM, IMeB B Ndy, YTO NepePepToE MACIO MOKET BOCIIaMeHrTbC.
Yto kacaetc Texhuecknx Mep u ycIOBn no TexHnke 6e3oNaChOCTn npn OTBOe DbIMOB,TO npuIepKbAaTEcb cTporo npabIN, npdeymOTpeHHbIX peIamEHTOM MeCTHBIX KOMNETHTbIX BnacteY.
Ipon3BODITE nepnoDnueckyO ONUCTKY BbITJCKN KAK BHyTPI, TAK N ChapyKIN (IO KPAHHE MEPE PA3 B MECAL, BO BCYKOM Cnyae C CObIHOENEM yCIOBNI, KOtOpbIE CneuaJIbHO PnpEDyCMOTpeHb I HNCTpyKUHX NO 06cIyXBAHNIO daHnHO pyKOBOCDTA).
HecobIHOeHHe IHCTpyKUINo ONUCTKe BbITaIKN I NO 3aMeHE N ONUCTKe FInbTPOB MOKET CTaTB PnUHNIO NOXAPA. He NcIOJIb3OBAt ININ OCTABNPTb BbITaIKy Be3 npAunIbHO yCTAHOBIIeHHbIX JAMIOueK BC8r3N C BO3MOxHBIM PNCKOM yDapa 3NeKTpUeCKM TOKOM.
Mblchimaem C c6eBCkyo OTBETCTBEHOCt 3a HeNoIaIKn, yuepe nnCropaHne pnpbopa BCNECTBne HecO6JIIOJeHHNCTpyKlni, pnpBeDEHHbIX B daHHom pyKOBOcTBe.
Данhoe Иделп epoMapKIpObaH BO COOTBETCTBn C Ebponeckoi DupeKTbOY 2002/96/EC no ytniHaCNI 3NeKTpUeCKOrO IN 3NeKTponHoro obOpyobAnHg (WEEE).
OBeCneuB npaBnIbHyU yTnIIN3aIcNIO daHnHO n3dEJIa, BbI NOMOXETe PnpoTbPaTbN TONEHuaIbHbIe HErATNBHeI NOcLNeCTBnI DnI OKpyKaIouSe I cpebl N3doPobBa YeIobeka, KOTOpble MOrIN bI IMETb MecTo B IpOToNBOM Cnyae.

CnB01 Ha cAMOM n3dennn nIN cOpBoNDteHbHOJ DOKyMeHTaun yKa3bIAeT, YTO pRn yTnIIN3aUN daHHORO n3dennr C HMM HeN53 o6paauTcB KAK C obHybIMn 6bITobBMn OTxOAMu Bmecto 3Toro,ero cJeYET cDaBaTb COOTBeCTByUOoi NyHK TnpEEMKn 3NeKtpueckoro n 3NEkTPOHHO O6OpyD0BaHnI dN NOcJIeDyUOeJ yTnIN3aUN.
CdaHa hCNOMdoJXHaIPOIN3BOIDHTCB8CAOOTBETCTBn C MEcTHbIMN PpABINAMN ITOYTNIN3aUN OTXoOB.
3a 6oJIe nOIOpObHOn INHΦOpMaJne O npABynax oBpaUeHncaTakIMN I3dJIINMn, INx yTNIIn3aUNn INpepeaBoTKnOBpaauaIteCB B MeCTHbE OprAHbI BnactN, B Cnyk6y noyTIN3aUNn OTXODOB INN B MaraINH, B KOTOpOM BInpno6pei nn daHnOE IN3dJIe.
Пользоваиме
BbIyKa cKoHCTpyuPoBaHa dJa pa60Tb I B pexime OTbda BO3dYa hapyu Ky nPi nePcIrpKylraun BO3dyxa.
IcnoHHeHc COTBOOM BO3Dyxa
BbIyKa Chabxeka BepxHMM BbIOHbIM OTBepCTnEM B DnIy Bbl6pOa DlMOB HapyKy (UcNOJIHeHne C OTBOOM BO3dyxa HapyKy - BbIOHaTpy6a N XOMYbTI KpeIIeHnHE BXoJrT B KOMIIKeT).
BHMaHne!
EcnBbITXKa CHa6KeHa yOrIbHbIM fNJIbTpOM,TO y6epnteero.
IcnoHHeHcOTbOdom Bo3dyxa
EcnIO TBIOB N napOB HApKy HeBO3MOKeH Bbl MOKeTe NOIbOaTcBc BITJAKKO B Peknme C peNPKyIeuei npri NOMOuY rOJIbHbIX QmIbTPOB N UCTAOBKn DEpNeKTopp F Ha KPOHIteH G. TaKIM O6pa30 OM uINeHHbIOT DlMOBbIX napOB Bo3DyX BO3BpaAaTcB N OmieJeHne Ycepe BepxHIOpeWetky H bIBoNDHy Tpy6y, NOdCoeINHReMyK BepxHEmy BVIOBDHomY OTBePCTHNO B, pni NOMOoi CoeINHHTeBHOrO KOJIbCa, CMOnTIPOBaBHHO H dePfKeTOpE F (BbIOBNaTHpy6a n XOMyTbI KpENNEHnHE BxOJaT B KOMPiNeKT NoCTABKn).
BHMaHne!
Ecnn BbIyKa He Cha6KeHa yroJIbHbIM ΦnIbTpOM, To 3akaxnte n yctahOBITE ero nepeid nCnOJIb3OBAHHem.
MoJeIN BbITJKeK 6e3 MOTOPHO 6JIoka MOrT pa6OtaTB B ODHOM peKIMe OTBDA BO3dYxa HApKy, NO3tOMy OHI DOnIKHbI 6bITb NIOCoEINHEbI K BHeUHei BbITJKHOH yCTAHOBke (He BXODIT B NoCTABky).
YctaHObKa
PacctoHne HnKHeI rpaHbBITaXKnHaOnOpHn IIOCKOCTbIO NOcOyDbHa XyKOHHO pNTe DOJXHO 6bITb He Mehee 50cm-ДЯ 3NeKTPuYeCKHX pINT,н He Mehee 65cm dIpyraObIX INI KOMbHINPOBaHHbx PINT.
EcnB INHCTpyKUxRn NO yCTaHOBe Ra3OBoI PJIITbI OROBOpeHo 6oJIbuee paCtOraHne,To yHTnte 3TO.

3Jektpnueckoe coeHneHne
Hnpanjxhene cTeI DOJNHO COOTBETCTBOBaTb HnpanjxhenIO, Yka3aHHOMy Ha Ta5nUKe TEXHnuecknx DaHnBHX, KOtOpaa pa3MeuHa BHTpy np6Opa. Ecn N BYTJkca Ch6xeha BInKo, NOKnOHTe ee K IeTcNcJIbHOMy pa3bEmy, OTEbuaOeMy DeIcTBvUOnm npabINaM, KOtOpB IOJXeH 6bIb paCNOxEH B IeKo DoCTynHom MeCe. Ecn Jx BeBtJKA He Ch6xeha BInKo (DnI pRmoro NOKnIOChEHNK CTeH), INI N STeCNcJIbHb pa3bEm H paCNOxEH BDOCTynHom MeCe, TO NcNoJIb3yIte HAdPEnKaun DByxN0JIocHb BYIKIoUcAteNb, ObecNeuBaIOUn nONHoe pa3MbKAnHe cTeN Pn BO3NHKnHOBeHN yCNOBn NepehpanjxHenH 3-e KaterOpBN, BOOTBETCTBN C NHCCTPyKlqYMaN No YCTaHOBKe.
BHIMAHHE: npexJe yem NOdkHIOUHTb K CETn NITaHn 3IeKTPuYeCKyUO CNTeMBy BbITJAKN INPOBepTb NCnPabHoe cyHKtioHINpOBaHHe ee y6eDntecb B TOM, YTO Ka6ejb NITaHn PpaBnJIbHO CMOHTPOBaH.
YctaHObKa
YcTaHOBkaMoDJIINdCTeHbI
Pnc.5
- KapaHdAOM, HauepTne Ha CteHe Do nOTOnKa JInHIO, COOTBETCTByUOyO OceBOJ LInHM yCTaHbIMBaEMo BbITRAKKI: 3TO oBJeHT ONepaUNo YcTaHOBKe.
2.ПисLOHITEшбLOHКCTHE:срEDнЯВерТКальнаяпИИ,нанecEH纳HAшБLOHДOLJXHaCOBnAtebC OCEBoI BepTmKALBIHOЛINHMe,нанeчeHNoHЯСTeH;КРOMETORI,нХнЯКOMPkaшБLOHaCOOTBeTcTByET HIXKHe TpAHN BYITJAKM.
3.Пложnte Hнжнй onOpнь кроштейн Ha шаблон B COOTBETCTBnC 3aштprnxOBaHHbIM ПямоуглнКOM, OTМБte ДBA BHEшнх OTВерстney nnpoceberite IN, CHMNTe шабLOH, BCTabTe 2Дюбеля nЗakpenITE onOpнь кроштейн по ВытЖку 2-Maшуразами 5x45 MM. - Hadehbe TBe BbTjAaKy Ha HxHbI KPOHtEeH
- OtperynpyTe paCCTOHHe BbITJKKN OT CTeHbI
- OtperynpyTe noIOxEHe N BbITXKNI NO rOpN3OHTaJI
7.ИЗнутп ВьгЖНО 6ЛOKA,OTMeTbTe KapaHdIaWOM OTBepCTneДЯ OKOHHTeJIbHOrO KpeIJIeHnIЯ BvITaKKN (HeobxOJIMMbI 23akIIOHHTeJIbHbIXpyHKTa KpeIJIeHnI).
8. CHIMITE BbITAKKY C HIXKHERO KPOHHTeHa.
9. Iopaa3metke npoedeJaIte OTBepctne (0 8 MM).
10. BctabbTe 2 IIO6eB b CteHy.
11. 3aKpeHnTe onOpHbI KPOHHTeIN PNO KaMHbIG C TcHe CMEXHO KNOTOKy; NcONb3yIte OopHbI KPOHHTeIN NOI KAMHbI B KAcETBe UaBIOHa (ecmno H0MeTcA, MAIOE OBaHbOE OTBepCTBe B KPOHHTeNE DOJXHO COOTBETCTBOBaTc LInHMe, paHee HauepeHHo HA CTHe), OTMeTbTe KapahdaWOM 2 OTBepCTn, npOenaiTe OTBepCTn (Ø 8 MM), BCTabTe 2 DIO6Bn.
12. 3akpennte onopbky kpoHTeH nOd kAMnK cTeHe 2-My wypynm5x45 MM.
13. NObBeCnTe BbITJkKy K HmKHeMy KpOHtSeHvY.
14. 3aKpeNite OOKHcTEnbHO BbITraKy K CTHe (HEIPEMEHHO HEO6XODMO!).
15.ПовьдпгЕВERTINТУСИОнHуTOpy6у(Tpy6aN XOMYtBkPENJIENHЯ БXODIYВ KOMПЛКET NOCTABKN)K BYITJKHHOBTyNke,paCNoJoxEHNOH HAd 6NOKM3NEKTPODBINATeN.ПовьдпгЕДPyROK OKeHc Tpy6bKNCCTEme OTBOA,B Cnyuay NcOЛьЗOBAHNY BByTJKKN BpeKIMe OTBOaDbIMOB HApKy.EcIN BblXOTNe IcNoJIb3OBAr bBbITJCKyBpeKIMe peUpkyIaUMn BO3dYxa,ZakpeINTe DePfKeTOpF KKPOHsTeHy Gи ПовьдпгЕДpyROK OKeHc Tpy6bKCoedHHTeJIbHoB BTyNke,paCNoJoxEHNOHHaDePfKeTopeF.
16. BbInOnJIHnTe 3JIeKtpUneCeKoe NOJKNIOUHeHnE.
17. BCTABITb DeKopatMBHb KOp6 NaB BbITJxKo, YTO6bl OH NnHOCTbIO NOKpbIbn BCaCbBaIOUy Ipynny.
18. 3aKpeHnTe HnKHeIO CEkuHIO KaMnHa DByMa UpypnaMn.
19. 3aKpeiNtB ee Cbepxy DByMn BHTamn (19a) K KPOHJTeHny DeKopatNBHOrO KOp06a G (19b).
YctaHOBITE BHOB DePKaTeJIb yroJIbHOrOФIMlbTpa INФЛbTp/bl 3aepKKn JmPa n IpOBepTe NcnpabHoeФyHKUHOHPOBaHne BbITRAKKN.
YctaHObKa nHaHEn
(KOJIHueCTBO INΦOpMa IaHEnIe MoKET N3MeHrTbCRA B 3aBcIMoCTN OT MOdEIN BbITraKKn).
PanaJIb nOCTabJIeTcB KOMnJIeKTe C oOboyIDoBaHHeM.
3aueinb Taenb Ha 1tTqTx BItjKKn m3kpeInb TaueIko, NocTabIeMoB Bmecte C o6opyoBaHnem (KOINcETo 3aBNCIT OT MOeIN - Kpennne npedoxpanhtelho 3aueken 6oa3atelbo!
IobepHyTb nokpbBaHouy 3OHy BCaCbBaHnaHaJIb I cnJbHO npnxKmam, cyeNtB ee UTnФTAM.
IpoBepnTb, yTo6bl naHeIb 6blIa xopoIo 3akpenHeHa h CBOEM MecTe.Pnc.6
OnucaHHe BbITaXKn
Pnc.1
- Naheb ynpablennna
2.Фильтрзадержк immpa - Pучka отцеленяфильта заерхи кupa
- TajoreHHa JAMna
- OTKnIaHoi 3KpaH
- Kamin TeJeCKOnuYeckn
- BbIOB Bo3dyxa (ToIbKO BpeXmme peuRpyJUaUN)
- Панень.
Функционроваимe
Ib3yTeBc HTEHCNBbIM pexNMOM pa60Tb BbITKKN B Cnyae oc6oB bICOKO KOHcHTpaCNI KxOHhbIX nCapenHm. Mbl peKomeHdyem BKJIOUHTb BbITKkY 3a 5 MNHT do hauHa npOecca npiroTOBJeHnPiUs N OCTabNTb ee BKIOUeHHoB TeueHne 15 MNHT np6bn3ntEhNo NO OKOHuaHN IpOcecca.
Kohcnoy npabJeHnna
KpaTkoBpeMeHHo HkaTaH Ha KHOIIKy, YTO6bI BbIKJIOHTb MOTOp.
C5POC CnIHJIN3ALUNIΦJIbTPOB
Tcnoe TOrO KAc BbInoJIHeHO ObcIyKmBaHne 0nIbTpoB, DepKaTb Haxatoi 3 cekHyDbl KhoNkY, MrraiouM CBeToIDoM 1 (pnlbTp 3adepKnn Jnpa) n2 (yrolbHbI pnlbTp) npkepnt MTMRatb.