
Venus 2 A3/125 - Laminating machine FELLOWES - Free user manual and instructions
Find the device manual for free Venus 2 A3/125 FELLOWES in PDF.


| Product type | Hot laminating machine |
| Brand | Fellowes |
| Model | Venus 2 A3/125 |
| Maximum laminating width | A3 (up to 330 mm) |
| Recommended pouch size | Up to 125 microns |
| Heating system | Heating rollers |
| Warm-up time | Approximately 1 minute |
| Laminating speed | Up to 300 mm/min |
| Reverse function | Yes, to release a jammed pouch |
| Adjustable temperature | No, preset for 125 micron pouches |
| Power supply | Mains 220-240 V, 50/60 Hz |
| Power consumption | 350 W (estimated) |
| Dimensions (L x W x H) | Approximately 500 x 150 x 100 mm |
| Weight | Approximately 2.5 kg |
| Maintenance and cleaning | Clean the rollers with a soft cloth after cooling down |
| Safety | Automatic shut-off in case of overheating (estimated) |
| Spare parts and repairability | Fellowes laminating pouch recommended |
| Warranty | Manufacturer's warranty 2 years |
| General information | Laminator suitable for light office use |
Frequently Asked Questions - Venus 2 A3/125 FELLOWES
User questions about Venus 2 A3/125 FELLOWES
0 question about this device. Answer the ones you know or ask your own.
Ask a new question about this device
Download the instructions for your Laminating machine in PDF format for free! Find your manual Venus 2 A3/125 - FELLOWES and take your electronic device back in hand. On this page are published all the documents necessary for the use of your device. Venus 2 A3/125 by FELLOWES.
USER MANUAL Venus 2 A3/125 FELLOWES
GB Please read these instructions before use.
FR Lire ces instructions avant utilisation.
ES Lea estas instrucciones antes de usar la máquina.
DE Diese Anleitungen vor Gebrauch genau durchlesen.
IT Primo dell'uso, si raccomanda di leggere questo manuale di istruzioni.
NL Lees deze instructies zorgvuldig door voordat u de machine in gebruik neemt.
SE Läs dessa anvisningar innan du använder apparaten.
DK Læs venligst denne vejledning for anvendelse.
FI Lue nämä ohjeet ennen käyttöä.
NO Vennligst les nøye igjennom denne bruksanvisningen for bruk.
PL Przed użyciem proszę zapoznać się z niniejszą instrukcją.
RU Перед эксплуатацией устройства ознакомьтесь с содержанием данной инструкции.
GR Διαβάστε τις παρακάτω οδηγίες πριν από τη χρήση.
TR Kullanmadan önce lutfen bu talimatlari okuyen.
CZ Pred použitím si pročtěte tyto pokyny.
SK Pred použitím si prečítajte tieto pokyny.
HU Kérjük, hogy használat elött olvassa el az utasításokat.
PT Leia estas instruções antes da utilização.
BG Моля, прочетете инструкциите преди употреба.
RO Vă rugăm să citiți instrucțiunile înainte de utilizare.
HR Pažljivo pročitajte ove upute prije korištenja.
SI Pred uporabo izdelka preberite ta navodila za uporabo.
SR Pročitajte ova uputstva pre upotrebe.
AR
يرجى الاطلاع على الإرشادات قبل الاستعمال.
HB
CONTENTS
| LOCATION OF CONTROLS 3 | |
| ENGLISH | 4-6 |
| FRANCAIS | 7-9 |
| ESPAÑOL | 10-12 |
| DEUTSCH | 13-15 |
| ITALIANO | 16-18 |
| NEDERLANDS | 19-21 |
| SVENSKA | 22-24 |
| DANSK | 25-27 |
| SUOMI | 28-30 |
| NORSK | 31-33 |
| POLSKI | 34-36 |
| РУССКИЙ | 37-39 |
| ΕΛΛΗΝΙΚΑ | 40-42 |
| TÜRKÇE | 43-45 |
| ČESKY 46-48 | |
| SLOVENSKY | 49-51 |
| MAGYAR | 52-54 |
| PORTUGUÊS | 55-57 |
| ΒЪЛГАРСКИ | 58-60 |
| ROMÂNÃ | 61-63 |
| HRVATSKI | 64-66 |
| SLOVENČINA | 67-69 |
| SRPSKI | 70-72 |
| الصعربية | |
| النامعربية | 76-78 |
LAMINATOR CONTROLS

QUICK START GUIDE

natural_image
Illustration of a printer placed on a desk with a paper airplane and a door (no text or symbols)
natural_image
Illustration of a printer placed on a desk with a paper sheet and a 20-inch ruler, no text or symbols present.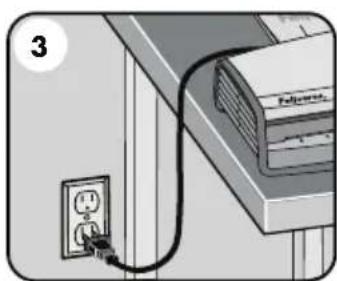
natural_image
Illustration of an electrical outlet connected to a wall-mounted air conditioner unit (no text or symbols visible)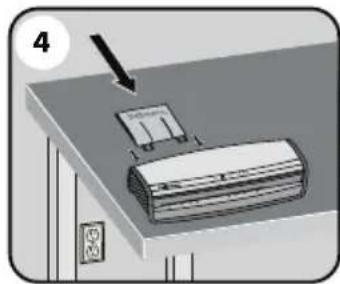
natural_image
Illustration of a kitchen appliance with a paper roll and a door, no text or symbols present
natural_image
Illustration of a printer placed on a desk with a hanging label and a door nearby (no text or symbols)




LAMINATOR CONTROLS
| A | On / off switch | G | Pouch / document entry slot |
| B | Standby / Power on button | H | Entry shelf (illuminated) |
| C | Ready Button (hot/cold) | I | Pouch / document exit |
| D | Feed button | J | Illuminated user interface |
| E | Reverse button | K | Exit tray |
| F | Carry handles | L | Micron indicators |
CAPABILITIES
| Performance | Technical Data | ||
| Entry width A3 / 318mm | Voltage | 220-240V | AC |
| Pouch thickness (min.) 75 micron | Frequency | 50-60Hz | |
| Pouch thickness (max.) 250 micron | Wattage | 1200 Watts | |
| Estimated heat-up time 30 seconds | Amps | 5.2 Amps | |
| Cool down time 30-60 minutes | Dimensions (HxWxD) | 121mm x 546mm x 172mm | |
| Lamination speed up to 109cm/min | Net weight | 6.5Kg | |
| Number of rollers 6 | Max document thickness | 0.8mm | |
| Ready indication Light & beep | |||
| Reverse/Auto reverse Yes/Yes | |||
| Clear Path / Anti-jam engine Yes | |||
| LED interface Yes | |||
| Auto Shut-off Yes (30 mins) | |||
| Photo-capable Yes | |||
| Carrier-free Yes | |||
| Exit tray Yes | |||

IMPORTANT SAFETY INSTRUCTIONS - KEEP FOR FUTURE USE
- The machine is for indoor use only. Plug the machine into an easily accessible outlet.
- To prevent electrical shock - do not use the appliance close to water, do not spill water on to the appliance, power cord or wall socket.
DO ensure the machine is on a stable surface.
DO test laminate scrap sheets and set the machine before final laminations.
DO remove staples and other metal articles prior to laminating.
DO keep the machine away from heat and water sources.
DO turn off the machine after each use.
DO unplug the machine when not in use for an extended period.
DO use pouches designed for use at the appropriate settings.
DO keep away from pets, while in use.
DO NOT leave the power cord in contact with hot surfaces.
DO NOT leave power cord hanging from cupboards or shelves.
DO NOT use appliance if the power cord is damaged.
DO NOT attempt to open or otherwise repair the machine.
DO NOT exceed the machines quoted performance.
DO NOT allow minors to use this machine.
DO NOT laminate sharp or metal objects (eg: staples, paper clips).
DO NOT laminate heat-sensitive documents (eg: tickets, ultrasounds etc) on hot settings.
DO NOT laminate an empty pouch.
FEATURES & TIPS
Advanced Pouch Tracking System
This feature will detect and alert the user if there is a mis-feed or the document has not gone completely through the machine in normal operating time, and automatically reverse the document until the jam is cleared. This feature will also track the pouch as it is going through the machine and let the user know when the machine is ready for the next pouch.

AutoSense
Unique system detects pouch thickness and self-adjusts to optimal lamination setting.

'Reverse' function
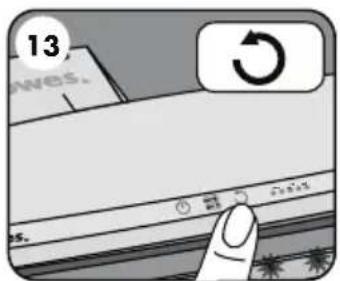
To eject the laminating pouch during use, press and hold down the reverse button until the pouch has ejected from the machine.

'Auto Shut-Off' function
If the machine is not active for 30 minutes, the 'Sleep Mode' function will place the machine into standby mode. To operate the machine, press the 'Power On' button on the control panel.
- For best results, use Fellowes ® brand thermal pouches: Enhance 80, Impress 100, Capture 125, Protect 175, Preserve 250 and cold pouches
- This machine does not need a carrier to laminate. It is a carrier-free mechanism.
- Always put the item to be laminated into the appropriate sized pouch.
- Always test laminate with a similar size and thickness before final process.
- Prepare pouch and item for lamination. Place item within pouch centered and touching the leading sealed edge. Ensure the pouch is not too large for the item.
- If required, trim excess material from around the item after lamination and cooling
BEFORE LAMINATING
- Ensure the machine is on a stable surface.
-
Check there is enough clear space (min 50cm) behind the machine to allow items to pass through freely.
-
Plug the machine into an easily accessible main outlet.
- Equip the Exit Tray for best laminating results.
STEPS TO LAMINATE
- Switch the power on (located at the rear right side of the machine). The control panel buttons will flash once as part of a check light system to ensure proper function.
- The Standby button will turn on with a soft blue glow. The machine is automatically warming up to hot lamination. Note: the laminator features AutoSense which automatically recognizes the pouch thickness you insert into the laminator.
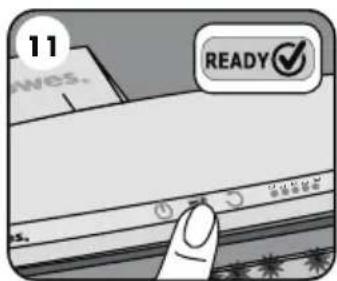
- When the machine is ready, the green "Ready" READY LED and entry tray LED's will come on and the machine will beep to indicate that it is ready for lamination. Also, the micron lights will come on indicating when the machine is warmed up to each setting.
- The Green "Feed" FEED light will light up when the user can insert a pouch. The light will go off when the document is inside the machine and will come back on when it is acceptable to feed another pouch.
- To toggle between Cold and Hot lamination, press and hold the "Ready" button for 2 seconds. The Ready icon will blink 3 times in "Blue" when initially switched to the Cold mode to indicate that the mode has been switched then the Ready light will turn off until the machine is ready for cold lamination. Note: to use the cold setting after hot lamination you may have to wait for the laminator to cool down for 30 - 60 minutes.
-
When the machine is ready for Cold Lamination the "Ready" LED will illuminate "Blue" and the machine will beep.
-
To switch back to hot pouch laminating after cold laminating, press and hold the "Ready" LED. Wait until the ready light turns green to indicate it's ready for hot lamination before inserting pouch.
- Place the pouch, sealed edge first, into the pouch / document entry. Keep the pouch straight and central within the document entry, not on an angle. Use the entry markings as a guide.
- This unit is equipped with an Advanced Pouch Tracking System that will detect and alert the user if there is a mis-feed. If a jam is detected the machine will automatically reverse the document to help clear the jam. The reverse button will come on while auto-reverse is engaged. After this, if the jam is not completely cleared the Reverse button will blink/flash. Press and hold the reverse button while pulling on the pouch to completely remove the laminate from the machine. Once the jam is cleared the unit will return to normal operation.
- Upon exit, the laminated pouch may be hot and soft. For the best quality and to prevent jamming remove the pouch immediately. Place the pouch on to a flat surface to cool. Take care when handling a hot pouch. Always remove laminated document before starting next laminate. For best performance/results, use the Exit Tray.
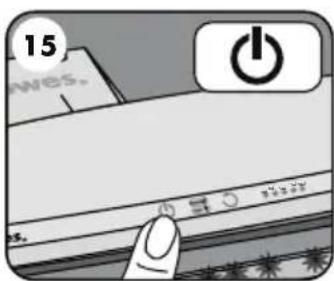
- Turning off the Machine — If the top power button is pushed, the machine will go into cool-down mode. The heaters will turn off, but the rollers will still run until the unit reaches the desired temperature to turn off completely. This functionality reduces long term wear and tear to the unit.
TROUBLESHOOTING
| Problem Possible cause Solution | ||
| No glowing ‘blue’ Power on LED Machine not switched on | Switch on machine at right rear side and at wall socket. Press power standby button | |
| Pouch does not completely seal the item | Item may be too thick to laminate | Maximum document thickness equals .03". Pass through laminator a second time |
| Pouch is lost in the machine | Pouch is jammed | Machine will automatically reverse the document. If jam is not completely cleared Reverse button will blink/flash. Press and hold reverse button while pulling on pouch to completely remove pouch. |
| Pouch was inserted open end first | ||
| Pouch was not centered on entry | ||
| Pouch was not straight upon entry | ||
| Empty pouch was used | ||
| Damaged rollers or adhesive on rollers | ||
| Pouch is damaged after lamination | Damaged rollers or adhesive on rollers | Pass cleaning sheets through the machine to test and clean rollers |
NEED HELP?
Let our experts help you with a solution.
Customer Service... www.fellowes.com
Always call Fellowes before contacting your place of purchase, see the rear cover for contact details.
Consider registering your machine at www.fellowes.com/register to receive updates and additional information.
STORAGE & CLEANING
Turning off the Machine — If the top power button is pushed, the machine will go into cool-down mode. The heaters will turn off, but the rollers will still run until the unit reaches the desired temperature to turn off completely. This functionality reduces long term wear and tear to the unit. Unplug the machine at the wall. The outside of the machine can be cleaned with a damp cloth. Do not use solvents or flammable materials to polish the machine. Cleaning sheets can be purchased for use with the machine. When the machine is warm — run the sheets through the machine to clean any residue off the rollers. For optimum performance, it is recommended that cleaning sheets are used with the machine regularly. (Cleaning sheet order code #5320603).
PRODUCT REGISTRATION / WORLDWIDE WARRANTY
Thank you for purchasing a Fellowes product. Please visit www.fellowes.com/register to register your product and benefit from product news, feedback and offers. Product details can be found listed on the rating plate positioned on the rear side or underside of the machine. Fellowes warrants all parts of the laminator to be free of defects in material and workmanship for 2 years from the date of purchase by the original consumer. If any part is found to be defective during warranty period, your sole and exclusive remedy will be repair or replacement, at Fellowes' option and expense, of the defective part. This warranty does not apply in cases of abuse, mishandling or unauthorised repair. Any implied warranty, including that of merchantability or fitness for particular purpose, is hereby limited in duration to the appropriate warranty period set forth above. In no event shall Fellowes be liable for any consequential damages attributable to this product. This warranty gives you specific legal rights. You may have other legal rights that vary from this warranty. The duration, terms and conditions of this warranty are valid worldwide, except where different limitations, restrictions or conditions may be required by local law. For more details or to obtain services under this warranty, please contact Fellowes or your dealer.
COMMANDES DE LA PLASTIFIEUSE
Dimensions (H x I x P) 121 mm x 546 mm x 172 mm
Poids net 6,5 kg
VOORDAT U GAAT LAMINEREN
I Utgang for pose/dokument
J Belyst brukerpanel
K Utgangsskuff
L Mikron-indikatorer
KAPASITET
Kapasitet
DÔLEŽITÉ BEZPEČNOSTNÉ POKYNY – USCHOVAJTE NA POUŽITIE V BUDÚCNOSTI
POTREBNA VAM JE POMOĆ?
,Enhance 80, Impress 100
,Capture 125 Protect 175
natural_image
Simple line drawing of a trash bin with crossed lines indicating no waste or plastic discharge (no text or symbols)GB This product is classified as Electrical and Electronic Equipment. Should the time come for you to dispose of this product please ensure that you do so in accordance with the European Waste of Electrical and Electronic Equipment (WEEE) Directive and in compliance with local laws relating to this directive. For more information on the WEEE Directive please www.fellowes.com/WEEE
natural_image
Simple line drawing of a trash bin with crossed lines indicating no waste or discharge (no text or symbols)Declaration of Conformity
Fellowes Ltd.
Unit 2 Ontario Drive, New Rossington, Doncaster, DN11 OBF, England declares that the product model Venus 2 conforms with the requirements of the Restriction of Hazardous Substances Directive (2011/65/EU), the Low Voltage Directive (2014/35/EU), the Electromagnetic Compatibility Directive (2014/30/EU), the WEEE directive (2012/19/EU), and below harmonized European EN Standards.
Safety: EN60950-1: 2006/A2:2013
EMC Standard: EN55014-1:2006+A1:2009+A2:2011
EN55014-2:1997+A1:2001+
EN61000-3-2:2014
EN61000-3-3:2013
A2:2008

John Fellowes
Year Affixed: 17
Itasca, Illinois, USA
August 1, 2016


- LAMINATOR CONTROLS
- QUICK START GUIDE
- IMPORTANT SAFETY INSTRUCTIONS - KEEP FOR FUTURE USE
- FEATURES & TIPS
- Advanced Pouch Tracking System
- AutoSense
- 'Reverse' function
- 'Auto Shut-Off' function
- BEFORE LAMINATING
- STEPS TO LAMINATE
- NEED HELP?
- STORAGE & CLEANING
- PRODUCT REGISTRATION / WORLDWIDE WARRANTY
- COMMANDES DE LA PLASTIFIEUSE
- VOORDAT U GAAT LAMINEREN
- KAPASITET
- DÔLEŽITÉ BEZPEČNOSTNÉ POKYNY – USCHOVAJTE NA POUŽITIE V BUDÚCNOSTI
- POTREBNA VAM JE POMOĆ?
- Declaration of Conformity
- Fellowes Ltd.
Brand : FELLOWES
Model : Venus 2 A3/125
Category : Laminating machine