
Fidelio E6 - Home Theater System PHILIPS - Free user manual and instructions
Find the device manual for free Fidelio E6 PHILIPS in PDF.


| Product type | 2.1 home cinema system with detachable rear speakers |
| Brand | Philips |
| Model | Fidelio E6 |
| Soundbar dimensions (W x H x D) | 1050 x 70 x 160 mm |
| Subwoofer dimensions (W x H x D) | 210 x 400 x 250 mm |
| Total weight | Approximately 8.5 kg |
| Power supply | 100-240 V AC, 50/60 Hz |
| Output power | 240 W RMS |
| Key features | Soundbar with wireless rear speakers, wireless subwoofer, Bluetooth, NFC, HDMI ARC, optical input, USB playback, sound modes (movie, music, voice, night) |
| Supported audio formats | Dolby Digital, DTS, stereo PCM |
| Care and cleaning | Clean with a soft, dry cloth. Do not use liquids or abrasive products. |
| Safety | Do not expose to water, humidity or heat sources. Use only the supplied adapter. |
| Spare parts and repairability | Contact an authorized Philips service center for repairs. No user-serviceable parts. |
| General information | Designed for indoor use. Compatible with most TVs equipped with an optical audio output or HDMI ARC. |
Frequently Asked Questions - Fidelio E6 PHILIPS
User questions about Fidelio E6 PHILIPS
0 question about this device. Answer the ones you know or ask your own.
Ask a new question about this device
Download the instructions for your Home Theater System in PDF format for free! Find your manual Fidelio E6 - PHILIPS and take your electronic device back in hand. On this page are published all the documents necessary for the use of your device. Fidelio E6 by PHILIPS.
USER MANUAL Fidelio E6 PHILIPS
Wireless satellite speakers and subwoofer

natural_image
Black cylindrical object with a red handle, resembling a smart speaker or electronic device (no visible text or symbols)
natural_image
Black cylindrical electronic device with a small square logo on the front panel (no visible text or symbols on body)
natural_image
Black HIMI brand water heater with visible branding and logo (no text or symbols on body)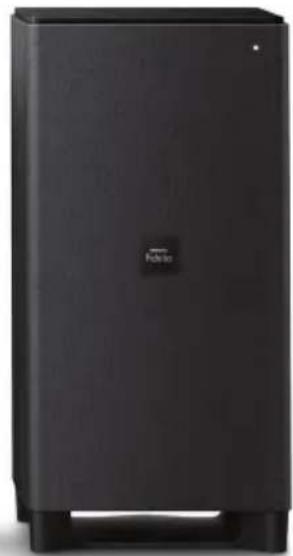
natural_image
Exterior view of a black rectangular electronic device with a logo on the front panel (no visible text or symbols beyond branding)EN User manual
Always there to help you
Register your product and get support at www.philips.com/support

Contents
1 Important 2
Safety 2
Care for your product 3
Care of the environment 3
Compliance 3
Help and support 4
Open source software 4
2 Your product 4
Main unit 4
Remote control 5
Wireless surround speakers 6
Wireless subwoofer 7
Connectors 8
3 Connect and set up 9
Connect the main unit 9
Network setup prompt 9
Charge speakers 9
Manual pair-up with the main unit 10
Place speakers 10
Connect audio from TV 11
Connect audio from other devices 12
Connect digital devices through HDMI 13
4 Chromecast built-in and Spotify
Connect 14
Connect this product to network 14
Stream music to this product 14
Navigate the App home menu 15
5 Spatial calibration 15
Step 1: calibrate the listening zone 16
Step 2: calibrate the surround speaker position 16
6 Use your product 17
Adjust the volume 17
Choose your sound 17
MP3 player 19
USB storage devices 19
Play music via Bluetooth 19
Connect Bluetooth via NFC 22
Auto standby 22
Set display brightness 22
Apply factory settings 22
7 Update software 23
Check software version 23
Update software via Internet 23
Update software via USB 24
8 Product specifications 25
9 Troubleshooting 26
1 Important
Read and understand all instructions before you use your product. If damage is caused by failure to follow instructions, the warranty does not apply.
Safety
Risk of electric shock or fire!
- Before you make or change any connections, make sure that all devices are disconnected from the power outlet.
- Never expose the product and accessories to rain or water. Never place liquid containers, such as vases, near the product. If liquids are spilt on or into the product, disconnect it from the power outlet immediately. Contact Consumer Care to have the product checked before use.
- Never place the product and accessories near naked flames or other heat sources, including direct sunlight.
- Never insert objects into the ventilation slots or other openings on the product.
- Where the mains plug or an appliance coupler is used as the disconnect device, the disconnect device shall remain readily operable.
- Batteries (battery pack or batteries installed) shall not be exposed to excessive heat such as sunshine, fire or the like.
- Disconnect the product from the power outlet before lightning storms.
- When you disconnect the power cord, always pull the plug, never the cable.
Risk of short circuit or fire!
- For identification and supply ratings, see the type plate at the back or bottom of the product.
- Before you connect the product to the power outlet, ensure that the power voltage matches the value printed on the
back or bottom of the product. Never connect the product to the power outlet if the voltage is different.
Risk of injury or damage to this product!
- Never place the product or any objects on power cords or on other electrical equipment.
- If the product is transported in temperatures below 5°C, unpack the product and wait until its temperature matches room temperature before connecting it to the power outlet.
- Parts of this product can be made of glass. Handle with care to avoid injury and damage.
Risk of overheating!
- Never install this product in a confined space. Always leave a space of at least four inches around the product for ventilation. Ensure curtains or other objects never cover the ventilation slots on the product.
Risk of contamination!
- Do not mix batteries (old and new or carbon and alkaline, etc.).
- Danger of explosion if batteries are incorrectly replaced. Replace only with the same or equivalent type.
- Remove batteries if they are exhausted or if the remote control is not to be used for a long time.
- Batteries contain chemical substances, they should be disposed of properly.
Risk of swallowing batteries!
- The product/remote control may contain a coin/button type battery, which can be swallowed. Keep the battery out of reach of children at all times! If swallowed, the battery can cause serious injury or death. Severe internal burns can occur within two hours of ingestion.
-
If you suspect that a battery has been swallowed or placed inside any part of the body, seek immediate medical attention.
-
When you change the batteries, always keep all new and used batteries out of reach of children. Ensure that the battery compartment is completely secure after you replace the battery.
- If the battery compartment cannot be completely secured, discontinue use of the product. Keep out of reach of children and contact the manufacturer.

This is CLASS II apparatus with double insulation, and no protective earth provided.
Care for your product
- Use only microfiber cloth to clean the product, such as removing dust and shedding accumulated on the speaker cloth. Do not use any cleaning solvent to clean the wooden panels and speaker cloth.
- Clean the leather handles with a slightly damp soft cloth which is dipped in a leather cleaning solution, then buff the leather with a dry soft cloth.
- The wooden panels and leather handles may vary on color and grain pattern due to the use of natural materials.
Care of the environment
Disposal of your old product and battery

Your product is designed and manufactured with high quality materials and components, which can be recycled and reused.
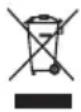
This symbol on a product means that the product is covered by European Directive 2012/19/EU.

This symbol means that the product contains a built-in rechargeable battery covered by European Directive 2013/56/EU which cannot be disposed of with normal household waste. We strongly advise you to take your product to an official collection point or a Philips service centre to have a professional remove the rechargeable battery.
Inform yourself about the local separate collection system for electrical and electronic products and rechargeable batteries. Follow local rules and never dispose of the product and rechargeable batteries with normal household waste. Correct disposal of old products and rechargeable batteries helps prevent negative consequences for the environment and human health.
Compliance
This product complies with the radio interference requirements of the European Community.
Hereby, Gibson Innovations declares that this product is in compliance with the essential requirements and other relevant provisions of Directive 2014/53/EU. You can find the Declaration of Conformity on www.p4c.philips.com.
Help and support
For extensive online support, visit
www.philips.com/support to:
- download the user manual and the quick start guide
- watch video tutorials (available only for selected models)
• find answers to frequently answered questions (FAQs) - email us a question
- chat with our support representative.
Follow the instructions on the website to select your language, and then enter your product model number.
Alternatively, you can contact Consumer Care in your country. Before you contact, note down the model number and serial number of your product. You can find this information on the back or bottom of your product.
Open source software
This product contains software licensed under an open source license. For acknowledgements and license texts, please refer to your product's user manual on www.philips.com/support.
Gibson Innovations Limited hereby offers to deliver, upon request, a copy of the corresponding source code for the necessary open source software packages used in this product for which such offer is requested by the respective licenses. This offer is valid up to three years after product purchase. To obtain source code, please contact open.source-gi@gibson.com. If you prefer not to use email or if you do not receive confirmation receipt within a week after mailing to this email address, please write to Open Source Team, Gibson Innovations Limited, 5/F Philips Electronics Building, 5 Science Park East Avenue, Hong Kong Science Park, Shatin, N.T. Hong Kong.
2 Your product
Congratulations on your purchase, and welcome to Philips! To fully benefit from the support that Philips offers, register your product at www.philips.com/welcome.
Main unit
The main unit of this product is comprised of left and right base speakers.
Right base speaker

① Display panel
②
Switch to Bluetooth mode (main unit only).
③ +/- (Volume)
Increase or decrease volume.
④
Toggle through all sources.
⑤
- Switch this product on.
- Switch this product to ECO standby when this product is not connected to the network.
- Switch this product to networked standby when this product is connect to the network.
⑥ NFC tag
⑦ Red/white/orange LEDs
Red LED
- Lights up when this product is in ECO standby (not connected to the network).
White LED
- Blinks when this product is not connected to the network, or when connection error occurs.
- Lights up when this product is connected to the network, or when this product is in networked standby (connected to the network).
Orange LED
- Lights up when software update is detected.
Remote control
This section includes an overview of the remote control.

①
- Switch this product on.
- Switch this product to ECO standby when this product is not connected to the network.
- Switch this product to networked standby when this product is connect to the network.
• In the network status, press and hold to switch this product to ECO standby.
② Source buttons
- HDMI ARC: Switch your source to the HDMI ARC connection.
• HDMI 1: Switch your source to the HDMI IN 1 connection.
• HDMI 2: Switch your source to the HDMI IN 2 connection.
• COAX: Switch your audio source to the coaxial connection.
• OPTICAL: Switch your audio source to the optical connection.
• AUDIO IN: Toggle audio source between AUX or AUDIO IN connection (3.5mm jack).
• USB: Switch to USB mode.
• 8: Switch to Bluetooth mode (main unit only).
- SOURCE: Select an input source for this product. Or for Spotify Premium users, quickly resume Spotify Connect play.
③
Skip to the previous or next track (for USB/ Bluetooth/ online music streaming).
④ ▶ II
Start, pause or resume play (for USB/Bluetooth/ online music streaming).
⑤ BASS +/-
Increase or decrease bass on the main unit.
⑥ Volume control
• +/-: Increase or decrease volume.
• : Mute or restore volume.
⑦ Sound mode control
SMART: Automatically select a predefined sound mode to suit your video or music.
MUSIC: Select stereo sound mode.
VOICE: Select voice clarity or CLOSE TO
ME (close to me) sound mode.
MOVIE: Select surround sound mode.
⑧ REAR VOL.+/-
Press to increase or decrease volume of the wireless surround speakers (only applicable when the surround speakers are wirelessly connected to the main unit (or SOD mode switches on)).
⑨ AUDIO SYNC +/-
Increase or decrease audio delay.
⑩ NIGHT
Turn night mode on or off.
⑪ CALIBRATION
- Press and hold to trigger calibration for listening zone.
- Press three times to trigger calibration for the wireless surround speakers position.
⑫ AUTO VOL.
Turn auto volume on or off.
⑬ DIM
Set the brightness of the display panel for this product.
⑭ TREBLE +/-
Increase or decrease treble on the main unit.
Wireless surround speakers
This product comes with a pair of wireless surround speakers.
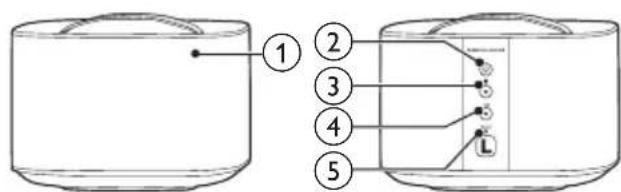
* The illustration above is for either of wireless surround speakers.
① Speaker LED
- Blinks in red and orange alternatively if the surround speaker is not wirelessly connected to the main unit.
- Lights up white when the surround speaker is wirelessly connected to the main unit, or when the battery capacity is full or more than 30% remaining.
• Lights up red when the battery capacity is less than 30% remaining.
- Blinks red when the battery capacity is less than 10% remaining.
- Lights up orange when the surround speaker is being charged (only for the surround speakers docked onto the main unit).
②
- Press to turn on the surround speaker if it automatically goes to standby.
- Press and hold to switch the surround speaker to standby.
③ button/LED
- Press to switch the surround speaker to Bluetooth mode.
- The LED blinks when you switch the surround speaker to Bluetooth and no Bluetooth devices are connected.
- The LED lights up when you switch the surround speaker to Bluetooth and Bluetooth devices are connected.
④ SOD button/LED
- Press to switch the surround speaker to SOD (surround on demand) mode.
- The LED lights up white when the surround speaker is switched to SOD mode.
⑤ RESET
In case of no response from the surround speaker, press and hold with a pin for 5 seconds to reset the surround speaker to the default settings.

Note
- If you press the button on the surround speaker, the surround speaker disconnects the main unit (or SOD mode switches off).
Wireless subwoofer
This product comes with a wireless subwoofer.

① Subwoofer indicator
- Blinks when the subwoofer is not connected, or being connected, to the main unit.
- Lights up when the subwoofer is connected to the main unit.
- Lights off when the subwoofer goes to standby, or wireless connection is disconnected for 4 minutes.
② CONNECT (connect)
Press to enter the pairing mode for connection with the main unit.
③ AC MAINS\~
Connect to the power supply.
Connectors
This section includes an overview of the connectors available on this product.
On the left base speaker

① TO R SPEAKER
Connect to the right base speaker with the supplied DIN cable.
② AC MAINS\~
Connect to the power supply.
On the right base speaker
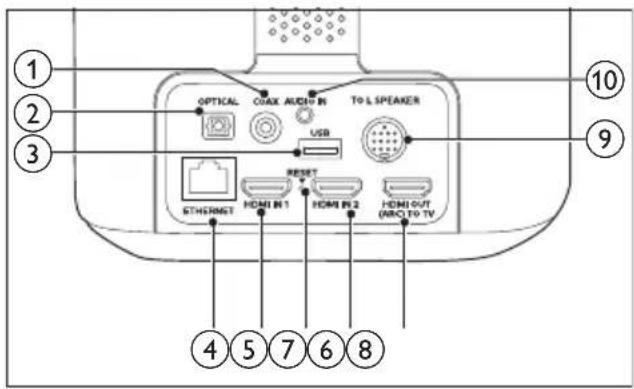
① COAX
Connect to a coaxial audio output on the TV or a digital device.
② OPTICAL
Connect to an optical audio output on the TV or a digital device.
③ USB
- Connect to a USB storage device for audio media play.
- Upgrade software of this product.
④ ETHERNET
Connect to the ethernet port on a broadband modem or router.
⑤ HDMI IN 1
Connect to the HDMI output on a digital device.
⑥ RESET
In case of no response from the surround speaker, press and hold with a pin for 5 seconds to reset this product to the factory settings.
⑦ HDMI IN 2
Connect to the HDMI output on a digital device.
⑧ TO TV - HDMI OUT (ARC)
Connect to the HDMI (ARC) input on the TV.
⑨ TO L SPEAKER
Connect to the left base speaker with the supplied DIN cable.
⑩ AUDIO IN
Connect to an audio output on a device via AUDIO IN or AUX source (by pressing repeatedly AUDIO IN on the remote control).
3 Connect and set up
This section helps you connect this product to a TV and other devices, and then set it up. For information about the basic connections of this product and accessories, see the quick start guide.

Note
- For identification and supply ratings, see the type plate at the back or bottom of the product.
- Before you make or change any connections, make sure that all devices are disconnected from the power outlet.
Connect the main unit
With the supplied DIN cable, connect the left base speaker to the right base speaker as main unit. See the quick start guide for details.

Caution
- When you plug the supplied DIN cable into the connectors on the main unit, make sure that you plug the DIN cable in the correct orientation to prevent product damage.
Network setup prompt
When this product is turned on for the first time, or network is not setup, you are prompted to set up the network to stream music from the online music apps.

→ The network setup prompt is displayed on the display panel of this product.
→ The white LED on the right base speaker blinks.
- To initialize network setup, see "Chromecast built-in and Spotify Connect".
- To skip network setup, select other audio input source.
Charge speakers
If the wireless surround speaker is undocked from the main unit, its battery level is indicated by the indicators on the wireless speaker.
• Light up white: full battery or more than 30% capacity remaining
• Light up red: low battery level, less than 30% remaining
- Blink red: near empty, less than 10% remaining
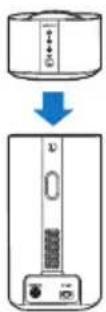
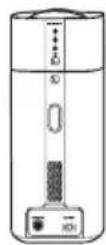
1 Dock the left and right wireless speakers onto the main unit (left and right base speakers) to charge the speakers.
2 Turn on the main unit.
→ During charging, the orange LED on the wireless speaker lights up.
When fully charged, the orange LED on the wireless speaker turns off.

Note
• It may take around 3 hours to fully charge the speakers.
Manual pair-up with the main unit
The wireless speakers and subwoofer automatically pair up with the main unit (left and right base speakers) for wireless connection when you turn on the main unit, the speakers and the subwoofer.
Manual pair-up with the main unit is required in one of the following cases.
• Audio from the main unit cannot be heard through the wireless speakers and subwoofer.
• More than 1 set of Philips E6 is used in close proximity (10m).
1 Dock the wireless surround speakers onto the main unit.
2 Turn on the main unit and the subwoofer.
3 Press the CONNECT Button on the subwoofer to enter the pairing mode.
→ The indicator on the subwoofer blinks quickly.
4 In HDMI ARC mode (press HDMI ARC), within six seconds, on the remote control, press twice then Volume + once, and then hold down BASS +.
→ If the pairing succeeds, the indicator on the subwoofer lights up.
→ If the pairing fails, the indicator on the subwoofer blinks slowly.
5 If the pairing fails, repeat the steps above.

Note
- If there is no sound from the wireless surround speakers which are undocked (or the LED on the wireless surround speaker blinks in red and orange alternatively), you may dock then undock the surround speakers to make wireless connection with the main unit.
Place speakers
For best sound effect, position all the speakers towards the seating position and place them close to your ear level (seated).
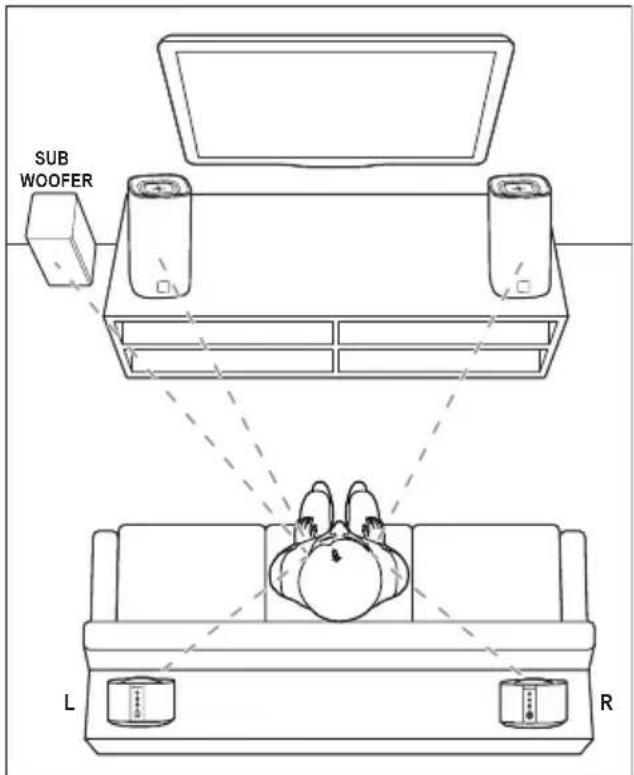

Note
- Surround sound depends on factors such as room shape and size, type of wall and ceiling, windows and reflective surfaces, and speaker acoustics. Experiment with the speaker positions to find the optimum setting for you.
Follow these general guidelines for speakers placement.
1 Seating position:
This is the center of your listening area.
2 Place the main unit (left and right base speakers) in front of the seating position.
3 L/R surround speakers (left/right):
Place the rear surround speakers to the left and right side of your seating position, either in line with it or slightly behind it.
4 (SUBWOOFER)
Place the subwoofer at least one meter to the left or right of the TV. Leave about 10-centimeter clearance from the wall.
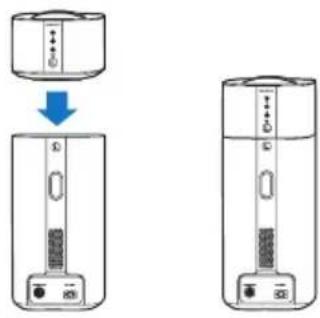
Dock the surround speakers
You can also dock your surround speakers onto the main unit to listen to audio, for example, watching TV shows and news.
Connect audio from TV
Connect this product to a TV. You can listen to audio from TV programs through the speakers of this product.
Option 1: Connect to TV through HDMI (ARC)
Best quality audio
This product supports HDMI with Audio Return Channel (ARC). With the ARC feature, you can hear the TV audio through this product by using a single HDMI cable.
What you need
• A High Speed HDMI Cable.
- Your TV supports both HDMI ARC and HDMI-CEC (see the TV user manual for details).
- For some TV models, enable the external speaker output from the TV setting menu (see the TV user manual for details).
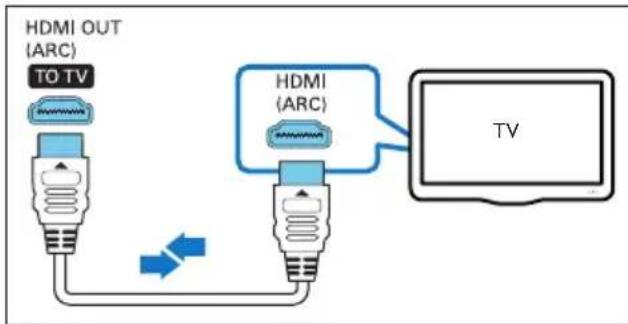
1 Using a High Speed HDMI cable, connect the HDMI OUT (ARC) connector on this product to the HDMI ARC connector on the TV.
- The HDMI ARC connector on the TV might be labeled differently. For details, see the TV user manual.
2 On your TV, turn on HDMI-CEC operations.
- For HDMI-CEC issues on your TV, see the TV user manual to make sure that the HDMI-CEC setup is correct, or contact the TV manufacturer if needed.
3 Press HDMI ARC on the remote control of this product to enable the HDMI ARC connection.
Note
- 100% interoperability with all HDMI-CEC devices is not guaranteed.
- If your TV is not HDMI ARC compliant, connect an audio cable to hear the TV audio through this product.
Option 2: Connect to TV through optical cable
Best quality audio
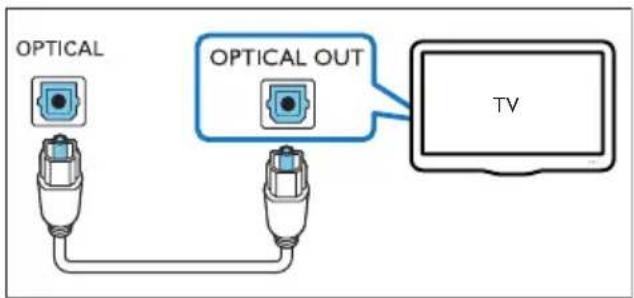
1 Using an optical cable, connect the OPTICAL connector on this product to the optical output on the TV.
- The digital optical output on the TV might be labeled OPTICAL OUT, SPDIF or SPDIF OUT.
2 Press on the remote control of this product to enable the optical connection.
Option 3: Connect to TV through coaxial cable
Best quality audio
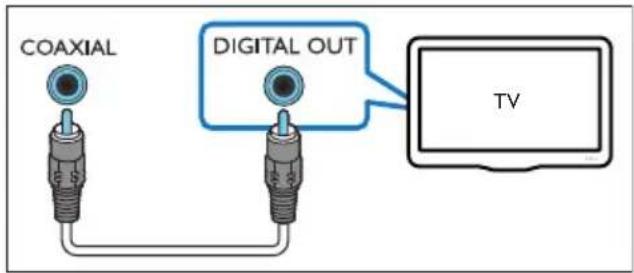
1 Using a coaxial cable, connect the COAXIAL connector on this product to the coaxial output on the TV.
• The digital coaxial output on the TV might be labeled COAXIAL/DIGITAL OUT or DIGITAL AUDIO OUT.
2 Press COAX on the remote control of this product to enable the coaxial connection.
Option 4: Connect to TV through analog audio cables
Basic quality audio

1 Using an analog cable, connect the AUDIO IN (3.5mm jack) on this product to the analog audio output (red and white) on the TV.
• The analog audio output on the external device might be labeled AUDIO OUT.
2 Press repeatedly AUDIO IN on the remote control of this product to enable the analog audio connection.
→ AUX is displayed on the display panel of this product.
Connect audio from other devices
You may also play audio from other devices through the speakers of this product.
Option 1: Connect to other device through optical cable
Best quality audio

1 Using an optical cable, connect the OPTICAL connector on this product to the optical output on the external device.
- The digital optical output on the external device might be labeled OPTICAL OUT, SPDIF or SPDIF OUT.
2 Press OPTICAL on the remote control of this product to enable the optical connection.
Option 2: Connect to other device through coaxial cable
Best quality audio

1 Using a coaxial cable, connect the COAXIAL connector on this product to the coaxial output on the external device.
- The digital coaxial output on the external device might be labeled COAXIAL/DIGITAL OUT or DIGITAL AUDIO OUT.
2 Press COAX on the remote control of this product to enable the coaxial connection.
Option 3: Connect to other device through analog audio cables
Basic quality audio

1 Using an analog cable, connect the AUDIO IN (3.5mm jack) on this product to the analog audio output (red and white) on the external device.
- The analog audio output on the external device might be labeled AUDIO OUT.
2 Press AUDIO IN on the remote control of this product to enable the analog audio connection. → AUX is displayed on the display panel of this product.
Connect digital devices through HDMI
Connect a digital device such as a set-top box, DVD/Blu-ray player, or games console to this product through a single HDMI connection. When you connect the devices in this way and play a file or game, the
• video is automatically displayed on your TV, and
• audio is automatically played on this product.
1 Using a High Speed HDMI cable, connect the HDMI OUT connector on your digital device to the HDMI IN 1/2 on this product.
2 Using a High Speed HDMI cable, connect the HDMI OUT (ARC) - TO TV connector on this product to the HDMI connector on the TV.
- On your TV and the connected device, turn on HDMI-CEC controls (if available). For details, see the user manual of the TV and the device.
3 Press HDMI 1/2 on the remote control of this product to enable the HDMI IN connection.
- If the TV is not HDMI-CEC compliant, select the correct video input on your TV
4 Chromecast built-in and Spotify Connect
Through the speakers of this product, you can listen to music from the following online music services.
• Chromecast-enabled apps
- Spotify Connect
What you need
- Smartphone/tablet with Android 4.3 or above; iPhone/iPad with iOS 8.0 or above.
- Download Philips "HCWeSet" application from Google Play or iOS App Store.
- A network router.
- A network cable (for wired connection).
Connect this product to network
To use Chromecast built-in and Spotify Connect services, you need to setup the network to connect this product to the network.
Before you start
• Make sure that this product and your mobile device share the same network.
- For wired network, connect a network cable to the LAN connector on this product to the network router.
- For wireless network, this product has built-in Wi-Fi.
- For iOS devices, it is recommended to turn on Bluetooth function before you launch "HCWeSet" app to set up.
1 Launch Philips "HCWeSet" app on your mobile device.
2 Follow the on-screen App instructions to complete the setup.
- At the initial setup page, select "Setup New Speaker" to initialize the setup.
- For iOS users: When prompted, go to the Wi-Fi list of the iOS device to select this product, then return to the App to continue the network setup.
- When this product is connecting to the network, white LED on the right base speaker blinks.
- When this product is connected to the network, white LED on the right base speaker lights up.

Note
- During network setup, accept the Google service and privacy agreement to enable Chromecast-enabled apps.
- During network setup, if the network connection fails, follow the on-screen instructions to retry.
Stream music to this product
After the successful network setup, you can stream music from online Chromecast built-in and Spotify Connect services to this product.
1 Launch Philips "HCWeSet" app on your mobile device.
2 Go to the App home page.
On the home page, Chromecast enabled apps and Spotify app is displayed.
3 Tap a music service icon to play music.
- If a music app is already installed on your mobile device, the app is launched.
- If a music app is not installed on your mobile device, you are routed to Google Play or iOS App Store to install the app.
- To learn how to use Chromecast built-in and Spotify Connect, see “Navigate the App home menu”.
→ The music which is played on your mobile device is streamed to this product.

Note
- After network setup, if Spotify app or Chromecast enabled apps (such as Google Play Music, TuneIn Radio, etc.) are installed on your mobile device, you may just launch these music apps to stream online music to this product.
- To use Spotify Connect, a Spotify Premium user is required.
- When software update is detected, the orange LED on the right base speaker lights up.
Navigate the App home menu
1 Launch Philips "HCWeSet" app on your mobile device.
2 Go to the App home page.
3 Tap ≡ to access the menu options for the following features.
- Through “My Speakers” option, check software version of this product, update the software of this product, reset the factory default settings of this product, customize name of this product, and set time zone.
- Learn how to use Chromecast built-in.
- Learn how to use Spotify Connect.
- Access legal information and notice.
- Access customer support.
5 Spatial calibration
Spatial calibration is used to achieve the following convenience, and simultaneously optimizes surround sound experience for it.
- Have freedom to place the wireless surround speakers according to your need, and
• automatically balance the placement of the wireless surround speakers with respect to your seating position.
The spatial calibration involves two steps.
- Step 1: calibrate the listening zone
- Step 2: calibrate the surround speaker position
When to calibrate
- If you perform spatial calibration for the first time, perform Step 1 and Step 2 in sequence.
- If you re-design your seating position, perform Step 1 and Step 2 in sequence.
- If you re-locate the wireless surround speakers, perform Step 2 independently (Step 1 can be skipped).
Before you start
• Make sure that the room is fairly quiet.
• Make sure that there is no obstacle between the left and right base speakers.
- Place the wireless surround speakers with the speaker side facing towards the main unit.
- Make sure that the main unit, the wireless surround speakers can fully "see" each other, no obstacle between them blocking such view.
- The minimum distance between the left and right base speakers is 0.8m (2.6'), the maximum distance 3m (20').
- The minimum distance between the wireless surround speakers and the main unit is 0.8m (2.6'), the maximum distance 6m (10').
Step 1: calibrate the listening zone
This step is to optimize surround experience through balance of your seating position.
1 Place the wireless surround speakers on two seating positions you prefer most (such as on a sofa).
• Make sure that the wireless surround speakers are wirelessly connected to the main unit (press SOD on the wireless speaker).

2 Press and hold CALIBRATION remote control for three seconds to trigger calibration.
→ ZONE (zone) is displayed on the display panel.
→ You can hear the calibration tones from the wireless surround speakers.
3 Wait until the calibration tones end.
→ ->SPEAKER (speaker) is displayed on the display panel.
4 Then perform the following Step 2 (calibrate the surround speaker position) to complete and store the new settings.
Step 2: calibrate the surround speaker position
This step is to optimize surround experience through balance of the placement of wireless surround speakers.
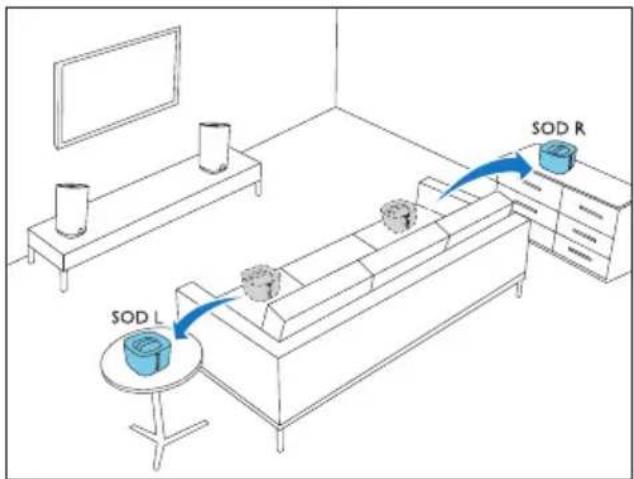
1 Place the wireless surround speakers on the position you prefer.
• Make sure that the wireless surround speakers are wirelessly connected to the main unit (press SOD on the wireless speaker).
flowchart
graph TD
    A["SOD L"] --> B["SOD R"]
    B --> C["Storage Unit"]
    style A fill:#cce5ff,stroke:#333
    style B fill:#cce5ff,stroke:#333
    style C fill:#cce5ff,stroke:#333
2 Press CALIBRATION once to trigger calibration.
- Press CALIBRATIONthree times to trigger calibration if you re-locate the wireless surround speakers and skip Step 1 (calibrate the listening zone) after you completed a round of spatial calibration previously.
→ You can hear the calibration tones from the wireless surround speakers.
3 Wait until the calibration tones end.
→ If the calibration succeeds, DONE (done) is displayed on the display panel. And the new settings are stored.

Note
- Spatial calibration takes around three minutes.
- Surround sound improvement is only noticeable if the wireless surround speakers were improperly placed, or if there is strong surround effect in the music you play.
- If the wireless surround speakers are swapped in placement, at the end of calibration L < - > R is displayed for few seconds, then the calibration completes.
- During calibration, you may press CALIBRATION to cancel calibration, and the settings returns to the default.
- If the spatial calibration fails, an error message is displayed on the display panel, such as FAIL (fail), and the settings returns to the default.
- If the spatial calibration fails, try the spatial calibration again, and make sure that the calibration points described at the beginning of this chapter are fully met.
6 Use your product
This section helps you use this product to play audio from connected devices.
Before you start
- Make the necessary connections described in the quick start guide and the user manual.
- Switch this product to the correct source for other devices.
Adjust the volume
1 Press Volume +/- to increase or decrease a volume level.
• To mute sound, press
- To restore the sound, press ✦ again or press Volume +/-
For the wireless surround speakers only
1 When the wireless surround speakers are wirelessly connected to the main unit (in SOD mode), press REAR VOL.+/- to increase or decrease a volume level.
Choose your sound
This section helps you choose the ideal sound for your video or music.
Sound mode
Select predefined sound modes to suit your video or music.
- Press MOVIE to create a surround listening experience. Ideal for watching movie.
-
Press MUSIC to create two-channel or multi-channel stereo. Ideal for listening to music.
-
Press to voice sound effect which makes human voice more clear and outstanding for listening.
- Press SMART to automatically select a predefined sound mode (MOVIE, MUSIC or VOICE) based on input audio content to optimize audio performance.
CLOSE TO ME (close to me)
For ultimate clear sound without disturbing your neighbors, place both the wireless surround speakers close to you, and activate this feature (to mute the main unit).

Note
- It is applicable only when the wireless surround speakers are wirelessly connected to the main unit (or SOD mode switches on).
- CLOSESE TO ME) is turned on, the functions for MOVIE and MUSICS are disabled.
1 Press and hold VOICE seconds to activate the feature.
→ CLOSE TO ME (close to me) scrolls once on the display panel.
→ The main unit is muted.
2 To exit this sound mode, press and hold VOICE again for three second.
→ The previous sound mode switches in.
Equalizer
Change the high frequency (treble) and low frequency (bass) settings of this product.
1 Press TREBbExchange BASS +/- the frequency.
Synchronize video and sound
If the audio and video are not synchronized, delay the audio to match the video.
1 Press AUDIO SYNG +/- the audio with the video.
• AUDIO SYNC + increases the sound delay, and AUDIO SYNC - decreases the sound delay.
Auto volume
Turn the auto volume on to keep the volume constant when you switch to a different source. It also compresses the sound dynamics, increasing the volume for quiet scenes and decreasing the volume for loud scenes.
1 Press AUTO VOL. to turn auto volume on or off.
When auto volume is turned on AUTO VOLUME scrolls once on the display panel.
When auto volume is turned OFF AUTO VOLUME scrolls once on the display panel.
Night mode
For quiet listening, night mode decreases the volume of loud sounds when audio is played. Night mode is only available for Dolby Digital soundtracks.
1 Press NIGHT to turn night mode on or off. → When night mode is turned on NIGHT is displayed briefly on the display panel.
When night mode is turned off NIGHT is displayed briefly on the display panel.

Note
- If auto volume is set to turned on, you cannot enable the night mode.
MP3 player
Connect your MP3 player to play your audio files or music.
What you need
- An MP3 player.
• A 3.5mm stereo audio cable.
1 Using the 3.5mm stereo audio cable, connect the MP3 player to the AUDIO IN connector on the right base speaker.
2 Press REPEATED.
→ AUDIO IN is displayed on the display panel.
3 Press the buttons on the MP3 player to select and play audio files or music.
- On the MP3 player, it is recommended to set the volume in the range of 80% maximum volume.
USB storage devices
Enjoy audio on a USB storage device, such as an MP3 player and USB flash memory, etc.
What you need
- A USB storage device that is formatted for FAT or NTFS file systems, and complies with the Mass Storage Class.
1 Connect a USB storage device to this product.
2 Press USB on the remote control.
3 Use the remote control to control play.
- Press ▶II to start, pause or resume play.
- Press ◄/▶to skip to the previous or next track.
- During USB play, press USB to select one of the following play modes.
• RPT TRACK: repeat the current track.
• RPT ALL: repeat all the tracks in one folder.
• : BRT RANDOM in one folder.
• RPT OFF: exit repeat or shuffle play mode.

Note
- This product may not be compatible with certain types of USB storage device.
- If you use a USB extension cable, USB HUB, or USB multi-reader, the USB storage device may not be recognized.
• Digital camera PTP and MTP protocols are not supported. - Do not remove the USB storage device while it is being read.
- DRM-protected music files (MP3) are not supported.
• Support a USB port: 5V= , 1A.
Play music via Bluetooth
Through Bluetooth, connect your product with a Bluetooth device (such as an iPad, iPhone, iPod touch, Android phone, or laptop), and then you can listen to the audio files stored on the device through the speakers of this product.
What you need
• A Bluetooth device which supports:
- Bluetooth profiles: A2DP, AVRCP
- Bluetooth version: Bluetooth V4.1 with Bluetooth Low Energy
- The operational range between the main unit (left and right base speakers) and a Bluetooth device is approximately 10 meters (30 feet).

Note
- The music streaming may be interrupted by obstacles between the device and this product, such as wall, metallic casing that covers the device, or other devices nearby that operate in the same frequency.
- If you want to connect this product with another Bluetooth device, break the current Bluetooth connection.
Bluetooth on the main unit
1 Press on the remote control to switch the main unit to Bluetooth mode.
→ BT on the display blinks.
2 On the Bluetooth device, switch on Bluetooth, search for and select Philips E6 to start connection (see the user manual of the Bluetooth device on how to enable Bluetooth).
→ During connection, BT on the display panel blinks.
3 Wait until BT on the display lights up.
→ If the connection succeeds, BT on the display panel lights up.
→ If the connection fails, BT on the display panel blinks.
4 Select and play audio files or music on your Bluetooth device.
- During play, if a call is coming, music play is paused (this feature is dependent on the connected mobile phone).
- If your Bluetooth device supports AVRCP profile, on the remote control you can press ◄/▶to skip to a track, or press ▶II to pause/resume play.
- If music streaming is interrupted, place the Bluetooth device closer to the main unit.
5 To exit Bluetooth, select other source. → When you switch back to Bluetooth mode, Bluetooth connection resumes.
• To break the current Bluetooth connection, press and hold ⓣ on the remote control.
Bluetooth on a single surround speaker
You can use the left or right surround speaker as a standalone Bluetooth speaker, independently from the main unit.

1 Press the 🔒 button on the left or right surround speaker to switch to Bluetooth mode.
→ TheLED on the left or right surround speaker blinks.
2 On the Bluetooth device, switch on Bluetooth, search for and select the name of the left or right surround speaker to start connection (see the user manual of the Bluetooth device on how to enable Bluetooth).
• Philips E6 -L stands for the left surround speaker, Philips E6 -R for the right surround speaker.
→ During connection, the LED on the left or right surround speaker blinks.
3 Wait until the LED on the surround speaker lights up.
If the connection succeeds, connection tone is heard, and the LED on the surround speaker lights up.
→ If the connection fails, the LED on the surround speaker blinks.
4 Select and play audio files or music on your Bluetooth device.
- During play, if a call is coming, music play is paused (this feature is dependent on the connected mobile phone).
- If music streaming is interrupted, place the Bluetooth device closer to the surround speaker.
5 To exit Bluetooth, press the SOD button on the surround speaker.
→ Then the surround speaker is wirelessly re-connected to the main unit.
When you switch back to Bluetooth mode, Bluetooth connection resumes.
• To break the current Bluetooth connection, press and hold the 8 button on the surround speaker.

Note
- The function of the remote control is not available to this feature.
Stereo Bluetooth on wireless speakers
You can also pair up the left and right surround speakers with each other as a whole for Bluetooth to create stereo effect, independently from the main unit.
The left surround speaker functions as the master speaker, and the right surround speaker as the slave speaker.
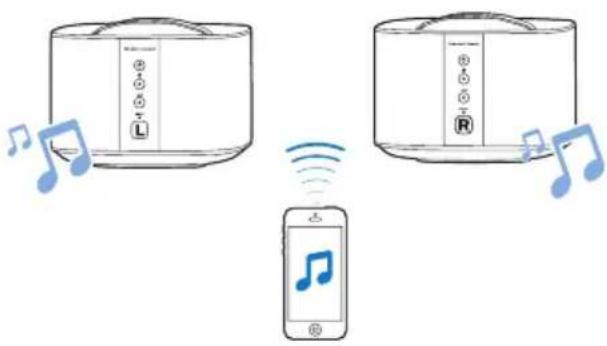
1 Press the 8 buttons on the left and right surround speaker to switch both speakers to Bluetooth mode.
- Make sure that both surround speakers are turned on. - Make sure that the right surround speaker is not currently connected with other Bluetooth device.
→ TheLEDs on the left and right surround speakers blink.
2 Press the 🔊 buttons on the left and right surround speakers to initialize pair-up.
→ The LED on the left surround speaker blinks, and the LED on the right surround speaker lights up, indicating that the right surround speaker is connected to the left surround speaker.
3 On the Bluetooth device, switch on Bluetooth, search for and select Philips E6 L to connect the left surround speaker to the Bluetooth device (see the user manual of the Bluetooth device on how to enable Bluetooth).
During connection between the left surround speaker and the Bluetooth device, the LED on the left surround speaker still blinks.
4 Wait until the LED on the left surround speaker lights up.
If the connection between the left surround speaker and the Bluetooth device succeeds, the LED on the left surround speaker lights up.
If the connection between the left surround speaker and the Bluetooth device fails, the LED on the left surround speaker still blinks.
5 Select and play audio files or music on your Bluetooth device.
- During play, if a call is coming, music play is paused (this feature is dependent on the connected mobile phone).
- If music streaming is interrupted, place the Bluetooth device closer to the left surround speaker.
6 To break pair-up of the right surround speaker from the left surround speaker, press the SOD on the right surround speaker.
Or, to exit Bluetooth mode or stop Bluetooth play, press the SOD on the left surround speaker.
- Press and hold Ⓤ on the left surround speaker to break the Bluetooth connection.

Note
- The function of the remote control is not available to this feature.
Connect Bluetooth via NFC
NFC (Near Field Communication) is a technology that enables short-range wireless communication between NFC-enabled devices, such as mobile phones.
What you need
• A Bluetooth device with NFC function.
- For pairing, tap the NFC device on the NFC tag of the right base speaker.

Note
- NFC feature is only available to the main unit, not available to the left and right surround speakers.
1 Enable NFC on the Bluetooth device (see the device's user manual for details).
2 Tap the NFC device on the NFC tag of this product until you hear a beep sound from this product.
- Make sure that this product is switched on from standby, and is currently disconnected from other Bluetooth device.
→ The BT on the display panel lights up, and the NFC device is connected to this product via Bluetooth.
→ If the connection fails, the BT on the display panel blinks.
3 Select and play audio files or music on your NFC device.
- To break the connection, tap again the NFC device with the NFC tag on this product.
Auto standby
Networked standby
When this product is connected to the network, this product automatically switches to networked standby after 15 minutes of inactivity. Networked standby shortens the startup time from standby, optimized for streaming music from mobile apps.
ECO standby
When this product is not connected to the network, this product automatically switches to ECO standby after 15 minutes of inactivity. ECO standby lengthens startup from standby, and less power is consumed.
In the network status, you may also press and hold ⏻ on the remote control to switch this product to ECO standby.

Note
- If this product is in ECO standby, the red LED on the right base speaker lights up.
- If this product is in networked standby, on the right base speaker, the white LED lights up and the red LED turns off.
Set display brightness
You can press DIM repeatedly to select a different brightness level of the display panel on this product.
If you select DIM 0, LED message is switched off after 10 seconds of button inactivity.
Apply factory settings
In case of no response from this product or network setup issue, you may reset this product to the default settings programmed at the factory.

Note
- When the factory settings restore is complete, the product automatically switches off and restarts.
Option 1:
1 Launch Philips "HCWeSet" app on your mobile device.
• Make sure that you connect this product to the network.
• Make sure that the surround speakers are connected to the main unit.
2 Go to the App home page.
3 Tap ≡ to access the menu options.
4 Select "My Speakers".
→ The connected devices are listed.
5 Then select "Factory Reset", and follow the on-screen instructions to finish.
Option 2:
1 On the right base speaker and the wireless surround speakers respectively, press and hold RESET with a pin for 5 seconds to reset this product.
7 Update software
To get the best features and support, update your product with the latest software.

Note
- With this product connected to the network, when software update is detected, the orange LED on the right base speaker lights up.
- The upgrade takes some time. During upgrade, "UPG" (upgrade) is displayed on the display panel of this product, and wait until the upgrade is completed.
Check software version
1 Launch Philips "HCWeSet" app on your mobile device.
• Make sure that you connect this product to the network.
2 Go to the App home page.
3 Tap ≡ to access the menu options.
4 Select "My Speakers".
→ The connected devices are listed.
5 Then select "About".
→ The software version number together with other product information is displayed.
Update software via Internet
1 Launch Philips "HCWeSet" app on your mobile device.
• Make sure that you connect this product to the network.
2 Go to the App home page.
3 Tap ≡ to access the menu options.
4 Select "My Speakers". → The connected devices are listed.
5 Select the name of this product, then select "Software Update" > "Network".
6 Follow the on-screen instructions to complete the update.
During upgrade, "UPG XX" (upgrade) is displayed on the display panel, and "XX" indicates a percentage of upgrade completion.
→ If the update is complete, this product automatically turns off and on again.
If the update fails, "ERROR"(error) is displayed on the display panel, then this product automatically turns off and on again, and prompts you to re-trigger the upgrade.
Update software via USB

Caution
- Do not turn off the power or remove the USB storage device when the software update is in progress because you might damage this product.
What you need
- A USB storage device that is formatted with FAT16, FAT32 or NTFS.
1 Check the latest software version on www.philips.com/support.
- Search for your model and click on "Software and drivers".
2 Download the software into a USB storage device.
① Unzip the downloaded file, and make sure that the unzipped folder is named "UPG".
② Put the "UPG" folder in the root directory.
3 Connect the USB storage device to the ⬆ (USB) connector on this product.
4 Launch Philips "HCWeSet" app on your mobile device.
• Make sure that you connect this product to the network.
5 Go to the App home page.
6 Tap ≡ to access the menu options.
7 Select "My Speakers".
→ The connected devices are listed.
8 Select the name of this product, then select "Software Update" > "USB".
9 Follow the on-screen instructions to complete the update.
During upgrade, "UPG XX" (upgrade) is displayed on the display panel, and "XX" indicates a percentage of upgrade completion.
If the update is complete, this product automatically turns off and on again.
If the update fails, "ERROR"(error) is displayed on the display panel, then this product automatically turns off and on again, and prompts you to re-trigger the upgrade.
8 Product specifications

Note
- Specifications and design are subject to change without notice.
Amplifier
• Total output power:
192W RMS (+/- 0.5 dB, 10% THD)
• Frequency response: 20 Hz-20 kHz / ±3 dB
• Signal-to-noise ratio:
65 dB (CCIR) / (A-weighted)
- Input sensitivity: - AUDIO IN: 500 mV - AUX: 1000 mV
Audio
• S/PDIF Digital audio input:
• Coaxial: IEC 60958-3
- Optical: TOSLINK
USB
- Compatibility: Hi-Speed USB (2.0)
• Class support: USB Mass Storage Class (MSC)
• File system: FAT16, FAT32, NTFS - Playable audio files: .aac, .mka, .mp3, .wav, .m4a, .flac, .ogg, .ape, .dsf, .dff
WLAN
• Frequency band/Output power:
• 2412 - 2472 MHz (Europe) / ≤ 20 dBm
• 2412 - 2462 MHz (US and Asia)/≤ 20 dBm
• 5180 - 5240 MHz (worldwide)/≤ 14 dBm
• 5745 - 5825 MHz (US and Asia)/≤14 dBm
- In Europe, 5150MHz - 5350MHz is restricted to indoor use only.
• Support wireless standards: IEEE802.11 a/b/g/n
• Supported channels:
• 2.4 GHz: 1 to 13 (Europe) or 1 to 11 (US and Asia)
• 5.X GHz: 36, 40, 44, 48 (worldwide) and 149, 153, 157, 161, 165 (US and Asia)
Bluetooth
- Bluetooth profiles: A2DP, AVRCP,
- Bluetooth version: Bluetooth V4.1 with Bluetooth Low Energy
• Frequency band/Output power: 2400 - 2483.5 MHz / ≤ 20 dBm
• NFC frequency: 13.56 MHz
Wireless speaker link
• Frequency band: 5725 - 5875 MHz
• Output power: ≤ 14 dBm
Main unit (left and right base speakers)
• Power supply: 110-240 V\~, 50-60 Hz
• Power consumption: 70 W
- Standby power consumption:
• ECO standby: ≤ 0.5 W
• Networked standby: < 6 W
• Dimensions (W × H × D):
161 × 302 × 161 mm
- Weight: 2.4 kg/each
• Built-in speakers
- Left/Right channel: 2 × woofer (76.2 mm/3", 8 ohm) + 2 × tweeter (25.4 mm/1", 8 ohm)
- Center channel: 2 x full-range (76.2 mm/3", 8 ohm)
Surround speakers
• Speaker impedance: 8 ohm
- Speaker drivers: 2 × 63.5 mm (2.5") full range
- Dimensions (W × H × D): 161 × 111 × 161 mm
• Weight: 1.0 kg/each
Subwoofer
• Power supply: 110-240 V\~, 50-60 Hz
• Power consumption: 30 W
- Standby power consumption: ≤ 0.5 W
- Impedance: 4 ohm
- Speaker drivers: 1 x 165 mm (6.5") woofer
- Dimensions (W × H × D): 222 × 441 × 222 mm
- Weight: 5.4 kg
Remote control batteries
- 2 × AAA-R03-1.5 V
Standby power management
- When the product remains inactive for 15 minutes, it automatically switches to standby or networked standby.
- To deactivate Bluetooth connection, press and hold the Bluetooth button on the remote control.
- To activate Bluetooth connection, enable Bluetooth connection on your Bluetooth device, or enable Bluetooth connection via the NFC tag (if available).
9 Troubleshooting

Warning
- Risk of electric shock. Never remove the casing of the product.
To keep the warranty valid, never try to repair the product yourself.
If you have problems using this product, check the following points before you request service. If you still have a problem, get support at www.philips.com/support.
Main unit
The buttons on this product do not work.
- Disconnect this product from the power supply for a few minutes, then reconnect.
Sound
No sound from the speakers of this product.
- Connect the audio cable from this product to your TV or other devices. However, you do not need a separate audio connection when: - this product and TV are connected through HDMI ARC connection, or - a device is connected to the HDMI IN connector on this product.
- Make sure that you connect the audio input on this product to the audio output on your TV or other devices.
- Reset this product to its factory settings.
- On the remote control, select the correct audio input.
• Make sure that this product is not muted.
No sound from the wireless surround speakers.
- Make sure that the wireless surround speaker is turned on. Press ⏻ on the wireless surround speaker.
-
Dock the wireless surround speakers onto the main unit to charge the battery.
-
If you intend the wireless surround speaker to wirelessly connect to the main unit, make sure that you press the SOD button on the wireless surround speaker.
- If you intend the surround speaker to be a standalone Bluetooth speaker, make sure that you connect the surround speaker to a Bluetooth device.
Audio from the main unit cannot be heard through the subwoofer and the wireless surround speakers.
- Manually pair up the subwoofer with the main unit.
- Re-dock the wireless surround speakers onto the main unit to pair up the surround speakers with the main unit.
Distorted sound or echo.
- If you play audio from the TV through this product, make sure that the TV is muted.
Audio and video are not synchronized.
- Press AUDIO SYNC +/- to synchronize the audio with the video.
Bluetooth
A device cannot connect with this product.
- The device does not support the compatible profiles required for this product.
- You have not enabled the Bluetooth function of the device. See the user manual of the device on how to enable the function.
- The device is not correctly connected. Connect the device correctly.
- This product is already connected with another Bluetooth device. Disconnect the connected device, then try again.
Quality of audio play from a connected Bluetooth device is poor.
- The Bluetooth reception is poor. Move the device closer to this product, or remove any obstacle between the device and this product.
The connected Bluetooth device connects and disconnects constantly.
- The Bluetooth reception is poor. Move the device closer to this product, or remove any obstacle between the device and this product.
- Turn off Wi-Fi function on the Bluetooth device to avoid interference.
- For some Bluetooth, the Bluetooth connection can be deactivated automatically to save power. This does not indicate any malfunction of this product.
NFC
A device cannot connect with this product via NFC.
- Make sure that the device is supported by NFC.
- Make sure that NFC is enabled on the device (see the device's user manual for details).
- For pairing, tap the NFC device on the NFC tag of this product.
Internet services
Cannot stream music from Chromecast built-in or Spotify Connect services to this product.
- This product is not connected to the network, and perform the first time setup if the setup is not completed.
Cannot connect this product to the network.
- Make sure that the wireless network is not disturbed by microwave ovens, DECT phones, or other neighboring Wi-Fi devices.
- Place the wireless router and this product within five meters of each other.
• Make sure that this product and your mobile device share the same network. - Reset this product to its factory settings.
• Make sure that the wireless router supports mDNS.
Spatial calibration
Why spatial calibration is needed?
- Spatial calibration optimizes surround sound experience if your portable left and right speakers (surround) are not properly placed.
Improvement in surround sound is not noticeable after successful spatial calibration.
- Surround sound improvement is only noticeable if the portable left and right speakers (surround) were improperly placed, or if there is strong surround effect in the music you play.
Error message is displayed on the display panel.
- If spatial calibration fails, one of the following error message is displayed. Refer to the fourth chapter (Spatial calibration) for details to re-calibrate.
- FAIL (fail): indicates that the portable left/right speaker is not in SOD mode or out of calibration range, or there is some obstacle by which the main unit, the portable left and right speakers cannot completely “see” each other.
- BATT LOW (battery low): indicates that the portable left/right speaker has low battery.
- ERROR (error): indicates that the portable left and right speakers are not detached from the main unit.
Obsah
① Panel displeje
① Indikátor subwooferu
⑧ TO TV - HDMI OUT (ARC)

Poznámka
natural_image
Illustration of a smart speaker connected to a smartphone via wireless signal (no text or symbols)① Skærmpanel
②
① Subwooferindikator
⑧ TO TV - HDMI OUT (ARC)
Tilslut HDMI (ARC)-indgangen på TV'et.
⑨ TO L SPEAKER

Bemærk
Navigering i app'ens startmenu
natural_image
Illustration of a portable device connected to a smartphone via wireless signal and music notes (no text or symbols)① Display
②
① Subwoofer-Anzeige
⑧ TO TV - HDMI OUT (ARC)

Hinweis
- Chromecast-Apps
- Spotify Connect
Was wird benötigt?
⑧ TO TV -HDMI OUT (ARC)

Σημείωση
natural_image
Illustration of a portable device connected to a smartphone via wireless signal icons (no text or symbols)① Panel de visualización
②
⑧ TO TV - HDMI OUT (ARC)

Nota
natural_image
Illustration of a portable device connected to a smartphone via wireless signal icons (no text or symbols)① Näyttö
②
⑧ TO TV - HDMI OUT (ARC)

Huomautus
natural_image
Illustration of a portable device connected to a smartphone via wireless signal waves (no text or symbols)① Afficheur
②
⑧ TO TV - HDMI OUT (ARC)

Remarque
natural_image
Illustration of a portable device connected to a smartphone via wireless signal icons (no text or symbols)⑧ TO TV - HDMI OUT (ARC)

Megjegyzés
natural_image
Illustration of a portable kitchen with sound waves and a smartphone displaying a music note (no text or symbols)① Display
②
ME close to me (vicino a me).
⑧ TO TV - HDMI OUT (ARC)

Nota
natural_image
Illustration of a portable device connected to a smartphone via wireless signals (no text or symbols)• Supporto standard wireless: IEEE802.11 a/b/g/n
① Display
②
① Subwooferlampje
⑧ TO TV - HDMI OUT (ARC)

Opmerking
natural_image
Illustration of a toaster connected to a smartphone via wireless signal waves (no text or symbols)Energiebeheer in stand-by
Fare for overoppheting!
① Displaypanel
②
① Indikator for subwoofer
- Blinker när subwooferen ikke er tilkoblet, eller holder på å koble til hovedenheten.
- Begynner å lyse när subwooferen er koblet til hovedenheten.
- Lyset er slått av när subwooferen går i standbymodus, eller den trådløse tilkoblingen er frakoblet i fire minutter.
⑧ TO TV - HDMI OUT (ARC)
Koble til HDMI (ARC)-inngangen på TVen.
⑨ TO L SPEAKER

Merknad
flowchart
graph TD
    A["HDMI OUT (ARC) TO TV"] --> B["Device"]
    C["HDMI (ARC)"] --> D["Device"]
    D --> E["TV"]
1 Hvis du bruker en høyhastighets HDMI-kabel, kobler du HDMI OUT (ARC)-kontakten på produktet til HDMI ARC-kontakten på TV-en.
1 Hvis du bruker en optisk kabel, kobler du OPTICAL-kontakten på produktet til den optiske utgangen på TV-en.
1 Hvis du bruker en koaksialkabel, kobler du COAXIAL-kontakten på produktet til koaksialutgangen på TV-en.
1 Hvis du bruker en koaksialkabel, kobler du COAXIAL-kontakten på produktet til koaksialutgangen på den eksterne enheten.
- Den digitale koaksialutgangen på den eksterne enheten kan være merket COAXIAL/DIGITAL OUT eller DIGITAL AUDIO OUT.
2 Trykk på COAX på fjernkontrollen til dette produktet for å aktivere den koaksiale tilkoblingen.
natural_image
Illustration of a portable device connected to a smartphone via wireless signal waves (no text or symbols)⑧ TO TV - HDMI OUT (ARC)

Uwaga
natural_image
Illustration of a microwave oven connected to a smartphone via wireless signal (no text or symbols)① Painel do visor
②
Mudar para o modo Bluetooth (apenas unidade principal).
③ +/- (Volume)
Aumentar ou diminuir o volume.
④
① Indicador do subwoofer
⑧ TO TV - HDMI OUT (ARC)
Ligar à entrada HDMI (ARC) no televisor.
⑨ TO L SPEAKER

Nota
flowchart
graph TD
    A["HDMI OUT (ARC) TO TV"] --> B["HDMI (ARC)"]
    B --> C["TV"]
natural_image
Illustration of a portable device connected to a smartphone via wireless signal waves (no text or symbols)Boxe surround wireless 7
Subwoofer-ul wireless 8
Conectori 8
① Panou de afişare
②
Boxe surround wireless
Subwoofer-ul wireless
⑧ TO TV - HDMI OUT (ARC)

Notă
Andocarea boxelor surround
natural_image
Illustration of a portable device connected to a smartphone via wireless signal icons (no text or symbols)① Panel displeja
②
Prepnutie do režimu Bluetooth (len hlavná jednotka).
③ +/- (Hlasitost')
① Indikátor subwoofera
⑧ TO TV – HDMI OUT (ARC)
Pripojenie ku vstupu HDMI (ARC) na televízore.
⑨ TO L SPEAKER

Poznámka
natural_image
Illustration of a portable device connected to a smartphone via wireless signal waves (no text or symbols)1 Pomocou tlačidiel əna ľavom a pravom priestorovom reproduktore prepnete obidva reproduktory do režimu Bluetooth.
① Teckenfönster
②
① Subwooferindikator
⑧ TO TV - HDMI OUT (ARC)

Kommentar
flowchart
graph TD
    A["TO TV"] --> B["HDMI OUT (ARC)"]
    B --> C["HDMI (ARC)"]
    C --> D["TV"]
1 Anslut HDMI OUT (ARC)-kontakten på produkten till HDMI ARC-kontakten på TV:n med en HDMI-höghastighetskabel.
natural_image
Illustration of a portable device connected to a smartphone via wireless signal waves (no text or symbols)① Gösterge paneli
②
⑧ TO TV - HDMI OUT (ARC)

Not
flowchart
graph TD
    A["TO TV"] --> B["HDMI OUT (ARC)"]
    B --> C["HDMI (ARC)"]
    C --> D["TV"]
4 Chromecast built-in и Spotify
Connect 16
① TO R SPEAKER
⑧ TO TV - HDMI OUT (ARC)

Примечание
4 Chromecast built-in и Spotify Connect
6 Use your product 20
⑧ TO TV - HDMI OUT (ARC)

Примітка
natural_image
Illustration of a microwave oven connected to a smartphone via wireless signal waves (no text or symbols)⑧ TO TV - HDMI OUT (ARC)

Ескертпе
natural_image
Illustration of a portable device connected to a smartphone via wireless signal waves (no text or symbols)Manufactured under license from Dolby Laboratories. Dolby, Pro Logic, and the double-D symbol are trademarks of Dolby Laboratories.


Digital Surround
For DTS patents, see http://patents.dts.com. Manufactured under license from DTS Licensing Limited. DTS, the Symbol, & DTS and the Symbol together are registered trademarks, and DTS Digital Surround is a trademark of DTS, Inc. © DTS, Inc. All Rights Reserved.

The terms HDMI and HDMI High-Definition Multimedia Interface, and the HDMI Logo are trademarks or registered trademarks of HDMI Licensing LLC in the United States and other countries.


SMART READY
The Bluetooth® word mark and logos are registered trademarks owned by Bluetooth SIG, Inc. and any use of such marks by Gibson Innovations Limited is under license. Other trademarks and trade names are those of their respective owners.


The N Mark is a trademark or registered trademark of NFC Forum, Inc. in the United States and in other countries.


Chromecast is a trademark of Google Inc.


The Spotify Software is subject to third party licenses found here: www.spotify.com/connect/third-party-licenses.

Specifications are subject to change without notice
Copyright © 2015 Gibson Innovations Limited. Revised Edition © 2017
This product has been manufactured by, and is sold under the responsibility of Gibson Innovations Ltd., and Gibson Innovations Ltd. is the warrantor in relation to this product. Philips and the Philips Shield Emblem are registered trademarks of Koninklijke Philips N.V. and are used under license.



- Always there to help you
- Contents
- Important 2
- Your product 4
- Connect and set up 9
- Chromecast built-in and Spotify
- Spatial calibration 15
- Use your product 17
- Update software 23
- Product specifications 25
- Troubleshooting 26
- Important
- Safety
- Risk of electric shock or fire!
- Risk of short circuit or fire!
- Risk of injury or damage to this product!
- Risk of overheating!
- Risk of contamination!
- Risk of swallowing batteries!
- Care for your product
- Care of the environment
- Compliance
- Help and support
- Open source software
- Your product
- Main unit
- Red LED
- White LED
- Orange LED
- Remote control
- Wireless surround speakers
- ②
- ③ button/LED
- ④ SOD button/LED
- ⑤ RESET
- Note
- Wireless subwoofer
- ① Subwoofer indicator
- ② CONNECT (connect)
- ③ AC MAINS\~
- Connectors
- Connect and set up
- Connect the main unit
- Caution
- Network setup prompt
- Charge speakers
- Manual pair-up with the main unit
- Place speakers
- (SUBWOOFER)
- Dock the surround speakers
- Connect audio from TV
- Option 1: Connect to TV through HDMI (ARC)
- Best quality audio
- What you need
- Option 2: Connect to TV through optical cable
- Option 3: Connect to TV through coaxial cable
- Option 4: Connect to TV through analog audio cables
- Connect audio from other devices
- Option 1: Connect to other device through optical cable
- Option 2: Connect to other device through coaxial cable
- Option 3: Connect to other device through analog audio cables
- Connect digital devices through HDMI
- Chromecast built-in and Spotify Connect
- Connect this product to network
- Before you start
- Stream music to this product
- Navigate the App home menu
- Spatial calibration
- When to calibrate
- Step 1: calibrate the listening zone
- Step 2: calibrate the surround speaker position
- Use your product
- Adjust the volume
- Choose your sound
- Sound mode
- CLOSE TO ME (close to me)
- Equalizer
- Synchronize video and sound
- Auto volume
- Night mode
- MP3 player
- USB storage devices
- Play music via Bluetooth
- Bluetooth on the main unit
- Bluetooth on a single surround speaker
- Stereo Bluetooth on wireless speakers
- Connect Bluetooth via NFC
- Auto standby
- Networked standby
- ECO standby
- Set display brightness
- Apply factory settings
- Option 1:
- Option 2:
- Update software
- Check software version
- Update software via Internet
- Update software via USB
- Product specifications
- Amplifier
- Audio
- USB
- WLAN
- Bluetooth
- Wireless speaker link
- Main unit (left and right base speakers)
- Surround speakers
- Subwoofer
- Remote control batteries
- Standby power management
- Troubleshooting
- Warning
- Sound
- No sound from the wireless surround speakers.
- Audio from the main unit cannot be heard through the subwoofer and the wireless surround speakers.
- Distorted sound or echo.
- Audio and video are not synchronized.
- A device cannot connect with this product.
- Quality of audio play from a connected Bluetooth device is poor.
- The connected Bluetooth device connects and disconnects constantly.
- NFC
- A device cannot connect with this product via NFC.
- Internet services
- Cannot stream music from Chromecast built-in or Spotify Connect services to this product.
- Cannot connect this product to the network.
- Spatial calibration
- Why spatial calibration is needed?
- Improvement in surround sound is not noticeable after successful spatial calibration.
- Error message is displayed on the display panel.
- Obsah
- ① Indikátor subwooferu
- ⑧ TO TV - HDMI OUT (ARC)
- Poznámka
- ① Subwooferindikator
- Bemærk
- Navigering i app'ens startmenu
- ① Subwoofer-Anzeige
- Hinweis
- Was wird benötigt?
- ⑧ TO TV -HDMI OUT (ARC)
- Σημείωση
- Nota
- Huomautus
- Remarque
- Megjegyzés
- ① Subwooferlampje
- Opmerking
- Energiebeheer in stand-by
- Fare for overoppheting!
- Merknad
- Uwaga
- ⑨ TO L SPEAKER
- Boxe surround wireless
- Subwoofer-ul wireless
- Notă
- Andocarea boxelor surround
- ① Indikátor subwoofera
- ⑧ TO TV – HDMI OUT (ARC)
- Kommentar
- Not
- Chromecast built-in и Spotify
- Примечание
- Chromecast built-in и Spotify Connect
- Use your product 20
- Примітка
- Ескертпе
Brand : PHILIPS
Model : Fidelio E6
Category : Home Theater System