
HCM-5300E - Humidifier HONEYWELL - Free user manual and instructions
Find the device manual for free HCM-5300E HONEYWELL in PDF.


| Product type | Evaporative humidifier |
| Brand | Honeywell |
| Model | HCM-5300E |
| Dimensions (L x D x H) | 38 x 25 x 34 cm |
| Weight | 3.2 kg |
| Power supply | 220-240 V, 50 Hz |
| Power consumption | 25 W |
| Tank capacity | 3.4 liters |
| Humidification output | 5.7 liters per day |
| Coverage area | Up to 50 m² |
| Humidification type | Natural evaporation with wick filter |
| Automatic shut-off | Yes, when tank is empty |
| Humidity control | Adjustable built-in humidistat |
| Water level indicator | LED indicator and level window |
| Noise level | 34 dB(A) (quiet) |
| Filter | Antibacterial wick filter, replaceable |
| Maintenance | Clean tank and filter every 2 weeks |
| Safety | Automatic shut-off if tipped over or tank empty |
| Spare parts | HC-12 filter, tank, top cover |
| Repairability | Repairability rating 8.1/10 (parts available) |
| Warranty | 2 years |
| Included accessories | Filter, power adapter, user manual |
Frequently Asked Questions - HCM-5300E HONEYWELL
User questions about HCM-5300E HONEYWELL
0 question about this device. Answer the ones you know or ask your own.
Ask a new question about this device
Download the instructions for your Humidifier in PDF format for free! Find your manual HCM-5300E - HONEYWELL and take your electronic device back in hand. On this page are published all the documents necessary for the use of your device. HCM-5300E by HONEYWELL.
USER MANUAL HCM-5300E HONEYWELL
natural_image
White ceramic jar with a small mouth and glass lid, labeled HCM-5300E (no other text or symbols visible)| CONTENTS |
| INHALTSVERZEICHNIS |
| SOMMAIRE |
| INHOUDSOPGAVE |
| INDICE |
| INDICE |
| INDICE |
| INNEHÅLLSFÖRTECKNING |
| INNHOLTSFORTEGNELSE |
| INDHOLDSFORTEGNELSE |
| SISÄLLYSLUETTELO |
| SPIS TREŚCI |
| FIHRIST |
| TARTALOMJEGYZÉK |
| OBSAH |
| SADRŽAJ |
| VSEBINA |
| СОДЕРЖАНИЕ |
| ПЕРИЕХОМENA |
| فهرس احتويات |
| ENGLISH | GB | 5 |
| DEUTSCH | DE | 10 |
| FRANÇAIS | FR | 16 |
| NEDERLANDS | NL | 22 |
| ESPAÑOL | ES | 28 |
| PORTUGUÊS | PT | 34 |
| ITALIANO | IT | 40 |
| SVENSKA | SE | 46 |
| NORSK | NO | 52 |
| DANSK | DK | 56 |
| SUOMI | FI | 61 |
| POLSKI | PL | 66 |
| TÜRKÇE | TR | 73 |
| ČESKY | CZ | 77 |
| MAGYAR | HU | 83 |
| HRVATSKI | HR | 89 |
| SLOVENSKO | SI | 94 |
| PYCCKIIЙ | RU | 99 |
| ΕΛΛΗΝΙΚΑ | GR | 106 |
| عربي | SA | 113 |

natural_image
Close-up of a white object with a diamond-shaped top and a curved line below, labeled '1' (no text or symbols on the object itself)
natural_image
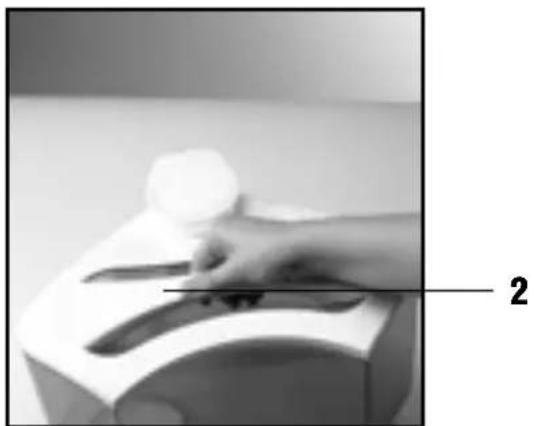
Hand pressing down on a curved surface with a numbered label '2' pointing to the point of the hand (no text or symbols on the object itself)

natural_image
Close-up of a white electronic device with a black cover and labeled component '3' (no text or symbols on the device itself)

natural_image
Close-up of a white toilet with a circular button and a numbered label '4' pointing to the lid (no other text or symbols)
HCM-5300E
ENGLISH
IMPORTANT SAFETY INSTRUCTIONS
Read through all the instructions before operating the humidifier. Keep these instructions safely for future use.
- Keep out of reach of children.
- Do not operate the humidifier outdoors; do not place in direct sunlight, high-temperature areas or near computers or sensitive electronic equipment.
- The humidifier must only be used to humidify the room. Inappropriate use can lead to hazards and damages for which no liability is assumed.
- Place the humidifier on a level, firm, non-metallic and waterproof surface. Make sure it is in a stable position, so that it cannot fall over or fall down. Water can damage furniture and floors.
- Unravel the cord before use. Failure to do so could cause overheating and possible fire hazard.
- Do not use an extension cord or a solid-state speed-control device. Doing so could cause overheating, fire hazard or electric shock.
- Only connect the humidifier to a single-phase AC supply to the voltage shown on the rating plate.
- Always disconnect the cord at the wall plug before removing the unit, filling, touching, moving or cleaning or when it not in use. Do not tug at when disconnecting it. Do not touch the power cable with wet hands.
- Do not add any substances into the water (e.g. inhalant, aromatic substances etc.). This can cause health hazards to humans.
- Do not touch the Ultrasonic Nebulizer (17) when the humidifier is operating. Doing so could cause burns.
- Do not direct the mist outlet (4) directly at people, walls or any objects.
- Do not remove the filled Water Tank (3) when the humidifier is in operation. Do not operate the humidifier without water or when the Water Tank (3) is empty. Doing so could damage the humidifier.
- Do not operate the humidifier without the demineralization cartridge (13) and do not use an exhausted cartridge. In areas where the water is very hard there might be an output of minerals, noticeable as "white dust".
-
Do not immerse the humidifier in water or other liquids and do not pour water or other liquids over the humidifier or into the Mist Outlet (4) or Air Inlet (21).
-
Ventilate the room regularly. When a humidifier is used in closed or small rooms, excessive humidity can condense on furniture, walls and floors. It is also possible to reduce the output with the Intensity Control (5) and with the Humidistat (6).
- Clean the humidifier regularly following the "Cleaning Instructions".
- If the Power cable (20) is damaged, it must be replaced by the manufacturer, a service agent or an authorized person to avoid any risk.
- Do not operate the humidifier if it is damaged, faulty or is not working properly. Disconnect it from the electricity supply.
PARTS IDENTIFICATION
1 Directional Mist Nozzle
2 Carrying Handle
3 Water Tank 7.7 litres
4 Mist Outlet
5 Power Switch and Intensity Control
6 Humidistat Switch and Humidity Control
7 Power Indicator Light
8 Humidity Indicator Light
9 Tank Cap
10 Tank Water Valve
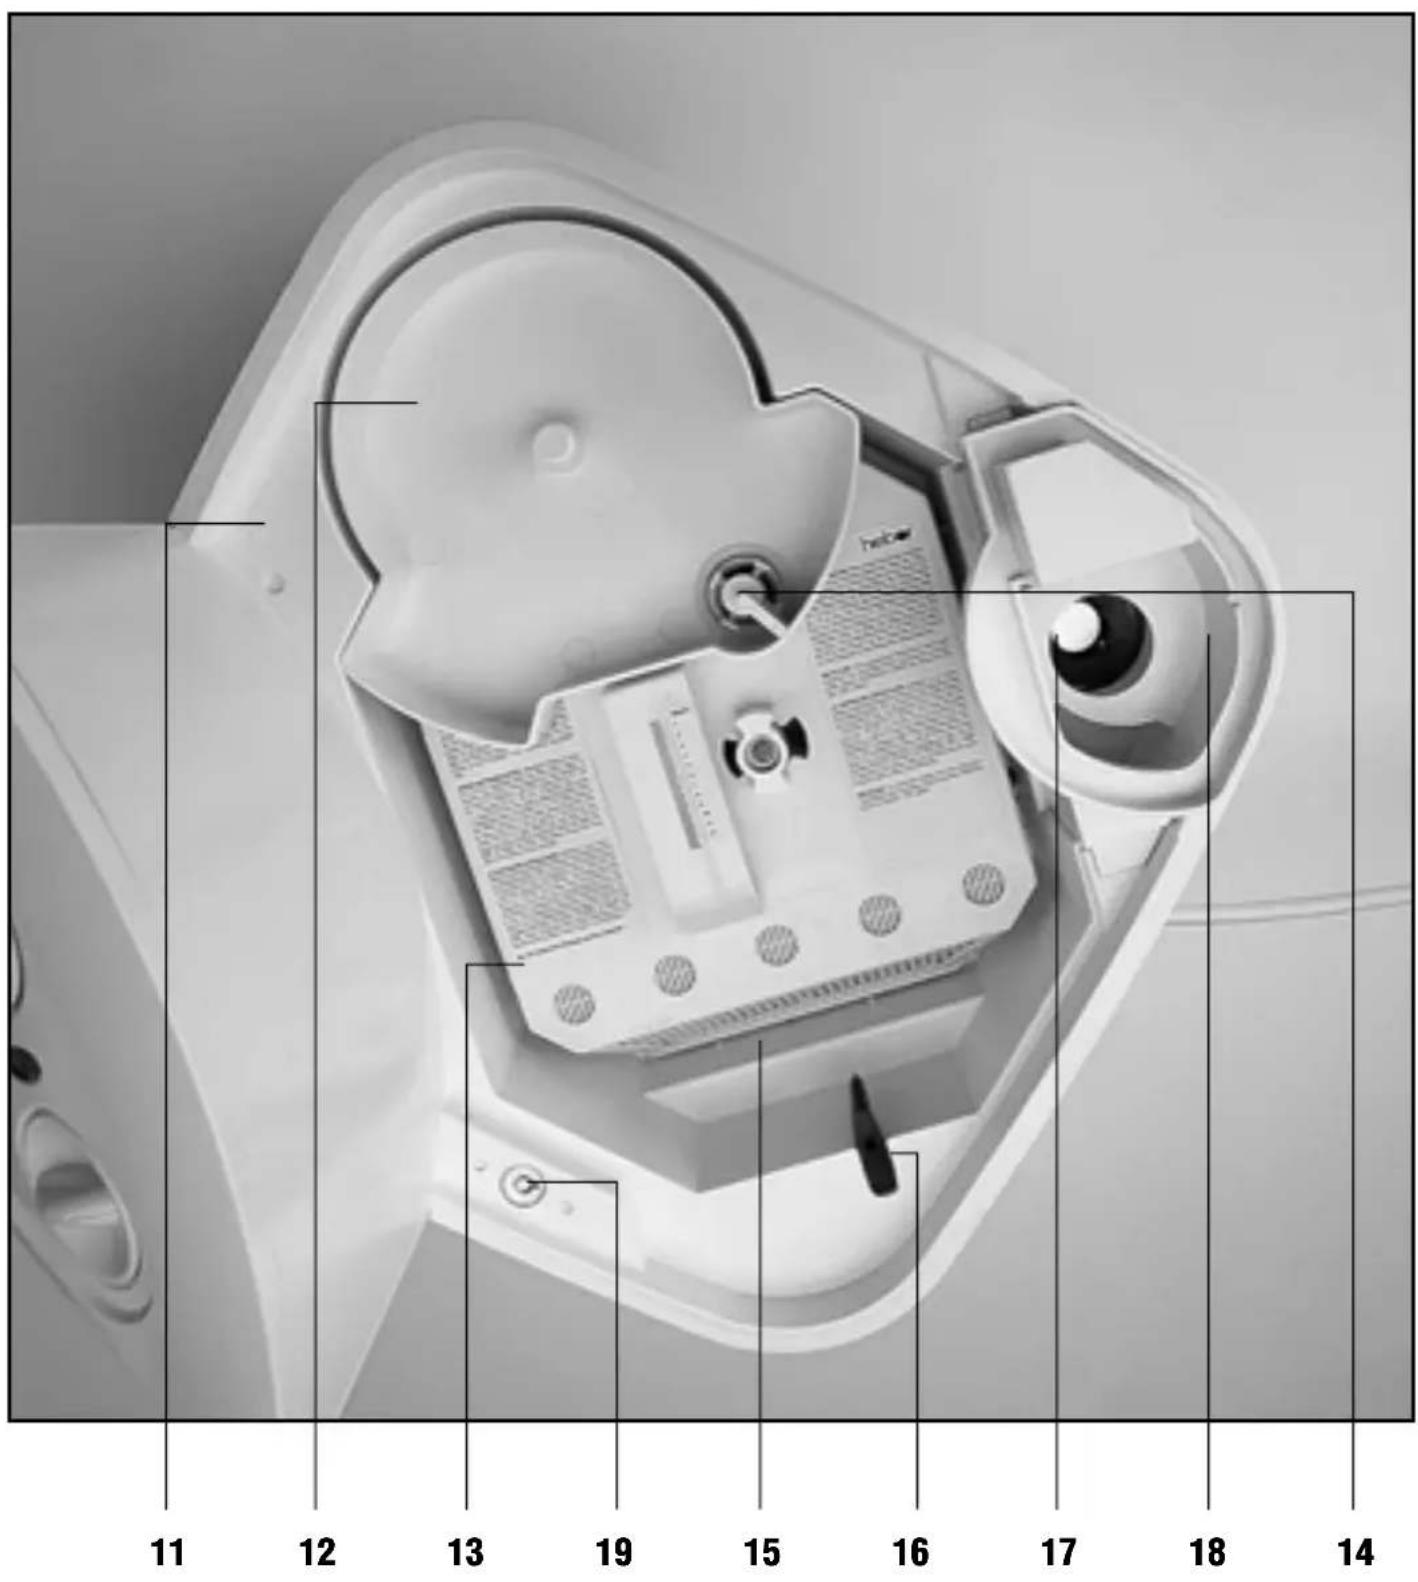
11 Base
12 Water Tray
13 Demineralization Cartridge AC-819E
14 Cartridge Water Valve
15 Reservoir
16 Water Sensor
17 Ultrasonic Nebulizer
18 Ultrasonic Nebulizer Cover
19 Automatic Shut-Off Function
20 Power cable and Plug
21 Air Inlet
22 Test strips for water hardness
23 Cleaning brush
24 Disinfectant "Dimanin A"
*These accessories can be purchased.
Accessories\*
FIRST TIME OF USE
- Read through all the instructions before using the humidifier.
- Unpack the humidifier, the Power cable (20), the Water Tank (3), the Directional Mist Nozzle (1), the Base (11) and the Demineralization Cartridge (13); remove all packaging material and discard. Packaging material can be recycled.
- Place the humidifier on a level, firm, non-metallic and waterproof surface. Make sure it is in a stable position, so that it cannot fall over or fall down. Water can damage furniture and floors. A safety distance of at least 1.20 m from any objects must be kept.
- Soak the Demineralization Cartridge (13) in cool tap water for two hours prior to use in order to achieve best filter results.
- Check your water hardness.
DEMINERALIZATION CARTRIDGE AC-819E
- The durability and performance of the AC-819E Cartridge (13) depends on the mineral content of the water. It can be used for a water hardness of up to 15^ dH. Its lifetime for 0-10^ dH is approx. five months and for 10-15^ dH approx. three months. Ask your local water supplier for information about the water hardness in your area.
- When using the humidifier under normal conditions the Cartridge (13) should be replaced every three to five months at the latest.
- If the humidifier has not been used for a longer period of time (e.g. over the summer season), the Cartridge (13) must be replaced by a new one. Soak the Demineralization Cartridge (13) in cool tap water for two hours prior to use in order to achieve the best filter results.
- Replacement AC-819E Cartridges (13) are available where you purchased your humidifier.
- Do not operate the humidifier without the Demineralization Cartridge (13) and do not use an exhausted Cartridge. In areas, where water is very hard, there might be an output of minerals, noticeable as “white dust” (see extra filters).
EXTRA FILTERS
In areas where the water is very hard there might be an output of minerals, noticeable as “white dust”. In order to determine the hardness of the water you may ask your local waterworks.
KF-520E K-Filter
- If the water is extremely hard the cold tap water should be filtered with the KF-520E K-Filter before filling it into the Water Tank (3).
- The KF-520E K-Filter reduces the calcium carbonate content of the water.
- The KF-520E K-Filter can be regenerated and therefore has a long lifetime.
- For using the KF-520E K-Filter, please read and follow carefully the special instructions included in each filter package.
SF-530E A-Filter
- The SF-530E A-Filter should be used when salt is added to the water by use of a water softening plant. If the water has an extremely high salt content the cold tap water should first be filtered with the SF-530E filter.
- Then filter the water with the KF-520E K-Filter. The water, filtered twice, can now be filled into the Water Tank (3).
- The SF-530E A-Filter can be regenerated and therefore has a long lifetime.
- For using the SF-530E A-Filter, please read and follow carefully the special instructions included in each filter package.
FILLING THE WATER TANK
- Check that the Power Switch (5) is in the Off position and that the plug is not in the socket.
- Remove the Directional Mist Nozzle (1) from the Water Tank (3).
- Remove the Water Tank (3) from the Base (11) and turn it upside down. Open the Tank Cap (9) by turning it counter-clockwise.
- Fill the Water Tank (3) only with clean, cool tap water (approx. 7,7 litres). Do not use warm or hot water. This can damage the Cartridge (13) and the Ultrasonic Nebulizer (17) and void the warranty.
- Do not add any substances into the Water Tank (3), the Reservoir (15) or onto the Cartridge (13) (e.g. inhalant, aromatic substances etc.). This can cause health hazards to people.
- Close the Water Tank (3) with the Tank Cap (9) by turning it clockwise.
- Make sure the Demineralization Cartridge (13) is properly located and secured in the reservoir (15) with the water tray (12) located on top.
ENGLISH
Place the water tray (12) carefully onto the Cartridge Water Valve (14) and press down until it sits properly on the Cartridge (13).
- Turn the Water Tank (3) upright. Make sure that the Tank Cap (9) is in place and check it for leaks.
- Replace the filled Water Tank (3) on the Base (11) and the Directional Mist Nozzle (1) into the Water Tank (3). Wait for approx. 15 minutes before operating the humidifier, so that the water can run through the Cartridge (13).
EXPLANATION OF THE CONTROL PANEL
1. Humidistat (6)
for continuous adjustment of the desired humidity. The optimum value between 40 % and 60 % is additionally marked in blue. Once the humidity level exceeds the set level, the unit will turn off and the blue humidity indicator light (8) will illuminate. Once the humidity falls below the set level, the unit will turn back on and the humidity indicator light (8) will turn off.
2. Intensity Regulator (5)
for the precision regulation of the emission of mist – marked by blue drops. The associated Power Indicator Light (7) will glow green when the unit is powered on.
OPERATING INSTRUCTIONS
- Check that the Water Tank (3) is filled and that the Cartridge (13) and the Ultrasonic Nebulizer Cover (18) are in place.
- Check that the Power Switch (5) is in the Off-position. Plug the power cable into the outlet. Do not touch the power cable with wet hands.
- Turn the Power Switch (5) to the desired output level. The green Power Indicator Light (7) will illuminate. Turn the Power Switch (5) clockwise to increase mist output; turn it counter-clockwise to decrease mist output.
- Use the Humidistat Switch (6) to select the desired humidity level. To increase humidity turn the switch clockwise. When the desired humidity level is reached, the humidifier will shut off and the blue humidity light (8) will illuminate. The humidistat will automatically turn the humidifier back on and off again to maintain the humidity level, with the humidity light (8) indicating accordingly.
-
Direct the Mist Nozzle (1) away from people, objects or walls.
-
If surplus humidity condenses on furniture, walls or floors in closed or small rooms, turn the Power Switch (5) counter-clockwise to decrease mist output and open the door to the room. If this does not solve the problem turn the Power Switch (5) to the Off-position and unplug the humidifier.
- Before removing the humidifier or filling the Water Tank (3) turn the Power Switch (5) to the Off-position and unplug the humidifier.
CLEANING, CARE AND STORAGE
We recommend cleaning the humidifier frequently. In order to not impair the performance of the humidifier, follow the instructions for Cleaning, Care and Storage.
Daily Cleaning
- Before cleaning, turn the Power Switch (5) to the Off-position and unplug the unit.
- Remove the Directional Mist Nozzle (1) from the Water Tank (3) and remove the Water Tank (3) from the Base (11).
- Remove the Water Tray (12), the Ultrasonic Nebulizer Cover (18) and the Cartridge (13) from the Base (11). Do not wash or clean the Cartridge (13).
- Carefully wipe the end of the Water Sensor (16) with white spirit to remove any deposits that may have collected. Do not attempt to remove or in any other way modify the Water Sensor (16). Even touching it can damage the delicate Sensor (16).
- Empty excess water from the Base (11) only via the side opposite to the Water Sensor (16) and make sure that water does not enter into the Air Inlet (21).
- Open the Tank Cap (9) by turning it counterclockwise and drain any water from the Water Tank (3).
- Rinse the Water Tank (3) thoroughly with lukewarm water.
- Wipe the outer surfaces of the Water Tank (3) with a clean, damp cloth.
- To operate the humidifier follow the instructions under „Filling the Water Tank“ and „Operating Instructions“.
ENGLISH
Weekly Cleaning
- Follow the instructions under "Daily Cleaning", figures 1. to 6.
- Clean the Water Tray (12), the Tank Cap (9) and the Ultrasonic Nebulizer Cover (18) with a commercially available washing liquid. To assist the cleaning process, use a cleaning brush. Afterwards thoroughly rinse these parts several times in lukewarm water.
- Fill the Water Tank (3) approx. half-full with lukewarm water. To assist the cleaning action we recommend that you add approx. 10 drops of "Dimanin A"*. Do not add soap or detergents. Use a cleaning brush. Afterwards thoroughly rinse the Water Tank (3) several times in lukewarm water. Wipe the outer surfaces of the Water Tank (3) with a clean, damp cloth.
*Dimanin A is a chlorine-free disinfectant that is also used in swimming pools. It can be purchased as an accessory. Caution: Keep out of reach of children. Do not swallow. Avoid direct eye contact. In the recommended dilution it is not harmful to skin or eyes.
- Clean the inside of the Base (11) only with lukewarm water. Do not touch the Water Sensor (16) or the Ultrasonic Nebulizer (17). Make sure that water does not enter into the Air Inlet (21). Do not immerse the Base (11) in water.
- To operate the humidifier follow the instructions under „Filling the Water Tank“ and „Operating Instructions“.
Disinfecting
- Every fortnight, after cleaning, you should additionally disinfect these parts of the humidifier: Water Tank inside (3), Base inside (11), Water Tray (12) and Ultrasonic Nebulizer Cover (18).
- Use a commercially available alcohol-based disinfectant or high-proof alcohol. This disinfectant is an alcohol mixture available at pharmacies and drug stores. Follow the disinfectant manufacturers' written instructions. Neither substance will harm the plastic parts but these should be rinsed thoroughly in water after disinfecting.
- Dry all inner surfaces with a soft tissue and wipe all outer surfaces with a soft, dry cloth.
-
Every six weeks remove the Demineralization Cartridge (13) from the Base (11). Put it briefly in hot, but not boiling water of approx. 70 °C in order to counteract any formation of germs.
-
To operate the humidifier follow the instructions under „Filling the Water Tank“ and „Operating Instructions“.
Care and Storage
- Follow the "Weekly Cleaning" instructions when the humidifier is not used for a longer period (one week or more).
- Let the humidifier and all its parts dry completely.
- Remove the Cartridge (13) from the Base (11) and discard.
- Do not store the humidifier with a filled Water Tank (3) nor with a used Cartridge (13).
- Store the humidifier in a cool, dry place.
ACCESSORIES
Test strips for checking the water hardness
- To check your water hardness (total hardness) you can make use of test strips (22), which can be purchased as an accessory.
- Dip a test strip (22) with all its test zones into a glass filled with fresh tap water. Do not hold under running water. After two minutes you can determine the degree of hardness of your tap water according to the following table:
| No. of test zones Total hardness | ||
| green violet | ||
| 4 0 below 3° dH | ||
| 3 | 1 | 4 – 7° dH |
| 2 | 2 | 8 – 15° dH |
| 1 3 16 | – 22° dH | |
| 0 4 over 23° dH | ||
Cleaning Brush and Disinfectant
To assist the cleaning action we recommend that you use Dimanin A* (24) and the cleaning brush (23), which can be purchased as accessories.
*“Dimanin A” is a chlorine-free disinfectant that is also used in swimming pools. Caution: Keep out of reach of children. Do not swallow. Avoid direct eye contact. In the recommended dilution it is not harmful to skin or eyes.
TROUBLE SHOOTING
| Problem | Possible Cause | Solution |
| The Power Switch is in the on-position.The Pilot Light (7) does not illuminate. | 1. The plug is not plugged in.2. There is no power at the outlet. | 1. Plug the humidifier in.2. Check the circuits and fuses or ask a specialist. |
| The humidifier produces only little or no mist. | 1. No water in Tank (3).2. The unit is not placed on a firm, level surface.3. The Water Tank (3) was washed with a washing liquid and not rinsed thoroughly.4. Mineral deposits on Water Sensor (16) or Nebulizer (17).5. Blower not operating (10).6. Cartridge (13) is clogged.7. Nebulizer not functioning. | 1. Fill the Water Tank (3).2. Place the humidifier on a firm, level surface.3. Empty the water tank (3) and rinse thoroughly with warm water.4. Carefully clean or disinfect Water Sensor (16) and Nebulizer (17).5. Ensure water in Reservoir (15) is adequate to immerse Water Sensor (16).6. Replace used Cartridge with a new one (13).7. Ask a specialist and follow the instructions in the warranty manual. |
| Humidity condenses on furniture, walls or floors. | 1. The relative humidity in the room is too high. | 1. Follow the “Operating Instructions”. |
| White dust | 1. The water is too hard.2. The Cartridge (13) is exhausted. | 1. Follow the instructions under “Demineralization Cartridge AC-819E” and use the extra filter KF-520E.2. Replace the exhausted Car-tridge (13) with a new one. |
CONDITION OF SALE
As a condition of sale, the purchaser assumes responsibility for the proper use and care of this appliance in accordance with these printed instructions. The purchaser or user must judge himself or herself when to use the appliance and the length or use.
Our oral and written indications are based on extensive tests. Our advice is given to the best of our present knowledge, but without obligation inasmuch as the use of the unit is beyond our direct influence. No liability can be assumed for any damages caused by improper use (such as inadequate cleaning, decalcifying filter exchanged too late, free discharge of humidity impeded atomization of chemical additives or liquids other than pure tap water etc.). No additives must be put in the water as the unit could suffer damage and health risks could not be excluded as well.
NOTE: IF YOU EXPERIENCE A PROBLEM WITH YOUR HUMIDIFIER PLEASE SEE WARRANTY FOR INSTRUCTIONS. PLEASE DO NOT ATTEMPT TO REPAIR THE HUMIDIFIER YOURSELF. DOING SO WILL VOID THE WARRANTY AND COULD CAUSE DAMAGE OR PERSONAL INJURY.
Technical specifications are subject to change.
DEUTSCH
FYLDNING AF VANDBEHOLDEREN
VAŽNE SIGURNOSNE UPUTE
Pročitajte sve upute prije rukovanja ovlaživačem. Sačuvajte ove upute.


- HCM-5300E
- ENGLISH
- IMPORTANT SAFETY INSTRUCTIONS
- PARTS IDENTIFICATION
- Accessories\*
- FIRST TIME OF USE
- DEMINERALIZATION CARTRIDGE AC-819E
- EXTRA FILTERS
- KF-520E K-Filter
- SF-530E A-Filter
- FILLING THE WATER TANK
- EXPLANATION OF THE CONTROL PANEL
- Humidistat (6)
- Intensity Regulator (5)
- OPERATING INSTRUCTIONS
- CLEANING, CARE AND STORAGE
- Daily Cleaning
- Weekly Cleaning
- Disinfecting
- Care and Storage
- ACCESSORIES
- Test strips for checking the water hardness
- Cleaning Brush and Disinfectant
- CONDITION OF SALE
- DEUTSCH
- FYLDNING AF VANDBEHOLDEREN
- VAŽNE SIGURNOSNE UPUTE
Brand : HONEYWELL
Model : HCM-5300E
Category : Humidifier