
IB271090 - Binder GBC - Free user manual and instructions
Find the device manual for free IB271090 GBC in PDF.


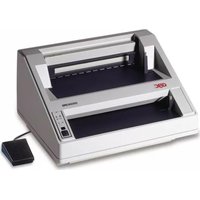
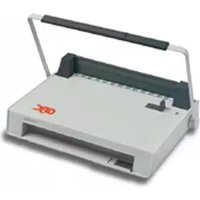
| Product Type | Electric Wire Binder |
| Brand | GBC |
| Model | IB271090 |
| Power Supply | 220-240 V, 50 Hz |
| Dimensions (L × D × H) | 40 × 30 × 20 cm |
| Weight | 5 kg |
| Punching Capacity | Up to 20 sheets |
| Binding Capacity | Up to 300 sheets with 30 mm rings |
| Compatible Ring Diameter | 6 to 30 mm |
| Number of Holes | 21 holes (for A4) |
| Adjustable Margin | Yes, from 2 to 6 mm |
| Binding Type | Double wire rings (wire binding) |
| Punching Function | Manual or electric depending on model |
| Safety | Automatic shut-off in case of overload, finger protection |
| Maintenance | Clean the punching heads after each use, lubricate the shafts |
| Spare Parts | Available: sets of blades, binding combs, punching dies |
| Repairability | Repairability index: 7/10 (standardized parts) |
| Noise Level | < 70 dB |
| Operating Temperature | 10°C to 40°C |
Frequently Asked Questions - IB271090 GBC
User questions about IB271090 GBC
0 question about this device. Answer the ones you know or ask your own.
Ask a new question about this device
Download the instructions for your Binder in PDF format for free! Find your manual IB271090 - GBC and take your electronic device back in hand. On this page are published all the documents necessary for the use of your device. IB271090 by GBC.
USER MANUAL IB271090 GBC
natural_image
Two black plastic electronic devices with cooling fins and a grid-patterned base, labeled 'MultiBind 220 & 320' below (no other text or symbols)MultiBind 220 & 320
GB Instruction Manual
F Manuel d'utilisation
D Bedienungsanleitung
① Manuale d'istruzioni
NL Gebruiksaanwijzing
E Manual de instrucciones
P Manual de Instruções
TR Kullanım Kılavuzu
GR Οδηγίες
DK Brugsvejledning
FI Käyttöopas
NO Bruksanvisning
⑤ Bruksanvisning
PL Instrukcja obsługi
© CZ Návod k obsluze
H Használati útmutató
RUS Руководство по эксплуатации

To register and activate the warranty go to
www.accoeurope.com
English 4
Français 8
Deutsch 12
Italiano 16
Nederlands 20
Español 24
Português 28
Türkçe 32
Ελληνικά 36
Dansk 40
Suomi 44
Norsk 48
Svenska 52
Polski 56
Česky 60
Magyar 64
Русский 68


flowchart
graph TD
    A["13:0: Pressing"] --> B["79: Cutting into press"]
    B --> C["14: Cutting into sheet"]
    C --> D["15: Assembly with clamping"]
    D --> E["10: Cutting into sheet"]
    E --> F["14: Rolling part"]
    style A fill:#f9f,stroke:#333
    style B fill:#ccf,stroke:#333
    style C fill:#cfc,stroke:#333
    style D fill:#fcc,stroke:#333
    style E fill:#cff,stroke:#333
    style F fill:#ffc,stroke:#333

Specifications
| GBC MultiBind 320 | GBC MultiBind 220 | |
| Type of Punch | Manual | Manual |
| Max. Punch Capacity per lift (80 gsm) | 20 CombBind & WireBind 21, 30 4Hole | 20 CombBind, 30 4Hole |
| Max Punch Capacity per lift Foils/PVC Covers | 2 x Foils/PVC Covers (0.2mm) | 2 x Foils/PVC Covers (0.2mm) |
| Max. Approx. Binding Capacity (80 gsm) | 450 CombBind, 125 (WireBind 21) | 450 CombBind |
| Paper Formats, | A4, A5, 315mm | A4,315mm |
| Max Binding Element Cap | 51mm CombBind, 14 mm (WireBind 21) | 51mm CombBind |
| Anti- Jam Feature | X | X |
| De-Selector Pins | 7 Disengageable | Fixed 21 loop/4 Hole |
| Comb/Wire Size Selector | √ | X |
| Margin Depth Selector | √ | Fixed |
| Additional Features | Foldaway design | Foldaway design |
| Machine Dimensions mm (HxWxD mm) | 125x425x425 | 125x425x425 |
| Weight | 12.4kg | 11.5kg |
Location of controls
① Limit stop for comb and wire
② Transport Guard
3 Adjustable Paper Edge Guide (4 hole)
4 Adjustable Paper Edge Guide (21 Hole)
5 Document Stand
6 Punching lever
⑦ De-selectable Punching Pins (MB 320 only)
8 Comb Size Guide (in the binder channel)
9 Comb holder
⑩ Wire Binding Channel (MB 320 only)
11 Binding Lever
⑫ Punching Slot (4 holes)
13 Punching Slot (21 Hole)
14 Margin Depth Selector (MB 320 only)
⑮ Clippings Tray
Special notice
Thank you for choosing a GBC Binding machine. We aim to produce quality binding machines at an affordable price, with many advanced features to enable you to create excellent results every time. Before using your machine for the first time, please take a few minutes to read through this guide and retain these instructions for future reference.
Tips on use
The cutting blades of your MultiBind machine were coated with oil during manufacture in order to protect against corrosion and to ensure easy running.
- Before using the unit properly for the first time, it is advisable to carry out several punching operations using old paper in order to remove all traces of the oil from the components.
- Test the punching results using old paper before you punch the final document.
- Use only original GBC accessories and parts.
The unit is maintenance-free when used correctly for its intended application.
Safety instructions

YOUR SAFETY AS WELL AS THE SAFETY OF OTHERS IS IMPORTANT TO ACCO BRANDS EUROPE. IN THIS INSTRUCTION MANUAL AND ON THE PRODUCT ARE IMPORTANT SAFETY MESSAGES. READ THESE MESSAGES CAREFULLY.
Please note that your MultiBind machine has been designed exclusively for punching and binding paper material and PVC plastic foils. Only use the unit for this purpose and do not attempt to process any other materials. This will ensure a long service life and prevent any damage to the mechanical function of your binding machine.
- In order to avoid overloading your machine, please refer to the maximum punch guide located on the front of your machine before punching.
- When punching PVC/PP covers, we recommend the cover be punched with some paper either side.
- DO NOT punch metallic objects such as staples or paper clips.
- Please empty the waste tray regularly.
- Ensure that the machine is operated on a flat stable surface.
- Never lift the machine by the punching handle. Always use the hand grips located on the side of the machine.
- To avoid risk of injury DO NOT put your fingers into the wire binding channel.
- The binder is not to be exposed to temperature / humidity conditions that would cause condensation. Maximum ambient temperature: 40°C
Preparing the unit
- Place the unit on a stable surface.
- Fold up the document stand (cover) (see fig 1.1)
- Push the two transport locks of the transport guard inwards (see fig 1.2)
- Move the punch handle upwards until the limit stop (see fig 1.3)
- Move the binding lever upwards until the limit stop. A spring in the unit presses the binding lever a few centimetres to the side so that you can use this easily. (see fig 2)
Your MultiBind machine is now ready for use.
4 Hole Punching
1 Set the paper edge guide (see fig 3)
2 Punching
- With the handle in the upright position, insert the sheets into the 4 hole punching channel.(max 30 sheets 80 gsm) Making sure the pages are flush to the edge guide. (See fig 4)
- Press the punching level downwards to punch. Return the handle to the original position. (See fig 5)
- Remove the document.
Comb/Wire Punching (21 holes, rectangular)
1 Set the paper edge guide (see fig 6)
2 Setting the Margin depth (MB 320 only)
- Adjust the rotating button on the right side of the punching channel to the required punching depth. (The correct punching depth makes it easier to turn over the pages of the document.) (see fig 7)
| Comb Size 6-8 10 | 12 14-19 | 22-51 | ||
| Perforation depth | 1 2 3 4 |
3 Punching
- With the handle in the upright position, insert the sheets into the 21 hole punching channel.(max 20 sheets 80 gsm) Making sure the pages are flush to the edge guide. (See fig 8)
- Press the punching level downwards to punch. Return the handle to the original position. (See fig 9)
- Remove the document.
Custom Binding
The MultiBind 320 has 7 de-selectable punching pins to punch different paper sizes (e.g. A5)
To adjust the punching pins: (see fig 10)
- Fold the transparent covering upwards.
- Press the button relevant to each blade (button down = blade in position, button up = blade retracted).
Note: The blades can only be retracted and re-inserted when the punch handle has been moved to the upward position.
Comb Binding
1 Select the correct comb size (See fig 11)
- Insert the entire document to be bound into the binder channel. Press the binding lever downwards and read off the required comb size from the scale on the mobile pressure bar. Use the table if you intend to bind more than approx. 125 sheets of 80g paper (comb larger than 14mm).
| Max. Sheet Number | Comb Size |
| 145 16 | |
| 165 19 | |
| 195 22 | |
| 225 25 | |
| 240 28 | |
| 280 32 | |
| 330 38 | |
| 390 45 | |
| 450 51 |
② Insert and open the comb (see fig 12)
- Place the plastic comb with the open side facing upwards into the comb holder.
- Press the binding lever downwards so that the comb opens fully and the material to be bound can be inserted easily.
Note (MB320 only): Many Identical documents can be bound quickly by setting the machine to remember the exact position you opened the comb to. To do this simply slide the comb opening button upwards until it stops. The comb can now not open any further than your setting. (see fig 13)
3 Load the punched paper onto the comb (see fig 14)
- Load each punched paper stack onto the comb.
4 Close the comb (see fig 15)
- Move the binding lever back to its uppermost position.
- Remove your bound document from the unit.
How to bind using 21 loop wires (MB 320 only)
Wires are intended for one-off use only. In contrast to the plastic combs these cannot be re-opened and closed.
1 Select the correct wire size (see fig 16)
- Hold the material to be bound in the wire binding channel
- Press the binding lever downwards and read off the required wire size from the left and scale of the pressure bar.
② Insert the wire (see fig 17)
- Insert the wire with the open side facing front into the wire holder.
3 Insert the document onto the wire (see fig 18)
- Load each punched paper stack onto the wire.
- Remove the document with the wire from the wire holder.
4 Closing the wire (see fig 19)
- Slide the button downwards. (see fig 13)
- Using your left hand, hold the document in the binding channel in such a way that the wire stops with the open end facing down.
- With your right hand press the binding lever down as far as is necessary until the wire is perfectly closed.
Note: Many Identical documents can be bound quickly by setting the machine to remember the exact position you closed the wire to. To do this simply slide the wire closing button upwards until it stops. The wire can now not close any further than your setting. (see fig 13)
Transporting or storing the unit
① Locking the unit (see fig 20)
- Press the binder lever towards the unit and fold this downwards (1).
- Push down the punching lever (2).
- Push the two latches outwards to lock the punching lever (3). Make sure that the punch handle can no longer be moved.
- Fold down the document stand (4).
② Transporting or storing the unit (see fig 21)
You can now use the punch handle as a carrying handle. This lets you transport the unit easily and it can now be stored either in an upright position or lying down.
Warning: Danger of injury! Before transporting the unit, always make sure that the punching lever has been correctly locked.
Emptying the clippings tray
1 Lock the unit. (see fig 20)
2 Place the unit in an upright position and fold out the tray on the underside of the unit and empty it. (see fig 22)
③ Replace the tray until the spring locks into place. (see fig 23)
Guarantee
Operation of this machine is guaranteed for two years from date of purchase, subject to normal use. Within the guarantee period, ACCO Brands Europe will at its own discretion either repair or replace the defective machine free of charge. Defects due to misuse or use for inappropriate purposes are not covered under the guarantee. Proof of date of purchase will
Register this product online at www.accoeurope.com
be required. Repairs or alterations made by persons not authorised by ACCO Brands Europe will invalidate the guarantee. It is our aim to ensure that our products perform to the specifications stated. This guarantee does not affect the legal rights which consumers have under applicable national legislation governing the sale of goods.
Spécifications
Plastspiralinnbinding
① Velg riktig plastspiralstørrelse (se fig. 11)
GB ACCO Service Division
Hereward Rise, Halesowen, West Midlands, B62 8AN Tel: 0845 658 6600, Fax: 0870 421 5576 www.acco.co.uk/service
F ACCO France
Service Après-Vente Tel: 0820 872 356, Fax: 03 80 68 60 49 contact@vmbs.fr
D ACCO Deutschland
Arnoldstrasse 5, 73614 Schorndorf, Germany Tel: +49 7181/887-420, Fax: +49 7181/887-498
E ACCO Iberia SL
P Isaac Peral 19, 28820 Coslada (Madrid) Tel: 91 669 9391, Fax: 91 672 07 11
① ACCO Brands Italia Srl
Via Pietro Nenni 13, Settimo Torinese (TO) Tel: +39 011 896 11 11, Fax: +39 011 896 11 13 assistenzaitalla@acco.com
B ACCO Brands Benelux B.V.
Peppelkade 64, 3992AK Houten, Nederland/Les Pays-Bas Tel: 0800-73362, Fax: 02-4140784 info@accobenelux.be, www.accobenelux.be
LUX ACCO Brands Benelux B.V.
Peppelkade 64, 3992AK Houten, Nederland/Les Pays-Bas Tel: 0800-21132, Fax: 02-4140784 info@accobenelux.be, www.accobenelux.be
NL ACCO Brands Benelux B.V.
Peppelkade 64, 3992AK Houten, Nederland/Les Pays-Bas Tel: 030-6346060, Fax: 030-6346070 info@accobenelux.nl, www.accobenelux.nl
⑤ ACCO Brands Nordic AB
DK Makadamgatan 5, 254 64 Helsingborg, Sweden
N Tel: +46 42 38 36 00, Fax: +46 42 38 36 10
⑤ service.nordic@acco.com
LV
EST
LT
cz XERTEC a.s.
SK U Továren, 770/1b, 102 00, Praha 10, Ceska Republika Tel: +420 271 741 800, Fax: +420 271 743 143 www.xertec.cz
PL SERWIS ACCO
05-300 Mińsk Mazowiecki, Ul. Grobelnego 4, Polska Tel: +48 25 758 11 90, Fax: +48 25 758 11 90
H ACCO Hungária Kft
AUB ACCO Australia Pty Ltd
Level 2, 8 Lord Street, Botany, NSW, Australia 2019 Tel: +61 2 9700 0180, Fax: +61 2 9700 0195 sales.au@acco.com
A ACCO Österreich
IND GBC Asia Pte Ltd
PAK 47 Ayer Rajah Crescent, #05-08/17, Singapore 139947
Tel: +65 6776 0195, Fax: +65 6779 1041 webmaster@gbcasia.com.sg
GBC-Japan K.K.
14F Harmony Tower, 1-32-2 Honcho, Nakano-ku, Tokyo 164-8721 Tel: (81)-03-5351-1801, Fax: (81)-03-5351-1831 serv@gbc-japan.co.jp, www.gbc-japan.co.jp
Ref: 220-320/5469
Issue: 1 (07/08)

BRANDS
ACCO Brands Europe
Oxford House
Oxford Road
Aylesbury HP21 8SZ
United Kingdom
www.accoeurope.com


- MultiBind 220 & 320
- Location of controls
- Special notice
- Tips on use
- Safety instructions
- Preparing the unit
- Hole Punching
- Comb/Wire Punching (21 holes, rectangular)
- Custom Binding
- Comb Binding
- How to bind using 21 loop wires (MB 320 only)
- Transporting or storing the unit
- Emptying the clippings tray
- Guarantee
- Plastspiralinnbinding
- GB ACCO Service Division
- F ACCO France
- D ACCO Deutschland
- E ACCO Iberia SL
- ① ACCO Brands Italia Srl
- B ACCO Brands Benelux B.V.
- LUX ACCO Brands Benelux B.V.
- NL ACCO Brands Benelux B.V.
- ⑤ ACCO Brands Nordic AB
- cz XERTEC a.s.
- PL SERWIS ACCO
- H ACCO Hungária Kft
- AUB ACCO Australia Pty Ltd
- A ACCO Österreich
- IND GBC Asia Pte Ltd
- GBC-Japan K.K.
Brand : GBC
Model : IB271090
Category : Binder