
SureBind System 2 - Binder GBC - Free user manual and instructions
Find the device manual for free SureBind System 2 GBC in PDF.


| Product type | Ring binder |
| Brand | GBC |
| Model | SureBind System 2 |
| Main functions | Punching and binding documents up to 300 pages with metal or plastic rings |
| Punching capacity | Up to 20 sheets of 80 g/m² per cycle |
| Binding capacity | Up to 300 sheets with rings of diameter 8 to 22 mm |
| Number of holes | 21 holes for A4 sheets (configurable) |
| Supported paper size | A4, A5, Letter, Legal |
| Power supply | 220-240 V, 50 Hz, 0.5 A |
| Power consumption | 100 W max |
| Dimensions (W×D×H) | 450 × 300 × 250 mm |
| Weight | 4.8 kg |
| Chassis material | Painted steel and ABS plastic |
| Maintenance and cleaning | Clean with a soft dry cloth; do not use solvents; lubricate the punching shafts every 3 months |
| Safety | Handle locking device in rest position; safety cover protecting the blades |
| Spare parts | Punching plate, replacement blades, paper guide, waste tray |
| Repairability | Repairability index: 7.6/10 (according to French decree) |
| Included accessories | Layout guide, 25 demonstration rings, instruction manual |
| Warranty | 2 years (parts and labor) |
Frequently Asked Questions - SureBind System 2 GBC
User questions about SureBind System 2 GBC
0 question about this device. Answer the ones you know or ask your own.
Ask a new question about this device
Download the instructions for your Binder in PDF format for free! Find your manual SureBind System 2 - GBC and take your electronic device back in hand. On this page are published all the documents necessary for the use of your device. SureBind System 2 by GBC.
USER MANUAL SureBind System 2 GBC
natural_image
Line drawing of a printer with paper roll and control panel (no text or symbols)SureBind® System Two™
GB Instruction Manual
F Manuel d'utilisation
D Bedienungsanleitung
① Manuale d'istruzioni
NL Gebruiksaanwijzing
E Manual de instrucciones
AR دليل التعليمات

ATTENTION
To register and activate the warranty go to www.gbceurope.com
natural_image
Line drawing of a printer with paper roll and control panel (no text or symbols)English 4
Français 8
Deutsch 12
Italiano 16
Nederlands 20
Español 24
اللغة العربية
28



natural_image
Line drawing of a printer with a stack of books on top, showing mechanical components and a page number 34 (no text or symbols on the diagram itself)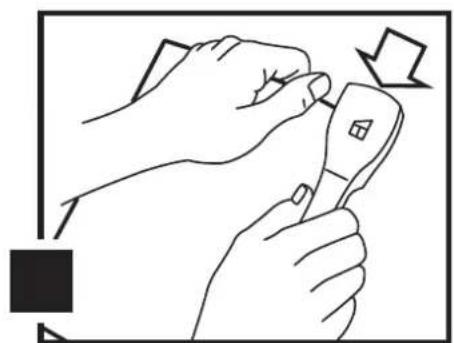
natural_image
Illustration of hands using a handheld device to adjust or install a component (no text or symbols visible)
natural_image
Illustration of hands using a tool to adjust or install a device (no text or symbols visible)Specifications
| SureBind System Two | |
| Weight | 20.9kg |
| Dimensions WxDxH | 597 x 457 x 274mm |
| Power Requirements | 220-240 VAC, 50-60Hz |
| Punch Capacity | 22 sheets 80g/m2 paper (3.46mm) |
| Punch Cycle Time | 1 punch cycle per 15 seconds |
| Binding Capacity | Up to 51mm thick x 378mm wide |
| Bind Cycle Time | 13-15 seconds |
Subject to technical changes without prior notice.
Important safeguards


WARNING: FOR YOUR PROTECTION, DO NOT CONNECT THE EQUIPMENT TO ELECTRICAL POWER OR ATTEMPT TO OPERATE IT UNTIL YOU HAVE READ THESE INSTRUCTIONS COMPLETELY. KEEP THESE INSTRUCTIONS IN A CONVENIENT LOCATION FOR FUTURE REFERENCE.

WARNING: TO GUARD AGAINST INJURY, THE FOLLOWING BASIC SAFETY PRECAUTIONS MUST BE OBSERVED IN THE SET-UP AND USE OF THE EQUIPMENT.
Electrical safeguards
WARNING: TO REDUCE RISK OF ELECTRICAL SHOCK ALWAYS OBSERVE THE FOLLOWING SAFEGUARDS.
- The equipment must only be operated from the type of power source indicated in these operating instructions and the serial label located on the rear panel of the unit.
- The socket outlet should be located near the equipment and should be easily accessible.
- The three-pronged grounding plug is a safety feature and will only fit into an outlet. If you are unable to insert the plug into an outlet contact a qualified electrician to have a suitable outlet installed.
- Do not leave the power on overnight.
- Unplug the equipment before moving it or when it is not in use for an extended period of time.
- Do not operate the unit with a damaged power supply cord or plug, after it malfunctions, or after it has been damaged in any manner.
- Do not let the power supply cord contact hot surfaces or sharp objects.
- Do not over load electrical outlets beyond their capacity, as this can result in fire or electrical shock.
General safeguards
- Use the equipment only for its intended purpose of punching and binding documents.
- To avoid possible injury, never place fingers under the pressure bar.
- Do not place the equipment on an unstable, cart, stand or table. The binding system may fall, causing serious bodily injury. Move the equipment and cart combination with care. Quick stops, excessive force and uneven floor surfaces may cause the binding system and cart to overturn. Before moving the equipment, pull out the debris tray and discard pins and paper to prevent them from spilling inside the machine.
YOUR SAFETY AS WELL AS THE SAFETY OF OTHERS IS IMPORTANT TO ACCO BRANDS. IN THIS INSTRUCTION MANUAL AND ON THE PRODUCT ARE IMPORTANT SAFETY MESSAGES. READ THESE MESSAGES CAREFULLY.
THE SAFETY ALERT SYMBOL PRECEDES EACH SAFETY MESSAGE IN THIS INSTRUCTION MANUAL. THIS SYMBOL INDICATES A POTENTIAL PERSONAL SAFETY HAZARD THAT COULD HURT YOU OR OTHERS AS WELL AS CAUSE PRODUCT DAMAGE OR PROPERTY DAMAGE.
THE FOLLOWING WARNING IS FOUND ON THE BOTTOM OF THE PRODUCT.

WARNING
Electrical shock hazard.
Do not open. No user serviceable parts inside.
Refer servicing to qualified service personnel.
This safety message means that you could be seriously hurt or killed if you open the product and expose yourself to hazardous voltage.

CAUTION
Hot surface.
This safety message means that some areas directly below are hot and could burn you. Do not touch the hot areas.
Service
- Do not attempt to service or repair the equipment yourself. Unplug the unit from the electrical outlet and contact an authorized service representative under the following conditions:
- When the power supply cord or plug is damaged or frayed
- If liquid has been spilled into the equipment
- If the binding system has been exposed to rain or water
- If the unit has been subjected to excessive shock through being dropped or rough handling
- If the unit does not operate normally when following these Operating Instructions
- Adjust only those controls that are specified in these Operating Instructions.
Care Instructions
- Wipe exterior only with a damp cloth. Do not use any detergents or solvents.
- Empty the Debris Tray frequently. Failure to empty the tray may result in debris lodging in the equipment and causing damage to the equipment.
Installation
1 Inspect your equipment for shipping damage. Bring damage immediately to the attention of the delivery carrier.
2 Place the equipment on a sturdy, flat surface of the appropriate height for the comfortable operation.

CAUTION: THE SOCKET OUTLET SHOULD BE LOCATED NEAR THE EQUIPMENT AND SHOULD BE EASILY ACCESSIBLE.
3 Plug the power cord into the receptacle on the rear right side of the unit and into a proper power source.
4 Place the machine at least 2" (51mm) from any wall or obstruction to protect the power receptacle and power cord.
Punching
1 Place the paper fully in the punch, slide the paper to the left against the Punch Edge Guide and press the 'Punch' button.
To prevent jamming only 22 sheets of 80g/m ^2 (20lbs bond) paper should be punched at one time (fewer sheets if the paper is heavier). Punch one 22 sheet segment of your document and stack the punched sections on the binding surface. Do not punch more than 4 composition covers or 3 transparent covers at one time.
3 If you try to punch too much paper the Jam-Stopper™ feature will sense the high paper load and will retract the punch pins and you will hear a beeping sound. Simply separate the paper and lift and punch fewer pages at a time.
4 Remember to lay each punched segment of your documents on the Binding Surface as you work. Preassembling your document on another surface can cause binding problems due to improper location of the receiving strip (not on the Locating Pin).
Features Guide
A. Debris Tray
The Debris Tray is located on the front side near the bottom of the machine. It collects excess paper and pin segments. The Tray should be emptied frequently.
B. Punching Surface
The flat area is where your document is placed for punching holes.
C. Punch Edge Guide
An adjustable Guide positions the paper for punching. Using the scale the Guide can be adjusted for 210mm, 297mm (8½", 11", 13" or 14") bind edge lengths.
D. Binding Surface
The Binding Surface is a flat area where the document is placed for binding after it has been punched.
E. Bind Edge Guide
An adjustable Guide properly aligns the paper for binding.
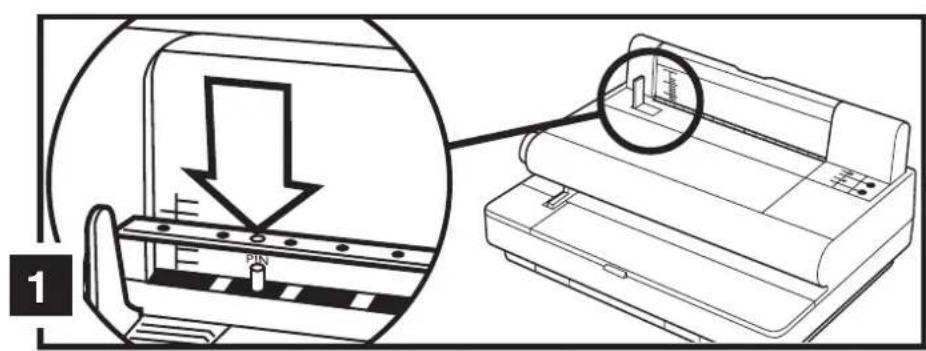
F. Locating Pin
The Locating Pin can be found near the lower left hand side of the Backstop where the word 'PIN' and an arrow are printed.
G. Backstop
The Backstop serves to position the paper along with the Bind Edge Guide so that the holes are easily aligned for easy insertion of the strip with pins. The Backstop also has a scale that measures document thickness to help select the proper length of the strip with pins or correct hard cover size.
H. Pressure Bar
The Pressure Bar exerts pressure on the document and contains the trigger which starts the bind cycle.
I. Strip Recess
The Strip Recess supports the receiving strip (binding strip with holes).
J. Bind Button
Press the Bind Button to activate the bind process after placing the Pressure Bar on the document.
K. Punch Button
Press the Punch Button after you have aligned the paper fully in the Punch Edge Guide. The punch will operate every time the Punch Button is pressed.
L. Ready Indicators
When the equipment is turned on the indicator will light. During binding the indicator will flash, but will return to a steady light when the bind cycle is complete.
M. Tray Full
The Tray Full indicator will light up when the Debris Tray is full and must be emptied.
N. On/Off Switch
Power must be turned 'ON' for both punching paper and binding documents. Remember to turn off the equipment at the end of the day.
Set-Up
1
1 Adjust the Punch Edge Guide to the correct paper length.
② Check the Bind Edge Guide alignment by inserting a receiving strip in the Strip Recess area. Lay a sheet of correctly aligned punched paper on the strip, matching up the holes and the strip so that the strip is not showing at the top or bottom of the paper. Adjust the Guide if necessary by loosening the thumb screw on top of the Guide and sliding the Guide to the edge of the paper.
Binding
2 3
1 Place the receiving strip (bottom binding strip with holes) textured side down in the Strip Recess located in front of the Backstop. Be sure the small hole in the receiving strip is over the Locating Pin. The Locating Pin is on the left hand side of the Strip Recess area in front of the Backstop. The Locating Pin fits into the small hole in the plastic strip. The strip is positioned correctly over the Locating Pin when it is difficult to slide the strip to the right. Failure to properly align the strip can cause machine damage.
2 Place the back cover (face down) the punched sheets (last page on the bottom) and front cover (face up) on top of the receiving strip.
3 Now determine the correct size of the pin strip. Use the scale on the Backstop to determine the thickness of the document and the size of the pins required. Twenty-five millimeters (1") on the scale requires a 25mm (1") pin. Anything over 25mm (1") requires a 51mm (2") pin. The pins should extend all the way through the document but not more than 25mm (1") beyond. Insert the strip through the document's holes and the receiving strip.
Begin the binding process by pulling the Pressure Bar toward you and lowering it on top of the document. To prevent jamming problems lower the bar onto the document rather than 'dropping it'. Press the Bind Button and the Ready indicator will flash. When the binding cycle is complete you will hear beeps and the Ready Indicator will be off. Lift the Pressure Bar to its original position and the Ready Indicator will illuminate continuously. Remove the document.
If the binding cycle is not completed the Tray Full and Ready Indicators will flash alternately. Simply turn the machine off and then on. Then rebind the document. If the binding cycle is again incomplete call for service.
Debinding
Debinding a document which has already been bound can be accomplished by using the Debinder Tool. A Debinder Tool is packaged free with all systems. Additional Debinder Tools and replacement blades are also available.
Using the Debinder Tool
4 5
1 Place the document face down on a flat surface. The strip should be at your right with the formed studs heads up.
2 Holding the document in place with the left hand and using the Debinder with the right hand, insert the blade between the strip and the document cover. Make certain the Debinder is tight against the right edge of the document to provide shearing leverage. Pull the Debinder toward you until it contacts the first stud.
③ With the Debinder tight against the right side of the document and continuing to pull toward you, swing the handle of the Debinder to the right, away from the document. This automatically shears the first stud.
4 Move the Debinder to the next stud, swing to shear, pull to the next stud, swing to shear, pull to the next stud and so on. For rapid debinding, the Debinder can be pulled toward the user in one continuous motion after the first stud has been sheared. Extreme caution should be used when using this method.
5 Remove the plastic strips and debinding is complete.
6 Replace the Debinder blade when it becomes dull.
Waste Electrical and Electronic Equipment (WEEE)
At the end of its useful life, your product is considered to be WEEE. As such, it is important to note that:
WEEE is not to be disposed of as unsorted municipal waste. It is to be collected separately such that it can be disassembled so its components and materials can be recycled, re-used, and recovered (burned for energy content in the production of electricity).
Public collection points have been set up by municipalities for the collection of WEEE, free of charge to you.
Please return your WEEE to the collection facility nearest your home or office.
If you have difficulty locating a collection facility, the retailer that sold you the product should accept your WEEE.
If you are no longer in contact with your retailer, please contact ACCO for assistance with this matter.
Recycling of WEEE is geared toward protecting the environment, protecting human health, preserving raw materials, improving sustainable development, and ensuring a better supply of commodities in the European Union. This will be achieved by retrieving valuable secondary raw materials and reducing the disposal of waste. You can contribute to the success of these goals by returning your WEEE to a collection facility.
Your product is marked with the WEEE symbol (wheelie bin with an X through it). This symbol is to inform you that the WEEE is not to be disposed of as unsorted municipal waste.
Guarantee
Operation of this machine is guaranteed for 2 years from date of purchase, subject to normal use. Within the guarantee period, ACCO Brands Europe will at its own discretion either repair or replace the defective machine free of charge. Defects due to misuse or use for inappropriate purposes are not covered under the guarantee. Proof of date of purchase will be required. Repairs or alterations made by persons not authorised by ACCO Brands Europe will invalidate the guarantee. It is our aim to ensure that our products perform to the specifications stated. This guarantee does not affect the legal rights which consumers have under applicable national legislation governing the sale of goods.
If you experience a technical fault with your product during the warranty period, please contact the relevant ACCO service centre. Depending on the diagnostics and the model type, we will either arrange a service call by an engineer or we will ask you to return the machine to ACCO. If you return the machine, ACCO will, at its discretion, in accordance with law, either (i) repair the machine using either new or refurbished parts, or (ii) replace the machine with a new or refurbished machine that is equivalent to the machine being replaced.
Register this product online at www.gbceurope.com
Troubleshooting Guide
SYMPTOM POSSIBLE CAUSE CORRECTIVE ACTION
| Rivets stand out too far from the receiving strip. | The receiving strip is not placed properly on the Locating Pin. | Debind to take the document apart. Rebind the document being careful to place the small hole in the receiving strip on the Locating Pin. |
| Rivets are too small; document comes apart easily. | The Bind Edge Guide may be misaligned. | Check the position of the Bind Edge Guide. It may need to be readjusted to ensure that the document's holes line up with the receiving strip.The best way to check the machine, is to bind without paper. If the bind is good, no service call is necessary.Call your local Service Representative if you are unable to locate the cause of the problem. |
| Partially cut pins. The wrong strip is being used—pins are too short for the document thickness. | Choose a strip with longer pins. This machine will accept pin lengths of 25mm and 51mm (1" and 2") | |
| Burns on receiving strip. Temperature set too high; knife blade out of adjustment. | Call your local Service Representative. | |
| No power Incorrect electrical connection. Check the rear power plug and the wall socket to be sure that all connections are tight.Call your local Service Representative if you are unable to locate the cause of the problem. | ||
| Paper is difficult to remove from the punch. | Punching too much paper. Try punching less paper at one time. It is recommended that you punch only 22 sheets of 80g/m^2 (20lb bond) paper or four (4) sheets of composition covers or three (3) sheets of transparent covers at one time. Punching more than the recommended amount may damage the punch. | |
| Punched holes are torn or paper is buckled around the holes. | Coated Paper: too many sheets Try punching less coated paper at one time. 80g/m^2 (20lb Bond) Paper: worn punch housing. | If this problem occurs when you punch 22 sheets of 80g/m^2 (20lb bond) paper, you should contact your local Service Technician. |
| Punched holes not equally spaced from edge. | Obstruction in punch. Check punch area for jams (i.e. strip caught in punch, pin caught, etc.). Run a receiving strip along the inside of the punch area to loosen any trapped material. | |
| Punched paper hangs from top or bottom of document. | Punch misalignment. Adjust Punch Edge Guide by moving it to the left or the right. Check punch alignment by folding paper in half and making sure holes line up and corners are square. | |
| Debris Tray will not pull out. | Debris Tray is too full. | Push tray in and out until it pulls out freely. Empty the Debris Tray more often. |
| Covers are ripped when using the Debinder Tool. | Incorrect use of the Debinder Tool. | Make sure you use a twisting motion when cutting each rivet.Make sure you insert the blade between the strip and cover. |
| Dull Debinder Tool blade. | Change the razor blade in your Debinder Tool. | |
Spécifications
SYMPTÔME CAUSES POSSIBLES ACTIONS CORRECTIVES
M. Lade vol (Tray Full)
GB ACCO Service Division
Hereward Rise, Halesowen, West Midlands, B62 8AN
0800 279 5102
service.uk@acco.com
www.rexeleurope.com/service
NL ACCO Brands Benelux B.V.
Holtum Noordweg 11, 6121 RE Born, Holland
08000 234 931
service.nl@acco.com
www.rexeleurope.com/service
FR ACCO France
08 05 63 02 55
service.fr@acco.com
www.rexeleurope.com/service
AU ACCO Austria
0800 677671
service.at@acco.com
www.rexeleurope.com/service
DK ACCO Brands Nordic AB
80 251495
service.nordic@acco.com
www.rexeleurope.com/service
FI ACCO Brands Nordic AB
0800 915871
service.nordic@acco.com
www.rexeleurope.com/service
IS ACCO Brands Nordic AB
800-7407
service.nordic@acco.com
www.rexeleurope.com/service
LV ACCO Brands Nordic AB
8000-4993
service.nordic@acco.com
www.rexeleurope.com/service
BE ACCO Brands Benelux B.V.
0800 48352
service.be@acco.com
www.rexeleurope.com/service
LU ACCO Brands Benelux B.V.
800 27649
service.lu@acco.com
www.rexeleurope.com/service
PT ACCO Iberia SLP
800 8 55955
service.ib@acco.com
www.rexeleurope.com/service
CH ACCO Schweiz
0800 001790
service.ch@acco.com
www.rexeleurope.com/service
DE ACCO Brands Benelux B.V.
08007238504
service.de@acco.com
www.rexeleurope.com/service
ES ACCO Iberia SLP
800 300655
service.ib@acco.com
www.rexeleurope.com/service
IE ACCO Service Division
0800 939 254
service.ie@acco.com
www.rexeleurope.com/service
IT ACCO Brands Italia S.r.l
800029359
service.it@acco.com
www.rexeleurope.com/service
NI ACCO Service Division
08002795103
service.uk@acco.com
www.rexeleurope.com/service
NO ACCO Brands Nordic AB
800 10953
service.nordic@acco.com
www.rexeleurope.com/service
PL Poland
00-800-1215218
service.pl@acco.com
www.rexeleurope.com/service
SE ACCO Brands Nordic AB
0200899942
service.nordic@acco.com
www.rexeleurope.com/service
HU ACCO Hungária Kft
06-800-20886
service.hu@acco.com
www.rexeleurope.com/service
©Czech Republic
00-800-44858150
service.cz@acco.com
www.rexeleurope.com/service
www.rexeleurope.com/service
ZA Rexel Office Products (PTY) Ltd
011 837 7723
service@rexelsa.co.za
www.rexelsa.co.za
IN GBC Asia Pte Ltd
6776 0195
Singapore.Webmaster@acco.com
www.accobrandsasia.com
JP ACCO Brands Japan K.K.
03 5351 1801
service.jp@acco.com
www.rexeleurope.com/service
AU ACCO Australia
1300 366 376
sales.au@acco.com
www.rexeleurope.com/service


- SureBind® System Two™
- Important safeguards
- Electrical safeguards
- WARNING: TO REDUCE RISK OF ELECTRICAL SHOCK ALWAYS OBSERVE THE FOLLOWING SAFEGUARDS.
- General safeguards
- WARNING
- CAUTION
- Service
- Care Instructions
- Installation
- CAUTION: THE SOCKET OUTLET SHOULD BE LOCATED NEAR THE EQUIPMENT AND SHOULD BE EASILY ACCESSIBLE.
- Punching
- Features Guide
- Debris Tray
- Punching Surface
- Punch Edge Guide
- Binding Surface
- Bind Edge Guide
- Locating Pin
- Backstop
- Pressure Bar
- Strip Recess
- Bind Button
- Punch Button
- Ready Indicators
- Tray Full
- On/Off Switch
- Set-Up
- Binding
- 3
- Debinding
- Using the Debinder Tool
- 5
- Waste Electrical and Electronic Equipment (WEEE)
- Guarantee
- Troubleshooting Guide
- Lade vol (Tray Full)
- GB ACCO Service Division
- NL ACCO Brands Benelux B.V.
- FR ACCO France
- AU ACCO Austria
- DK ACCO Brands Nordic AB
- FI ACCO Brands Nordic AB
- IS ACCO Brands Nordic AB
- LV ACCO Brands Nordic AB
- BE ACCO Brands Benelux B.V.
- LU ACCO Brands Benelux B.V.
- PT ACCO Iberia SLP
- CH ACCO Schweiz
- DE ACCO Brands Benelux B.V.
- ES ACCO Iberia SLP
- IE ACCO Service Division
- IT ACCO Brands Italia S.r.l
- NI ACCO Service Division
- NO ACCO Brands Nordic AB
- PL Poland
- SE ACCO Brands Nordic AB
- HU ACCO Hungária Kft
- ©Czech Republic
- ZA Rexel Office Products (PTY) Ltd
- IN GBC Asia Pte Ltd
- JP ACCO Brands Japan K.K.
- AU ACCO Australia
Brand : GBC
Model : SureBind System 2
Category : Binder