
AquaTouch HS8460 - Razor PHILIPS - Free user manual and instructions
Find the device manual for free AquaTouch HS8460 PHILIPS in PDF.

 BG
BG
 CS
CS
 DA
DA
 DE
DE
 EL
EL
 EN
EN
 ES
ES
 ET
ET
 FI
FI
 HU
HU
 ID
ID
 IT
IT
 KK
KK
 KO
KO
 LT
LT
 LV
LV
 NL
NL
 NO
NO
 PL
PL
 PT
PT
 RO
RO
 RU
RU
 SK
SK
 SL
SL
 SV
SV
 TH
TH
 TR
TR
 UK
UK
 VI
VI
 ZH
ZH
| Type de produit | Rasoir électrique |
| Marque | Philips |
| Modèle | AquaTouch HS8460 |
| Dimensions (approx.) | 15 x 5 x 6 cm |
| Poids (approx.) | 250 g |
| Alimentation | Rechargeable, batterie Li-Ion |
| Autonomie | Environ 50 minutes |
| Temps de charge | 1 heure |
| Utilisation | Sec et humide (AquaTouch) |
| Système de rasage | Têtes flottantes multidirectionnelles |
| Nombre de lames | 3 |
| Tondeuse intégrée | Pop-up trimmer |
| Nettoyage | Rinçable sous l'eau courante |
| Affichage LED | Niveau de charge, état de nettoyage |
| Accessoires inclus | Station de charge, étui de voyage |
| Pièces détachées | Têtes de rasage HQ8, tondeuse |
| Réparabilité | Têtes et batterie remplaçables |
| Garantie | 2 ans |
Frequently Asked Questions - AquaTouch HS8460 PHILIPS
User questions about AquaTouch HS8460 PHILIPS
0 question about this device. Answer the ones you know or ask your own.
Ask a new question about this device
Download the instructions for your Razor in PDF format for free! Find your manual AquaTouch HS8460 - PHILIPS and take your electronic device back in hand. On this page are published all the documents necessary for the use of your device. AquaTouch HS8460 by PHILIPS.
USER MANUAL AquaTouch HS8460 PHILIPS
natural_image
Black-and-white product photo featuring NIVEA for men shaving a shaver and anti-irritation shaver with water droplets (no text or symbols on main objects)A

B

natural_image
Line drawing of a conical object with internal structures (no text or symbols)C


ENGLISH 6
БЪЛГАРСКИ 15
ČEŠTINA 25
DANSK 34
DEUTSCH 43
ΕΛΛΗΝΙΚΑ 53
ESPAÑOL 63
EESTI 72
SUOMI 80
FRANÇAIS 89
HRVATSKI 99
MAGYAR 108
INDONESIA 118
ITALIANO 127
КАЗАКША 136
한국어 146
LIETUVIŠKAI 155
LATVIEŠU 164
BAHASA MELAYU 173
NEDERLANDS 182
NORSK 191
POLSKI 200
PORTUGUÊS 209
ROMÂNĂ 218
РУССКИЙ 227
SLOVENSKY 237
SLOVENŠČINA 246
SRPSKI 254
SVENSKA 263
ภาษาไทย 272
TÜRKÇE 279
УКРАЇНСЬКА 288
TIÊNG VIÊT 298
繁體中文 307
简体中文 315
العربية 338
265 فارى
Introduction
Congratulations on your purchase and welcome to Philips! To fully benefit from the support that Philips offers, register your product at www.philips.com/welcome.
Please read this user manual, as it contains information about the wonderful features of this shaver as well as some tips to make shaving easier and more enjoyable.
General description (Fig. 1)
A Shaver
1 Protection cap
2 Trimmer
3 Shaving unit
4 Shaving conditioner cartridge
5 Shaving conditioner button
6 On/off button
7 Charging lights
B Charger
C Refill & charge station
1 Cap of the refill & charge station
2 Trimmer storage recess
3 Back panel
4 Socket for small plug
5 'Filling conditioner cartridge' light
6 Conditioner bottle light
D Cleaning brush
E NIVEA FOR MEN shaving conditioner bottle
F Pouch
G Adapter (your adapter may differ from the one shown in the figure)
Important
Read this user manual carefully before you use the appliance and save it for future reference.
Danger
- Make sure the adapter does not get wet (your adapter may differ from the one shown in the figure) (Fig. 2).
Warning
- Be careful with hot water. Always check if the water is not too hot, to avoid burning your hands.
- The adapter contains a transformer. Do not cut off the adapter to replace it with another plug, as this causes a hazardous situation.
- This appliance is not intended for use by persons (including children) with reduced physical, sensory or mental capabilities, or lack of experience and knowledge, unless they have been given supervision or instruction concerning use of the appliance by a person responsible for their safety.
- Children should be supervised to ensure that they do not play with the appliance.
Caution
- Never immerse the refill & charge station in water nor rinse it under the tap (Fig. 3).
- Never immerse the charger in water nor rinse it under the tap (Fig. 4).
- Always place and use the refill & charge station and the charger on a surface that is fluid-resistant.
- Use, charge and store the appliances at a temperature between 5°C and 35°C.
-
Always put the protection cap on the shaver to protect the shaving heads when you are travelling.
-
The shaver and the other accessories are not dishwasher-proof.
- Never use water hotter than 80^ C to rinse the shaver.
- Only use the adapter, charger and the refill & charge station supplied.
- Do not use the refill & charge station if the adapter or the station itself is damaged.
- Do not use the shaver or the charger if it is damaged.
- If the adapter is damaged, always have it replaced with one of the original type in order to avoid a hazard.
Compliance with standards
- This shaver complies with the internationally approved safety regulations and can be safely used in the bath or shower and cleaned under the tap (Fig. 5).
- This Philips appliance complies with all standards regarding electromagnetic fields (EMF). If handled properly and according to the instructions in this user manual, the appliance is safe to use based on scientific evidence available today.
General
- The adapter transforms 100-240 volts to a safe low voltage of less than 24 volts.
Preparing for use
1 Remove the tab of the NIVEA FOR MEN shaving conditioner bottle (Fig. 6).
2 Turn the cap of the conditioner bottle clockwise ('click') (Fig. 7).
The cap moves downwards and the conditioner nozzle appears.
3 Turn the cap of the refill & charge station anticlockwise to remove it.
4 Remove the packaging from the bottle docking hole in the refill & charge station.
5 Place the conditioner bottle in the docking hole with the nozzle pointing downwards (Fig. 8).
6 Place the cap back onto the refill & charge station (1) and turn the cap clockwise to fix it (2) (Fig. 9).
7 Put the small plug in the socket of the refill & charge station and put the adapter in the wall socket (Fig. 10).
8 Put the shaver in the refill & charge station and push it backwards ('click') (Fig. 11).
Note: The shaver is charged and filled with shaving conditioner automatically.
9 Charge the shaver for 90 minutes. (Fig. 12)
Note: Charge the shaver before you use it for the first time or when the charging light indicates that the battery is empty (see section 'Charge indications').
Note: A fully charged shaver has a shaving time of up to 40 minutes.
Charging by means of the charger
1 Put the small plug in the charger and put the adapter in the wall socket.
2 Put the shaver in the charger (Fig. 13).
The shaver is being charged.
3 Charge the shaver for 1.5 hours.
Note: Charge the shaver before you use it for the first time or when the charging light indicates that the battery is empty (see section 'Charge indications').
Note: A fully charged shaver has a shaving time of up to 40 minutes.
ENGLISH8
Manual refill
You can also refill the shaving conditioner cartridge without using the refill & charge station:
1 Place the nozzle of the conditioner bottle in the filling opening of the conditioner cartridge.
2 Move the bottle up and down approx. 5 times to pump shaving conditioner into the cartridge until you see that the cartridge is full (Fig. 14).
Indications on the shaver
Charging
- The charging lights indicate to what level the battery has been charged. During charging, the bottom charging light first flashes orange and then goes out. The top charging light then starts to flash white and finally lights up white continuously.
Quick charge
- After the shaver has charged for 9 minutes, the bottom charging light goes out and the top charging light starts to flash white, to indicate that the shaver contains enough energy for one shave.
Note: Quick charging is only possible when you have already charged the shaver for 1.5 hours minutes once.
Remaining battery capacity
- The amount of energy left in the battery is indicated by the number of charging lights that are on. The remaining battery capacity is visible for a few seconds when you switch the shaver on or off (Fig. 15).
Battery low
- When the battery is low, the bottom charging light lights up orange during shaving and flashes orange when you switch off the shaver. (Fig. 16)
Battery full
- When the battery is fully charged, all charging lights light up white continuously (Fig. 15).
- After approx. 1 hour, the white charging lights go out, to save energy.
Indications on the refill & charge station
Conditioner bottle light
When the conditioner bottle light flashes orange, there are two possibilities: (Fig. 17)
- There is no conditioner bottle in the refill & charge station or the bottle has not been placed properly.
- The conditioner bottle is empty.
'Filling conditioner cartridge' light
The ‘filling conditioner cartridge’ light signals three different things: (Fig. 18)
- When the conditioner cartridge is being filled, the white 'filling conditioner cartridge' light flashes.
- When the shaving conditioner cartridge is full, the white 'filling conditioner cartridge' light is on continuously.
- If the conditioner bottle becomes empty while the conditioner cartridge is being filled, the white 'filling conditioner cartridge' light goes out and the conditioner bottle lights flashes red.
Using the appliance
Shaving
Note: Your skin may need 2 to 3 weeks to get accustomed to a new shaving system.
1 Make sure there is sufficient shaving conditioner in the shaving conditioner cartridge.
2 Press the on/off button to switch on the shaver.
3 Make sure the shaver is sufficiently charged (see chapter ‘Preparing for use’, section ‘Charge indications’).
4 Gently move the shaving unit in circles over your skin and press the shaving conditioner button until there is enough shaving conditioner on your skin for a comfortable shave. (Fig. 19)
- When you release the shaving conditioner button, the appliance stops dispensing conditioner.
- If you briefly press the shaving conditioner button, the appliance automatically applies a certain amount of conditioner.
- Press the shaving conditioner button again to apply more shaving conditioner during shaving to ensure that the shaving unit continues to glide smoothly over your skin.
Note: The shaving conditioner button only works when the shaver is switched on.
Note: This shaver can be used in a way similar to a razor blade: you can use the shaver on a wet face. Unlike a conventional electric shaver, this appliance has no hair chamber that collects stubble. To prevent stubble from falling on your clothes, apply sufficient shaving conditioner while shaving.
5 Thoroughly clean the shaver after every use (see chapter ‘Cleaning and maintenance’).
6 Slide the protection cap onto the shaver to prevent damage (Fig. 20).
Tips for optimal gliding and a smooth shaving result
- Gently move the shaver in circles over your skin.
- Do not exert too much pressure on the shaver, as this may cause skin irritation.
- To ensure proper gliding, apply shaving conditioner regularly.
- You can also use the shaver in the bath or shower.
Trimming
Note: Because of the new open design, you hear the cutting action of the trimmer more clearly than with other trimmers. This is normal.
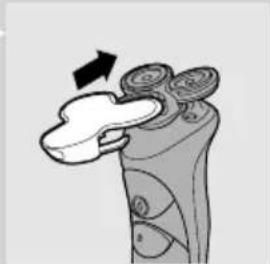
1 Pull the shaving unit off the shaver (Fig. 21).
2 Take the trimmer out of the trimmer holder on the charger and put it on the shaver ('click') (Fig. 22).
3 Press the on/off button to switch on the shaver.
4 Use the trimmer to groom your sideburns and/or moustache.
5 Thoroughly clean the trimmer after use (see chapter ‘Cleaning and maintenance’).
6 Remove the trimmer and put it back into the trimmer holder.
7 Put the shaving unit back onto the shaver ('click') (Fig. 23).
8 Slide the protection cap onto the shaver to prevent damage (Fig. 20).
Cleaning and maintenance
Cleaning
Never use scouring pads, abrasive cleaning agents or aggressive liquids such as alcohol, petrol or acetone to clean the appliance.
Shaver/trimmer
Clean the shaver and the trimmer after every use.
Be careful with hot water. Always check if the water is not too hot, to avoid burning your hands.
ENGLISH10
Never dry the shaving unit with a towel or tissue, as this may damage the shaving heads.
Note: The shaver is watertight and can be cleaned with water.
1 Press the on/off button to switch on the shaver.
Note: Clean the shaver while it is switched on.
2 Immerse the shaving unit/trimmer in hot water for at least 30 seconds (Fig. 24).
3 Switch off the shaver and shake off excess water.
4 Slide the protection cap onto the shaver to prevent damage (Fig. 20).
Note: If the shaver does not shave as well as it used to and you are unable to solve this with the cleaning method described in this chapter, consult chapter ‘Troubleshooting’ for an extra-thorough cleaning method.
Maintenance
1 Lubricate the trimmer teeth with a drop of sewing machine oil every six months.
Storage
Storage
1 Store the shaver in the refill & charge station.
2 If you are going to travel or if you do not want to store the shaver in the refill & charge station, put the protection cap on the shaver and store the shaver in the pouch (Fig. 20).
Transport
If you are going to store the shaver for a longer period or if you are going to travel, it is possible to lock the shaver. The travel lock prevents the shaver from being switched on by accident.
Activating the travel lock
1 Make sure the shaver is switched off.
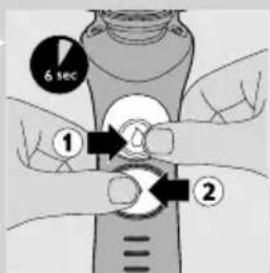
2 Press and hold the shaving conditioner button (1) and simultaneously press the on/off button with your other hand (2) (Fig. 25).
3 Hold both buttons for 6 seconds. Wait until the shaver produces a brief humming sound and the middle charging light on the shaver flashes a few times.
The travel lock is now activated.
Note: If you accidentally press the on/off button first, the shaver starts working. If this happens, press the on/off button again to switch off the shaver.
Note: If you press the on/off button when the travel lock is activated, the middle charging light flashes white to indicate that the shaver is locked.
Tip: Press the on/off button to check if the travel lock is activated. If the travel lock is activated, the shaver does not go on.
Deactivating the travel lock
1 Press and hold the shaving conditioner button (1) and simultaneously press the on/off button with your other hand (2) (Fig. 25).
2 Hold both buttons for 6 seconds. Wait until the shaver produces a brief humming sound and the middle charging light on the shaver flashes a few times.
The travel lock is now deactivated.
Note: You can also deactivate the travel lock by placing the shaver back into the charger.
Travel
If you are going to travel and you don't want to take the refill & charge station with you, you can take the charger with you, to charge the shaver when necessary.
Replacement
Shaving conditioner cartridge
For hygienic reasons, we advise you to replace the shaving conditioner cartridge once a year. A new cartridge is packed with each NIVEA FOR MEN shaving conditioner bottle 3-pack, and with the replacement kit (which contains a new HS85 shaving unit and a new cartridge).
1 Remove the shaving conditioner cartridge from the shaver (Fig. 26).
2 Insert the lug at the top of the new shaving conditioner cartridge into the slot in the rim of the shaver (1). Then press the bottom part of the cartridge with your thumb (2) to attach the cartridge to the shaver ('click') (Fig. 27).
3 Fill the shaving conditioner cartridge (see chapter 'Getting started').
Shaving unit
Replace the shaving unit every year for optimal shaving results.
Only replace the shaving unit with an HS85 Philips Shaving Unit.
1 Pull the old shaving unit off the shaver (Fig. 21).
2 Put the new shaving unit on the shaver ('click') (Fig. 23).
NIVEA FOR MEN shaving conditioner bottle
Only use NIVEA FOR MEN shaving conditioner bottles.
1 Remove the tab of the NIVEA FOR MEN shaving conditioner bottle (Fig. 6).
2 Turn the cap of the conditioner bottle clockwise ('click') (Fig. 7).
The cap moves downwards and the conditioner nozzle appears.
3 Turn the cap of the refill & charge station anticlockwise to remove it.
4 Put the conditioner bottle in the bottle docking hole with the nozzle pointing downwards (Fig. 8).
5 Push the cap back onto the refill & charge station (1) and turn it clockwise (2) to fix it (Fig. 9).
Environment
- Do not throw away the appliance with the normal household waste at the end of its life, but hand it in at an official collection point for recycling. By doing this, you help to preserve the environment (Fig. 28).
- The built-in rechargeable battery contains substances that may pollute the environment. Always remove the battery before you discard and hand in the appliance at an official collection point. Dispose of the battery at an official collection point for batteries. If you have trouble removing the battery, you can also take the appliance to a Philips service centre. The staff of this centre will remove the battery for you and will dispose of it in an environmentally safe way.
Removing the rechargeable battery
Only remove the rechargeable battery when you discard the shaver. Make sure the battery is completely empty when you remove it.
Be careful, the battery strips are sharp.
1 Remove the shaving conditioner cartridge from the shaver (Fig. 26).
2 Undo the three screws at the back of the shaver (Fig. 29).
3 Remove the back panel of the housing with a screwdriver (Fig. 30).
4 Cut the wires and remove the rechargeable battery.
Guarantee and service
If you need service or information or if you have a problem, please visit the Philips website at www.philips.com/support or contact the Philips Consumer Care Centre in your country (you find its phone number in the worldwide guarantee leaflet). If there is no Consumer Care Centre in your country, go to your local Philips dealer.
Guarantee restrictions
The shaving unit (cutters and guards) is not covered by the terms of the international guarantee because they are subject to wear.
The conditioner cartridge is a disposable item and is not covered by the terms of the international guarantee.
Troubleshooting
This chapter summarises the most common problems you could encounter with the appliance. If you are unable to solve the problem with the information below, contact the Consumer Care Centre in your country.
Problem Possible cause Solution
| The shaver does not glide smoothly over my skin. | You have not applied enough shaving conditioner. | Press the shaving conditioner button until a sufficient amount of NIVEA FOR MEN shaving conditioner has been released. This makes the shaving unit glide smoothly over your skin again. |
| The shaver does not shave as well as it used to. | You have not cleaned the shaver properly. | Clean the shaver thoroughly (see chapter ‘Cleaning and maintenance’). |
| Long hairs obstruct the shaving heads. | Clean the shaving heads by following the steps of the extra-thorough cleaning method described below. | |
| The shaving unit is damaged or worn. | Replace the shaving unit (see chapter ‘Replacement’). | |
| The shaver does not work when I press the on/off button. | The rechargeable battery is empty. | Recharge the battery (see chapter ‘Preparing for use’). |
| The travel lock is activated. | Deactivate the travel lock (see chapter ‘Storage’). | |
| Dried shaving conditioner blocks the shaving heads in the shaving unit. | Clean the shaver thoroughly before you continue shaving (see chapter ‘Cleaning’). | |
| You have not reassembled the shaving unit properly after extra-thorough cleaning. | When you reassemble the shaving unit, make sure you turn each guard anticlockwise until it locks into position. | |
| Little shaving conditioner comes out of the holes even though there is enough conditioner in the cartridge. | One of the conditioner holes is blocked. | Rinse or soak the shaving unit. If this does not work, pump shaving conditioner into the shaving conditioner cartridge until conditioner starts to come out of the blocked hole. If this does not work either, try the following method: 1) Switch off the shaver 2) Pull the shaving unit off the shaver 3) Put your finger on the hole that is not blocked 4) Switch on the shaver 5) Press the shaving conditioner button several seconds until conditioner starts to come out of the blocked hole again. |
Problem Possible cause Solution
| You have not put the shaving heads back into their original holders. One of the shaving heads does not have a shaving conditioner hole in its centre and needs to be placed in a specific holder. | Make sure you put the shaving head without conditioner hole in the correct holder. This is the holder that is closest to the on/off button when the shaving unit is assembled on the shaver. | |
| No shaving conditioner comes out of the holes when I press the shaving conditioner button. | The shaving cartridge is almost empty. | Refill the shaving conditioner cartridge (see chapter ‘Preparing for use’). |
| The trimmer makes more noise than other trimmers. | This trimmer has an open design. | Due to the new open design, you hear the cutting action of the trimmer more clearly than is the case with other trimmers. This is normal and does not mean that there is something wrong with the trimmer. |
Extra-thorough cleaning method
Make sure the appliance is switched off.
1 Pull the shaving unit off the shaver (Fig. 31).
2 Turn the guard clockwise and lift it from the shaving unit (Fig. 32).
Note: Only remove one shaving head at a time. This ensures that you always put the shaving head back into its original holder, which is necessary because two of the shaving heads have special holes for the shaving conditioner. This also ensures that you do not mix up the cutters and guards of different shaving heads, which affects the shaving performance.
3 If necessary, remove the cutter from the guard.
4 Clean the cutter and guard with the brush supplied.
5 After cleaning, place the cutter back into the shaving unit with the cutter legs pointing upwards.
6 Place the guard back onto the shaving head holder (over the cutter) (Fig. 33).
7 Turn the guard anticlockwise until it locks into position (Fig. 34).
8 Put the shaving unit back onto the shaver ('click') (Fig. 35).
УВОА
Mengaktifkan travel lock
Kassett for barberingslotion
natural_image
Illustration of hands holding a small object with an arrow pointing upward, no text or symbols present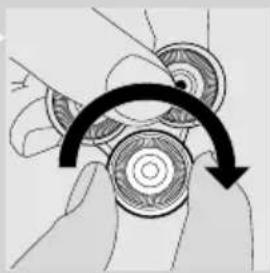
natural_image
Illustration of hands assembling a mechanical component with a curved arrow indicating rotation (no text or symbols)
natural_image
Illustration of hands assembling mechanical parts with a directional arrow (no text or symbols)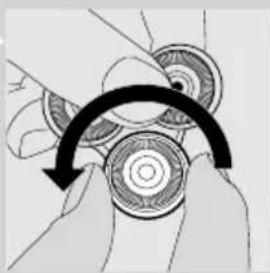
natural_image
Illustration of hands assembling a mechanical component with a curved arrow indicating rotation (no text or symbols)
natural_image
Illustration of a hand holding a small object with a curved arrow indicating motion (no text or symbols)

natural_image
Diagram of a mechanical device with circular components and directional arrows indicating motion (no text or symbols)
natural_image
Mechanical assembly diagram showing a lever mechanism with a black arrow indicating direction (no text or symbols present)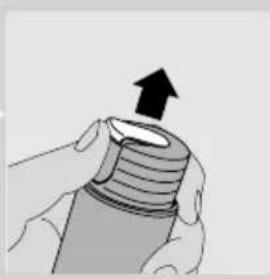
natural_image
Illustration of a hand holding a bottle with an upward arrow indicating motion (no text or symbols)
natural_image
Illustration of a mechanical device with a spiral arrow and 'click' label (no text or symbols on the device itself)
natural_image
Diagram of a mechanical device with a labeled component (no readable text or symbols)
natural_image
Illustration of a hand holding a knife with a curved blade, no text or symbols present
natural_image
Illustration of hands holding a small container with an arrow indicating upward motion (no text or symbols)النقل
natural_image
Diagram of a hand holding a device with an arrow indicating motion (no text or symbols present)
natural_image
Diagram of a mechanical device with internal components and an arrow indicating motion (no text or symbols)التشذيب
natural_image
Illustration of hands holding a small object with an arrow indicating upward motion (no text or symbols)

natural_image
Illustration of a hand holding a small object with arrows indicating motion (no text or symbols)التنظيف والصيانة
التنظيف
natural_image
Line drawing of a person applying makeup to the ear (no text or symbols)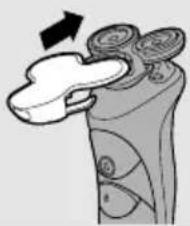
natural_image
Illustration of a mechanical device with a curved arrow indicating motion or force (no text or symbols)natural_image
Illustration of a hand holding a remote with battery and four other batteries (no text or symbols)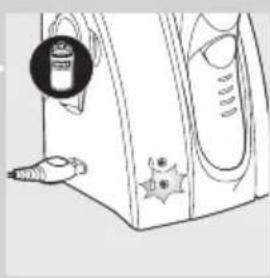
natural_image
Line drawing of a computer monitor with a close-up inset showing a device (no text or symbols)
natural_image
Line drawing of a portable electric fan with a circular icon and star-shaped label (no text or symbols)استخدام الجهاز
الحلاقة
natural_image
Illustration of a hand holding a bottle with an arrow indicating direction (no text or symbols)

natural_image
Simple line drawing of a device with a downward arrow indicating compression or disassembly (no text or symbols)مطابقة المعايير
natural_image
Line drawing of a handheld electric shaver with a small inset showing a bowl and a brush (no text or symbols)التجهيز للاستخدام
natural_image
Illustration of hands holding a cylindrical object with an upward arrow (no text or symbols)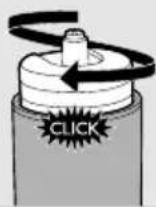

natural_image
Electrical plug and probe with no visible text or symbols (no readable text or labels)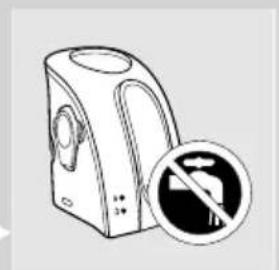
natural_image
Illustration of a portable device with a prohibition symbol (no text or labels)
natural_image
Illustration of a hand holding a tool with a circular no-smoking symbol (no text or labels)مقدمة
natural_image
Illustration of hands holding a mechanical component with a curved arrow indicating rotation (no text or symbols)


natural_image
Close-up of hands assembling mechanical parts with a black arrow indicating rotation (no text or symbols)
natural_image
Illustration of hands assembling a mechanical component with a curved arrow indicating rotation (no text or symbols)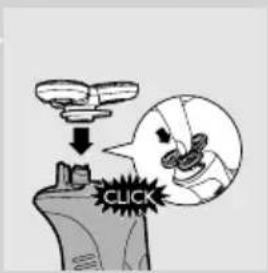
natural_image
Illustration of hands holding a small object with an arrow indicating upward motion (no text or symbols)عيب يابى
natural_image
Illustration of a hand holding a tool with a curved arrow indicating motion (no text or symbols)
natural_image
Diagram of a mechanical device with circular components and a pointer, no visible text or symbols
natural_image
Mechanical assembly diagram showing a lever mechanism with a directional arrow (no text or labels)ضمانت و سرويس
natural_image
Symbol of a trash bin crossed with no text or numbers, representing waste sorting or disposal (no text present)تعويض
natural_image
Illustration of a hand holding a small object with a curved arrow indicating motion (no text or symbols)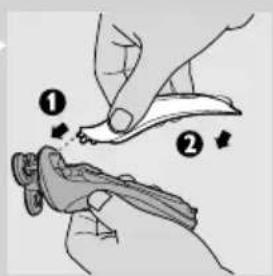

natural_image
Illustration of hands holding a small object with an arrow indicating upward motion (no text or symbols)
natural_image
Diagram of a hand holding a small object with arrows indicating motion (no text or symbols)
natural_image
Diagram of a mechanical component with arrows indicating motion or force direction (no text or symbols)

natural_image
Illustration of a hand holding a device with a circular button and arrow indicating motion (no text or symbols)تميز کردن و نگهداری
تميز کردن
natural_image
Diagram of a mechanical or biological structure with arrows indicating direction (no text or symbols)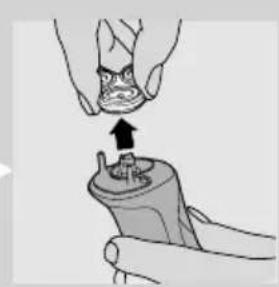
natural_image
Illustration of hands using a tool to adjust or install a small object, no text or symbols present
natural_image
Line drawing of a person applying a product to their face (no text or symbols)natural_image
Line drawing of a computer monitor with a close-up inset showing a button (no text or symbols)
natural_image
Line drawing of a mechanical device with a circular component and a base (no text or symbols)natural_image
Illustration of a hand holding a container labeled 'RAIN' with an arrow indicating motion (no text or symbols beyond label)شارز کردن
natural_image
Line drawing of a mobile phone with a cable inserted, showing a downward arrow indicating compression or disassembly (no text or symbols present)natural_image
Line drawing of a handbrush with three circular buttons and a small icon showing a bowl (no text or symbols)natural_image
Illustration of a hand holding a cylindrical object with an upward arrow, no text or symbols present
natural_image
Illustration of a mechanical device with a spiral arrow and 'click' label (no text or symbols on the diagram itself)
natural_image
Illustration of a handheld device with a white top and black arrow pointing to a circular opening (no text or symbols)خطر
natural_image
Illustration of a thermocouple with a probe and a circular no-smoking symbol (no text or labels)
natural_image
Illustration of a portable device with a circular vent and a prohibition symbol (no text or labels)
natural_image
Illustration of a medical device with a catheter and a no-smoking symbol (no text or labels)مقدمة
- Introduction
- General description (Fig. 1)
- Important
- Danger
- Warning
- Caution
- Compliance with standards
- General
- Preparing for use
- Charging by means of the charger
- ENGLISH8
- Manual refill
- Indications on the shaver
- Charging
- Quick charge
- Remaining battery capacity
- Battery low
- Battery full
- Indications on the refill & charge station
- Conditioner bottle light
- 'Filling conditioner cartridge' light
- Using the appliance
- Shaving
- Tips for optimal gliding and a smooth shaving result
- Trimming
- Cleaning and maintenance
- Cleaning
- Shaver/trimmer
- ENGLISH10
- Maintenance
- Storage
- Transport
- Activating the travel lock
- Deactivating the travel lock
- Travel
- Replacement
- Shaving conditioner cartridge
- Shaving unit
- NIVEA FOR MEN shaving conditioner bottle
- Environment
- Removing the rechargeable battery
- Guarantee and service
- Guarantee restrictions
- Troubleshooting
- Extra-thorough cleaning method
- УВОА
- Mengaktifkan travel lock
- Kassett for barberingslotion
- النقل
- التشذيب
- التنظيف والصيانة
- التنظيف
- التجهيز للاستخدام
- مقدمة
- عيب يابى
- ضمانت و سرويس
- تعويض
Brand : PHILIPS
Model : AquaTouch HS8460
Category : Razor