PocketCinema V100 - Projector AIPTEK - Free user manual and instructions
Find the device manual for free PocketCinema V100 AIPTEK in PDF.

User questions about PocketCinema V100 AIPTEK
0 question about this device. Answer the ones you know or ask your own.
Ask a new question about this device
Download the instructions for your Projector in PDF format for free! Find your manual PocketCinema V100 - AIPTEK and take your electronic device back in hand. On this page are published all the documents necessary for the use of your device. PocketCinema V100 by AIPTEK.
USER MANUAL PocketCinema V100 AIPTEK
Thank you very much for purchasing this product. This product is a compact pico projector and the best solution for business. The used DLP chip, known for great cinema projectors, provides rich colors and high contrasts with up to 100 Lumen brightness. Versatile connection options like HDMI-in, AV-in, USB or SD-card slot makes the product to the universal projection machine. Use it in office, at home or on the road, share your life, your ideas and your passion without compromises in quality or brightness.
Care and Safety Information
- Keep the device and packaging materials out of the reach of infants and children.
- Avoid subjecting the power adapter and other contacts to dripping or splashing water and dry your hands before you use it. Do not place objects filled with liquids such as vases, etc. on or near the device.
- Make sure that the used power outlet is always readily available and never hidden. In case of emergency, use the power adapter to separate the device from the power network.
- Keep your device away from all flames such as candles and do not set them up in the vicinity of the device.
- Keep the unit at least 10 cm away from other objects. Make sure the ventilation is not covered by newspapers, tablecloths, curtains, etc.
- For your own safety, do not use the projector during thunderstorms or lightning.
- Relative Humidity is 25% \~ 80%, non-condensing.
- The battery is integrated with the device. Do not dissemble and modify. The battery should be replaced by an authorised service center only.
- Ensure that the ambient room temperature is within 5 \~ 35°C
- During the operation, this product may heat lightly, which is normal.
- Wait before using if the device has been moved from a cold location into a warm one. Any condensation that has formed may in certain circumstances destroy the device. As soon as the device has reached room temperature it can be used without risk.
- Handle the product with care. Avoid contact with sharp objects. Keep device away from metallic objects.
- Place the projector on a flat surface. Any collision or falling to the ground is likely to damage the product.
- Do not drop or disassemble the product otherwise the warranty voids. Opening or removing covers may expose you to dangerous voltage or other hazards. Refer all servicing to an authorized service center.
- Use only the accessories supplied by the manufacturer.
-
Both product and user's manual are subject to further improvement or supplement without further notice.
-
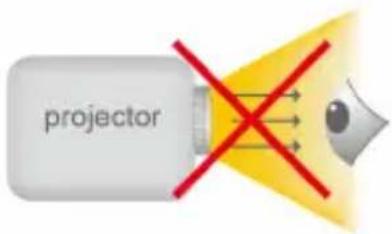
Avoid facing directly into the projector's lens.
- The device should not be used in a very dusty environment. Dust particles and other foreign objects may damage the unit.
- Do not expose the device to extreme vibrations. It may damage the internal components.
- Use the enclosed power adapter (see technical data):
Check whether the mains voltage of the power supply matches the mains voltage available at the setup location. This equipment complies with the voltage type specified on the unit.
text_image
projectorFCC Compliance Statement:
This device complies with Part 15 of the FCC Rules. Operation is subjected to the following two conditions: (1) this device may not cause harmful interference, and (2) this device must accept any interference received, including interference that may cause undesired operation.

text_image
FEDERAL COMMUNICATION COMMISSION U.S.A.This equipment has been tested and found to comply with limits for a Class B digital device, pursuant to Part 15 of the FCC rules. These limits are designed to
provide reasonable protection against harmful interference in residential installations. This equipment generates, uses, and can radiate radio frequency energy, and if not installed and used in accordance with the instructions, may cause harmful interference to radio communications.
However, there is no guarantee that interference will not occur in a particular installation. If this equipment does cause interference to radio or television equipment reception, which can be determined by turning the equipment off and on, the user is encouraged to try to correct the interference by one or more of the following measures:
- Reorient or relocate the receiving antenna.
- Move the equipment away from the receiver.
- Plug the equipment into an outlet on a circuit different from that to which the receiver is connected.
- Consult the dealer or an experienced radio/television technician for additional suggestions.
You are cautioned that any change or modifications to the equipment not expressly approved by the party responsible for compliance could void your authority to operate such equipment.

text_image
CE RoHS COMPLIANTIf the time arises to throw away your product, please recycle all the components possible.
Batteries and rechargeable batteries are not to be disposed in your domestic waste! Please recycle them at your local recycling point.
Together we can help to protect the environment.
Content
Package Content 4
Knowing your Device 4
Getting Started 5
Charging the product 5
LED Indicator 5
Projecting from Internal Memory 5
Projecting from External AV Source 6
External SD/SDHC card slot 7
USB Device 7
Using Headphones 7
Function and Operations 8
Main Menu 8
Playing Videos 8
Playing Music 8
Playing Photos 9
File 9
Source 9
Setting 10
Notice for Long-time Projection 11
Specifications 12
Package Content
Please check if the following items are located in your packaging:
 Projector Projector |  AC Adapeter AC Adapeter |  Remote Controller Remote Controller |  Exchangable Plug Exchangable Plug |
 USB Cable USB Cable | 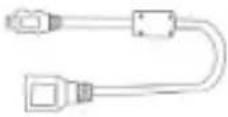 USB Adapter Composite AV Cable USB Adapter Composite AV Cable |  HDMI Cable(A to C) (Optional) HDMI Cable(A to C) (Optional) | |
 Mini HDMI to VGA Cable (Optional) Mini HDMI to VGA Cable (Optional) |  Pouch Pouch |  User's Manual User's Manual |  Warranty Card Warranty Card |
Knowing your Device
Projector
- OK Button
- Menu Navigation
- DC IN Jack
- Mini USB
- Infradred Receiver
- SD / SDHC
- AV IN
- HDMI / VGA / YPbPr (Component)
- Focus Wheel
- Return
- Power Switch
- Speaker
- LED Indicator
- Headphones

text_image
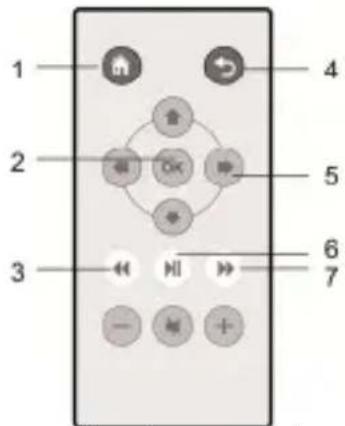
1 2 3 4 5 6 7 8 9 10 11 12 13 14 FOCUS 2004 OKRemote Controller
- Home
- OK
- Fast rewind
- Return
- Navigation Keys
- Play / Pause
- Fast forward
text_image
1 2 3 4 5 6 7Infradred Receiver
Warning:
Improper use of the battery may cause overheating, explosion or ignition, which can result in an injury or a fire. Battery leakage may damage the remote controller.
Do not expose the remote controller unit to direct sunlight.
Do not recharge, dissemble, deform or heat the battery.
Do not expose the battery to fire or water.
Immediately replace the exhausted battery.
Take out battery when the remote is not in use for a long time.

text_image
30° 30°Getting Started
Charging the product
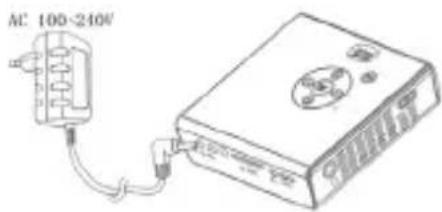
The projector is built in a 1800 mAh Li-Ion battery for mobile use. Please charge the projector for 4 hours prior to its first use. Connect one end of the supplied AC adapter to DC IN jack and the other end to a power outlet to starts charging. Exchange the plug (EU, US and etc.) of AC adapter that accommodates the type of power outlet in your country if it's different.
text_image
AC 100-240VLED Indicator
During charging, the LED on the top housing turns Red. It turns to Green when is the battery is fully charged.
Projecting from Internal Memory
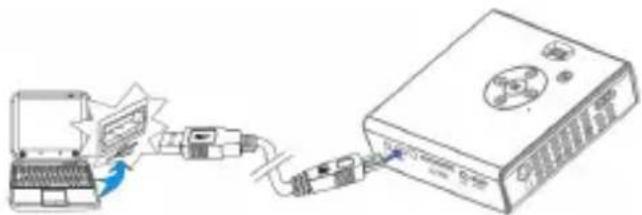
The projector has 2GB internal memory for file storage. Please download media files from your PC to the internal memory for projection:
- Turn on the PC and the projector.
- Connect the mini-USB port of the projector to the PC via USB cable. The message "Connected" will appear on the screen to show the progress. Once the connection is established, the screen and ventilation fan will automatically turn off to save the power. Now the projector is in mass storage mode.
flowchart
graph LR
    A["Laptop"] -->|Data Packet| B["Printer"]
    B --> C["USB Cable"]
    C --> D["Network Device"]
- You can copy the pictures, videos, and music from your PC to the internal memory or delete the files on the internal memory.
Note: You can't make any operation to the projector by the remote controller when the projector is a USB device.
Projecting from External AV Source
AV IN
-
Follow the figure below to connect the external AV output device to the AV IN jack on the rear panel of the unit. Connection is color-coded. After connection, ensure that the corresponding (e.g.: Composite Video) mode is enabled in the Input Source.
-
Enter "Source" in main menu and selete "AV mode".

text_image
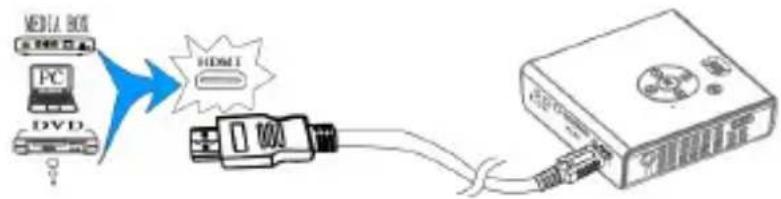
Diagram showing connection between a device with labeled components and cable connectors, including a starburst icon labeled 'CYB' and a separate electronic device.HDMI (Optional)
-
Use the HDMI cable to connect the HDMI port on the panel of the projector to the external HDMI signal source. Ensure that the HDMI input is enabled in the "Input Source" menu.
-
Enter "Source" in main menu and selete "HDMI mode".

flowchart
graph LR
    A["Media Box"] -->|Signal| B["PC"]
    B --> C["DVD"]
    C --> D["+"]
    D --> E["+"]
    E --> F["Computer"]
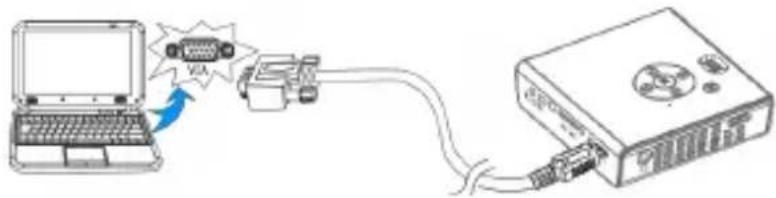
VGA (Optional)
Use "Mini HDMI to VGA cable" to connect the HDMI port on the rear panel of the projector to PC or other external source.
-
Plug one end of "Mini HDMI to VGA Cable" into the HDMI port on the projector.
-
Plug one end of "Mini HDMI to VGA Cable" into the VGA connector on PC or other external source.
-
Enter "Source" in main menu and selete "PC mode".
text_image
Diagram showing connection between a laptop and an electronic device via USB cable, with a VEA logo and cable connector.Note:
-
Supported screen resolution of PC:
-
1920 x 1080 / 1440 x 900 / 1400 x 1050
- 1360 x 768 / 1280 x 800 / 1280 x 768 / 1280 x 720
-
1152 x 864 / 1024 x 768 / 800 x 600
-
Many laptop computers do not automatically turn on their external video port when a secondary display device such as a projector is connected. Refer to your computer manual for the command that activates the external video port.
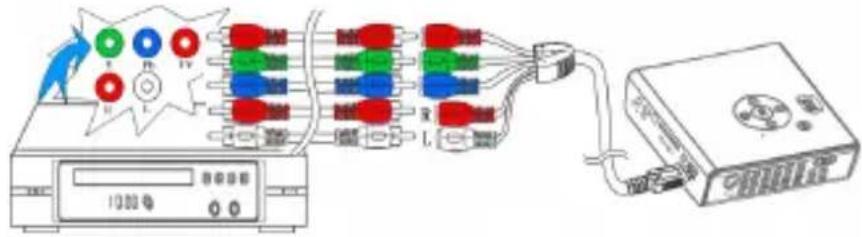
YPbPr (Optional)
-
Use the YPbPr (Component) cable (not supplied) to connect the YPbPr input jack on the rear panel of the projector to the external AV signal source. Ensure that the relevant input (e.g.: Component 1 or Component 2) is enabled in the "Input Soure" menu.
-
Highlight "Source" and switch to YPbPr mode.
text_image
Diagram showing a power supply connected to an electronic device with labeled components and wiring connections.Note
-
The YPbPr jacks are sometimes labeled Y/CB/Ce. If so, connect the cables to same colors.
-
If the Input soure menu disappears, press OK button to popup the menu.
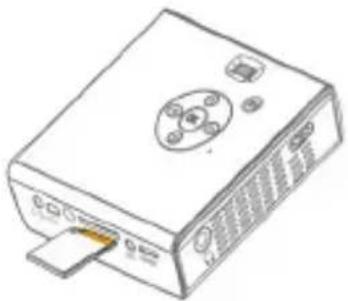
External SD/SDHC card slot
A single built-in memory card reader is available for reading the following flash memory cards: SD and SDHC card up to 32GB. Gentally insert the card by following the direction shown below until it reached the bottom of the slot. To remove the memory card, gently push the top edge of the card and pull it out.
USB Device
The projector can project the content from USB device such as USB dongle. Connect one end of the mini-USB transfer cable to the mini-USB port of the unit and the other end to USB device as shown.
Using Headphones
The projector equips stereo speakers for providing the best audio performance. Additionally, you can connect the headphones to the headphone jack of the unit. When headphone is connected, the speakers will automatically turn off.
natural_image
Illustration of a white electronic device with ports and a paper clip, no visible text or symbols
natural_image
Line drawing of a device connected to a power outlet (no text or symbols visible)
natural_image
Line drawing of an electronic device with a coiled cable and two ear clips (no text or symbols)Warning: Avoid Hearing Damage
Listening at high volume for a long period of time could cause damage to your ears.

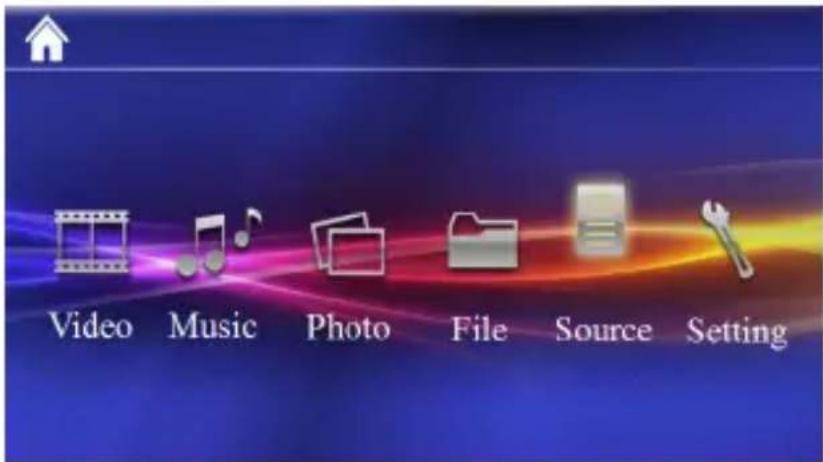
Function and Operations
Main Menu
text_image
Video Music Photo File Source SettingPress ▲ to highlight the desired item and press press to return to Main Menu.
OK to enter the submenu;
Playing Videos
Select and playback video files.
- In the videos list, press OK to open the selected folder; press ▲to navigate the list. Press OK to start playback of the selected video.
- During playback, press ◀▶ to play the previous / next video.
- Press ◀◀ /▶▶ to play fast rewind /fast forward.
- Press ▶II to pause and press it again to resume.
- To adjust the video volume, press Vol -/+ (on remote controller) to display the Vol menu, the press ▲▼ to shift aming Brightness / Contrast / Color / Volume / Smart settings and press ◀▶ to adjust the value.
Note: The projector supports the following video formats: MJPEG, MPEG-1, MPEG-4, H.264, Real Video
Playing Music
Select and playback audio files.
- Before you are able to listen to music, you must first store music files on the memory card you wish to use.
- Press ▲▼ to select one song and press OK to start the music playback. To adjust the music volume, press Vol -/+
- During playback, press ◀▶ to play the previos / next song. Press ▶II to pause the music. Press it again to resume normal playback.
- You can turn off the projection screen with "Music Screen Off" feature. Go to Setting→Power Saving→Music Screen and select "Off".
Note: The projector supports the following music formats: MP3, WAV, OGG
Playing Photos
Select and playback images.
- To view your pictures as multi-up thumbnails, press ▶II to pause when a slide show is playing.
- To navigate through the thumbnails, press ▲▼ and ◀▶.
- To play a picture, highlight it and press OK.
- To start a slideshow from any selected picture (thumbnail show), press OK. Press ◀▶ select the previous / next picture.
Note: The projector supports the following photo formats: JPEG, BMP, PNG, GIF, TIFF
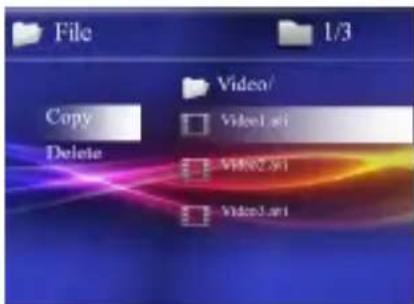
File
The File navigator is a fast and convenient way of moving between files and folders.
- On the menu, press to select the desired item and press to popup the menu as shown below.
- Copying file Select "Copy" to copy the selected file from Internal memory to external memory device and vise versa.
- Deleting file Select "Delete" to delet the selected file.
- Press ← to cancel the popup menu.
text_image
File 1/3 Video/ Copy Delete Video.avi Video2.avi Video3.aviSource
When projecting from external AV source (AV IN, HDMI, VGA, or YPbPr), enter "Source" in main menu to select the exact input connection.
Note: If the blue screen appears and shows (No Signal) after the projector with the external AV source, please follow the instruction above to select the correct source. Or, check weather the cable is connected well.
Mobile Charging Mode
Activate the Mobile Charging Mode for saving power by turning off the projecting screen while charging your cellphone.
Note: USB port output — 5V, 750mA (max.)
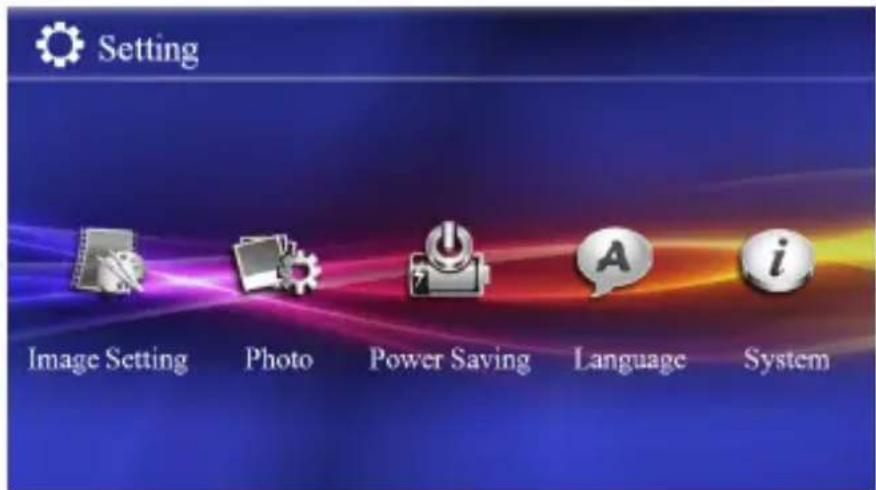
Setting
text_image
Setting Image Setting Photo Power Saving Language System- Image Setting
Smart Setting
Use funzons to select the image display mode among Standard, Vivid, Natural, Cinema and Manual.
Brightness / Contrast / Saturation
Use bulbs to adjust the screen display.
Projection Mode
Use buttons to choose front / rear / ceiling / rear cealing for image mirror from left & right or top & down.
- Photo
View
Display the picture in thumbnail or list mode.
Time per slide
Select the amount of time you want pictures to display before moving to the next picture in slideshow.
- Power Saving
ECO mode
Activate the function to save power.
Music Screen
Activate Music Screen mode for saving power while playing music by turning off the projecting screen.
- Language
Select the language in menu.
5. System
Reset settings
Select "Yes" to reset all the options to original setting. Select "No" to cancel.
Firmware Update
Firmware update information may be available on our website. Connect the power adapter when updating the firmware.
Information
Detailed information about the projector.
Notice for Long-time Projection
The built-in battery supports approximately 1.5 hours of projection. For long time projection, you are recommended to use AC adapter. Without using power adapter and the battery isn't charged timely, the projector will enter standby mode automatically. Press any button to exit from the standby mode.
When the battery is too weak to stay in operation, the low battery capacity icon ( ) will flash. You need to charge the product while the icon showed. In standby mode, only the LED Indicator flashes.
It's normal that the projector will feel warm with continuous use due to its high performance. If the projector runs for a long time and over-heated, the High-Temperature icon ( ) will appear on the screen. The system will automatically enter the standby mode.
Specifications
| Item Description | |
| Optical Technology | WVGA 0.3" DLP |
| Light Source | RGB LED |
| LED Lifetime | Up to 20,000 hours |
| Contrast 1000:1 | |
| Resolution 854 x 480 Pixels | (WVGA) |
| Aspect Ratio | 16:9 (4:3 compatible) |
| Projection Image Size 30 cm ~ 300 cm (12" ~ 120") | |
| Projection Distance 50 cm ~ 300 cm (20" ~ 120") | |
| Brightness | AC Mode: Up to 100 LumensBattery Mode: Up to 50 Lumens |
| Focus Manual | |
| Lens Offset 100% | |
| Internal Memory | 2 GB |
| Internal Speaker | Mono |
| USB Mini USB 2.0 for file transfer, USB Stick, Android storage projection | |
| AV Source AV in (3.5 mm mini jack, PAL & NTSC), Mini HDMI, VGA, YPbPr (Component) | |
| Audio-out 3.5 mm mini jack | |
| Card Slot | SD/SDHC card up to 32 GB |
| Cooling | Active |
| Power Supply | Input: 100 ~ 240V AC; Output: 12V, 2A DC |
| Battery Type | Embedded 1800 mAh, 7.4 V , Li-polymer rechargeable battery |
| Battery Lifetime | 90 min |
| Power Consumption | ≤ 22W |
| Dimensions( L x W x H ) | 106 mm x 104 mm x 32 mm |
| Weight | 300 g |
Willkommen
text_image
projector
text_image
FEDERAL COMMUNICATION COMMISSION U.S.A. FCflowchart
graph LR
    A["Laptop"] -->|Data Link| B["USB Cable"]
    B --> C["Physical Device"]
    C --> D["USB Cable Interface"]
text_image
Diagram showing connection between a device with labeled components and cable connectionsHDMI (Optional)
text_image
Diagram showing connection between a laptop and an electronic device via USB cable, with a warning symbol indicating 'VIA' (USB) to the device.Hinweis:
text_image
Diagram showing a power supply connected to an electronic device with labeled components and wiring connections.Hinweis:
natural_image
Line drawing of an electronic device with a coiled cable and connectors (no text or symbols)text_image
Video Music Photo File Source Settingtext_image
File 1/3 Video/ Copy Delete Vidol and Vidoo2 and Vidoo3 andQuelle
text_image
Setting Image Setting Photo Power Saving Language System1. Bildeinstell.
Smart Settings
text_image
projectortext_image
CE RoHS COMPLIANTtext_image
Diagram showing a laptop connected to an electronic device via USB cable, with a CD and monitor labeled in the background.text_image
Diagram showing connection between a laptop and an electronic device via USB cable, with a VEA logo and cable connector.Remarque :
text_image
Diagram showing a power supply connected to an electronic device with labeled components and wiring connections.Remarque :
natural_image
Illustration of a white electronic device with ports and buttons, no visible text or symbolsAppareil USB
natural_image
Line drawing of a device with cable and connector (no text or symbols)
natural_image
Illustration of a portable electronic device with attached cable and ear clips (no text or symbols)text_image
Video Music Photo File Source Settingtext_image
Setting Image Setting Photo Power Saving Language System- Réglages image
Réglages Optimaux
text_image
projectortext_image
CE RoHS COMPLIANTtext_image
Diagram showing a laptop connected to an electronic device via cable, with a globe icon and Chinese text labels.text_image
Diagram showing connection between a device and an electronic device with labeled ports and cablestext_image
Diagram showing connection between a laptop, VGA cable, and an electronic device with ports labeled 'VGA'Nota:
text_image
Diagram showing a power supply connected to an electronic device with labeled components and wiring connections.Nota
natural_image
Illustration of a rectangular electronic device with ports and a paper clip, no visible text or symbols.
natural_image
Line drawing of a device connected to a power strip (no text or symbols)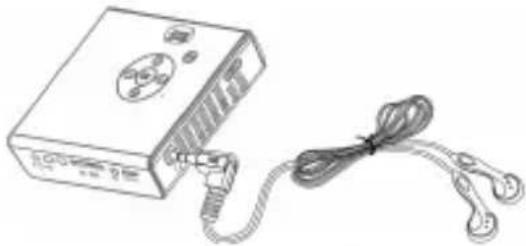
natural_image
Line drawing of an electronic device with a coiled cable and two ear clips (no text or symbols)text_image
Video Music Photo File Source Settingtext_image
Setting Image Setting Photo Power Saving Language System- Imp. Immagine
Impostazione Smart
text_image
projectortext_image
Diagram showing a laptop connected to an electronic device via cable, with a CD and printer nearby.text_image
Diagram showing connection between a device with labeled ports and cable connectors, including a warning icon and Chinese text.HDMI (選用)
text_image
Diagram showing connection between a laptop, USB port, and CD-ROM with cable routing註:
text_image
Diagram showing a power supply connected to an electronic device with labeled components and wiring connections.註:
natural_image
Line drawing of a rectangular electronic device with ports and a paper clip, no visible text or symbolsUSB 装置
natural_image
Line drawing of a device with an external cable and connector (no text or symbols)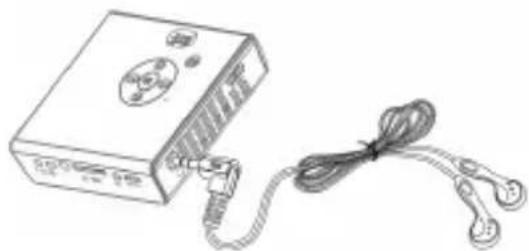
natural_image
Illustration of a portable electronic device connected to a cord with earpins (no text or symbols visible)警告:避免聽力受損
JPEG, BMP, PNG, GIF, TIFF
檔案
text_image
projectortext_image
Diagram showing a printer connected to an electronic device with a cable, illustrating the connection and data transfer process.text_image
Diagram showing connection between a device with labeled ports (O, K, L) and cable connectors to an electronic device.(اختياري) HDMI
text_image
Diagram showing a laptop connected to an electronic device via USB cable, with a printer and USB logo visible.ملاحظة:
text_image
Diagram showing a power supply connected to an electronic device with labeled components and wiring connections.ملاحظة:
natural_image
Illustration of a rectangular electronic device with ports and buttons, no visible text or symbolsnatural_image
Line drawing of a device with an attached cable and connector (no text or symbols)USB جهاز
natural_image
Line drawing of a portable electronic device with attached cable and ear connectors (no text or symbols)text_image
Video Music Photo File Source Settingtext_image
File 1/3 Video/ Copy Delete Video Art Video Art Video Art"Source" (YPbPr, VGA, HDMI, AV IN) : أدخل (أدخل)
text_image
Setting Image Setting Photo Power Saving Language System- ضبط الصورة
الإذكي الإضبط
text_image
projectorErklæring fra FCC:
text_image
Diagram showing connection between a CD-ROM and an electronic device with labeled ports and cablesHDMI (Valgfri)
-
Bruk HDMI-kabelen for å koble til HDMI-porten på panelet til projektoren til den eksterne HDMI-signalkilden. Sørg for at HDMI-inputen er tilkoblet i "Input-kilde"-menyen.
-
Skriv inn "Kilde" i hovedmenyen og velg "HDMI-modus".
flowchart
graph LR
    A["Media Box"] -->|USB| B["PC"]
    B --> C["DVD"]
    C --> D["+"]
    D --> E["+"]
    E --> F["+"]
    F --> G["+"]
    G --> H["+"]
    H --> I["+"]
    I --> J["+"]
    J --> K["+"]
    K --> L["+"]
    L --> M["+"]
    M --> N["+"]
    N --> O["+"]
    O --> P["+"]
    P --> Q["+"]
    Q --> R["+"]
    R --> S["+"]
    S --> T["+"]
    T --> U["+"]
    U --> V["+"]
    V --> W["+"]
    W --> X["+"]
    X --> Y["+"]
    Y --> Z["+"]
VGA (Valgfri)
text_image
Diagram showing connection between a laptop and an electronic device via USB cable, with a switch labeled 'VIA' pointing to the device.Merk:
text_image
Diagram showing a power supply connection with labeled components including a 10Ω meter and a device labeled '电源箱' (Power Panel).Merk
natural_image
Line drawing of a computer device with ports and buttons (no text or symbols)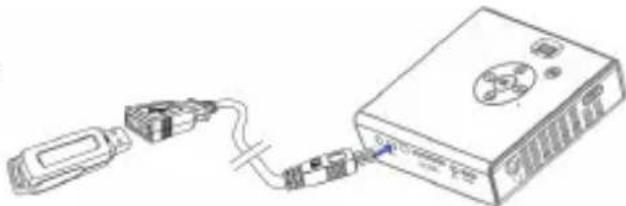
natural_image
Line drawing of a device with an external connector and cable, no text or symbols present
natural_image
Line drawing of an electronic device with a coiled cable and two ear clips (no text or symbols)text_image
Video Music Photo File Source Settingtext_image
File 1/3 Video/ Copy Delete Video1 Video2 VMSC1 Video3Kilde
text_image
Setting Image Setting Photo Power Saving Language System1. Bildeinnstilling
Smart innstilling
text_image
projectortext_image
CE RoHS COMPLIANTtext_image
Diagram showing a laptop connected to an electronic device via cable, with a printer and switch labeled in Chinese.text_image
Diagram showing connection between a device labeled '1000' and an electronic device with three connected cables labeled O, H, I.HDMI (Valinnainen)
text_image
Diagram showing connection between a laptop and an electronic device via USB cable, with a magnified view of the device's internal components.Huomautus:
text_image
Diagram showing a power supply connected to an electronic device with labeled components and wiring connections.Huomautus:
natural_image
Illustration of a rectangular electronic device with buttons and a paper clip, no visible text or symbols.USB-laite
natural_image
Line drawing of a device with cable and connector, no text or symbols presentKuulokkeiden käyttö
natural_image
Line drawing of a portable electronic device with attached cable and connectors (no text or symbols)text_image
Video Music Photo File Source Settingtext_image
Setting Image Setting Photo Power Saving Language System1. Kuva-asetus
Älykäs Asetus
text_image
projectortext_image
CE RoHS CORRIGANTnatural_image
Diagram showing a laptop connected to an electronic device via cable, with no visible text or symbols.text_image
Diagram showing connection between a device with labeled components and wiring, including a monitor, capacitor, and network interface.HDMI (Tillval)
text_image
Diagram showing connection between a laptop, USB drive, and CD-ROM with cable routingNotera:
text_image
Diagram showing a device connected to an electronic device via cable and cable connectors, with labeled components and wiring.Notera
natural_image
Line drawing of a rectangular electronic device with ports and a paper clip, no visible text or symbolsUSB-enhet
natural_image
Line drawing of a device connected to a power strip and a rectangular electronic device (no text or symbols visible)Använda hörlurar
natural_image
Line drawing of an electronic device with a coiled cable and connectors (no text or symbols)Varning: Undvik hörselskador
text_image
Video Music Photo File Source Settingtext_image
Setting Image Setting Photo Power Saving Language System1. Bildinställning
Smart inställning
text_image
projector


natural_image
Diagram showing a laptop connected to an electronic device via cable, with no visible text or symbols.text_image
Diagram showing connection between a device with labeled ports and colored wires, likely illustrating a wireless or signal transmission setup.Разъем HDMI (Опция)
1. Используйте
text_image
Diagram showing connection between a laptop, USB port, and an electronic device with cable routingПримечание:
text_image
Diagram showing a device connected to an electronic device via cable, with labeled components and signal indicators.Примечание:
natural_image
Illustration of a rectangular electronic device with ports and a paper clip, no visible text or symbols.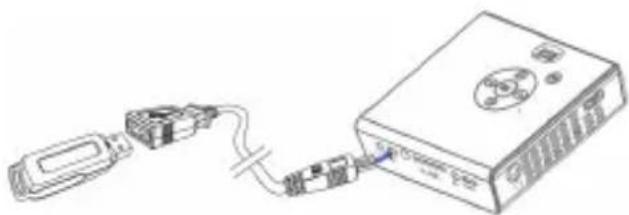
natural_image
Line drawing of a device with an attached cable and connector (no text or symbols)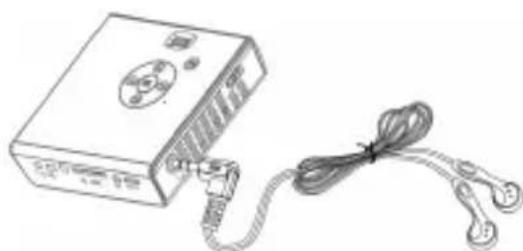
natural_image
Line drawing of an electronic device with a coiled cable and connectors (no text or symbols)text_image
Video Music Photo File Source Settingtext_image
File 1/3 Video/ Copy Delete Vikcai art Vikcai art Vikcai artИсточник
text_image
Setting Image Setting Photo Power Saving Language System- Настр. нозобр.