
ESM1009 - Sander Ferm - Free user manual and instructions
Find the device manual for free ESM1009 Ferm in PDF.


| Product Type | Orbital Sander |
| Brand | Ferm |
| Model | ESM1009 |
| Power Input | 480 W |
| Voltage | 230 V~ |
| Frequency | 50 Hz |
| No-load Speed | 4,000 - 14,000 min⁻¹ |
| Weight | 2.0 kg |
| Protection Class | IP20 |
| Vibration Level | 3.52 m/s² (K=1.5 m/s²) |
| Sound Pressure Level | 79 dB(A) (K=3 dB(A)) |
| Sound Power Level | 90 dB(A) (K=3 dB(A)) |
| Speed Settings | 6 positions, variable |
| Dust Extraction | Yes, with included dustbag |
| Sanding Pad Attachment | Hook and loop (velcro) |
| Double Insulated | Yes |
| Replaceable Sanding Pad | Yes |
| Spare Parts Available | Yes (see manual for list) |
| Mains Cable Length | Approx. 2 m (est.) |
| Recommended Sanding Paper Grain | Coarse (50), Medium (80), Fine (120) |
Frequently Asked Questions - ESM1009 Ferm
User questions about ESM1009 Ferm
0 question about this device. Answer the ones you know or ask your own.
Ask a new question about this device
Download the instructions for your Sander in PDF format for free! Find your manual ESM1009 - Ferm and take your electronic device back in hand. On this page are published all the documents necessary for the use of your device. ESM1009 by Ferm.
USER MANUAL ESM1009 Ferm
C
D
ORBITAL SANDER ESM1009
Thank you for buying this Ferm product.
By doing so you now have an excellent product, delivered by one of Europe's leading suppliers. All products delivered to you by Ferm are manufactured according to the highest standards of performance and safety. As part of our philosophy we also provide an excellent customer service, backed by our comprehensive warranty. We hope you will enjoy using this product for many years to come.
SAFETY WARNINGS

WARNING
Read the enclosed safety warnings, the additional safety warnings and the instructions.
Failure to follow the safety warnings and the instructions may result in electric shock, fire and/or serious injury.
Keep the safety warnings and the instructions for future reference.
The following symbols are used in the user manual or on the product:

Read the user manual.

Risk of personal injury.

Risk of electric shock.

Immediately remove the mains plug from the mains if the mains cable becomes damaged and during cleaning and maintenance.

Wear safety goggles.
Wear hearing protection.

Wear a dust mask.

Double insulated.

Do not dispose of the product in unsuitable containers.

The product is in accordance with the applicable safety standards in the European directives.
Additional safety warnings for orbital sanders

Contact with or inhalation of dust coming free during use (e.g. lead-painted surfaces, wood and metal) can endanger your health and the health of bystanders. Always wear appropriate protective equipment, such as a dust mask. Always use proper dust extraction during use.
- Do not work materials containing asbestos. Asbestos is considered carcinogenic.
- Do not use the machine for sanding magnesium workpieces.
- Wear safety goggles. Wear hearing protection. If necessary, use other protective means, such as safety gloves, safety shoes, etc.
- Hold the machine by the insulated gripping surfaces where the accessory may contact hidden wiring or the mains cable. If the accessory contacts a ,live' wire, the exposed metal parts of the machine can also become ,live'. Risk of electric shock.
- Be very careful when sanding painted surfaces.
- Before use, remove all nails and other metal objects from the workpiece.
- Make sure that the workpiece is properly supported or fixed.
- Only use sanding paper that is suitable for use with the machine.
- Only use sanding paper with the correct dimensions. Make sure that the sanding paper is properly mounted.
- Inspect the sanding paper before each use. Do not use sanding paper that is worn because of prolonged use.
- Never put the machine down on a table or a workbench before it has been switched off.
Electrical safety

Always check that the voltage of the power supply corresponds to the voltage on the rating plate.
- Do not use the machine if the mains cable or the mains plug is damaged.
- Only use extension cables that are suitable for the power rating of the machine with a minimum thickness of 1.5 mm^2 . If you use a extension cable reel, always fully unroll the cable.
Mains plug replacement (UK only)
If the moulded 3-pin plug attached to the unit is damaged and needs replacing, it is important that it is correctly destroyed and replaced by an approved BS 1363/3A fused plug and that the following wiring instructions are followed.
The wires in the mains cable are coloured in accordance with the following code:
blue neutral
brown live
As the colours of the wires in the mains cable of the unit may not correspond to the coloured markings identifying the terminals in the plug, proceed as follows:
- The wire which is coloured blue must be connected to the terminal which is marked with the letter N or coloured black.
- The wire which is coloured brown must be connected to the terminal which is marked with the letter L or coloured red.
TECHNICAL DATA
| ESM1009 | |
| Mains voltage V~ 230 | |
| Mains frequency Hz 50 | |
| Power input W 480 | |
| No-load speed min | ^-1 4,000 - 14,000 |
| Protection class IP 20 | |
| Weight kg 2.0 |
NOISE AND VIBRATION
| ESM1009 | |
| Sound pressure (Lpa) dB(A) 79 | |
| Acoustic power (Lwa) dB(A) 90 | |
| Uncertainty (K) dB(A) 3 | |
| Vibration m/s | 2 3.52 |
| Uncertainty (K) m/s | 2 1.5 |

Wear hearing protection.
Vibration level
The vibration emission level stated in this instruction manual has been measured in accordance with a standardised test given in EN 60745; it may be used to compare one tool with another and as a preliminary assessment of exposure to vibration when using the tool for the applications mentioned
- using the tool for different applications, or with different or poorly maintained accessories, may significantly increase the exposure level
- the times when the tool is switched off or when it is running but not actually doing the job, may significantly reduce the exposure level
Protect yourself against the effects of vibration by maintaining the tool and its accessories, keeping your hands warm, and organizing your work patterns
DESCRIPTION (FIG. A)
Your orbital sander has been designed for sanding wood, metal, plastics and painted surfaces.
- On/off switch
- Dustbag
- Speed adjustment wheel
- Sanding pad
- Main grip
- Auxiliary grip
- Dustbag connection
ASSEMBLY

Before assembly, always switch off the machine and remove the mains plug from the mains.
Mounting and removing the sanding paper (fig. B)
Mounting
- Mount sanding paper (8) with the required grain size onto the sanding pad (4). Make sure that the perforation in the sanding paper (8) corresponds with the perforation on the sanding pad (4).
- Use coarse sanding paper (grain 50) for sanding rough, uneven surfaces.
- Use medium sanding paper (grain 80) for removing the remaining scratches from the coarse sanding paper.
- Use fine sanding paper (grain 120) for finishing surfaces.
Removing
- Remove the sanding paper (8) from the sanding pad (4).
USE
Switching on and off (fig. A)
- To switch on the machine, press the on/off switch (1).
- To switch off continuous mode, press the on/off switch (1) again.
Setting the speed (fig. A)
The speed adjustment wheel is used for setting the speed. The speed adjustment wheel can be set to 6 positions. The ideal speed depends on the required grain size and on the material to be worked.

Do not set the speed during use.
- Turn the speed adjustment wheel (3) to the required position.
- For hard materials, use sanding paper with a fine grain size and select a lower speed.
- For soft materials, use sanding paper with a coarse grain size and select a higher speed.
Dust extraction (fig. C)
- Insert the dustbag (9) into the dustbag connection (7).
- Turn the dustbag (9) clockwise until it locks into place.
Hints for optimum use
- Clamp the workpiece.
- Firmly hold the machine with both hands.
- Switch on the machine.
- Place the sanding pad with sanding paper on the workpiece.
- Slowly move the machine over the workpiece, firmly pressing the sanding pad against the workpiece.
- Do not apply too much pressure on the machine. Let the machine do the work.
- Switch off the machine and wait for the machine to come to a complete standstill before putting the machine down.
CLEANING AND MAINTENANCE

Before cleaning and maintenance, always switch off the machine and remove the mains plug from the mains.
• Regularly clean the housing with a soft cloth.
- Keep the ventilation slots free from dust and dirt. If necessary, use a soft, moist cloth to remove dust and dirt from the ventilation slots.
• Regularly clean the sanding pad to avoid
inaccuracies during use.
Replacing the sanding paper (fig. B)
- To remove the old sanding paper (8), proceed as described in the section „Mounting and removing the sanding paper“.
- To mount the new sanding paper (8), proceed as described in the section „Mounting and removing the sanding paper“.
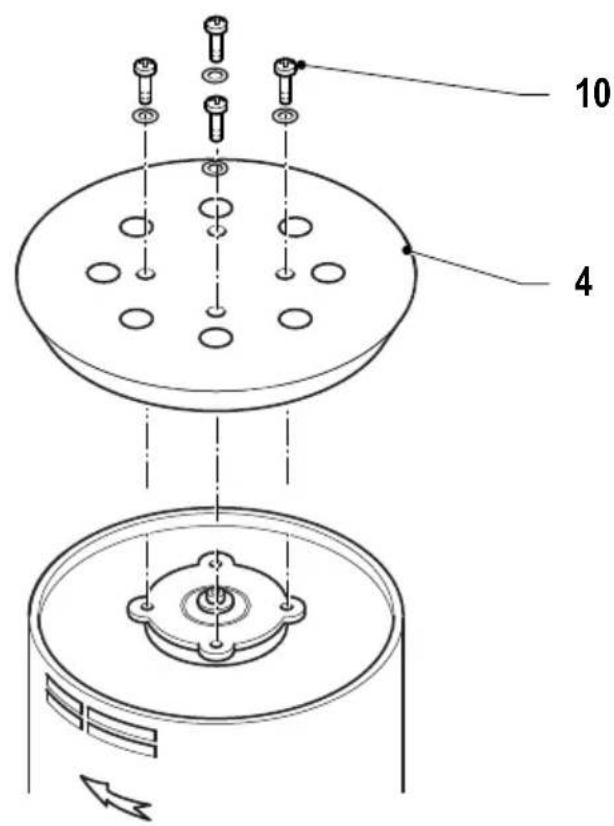
Replacing the sanding pad (fig. D)
In case of wear, the sanding pad must be replaced.
- If necessary, remove the sanding paper.
- Loosen the screws (10) from the sanding pad (4).
- Remove the old sanding pad (4).
- Mount the new sanding pad (4).
- Tighten the screws (10) to the sanding pad (4).
WARRANTY
Consult the enclosed warranty terms.
ENVIRONMENT
Disposal

The product, the accessories, and the packaging must be sorted for environmentally friendly recycling.
Only for EC countries
Do not dispose of power tools into domestic waste. According to the European Guideline 2002/96/EC for Waste Electrical and Electronic Equipment and its implementation into national right, power tools that are no longer usable must be collected separately and disposed of in an environmentally friendly way.
The product and the user manual are subject to change. Specifications can be changed without further notice.
EXZENTERSCHLEIFER ESM1009
BESCHRIJVING (FIG. A)
(GB) We declare under our sole responsibility that this product is in conformity and accordance with the following standards and regulations:
It is our policy to continuously improve our products and we therefore reserve the right to change the product specification without prior notice.
Ferm BV • Lingenstraat 6 • 8028 PM • Zwolle The Netherlands
Spare parts list ESM1009 - FROS-480
| No. | Description | Position |
| 204108 | Switch 7 + 8 | |
| 204109 | Speed control 12 | |
| 204110 | Stator 13 | |
| 204111 | Carbon brush holder 17 + 18 | |
| 204112 | Carbon brush set 19 | |
| 204113 | Rotor 21 | |
| 800608 | Bearing 608 23 | |
| 806002 | Bearing 6002 26 | |
| 204114 | Baseplate 30 - 32 | |
| 204115 | Dust extraction adapter 36 + 38 + 39 |


- ORBITAL SANDER ESM1009
- SAFETY WARNINGS
- WARNING
- Additional safety warnings for orbital sanders
- Electrical safety
- Mains plug replacement (UK only)
- Vibration level
- DESCRIPTION (FIG. A)
- ASSEMBLY
- Mounting
- Removing
- USE
- Switching on and off (fig. A)
- Setting the speed (fig. A)
- Dust extraction (fig. C)
- Hints for optimum use
- CLEANING AND MAINTENANCE
- Replacing the sanding paper (fig. B)
- Replacing the sanding pad (fig. D)
- WARRANTY
- ENVIRONMENT
- Disposal
- Only for EC countries
- EXZENTERSCHLEIFER ESM1009
- BESCHRIJVING (FIG. A)
Brand : Ferm
Model : ESM1009
Category : Sander