GP-E1 - Photo Accessories CANON - Free user manual and instructions
Find the device manual for free GP-E1 CANON in PDF.

User questions about GP-E1 CANON
0 question about this device. Answer the ones you know or ask your own.
Ask a new question about this device
Download the instructions for your Photo Accessories in PDF format for free! Find your manual GP-E1 - CANON and take your electronic device back in hand. On this page are published all the documents necessary for the use of your device. GP-E1 by CANON.
USER MANUAL GP-E1 CANON
text_image
Screenshot of a Chinese website interface showing a map with labeled locations and navigation controls
natural_image
Simple diagram of a circular ring with concentric rings (no text or symbols)GPS Receiver Solution Disk
地図データ©2012 ZENRIN -
目次
はじめに 2
GP-E1 でできること....2
本使用説明書上のおことわり 5
安全上のご注意……6
各部の名称 7
カメラに取り付ける / 取り外す 8
GPS の信号を受信する……9
位置情報の更新間隔を設定する 13
電子コンパスを使う.... 14
GPS の時刻をカメラに設定する 17
GPS に関するご注意.... 18
付属のソフトウェアについて 19
主な仕様 22
本使用説明書上のおことわり
本文中の絵文字について

natural_image
Line drawing of a rectangular object with two handles and a curved band, resembling a scroll or bag (no text or symbols)EOS-1D Xの背面表示パネル
text_image
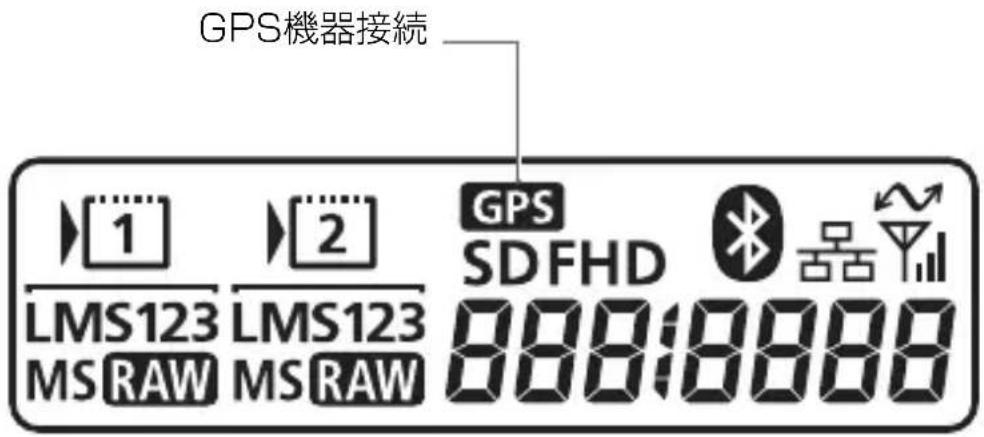
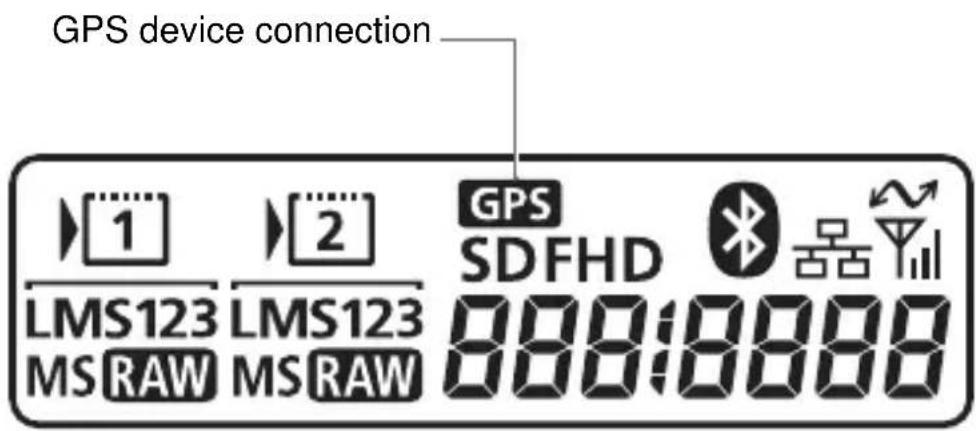
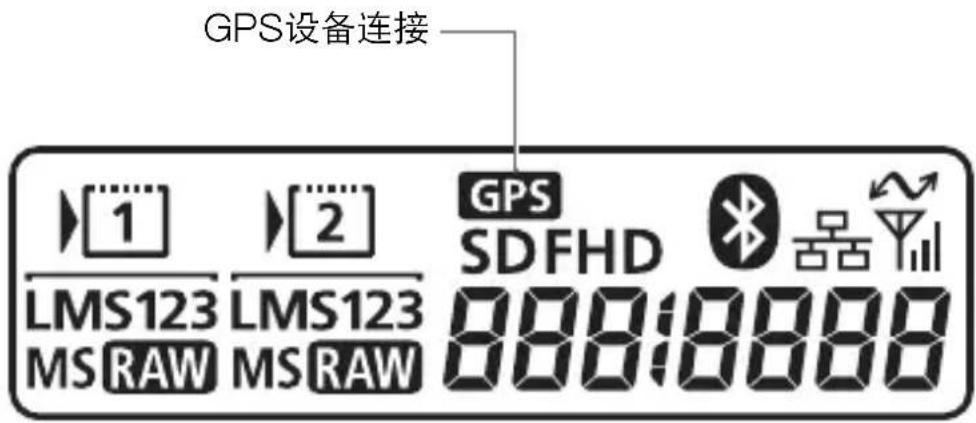
GPS機器接続 1 LMS123 MS RAW 2 LMS123 MS RAW GPS SDFHD 888:8888カメラに取り付ける / 取り外す
text_image
Diagram of a camera module with labeled parts and directional arrows indicating motion or movement.1 カメラの端子カバーを開ける
The GPS Receiver GP-E1 is an EOS-1D X accessory that can geotag your shots. Using the provided software Map Utility, you can view shooting locations. The receiver can also set the camera time via GPS.
Features
Geotagging Images and Adding the Shooting Direction
text_image
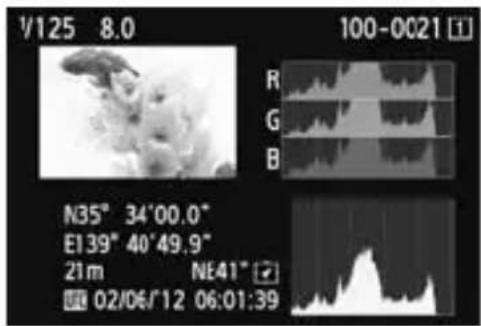
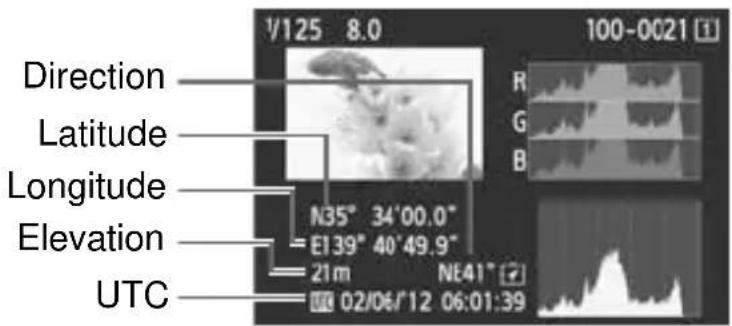
V125 8.0 100-0021 R G B N35° 34'00.0" E139° 40'49.9" 21m NE41" 02/06/12 06:01:39- Shots taken while the receiver is attached to the camera are geotagged, adding location information*1 (latitude, longitude, elevation, and shooting time (UTC*2)) to images.
- Shooting locations and the shooting direction of geotagged images can be viewed on a virtual map on a computer.
Images can also be tagged with the shooting direction, using the receiver's digital compass (magnetic north standard).
*1: Some traveling conditions or receiver settings may cause inaccurate location information to be added to images.
*2: Coordinated Universal Time, abbreviated UTC, is essentially the same as Greenwich Mean Time.
Setting the Camera Time
- The camera time can be set using GPS signals. The margin of error is approx. ± 0.02 second.
Viewing Images and Information on a Virtual Map
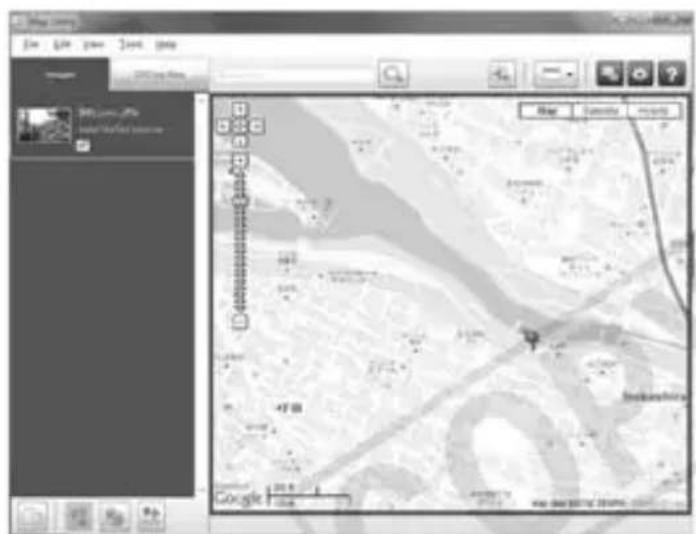
● Shooting locations and the shooting direction can be viewed on a virtual map, using the Map Utility software on the provided CD-ROM.
text_image
Map File Edit View Insert Map Map Options Map Saturn Maps Map Saturn Maps Map Saturn Maps Map Saturn Maps Map Saturn Maps Map Saturn Maps Map Saturn Maps Map Saturn Maps Map Saturn Maps Map Saturn Maps Map Saturn Maps Map Saturn Maps Map Saturn Maps Map Saturn Maps Map Saturn Maps Google
natural_image
Simple diagram of concentric circles with no text or symbolsGPS Receiver Solution Disk
Map data ©2012 ZENRIN -
Contents
Introduction.... 2
Features 2
Conventions Used in this Manual.... 5
Safety Precautions 6
Nomenclature.... 7
Attaching and Detaching the Receiver.... 8
Acquiring GPS Signals.... 9
Setting the Positioning Interval.... 13
Using the Digital Compass.... 14
Setting Time from GPS on the Camera.... 17
GPS Precautions.... 18
Provided Software.... 19
Specifications 22
Conventions Used in this Manual
Meaning of Symbols

: Warning to prevent shooting problems.
: Supplemental information.
(p. ^** ): Reference page numbers for more information.
The icons and markings indicating the camera's controls and settings used in the manual correspond to the icons and markings on the camera and on the receiver.
Basic Assumptions
- All operations in this manual assume that the camera and receiver are connected and the camera power switch is set to
● Windows is a trademark or registered trademark of Microsoft Corporation in the United States and other countries.
● Macintosh is a registered trademark of Apple Inc. in the United States and other countries.
- Google™, Google Maps™, and Google Earth™ are trademarks of Google Inc.
- Map Utility uses Google Maps™ to display images and routes traveled on a map.
● All other corporate and brand names in this manual are trademarks or registered trademarks of their respective owners.
Safety Precautions
The following precautions are intended to prevent harm to you and others as well as damage to equipment. Become familiar with the precautions before using the receiver to ensure correct and safe operation.

Warning
Preventing Serious Injury or Death
- To prevent fire, excessive heat, chemical leakage, or explosion, follow these safety guidelines.
- Do not insert metallic objects between the receiver's electrical contacts.
- Keep the accessories away from children. In case of accidental ingestion, consult a physician immediately.
- In case of excessive heat, smoke, or fumes, immediately remove the batteries, being careful to avoid burns. Continued use in this state may cause fire or burns.
- Do not operate the receiver while driving. This poses a risk of traffic accidents.
- Do not use the receiver where there is flammable gas. There is a risk of explosion or fire.
- If the receiver is dropped and internal parts are exposed, do not touch the exposed parts. There is a risk of electrical shock.
- Do not disassemble or modify the receiver. High-voltage internal parts may cause electrical shock.
- Do not store the receiver in dusty or humid places. There is a risk of fire or electrical shock.
- Before using the receiver on board airplanes or in hospitals, make sure use is permitted. Electromagnetic waves emitted by the receiver may interfere with instrumentation or medical equipment.

Caution
Preventing Injury or Equipment Damage
- Do not leave the receiver inside a vehicle in hot weather or near a heat source. The receiver may become hot and cause burns if touched.
- Do not use the receiver when it is covered by or wrapped in a cloth. This may trap heat inside, posing a risk of case deformation or fire.
- Do not use paint thinner, benzene, or other organic solvents to clean the receiver. This poses a risk of fire and may be hazardous to your health.
- If you drop the receiver in water, or if water or metal objects get inside, immediately remove the batteries. This poses a risk of fire or electric shock.
If the unit malfunctions, becomes damaged, or requires repair, contact your dealer or a Canon Service Center.
Handling Precautions
Handle the receiver in accordance with “Handling Precautions: Camera Care” in the camera instruction manual.
text_image
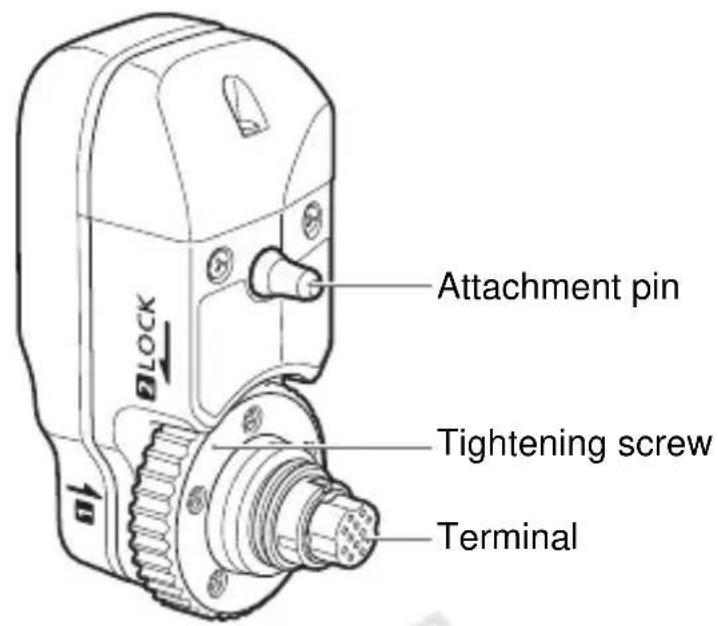
Attachment pin Tightening screw TerminalStorage Case
natural_image
Line drawing of a closed book with a strap and spout (no text or symbols)EOS-1D X Rear LCD Panel
text_image
GPS device connection 1 LMS123 MS RAW 2 LMS123 MS RAW GPS SDFHD 888:8888Attaching and Detaching the Receiver
Turn off the camera before attaching the receiver. The receiver is powered by the camera.
text_image
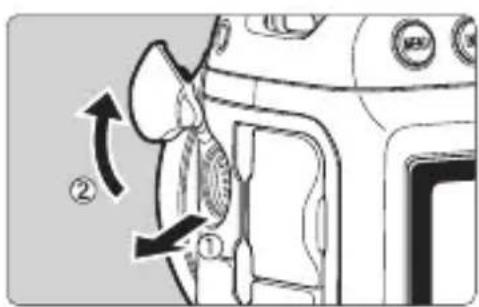
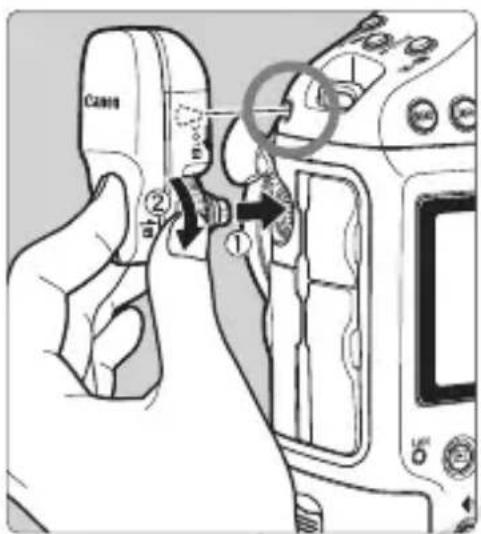
Diagram showing car door and air vent with numbered arrows indicating directional movement or component labels1 Open the terminal cover on the camera.
- Pull out the extension system terminal cover and rotate it toward the front.
text_image
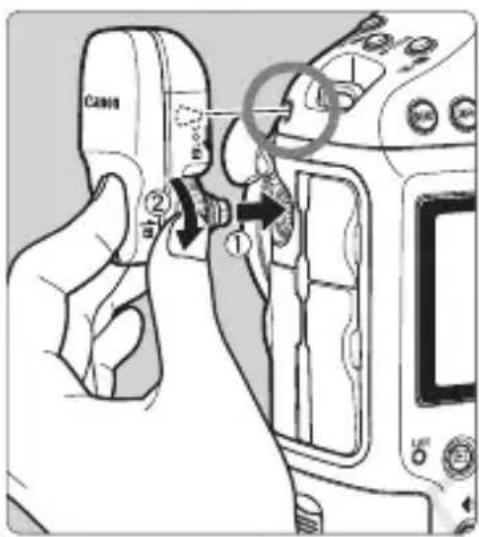
Canon ① ② ③2 Attach the receiver.
- Align the receiver terminal and attachment pin with the corresponding camera terminal and hole.
- Push the terminal firmly into the camera.
- As you push the terminal into the camera with your left index finger, attach the receiver securely by turning the tightening screw until it stops rotating.
Detaching
- Turn off the camera.
- Loosen the tightening screw until it spins freely.
- Pull the terminal out of the camera.

Always make sure to turn the camera off before attaching or detaching the receiver.
Acquiring GPS Signals
To acquire GPS signals, bring your camera with the receiver attached outdoors where the sky is unobstructed and aim it up. Keep your hand or other objects off the top of the receiver.
text_image
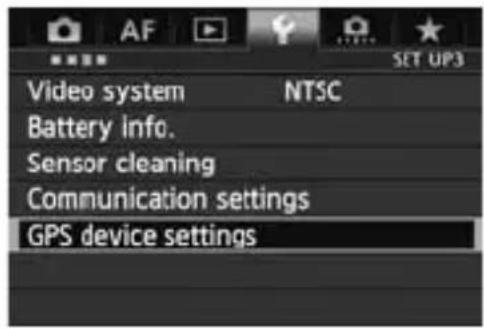
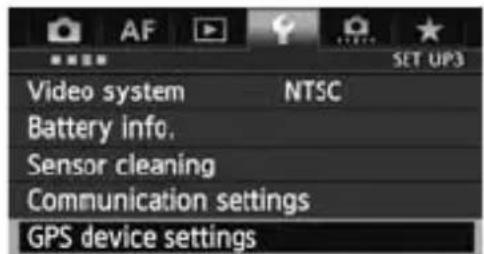
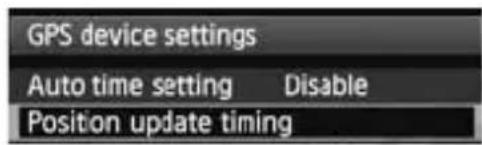
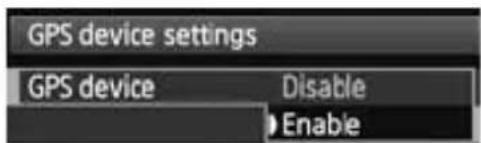
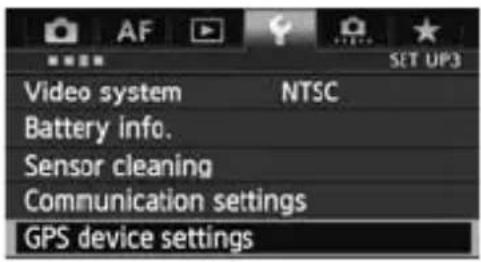
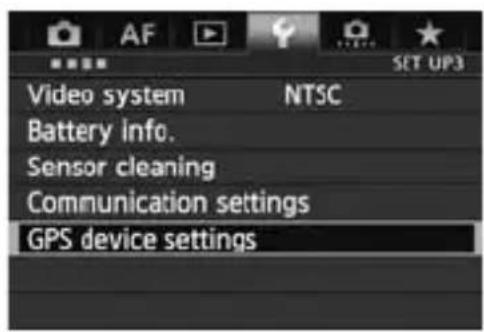
Video system NTSC Battery info. Sensor cleaning Communication settings GPS device settings1 Select [GPS device settings].
![CANON GP-E1 - Select [GPS device settings]. - 1](/content/2026/06/1237700/images/cfd2a77de173ffe2a886bc45ab7aae276d78a0207f58f61fec1ceac3307b9876.jpg)
text_image
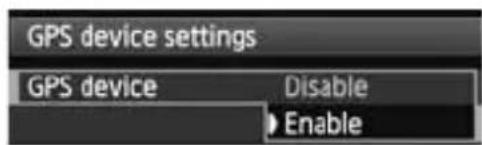
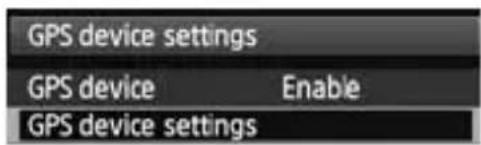
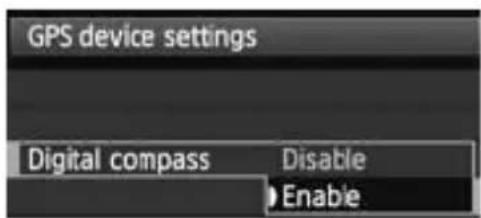
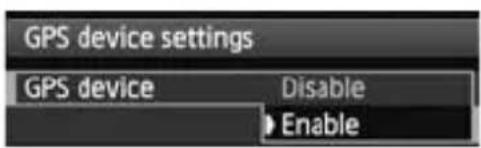
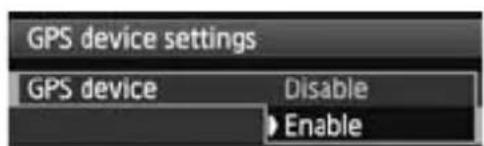
GPS device settings GPS device Disable EnableSet [GPS device] to [Enable].
- If the [Calibrate digital compass] screen is displayed, follow steps 6 – 7 on p.16.
3 Close the menu.
- Press the
- Signal acquisition takes about 30 – 60 seconds under favorable conditions after you turn the camera on.
● After initial signal acquisition, signals can be reacquired soon after the camera is turned on again (under favorable conditions, and when the camera has been off for less than approx. 30 minutes).

Places with Poor GPS Coverage
Location information may not be recorded, or inaccurate information may be recorded where GPS signal coverage is poor, such as in the following places.
-
- Indoors, underground, in tunnels or forests, near buildings or in valleys
● Near high-voltage power lines or mobile phones operating on the 1.5 GHz band
- Indoors, underground, in tunnels or forests, near buildings or in valleys
- When traveling through different environments
- Even in other places, GPS satellite movement may interfere with geotagging and cause missing or inaccurate location information. The information may also indicate that the camera has been used in a different location, even if you were shooting at the same place.
Appended Information
- If shooting is performed immediately after turning on the camera's power switch (or resuming use after auto power off) when the receiver is attached to the camera, images may not be geotagged. Similarly, directions may not be recorded correctly. To avoid this, wait a moment before shooting.
Viewing GPS Information
text_image
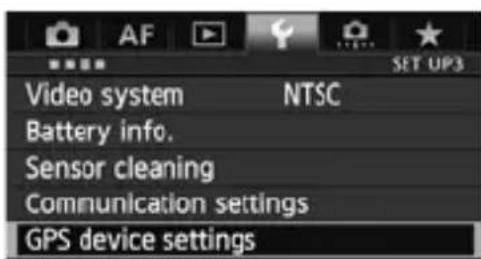
Video system NTSC Battery info. Sensor cleaning Communication settings GPS device settings1
Select [GPS device settings].
![CANON GP-E1 - Select [GPS device settings]. - 1](/content/2026/06/1237700/images/f1dde75d962aaa0776a45300a50b689a9a9b87d22e6578461091bb45d1b2712e.jpg)
text_image
GPS device settings GPS device Disable Enable2
Set [GPS device] to [Enable].
- If the [Calibrate digital compass] screen is displayed, follow steps 6 – 7 on p.16.
![CANON GP-E1 - Set [GPS device] to [Enable]. - 1](/content/2026/06/1237700/images/bd56a1b979ef64d4033e43ea42b8b021198912685a4b23e1762d81b26d14e075.jpg)
text_image
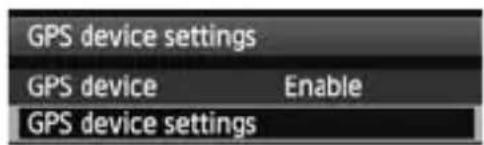
GPS device settings GPS device Enable GPS device settings![CANON GP-E1 - Set [GPS device] to [Enable]. - 2](/content/2026/06/1237700/images/debbb6053b484ee77fa56bd1c3351bbc98135c26291b61e2c99316c50a2ab7bc.jpg)
text_image
GPS device settings Auto time setting Disable Position update timing Digital compass Enable GPS information display Calibrate digital compass MENU ↕![CANON GP-E1 - Set [GPS device] to [Enable]. - 3](/content/2026/06/1237700/images/ba8a0ec7bb0c7a207d446501b0b7e0900c99eebdf423ebb4c7ed87fdccbcda52.jpg)
text_image
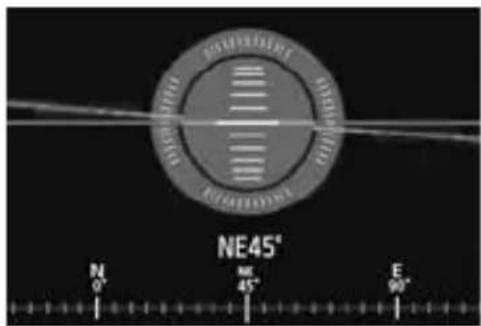
North 0° NW NE W E 3S East 90° West 270° MS S South 180°3 Select [GPS device settings].
4 Select [GPS information display].
Detailed GPS information is displayed.
![CANON GP-E1 - Select [GPS information display]. - 1](/content/2026/06/1237700/images/c3915cf783c4b8bdb7f2ca096db3a1019ee50e14b2975c743cdc5e7416bed8fe.jpg)
text_image
GPS information display Latitude N30°30'30.0" Longitude W30°30'30.0" Elevation 50m Direction NE 45" UTC 01/11/2012 13:30:30 Satellite reception 3D- In this sample screenshot, [Direction: NE 45°] indicates that the camera was facing 45° northeast. [UTC] (Coordinated Universal Time) is essentially the same as Greenwich Mean Time.
The icon <> indicates signal conditions. When <3D> is displayed, elevation can also be recorded. However, elevation cannot be recorded when <2D> is displayed.
5 Take a picture.
Shots taken after GPS signal acquisition are geotagged.
Geotagging Information
text_image
Direction Latitude Longitude Elevation UTC N35° 34'00.0" E139° 40'49.9" 21m NE41" 02/06/12 06:01:39
For movies, the GPS information acquired when movie shooting starts is recorded. Note that signal reception conditions are not recorded.
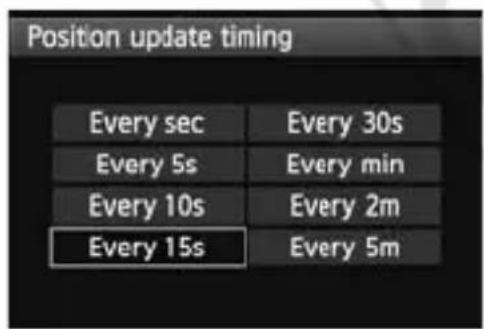
Setting the Positioning Interval
On the camera, you can specify the positioning interval. Shorter positioning intervals yield more accurate location information for your images. However, fewer shots can be taken per charge.
text_image
Video system NTSC Battery info. Sensor cleaning Communication settings GPS device settings1 Select [GPS device settings].
text_image
GPS device settings GPS device Disable Enable2 Set [GPS device] to [Enable].
text_image
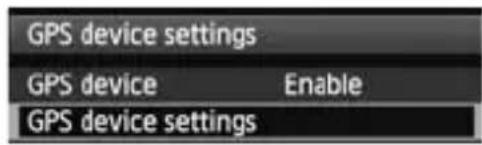
GPS device settings GPS device Enable GPS device settings3 Select [GPS device settings].
text_image
GPS device settings Auto time setting Disable Position update timing4 Select [Position update timing].
text_image
Position update timing Every sec Every 30s Every 5s Every min Every 10s Every 2m Every 15s Every 5m5 Select the time.
Estimated No. of Shots per Charge, by Positioning Interval (Viewfinder Shooting)
| Position Update Timing | Normal Temperature (23°C/73°F) | Low Temperature (0°C/32°F) |
| Every second Approx. | 790 shots Approx. 620 shots | |
| Every 15 sec. Approx. | 970 shots Approx. 740 shots | |
| Every 5 min. Approx. | 990 shots Approx. 760 shots |
*Fewer shots can be taken per charge in poor signal conditions.
*The nature of GPS may cause some inconsistency between positioning intervals.
Using the Digital Compass
You can tag images with the shooting direction.

text_image
Video system NTSC Battery info. Sensor cleaning Communication settings GPS device settings1 Select [GPS device settings].
text_image
GPS device settings GPS device Disable Enable2 Set [GPS device] to [Enable].
text_image
GPS device settings GPS device Enable GPS device settings3 Select [GPS device settings].
text_image
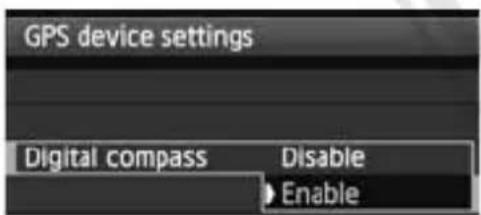
GPS device settings Digital compass Disable Enable4 Set [Digital compass] to [Enable].
- If the [Calibrate digital compass] screen is displayed, follow steps 6 – 7 on p.16.
Viewing the Compass when Shooting
You can see which direction the camera is facing as you shoot.
text_image
NE45° N O' ME 45° E 90°- To view the compass, press the
● The electronic level is also displayed at this time.
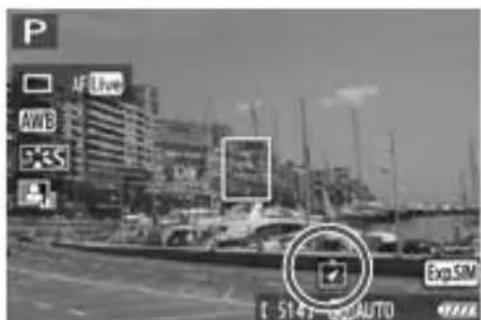
● The compass is also displayed in Live View or movie shooting.
text_image
P AF Live AWE +SS SAR 1:514 AUTO Exp SIMCalibrating the Digital Compass
text_image
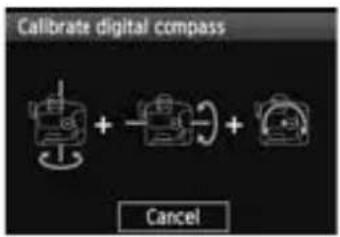
Calibrate digital compass + - + CancelCalibrate the compass as described here and on the next page at the shooting location, or if the screen at left is displayed during menu operations, or if the direction shown as you shoot seems incorrect.
text_image
Video system NTSC Battery info. Sensor cleaning Communication settings GPS device settings1 Select [GPS device settings].
text_image
GPS device settings GPS device Disable Enable2 Set [GPS device] to [Enable].

text_image
GPS device settings GPS device Enable GPS device settings3 Select [GPS device settings].
text_image
GPS device settings Digital compass Disable Enable4 Set [Digital compass] to [Enable].
text_image
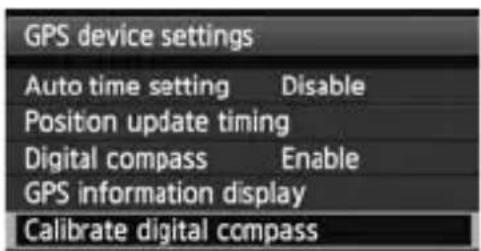
GPS device settings Auto time setting Disable Position update timing Digital compass Enable GPS information display Calibrate digital compass5 Select [Calibrate digital compass].
- Press < > to prepare for calibration.
- Move the camera as shown on the next page.

flowchart
graph TD
    A["1: Camera Setup"] --> B["2: Display"]
    B --> C["3: Packaging"]
6 Move the camera.
① Wave the camera laterally in at least a 180^ arc.
② Wave the camera up and down in at least a 180^ arc.
③ Rotate the camera in at least a 180^ arc as it faces the same direction.
- Be careful not to drop the camera during calibration.
- Steps①, ②, and ③ can be done in any order. Keep moving the camera until calibration is finished.
- If the compass is not calibrated after you do this, turn your body to the right or left and move the camera again.
text_image
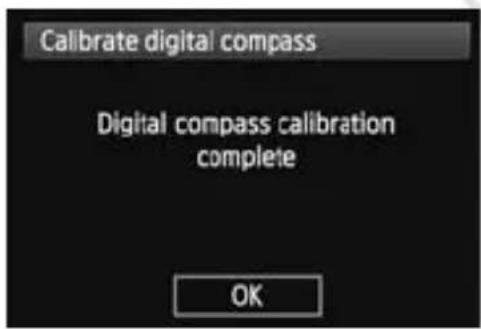
Calibrate digital compass Digital compass calibration complete OK7 Finish calibration.
● A screen indicating completion is displayed when calibration is finished.
Although this screen may be displayed while you are still moving the camera in a direction of step 6 (①, ②, or ③), calibration has been finished successfully.

- For safety, remove the lens and other accessories before calibration.
- As the digital compass uses geomagnetism, calibration may not be possible under the following conditions: at high altitudes, near magnetic fields, in steel-structure buildings, underground, etc. Even if calibration is possible, the receiver may not be able to detect the shooting direction correctly.
Setting Time from GPS on the Camera
The camera time can be set using GPS signals. The margin of error is approx. ±0.02 second.
text_image
Video system NTSC Battery info. Sensor cleaning Communication settings GPS device settings1 Select [GPS device settings].
text_image
GPS device settings GPS device Disable Enable2 Set [GPS device] to [Enable].
text_image
GPS device settings GPS device Enable GPS device settings3 Select [GPS device settings].
text_image
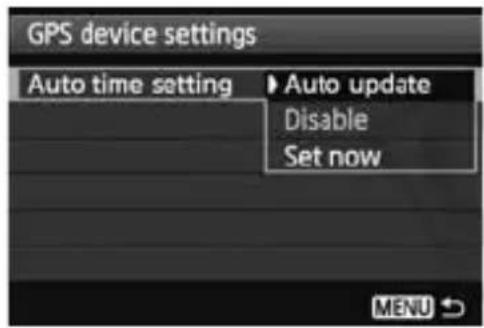
GPS device settings Auto time setting ► Auto update Disable Set now MENU ↻4 Select [Auto time setting].
- Select an option and press < > .
- [Auto update] updates the time after the camera is turned on and a GPS signal is received.

- If the GPS signal cannot be received from five or more satellites, time setting is not possible. [Set now] will be unavailable.
- Even if [Set now] is selected, auto time adjustment may not be possible, depending on the timing of GPS signal acquisition.
- When [Auto time setting] is set to [Auto update], the date and time cannot be set manually using [Date/Time/Zone] in the menu.
- If you prefer not to change the time (when using [Sync time between cameras] with WFT series, for example), select [Auto time setting: Disable].
GPS Precautions
Keep the following points in mind when using the receiver.
- In certain countries and regions, the use of GPS may be restricted. Therefore, be sure to use GPS in accordance with the laws and regulations of your country or region. Be particularly careful when using GPS outside your home country.
- Be careful about using GPS functions where the operation of electronic devices is restricted.
- Others may be able to locate or identify you by using location data in your geotagged pictures or movies. Be careful when sharing these images with others, as when posting them online where many others can view them.
● ● GPS signal reception may take some time.
● Never leave the receiver near any equipment that generates a strong magnetic field, such as magnets or electric motors.
Provided Software
Software on the provided solution disc is described below, with installation instructions.

text_image
Canon © Canon Isten Kit (ISO) (ISO) (ISO)GPS Receiver Solution Disk
Includes receiver software and the instruction manual.
Map Utility
This software uses location information recorded by the receiver to show shooting locations and the shooting direction on a virtual map.
ImageBrowser EX
This software can update Map Utility.
For information on other features, refer to the ImageBrowser EX instruction manual (provided as a PDF).

ImageBrowser EX must be installed to use Map Utility.
Installing the Software

Follow these steps even if an older version of the software is already installed. (The previous version will be overwritten, as needed.)
1 Insert the GPS Receiver Solution Disk in the computer.
2 Double-click the CD-ROM icon.
- Windows: This icon is displayed in [Computer] or [My Computer].
● Macintosh: This icon is displayed on the desktop.
3 Double-click [Set up.exe].
4Click [Easy Installation] and follow the on-screen instructions to complete the installation process.
- If install screen for “Microsoft Silverlight” is displayed during installation, install “Microsoft Silverlight”.
5 Click [Finish], and then remove the disc.
● ● Installation is now finished.
Copying and Viewing the PDF Instruction Manual
1 Insert the GPS Receiver Solution Disk in the computer.
2 Double-click the CD-ROM icon.
- Windows: This icon is displayed in [Computer] or [My Computer].
● Macintosh: This icon is displayed on the desktop.
3 Double-click the [Manual] folder to open it.
4 Copy the [English] folder to a convenient location on your computer.
● The following PDF instruction manuals are copied.
Windows Macintosh
| Map Utility MUx.xW_E_xx | MUx.xM_E_xx | |
| ImageBrowser EX IBXxx_E_xx | ||
5 Double-click a copied PDF file.
- Viewing the manuals requires Adobe Reader (latest version recommended) to be installed on your computer.
- Adobe Reader can be downloaded free from the Internet.
Compatible camera EOS-1D X
Geotagging images Tags images as shots are taken
Latitude, longitude, elevation, direction, shooting time (UTC), and signal status
Reception frequency 1575.42 MHz (L1 band)
Position update timing Every 1, 5, 10, 15, or 30 seconds, or every 1, 2, or 5 minutes
Time adjustment Camera time can be set from GPS time data
Digital compass Triaxial geomagnetic sensor and triaxial acceleration sensor used to calculate direction
Power supply Powered by the camera
Shots per battery charge
| Position Update Timing | Normal Temperature (23°C/73°F) | Low Temperature (0°C/32°F) |
| Every second Approx. 790 shots Approx. 620 shots | ||
| Every 15 sec. Approx. 970 shots Approx. 740 shots | ||
| Every 5 min. Approx. 990 shots Approx. 760 shots | ||
*When shooting through the viewfinder
*Based on CIPA standards
Dimensions Approx. 24.7 x 57.0 x 35.7 mm / 0.97 x 2.24 x 1.41 in. (W x H x D)
Weight Approx. 44 g / 1.55 oz.
*According to CIPA guidelines
Operating temperature 0^ C to +45^ C / 32^ F to 113^ F
Operating humidity 85% or less
Provided software ImageBrowser EX, Map Utility for GP-E1
● All information in this manual is based on Canon testing standards.
● Receiver specifications and appearance are subject to change without notice.
MEMO
Canon
The cameras and accessories referred to in this Instructions booklet are current as of February 2012. For information on compatibility with the cameras and accessories marketed after this date, contact your nearest Canon Service Center.
RÉCEPTEUR GPS
GP-E1
Français
Introduction
text_image
Screenshot of a map editing software interface showing location grid and navigation controls
natural_image
Simple diagram of concentric circles with no text or symbolsGPS Receiver Solution Disk
natural_image
Line drawing of a closed book with a strap and spout (no text or symbols)text_image
Diagram showing car door and camera seat components with numbered arrows indicating directional movement or adjustment.text_image
Canon © Canon Isten Kit (ISO) (ISO) (ISO)GPS Receiver Solution Disk
text_image
Screenshot of a GIS or GIS software interface displaying a map with labeled locations and grid coordinates.
natural_image
Simple diagram of concentric circles with no text or symbolsGPS Receiver Solution Disk
Kartendaten ©2012 ZENRIN -
Inhalt
Einführung 2
Funktionen.... 2
natural_image
Line drawing of a closed book with two spines and a handle, no text or symbols presenttext_image
Diagram showing a car interior with labeled parts and directional arrows indicating movement or change.text_image
Cann ① ② ③text_image
Nord 0° West 270° NW W W RS S E 3S Ost 90° Süd 180°flowchart
graph TD
    A["1: Camera Setup"] --> B["2: Display"]
    B --> C["3: Equipment Setup"]
GPS Receiver Solution Disk
text_image
Screenshot of a GIS site management interface showing a grayscale map with location markers and control panels.
natural_image
Simple diagram of concentric circles with no text or symbolsGPS Receiver Solution Disk
Map data ©2012 ZENRIN -
Indice
Introduzione.... 2
Funzioni.... 2
natural_image
Line drawing of a rectangular object with a looped handle and attached connectors (no text or symbols)Pannello LCD posteriore EOS-1D X
text_image
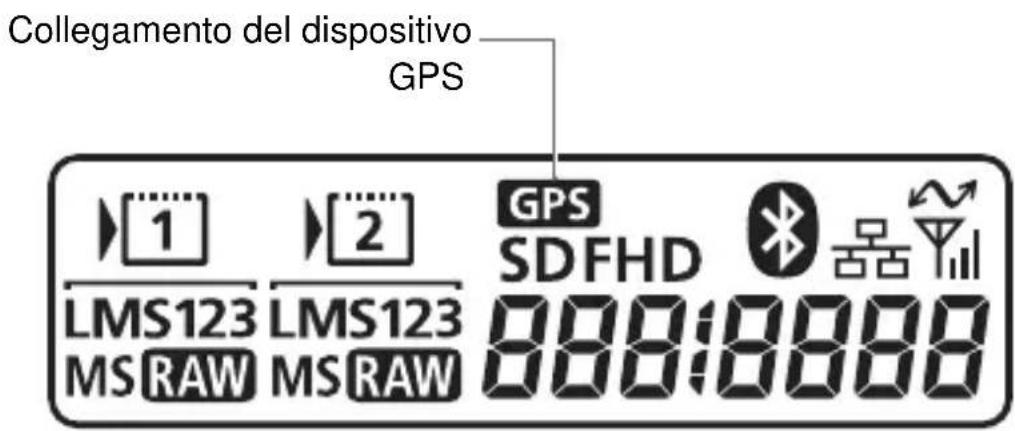
Collegamento del dispositivo GPS 1 LMS123 MS RAW 2 LMS123 MS RAW GPS SDFHD 888:8888text_image
Diagram showing a car's front panel with labeled parts and directional arrows indicating movement or adjustment.text_image
Canon © Canon Isten Kit (ISO) (ISO) (ISO)GPS Receiver Solution Disk
text_image
Screenshot of a GIS or GIS software interface displaying a map with labeled regions and data panels.
natural_image
Simple diagram of concentric circles with no text or symbolsDisco GPS Receiver Solution Disk
natural_image
Line drawing of a rectangular object with a looped handle and attached connectors (no text or symbols)text_image
Diagram showing car door and air vent with numbered arrows indicating directional movement or component labelstext_image
Canon ① ② ③Monte el receptor.
text_image
Canon © Canon Isten Kit (ISO) (ISO) (ISO)Disco GPS Receiver Solution Disk
1575,42 MHz (banda L1)
natural_image
Simple diagram of a circular ring with concentric rings (no text or symbols)GPS Receiver Solution Disk
Map data ©2012 ZENRIN -
Inhoud
Inleiding 2
Kenmerken 2
natural_image
Line drawing of a rectangular object with a looped handle and attached connectors (no text or symbols)text_image
Diagram showing a car interior with labeled parts and directional arrows indicating movement or change.text_image
Noord 0° West 270° W N NW ME E Oost 90° S Zuid 180°3 Selecteer [Instellingen GPS-systeem].
4 Selecteer [GPS-informatiedisplay].
flowchart
graph TD
    A["1: Camera Setup"] --> B["2: Display Setup"]
    B --> C["3: Device Setup"]
6 Beweeg de camera.
text_image
Canon © Canon Isten Kit (ISO) (ISO) (ISO)GPS Receiver Solution Disk
text_image
Screenshot of a map editing software interface showing a map with labeled locations and grid coordinates.
natural_image
Simple diagram of concentric circles with no text or symbolsGPS Receiver Solution Disk
natural_image
Line drawing of a closed bag with handles and a small attached clip (no text or symbols)text_image
Diagram of a car door with labeled parts and directional arrows indicating movement or adjustment.text_image
P AF Live AWB S EXP SIM (514) AUTOflowchart
graph TD
    A["1: Camera Setup"] --> B["2: Display Setup"]
    B --> C["3: Equipment Setup"]
GPS Receiver Solution Disk
text_image
Screenshot of a Chinese GIS or map editing software interface showing geographic coordinates and navigation controls.
natural_image
Simple diagram of concentric circles with no text or symbolsGPS Receiver Solution Disk
地图数据 ©2012 ZENRIN -
内容
介绍.... 2
功能.... 2
本说明书中使用的说明方法 5
安全注意事项 6
部件名称 7
安装和卸下接收器 8
获取 GPS 信号....9
设定定位间隔 13
使用数字罗盘 14
从 GPS 设定相机上的时间 17
GPS 的注意事项 18
随机提供的软件.... 19
规格.... 22
本说明书中使用的说明方法
符号的含义

:指示避免拍摄问题的警告。

:附加信息。
(第**页):提供更多信息的参考页码。
natural_image
Simple line drawing of a rectangular object with handles and a curved band, no text or symbols present.EOS-1D X机背液晶显示屏
text_image
GPS设备连接 1 LMS123 MS RAW 2 LMS123 MS RAW GPS SDFHD 888:8888安装和卸下接收器
text_image
Diagram showing a camera interior with labeled parts and directional arrows indicating motion or movement.1 打开相机上的端子盖。
● 拉起系统扩充端子盖并将其朝前旋转。
text_image
CAMI2 安装接收器。
text_image
Canon on Canadian Open (Open) (Open) (Open)GPS Receiver Solution Disk
包括接收器软件和使用说明书。
Map Utility
30-2, Shimomaruko 3-chome, Ohta-ku, Tokyo 146-8501, Japan
CANON EUROPA N.V.
Bovenkerkerweg 59, 1185 XB Amstelveen, The Netherlands
修订日期:2014.05.01
© CANON INC. 2014CPA-M040-003
