
Speedlite ST-E2 - Photo Accessories CANON - Free user manual and instructions
Find the device manual for free Speedlite ST-E2 CANON in PDF.


| Product Type | Wireless Flash Transmitter |
| Brand | Canon |
| Model | Speedlite ST-E2 |
| Compatibility | Canon E-TTL / E-TTL II Speedlites (EX-series) |
| Wireless Control Channels | 3 groups (A, B, C) with 4 channels |
| Wireless Range | Approx. 15 meters (50 ft) indoors |
| Dimensions (W x H x D) | 66 x 56 x 28 mm (2.6 x 2.2 x 1.1 in) |
| Weight (without batteries) | Approx. 70 g (2.5 oz) |
| Power Source | Two CR123A lithium batteries (3V each) |
| Battery Life | Up to 2 years typical use (standby) |
| Flash Exposure Lock (FEL) | Yes, via test button |
| Sync Terminal | None (wireless only) |
| Hot Shoe | Standard Canon hot shoe (mounts on camera) |
| Indicator Lights | Red LED for transmission, green for power |
| Operating Temperature | 0°C to 40°C (32°F to 104°F) |
| Cleaning Instructions | Wipe with a soft, dry cloth; avoid liquids |
| Storage Temperature | -20°C to 60°C (-4°F to 140°F) |
| Safety Warnings | Do not disassemble; keep dry; use only specified batteries |
| Spare Parts Availability | Battery cover, hot shoe adapter (Canon service centers) |
| Repair Information | Refer to authorized Canon service providers |
| Warranty | 1 year limited (varies by region) |
Frequently Asked Questions - Speedlite ST-E2 CANON
User questions about Speedlite ST-E2 CANON
0 question about this device. Answer the ones you know or ask your own.
Ask a new question about this device
Download the instructions for your Photo Accessories in PDF format for free! Find your manual Speedlite ST-E2 - CANON and take your electronic device back in hand. On this page are published all the documents necessary for the use of your device. Speedlite ST-E2 by CANON.
USER MANUAL Speedlite ST-E2 CANON
J 使用說明書 E Instructions F Mode d'emploi G Bedienungsanleitung s Instrucciones
Thank you for purchasing a Canon product.
Speedlite Transmitter ST-E2 is a wireless transmitter which can control up to two Speedlite 550EX groups set as slaves.
The transmitting range is about 12 to 15 meters / 39.4 to 49.2 ft indoors and 8 to 10 meters / 26.2 to 32.8 ft outdoors. With Type A cameras (EOS-3, EOS Elan II/IIE, EOS 50/50E, EOS 500N/Rebel G, EOS IX. EOS IX7/IX Lite), the ST-E2 can execute the following operations through wireless control:
• E-TTL autoflash • High-speed sync (FP flash) • FE lock
Flash exposure compensation
- Manual flash (Flash output set with Speedlite)
- Multi-flash firing (Set with the Speedlites)
With the EOS-3, the following operations are also possible: Flash ratio control between two Speedlite slave groups, modeling flash firing; and linkage of AF-assist beam to area AF.
CE
The CE Mark is a Directive conformity mark of the European Community (EC).
This Instructions booklet assumes that a Type A camera is used with the ST-E2.
With Type B cameras (EOS cameras except Type A models), the ST-E2 can be used only for manual flash and multi-flash photography. See pages 23 to 27 in this booklet and the Speedlite 550EX Instructions.
Symbols used in this Instructions booklet:
Warning for preventing camera or ST-E2 malfunction. : Supplementary notes for using the ST-E2 with the camera. Helpful tip for using the ST-E2 and taking pictures. - Keep this Instructions booklet handy for future reference.
This digital apparatus does not exceed the Class B limits for radio noise emissions from digital apparatus as set out in the interference-causing equipment standard entitled "Digital Apparatus", ICES-003 of the Industry Canada.
Contents
- Nomenclature .....22
- Readying the ST-E2....23
- Readying the 550EX (Slave Setting)....25
- Basic Wireless E-TTL Autoflash Operation....26
- Wireless Multi-Flash E-TTL Autoflash Operation 29
- Applications 33
- Troubleshooting 34
Specifications....35
Note
All the operation instructions in this booklet assume that the ST-E2 and other relevant equipment are already turned on. Before proceeding, make sure the ST-E2 and other equipment are on.
This device complies with Part 15 of the FCC Rules. Operation is subject to the following two conditions: (1) This device may not cause harmful interference, and (2) this device must accept any interference received, including interference that may cause undesired operation.
Do not make any changes or modifications to the equipment unless otherwise specified in the instructions. If such changes or modifications should be made, you could be required to stop operation of the equipment.
This equipment has been tested and found to comply with the limits for a class B digital device, pursuant to part 15 of the FCC Rules. These limits are designed to provide reasonable protection against harmful interference in a residential installation. This equipment generates, uses and can radiate radio frequency energy and, if not installed and used in accordance with the instructions, may cause harmful interference to radio communications.
However, there is no guarantee that interference will not occur in a particular installation. If this equipment does cause harmful interference to radio or television reception, which can be determined by turning the equipment off and on, the user is encouraged to try to correct the interference by one or more of the following measures:
• Reorient or relocate the receiving antenna. • Increase the separation between the equipment and receiver. • Consult the dealer or an experienced radio/TV technician for help.
1. Nomenclature
- Front

- Rear
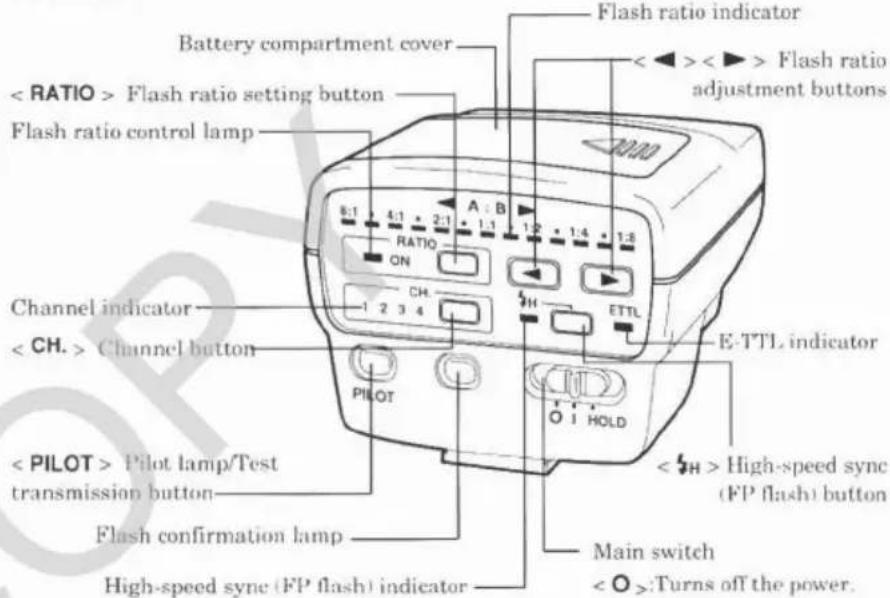
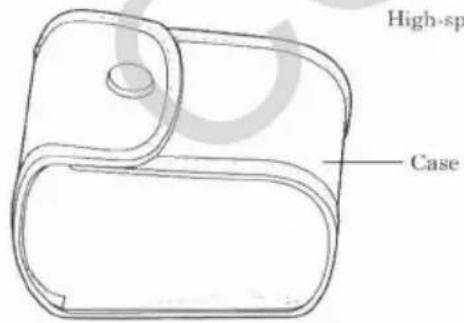
< O>: Turns off the power. < I>: Turns on the power. < HOLD>: Retains the current settings while the switch position is 1. All transmitter controls except the test transmission button are disabled.
2. Readying the ST-E2
(1) Installing the Battery

Use one lithium 2CR5 battery (sold separately).
1. Slide the battery compartment cover as shown by the arrow and remove. 2. Install the battery in the orientation shown in the compartment. 3. Install the battery compartment cover to close the battery compartment.
About the battery If the battery contacts are soiled, improper electrical contact may result. Before installing the battery, wipe the battery contacts with a clean cloth.
When to replace the battery Replace the battery if it takes 30 sec. or longer for the red pilot lamp to light after you set the main switch to or .
(2) Attachment to the Camera

1. Push in the ST-E2's mounting foot all the way into the camera's hot shoe.
2. Slide the shoe lock slider as shown by the arrow. (The lock pin protrudes to lock the ST-E2 onto the camera.)
- To remove the ST-E2, slide the shoe lock slider in the opposite direction (the lock pin retracts) and slide off the ST-E2.

The hot shoe on the EOS 650, EOS 620, EOS 750, and EOS 850 will not couple with the lock pin. The ST-E2 can still be attached to these cameras, but it cannot be locked onto the hot shoe.
(3) Turning On the Power

1. Turn the main switch to . - The main switch has the following three positions: : Turns off the power. : Turns on the power. : The settings which were set at the I switch position are frozen. All transmitter controls except the test transmission button are disabled. This prevents inadvertent alteration of transmitter settings.
2. When transmission is possible, the pilot lamp lights in red and the 5 icon lights in the camera viewfinder.

When the 5 icon lights in the camera viewfinder, it indicates that the ST-E2 is able to transmit. When Speedlite 550EX is recharged and ready to fire, its AF-assist beam emitter blinks.
- If the ST-E2 is on and not used for 90 sec., the SE (Save Energy) feature takes effect and turns off the power automatically to save battery power. The ST-E2 turns back on when the shutter button or test transmission button is pressed.
- With a Type A camera (EOS-3, EOS Elan II/IIE, EOS 50/50E, EOS 500N/Rebel G, EOS IX, EOS IX7/IX Lite) equipped with E-TTL, the ST-E2's E-TTL indicator lights.
3. Readying the 550EX (Slave Setting)
(4) Channel Setting
To prevent wireless signals from being transmitted to unrelated Speedlite 550EX units in the vicinity, you can set a channel different from the one used by the unrelated Speedlite 550EX units. One of four channels can be set. The ST-E2 (master) and slave Speedlite(s) must be set to the same channel No.
Press the button and select the desired channel.
• Each time the button is pressed the channel indicator changes in the following loop: 1 → 2 → 3 → 4 → 1 • The ST-E2 and Speedlite 550EX must be set to the same channel No.
(1) Slave setting/Power on
1. Set the wireless selector to . Hereinafter, a Speedlite 550EX set to this mode will be called a "slave."
- The zoom setting is set automatically to 24mm. This can be overridden manually.
2 Set the slave's main switch to or to turn it on.
- When the Speedlite is ready to fire, the AF assist beam emitter blinks continuously at 1 Hz.
(2) Channel setting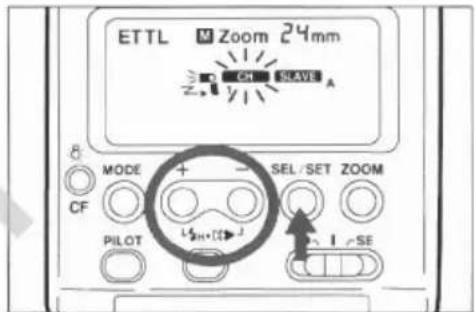
1 Each time you press the button, the blinking display changes in the following loop:

2 While CH is blinking, press the <+ > or <- > button to select the same channel No. as the ST-E2's.
If the 550EX's channel No. is different from the ST-E2's channel No., wireless transmission will not work.
4. Basic Wireless E-TTL Autoflash Operation
3 Press the button to register the channel No. (the display stops blinking and stays on).
After the ST-E2 and slave are ready, they can work within the area shown below for easy wireless E-TTL autoflash.
- For explanatory purposes, the EOS-3 will be used as the sample camera here.
(1) Positioning of ST-E2 and slave
- Attach the slave to the mini stand (equipped with tripod socket) which comes with the 550EX.
- Turn the Speedlite's body (bounce feature) so that the slave sensor faces toward the ST-E2.
- Indoors, the slave position need not be so precise since the light will also bounce off the walls. • After positioning the camera and slaves, be sure to test the wireless control before taking a picture.
- Do not place any obstructions between the ST-EP and slaves. Otherwise, remote transmission may not be achieved.

(2) Camera operation
Set the camera for normal flash operation.

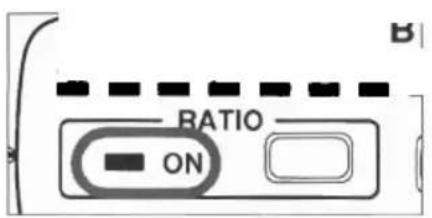
With the EOS-3, make sure the ST-E2's flash ratio control lamp is off. (If necessary, press the button to turn it off.) If the flash ratio control lamp is on, the Speedlite may not fire or a correct exposure may not be attained. After turning off the flash ratio control lamp, set the main switch to prevent the flash ratio control lamp from lighting inadvertently.
(3) Checking the ST-E2's pilot lamp and slave-ready status

Check that the ST-E2's pilot lamp is on and that the slave is ready.
- When the slave is ready to fire, its AF-assist beam emitter flashes at 1 Hz.
(4) Wireless operation test
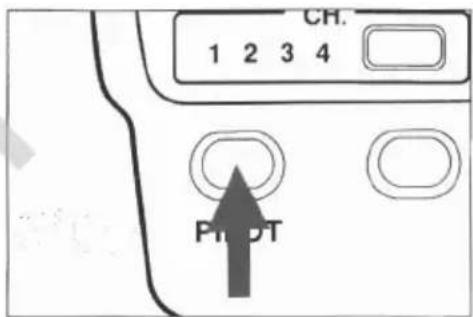
Press the ST-E2's pilot lamp (which also functions as a test transmission button).
- If everything is OK, slave A will fire followed by slave B (at 1/64 output).
- If the slave(s) does not fire, reposition the slave's angle or distance toward the ST-E2 and test it again.

When the ST-E2's pilot lamp lights and the 4 icon lights in the camera viewfinder, they indicate that the ST-E2 is ready for remote transmission. They do not indicate that the slave is ready (recharged).
(5) Taking the picture and flash confirmation

When you press the shutter button completely, a wireless signal is transmitted to the slave, then the slave fires a preflash and then the main flash when the picture is taken.
- The subject's flash exposure reading is obtained with the preflash and used to set the main flash output. Wireless flash photography is thereby executed with an optimum flash output.
- When the correct flash exposure is obtained, the ST-E2's flash confirmation lamp lights for about 3 sec. immediately after the flash fires. If it does not light, the picture might be underexposed. In this case, use a larger aperture or place the slave
closer to the subject and repeat steps (2) to (5).

- With the EOS-3, the modeling flash can be fired to see the lighting effects before the picture is taken. See page 32. • The slave must be properly positioned to receive the wireless transmission. • After the picture is taken, the slave's operation result is displayed on the slave's display panel.
- If the slave is in the SE (Save Energy) mode, pressing the ST-E2's test transmission button will cancel it.
- When you press the shutter button halfway and activate the camera's exposure meter, the ST-E2 cannot be used to cancel the slave's SE mode or to execute a test transmission. The camera's exposure meter must turn off (viewfinder's exposure setting display turns off) before the SE mode can be canceled or a test transmission executed.
- AF-assist beam
Under low-light or low-contrast conditions, the ST-E2's AF-assist beam is emitted to assist autofocusing. The AF-assist beam is compatible with the EOS-3's Area AF. The AF-assist beam's effective range is about 0.6 meter to 10 meters at the center and 0.6 meter to 5 meters along the periphery.
- The ST-E2's AF-assist beam can be emitted only while the ST-E2 is attached to the EOS-3. In the case of EOS cameras with a built-in AF-assist beam emitter, the beam will be emitted by the camera.
- The slave's AF-assist beam is not emitted (except when the flash is ready).
To prevent overheating, limit the number of consecutive wireless transmissions to 50. After 50 consecutive wireless transmissions, allow the ST-E2 to rest for 10 minutes.
5. Wireless Multi-Flash E-TTL Autoflash Operation
There are two types of wireless multi-flash E-TTL autoflash operations:
① OFF: All slaves fire the same flash output.
② ON: Slaves are given an ID, either A or B. The flash ratio is then set for each ID.
- The flash ratio can be set only when the camera is an EOS-3.
- The flash ratio cannot be set with an EOS Elan II/IIE, EOS 50/50E, EOS Rebel G/500N, EOS IX or EOS IX7/IX Lite.

- By changing the distance between the subject and slaves, the lighting balance (flash ratio) can be changed accordingly.
- Two or more slaves can be used.
- With the EOS-3, a modeling flash can be fired to check the lighting effects before the picture is taken.
As an example, two slaves are used here, one positioned on the left and the other on the right of the subject.
Multi-Flash with a Uniform Flash Output
All the slaves set at the same channel fire at the same output controlled by E-TTL autoflash to obtain a correct exposure.
• The operation procedure is the same as with wireless E-TTL autoflash.

With the EOS-3, make sure the ST-E2's flash ratio control lamp is off. (If necessary, press the button to turn it off.) If the flash ratio control lamp is on, the Speedlite may not fire or a correct exposure may not be attained. After turning off the flash ratio control lamp, set the main switch to to prevent the flash ratio control lamp from lighting inadvertently.
Sample Multi-Flash Setup with Uniform Flash Output
In the sample flash setup shown below, the lighting on the left will be brighter than on the right of the subject.

Multi-Flash with Slave ID and Flash Ratio Settings
In the example shown for "Multi-Flash with a Uniform Flash Output," the lighting balance (flash ratio) was adjusted by placing the slaves at different distances to the subject. However, with "Multi-Flash with Slave ID and Flash Ratio Settings," the flash ratio can be adjusted without moving the slaves.
The flash ratio can be adjusted from 8:1 to 1 and from 1 to 1:8 in half-stop increments.
■ Sample Multi-Flash Setup with SlaveID and Flash Ratio Settings
(1) Setting the Slave ID
With wireless control of multiple slaves, you can set the flash ratio and specify the main flash and fill flash by assigning a slave ID. There are three IDs: A, B, and C. The controller can control slaves A and B. When the flash ratio control lamp is lit, the C slave does not fire.
Set the slave ID to A for the slave on the left of the camera, and to B for the slave on the right of the camera.
If the slave's ID is set to C, it cannot be controlled by
E2. Be sure to set the slave ID to A or B.
There is no limit as to the number of slaves that can be used. Set the slave ID for all the slaves to either A or B.
Press the slave's button to select
2 Press the + or - button to set the slave ID to
3 Press the button to register the slave ID. (The slave ID stops blinking and stays on.)
4 Follow the same procedure for the other slave to set the slave ID to
About Slave Group Control
All slaves set to the same ID are controlled as one group.
Shown below is a group of three slaves whose ID is A. They will be controlled as a single slave group A.
(2) Setting the A:B Flash Ratio
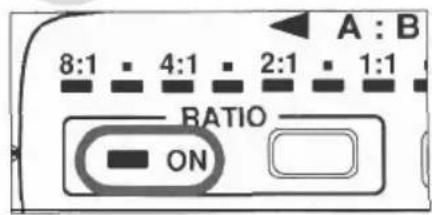
The flash ratio between slave A and slave B can be set to specify the main flash and fill flash. The flash ratio can be set from 8:1 to 1 and from 1 to 1:8 in half-stop increments. In terms of exposure stops, it ranges from 3:1 to 1 and from 1 to 1:3. When the flash ratio is set, E-TTL autoflash metering controls the flash output to obtain a correct exposure.

1 Check that the ST-E2's main switch is set to , then press the button.
• The flash ratio control lamp lights in red, and the respective flash ratio indicator lights.
The flash ratios for the unmarked indicators (■) are shown in parentheses below.
2 Press the <◀> or <▶> button to select the desired flash ratio.
If the main switch has been set to <1>, the buttons will not work. Set the main switch to .

(3) Camera and Slave Positions
Position the ST-E2-attached camera and the two slaves to obtain the desired lighting effect. See page 26.

The modeling flash can be fired to see the lighting effects before the picture is taken.
(4) Follow the basic procedure for wireless E-TTL autoflash exposure to take the picture. See page 26.
6. Applications
Even with a wireless multi-flash system, you can use high-speed sync (FP flash), FE lock, and flash exposure compensation in the same way as with a camera-attached 550EX.
● Wireless high-speed sync (FP flash)
● Wireless FE lock

After setting the wireless single or multi-flash setup, just set the ST-E2's high-speed sync button to <1/3 . This enables wireless high-speed sync. The slaves need not be touched at all.

After setting the wireless single- or multi-flash setup, just press the camera's button to enable wireless FE lock.
- Flash exposure compensation Flash exposure compensation can be set with the camera. Wireless manual flash Wireless manual flash can be fired by setting the slave to single-slave or manual flash
- Wireless repeating flash Wireless repeating flash can be used when the slave has been set to single-slave or repeating flash For details, see the 550EX's Instructions

The ST-E2 can transmit wireless signals only toward the front. Therefore, the slaves cannot be positioned behind the camera. Otherwise, they will not be able to pick up the ST-E2's wireless control signals. However, with Off-Camera Shoe Cord 2 (sold separately), the ST-E2 can be positioned away from the camera and face any direction for wireless transmission.
- Troubleshooting
| Problem | Probable Cause | Solution | Page |
| Soon after the power is turned on, the indicator lamp turns on' | If the power is turned on and the ST-E2 is not used for 90 sec., the power turns off automatically. | Either press the shutter button halfway or press the < PILOT > button. | 24 |
| Although the icon is lit in the viewfinder, the slave does not fire. | The icon in the viewfinder does not indicate flash ready. Rather, it indicates that the ST-E2 is able to transmit. | When the slave is ready to fire, its AF-assist beam emitter blinks | 27 |
| The flash picture came out undrexposed | The flash ratio control lamp was lit even though a multi-flash system with flash ratio settings was not used. | Turn off the flash ratio control lamp before taking the picture. | 29 |
| The subject is beyond the effective flash range. | Place the slave nearer to the subject or use a larger aperture (smaller Enumber). | 28 | |
| The slave does not fire even when the shutter is released. | The slave's channel does not match the ST-E2's channel. | Set thr slave to the samechannel as the ST-E2. | 25 |
| The slave to far away from the ST-E2. | Position the slave nearer to the ST-E2 and test the transmission before taking the picture. | 26 | |
| The slave on the side or hack of thr camera. | Use Off-Camera Shoe Cord 2 (sold separately) and point the ST-E2's transmitter toward the slave. | 33 | |
| The Speedlite's slave sensor is not properlypoint - ed at the ST-E2. | Use the 550EX's bounce feature to point its slave sensor toward the STEZ. | 26 | |
| The flash ratio has been set, but the slave ID has been set to C. | Set the slave ID to A or B. | 31 | |
| The ST-E2 does not emit the AF-assist beam. | The camera is not EOS-3. | If the EOS camera has a built-in AF-assist beam, the camera will rmit the beam instead of the ST-E2. | 28 |
| The slave's flash-ready indicator (blinking AF-assist beam) turns off. | The slave is in the SE mode. | Press the ST-E2's < PILOT > button to cancel the slave's SE mode. | 28 |
| The test transmission does not work. | You pressed the shutter button halfway and this activated the exposure meter | Make sure the metering display in the viewfinder is off Then test the transmission. | 28 |
| The flash ratio cannot be set. | The camera is not an EOS-3. | The flash ratio cannot he set with cameras other than the EOS3. | — |
| The ST-E2's main switch is set to < HOLD>. | Set the main switch to < I >. | 24 |
Specifications
| Type | 550EX-dedicated,clip-on Speedlite transmitter with direct contacts |
| Compatible Cameras | Type A EOS cameras (E-TTL atoflash) |
| Type B EOS canicras (Manual flash) | |
| Channels | 4 |
| Flash Ratio Control | For AR ratio 1 8 to 1:1lo 8:1, in half-step increments or 13 steps |
| High-Speed Sync (FP flash) | Enabled with high-speed sync mode 5#. |
| Slave Operation Confirmation | With trst transmission button.*Slave A fires followed by slave B at 1/64 output. |
| Flash Exposure Confirmation | 1 Beforeflash fires during FE lockAdequate flash exposure indicatrd by the 4 icon lit in the viewfinder.Insufficient flash exposure indicated bythe 5 icon blinking inthe viewfinder.2 After flash firesST-E2's flash confirmation lamp lights in green for 9 sec. |
| Wireless slave SE mode cancellation | Cancels when the test transmission button or FE lock button is pressed to turn on the slave unit |
| Wireless Transmission | Infrared pulse |
| Transmission Range | Indoors: Approx. 12 . 15 meters 139.4 . 49.2 ft Outdoors: Approx. 8 . 10 meters/26.2 . 32.8 ft |
| Transmission Coveragr | ±40' horizontal and ±30' vertical |
| Battery Life | Approx. 1,500 transmissions (At room temperature and with a newset of batteries) |
| AF-assist Beam | Compatible with EOS-3's45-point Area AF and 28mm and longer lens focal lengths |
| AF-assist Beam Effective Range | Approx. 0.6 to 10m / 2.0 to 33A at center. 0.6 to 5 m 12.0 to 16.5 ft along the periphery (in total darkness). |
| SE Feature | While the power switch is set to I or HOLD, the transmitter turns off automatically after about 90 sec. of non-use. |
| Power Source | 2CR2 lithium (6V) battery x 1 |
| Dimensions | 62 (W) ×51 (H) × 80 (D) mm12.4 (W) × 2.0 (H) × 3.1 (D) in |
| Weight | 100 g 13.5 oz (excluding battery) |
| Wireless Operation Differences with the 550EX | ||
| Wireless Operation | ST-E2 | 550EX (Master) |
| Flash ratio control | 2 groups A, B | 3 groups: A, B, C |
| FER | ○ | |
| Flash exposure compensation | Each slave is set manually. | Set with master. |
| Manual flash | ||
| Repeating flash | ||
- All data are based on Canon's Standard Test Method. Subject to change without notice.
Canon


- THANK YOU FOR PURCHASING A CANON PRODUCT
- CE
- CONTENTS
- NOTE
- NOMENCLATURE
- READYING THE ST-E2
- INSTALLING THE BATTERY
- ATTACHMENT TO THE CAMERA
- TURNING ON THE POWER
- READYING THE 550EX (SLAVE SETTING)
- BASIC WIRELESS E-TTL AUTOFLASH OPERATION
- POSITIONING OF ST-E2 AND SLAVE
- CAMERA OPERATION
- CHECKING THE ST-E2'S PILOT LAMP AND SLAVE-READY STATUS
- WIRELESS OPERATION TEST
- TAKING THE PICTURE AND FLASH CONFIRMATION
- AF-ASSIST BEAM
- WIRELESS MULTI-FLASH E-TTL AUTOFLASH OPERATION
- MULTI-FLASH WITH A UNIFORM FLASH OUTPUT
- SAMPLE MULTI-FLASH SETUP WITH UNIFORM FLASH OUTPUT
- MULTI-FLASH WITH SLAVE ID AND FLASH RATIO SETTINGS
- SETTING THE SLAVE ID
- ABOUT SLAVE GROUP CONTROL
- SETTING THE A:B FLASH RATIO
- CAMERA AND SLAVE POSITIONS
- APPLICATIONS
- CANON
Brand : CANON
Model : Speedlite ST-E2
Category : Photo Accessories