
Macro Ring Lite MR-14EX II - Photo Accessories CANON - Free user manual and instructions
Find the device manual for free Macro Ring Lite MR-14EX II CANON in PDF.


| Product type | Macro ring flash (Ring Lite) |
| Brand | Canon |
| Model | Macro Ring Lite MR-14EX II |
| Category | Photo accessory |
| Dimensions (W x D x H) | Approx. 136 x 116 x 44 mm |
| Weight | Approx. 320 g (with alkaline batteries) |
| Power supply | 4 AA batteries (LR6) or optional AC adapter |
| Number of flash tubes | 2 ring tubes (A and B) with independent control |
| Guide number (ISO 100) | 14 |
| Recycling time | Approx. 0.1 to 3.5 s (alkaline batteries) |
| Number of flashes per battery set | Approx. 100 to 700 (depending on power) |
| Flash modes | E-TTL II, manual, multi |
| Exposure compensation | ±3 stops in 1/3-stop increments |
| High-speed sync | Yes (with compatible cameras) |
| Modeling flash | Yes (with compatible cameras) |
| Lens mounting | 58 mm filter thread (adapters for other diameters) |
| Main functions | Shadowless macro lighting, separate control of two tubes, fill flash |
| Maintenance and cleaning | Clean with a soft, dry cloth. Avoid moisture and solvents. |
| Safety | Do not expose to water. Use recommended batteries. Turn off when not in use. |
| Spare parts and repairability | No user-serviceable parts. Have repairs done by a Canon authorized technician. |
| General information | Ring flash dedicated to macrophotography and close-up subjects. |
Frequently Asked Questions - Macro Ring Lite MR-14EX II CANON
User questions about Macro Ring Lite MR-14EX II CANON
0 question about this device. Answer the ones you know or ask your own.
Ask a new question about this device
Download the instructions for your Photo Accessories in PDF format for free! Find your manual Macro Ring Lite MR-14EX II - CANON and take your electronic device back in hand. On this page are published all the documents necessary for the use of your device. Macro Ring Lite MR-14EX II by CANON.
USER MANUAL Macro Ring Lite MR-14EX II CANON
MACRO RING LITE MR-14EX II

INSTRUCTION MANUAL
MODE D'EMPLOI
MACRO RING LITE MR-14EX II
Introduction
The Canon Macro Ring Lite MR-14EX II is a flash unit for shooting close-ups with Canon EOS cameras, compatible with E-TTL II/E-TTL/TTL autoflash systems.
- Read this instruction manual while also referring to your camera's instruction manual.
Before using the product, read this instruction manual and your camera's instruction manual to familiarize yourself with their operations.
Using the MR-14EX II with a Camera
Using with an EOS DIGITAL camera (Type-A camera)
You can use the MR-14EX II for easy macro flash shooting by autoflash control in the same way as a camera's built-in flash.
• Using with an EOS film camera
- Camera with an E-TTL II/E-TTL autoflash system (Type-A camera)
You can use the MR-14EX II for easy macro flash shooting by autoflash control in the same way as a camera's built-in flash.
- Camera with a TTL autoflash system (Type-B camera)
See page 76.
* This instruction manual assumes that the MR-14EX II is used with a Type-A camera.
Cautions when using continuous flash
Flashes will fire repeatedly in continuous shooting using a flash, multi-flash shooting, modeling flash, etc. Some people may experience seizures, etc. due to visual overstimulation from continuous flashes (including light reflected off brightly colored walls, etc.). Stop using flashes immediately if any symptoms emerge.
Item Check List
Before starting, check that all the following items are included with your MR-14EX II. If anything is missing, contact your dealer.

MR-14EX II

Lens Cap
(p.16)

Case
* Be careful not to lose any of the above items.
Conventions Used in this Manual
Icons in this Manual
: Indicates the Select dial.
● : Indicates the Set button.
♂4/♂6/♂8/ : Indicates that the respective function remains active for
10/16 4 sec., 6 sec., 8 sec., 10 sec., or 16 sec. after you let go of the button.
(p.**): Reference page numbers for more information.

: Warning to prevent shooting problems.

: Supplemental information.
☆: ☆ shown to the right of the page title indicates that the function is performed when the camera's shooting mode is set to
(Creative Zone mode).
Basic Assumptions
The operation procedures assume that both the camera and the MR-14EX II's power switches are set to
The icons used for buttons, dials and symbols in the text match the icons found on the camera and the MR-14EX II.
The operation procedures assume that the menu and Custom Functions of the camera, and the Custom Functions and Personal Functions of the MR-14EX II are at their default settings.
All figures are based on the use of four AA/LR6 alkaline batteries and Canon's testing standards.
The operation procedures assume that a macro lens is used.
Chapters
| Introduction | 2 |  | |
| 1 | Getting Started with Macro Flash ShootingPreparations for macro flash shooting and basic shooting | 13 |  |
| 2 | Setting Flash Functions with Camera OperationsSetting the flash functions from the camera's menu screen | 37 | [8GKS] |
| 3 | Wireless Multiple Flash ShootingWireless multiple flash shooting using additional receiver units with optical transmission | 43 |  |
| 4 | Customizing the MR-14EX IICustomizing with Custom Functions and Personal Functions | 57 |  |
| 5 | ReferenceSystem map, FAQ, use with a type-B camera | 67 |  |

Contents
Introduction 2
Item Check List.... 3
Conventions Used in this Manual.... 4
Chapters....5
Nomenclature....8
1 Getting Started with Macro Flash Shooting 13
Installing the Batteries.... 14
Attaching the Control Unit to the Camera 15
Attaching the Flash Unit to the Lens 16
Turning on the Power 18
Fully Automatic Flash Shooting.... 20
Using E-TTL II and E-TTL Autoflash by Shooting Mode 21
Effective Flash Range (Reference) 24
A:B Setting the Flash Ratio.... 25
Flash Exposure Compensation.... 27
FEB 28
FEL: FE Lock 29
High-speed Sync 30
Second-curtain Sync 31
M: Manual Flash 32
Clearing MR-14EX II Settings 36
2 Setting Flash Functions with Camera Operations 37
Flash Control from the Camera's Menu Screen.... 38
3 Wireless Multiple Flash Shooting 43
Wireless Multiple Flash Shooting....44
Wireless Settings ....47
ETTL: Multiple Flash Shooting with Receiver C Added......49
ETTL: Advanced Multiple Flash Shooting with
Receiver A, B, and C Added....53
M: Wireless Multiple Flash Shooting with Manual Flash Output ....55
4 Customizing the MR-14EX II 57
C.Fn / P.Fn: Setting Custom and Personal Functions....58
C.Fn: Setting Custom Functions ......61
P.Fn: Setting Personal Functions....65
Memory Function 66
5 Reference 67
MR-14EX II System 68
Flash Firing Restriction due to Temperature Increase....69
Troubleshooting Guide....71
Specifications....73
Using MR-14EX II with a Type-B Camera ....76
Index 81
Nomenclature
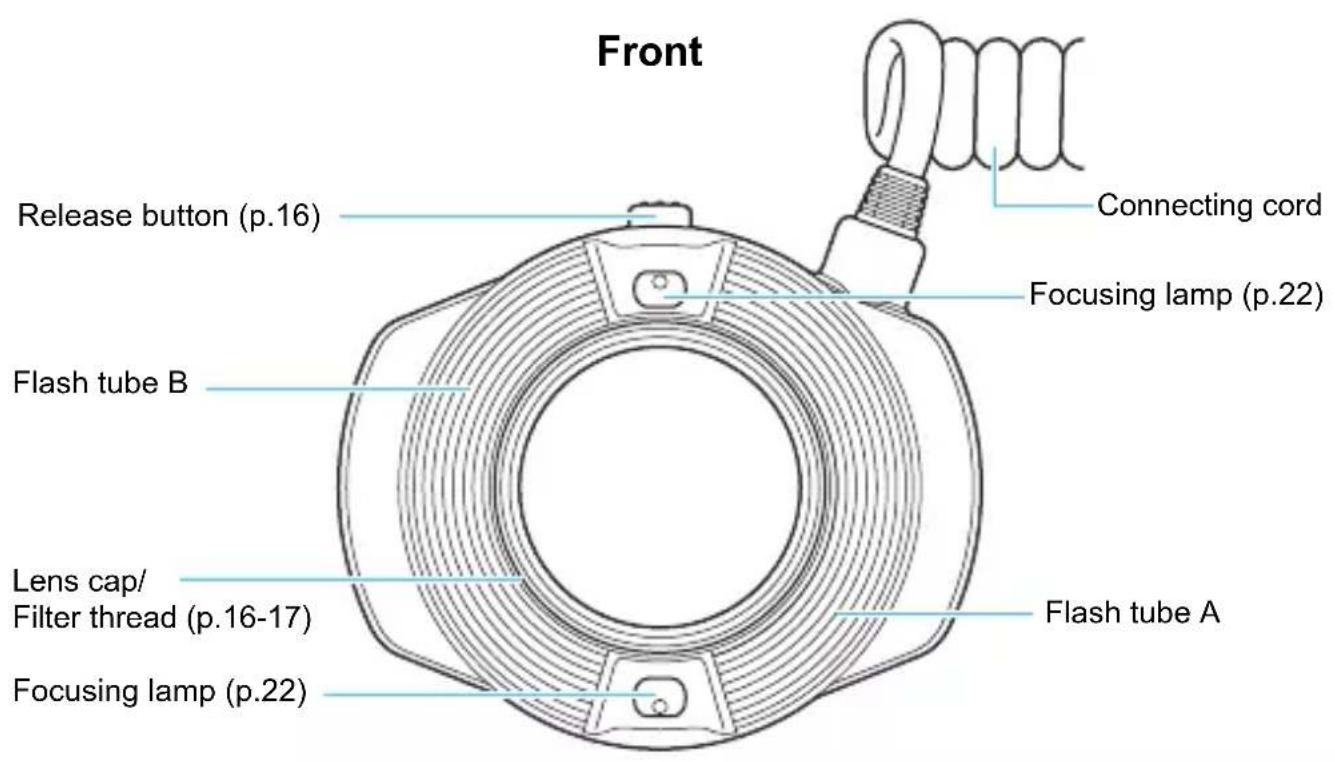
Flash Unit

Control Unit


LCD Panel
E-TTL II/E-TTL/TTL autoflash (p.21)
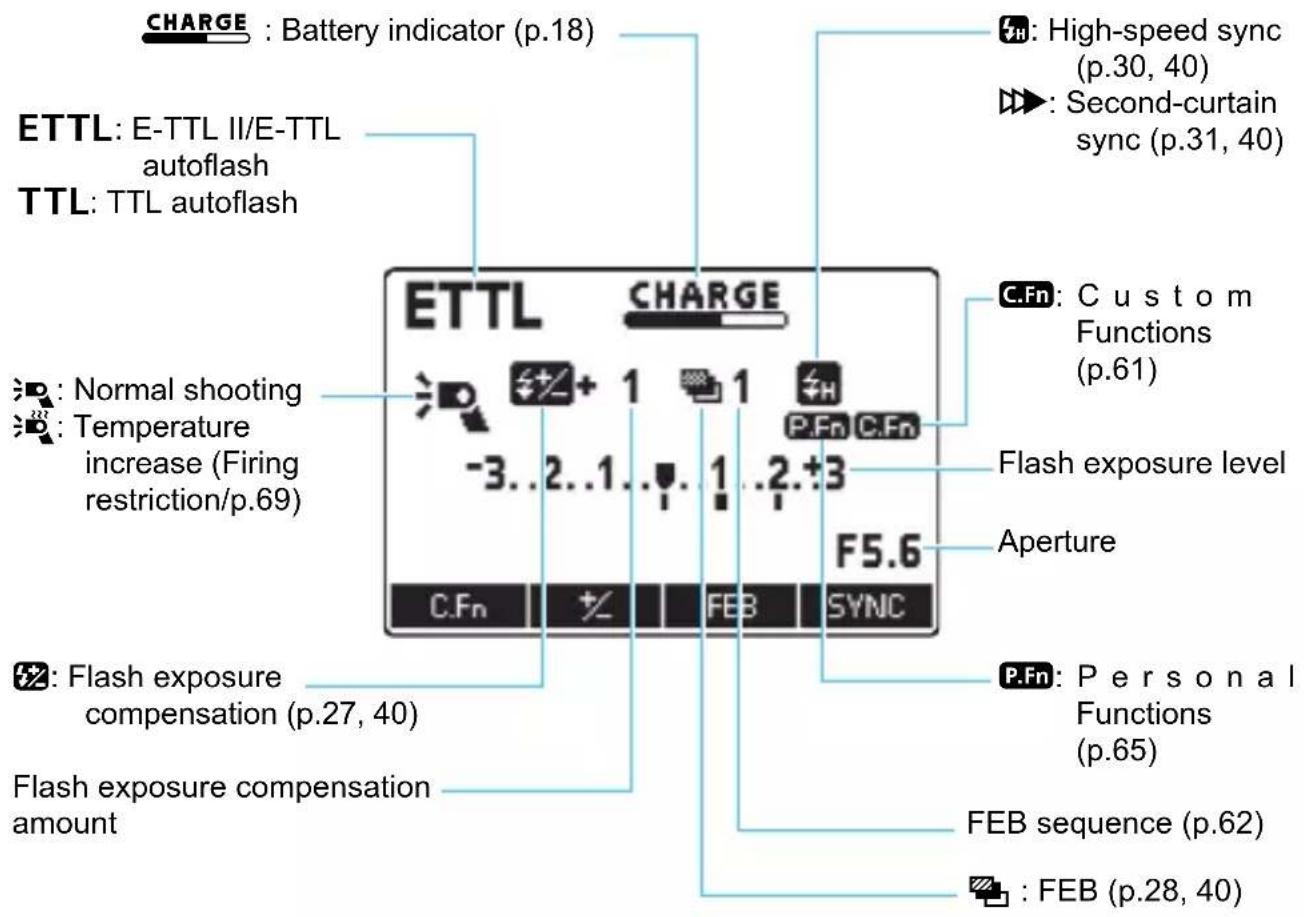
![graph TD A["ETTL"] --> B["A:B"] B --> C["4:1"] B --> D["2:1"] B --> E["1:1"] style A fill:#f9f,stroke:#333 style B fill:#ccf,stroke:#333 note right of A: Fire A: B (flash ratio control) note right of B: Fire B (single-side firing)](/content/2026/06/1263399/images/639b8e7c037aa6e37a76b6f8e8b071bdaa17d2b52c91b941bf1c62617e57404d.jpg)

- The screens shown are examples. The display will show only the settings currently applied.
- The functions, such as
and <%>, displayed above function buttons 1 to 4, change according to the settings.
When a button or dial is operated, the LCD panel illuminates (p.19).
Manual flash (p.32)
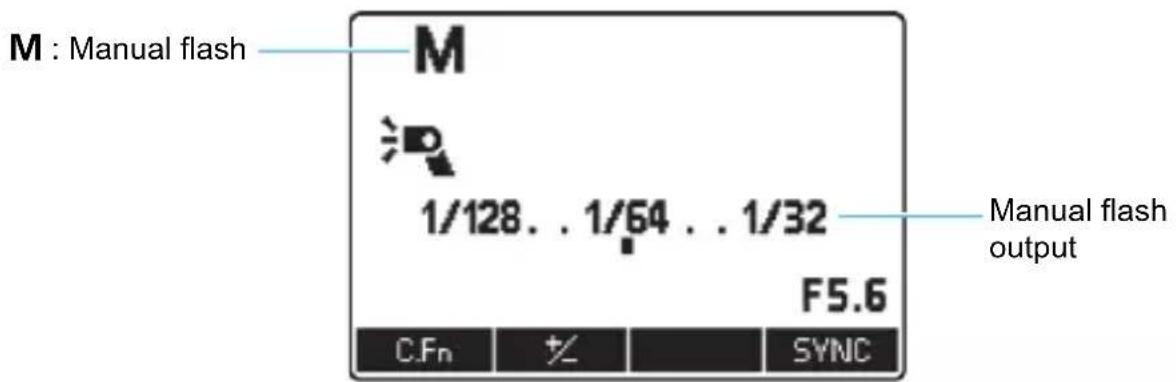
![graph TD A["Firing group"] --> B["A"] A --> C["B"] B --> D["1/4 .. 1/2 .. 1/1"] B --> E["1/16 .. 1/8 .. 1/4"]](/content/2026/06/1263399/images/59ab706fb0cb1e1b1cd0e0fa7eac58888577531687d125cf2408e3404388b042.jpg)
Wireless multiple flash shooting with optical transmission (p.43)

Cautions for firing continuous flashes
- To avoid degrading and damaging the flash unit due to overheating, do not fire more than 20 continuous flashes. After 20 continuous flashes, allow a rest time of at least 10 min.
If you fire 20 continuous flashes, and then fire the flash again repeatedly in short intervals, the safety function may activate and restrict flash firing. While flash firing is restricted, the firing interval is automatically set to a time between approx. 8 and 15 sec. If this happens, allow a rest time of at least 10 min.
For details, see “Flash Firing Restriction due to Temperature Increase” on page 69.
1
Getting Started with Macro Flash Shooting
This chapter describes the preparations before starting macro flash shooting and the basic shooting operations.

Conditions of the subject greatly influence the exposure when shooting close-ups. Therefore, it is recommended to shoot the same subject with different exposures (p.27) and check the exposure immediately after shooting.
When the camera's shooting mode is set to a fully automatic mode or an Image Zone mode, the functions with ☆ added to the right side of the page title cannot be set. Set the camera's shooting mode to P/Tv/Av/M/B (Creative Zone mode) to enable all the operations in this chapter.
Installing the Batteries
Use four AA/R6 batteries.

1 Open the cover.
- Slide the lock-release lever to the left as shown in the illustration, slide the cover down, then open the battery compartment cover.
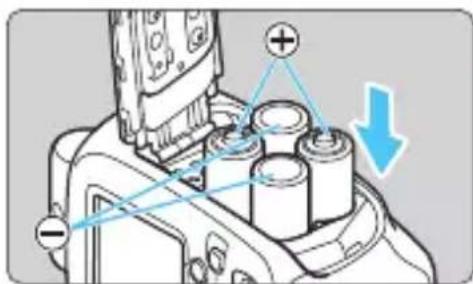
Install the batteries.
- Make sure the “+” and “-” battery contacts are correctly oriented as shown in the battery compartment. - The grooves on the side surfaces of the battery compartment indicate “-”. This is convenient when replacing the batteries in a dark place.

2 Close the cover.
- Close the battery compartment cover and slide it up. - When it clicks in place, the battery compartment cover is locked.
Firing Interval and Number of Flashes
| Firing Interval | Number of Flashes | |
| Quick Flash Normal Flash | ||
| Approx. 0.1 to 3.3 sec. | Approx. 0.1 to 5.5 sec. | Approx. 100 to 700 |
- Based on new AA/LR6 alkaline batteries, both sides firing, and Canon's testing standards.
- The Quick flash function enables flash shooting before the flash is fully charged (p.18).

Note that certain AA/R6 lithium batteries may become extremely hot in rare cases during usage. Due to safety reasons, do not use “AA/R6 lithium batteries”.
- Using AA/R6 batteries other than the alkaline type may cause improper battery contact due to the irregular shape of the battery contacts.

- Be aware that the batteries may become hot, if you change batteries after firing flashes continuously.
- Batteries are required by the flash unit even when an external power source (p.68) is used.

- When <∞> is displayed, or the LCD panel display turns off during recycling, replace the batteries with new ones.
Use a new set of four batteries of the same brand. When replacing the batteries, replace all four at one time.
AA/HR6 Ni-MH batteries can also be used.
Attaching the Control Unit to the Camera

1 Attach the control unit.
- Slip the control unit's mounting foot all the way into the camera's hot shoe.

Secure the control unit.
- Slide the mounting foot lock lever to the right.
When the lock lever clicks in place, it is locked.
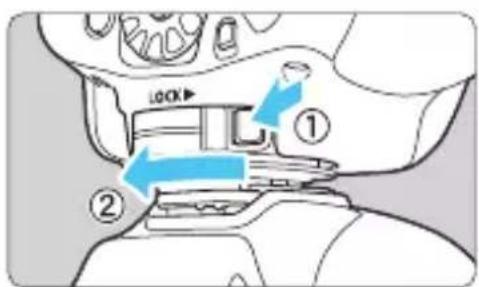
3 Detach the control unit.
While pressing the lock-release button, slide the lock lever to the left and detach the control unit.

Be sure to turn off the MR-14EX II before attaching or detaching it.
Attaching the Flash Unit to the Lens
Attach the flash unit to the front of the macro lens.

Attach the flash unit to the front of the lens while holding down the release button.
Make sure that the flash unit is securely attached.
- When rotating the flash unit, lightly press the release button while rotating it.
- Detach the flash unit while holding down the release button.
Attaching the Lens Cap
Attach the provided lens cap to the flash unit when it is not used in order to protect the lens.

A 67 mm diameter filter can also be attached to the flash unit (p.17).

- Be sure to attach the flash unit to the lens when shooting. Shooting while holding the flash unit in your hand may result in a low temperature burn.
- Do not touch the flash unit or batteries immediately after continuous flash firing or modeling flash (p.23). Touching them may result in a burn. Make sure that the flash unit has cooled before detaching the flash unit or replacing batteries.

When using the following lenses, attach the Macrolite Adapter (sold separately) to the front of the lens (filter thread) and then attach the flash unit.
• EF100mm f/2.8L Macro IS USM: Macrolite Adapter 67
• EF180mm f/3.5L Macro USM: Macrolite Adapter 72C
Using a Filter
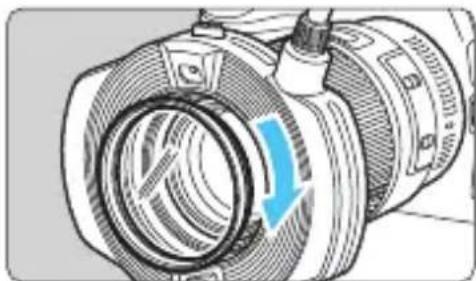
A commercially-available filter can be used during flash shooting. A filter can be attached, using the two procedures described below. Filters may not be used together with some macro lenses.
(1) Attach a 67 mm filter on the front face of the flash unit (see the above illustration).
(2) Attach the flash unit to the lens with the filter attached to the front of the lens (filter thread).
| Macro Lens | Filter Compatibility | |
| (1) (2) | ||
| EF50mm f/2.5 Compact Macro Not usable* | 1 | Usable |
| EF100mm f/2.8 Macro | Usable | |
| EF100mm f/2.8 Macro USM Not usable | ||
| EF100mm f/2.8L Macro IS USM | Conditionally usable*2 | |
| EF180mm f/3.5L Macro USM | ||
| EF-S60mm f/2.8 Macro USM Usable | ||
| MP-E65mm f/2.8 1-5x Macro Photo Not usable | ||
*1: The lens cannot be used with a filter, since focusing is interrupted by an attached filter touching the front of the lens. Also, filter may be damaged or the lens malfunction may result.
*2: Attach a filter to the front of the lens before attaching Macrolite Adapter (p.16) to the front part of the filter. If attachment threads are not provided on the front rim of the filter, the flash unit cannot be attached since Macrolite Adapter cannot be attached. Note that if the flash unit is attached after a filter and Macrolite Adapter are attached to the front of the lens, the periphery of the photo may look darker.
Using a Hood
If you want to use a dedicated hood with the MP-E65mm f/2.8 1-5x Macro Photo (sold separately), attach the flash unit after attaching the hood to the lens.
A hood cannot be attached when using any other macro lens.
Turning on the Power

1 Set the power switch to .
The flash recycling starts.
During recycling,
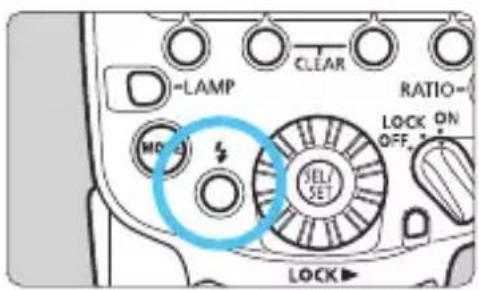
Check that the flash is ready.
The state of the flash-ready lamp changes from off to green (Quick flash ready) to red (fully charged).
- Press the test flash button (flash-ready lamp) to fire a test flash.
Quick Flash
The Quick flash function enables flash shooting when the flash-ready lamp is lit green (before the flash is fully charged). It is available when the camera's drive mode is set to single shooting. The flash output will be approx. 1/2 to 1/5 of the full output, but it is effective for shooting with a shorter firing interval.
Note that you cannot use Quick flash when continuous shooting, FEB, manual flash, or wireless multiple flash shooting is set.
Auto Power Off
To save battery power, the power will turn off automatically after approx. 90 sec. of idle use. To turn on the MR-14EX II again, press the camera's shutter button halfway, or press the test flash button (flash-ready lamp).

- Quick flash cannot be used when the flash mode is set to
.
A test flash cannot be fired when the camera's ⏻4/ ⏻6/ ⏻8/ ⏻10/ ⏻16 timer is active.
Lock Function
By setting the power switch to
If you operate a button or dial,
LCD Panel Illumination
When a button or dial is operated, the LCD panel illuminates for 12 sec. If you operate them when the LCD panel is illuminated, duration of the illumination will be extended.

The flash settings will remain in effect even after the power is turned off. To retain the settings when replacing the batteries, replace the batteries within 1 min. after turning off the power switch and removing the batteries.
When the temperature of the flash unit has risen due to continuous flash firing, the time until auto power off takes effect may increase.
You can fire a test flash or turn on/off the focusing lamp while the power switch is set to the
You can fire Quick flash during continuous shooting (C.Fn-06/p.62).
Auto power off can be disabled (C.Fn-01/p.61).
- You can select the charging method to be used when an external power source is used (C.Fn-12/p.63).
You can change the setting of the LCD panel illumination (C.Fn-22/p.64).
You can change the color of the LCD panel illumination (P.Fn-03/p.65).
Fully Automatic Flash Shooting
When you set the camera's shooting mode to
(Program AE) or a fully automatic mode, you can shoot in the E-TTL II/E-TTL fully automatic flash mode.

1
Set the flash mode to .
- Press the
button and set to . - Check that
is not displayed.

2

Focus on the subject.
- Press the shutter button halfway to focus.
The shutter speed and aperture are displayed in the viewfinder. - Check that <z> is lit in the viewfinder.

3
Take the picture.
- When you press the shutter button completely, the flash will fire and the picture will be taken.
If a standard flash exposure was obtained, the flash exposure confirmation lamp lights for 3 sec.

Even when attached to a camera that supports the E-TTL II autoflash,
- If the flash exposure confirmation lamp does not light or if the subject is dark (underexposed) when you check the image on the camera's LCD monitor, move closer to the subject and shoot again. You can also set a higher ISO speed when using a digital camera.
- “Fully automatic mode” refers to <+> , <> , and <> shooting modes.
Using E-TTL II and E-TTL Autoflash by Shooting Mode
Simply set the camera's shooting mode to
| Av | You can perform flash shooting while obtaining a standard exposure of both the main subject and background while considering the depth of field.Select this mode when you want to set the aperture manually. The camera will then automatically set the shutter speed, matching the aperture to obtain a standard exposure. If the scene is dark, a slow sync speed will be used to obtain a standard exposure for both the main subject and background. Standard exposure of the main subject is obtained with the flash, while a standard exposure of the background is obtained with a long exposure using a slow shutter speed.Since a slow shutter speed will be used for low-light scenes, using a tripod is recommended.If the shutter speed display blinks, it means that the background exposure will be underexposed or overexposed. Adjust the aperture until the shutter speed display stops blinking. |
| M | Select this mode if you want to set both the shutter speed and aperture manually.Standard exposure of the main subject is obtained with the flash. The exposure of the background is obtained with the shutter speed and aperture combination you set. |
- When the shutter speed is manually set with the shooting mode set to


- MACRO RING LITE MR-14EX II
- INTRODUCTION
- USING THE MR-14EX II WITH A CAMERA
- CAUTIONS WHEN USING CONTINUOUS FLASH
- ITEM CHECK LIST
- CONVENTIONS USED IN THIS MANUAL
- ICONS IN THIS MANUAL
- BASIC ASSUMPTIONS
- CHAPTERS
- CONTENTS
- INTRODUCTION 2
- 1 GETTING STARTED WITH MACRO FLASH SHOOTING 13
- 2 SETTING FLASH FUNCTIONS WITH CAMERA OPERATIONS 37
- 3 WIRELESS MULTIPLE FLASH SHOOTING 43
- 4 CUSTOMIZING THE MR-14EX II 57
- 5 REFERENCE 67
- NOMENCLATURE
- FLASH UNIT
- CONTROL UNIT
- LCD PANEL
- MANUAL FLASH (P.32)
- WIRELESS MULTIPLE FLASH SHOOTING WITH OPTICAL TRANSMISSION (P.43)
- CAUTIONS FOR FIRING CONTINUOUS FLASHES
- 1
- GETTING STARTED WITH MACRO FLASH SHOOTING
- INSTALLING THE BATTERIES
- 1 OPEN THE COVER
- INSTALL THE BATTERIES
- 2 CLOSE THE COVER
- ATTACHING THE CONTROL UNIT TO THE CAMERA
- 1 ATTACH THE CONTROL UNIT
- SECURE THE CONTROL UNIT
- 3 DETACH THE CONTROL UNIT
- ATTACHING THE FLASH UNIT TO THE LENS
- ATTACH THE FLASH UNIT TO THE FRONT OF THE LENS WHILE HOLDING DOWN THE RELEASE BUTTON
- ATTACHING THE LENS CAP
- USING A FILTER
- USING A HOOD
- TURNING ON THE POWER
- 1 SET THE POWER SWITCH TO
- CHECK THAT THE FLASH IS READY
- QUICK FLASH
- AUTO POWER OFF
- LOCK FUNCTION
- LCD PANEL ILLUMINATION
- FULLY AUTOMATIC FLASH SHOOTING
- SET THE FLASH MODE TO
- 2
- FOCUS ON THE SUBJECT
- 3
- TAKE THE PICTURE
- USING E-TTL II AND E-TTL AUTOFLASH BY SHOOTING MODE
Brand : CANON
Model : Macro Ring Lite MR-14EX II
Category : Photo Accessories