X-SMC00 - Audio System PIONEER - Free user manual and instructions
Find the device manual for free X-SMC00 PIONEER in PDF.

| Product type | Micro audio system |
| Brand | Pioneer |
| Model | X-SMC00 |
| Dimensions (W × H × D) | 430 mm × 218 mm × 114 mm |
| Weight (without packaging) | 2.9 kg |
| Power supply | AC 100 V – 240 V, 50/60 Hz (AC adapter included) |
| Power consumption (operation) | 25 W |
| Power consumption (standby) | 0.5 W max |
| RMS output power | 10 W + 10 W |
| Playback sources | CD, FM RDS, Bluetooth® (X-SMC00BT), iPod/iPhone/iPad mini, USB, auxiliary input (AUDIO IN) |
| Supported audio formats | CD-Audio, MP3, WMA |
| Main functions | Equalizer, P.BASS, bass/treble adjustment, alarm, sleep timer, mute, adjustable display (4 levels) |
| Included accessories | Remote control, AC adapter, interchangeable panels (×2, except X-SMC00-W/X-SMC00BT-W), AAA batteries (×2), FM wire antenna, iPhone dock, warranty card, instruction manual |
| Care and cleaning | Clean with a soft dry cloth. For stains, use a soft cloth slightly dampened with a diluted neutral detergent solution. Then wipe with a dry cloth. Do not use alcohol, thinner or benzene. |
| Safety | Do not expose to water, rain or moisture. Do not place lighted candles on the unit. Do not obstruct ventilation openings. Use only the supplied AC adapter. Disconnect during extended non-use. |
| Spare parts and repairability | Interchangeable panel available (except white models). Any repair must be carried out by an authorized Pioneer service center. Do not open the casing. |
Frequently Asked Questions - X-SMC00 PIONEER
User questions about X-SMC00 PIONEER
0 question about this device. Answer the ones you know or ask your own.
Ask a new question about this device
Download the instructions for your Audio System in PDF format for free! Find your manual X-SMC00 - PIONEER and take your electronic device back in hand. On this page are published all the documents necessary for the use of your device. X-SMC00 by PIONEER.
USER MANUAL X-SMC00 PIONEER
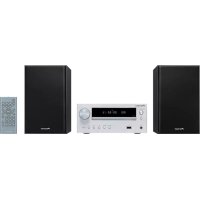
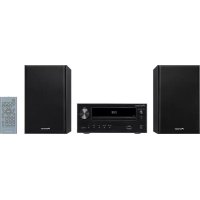
X-SMC00 X-SMC00-w X-SMC00BT X-SMC00BT-w
Slim Micro System | Système compact | Slim-Mikrosystem |
Slim Micro System | Slim Microsystem |
Sistema Micro Slim | CbePXOMnKaTHa MInKpOscIeMa

ME06

Bluetooth
Operating Instructions
Mode d'emploi
Bedienungsanleitung
This equipment is not waterproof. To prevent a fire or shock hazard, do not place any container filled with liquid near this equipment (such as a vase or flower pot) or expose it to dripping, splashing, rain or moisture.
D3-4-2-1-3_A1_En
WARNING
To prevent a fire hazard, do not place any naked flame sources (such as a lighted candle) on the equipment.
D3-4-2-1-7a_A1_En
WARNING
Slots and openings in the cabinet are provided for ventilation to ensure reliable operation of the product, and to protect it from overheating. To prevent fire hazard, the openings should never be blocked or covered with items (such as newspapers, table-cloths, curtains) or by operating the equipment on thick carpet or a bed.
D3-4-2-1-7b*A1En
Operating Environment
Operating environment temperature and humidity: +5^ to +35^ (+41^ to +95^) less than 85% RH (cooling vents not blocked)
Do not install this unit in a poorly ventilated area, or in locations exposed to high humidity or direct sunlight (or strong artificial light)
D3-4-2-1-7c*A1En
When using this product, confirm the safety information shown on the bottom of the unit and the AC adapter label.
D3-4-2-2-4_B1_En
This product is for general household purposes. Any failure due to use for other than household purposes (such as long-term use for business purposes in a restaurant or use in a car or ship) and which requires repair will be charged for even during the warranty period.
K041_A1_En
CAUTION
The OSTANDBY/ON switch on this unit will not completely shut off all power from the AC outlet. Since the power cord serves as the main disconnect device for the unit, you will need to unplug it from the AC outlet to shut down all power. Therefore, make sure the unit has been installed so that the power cord can be easily unplugged from the AC outlet in case of an accident. To avoid fire hazard, the power cord should also be unplugged from the AC outlet when left unused for a long period of time (for example, when on vacation).
D3-4-2-2-2a*A1En
CAUTION
This product is a class 1 laser product classified under the Safety of laser products, IEC 60825-1:2007.
CLASS 1 LASER PRODUCT
D58-5-2-2a_A1_En
WARNING
Store small parts out of the reach of children and infants. If accidentally swallowed, contact a doctor immediately.
D41-6-4_A1_En
Information for users on collection and disposal of old equipment and used batteries
(Symbol for equipment)

(Symbol examples) for batteries

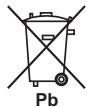
These symbols on the products, packaging, and/or accompanying documents mean that used electrical and electronic products and batteries should not be mixed with general household waste.
For proper treatment, recovery and recycling of old products and used batteries, please take them to applicable collection points in accordance with your national legislation.
By disposing of these products and batteries correctly, you will help to save valuable resources and prevent any potential negative effects on human health and the environment which could otherwise arise from inappropriate waste handling.
For more information about collection and recycling of old products and batteries, please contact your local municipality, your waste disposal service or the point of sale where you purchased the items.
These symbols are only valid in the European Union.
For countries outside the European Union:
If you wish to discard these items, please contact your local authorities or dealer and ask for the correct method of disposal.
K058a_A1_En
AC adapter caution
- Make sure to grasp the body of the AC adapter when removing it from the power outlet. If you pull the power cord, it may become damaged which could lead to fire and/or electrocution.
- Do not attempt to plug in or remove the AC adapter with wet hands. This may result in electrocution.
- Insert the prongs of the AC adapter all the way into the power outlet. If the connection is incomplete, heat may be generated which could lead to fire. Furthermore, contact with the connected prongs of the adapter may result in electrocution.
- Do not insert the AC adapter into a power outlet where the connection remains loose despite inserting the prongs all the way into the outlet. Heat may be generated which could lead to fire. Consult with the retailer or an electrician regarding replacement of the power outlet.
- Do not place the unit, a piece of furniture, etc., on the power cord, or pinch the cord. Never make a knot in the cord or tie it with other cords. The power cords should be routed such that they are not likely to be stepped on. A damaged AC adapter and power cord can cause a fire or give you an electrical shock. Check the AC adapter and the power cord once in a while. When you find it damaged, ask your nearest PIONEER authorized service center or your dealer for a replacement.
Radio wave caution
This unit uses a 2.4 GHz radio wave frequency, which is a band used by other wireless systems (Microwave ovens and Cordless phones, etc.). In this event noise appears in your television image, there is the possibility this unit (including products supported by this unit) is causing signal interference with the antenna input connector of your television, video, satellite tuner, etc. In this event, increase the distance between the antenna input connector and this unit (including products supported by this unit).
- Pioneer is not responsible for any malfunction of the compatible Pioneer product due to communication error/malfunctions associated with your network connection and/or your connected equipment. Please contact your Internet service provider or network device manufacturer.
- A separate contract with/payment to an Internet service provider is required to use the Internet.
POWER-CORD CAUTION
Handle the power cord by the plug. Do not pull out the plug by tugging the cord and never touch the power cord when your hands are wet as this could cause a short circuit or electric shock. Do not place the unit, a piece of furniture, etc., on the power cord, or pinch the cord. Never make a knot in the cord or tie it with other cords. The power cords should be routed such that they are not likely to be stepped on. A damaged power cord can cause a fire or give you an electrical shock. Check the power cord once in a while. When you find it damaged, ask your nearest PIONEER authorized service center or your dealer for a replacement.
Thank you for buying this Pioneer product.
Please read through these operating instructions so that you will know how to operate your model properly. After you have finished reading the instructions, put them in a safe place for future reference.
Contents
01 Before you start
What's in the box 5
Loading the batteries in the remote control 5
Using the remote control 6
02 Part names and functions
Remote control 7
Hang from the wall to use 8
Front panel 9
Top panel/Rear panel 10
Change the interchangeable panel 11
03 Connections
Connecting antenna 12
Using external antennas. 12
Plugging in 12
04 Getting started
To turn the power on 13
Setting the clock 13
General control 13
Input function. 13
Display brightness control 13
Volume auto setting. 13
Volume control. 13
Muting. 13
Sound controls 14
Equalizer 14
P.BASS control 14
Bass/treble control 14
Setting the wake-up timer 14
Calling the wake-up timer. 15
Cancelling the wake-up timer. 15
Using the wake-up timer. 15
Using the sleep timer 15
Using Headphones 15
05 iPod/iPhone/iPad mini playback
Confirming what iPod/iPhone/iPad mini models are supported 16
Connecting your iPod/iPhone 16
Connecting iPod/iPhone/iPad mini using supplied iPhone stand 17
Playing iPod/Phone/iPad mini 17
06 Disc playback
Playing discs or files 18
Advanced CD or MP3/WMA disc playback 19
Direct track search 19
Repeat play. 19
Random play 19
Programmed play (CD or MP3/WMA) 20
About downloading MP3/WMA 20
About folder playback order 20
Specify the folder to play. 21
Switch the display contents 21
07 USB playback
Playing USB storage devices 22
Repeat play. 22
Random play 22
Specify the folder to play. 23
Switch the display contents 23
Playing in the desired order (Programmed Play) 23
08 Using the tuner
Listening to the radio broadcasts 24
Tuning. 24
Saving station presets. 24
To recall a memorised station 25
To scan the preset stations. 25
To erase entire preset memory. 25
Using the Radio Data System (RDS) 25
An introduction to RDS. 25
Searching for RDS programs 25
Information provided by RDS. 26
Using the Auto Station Program Memory (ASPM). 26
Notes for RDS operation. 26
09 Other connections
Connecting auxiliary components 27
10 Bluetooth® Audio playback
Music playback using Bluetooth wireless technology 28
Pairing with the unit (Initial registration) 28
Listen to music on the unit from a Bluetooth capable device 29
Radio wave caution 29
Scope of operation 29
Radio wave reflections 30
Precautions regarding connections to products
supported by this unit. 30
11 Additional information
Troubleshooting 31
Playable discs and formats 34
Regarding copy protected CDs 34
Supported audio file formats 34
Cautions on use 34
When moving this unit 34
Place of installation. 34
Do not place objects on this unit 35
About condensation 35
Cleaning the product. 35
Cleaning the lens. 35
Handling discs 35
Storing 35
Cleaning discs 35
About specially shaped discs 35
About iPod/iPhone 36
Restoring all the settings to the defaults 36
Specifications 37
Chapter 1:
Before you start
What's in the box
Please confirm that the following accessories are in the box when you open it.
Remote control
- AC adapter
- Changeable panel x 2 (X-SMC00-W and X-SMC00BT-W do not have an interchangeable panel in the box)
AAA batteries (R03)× 2
FM wire antenna
iPhone stand
Warranty card
- Operating instructions (this document)
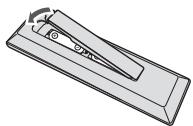
Loading the batteries in the remote control
1 Open the rear lid and load the batteries as illustrated below.
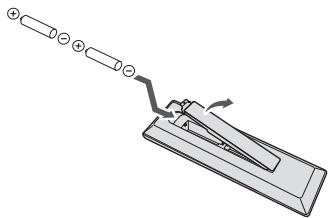
2 Close the rear lid.
The batteries included with the unit have been provided to allow you check product operation and may not last long. We recommend using alkaline batteries that have a longer life.
CAUTION
- When inserting the batteries, make sure not to damage the springs on the battery's terminals. This can cause batteries to leak or over heat.

Insert the battery by aligning the pole against the remote control's terminal

If a battery pushes and bends the terminal out of shape, there is possibility of the alkaline battery shorting out
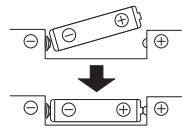
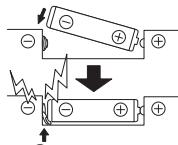
The terminal is bent out of shape
- Do not use any batteries other than the ones specified. Also, do not use a new battery together with an old one.
- When loading the batteries into the remote control, set them in the proper direction, as indicated by the polarity marks ( and ).
- Do not heat batteries, disassemble them, or throw them into flames or water.
- Batteries may have different voltages, even if they are the same size and shape. Do not use different types of batteries together.
- To prevent leakage of battery fluid, remove the batteries if you do not plan to use the remote control for a long period of time (1 month or more). If the fluid should leak, wipe it carefully off the inside of the case, then insert new batteries. If a battery should leak and the fluid should get on your skin, flush it off with large quantities of water.
- When disposing of used batteries, please comply with governmental regulations or environmental public institution's rules that apply in your country/area.
WARNING
Do not use or store batteries in direct sunlight or other excessively hot place, such as inside a car or near a heater. This can cause batteries to leak, overheat, explode or catch fire. It can also reduce the life or performance of batteries.
Using the remote control
The remote has a range of about 7 m at an angle of about 30^ from the remote sensor.
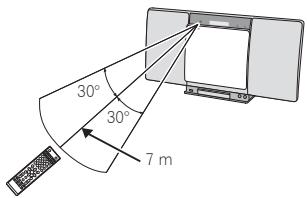
Keep in mind the following when using the remote control:
- Make sure that there are no obstacles between the remote and the remote sensor on the unit.
- Remote operation may become unreliable if strong sunlight or fluorescent light is shining on the unit's remote sensor.
- Remote controllers for different devices can interfere with each other. Avoid using remotes for other equipment located close to this unit.
- Replace the batteries when you notice a fall off in the operating range of the remote.
Chapter 2:
Part names and functions
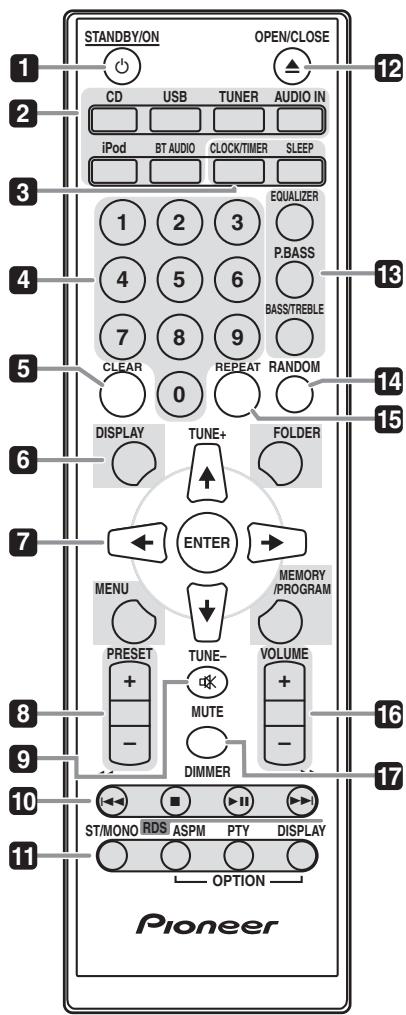
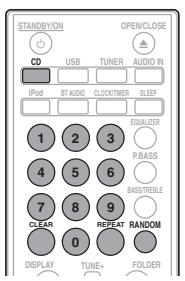
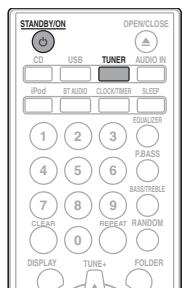
Remote control
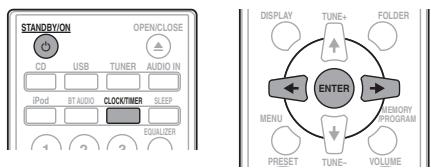
1 STANDBY/ON
Switches the receiver between standby and on (page 13).
2 Input function buttons
Use to select the input source to this receiver (pages 17, 18, 22, 24, 27 and 28).
3 Control buttons CLOCK/TIMER
Use for setting the clock, as well as for setting and checking the timers (page 13).
SLEEP
See Using the sleep timer on page 15.
4 Numeric buttons (0 to 9)
Use to enter the number (page 19).
5 CLEAR
Use to clear the programmed play (page 20).
6 Control buttons DISPLAY
Press to change the display for songs playing back from CD or USB (page 21).
FOLDER
Use to select the folder of the MP3/WMA disc or USB mass storage device (page 20).
MENU
Use to access the menu.
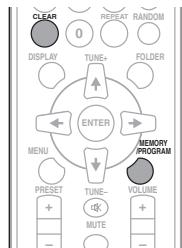
MEMORY/PROGRAM
Use to memory or program the MP3/WMA disc (page 20).
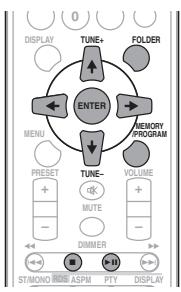
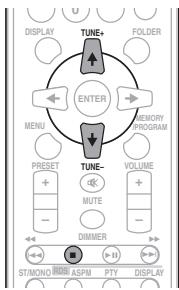
7 / / / (TUNE + / - ), ENTER
Use to select/switch system settings and modes, and to confirm actions.
Use TUNE + / - can be used to find radio frequencies (page 24).
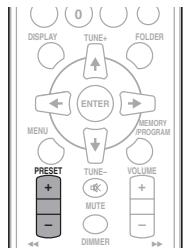
8 PRESET + / -
Use to select preset radio stations (page 25).
9 MUTE
Mutes/unmutes the sound (page 13).
10Playback control buttons
Use to control each function after you have selected it using the input function buttons (page 18).
11 Tuner control buttons ST/MONO
Use to switch the sound mode between stereo and monaural. (page 24)
RDS ASPM
Use to search for RDS Auto station program memory (page 25).
RDS PTY
Use to search for RDS program types (page 25).
RDS DISPLAY
Press to change the RDS display for information mode (page 25).
12 OPEN/CLOSE
Use to open or close the electric slide CD door (page 18).
13 Sound control buttons
Adjust the sound quality (page 14).
14 RANDOM
Randomize order of track playback from a CD, iPod or USB (page 19).
15 REPEAT
Press to change the repeat play setting from a CD, iPod or USB (page 19).
16 Volume control buttons
Use to set the listening volume (page 13).
17 DIMMER
Dims or brightens the display. The brightness can be controlled in four steps (page 13).
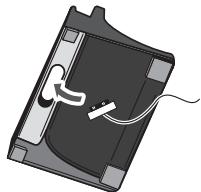
Hang from the wall to use
When hanging the unit from a wall, firmly screw the wall hanging screws (sold separately) into the wall, and confirm that the wall is capable of holding the unit safely. If the materials or strength of the wall cannot support the weight of the unit, then there is the possibility of the unit falling off.
1 Screw the wall hanging screws into the wall, putting them the specified attachment measurement (130 mm) apart.
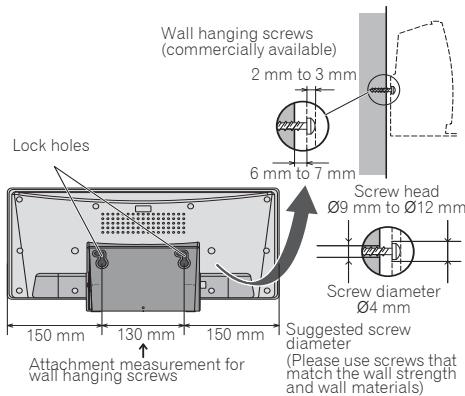
2 Insert the wall hanging screws into the lock holes.
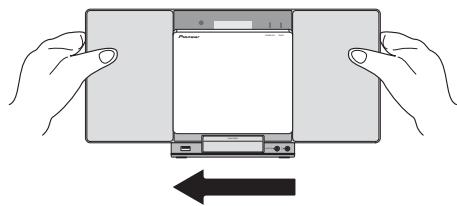
3 Slide to the left to secure in place. (Slide distance is around 10mm )

Note
- When attaching the unit to the wall, there is the possibility of it falling depending on how it is attached. Take due care to avoid any accidents.
- Select a location for the placement/installation of unit that is sufficiently strong enough to hold the weight of the unit. If you do not know the strength etc. of the wall, then consult with a professional.
- The company bears no responsibility for accidents or damages caused by inadequate installation/attachment, incorrect use, modifications, natural disasters etc.
- Place all cables along the wall to prevent anyone from tripping over them.
- Do not exchange the changeable panel while the unit is hanging from a wall.
- When the unit is hanging from a wall, pay extra attention to make sure your iPod/iPhone does not fall.
- Do not hold the unit by grabbing onto the iPod/iPhone connector.
Front panel
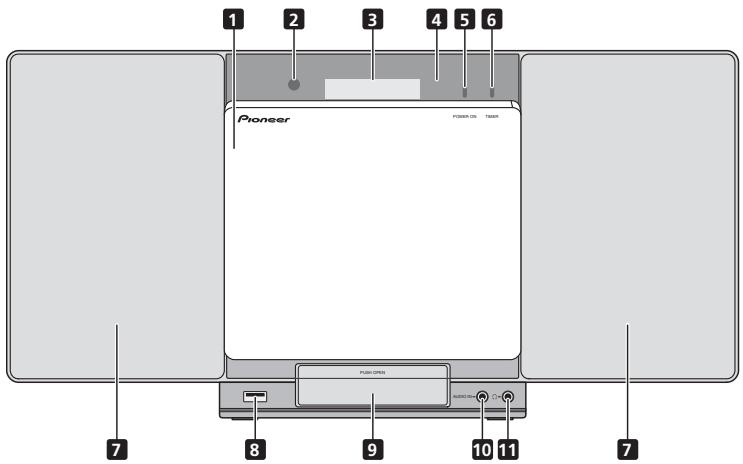
1 Electric slide CD door
2 Remote sensor
Receives the signals from the remote control.
3 Main display
4 Display panel
5 POWER ON indicator
When the power is on, this indicator lights.
6 TIMER indicator
Lit when the unit power is off but when the timer setting is activated.
7 Speaker
8 iPod/iPhone terminal
Use to connect your USB mass storage device or Apple iPod/ iPhone/iPad mini as an audio source (pages 17 and 22).
9 iPod/iPhone connector port
To connect the iPod/iPhone, press the PUSH OPEN tab (page 16).
10 AUDIO IN socket
Use to connect an auxiliary component using a stereo minijack cable (page 27).
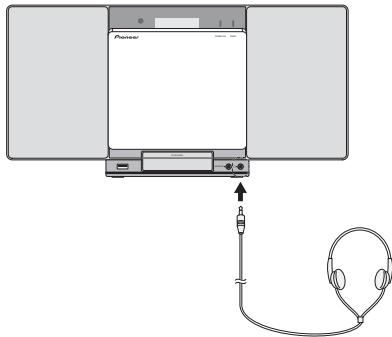
11 Headphone socket
Use to connect headphones. When the headphones are connected, there is no sound output from the speakers (page 15).
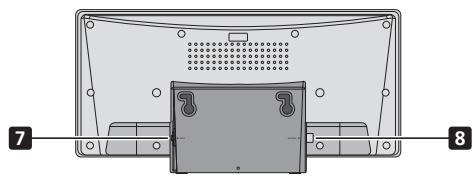
Top panel/Rear panel

1 STANDBY/ON button
Switches the receiver between standby and on (page 13).
2 INPUT button
Selects the input source.
3 EQ button (X-SMC00)
Used when switching sound mode (page 14).
BT AUDIO button (X-SMC00BT)
Used when playing back music from a device with Bluetooth functionality (page 28).
4Playback control buttons
Select the desired track or file to be played back. Stop current playback. Stop playback or resume playback from the point where it was paused.
5 VOLUME-/+
Use to set the listening volume (page 13).
6 Disc tray open/close button
Use to open or close the electric slide CD door (page 18).
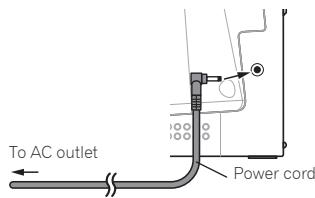
7 DC IN terminal
Plug the supplied AC adapter (page 12).
8 FM antenna socket
Connect provided FM wire antenna here (page 12).
Change the interchangeable panel
(X-SMC00-W and X-SMC00BT-W do not have an interchangeable panel in the box)

CAUTION
- Exchange of the changeable panel should be performed on a stable surface.
- Do not exchange the changeable panel while the unit is hanging from a wall.
- Be careful not to scratch or damage the display panel when exchanging the changeable panel.
- Do not apply excessive force to the changeable panel.
- If the panel is not attached correctly there is a chance that opening and closing operations will not be performed correctly. Because incorrect attachment can also be the cause of irregular or unwanted noise, make sure the panel is attached in the correct position.
- Be sure to turn off the power and unplug the power cord from the power outlet whenever making or changing connections.
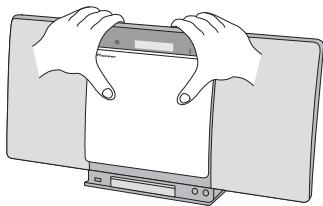
1 Make sure the electric slide CD door is closed.
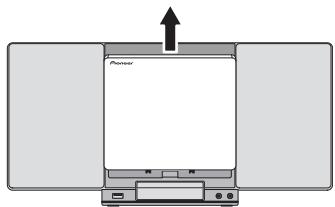
2 Using both hands, slide the changeable panel up to remove it.
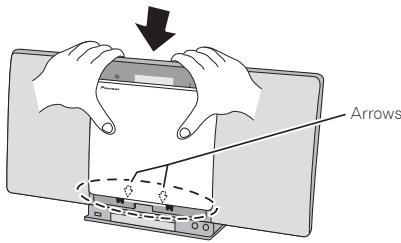
3 Align the line below the arrow and the bottom of the changeable panel, then slide downward using both hands until you hear a clicking sound.
Chapter 3:
Connections

CAUTION
- Be sure to turn off the power and unplug the power cord from the power outlet whenever making or changing connections.
- Connect the power cord after all the connections between devices have been completed.
Connecting antenna
Connect the FM wire antenna as shown below. To improve reception and sound quality, connect external antennas (see Using external antennas below).
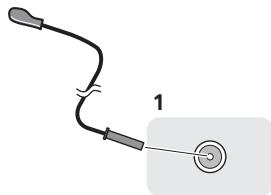
1 Connect the FM wire antenna into the FM antenna socket.
For best results, extend the FM antenna fully and fix to a wall or door frame. Don't drape loosely or leave coiled up.
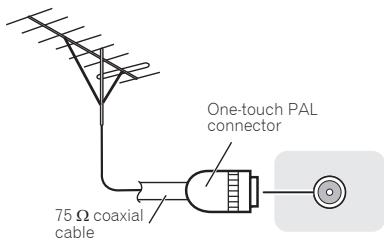
Using external antennas
To improve FM reception
Use a PAL connector (not supplied) to connect an external FM antenna.
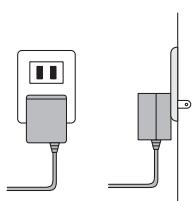
Plugging in
CAUTION
- Do not use any power cord other than the one supplied with this unit.
- Do not use the supplied power cord for any purpose other than that described below.
- The cord on the AC adaptor is 1.5 m long. Make sure that the body of the AC adaptor is not suspended off the ground during use, as this will place unnecessary force on the DC plug.

- When inserting the AC adapter into a wall socket, make sure that there is no gap between the AC adaptor and the wall socket. Such a gap may cause a poor connection, and metal items like coins or paperclips falling into it may cause a short circuit and start a fire.

Side view
Front view
Side view
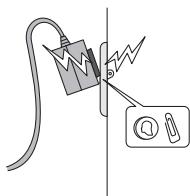
Metal objects such as coins and papeclips
Connect the AC adaptor into a wall socket. Only connect the AC adapter when all other connections to the unit have been completed.
Chapter 4:
Getting started
To turn the power on
Press the 品 STANDBY/ON to turn the power on.
After use:
Press the STANDBY/ON to enter the power stand-by mode.

- In standby mode, if iPod/iPhone/iPad mini is connected, the unit turns charge mode.
Setting the clock
1 Press STANDBY/ON to turn the power on.
2 Press CLOCK/TIMER on the remote control.
"CLOCK" is shown on the main display.
3 Press ENTER.
4 Press / to set the day, then press ENTER.
5 Press / to set the hour, then press ENTER.
6 Press / to set the minute, then press ENTER to confirm.
7 Press ENTER.
To confirm the time display:
Press the CLOCK/TIMER. The time display will appear for about 10 seconds.
To readjust the clock:
Perform "Setting the clock" from step 1.

- When power supply is restored after unit is plugged in again or after a power failure, reset the clock.
General control
Input function
When the INPUT on main unit is pressed, the current function will change to different mode. Press the INPUT repeatedly to select desired function.
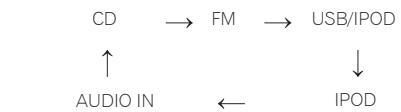
X-SMC00
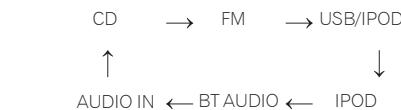
X-SMC00BT
Display brightness control
Press DIMMER to dims the display brightness. The brightness can be controlled in four steps.
Volume auto setting
If you turn off and on the main unit with the volume set to 31 or higher, the volume starts at 30 and sets in to the last set level.
Volume control
Press the VOLUME - / + on the unit or press VOLUME + / - on the remote control to increase or decrease the volume.
CAUTION
- The sound level at a given volume setting depends on speaker efficiency, location, and various other factors. It is advisable to avoid exposure to high volume levels. Do not turn the volume on to full at switch on. Listen to music at moderate levels. Excessive sound pressure from earphones and headphones can cause hearing loss.
Muting
The volume is muted temporarily when pressing the MUTE on the remote control. Press again to restore the volume.
Sound controls
Equalizer
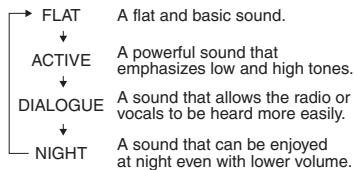
When the EQUALIZER is pressed, the current mode setting will be displayed. To change to a different mode, press the EQUALIZER repeatedly until the desired sound mode appears.
P.BASS control
When the power is first turned on, the unit will enter the P.BASS mode which emphasises the bass frequencies. To cancel the P.BASS mode, press the P.BASS on the remote control.
Bass/treble control
Press the BASS/TREBLE, then press / / / to adjust the bass or treble.

Note
- The EQUALIZER and P.BASS cannot operate simultaneously. The most recently selected of these two functions will be the one used.
- BASS/TREBLE can operate alongside either the EQUALIZER or P.BASS.
When one of the above two functions is selected, the function that is not selected will be displayed as follows.
1 When P.BASS setting (ON/OFF) is changed
EQUALIZER:FLAT
2 When EQUALIZER setting (ON/OFF) is changed
P.BASS:OFF
Setting the wake-up timer
Used to change the existing timer setting, or to set a new timer.
1 Press STANDBY/ON to turn the power on.
2 Press and hold CLOCK/TIMER.
3 Press / to select "ONCE" or "DAILY", then press ENTER.
ONCE - Works once only at a preset time.
DAILY - Works at the preset time on a preset day.
4 Press / to select "TIMER SET", then press ENTER.
5 Press / to select the timer playback source, then press ENTER.
CD, FM, USB/IPOD, IPOD, BT AUDIO and AUDIO IN can be selected as the playback source.
6 Press / to select the timer day, then press ENTER.
7 Press / to set the hour, then press ENTER.
8 Press / to set the minute, then press ENTER.
- Set the time to finish as in steps 7 and 8 above.
9 Adjust the volume press VOLUME + / - , then press ENTER.
10 Press STANDBY/ON to enter the power standby mode.
The TIMER indicator lights up.
Calling the wake-up timer
An existing timer setting can be reused.
1 Follow steps 1 to 3 in "Setting the wake-up timer".
2 Press / to select "TIMER ON", then press ENTER.
Cancelling the wake-up timer
Turn off the timer setting.
1 Follow steps 1 to 3 in "Setting the wake-up timer".
2 Press / to select "TIMER OFF", then press ENTER.
Using the wake-up timer
1 Press STANDBY/ON to turn the power off.
2 At the wake-up time, this unit will turn on automatically and play the selected input function.

Note
- If at the wake-up time an iPod/iPhone/iPad mini is not connected to the unit or a disc is not inserted, the unit will be turned on but will not play back the track.
- Some discs may not be played automatically at the wake-up time.
- When setting the timer set at least one minute between the start and end time.
Using the sleep timer
The sleep timer switches off the unit after a specified time so you can fall asleep without worrying about it.
1 Press SLEEP repeatedly to select a switch off time.
Choose between 10 min, 20 min, 30 min, 60 min, 90 min, 120 min, 150 min, 180 min or OFF. The newly set value displays for 3 seconds, and then the setting is completed.

Note
- The sleep timer can be set by pressing SLEEP while the remaining time is displayed.
Using Headphones
Connect the headphones plug to the PHONES terminal. When the headphones are connected, there is no sound output from the speakers.
- Do not turn the volume on to full at switch on and listen to music at moderate levels. Excessive sound pressure from earphones and headphones can cause hearing loss.
- Before plugging in or unplugging the headphone, reduce the volume.
- Be sure your headphone has a 3.5 ~mm diameter plug and impedance between 16 and 50 . The recommended impedance is 32 .
- Audio from the iPod/iPhone/iPad mini cannot be heard via the headphones connected to the unit. "HP MUTE" will be displayed if you connect the headphones when the iPod/iPhone/iPad mini function is selected.
Chapter 5:
iPod/iPhone/iPad mini playback
Merely by connecting your iPod/iPhone/iPad mini to this unit, you can enjoy high-quality sound from your iPod/iPhone/iPad mini. Playback setting for iPod/iPhone/iPad mini music can be performed from this unit or the iPod/iPhone/iPad mini itself.
Confirming what iPod/iPhone/iPad mini models are supported
The iPod/iPhone/iPad mini playable on this unit are shown below.
| iPod/iPhone/iPad mini | Dock connector | iPod/iPhone Terminal |
| iPod nano 3G/4G/5G/6G | ✓ | ✓ |
| iPod nano 7G | × | ✓ |
| iPod touch 1G/2G/3G/4G | ✓ | ✓ |
| iPod touch 5G | × | ✓ |
| iPhone | ✓ | ✓ |
| iPhone 3G | ✓ | ✓ |
| iPhone 3GS | ✓ | ✓ |
| iPhone 4 | ✓ | ✓ |
| iPhone 4S | ✓ | ✓ |
| iPhone 5 | × | ✓ |
| iPad mini | × | ✓ |

Note
- Pioneer does not guarantee that this unit plays iPod/ iPhone/iPad mini models other than the ones specified.
Some functions may be restricted depending on the model or software version. - iPod/iPhone/iPad mini is licensed for reproduction of non-copyrighted materials or materials the user is legally permitted to reproduce.
- Features such as the equalizer cannot be controlled using this system, and we recommend switching the equalizer off before connecting.
- Pioneer cannot under any circumstances accept responsibility for any direct or indirect loss arising from any inconvenience or loss of recorded material resulting from iPod/iPhone/iPad mini failure.
- For detailed instructions on using the iPod/iPhone/iPad mini, please refer to the manual supplied with the iPod/ iPhone/iPad mini.
- This system has been developed and tested for the software version of iPod/iPhone/iPad mini indicated on the website of Pioneer (http://pioneer.jp/homeav/support/ios/eu/).
- Installing software versions other than indicated on the website of Pioneer to your iPod/iPhone/iPad mini may result in incompatibility with this system.
- This unit cannot be used to record CD, tuner or other content on an iPod/iPhone/iPad mini.
Connecting your iPod/iPhone
CAUTION
- When connecting iPod/iPhone devices, always use the dock adapter provided with iPod/iPhone devices, or a commercially available adapter designed to support iPod/iPhone. The iPod/iPhone cannot be connected without a dock adapter; attempting to connect an iPod/ iPhone without it will cause damage or malfunction.
- An iPod/iPhone universal dock adapter is not supplied with this unit.
Important
- If you use a commercially available protective cover with your iPod/iPhone, you may not be able to connect your iPod/iPhone to the unit.
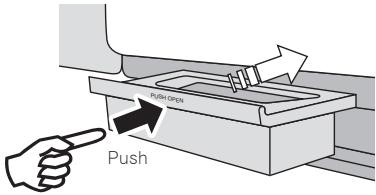
1 Press the PUSH OPEN.
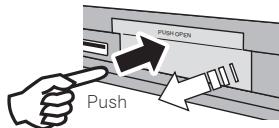
2 Attach the dock adapter to iPod/iPhone connector port.
When attaching the dock adapter, be sure to orient the frontback directions of the dock adapter correctly. To attach, first place the protruding tabs on the front side of the adapter into the depressions on the iPod/iPhone connector port and press into position. When attaching the adapter, be careful not to strike the connectors.
3 Connect your iPod/iPhone.
- When iPod/iPhone is not connected to the unit, close the iPod/iPhone connector port firmly.

CAUTION
- Do not use an adaptor that converts into a Lightning connector on the unit's dock connector to connect an iPod/iPhone/iPad mini. This may lead to malfunction/ damage to the connector.
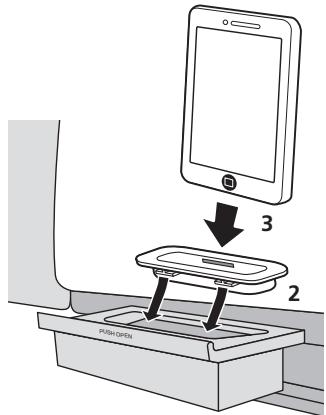
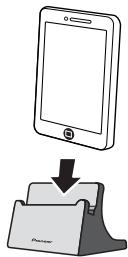
Connecting iPod/iPhone/iPad mini using supplied iPhone stand
1 Connect the iPod/iPhone/iPad mini cable to the iPod/iPhone terminal on the front of the unit.
2 Pass the iPod/iPhone/iPad mini cable through the bottom of the stand and connect it to the iPod/iPhone/iPad mini.
3 Set the iPod/iPhone/iPad mini on the stand.
Playing iPod/iPhone/iPad mini
1 Connect your iPod/iPhone/iPad mini.
- If an iPod/iPhone/iPad mini is connected while the unit is turned on, playback of the iPod/iPhone/iPad mini will not begin.
2 Press iPod or USB as the input source.
"IPOD" or "USB/IPOD" is shown on the main display.
3 When the recognition is completed, will begin playing automatically.
- The available iPod/iPhone/iPad mini playback controls from the unit are II, I II, II II.
-
In the following case, operate your iPod/iphone/iPad mini directly:
-
Searching a file by artist name or genre.
- Playing in the repeat or random mode.

CAUTION
- When your iPod/iPhone/iPad mini is connected to this unit and you wish to operate the iPod/iPhone/iPad mini directly, be sure to steady the iPod/iPhone/iPad mini with the other hand to prevent malfunctions due to faulty contacts.

Note
- For detailed instructions on using the iPod/iPhone/iPad mini, please refer to the manual supplied with the iPod/ iPhone/iPad mini.
- iPod/iPhone/iPad mini recharging occurs whenever an iPod/ iPhone/iPad mini is connected to this unit. (This function is supported in standby mode as well.)
- When input is switched from iPod to another function, iPod/iPhone/iPad mini playback is temporarily stopped.

Important
If this unit cannot play your iPod/iPhone/iPad mini, perform the following troubleshooting checks:
- Check whether the iPod/iPhone/iPad mini is supported by this unit.
- Reconnect the iPod/iPhone/iPad mini to the unit. If this doesn't seem to work, try resetting your iPod/iPhone/iPad mini.
- Check that iPod/iPhone/iPad mini software is supported by the unit.
If the iPod/iPhone/iPad mini cannot be operated, check the following items:
Is the iPod/iPhone/iPad mini connected correctly? Reconnect the iPod/iPhone/iPad mini to the unit.
- Is the iPod/iPhone/iPad mini experiencing a hangup? Try resetting the iPod/iPhone/iPad mini, and reconnect it to the unit.
Chapter 6:
Disc playback
This system can play back a standard CD, CD-R/RW in the CD format and CD-R/RW with MP3 or WMA files, but cannot record on them. Some audio CD-R and CD-RW discs may not be playable due to the state of the disc or the device that was used for recording.
MP3:
MP3 is a form of compression. It is an acronym which stands for MPEG Audio Layer 3. MP3 is a type of audio code which is processed by significant compression from the original audio source with very little loss in sound quality.
- This system supports MPEG-1/2 Audio Layer3 (Sampling rates: 8 kHz to 48 kHz; Bit rates: 64 kbps to 384 kbps).
- During VBR file playback, time counter in the display may differ from its actual playback time.
WMA:
WMA (Windows Media Audio) files are Advanced System Format files that include audio files which are compressed with Windows Media Audio codec. WMA is developed by Microsoft as an audio format file for Windows Media Player.
- This system supports WMA (Sampling rates: 32 kHz/44.1 kHz/48 kHz; Bit rates: 64 kbps to 320 kbps).
- During VBR file playback, time counter in the display may differ from its actual playback time.
Playing discs or files
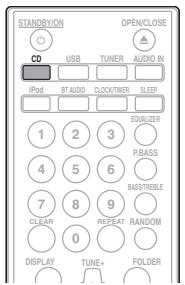
1 Press STANDBY/ON to turn the power on.
2 Press CD on the remote control or INPUT repeatedly on the main unit to select CD input.
3 Press OPEN/CLOSE to open the electric slide CD door.
4 Insert the disc.
Inset the disc with the printed label facing outward (you can see it).
Inset the disc while pressing down on it until the centre of the disc is held in place (until you hear a clicking sound).
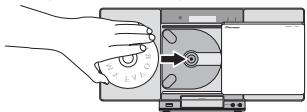
5 Press OPEN/CLOSE to close the electric slide CD door.
6 Press to start playback.
After the last track is played, the unit will stop automatically.
CAUTION
- Do not touch the lens.
- Be careful not to get your hand or headphone cable caught when opening and closing the slide door.
- Do not insert two or more discs into the disc tray at once.
- Do not play discs of special shapes (heart, octagon, etc). It may cause malfunctions.
- Do not touch the electric slide CD door when it is moving.
- If power is lost while the electric slide CD door is open, wait until the power is restored.
Note
- Due to the structure of the disc information, it takes longer to read an MP3/WMA disc than a normal CD (approximately 20 to 90 seconds).
- When the beginning of the first track is reached during fast reverse, the unit will enter the playback mode (only for CD).
- If TV or radio interference occurs during CD operation, move the unit away from the TV or radio.
Tip
- When no operation has done in CD mode and the audio file is not played for more than 30 minutes, the power will automatically turn off.
Various disc functions
| Function | Main unit | Remote control | Operation |
| Play | →II | →II | Press in the stop mode. |
| Stop | ■ | ■ | Press in the playback mode. |
| Pause | →II | →II | Press in the playback mode. Press ➔II to resume playback from the paused point. |
| Track up/down | ←←0→← | ←→ | Press in the playback or stop mode. If you press the button in the stop mode, press ➔II to start the desired track. |
| Fast forward/reverse | ←←0→← | ←→ | Press and hold down in the playback mode. Release the button to resume playback. |
Advanced CD or MP3/WMA disc playback
Direct track search
By using the numeric buttons, the desired tracks on the current disc can be played.
Use the numeric buttons on the remote control to select the desired track whilst playing the selected disc.
Note
- A track number higher than the number of tracks on the disc cannot be selected.
To stop playback:
Press
Repeat play
Repeat play can play one track, all tracks or a programmed sequence continuously.
To repeat one track:
Press REPEAT repeatedly until "RPT ONE" appears. Press ENTER.
To repeat all tracks:
Press REPEAT repeatedly until "RPT ALL" appears. Press ENTER.
To repeat desired tracks:
Perform steps 1 to 5 in "Programmed play (CD or MP3/WMA)" section on next page and then press REPEAT repeatedly until "RPT ALL" appears. Press ENTER.
To cancel repeat play:
Press REPEAT repeatedly until "RPT OFF" appears. Press ENTER.

Note
After performing repeat play, be sure to press Otherwise, the disc will play continuously.
During repeat play, random play is not possible.
Random play
The tracks on the disc can be played in random order automatically.
To random play all tracks:
Press RANDOM repeatedly until "RDM ON" appears. Press ENTER.
To cancel random play:
Press RANDOM repeatedly until "RDM OFF" appears. Press ENTER.

Note
- If you press the I during random play, you can move to the track selected next by the random operation. On the other hand, the does not allow you to move to the previous track. The beginning of the track being played will be located.
- In random play, the unit will select and play tracks automatically. (You cannot select the order of the tracks.)
During random play, repeat play is not possible.
Programmed play (CD or MP3/WMA)
You can choose up to 32 selections for playback in the order you like.
1 Whilst in the stop mode, press MEMORY/PROGRAM on the remote control to enter the programming save mode.
2 Press or the numeric buttons on the remote control to select the desired tracks.
3 Press ENTER to save folder and track number.
4 Repeat steps 2 to 3 for other folder/tracks. Up to 32 tracks can be programmed.
- If you want to check the programmed tracks, press MEMORY/PROGRAM.
- If you make a mistake, the last programmed tracks will be canceled by pressing CLEAR.
5 Press to start playback.
To cancel the programmed play mode:
To cancel the programmed play, press twice on the remote control. The display will show "PRG CLR" and all the programmed content will be cleared.
Adding tracks to the program:
Press the MEMORY/PROGRAM. Then follow steps 2 to 3 to add tracks.

Note
- When a disc is ejected anything programmed is cleared.
- If you press the STANDBY/ON to enter the standby mode or change the function from CD to another, the programmed selections will be cleared.
- During the program operation, random play is not possible.
About downloading MP3/WMA
There are many music sites on the internet that you can download MP3/WMA music files. Follow the instructions from the website on how to download the music files. You can then play back these downloaded music files by burning them to a CD-R/RW disc.
- Your downloaded song/files are for personal use only. Any other usage of the song without owner's permission, is against the law.
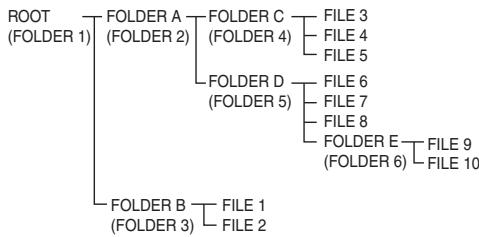
About folder playback order
If MP3/WMA files are recorded in several folders, a folder number will be set to each folder automatically.
These folders can be selected by the FOLDER on the remote control. If there is no supported file formats inside the selected folder, the folder is skipped and the next folder will be selected.
Example: How the folder numbers are assigned if MP3/WMA format files are recorded are as shown below.
1 ROOT folder is set as FOLDER 1.
2 As for folders inside ROOT folder (FOLDER A and FOLDER B), the folder which is recorded earlier on the disc will be set as FOLDER 2 and FOLDER 3.
3 As for folder inside FOLDER A (FOLDER C and FOLDER D), the folder which is recorded earlier on the disc will be set as FOLDER 4 and FOLDER 5.
4 FOLDER E that is inside FOLDER D will be set as FOLDER 6.
- The folder and file order information which is recorded on the disc depends on the writing software. There may be possibilities that this unit will playback the files not according to our expected playback order.
- From a disc with MP3/WMA files up to 255 folders and 999 files (including non playable files) can be read.
Specify the folder to play
To specify the folder to play, perform the following steps.
1 Press CD, and load an MP3/WMA disc.
2 Press FOLDER, and press ↑/↓ to select desired playback folder.
3 Press ENTER.
Playback will start from the first song of the selected folder.
Even if it is stopped, it is possible to press / , to select a folder.
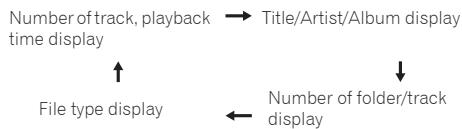
Switch the display contents
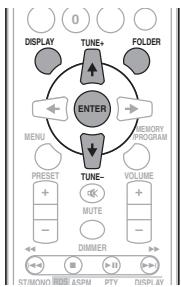
1 Press DISPLAY.
If the title, artist and album name has been written to the file, that information will be displayed. (The unit can only display alphanumeric characters. Non-alphanumeric character are displayed as **.

Note
- "Copyright protected WMA files" or "Unsupported files" cannot be played back. In these case the files will be skipped automatically.
- There may be cases where no information can be displayed.
- Displaying title, artist and album name is only supported for MP3 files.
Chapter 7:
USB playback
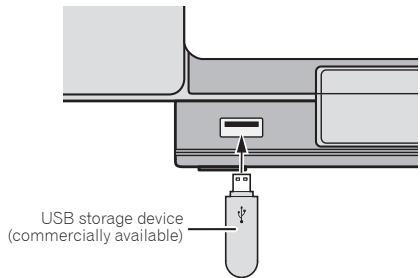
Playing USB storage devices
It is possible to listen to two-channel audio using the USB interface on the front of this receiver.
- Pioneer does not guarantee that any file recorded on a USB storage device will play or that power will be supplied to a USB storage device. Also note that Pioneer will accept no responsibility whatsoever for loss of files on USB storage devices caused by connection to this unit.
1 Press USB as the input source.
"USB/IPOD" is shown on the main display.
2 Connect the USB storage device.
The number of folders or files stored on the connected USB storage device appear on the main display automatically.
- This receiver does not support a USB hub.
- If an iPod/iPhone/iPad mini is connected to the unit, the unit will automatically begin charging it.
3 When the recognition is completed, press to start playback.
- When changing to a different input source, stop the USB memory playback first, before changing.
4 Disconnect USB storage device from the iPod/iPhone terminal.
Turn the power off before removing the USB storage device.

Note
- USB flash drive that supports USB 2.0 can be used.
- This unit may not recognize a USB storage device, play files or supply power to a USB storage device. For details, see When a USB storage device is connected on page 32.
- When a USB storage device is not playing and no operations have been performed for more than 30 minutes, the unit will automatically power off.
Repeat play
Repeat play can play one track, all tracks or a programmed sequence continuously.
To repeat one track:
Press REPEAT repeatedly until "RPT ONE" appears. Press ENTER.
To repeat all tracks:
Press REPEAT repeatedly until "RPT ALL" appears. Press ENTER.
To repeat desired tracks:
Perform steps 1 to 5 in "Programmed play (CD or MP3/WMA)" section on next page and then press REPEAT repeatedly until "RPT ALL" appears. Press ENTER.
To cancel repeat play:
Press REPEAT repeatedly until "RPT OFF" appears. Press ENTER.

Note
- After performing repeat play, be sure to press. Otherwise, the file of USB storage device will play continuously.
During repeat play, random play is not possible.
Random play
The file of USB storage device can be played in random order automatically.
To random play all tracks:
Press RANDOM repeatedly until "RDM ON" appears. Press ENTER.
To cancel random play:
Press RANDOM repeatedly until "RDM OFF" appears. Press ENTER.

Note
- If you press the during random play, you can move to the track selected next by the random operation. On the other hand, the does not allow you to move to the previous track. The beginning of the track being played will be located.
- In random play, the unit will select and play tracks automatically. (You cannot select the order of the tracks.)
- During random play, repeat play is not possible.
Specify the folder to play
To specify the folder to play, perform the following steps.
1 Press USB, and connect the USB storage device.
2 Press FOLDER, and press / to select desired playback folder.
3 Press ENTER.
Playback will start from the first song of the selected folder.
Even if it is stopped, it is possible to press / , to select a folder.
Switch the display contents
The unit can display the information recorded in the USB storage device. For details, see Switch the display contents on page 21.
Playing in the desired order (Programmed Play)
The unit can play folders stored on a USB storage device in the desired order. For details, see Programmed play (CD or MP3/WMA) on page 20.
Chapter 8:
Using the tuner
Listening to the radio broadcasts
The following steps show you how to tune in to FM radio broadcasts using the automatic (search) and manual (step) tuning functions. Once you are tuned to a station you can memorize the frequency for recall later. See Saving station presets below for more on how to do this.
Tuning
1 Press the STANDBY/ON to turn the power on.
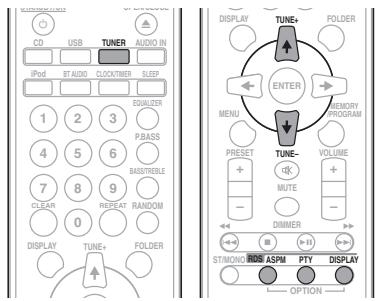
2 Press TUNER.
3 Press TUNE + / - on the remote control to tune in to the desired station.
Automatic tuning:
Press and hold TUNE +/- , scanning will start automatically and the tuner will stop at the first receivable broadcast station.
Manual tuning:
Press the TUNE + / - repeatedly to tune in to the desired station.

Note
- When radio interference occurs, automatic tuning may stop automatically at that point.
Automatic tuning will skip weak signal stations. - To stop the automatic tuning, press.
- When an RDS (Radio Data System) station is tuned in, the frequency will be displayed first. Finally, the station name will appear.
Full auto tuning can be achieved for RDS stations using Auto Station Program Memory (ASPM) mode, see page 26.
To receive an FM stereo transmission:
- Press ST/MONO to select stereo mode and "AUTO" will be displayed.
Improving poor FM reception:
1 Press ST/MONO repeatedly to select MONO.
This will change the tuner from stereo to mono and usually improve the reception.
Saving station presets
If you often listen to a particular radio station, it's convenient to have the receiver store the frequency for easy recall whenever you want to listen to that station (Preset tuning). This saves the effort of manually tuning in each time. This unit can memorize up to 30 stations.
1 Tune to a station you want to memorize.
See Tuning above for more on this.
2 Press MEMORY/PROGRAM.
The preset number will flash.
3 Press PRESET + / - to select the preset channel number.
4 Press MEMORY/PROGRAM to store that station in memory.
If the preset number has changed from flashing to lighting, before the station is memorised, repeat the operation from step 2.
- Repeat steps 1 to 4 to set other stations, or to change a preset station. When a new station is stored in the memory, the station previously memorised for that preset channel number will be erased.

Note
- The backup function protects the memorised stations for a few hours should there be a power failure or the AC power cord become disconnected.
To recall a memorised station
1 Press PRESET + / - to select the desired station.
To scan the preset stations
The stations saved in the memory can be scanned automatically. (Preset memory scan)
1 Press and hold PRESET + / -
The preset number will appear and the programmed stations will be tuned in sequentially, for 5 seconds each.
2 Press PRESET + / - again when the desired station is located.
To erase entire preset memory
1 Press TUNER on the remote control.
2 Press CLEAR until "MEM CLR" appears.

All stations will be erased.
Using the Radio Data System (RDS)
An introduction to RDS
Radio Data System (RDS) is a system used by most FM radio stations to provide listeners with various kinds of information—the name of the station and the kind of show they're broadcasting, for example.
One feature of RDS is that you can search by type of program. For example, you can search for a station that's broadcasting a show with the program type, JAZZ.
You can search the following program types:
NEWS - News
AFFAIRS - Current Affairs
INFO - General Information
SPORT-Sport
EDUCATE - Educational
DRAMA - Radio plays, etc.
CULTURE - National or regional culture, theater, etc.
SCIENCE - Science and technology
VARIRED - Usually talk-based material, such as quiz shows or interviews.
POP M - Pop music
ROCK M - Rock music
EASY M - Easy listening
LIGHT M - 'Light' classical music
CLASSICS - 'Serious' classical music
OTHER M - Music not fitting above categories
WEATHER - Weather reports
FINANCE - Stock market reports, commerce, trading, etc.
CHILDREN - Programs for children
SOCIAL-Social affairs
RELIGION - Programs concerning religion
PHONE IN - Public expressing their views by Phone
TRAVEL - Holiday-type travel rather than traffic announcements
LEISURE - Leisure interests and hobbies
JAZZ-Jazz
COUNTRY - Country music
NATION M - Popular music in a language other than English OLDIES - Popular music from the '50s and' 60s
FOLK M - Folk music
DOCUMENT - Documentary
TEST - Broadcasting when testing emergency broadcast equipment or receivers.
ALARM - Emergency announcement made under exceptional circumstances to give warning of events causing danger of a general nature.
Searching for RDS programs
You can search a program type listed above.
1 Press TUNER on the remote control.
- RDS is only possible in the FM.
2 Press RDS PTY on the remote control.
"SELECT" will appear for about 6 seconds.
3 Press / to select the program type you want to hear.
Each time the button is pressed, the program type will appear. If the button is held down, the program type will appear continuously.
4 Whilst the selected program type is displayed (within 6 seconds), Press RDS PTY again.
After the selected program type has been lit for 2 seconds, "SEARCH" will appear, and the search operation will start.

Note
- If the display has stopped flashing, start again from step 2. If the unit finds a desired program type, the corresponding channel number will be lit for about 8 seconds, and then the station name will be displayed.
-
If you want to listen to the same program type of another station, press the RDS PTY whilst the channel number or station name is flashing. The unit will look for the next station.
-
If no station can be found, "NO FOUND" will appear for 4 seconds.
Information provided by RDS
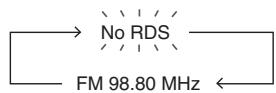
Each time the RDS DISPLAY is pressed, the display will switch as follows:

When tuning in to a station other than an RDS station or to an RDS station which sends weak signal, the display will change in the following order:
Using the Auto Station Program Memory (ASPM)
Whilst in the ASPM operation mode, the tuner will automatically search for new RDS stations. Up to 30 stations can be stored.
If you have already stored some stations in memory, the number of new stations you can store will be less.
1 Press TUNER on the remote control.
2 Press and hold down RDS ASPM on the remote control.
After "ASPM" has flashed for about 4 seconds, scanning will start (87.5 MHz to 108 MHz).
After scanning, the number of stations stored in memory will be displayed for 4 seconds, and then "END" will appear for 4 seconds.
To stop the ASPM operation before it is complete:
Press whilst it is scanning for stations. The stations which are already stored in memory will be kept there.

Note
- If the same station is broadcasting on different frequencies, the strongest frequency will be stored in memory.
- Any station which has the same frequency as the one stored in memory will not be stored.
- If 30 stations have already been stored in memory, the scan will be aborted. If you want to redo the ASPM operation, erase the preset memory.
- If no station have been stored in memory, "END" will appear for about 4 seconds.
- If the RDS signals are very weak, station names may not be stored in memory.
- The same station name can be stored in different channels.
- In a certain area or during certain time periods, the station names may temporarily be different.
Notes for RDS operation
If any of the following events occur, it does not mean that the unit is faulty:
- "PS", "No PS" and a station name appear alternately, and properly.
- If a particular station is not broadcasting properly or a station is conducting tests, the RDS reception function may not work properly.
- When you receive an RDS station whose signal is too weak, information like the station name may not be displayed.
- "No PS", "No PTY" or "No RT" will flash for about 5 seconds, and then the frequency will be displayed.
Notes for radio text:
- The first 8 characters of the radio text will appear and then they will scroll across the display.
- If you tune in to an RDS station which is not broadcasting any radio text, "No RT" will be displayed when you switch to the radio text position.
- Whilst radio text data is received or when the text contents change, "RT" will be displayed.
Chapter 9:
Other connections
CAUTION
- Before making or changing the connections, switch off the power and disconnect the power cord from the AC outlet.
Connecting auxiliary components
Connect the front panel AUDIO IN mini-plug jack to your auxiliary playback component.
- This method can be used to play music on this unit from iPod/iPhone/iPad mini that do not support use of an iPod Dock and iPod/iPhone terminal.
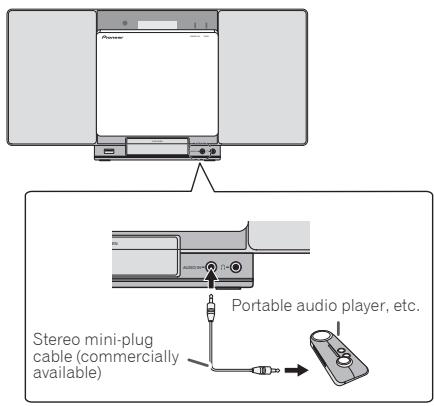
1 Switch input by pressing the INPUT on the main unit or the AUDIO IN on the remote control.
When INPUT is selected "AUDIO IN" will be displayed on the main display.
Note
- If the AUDIO IN mini-plug jack is connected to auxiliary phones jack, the volume of the unit will be adjusted by the volume on the playback component. If the sound is distorted after you lower the volume of the unit, try lowering the volume on the auxiliary playback component.
Chapter 10:
Bluetooth® Audio playback
Music playback using Bluetooth wireless technology

Bluetooth wireless technology enabled device: Cell phone

Bluetooth wireless technology enabled device: Digital music player
Device not equipped with Bluetooth wireless technology: Digital music player
B/teuetho® audio transmitter (commercially available)
Music data
The unit is capable of playing back music stored on Bluetooth capable devices (cell phones, digital music players etc.) wirelessly. You can also use a Bluetooth audio transmitter (sold separately) to enjoy music from devices that do not have Bluetooth functionality. Please refer to the user's manual for your Bluetooth capable device for more details.
The Bluetooth® word mark and logos are registered trademarks owned by Bluetooth SIG, Inc. and any use of such marks by PIONEER CORPORATION is under license. Other trademarks and trade names are those of their respective owners.
Pairing with the unit (Initial registration)
In order for the unit to playback music stored on a Bluetooth capable device, pairing must first be performed. Pairing should be performed when first using the unit with the Bluetooth capable device, or when the pairing data on the device has been erased for any reason. Pairing is a step required to allow communication using Bluetooth wireless technology to be carried out.
- Pairing is only performed the first time that you use the unit and the Bluetooth capable device together.
- In order to allow communication using Bluetooth wireless technology to take place, pairing must be performed on both the unit and the Bluetooth capable device.
After pressing the BT AUDIO and switching to BT AUDIO input, perform the pairing procedure on the Bluetooth capable device. If pairing has been performed correctly, you will not need to perform the pairing procedures for the unit as shown below.
Please refer to the user's manual for your Bluetooth capable device for more details.
1 Press the STANDBY/ON and turn the power to the unit on.
2 Press the BT AUDIO.
The unit switches to BT AUDIO and PAIRING will be displayed.
3 Turn on the power to the Bluetooth capable device that you wish to pair with, and perform pairing procedure on it.
Pairing will start.
- Place the Bluetooth capable device close to the unit.
- Please refer to the user's manual for your Bluetooth capable device for details on when pairing can be performed and the procedures required for pairing.
- When PIN code entry is requested, enter '0000'. (This unit does not accept any PIN code setting other than '0000').
4 Confirm on the Bluetooth capable device that pairing has been completed.
If pairing with the Bluetooth capable device has been completed correctly, the name of the Bluetooth capable device will be displayed on the front panel of the unit. (Only single-byte alphanumeric characters can be displayed. Any character that cannot be displayed will be indicated by a **
Listen to music on the unit from a Bluetooth capable device
1 Press the BT AUDIO.
The unit will switch to BT AUDIO input.
2 A Bluetooth connection will be created between the Bluetooth capable device and the unit.
Procedures for connecting to the unit should be performed from the Bluetooth capable device.
- Please refer to the user's manual for your Bluetooth capable device for details of the connection procedures.
3 Playback music from the Bluetooth capable device.
Radio wave caution
This unit uses a 2.4 GHz radio wave frequency, which is a band used by other wireless systems (see list below). To prevent noise or interrupted communication, do not use this unit nearby such devices, or make sure these devices are switched off during use.
- Cordless phones
- Cordless facsimiles
- Microwave ovens
- Wireless LAN devices (IEEE802.11b/g)
- Wireless AV equipment
- Wireless controllers for game systems
- Microwave-based health aids
Some baby monitors
Other, less common, equipment that may operate on the same frequency:
- Anti-theft systems
- Amateur radio stations (HAM)
Warehouse logistic management systems - Discrimination systems for train or emergency vehicles

Note
- In the event noise appears in your television image, there is the possibility that a Bluetooth wireless technology enabled device or this unit (including products supported by this unit) are causing signal interference with the antenna input connector of your television, video, satellite tuner, etc. In this event, increase the distance between the antenna input connector and the Bluetooth wireless technology enabled device or this unit (including products supported by this unit).
- If there is something obstructing the path between this unit (including devices supported by this unit) and the device equipped with Bluetooth wireless technology (such as a metal door, concrete wall, or insulation containing tinfoil), you may need to change the location of your system to prevent signal noise and interruptions.
Scope of operation
Use of this unit is limited to home use. (Transmission distances may be reduced depending on communication environment).
In the following locations, poor condition or inability to receive radio waves may cause the audio to be interrupted or stopped:
- In reinforced concrete buildings or steel framed or iron-framed buildings.
Near large metallic furniture.
In a crowd of people or near a building or obstacle. -
In a location exposed to the magnetic field, static electricity or radio wave interference from radio communication equipment using the same frequency band (2.4 GHz) as this unit, such as a 2.4 GHz wireless LAN device (IEEE802.11b/g) or microwave oven.
-
If you live in a heavily populated residential area (apartment, townhouse, etc.) and if your neighbor's microwave is placed near your system, you may experience radio wave interference. If this occurs, move your unit to a different place. When the microwave is not in use, there will be no radio wave interference.
Radio wave reflections
The radio waves received by this unit include the radio wave coming directly from the device equipped with Bluetooth wireless technology (direct wave) and waves coming from various directions due to reflections by walls, furniture and building (reflected waves). The reflected waves (due to obstacles and reflecting objects) further produce a variety of reflected waves as well as variation in reception condition depending on locations. If the audio cannot be received properly due to this phenomenon, try moving the location of the device equipped with Bluetooth wireless technology a little. Also note that audio may be interrupted due to the reflected waves when a person crosses or approaches the space between this unit and the device equipped with Bluetooth wireless technology.
Precautions regarding connections to products supported by this unit
- Complete connections for all devices supported by this unit, including all audio cords and power cables before connecting them to this unit.
After completing connections to this unit, check the audio and power cables to confirm that they not twisted together. - When disconnecting this unit, confirm that you have sufficient working space in the surrounding area.
- When changing connections of audio or other cables for products supported by this unit, confirm that you have sufficient working space in the surrounding area.
Chapter 11:
Additional information
Troubleshooting
Incorrect operations are often mistaken for trouble and malfunctions. If you think that there is something wrong with this component, check the points below. Sometimes the trouble may lie in another component. Investigate the other components and electrical appliances being used. If the trouble cannot be rectified even after exercising the checks listed below, ask your nearest Pioneer authorized service center or your dealer to carry out repair work.
- If the unit does not operate normally due to external effects such as static electricity disconnect the power plug from the outlet and insert again to return to normal operating conditions.
General problem
| Problem | Check | Remedy |
| Settings you have made have been cleared. | Was the power cord unplugged? | When power cord is unplugged, the settings you have made is cleared. Please set the clock again. If you do not want to clear the settings, do not unplug the power cord. |
| Difference in volume between CDs, MP3, WMA, iPod/Phone/iPad mini, Tuner and AUDIO IN. | This is not a problem with this unit. | The volume may sound differently depending on the input source and recording format. |
| This unit cannot be operated with the remote control. | Are you operating from far away? | Operate within 7 m, 30° of the remote sensor on the front panel (page 6). |
| Is the remote control sensor exposed to direct sunlight or strong artificial light from a fluorescent bulb, etc.? | The remote control signals may not be received properly if the remote control sensor is exposed to direct sunlight or strong artificial light from a fluorescent bulb, etc. | |
| Are the batteries dead? | Replace the batteries (page 5). | |
| Disc cannot be played. | Is the disc scratched? | Scratched discs may not play. |
| Is the disc dirty? | Wipe the dirt off the disc (page 35). | |
| Is the disc inserted correctly? | Make sure that the printed label is facing outward, visible to you (page 18). | |
| Is this unit placed in a humid location? | There could be condensation inside. Wait a while for the condensation to evaporate. Do not place this unit near an air-conditioner, etc. (page 35). | |
| Sound skips when the disc is played back. | Is the playback volume too loud? | If the sound skips when played back at a loud volume, reduce the playback volume (page 13). |
| Folder or file names are not recognized. | Have you exceeded the maximum number of folder or file names this unit can recognize? | Up to 255 folders can be recognized on one disc. Up to 999 files can be recognized within one folder. Depending on the folder structure, however, this unit may not be able to recognize certain folders or files. |
| The unit turns off automatically. | If no play back and no operation has done for 30 minutes or more, the unit turns off automatically. | |
| Unable to connect to aBluetooth capable device, no sound comes out at all or sound cuts out when connected. | Are there any devices nearby that emit electromagnetic waves in the 2.4 GHz band (microwaves, wireless LAN devices, otherBluetooth capable devices etc.)? | If so, either move these devices away from the unit, or stop using other devices that emit electromagnetic waves. |
| Is theBluetooth capable device too far away from the unit, or is there something between them? | Place theBluetooth capable device inside the same room, with no obstacles between them, and within a range of 10 m *. * Only a suggested range. The actual possible communication range may change depending upon the surrounding environment. | |
| Is theBluetooth capable device set to a mode that allows forBluetooth wireless communication? | Check the settings on theBluetooth capable device. | |
| Has pairing not been completed successfully, or has either the unit or theBluetooth capable device erased the previous pairing setting? | Perform the pairing operation again. | |
| Does the device you are trying to connect have a supported profile? | Please use aBluetooth capable device that supports A2DP. |
When a USB storage device is connected
| Problem | Check | Remedy |
| USB storage device is not recognized. | Is the USB storage device properly connected? | Connect the device securely (all the way in). |
| Is the USB storage device connected via a USB hub? | This unit does not support USB hubs. Connect the USB storage device directly. | |
| Is the USB storage device supported by this unit? | This unit only supports USB mass storage class devices. | |
| This unit supports portable flash memory and digital audio playback devices. | ||
| Only the FAT16 and FAT32 file systems are supported. Other file systems (exFAT, NTFS, HFS etc.) are not supported. | ||
| USB flash drive that supports USB 2.0 can be used. | ||
| This device does not support the use of external hard disc drives. | ||
| This is not a problem with this unit. | Turn the power off then back on. | |
| Some USB storage devices may not be recognized properly. | ||
| File cannot be played. | Is the file copyright-protected (by DRM)? | Copyright-protected files cannot be played. |
| This is not a problem with this unit. | Files stored on a computer cannot be played. | |
| It may not be possible to play some files. | ||
| Folder or file names are not displayed or are not properly displayed. | Do the folder or file names contain more than 30 characters? | The maximum number of characters displayable for the folder and file names is 30. |
| Folder or file names are not displayed in alphabetical order. | This is not a problem with this unit. | The order in which the folder and file names are displayed depends on the order in which the folders or files were recorded on the USB storage device. |
| Much time is required to recognize the USB storage device. | What is the USB storage devices capacity? | Some time may be required to load the data when large capacity USB storage devices are connected (this could take several minutes). |
| Power is not supplied to the USB storage device. | Is AUTH ERR displayed on the front panel display? No power is supplied if the power consumption is too high. | Turn the power off then back on. |
| Turn the power off, then disconnect and reconnect the USB storage device. | ||
| Press INPUT to switch to the other mode, then switch again to the USB mode. |
When an iPod/iPhone/iPad mini is connected
| Problem | Remedy |
| Can't operate the iPod/iPhone/iPad mini by the remote control. | Make sure the iPod/iPhone/iPad mini is connected correctly (refer to Connecting your iPod/iPhone on page 16). |
| Can't operate the iPod/iPhone/iPad mini. | Make sure the iPod/iPhone/iPad mini is connected correctly (refer to Connecting your iPod/iPhone on page 16).If the iPod/iPhone/iPad mini is experiencing a hangup, try resetting the iPod/iPhone/iPad mini, and reconnect it to the unit. |
Playable discs and formats
| Audio CD | • Commercially available audio CDs • CD-R/ -RW/ -ROM discs containing music recorded in the CD-DA format |
| WMA | WMA files recorded on CD-R/ -RW/ -ROM discs or USB storage devices |
| MP3 | MP3 files recorded on CD-R/ -RW/ -ROM discs or USB storage devices |
Only the discs that have been finalized can be played.
- Discs recorded in packet write mode (UDF format) are not compatible with this unit.
Corporation and product names mentioned herein are trademarks or registered trademarks of the respective corporations.
Only discs recorded in ISO9660 Level 1, Level 2 and Joliet can be played.
- Files protected by DRM (Digital Rights Management) cannot be played.

Note
- This unit does not support multisession discs or multiborder recording.
- Multisession/multiborder recording is a method in which data is recorded on a single disc in two or more sessions/borders. A "session" or "border" is one recording unit, consisting of a complete set of data from lead-in to lead-out.
Regarding copy protected CDs
This unit is designed to conform to the specifications of the audio CD format. This unit does not support the playback or function of discs that do not conform to these specifications.
Supported audio file formats
- This unit does not support lossless encoding.
Cautions on use
When moving this unit
When moving this unit, be sure to first check that there is no disc loaded and disconnect the iPod/iPhone/iPad mini. Then press STANDBY/ON, wait for "STANDBY" disappears on main display to turn off, then unplug the power cord. Damage may occur if the unit is transported or moved with a disc inserted, or when another device is connected to the iPod/iPhone connector port, iPod/iPhone terminal, or AUDIO IN mini-plug jack.
Place of installation
- Choose a stable place near the TV or stereo system being used with this unit.
- Do not place this unit on top of a TV or color monitor. Also install it away from cassette decks and other devices easily affected by magnetic forces.
Avoid the following locations:
- Places exposed to direct sunlight
- Humid or poorly ventilated places
- Extremely hot places
- Places exposed to vibrations
- Places in which there is much dust or cigarette smoke
- Places exposed to soot, steam or heat (kitchens, etc.)
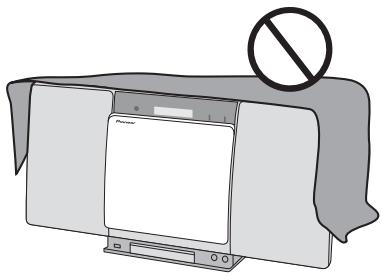
Do not place objects on this unit
Do not place any objects on top of this unit.
Do not obstruct the ventilation holes.
Do not use this unit on shaggy rugs, beds, sofas, etc., or wrapped in cloth, etc. Doing so will prevent the heat from dispersing, leading to damage.
Do not expose to heat.
Do not place this unit on top of an amplifier or other component that generates heat. When rack mounting it, to avoid the heat given off by the amplifier or other audio component, place it on a shelf below the amplifier.
- Turn off the unit's power when not using it.
Depending on signal conditions, striped patterns may appear on a TV screen and noise may enter the sound of radio broadcasts when the unit's power is on. If this happens, turn the unit's power off.
About condensation
If this unit is moved suddenly from a cold place into a warm room (in winter, for example) or if the temperature in the room in which this unit is installed rises suddenly due to heater operation, etc., water droplets (condensation) may form inside (on operating parts and the lens). When condensation is present, this unit will not operate properly and playback is not possible. Let this unit stand at room temperature for 1 or 2 hours with the power turned on (the time depends on the extent of condensation). The water droplets will dissipate and playback will become possible. Condensation can also occur in the summer if this unit is directly exposed to the air flow from an air-conditioner. If this happens, move this unit to a different place.
Cleaning the product
- Unplug the power cord from the power outlet when cleaning this unit.
- Clean this unit using a soft cloth. For tough dirt, apply some neutral detergent diluted in 5 to 6 parts water to a soft cloth, wring out thoroughly, wipe off the dirt, then wipe again with a soft, dry cloth.
- Alcohol, thinner, benzene, insecticides, etc., could cause the print or paint to peel off. Also, leaving rubber or vinyl products in contact with this unit for long periods of time could mar the cabinet.
- When using chemical-impregnated wipes, etc., read the cautions included with the wipes carefully.
Cleaning the lens
- This unit's lens should not become dirty in normal use, but if for some reason it should malfunction due to dust or dirt, consult your nearest Pioneer authorized service center. Although lens cleaners for players are commercially available, we advise against using them since some may damage the lens.
Handling discs
Storing
Always place discs in their cases and store them vertically, avoiding hot, humid places, places exposed to direct sunlight and extremely cold places.
- Be sure to read the cautions included with the disc.
Cleaning discs
- Discs may not play if there are fingerprints or dust on them. In this case, use a cleaning cloth, etc., to gently wipe the disc from the inside towards the outside. Do not use dirty cleaning cloths.
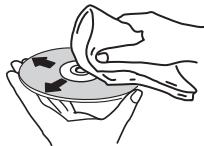
- Do not use benzene, thinner or other volatile chemicals. Also do not use record spray or antistatic agents.
- For tough dirt, apply some water to a soft cloth, wring out thoroughly, wipe off the dirt, then wipe off the moisture with a dry cloth.
- Do not use damaged (cracked or warped) discs.
- Do not let the signal surface of discs get scratched or dirty.
- Do not attach pieces of paper or stickers to discs. Doing so could warp discs, making it impossible to play them. Also note that rental discs often have labels attached to them, and the label's glue may have oozed out. Check that there is no glue around the edges of such labels before using rented discs.


About specially shaped discs
Specially shaped discs (heart-shaped, hexagonal, etc.) cannot be played on this unit. Do not attempt to play such discs, as they could damage this unit.

About iPod/iPhone
Made for

iPod

iPhone
"Made for iPod" and "Made for iPhone" mean that an electronic accessory has been designed to connect specifically to iPod or iPhone, respectively, and has been certified by the developer to meet Apple performance standards. Apple is not responsible for the operation of this device or its compliance with safety and regulatory standards. Please note that the use of this accessory with iPod or iPhone may affect wireless performance.
iPhone, iPod, iPod nano and iPod touch are trademarks of Apple Inc., registered in the U.S. and other countries.
Restoring all the settings to the defaults
Use the steps below to restore the all settings to their defaults.
1 Press STANDBY/ON to turn the power on.
2 Press CD on the remote control or INPUT repeatedly on the main unit to select CD input.
3 Press OPEN/CLOSE to open the electric slide CD door.
4 Press STANDBY/ON while pressing.
Use the buttons on this unit's top panel. "DEFAULT" is displayed while the settings are being restored. Power is turned off.
Specifications
- Amplifier section
RMS Power Output: 10 W + 10 W
(1 kHz, 10%, T.H.D., 8Ω)
Tuner section
Frequency Range (FM). 87.5 MHz to 108 MHz
Antenna Input (FM) 75Ω unbalanced
Miscellaneous
iPod/iPhone connector port 5V,1A
iPod/iPhone terminal 5V,1A
Power source AC 100 V to 240 V, 50 Hz/60 Hz
Power consumption
Power on. 25 W
Power stand-by. .0.5 W or less
Dimensions. 430 mm (W) x 218 mm (H) x 114 mm (D)
Weight (without package) 2.9 kg
Speaker
Type
Passive radiator
Fullrange 6.6 cm cone
Passive radiator 7.7 cm cone
Playback frequency range. 60 Hz to 20 kHz
- Accessories
Remote control. 1
ACadapter 1
Changeable panel
(X-SMC00-W and X-SMC00BT-W do not have an
interchangeable panel in the box) 2
AAA batteries (R03) 2
FM wire antenna. 1
iPhone stand. 1
Warranty card
Operating instructions (This document)
Note
- Specifications and the design are subject to possible modifications without notice, due to improvements.
© 2013 PIONEER CORPORATION.
All rights reserved.
ATTENTION
POUR EVITER TOUT RISQUE D'ÉLECTROCUTION, NE PAS ENLEVER LE COUVERCLE (NI LE PANNEAU ARRÊRIÈ). AUCUNE PIECE REPARABLE PAR L'UTILISATEUR NE SE TROUVE À L'INTERIEUR. CONFIER TOUT ENTRETION À UN PERSONNEL QUALIFIÉ UNIQUÉMENT.
D3-4-2-1-B1_Fr
AVERTISSEMENT
(1 kHz, 10%, T.H.D., 8Ω)
Sectiontuner
© 2013 PIONEER CORPORATION.
This is the first example of an undetermined displayanzeige. The displayanzeige, which is a displayanage, is a displayanage in which the displayanage is not determined by the displayanage itself.
(1 kHz, 10%, THD, 8Ω)
Tunerbereich
© 2013 PIONEER CORPORATION.
Connetteri I'Pod/iPhone
ATTENZIONE
EDUCATE -Programmi educativi
(1 kHz, 10%, T.H.D., 8Ω)
© 2013 PIONEER CORPORATION.
KLASSE 1 LASERPRODUCT
D58-5-2-2a_A1_NI
WAARSCHUWING
WAARSCHUWING NETSNOER
BT AUDIO-toets (X-SMC00BT)
(1 kHz, 10%, T.H.D., 8Ω)
- Tunergedeelte
Frequentiebereik (FM) 87,5 MHz tot 108 MHz
© 2013 PIONEER CORPORATION.
Busesueda directadepistas 19
Busesuede programs RDS 25
Siwhelmingly, the sales of the products were very good. The sales of the products were very good.
EDUCATE - Material educative DRAMA - Radionovelas, etc.
CULTURE - Cultura nacional o regional, teatro, etc.
WEATHER-Informs meteorologicos
Se做不到 "SELECT" during one hour.
© 2013 PIONEER CORPORATION.
JIA3EPHbI IPODyKT KJIACC 1
D58-5-2-2a_A1_Ru
PNEyPPEKDEHNE
XpaHNTe He6oBbIme DetarN BHe Doctyna Detei. PnI CnyHOM 3aIaTbIBaHN, HemeDJIeHNO o6paauTeCb K bpaUy.
D41-6-4_A1_Ru
HOpMaunI nnb3oBateNe no c6opy uyttnnaumn 6bIBwero B 3cknnyaataunn o6opydobAHn n OTPa6otabux 3neMeHTOB nHTAHN
0603NaeHne 1nnaOpdyoBaHn

0603haeHnnaI INIa 3neMeHTOB NITAHnIa

3THO603NaueHnHa IPOyKuHH, ynaKOBKe, H/IIIN cOpBOJNTeJIbIbIX DOkUMeHTax O3NaHauOT, YTO 6BbIaII B 9CKIJIYATAIHH 3JEKTPOTeXHNeCckA N 3JEKTPOHnA INoDyKcIIH OtpaOToAHHe 3JIeMeHTbI bTIaTHAn He DIOJIHKbI BbIpaCBaTbcBAMeCTe C oBbIbIM 6bITobM MycOpOM.
IITTOY06bIaHHaA BbHbIaB YNtOpe6JIeHHINPOJyKIIH NOTpABoTaHHbIeJIeMeHTbI INTHAHbIcOHTBeCTCBIOOHMOBpa3OMIObApOaTbHI,ytHNH3IOPABOAHbI NIEpePabOaHTbI,POKaJIyCTa,IEpeDAJIteHX BCOBTBeCTCBIOHIMYHKCTcOpaHcNOJIb3OBAHbIX 3JIeKTPOHHbIX H3dJIeHH B COOTBECTCBHI C MeCTHbIMaKHOJaTeJIbCTBOM.
YTHIN3Hpya DaHHbE yctpoiCTBa H ⅢeMeHTb IITaHHN IIpaBnJIbHO, Bbl NOMoAte CoXpAHNTb IHeHHbE pceCybI h IpeIOTbrATHT bO3MOKbHE HeTATNBHe IIOcJIeCTBnI J3IOpOBbI IOJeI h OkpyKaIOuIIe cpeIbI, KOTOpBe MOrT bO3HNKHyT b Pe3yIbTaTe HEco0BTcTBYIOUe OdaJIeHH oTxOIOB.
IJIIOJIyUeHIN DIOIOIHInTeHbHOIN HnFOpMaIIHN O pNABHbHbIX CnOcO6aX c6Opa H yTHIN3aIINOTAPoBAtiIEBOOpyHAnH IN HCIOIISOBAHbHX 3JIeMeHTOB INHTAHnn ObaIaIteB C oOTBeTCTByIoIe MeCtHbIe OprAHI bCaMOIPaBJIeHN, B IeHTpbl yTHIN3aIINOTOXIOB HIN IO MeCTy IIOKUYIKN DAHHOr H3JIeJIIN.
01 Pered nauanom pa6oTbI
KOMIIJEKTIOCTaBKN 5
YcTaHObKa 6aTapeeK B IyIbT IInCTaHIOHHO
yipabJIeHn 5
HcIOJIb3OBaHHe IyJIbTa IINCTaHIIHOHHOrO yIpaBJIeHn . 6
02 Ha3BaHnuaCTeN uФyHKcMn
IyJB7
IIOBBeINHbHne anIIpaTa Ha cTeHy 8
IpeDnnaHeJIb 9
BepxHra PAnHeJIb/3aIHHra PAnHeJIb 10
3aMeHa cMeHHoI IaHeJIH 11
03 PoioknloueHna
PiokJIIOueHHe aHTeHHbI 12
HcIOJIb3OBaHHe BHEIIHHx aHTeHH 12
BkJIIOUeHHe B ceTb 12
04 Haayano pa6o7b1
IIIBKJIIOUeHnI\PHTaHHN 13
HacrpoiKa Yacob 13
O6IeeyIpaBJIeHne 13
_HKII BBOa 13
PeryIipOBaHHe IpKocTH IHCIIe 13
ABTomathueckay yctaHOBka rPOMKoCTH 13
PeryJIINPOBaHHe rPOMKocTH 13
IIprHJIyIeHHe 3ByKa. 14
YIIpaBJIeHHe 3ByKOM 14
3KbJaI3ep. 14
PeryInpOBAHHe Hn3KHX qACTOT (peKHM P.BASS). 14
PeryIINPOBka TEM6pa Hn3KHX/ByICOKHX qactOT 14
HacpoiKa TaMepa BKIOUeHn 14
Bb3OB TaHMepa BKJIIOueHHN 15
OTMeHa TaMepa BKJIOueHnra 15
HcIOJIb3OBaHNHe TaIMepa BKJIOUeHHN 15
HcnoJIb3OBAHHe TaIMepe OTKJIIOUeHn 15
HcnoJIb3OBaHHe HayIIHHKOB 15
05 Bocnpoun3BedeHne iPod/iPhone/iPad mini
ПOTТВЕРЖДЕНИЕ ПОЛДЕРЖКМОЛЕЙ iPod/iPhone/iPad mini 16
IIOKJIIOUeHHe iPod/iPhone 16
IIOdkIOHHeNEiPod/iPhone/iPad mini c HNIOJI3OBAHENI 彭伊拉桑梅OIOCTABKNi PhOe 17
BocpoH3BeHeiPd/iPhone/iPad mini 17
06 Bocnpon3BedeHne Dncka
BocpoH3BeDeHHe HsckOB HIN aHIOB 18
YcoBepHHeCTBOBaHHoe BOCnpoH3BeDeHne HnckOB CD nHn
MP3/WMA 19
IIpMaMoI IOnsK IopOxKn 19
IIOBTOPHoe BOCIIPOH3BeJeHHe 19
BocpoH3BeHeHb ClyaHNoIocJeIOBaTeJIbHOCTn... 19
3aiporpaMmPbAHHoe Bocnpn3BeJHHe (CD HJMP3/WMA). 20
O 3aŋpy3ke ΦaɪJIOB MP3/WMA. 20
O npjaKe Bocippon3BeJeHnHaIKn 20
Bb6op IIaIKN IJI BOCIIPOH3BeDeHnI. 21
IpekeJIIOUeHHe coIepKHMOrO IHCIIeJ. 21
07 Bocnpon3BedeHne c USB
BocpoH3BeEHeH 3aIOMHaHOiHX yCtpoiCTB USB .22
IIOBTOHoe BOCIOPOH3BeJeHHe 22
BocpoH3BeHe H B cIyauHoi IocJIeIOBaTeIbHOCTn. 23
Bb6op IaIKN IJI BOCIIPOH3BeJeHH 23
IpekeJIOueHHe coJepeKHMOrO nHcIIeR 23
BocpoH3BeDeHHe BKeJaEMOMIopRJKe
(3aIpOprpaMMHPOBaHHoe BocIpOn3BeJeHne) 23
08 NcnoJb3ObaHne TIOhepa
IpocJyHbAHne paHnopeauch 24
Hacroka 24
CoxpaHeHHe 3aIporpamMnpoBaHHbIX paAnocTaHcH..24
IIIBbI3OBA 3aHeceHHoB IaMaTb CTaHcHn. 25
IIaCKaHHPOBaHHIpeDyCTaHOBJIeHHbIX CTaHcH. 25
IIIOJHORO CTnpaHHIpeDyCTaHOBJeHHoI IaMTH 25
HcIOJIb3OBaHHe cHCTeMbI paJINoJaHHbIX (RDS) .25
6 KhoNkynypnbJeHnY DISPLAY
Hajmnte IJIpeKJIIOUeHHI JIcIJIe IPIH BocipOn3BVeJeHHI IeCeH c CD H.II USB (ctp. 21).
FOLDER
HcnoIb3yyte DIA Bb6opa HnKn DnKs Ka MP3/WMA IHH 3aIOMHaIOeO YoCTBa 6oJIIOH eMkOCTh USB (ctp.20).
MENU
HcnoIb3yIte IJIIOCTyIa K MeHO.
MEMORY/PROGRAM
HcnoJIb3yIteJIA 3aIOMHHaHHN HIN IpoIgpaMMHPOBaHHa HnCKa MP3/WMA (ctp.20).
7 / / / (TUNE +/- ), ENTER
HcNIOJIyIeI IaIb6Opa/NepeKIOUHeHNEA HCTPOE KCHTcEMbI KEPKMOH II aIIOITBepKJHEIN DEiCTBN.
KHOIIKN TUNE + / - MOYr HcIOJIb3OBaTbcra IINHCKa paIIOHocACTOT (ctp. 24).
8 PRESET + / -
HcnoJIb3yIte DJIa BbI6opa 3aInporpaMMNPOBaHHbIX paIHOCTaHI (ctp.25).
9 MUTE
OTKJIIOUHHe/BBKJIIOUHHe 3ByKa (cTp.14).
10 Khonkn ynpabJeHnB BocnpOn3BeDeHnEm
HcnoJIb3yIte IJIA yIipABJIeHHaKaKdIOyHKnHeIIOcJIe ee bIbOpa c NOMOIIbO KHOIIOK oYHKIIIN BxoJa (ctp. 18).
11 KhoIKN ynpaBneHn Tuner ST/MONO
HcnoJIb3yETcI,IIaIpeKIOUOeHNHe peKHMa 3BvauHnM MeKJy cTepeofoHHueckHM mHOofoHHueckHM peKHMamH (ctp.24).
RDS ASPM
HcNIOJI3yITTEI INOHOCKA ATOBMATUHECKOH HAcTPOIKHnHa IIpeIeBaHPTeJIbHO 3aIOMHeHHbIe IporpAMMbI (paHIOCTaHIN) IHI cHcTeMBI RDS (ctp.25).
RDS PTY
HcnoIb3yetyra IINCKA TINIOB IporpamM RDS (ctp. 25).
RDS DISPLAY
Hajmhte DIII IpekeIIOueHHa HcIIJIe RDS DIA peKHMa HHΦopMaIH (ctp. 25).
12 OPEN/CLOSE
HcNbIyETTgAITKpBtTHN3AkpBtTHN3JIeKTPNueckOc dBHAnoUeichek kpbIuHKD CT (1pr. 3)
13 Khonkn ynpabneHn 3Bykom
PeryinpyiOT KaueCTBO 3Byka (ctp.14).
14 RANDOM
Bocipno3BeIeHHeIopOKeB CJIyuaHoiNIOcIeIOBaTeJIbHOCTn CD, iPod HJIN USB (ctp. 19).
15 REPEAT
HaKMHTe IJIA H3MeHHeHHaHCTpoiKNIIOBTOPHORO BocPOnH3BeJeHHa c CD,iPod H1IN USB (ctp. 19).
16 Khonkynpablenya Volume
HcnoJIb3yIte Iure peryJInpOBKn yOPOBBr rPOMKoCTn pOcIyIuBHAnH (ctpr.13).
17 DIMMER
PeyIINPOBKA JRPKoCTN DHCIIJIe. HMeETcYteTbIpe yPOBHa H3MeHeHnRA JRPKoCTN (ctp. 13).
POnDbWeuBAnHe annapaTa Ha cTeHy
YTO6bI IOBecHTb aIInapat Ha cTHeN, BBNHHTte IIpyIbI (npOaIOCTcOTJeJIbHO) B cTHeN H y6EJIITeCb, YTO cTHeA DOCTaOHTHO IPOuHAA, YTO6bI yIepKaTb BE aIInapata. Ecln KpeENKbIe TAEtAN HIN cTHe A He bUyt DOCTaOHToHIO pOuHbIMn, aIInapat MoKeT yIaCTb,
1 BvHTte HacteHHbI uypnbI b cTeHy Ha yka3aHHom paCCToHnn dpyr ot dpyra (130 MM).
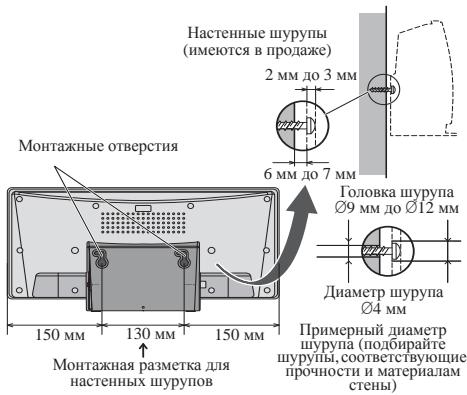
2 BctaBbTe HacteHHbe Wypynbl B MOHTaxHbIe OTBepCTnI.
3 CdBnHbTe BnEBO nIaKpenJIeHnIO MeCTy. (PacctoHnne IINcDnra OKO10 MM)

Приимechаиме
-Пикpenlenii aninapara на CTeHc bctb BepoHTHOCT erO nAIIeHn, eJIi aninapar KpIeHrTc HnePABuHbNo. ByIbe OcMOTPrTeJbHbN, YTOb6I h3E6Kbat HeCNaCTHbX cIyuaeB.
Bb6npaHte MeToIy cTaHOBKn aIInapata, KOTOpoe 6yTeJIOCTaTOOH NPOuHbM, Tc06bYuePkaTb BEc aIInapata. EclN BHe 3HaTe IpoUHcTHbE HpyrTH xapeKtepHCTKN CteHN, o6pHTeCb K cIeHInHcty.
KOMIIaHnHe He Hecet OTBeTcBHeOCTH 3a HeCuaCTHbE CJIyH NII IIOJOMKHN, Bb3BAHbMe HEHaIeKAIIeY cTaHOBKO, HeIIpaHBJIbHM IHCIOJIb3OBaHHem, BHEceHHbIMN I3MeHeHHMn, CTXHHbIMN 6eICTBHHm H T.I.
PacIOJIOKHTe BCE Ka6eJIH BIOJIb CTeHbI, YTO6bI HNKTO He CNOTKHUYIC O HNX.
He MeHnIe CmEHyIO HAnEJIb, NOKA AnIIapat BHCNT Ha CTHe.
Ioka aniapanat BnHt ha ctreHne, cIeHnre 3a tem, YTOb6 baii iPod/iPhone he ynaI.
HeepKHTe anIpaat 3a pa3bem iPod/iPhone.
PepednnaheB
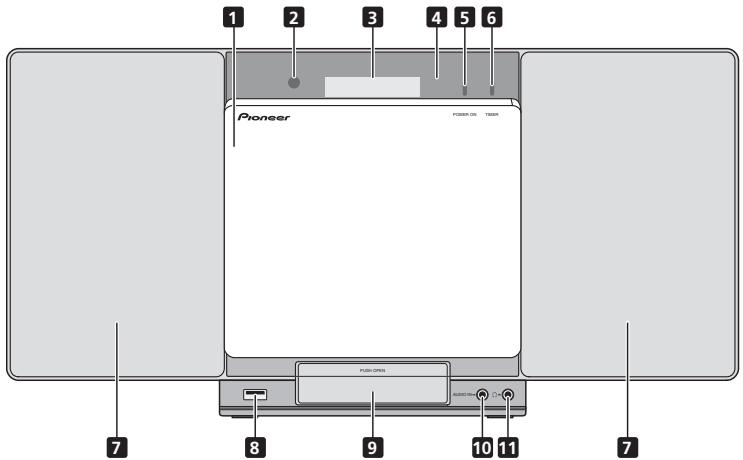
1 CdBnraHouaJcKpbIkaOTceKa CD c 3JIeKTPoPnPBODOM
2 DaTnK DnCTaHcNHOHHoro ynpaBneHn
PpHHMaet CnHaJIbI OT NjIbTa YV.
3 TnaBbI ducnnei
4 DucnneHna naHeB
5 INDnKaTop POWER ON
Korda IIHTaHHe BKJIOUeHO, 3OT INHINKaTOp rOpHT.
6 INHdkaTop TIMER
3aropaetcK, KOrIa IIHTaHne aIIIapata BbIKIOuHaETcR, HO aKTbHBpyETcYctaHOBka TaIMepa.
7 PpomKorOBopnteB
8 Pa3bem iPod/iPhone
HcnoIb3yEtCraI IIOkIXIOUeHN B KAcyeBCTHe HcToOnHka AynHO 3aONMnHaOioe yctpoiCTBa 6oJIbIoIe EMKoTH USB HIn yctpoiCTBa Apple iPod/iPhone/iPad mini (ctp. 17 n 22).
9 CoeHHTeHbHbI pa3bem dJa iPod/ iPhone
Дя ПОДКЛЮЧЕпЯ iPod/iPhone нажмerte на ВьICTуП PUSH OPEN (ctp. 16).
10 THe3do AUDIO IN (aydnoBxOa)
HcnoJIb3yETcI IIOJIOJIIOUeHHB BCINOMoRAtEJIbHOKOMIOHEHTa CIOMOIIbIO Ka6eJIa CMHHaTIOpHbIM CTpeo pabEMon (cst. 27p).
11 He3do dny hauwnikOB
HcnoJIb3yIeI IJIIOJIXLIIOUeHHaHIHHKOB.IIIpIIOJIKIOUeHHI HauHHNKOB 3ByaunHe He 6yDeT BOCIOPOH3BOIDHTbcyape3 rpoMKOROBOPRTEIN (ctp.15).
BepxnaheJIb/3aJnra naHeIb


1 Khonka STANDBY/ON
IcNIOJIbETy IaI BkJIOUeHHeI pceBhepa II Hr eoIpeKJIIOUeHHeI BpEKHM OKeJIaHAnee (ctp. 13).
2 Khonka INPUT
HcnoIb3yetcaIJIaBbI6opa HcToUHHKa BXoJa.
3 KhoNka EQ (X-SMC00)
HcnoIb3yetyraI IpeKJIIOUeHnpeKHMa 3Byka (ctp.14).
Khonka BT AUDIO (X-SMC00BT)
IcnoJIb3yETcA IIpH BOCnPOH3BcEJIHH M3bIKN C yCTPOJCTBa C cyHKIIeH Bluetooth (ctp. 28).
4 Khonkn ynpaBneHn Bocnpoun3BeHeHnem
HcNIOJIeTcIy IaIb6paTeSyEOMoiIopOxKIIINfaiJaIaIyBOCIOPIONBDEEHNOCTAHOBKAtKeTIgOBCIOPIONBDEEHNO
OctaHOBka BOCIPOH3BEJENHn HJIN BO3O6HOBJENHe BOCIPOH3BEJENHc TOUKHn Iay3bI,
5 VOLUME-/+
HcNIOJIbYIe TnI peryJINpOBKbYyOBHNr IPOMOKCTH pOcIyIuHHaBHn (ctp.13).
6 KhONka OTKpbITn/3aKpbITn JOTKa dIy DnCKOB
HcnoJIb3yETcI dIa OTKpbITnHaII 3aKpbITnHaJIeKtpueckoi CdbraIOJIeC KpbIshk CD (ctp.18).
7 Pa3bEm DC IN (BxOД noct. TOKa)
IIoKJIIOUHTe BXOJIAIIN B KOMIIJIeKT aIaIITep Iepem. TOKa (cTp. 12).
8 He3do aHTeHHbI FM
IIoKJIIOHHTe K 3TOMy pa3bemy IprHJIaIgEMyIO IPOBOIOUHyO aHTeHNy FM (ctp. 12).
3aMeHa cMeHHo naeJIn
(X-SMC00-W u X-SMC00BT-W he umeiom cmenho naneu 6 kopo6ke)
PNEyPExKDEHNE
3aMehy cmeHHHOI HnAEHN HJXHO BbIOJIaHTb HA yCTOINHBOI NOBEPHXOHTC.
He MeHNHTe CmEHNYIO HAnEJIb, NOKA AnNAPAT BNCHT Ha cTene.
CJeHHTe 3a TEM, TcObIe HneIoapanatBn He NOBpeHJTb HcNJIeHHyo NaHepJI pIzamHe cMehHO naneHJI.
He npHjaarateYepe3Mepehbyx ychJIIN K cMeHHoI paHeJI.
Ecln nAHeI He npKpIeJIa I npAIBIbHO,ecb BepoTHocTB,HTO OnpaIIHH OTKpbTHiN H 3akpbTnH 8dyT BmIOJIHtBcI NHePABIIbHO. TaK kAc HnePaBnIbHo KpeIIHe MeKet TAKKe Bb3BaT bHeo6bHnI hIh HeKeJatelbHn IIyM, cIeJIte 3a IIpaBnIbHbM KpeIIHeHem NaHeJI.
- O63aTeIbHO BbIKIOHHTe IITAHHe NOTcEOJINHTe KAbEJI bIIITAHnO tO p3ETKH II pHI BbIOJIHEHHN IOKJIIOHEnH NII HIMeHHENOH CoEDHHEN.
1 Cneinte 3a tem, yTo6bI cDnBraIo7aCkpbIka oTcKa CD c 3JeKtpoPnpBOdom 6blna 3akpbIta.
2 TTo6bI CHaTb CMeHHyIO NaHeJIb, CdBnraIte ee DByMa pyKaMn.
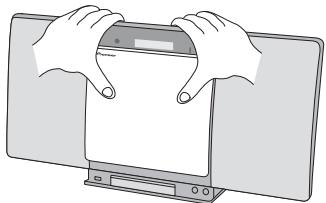
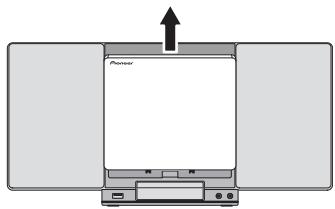
3 COBmCTHnTe JINHHIO HNKe CTpeJIKN IN HNXHIOU qACTb CMeHHoN NaHENi, 3aTeM CdBnraIte naHeIb BHN3, noka He ycblIWIte UeJIQUK.
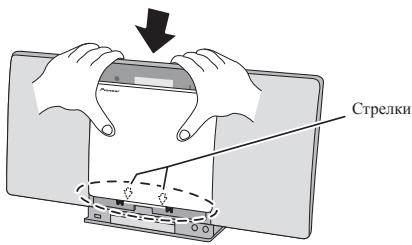
Глaba 3:
Поклоченья
PNEyPExEHN
- Ośb3aTeJbHOBbKIIIOUHTe IIITaHHe NOTCOeIINHTe Ka6eJIb IIITaHnEoTpO3eTKPi INBbIOJIeHHeNIIPOJKIOUChEHNIIHN IHMENHEHN CoEIIHNHeH.
IpoKJIOnOHTeKa6EJI INITAHINHIOCEBbIIOJIENHEI BCEX coJIeHNHeM KEmJy UcTPOBCTBAMN.
Поdkлioуене aHTeHHbI
Плкнчгп поблочиу antheHny FM, ка ПКаЗано HnKHe.Дд yIyUshneHa symeHa m a KcBaTb3Ba 2yBa Ka Плкнчгп bHeuHnHnE antheHny (сm.pa3Jen HcnobOanue bHeunHns anmenn HnKHe).
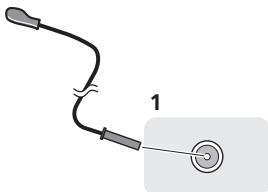
1 PoiKlnHouNte npoBOJOnHyO aHTeHHy FM K pa3bemy aHTeHHb FM.
T'Qb6I yUJYHINTB IPIHm,IOJHOCTbO bBHTINITe IPOBOLOHYU anTHENy FM n HpKpeHnTE e K CTHe N HJI DBEPHO pame. He OJmyckaHre, T'Qb6I aHTENHa CbeEHNBaJAcB N HcN cHytBlaJaCb.
NcnoJb3ObaHne BHeuHX aHTeHH
YnyuueHne KaeeCTBa npema FM
PerylnpobKa Tem6pa Hn3Knx/ByICOKnx yactOT
HaKMHTe BASS/TREBLE,3aTeM HaKMHTe / / / ,TTO6bIOTepyJHPOBAtb HN3KHe HJH BcOKe NaCToBJ.
Приимechанинe
ΦyHKHII EQUALIZER H P.BASS He MOYr pa60Tatb OIOBpemHeNo. Pa60TaB 6yEt NocJeHnBa Bb6paHHaN H3 3TNx DBx yFHKHn.
BASS/TREBLE MOKET pa60TbIpaJIaJIbIOH cYHKINIE EQUALIZER INP P.BASS.
PnBbIbOpe OHOH n3 3Tnx cyHKcN HeBbIbpaHHa cyHKcN6yDeT OTo6paXaTbcra CJeMyUoIm O6pa3OM.
1 Korga n3meHeHa hAcTroPoiKa P.BASS (ON/OFF).
- EQUALIZER:FLAT
2 Korda n3MeHeHa hAcTpoiKa EQUALIZER (ON/OFF).
P.BASS:OFF
HactpoKa TaMepa BkJIIOUeHnA
HcnoJIb3yETcI IJI H3MeHENH TeKyuIeI yCTAHOBKn Taimepa IIIN IJIy yCTAHOBKN HOBOrO Taimepa.
1 Haxmnte STANDBY/ON, yTo6bl BKJIouHtB nTuHne.
2 HaxmTe n ydepxnBaIte KhONky CLOCK/ TIMER.
3 Haxmnte KhoNk ,YTO6bI Bb16paTb napamTp «ONCE» nnn «DALY», 3aTe m Haxmnte KhoNky ENTER.
ONCE -Cpa6aTbIbAeT TOJIbKO OJINH pa3 B 3aDaHHoe BpeM. DAILY -Cpa6aTbIbAeT B 3aDaHHoe BpeM B 3aDaHHN deHb.
4 Haxmnte KhoNk ,YTO6bI BbIpaTb napameTp «TIMER SET》,3aTe Haxmnte ENTER.
5 Haxmnte KhoNk ,TO6bI Bb16paTb NCTOuHnK BOCnPOn3BeHeHnC TaMepoM, 3aTe m Haxmnte ENTER.
B KaueCTBE HcToUHnKa BocIPOH3BeJeHnMoKHO BbIpaTb CD, FM, USB/IPOD, IPOD, BT AUDIO H AUDIO IN.
6 HaxMNTe KhoNKn →, qTo6bIyCTaHOBnTb DeHb Ha Taimepe, 3aTeM HaxMNTe ENTER.
7 Haxmnte KhoNk / ,yTo6bI yCTaHOBnTb Yacbl,3aTeM Haxmnte ENTER.
8 HaxMNTe KHOJKN / ,YTO6bI yCTaHOBnTb MNHyTb,3aTEM HaxMNTe ENTER.
- YctaHOBHTe OKOHyateJIbHO BpeM, KaK OIIHcHo B IIarax 7 H 8 BblIe.
9 Otperyu npuyte rpoMocctb HaxaTneVOLUME + / - 3atem haxmnte ENTER.
10 HaxmTe KhoNky STANDBY/ON, yTo6bI BOITn B peKIM OxuHaHna.
3aropaetcHINKATOP TIMER.
Bb3OB TaMepa BkIIOyeHna
TekyuIyU yctaHOBky TaMepa MoKHO HcIOJIb3ObaTb MHOrOKpaTHo.
1 BbInOpHnTe 7aHc 1 Do 3 B pa3dene «Setting the wake-up timer».
2 HaxmTe / BBi6epnte «TIMER ON» n HaxmTe ENTER.
OTmeHa TaMepa BKNIOueHnA
BbKJIIOUeHHe TaIMepa.
1 BbInonHnTe 7aHc 1 Do 3 B pa3dene «Setting the wake-up timer».
2 HaxmTe / BbI6epnte «TIMER OFF» n HaxmTe ENTER.
NcNoB3OBAHne TaMepa BKJIUChENIA
1 Haxmnte STANDBY/ON, yTo6bI BbIKJIOUHTb NITaHne.
2 Pn HactynIeHn BpeMeHn BKIOueHn DaHHoe yCTPOJCTBO aBTOMaTHueCKN BKIOUHTcN HaCHET BOCIpON3BeDeHne Ha BbIbpaHHo FyHKuIN BXOJa.

Приимеанne
EciNBoBpeMRA BkIOUeHnI Pod/Iphone/IPad mini He NOIKJIOHEn KAnIAPATy, INHe HcBCTaJIeH Nck, AnIpaTat BKIOUHTCt, Ho He 6yETbOBCPIN3BOIDITb IDOPOKky.
- HeKOTOpBIE DnCKH He MOrT BOCIIPOH3BOIDHTbcABTOMATNHeCCKH IIPIH HAcTyIJIeHHBpeMeHH BKIOUeHHe.
-Пи установке taiмера зааваite He MeHee OДнOH MнHyтbl MekdY BpeMeHem HauJIa I OKOHaHIN.
IcnojIb3OBAHne TaMepa
OTKJIIOUChENIA
TahMepOTKIOHEnOHOTIOUaHTyCTPOIcTBoYepe3 3aJAHnBbI nepHOBVPemEHN,IIIOBLOJIaCIOKOIHIO 3aBmIaTb,He6cIOKOBc bO He6xo1MOCHNT BkIKIOHcEHYvTOpCTBa.
1 Haxmnte SLEEP HeckoIbko pa3, YTo6bl BbIpaTb BpeM OTKIOUeHn.
Bb6epHTe MeKJy 3HaueHEnMn B MmHytax 10 min, 20 min, 30 min, 60 min, 90 min, 120 min, 150 min, 180 min HN OFF (BbIK). BBohBa 3aJaHHoe 3HaueHne OTo6paKaetcB TeueHne 3 cekyHd. NocIe heter BoHIOJIENHe NaCTPOHN K3AbePHEo.

PpimmeaHne
TaimepOTKJIOUeHnMoKHOyCTaHOBHtHaKaTHEmSLEEPBOBpeMOrTObpaKeHHoOCTabIeIcOgBpeMeHH.
IcnoJIb3OBAHnE HayuHnKOB
IoiKJIIOHHTe pa3bem HayIIHHKOB K rHe3Jy PHONES.
3 POnkInouTe Baw iPod/iPhone.
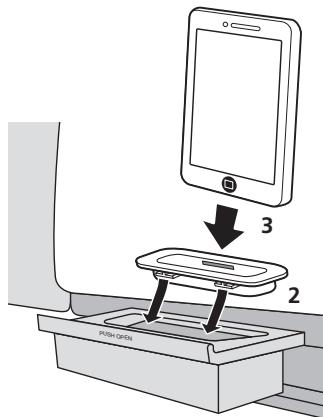
Ecln iPod/iPhone He noIeKIOHcEN K Anapaty, IIOTHO 3aOKoRpe pAsem Jua iPod/iPod
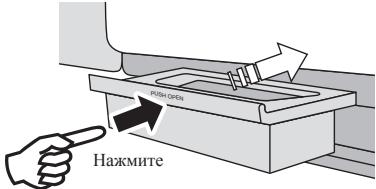

IPEyIPEXDEHNE
He HcnoJIb3yIte aIaIIreP, KOTOpB I pneO6pa3yETCB MoJIHNEOTBIO B JOK-pa3bEme IaIIAPATAI IOI NOKJIHOeHnIPOiD/Phone/iPad mini. 2TO MOKet IPiBECTN K HeNCIIpABHOCTH NIIH IOBpeKeJDeHHo pa3bEma.
BCTabte DnKOTNEHTAetaHHO 3NHTKETKO HApky (TTO6bl Bb MOJIN BHIDtbe)e.
Дя octaHOBK BOCPon3BedeHnA:
HaKmTe ■
NoBToPHOe BocIpOn3BeDeHne
Пи ВОТБОН ВОЦИПОЗьДЕСHIМОЖН ИПЕРБИНВОВИПОЗИЗДОИДLOПОКУ, СЕ ДОПОКК HЛДОПОКК B3ANPOrpAMMPOBAHHNOСЮДJOBADEIJIHOCTN.
O 3arpy3ke faHIOB MP3/WMA
B HInTePHeTHe MHEmeTcH MHOrO My3bIkaJIbHbIX caHTOB, Tge Bb MoKETe 3aRpy3HTb My3bIkaJIbHbe aaiMb B (OpMaTE MP3/WMA. IJIA 3aRpy3KN My3bIkaJIbHbIX aaiIOB cJeIyE HnCTpyKUHM Ha Be6-caiYe. 3aTeM bI CMOKETe BOcIIPOIN3BecTH 3TN 3aRpyKeHHBe My3bIkaJIbHbe aaiIb, 3aHNcAB IH Na IIcCK CD-R/RW.
3aIpyKeHHbIe KOMIO3HUN/phiJIb IIpeHa3NaueHbToJbKO JIINHO HOIOB3OBAHnJIIO6oe HIOE HcIOBJ3OBAHne KOMIO3HUN 63e3paeHHe BIAJIeJIbIa 3aIpeHHe 3AKOHOM.
O npaekbe Bocnpo3BeDeHnnaKn
Ecnf aJb MP3/WMA 3aHncaHb B HeckoJIbKHX IIaIKaX,TO JIA KaKdoI IaIKN 6ydet ABtOMaTHueCKH 3aJaBaTbc HOpE IaIKN.
3TN PAnIKM MOKHO BbIbHpB KhoIkoF FOLDER Ha NpIbTe IV. EcIN BByTPR BbIbpaHNO PAnIK HET NOIdepKHeMaEhXΦopMatOB aiIOB, TO PAnIA IIPOIyUcKaetc, H bEyET BbIbHpBa cIeDyIouHa PAnIA.
HnpiHmep: Hnke noka3aHO, Ka IIpHcBaHbAOTc Homepa IaIOK, ecIIN 3aIIHCbBAOTc aJIb foPMATOB MP3/WMA.
1 KOPHEBA nanka yka3aHa KaK PAnKA 1.
2 2To kacaetcnaok, KOtOpbIe BnOKeHbIB KOPHEBYIO nanky (PANKA A u PAnKA B), nanku, KOtOpbIe 6dyT 3aNcaHbI paNbIe Ha dNck, 6dyT 3aNcaHbI KaK PAnKA 2 u PAnKA 3.
3 Yto kacaetc nanok, KOtOpbIe BINOKeHbIB PAnKy A (PAnIKA C n PAnIKA D), panKn, KOTopbIe 6ydyT 3aIncahb paNbwe Ha nick, 6ydyT 3aIncahb Ka PAnIKA 4 n PAnIKA 5.
4 IAPIKA E, KOTOPA BLOXeHa B IAPIKY D, 6ydet yka3aHa KaI PANKA 6.
ПаикИннформая по орядке Фанлов,КOTOPA 3ANHcBIAEcTЯ наДСК,3ABNCHTОТ 3ANHcBIAHOHTe IporpamMHOroбобсчени.ИМeETcER BEPOTHOCTBTOr, TToHаТOMAnIAPaTeФыЛБуDTBOCIPIN3BOITNTCBHe B COOTBETCTBnC OXHДAeMbIM ПОЯДКOM BOCIPON3BeDENH.
C INsCA c faiIaAMM MP3/WMA MoJHO npOHTaB,IO 255 IAnOK H 999 faiIIOB (BKJIHOAAH BEOCIIPOH3BOIIMbE (faiJIb).

Bb6op nankn DnBocnpOn3BeDeHn
YTo6bIyka3aTbIIaIKyIJIbI BOCINpOH3BcEHHa, BbIIOJIHITe CJIeDyUOHe OIEpaunH.
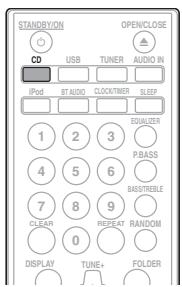
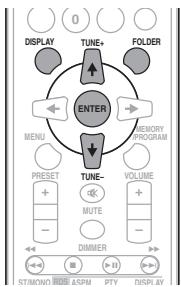
1 Haxmnte KhoNky CD n 3aRpy3nTe dNc c faJ lam MP3/WMA.
2 HaxmTe KhoNky FOLDER n 3aTEM HaxmTe KhoNk / ,YTO6bI BbI6paTb JKeJaemyo npKy dny BocnpOn3BeDeHnA.
3 Haxmnte ENTER.
BocnpnO3BeDeHHe NaHETcC nepBoi Necn HbIbpaHHOIIaIKN.
JaKeEcJIHBOcIIPOH3BeJeHHeOCTaHaBJIHBAeTcA,MOKHO HauKaTb↑/,YTObIbIbOpTaPiKy.
IpeeknoueHne coepxmoTO dncnpea
1 Haxmnte DISPLAY.
EcIINBΦaII3aIIHCanaHINΦopMaIIH O HA3BaHINII IeCNH, HMeHHNcIOJIHNTEJI Hn3BaHINII AIIb6OMA, To 37A INΦopMaIIH 6yETOTOBpaKaTbHa NcIIIEe.(JaHHbI AnIIAPAT MoKet OTbopaKaTbTOJIbKO bKBEHO-IIIΦpOBBe CmBOJIb.He 6yKBENHO-IIIΦpOBoCmBOJOTOBpaKaTeC,KaK 一 ^ 心 * _ 一
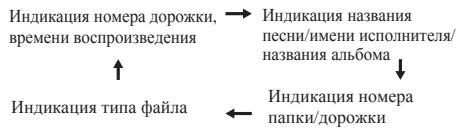
Приимechане
·《AaJIbWMA,OxaHnEEMHbAOTpCKHMIIpaBOM》HINHeNoJIeKbHaEBMeIe baiIb》,BOcIPOH3BOIHTbHeB03MoKHO.BTHxCclyuaXbaiJI6yETabOMaTHueckNipOnyuJeH.
BOMOKXhbl CJyuaH, KOrJa He OTo6paKaTeCS HnKaKoHnHOFPMAuHN.
- Oto6paKeHHe Na3BaHHaIIeNCHn, HmEHn HcIIOJIHTTeJr H Na3BaHHaIb60Ma IIOJIdepKHaEaETcT ToJIbKO JIJIaIJIb MP3.
Pa3dien 7:
Bocnpon3VeJeHne c USB
Bocnpoun3BeDene 3aONMHaIOxuycTpoiCTVB
C NOMOJIHO HHTERPeHcA USB HA nepeJHneI PAneHn 3TOrO peCHBepa MOKHO pOcJIyHbATb BByXKaHbNb3ByK c USB -ycptOBt.
Pioneer He rapaTHpyet, YTO 6yET BOCIPOH3BOJNTbCJIIOBoi faii, 3aIIHcHnHIb HA 3aONMHHAOHE mYCTPOIHCTBEUSB, HJIY TO 6yET IOJABATbCe IINHTAHHe 3aONMHHAOIOOe yCTPOIECTBO USB. TaKke 6oPAHTHe BHIMAHNE, YTO KOMNIAHRI Pioneer He Hecet HNKAKOIOTBTCTBEHOCTn 3a IIO6yIO nOpTePOfAIIOB Ha 3aONMHHAOIOHX yCTPOCTHB USB B CBAHc NIOIKJIOUeHNEM K DAHNOMY yCTPOICTBY.
1 Haxmnte USB nIy BbIbopa B KaueCTBe BXoDHOrO NCTOCHNka.
Ha oCHOBHOM hCIIJIe IOKa3bIbAeTc HnIHKaIINR «USB/IPOD»
2ПоdkлючпTe 3anOMnHaIoоe ycToiCtBO USB.
Homepa napanok hui paijOB, coxaPAHENHbe Ha noiKaJIOueHHOM 3anOMHaioe mycTroPCTBE USB, IIOBIAIHTcHa oCHOBHm DnJIeae ATOmatuYeCKn.
JaHHbI peCHBep He IOIDeprKHBaer USB KOHcHTpaTop.
- Пиюклоченii iPod/iPhone/iPad mini annapat nuchet abTomathueckn 3apkaTbca.
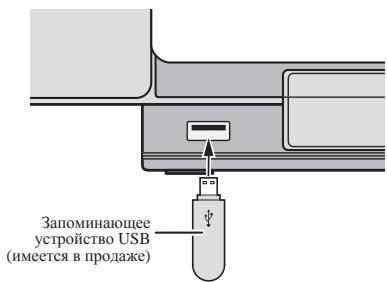
3 Pocne 3aBepueHn pacno3HaBaHnna HaxMnte I nIy3anycKa Bocnpou3BeHn.
- IpiHneKIOHcENHnA hIpyrO BXbOHO HtOcNTHC hChaJIaT OCTAOHOBTE BOCINB3EJHene C yctpoTbTA nAMTT USB.
4 OToeHNHTe 3aONMnHaOooee ycTpoiCtBO USB or pa3bema iPod/iPhone.
IpeJbHbueyHeHHem 3aONMHaioIOeO yCTPOBCTBA USB OTKJIOnHTI INTAHNE.

PpmeaHne
- MoKHO HcIOJIb3OBAt b fI3H-HaKOIIHTeJB USB 2.0.
Данhoeустбго может He paio3habt 止OMHauOoiee yctpoICTBO USB, He BocPOn3BOIHT baiJIHnHe noBaaTb IIITaHne Ha 3aONMHaIOoee eyctpoICTBO USB. IIOpO6hee, cm. KozdaKoNkUeno 3aONMauOoiee ycmpoiCm60 USB ha ctr. 32.
KorJa 3aHOMHHaIOoee yCTpoIcTBO USB He BOCPOINHOBUNITC, H B TceHHe 6JIeue Yem 30 MHNyt He BbIOJHHaETcH NHKaHX DeIcTBn, AnIIapat ABOTMAHTYeCKH BHKIOUHTCn.
IOBTOPHoe BocnpOn3BeDeHne
IIINIOBTOPHOMBOICIPHOH3BEJENHHMOKHOHEIpepbHBO BOCIOPOH3BOOHTOBJNOLOPOKKY, BCELOPOKKHNJLOPOKKBN ZaONPAMPMOBAHNOIOCJIeJOBATEBJLHOCTN.
3HaKOMCTBO C CNCTeMoR RDS
CnCTema paJIOJADHbIX (RDS) -3TO cHCTema, KOtOpa HcNIOJIb3yeTcE 6OJIbIHHCTBOM paJIOCTAHINI B IHaIAna3OHe FM IJIpeIOCTABJIeHn CJIyIaTeJIaM pa3JIHyOHNo HHΦOpMaIIH - HanpIMeM, HA3BaHnna paJIOCTAHINI II INI TpaHcJIHyEmoI npOrpAMMbI.
OJHOH H3 yHKUIN cHCTeMbR DRS ABJIeTc8 Bo3MOKHOCTb
IIOHCKA tCtAHIN, TpAChLHyUOeTIpe6yEmbTH INI pOrpAMMb.
HaIPHMep, MOJHO OCUyIeCTBIAJIb TPOHC KTAHHU, KOtOPaAR TpAHNCIpyET npORPAMMb B JxHape JAZZ (Jka3).
Mozho Bectn HONCKIporpamm CJJeDyIOUHx TINOB:
NEWS-HOBOCTH
AFFAIRS - TeKyuüne co6bTiHn
INFO-HHΦopMaunu
SPORT - cnopt
EDUCATE -6pb0aOBatelbHnA HnOpmaun
DRAMA - paJHocneKtAKIN H. T.I.
CULTURE - HauHOnaJIbHaN i MeCtHnA KJbIbTpyHnKJH3Nb, TeatpH n.T.I.
SCIENCE-Hayka H TeXHHKA
VARIED -IporpaMMbI, IIOCTPOEHMHHe Na 6ececJe HIN oBIIeHNH, HApIHMeP BHKTOHPNbI HIN HNTepBbU.
POP M -IIOI-My3bika
ROCK M - pOK-My3bIka
EASY M-JeTka My3bika
LIGHT M - JIeKJAAJIACCHUeCKAe MY3bJa
CLASSICS 豆漿334
Klauinschekern Mybika
OTHER M - Mybka, He COOTBETCTBNUOJIaI PEUNCHENHMIK KATEGOR
WEATHER-CBVDKHNI PINOHO3BNOFOID
FINANCE -6HPrKeBHe CBOJKN, KOMMepHeckaK,TopROBaN HINOpDAMnIu N.T.D.
CHILDREN -nporpaMMbIJIaIeTJ
SOCIAL - 06IeCTBeHHaJ Xn3Hb
RELIGION -IpoRpaMMbO o peJIHHIN
PHONE IN -IpoIpaMMbI,
IpeIyMcatPBAIOHHe
O6cyyJdHHe KAKOH-JINHO TeMbI H
06UHe co cIyIaTeJIaMn IIO
TeJIeOHy
TRAVEL - NYTEHIECTBNA H OTJLbX
LEISURE - CBO6DIOHBEPMA, HHTpeceblxHo60H
OLDIES -NONIJIAPRAH MaYbika 1950-x I 1960-x RoAod
FOLK M - HapoIIaHa My3bIka DOCUMENT - nyIbIcHTnueCKe nIporpam
TEST - TpaHcIaIII INI TteTIOBAPAHINbAApRIHOrO BeIHateJIbHOrO bOpOpyOBAHIN HIN pIneHMbIX yUptOCTb.
ALARM - TpeboxHoe OIOBESEHHe,CEJIAHNHO B KHCJNOHTIEBHLbX
06cToTaeJIbCTBaxДIJI pIeIyIpeJXeiHINo OcoBtIHX, pIeIcTabJIeXIOHIN OAnchocTeB OoiEero XapAKtepa.
POnck PpOpaMM CnCTeMbI paAnoHaHHbIX RDS
MoJxO oSyIeCTBHTI IOHCK TIIIOB IPOrpaMM, IpeEHcJIeHHbIX BHIJIe.
1 HaxmTe TUNER Ha nyIbTe DnCTaHcUHOHORO ynpabJeHna.
- CnCTemaRDSIOCTyINHaTOJIbKO B DHaIIa3OHe FM.
2 Haxmnte RDS PTY Ha nyIbTe DnCTaHcNoHHoro ynpabNeHna.
HdNkaHg «SELECT» IOBHTcI npMepHo Ha 6 ckyH.
3 HaxmTe / Дя Вьбopa Тида nporpaMMbI, KOTOPYO XOTNe npocnyaTb.
Пи Каддом Нахати КнКИн 6удт ПОК3aBbATcT HIN IporpamMb.Еслк ИНКИУдаркHBaTeC,THIN IporpamMb6уdET NOKa3bBbTaHc HeIIpePbBHo.
4 Bo Bpem OTo6paXeHnBbIbpaHHOro TnnporpaMbl (B TeueHne 6 cekyH), NOBtOphHO haxmnte KhoNky RDS PTY.
IIOse 3aogopannB TeueHne 2 cekyHn BblbopaHoro Tnna IporpaMmB,IOBaHTc HnDnKaHn «SEARCH»,N haunetcr OonepaHHo NnCKa.
Ппимechаиме
Ecln HnIHKaIIHa NdHcIIe HepectaHa MHRbT,3aYcHTHe onepaHIO cIaIa 2.Ecln AnIapat HaxoJIT KeJaembl TNI pOrpPambl,To npMepHO Ha 8 cekyHd 3aOpHTcOoBETCTByIOHmOp KApAla, H 3aTeM OTO6pa3ntc H3BaHne CTaanHIN.
Ecln Heo6xoJHMO IpocLyIaTb aHaJIOrHHyBn TIII IporpAmbl dyroYt CtaHNi, HAKMITE KHOINyRDS PTY BO BEmr MMHAnHOMepaKaHala Hn HaBaHnnCTaHNH. YctpoIcTBO 6yETb BInIOJHrtb IOHcK cJeDyOnu CTaNHNH.
EHN He NaHeO HnKAKoI CTaHIu, Ha 4 cekyIbI IOBHTcIe HNIIkAICIIA N0 FOUND'.
HnΦopMaζη, npeIoocTaBlaeMa cnCTemoi RDS
KaqIbIpa3,KoTgHaKaHMaAeTcKHOIIKaRDS DISPLAY, IINCHIIe8byETPiEpeKJIIOuATcbcJcJeDyIOHM6p3OM:


Пин гастрике на.staшино, о.Tлпчую о.Tсанши RSS, n.ln haТши RSS, KOTOPA Nepeaet cIbajc snHJI, nIcHJIeB 6yIeT n3MeHHTbB CBJIyUoiTeN nopJ4Ke:
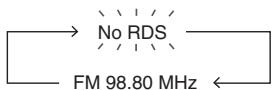
NcNoJIb3OBAHHe aBTOMaTnueckoH NaCTPOIeKHa IpeDvapHTeJIbHO 3aONMeHHbIe IpOgpaMMbl (paIIOCTaHUn) (ASPM)
Bo Bpemra6o0epeKHMAsPMMTOHEp 6yET ABOTMATHueckn BbIIOJIaHTb IOIcK HObX CTAnuRDS. MoJHO COxPAHITB bIAMTn DO 30 CTAnuRd.
Ecln HeKOTOpbIe cTaNHH yKe COxpaHEnb I NaMaTHN, YNCIO HObIX CTaHIIN, KOtOpBE MOJHO COXpaHHTb, 0yTeT MeHbIIe.
1 HaxmTe TUNER Ha nyIbTe DnCTaHcNoHHoro ynpabJeHna.
2 Haxmnte u yapedxnbai Te KhoNky RDS ASPM ha npIbTe Dy.
IocJIe MngHnHn HnHnKaaHnN [ASPM] B TeueHne IpnHmepHO 4 cekyH,3aynCTTc8 ckanHnpoBaHne (87,5Mg108Mg). IocJIe ckanPoBaHHa,Ha nCtllae BteueHHe 4 cekyHb6ydet oTo6paKaatbce HnCIO CTaHnO, coxpaHeHHbX bHAMrTH, H3aTeM Ha 4 cekyHbIb IOBHTTCn HnHnKaaHnN [END]
Дяпocтановп ржима ASPMdo er0 3aBepseHn:
HaKMHTe KOHNKI BO BPEM cAKHIOBAAHH cTAHINH. BJyTJ MHeBTc b PACNOPREHH cTAHINH, yye CKoPAEHHEbI e NAMTHI.
Приимецни
Ecln OJHa n TtKe StaHInu BeaHaet NaPb3hX cAptotax, 6yIet CooxpahTbB n PAmthn Camar CnHbNac Hactota.
He 6yJET coxPAHHTcB NAMATTH CTAHUIN, HMEHOIH TAKYIO He cactOTy, KAK yke COxAPEHHAICTAHUN.
EciynykecoxpaHEnbIBaamTn30ctanH,cKaHNPOBAHHe 6byETnpkPaIeHO.ECHeIOEoXdmoHEBepHytbcKpeKHMy ASPM, cOTPHTeIpyCTAHOBJIENHYO pAmTb.
- Ecln HNKAKOJI CTAHINI He COXAPHEBO IAMPTN,IIHPMEHO HA 4 cekyHbIIOBHTTcN HUNKIAKURA
EciH CHTHaI RDS OChEh CJIa6Bc, HauBaHH CTAnIHIN MOTyH CEcoXPAHTbB BAMTHI.
HazbaHne OJHn H Toi JcStaHHm MOKet 6bTb COxpaHEnHO naP3bHx KAnahJaA.
B onopelehenho 3oene HIN b onopelehenhe IpenoHb BPemEH HABaHHa TcAHHHMOYT BPEmHHO OTJHHATcyb.
PpmeuHnnopeKmRDS
Ecnn npoocxooH IIOOe H3 cIeMyoUxN co6bIITn, 3TO He O3NaHaet, YTO yCTpOiCTBO HenCnpaBHO:
IIOOuepeHIO IOBbIIOCTo HINKdIaIKN PSS NOPS HABAHBE CTaIHUN, B Y cTahOBJIeHOM NOPJkE.
Ecln OIIpeJeIeHHa CTAHINHe BEIaET JOJIHKHM Opa3OM HIN Ha cTAHINIOPOBOTc HCNbTIaHHa,dyHKHnI pHema RDS MOKET pa6oTAb HeNPABuHbHO.
EcnHnPnHHMaETcTaHINRDScoCJHIIKOMCJa6bMmCHrHaJIOM,MOKetHEOTO6paKaTbCeTakAHHΦOpMaIIH,KAKHA3BAHHeCTaHINI.
HINKIAIHHN
Ppimechannno paadnoTeKcty:
IIOBBAITcIePbIe 8 CmMbIOJB paDInOTekCTa H 3aTeM OH 6yDyT IIPOKpyuHBatcbI IO DnCIIJeIO.
-Пин hactroponke ha CTaHsHIO RDS, KOTOPa He nepeJaTe paoHOTekCT, 6yIet OTo6paKaTaBcHa HnDnKauHn
EclnHnHHMaOTcA DaHbHepeaHIOTeKCTa HIN H3MeHaeTc coOpEkaHHe TKeCTa,HaNcHIIeE 6yET OTObpaKaIbTa cHnHkAuaHc RT).
Pa3d9:
Другne подклоченья
PNEyUNPEXDEHNE
IpeEi BIIIOJIHEHHeH IINI I3MeHHeHEm COeIHHeHHI BbIKIOJHTeIHTaHHeN HOTcOeIHHTe Ka6eJIb IITaTHnHOT OT cTeB0I pO3eTKH.
ПОДСОЕДИЕНUE ДОПЛНТЕЛБHBIX KOMПОHENTOB
Плклочп Мнн-разьем AUDIO IN Ha перден Панелк BCNOMORATEJBHOMY KOMIOHEHTY BOCIPON3BedeHЯ.
Даннь метол можно Нспьлбовд пюроггыань Музькн наст amapate с учтою вiod/iPhone/iPad mini, которoe He ndoepkrbaert Hcnoььбанhoe dokstanciiipodи pashbemaiod/iPhone.
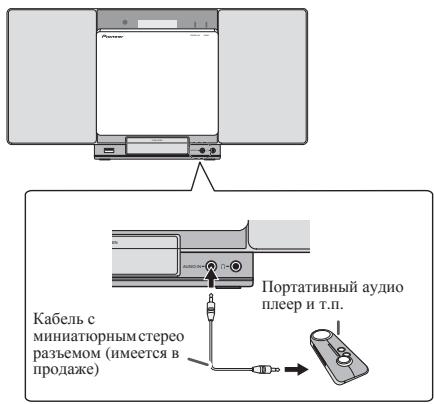
1 Haxmnte INPUT nIpeKluoyenBxOda Ha oCHOBHOM yCTpoiCTBe IIN AUDIO IN ha nyIbTe DY.
KorJa BbObpaetcI INPUT,Ha OCHOBHOM IINCJIeE OTObpaJAcTcI INdKaIIHRA «AUDIO IN».
Приимechанинe
Ecln rHe3IOI MmHH-ITKePA AUDIO IN IOIcoeHHeo KrHe3Iy IIOIINHTbeIbHbIX HauYIIHNKOB, yOpeBbI rPOMKCTN DAHONHO YcPOTObCTBA 6dIpyERIOBAPoBATCB S COOTBTCTBHN C yOpOBHM rPOMKCTN BOCIPOn3BOJIAIeO KCMIOHEtA. Ecln 3ByK HApUIIaETC NOcIE NOpHJKeHN rPOMKCTN yCTPOBCTBA, IIOPi6yIte CnH3NTb rPOMKCTb Ha BCIOMOrATEJIbHOM KOMIOHOHTe BOCIPOn3BEdeHHe.
Глaba 10:
He pa3MeaIte npedMeTbI Ha yctpOiCTBe
He pa3meiainTe KaKHe-JIb6 IpEaMeTbHa yctpoiCTBe CBepxy.
He 3akpbibaiTe BEHTNJIaHIOHHbE OTBepCTn.
He HcIOJIb3yIte DaHHOe yctPOiECTBO Ha BOPCHCTbIX KObPax, KcOBArJx, DmBaHAn H T. I. N.II 3aBepHyTbM B TKAhB I T. I. 3TO MoKet IOMeIaTb paCCeHBAHHIO TeIIJa, YTO MoKet IIpHBecTH K IOIOMKe.
He noDBepraTe peCnBep Bo3DeiCTBnIO TeNa.
He pazmeiaiye yctpoictBO cBepxy Ha ycHJIteJe HIN npyrom KOMIOHETE, rhepehpyoHem TEIIO. IIPh YCTAHOBKe B CToiKy, YTObI 36eKaTb BO3eiCTBnA TEIIa, OTBOIMORO OT ycHlHTeJI NHHNHO AuyIOKOMIOHEnTA, yCTAHABJHBAITE pechBep Ha nIOKY HNKe yCHNIIEJIa.
KoJra yctroIcTbHO He hCIOJIb.3yETc, OTKIOUaHTeero IITAHHe.
B3abHCMOCTHOTyCIOBHNCHHJIaHA,HA TEJIeBH3HOHHOM 3KpAHc MOYrTOObPakTbCSIOIOLsI, H MoKET IIOJaTb IIIym B3ByuHHe PAJIoTHoPacHcJIaHI, KOrIa IIHTaHHe yctPoCTBA BKJIOUHe. B TAKOM CIIyuae OTKIOUHTe IIITaHHe yctPoCTBA.
OKohdeHcaUN
Ipih 6bctpom IepemeeHnn HauHHo yctpoiCTBa H3 XIOJHOFO MeTa b TEJIIOe NIOHHeHne (Haipmep, 3HM) HIN pPi npE3KOM NOBIIHNN IOI BO3JeCTBHEm paOBoTI BOOprEbaTeJIaN T.I. TEMIEPATyPB b IIOHHeHHN, B KOTOpom yctAHOBHeO YcPOTHBO, BHITPN YcTOPTCTBA (Ha paOooH TeJAAx H JINH3e) MOrTy 6bpa3OBbIbATCB KaIIH NBOI (KOHDeHCaIIa).PiN HAIHNuON KOHHeCAIIaHNOY cYcPOTHB OHe 6bET paOBoT aHdJIeKaIaHMM o6p3OM, H BCIOPOHN3BeHEne 6bET HeBO3MOKHO. OCTABteY cYcPOTHB IOI pKOMHAnTO mTeMePA type Ha I N12 Yaca C BkIIIOueHHbIM HnTAHHe (BpeM 3aBHCHT OT CTeNEH NCOHcAICI). KANI BOI bIb HnAPATC, N BOCIOPOHN3BeHEne cTahET BO3MOKHNb. KOHHeCAIIH MoKet TakKe o6p3OBbIbATCB JETOM, ECJIY cYcPOTHB OTOKbHIto BO3dCTBIO pIMBXI NtOKOB BO3Dxa OKTOOHOb PA3Dxa. Ecln 3TO pIONOHET, PEPCEMTTE DAHNHOe YcTOPTCTBO B dpyrOe MeTO.
UncTa u3dennia
IpeTeT IeK IIpHCTyHINb K OHTcE JaHHORO YctPOBCTBa,OTcoEOHNHtKa6BeJbIITaAHNnO rTO p3ETKn.
Дячтукданногу ectpoIcTBA HcNIOJIb3yITE MAnKYIO TKAHBJIpyINIIHIIeIbIIHmOcHteMnKYIO TkaBH NEKOTOPBIM KOJIYNCETBOM HeNTpaJIBO HOIQUIero CpeIDCTBA, pa36abIeHNHO 5do 6 cuaTmBIoBbIa TtATEJIbHO BbMKMtE TKAHBJ,COTPHe IbJIb H3aTeBbITpHE NOBepXHOCTb MAnKOJ CYXOH TAKHJO.
CINHPT, pactBopHTeJIb, 6EH3HH, HHCekTHIHHIIH N.T.II. MoryT Bb3BaTbPacCLaHBAHHe PecAHn HIn KpaCKn. TaKKe H3eRaTe IJITeJIbHO ROKoTakTa pe3HHOBxH IIH BHNIOBxH INdEIn C daHbM yCTpoIcTBOM, TAK KaK 3TO MoKer HcNIOPTHTb KOpYNc.
- Ipn HcnoIb3OBOAHHH NCHTIIHx TkaAeH, CMOeHHbIX XHMpeAKTHBAMH T.I., BHNMaTeJIbHO INPOHTHTE HHCTpyKIIH IN IO HX INPImeEHINHO.
UHCTKaJINH3bl
- PnH HopMaJIbIbIyX yCIOBHX 3KcIIpyataaHHIIN HIN3a 06bIuHO He 3aIg3HBETNC, Ho eCLI OHo NO KaKOH To IpnHHe NaHET paboTAtB HEPaBPbIbHO H3-3a rpAHI IN IIbI, O6pATITRE B 6IHKaiHHN ABTOPI3OBAHHB CepBHcHbI cHTP Pioneer. XOTa B IPOJAZHE MHeOTc CpeCTDB AOnCTKN IIN3I JINPHrBbIaTeJIe, HcIOJIbO3aBt Hx HE peKOMeHJyETcR, TAK KAK HEKOToPbIE CpeCTDbA MOYT NOBpeDttB INH3Y.
06paueHne c dnckamn
XpaHHeHne
BcerIa IOMeIaIte HnKCNb Hx Kopo6Kn H xpaHInTe Hx BBeTnKkIbHOMIOJIoKeHHn36EraI rOp8Hu, CbIbHX MeCt, IOIbERkeHHbX Bo3ECTBHO IprMbIX coJIHeuHbIX JyueH NcIIHKOM HnKHX TEMHPatyp.
-ПиочтайтЕ Меры ПпебосторожсOTH,BLOжeHHье Вмстс cДИСКOM.
UHCTKa DnCKOB
- HNCKH MORYT HE BOCINPOHN3BOINHTBCsE, ECIN HA HNX OCTaOTcR OTNEATKII PAJIbHE INI IIIB. BYTOM CUYAE, HNOJb3yIe YCHTHIyU TKAhB H T.II, YTO6bI octopOKHO BVITEpETb IHKOT BNYTPENH CEtOPOH K HApuyKHO. He NIOJIb3yIITecb Rpy3HIMN YNCTRIIMM TKAHMM.
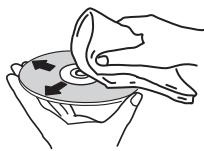
He nCIOJIb3yIte 6eH3HH, pactBOPTeJI bI HIN HIIthe JIeTpyHe xHMKaTH. TaKJE He nCIOJIb3yIte cpeCTBa IJHcHTKn BHNHla IIHn AHTNCTAHKN.
ДлгшпшшпшпллнсмчнгМКУHToTKaHb BOLOI, TIIATeJIbHo BbKmHTe ec, COtPHe TlJIbI H 3AteM BbITpTe BJIary cyXOJI KTHaIO.
HcNIOJI3yIe IOpeBKeJHHeBte (TpeCHyIIne HIN NokOp6BeHHeBte)JnCKH.
HeIOnyckaiTe IaapanHnI 3arp3HEnHn pa6ooye NOBepxHOCTN IIKCKOB.
He pHJIeIJIHrte KycOcKHN HJIN CTNKepebHa JINCKH. 3TO MOKeT IOBPeDITbIckn TAK,THX HO BHeM2OMeKHO 6yETCBOPOINB3eCTh.Takae YUHTHe, YTO Ha BA3BTbHX HApIOKAT IHCkAX qACTo KJIeT 3TNKETKN, a KJIe C 3TNKETKMOJ EIOCAuVHbATbC HApYk. IpeE NcIOJIb3OBAHmE B3BTbX HApIOKAT IIHCKOB IOBpeBte, He BvCTyIIaET JIN KJIe IIO KPAAM TAKHX 3TNKETOK.


O Dnckax CneuaJIbHOJ FOOpMbI
ДиснocoboiфорMb(ВВИесерцia,IeCTHyTObHnKa nT.II.) He myOTy BOCIOPIB3BOuNTcBaHa DAHNOM yCTPOiCTBe. He IIbTaIeTcB BOCIOPIH3BcTn TAKHe IZCNK,TAK KAK OHN MOryt NOpEeNTd DAnHOHeYCTPOICTBo.

06 iPod/iPhone
Made for

iPod

iPhone
"Made for iPod" "Made for iPhone" 03haaet, YTO JIeKtproHbI npH6op 6bln papa6oTan c IeJbIO nOIOJIHOueHHN OpOEJIENHc K iPod INI iINPhe COOTBETCTBEHNIO, I HmEeTc cepIHoiHuaIIHpa6oTouHka O COOTBETCTBNI C TEXHNUeCKHM XapKeTHePCHKAMl Apple. He Heecet OTBETCTBEHNOCTH 3a paBOy TAnHOrO yctPOCTBA HIN erO coTTOCTCTBNE Co CTaNAPrAmH IO texHNIke 6e3OIIaHocSTH NII HpyTEUINHBHbIMN HOPMAMII. IIOKaJIyNTa, O6pATITHE BHNMAHNE, YTO HcNOJIb3OBAHne DAHOrO IIpH6opa c iPod INI iINPhe MoKet OTPhuateJIbHO CkSAIBATbCe HA KaeeCTBe 6eClIPOBADHO CBZHI.
iPhone, iPod, iPod classic, iPod nano u iPod touch iOSromca mobaŋbμm 3nakμm comnauu Apple Inc., 3aεe2cεπρμo8aŋbμm b CIIU a odyux cmpanax.
Сбрoc BCex Hactpoek Ha 3HaueHnЯ поумолчаню
Дя ВOCCTaHOBJIeHЯ BCEx HAcTpoE KI yMOJIuaHHIO BbIIOJIHHTeДeIcTBnA, OIIHCaHHBe HNKe.
1 Haxmnte STANDBY/ON, yTo6bl BKJIOUHTb NtAHne.
2 Haxmnte CD ha npIbTe Dn nn HeckoJIbKO pa3 KhoNky INPUT Ha oChOBHom 6Noke, YTo6bl BbIbpaTb yHKnIO CD.
3 Haxmnte KhoNky OPEN/CLOSE, YTo6bl OTKpbItb 3JIeKTPnueckyUo CdBnraIoOyHocr KpbIshky CD.
4 HaxmTe 念 STANDBY/ON, Haxmma npn 3TOM
HcNpO3yIte KHOKNHaBepXHeN PAHEIN YCTPOICTBA.IoKA HJET IpoIeCC BOCCTAHOBIEHNAHCTPOE,KOTbpaKaTeCRA "DEFAULTS".IIHTaHne OTKJIIOAeTcR.
TexHnueckne xapaKTepeNCTNKn
- ycnjnteIb
BbIXOHaHcpeHeKBAIpaTHueckaMoHIOCTb:10BT+10BT (1Kt,10%Ko3ΦΦHneHTraptMOHNK,8OM)
Cekzua TIOhepa
YactotbI dHaia3oH (FM). 87,5 MgIO 10 108 Mg BxOaHTehn (FM) .75OM hec6aJahcnpoBaHH
OctaJIbHoe
CoeHHHeBbIpa3bEmIPIoPd/iPhone.5V,1A
Pa3bem iPod/iPhone .5V,1A
HcToHHK IHTAHNHA .0r 100Bdo240BIIpeMeHHoro ToKa,50T/60T
IITpe6JIbEMAR MOIOHcBbKIOJIeHHe IIITaHHa 25 Bt
MoIIOCTb BpeKHMe OKHJAHINH 0.5BTHINHEMSE
Pa3mepbl .430 MM (III) x 218 MM (B) x 114 MM (T)
Bec (63 yIIaKOBKN). 2.9 Kt
- FrpomkoorOBopnteB
TnIPiaccNBHbH3JyauTeJIb
PiJHOIOLOChb. 6,6cm,KOHyc
PiaccNBHbH3JyauTeJIb. 7,7cm,KOHyc
DuaapanoYacToT BocnpOn3BedeHnn. 0T 60 Tdo 20 T
-Пинадлесховс
IyJIbT nHCTaHtUHO HrO ynpabJIeHHn 1
AaIIreIep IepemEnHOro ToKa 1
CmeHHaIeHb
(X-SMC00-WnX-SMC00BT-W He HMeIOCT CMeHHoI IaHeJI B
Korob6ke) 2
BatapeiAAA (R03) 2
IpoBoJIOUHnA aHTeHHa FM. 1
PIONEER CORPORATION, 2013.
Bce npaba 3aunnneHbI.
Declaration of Conformity with regard to the R&TTE Directive 1999/5/EC
Manufacturer:
PIONEER CORPORATION
1-1, Shin-ogura, Saiwai-ku,
Kawasaki-shi, Kanagawa
212-0031, Japan
EU Representative's:
Pioneer Europe NV
Haven 1087, Keetberglaan 1,
9120 Melsele, Belgium
http://www.pioneer.eu
[+] X-SMC00BT, X-SMC00BT-W

English:
Hereby, Pioneer, declares that this [ ] is in compliance with the essential requirements and other relevant provisions of Directive 1999/5/EC.
Suomi:
C hactoJeTo, Pioneer DeKnapupa, Ye To3n ['] OTROBapHa OCHOBHInTe N3NCKBaHnI NpyrN CbOTBeTHn IOCTaHOBJIeHn Ha DnpeKTnBa 1999/5/EC.
Polski:
© 2013 PIONEER CORPORATION.
All rights reserved.
© 2013 PIONEER CORPORATION.
HmnpTeP: OOO "TMOHEP PUC"
125040, Pocnia, r. MockBa, yI. PpaBbI, I2.26 TeN.: +7(495) 956-89-01
PIONEER ELECTRONICS (USA) INC.
P.O. BOX 1540, Long Beach, California 90801-1540, U.S.A. TEL: (800) 421-1404
PIONEER ELECTRONICS OF CANADA, INC.
340 Ferrier Street, Unit 2, Markham, Ontario L3R 2Z5, Canada TEL: 1-877-283-5901, 905-479-4411
PIONEER EUROPE NV
Haven 1087, Keetberglaan 1, B-9120 Melsele, Belgium TEL: 03/570.05.11
PIONEER ELECTRONICS ASIACENTRE PTE. LTD.
253 Alexandra Road, #04-01, Singapore 159936 TEL: 65-6472-7555
PIONEER ELECTRONICS AUSTRALIA PTY. LTD.
5 Arco Lane, Heatherton, Victoria, 3202, Australia, TEL: (03) 9586-6300
PIONEER ELECTRONICS DE MEXICO S.A. DE C.V.
Blvd. Manuel Avila Camacho 138 10 piso Col.Lomas de Chapultepec, Mexico, D.F. 11000 TEL: 55-9178-4270
K002_B4_Ru