
VMS-550 - Media player PIONEER - Free user manual and instructions
Find the device manual for free VMS-550 PIONEER in PDF.
| Product Type | Wireless active speaker (receiver) with transmitter |
| Brand | Pioneer |
| Model | VMS-550 |
| Speaker weight | 150 g |
| Transmitter power supply | 8V DC power adapter supplied |
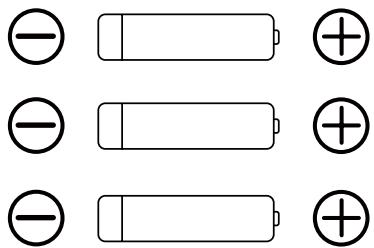
| Speaker power supply | 3 NiMH rechargeable batteries (AA size) supplied |
| Battery life | Approx. 16 hours (5 mW + 5 mW output) |
| Charging time | Approx. 8 hours (full charge up to 16 hours) |
| Transmission frequency | 863.53 MHz (Channel 1) / 864.53 MHz (Channel 2) |
| Transmission range | Up to 30 m in open area |
| Frequency response | 100 Hz - 14,000 Hz |
| Output power | 1 W + 1 W (practical maximum) |
| Speaker impedance | 8 ohms |
| Audio input | 3.5 mm jack (input cord) + RCA conversion cord |
| Main functions | Wireless charging, Voice Boost, auto synchronization, channel selection |
| Standby power consumption | 0.45 W |
| Operating temperature | +5°C to +35°C |
| Operating humidity | Less than 85% |
| Care and cleaning | Soft dry cloth; neutral detergent if necessary; no solvents |
| Safety | Magnetic shielding; do not use near a pacemaker |
| Included accessories | 1 transmitter, 1 speaker, 1 conversion cord, 1 power adapter with GS/BS plugs, 3 NiMH batteries, warranty card, instruction manual |
| General information | CE certified; do not expose to water or open flames |
Frequently Asked Questions - VMS-550 PIONEER
User questions about VMS-550 PIONEER
0 question about this device. Answer the ones you know or ask your own.
Ask a new question about this device
Download the instructions for your Media player in PDF format for free! Find your manual VMS-550 - PIONEER and take your electronic device back in hand. On this page are published all the documents necessary for the use of your device. VMS-550 by PIONEER.
USER MANUAL VMS-550 PIONEER
EU Representative's:
Pioneer Europe NV
Haven 1087, Keetberglaan 1,
9120 Melsele, Belgium
http://www.pioneer.eu
CE
English:
Hereby, Pioneer, declares that this VMS-550 is in compliance with the essential requirements and other relevant provisions of Directive 1999/5/EC.
Suomi:
natural_image
Technical line drawing of a mechanical component with mounting holes and a central internal slot (no text or symbols)3
natural_image
Pure electrical connector diagram without any text, numbers, or symbols4

natural_image
Line drawing of a handheld electronic device with cable and connector (no text or symbols)5
natural_image
Simple line drawing of a mechanical component with two pins (no text or symbols)7
6
natural_image
Three cylindrical rolled-up batteries, no text or symbols present1-2
2-1
1
3
natural_image
Technical diagram of a mechanical component with a curved arrow indicating direction (no text or symbols)2-2
1
natural_image
Diagram showing a device being processed into two separate electrical outlets (no text or symbols present)3
natural_image
Technical line drawing of a device with a top panel and a bottom view showing a component with a downward arrow (no text or symbols present)2
2
4
2-3
1
natural_image
Line drawing of a computer monitor with an audio player icon below (no text or symbols)
2
natural_image
Simple line drawing of a monitor and two circular buttons below (no text or symbols)
3-1
3-2
3-3
3-4
CAUTION
TO PREVENT THE RISK OF ELECTRIC SHOCK, DO NOT REMOVE COVER (OR BACK). NO USER-SERVICEABLE PARTS ARE INSIDE. REFER SERVICING TO QUALIFIED SERVICE PERSONNEL.
D3-4-2-1-1_B1_En
WARNING
This equipment is not waterproof. To prevent a fire or shock hazard, do not place any container filled with liquid near this equipment (such as a vase or flower pot) or expose it to dripping, splashing, rain or moisture.
D3-4-2-1-3_A1_En
WARNING
To prevent a fire hazard, do not place any naked flame sources (such as a lit candle) on the equipment.
D3-4-2-1-7a_A1_En
Operating Environment
Operating environment temperature and humidity:
+5 °C to +35 °C (+41 °F to +95 °F); less than 85 %RH (cooling vents not blocked) Do not install this unit in a poorly ventilated area, or in locations exposed to high humidity or direct sunlight (or strong artificial light)
D3-4-2-1-7c*_A1_En
When using this product, confirm the safety information shown on the bottom of the unit.
D3-4-2-2-4_B1_En
When disposing of used batteries, please comply with governmental regulations or environmental public institution's rules that apply in your country/area.
D3-4-2-3-1_B1_En
WARNING
Do not use or store batteries in direct sunlight or other excessively hot places, such as inside a car or near a heater. This can cause batteries to leak, overheat, explode or catch fire. It can also reduce the life or performance of batteries.
D3-4-2-3-3_A1_En
Information for users on collection and disposal of old equipment and used batteries
(Symbol for equipment)

(Symbol examples) for batteries

These symbols on the products, packaging, and/or accompanying documents mean that used electrical and electronic products and batteries should not be mixed with general household waste.
For proper treatment, recovery and recycling of old products and used batteries, please take them to applicable collection points in accordance with your national legislation.
By disposing of these products and batteries correctly, you will help to save valuable resources and prevent any potential negative effects on human health and the environment which could otherwise arise from inappropriate waste handling.
For more information about collection and recycling of old products and batteries, please contact your local municipality, your waste disposal service or the point of sale where you purchased the items.
These symbols are only valid in the European Union.
For countries outside the European Union:
If you wish to discard these items, please contact your local authorities or dealer and ask for the correct method of disposal.
K058a_A1_En
Information to User
Alterations or modifications carried out without appropriate authorization may invalidate the user's right to operate the equipment.
D8-10-2_A1_En
Before making or changing the connections, switch off the power and disconnect the power cord from the AC outlet.
D44-9-3_A1_En
This product is for general household purposes. Any failure due to use for other than household purposes (such as long-term use for business purposes in a restaurant or use in a car or ship) and which requires repair will be charged for even during the warranty period.
K041_A1_En
Power source
If you are not going to use the system for a long time, unplug the AC adaptor from outlet. When removing the plug, grip the AC adaptor. Do not pull on the cord.
POWER-CORD CAUTION
Handle the power cord by the plug. Do not pull out the plug by tugging the cord and never touch the power cord when your hands are wet as this could cause a short circuit or electric shock. Do not place the unit, a piece of furniture, etc., on the power cord, or pinch the cord. Never make a knot in the cord or tie it with other cords. The power cords should be routed such that they are not likely to be stepped on. A damaged power cord can cause a fire or give you an electrical shock. Check the power cord once in a while. If you find it damaged, ask your nearest PIONEER authorized service center or your dealer for a replacement.
S002*_A1_En
Thank you for buying this Pioneer product. Please read through these operating instructions so you will know how to operate your model properly. After you have finished reading the instructions, put them away in a safe place for future reference.
1. Before you start
1-1 What's in the box
1 Speaker (Receiver) .... 1
2 Transmitter.... 1
3 Conversion cord .... 1
4 AC adaptor....1
5 GS plug for AC adapter 1
6 BS plug for AC adapter.... 1
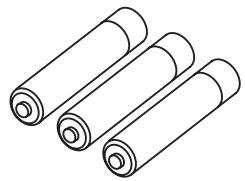
7 Rechargeable nickel-metal hydride battery (size AA) 3
Warranty Card 1
Operating instructions (this document)

Note
- Keep out of reach of small children to prevent accidental ingestion of the battery, conversion cord.
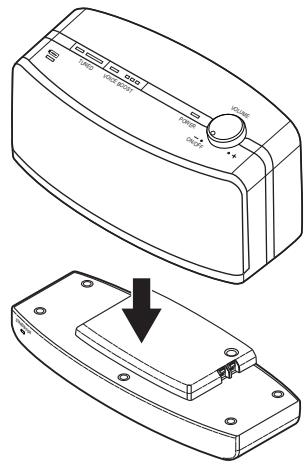
1-2 Names and Functions of Parts
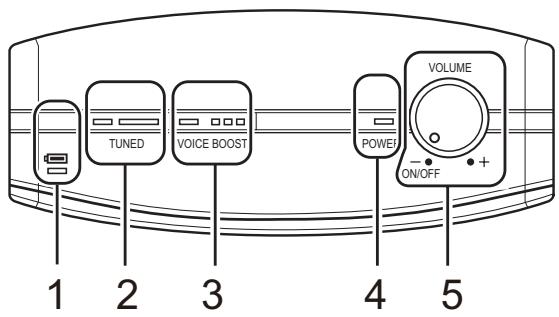
Speaker (Receiver)
1 CHARGE indicator
Lights red when charging speaker (receiver) battery.
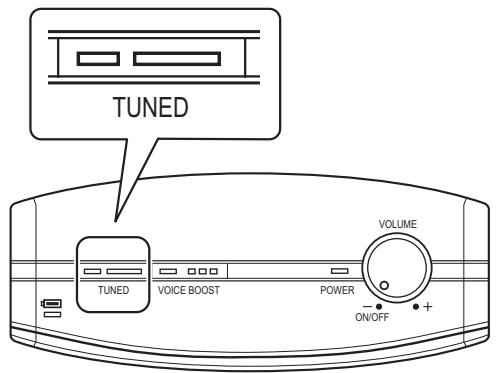
2 TUNED switch
Press to synchronize receiver to the transmitter's frequency.
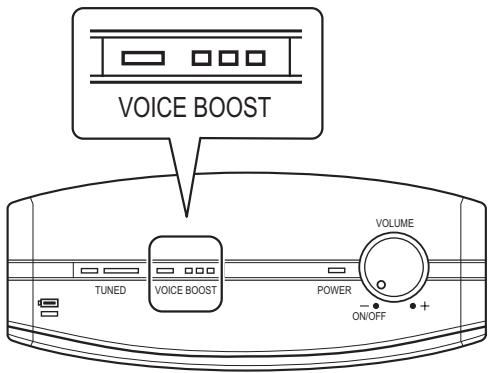
3 VOICE BOOST switch
Press to enhance the sound of television programs or other media focusing on spoken dialogue.
4 POWER indicator
Lights green when speaker power is turned ON. Flashes green to indicate low battery level.
5 POWER/VOLUME dial
Use to turn speaker (receiver) power ON/OFF, and to adjust sound level.
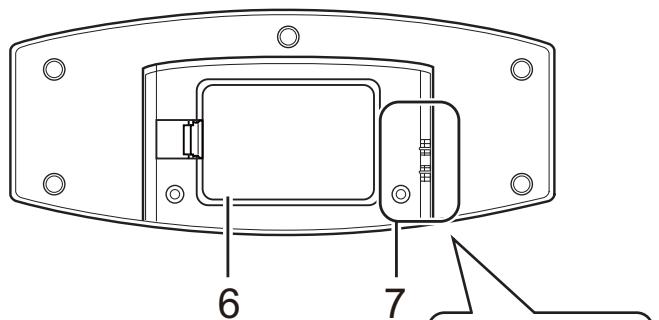
6 Battery compartment cover
7 Charging contacts
Battery charging begins when these terminals come into contact with the transmitter's terminals.
Transmitter
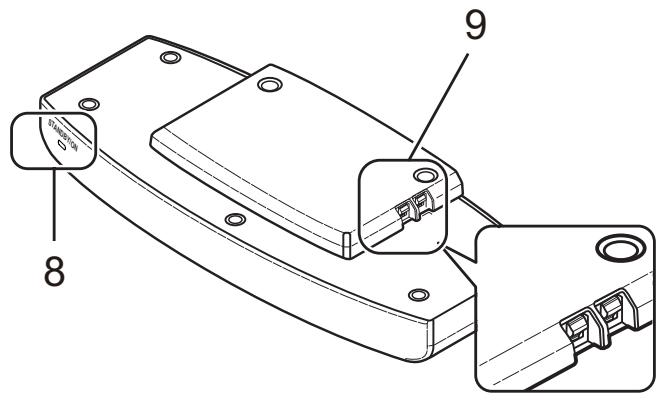
8 STANDBY/ON indicator
Lights green when transmitter is in operation. Lights red during standby mode.
9 Charging contacts
Battery charging begins when these terminals come into contact with the speaker's terminals.
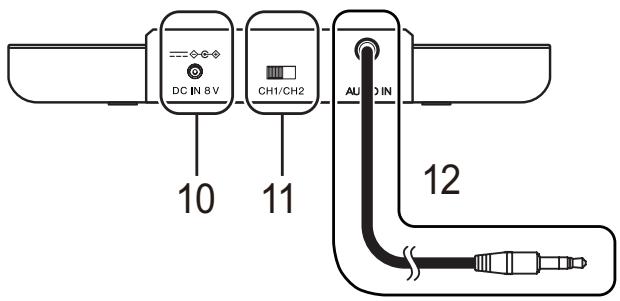
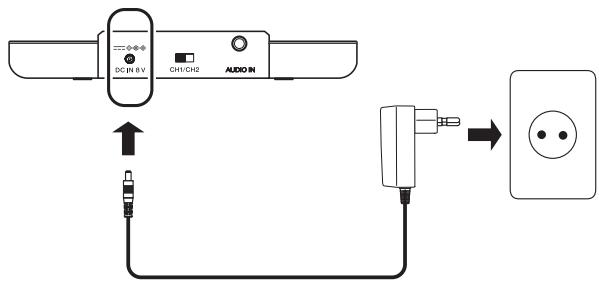
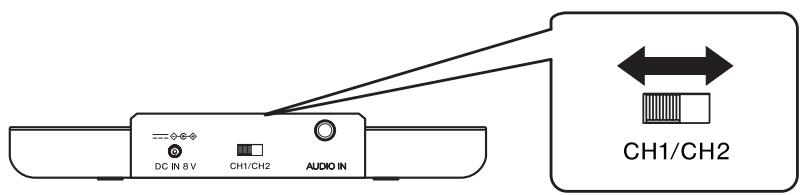
10 DC IN jack
Connect the supplied AC adaptor to this jack. (Use only the supplied AC adaptor. Using adaptors with different plug polarities or other characteristics could cause malfunction.)
11 Transmission frequency select switch
Slide the switch to change the transmission frequency (CH1/CH2).
12 Input cord
Connect to the headphone output jack of a television or AV component.
13 Conversion cord
Connect this conversion cord to the standard input cord when you wish to connect to the line output jack of a television or AV component.
2. Getting started
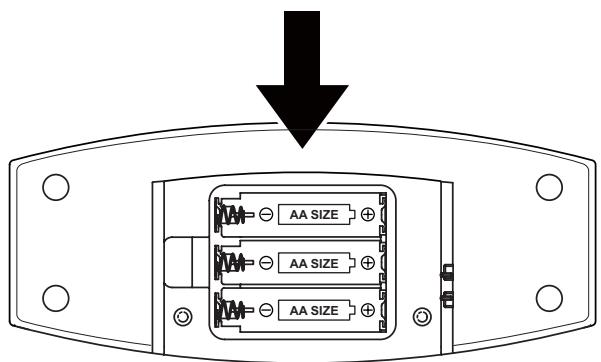
2-1 Inserting the batteries
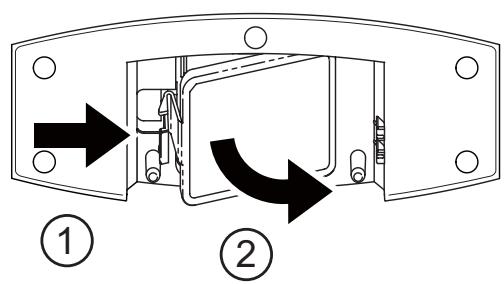
1 Remove the battery compartment cover on the bottom of the speaker (see illustration 2-1.1).
2 Confirm the “+” and “−” poles and insert the batteries.
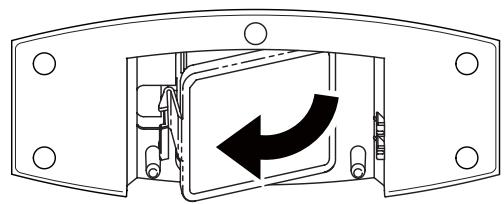
3 Return the battery compartment cover to its original position.
2-2 Charging the batteries
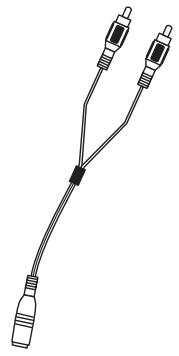
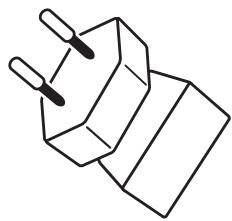
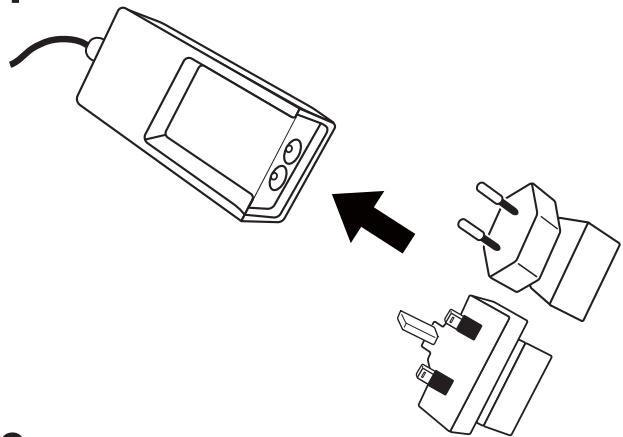
1 Confirm the type of electrical outlet and securely connect the appropriate adapter to the AC adapter body (see illustration 2-2.1).
2 Connect the supplied AC adaptor to DC IN jack on the transmitter. Plug the adaptor into the wall outlet.
3 Connect the speaker and transmitter so that their charging terminals are in contact. When charging begins, the speaker's CHARGE indicator will light red, and when charging is completed the indicator will go out. The time required for charging will vary depending on the amount of charge remaining in the battery at the time charging began (maximum time required approx. 8 hours). Maximum operating time with full charge is approx. 16 hours (5 mW + 5 mW output).

Note
- Turn off speaker power before beginning recharging.
- Usage time may vary according to the temperature and other conditions.
- Maximum operating time may be shorter depending on sound volume used and condition of battery.
- Even AC adaptors with the same voltage and plug polarity can damage this product due to the current capacity or other factors.
- Use only the supplied AC adaptor. Using other adaptors with different plug polarity or other characteristics can cause product failure.
Notes on battery charging
- Battery performance is influenced by the surrounding temperature. Charge the supplied rechargeable batteries within a temperature range of 5 to 35 degrees celsius.
- Do not overcharge batteries. In order to protect batteries, do not repeatedly charge the batteries that are already fully charged.
- Batteries become slightly warm when charging. This is not a malfunction.
- Use only the supplied AC adaptor with this unit. Using other AC adaptors may cause malfunction.
- For your safety, only the supplied rechargeable batteries can be charged by this unit. Do not use other types of rechargeable or dry-cell batteries.
- Rechargeable batteries should be replaced with new ones when they last only a short time after recharging. New batteries can be ordered from your nearest Pioneer authorized service centre.
- During recharging, sound is not produced from the speaker even if the speaker's power switch is turned on.
- The speaker's POWER indicator normally lights green during use, but when the battery's remaining charge is low, the indicator flashes green. If the indicator begins flashing, the speaker should be recharged as soon as possible.
- If the speaker is only used for short periods of time, the battery should not be recharged until it is allowed to discharge completely. If the battery still allows only a short operating time after full recharging, the battery may have reached the end of its lifetime.
2-3 Connecting up
By connecting this unit to a television or AV component, you can listen to the TV/AV component's sound through this unit's speakers. For details regarding connections, read the TV/AV component's operating instructions.
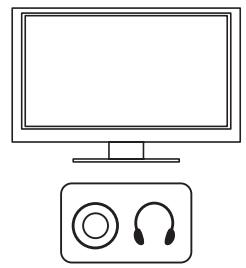
1 Listening to audio using only this unit's speakers
Connect the headphone output jack of the TV/AV component to the transmitter's input cord (see Figure 2-3.1).
Sound will cease to be output from the TV/AV component and will be output from this unit's speakers alone.

Note
- If this unit is connected to Mono TV, sound will be produced from the unit's left speaker only.
-
If the TV/AV component's controls are used to adjust the sound volume, the sound volume from the speakers will change. If the volume is raised to an excessive level in this way, sound from the speakers may be distorted. In this case, first lower the volume using the TV/AV component controls, then raise the volume by using the speaker's controls.
-
Depending on the TV/AV component used, sound may continue to be produced from its speakers even after connecting this unit to its headphone output jack.
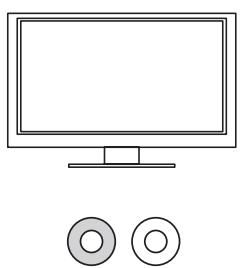
2 Listening to audio using the speakers of both this unit and those of the TV/AV component
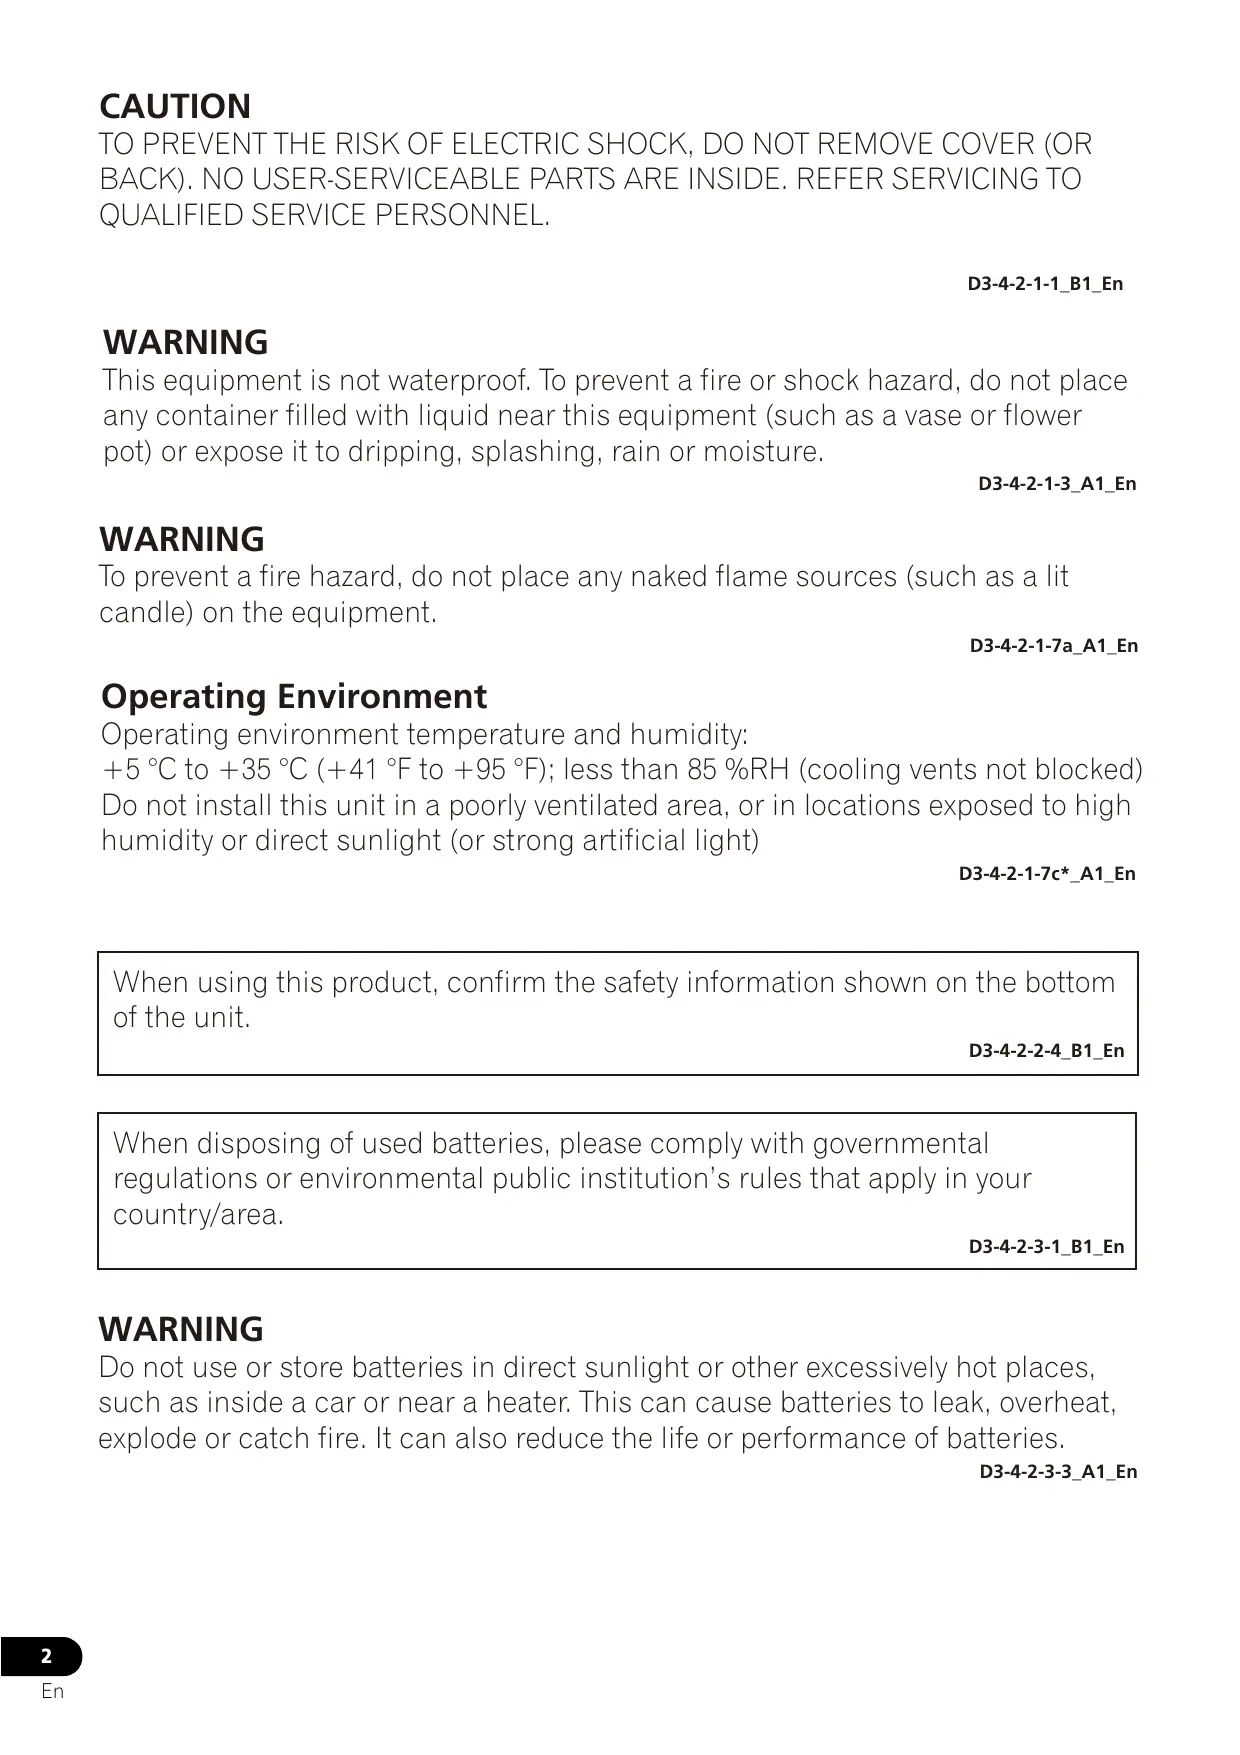
Using the accessory conversion cord, connect the line output jacks of the TV/AV component to the transmitter's input cord (consult Figure 2-3.2).

Note
- When connecting the conversion cord to the TV/AV component, be sure to match the colors (red and white) of the line output jacks.
- The method described here cannot be used if the TV has no line output jacks. In this case, consult the section “Listening to audio using only this unit’s speakers”.
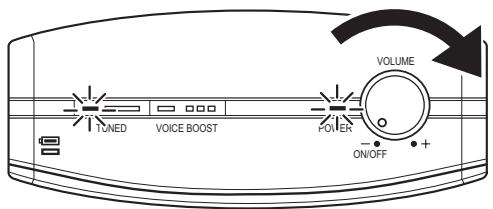
3. Operation
3-1 Using the system
1 Connect the supplied AC adaptor to DC IN jack on the transmitter. Plug the adaptor into the wall outlet.
2 Begin playback on the TV/AV component connected to the transmitter.
When an audio signal from the TV/AV component is input, the transmitter's STANDBY/ON indicator will light green.
3 Turn on power to speakers.
Rotate the speaker's POWER/VOLUME dial to the right to turn the power on. When power is turned on the POWER indicator will light green.
4 When the speakers receive the signal from the transmitter, sound will be produced from the speakers.
When the signal is received from the transmitter, the LED above the TUNED switch will light green. If no signal is received, the LED will go out and no sound will be output from the speakers.
5 Adjust the volume.
Use the speaker's POWER/VOLUME dial to adjust the sound volume. Rotate the dial to the right to raise the volume, and to the left to lower the volume.
6 Turn off the speaker's power.
When through using this unit, rotate the speaker's POWER/VOLUME dial to the left until you hear the “click” sound. When the power is off, the POWER indicator will go out.
7 Set the transmitter to standby.
If playback of the TV/AV component is stopped, or the connection is disconnected or there is no other audio input to the transmitter for four minutes, the transmitter will automatically enter the standby mode. When in the standby mode, the STANDBY/ON indicator will light red. The standby mode will be cancelled when an audio signal is input again.
- If the transmitter's power is turned OFF or enters STANDBY mode while the speaker's power is still ON, the speaker may emit a rather loud burst of noise. To avoid such noise, always turn the speaker power OFF after use.
- If you are not going to use the system for a long time, unplug the AC power adaptor from outlet. When removing the plug, grip the AC power adaptor. Do not pull on the cord.
3-2 Voice boost
When the VOICE BOOST switch (on the top of the speakers) is pressed, audio frequencies in the range of the human voice are emphasized, thus providing compensation to make the signals easier to hear. When the VOICE BOOST function is enabled, the LED above the VOICE BOOST switch lights green. If the VOICE BOOST switch is pressed again, the VOICE BOOST function will be canceled.
3-3 Changing the transmission frequency
The transmitter has two frequency channels. Select the channel that provides the best reception for the conditions in your area.
1 First, turn OFF speaker power.
2 Slide the transmission frequency select switch on the back side of the transmitter to choose either CH1 or CH2; in this way the transmission frequency will be changed.
3 Turn speaker power ON again. Sound will be produced in sync to the transmitter's frequency.

Note
- If the transmitter's channel is changed without first turning off the speaker power, immediately press the speaker's TUNED switch. Sound will be produced from the speaker in synch with the transmitter's frequency.
- The transmission distance is affected by the surrounding environment. If you hear noise or intermittent sound, either move the speaker to a location with better reception, or change the transmission channel.
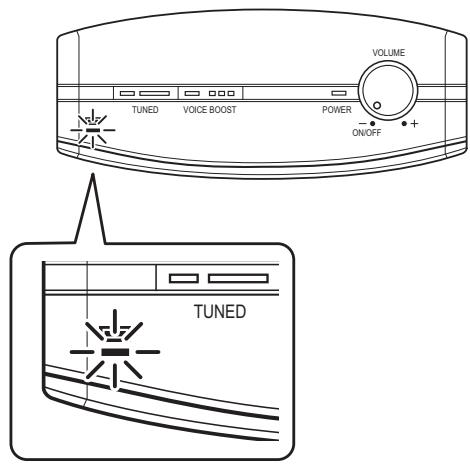
3-4 TUNED switch
If the LED above the TUNED switch is not illuminated (no sound is produced), or if a burst of noise is heard from the speaker, it generally means the signal from the transmitter has not been received correctly by the speaker. In this event, press the TUNED switch in order to sync the speaker to the transmitter's frequency.
4. Additional information
Troubleshooting
If you run into any problems using this speaker system, refer to the following checklist.
Incorrect operation may result in some problems. In addition, the problems may be caused by malfunctions on the components connected to this system. Should any problem persist, consult your nearest Pioneer authorized service centre or your dealer to carry out repair work.
When visiting your Pioneer authorized service centre for repairs, be sure to take both the speaker and transmitter.
| Problem | Remedy |
| No sound. | Check the connection between the AC adaptor and the wall outlet.Check the connection between the transmitter and the AV components.Start playback after checking that the power is turned on for the TV or audio playback device used.Check the batteries are placed in correct polarities.Batteries are completely used up.Confirm that the speaker's POWER indicator and the transmitter's STANDBY/ON indicator are lit green. If the speaker's POWER indicator is not lighted, recharge the speakers.Raise the sound volume. If no sound can be heard even when the sound volume is raised, lower the sound volume again and try the other suggestions here.Press the speaker's TUNED switch to match the transmitter's frequency channel. |
| Sound intermittent.Sound is distorted. | Change the transmitter's frequency to a channel with better reception conditions.Bring the speakers and transmitter closer together. Also, do not allow any obstacles to come between the speakers and transmitter.The sound volume control is set too high, or too low at the TV/AV or other playback source. Try adjusting the sound volume of the playback device. |
| Interference with other wireless transmitters | ·If other wireless devices using the 860 MHz band are nearby, separate them as far as possible from this unit.·Bring the speaker and transmitter closer together and turn on their power switches again.·Change the transmitter's frequency to a channel with better reception conditions. |
| The batteries will not charge. | ·Confirm that the speaker's charging terminals are securely in contact with the transmitter's charging terminals. Also confirm that the speaker's CHARGE indicator is lit red.·Dry-cell batteries or rechargeable batteries other than the ones supplied are being used. Use only the supplied rechargeable batteries.·The rechargeable batteries are exhausted. Replace them with new rechargeable batteries.·Check the terminals of the rechargeable battery and confirm that they are clean. Remove and re-install.·Check whether the charging contacts are soiled, and clean with a cotton swab if necessary.·Confirm that the rechargeable batteries have been installed with the +/- polarities in the correct orientation. |
Precautions
About use of speaker
- This speaker system is magnetically shielded. However, depending on the installation location, colour distortion may occur if the speaker system is installed extremely close to the screen of a television set. If this happens, turn the power switch of the television set OFF, and turn it ON after 15 to 30 minutes. If the problem persists, place the speaker system away from the television set.
- Magnetically susceptible devices (floppy discs, cassette tapes, video tapes, etc.) should be placed and stored away from this unit.
Cleaning
- Use a soft and dry cloth for cleaning. Use a soft cloth slightly moistened with mild detergent solution, if necessary. Do not use solvents such as thinner, benzene or alcohol as these may damage the surface.
About safety
- This unit should not be used by persons who have heart pacemakers installed, since adverse affects could occur.
- Do not use this unit in hospitals or clinics, or near medical equipment.
natural_image
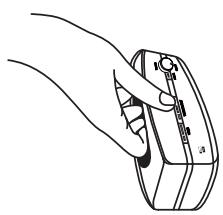
Line drawing of a hand holding a device with a knob and label (no text or symbols present)- When carrying the speakers hold them as shown in the illustration, and take care to avoid dropping, since damage or personal injury could result.
Placement
- Do not place the system in any of the following locations:
- Location exposed to direct sunlight, in a car, near a heater, or other areas of extreme high temperature.
- Dusty location.
- On an unsteady or inclined surface.
- Location exposed to large amounts of vibration.
- Bathroom or other high-humidity locations.
When something is wrong with the Product
- If any of the following conditions are observed, immediately unplug the AC adapter from its outlet, and turn off power to the speakers. Consult your Pioneer authorized service centre at your earliest convenience.
- This unit exhibits unnatural heating, smells, deformation, discoloration, etc.
- If the unit is accidentally dropped
- When taking the system to Pioneer authorized service centre, be sure to take both the speaker and transmitter.
Specifications
Speaker
Type ...... Sealed-type active speaker system/magnetically shielded design
Playback frequency range.... 100 Hz to 14 000 Hz
Driver units .... 50 mm
Impedance 8 ohm
Continuous playing time....About 16 hours
Maximum practical output 1 W + 1 W
Power source ...... DC 3.6 V (supplied rechargeable battery x 3)
Weight 580 g
Transmitter
Audio input ...... Analog input
Power source ...... DC 8 V (from the supplied AC adaptor)
Power consumption in standby mode 0.45 W
Weight 150 g
General specifications
Transmission method.... RF
Modulation method ...... FM modulation
Carrier frequency Channel 1: 863.53 MHz
Channel 2: 864.53 MHz
Transmission distance 30 m
(open area without obstructions; the actual effective distance may vary depending on environmental conditions.)

Note
- Specifications and Designs are subject to possible modifications without notice due to improvements.
ATTENTION
POUR ÉVITER TOUT RISQUE D'ÉLECTROCUTION, NE PAS ENLEVER LE COUVERCLE (NI LE PANNEAU ARRIÈRE). AUCUNE PIÈCE RÉPARABLE PAR L'UTILISATEUR NE SE TROUVE À L'INTÉRIEUR. CONFIER TOUT ENTRETIEN À UN PERSONNEL QUALIFIÉ UNIQUEMENT.
D3-4-2-1-1_B1_Fr
AVERTISSEMENT
natural_image
Line drawing of a hand holding a device with a scroll wheel (no text or symbols)Alimentation ....CC 3,6 V (pile rechargeable fournie x 3)
Poids 580 g
Emetteur
natural_image
Line drawing of a hand holding a device with a knob (no text or symbols)natural_image
Line drawing of a hand holding a device with a knob and adjustment knob (no text or symbols)WAARSCHUWING NETSNOER
© 2013 PIONEER CORPORATION.
Information Note for Customers in Russia and CIS countries.
© 2013 PIONEER CORPORATION.
All rights reserved.
© 2013 PIONEER CORPORATION.
© PIONEER CORPORATION, 2013.
Все права защищены.
PIONEER CORPORATION
1-1, Shin-ogura, Saiwai-ku, Kawasaki-shi, Kanagawa 212-0031, Japan / Japon
Корпорация Пайонир
PIONEER ELECTRONICS (USA) INC.
P.O. BOX 1540, Long Beach, California 90801-1540, U.S.A. / Etats-Unis.
TEL: (800) 421-1404
PIONEER ELECTRONICS OF CANADA, INC.
340 Ferrier Street, Unit 2, Markham, Ontario L3R 2Z5, Canada
TEL: 1-877-283-5901, 905-479-4411
PIONEER EUROPE NV
Haven 1087, Keetberglaan 1, B-9120 Melsele, Belgium / Belgique TEL: 03/570.05.11
PIONEER ELECTRONICS ASIACENTRE PTE. LTD.
253 Alexandra Road, #04-01, Singapore / Singapour 159936 TEL: 65-6472-7555
PIONEER ELECTRONICS AUSTRALIA PTY. LTD.
5 Arco Lane, Heatherton, Victoria, 3202, Australia / Australie, TEL: (03) 9586-6300
PIONEER ELECTRONICS DE MEXICO S.A. DE C.V.
Blvd.Manuel Avila Camacho 138 10 piso Col.Lomas de Chapultepec, Mexico /
Mexique, D.F. 11000 TEL: 55-9178-4270
K002_B4_Ru

- Pioneer Europe NV
- CE
- English:
- Suomi:
- 2-1
- 2-2
- 2-3
- 1
- 2
- 3-1
- 3-2
- 3-3
- 3-4
- CAUTION
- WARNING
- Operating Environment
- Information for users on collection and disposal of old equipment and used batteries
- These symbols are only valid in the European Union.
- For countries outside the European Union:
- Information to User
- Before making or changing the connections, switch off the power and disconnect the power cord from the AC outlet.
- Power source
- POWER-CORD CAUTION
- Before you start
- 1-1 What's in the box
- Note
- 1-2 Names and Functions of Parts
- Speaker (Receiver)
- Transmitter
- Charging contacts
- DC IN jack
- Transmission frequency select switch
- Input cord
- Conversion cord
- Getting started
- 2-1 Inserting the batteries
- 2-2 Charging the batteries
- Notes on battery charging
- 2-3 Connecting up
- Listening to audio using only this unit's speakers
- Operation
- 3-1 Using the system
- 3-2 Voice boost
- 3-3 Changing the transmission frequency
- 3-4 TUNED switch
- Additional information
- Troubleshooting
- Precautions
- About use of speaker
- Cleaning
- About safety
- Placement
- When something is wrong with the Product
- Specifications
- Speaker
- General specifications
- ATTENTION
- AVERTISSEMENT
- Emetteur
- WAARSCHUWING NETSNOER
- PIONEER CORPORATION
- Корпорация Пайонир
- PIONEER ELECTRONICS (USA) INC.
- PIONEER ELECTRONICS OF CANADA, INC.
- PIONEER ELECTRONICS ASIACENTRE PTE. LTD.
- PIONEER ELECTRONICS AUSTRALIA PTY. LTD.
- PIONEER ELECTRONICS DE MEXICO S.A. DE C.V.
Brand : PIONEER
Model : VMS-550
Category : Media player