PRV-LX1 - Media player PIONEER - Free user manual and instructions
Find the device manual for free PRV-LX1 PIONEER in PDF.

| Product Type | Professional DVD Recorder / Media Player |
| Brand | Pioneer |
| Model | PRV-LX1 |
| Hard Drive Capacity | 120 GB |
| Supported Discs | DVD-R (General Use), DVD-RW (Ver. 1.1 or later), DVD-Video |
| Video Inputs | Composite, S-Video, Component (Y/B-Y/R-Y), DV (IEEE 1394) |
| Audio Inputs | RCA (CH1/CH2), XLR, DV |
| Video Outputs | Composite, S-Video, Component, DV, VGA (GUI), optional SDI |
| Audio Outputs | RCA, XLR, Digital (PCM/AC-3), DV |
| Power Supply | AC 100-240 V, 50/60 Hz |
| TV System | NTSC (factory preset), PAL selectable |
| Remote Control | Infrared with full transport functions |
| Interface | USB 2.0, Ethernet, RS-422A, LTC |
| Recording Time (HDD) | Approx. 23-100 hours (depending on quality) |
| Recording Time (DVD) | Approx. 1-6 hours per 4.7 GB disc |
| Air Filter | Replaceable dust filters on front lower panel |
| Operating Temperature | +5 °C to +35 °C |
| Humidity | 85% RH (non-condensing) |
| Safety Certifications | FCC Class A, ICES-003 |
| Warranty | Refer to included warranty card |
Frequently Asked Questions - PRV-LX1 PIONEER
User questions about PRV-LX1 PIONEER
0 question about this device. Answer the ones you know or ask your own.
Ask a new question about this device
Download the instructions for your Media player in PDF format for free! Find your manual PRV-LX1 - PIONEER and take your electronic device back in hand. On this page are published all the documents necessary for the use of your device. PRV-LX1 by PIONEER.
USER MANUAL PRV-LX1 PIONEER
The lightning flash with arrowhead, within an equilateral triangle, is intended to alert the user to the presence of uninsulated "dangerous voltage" within the product's enclosure that may be of sufficient magnitude to constitute a risk of electric shock to persons.
CAUTION
RISK OF ELECTRIC SHOCK DO NOT OPEN
CAUTION:
TO PREVENT THE RISK OF ELECTRIC SHOCK, DO NOT REMOVE COVER (OR BACK). NO USER-SERVICEABLE PARTS INSIDE. REFER SERVICING TO QUALIFIED SERVICE PERSONNEL.

The exclamation point within an equilateral triangle is intended to alert the user to the presence of important operating and maintenance (servicing) instructions in the literature accompanying the appliance.
D1-4-2-3_En
WARNING – TO PREVENT FIRE OR SHOCK HAZARD, DO NOT EXPOSE THIS APPLIANCE TO RAIN OR MOISTURE.
D1-4-2-1_En
For pluggable Equipment, The Socket-Outlet Shall Be Installed Near The Equipment and Shall Be Easily Accessible.
WARNING: Handling the cord on this product or cords associated with accessories sold with the product will expose you to lead, a chemical known to the State of California and other governmental entities to cause cancer and birth defects or other reproductive harm.
Wash hands after handling
D36-P4_En
NOTE: This equipment has been tested and found to comply with the limits for a Class A digital device, pursuant to Part 15 of the FCC Rules. These limits are designed to provide reasonable protection against harmful interference when the equipment is operated in a commercial environment. This equipment generates, uses, and can radiate radio frequency energy and, if not installed and used in accordance with the instruction manual, may cause harmful interference to radio communications. Operation of this equipment in a residential area is likely to cause harmful interference in which case the user will be required to correct the interference at his own expense. D8-10-1-1_En
This Class A digital apparatus complies with Canadian ICES-003.
Alteration or modifications carried out without appropriate authorization may invalidate the user's right to operate the equipment. D8-10-2
CAUTION: This product satisfies FCC regulations when shielded cables and connectors are used to connect the unit to other equipment. To prevent electromagnetic interference with electric appliances such as radios and televisions, use shielded cables and connectors for connections. D8-10-3
D8-10-3a_En
IMPORTANT NOTICE - THE SERIAL NUMBER FOR THIS EQUIPMENT IS LOCATED IN THE REAR. PLEASE WRITE THIS SERIAL NUMBER ON YOUR ENCLOSED WARRANTY CARD AND KEEP IN A SECURE AREA. THIS IS FOR YOUR SECURITY. D1-4-2-6-1_En
CAUTION : USE OF CONTROLS OR ADJUSTMENTS OR PERFORMANCE OF PROCEDURES OTHER THAN THOSE SPECIFIED HEREIN MAY RESULT IN HAZARDOUS RADIATION EXPOSURE.
CAUTION : THE USE OF OPTICAL INSTRUMENTS WITH THIS PRODUCT WILL INCREASE EYE HAZARD. D6-8-2-1_En
DANGER – VISIBLE AND INVISIBLE LASER RADIATION WHEN OPEN. AVOID DIRECT EXPOSURE TO BEAM.
WARNING
This product equipped with a three-wire grounding (earthed) plug - a plug that has a third (grounding) pin. This plug only fits a grounding-type power outlet. If you are unable to insert the plug into an outlet, contact a licensed electrician to replace the outlet with a properly grounded one. Do not defeat the safety purpose of the grounding plug.
D3-4-2-1-6_A_En
IMPORTANT SAFETY INSTRUCTIONS
READ INSTRUCTIONS — All the safety and operating instructions should be read before the product is operated.
RETAIN INSTRUCTIONS — The safety and operating instructions should be retained for future reference.
HEED WARNINGS — All warnings on the product and in the operating instructions should be adhered to.
FOLLOW INSTRUCTIONS — All operating and use instructions should be followed.
CLEANING — The product should be cleaned only with a polishing cloth or a soft dry cloth. Never clean with furniture wax, benzine, insecticides or other volatile liquids since they may corrode the cabinet.
ATTACHMENTS — Do not use attachments not recommended by the product manufacturer as they may cause hazards.
WATER AND MOISTURE — Do not use this product near water — for example, near a bathtub, wash bowl, kitchen sink, or laundry tub; in a wet basement; or near a swimming pool; and the like.
ACCESSORIES — Do not place this product on an unstable cart, stand, tripod, bracket, or table. The product may fall, causing serious injury to a child or adult, and serious damage to the product. Use only with a cart, stand, tripod, bracket, or table recommended by the manufacturer, or sold with the product. Any mounting of the product should follow the manufacturer's instructions, and should use a mounting accessory recommended by the manufacturer.
CART — A product and cart combination should be moved with cars. Quick stops, excessive force, and uneven surfaces may cause the product and cart combination to overturn.

VENTILATION — Slots and openings in the cabinet are provided for ventilation and to ensure reliable operation of the product and to protect it from overheating, and these openings must not be blocked or covered. The openings should never be blocked by placing the product on a bed, sofa, rug, or other similar surface. This product should not be placed in a built-in installation such as a bookcase or rack unless proper ventilation is provided or the manufacturer's instructions have been adhered to
POWER SOURCES — This product should be operated only from the type of power source indicated on the marking label. If you are not sure of the type of power supply to your home, consult your product dealer or local power company.
LOCATION – The appliance should be installed in a stable location.
NONUSE PERIODS – The power cord of the appliance should be unplugged from the outlet when left un-used for a long period of time.
GROUNDING OR POLARIZATION
- If this product is equipped with a polarized alternating current line plug (a plug having one blade wider than the other), it will fit into the outlet only one way. This is a safety feature. If you are unable to insert the plug fully into the outlet, try reversing the plug. If the plug should still fail to fit, contact your electrician to replace your obsolete outlet. Do not defeat the safety purpose of the polarized plug.
- If this product is equipped with a three-wire grounding type plug, a plug having a third (grounding) pin, it will only fit into a grounding type power outlet. This is a safety feature. If you are unable to insert the plug into the outlet, contact your electrician to replace your obsolete outlet. Do not defeat the safety purpose of the grounding type plug.
POWER-CORD PROTECTION — Power-supply cords should be routed so that they are not likely to be walked on or pinched by items placed upon or against them, paying particular attention to cords at plugs, convenience receptacles, and the point where they exit from the product.
OUTDOOR ANTENNA GROUNDING — If an outside antenna or cable system is connected to the product, be sure the antenna or cable system is grounded so as to provide some protection against voltage surges and built-up static charges. Article 810 of the National Electrical Code. ANSI/NFPA 70, provides information with regard to proper grounding of the mast and supporting structure, grounding of the lead-in wire to an antenna discharge unit, size of grounding conductors, location of antenna-discharge unit, connection to grounding electrodes, and requirements for the grounding electrode. See Figure A.
LIGHTNING — For added protection for this product during a lightning storm, or when it is left unattended and unused for long periods of time, unplug it from the wall outlet and disconnect the antenna or cable system. This will prevent damage to the product due to lightning and power-line surges.
POWER LINES — An outside antenna system should not be located in the vicinity of overhead power lines or other electric light or power circuits, or where it can fall into such power lines or circuits. When installing an outside antenna system, extreme care should be taken to keep from touching such power lines or circuits as contact with them might be fatal.
OVERLOADING — Do not overload wall outlets, extension cords, or integral convenience receptacles as this can result in a risk of fire or electric shock.
OBJECT AND LIQUID ENTRY — Never push objects of any kind into this product through openings as they may touch dangerous voltage points or short-out parts that could result in a fire or electric shock. Never spill liquid of any kind on the product.
SERVICING — Do not attempt to service this product yourself as opening or removing covers may expose you to dangerous voltage or other hazards. Refer all servicing to qualified service personnel.
DAMAGE REQUIRING SERVICE — Unplug this product from the wall outlet and refer servicing to qualified service personnel under the following conditions:
- When the power-supply cord or plug is damaged.
- If liquid has been spilled, or objects have fallen into the product.
• If the product has been exposed to rain or water. - If the product does not operate normally by following the operating instructions. Adjust only those controls that are covered by the operating instructions as an improper adjustment of other controls may result in damage and will often require extensive work by a qualified technician to restore the product to its normal operation.
- If the product has been dropped or damaged in any way.
- When the product exhibits a distinct change in performance — this indicates a need for service.
REPLACEMENT PARTS — When replacement parts are required, be sure the service technician has used replacement parts specified by the manufacturer or have the same characteristics as the original part. Unauthorized substitutions may result in fire, electric shock, or other hazards.
SAFETY CHECK — Upon completion of any service or repairs to this product, ask the service technician to perform safety checks to determine that the product is in proper operating condition.
WALL OR CEILING MOUNTING — The product should not be mounted to a wall or ceiling.
HEAT — The product should be situated away from heat sources such as radiators, heat registers, stoves, or other products (including amplifiers) that produce heat.
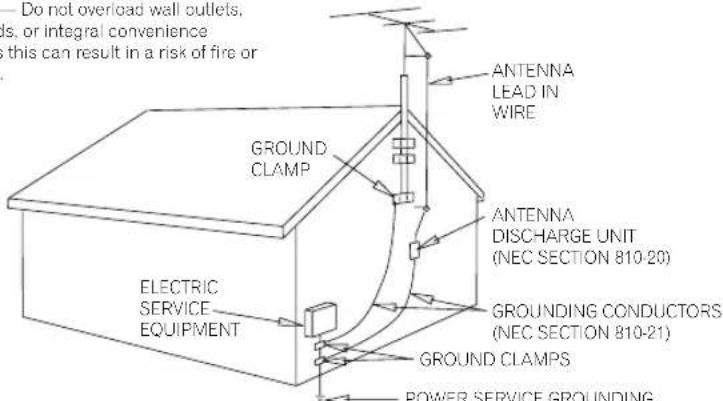
Fig. A
— POWER SERVICE GROUNDING ELECTRODE SYSTEM (NEC ART 250, PART H)
NEC — NATIONAL ELECTRICAL CODE
D1-4-2-2_En
Confirm Supplied Accessories
☐ Remote control unit (1)
□ AA batteries (2)
☐ Air filter replacements set (1)
Power cord 2-meters (1)
□ Warranty (1)
☐ Operating Instructions (1)
- If any of the above accessories are missing, contact your dealer.
IMPORTANT SAFETY INSTRUCTIONS ..... 2
Precautions 5
Preparations for Use: Basic Information ... 8
Features 11
Example of System Composition and Recording Component Setup .... 12
Names of Parts 14
Front Panel Facilities 14
Rear Panel Facilities 16
Remote Control Unit 17
Video Clip Management and Disc Authoring Procedure 18
Basic Operations ......19
Functions 22
Status Confirmation Using Onscreen Display (OSD) 26
System Default Settings 29
Mouse/Keyboard 29
Network 30
UPS Support 30
System Information 31
HDD Tools 31
Background Color 32
Composite Video/Audio RCA Output ..... 32
GUI Language Setting 32
Recording 33
Selecting the TV System Mode 33
Selecting Input 34
Selecting Recording Destination 35
Other Recording Settings 36
Video Encode Rate Settings 36
Video Filter Level Setting 37
Audio Encode Setting 37
Audio Level Setting 37
Methods for Setting Chapter Mark Insertion .... 37
Preview Function 38
Starting and Stopping Recording 38
Settings for Automatic Recording ..... 40
Eject Setting 41
Editing the Edit List 41
Recording to DVD Discs 42
Recording from HDD to DVD 44
Playing Discs 45
Selecting Playback Source 45
Playing DVD-Video Discs (including commercially available software titles) 45
Clip Playback (HDD) 46
Basic Operations 46
Playback Monitoring during Recording .. 49
Other Playback Settings 50
External Sync Function 53
Other Functions 53
Regarding Progressive Scan Output ..... 54
DVD Menu Editing 55
DVD Menu Type Selection 55
Font Selection 55
DVD Menu Selection 56
Thumbnail Selection 56
Button Text....57
Selecting Opening Clip 57
Setting an Idle Clip 58
Setting Navigation Commands 58
Customizing the DVD Menu 59
Deleting and Initializing Menu Library .... 60
DVD Menu Preview 61
DVD Disc Emulation 61
Load / Save to Default Menu 61
Title Editing / Chapter Editing ...... 62
Editing Chapter Names 62
Title Trimming 63
Chapter Editing 64
Dividing Clips 64
Title Order Edit 65
DVD Disc Emulation 65
Recording to DVD Disc 66
Project Editing 67
Copying a Project 68
Copying Clips 68
Renaming a Clip 69
Exporting VOB Files 69
Deleting a Project 69
Disc Duplication 70
Disc-to-disc Duplication 70
Creating Image Files from a Disc .....71
Creating Discs from Image Files 71
Deleting Image Files from a Hard Disk .. 71
Importing Image Data, Edit Lists 72
DVD Menu Layout Image File Format .... 73
DVD Menu Background Image File Format .... 73
Edit List File Format 74
Edit List Example 75
Backing Up/Restoring USB HDDs ..... 76
Connecting a USB HDD 76
Formatting 76
Backing Up 76
Restoring 77
Deleting Backup Data 77
Removing a USB HDD 77
Backing up and Restoring System Settings ...77
Recording Time 78
Function Menu Table 80
Shortcut Key Information 88
Message Display 89
TROUBLESHOOTING 95
Specifications 97
Language Code List 99
Country Code List 100
Regarding the GNU General Public License ....101
Thank you for buying this Pioneer product. Please read through these operating instructions so you will know how to operate your model properly.
■Care must be taken not to infringe copyright restrictions under the laws of each country. If this device is used to record copyrighted materials, approval must be obtained from the respective copyright holders. The recording of copyrighted materials without the express approval of the respective copyright holders may result in legal penalties. Pioneer disclaims any and all responsibility for any legal damages resulting from the use of this device in the unauthorized copying of copyrighted materials.
■Pioneer may not be held liable for the loss of any data or any other direct or indirect damage suffered as the result of the use or breakdown of this product.
■All names of corporations, products, and systems listed herein, even when the (TM) or (®) symbols are omitted, should be considered the registered trademarks of their respective owners.
Installation Notes
●Install in a level, stable location. Avoid unstable locations, or locations exposed to strong vibrations.
- Do not interfere with the dispersion of heat from the unit. Avoid using the unit on deep pile carpets or other thick fabrics, and do not cover the unit with blankets or cloths. Such usages may interfere with cooling and result in malfunctions.
●Do not place other objects on top of the unit.
●Install in a location not exposed to other sources of heat. Avoid installing the unit on top of amplifiers or other components that emit heat. When mounting the unit in a rack, avoid the effect of heat from amplifiers and other audio components by installing the PRV-LX1 as low as possible beneath the other components in a well-ventilated position in the rack.
- When mounting the unit in a rack, special precautions are necessary to avoid heat rise inside the unit. As a general rule, install the unit in a location not exposed to heat from below, and with at least 10 cm clearance to right and left and above, to provide for natural convection (ambient temperature below 35 °C).
Under other conditions, install so that when fully warmed up, the temperature at a point 5 cm above the center top of the case is below 35 °C. Provide for the installation of some means of forced ventilation if necessary.
- When connecting multiple PRV-LX1 units in series and using an external means of controlling power ON/OFF, the initial current surge will become quite large. Consult your Pioneer service center regarding the ratings for power switches used with such an installation.
When using this unit alone, be sure that the power outlet supplies current sufficient for the component's power rating.
- Do not install in fully enclosed rack mounts, since damage may result from overheating.
Environment Conditions
Ambient conditions during use should be within the range of +5 °C to +35 °C (+41 °F to +95 °F) and 85% Relative Humidity (with ventilation ports not blocked).
■Prohibited Installation Locations
- Places exposed to direct sunlight or bright artificial light.
- Places exposed to high levels of dust or smoke.
- Places subject to vibration.
- Places subject to strong electrical or magnetic fields.
- Close to heat sources.
- Places exposed to high levels of electrical noise.
- Places liable to the generation of electrostatic noise.
- Places exposed to high humidity or poor ventilation.
- Fully enclosed rack mounts.
About Condensation
During winter months when the unit is moved from a cold location into a warm room, or when the temperature of the installation location is raised suddenly, condensation may form on the unit's internal parts (drive mechanism, laser lens, hard disk, etc.). When condensation forms, the unit will not operate. To eliminate the condensation, disconnect the power cord and allow the unit to warm to room temperature. Depending on the degree of condensation, this may require 1-2 hours. Once the unit has warmed sufficiently, it will become operational again.
Condensation may also form during summer months if the cool air from an air conditioner is directed toward the unit. In this case, change the installation location of the unit or the air conditioner.
Moving the Unit
If transporting of the unit is required, be sure to use the original packing materials supplied with the unit, and avoid subjecting the unit to impact, vibration, or dropping. Also take precautions to avoid exposing the unit to heat or moisture during the move. Always remove any discs from the unit before moving. Moving the unit with a disc loaded may result in scratches to the disc or internal damage to the drive unit.
■Special Precautions
Never move the unit during playback or recording. During playback and recording, the disc is rotating at very high speed, and lifting or moving the unit during this time may result in damage to the disc. Subjecting the unit to strong impacts or vibrations when a disc is loaded may also result in damage to the disc or internal parts of the unit. When it is necessary to transport the unit, stop any recording or playback operations, and remove any disc that is loaded. Remove discs anytime lifting or moving of the unit is required.
This unit is designed with precision optical devices. Take special care to control room temperature and dust in the installation location.
About Copyright
●Unauthorized copying, broadcast, public performance, or rental of copyrighted discs is prohibited by law.
●This product incorporates copyright protection technology that is protected by method claims of certain U.S. patents and other intellectual property rights owned by Macrovision Corporation and other rights owners. Use of this copyright protection technology must be authorized by Macrovision Corporation, and is intended for home and other limited viewing uses only unless otherwise authorized by Macrovision Corporation. Reverse engineering or disassembly is prohibited.
●This unit is equipped with copy prevention technology, and will not permit the unauthorized copying of contents recorded by their copyright holders with copy-prevention signals.
- This unit does not support recording of DVD-RW discs in VR mode. As a result, it also does not support CPRM ("copy once") discs.
- This unit features a GNU/Linux system based on a GNU general public licence.
The contents of this contract can be found on page 101
About the use of Dolby Digital Logo
Audio bitstreams created with this system are not intended for distribution on DVDs bearing the Dolby Digital logo. For more information on the use of Dolby trademarks and logos, please contact Dolby Laboratories: http://www.dolby.com
■Precautions when starting
- When powering on the unit (from the time the power is turned on until the STOP button lights; see page 15), do not operate the keyboard until the monitor displays the PRV-LX logo. If the startup procedure is interrupted due to inadvertent keyboard input, press the keyboard's [ESC] key.
●Also, When restarting after a shutdown, the wait several seconds after the power indicator (see page 14) turns orange before powering on again.
Precautions Regarding Built-In Hard Disk Drive (HDD)
The built-in hard disk drive (HDD) incorporates high-precision technology, and recorded contents may be damaged or lost under certain conditions of use. Take precautions regarding the following:
■Important Recordings
If the built-in hard disk drive malfunctions, contents previously recorded on the drive may be lost. Important recordings should not be left permanently on the HDD, but preserved as DVD-Video discs by means of DVD-R/RW recording. Pioneer disclaims any responsible for loss of recorded data or other collateral damage arising from any malfunction, including failure of the HDD at the end of its operating lifetime.
Pioneer disclaims all responsibility for the integrity of contents recorded on hard disk drives or DVD discs, and for any damages resulting from the loss of such contents.
■Precautions Regarding Installation and Use
▼Do not subject the unit to vibration and impacts. Subjecting the unit to such vibrations or impacts during operation is particularly to be avoided, since malfunctions may result.
▼Do not install unit in unstable locations, or locations exposed to vibration.
▼Always install in level horizontal position.
▼Do not block the rear cooling fan and front lower air intakes. Malfunctions may result from attempting to use the unit with the fan or vents blocked.
Two dust filters are installed in the air intakes on the unit's front lower panel (see page 14). With time, the air filters will gradually become soiled with dust. If the unit is subjected to continued use with dirty filters, the unit pay not perform to its full, and malfunctions may occur. As a result, please replace the filters at regular intervals (see the appended "Air Filter Replacement Instructions and Precautions").
▼Do not use the unit in environments exposed to high temperature or humidity. Also, avoid using the unit in locations exposed to sudden changes of temperature, since condensation may occur on internal parts, leading to possible damage to the hard disk drive (HDD) and other malfunctions. Consult the section "About Condensation" on page 5.
When power is turned ON, do not turn off the rear panel's power switch, disconnect the power plug, or trip the power breaker to the power outlet.
▼Do not move the unit when the power is turned ON, or immediately after turning the power OFF. When moving the unit is required, follow these guidelines:
1. Turn power OFF.
Press the STANDBY/ON switch so that the power indicator appears orange, then wait at least two minutes.
2. Turn off the main power switch on the rear panel.
3. Disconnect the power cord from its outlet.
4. Move the unit.
- In the event of a malfunction, removal of the entire unit may be necessary for repair (depending on the kind of malfunction). In such cases, consult your service dealer to have the unit removed by professional installation personnel. Failure to have the unit removed by professional installation personnel may result in refusal of repair service.
■Usable Lifetime of the Hard Disk Drive
The hard disk drive (HDD) is a high precision device, and when subjected to severe environmental or usage conditions, may reach the end of its operating lifetime in only a few years.
▼Frequent symptoms occurring when the HDD approaches the end of its lifetime including "part or all of the playback image will repeatedly enter pause mode," or "block noise (mosaic distortion) and other image distortion will occur". The HDD may also reach the end of its lifetime even without these symptoms occurring.
When the HDD reaches the end of its operating lifetime, any data recorded on it may become unrecoverable. When the HDD malfunctions at the end of its operating lifetime, it must be replaced. Inquire your Pioneer dealer or Pioneer Electronics (USA) Inc. Customer Support Division listed at the end of this manual.
(In the event of HDD failure, any data recorded on the HDD cannot be recovered.)
Data Protection in Event of Power Failure
While operating this unit, if a power failure occurs, the main power switch is turned OFF, the power cord is disconnected, or other interruption in AC power occurs, the data recorded on the HDD and DVD may be lost.
To prevent such untoward occurrences, we recommend that this unit be connected to an Uninterruptible Power Supply (UPS).
UPS devices supported by this unit include the following:
AMERICAN POWER CONVERSION CORP. (APC)
Smart-UPS 500
Smart-UPS 700VA (SU700NET)
* The Smart-UPS 500 is a model marketed only in Japan.
* APC and Smart-UPS are trademarks or registered trademarks of the American Power Conversion Corporation.
* The UPS devices supported may be subject to change; for latest information on supported devices, consult your Pioneer dealer or Pioneer Electronics (USA) Inc. Customer Support Division listed at the end of this manual.
See page 30 for connections used when employing a UPS.
Cleaning Care of the Unit
▼Normal cleaning should consist of dry wiping the unit with a soft cloth. In the event of severe soiling, make a dilution of 1 part neutral deutergent in 5 or 6 parts water. Dip a soft cloth in the solution and wring well, then wipe away the dirt, followed by a gentle wiping with a soft dry cloth.
Avoid contact of the unit with alcohol, thinner, benzene, insecticides or other similar chemicals, since they may cause the unit's labeling or finish to peel.
▼Avoid long term contact of the unit with rubber or vinyl objects, since damage to the cabinet finish may result.
▼When using a chemically impregnated cleaning cloth, read the instructions accompanying the cloth and follow all cautionary notes.
▼Disconnect the power cord from its outlet before performing cleaning.
Cleaning the pickup lens
The DVD recorder's lens should not become dirty in normal use, but if for some reason it should malfunction due to dust or dirt, consult your nearest Pioneer authorized service center. Although lens cleaners for CD players are commercially available, we do not recommend using them since some may damage the lens.
Disc Precautions
■Recommended Discs
- Use only recommended disc media in order to assure stable recording and playback.
- Consult your nearest Pioneer-authorized service center regarding recommended disc media.
■Handling of Discs
Discs may become incapable of recording and playback when scratched, or when soiled with fingerprints or dust. Always handle discs as noted below:
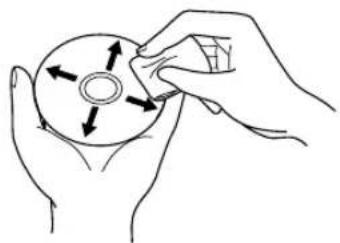
●Never touch the recording surface (mirror surface) when handling discs. Hold discs between their edges, or between one edge and one finger in the center hole.

natural_image
Two hands holding a circular disc, one with a pointed tip and the other with a small arrow (no text or symbols)- Do not apply adhesive tapes or labels to discs.

natural_image
CD/DVD icon with a prohibition symbol overlay (no text or symbols present)- Do not use cracked or warped discs, since they may shatter dangerously at high rotation speeds.
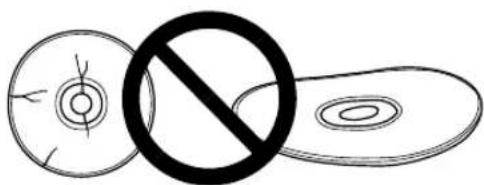
- Do not use non-standard discs, since they may cause adverse affects to the player and other components.
- Do not use discs shaped in non-circular shapes (hearts, polygons, etc.), since they may cause malfunctions.


●To clean fingerprints from a soiled disc, wipe gently from the center hole radially toward the circumference. Do not wipe in a circular motion.
natural_image
Line drawing of hands holding a CD or DVD disc with arrows indicating rotation (no text or symbols)- Do not use anti-static or other record sprays. Also, never use benzene, thinner or toher volatile cleaners to clean the surface of discs, since such chemicals may melt or otherwise damage the surface.
Always store discs in their protective cases; before use, check the recording surface for fingerprints or other soiling.
Disc Problem Checklist
■Data recording errors or inability to record
●Was a recommended disc used?
●Was sufficient recording area on the disc?
●Had the disc been finalized after previous recording sessions?
●Was the disc loaded properly, recording surface down and label up?
●Was the disc soiled or scratched?
■Playback errors
●Was a recommended disc used?
●Was the disc properly recorded (not empty)?
●Was the disc soiled or scratched?
- Condensation of moisture on the player's optical parts or disc surface is also a possibility; allow the disc and player to sit for 1-2 hours before attempting to use again.
External Hard Disk (USB HDD)
- Although we confirm the USB hard disk drive is in working order at time of shipment, it is not covered by the Pioneer Warranty.
- Do not connect/disconnect the USB connectors when the unit is on as this may cause data loss and result in unstable operation. Connect the USB HDD before turning on the unit. A USB HDD equipped with a power switch should be turned on before turning on the unit. The unit should also be turned off before removing the USB HDD.
- Do not connect two or more USB HDDs to the unit.
- Refer to the instruction manual supplied with the USB HDD for information on USB HDD precautions.
- Data backed up on the hard disk may be corrupted if the USB HDD is damaged. Save important data to DVD-R/RW as DVD-Video disc.
About DVD-R / DVD-RW Discs
The DVD-R/RW (video mode) discs recorded on this unit can be finalized (see page 43) to allow them to be played* on other standalone DVD players, automobile DVD players, or DVD players installed in computers. Some players, however, may exhibit the following symptoms when an attempt is made to play such discs:
- Discs aren't accepted by the player.
●Macroblock distortion (mosaic pattern) frequently appears in the video image.
●Sound and image are interrupted.
●Playback stops midway through.
A finalized DVD-R does not permit new recording or editing. A DVD-RW disc can be reused if initialized or finalization is canceled.
However, finalization of DVD-RW discs finalized using the initial version (prior to 1.12/1.02) cannot be canceled.
* The DVD Forum in 2000 approved the use of the DVD-Video format for recording on DVD-R/DVD-RW discs. On Pioneer's DVD Recorders, this is referred to as recording in Video Mode. Supporting playback of DVD-R/DVD-RW with this type of content is optional for manufacturers of DVD playback devices, and there are DVD-Video players, DVD-ROM drive equipped PCs or other DVD playback devices that do not play DVD-R or DVD-RW discs recorded in the Video Format.
Recordable discs
Logo Attributes

12cm, single-sided, single layer disc Approx. max. recording time: 360 minutes (4.7GB)

12cm, double-sided, single layer disc Approx. max. recording time: 720 minutes (9.4GB)
* This unit does not support use of 8 cm DVD-R discs.
▼DVD-R/RW discs are especially sensitive to dust, fingerprints, and scratches. Since a scratch on the disc may make further recording impossible, and may make it impossible to playback important data recorded on the disc, take special precautions in handling and storing these discs.
▼CD-R/CD-RW discs cannot be recorded on this unit.

trademark of DVD Format/Logo Licensing Corporation.
DVD Recording Modes
Video Mode:
The “video mode” employs the same recording format as commercially sold DVD video discs. As a result, discs recorded on this unit can be played on other DVD players, but discs must be finalized before they can be played in this way (see page 43).
▼Recording to DVD-R/RW discs is in video mode only.
VR Mode:
▼VR mode is the basic recording mode for DVD-RW, allowing repeated recording and editing on a single disc. VR is an abbreviation for "Video Recording."
▼DVD-RW discs recorded in VR (Video Recording) format can be played back on DVD players bearing the logo.
The recording mode can be switched to Video mode when using the following kinds of disc. Be careful, however, since formatting of the disc is necessary, resulting in the erasure of any previously recorded material.
DVD-RW Ver.1.1
DVD-RW Ver.1.1 CPRM compatible
DVD-RW Ver.1.1/2xCPRM compatible
* This component does not support recording and playback of DVD-RW discs in VR mode.
Precautions When Recording in Video Mode
Discs recorded in video mode on other recorders and which have not yet been finalized on their original recorders cannot be played back or further recorded/ edited (including finalizing) on this unit.
▼When recording DVD-RW discs in video mode use only disc media compatible with Ver. 1.1 or later.
The remaining recording time decreases each time recording is performed. Additional recording is possible so long as remaining space is still available on the disc unless finalization has been performed (see page 43). However, DVD-R discs do not permit restoring of disc capacity to pre-recorded levels, nor overwriting of previously recorded material. These operations are possible with DVD-RW discs by reformatting the discs.
Precautions Regarding TV System
▼This unit has been factory preset for use with the NTSC TV system.
Regarding DVD-R/RW discs
Due to the unique construction of DVD-R/RW discs, leaving them for extended periods of time in the pause mode at a single point may result in the discs' becoming difficult to play at that place. The same symptom may also occur if play back a single point on the disc excessively.
As a result, users are advised to construct backup archive discs when playing discs containing important data.
DVD disc box information
When you buy a DVD-Video in the shops, the back of the disc box usually contains various information about the contents of the disc. Below is an example, with an explanation of each section.

1 Audio languages and audio formats
DVD-Video discs can contain up to 8 separate soundtracks with a different language on each. The first in the list is the original soundtrack. This section also details the audio format of each soundtrack—Dolby Digital, DTS, etc.
Dolby Digital DOLBY DIGITAL
Dolby Digital is the most widespread DVD-Video audio format. Dolby Digital soundtracks can be mono, stereo, or contain up to 5.1 channels (the .1 refers to a special low-frequency effects channel).

DTS is another 5.1 channel surround format sometimes used on DVD-Video discs, often in addition to a Dolby Digital track.
Linear PCM
Linear PCM audio also sometimes appears on DVD-Video discs, usually on music related material. Linear PCM sountracks are mono or stereo only.
2 Subtitle languages
DVD discs can contain up to 32 subtitle languages. You can watch the disc with any of these subtitle languages, or with no subtitles displayed at all.
3 Screen aspect ratio
Movies are shot in a variety of screen formats. This box tells you what the original format was (in this case, Cinemascope), and what it is best viewed as on a widescreen TV and a regular 4:3 TV. In this case, if you have a regular 4:3 TV, it is recommended that you watch it in letterbox mode.
4 Region code and TV format
The world is divided into 6 DVD regions. Both discs and players are coded for a particular region, and to be able to play a disc, it must contain the same region code as the player. This section also contains the TV format of the disc. In this case, NTSC.
5 DVD-Video logo
Angle mark (
Some DVD-Video discs feature scenes shot simultaneously from two or more angles. During playback, you can switch between these different angles.
- Manufactured under license from Dolby Laboratories. "Dolby" and the double-D symbol are trademarks of Dolby Laboratories.
- "DTS" and "DTS Digital Surround" are registered trademarks of Digital Theater Systems, Inc.
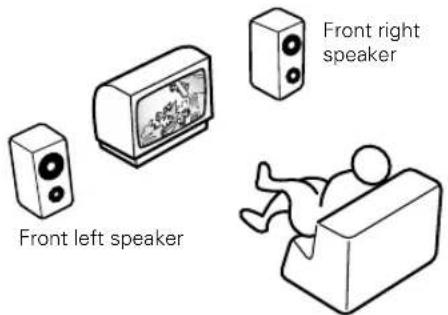
▼Stereo Playback:
Stereo playback means sound is played back through independent channels from right and left speakers. The soundtracks for DVD video stereo and ordinary music CDs (recorded with 2ch stereo) are played back only from the front speakers, even when 5 surround speakers or sub-woofers are connected.
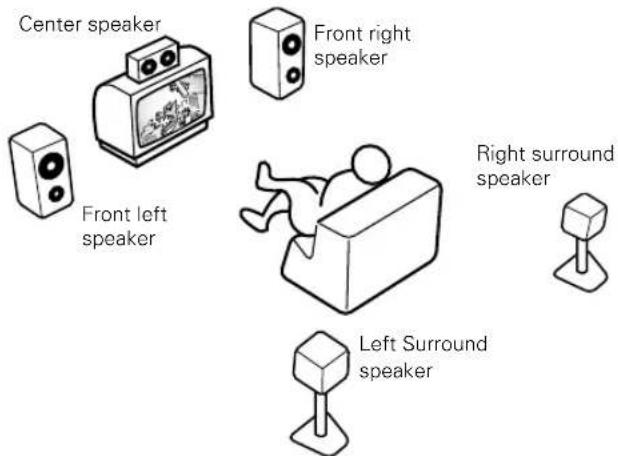
▼Dolby Surround Playback:
When Dolby Surround is noted on a commercially purchased DVD video, it means that sound can be played back from five surround speakers.
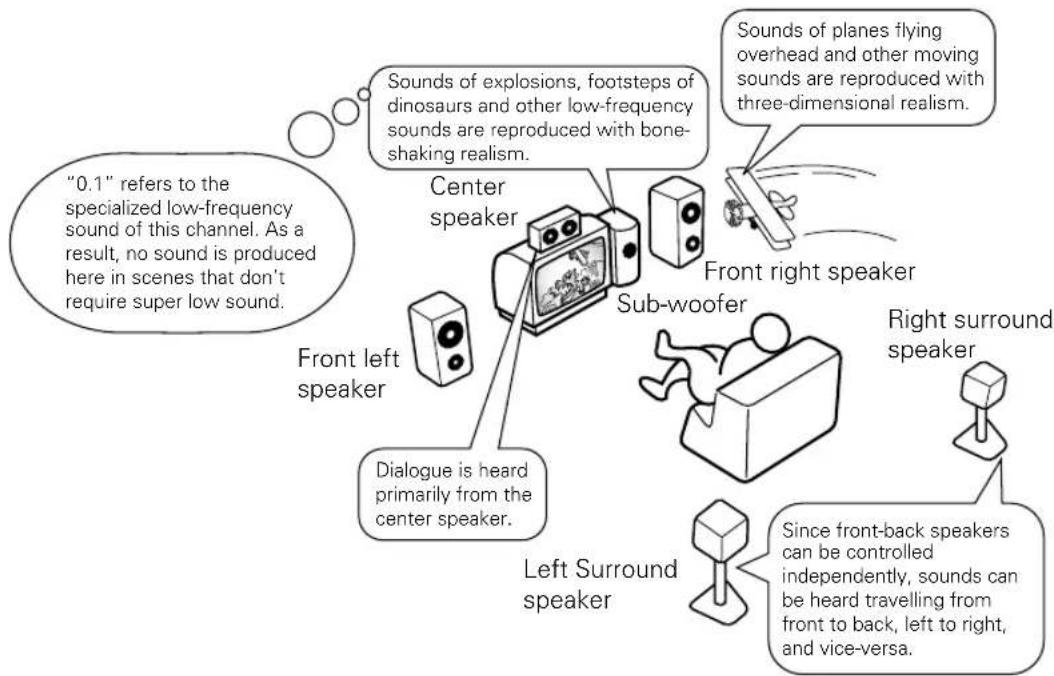
▼Dolby Digital 5.1 ch or DTS Surround Playback:
Programs recorded in Dolby Digital (5.1 ch surround) or DTS surround mode are played back through 5 surround speakers plus sub-woofer, each with its own independent channel. Since each channel is recorded independently, the reproduced sound has high presence and three-dimensionality.
[Product Introduction]
The PRV-LX1 (single-DVD-drive/twin-DVD-drive) is a DVD recorder developed by Pioneer for dedicated use in DVD-Video production. The broad range of interface supports built into the PRV-LX1 allows the input of professional mastering media (tapes) using professional component ^*1 video signals.
One of the PRV-LX1's greatest features is its ability to create DVD-Video discs merely by pressing the REC button, without worrying about the difficult DVD settings ordinarily required. A wealth of recording, playback, and DVD setting functions and features are provided for efficient DVD production, thus achieving efficient and high-performance operational characteristics for each type of DVD application.
![PIONEER PRV-LX1 - [Product Introduction] - 1](/content/2026/05/827245/images/d4274580c46251111b89a5ac41d8942120e83af52cc6403cd6c8a70eac308eaf.jpg)
flowchart
graph LR
    A["Professional media source"] --> B["Video cassette tape"]
    B --> C["Input signal"]
    C --> D["Recording functions, DVD production functions"]
    D --> E["One-push recording"]
    E --> F["Media output"]
    F --> G["DVD-Video"]
*1 Component video inputs (NTSC only) supported by this unit include Betacam and SMPTE, with signal levels as noted in the accompanying chart. Confirm the component output of your VTR or other connected component when making settings.
Color Bar (75%)
| Betacam component Y 1 | Vp-p 0.714/0.286 | |
| B-Y/R-Y 0.7 Vp-p ±0.35 | ||
| SMPTE Component Y 1 | Vp-p 0.7/0.3 | |
| B-Y/R-Y 0.486 Vp-p ±0.2625 |
■Dedicated HDD Hybrid Recorder for DVD-Video Creation
●120 GB Hard Disk Drive with up to two writer units *2 permits the creation of a wide variety of DVD-Video discs.
●High-level DVD-Video authoring functions and video recording functions permit optimum disc creation for any application.
*2 Required in the event of a twin-DVD-drive model or when the optional DVD writer unit PRA-DW11 is installed.
■Professional System Support
●This unit is equipped with a wide range of input and output systems, including component input/output, XLR input/output, DV connector, composite and S-video, in this way supporting a wide range of professional media sources. It has also been provided with an expansion slot for excellent input/output expansion potential.
●Supports RS-422A and DV protocols for time-code recording.
■Features and Functions for Efficient DVD-Video Creation
●Twin-DVD-drive recording system for simultaneous 2-disc recording and disc duplication*3, providing for efficient creation of dual and backup discs.
●Built-in graphical users' interface (GUI) for dedicated use with DVD-Video authoring. Supports use of main and remote unit buttons, as well as keyboard and mouse, for optimum operating efficiency.
●Equipped with auto-capture function for smooth media conversion from tape sources. The range of functions includes everything from video input to DVD settings, for fully automatic operation.
●Supports Ethernet or DVD-R/RW disc input of EDL for menus and auto-capture, providing for more efficient work flow, as well as allowing the creation of customized menus for various applications.
●Program available for upgrading professional functions (requires user registration).
*3 Duplication of copyright protected disc media is prohibited. Do not attempt to duplicate copyrighted discs without permission of the copyright owner.
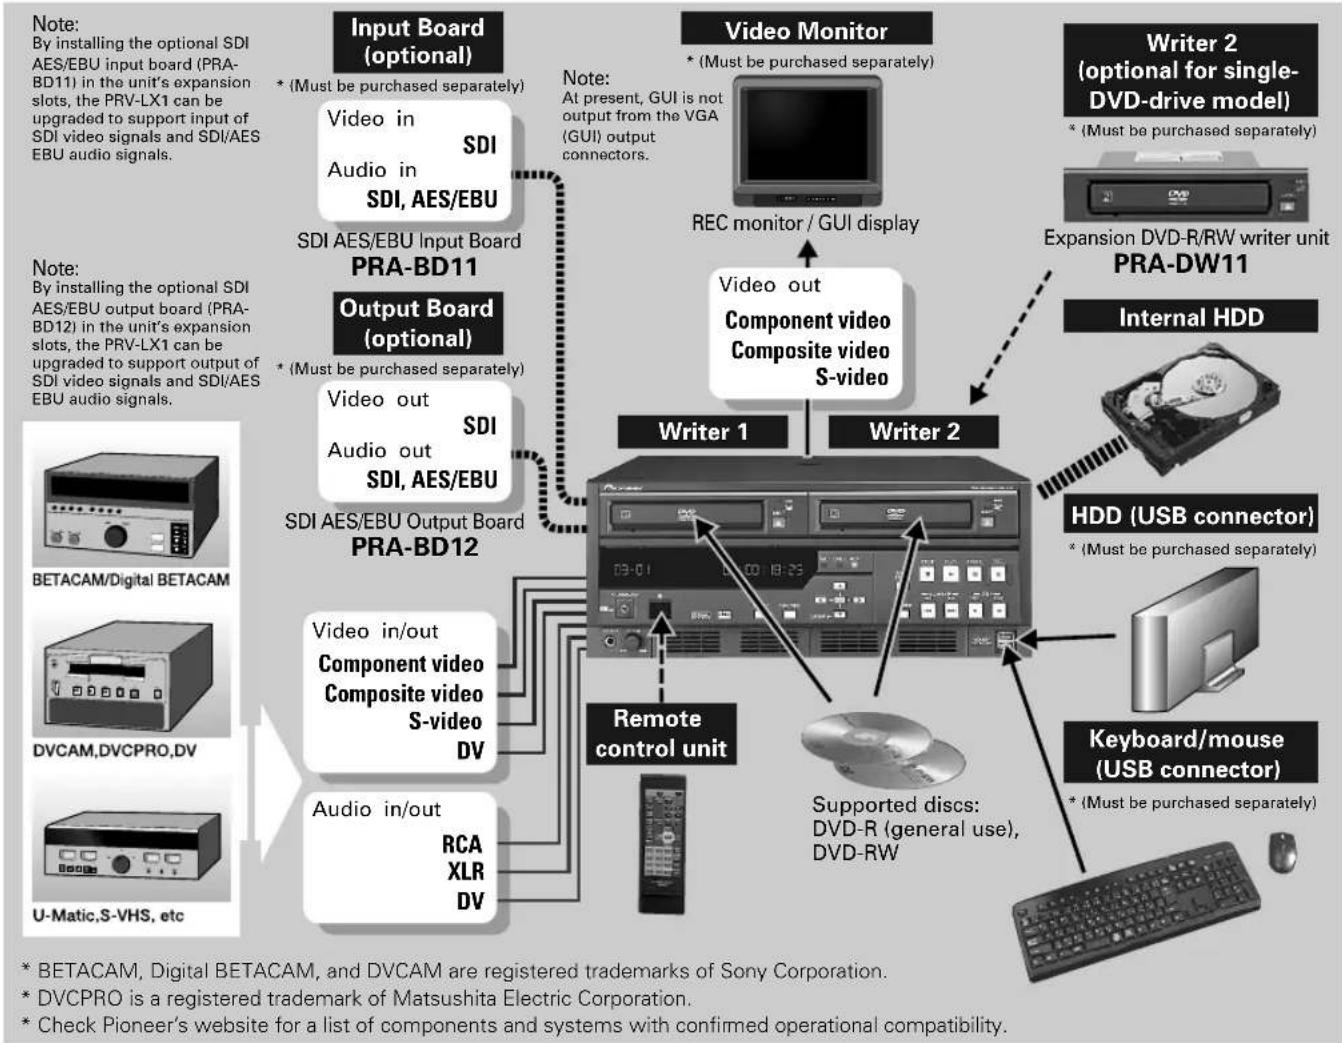
Example of System Composition and Recording Component Setup
■System Composition
flowchart
graph TD
    A["Input Board (optional)"] -->|Note: By installing the optional SDI AES/EBU input board (PRA-BD11) in the unit's expansion slots, the PRV-LX1 can be upgraded to support input of SDI video signals and SDI/AES EBU audio signals.| B["Video in"]
    B --> C["Audio in"]
    C --> D["SDI, AES/EBU"]
    D --> E["SDI AES/EBU Input Board PRA-BD11"]
    E --> F["Output Board (optional)"]
    F --> G["Video out"]
    G --> H["Audio out"]
    H --> I["SDI, AES/EBU"]
    I --> J["SDI AES/EBU Output Board PRA-BD12"]
    J --> K["Video in/out"]
    K --> L["Component video Composite video S-video DV"]
    L --> M["Audio in/out"]
    M --> N["RCA XLR DV"]
    N --> O["Remote control unit"]
    O --> P["Writer 1"]
    O --> Q["Writer 2"]
    P --> R["Video Monitor"]
    Q --> S["Writer 2"]
    R --> T["REC monitor / GUI display"]
    S --> U["Encoder (optional for single-DVD-drive model)"]
    U --> V["PRA-DW11"]
    V --> W["Internal HDD"]
    W --> X["HDD (USB connector)"]
    X --> Y["Keyboard/mouse (USB connector)"]
    Y --> Z["Supported discs: DVD-R (general use), DVD-RW"]
    Z --> AA["Memory"]
    AA --> AB["Computer video Composite video S-video"]
    AB --> AC["External Device"]
    style A fill:#f9f,stroke:#333
    style B fill:#ccf,stroke:#333
    style C fill:#cfc,stroke:#333
    style D fill:#fcc,stroke:#333
    style E fill:#cff,stroke:#333
    style F fill:#ffc,stroke:#333
    style G fill:#cfc,stroke:#333
    style H fill:#fcc,stroke:#333
    style I fill:#cfc,stroke:#333
    style J fill:#cfc,stroke:#333
    style K fill:#fcc,stroke:#333
    style L fill:#cfc,stroke:#333
    style M fill:#cfc,stroke:#333
    style N fill:#cfc,stroke:#333
    style O fill:#cfc,stroke:#333
    style P fill:#cfc,stroke:#333
    style Q fill:#cfc,stroke:#333
    style R fill:#fcc,stroke:#333
    style S fill:#fcc,stroke:#333
    style T fill:#fcc,stroke:#333
    style U fill:#fcc,stroke:#333
    style V fill:#fcc,stroke:#333
    style W fill:#fcc,stroke:#333
    style X fill:#fcc,stroke:#333
    style Y fill:#fcc,stroke:#333
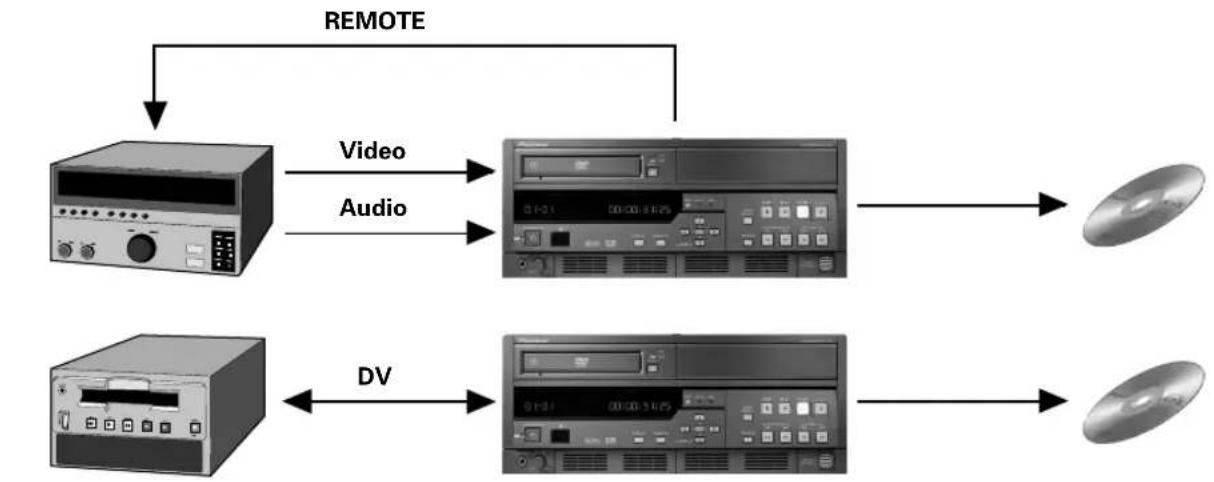
An exterior control system can be created using REMOTE/DV protocols\*.
* Operating compatibility is not guaranteed for all components equipped with REMOTE/DV connectors. Check Pioneer's website for a list of components and systems with confirmed operational compatibility.
* Control from editing equipment is not supported.
[System Example]
flowchart
graph TD
    A["Physical Audio Device"] -->|Video| B["Video"]
    A -->|Audio| C["Audio"]
    D["Physical Display"] -->|DV| E["Display"]
    B --> F["CD"]
    C --> G["CD"]
    E --> H["CD"]
    style A fill:#f9f,stroke:#333
    style D fill:#f9f,stroke:#333
    style B fill:#ccf,stroke:#333
    style C fill:#ccf,stroke:#333
    style E fill:#ccf,stroke:#333
    style F fill:#dfd,stroke:#333
    style G fill:#dfd,stroke:#333
    style H fill:#dfd,stroke:#333
■Regarding Recording Time
Recording to Hard Disk Drive → About 23-100 hours
* The capacity of the hard disk drive usable for recording is about 100 GB; continuous recording can be performed until no more capacity remains, or up to a maximum of 100 hours.
Recording to disc media → About 1-6 hours
Disc Recording Times
- When creating project on a single disc (4.7 GB) without DVD menus.
- Create DVD-Video disc after pressing Make Disc button.
| Read\Write | DVD-R | DVD-R(4X-SPEED) | DVD-RW(2X-SPEED) |
| HDD | About 30 minutes About 20 minutes About 30 minutes | ||
Disc Duplication Times
- DVD → HDD: Times required when copying one disc (4.7 GB) to hard disk drive.
- DVD → DVD: Times required when using optional additional drive to duplicate one disc (4.7 GB) from one DVD drive to another.
| Write Read | HDD DVD-R | DVD-R(4X-SPEED) | DVD-RW(2X-SPEED) | |
| DVD-Video About | 30 minutes About 30 minutes About 30 minutes | About 30 minutes | ||
| DVD-R About 30 minutes About 30 minutes | About 30 minutes | |||
| DVD-R(4X-SPEED) | About 15 minutes About 30 minutes About 15 minutes | About 30 minutes | ||
| DVD-RW(2X SPEED) | About 15 minutes About 30 minutes About 15 minutes | About 30 minutes | ||
Note:
Times for recording and duplication of DVD-Video discs are given as general estimates. Actual recording times may vary.
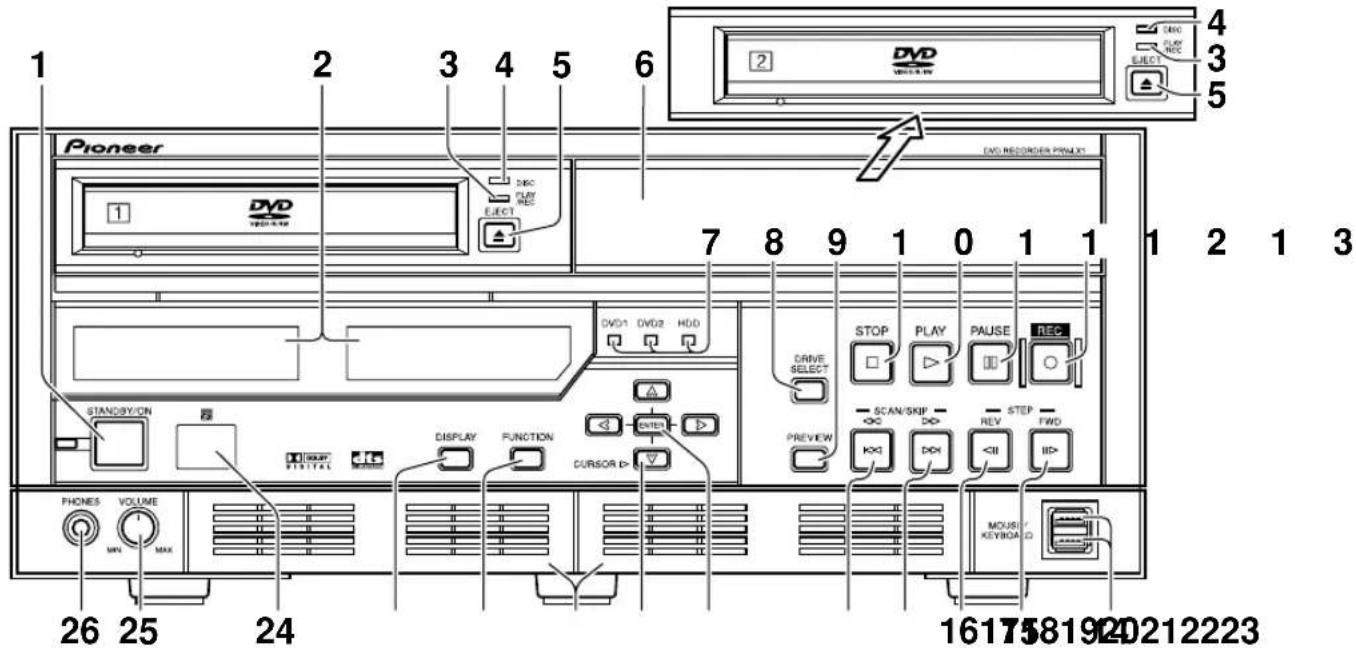
Front Panel Facilities
Twin-DVD-drive model or single-DVD-drive model added PRA-DW11 (optional)
| No. | Name | Function |
| 1 | STANDBY/ON button | When the unit is in the standby condition, pressing this button causes the power to come on; the power indicator (to the left of the button) changes from orange to green. The main display section indicates system startup. After system startup is completed, the unit enters “idling condition,” and as the unit’s display changes to show the current time, the STOP button lights. When the unit is in the standby condition, if this button is pressed while holding the STOP button depressed, the Function Menu’s setting values will be reset to their factory defaults, and the power will then turn ON. If the button is held depressed for one second or more when the unit is in the idling condition, the unit will perform system shutdown, followed by return to the standby mode (the power indicator will change from green to orange). In the event operation becomes unstable and manual forced shutdown is required, hold the button depressed for four seconds or more. |
| 2 | Display sections | |
| 3 | PLAY/REC indicator | Lights to indicate operating state of DVD1/DVD 2 drive.Appears green during PLAY mode, and orange during REC mode. |
| 4 | DISC indicator | Located to the right side of DVD1/DVD 2, this indicator light (orange) to indicate that a disc is loaded. (*1) |
| 5 | EJECT button (▲) | Press to open/close disc tray. The DISC indicator flashes from the time the button is pressed until the disc tray closes fully. |
| 6 | Drive 2 cosmetic panel | This space is provided to allow the addition of a second DVD drive. When an additional writer (PRA-DW11) is added here, it is considered “DVD2.” Some models are factory equipped with twin-DVD-drive.* For information on availability of twin-DVD models, consult your dealer. |
| 7 | DVD1, DVD2, HDD (Hard disk Drive) indicators | These indicators light to show which drive has been selected with the DRIVE SELECT button (the indicator for the selected drive lights green). |
| 8 | DRIVE SELECT button | Use to select the playback source and destination drive for recording. The selection changes in the order HDD (Hard disk Drive) → DVD1 → DVD2 → DVD1&2. When a drive is selected, the corresponding indicator lights (green). When DVD1&2 is selected, DVD1 is designated as the playback source. |
| 9 | PREVIEW button | When this button is pressed with the unit in the idling condition, a preview image/sound of the selected input (following encode and decode processing) is supplied to all output connectors except DV; when the button is pressed again, the unit returns to idling condition. |
*1 A disc created on the PRV-LX1 that contains many titles may take dozens of seconds to recognize when loaded. The DISC indicator flashes and the disc recording and playback cannot be started during disc recognition.
| No. | Name | Function |
| 10 | STOP button (■) | Functions to stop recording or playback. Until all internal operations are completed, the indicator flashes (white), and when fully completed, the unit returns to the idling condition and the indicator lights (white). Also, during idle condition, pressing the STOP button while holding down the CURSOR (bottom pointing arrow) button turns progressive encoding ON/OFF. (*2)To switch the selected TV system format (NTSC/PAL), hold the CURSOR (upward pointing arrow) button depressed and press the STOP button. |
| 11 | PLAY button (▶) | When this button is pressed, playback begins from selected source (DVD drive or HDD), and the indicator lights (white). When HDD is designated as the recording destination and time shift playback has been set, this button responds even during recording, and initiates playback from the recording start. |
| 12 | PAUSE button (II) | When pressed, recording or playback is temporarily interrupted and the indicator lights (white). During recording, allows automatic setting of chapters. To resume recording from the recording pause mode, press the REC button. |
| 13 | REC button (●) | When pressed, recording begins to the selected recording destination (drive or project), and the indicator lights (white). |
| 14 | MOUSE/KEYBOARD connectors | Allows connection of a USB mouse, USB keyboard and USB HDD to the unit. (*3) |
| 15 | STEP FWD button (II▶) | During normal playback, press for frame advance. Hold depressed for slow motion playback; during slow mode, press again to increase playback speed. (*5) |
| 16 | STEP REV button (◀II) | During normal playback, press for frame playback in reverse direction. Hold depressed for slow motion playback; during slow mode, press to decrease playback speed. (*5) |
| 17 | SCAN/SKIP FWD button (▶▶/▶▶I) | During playback, press to move to next title or chapter. Hold depressed to initiate scan mode. |
| 18 | SCAN/SKIP REV button (◀◀/◀◀◀) | During playback, press to move to previous title or chapter. Hold depressed to initiate scan mode. |
| 19 | ENTER button | Press to select function menu items and commands, and to input DVD menu items and commands (during DVD playback).During recording, press to insert chapter marks at optional locations. |
| 20 | CURSOR buttons (▲, ▶, ▼, ◀) | Use when selecting function menu items, and for DVD menu control (during DVD playback). |
| 21 | Filter cover (2) | These are ventilation ports provided to prevent excessive heating of internal parts. During installation and operation, do not allow these ports to become blocked, since malfunctions may result.* Air filters are installed inside these filter covers, and must be removed and replaced at regular intervals. Continuing to use the unit with clogged filters may result in malfunction. Consult the appended instruction sheet “Air Filter Replacement Instructions and Precautions”. |
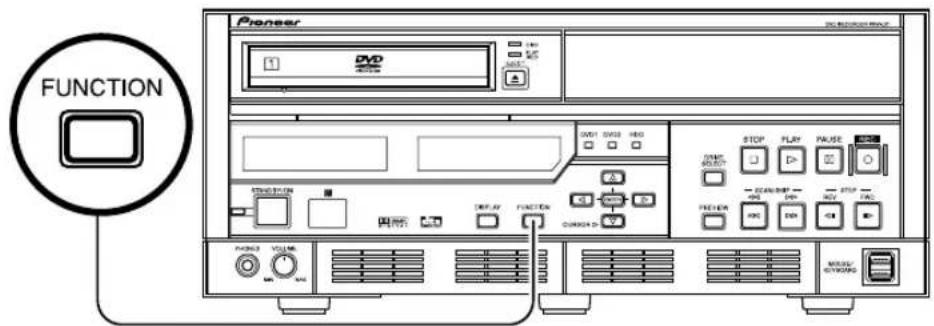
| 22 | FUNCTION button (*4) | Press to enable and disable the monitor’s on-screen function menu display (default setting: DISABLED). When disabled, the unit returns to idling condition. |
| 23 | DISPLAY button | Press to turn on-screen display (OSD) ON/OFF (default setting: OFF). This button does not operate when on-screen function display is set to DISABLED. |
| 24 | Remote control sensor (RR) | Receives signals from the remote control unit. Do not allow this part to be blocked by other objects. |
| 25 | VOLUME knob | Use to adjust output level to the headphones jack. |
| 26 | PHONES jack | Use to connect headphones. |
*2 Progressive is supported only during NTSC output.
- Connect to progressive-scan TV monitor. Non-progressive monitors will not produce correct playback.
- When progressive is set to ON, no video is output to any output connectors except the component output.
*3 Functionality of connected devices is not guaranteed. If USB mouse and keyboard operation is unstable, try disconnecting and reconnecting the USB connector. If a USB hard disk drive is not recognized, or if operation is unstable, change to a hub supporting USB 2.0. If operation continues to be erratic, inquire your Pioneer dealer or one of the service centers listed at the end of this manual.
*4 This operates the same as the remote control unit's SETUP button. The FUNCTION button operates only in the idling condition.
*5 When performing reverse slow-motion playback with progressive output (NTSC only), the speed cannot be changed.
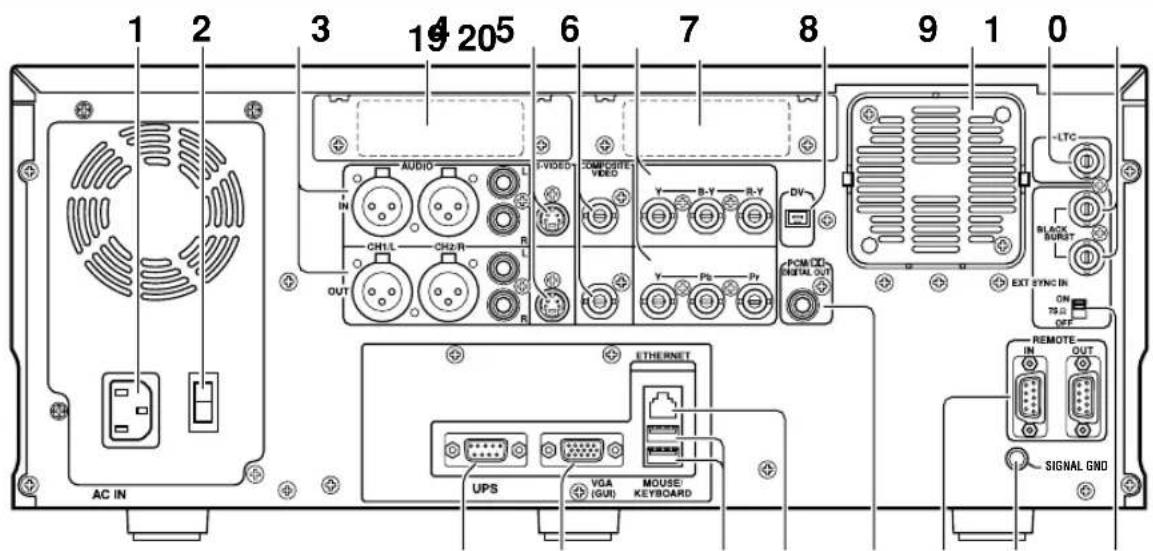
Rear Panel Facilities
111213141516
| No. | Name | Function |
| 1 | AC IN connector | Connect to power cord. |
| 2 | Main power switch | When set to ON, the unit enters standby condition and front panel indicator lights orange. |
| 3 | AUDIO CH1/L CH2/R IN/OUT connectors | Input/output connectors for analog audio CH1/L CH2/R signals. |
| 4 | S-VIDEO IN/OUT connectors | Input/output connectors for S-VIDEO video signal. Output is compatible with S2. |
| 5 | COMPOSITE VIDEO IN/OUT connectors | Input/output connectors for analog composite video signals.Note: Use coaxial cables (impedance: 75-ohm) to connect with BNC plugs. |
| 6 | COMPONENT VIDEO IN/OUT connectors | Input/output connectors for analog component video signals. (*1)Note: Use coaxial cables (impedance: 75-ohm) to connect with BNC plugs. |
| 7 | DV connector | Connect to DV connector of professional use VTR or similar component. |
| 8 | Fan motor | Fan motor for cooling internal parts. |
| 9 | LTC connector (*2) | Connector for obtaining time code from VHS, VTR, etc.Note: Use a coaxial cable (impedance: 75-ohm) to connect with BNC plugs. |
| 10 | EXT SYNC IN and through Output connector | Use for connecting external sync signal, and for pass-through signals.Note: Use coaxial cables (impedance: 75-ohm) to connect with BNC plugs. |
| 11 | Terminate switch | Use to terminate sync signal. Set to ON when used alone or when connected to a terminating unit. |
| 12 | SIGNAL GND terminal | Ground terminal for signals. When using the unit in environments exposed to high levels of electronic noise, malfunctions may occur to mouse and other control devices. In such cases, connect a ground wire between the components to reduce the noise. This is not an electric safety ground. |
| 13 | REMOTE IN/OUT connectors | RS-422A compatible external control connector. The protocol is compatible with SONY format. (*3) |
| 14 | PCM/DIGITAL OUT connector | Digital audio output connector.Note: Use a coaxial cable (impedance: 75-ohm) to connect with RCA in plugs. |
| 15 | ETHERNET connector | Use for network connection. |
| 16 | MOUSE/KEYBOARD connectors | Allows connection of a USB mouse, USB keyboard and USB HDD to the unit. (*4) |
| 17 | VGA (GUI) connector | Connect to VGA monitor for expanded operation. (*5) |
| 18 | UPS connector | Connect when using UPS. |
| 19 | Expansion slot 1 | Provided to allow installation of the optional SDI AES/EBU input board (PRA-BD11).Consult your dealer regarding installation. |
| 20 | Expansion slot 2 | Provided to allow installation of the optional SDI AES/EBU output board (PRA-BD12).Consult your dealer regarding installation. |
*1 Inputs are compatible with signal levels for both BETA and SMPTE (NTSC only). However, since outputs are based on DVD format, they differ from BETA and SMPTE levels. As a result, outputs should be used only for monitoring. See page 34 for input selection methods.
*2 LTC is not supported in drop frame mode.
*3 SONY is a trademark of Sony Corporation. Frame precision is not guaranteed when this unit is used as a playback unit for editing. This component does not support control from an editing machine.
*4 Functionality of connected devices is not guaranteed. If a USB hard disk drive is not recognized, or if operation is unstable, change to a hub supporting USB 2.0. If USB mouse and keyboard operation is unstable, try disconnecting and reconnecting the USB connector. If operation continues to be erratic, inquire your Pioneer dealer or one of the service centers listed at the end of this manual.
*5 The VGA output connector is provided for future expansion use; at present, the connector does not support the output of GUI display signals.
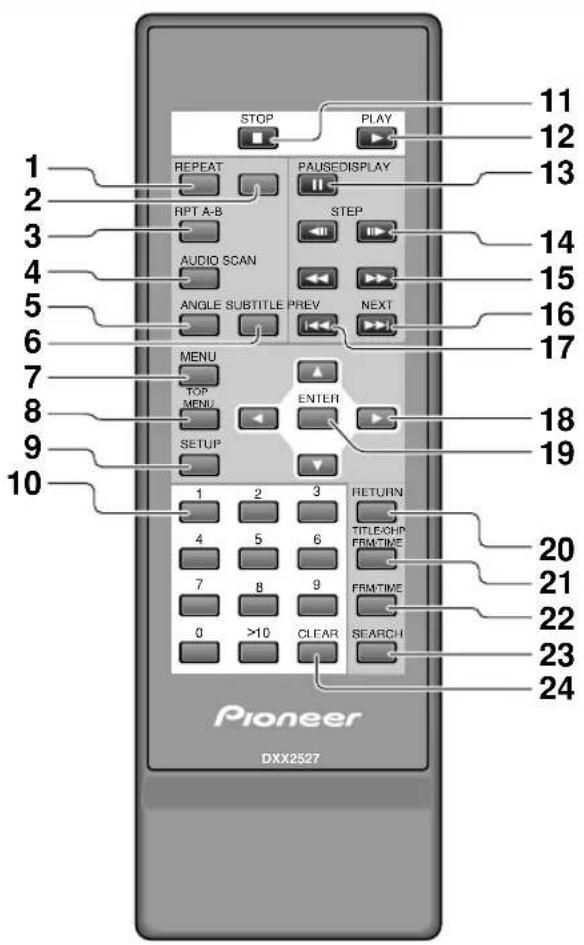
Remote Control Unit
Load batteries into the remote control unit
Open the rear battery compartment cover and insert two AA batteries.
- Insert the two batteries with + and - polarities aligned as indicated in the battery case.
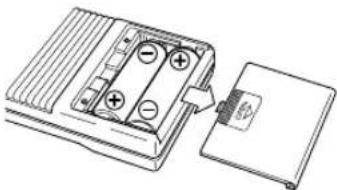
natural_image
Diagram of an electronic component with battery and socket, showing internal structure without any text or symbolsRange of Remote Control Unit
When pressing the remote control unit's buttons, point it toward the front-panel remote sensor. The range of the remote control unit is about 7 meters, within an angular range of 30^ to either side of the front of the remote sensor.
●The remote control unit may malfunction if strong sunlight or fluorescent light is allowed to strike the remote sensor directly.
| No. | Name |
| 1 | REPEAT button |
| 2 | DISPLAY button |
| 3 | RPT A-B button (repeat playback between two points) |
| 4 | AUDIO select button |
| 5 | ANGLE button |
| 6 | SUBTITLE button |
| 7 | MENU button |
| 8 | TOP MENU button |
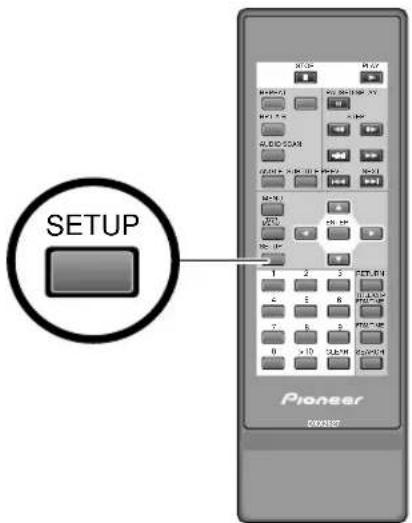
| 9 | SETUP menu button *1 |
| 10 | Number buttons (0-9, >10) |
| 11 | STOP button (■) |
| 12 | PLAY button (▶) |
| 13 | PAUSE button (II) |
| 14 | STEP / Slow buttons (◀II, II▶) |
| 15 | SCAN (fast forward/reverse) buttons (◀◀, ▶▶) |
| 16 | Chapter skip NEXT button (▶▶I) |
| 17 | Chapter skip PREV button (I◀◀) |
| 18 | Cursor buttons (▲, ▶, ▼, ◀) |
| 19 | ENTER button |
| 20 | RETURN button |
| 21 | Title, chapter, frame, time button (TITLE/CHP/FRM/TIME) |
| 22 | Frame/time button (FRM/TIME) |
| 23 | SEARCH button |
| 24 | CLEAR button |
*1 This key operates the same as the FUNCTION button on the main unit.
Note:
●Do not mix new batteries with old.
●Even batteries of the same type may display different voltage characteristics. As a result, do not mix batteries of different brands together.
- If you do not plan to use the remote control unit for an extended period (one month or more), remove the batteries from the remote control unit to prevent potential damage from leakage of battery fluid. If battery leakage is discovered, remove and discard the batteries, and carefully wipe up any battery fluid from inside the compartment. Replace the old batteries with new.
- When disposing of used batteries, please comply with governmental regulations or environmental public instruction's rules that apply in your country or area.
●This remote control unit cannot be used for recording operations (recording start/pause/stop).
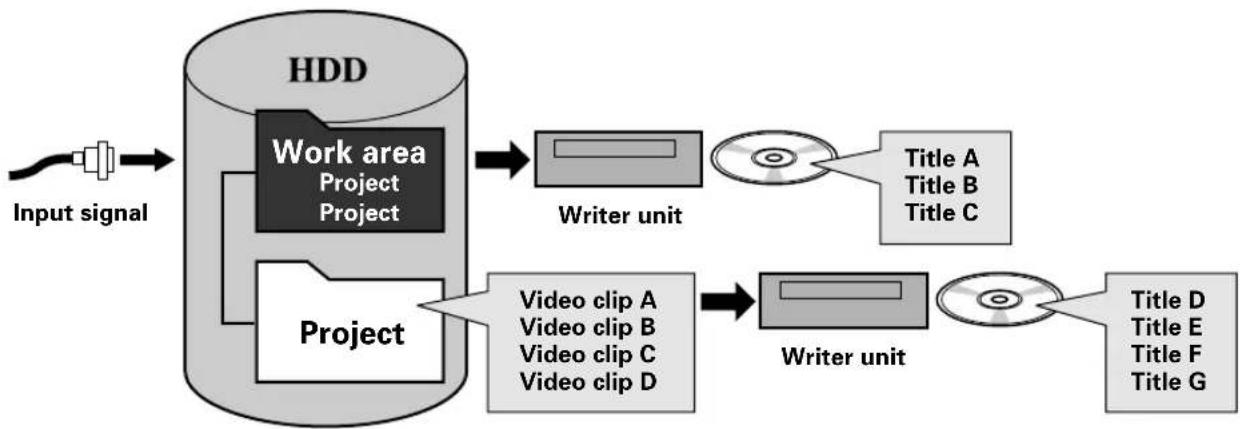
Video Clip Management and Disc Authoring Procedure
When recording to either disc or hard disk drive (HDD), the PRV-LX1 manages the video recording clips by units of "project." When creating a disc from clips recorded on HDD, this project unit is used to perform the disc recording.
A project is composed of individual recorded video clips (video data); while on the HDD, clips can be subjected to simple editing processes (trimming, chapter marking and clip dividing), and editing of the clip selections and their order can also be performed when recording from the HDD to DVD.
flowchart
graph LR
    A["Input signal"] --> B["HDD"]
    B --> C["Work area Project"]
    B --> D["Project"]
    C --> E["Writer unit"]
    D --> F["Video clip A"]
    D --> G["Video clip B"]
    D --> H["Video clip C"]
    D --> I["Video clip D"]
    E --> J["Title A"]
    E --> K["Title B"]
    E --> L["Title C"]
    F --> M["Writer unit"]
    G --> M
    H --> M
    I --> M
    J --> N["Title D"]
    J --> O["Title E"]
    J --> P["Title F"]
    J --> Q["Title G"]
In principle, video data recorded in a unit lasting from REC start to REC stop is recorded on the HDD or DVD disc as a single unit called a video file (clip or title). Chapter marking can also be performed during recording.
■ Following recording of the video signal, items which can be set or changed, together with disc production procedures, are noted below:
When recording to DVD disc:
①Settable items: ●Disc menu setting
●Disc program setting
②Disc creation flow:
Video image recording → Disc setting → Finalize
Note:
A disc created on the PRV-LX1 that contains many titles may take dozens of seconds to recognize when loaded. The DISC indicator flashes and the disc recording and playback cannot be started during disc recognition.
When recording to HDD:
① Settable items: ● Clip editing (chapter marking, trimming, clip dividing)
●Title selection (selection of clips and their order for recording to disc)
●Project copying, erasing
- Clip copying, erasing
●Disc menu setting
●Disc program setting
②Disc creation flow:
Video image recording → Clip editing → Disc setting → Recording to disc (including finalizing)
[Operation]
The various operating settings are performed using the buttons on the main unit's front panel, as well as the remote control unit and optional mouse/keyboard.

■Operations using remote control unit
The furnished remote control unit has been designed primarily for video playback control, including emulation operations before recording images from HDD to DVD media, and when playing DVD-Video discs. The remote control unit can also be used to make Function Menu settings.
Note 1:
The remote control unit cannot be used to turn power ON/OFF or to perform recording operations.
■Operations Using a Mouse or Keyboard
A commercially available keyboard or mouse (with USB connector) can be used to control the main unit for more efficient selection of setting items. Also, the keyboard's function keys can be programmed with the operations of the main unit's operating keys. This not only enhances operating efficiency, but also allows standard operations to be performed even at a distance separated from the main unit. See page 29 for information on function key settings Some front panel control buttons are assigned to shortcut keys. Shortcut key assignments are described on page 88.
The numeric keys on the keyboard provide the same functions as the numeric buttons on the remote control unit. During title text and other text input, any functions assigned to the keyboard's normal function keys are disabled.
Note 2:
Mouse and keyboard are not provided, and must be purchased separately.
Note 3:
Title text and other text inputs require the use of a keyboard. The purchase and implementation of a keyboard is recommended.
Note 4:
Certain special keys ("Play" etc.) found on commercially available keyboards may not be used.
Note 5:
A connected keyboard or mouse may not be recognized during the power on and booting operation. In this event, try disconnecting and then reconnecting the mouse or keyboard. If the USB port cannot be accessed due to a specific kind of rack mounting, a USB hub can be attached to solve this symptom. If a USB hard disk drive is not recognized, or if operation is unstable, change to a hub supporting USB 2.0.

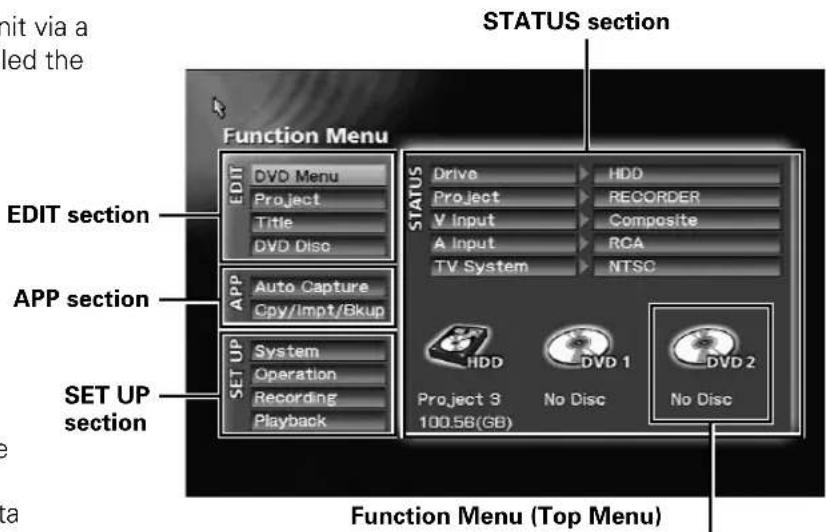
[Function Menu]
Setting operations are performed on this unit via a dedicated graphical user interface (GUI) called the
"Function Menu".
* With a few exceptions, the menu screens shown here represent those appearing on the single-DVD-drive model. As a result, the actual appearance may be slightly different in the case of the twin-DVD-drive model.
The Function Menu is composed of a top menu for confirming current operating
STATUS, together with the following three sub-sections:
①EDIT: items related to recorded video data and DVD settings.
②APP (Application): settings for disc duplication and importing, auto capture for EDL (Edit Decision List) and other settings.
③SET UP: basic unit settings.
Each of these sections is composed of further sub-menus.
* Displayed in the event of a twin-DVD-drive model or when the optional DVD writer unit PRA-DW11 is installed.
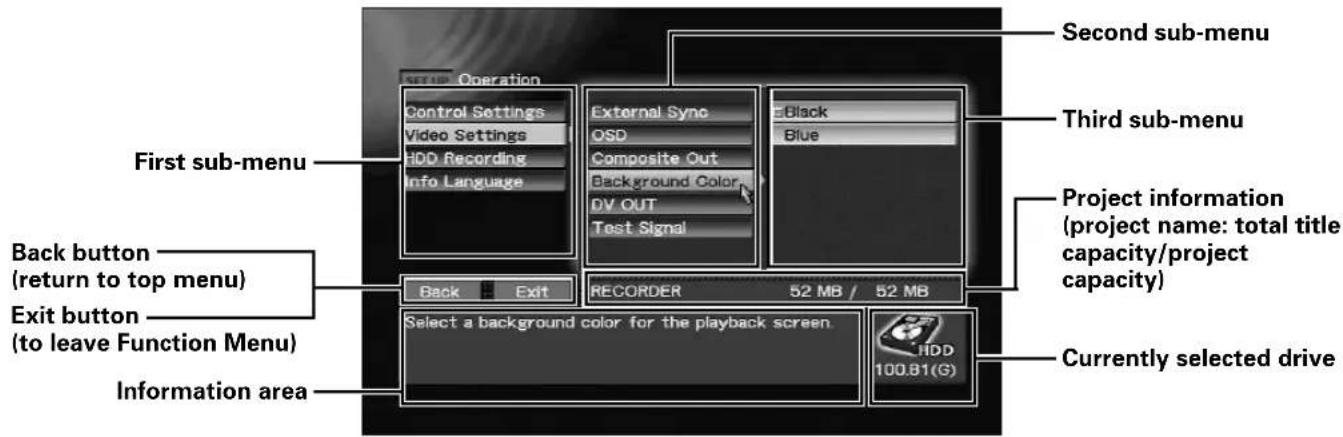
Function Menu (SET UP section → [Operation] → [Video Setting] → [Background Color])
■How to Access Function Menu
Use the following method to display the Function Menu overlaid on the current Video signal:
① Press the FUNCTION button on the main unit's front panel.
This product includes FontAvenue® fonts licenced by NEC Corporation. FontAvenue is a registered trademark of NEC Corporation.
② Press the remote control unit's SETUP button
③ Using the mouse to display and access the playback control bar.

natural_image
Illustration of a computer mouse with a stylized 'W' mark on its screen (no text or symbols beyond the graphic)Press both right and left mouse buttons simultaneously.

Control bar is displayed.
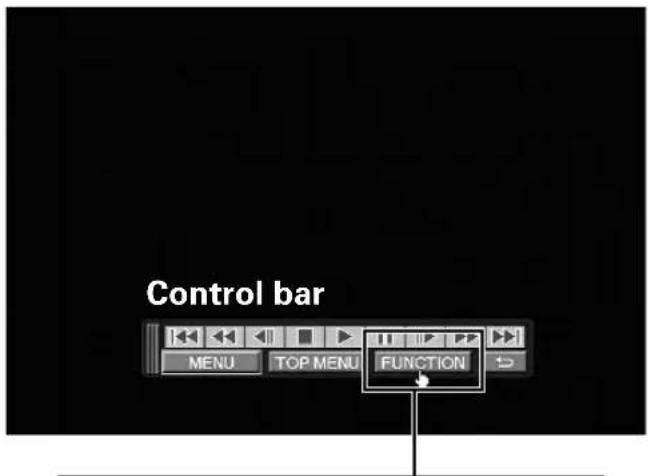
Press the FUNCTION button

Move the mouse cursor over the FUNCTION button and click the mouse's left button.
④Access from the Keyboard by Assigning a Function key.
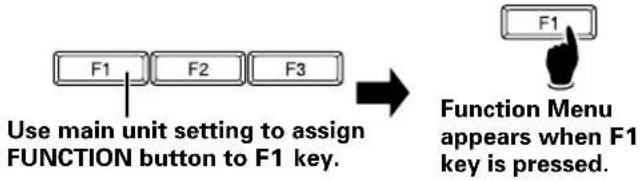
flowchart
graph TD
    A["F1"] --> B["F2"] --> C["F3"]
    D["Use main unit setting to assign FUNCTION button to F1 key."] --> E["Function Menu appears when F1 key is pressed."]
■To Exit the Function Menu
Use either of the following methods:
① Press the Exit button found on any of the sub-menus (move mouse cursor over the Exit button and press the left mouse button).
② Press the main unit's front panel FUNCTION button.
③ Press the remote control unit's SETUP button.
④Click the right button on the mouse (Note 6).
⑤If the Function Menu has been assigned to a function key on the keyboard, press that key.
Note 6:
Use of the mouse's right button to exit the Function Menu is supported only during display of the top menu.
■Control Bar
The control bar is displayed by pressing the mouse's right and left buttons simultaneously. When the control bar is displayed, pressing the mouse's right and left buttons once again will cause the control bar to be hidden. When the mouse cursor is moved over the control bar, the cursor pointer arrow changes to a hand. When the hand is displayed, it can be used to perform the same operations available with the remote control unit; move the hand over the desired item and select by clicking the left mouse button.
The position of the control bar can be changed by placing the mouse cursor on the left edge and dragging. (Note 7)
Note 7:
The movable range of the control bar is limited to that area not overlapping the OSD display. Also, the new location of the control bar is preserved until the Function Menu is displayed.
[Main Unit Setting Functions]
■System Settings (Operation Details: page 29)
- These items allow setting of mouse and keyboard, function keys of a keyboard assignments, network settings, and other defaults. Displaying system information and formatting the hard disk can also be performed here.
① System Setting: Use to perform settings including keyboard, mouse, and main unit clock.
② F-Key Set: Use to assign unit functions to the function keys of a keyboard.
③ Network: Use to perform network settings (when an optional network is installed).
④ UPS Setting: Use to perform settings when connected to a designated uninterrupted power system (UPS).
⑤Information: Display system information.
⑥ HDD Tools: Use to erase user data and perform file system checks on the hard disk drive.
Note 1:
A mouse and keyboard are not included. Most commercially available mouses and keyboards (with USB connector) may be used.
Note 2:
When connecting a UPS, please purchase the Smart-UPS 700VA (SU700NET) manufactured by AMERICAN POWER CONVERSION CORP. (APC).
■Operation Settings
- Use to make settings required when connecting the PRV-LX1 to other components, and to perform operation settings.
① Control Setting: Settings required when connecting this unit to a source component (page 40).
* Example of connections with local settings

flowchart
graph LR
    A["PRV-LX1"] -->|No control| B["Connected VTR"]
    C["PRV-LX1"] -->|Control| D["Connected VTR"]
* Example of connections with remote settings

flowchart
graph LR
    A["VTR or Computer"] -->|Control| B["PRV-LX1"]
Note 3:
There are limitations on supported commands. In addition, control may not be possible depending on the model.
Please check our web site for information on devices for which connection has been confirmed.
Operations other than manual forced shutdown may not be accepted if auto capture is performed with a device for which connection has been confirmed. Manual forced shutdown may damage the contents of HDD recordings.
② Video Setting: Use to perform settings for Video and OSD output (page 52).
③ HDD Recording: Use to enable/disable settings for time shift playback (page 49).
④ Info Language: Set GUI display language (page 32).
Note 4:
When GUI language is set to Japanese, the information area and dialogue displays are shown in Japanese, and Japanese language input is also supported.
[Recording Functions] (Operation Details: page 33)
- In addition to composite video, S-video, DV and RCA connectors, this unit is equipped with connectors for component video and XLR, thus providing support of connections to professional video components. In this way, RS-422A, IEEE1394, and LTC (linear time code) connectors can be used to support recording compliant with time code information.
- Video and audio inputs are recorded to HDD or DVD-R/RW media while being converted to data compliant with the DVD-Video format.
- During recording, manual chapter setting can be performed, as well as automated chapter insertion at 3, 5, 10, 15, 30 or 60 minute intervals.
Notes :
▶ Playback video/audio signals are delayed approximately 4 seconds from the input signal due to time required for encoding and decoding.
▼Recording will not begin when copy guard protected signals are input.
When DVD drive is selected as the recording destination, the EJECT button is disabled during use of the preview function.
When recording to DVD media, at the end of a recording, from several to several dozen seconds will be required to complete the disc writing process. If an attempt is made to restart recording during this period, the actual recording cannot begin until the disc writing process is completed.
▼ Up to 99 chapter marks can be designated per title (clip); regardless of the insertion method, however, no more than 99 chapters can be inserted.
When chapter marks are inserted by pressing the Enter key on a keyboard, if the Enter key is held depressed, multiple consecutive chapter marks may be inserted.
▼Chapter mark positions are inserted in units of 15 frames (NTSC) or 12 frames (PAL).
When using the Edit List (EDL) function, at the final IN/OUT point setting, the APP section → [Auto Capture] → [IN/OUT Point] → [Record As] command must be set to "Title (Stop)".
▼Recordings cannot be made directly to the USB HDD.
[Play Functions] (Operation Details: page 45)
- Perform playback of clips recorded on DVD-Video discs or in projects recorded on hard disk drive, with video/audio being output to all output connectors.
- During recording to hard disk drive, time shift playback can be used to play the recorded contents from beginning.
Notes :
When using DVD-Video time search, playback may begin at a point somewhat shifted from the actually designated time number.
▼ Depending on the structure of the DVD-Video used, some errors may occur when time search is performed for time numbers located in a range extending from several frames before to several frames after the divisions between titles and chapters.
▼Some recorded DVD-Video discs may not playback properly.
When a copy-protected DVD media is played back, if recording is performed, no signal will be output to DV, even if DV output is set to "Enabled".
When DV output is "Enabled", pressing the PLAY button on the front panel or remote control unit will cause playback to begin after about five seconds.
During time shift playback, the PLAY button enable start time is different depending on video encode rate and audio encoding method.
[Editing Functions] (Operation Details: page 62, 67)
- When recording to HDD, it is possible to change the name of each of multiple recording data (clips), and editing functions including trimming, chapter editing, clip dividing, and title-order editing can be performed.
• DVD disc emulation allows you to check editing results before recording them on the hard disk. - Clips in projects on the hard disc, although discs created with the PRV-LX1 can be copied.
- Clips in projects backed up on the USB HDD cannot be copied.
- It is possible to export project content clips in the form of vob files. The resulting files can be exported via FTP connection to a networked computer.
Notes :
▼ To change clip names, connect a keyboard to the MOUSE/KEYBOARD USB jack.
▼The name of the clip is that of the title listed on the title menu.
During trimming edit, it is possible to select whether the edited results are to be saved by overwriting previous files or created as independent new files. The size of new clips created by trimming differs depending on the HDD's open space. When saving by overwriting previous files, clips up to "4.7GB + HDD available space" can be created.
▼Chapter mark positions are inserted in units of 15 frames (NTSC) or 12 frames (PAL).
The total size after editing must be such that can be held on a single DVD disc (4.7 GB) or recording to disc will not begin.
[Authoring Functions] (Operation Details: page 55)
- This unit provides a number of DVD menu layouts, allowing them to be associated with recorded images for creation of DVD-Video discs.
- During disc playback, various playback program settings can be made, including a first play program to designate what scene is played back first, and title post command to designate operations following title playback.
Note :
The menu screen supports only a 4:3 aspect ratio. As a result, when a menu background image or thumbnail is extracted from a title recorded in 16:9 aspect ratio, the image will appear vertically elongated.
▼ Removing a recorded DVD disc whether finalized or not finalized deletes the DVD menu settings, clip name and chapter name settings. Edit DVD menu settings, titles and chapter names prior to finalization.
[Copy, Import, Backup and Restore Functions] (Operation Details: pages 70, 72, 76)
■Copy
- Disc duplication operations have been optimized by the provision a 4x high-speed (maximum) duplication function.
- In addition to copying from HDD to DVD-R/RW, duplication of DVD-R/RW discs is also possible.
Notes :
▼ Only one image file can be constructed on the hard disk drive. If a disc differing from the original copy source disc is newly copied to the hard disk drive, the previous image file will be erased.
▼Image files with volume exceeding 4.7 GB cannot be copied to disc.
The time required for disc copying will differ depending on the disc's record and read performance.
Discs with copy-prohibited contents cannot be copied. When this unit is used to record copyrighted material, the permission of each copyright holder and neighboring rights holder must be obtained. Failure to obtain the permission of each rights holder can be punished by law. Pioneer disclaims any and all responsibility for any trouble arising between the user of this device and any such rights holders as the result of recording of copyrighted materials.
■Import
- By using CD/DVD discs, or an FTP connection from a computer linked to online network, DVD menu layout image files and DVD menu background image files can be downloaded for importing to the menu library.
- Edit Lists (EDL) can be similarly downloaded and imported.
■Backup and Restore
- Projects, image files, menu libraries, EDL and system settings on the internal hard disk can be backed up by connecting an external hard disk (USB HDD).
- Data backed up on a USB HDD can be used to restore hard disk data.
- Project data backed up on the USB HDD can be deleted.
- This unit supports USB 2.0 (maximum transfer rate: 480 Mbps). For efficient backup and restore, it is recommended that USB HDDs supporting USB 2.0 be used.
Notes :
▼ Data backed up on the hard disk may be corrupted if the USB HDD is damaged. Save important data to DVD-R/RW as DVD-Video disc.
The menu layout and background image data is not saved in a project backup. The menu library is backed up when the original menu data is used.
▼ Default menus are selected when the menu layout and background image data are not specified in restoring a project.
▼When using a USB hub, it is recommended to use one supporting USB 2.0.
▼Turn off the unit before connecting and disconnecting to the USB HDD.
Backed up data may be lost and unit operation may become unstable when the USB HDD is connected and disconnected during unit operation.
Status Confirmation Using Onscreen Display (OSD)
By pressing the DISPLAY button on the unit's front panel or on the remote control unit, the onscreen display (OSD) will be projected on the monitor screen. The OSD permits confirmation of the unit's current setting status, as well as recording/playback conditions.
■Idling Condition Recording-Setting Confirmation Screen
When the unit is in the idling condition, pressing the DISPLAY button causes a listing of the unit's current Status (settings) to be displayed. This display allows the user to check settings before operating the unit, yet without the need to enter the Function Menu, thus permitting more efficient operation.
When in the idling condition, the OSD screen is composed of two pages. The first two times the DISPLAY button is pressed, the OSD alternates between the two pages; when the button is pressed a third time, the OSD is turned off.
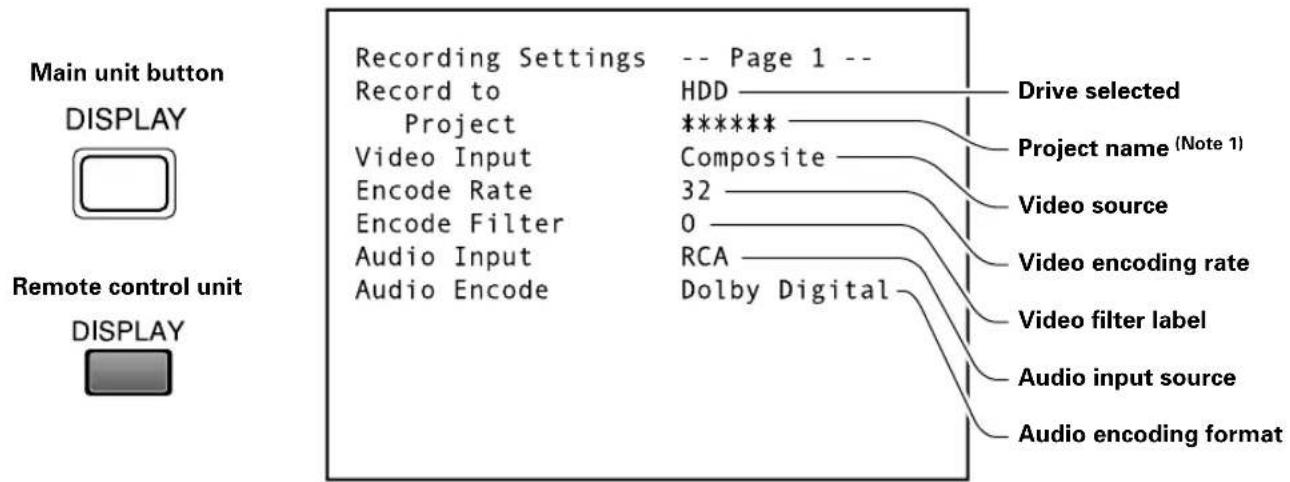
OSD Page 1
Note 1:
When the destination drive is DVD, the project name is not displayed.
Project names are displayed only when HDD is designated as the destination drive.
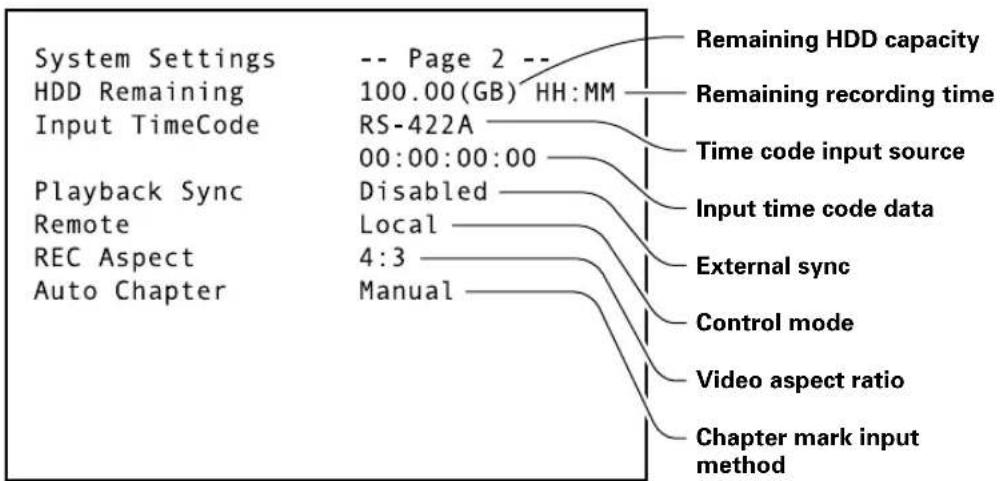
flowchart
graph TD
    A["System Settings"] --> B["HDD Remaining Input TimeCode"]
    B --> C["Playback Sync Remote REC Aspect Auto Chapter"]
    C --> D["-- Page 2 -- 100.00(GB) HH:MM RS-422A 00:00:00:00 Disabled Local 4:3 Manual"]
    D --> E["Remaining HDD capacity"]
    D --> F["Remaining recording time"]
    D --> G["Time code input source"]
    D --> H["Input time code data"]
    D --> I["External sync"]
    D --> J["Control mode"]
    D --> K["Video aspect ratio"]
    D --> L["Chapter mark input method"]
OSD Page 2
■OSD during Recording
When the DISPLAY button is pressed during recording, the OSD projects the unit's recording status and playback condition (during time shift playback), thus allowing confirmation of these items. In the recording mode, the OSD screen is composed of two pages, a simple (reduced clutter) page, and a detailed information page. The first two times the DISPLAY button is pressed, the OSD alternates between the two pages; when the button is pressed a third time, the OSD is turned off.

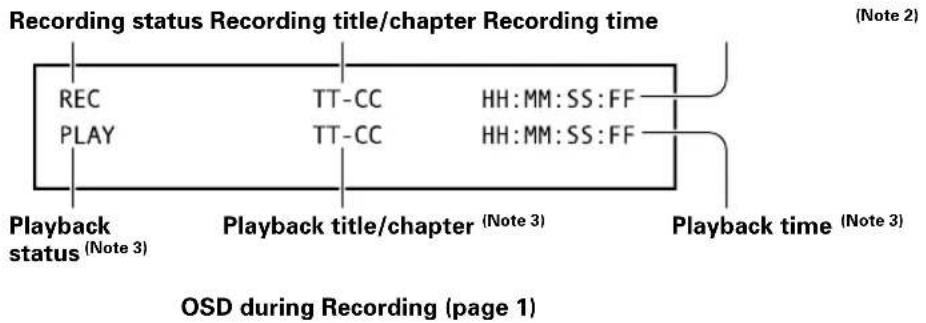
Note 2:
The recording time is the same as the time for the input video image; this differs from the output video image time (which is subjected to encoding/decoding).
Note 3:
Playback status is shown only during time shift playback.
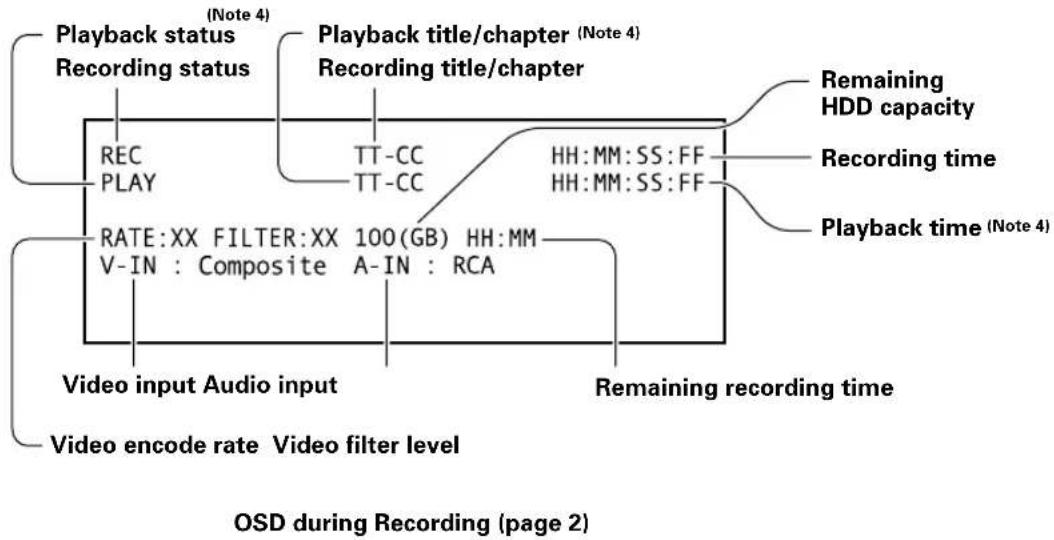
flowchart
graph TD
    A["Playback status\nRecording status"] --> B["RECPPLAY"]
    B --> C["RATE:XX FILTER:XX 100(GB) HH:MM\nV-IN : Composite A-IN : RCA"]
    C --> D["Video input Audio input"]
    D --> E["Video encode rate\nVideo filter level"]
    F["Playback title/chapter\nRecording title/chapter"] --> G["TT-CC\nTT-CC"]
    G --> H["HH:MM:SS:FF\nHH:MM:SS:FF"]
    H --> I["Remaining HDD capacity"]
    H --> J["Recording time"]
    H --> K["Playback time (Note 4)"]
    L["Video input Audio input"] --> M["Video filter level"]
    N["Remaining recording time"] --> O["Video input Audio input"]
    style A fill:#f9f,stroke:#333
    style F fill:#f9f,stroke:#333
    style L fill:#f9f,stroke:#333
Note 4:
Playback status is shown only during time shift playback.
■OSD during Playback
When the DISPLAY button is pressed during playback, the OSD projects the unit's playback status, allowing confirmation of these items.
In the playback mode, the OSD screen is composed of two pages, a simple (reduced clutter) page, and a detailed information page. The first two times the DISPLAY button is pressed, the OSD alternates between the two pages; when the button is pressed a third time, the OSD is turned off.
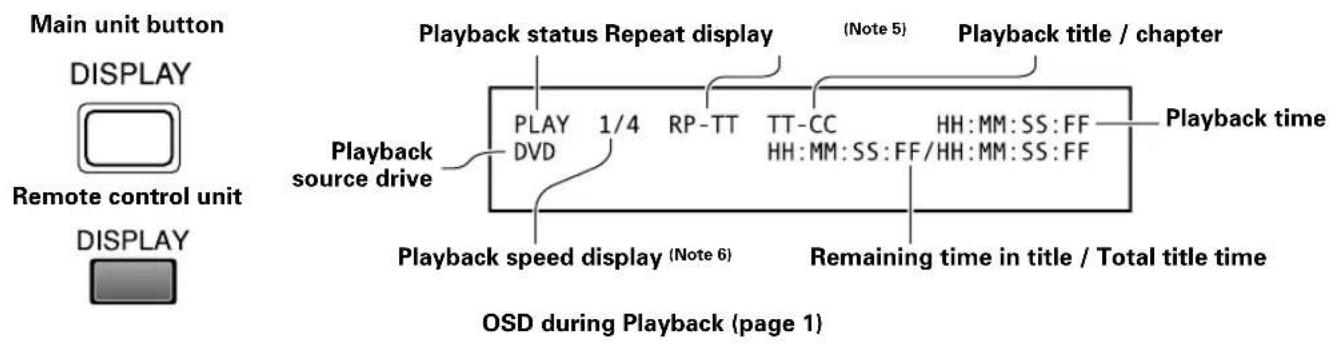
Note 5:
Displayed only during repeat play.
Note 6:
Displayed only during scan and slow speed playback.
Not displayed when performing reverse slow-motion playback with progressive output (NTSC only).
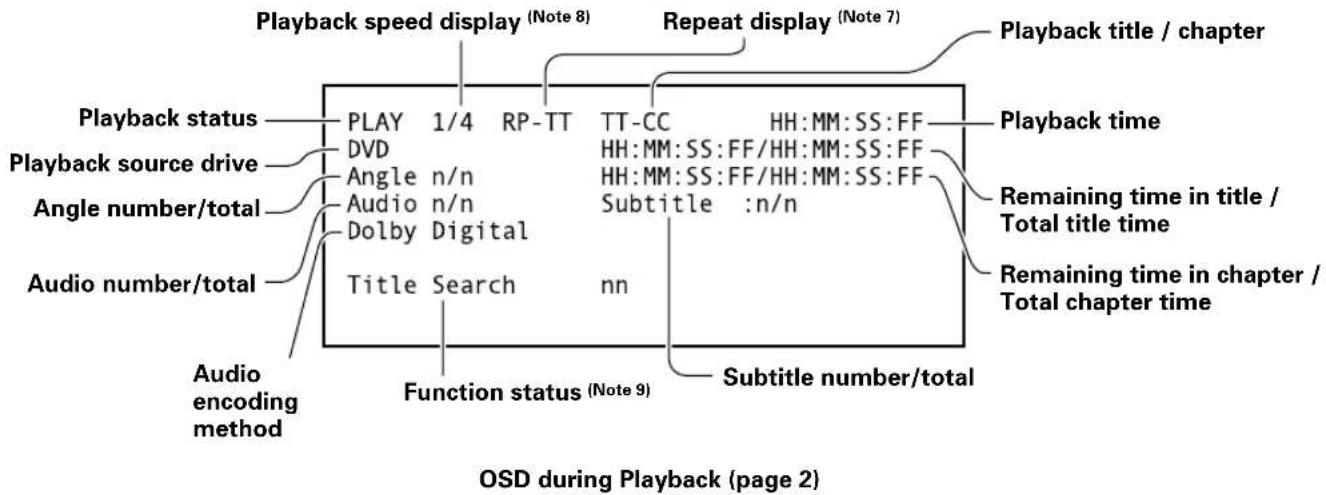
Note 7:
Displayed only during repeat play.
Note 8:
Displayed only during scan and slow speed playback.
Not displayed when performing reverse slow-motion playback with progressive output (NTSC only).
Note 9:
Displayed during angle, audio, subtitle change, and during search operations.
Select [System] command on the Function Menu's SET UP section to select initial defaults for the PRVLX1.
Mouse/Keyboard
This DVD recorder supports use of a mouse and keyboard. The types of mouse and keyboard supported are as follows:
Mouse: Generic
Keyboard: US type (101-key)
Japan type (106-key)
To set the keyboard type, go to SET UP section →
[System] [System Settings] [Keyboard].
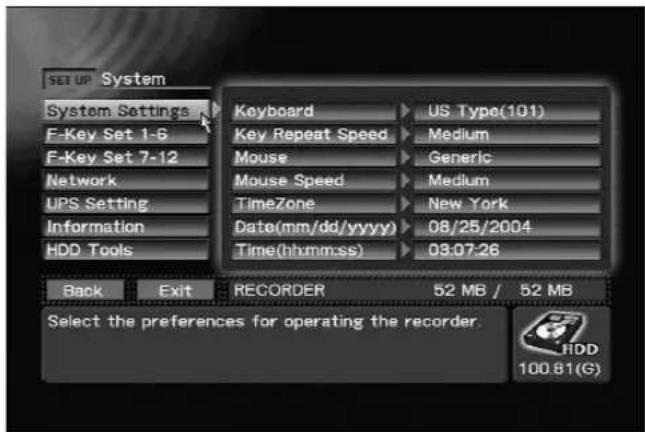
SET UP section → [System] → [System Settings]
The [System Settings] command also allows selection of mouse cursor movement speed, keyboard key repeat speed, and time zone and date/time.
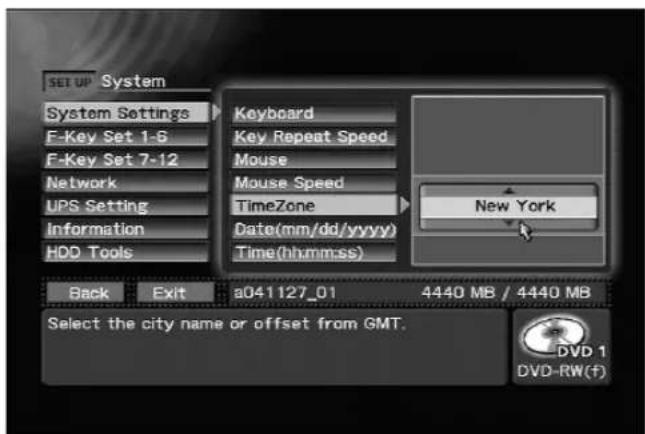
SET UP section → [System] → [System Settings] → TimeZone setting
Programming the Function keys:
To facilitate operation of the unit, the SET UP section → [System] → [F-Key Set] command allows you to program your keyboard's 12 function keys (F1-F12) to perform the equivalent functions of front panel controls. The function keys can also be combined with Ctrl and Shift keys to provide additional programming combinations.
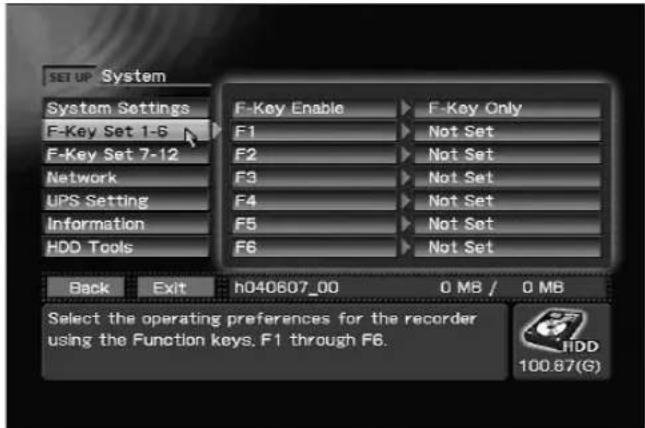
SET UP section → [System] → [F-Key Set 1-6]
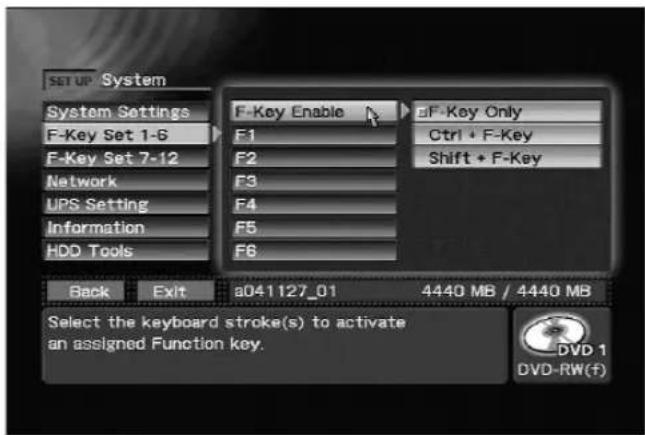
SET UP section → [System] → [F-Key Set 1-6] → F-key Enable setting
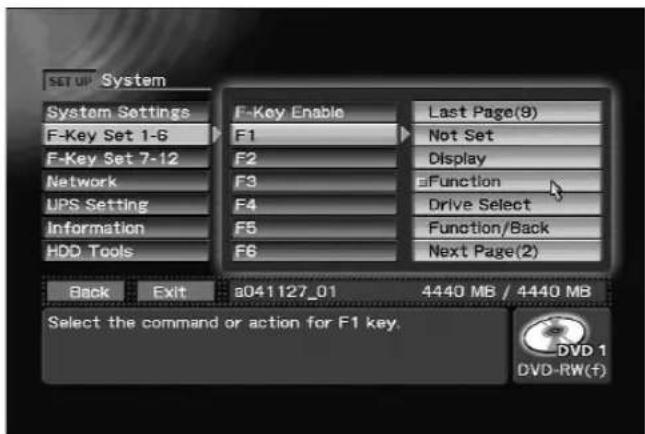
SET UP section → [System] → [F-Key Set 1-6] → F1 setting
Network
When using this unit on a network, go to SET UP section → [System] → [Network], and set the [Network] command to "ON". Then go to SET UP section → [System] → [Network], and set the [DHCP/Manual] command either to use DHCP (Dynamic Host Configuration Protocol) or input the IP address used, together with sub-net mask and Gateway address.
If "DHCP" is selected, confirm that a DHCP server in fact exists. If no server exists, a longer time will be required for the unit to boot to the idling condition when the power is turned on. When "DHCP" is
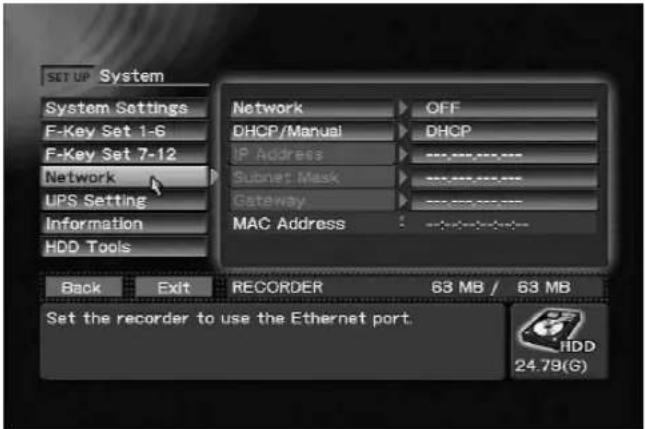
SET UP section → [System] → [Network]

SET UP section → [System] → [Network] → [DHCP/Manual] → [DHCP]
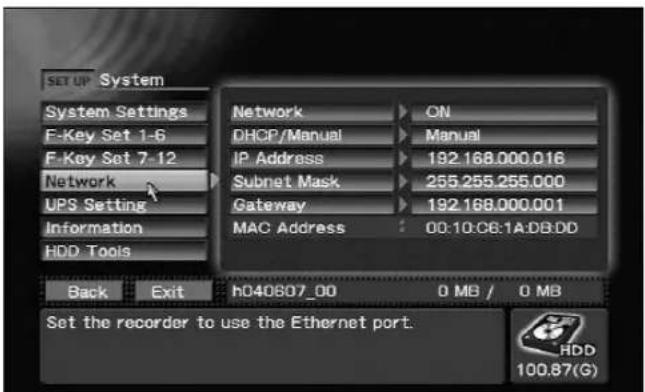
SET UP section → [System] → [Network] → [DHCP/Manual] → [Manual]
selected, the [IP Address] command will display the address automatically allocated to the recorder.
Also, setting [Network] to "ON" makes it possible to check the MAC address of this unit.
Note:
Be very careful when setting IP address, sub-net mask, and Gateway addresses. Failure to set the correct values may not only make it impossible to connect to a network, but cause malfunctions throughout the network. If you are unsure of the proper values to set for these items, consult your network administrator.
UPS Support
Whenever the power to this unit is turned OFF, the unit performs a shutdown operation. An unintentional power interruption results in the power being disconnected without the shutdown operation being performed, thus resulting in potential malfunctions. In order to avoid such malfunctions, the use of an uninterrupted power supply (UPS) is recommended. By going to SET UP section → [System] → [UPS Setting] → [Model], you can select APC Smart-UPS 700 or Smart-UPS 500 (Note).
Note:
Smart-UPS 500 is for use in Japan only.
Also, if power is interrupted and the UPS operates, the time before automatic shutdown is initiated can be set to 30 seconds or 60 seconds (SET UP section → [System] → [UPS Setting] → [Shutdown
Delay]). In this way, the shutdown operation will be avoided if normal power is restored within the selected time interval.
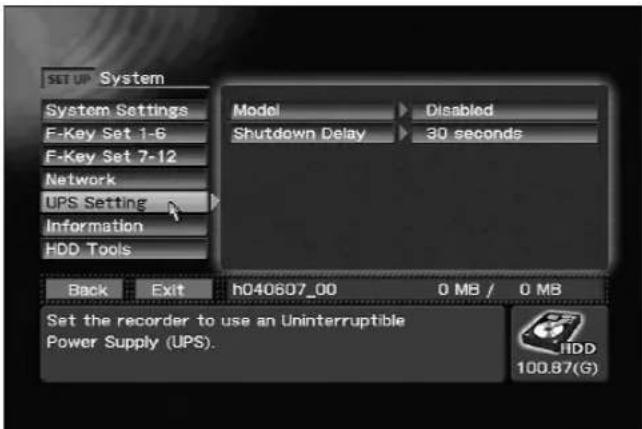
SET UP section → [System] → [UPS Setting]
Use the UPS products below, manufactured by AMERICAN POWER CONVERSION CORP. (APC).
Smart-UPS 700VA
(Part Number: SU700NET)
Connection of other manufacturers' UPS will not result in proper operation.
When connecting the UPS to the PRV-LX1, be sure to disconnect the power to the PRV-LX1 first, and use the cord supplied with the UPS to connect the two units. If the connection is made after the PRV-LX1 has booted up, the shut-down operation may not occur properly.
Before using the unit with a UPS, be sure to consult the operating instructions accompanying the UPS product.
System Information
Go to SET UP section → [System] → [Information] to confirm the following system information:
System version (application version / OS version)
Total power-on time (hours)
Hard disk drive (HDD) access time (hours)
DVD-R/RW Drive read/write time (hours)
Service information
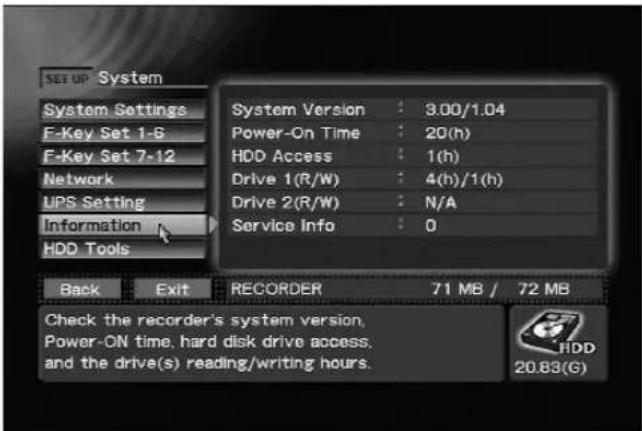
SET UP section → [System] → [Information]
Note:
The number in service Information [Service Info] indicates the result of hard disk fault diagnosis.
0 Hard disk is operating normally.
1, 2 Hard disk operation requires caution.
3, 4 The hard disk may crash. Take it back to the dealer's at the earliest possible opportunity.
This information is only a guideline. Contact your dealer when the hard disk does not seem to run normally regardless the information that appears. Do not leave important data on the hard disk but save it to a DVD-R/RW as DVD-Video disc.
HDD Tools
The SET UP section → [System] → [HDD Tools] command allows you to format and perform file checks of the video recording area on the hard disk and the USB HDD.
Use the [Target Drive] command to specify the drive where the operation is to be performed.
Formatting deletes all data on the drive so be sure to enter the correct drive in the [Target Drive] setting.
Note:
The Delete and Format commands provided with the unit do not completely delete all data on a hard disk.
Thus discarding or transferring a USB HDD to a third party when hard disk data has been deleted using these functions runs the risk of placing backed up image data into the wrong hands. To prevent such a risk, use commercially available software to wipe the hard disk clean or request a dealer to do so. Consult your USB HDD manufacturer for details.
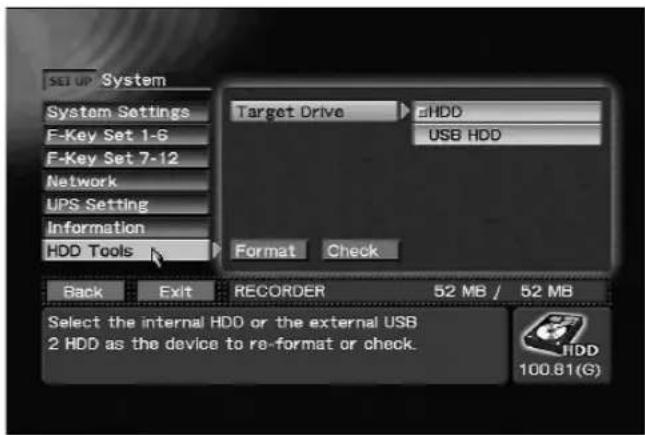
SET UP section → [System] → [HDD Tools]
Note 1:
Selecting Format deletes all projects and image files on the hard disk. The Format command erases even those clips in projects which have been set for accidental erasure protection using the EDIT section
→ [Project] → [Record/Name] → [Protect]
command. Also, when executing the Format command, set drive selection to "HDD" (see page 35) (formatting cannot be performed on "DVD1" and "DVD2").
Note 2:
The internal hard disk drive cannot be formatted when there is a disc in the drive. Remove the disc to format the hard disk drive.
Note 3:
[USB hard disk] appears as [Target Drive] command only when a USB HDD is connected before opening the Function Menu.
Note 4:
When using a USB HDD, connect the hard disk before turning on the unit. A USB HDD equipped with a power switch should be turned on before turning on the unit. Do not connect and disconnect the USB cable when the unit is in operation.
Background Color
Go to SET UP section → [Operation] → [Video Settings] → [Background Color] to select the background color when the unit is in the idling condition.
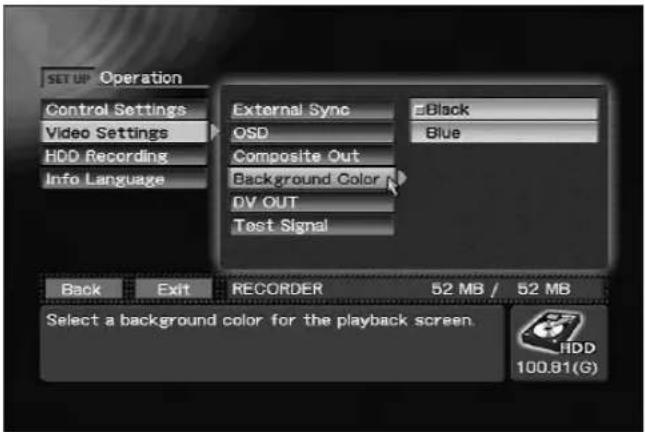
SET UP section → [Operation] → [Video Settings] → [Background Color]
Composite Video/Audio RCA Output
Signal pass-through is supported on this unit only with composite video output and audio RCA output signals.
Use the SET UP section → [Operation] → [Video Settings] → [Composite Out] command to select "Source Monitor".
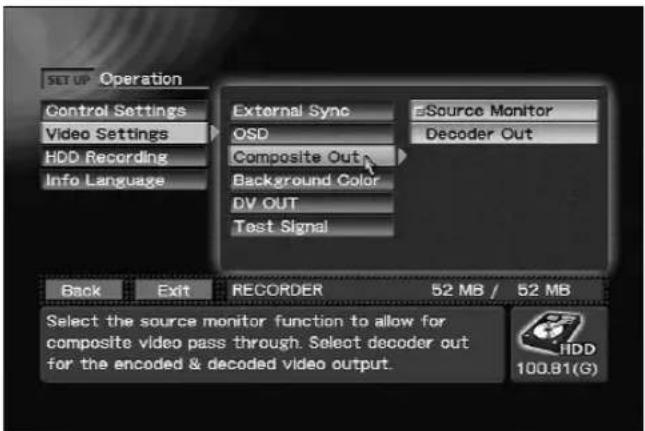
SET UP section → [Operation] → [Video Settings] → [Composite Out]
Note:
If [Composite Out] is set to "Source Monitor" (pass-through output), when OSD is set to ON during recording, the video and audio will switch to "Decoder Out" (encode/decode output). Regardless of the setting of the [Composite Out] command, outputs other than composite video, audio RCA and headphones will be treated as "Decoder Out" (encode/decode output) video and audio signals.
GUI Language Setting
Use the SET UP section → [Operation] → [Info Language] → [Language] command to change the language used in the information area of the Function Menu and text entry language between English or Japanese.
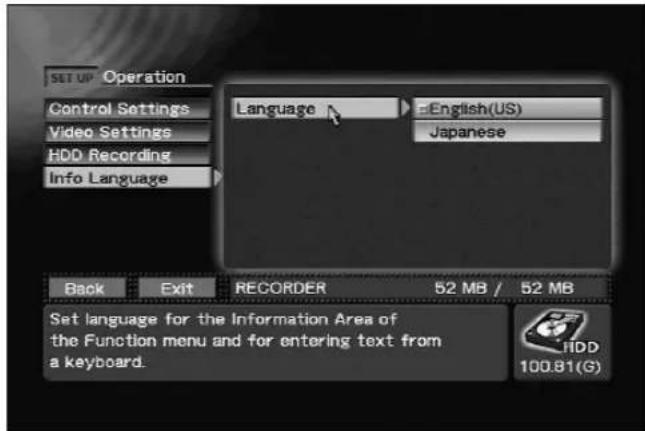
SET UP section → [Operation] → [Info Language] → [Language]
The recording function involves inputting video/audio signals from a VTR or other video playback device ("external VTR"), converting those signals to data compatible with the DVD video format, and recording that data on the hard disk or a DVD-R/RW disc. A playback video/audio signal is simultaneously output. If the SET UP section [Operation] → [Video Settings] → [Composite Out] is set to "Source Monitor", the input image will be passed through during recording as well (see page 32). In addition, in the event this command is set to "Decoder Out", the output signal will be the encoded/ decoded version of the original input video/audio signal.
Note 1:
The playback video signal is delayed about 4 seconds with respect to the input signal due to the time required for encoding and decoding.
Note 2:
Recording will not begin if a copy-guard protected input signal is detected.
Note 3:
If [Composite Out] is set to "Source Monitor" (pass-through output), when OSD is set to ON during recording, the video and audio will switch to "Decoder Out" (encode/decode output).
Note 4:
Turn off the power of the recorder and then turn it back on again if the disc does not come out even when a drive error has occurred.
Selecting the TV System Mode
Select the TV system mode for recording. When [TV SYSTEM] is selected on the STATUS section of the Function Menu, the selectable TV systems are displayed. Using the CURSOR button and ENTER button, select either "NTSC" or "PAL". When changing from the currently selected system, a confirmation dialogue box will be displayed.
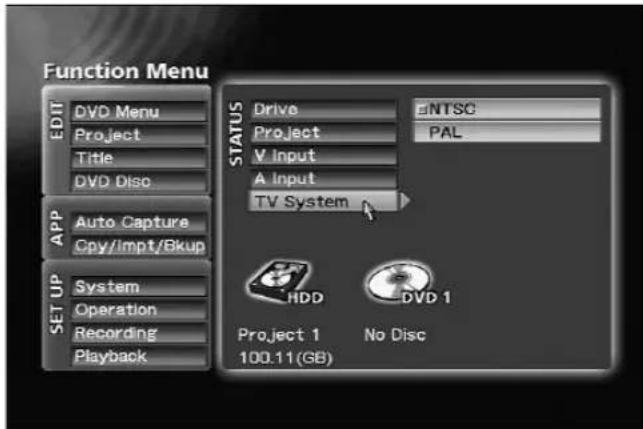
STATUS section → [TV System]
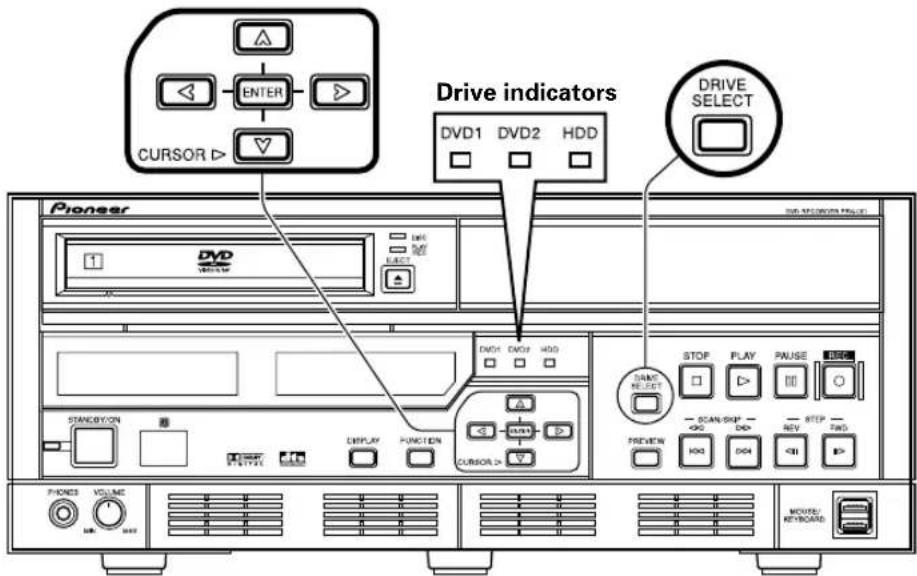
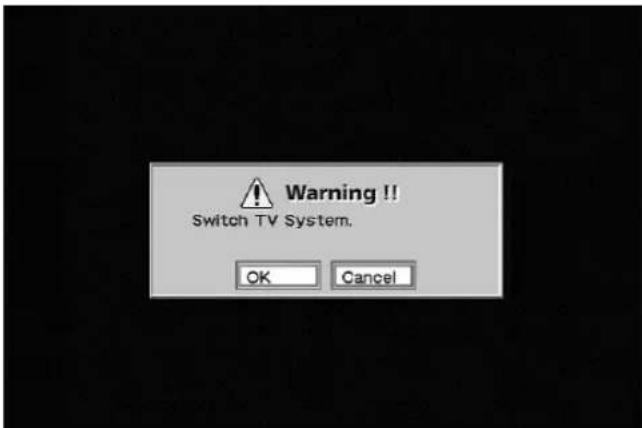
TV system switch confirmation dialog 1
When [OK] is selected, the TV system changes and a second confirmation dialogue box appears.
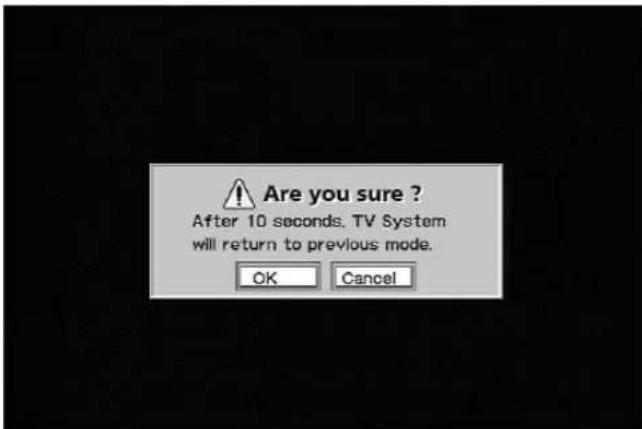
TV system switch confirmation dialog 2
Press [OK] to confirm the newly selected TV system. If [Cancel] is selected, the unit will return to the previously set TV system. Also, the previous TV system will also be restored automatically if the dialogue box is left displayed without taking action for 10 seconds or more.
The TV system can also be changed by simultaneously pressing the front panel's CURSOR (upward pointing arrow) and STOP buttons,

or by pressing function key 1-12 if that function has been allocated. In this case, no dialogue box will be displayed.
Note:
TV system cannot be changed except when the unit is in the idle mode.
Selecting Input
On the Function Menu, the STATUS section → [V Input] and [A Input] commands indicate the currently selected video and audio input signals. Use the CURSOR and ENTER buttons to change to the connectors for different input signals if desired.
With either [V input] or [A input] is designated in "DV", both video and audio will become DV input. In this case, "LPCM" (see page 37) cannot be selected as the audio encoding method.
When "PAL" is selected as the TV system, only 1 [Component] type will be available.
Also, DV audio format auto-sensing is performed in the case of the following settings, with the result that recording and preview are disabled during the 2 or 3 seconds until the sensing is completed.
①When input selection is changed;
②When recording settings are changed;
③Immediately following DV signal input (when cable is connected or playback is begun on a connected DV component)
Note:
If preview is performed immediately after setting input, the error message "No DV Input" will appear. This is only the result of the auto-sensing process noted above, however, and is not a malfunction.
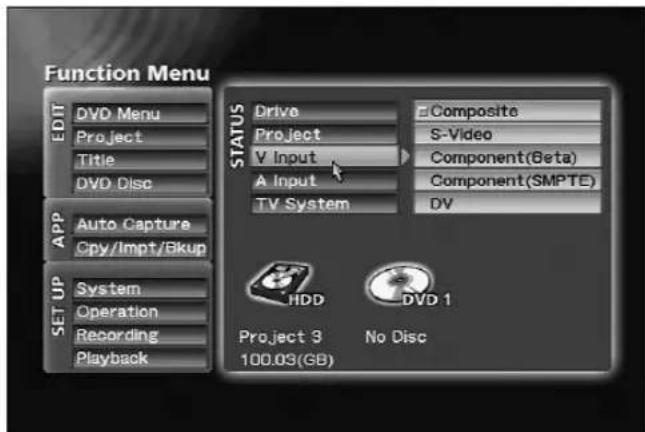
STATUS section → [V Input]

STATUS section → [A Input]
Selecting Recording Destination
The currently selected recording destination (also the playback source) will be displayed on the front panel's central indicator (DVD1, DVD2, HDD indicator). The [Drive] command on the Function
Menu's STATUS section also indicates the currently selected recording destination/playback source. Use the front panel's DRIVE SELECT button, or the
[Drive] command in the Function Menu's STATUS section to select the recording destination. However, note that the DRIVE SELECT button is disabled during display of the Function Menu.
When the "HDD" is selected, recording to performed to HDD only. If only 1 DVD-R/RW writer is installed, "DVD1" will be selected; if two writers are present, either "DVD1" or "DVD2", or "DVD1&2" can be selected as the recording destination.
When "DVD&HDD" is selected using the EDIT section → [Project] → [Record/Name] → [Record To] command, data is recorded both to the DVD disc and hard disk simultaneously, and hard disk recording remains stored even after the DVD disc has been removed.
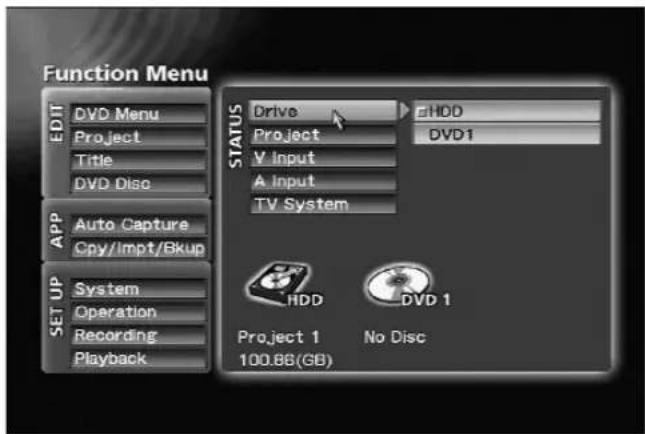
STATUS section → [Drive] (single-DVD-drive model)
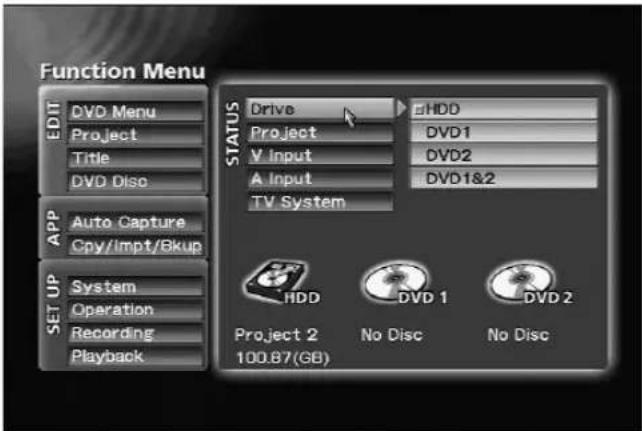
STATUS section → [Drive] (twin-DVD-drive model)
When a disc is removed before finalizing, the data recorded so far remains on the hard disk. A new project is automatically created when this disc is reinserted and additional data that is recorded is saved to this project. Thus data recorded prior to removal and data recorded after reinsertion are saved to different projects.
Note:
When a disc is inserted and a recording is made, [Record To] setting can no longer be changed. The [Record To] setting is saved for each drive and can be changed when drive selection changed.
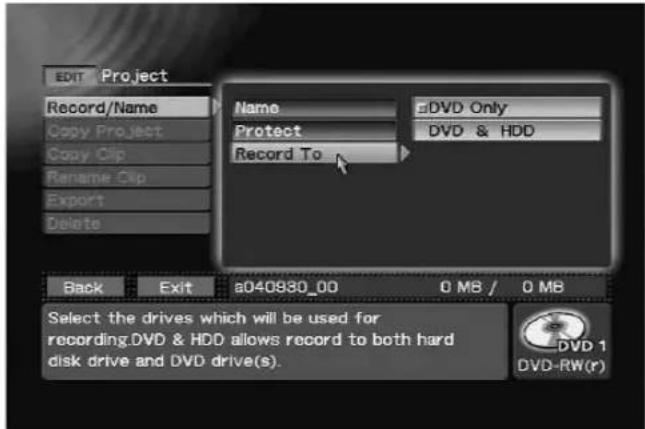
EDIT section → [Project] → [Record/Name] → [Record To]
When recording to hard disk drive, this recorder performs internal management of recorded data (clips) in units called "projects." Multiple clips (up to a maximum of 255) can be recorded in a single project, and so long as a project is not changed, clips can be recorded continuously within a single project. When you wish to classify your recorded data in multiple groups, change the project by using the [Project] command on the STATUS section, and continue recording.
![Function Menu EDIT DVD Menu Project Title DVD Disco APP Auto Capture Cpy/Impt/Bkup SET UP System Operation Recording Playback STATUS Drive [new]h040721_01 Project V Input A Input TV System REORDER HDD DVD 1 Project 2 No Disc 100.11 (GB)](/content/2026/05/827245/images/347c75e42aa7ecf23c819a87df6ce3310455500c6f0d0993393bacb31605ee63.jpg)
STATUS section → [Project]
Other Recording Settings
Function Menu's SET UP section → [Recording]:
This command also allows the following settings:
Video Encode Rate: 32 levels
Video Filter (NR): 16 levels
Audio Encode: Dolby Digital / LPCM
(Note1)
Audio Level: -48 dB to +14 dB
Aspect: 4:3 / 16:9
Setup Level: 0 IRE / 7.5 IRE
(Note2)
Auto Chapter: Manual / Automatic
(at 3/5/10/15/30/60
minutes intervals)
REC Button: REC Start /
Standby → REC
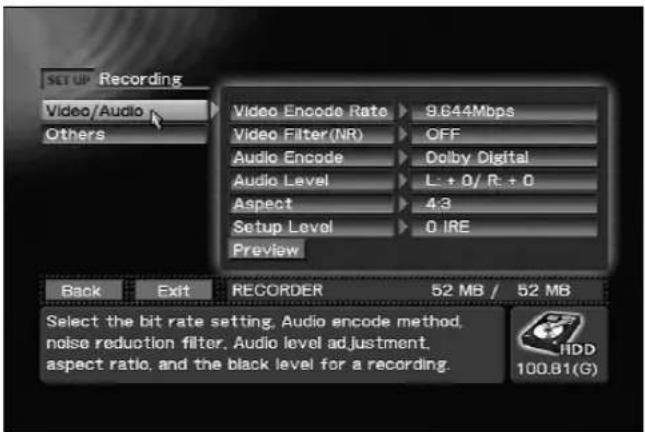
SET UP section → [Recording] → [Video/Audio]
Note 1:
"LPCM" cannot be selected when "DV" is set as the input.
Note 2:
Cannot be selected when "PAL" is selected as the TV system.
Video Encode Rate Settings
The SET UP section → [Recording] → [Video/Audio] → [Video Encode Rate] command allows you to set the encoding rate for recording. This setting affects the recording time and the transfer rate (image quality). See pages 78 and 79 for information on the relationship between encoding rate and recording time/transfer rate.
The encode rate can be set either as a step between step 1 to 32 or as a recording time value. The recording time value is converted to the step that is closest to the set time.
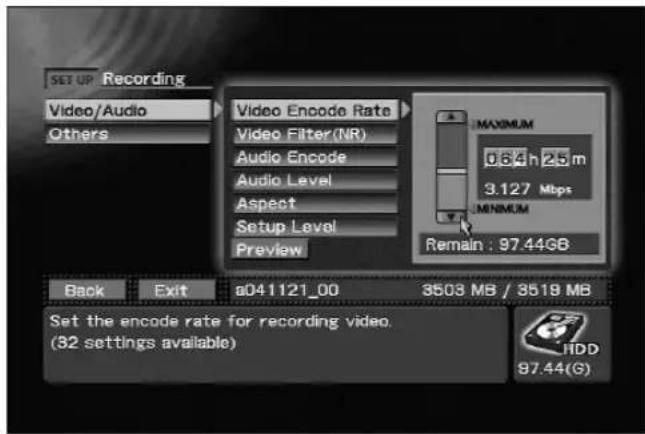
SET UP section → [Recording] → [Video/Audio]
→ [Video Encode Rate] Step change

SET UP section → [Recording] → [Video/Audio]
→ [Video Encode Rate] Time change
Video Filter Level Setting
Use the Video filter to improve image quality when the Video encode rate setting is low or when there is noise in the video source. A higher filter level reduces noise more efficiently but lowers resolution. Set the level where you obtain the greatest amount of noise reduction with the lowest loss of resolution.
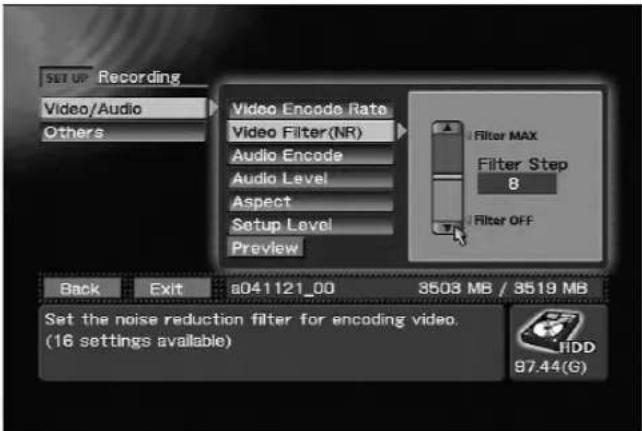
SET UP section → [Recording] → [Video/Audio] → [Video Filter (NR)]
Audio Encode Setting
Select Dolby Digital or LPCM audio encoding. As shown in the table on pages 78 and 79, the recording time differs depending on the selected encode setting even at the same recording rate.
Note:
"LPCM" cannot be selected when "DV" is selected as the input source.
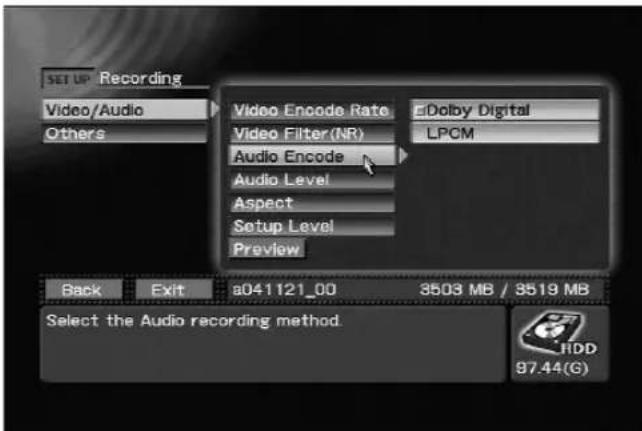
SET UP section → [Recording] → [Video/Audio] → [Audio Encode]
Audio Level Setting
The SET UP section → [Recording] → [Video/Audio] → [Audio Level] command allows you to set the audio level for recording.
Adjust the audio level when the audio source is too low or so large the sound is distorted to obtain an appropriate sound setting.
Select R or L and press the Up/Down key to adjust the sound in the right or left channel (the numbers are incremented or decremented by each press of the Up/Down key). To adjust both the right and left channels, select "L+R" and press the Up/Down key. Adjust the audio level so that maximum level does not light the top indicator on the level meter.
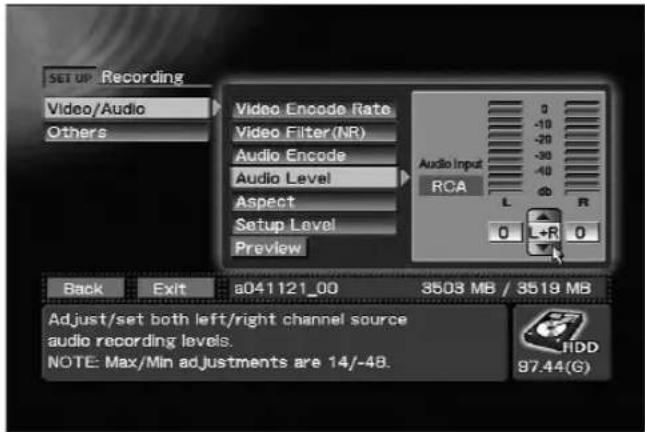
SET UP section → [Recording] → [Video/Audio] → [Audio Level]
Methods for Setting Chapter Mark Insertion
This function sets how chapter marks are set during recording.
In Manual mode, chapter marks can be entered at desired locations by using the main unit's front panel
ENTER button, the remote control unit's ENTER button, the Enter key on a connected keyboard, The PAUSE button also can be used to enter chapter marks during recording standby.
Chapter marks can be automatically set at intervals range from 3 to 60 minutes. In this case, the ENTER and PAUSE buttons cannot be used to enter chapter marks.
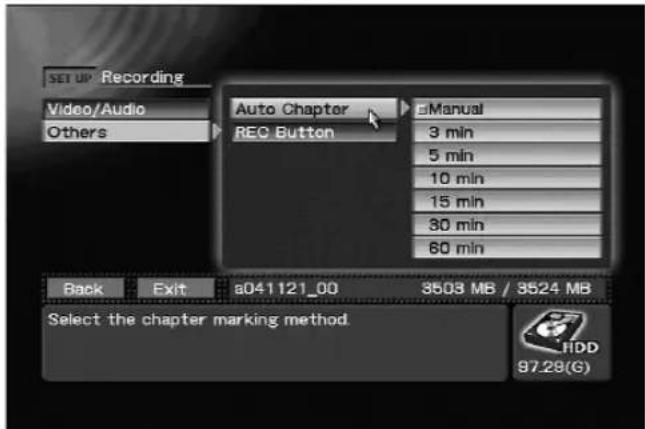
SET UP section → [Recording] → [Others] → [Auto Chapter]
Preview Function
The PREVIEW button on the front panel, or the SET UP section → [Recording] → Preview button makes it possible to check the result of encoding/decoding of the video/audio input signals without making a recording to DVD discs or hard disks.
In the idling condition, press either the PREVIEW button, or on the Function Menu's SET UP section
→ [Recording] command, press the Preview
button. The elected input preview image/sound (after encoding and decoding) will be produced at all output connectors. Also, while viewing the preview, if the PREVIEW button or the STOP button is pressed (or if the mouse's left and right buttons are clicked simultaneously), the unit will return to the idling condition or the Function Menu.
Note 1:
When DVD drive is selected as the recording destination, the EJECT button is disabled during use of the preview function.
Note 2:
Even if the SET UP section → [Operation] →
[Video Settings] → [DV OUT] command is enabled, no signal is output from the DV connector during use of the preview function.
![SET UP Recording Video/Audio Others Video Encode Rate 9.644Mbps Video Filter(NR) OFF Audio Encode Dolby Digital Audio Level L: +0/ R: +0 Aspect 4:3 Setup Level 0 IRE Preview Back Exit RECORDER 52 MB / 52 MB Preview the current encode/decode Video and Audio settings prior to recording. Press (FUNCTION) or [STOP] to exit the preview. HDD 100.B1(S)](/content/2026/05/827245/images/fe2462f748ef0251d3f73f7f116cd1f7b35899666aaaafdee5e9f263cb1deaa8.jpg)
Executing Preview command on SET UP section → [Recording] → [Video/Audio]
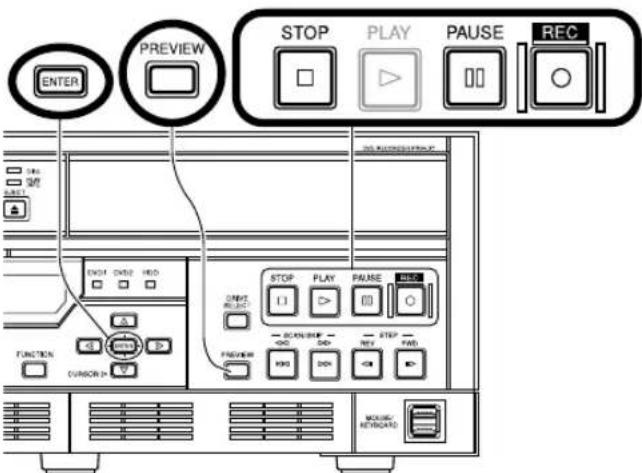
Starting and Stopping Recording
Recording can be started and stopped either manually or automatically.
Recording automatically stops whenever the recording destination runs out of recording capacity. Also, recording will not start if the medium has no recording space available. When recording to DVD, recording will not begin after 99 titles have been recorded to a single disc, even if the disc has recording capacity remaining. When performing continuous recording to hard disk drive, a single clip can contain a maximum of 100 hours of recording time.
Note:
When recording to DVD, if the unit is left in the recording standby mode for 1 hour or more, the unit will automatically switch to STOP mode to prevent damage to the system.
①Manual Recording
Starting and stopping manual recording is performed with the front panel's REC and STOP buttons.
During recording, the PAUSE button can be pressed to temporarily interrupt the recording. From the pause mode, press REC button again to resume recording, and the recording will be a continuous part of the clip (title) begun before the pause. During recording, the front panel's REC button will light, and during the pause mode, both the REC and
PAUSE buttons will light.
When manual chapter mark insertion is selected, chapter marks can be entered at desired locations by using the main unit's front panel ENTER button, the remote control unit's ENTER button, or the Enter key on a connected keyboard. A chapter mark is also inserted when the PAUSE button is used to set the unit to recording standby. If automatic chapter mark insertion has been selected, a chapter mark will be inserted automatically after each set interval. In this case, no chapter mark will be inserted at a recording pause position. The session from recording start to recording stop will be considered an independent title (clip).
Note 1:
When the STOP button is used to terminate recording, between several and several dozen seconds (when recording to DVD) are required to completely stop recording after the button is pressed. Recording cannot be restarted until after this operation is completed. During the period after the STOP button is pressed until recording stops completely, the STOP button will flash.
Also, when performing recording to an unused or full-blank formatted DVD-RW disc, more time may be required until STOP is completed.
Note 2:
In theory, up to 99 chapter marks can be inserted for a single title (clip), but no more than that number can be inserted, no matter what method is used.
Note 3:
Be careful when using a keyboard to insert chapter marks, since if the Enter key is held depressed, multiple consecutive chapter marks may be inserted.
②Automatic Recording
RS-422A or IEEE1394 interface protocols can be used to control an external VTR and perform automated recording.
■Recording Using IN/OUT Points Setting
On the Function Menu's APP section, use the
[Auto Capture] → [IN/OUT Point] → [IN/OUT
Point] command to set the time code for the IN and OUT points. When the Function Menu's REC button is then pressed, the external VTR is automatically rewound to a position just preceding the selected IN point, and recording starts automatically from that point. When the designated OUT point is detected, the unit automatically enters the REC pause/stop mode.
![APP Auto Capture IN/OUT Point Chapter Point EDL Command EDL EDL Load/Delete EDL Save Preroll Time Offset(Frame) Record As IN/OUT Point Add to EDL REC IN Mark 0.1 0.0 0.0 0.0 OUT Mark 0.1 3.0 0.0 0.0 Current Input Time Code 23:59:59:29 Back Exit RECORDER 308 MB / 308 MB Set In/Out points for auto capture recording. Press [Mark] to get actual timecode from source or manually enter it. Press [Add to EDL] to add to EDL. IIDD 100.56(G)](/content/2026/05/827245/images/81229dde858fca75db42a79e8c08c3d209d79ecfcf8de5a4d4b1fdb556dd193f.jpg)
APP section → [Auto Capture] → [IN/OUT Point]
→ [IN/OUT Point]
The preroll time preceding the IN point can be changed from between 1 to 10 seconds before the point by using the Function Menu's APP section → [Auto Capture] → [IN/OUT Point] → [Preroll Time] command. The time code delay compensation (offset) can be set to from 0 to -30 frames by using the APP section → [Auto Capture] → [IN/OUT Point] → [Offset (Frame)] command.
Note:
Frame accuracy during use of the auto recording function is as follows:
| SET UP section → [Operation] → [Control Settings] → [Time Code] | Offset (Frame) value |
| RS-422A | ± 1 Frame |
| LTC | ± 1 Frame |
| IEEE1394 | ± 1 Frame |
In order to match the phase with the input time code, the preroll should be set to about five seconds. The preroll value must be corrected using the source side component.
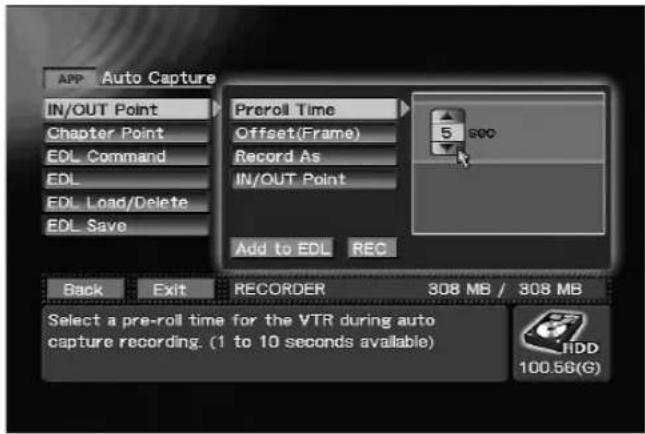
APP section → [Auto Capture] → [IN/OUT Point] → [Preroll Time]
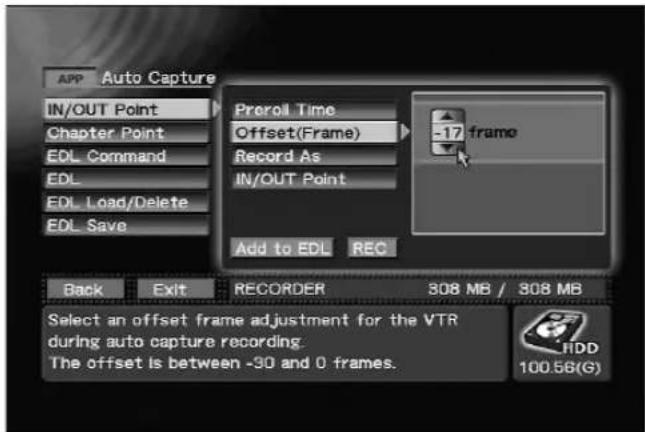
APP section [Auto Capture] → [IN/OUT Point] → [Offset (Frame)]
The APP section → [Auto Capture] → [IN/OUT Point] → [Record As] command allows designation of whether recording enters the REC pause mode, or stops completely when the OUT point is detected. When "Chapter (Pause)" is selected, the command also permits the insertion of a chapter mark at that point. When manual chapter mark insertion has been previously selected, optional chapter marks can be inserted by pressing the ENTER button during recording.
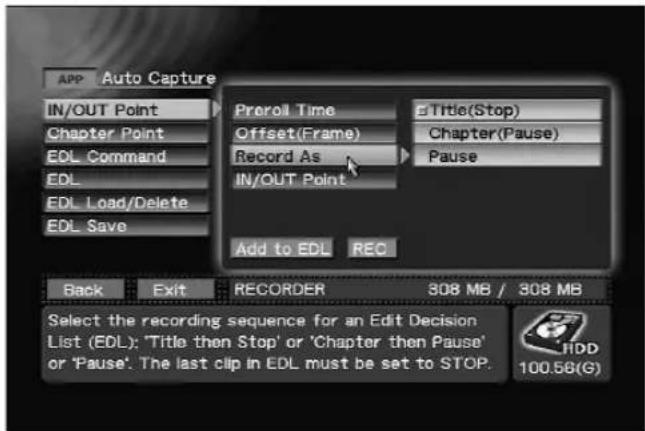
APP section → [Auto Capture] → [IN/OUT Point] → [Record As]
When automatic chapter mark insertion has been selected, however, a chapter mark is inserted automatically at regular intervals; in this case, even if "Chapter (Pause)" is designated, no chapter mark will be inserted when the unit enters the REC pause mode. The session from recording start to recording stop will be considered an independent title (clip). During recording, the playback video/audio signal will be output, but when recording is completed, the screen will return to the Function Menu display.
■Edit List (EDL) Recording
The Edit List (EDL) function allows automated recording of consecutive multiple IN/OUT points by setting the points on an Edit List (EDL). This recorder allows formation of an Edit List by using the contents set with the Function Menu's APP section → [Auto Capture] → [IN/OUT Point] command. By pressing the Add to EDL button, the IN/OUT points set are added to the edit list.
![APP Auto Capture IN/OUT Point Chapter Point EDL Command EDL EDL Load/Delete EDL Save Preroll Time Offset(Frame) Record As IN/OUT Point 5 seconds -17 frames Title(Stop) 01:00:00:00 Add to EDL REC Back Exit RECORDER 308 MB / 308 MB Press [Add to EDL] to add auto capture settings to the Edit Decision List (EDL). HDD 100.56(G)](/content/2026/05/827245/images/d1e95b6da0991ed6f346ac17802b1b1e2f8eed36f6a7440adce5de1020148dad.jpg)
APP section → [Auto Capture] → [IN/OUT Point] Adding to EDL
After construction of an edit list, or after loading a previously recorded edit list, pressing the Function Menu's APP section → [Auto Capture] → [EDL Command] → EDL REC button will cause recording to be performed automatically in accordance with the constructed list. In accordance with the recorded IN/OUT points, the external VTR is automatically rewound to the designated IN point, and recording begins automatically. When a designated OUT point is detected, the unit automatically enters the REC pause/stop mode.
By using the APP section → [Auto Capture] → [Chapter Point] command to record chapter point settings in an edit list, not only REC pause positions, but chapter marks can also be inserted at optional points.
The session from recording start to recording stop will be considered an independent title (clip). During recording, the playback video/audio signals are output, but when recording ends, the screen reverts to the Function Menu display.
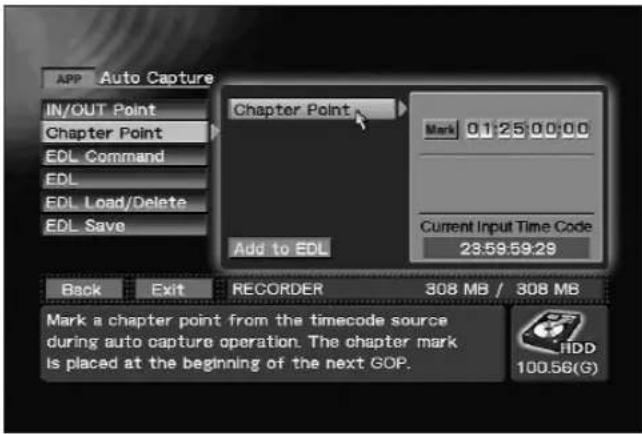
APP section → [Auto Capture] → [Chapter Point]
Settings for Automatic Recording
When using an external VTR with automatic recording, the Function Menu's SET UP section → [Operation] → [Control Settings] command allows independent settings to be made for the command line and time-code acquisition for controlling the external VTR. To perform automatic recording, set the SET UP section → [Operation] → [Control Settings] → [Control] command to "Local". The SET UP section → [Operation] → [Control Settings] → [Port] command allows setting of the command line to "RS-422A"/Disabled (or "IEEE1394"). When the external VTR cannot be controlled (such as a VTR with only an LTC output), set settings to "Disabled" and start VTR playback manually from before the IN point to record according to the entered time-code. Use the SET UP section → [Operation] → [Control Settings] → [Time Code] command to set the time code line to either "RS-422A" or "LTC" (or "IEEE1394").
When "DV" is selected as input, the "IEEE1394" interface is added to the possible selections.

SET UP section → [Operation] → [Control Settings]
Eject Setting
The operation performed at time of eject can be set using the [Eject Setting] command on the SETUP section's [Operation] → [Control Setting] menu. When set to "Eject", the disc will be ejected immediately without finalization even during recording. When set to "Finalize&Eject", when the eject command is received from an external controller at the remote control (RS-422A/IEEE1394), the disc will be finalized, and then ejected. Also, when using the front panel controls to eject a disc, if the drive for the EJECT button pressed is the same as the drive selected with the DRIVE SELECT button, a dialog box will appear asking whether you wish to finalize the disc.
Editing the Edit List
The contents that can be recorded on the edit list with this recorder are as follows: The contents set with the APP section → [Auto Capture] → [IN/OUT Point] and [Chapter Point] commands are added to the edit list by pressing the Add to EDL button.
Also, the APP section → [Auto Capture] → [EDL Command] command can be used to add disc finalize and initialize commands and wait functions to the edit list as well. The wait function can be used to place EDL recording in REC pause mode when necessary, for example, to change the recording source's VTR tape during EDL recording.
Note:
When recording to DVD, if the unit is left in the recording standby mode for 1 hour or more, the unit will automatically switch to STOP mode to prevent damage to the system.
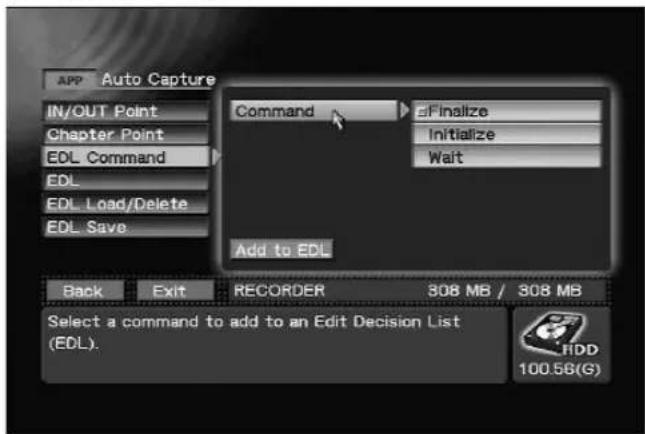
APP section → [Auto Capture] → [EDL Command] → [Command]
When selecting the APP section → [Auto Capture] → [EDL] command, the items entered on the edit list cannot be edited (changing order, deleting). In particular, the contents set with the APP section → [Auto Capture] → [Chapter Point] command must be recorded as the next step after setting and recording the IN/OUT points where you wish to insert chapter marks.
If chapter points are set and recorded after earlier setting and recording multiple IN/OUT points, the chapter points will be added as an additional record at the end of the edit list, and thus must be changed to their proper order.
![APP Auto Capture IN/OUT Point Chapter Point EDL Command EDL EDL Load/Delete EDL Save REC 01:00:00:00 CHP 01:05:00:00 CHP 01:10:00:00 CHP 01:15:00:00 CHP 01:20:00:00 next EDL REC Back Exit RECORDER 308 MB / 308 MB Check and modify the Edit Decision List (EDL). The list includes In/Out points and EDL commands. Press [EDL REC] to begin EDL recording. HDD 100.56(G)](/content/2026/05/827245/images/5794cdb13333753f52de8cd7fba98dc6e4c3407faa75363d563896b1a02fff0f.jpg)
APP section → [Auto Capture] → [EDL]
Note:
When recording the edit list, the final IN/OUT point setting must be as follows: APP section → [Auto Capture] → [IN/OUT Point] → [Record As] command must be set to "Title(Stop)".
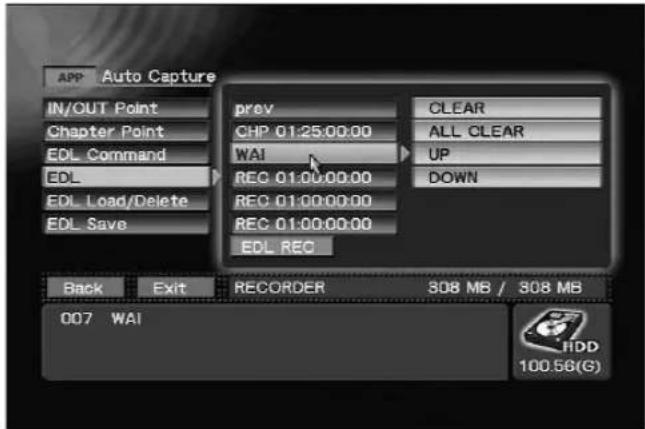
APP section → [Auto Capture] → [EDL] items editing (example 1)

APP section → [Auto Capture] → [EDL] items editing (example 2)
The constructed edit list can be saved with a name (*.edl) created with the [Auto Capture] → [EDL SAVE] command on the APP section. Also, a saved edit list can be selected and loaded with the [Auto Capture] → [EDL Load/Delete] → [Load] command. To delete an edit list, using the [Auto Capture] → [EDL Load/Delete] → [Delete] command on the APP section.
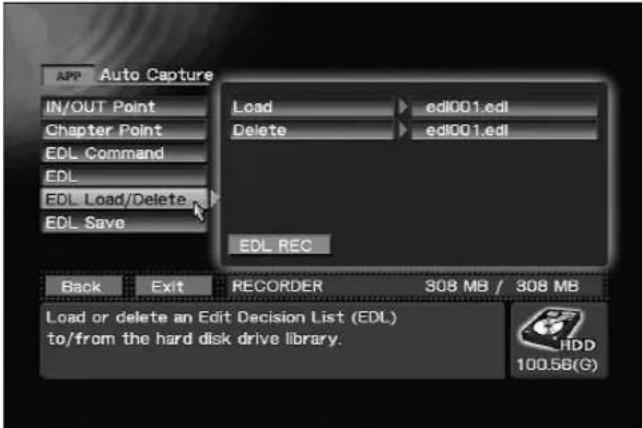
APP section → [Auto Capture] → [EDL Load/Delete]
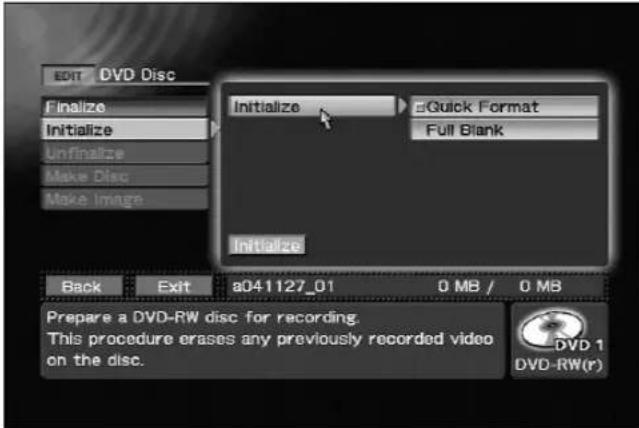
EDIT section → [DVD Disc] → [Initialize] → [Initialize]
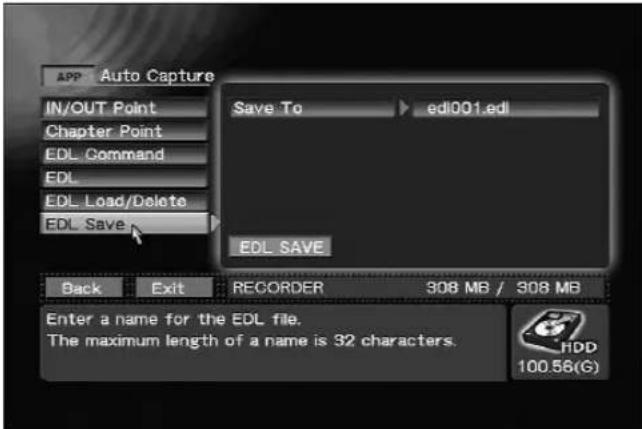
APP section → [Auto Capture] → [EDL Save]
![ARE you sure ? Initialize Cancel Press [Initialize] to format the disc. DVD 1 DVD-RW(r)](/content/2026/05/827245/images/75fa30d38236208d8b703b2c7e4a545aad627edb64a83f3f4e98717b89a908b2.jpg)
Initialize confirmation dialog
Note 1:
Edit lists can be composed outside of the recorder and imported (see page 72 "Importing Image Data, Edit Lists").
Note 2:
If [EDL] is used when target drive is set to HDD, initialize and finalize commands are ignored.
Recording to DVD Discs
Data can be recorded on an unused or not finalized DVD-R or DVD-RW disc.
A finalized DVD-RW disc must be initialized or finalization must be canceled before reuse.
Note:
However, finalization of DVD-RW discs finalized using the initial PRV-LX1 version (prior to 1.12/1.02) cannot be canceled. See "System Information" on page 31 for information on how to check system version.
①Disc initialization
Use the EDIT section → [DVD Disc] → [Initialize] command to initialize DVD-RW discs. Select "Quick Format" or "Full Blank" (all previously recorded material is erased). "Full Blank" takes 30 minutes to 1 hour to complete.
![EDIT DVD Disc Finalize Initialize Initialize Quick Format Max Disc Make Image Back 0 MB Press [Initialize] to format the disc. Initializing.... DVD 1 DVD-RW(r)](/content/2026/05/827245/images/ee599ec530e615e40152b47d8370bf26418621efeed4972921f894a96a384da3.jpg)
Initialize progress bar (appears during initialization)
②Canceling finalization
Finalization can be canceled by selecting the EDIT section → [DVD Disc] → [Unfinalize] command. The PRV-LX1 can only canceling finalization discs that it has been finalized on the PRV-LX1. Finalization cannot be canceled for two drives simultaneously.
Note 1:
The DVD menu information is lost when a disc is canceled finalization. When a disc has been canceled Finalization, use the EDIT section → [DVD Menu] command to set the DVD menu again.
Note 2:
However, finalization of DVD-RW discs finalized using the initial PRV-LX1 version (prior to 1.12/1.02) cannot be canceled.
![EDIT DVD Disc Finalize Initialize Unfinalize Make Disc Make Image Unfinalizeze : DVD1 Unfinalizeze Back Exit a041127_02 0 MB / 0 MB Press [Unfinalizeize] to begin unfinalizing DVD-RW disc for additional recording. Note.This will not erase previously recorded video on the disc. DVD 1 DVD-RW(F)](/content/2026/05/827245/images/2e05988ac31a47df7c5cee10e349ce1286e2f07c3d7ed6ec7ef6e8c38622eea8.jpg)
EDIT section → [DVD Disc] → [Unfinalize] → [Unfinalize]
![ARE you sure ? Menu Data is lost after unfinalization. Start Cancel Press [Unfinalize] to begin unfinalizing DVD-RW disc for additional recording. Note:This will not erase previously recorded video on the disc.](/content/2026/05/827245/images/1ce9de78d32776f4111febaa10693ca5e343f7f8b38d8e202f15231a266ce25b.jpg)
Unfinalizeize confirmation dialog
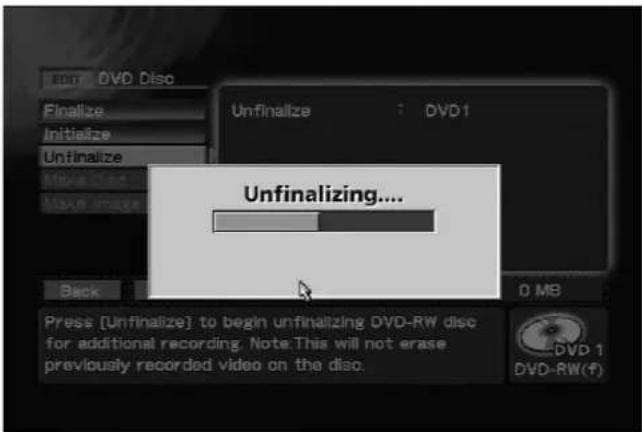
Unfinalizeize progress bar (appears during unfinalization)
③ Removing a disc before finalization
A recorded DVD-R/RW disc can be removed before finalization. A disc that has not been finalized can be loaded again for playing or additional recording. However, it must be finalized to enable playback on another DVD player.
Note 1:
Removing a recorded DVD disc whether finalized or not finalized deletes the DVD menu settings, clip name and chapter name settings. Edit DVD menu settings, titles and chapter names prior to finalization.
Note 2:
Discs removed before finalization cannot be played back and used for making additional recordings on the initial PRV-LX1 version (prior to 1.12/1.02). If playback and making additional recordings is not possible on another PRV-LX1, check the system version. See "System Information" on page 31 for information on how to check system version.
Note 3:
Discs removed before finalization cannot be played back and used for making additional recordings on home recorders other than the PRV-LX1.
Note 4:
Discs recorded on home recorders other than the PRV-LX1 that are not finalized cannot be played back or used for additional recordings on the PRV-LX1.
■ Notes for Simultaneous Recording on Two Drives
●Two discs removed simultaneously from each drive before finalization can be reloaded for simultaneous additional recording.
- Reselecting a drive makes it possible to cancel simultaneous recording and continue recording on one drive. Simultaneous recording cannot be resumed after this. Menus, chapter names and clip names can be edited after selecting one drive. Note that resuming a simultaneous recording after this will delete all edited data.
●Finalized discs that are canceled finalization cannot be used for simultaneous recording.
■Precautions When Saving Data to Hard Disk
Removing a disc before finalization when a recording is made both to a DVD disc and the hard disk (see page 35), the data recorded until the disc is removed remains on the hard disk. A new project is automatically created when this disc is reinserted and additional data that is recorded is saved to this project. Thus data recorded prior to removal and data recorded after reinsertion is saved to different projects.
④Finalizing discs
A DVD disc must be finalized using the EDIT section → [DVD Disc] → [Finalize] command to complete the recording of a DVD disc. The DVD menu is recorded on the disc at finalization depending on made settings.
Note:
In the event the EJECT button is pressed during the recording stop mode, if the [Operation] → [Control Setting] → [Eject Setting] command on the SETUP section has been set to "Eject," the disc will be ejected without finalizing. In the case of
"Finalize&Eject", if the drive for the EJECT button pressed is the same as the drive selected with the DRIVE SELECT button, a dialog box will appear asking whether you wish to finalize the disc. Discs which have not yet been finalized cannot be played on other DVD players.
![EDIT DVD Disc Finalize Initialize Unfinalize Make Disc Make Image Finalize DVD1 Finalize Back Exit a041127_01 14 MB / 14 MB Press [Finalize] to start process and close the disc. DVD 1 DVD-RW(r)](/content/2026/05/827245/images/10004f20fa66b81abf0449737b3143f4f107642f66875400b10555754dda0771.jpg)
EDIT section → [DVD Disc] → [Finalize]
![ARE you sure ? Finalize Cancel Press [Finalize] to start process and close the disc. DVD 1 DVD-RW(r)](/content/2026/05/827245/images/f0211a450eaf333ddcafeadaefa73602713e4a0951bcd5e2af55645c9b142331.jpg)
Finalize confirmation dialog

Finalize progress bar (appears during finalization)
Recording from HDD to DVD
Following recording of a video program to the hard disk drive, editing of the DVD menu and title can be performed before final recording to DVD disc.
Use the EDIT section → [DVD Disc] → [Make Disc] command to create discs. Use the EDIT section → [DVD Disc] → [Make Disc] → [Target] command to select the drive "DVD1", "DVD2" or "DVD1&2" for recording.
A disc can record a maximum of 4400 MB (approx. 4.3 GB (1GB = 1024 MB). When the total volume of the
selected titles exceed 4400 MB, reduce the number of titles (see "Title Order Edit" on page 65) or reduce clip size (see "Title Trimming" on page 63). The disc cannot be removed until the Make Disc process is completed.
![EDIT DVD Disc Finalize Initialize Unfinalize Make Disc Make Image Target DVD1 DVD2 DVD1&2 Write Back Exit a041121_00 3503 MB / 3524 MB Select one or more devices to record a project on to disc. Press [write] to begin sending material to the device(s). HDD 97.29(G)](/content/2026/05/827245/images/a6ee732d9bd13feda65774535f4082dba82aa5863663c878412bf31e8a407984.jpg)
EDIT section → [DVD Disc] → [Make Disc] → [Target]
Use the EDIT section → [DVD Disc] → [Make Image] command to create image files.
The [Target Image] will display in the initial condition the "project name" + the three-character ".img" extension. If the image file name is changed, the image file name will remain the same even if the project name is subsequently changed. For characters supported in file names see the section "About File Names" on page 94.
Note:
The total post-editing program size must be within the capacity of the DVD disc or recording will not be possible.
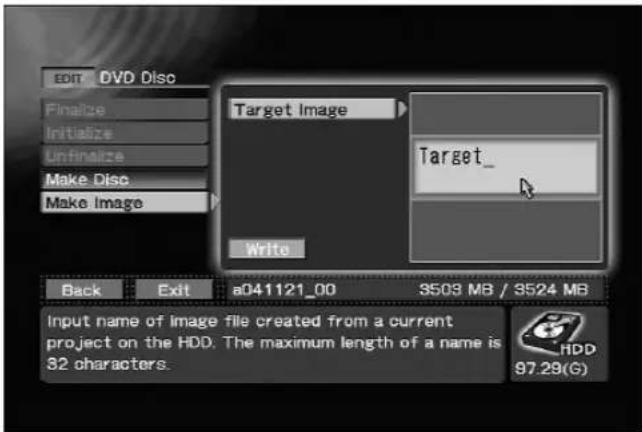
EDIT section → [DVD Disc] → [Make Image]
Note:
When [Finalize], [Make Disc] and [Make Image] commands are executed, a DVD-Video is created with the menu set in DVD Menu.
When playing discs on this unit, the program on a loaded DVD-Video disc, or the clips recorded as a project on the hard disk drive are played back and the video/audio signals output to all output connectors. However, when playing DVD-Video discs equipped with copy-guard copy protection, playback signals will not be output to the DV connector nor to other digital video output connectors.
Selecting Playback Source
The currently selected playback source (also the recording destination) will be displayed on the front panel's central indicator (DVD1, DVD2, HDD indicator). The [Drive] command on the Function Menu's STATUS section also indicates the currently selected recording destination/playback source. Use the front panel's DRIVE SELECT button, or the [Drive] command on the Function Menu's STATUS section to select the recording destination.
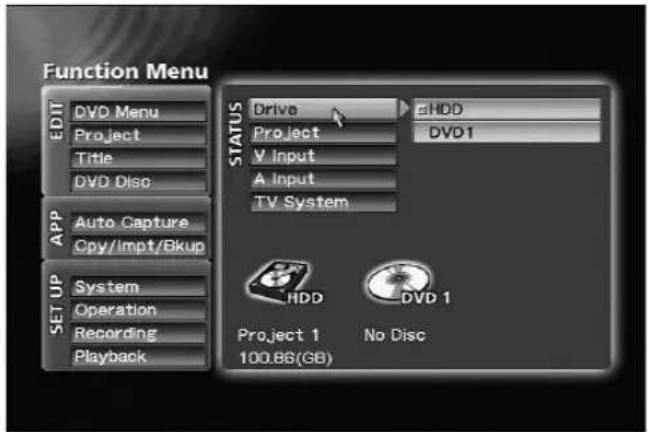
STATUS section → [Drive] (single-DVD-drive model)
Playing DVD-Video Discs (including commercially available software titles)
Begin playback of a DVD disc inserted in the currently selected drive by pressing the PLAY button on the front panel or remote control unit. Stop playback by pressing the STOP button on the front panel or remote control unit.
If a mouse is installed, play can also be controlled from the playback control bar displayed by simultaneously pressing both buttons of the mouse.
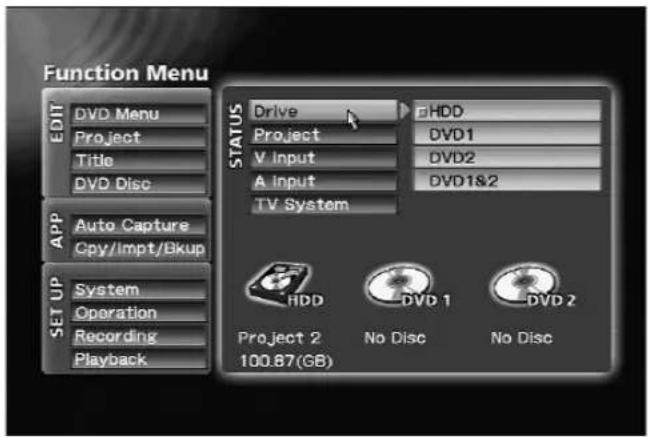
STATUS section → [Drive] (twin-DVD-drive model)
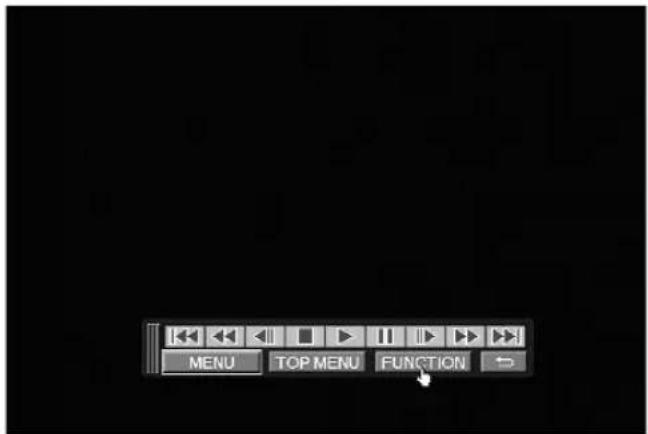
Playback control bar
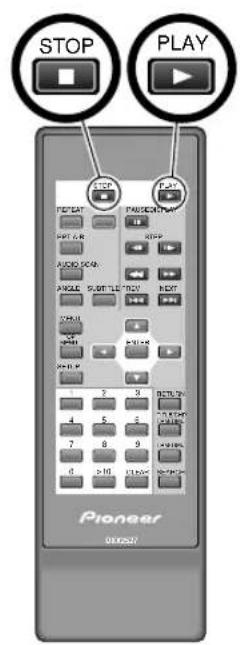
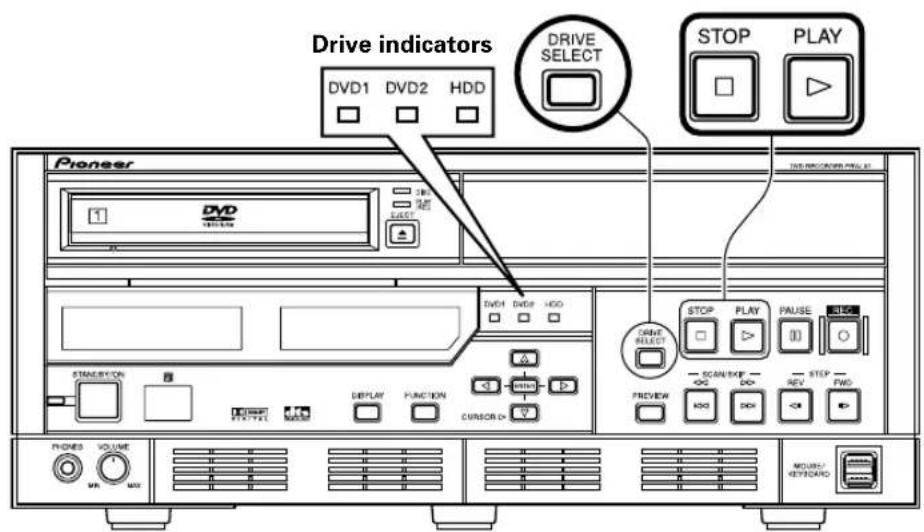
When a DVD disc has been set for fast play, follow the instructions to begin playback automatically upon insertion of the disc. When "DVD1" or "DVD1&2" is designated, "DVD1" is used. To playback discs on drive 2, "DVD2" must be designated as the playback source. During playback, controls on the front panel and remote control unit act to navigate the DVD in accordance with the disc's commands.
The ➕ button performs the same function as the remote control unit's RETURN button.
Clip Playback (HDD)
When the "HDD" is designated as the playback source, the PLAY button on the front panel or remote control unit is used to playback designated project clips in the order in which they were recorded. Press the STOP button on the front panel or remote control unit to end playback.
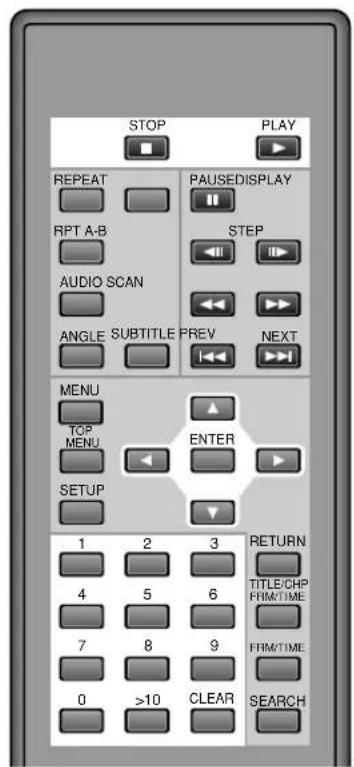
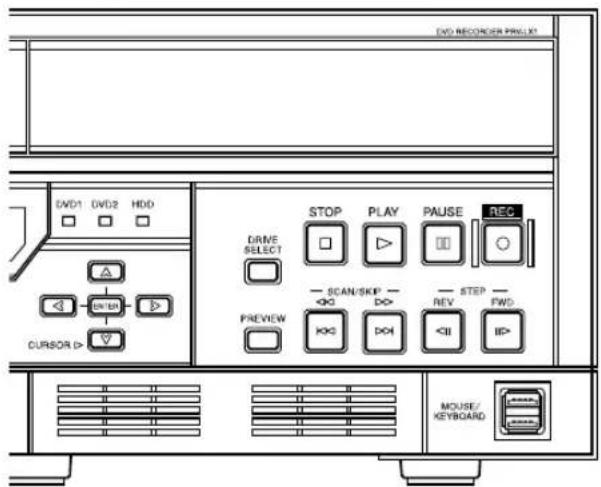
Basic Operations
■Operations on the Menu Screen
Some DVD-Video discs are equipped with menu (selection screen) functions. To select desired titles from the menu, use the PRV-LX1's CURSOR button to select, and the ENTER button to confirm the selection.
■To return to the menu screen during playback Press the ☐ button.
Also, if the □ button is pressed, the menu screen within the current title will appear.
■To advance to the next chapter/title
Press the main unit's SCAN/SKIP FWD button, or the remote control unit's ➕ button; the playback will advance immediately to the beginning of the next chapter or title.
■To go back to previous chapter/title
Press the main unit's SCAN/SKIP REV button, or the remote control unit's 📋 button once to return to the beginning of the currently playing chapter; press additional times to return to the beginning of previous chapters. When multiple titles exist on the disc and this command is executed within the first chapter of title, playback will return to the top chapter of the title immediately preceding the current one.
■Fast Forward
Hold the main unit's SCAN/SKIP FWD button or the remote control unit's 📄 button depressed. Release the button when you find the desired location.
While the button is depressed, the scan speed will increase at set intervals, reaching 192x normal speed. If the remote control unit's SCAN button is pressed and released, fast forward will continue. The scan speed will change depending on the number of times the button is pressed. Speed can be changed up to 96x normal, after which time the speed drops to 6x. When you find the desired location, press the PLAY button.
■Fast Reverse
Hold the main unit's SCAN/SKIP REV button or the remote control unit's 📋 button depressed. Release the button when you find the desired location.
While the button is depressed, the reverse scan speed will increase at set intervals, reaching 192x normal speed. If the remote control unit's button is pressed and released, fast reverse will continue. The scan speed will change depending on the number of times the button is pressed. Speed can be changed up to 96x normal, after which time the speed drops to 6x. When you find the desired location, press the button.
Note:
Depending on the disc used, the actual scan speed may be different from the displayed speed. The speed may be slower particularly when using angle playback.
■ To search for a desired scene (SEARCH function)
[Title Direct Search]
During playback:
-
Press the ☐ button.
-
Use the number buttons to enter the number of the desired title.
Example: to select title "3"
Press number button 3.
Example: to select title "10"
Press number buttons in order.
- Press SEARCH button.
Search can also be initiated by pressing the button.
During Stop Mode:
During stop mode, use the number buttons to perform title search.
Example: to select title "3"
Press number button ☐.
Example: to select title "10"
Press number buttons → 1 → 0 in order.
[Chapter Search]
-
Press □ button twice.
-
Use the number buttons to enter the chapter number.
Example: to select title "3"
Press number button ☐.
Example: to select title "10"
Press number buttons 1 0 in order.
- Press SEARCH button.
Search can also be initiated by pressing the button.
Note:
The search function cannot be used on discs displaying the "Operation Inhibited" message.
[Chapter Direct Search]
During playback, use the number buttons to perform chapter search.
Example: to select title "3"
Press number button □.
Example: to select title "10"
Press number buttons → in order.
Note:
The search function cannot be used on discs displaying the "Operation Inhibited" message.
[Time Search]
-
During playback, press the button. Alternate, press the button three times.
-
Use the number buttons to enter the desired time number.
Example: to designate the frame at 21 min 43 sec 17
Press number buttons: 2 → 1 → 4 → 3 → 1 → 7 in order.
- Press the 📄 button.
The selection can be made also by pressing the PLAY button.
Note 1:
The search function cannot be used on discs displaying the "Operation Inhibited" message.
Note 2:
When performing time search on DVD-video discs, actual playback may begin at a point somewhat separated from the designated time number.
Note 3:
Time search cannot be performed from the stop mode.
Note 4:
Depending on the structure of the DVD-Video used, some errors may occur when time search is performed for time numbers located in a range extending from several frames before to several frames after the divisions between titles and chapters.
■Frame Advance/Still Picture
[View a stopped (still) image]
Press the main unit's PAUSE/STEP FWD button, or the remote control unit's / STEP button.
Note:
The still picture function cannot be used on discs displaying the "Operation Inhibited" message.
[Frame Advance Playback]
Press the 📆 button.
Each time the button is pressed, playback will advance by one frame.
Each time the button is pressed, playback will reverse by one frame.
Note:
The frame advance function cannot be used on discs displaying the "Operation Inhibited" message.
■Slow playback
During normal playback, hold the 🏠 / 🏠 button depressed.
During slow playback, the playback speed can be adjusted by pressing the STEP and STEP buttons.
SLOWER FASTER


STEP3 - STEP1 - 1/16 - 1/8 - 1/4 - 1/2 - 1/1
Note 1:
No sound is produced during slow playback.
Note 2:
The slow playback function cannot be used on discs displaying the "Operation Inhibited" message.
Note 3:
If a still image playback appears shaky, use the
Function Menu's SET UP section → [Playback] →
[Video] → [Still Mode] command to switch to "Field".
Note 4:
1/1 slow playback is not supported on DVD-Video discs.
Note 5:
When performing reverse slow-motion playback with progressive output (NTSC only), the speed cannot be changed.
■Repeat Play
During playback of the chapter/title you wish to repeat, press the ☐ button.
Each time the button is pressed, the unit will alternate between chapter repeat, title repeat, and repeat OFF.
Note 1:
The repeat playback function cannot be used on discs displaying the "Operation Inhibited" message.
[Repeat Playback of a Designated Scene]
At the beginning and end points of the scene you wish to repeat, press the RPTA-B button.
Note 2:
Repeat playback cannot span the borders between titles.
Note 3:
The repeat playback function cannot be used on discs displaying the "Operation Inhibited" message.
[To Return to a Specific Scene]
-
At the point you will wish to return to, press the □ button.
-
Later during playback, when you wish to return to the designated point, press the PLAY button.
To stop repeat playback, press the □ button.
Note:
The repeat playback function cannot be used on discs displaying the "Operation Inhibited" message.
■To change the image angle
During playback of a DVD-Video disc, press the button.
Each time the button is pressed, the image alternates between the available angles. With DVD-Video discs containing multiple recorded angles of view, the angle can be switched as desired during playback.
Such discs are marked by the angle mark (☐) on the jacket.
48
PRV-LX1
En
■To Change the Subtitle Setting During Playback
During playback of a DVD-Video disc, press the button.
Each time the button is pressed, the subtitle display setting alternates between those available.
If multiple language subtitles are recorded on the disc, the subtitle can be selected from among those recorded. Some DVD-Video discs also allow subtitle selection from the disc's onscreen menu. In this case, display the menu by pressing the □ button and select the desired subtitle setting directly from the menu.
When playing a DVD-Video disc, the subtitle setting selected here is temporary. When playback is stopped, the subtitle setting reverts to the default selected using the SET UP section → [Playback] → [Language] → [Subtitle] command.
■To Change Audio During Playback
During playback of a DVD-Video disc, press the audio button.
Each time the button is pressed, the audio alternates between those available.
If multiple language soundtracks have been recorded on the disc, the language can be selected from among those recorded. Some DVD-Video discs also allow language selection from the disc's onscreen menu. In this case, display the menu by pressing the MENU button and select the desired language setting directly from the menu.
When playing a DVD-Video disc, the language setting selected here is temporary. When playback is stopped, the language setting reverts to the default selected using the SET UP section → [Playback] →
[Language] → [Audio] command.
■Operations with a Wheel Mouse
When using a mouse with center wheel control, frame advance, pause, fast forward and fast reverse can be performed.
[Press the Wheel]
The unit will enter standby mode. If the unit is already in the standby mode, standby mode will be released.
[Rotate the Wheel Toward You]
When the wheel is rotated forward during standby mode, the playback will be advanced by individual frames. During other playback modes, fast forward will begin. If the wheel is rotated more, the scan speed can be changed. The speed can be increased to 96x normal, after which time it drops to 6x.
[Rotate the Wheel Away from You]
When the wheel is rotated backwards during standby mode, the playback will be reversed by individual frames. During other playback modes, fast reverse will begin. If the wheel is rotated more, the scan speed can be changed. The speed can be increased to 96x normal, after which time it drops to 6x.
Note:
Depending on the disc used, the actual scan speed may be different from the displayed speed. The speed may be slower particularly when using angle playback.
Playback Monitoring during Recording
If time shift playback is enabled on the Function Menu (SET UP section → [Operation] → [HDD Recording] → [Time Shift PLAY]), the PLAY button responds when recording is being made to the hard disk drive. Pressing the PLAY button allows the user to monitor images recorded immediately before.
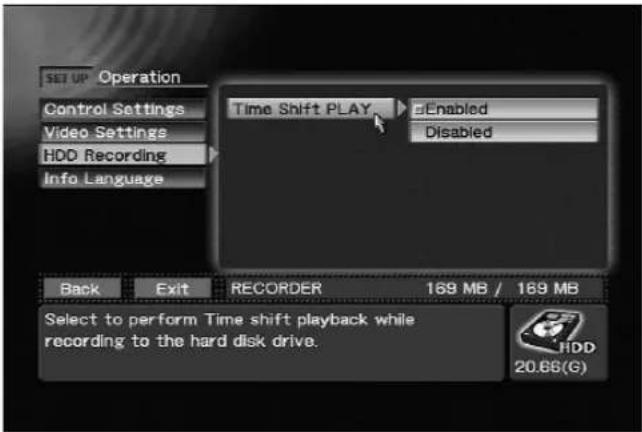
SET UP section → [Operation] → [HDD Recording] → [Time Shift PLAY]
Playback may be started within the range 60-324 seconds after beginning recording (Note 1). Basic operations are enabled during playback of the previously recorded images. The playback start position is the same as the recording start position, and the range of possible playback is within 60-324 seconds prior to the current recording point. During playback monitoring, the REC and PLAY buttons light, and during pause mode, the PAUSE button also lights.
If the STOP button is pressed during playback, playback monitoring stops and the screen display returns to show the point currently being recorded. Press the STOP button again to end the recording as well.
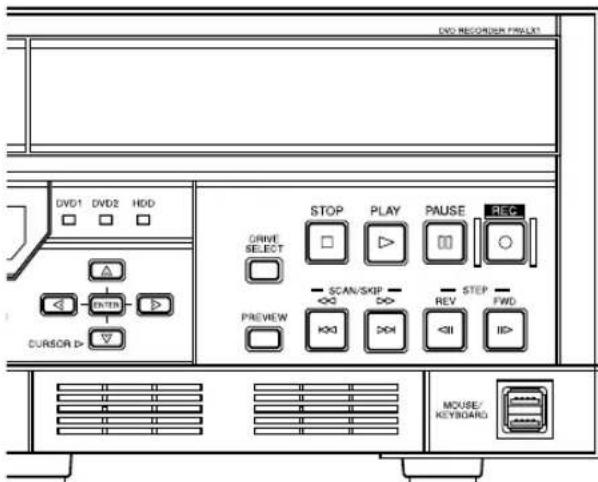
Note 1:
During time shift playback, the PLAY button enable start time will differ depending on the TV system, the video rate and the audio encoding format, as shown in the following table (mm:sec).
| Video RATE level | NTSC | PAL | ||
| Dolby Digital | L-PCM | Dolby Digital | L-PCM | |
| 1 | 5:20 | 2:40 | 5:24 | 2:58 |
| 2 | 5:00 | 2:40 | 5:10 | 2:54 |
| 3 | 4:48 | 2:40 | 4:54 | 2:50 |
| 4 | 4:48 | 2:40 | 4:40 | 2:44 |
| 5 | 4:48 | 2:30 | 4:26 | 2:40 |
| 6 | 4:00 | 2:30 | 4:12 | 2:34 |
| 7 | 4:00 | 2:24 | 3:58 | 2:30 |
| 8 | 4:00 | 2:08 | 3:44 | 2:24 |
| 9 | 4:00 | 2:08 | 3:30 | 2:18 |
| 10 | 3:20 | 2:08 | 3:20 | 2:14 |
| 11 | 3:12 | 2:00 | 3:12 | 2:10 |
| 12 | 3:00 | 2:00 | 3:02 | 2:06 |
| 13 | 3:00 | 1:40 | 2:54 | 2:02 |
| 14 | 2:40 | 1:40 | 2:44 | 1:56 |
| 15 | 2:30 | 1:40 | 2:36 | 1:52 |
| 16 | 2:24 | 1:40 | 2:26 | 1:48 |
| 17 | 2:24 | 1:40 | 2:18 | 1:42 |
| 18 | 2:08 | 1:36 | 2:10 | 1:38 |
| 19 | 2:08 | 1:30 | 2:00 | 1:32 |
| 20 | 2:00 | 1:20 | 1:52 | 1:28 |
| 21 | 1:40 | 1:20 | 1:42 | 1:22 |
| 22 | 1:36 | 1:12 | 1:34 | 1:16 |
| 23 | 1:30 | 1:12 | 1:30 | 1:14 |
| 24 | 1:30 | 1:04 | 1:26 | 1:10 |
| 25 | 1:20 | 1:04 | 1:22 | 1:08 |
| 26 | 1:20 | 1:04 | 1:16 | 1:04 |
| 27 | 1:12 | 1:00 | 1:12 | 1:02 |
| 28 | 1:12 | 1:00 | 1:08 | 1:00 |
| 29 | 1:04 | 1:00 | 1:04 | 1:00 |
| 30 | 1:00 | 1:00 | 1:00 | 1:00 |
| 31 | 1:00 | 1:00 | 1:00 | 1:00 |
| 32 | 1:00 | 1:00 | 1:00 | 1:00 |
Note 2:
The interval required from the time the PLAY button is pressed until playback actually begins is about 10 seconds.
Note 3:
The minimum time shift playback difference is the time shown on the playback start time table plus about 10 seconds.
Other Playback Settings
The Function Menu's SET UP section → [Playback] commands can be used to input default setups for playback on the PRV-LX1. These setup values cannot be changed during playback.
■ Video Aspect Ratio [Video] → [Aspect] 4:3 (LB) / 4:3 (PS) / 16:9
Choose the aspect ratio setting in accordance with your television monitor. This setting is unnecessary when the unit is connected to a wide monitor. Most DVD-Video prerecorded movies are designed for wide televisions, and recorded with screen aspect ratio of 16:9. Accordingly, when DVD-Video discs are viewed on ordinary conventionally sized television monitors, the image will appear vertically elongated in a ratio of 4:3. If this ratio is not desired, use the aspect ratio command to set the ratio to a more pleasing value.
■Still Video Mode [Video] → [Still Mode] Auto / Frame / Field
Use this command to eliminate image shake and produce clearer still images when viewing still images of DVD-Video when progressive scan is turn OFF.
Auto:
Switches automatically between Field and Frame.
Frame:
The normal mode. Some shakiness may be evident when viewing images from scenes with movement.
Field:
Eliminates shakiness from still images.
Note:
When Still video mode is set to Field, menu messages will not appear clearly since only one field of image data is output.
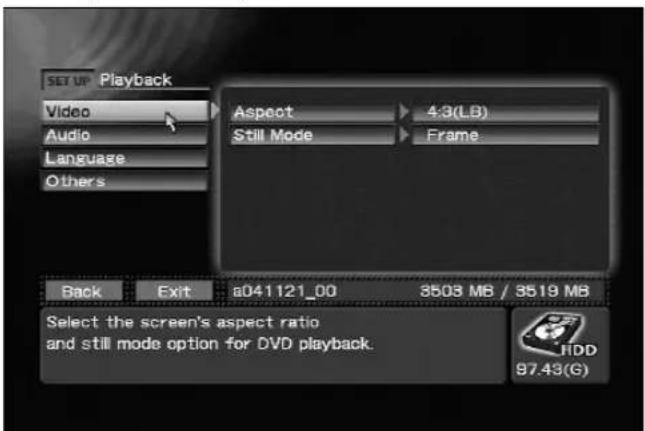
SET UP section → [Playback] → [Video]
■Audio Output Mode [Audio]
Use to select the type of digital signal supported by the amplifier connected to the unit. Be sure to set this correctly since incorrect settings may cause the generation of noise. Consult the Operating Instructions for your amplifier when making this setting.
Dolby Digital OUT
Dolby Digital / Dolby Digital → PCM
Dolby Digital:
Select when connecting an amplifier or decoder supporting Dolby Digital.
Dolby Digital → PCM:
Dolby Digital signals are converted to linear PCM before being output. Select this setting when connecting an amplifier that does not support Dolby Digital.
DTS OUT
ON/OFF
ON:
Select when connecting an amplifier or decoder that supports DTS.
OFF:
Select when connecting an amplifier or decoder that does not support DTS.
96 kHz PCM OUT
96kHz / Convert to 48 kHz
96 kHz:
Select when connecting an amplifier or DAC that supports 96 kHz.
Convert to 48 kHz:
96 kHz signals are down-sampled to 48 kHz and output. Select this setting when connecting an amplifier that does not support 96 kHz.
MPEG OUT
MPEG / PCM
MPEG:
Select when connecting an amplifier or decoder that supports MPEG.
PCM:
MPEG signals are converted to linear PCM for output. Select this setting when connecting an amplifier that does not support MPEG.
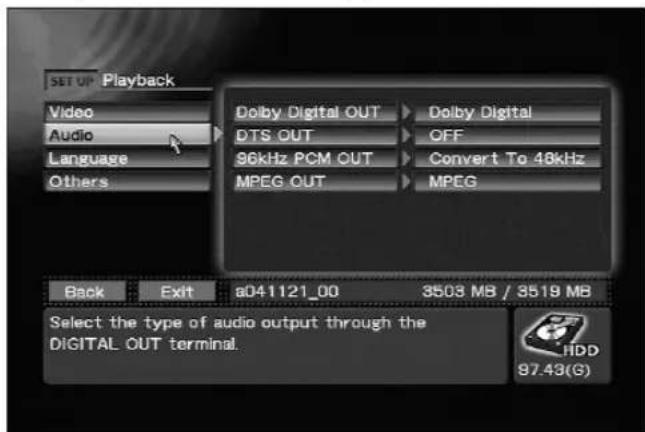
SET UP section → [Playback] → [Audio]
■Audio Language Setting [Language] → [Audio] English / Japanese / Others->Next Menu
Use to set the audio language to English, Japanese, or Other (Note).
■ Sub-Title Selection [Language] → [Subtitle] English / Japanese / Others->Next Menu
Use to set sub-titles to English, Japanese, or Other (Note).
■DVD Menu Language Selection [Language] → [DVD Menu]
English / Japanese / Others->Next Menu
Use to set the DVD-Video menu language to English, Japanese, or Other (Note).
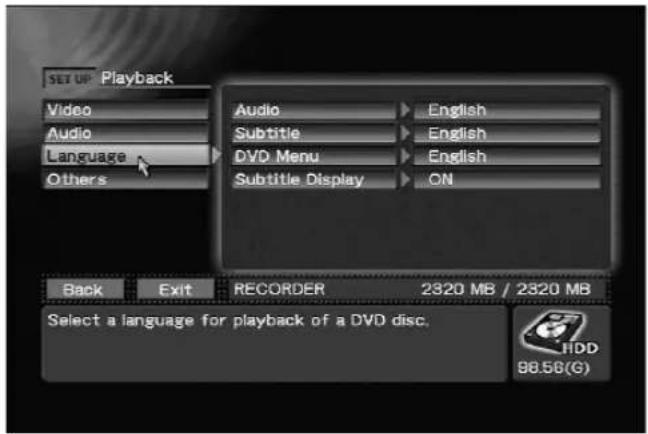
SET UP section → [Playback] → [Language]
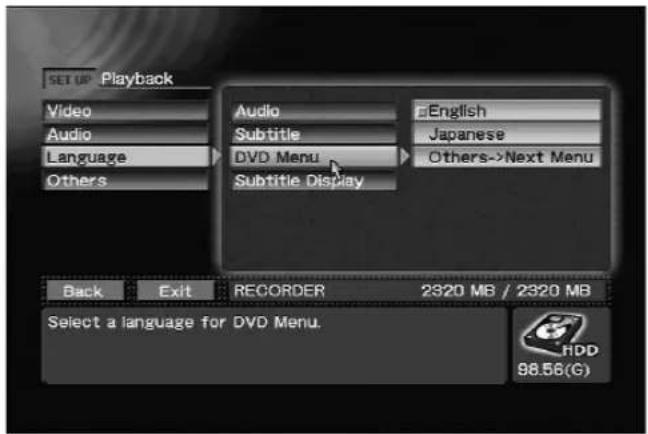
SET UP section → [Playback] → [Language] → [DVD Menu]
Note:
When [Others->Next Menu] is selected as the language, input the code number from the
"Language Code List" on page 99.
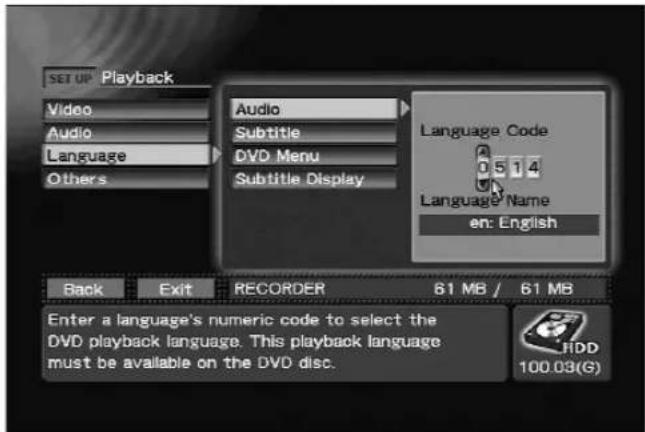
SET UP section → [Playback] → [Language] → Inputting Language Code (Note)
■Subtitle Display
[Language] → [Subtitle Display] ON / OFF
Use to select whether subtitles are displayed or not. However, some discs may require a specified method turning subtitles ON/OFF, in which case the operation performed here may not operate.
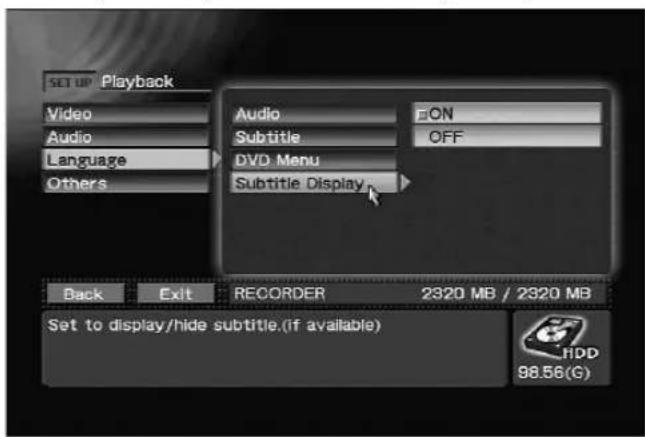
SET UP section → [Playback] → [Language] → [Subtitle Display]
■Parental Management Level [Others] → [Parental Level] 1-8, off
Some prerecorded DVD-Videos with violence or sexual contents are encoded with parental management levels (low-high). Such discs are so indicated on their jackets or labels. By setting the management level on the PRV-LX1 to a value lower than the disc's level, the viewing of such discs can be restricted.
When "off" is selected, playback will be performed without any restriction.
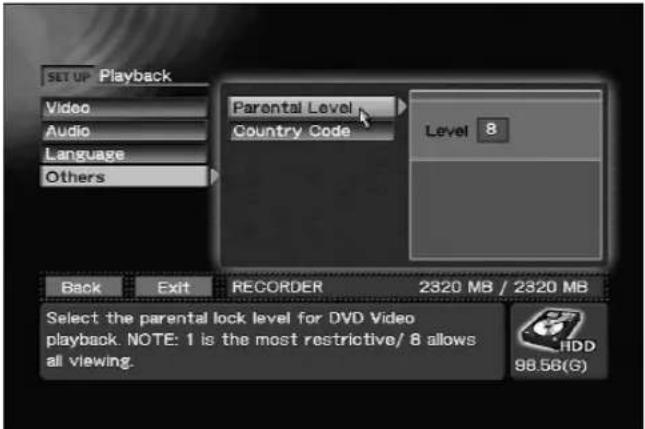
SET UP section → [Playback] → [Others] → [Parental Level]
■Country Code [Other] → [Country Code] us / jp / Others->Next Menu
Use to select the parental management country code. This allows the parental management level to be set separately for different countries.
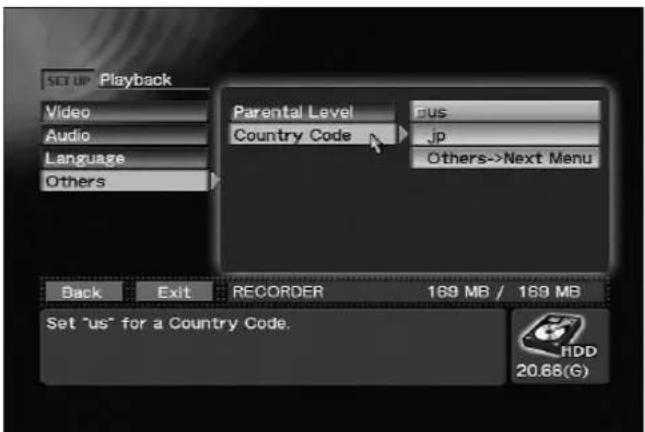
SET UP section → [Playback] → [Others] → [Country Code]
Note: If [Others->Next Menu] is selected for country code, input the country code number manually (see "Country Code List" on page 100).
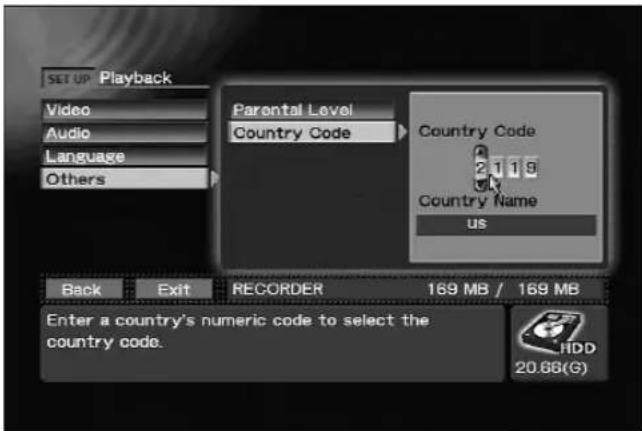
SET UP section → [Playback] → [Others] → [Country Code] → Inputting Country Code
Settings that can be made with the Function Menu's SET UP section → [Operation] → [Video
Settings] command include:
External Sync: Enabled/Disabled
OSD: Enabled/Disabled
Composite OUT: Source Monitor/Decoder Out
Background Color: Black/Blue
DV OUT: Enabled (Note1)/Disabled
For more information regarding settings for composite output, see page 32, "Composite Video/Audio RCA Output".
For more information about TV monitor image selection in the idling condition, see page 32, "Background Color".
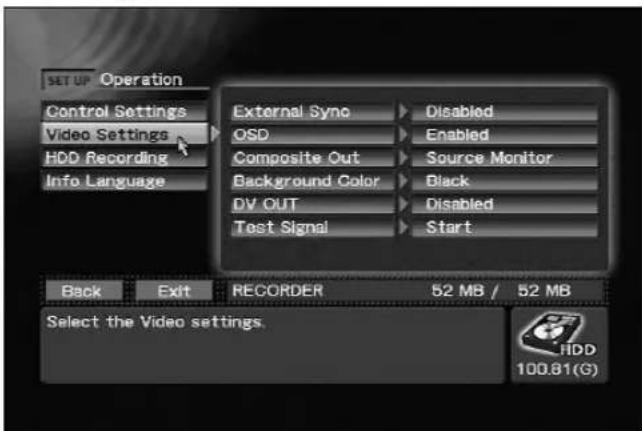
SET UP section → [Operation] → [Video Settings]
Note: During playback, recording, or previewing of DVD discs encoded with copy protection, no output is produced at the DV Out connector, even if DV output is set to "Enabled."
External Sync Function
The PRV-LX1 can use an externally input sync signal (black burst) in order to synchronize the output video signal to an external signal (during DVD disc playback).
This function allows switching of the video without the need for connecting a time base corrector (TBC) component, thus allowing video switching without distortion (V roll) of the TV monitor's image.
When the SET UP section → [Operation] → [Video
Settings] → [DV OUT] command is set to "Enabled", [External Sync] is automatically set to "Disabled". Thereafter, even if [DV OUT] is returned to the "Disabled" setting, external sync will remain off, so manual resetting is required.
When synchronizing two or more recorders
- When inputting sync signal from one sync generator to two or more recorders:
- Be sure to set the final recorder's termination switch to ON, and the other recorders' termination switches to OFF.
- When applying sync to a single recorder, set the termination switch to ON.
Other Functions
The Function Menu's SET UP section → [Operation] → [Video Settings] → [Test Signal] command can be used to output a test pattern signal. To turn off the test pattern, press the STOP button or the FUNCTION button, or if a mouse is connected, click both right and left buttons simultaneously.
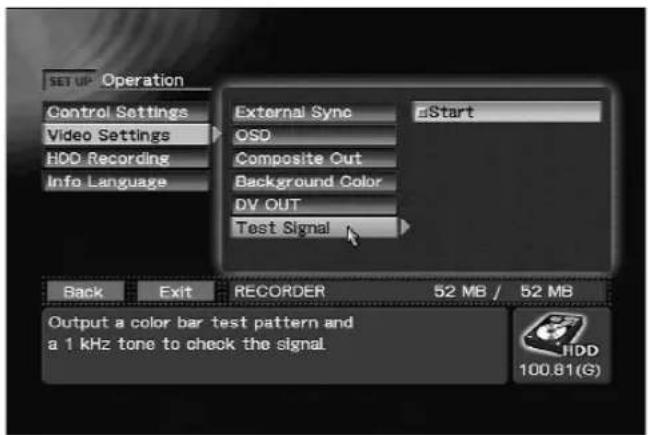
SET UP section → [Operation] → [Video Settings] → [Test Signal]
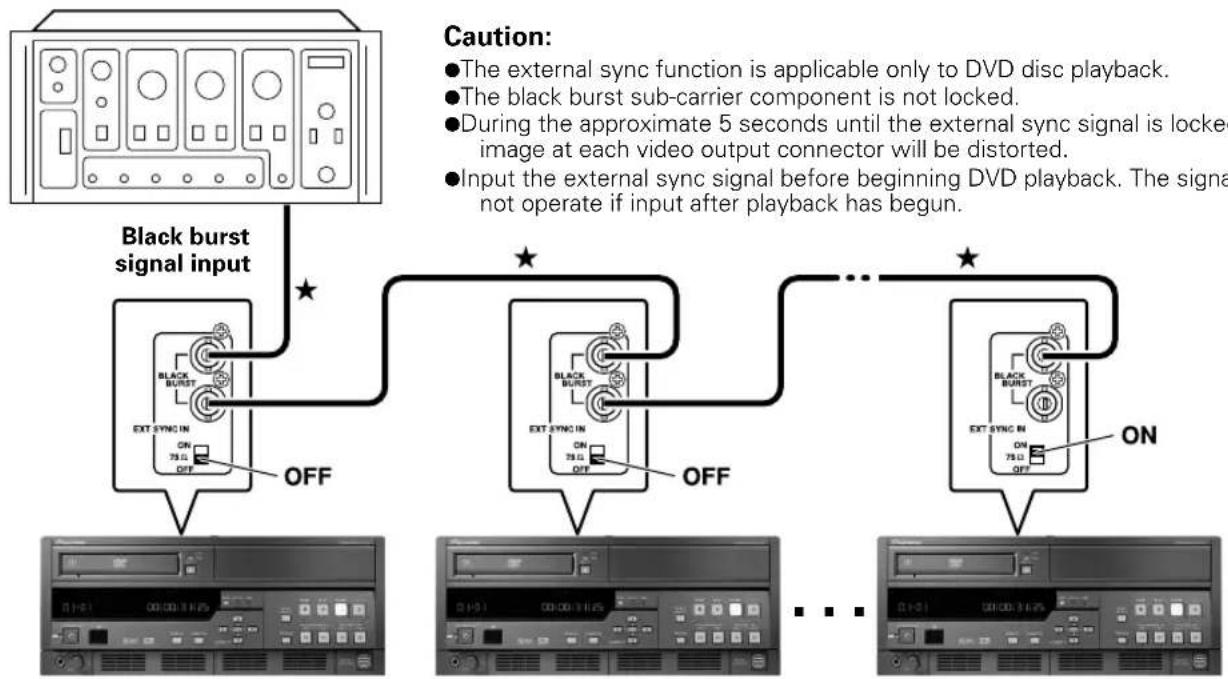
flowchart
graph TD
    A["Black burst signal input"] --> B["Black Burst In"]
    B --> C{OFF}
    C --> D["Video Output Connector"]
    D --> E{ON}
    E --> F["Video Output Connector"]
    F --> G{ON}
    G --> H["Video Output Connector"]
    H --> I{ON}
    I --> J["Video Output Connector"]
    J --> K["Output"]
First unit Final UnitSecond Unit
Connection cables indicated with (★) must be purchased separately.
Regarding Progressive Scan Output
This unit allows the output of progressive scan video signals from the component output connector. To turn progressive scan output ON/OFF, press the controls on the front panel:

Press these buttons simultaneously.
Note 1:
Switching is only possible during idling.
Note 2:
Be sure the unit is connected to a television monitor supporting progressive-scan. Proper image reproduction will not be produced with other monitors.
Note 3:
When progressive output is ON, image signals will not be produced from output connectors other than the component output connector.
Note 4:
Some progressive scan monitors currently available do not possess complete compatibility with the PRV-LX1, with the result that some image distortion may occur. If such distortion is observed during progressive scan playback, set the PRV-LX1's output to interlaced.
Note 5:
Progressive is supported during NTSC output only.
This unit is equipped with a number of DVD menu layouts that are selected with the Function Menu's EDIT section → [DVD Menu] command, and associated with a recorded image for convenient production of DVD-Video discs.
The constructed menu will be the same TV system (NTSC or PAL) as that currently selected. Opening clip and idle clip can be set only for HDD projects. A total of 1GB (about 10 minutes at highest rate) can be set. However, even if the same clip is selected, the total will be computed as separate clips. The DVD menu data set here is reflected in [Make Disc], [Make Image] and [Finalize] command.
Also, by using the save to default menu and read commands, the menu data for the currently selected project can be saved to the default DVD menu, or read from the default DVD menu.
The default DVD menu is always used for new projects. A standard menu can be registered as the default DVD menu for efficient production of DVD discs without having to edit menus each time. The preview and disc emulation functions can be used to confirm the contents before burning a DVD disc. Also, if the playback mode is field playback, output will be for one field only, and menu characters may not appear correctly.
DVD Menu Type Selection
Use the Function Menu's EDIT section → [DVD Menu] → [Menu Type/Font] → [Menu Type] command to select whether to make the DVD menu a title menu, chapter menu, to add no menu or a title & chapter menu.
Regarding the title and chapter menus: when a title is selected on the title menu, that title's chapter menu will be displayed. In this case, depending on the design, a button may be added to the chapter menu for direct access to the title menu. However, if only one chapter exists within the title, no chapter menu will be created.
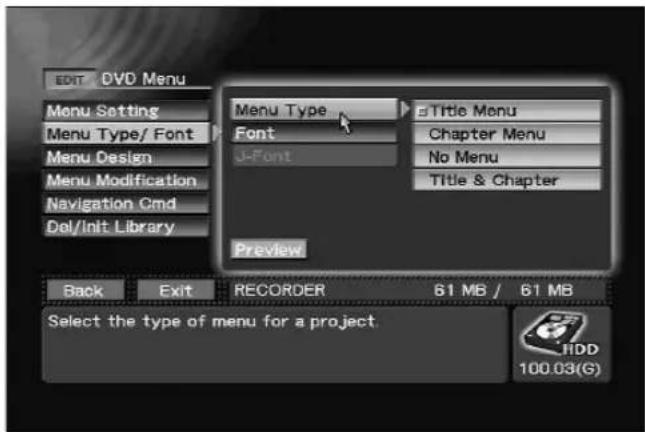
EDIT section → [DVD Menu] → [Menu Type/Font] → [Menu Type]
Font Selection
Use the Function Menu's EDIT section → [DVD Menu] → Menu Type/Font] → [Font] and [J-Font] commands to select fonts for DVD menus.
Fonts specified by the [Font] command are used for text that contains only English text. Fonts specified by the [J-Font] command are used for Japanese text or text that contains both Japanese and English text.
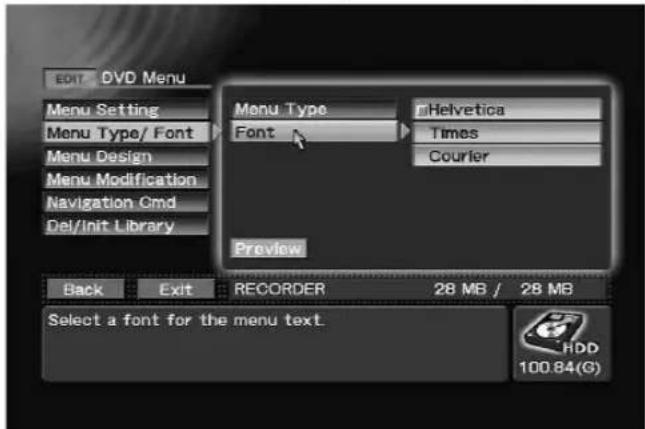
EDIT section → [DVD Menu] → [Menu Type/Font] → [Font]
Note: Use the SET UP section → [Operation] → GUI Control] → [Language] command to select "Japanese" for entering Japanese text.
DVD Menu Selection
When editing a menu, first use the Function Menu's EDIT section → [DVD Menu] → [Menu Design] → [Design Select] command to choose a basic button layout pattern from the DVD menu layout displayed on the screen. Use the ▲/▼ buttons to select the layout pattern type, the ▶ button to change the number of buttons, and the ENTER button or the ◀ button to confirm the selection. The number and type of buttons which can be placed on a single page may vary, depending on the layout patterns available. Also, the following information is displayed in the window at the bottom of the screen: DVD Menu's disc name status OFF and maximum characters; thumbnails status; and button text status and maximum characters.
![EDIT DVD Menu Menu Setting Menu Type/ Font Menu Design Menu Modification Navigation Cmd Del/Init Library Design Select Thumbnail Button Text Preview Back Exit RECORDER 61 MB / 61 MB Select a button layout for the menu. Navigate up, down and right to view possible layouts. Press [Enter] to select a layout. HDD 100.03(G)](/content/2026/05/827245/images/3bd34a3a80e3fad41d734cd228a98e9e448635a28654cb6188e7021be07b6754.jpg)
EDIT section → [DVD Menu] → [Menu Design] → [Design Select]
Thumbnail Selection
When the thumbnail type item is selected, the initial image of the title (clip) corresponding to each button is automatically extracted, but when the recording has already been made, the Function Menu's EDIT section → [DVD Menu] → [Menu Design] → [Thumbnail] command can be used to extract the actual recorded image.
When "Go To Video" is selected, the thumbnail extraction screen appears and the clips are played back in the order in which they were recorded. While watching the clip/chapter numbers displayed at the top of the screen, use the mouse to click on the on-screen control bar's SELECT button or press the ENTER button at the place you wish to use as a thumbnail.
To allocate the selected image as a thumbnail to a corresponding button, press the control bar's SAVE button. If the CANCEL button is pressed, the image is deselected and the screen returns to the Function Menu.
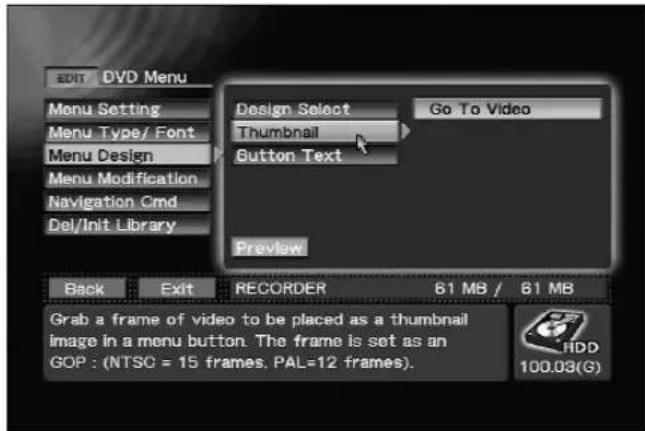
EDIT section → [DVD Menu] → [Menu Design] → [Thumbnail]
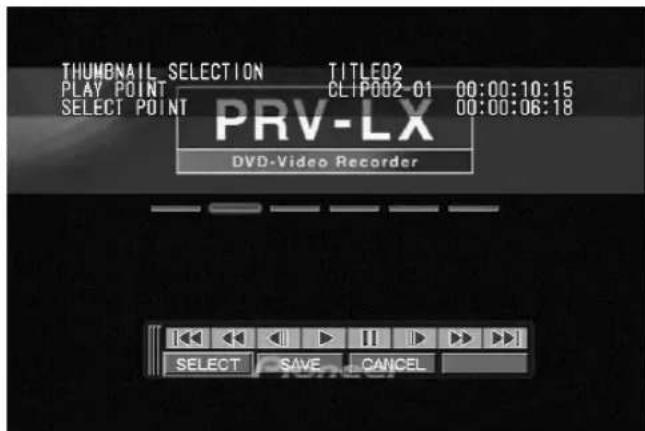
Thumbnail extraction screen
Button Text
When button text is selected, use the EDIT section → [DVD Menu] → [Menu Design] → [Button Text] command to select the format from the following choices:
Title (chapter) Number/Name
Title (chapter) Number
Title (chapter) Name
No text
When name is selected, the name of the clip (chapter) allocated to each title will be applied. The name can be changed during title editing (see page 62, "Title Editing / Chapter Editing").
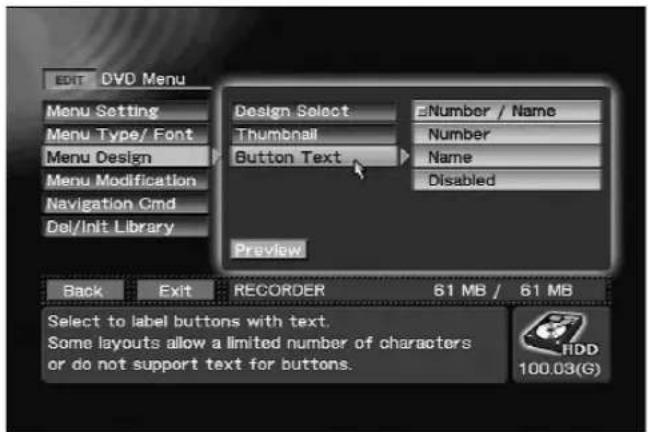
EDIT section → [DVD Menu] → [Menu Design] → [Button Text]
Selecting Opening Clip
Using the [DVD Menu] → [Navigation Cmd] → [Introduction Clip] command on the Function Menu's EDIT section, you can select the first clip to be played when a disc is inserted. Also, on the [User Operation] command, you can select operation restrictions during playback; if "Disabled" is selected, all operations during playback of the opening clip are disabled. If "Enabled" is selected, the ENTER key is enabled. The actual operation performed when the ENTER key is pressed during playback of the opening clip can be selected with the [Post Cmd] command.
Note 1:
The opening clip must be set to the same TV system as that on the menu.
Note 2:
The type of audio must be the same for both opening clip and idle clip.
Note 3:
An opening clip can be set only for HDD projects.
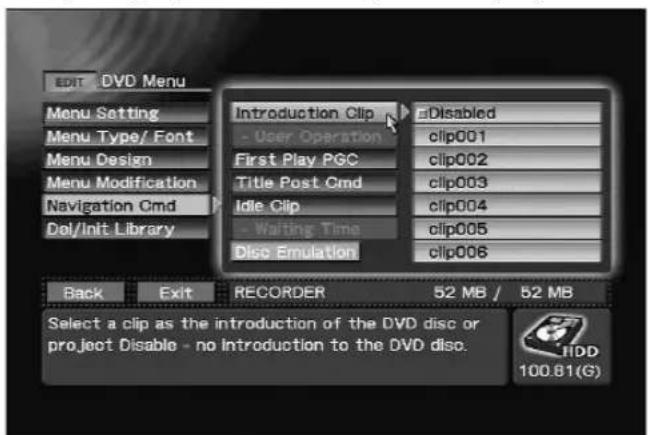
EDIT section → [DVD Menu] → [Navigation Cmd] → [Introduction Clip]
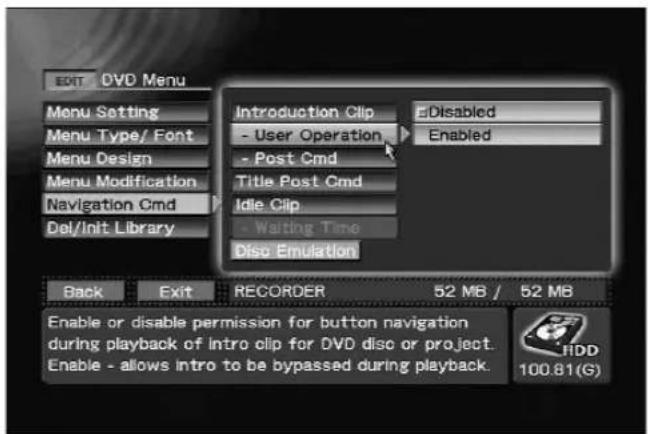
EDIT section → [DVD Menu] → [Navigation Cmd] → [User Operation]
Setting an Idle Clip
An idle clip (a clip played automatically after a specified waiting time from the menu display mode) can be set by using the [DVD Menu] → [Navigation Cmd] → [Idle Clip] command on the EDIT section of the Function Menu.
The clip is played repeatedly until the ENTER key is pressed to return to the menu display. The waiting time can be set with the [Waiting Time] command.
Note 1:
The idle clip must be set to the same TV system as that on the menu.
Note 2:
The type of audio must be the same for both idle clip and opening clip.
Note 3:
An opening clip can be set only for HDD projects.
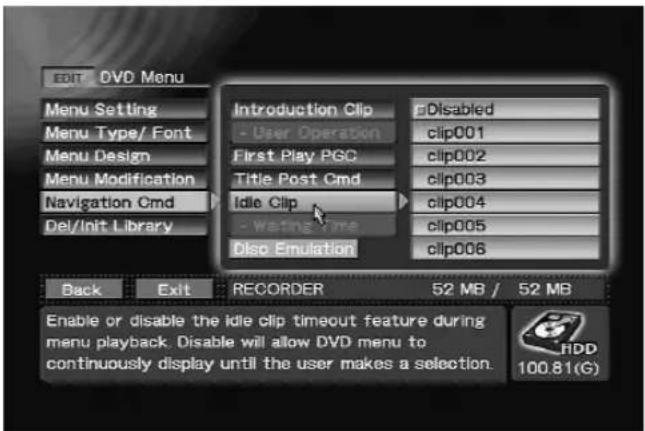
EDIT section → [DVD Menu] → [Navigation Cmd] → [Idle Clip]
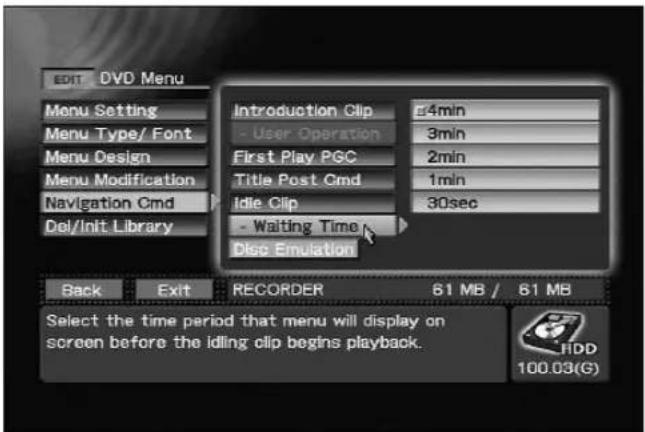
EDIT section → [DVD Menu] → [Navigation Cmd] → [Waiting Time]
Setting Navigation Commands
Using the [DVD Menu] → [Navigation Cmd] → [First Play PGC] command on the Function Menu's EDIT section, you can set the first play setting for a DVD-Video disc (when opening clip is set, whether opening post command is set to "Stop", "Title" or "Menu").
58
PRV-LX1
En
This item is reflected to [Make Disc], [Make Image] and [Finalize] command regardless of "No Menu" on DVD menu type selection.
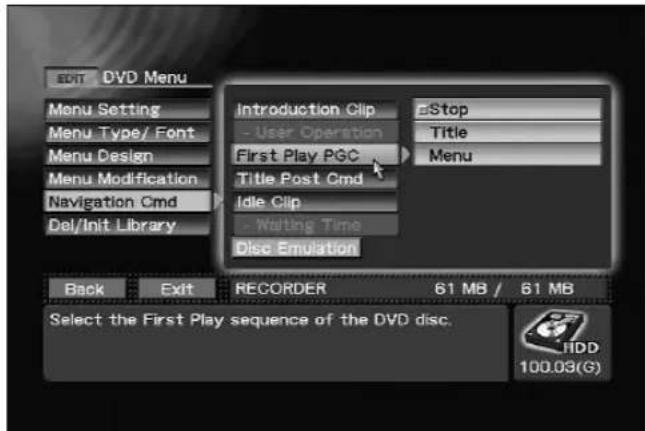
EDIT section → [DVD Menu] → [Navigation Cmd] → [First Play PGC]

EDIT section → [DVD Menu] → [Navigation Cmd] → [Post Cmd]
Also, the EDIT section → [DVD Menu] → [Navigation Cmd] → [Title Post Cmd] command can be used to control the action taken upon completion of each title's playback, including stop, return to menu, next title or repeat title.
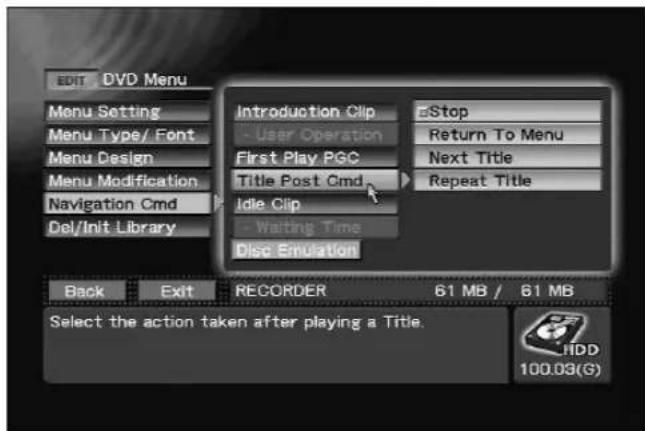
EDIT section → [DVD Menu] → [Navigation Cmd] → [Title Post Cmd]
Customizing the DVD Menu
Using the Function Menu's EDIT section → [DVD Menu] → [Menu Modification] command, it is possible to change the background image and highlight colors of the DVD menu currently being edited. With this unit, a number of background images are used, and when the EDIT section → [DVD Menu] → [Menu Modification] → [Background] command is used to select "HDD Library", the EDIT section → [DVD Menu] → [Menu Modification] → [Image] command can be used to select a background image (this operation is performed in the same way as for button layout pattern).
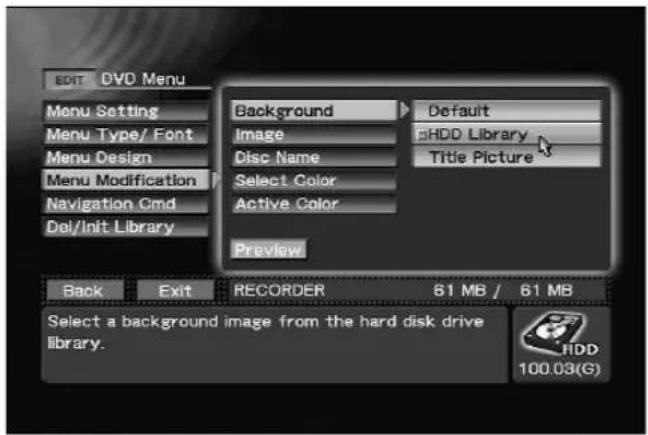
Using EDIT section → [DVD Menu] → [Menu Modification] → [Background] to select HDD Library
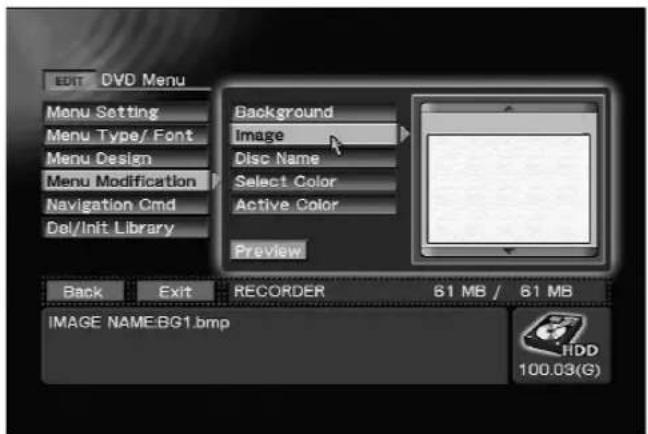
EDIT section → [DVD Menu] → [Menu Modification] → [Image]
Likewise, when the EDIT section → [DVD Menu] → [Menu Modification] → [Background] command is used to select "Title Picture", the first image of the first title (clip) is automatically extracted. When a previously recorded image is used, however, the EDIT section → [DVD Menu] → [Menu Modification] → [Image] command can be used to extract a background image from the actual recording (the procedure is the same as that for extracting thumbnail images). Note that the button
layout remains the same even when the background image is changed.
Note:
The color of characters for titles and other items used on menus are fixed for each design style. As a result, if the background image is changed, foreground characters may become difficult to see onscreen. Likewise, choice of design may make menu buttons invisible or difficult to see. Use the preview or disc emulation functions to confirm the appearance.
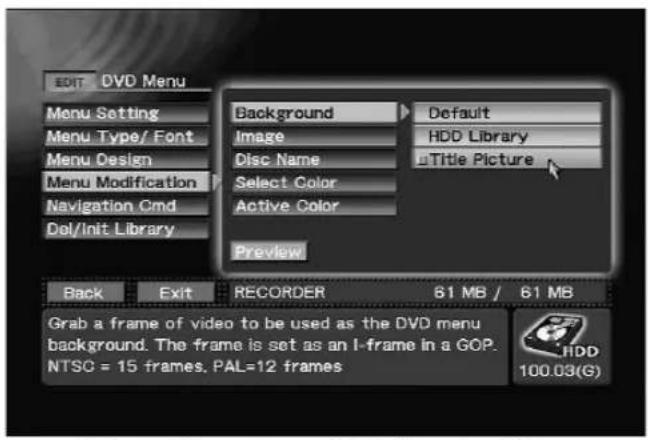
Using EDIT section → [DVD Menu] → [Menu Modification] → [Background] to select Title Picture

EDIT section → [DVD Menu] → [Menu Modification] → [Image]
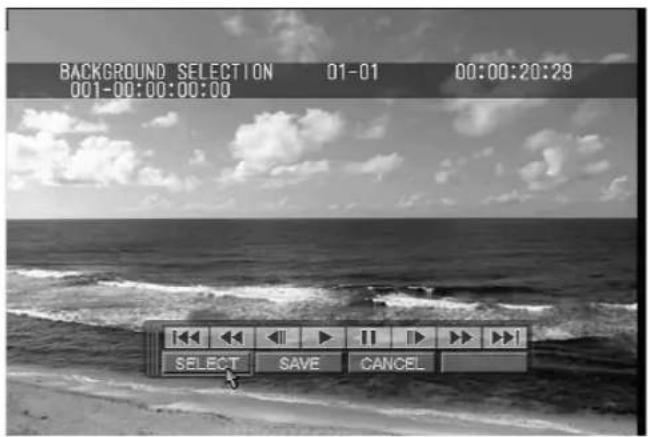
Background image extraction screen
The EDIT section → [DVD Menu] → [Menu
Modification] → [Disc Name] command can be used to insert a name (up to 32 characters long) into the DVD menu. The actual number of characters that can be embedded in the menu will differ depending on the menu design. Further, depending on design, excessive characters may drop out when too many are embedded. Be sure to use the preview function or the disc emulation to confirm the menu appearance.
Note:
To input characters, connect a keyboard to the MOUSE/KEYBOARD USB jack.
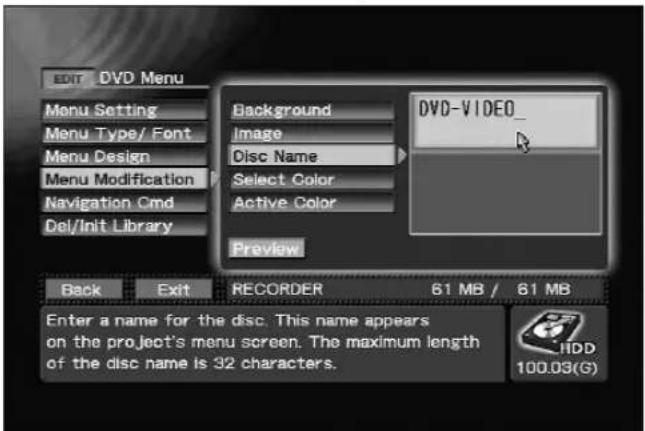
EDIT section → [DVD Menu] → [Menu Modification] → [Disc Name]
The EDIT section → [DVD Menu] → [Menu
Modification] → [Select Color] command allows you to change the display color that appears when each button is selected.

EDIT section → [DVD Menu] → [Menu Modification] → [Select Color]
The EDIT section → [DVD Menu] → [Menu
Modification] → [Active Color] command allows you to change the display color that appears when each button is finalized.

EDIT section → [DVD Menu] → [Menu Modification] → [Active Color]
Deleting and Initializing Menu Library
Use the EDIT section → [DVD Menu] → [Del/Init Library] command to delete menu layouts and background images that are no longer needed from the libraries. The Initialize command resets the menu layout and background images in respective library to their factory defaults regardless of [Type] or [Design Select] settings.
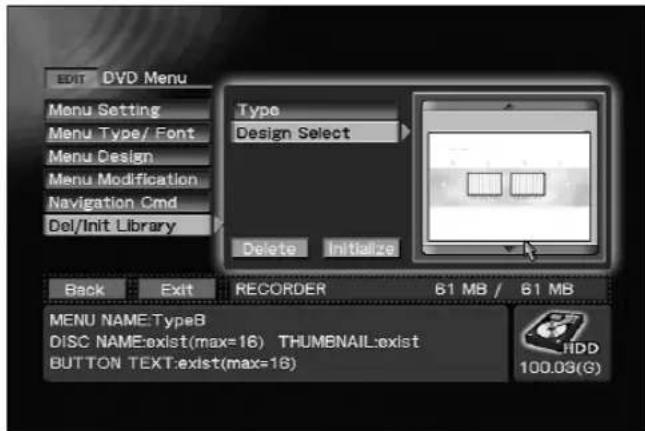
EDIT section → [DVD Menu] → [Del/Init Library]
Note:
The [Delete] command cannot be used to delete menu layouts and background images set using the default menu. But, the [Initialize] command resets default menus to their factory defaults and deletes all imported data.
DVD Menu Preview
With the Function Menu's EDIT section → [DVD Menu] command displayed, press the Preview button to display the DVD menu currently being edited. If no recorded image exists corresponding to a button on the DVD menu, no thumbnail will be extracted for that button, and it will instead appear with the default background image.
During preview display of the DVD menu, the
CURSOR buttons can be used to move the button highlights. Highlights can also be moved by using the mouse cursor. If multiple menu levels exist, use the mouse to click on the Next/Preview button, or else use the SKIP FWD/REV button to switch between the various menus. If a mouse is connected, clicking the right/left buttons simultaneously enables the displayed control bar. Press the FUNCTION button to end the preview and return to the Function Menu.
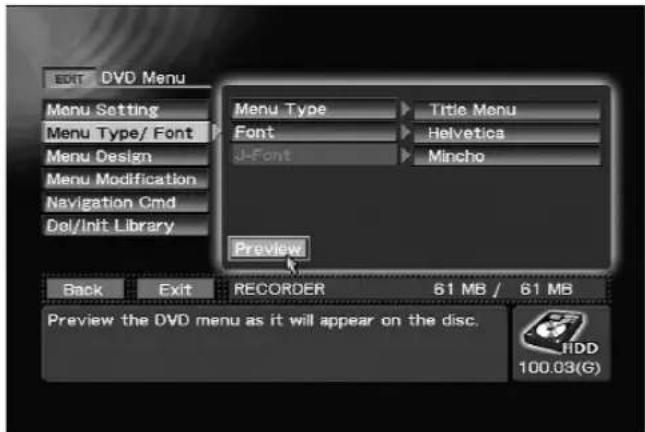
Executing Preview command on EDIT section → [DVD Menu]
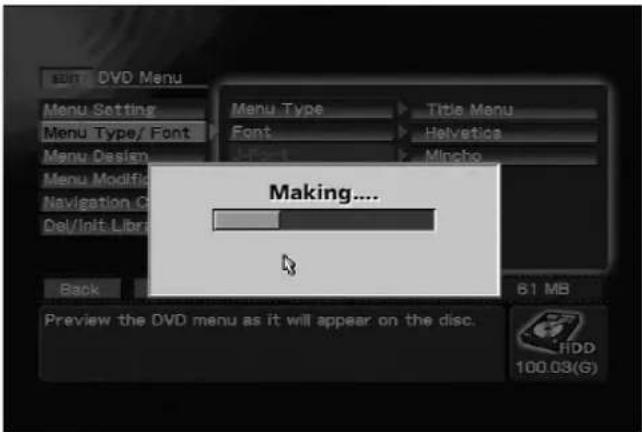
Progress bar during preview display
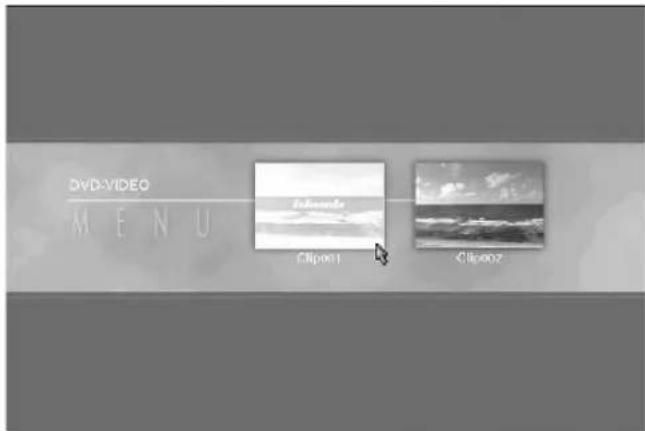
DVD menu preview image
DVD Disc Emulation
Performs same playback as DVD disc, with DVD menu, title and all other editing results added.
![EDIT DVD Menu Menu Setting Menu Type/ Font Menu Design Menu Modification Navigation Cmd Del/Init Library Introduction Clip Disabled - User Operation Disabled First Play PGC Stop Title Post Cmd Stop Idle Clip Disabled - Writing Time 4min Disc Emulation Back Exit RECORDER 169 MB / 169 MB Press [Disc Emulation] to start disc simulation of the project. HDD 20.66(G)](/content/2026/05/827245/images/244cdc903b2736b7f9e9cde0e5e95cda35d67c13bcb4137ee6087481d4ef788c.jpg)
Executing Disc Emulation command on EDIT section → [DVD Menu]→ [Navigation Cmd]
Load / Save to Default Menu
When the Load button is pressed from the EDIT section's [DVD Menu] → [Menu Setting] command, the menu data is loaded from the default DVD menu to the currently selected project. Pressing the Save button causes menu data to be saved to the default DVD menu.
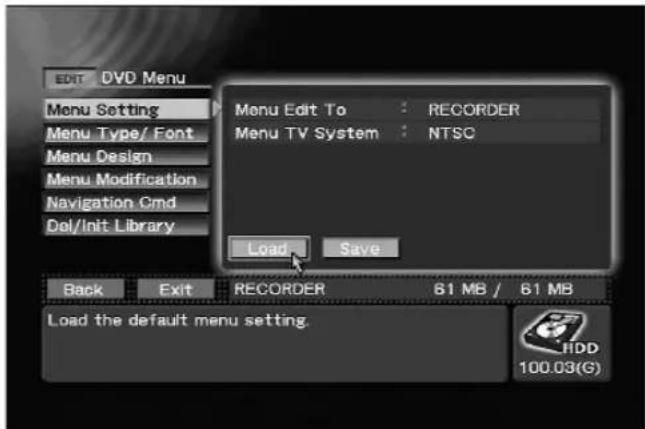
Executing Load command on EDIT section → [DVD Menu]→ [Menu Setting]
Title Editing / Chapter Editing
When recording to hard disk drive, the names given to the multiple recorded image data (clips) can be changed. Other editing processes supported include trimming, chapter editing, clip dividing, and title order editing. DVD disc emulation can also be performed in order to confirm editing results.
The name, size and time of a clip selected with the
Function Menu's EDIT section → [Title] → [Target Clip] → [Edit to (HDD)] command can be confirmed by using the EDIT section → [Title] → [Info/Rename/
Del] command. In addition to changing the name of a clip, the Delete button can also be used to eliminate the clip if desired.
The clip name input here is reflected in the various button text when the DVD menu type is made the title menu. The actual number of characters that can be embedded in the menu will differ depending on the menu design. Further, depending on design, excessive characters may drop out when too many are embedded. Be sure to use the preview function to confirm the menu appearance.
Note 1:
To change clip names, connect a keyboard to the MOUSE/KEYBOARD USB jack.
Note 2:
The clip name can contain up to 32 one-byte characters.
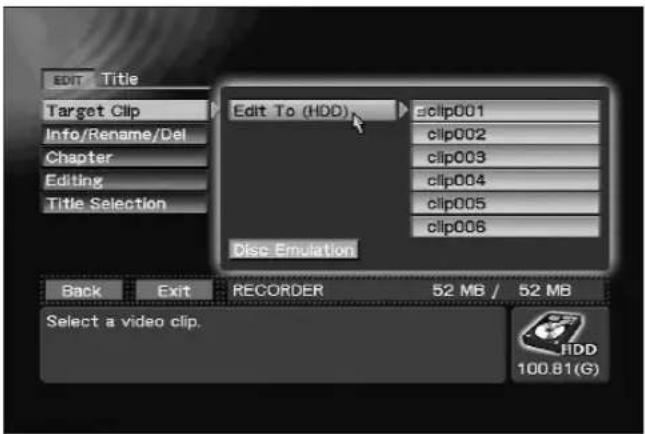
EDIT section → [Title] → [Target Clip] → [Edit To (HDD)]
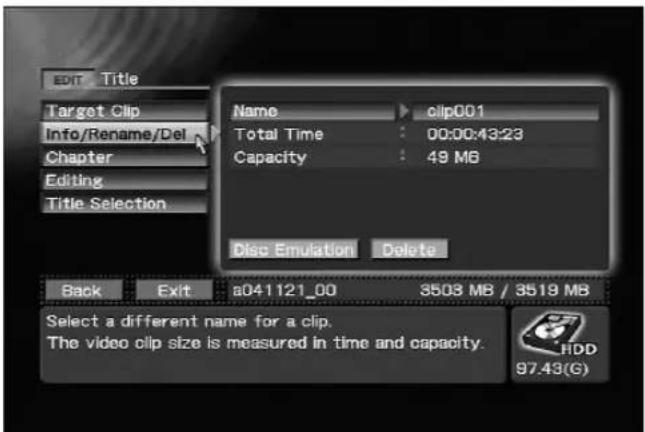
EDIT section → [Title] → [Info/Rename/Del]
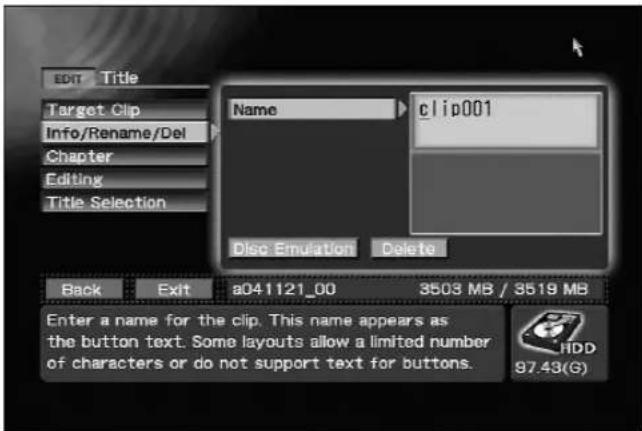
Changing the selected clip's name on EDIT section → [Title] → [Info/Rename] → [Name]
Editing Chapter Names
Individual names can be assigned to chapters existing within the clips selected with the EDIT section → [Title] → [Target Clip] → [Edit To (HDD)] command. When the EDIT section → [Title] → [Chapter] command is used to move to the chapter whose name you wish to change, character input is enabled. The chapter names input here are reflected in the various button text when the DVD menu type is made the chapter menu.
By default, no name is set. Also, when no name is set, standard designations such as "chapter 1" are automatically reflected in the button text. The actual number of characters that can be embedded in the menu will differ depending on the menu design. Further, depending on design, excessive characters may drop out when too many are embedded. Be sure to use the preview function to confirm the menu appearance.
Note 1:
To change chapter names, connect a keyboard to the MOUSE/KEYBOARD USB jack.
Note 2:
The chapter name can contain up to 32 one-byte characters.

EDIT section → [Title] → [Chapter]
Title Trimming
When you wish to cut out the first or last part of a clip, or to extract the middle part of a clip, use the Function Menu's EDIT section → [Title] → [Target Clip] command to select the clip you wish to edit, then use the EDIT section's [Title] → [Editing] → [Trimming Clip] command to select "Go To Video".
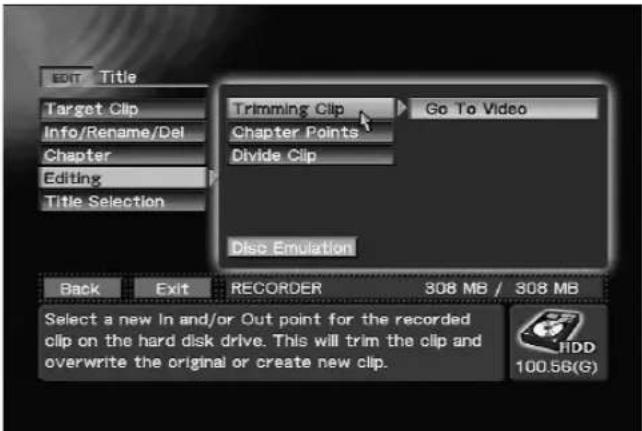
EDIT section → [Title] → [Editing] → [Trimming Clip]
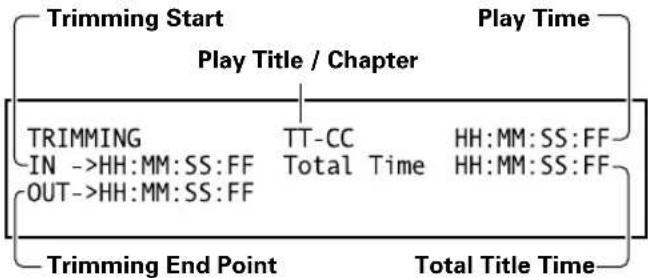
flowchart
graph TD
    A["Trimming Start"] --> B["Play Title / Chapter"]
    B --> C["Play Time"]
    C --> D["Trimming End Point"]
    D --> E["Total Title Time"]
    style A fill:#f9f,stroke:#333
    style B fill:#ccf,stroke:#333
    style C fill:#cfc,stroke:#333
    style D fill:#fcc,stroke:#333
    note1["TRIMMING IN ->HH:MM:SS:FF OUT->HH:MM:SS:FF"] --> A
    note2["TT-CC Total Time"] --> B
    note3["HH:MM:SS:FF HH:MM:SS:FF"] --> C
OSD during Trimming
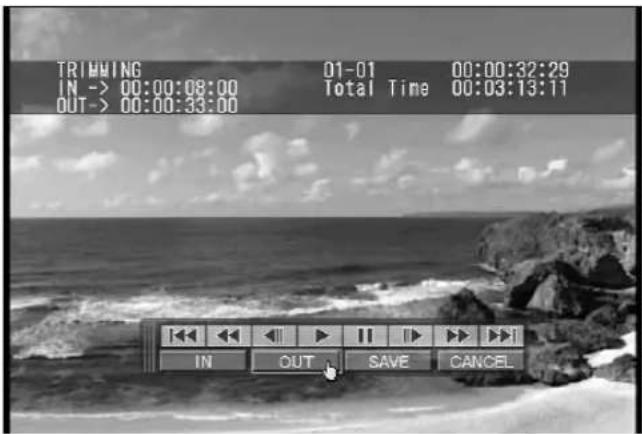
Trimming edit screen
The control bar displayed in conjunction with the clip's playback can be used to designate IN/OUT points for parts to be deleted. During playback, when the control bar's IN button is pressed, that part of the clip preceding that point will be memorized as a cut point.
Similarly, pressing the OUT button will result in memorization of that portion of the video image following that point as a cut point. Attempts to input reversed IN/OUT points will be ignored.
Pressing the SAVE button will initiate trimming edit, and when completed, the screen will return to the Function Menu. Pressing the CANCEL button will cause the screen to return to the Function Menu without completing the edit.
Note 1:
IN/OUT points can be set only at the beginning of a group of pictures (GOP; in 15 frame units (NTSC), 12 frame units (PAL)).
Trimming edit allows you to save the edited result either to the original clip or to a new clip. The size of a new clip that can be selected for trimming is limited by hard disk size. When saving by overwriting previous files, clips up to "4.7GB + HDD available space" can be created.
The symbol “+” is prefixed to the clip name when saved to a new clip. If, as a result of affixing the “+”, the clip name exceeds 32 single-byte characters, the final character of the name will automatically be deleted so as to keep the name within the 32-character limit.
If the pre-edit clip was saved as a title, the post-edit clip will be entered as the title instead. If the pre-edit clip was not saved as a title, the post-edit clip will not be saved as a title.
If required, add a title as described in "Title Order Edit" on page 65.
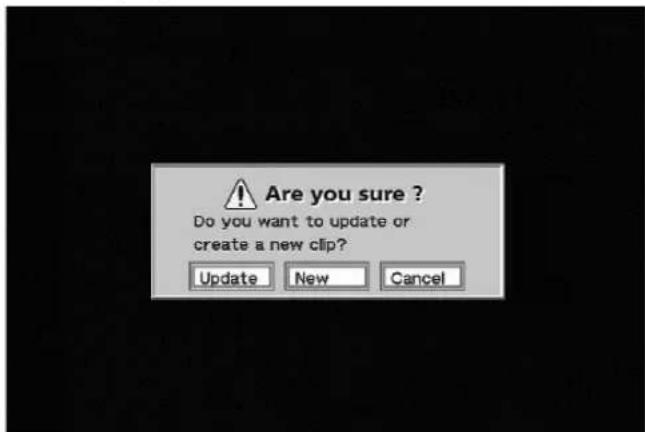
Trimming edit confirmation dialog
Chapter Editing
Select a clip edited with the Function Menu's EDIT section → [Title] → [Target Clip] command; by selecting "Go To Video" on the the EDIT section → [Title] → [Editing] → [Chapter Points] command, the selected clip's chapter mark position can be changed.
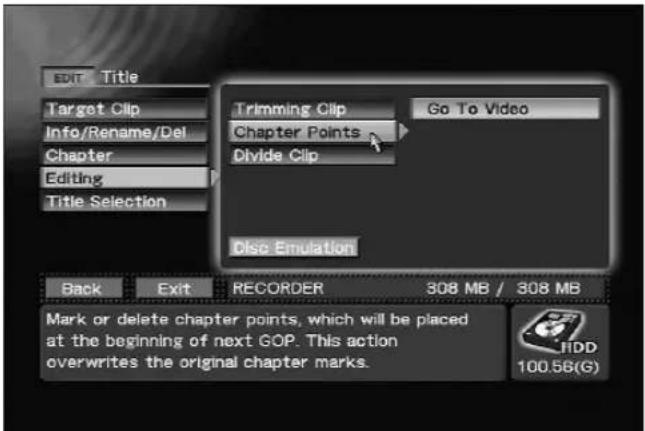
EDIT section → [Title] → [Editing] → [Chapter Points]
For this edit, use the MARK and DEL buttons on the control bar displayed in conjunction with the clip's playback. While playing back the clip, press the MARK button to insert a chapter mark at that point. When the DEL button is pressed, the chapter including the point at which the button was pressed is joined to the previous chapter (in other words, the nearest chapter mark prior to that point is deleted). When the SAVE button is pressed, the chapter mark edit is effected, and when it is completed the screen returns to the Function
Menu. Pressing the CANCEL button will cause the screen to return to the Function Menu without completing the edit.
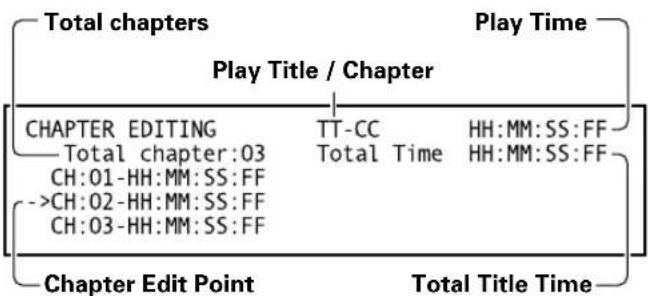
flowchart
graph TD
    A["Total chapters"] --> B["Play Title / Chapter"]
    B --> C["Play Time"]
    C --> D["Chapter Edit Point"]
    D --> E["Total Title Time"]
    subgraph Play Time
        F["CHAPTER EDITING"] --> G["TT-CC"]
        G --> H["HH:MM:SS:FF"]
        I["Total chapter:03"] --> J["Total Time"]
        K["CH:01-HH:MM:SS:FF"] --> L
        M["->CH:02-HH:MM:SS:FF"] --> N
        O["CH:03-HH:MM:SS:FF"] --> P
    end
OSD during Chapter Edit
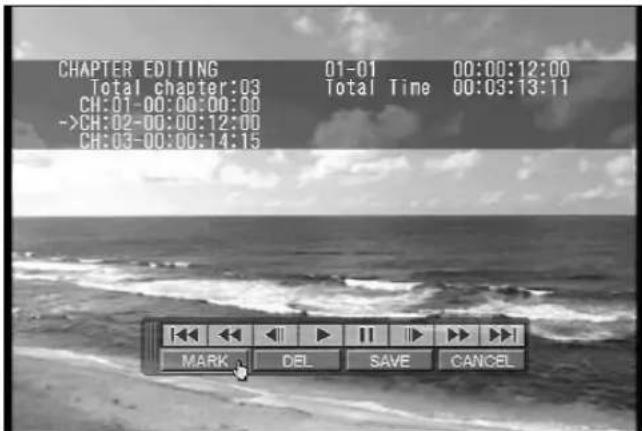
Chapter mark insert
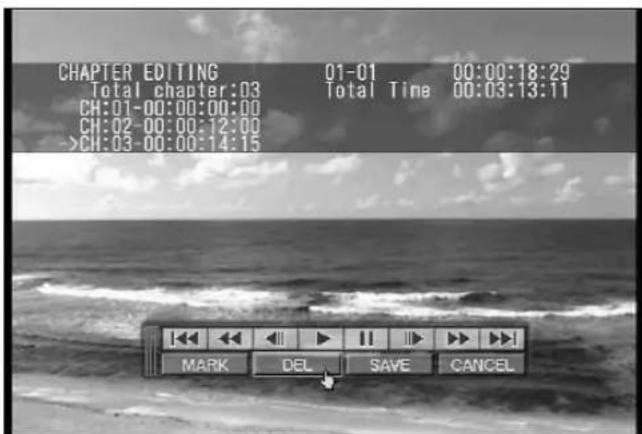
Erasing chapter marks
Note:
Chapter marks can be inserted only at the beginning of a group of pictures (GOP); as a result, actual chapter mark positions will be at the beginning of the GOP immediately following the marked time code.
Dividing Clips
Using the [Title] → [Target Clip] command in the Function Menu's EDIT section, select the clip you wish to divide, then use the "Go To Video" on the EDIT section → [Title] → [Editing] → [Divide Clip] command to divide the selected clip.
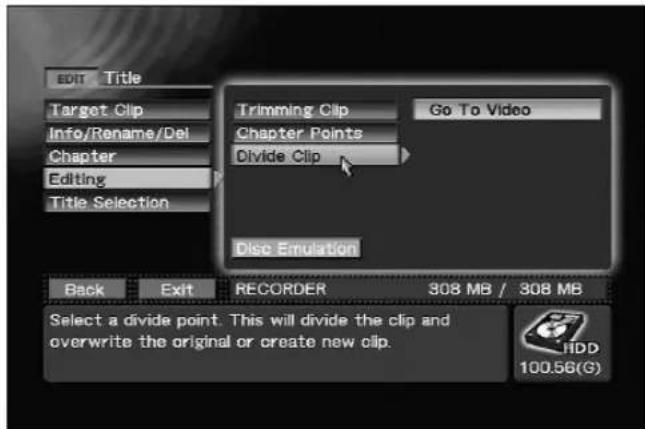
EDIT section → [Title] → [Editing] → [Divide Clip]
While playing back the selected clip, use the SELECT button on the displayed control bar to designate the point at which you wish to divide the clip. Clip division will begin when the SAVE button is pressed, and when completed, the display will return to the Function Menu. If the CANCEL button is pressed instead, the clip division will be canceled and the display will return to the Function Menu.
When beginning the division, you may select whether to overwrite the divided clip, or save it as a new clip. When dividing a clip, the hard disk drive must have available space exceeding the size of the clip before division. When a clip is divided, a "1-" and "2-" will be affixed to the heads of the clip names. If, as a result of affixing the numeral ("1-", etc.), the clip name exceeds 32 single-byte characters, the final character of the name will automatically be deleted so as to keep the name within the 32-character limit. Following division, if the pre-edit clip was recorded as a title, the divided clip will replace it; if the pre-edit clip was not recorded as a title, the post-edit clip will not be recorded as a title. A clip cannot be divided if the disc already holds 99 titles. If necessary, use the "Title Order Edit" command (see next section) to delete unnecessary titles before adding new titles.
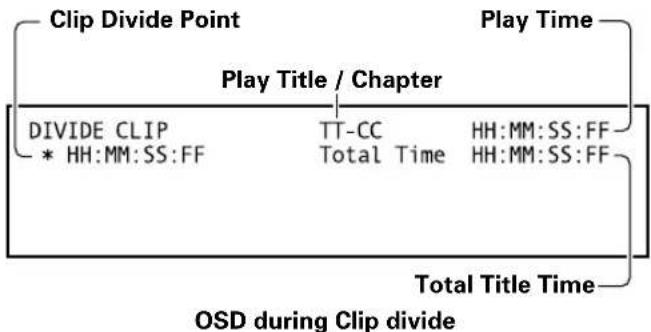
flowchart
graph TD
    A["Clip Divide Point"] --> B["Play Title / Chapter"]
    B --> C["Play Time"]
    C --> D["Total Title Time"]
    D --> E["OSD during Clip divide"]
    subgraph Clip Divide Point
        F["DIVIDE CLIP\n* HH:MM:SS:FF"]
        G["TT-CC\nTotal Time"]
    end
    subgraph Play Time
        H["HH:MM:SS:FF\nHH:MM:SS:FF"]
    end
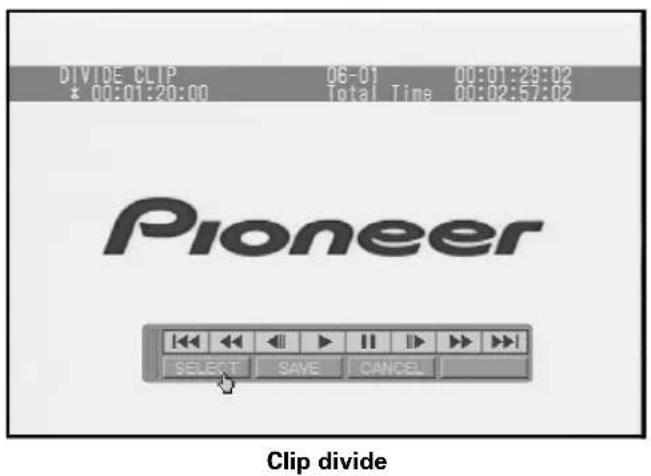
Note 1: The division point can be set only at the head of a group of pictures (GOP) (NTSC=15, PAL=12 frame units).
Note 2: Once divided, a clip cannot be rejoined.
Title Order Edit
In the DVD-Video format, the number of possible titles per disc is limited to 99. The projects created on this recorder, however, are capable of managing more than that number of clips. Fundamentally, the title numbers from 1 to 99 correspond to the clips in the order in which they are recorded, but beyond 99, the clips are not allocated to titles.
Using the Function Menu's EDIT section → [Title] → [Title Selection] command, before final recording on the DVD disc, the clips can be allocated to a title in an order differing from that in which they were recorded.
![EDIT Title Target Clip Info/Rename/Del Chapter Editing Title Selection clip001 clip002 clip003 clip004 clip005 clip006 Disc Emulation CLEAR ALL CLEAR UP DOWN CLIP LIST Back Exit RECORDER 62 MB / 62 MB TITLE 2: Duration = 00:00:06:29 (8MB) [NTSC] clip002 HDD 24.69(G)](/content/2026/05/827245/images/79952ec0112a24a7c3d1dd094102feb506254de2d275f38f4d00db4f4162a4ab.jpg)
EDIT section → [Title] → [Title Selection]
DVD Disc Emulation
The DVD disc emulation allows you to confirm the results of editing before recording those results to the final DVD disc. When the Disc Emulation button on the EDIT section → [Title] command is pressed, DVD menu editing, title editing and other editing results can be played back in the same form as they would be recorded on DVD disc. Following playback, the screen returns to the Function Menu. When the FUNCTION button is pressed, the display returns to the Function Menu.
![EDIT Title Target Clip Info/Rename/Del Chapter Editing Title Selection Edit To (HDD) clip001 Disc Emulation Back Exit RECORDER 62 MB / 62 MB Press [Disc Emulation] to start disc simulation of the project. HDD 24.68(G)](/content/2026/05/827245/images/6c437d77c611b9809aa4bbfaf8476abacd037eee24428ae954f08333a8aefff5.jpg)
Executing the Disc Emulation command on EDIT section → [Title]
Recording to DVD Disc
Projects edited on hard disk drive can be recorded to DVD-Video disc by using the EDIT section → [DVD Disc] → [Make Disc] command. By using the EDIT section → [DVD Disc] → [Make Disc] → [Target] command, the destination drive used for the recording is designated as "DVD1". If an additional expansion drive has been added, "DVD2" or "DVD1&2" can also be selected. Discs cannot be removed until the [Make Disc] processing has been completed.
The volume label given to the DVD disc will be the same as the project name.
Use the [Make Image] command for creating image files on the hard disk (see "Recording from HDD to DVD" on page 44).
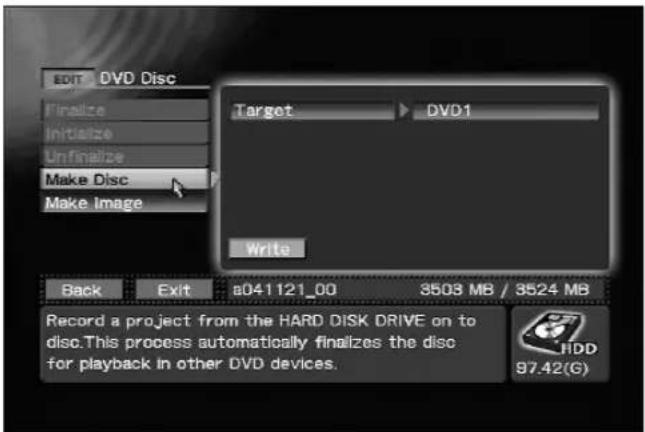
EDIT section → [DVD Disc] → [Make Disc]
![EDIT DVD Disc Finalize Initialize Unfinalize Make Disc Make Image Target DVD1 Write Back Exit a041121_00 3503 MB / 3524 MB Press [write] to begin sending material to the device(s). 97.42(G)](/content/2026/05/827245/images/73a396844aa3a10a4b40fd379554420187db06f335fb59acd2397ecb9549714d.jpg)
Executing the Make Disc command on EDIT section → [DVD Disc]
This recorder manages recorded image data (clips) by the unit of "project." A single project can preserve multiple clips, and so long as the project is not changed, the numerous clips are preserved as a continuous series within the project. It is possible to include both NTSC and PAL clips within a single project. In order to discriminate the different modes, an [N] or [P] is affixed to the head of list displays containing clips, or projects containing clips, that differ from the currently selected TV system. This display is used only for discriminating the two kinds, however, and is not reflected in the actual file names (during menu creation, etc.).
![Function Menu EDIT DVD Menu Project Title DVD Disc APP Auto Capture Cpy/Impt/Bkup SET UP System Operation Recording Playback STATUS Drive [new]h040722_01 Project [P]h040722_00 V Input [P]RECORDER A Input TV System HDD DVD 1 Project 3 No Disc 100.03(GB)](/content/2026/05/827245/images/1418c2fc159603bf391a73bde88e26b1a5f3793e0c5f60ac3be49395ddf19c99.jpg)
[P] project exists on the STATUS section's [Project] menu
![Edit Title Target Clip Info/Rename/Del Chapter Editing Title Selection Edit To (HDD) [P]*clip001 *clip002 [P]*+clip001 *clip007 [P]*clip001 Disc Emulation Back Exit RECORDER 169 MB / 169 MB Select a video clip. HDD 20.66(G)](/content/2026/05/827245/images/ce30a62e9ff271b7990c825c611007d787c9140e47b9e0a8624de285320240ab.jpg)
[P] clip exists on the EDIT section's [Title] → [Target Clip] → [Edit To (HDD)] menu
The Function Menu's EDIT section → [Project] → [Record/Name] command can be used to confirm the number of clips, the project size, and the number of titles within the currently selected project. Further, when a keyboard is connected, the EDIT section → [Project] → [Record/Name] → [Name] command can be used to change the name of the currently selected project.

EDIT section → [Project] → [Record/Name]
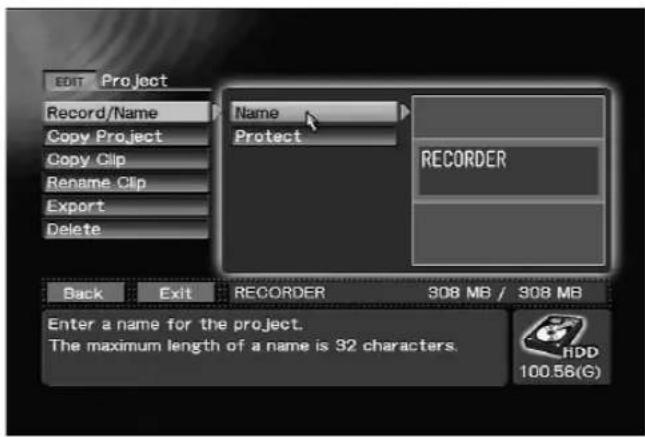
Changing project name on EDIT section → [Project] → [Record/Name]
Note 1: To change project names, connect a keyboard to the MOUSE/KEYBOARD USB jack.
Note 2 : Japanese cannot be used in project names.
The Protect command allows locking of the clips within a project to prevent deletion.
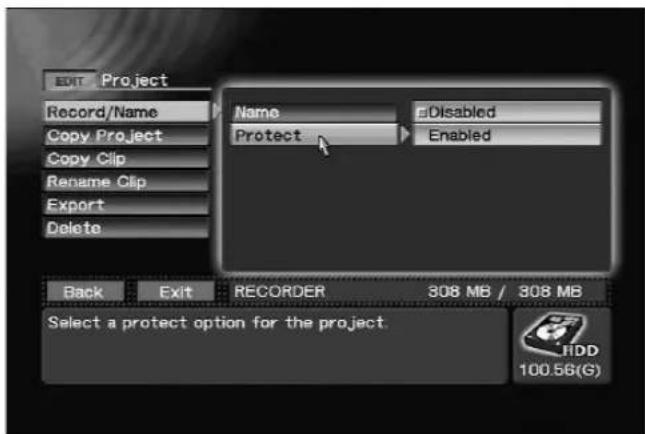
Setting project clips protection on EDIT section → [Project] → [Record/Name] → [Protect]
Recorded data is also managed as a project when recording directly to DVD disc, but editing is not possible in this case.
By using the EDIT section → [Project] → [Record/Name] → [Record To] command to select "DVD & HDD", the recorded images will be preserved on the hard disk drive even after finalizing and removal of the DVD, thus allowing later editing if desired.
Note 3:
When a disc is removed before finalizing, the data recorded so far remains on the hard disk. A new project is automatically created when this disc is reinserted and additional data that is recorded is saved to this project. Thus data recorded prior to removal and data recorded after reinsertion are saved to different projects.
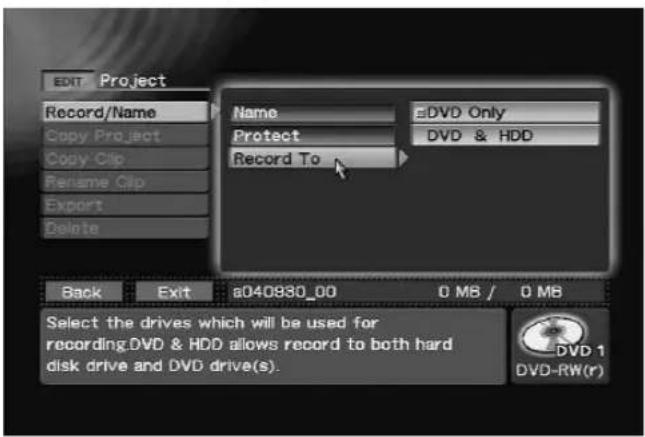
EDIT section → [Project] → [Record/Name] → [Record To]
Copying a Project
Using the EDIT section → [Project] → [Copy
Project] command, the currently selected project can be copied to a new project.
The project name that automatically appears in the
EDIT Section's [Project] → [Copy Project] → [Copy
To] command will be affixed with a numeral to distinguish it from the current default project (for example, "cX" + current project name, where the "X" is a numeral). When the project copy command is executed, the copied project name appear with the automatically changed numeral. However, this automatically processing will not be performed if the project name has been changed.
Note 1:
To input project names, connect a keyboard to the MOUSE/KEYBOARD USB jack.
Note 2:
Japanese cannot be used in project names.
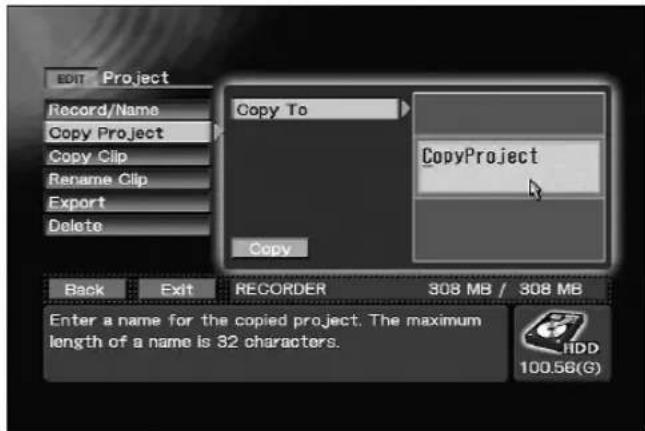
EDIT section → [Project] → [Copy Project] → [Copy To]
Copying Clips
Use the EDIT section → [Project] → [Copy Clip] command to copy clip in project specified by [Source Drive] command to currently selected project. "HDD", "DVD1" and "DVD2" can be selected. "DVD2" appear only if connected.
![EDIT Project Record/Name Copy Project Copy Clip Rename Clip Export Delete Back Exit RECORDER 52 MB / 52 MB Source Drive HDD Copy From DVD1 Clip DVD2 Copy Select a device including a project which has the source clip. Press [Copy] to begin copying. HDD 100.81(G)](/content/2026/05/827245/images/c2a36eea6bd95b0ad2480c41fe7edeb394d0d9c7289b6d29ccc78dd8bfb610f1.jpg)
Using EDIT section → [Project] → [Copy Clip] → [Source Drive] for selecting drives
![EDIT Project Record/Name Copy Project Copy Clip Rename Clip Export Delete Source Drive HDD Copy From RECORDER Clip clip003 Copy Back Exit RECORDER 308 MB / 308 MB Press [Copy] to begin copying. HDD 100.56(G)](/content/2026/05/827245/images/adfb962a04c9e0e8034e3fee50bf9a539ee646435e818ac443a5bc391116cf36.jpg)
Executing Copy command on EDIT section → [Project] → [Copy Clip]
The copied clip will be appended to the end of the project. You can choose whether to record the copied clip as the title. However, if 99 titles have already been recorded, the clip cannot be recorded as another title.
An asterisk (*) will be appended to the front of the name of the copied clip.
If the addition of “*” makes the clip name 33 one-byte characters or longer, the last characters are automatically truncated.
Note:
When "DVD1" or "DVD2" is selected as [Source] during copying clip, the content is not updated when a disc is inserted. Select the drive using [Source] again after disc insertion.
Renaming a Clip
Using the [Project] → [Rename Clip] command on the EDIT Section, the clip name of the currently selected project can be changed. The clip name entered here will be reflected on the text for buttons when the DVD menu type is made the title menu. In fact, the number of characters that can be embedded in the menu will differ depending on the design. Also, depending on the design, excessive characters may be omitted. Always use the preview function to confirm results.
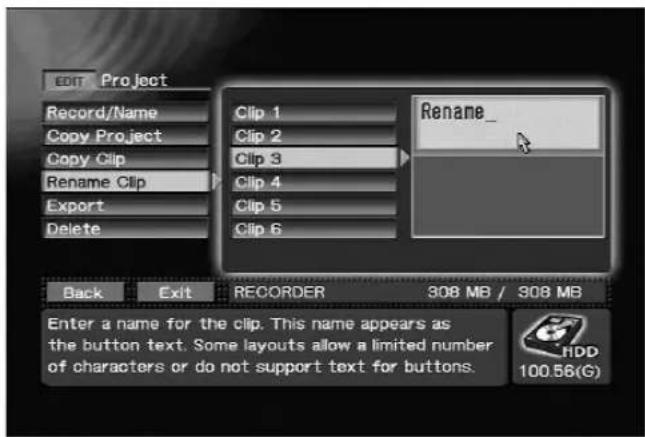
Using EDIT section → [Project] → [Rename clip] → [Clip 3]
Exporting VOB Files
Using the [Project] → [Export] command on the EDIT Section, clips within the currently selected project can be exported and saved as a VOB file with an individualizing name. The file name can be input using the [VOB Name] command, and saved in the vob folder accessible via FTP.
The [VOB Name] command provides the default file name "exptXXX"; each time the command is executed, the number (XXX) is incremented. However, this automatic operation is not supported if [VOB Name] is edited.
If the clip has a size exceeding 1 Gbyte, it will be output as multiple files. The actually output file names will be the name set with [VOB name] command, followed by consecutive number + extension (vob). (Example: expt000_001.vob)
Note:
Do not use the FTP during recording since the system may become unstable.
![Edit Project Record/Name Copy Project Copy Clip Rename Clip Export Delete Clip clip001 VOB Name expt001 Export Back Exit RECORDER 52 MB / 52 MB Press [Export] to begin exporting. HDD 100.81(G)](/content/2026/05/827245/images/c74295c95ba75748bf373a7c9c259d13a859ca7445f1960337430ea3df2fc23f.jpg)
Executing Export command on EDIT section → [Project] → [Export]
Deleting a Project
Projects are not automatically deleted, but preserved within the hard disk drive. When the available space on the HDD becomes low, use the EDIT section → [Project] → [Delete] command to select and delete unneeded projects in order to open up space on the drive.
![EDIT Project Record/Name Copy Project Copy Clip Rename Clip Export Delete Delete No Item Delete Back Exit RECORDER 52 MB / 52 MB Press [Delete] to remove the project. 100.81(G)](/content/2026/05/827245/images/09fa76dbb6d1673982bc0eb5bcdce5d76e05721d693166f7f1745189c37ac166.jpg)
EDIT section → [Project] → [Delete]
Note 1:
A project that is currently being edited cannot be erased.
Note 2:
Projects with protected clips cannot be deleted (see page 67).
This unit provides a function for duplicating discs. Disc-to-disc duplication can be performed by connecting another DVD drive. This function can be done on a single drive by creating an image file from a disc and using this file to create a new disc. Image files imported via FTP (uploading) can also be used to create discs (uploaded image files are saved to the imagefiles folder). See page 72 for information on FTP connection.
Note 1:
Copyright protected content cannot be duplicated or used to create image files. The copying of copyrighted materials requires the permission of the copyright holder and neighboring rights holder.
Failure to obtain the permission of each rights holder can be punished by law. Pioneer accepts no liability whatever for problems arising between the user of this device and any rights holder.
Note 2:
The time required for disc duplication and creating image files depend on disc read/write performance.
Disc-to-disc Duplication
Use the Function Menu's APP section → [Cpy/Impt/Bkup] → [Disc Copy] → [Source] command to specify the disc to be copied and the [Destination] command to specify the destination disc when duplicating discs.
Note:
When a single drive is used, the APP section → [Cpy/Impt/Bkup] → [Disc Copy] command is not available.
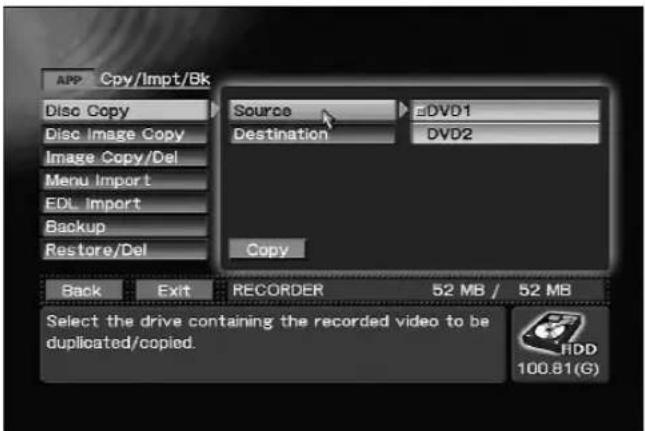
Using APP section → [Cpy/Impt/Bkup] → [Disc Copy] to select Source
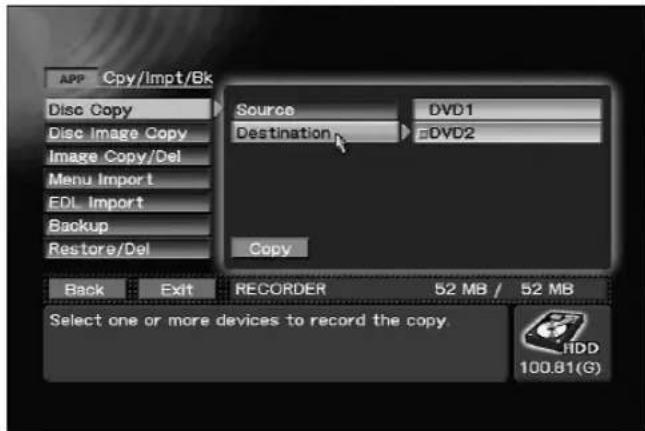
Using APP section → [Cpy/Impt/Bkup] → [Disc Copy] to select Destination
![APP Cpy/Impt/Bk Disc Copy Disc Image Copy Image Copy/Del Menu Import EDL Import Backup Restore/Del Source DVD1 Destination DVD2 Copy Back Exit REORDER 52 MB / 52 MB Press [Copy] to begin copying. HDD 100.81(G)](/content/2026/05/827245/images/154d74191c98393bb605787fce8d88f6fa8e563ce39bb9bf415b8e727f8cd8ac.jpg)
Using APP section → [Cpy/Impt/Bkup] → [Disc Copy] to execute copying
Creating Image Files from a Disc
Use the Function Menu's APP section → [Cpy/Impt/Bkup] → [Disc Image Copy] → [Source] command to specify the disc to be used in creating an image file. Use the [Input Image Name] command to enter the file name. The file is saved under the entered file name to the imagefiles folder, a folder that can be accessed via FTP. The disc cannot be removed until the image file has been created.
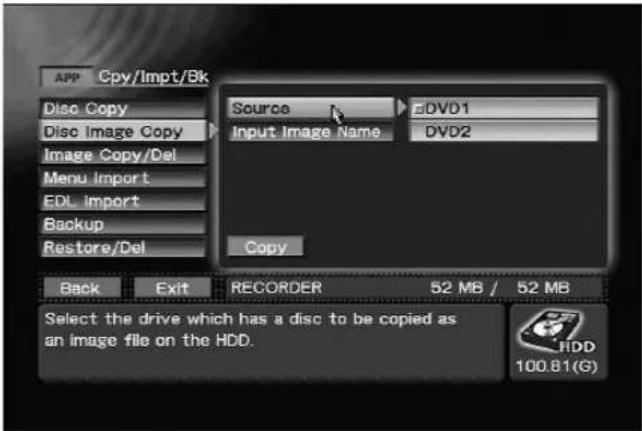
Using APP section → [Cpy/Impt/Bkup] → [Disc Image Copy] to select Source
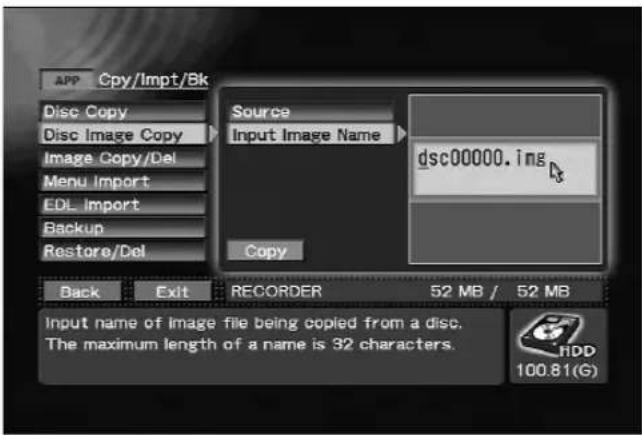
Using APP section → [Cpy/Impt/Bkup] → [Disc Image Copy] → [Input Image Name] to enter a file name
Note 1:
For characters usable in the names of image files, see section "About File Names" (page 94).
Note 2:
When the [Input Image Name] command is used, it automatically displays a default name that does not equal duplicate an already existing file name (example: dscXXXXX.img, where the "X" represent numbers). When file creation is executed, the new file name will be displayed with the numerals automatically modified. However, once an image file name has been changed, it cannot be handled by automatic processing.
Creating Discs from Image Files
Use the Function Menu's APP section → [Cpy/Impt/Bkup] → [Image Copy/Del] → [Source] command to specify image file to be copied and use the [Destination] command to specify the disc to write the file to. The [Source] command displays all the files saved in the imagefiles folder (a folder accessed using FTP).
Note:
Image files that are 4.7 GB or larger cannot be copied to disc.
![APP Cpy/Impt/Bk Disc Copy Disc Image Copy Image Copy/Del Menu Import EDI Import Backup Restore/Del Source image image1 Destination DVD1 Copy Delete Back Exit RECORDER 52 MB / 52 MB Press [copy] to begin copying image file to selected destination. 100.81(G)](/content/2026/05/827245/images/a5bafe7f96cb2dc00a01bf8a5600715f4406feae71ab7eb12982189354d4efd4.jpg)
Using APP section → [Cpy/Impt/Bkup] → [Image Copy/Del] to create a disc from an image file
Deleting Image Files from a Hard Disk
Use the Function Menu's APP section → [Cpy/Impt/Bkup] → [Image Copy/Del] → [Source] command to specify the disc whose image files are to be deleted. The [Source] command displays all the files saved in the imagefiles folder (a folder accessed using FTP).
Note:
Formatting a hard disk (see "HDD Tools" on page 31) deletes all image files on the disk.
![APP Cpy/Impt/Bk Disc Copy Disc Image Copy Image Copy/Del Menu Import EDL Import Backup Restore/Del Source Image ▶ image1 Destination ▶ DVD1 Copy Delete Back Exit RECORDER 52 MB / 52 MB Press [delete] to begin deleting image file. HDD 100.81(G)](/content/2026/05/827245/images/e8206c311228a8f7c526ab5efa516e08cdb0e1ca657a945da7bc0d39c4a9d931.jpg)
Using APP section → [Cpy/Impt/Bkup] → [Image Copy/Del] to delete image files
This function allows the importing of image data from CD/DVD discs, or a web browser with FTP connection from a computer linked to an online network. These images can be then stored in the recorder's menu library for use as DVD menu layout images and DVD menu background images. Edit list files can be similarly imported.
When using FTP to download images from the Internet, go to the SET UP section → [System] → [Network] command and confirm that network is set to "ON". Also, The displayed IP address will be the connection destination. The user name and password necessary for FTP connection is as follows:
User Name: PRVUser
Password: prv-lx1
Following establishment of FTP connection, store files relating to the DVD menu in the menu folder; files regarding edit lists should be stored in the EDL folder.
Files obtained via FTP from the network are temporarily stored in the hard disk drive's Import Directory; then, the "Import Directory" is designated using the Function Menu's APP section [Cpy/Impt/Bkup] → [Menu Import] → [Source] command; the files to be added to the menu library are selected, and the Add to Library button is pressed to begin importing. The same procedure is used for importing Edit List files. When "DVD1" or "DVD2" is designated as the source, import is begun from the disc loaded in the respective drive when the Add to Library button is pressed.
Note 1:
When importing image data or edit lists, if "DVD1" or "DVD2" is selected as the [Source], the contents [Source File] will not be imported merely by inserting the disc. The drive must be selected once again from [Source] after the disc is inserted in the drive.
Note 2:
Importing a file with the same name as a file already on the disk overwrites the existing file.
Note 3:
Characters usable in import file names are limited to single-byte alphanumeric, plus periods (.) and underscore characters (_) only.
Note 4:
Place the files that are to be imported in the top directory (root directory) when a disc is used for importing. Files placed in a directory other than the top directory are not imported.
Note 5:
Avoid using FTP during recording, since the system may become unstable.
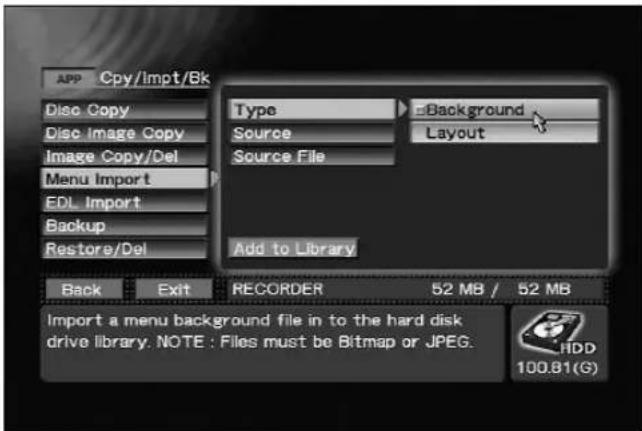
Using APP section → [Cpy/Impt/Bkup] → [Menu Import] → [Type] to select background image

APP section → [Cpy/Impt/Bkup] → [Menu Import] → [Source]
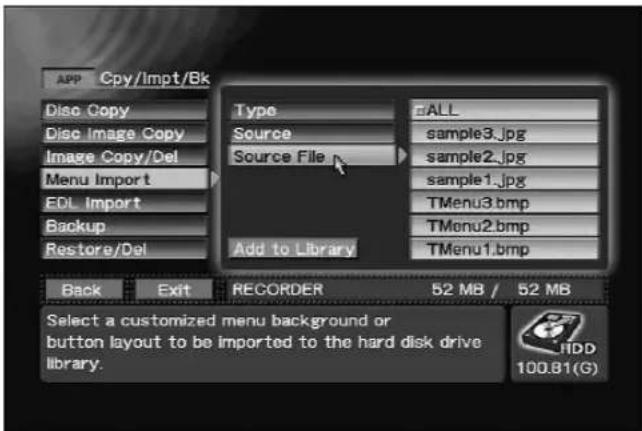
Using APP section → [Cpy/Impt/Bkup] → [Menu Import] → [Source File] to select import file
Select the "ALL" to import all files.
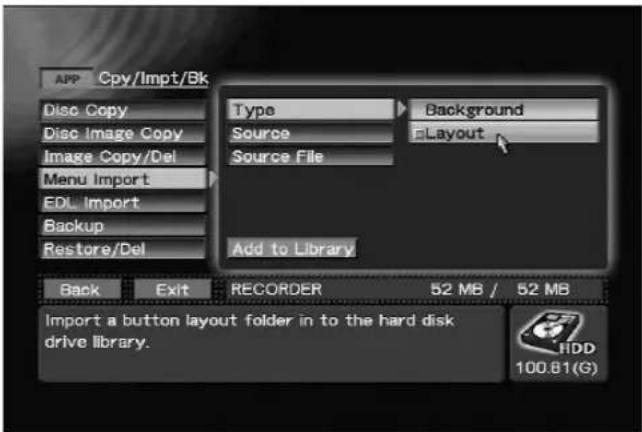
Using APP section → [Cpy/Impt/Bkup] → [Menu Import] → [Type] to select layout image
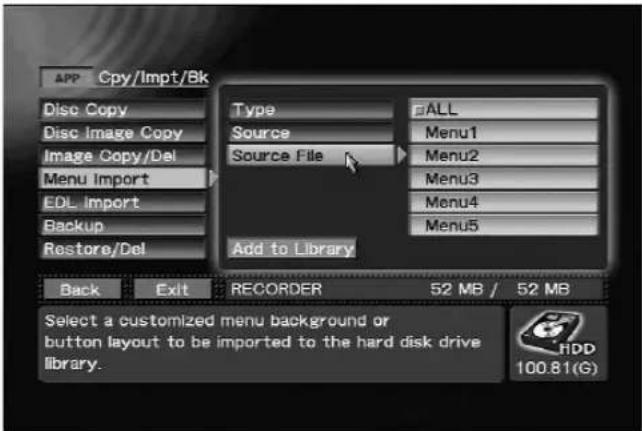
APP section → [Cpy/Impt/Bkup] → [Menu Import] → [Source File]
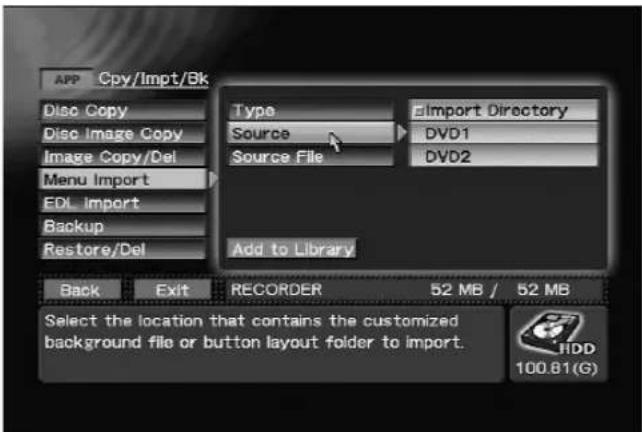
APP section → [Cpy/Impt/Bkup] → [Menu Import] → [Source]
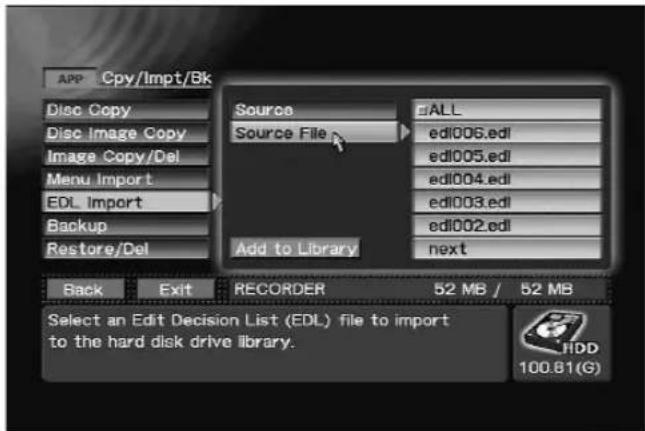
APP section → [Cpy/Impt/Bkup] → [EDL Import] → [Source File]
DVD menu layout image files are added to the DVD menu layout library selected with the Function Menu's EDIT section → [DVD Menu] → [Menu Design] → [Design Select] command.
DVD menu background image files are added to the background library selected with the EDIT section → [DVD Menu] → [Menu Modification] → [Background] → [HDD Library] command.
Edit list files are stored in the EDL library selected with the APP section → [Auto Capture] → [EDL Load/Delete] → [Load] command.
DVD Menu Layout Image File Format
DVD menu layout image files are composed of a combination of text files providing detailed information about the various DVD menu settings, together with multiple image files. Plans are currently underway to make available a plugin that will allow the output of computer image editing software to be converted to an importable form.
DVD Menu Background Image File Format
Support is currently available only for Windows Bitmap (.bmp) format and JPEG (.jpg) format files.
Edit List File Format
Edit list files are text files with the ".edl" filename extension. Composition is as follows:
Header: PIONEER-DVDRec-EDL 002 ENCODING=XXX
Entry: Number Operation Type Parameter 1 Parameter 2 Parameter 3
The number of parameters differs depending on the type of operation involved. Numbers are consecutive numerals beginning from 001.
Use a single-byte space (0x20) or tab (0x09) between [PIONEER-DVDRec-EDL] and [002]. Alternately, a carriage return character (0x0A, 0x0D0A, 0x0D) may also be used.
The message ENCODING=XXX indicates the character encoding, and may be omitted.
The "XXX" represented here supports utf8, eucJP, Shift-JIS, and JIS7. If the command is omitted, utf8 will be used as default encoding.
■IN/OUT Point Setting Entry
Number Operation Type Parameter 1 Parameter 2 Parameter 3
NNN REC IN Point OUT Point Post-REC action
The IN/OUT point is set using time code format as follows: HH:MM:SS:FF
Post-REC action will indicate either STOP or PAUSE.
The final IN/OUT point setting entry in an edit list must always designate the post-REC action as STOP.
■Chapter Point Setting Entry
Number Operation Type Parameter 1
NNN CHP CHAPTER POINT
The chapter point is designated using time code as HH:MM:SS:FF. The chapter point description must come immediately below the IN/OUT point setting to which it is applied. Also, the Number value is given as that given to the IN/OUT point setting entry.
■DVD-RW disc initialization
Number Operation Type
NNN INI
Initialization can be applied only at the head of an edit list entry.
■Finalize
Number Operation Type
NNN FNL
Finalizing can be applied only as the final entry of an edit list.
Wait
Number Operation Type Parameter
NNN WAI Comment
The wait command can be used within a list, to designate points necessary to change a VTR tape, etc.
If a comment is input, the comment will appear in the wait dialog.
If the comment is separated by a tab (0x09), it will appear split into two lines at the point of the tab.
■Designating the Encoding Parameter
Number Operation Type Parameter 1 Parameter 2
NNN SET
Rate
Filter
Rate is R:n (n= 1-32)
Filter is F:n (n=0-16)
This setting will continue to be reflected after EDL execution.
■Designating a Title Name
| Number Operation Type | Parameter 1 | |
| NNN | T-N | Title name |
The title name will be reflected in the title currently being recorded, or a previously recorded title.
■Designating a Chapter Name
| Number Operation Type | Parameter 1 | |
| NNN | C-N | Chapter name |
The chapter name will be reflected in the name of the chapter currently being recorded.
Note 1:
If [EDL] is used when target drive is set to HDD, initialize and finalize commands are ignored.
Note 2:
The header may also use [PIONEER-DVDRec-EDL001] version.
Edit List Example
| PIONEER-DVDRec-EDL 002 ENCODING=utf8 Explanation | |
| 001 INI ...... | |
| 002 SET R:16 F:2 ...... | |
| 002 REC 01:00:00:00 01:10:00:00 STOP ...... | |
| 002 T-N Title1 ...... | |
| 002 C-N Chapter1-1 ...... | |
| 002 CHP 01:05:00:00 ...... | |
| 002 C-N Chapter1-2 ...... | |
| 002 WAI Please insert Tape2 ...... | |
| 003 SET R:32 F:0 ...... | |
| 003 REC 01:20:00:00 01:30:00:00 PAUSE ...... | |
| 003 T-N Title2 ...... | |
| 003 C-N Chapter2-1 ...... | |
| 003 CHP 01:25:00:00 ...... | |
| 003 C-N Chapter2-2 ...... | |
| 004 REC 01:40:00:00 01:50:00:00 PAUSE ...... | |
| 004 CHP 01:45:00:00 ...... | |
| 004 C-N Chapter2-3 ...... | |
| 005 REC 02:00:00:00 02:10:00:00 STOP ...... | |
| 005 CHP 02:00:00:00 ...... | |
| 005 C-N Chapter2-4 ...... | |
| 006 FNL ...... |
DVD-RW disc initialization
Rate 16, filter 2 setting
Title 1 recording
Title 1 name setting
Chapter 1 name setting
Title 1 chapter 2 setting
Chapter 2 name setting
Wait
Rate 32, filter 0 setting
Title 2 recording
Title 2 name setting
Chapter 1 name setting
Title 2 chapter 2 setting
Chapter 2 name setting
Record as continuation of title 2
Title 2 chapter 3 setting
chapter 3 name setting
Record as continuation of title 2
Title 2 chapter 4 setting
Chapter 4 name setting
Finalize execute
Projects, image files, menu libraries, EDL data and System settings on the internal hard disk (HDD) can be backed up on an external hard disk (USB HDD) and data backed up on the external hard disk can be restored to the internal hard disk.
Projects and other data backed up on the USB HDD can be deleted to free up space on the hard disk (Note 2).
Note 1:
To prevent failure during backing up or restoring data, avoid simultaneous use of FTP and the USB HDD during these processes.
Note 2:
Use the [System] → [HDD Tools] → [Target Drive] command to specify the USB HDD and check free disk space.
Since disk space is calculated using the formula 1 GB = 1024 × 1024 × 1024 bytes,
actual disk space is somewhat less than the indicated figure. However, space on unformatted USB HDD is indicated as [--GB].
Note 3:
The time required for backing up and restoring depends on the amount of data on the hard disk. As a rule, it takes about 3 minutes for 1 GB of data.
However, the state of the connection between the unit and the USB HDD may slow down the process.
Connecting a USB HDD
Turn off the unit and make sure it is in standby mode before connecting the USB HDD. Turn on the USB HDD and the unit.
Note 1:
Unit operation may become unstable when the USB HDD is connected or disconnected during unit operation. To ensure stable operation, do not connect or disconnect the USB connectors during unit operation.
Note 2:
Do not connect two or more USB HDDs to the unit.
Formatting
A new USB HDD must be formatted before use. Note that also USB HDDs labeled "Formatted" must be formatted before use. See "HDD Tools" on page 31 for information on how to format and check a USB HDD.
Note:
Formatting deletes all data on a USB HDD.
Backing Up
Use the APP section → [Cpy/Impt/Bkup] → [Backup] command to back up data. Use the [Type] and [Target] commands to select the data types and files to be backed up and press the Backup button to start. Select "ALL" on [Target] command to process all files.
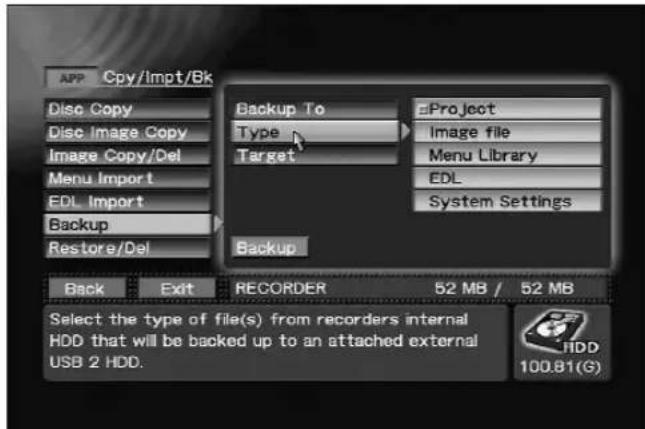
APP section → [Cpy/Impt/Bkup] → [Backup] → [Type]
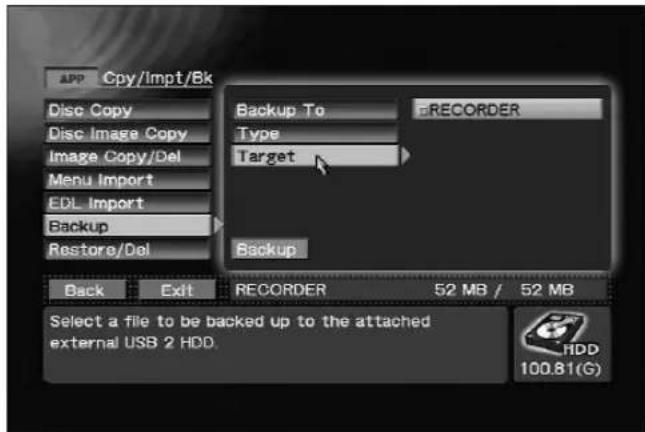
APP section → [Cpy/Impt/Bkup] → [Backup] → [Target]
![APP Cpy/Impt/Bk Disc Copy Disc Image Copy Image Copy/Del Menu Import EDL Import Backup Restore/Del Backup To USB HDD Type Project Target RECORDER Remaining Capacity: 30.74(GB) Backup Back Exit RECORDER 52 MB / 52 MB Press [Backup] to begin copying file(s) to the attached external USB 2 HDD. 100.81(G)](/content/2026/05/827245/images/c189b05877962042fe23a0a5dea6a73246004f509d73398236512d4ac443c3ce.jpg)
Executing Backup command on APP section → [Cpy/Impt/Bkup] → [Backup]
Note:
Data backed up on the hard disk may be corrupted if the USB HDD is damaged. Save important data to DVD-R/RW as DVD-Video disc.
Restoring
Use the APP section → [Cpy/Impt/Bkup] →
[Restore/Del] command to restore data. Use the [Type] and [Target] commands to select the data types and files to be restored and press the
Restore button to start. Select "ALL" on [Target] command to process all files.
![APP Cpy/Impt/Bk Disc Copy Disc Image Copy Image Copy/Del Menu Import EDL Import Backup Restore/Del Restore from/Del ▶ USB HDD Type ▶ Project Target ▶ ALL Remaining Capacity : 30.74(GB) Restore ▶ Delete Back Exit RECORDER 52 MB / 52 MB Press [Restore] to begin copying file(s) from the attached external USB 2 HDD to the recorders Internal HDD. 100.81(G)](/content/2026/05/827245/images/1acd61c0e0c5aebeb138732761f07fca5188f503ee61bbebe8ca0e6f5a9cd222.jpg)
Executing Restore command on APP section → [Cpy/Impt/Bkup] → [Restore/Del]
Deleting Backup Data
Use the APP section → [Cpy/Impt/Bkup] →
[Restore/Del] command to delete backup data. Use the [Type] and [Target] commands to select the data types and files to be deleted and press the Delete button to start. Select "ALL" on [Target] command to process all files.
![APP Cpy/Impt/Bk Disc Copy Disc Image Copy Image Copy/Del Menu Import EDL Import Backup Restore/Del Restore from/Del ▶ USB HDD Type ▶ Project Target ▶ ALL Remaining Capacity : 30.74(GB) Restore Delete Back Exit RECORDER 52 MB / 52 MB Press [Delete] to remove/delete file(s) from the attached external USB 2 HDD. 100.81(G)](/content/2026/05/827245/images/33113152940b781ab68307cee0a8549891f9ac4103ad9fa5c8c42717cb1e37c8.jpg)
Executing Delete command on APP section → [Cpy/Impt/Bkup] → [Restore/Del]
Note:
The Delete and Format functions provided with the unit do not allow you to completely delete all data on a hard disk. Thus discarding or transferring a USB HDD to a third party when hard disk data has been deleted using these functions runs the risk of placing backed up image data into the wrong hands. To prevent such a risk, use commercially available software to wipe the disk clean or request a dealer to do so. Consult your USB HDD manufacturer for details.
Removing a USB HDD
Turn off the unit and make sure it is in standby mode before disconnecting and turning off the USB HDD.
Note:
Never disconnect the USB cable, turn off the USB HDD or turn off the main power switch on the rear panel of the unit during backing up, restoring or deleting data as this may not only leave invalid data on the disc, but damage the hard disk. Invalid data can only be removed by formatting the disc.
Backing up and Restoring System Settings
A number of the items settable on the Function Menu can be backed on a hard disk drive connected to a USB port. The backed up settings can also be uploaded from a USB HDD to use in restoring previous settings. The items supported for backup and restore are listed on the "Function Menu Table" (page 80).
Note:
The default menu settings for the [DVD Menu] items are backed up and restored.
■Recording time with Dolby Digital (DVD, Hard Disk)
| Video level rate | Dolby Digital | |||||||
| Recording time (time: min)(*1) | Transfer rate | Video resolution | Audio sampling frequency | |||||
| DVD disc | Hard disk | Total (Mbps) | Video (Mbps) | Audio (Kbps) | NTSC PAL | |||
| 32 0:58 22:45 | 9.900 9.644 256 720x | 480 720x576 16bit, | 48kHz | |||||
| 31 1:01 23:53 | 9.426 9.169 256 720x | 480 720x576 16bit, | 48kHz | |||||
| 30 1:06 25:44 | 8.750 8.494 256 720x | 480 720x576 16bit, | 48kHz | |||||
| 29 1:10 27:35 | 8.164 7.908 256 720x | 480 720x576 16bit, | 48kHz | |||||
| 28 1:16 29:26 | 7.652 7.396 256 720x | 480 720x576 16bit, | 48kHz | |||||
| 27 1:21 31:17 | 7.200 6.944 256 720x | 480 720x576 16bit, | 48kHz | |||||
| 26 1:25 33:08 | 6.798 6.542 256 720x | 480 720x576 16bit, | 48kHz | |||||
| 25 1:30 35:00 | 6.438 6.182 256 720x | 480 720x576 16bit, | 48kHz | |||||
| 24 1:35 36:51 | 6.115 5.859 256 720x | 480 720x576 16bit, | 48kHz | |||||
| 23 1:40 38:42 | 5.822 5.566 256 720x | 480 720x576 16bit, | 48kHz | |||||
| 22 1:45 40:34 | 5.556 5.300 256 720x | 480 720x576 16bit, | 48kHz | |||||
| 21 1:54 44:17 | 5.090 4.834 256 720x | 480 720x576 16bit, | 48kHz | |||||
| 20 2:04 48:00 | 4.696 4.440 256 720x | 480 720x576 16bit, | 48kHz | |||||
| 19 2:14 51:47 | 4.358 4.102 256 720x | 480 720x576 16bit, | 48kHz | |||||
| 18 2:23 55:28 | 4.066 3.810 256 720x | 480 720x576 16bit, | 48kHz | |||||
| 17 2:33 59:13 | 3.810 3.554 256 720x | 480 720x576 16bit, | 48kHz | |||||
| 16 2:43 62:58 | 3.583 3.327 256 720x | 480 720x576 16bit, | 48kHz | |||||
| 15 2:52 66:43 | 3.383 3.127 256 720x | 480 720x576 16bit, | 48kHz | |||||
| 14 3:02 70:28 | 3.203 2.947 256 720x | 480 720x576 16bit, | 48kHz | |||||
| 13 3:12 74:14 | 3.041 2.785 256 720x | 480 720x576 16bit, | 48kHz | |||||
| 12 3:22 78:00 | 2.895 2.639 256 720x | 480 720x576 16bit, | 48kHz | |||||
| 11 3:31 81:46 | 2.762 2.506 256 720x | 480 720x576 16bit, | 48kHz | |||||
| 10 3:41 85:33 | 2.640 2.384 256 720x | 480 720x576 16bit, | 48kHz | |||||
| 9 3:51 89:20 | 2.529 2.273 256 720x | 480 720x576 16bit, | 48kHz | |||||
| 8 4:06 95:01 | 2.378 2.122 256 720x | 480 720x576 16bit, | 48kHz | |||||
| 7 4:21 100:00 | (100:43) (*2) 2.244 1.988 256 720x480 720x576 16bit, 48kHz | |||||||
| 6 4:35 100:00 | (106:26) (*2) 2.124 1.368 256 352x240 352x288 16bit, 48kHz | |||||||
| 5 4:50 100:00 | (112:09) (*2) 2.018 1.760 256 352x240 352x288 16bit, 48kHz | |||||||
| 4 5:05 100:00 | (117:53) (*2) 1.919 1.363 256 352x240 352x288 16bit, 48kHz | |||||||
| 3 5:20 100:00 | (123:38) (*2) 1.830 1.574 256 352x240 352x288 16bit, 48kHz | |||||||
| 2 5:35 100:00 | (129:24) (*2) 1.748 1.492 256 352x240 352x288 16bit, 48kHz | |||||||
| 1 5:50 100:00 | (135:10) (*2) 1.675 1.419 256 352x240 352x288 16bit, 48kHz | |||||||
*1 Recording time is only an approximate value and depends on hard disk and DVD disc size.
*2 The maximum recording time (maximum continuous recording time) for a clip (Rec - Stop) is 100 hours. (Figures in brackets indicate approximate recording times.)
*3 During DV recording, the video resolution is 704 × 480 (NTSC), 704 × 576 (PAL) and audio encoding is limited to Dolby Digital.
■Recording time with Linear PCM (DVD, Hard Disk)
| Video level rate | Dolby Digital | |||||||
| Recording time (time: min)(*1) | Transfer rate | Video resolution | Audio sampling frequency | |||||
| DVD disc | Hard disk | Total (Mbps) | Video (Mbps) | Audio (Kbps) | NTSC PAL | |||
| 32 1:02 23:59 | 9.444 7.908 1536 720 | x480 720 | x576 16b | t, 48kHz | ||||
| 31 1:02 23:59 | 9.444 7.908 1536 720 | x480 720 | x576 16b | t, 48kHz | ||||
| 30 1:02 23:59 | 9.444 7.908 1536 720 | x480 720 | x576 16b | t, 48kHz | ||||
| 29 1:02 23:59 | 9.444 7.908 1536 720 | x480 720 | x576 16b | t, 48kHz | ||||
| 28 1:05 25:22 | 8.932 7.396 1536 720 | x480 720 | x576 16b | t, 48kHz | ||||
| 27 1:09 26:44 | 8.480 6.944 1536 720 | x480 720 | x576 16b | t, 48kHz | ||||
| 26 1:12 28:04 | 8.078 6.542 1536 720 | x480 720 | x576 16b | t, 48kHz | ||||
| 25 1:16 29:23 | 7.718 6.182 1536 720 | x480 720 | x576 16b | t, 48kHz | ||||
| 24 1:19 30:41 | 7.395 5.859 1536 720 | x480 720 | x576 16b | t, 48kHz | ||||
| 23 1:22 31:58 | 7.102 5.566 1536 720 | x480 720 | x576 16b | t, 48kHz | ||||
| 22 1:26 33:13 | 6.836 5.300 1536 720 | x480 720 | x576 16b | t, 48kHz | ||||
| 21 1:32 35:41 | 6.370 4.834 1536 720 | x480 720 | x576 16b | t, 48kHz | ||||
| 20 1:38 38:03 | 5.978 4.440 1536 720 | x480 720 | x576 16b | t, 48kHz | ||||
| 19 1:44 40:22 | 5.638 4.102 1536 720 | x480 720 | x576 16b | t, 48kHz | ||||
| 18 1:50 42:36 | 5.346 3.810 1536 720 | x480 720 | x576 16b | t, 48kHz | ||||
| 17 1:56 44:47 | 5.090 3.554 1536 720 | x480 720 | x576 16b | t, 48kHz | ||||
| 16 2:01 46:53 | 4.863 3.327 1536 720 | x480 720 | x576 16b | t, 48kHz | ||||
| 15 2:06 48:56 | 4.663 3.127 1536 720 | x480 720 | x576 16b | t, 48kHz | ||||
| 14 2:12 50:56 | 4.483 2.947 1536 720 | x480 720 | x576 16b | t, 48kHz | ||||
| 13 2:17 52:52 | 4.321 2.785 1536 720 | x480 720 | x576 16b | t, 48kHz | ||||
| 12 2:21 54:45 | 4.175 2.639 1536 720 | x480 720 | x576 16b | t, 48kHz | ||||
| 11 2:26 56:35 | 4.042 2.506 1536 720 | x480 720 | x576 16b | t, 48kHz | ||||
| 10 2:31 58:22 | 3.920 2.384 1536 720 | x480 720 | x576 16b | t, 48kHz | ||||
| 9 2:34 60:06 | 3.809 2.273 1536 720 | x480 720 | x576 16bit | t, 48kHz | ||||
| 8 2:42 62:37 | 3.658 2.122 1536 720 | x480 720 | x576 16bit | t, 48kHz | ||||
| 7 2:48 65:03 | 3.524 1.988 1536 720 | x480 720 | x576 16bit | t, 48kHz | ||||
| 6 2:54 67:23 | 3.404 1.868 1536 352 | x240 352 | x288 16bit | t, 48kHz | ||||
| 5 3:00 69:38 | 3.296 1.760 1536 352 | x240 352 | x288 16bit | t, 48kHz | ||||
| 4 3:06 71:48 | 3.199 1.663 1536 352 | x240 352 | x288 16bit | t, 48kHz | ||||
| 3 3:11 73:54 | 3.110 1.574 1536 352 | x240 352 | x288 16bit | t, 48kHz | ||||
| 2 3:16 75:55 | 3.028 1.492 1536 352 | x240 352 | x288 16bit | t, 48kHz | ||||
| 1 3:21 77:52 | 2.955 1.419 1536 352 | x240 352 | x288 16bit | t, 48kHz | ||||
*1 Recording time is only an approximate value and depends on hard disk and DVD disc size.
| EDIT DVD Menu Menu | Setting | Menu Edit to | Selected Project at top menu | Display object for DVD menu editing. |
| Menu TV System | NTSC | Display currently set TV mode. | ||
| PAL | ||||
| Menu Type/Font | Menu Type | Title Menu | Select DVD menu type. | |
| Chapter Menu | ||||
| No Menu | ||||
| Title & Chapter | ||||
| Font | Helvetica | Select character font for DVD menu. | ||
| Times | ||||
| Courier | ||||
| J-Font | Mincho | Select Japanese font for DVD menu. | ||
| Gothic | ||||
| Menu Design | Design Select | Select Button Layout | Select menu design including button type. | |
| Thumbnail | Go To Video | Set thumbnail for posting to button. | ||
| Button Text | Number / Name | Select character format for button text. | ||
| Number | ||||
| Name | No characters are used for menus when “Disabled” is selected. | |||
| Disabled | ||||
| Menu Modification | Background | Default | Select background type when changing background image. | |
| HDD Library | ||||
| Title Picture | ||||
| Image | Default | Select background image. | ||
| Select Picture | ||||
| Go To Video | ||||
| Disc Name | (Text Edit) | Input characters for input to DVD menu. | ||
| Select Color | Default | Set color select. | ||
| 11 colors List | ||||
| Active Color | Default | Set active color. | ||
| 11 colors List | ||||
| Navigation Cmd | Introduction Clip | Disabled | Set opening clip. | |
| Clip List | ||||
| -User Operation | Disabled | Set user operations for opening clip playback. | ||
| Enabled | ||||
| First Play PGC or Post Cmd | Stop | Sets operations after DVD player begins playback or opening clip playback. | ||
| Title | ||||
| Menu | ||||
| Title Post Cmd | Stop | Set action after title playback. | ||
| Return to Menu | ||||
| Next Title | ||||
| Repeat Title | ||||
| Idle Clip | Disabled | Sets clip for playback on idle screen. | ||
| Clip List |
Note: Items in bold type are backed up and restored in the section "Backing up and Restoring System Settings" (page 77).
| EDIT | DVD Menu | Navigation Cmd | -Waiting Time | 4min 3min 2min 1min 30sec | Sets time until beginning idle clip playback. |
| Del/Init Library | Type | Background | Select type to delete. | ||
| Layout | |||||
| Design Select | Select Background or Layout | Select library to delete and press the Delete button to delete it. | |||
| Project | Record/Name | Name | Selected Project at top menu | Display name of currently selected project. | |
| Protect | Disabled | Prevent erasure of clips in projects. | |||
| Enabled | |||||
| Record to | DVD Only | Select whether to record also to HDD. | |||
| DVD&HDD | |||||
| Num of Clips | 15 | Display number of clips in project. | |||
| Num of Titles | 13 | Display number of titles in project. | |||
| Last Modified Date | 2002.05.23 00:00:00 | Indicates date on which project was last modified. | |||
| Total Capacity | 1234MB | Display total project capacity. | |||
| Copy Project | Copy To | (Text Edit) | Copy project to new project. | ||
| Copy Clip | Source Drive | HDD | Select the copy source. | ||
| DVD1 | |||||
| DVD2 | |||||
| Copy From | Project List | Select project source for copy. | |||
| Clip | Clip List | Select clip for copying. | |||
| Rename Clip | Clip1 | (Text Edit) | Set clip name. | ||
| Clip2 | |||||
| Clip3 | |||||
| Clip4 | |||||
| Clip5 | |||||
| next | |||||
| Export | Clip | Clip List | Attach file name to clip and export. | ||
| VOB Name | (Text Edit) | ||||
| Delete | Delete | Project List except current project | Delete selected project. | ||
| Title | Target Clip | Edit To (HDD) | Clip List | Select clip for edit. | |
| Info/Rename | Name | (Text Edit) | Display name of clip (editing also possible). | ||
| Total Time | xx:xx:xx | Display clip time. | |||
| Capacity | xxxxxMB | Display clip capacity. | |||
| Chapter | Chapter 1 | (Text Edit) | Display name of chapter (editing also possible). | ||
| Chapter 2 | |||||
| Chapter 3 | |||||
| Chapter 4 | |||||
| Chapter 5 | |||||
| Next Page | |||||
| Editing | Trimming Clip | Go To Video | Perform clip trimming. | ||
| Chapter Points | Go To Video | Edit the chapter point in a clip. | |||
| Divide Clip | Go To Video | Divide clip into two files. | |||
| EDIT | Title | Title Selection | Clip 1 | CLEAR/ALL CLEAR/UP/DOWN/CLIP LIST | Display the clip with the assigned title and edit in order. |
| Clip 2 | |||||
| Clip 3 | |||||
| Clip 4 | |||||
| Clip 5 | |||||
| Next Page | |||||
| DVD Disc | Finalize | Finalize | Selected Drive | DVD finalize. | |
| Initialize | Initialize | Quick Format | Use Quick Format to initialize DVD-RW disc. | ||
| Full Blank | Erase all DVD-RW contents. | ||||
| Unfinalize | Unfinalize | Selected Drive | Canceling finalization of DVD-RW. | ||
| Make Disc | Target | DVD1 | Select destination for recording selected project to disc and execute. | ||
| DVD2 | |||||
| DVD1&2 | |||||
| Make Image | Target Image | File Name Input | Enter the name for the selected project and create disc image file. | ||
| APP | Auto Capture | IN/OUT Point | Preroll Time | 1 - 5 - 10 Seconds | Set pre-roll time. |
| Offset(Frame) | 0 -- 17 -- 30 Frame | Set frame offset. | |||
| Record As | Title(Stop) | Select OUT point operation. | |||
| Chapter(Pause) | |||||
| Pause | |||||
| IN/OUT Point | (Time Code Setting)[Mark] | Set IN/OUT point. | |||
| Chapter Point | Chapter Point | (Time Code Setting)[Mark] | Set chapter point. | ||
| EDL Command | Command | Finalize | Designate additional special command to EDL. | ||
| Initialize | |||||
| Wait | |||||
| EDL | IN/OUT Point 1 | CLEAR/ALL CLEAR/UP/DOWN | Perform editing of EDL. | ||
| IN/OUT Point 2 | |||||
| IN/OUT Point 3 | |||||
| IN/OUT Point 4 | |||||
| IN/OUT Point 5 | |||||
| Next | |||||
| EDL Load/Delete | Load | EDL List | Loads selected EDL. | ||
| Delete | EDL List | Delete selected edit list. | |||
| EDL Save | Save To | File Name Input | Save EDL or save with new name. | ||
| Cpy/Impt/Bkup | Disc Copy | Source | DVD1 | Select copy source. | |
| DVD2 | |||||
| Destination | DVD1 | Select copy destination. | |||
| DVD2 | |||||
| Disc Image Copy | Source | DVD1 | Select the copy source. | ||
| DVD2 | |||||
| Input Image Name | File Name Input | Enter the filename of the file to be created. | |||
| Image Copy/Del | Source Image | File Name Input | Select the copy source or the file to be deleted. |
Note: Items in bold type are backed up and restored in the section "Backing up and Restoring System Settings" (page 77).
| APP | Cpy/Impt/Bkup | Image Copy/Del | Destination | DVD1 | Select the destination of the file to be created. |
| DVD2 | |||||
| DVD1&2 | |||||
| Menu Import | Type | Background | Select type of background image. | ||
| Layout | Select type of menu layout image. | ||||
| Source | Import Directory | Select source for importing of background image/menu layout image. | |||
| DVD1 | |||||
| DVD2 | |||||
| Source File | ALL | Select background image/menu layout image for import. | |||
| xxxx.bmp | |||||
| xxxx.jpg | |||||
| EDL Import | Source | Import Directory | Select source for edit list import. | ||
| DVD1 | |||||
| DVD2 | |||||
| EDL Import | Source File | ALL | Select edit list source file. | ||
| xxxxxxxx | |||||
| yyyyyyyy | |||||
| Backup | Backup To | USB HDD | Select the destination of backup data (USB HDD). | ||
| Type | Project | Select backup type. | |||
| Image File | |||||
| Menu Library | |||||
| EDL | |||||
| Target | ALL | Select project or image file to back up. | |||
| Project Name or File Name List | |||||
| Remaining Capacity | xxxxGB | Display free space on USB HDD. | |||
| Restore/Del | Restore From / Del | USB HDD | Select source (USB HDD) to be restored or deleted. | ||
| Type | Project | Select type of restore or delete process. | |||
| Image File | |||||
| Menu Library | |||||
| EDL | |||||
| System Settings | |||||
| Target | ALL | Select project or image file to restore or delete. | |||
| Project Name or File Name List | |||||
| Remaining Capacity | xxxxGB | Display free space on USB HDD. | |||
| SET UP | System | System Settings | Keyboard | US Type(101) | Select keyboard type. |
| Japan Type(106) | |||||
| Key Repeat Speed | Slow | Select key repeat speed. | |||
| Medium | |||||
| Fast | |||||
| Mouse | Generic | Select mouse type. | |||
| Mouse Speed | Slow | Select mouse cursor movement speed. | |||
| Medium | |||||
| Fast | |||||
| SET UP $ystem | System Settings | Time Zone | -12 to +13, City Name | Select time zone. | |
| Date(mm/dd/yyyy) | xx/xx/2xxx | Set date. | |||
| Time(hh:mm:ss) | xx:xx:xx | Set time. | |||
| F-Key Set 1-6 | F-Key Enable | F-Key Only | Select key combinations for function key operation. | ||
| Ctrl + F-Key | |||||
| Shift + F-Key | |||||
| F1 | Not Set Display Function Drive Select Function/Back Preview REC Play Pause Stop Scan Fwd Scan Rev Skip Fwd Skip Rev Slow Fwd (*1) Slow Rev (*2) Step Fwd Step Rev Local/Remote Composite out Finalize Initialize Unfinalize Make Disc EDL Rec | DV Out VIN(Composite) VIN(S-Video) VIN(Beta) (*3) VIN(SMPTE) (*3) IN(DV) AIN(RCA) AIN(XLR) Menu Top Menu Return Repeat Repeat A-B Audio Angle Subtitle Title/Chp/Time Time Search >10 TV System Reserved (*4) Reserved (*4) Reserved (*4) Reserved (*4) | Set allocation to function key F1. | ||
| F-Key Set 7-12 | F7 | Set allocation to function key F7. | |||
| F8 | Set allocation to function key F8. | ||||
| F9 | Set allocation to function key F9. | ||||
| F10 | Set allocation to function key F10. | ||||
| F11 | Set allocation to function key F11. | ||||
| F12 | Set allocation to function key F12. | ||||
| Network | Network | OFF | Select whether to enable network. | ||
| ON | |||||
| DHCP/Manual | DHCP | Select IP address setting method. | |||
| Manual | |||||
| IP Address | xxx.xxx.xxx.xxx | Select manual IP address. | |||
| Subnet Mask | xxx.xxx.xxx.xxx | Select manual sub-net mask. | |||
| Gateway | xxx.xxx.xxx.xxx | Select manual gateway address. | |||
| Mac Adress | xx:xx:xx:xx:xx:xx | Display MAC address. | |||
| UPS Setting | Model | Disabled | Select UPS. | ||
| APC Smart-UPS 500 | |||||
| APC Smart-UPS 700 | |||||
| Shutdown Delay | 30 seconds | Select time until shutdown via UPS. | |||
| 60 seconds | |||||
| Information | System Version | Application Ver / OS Ver | Display system version. | ||
| Power-On Time | Total Hours | Display total power-on time. | |||
| HDD Access | Total Hours | Display HDD access time. | |||
| Drive 1(R/W) | Read/Write Time | Display Drive 1 operating time. | |||
| Drive 2(R/W) | Read/Write Time | Display Drive 2 operating time. | |||
| Service Info | HDD Smart/PCI Error | Display Smart information on hard disk or information on internal PCI bus. | |||
| HDD Tools | Target Drive | HDD | Format and confirm operation of data area of HDD. | ||
| USB HDD (*5) | |||||
| Remaining Capacity | xxxxGB | Display hard disk or USB HDD free space. | |||
| Operation | Control Settings | Control | Local | Switch external control. | |
| Remote | |||||
*1: During playback, initiates slow playback.
*2: During playback, initiates slow reverse playback.
*3: When PAL is selected as the TV system, automatically set to Component.
*4: Disabled and reserved for future expansion. Performs no function and should not be set.
*5: Displayed only when USB HDD is connected.
| SET UP | Operation | Control Settings | Port | RS-422A | Select external control port. |
| Disabled | |||||
| IEEE1394 (*6) | |||||
| Time Code | RS-422A | Select time code input. | |||
| LTC | |||||
| IEEE1394 (*6) | |||||
| Eject Settings | Eject | Select Eject command operation. | |||
| Fainalize & Eject | |||||
| Video Settings | External Sync | Disabled | Select external sync signal for playback. | ||
| Enabled | |||||
| OSD | Enabled | Enable/disable OSD display. | |||
| Disabled | |||||
| Composite Out | Source Monitor | Enable/disable input pass-through for composite/RCA output. | |||
| Decoder Out | |||||
| Background Color | Black | Select background image during idling. | |||
| Blue | |||||
| DV OUT | Enabled | Enable/disable DV connector output. When enabled, outputs during playback only. (*7) | |||
| Disabled | |||||
| Test Signal | Start | Output color bar. | |||
| HDD Recording | Time Shift PLAY | Enabled | Enable/disable playback of previous recorded portion during recording (time-shift recording). | ||
| Disabled | |||||
| Info Language | Language | English(US) | Select language for information display and character input on Function Menu. | ||
| Japanese | |||||
| Recording | Video/Audio | Video Encode Rate | 32 Levels Setting | Set encoding rate. | |
| Video Filter(NR) | 16 Levels Setting | Set video filter level. | |||
| Audio Encode | Dolby Digital | Select audio encoding format. | |||
| LPCM | |||||
| Audio Level | (L) -48 to +14 setting | Set audio level. | |||
| (R) -48 to +14 setting | |||||
| (L/R) -48 to +14 setting | |||||
| Aspect | 4:3 | Select video aspect ratio. | |||
| 16:9 | |||||
| Setup Level (*8) | 0 IRE | Select setup level. | |||
| 7.5 IRE |
*6: Displayed only when [V Input] is set to "DV".
*7: Playback begins about 5 seconds after pressing the PLAY button on front panel/remote control unit.
*8: Not displayed when TV system is set to PAL.
Note: Items in bold type are backed up and restored in the section "Backing up and Restoring System Settings" (page 77).
| SET UP | Recording | Others | Auto Chapter | Manual | Select method for inserting chapter mark in title. When Manual is selected, chapter marks are inserted with ENTER button. |
| 3 min | |||||
| 5 min | |||||
| 10 min | |||||
| 15 min | |||||
| 30 min | |||||
| 60 min | |||||
| REC Button | REC Start | Select REC button function. | |||
| Standby ->REC | |||||
| Playback | Video | Aspect | 4:3(LB) | Select video aspect ratio during playback. | |
| 4:3(PS) | |||||
| 16:9 | |||||
| Still Mode | Auto | Select still display mode. | |||
| Frame | |||||
| Field | |||||
| Audio | Dolby Digital OUT | Dolby Digital | Select whether to convert Dolby Digital to PCM. | ||
| Convert To PCM | |||||
| DTS OUT | OFF | Set DTS. | |||
| ON | |||||
| 96 kHz PCM OUT | Convert To 48kHz | Select whether to convert 96 kHz PCM to 48 kHz. | |||
| 96kHz | |||||
| MPEG OUT | MPEG | Select whether to convert MPEG audio to PCM. | |||
| Convert To PCM | |||||
| Language | Audio | English | Select audio language. | ||
| Japanese | |||||
| Others->Next Menu | |||||
| Subtitle | English | Select subtitle language. | |||
| Japanese | |||||
| Others->Next Menu | |||||
| DVD Menu | English | Select DVD menu language. | |||
| Japanese | |||||
| Others->Next Menu | |||||
| Subtitle Display | ON | Select subtitle ON/OFF. | |||
| OFF | |||||
| Others | Parental Level | 1 - 8, off | Set parental level. | ||
| Country Code | us | Set country code for parental management. | |||
| jp | |||||
| Others->Next Menu |
Note: Items in bold type are backed up and restored in the section "Backing up and Restoring System Settings" (page 77).
| STATUS Display currently selected recording | Drive | HDD | destination/playback source.Also change recording destination/playback source. |
| DVD1 | |||
| DVD2 | |||
| DVD1&2 | |||
| Project | [new]h03mmdd_xx | Display currently selected project.Also change project. | |
| Project List | |||
| V Input | Composite | Display currently selected video input.Also change video input. | |
| S-Video | |||
| Component(Beta) (*9) | |||
| Component(SMPTE) (*9) | |||
| DV | |||
| SDI (*10) | |||
| A Input | RCA | Display currently selected audio input.Also change audio input. | |
| XLR | |||
| DV | |||
| SDI (*10) | |||
| AES/EBU (*10) | |||
| TV System | NTSC | Switch TV system setting. | |
| PAL | |||
| HDD | Project : xxx | Display number of projects on hard disc. | |
| Remaining : xxx.xx GB | Display remaining available space on hard disc. | ||
| DVD1 | No Disc | Display drive disc loading condition.(r) indicates recordable DVD;(f) indicates DVD-RW has been finalized.DVD-RW indicates RW disc requiring initialization.DVD indicates ROM disc or DVD-R has been finalized. | |
| DVD-R(r) | |||
| DVD-RW(r) | |||
| DVD-RW(f) & Volume Name | |||
| DVD-RW | |||
| DVD & Volume Name | |||
| CD | |||
| Unknown | |||
| DVD2 | No Disc | ||
| DVD-R(r) | |||
| DVD-RW(r) | |||
| DVD-RW(f) & Volume Name | |||
| DVD-RW | |||
| DVD & Volume Name | |||
| CD | |||
| Unknown |
*9: When TV system is PAL, combined under [Component].
*10: Displayed only when SDI/AES EBU input port is installed.
Shortcut key Function
Ctrl + P Play
Ctrl + L Pause
Ctrl + S Stop
Ctrl + N Scan Fwd
Ctrl + B Scan Rev
Ctrl + Shift + N Skip Fwd
Ctrl + Shift + B Skip Rev
Ctrl + . > Step Fwd
Ctrl + , < Step Rev
Ctrl + Shift + . > Slow Fwd (During playback, initiates slow playback.)
Ctrl + Shift + , < Slow Rev (During playback, initiates slow reverse playback.)
Ctrl + M Top menu
Ctrl + T Frame time
Ctrl + C Search
Ctrl + F Finalize
Ctrl + I Initialize
Ctrl + W Make disc
Ctrl + U Unfinalize
Ctrl + E DVD1 Eject
Ctrl + Shift + E DVD2 Eject
■Messages displayed in dialogue box during Function Menu operations
| Item | Message | Comment |
| TV System | Switch TV System | Switches TV system mode. When [OK] is pressed, TV system is switched temporarily. |
| TV System | After 10 seconds, TV System will return to previous mode. | When [OK] is pressed, TV system setting is maintained. Either press [Cancel] or wait 10 seconds to return to former setting. |
| Network | Network Error, Check Connection. | Check Ethernet cable connection. |
| Network | Network Settings Error. | There is something the matter with the network. Check that the IP address, subnet mask and gateway address are correct. |
| Text entry | Input Parameter Error. | The entered value is outside the range. Enter the correct value. |
| HDD format | Delete All User Data? | Displayed at start of hard disk formatting operation. All data previously recorded on the hard disk drive will be erased. |
| HDD format | Please eject a disc from drive, before formatting HDD. | The hard disk cannot be formatted when there is a disc in the drive. Eject the disc and try again. |
| HDD check | Start File System Check? | Displayed at start of hard disk check. Depending on the condition of the hard disk drive, this operation may require several minutes to complete. |
| USB HDD format, check | No USB HDD. | The USB HDD cannot be recognized. |
| USB HDD format | Format USB HDD(******) | Appears when USB HDD formatting starts. Delete all data on a USB HDD. |
| Eject | Do you finalize the disc to allow playback on other players? | When [Finalize] is pressed, the disc is finalized and then ejected. If [Eject] is pressed, the disc is ejected without being finalized. |
| Initialize | This is not a DVD-RW disc. | Only DVD-RW discs can be initialized. |
| Initialize | There is no disc. | No disk has been loaded. Insert a DVD-RW disc. |
| Initialize | This disc has been finalized. Reinitialize to record. | Press the Initialize button to reinitialize the disc. |
| Initialize | Disc initialization failed. | DVD disc initialization failed. A disc fault may have occurred. |
| Initialize | There is video recording data in this disc. | Press the Initialize button to initialize the disc. |
| Finalize | The disc needs to be finalized. | Finalize the disc. |
| Finalize | Cannot be finalized. | This disc cannot be finalized. |
| Finalize | There is no disc. | No disc has been loaded in the drive. |
| Finalize | The size of menu is too large. | The attached menu size is too large for the current project title composition. Change to a menu design with more buttons on each page of the menu. Also, by changing to title menu, it may be possible to construct the menu with a smaller volume. |
| Finalize | Disc finalization failed. | DVD disc finalization failed. A disc fault may have occurred. Since the DVD-Video was not finalized, playback may not be possible on some players. |
| Copy | The disc needs to be initialized. | The DVD-RW disc has already been recorded. To rerecord the disc, initialize it once again. |
| Copy | Target is not ready or illegal disc. | Check target disc. |
| Copy | Source is not ready or illegal disc. | Check the copy source. A copyrighted DVD disc or a DVD-RW disc with CPRM cannot be selected as a copy source. |
| Copy | There is no disc. | No disc has been loaded. Insert a disc. |
| Copy | This is not a blank disc. | When using DVD-R disc, insert an unused disc. |
| Copy | Not enough space to copy. | The target disc lacks sufficient open capacity to copy. |
| Copy | Not enough space to copy. | Not enough free space on the hard disk to store copied data. |
| Copy | The disc contains data. | Not a blank or initialized disc. |
| Copy | The disc needs to be finalized. | Copy source disc must be finalized. |
| Copy | No Image File(HDD) exists. | No image file on the hard disk. |
| Copy | Copy disc failed. | Disc copying failed. A disc fault may have occurred. |
| Copy | This will overwrite any existing copied image. | This operation will overwrite hard disk image files. |
| Copy | Invalid target file name. | See “About File Names” (page 94). |
| Copy | Copy data failed. | Attempt to copy data failed. |
| Import | No file to import. | No import files. |
| Import | Do you really want to overwrite ***** | The ***** file is overwritten. |
| Import | Does it overwrite all files when the same file exists? | All files with the same name are overwritten. Select “No” do display a dialog when there are files with the same name. |
| Import | Import failed. | Failed to import data.Either try again, or check original data. |
| Export | Do you want to export? | VOB file export confirmation query. |
| Export | The file *** exists.Now, do you want to overwrite? | Continuing this operation will overwrite (erase) this file. |
| Export | Please input a VOB name. | Input the desired VOB file name. |
| Export | There is no HDD space to export. | Check your remaining hard disk drive space. |
| Menu | No disc in drive. | No disc is in drive. Insert a disc. |
| Menu | There is no title. | No selectable title exists. |
| Menu | This disc is not supported. | This disc contains no selectable title. |
| Menu | There is no title in this project. | This project has no titles, so no thumbnails can be selected. |
| Menu | Do you want to save Current Menu to Default Menu? | Press [Yes] to copy menu data. |
| Menu | Do you want to load Default Menu to Current Menu? | Press [Yes] to copy menu data. |
| Menu Preview | The number of titles is over 99. | Current project already contains 99 titles. A DVD-Video disc can hold a maximum of 99 titles. Use the Title Editing [Title Selection] command to reduce the number of titles. |
| Menu Preview | The size of menu is too large. | The attached menu size is too large for the current project title composition. Change to a menu design with more buttons on each page of the menu. Also, by changing to title menu, it may be possible to construct the menu with a smaller volume. |
| Menu Preview | Data size is over 4.7GBytes. | The current project title capacity exceeds 4.7 GB. Use the Title editing [Title Selection] command to reduce the number of titles, or use trimming editing to shorten the length of titles. |
| Menu Preview | Menu not specified for preview. | The [Menu Type] specifies “No Menu.” To append a menu, use the [Menu Type] command. |
| Emulation | Data size is over 4.7GBytes. | The current project title capacity exceeds 4.7 GB. Use the Title editing [Title Selection] command to reduce the number of titles, or use trimming editing to shorten the length of titles. |
| Emulation | The size of menu is too large. | The attached menu size is too large for the current project title composition. Change to a menu design with more buttons on each page of the menu. Also, by changing to title menu, it may be possible to construct the menu with a smaller volume. |
| Emulation | Current TV System differs from a menu clip TV System. | The current TV system mode must be the same as that of the menu clip. |
| Emulation | Different audio encoding formats can’t exist in intro and idle clips. | The menu clips must have the same audio type. |
| PROJECT-Record/Name | The same file exists. | A project with the same name exists. Enter another name. |
| PROJECT-Delete | No target project is selected. | No project has been selected. Select a project to delete. |
| PROJECT-Delete | This PROJECT is proected. | The selected project has been protected and cannot be deleted. |
| PROJECT-Delete | Cannot delete new project. | A new project cannot be deleted. |
| PROJECT-Copy | Enter new project name. | To copy a project, enter a project name. |
| PROJECT-CopyClip | No target clip is selected. | Select a clip for copying. |
| PROJECT-CopyClip | Is this clip to be added as a title? | Confirm whether you wish to add the copied clip as a title or not. |
| PROJECT | Not enough space in HDD. | No free space left on the hard disk. Delete projects no longer needed to provide enough space for recording. |
| Make Disc | Data size is over 4.7GBytes. | The current project title capacity exceeds 4.7 GB. Use the Title editing [Title Selection] command to reduce the number of titles, or use trimming editing to shorten the length of titles. |
| Make Disc | The size of menu is too large. | The attached menu size is too large for the current project title composition. Change to a menu design with more buttons on each page of the menu. Also, by changing to title menu, it may be possible to construct the menu with a smaller volume. |
| Make Disc | There is no disc. | No disc has been loaded in the designated drive. |
| Make Disc | This is not a blank disc. | The designated disc has recorded contents. |
| Make Disc | The disc needs to be initialized. | The designated disc has not yet been initialized. Initialization is necessary before recording. |
| Make Disc | This is an illegal disc. | The designated drive contains an improper disc. |
| Make Disc | There is no title. | No title has been assigned. |
| Make Disc | The number of titles is over 99. | 99 titles already exist.A DVD-Video disc can hold a maximum of 99 titles. |
| Make Disc | Make disc failed. | Disc could not be created. A disc fault may have occurred. |
| Make Disc | Current TV System differs from a menu clip TV System. | The current TV system mode must be the same as that of the menu clip. |
| Make Disc | Different audio encoding formats can't exist in intro and idle clips. | The menu clips must have the same audio type. |
| Make Image | Invalid target file name. | See "About File Names" (page 94). |
| Make Image | Not enough space in HDD. | The hard disk does not have sufficient empty space to create the file. |
| Trimming | Do you want to update or create a new clip? | Select whether to save the edited data to a new file or to overwrite the original file. |
| Trimming | This VOB can't be trimmed. | This VOB cannot be trimmed. |
| Trimming | New clip can't be created unless duration is under HH:MM | Not enough space on the hard disk to save as a separate item to disk. Overwriting is possible. The item can be saved separately if trimming time is HH:MM or less. |
| Trimming | Please cut clip less than HH:MM | Not enough space on the hard disk for trimming. Trimming is possible if trimming time is HH:MM or less. |
| Trimming | New clip can't be created.Clips should be less than 255. | Too many clips already exist, so cannot create a new one. To save new clip, reduce the number of existing clips. |
| Divide | Do you want to update or create a new clip? | Confirm whether you wish to overwrite edited results or create a new clip. |
| Divide | This VOB can't be divided. | This VOB cannot be divided. |
| Divide | There is no remaining capacity.New clip can't be created. | The hard disk has insufficient space to create a new clip.Can only overwrite previous clip. |
| Divide | There is no remaining capacity.This VOB can't be divided. | The hard disk has insufficient space to allow division of the clip. |
| Divide | There are too many clips.Over 255 clips can't be created. | Too many clips already exist, so cannot create a new one. |
| Divide | The number of titles is 99.This VOB can't be divided. | Too many titles already exist, so cannot divide the VOB. |
| Divide | The number of clips is 255.This VOB can't be divided. | Too many clips already exist, so cannot divide the VOB. |
| Initialize Laibrary | Do you really want to Initialize? | Initializes library. This deletes imported libraries. |
| Delete Library | Default Layout/Background can't be deleted. | Layouts and background images set in the default menu cannot be deleted. |
| Delete Library | Please select Layout/Background before delete. | Select layout/background image to delete. |
| Delete Library | Do you really want to delete ***** | The ***** file will be deleted. |
| Backup / Restore | Cannot restore the current project. | Restore was attempted for the current project. A current project cannot be restored. |
| Backup / Restore | Do you really want to overwrite ***** | The ***** file is overwritten. |
| Backup / Restore | Does it overwrite all files when the same file exists? | All files with the same name are overwritten. Select “No” do display a dialog when there are files with the same name. |
| Backup / Restore | Not enough space in HDD. | No free space left on the hard disk.Free up space on the internal hard disk or USB HDD. |
| Backup / Restore | Backup failed. | The backup attempt failed. Either try again, or check for problems on the USB hard disk. |
| Backup / Restore | Restore failed. | The restore attempt failed. Either try again, or check for problems on the USB hard disk. |
| Backup / Restore | There is saved parameter file. Do you want to overwrite? | This parameter has already been set. Press [YES] if you wish to overwrite the previous setting. |
| Backup / Restore | Do you really want to restore system settings. | Press [Yes] to overwrite (erase) present system settings. |
| Backup / Restore | This PROJECT is protected. | The target project has been set to protect against erasure, so cannot overwrite restore. |
| Backup / Restore | No data to restore. | No data exists to restore. |
| Backup / Restore | Illegal data to restore. | The data to be restored is faulty. |
| Backup / Restore | Load error. | The data to be restored could not be loaded successfully. |
| Delete | Delete failed. | Failed attempt to delete. Either try again or check for problems on the USB hard disk. |
| Unfinalize | Menu Data is lost after unfinalization. | The DVD menu information is lost when a disc is canceled finalization. |
| Unfinalize | Cannot be unfinalized. | Finalization cannot be undone.(Finalization on discs other than DVD-RW discs created on the PRV-LX1 cannot be undone.) |
| Unfinalize | Disc unfinalization failed. | Failed attempt to unfinalize the disc. Disc may have problems. |
■Messages Displayed in Dialogue Box or Main Unit Display during Recording Operation
| Item | Message | Comment |
| REC | HDD_CAPA is not enough. | The hard disk drive has insufficient open capacity. Erase a project, to open enough space on the hard disk drive for the recording. |
| DVD_CAPA is not enough. | The DVD disc has insufficient remaining capacity. | |
| This disc is not writable. | The DVD disc cannot be written to. | |
| There is no disc. | No disc has been loaded. | |
| The number of titles is 99. | This disc has 99 titles recorded; no additional titles can be recorded. | |
| No SDI_V Input. | There is no SDI Video signal input. | |
| No SDI_A Input. | There is no SDI Audio signal input. | |
| No AES/EBU Input. | There is no AES/EBU signal input. | |
| No DV Input. | There is no DV signal input. | |
| Copy Protection | The input signal has been copy protected; copying is not possible. | |
| ENCODER ERROR********** | An encode error occurred. Reboot the system. (******* indicates the error code.) | |
| DRIVE ERROR***** | A drive error occurred. A drive fault may have occurred. | |
| The number of clips is 255. | There are 255 project clips. The maximum number of clips in a project is 255. | |
| REC | Cannot record to different condition discs. | Simultaneous recording to two discs is possible only if they contain identical data. |
| No Video Input. | No video input is connected. Check inputs. | |
| Confirm TV system of the video input. | Check input signal's TV system mode and mode set on Function Menu. | |
| Stopped automatically from Rec-Pause for the system protection. | When recording to DVD, REC-Pause is automatically switched to STOP after 1 hour, to preserve system components. | |
| Stopped automatically because of no HDD remaining capacity. | Insufficient remaining space on HDD, so stopped recording automatically. | |
| Stopped automatically because of no DVD remaining capacity. | Insufficient remaining space on DVD, so stopped recording automatically. | |
| IN-OUT REC | OUT Point must be larger than IN Point + 1 sec. | An IN-OUT REC cannot be performed within 1 sec from IN point to OUT point. |
| VTR(RS-422A) is not connected. | VTR (RS-422A) is not connected. Check also VTR settings. | |
| VTR(DV) is not connected. | VTR (DV) is not connected. Check also VTR settings. | |
| Stop operation is needed to finish IN/OUT recording. | Previous auto capture is in pause mode. To end the auto capture, press the STOP button or execute “Record As Title (Stop)” auto capture for recording stop. | |
| EDL REC | EDLFILE OPEN ERROR | Failed attempt to load EDL file. File is either too big (max. 2MB), or file may be damaged. |
| Invalid target file name. | EDL file name is incorrect. See “About File Names” (page 94). | |
| Do you really want to load EDL:***** | Confirm loading of EDL file. | |
| Do you really want to delete EDL:***** | Confirm deletion of EDL file. | |
| EDLFILE ERROR not start PIONEER-DVDRec-EDL | Repair EDL file. | |
| EDLFILE ERROR not support EDL VER*** | EDL file version *** is not supported. | |
| EDLFILE ERROR: line ** Syntax error 01 | EDL file errorFinal REC must end with STOP command. | |
| EDLFILE ERROR: line ** Syntax error 02 | EDL file errorNo command after the number. | |
| EDLFILE ERROR: line ** Syntax error 03 | EDL file errorREC before INI must end with STOP command. | |
| EDLFILE ERROR: line ** Syntax error 04 | EDL file errorREC cannot be performed after FNL. | |
| EDLFILE ERROR: line ** Syntax error 05 | EDL file errorDesignate CHP after REC.CHP, T-N, C-N cannot be designated after WAI, INI, FNL or SET. | |
| EDLFILE ERROR: line ** Syntax error 06 | EDL file errorREC before FNL must end with STOP command. | |
| EDLFILE ERROR: line ** Syntax error 07 | EDL file errorCommand not defined. | |
| EDLFILE ERROR: line ** Syntax error 08 | EDL file errorOUT Point must be larger than IN Point + 1 sec. | |
| EDLFILE ERROR: line ** Syntax error 09 | EDL file errorSET must be designated before REC-PAUSE. | |
| EDLFILE ERROR: line ** Syntax error 10 | EDL file errorTimeCode, Rate, Filter values are out of range. | |
| Total title num is over 99. | A DVD-Video disc can hold a maximum of 99 titles. | |
| Total clip num is over 255. | The maximum number of clips in a project is 255. | |
| More than 25f is carried out as 24f. | PAL has a frame rate of 24 fps. Check your entry. |
- "line**" indicates the line number in the EDL file. The EDL file begins with a single line header. Headers are omitted on lists displayed with the Function Menu's APP Section → [Auto Capture] → [EDL] command, with the result that the error line number in that case is displayed as "line**-1".
■Messages Displayed in the dialog/OSD or Main Unit Display during Playback Operation
| Item | Message | Comment |
| DVD-Video playback | Incompatible disc region number. | This disc has a region code which cannot be played on this player. |
| Operation cannot be performed. | This command is not supported with current playback condition. | |
| Operation is not permitted. | The operation is not permitted with this disc. | |
| No title on the disc. | The current disc has no playable titles. | |
| Unknown disc. | This disc cannot be played. | |
| ERROR REGION (main unit display) | This disc has a region code which cannot be played on this player. | |
| OPERATION INHIBITED (main unit display) | The operation is not permitted with this disc. | |
| DISC NO TITLE (main unit display) | The current disc has no playable titles. | |
| UNKNOWN DISC (main unit display) | This disc cannot be played. | |
| Temporarily change parental level? | Attempt to view a title prohibited under parental management level. To playback title, press [YES]; to cancel playback, press [NO]. | |
| HDD playback | No title in the project. | The current project has no playable titles. |
| NO TITLE PROJECT (main unit display) | The current project has no playable titles. |
About File Names
On this system, characters usable for file names are limited to single-byte alphanumeric, plus period (.) and underscore (_). Also, file names beginning with a period are prohibited. In the case of EDL files, the file extension ".edl" must be added.
Incorrect operations can be mistaken as malfunctions. If you believe the unit is not operating correctly, consult the chart below. Sometimes incorrect operation may be due to a malfunction in another component. If the problem is not fixed, check the other components used with the player. If the problem still persists, contact your nearest Pioneer authorized service center or dealer for service.
| Symptom | Cause/Remedy | Reference page |
| No power | ●Connect power cord to outlet. | 16 |
| No picture | ●Check for proper connections.●Change the video monitor or other input to the input connected to the PRV-LX1.●If a non-progressive-scan video monitor is connected to the component video output connector and the Component output is set to Progressive (525p), no picture will appear. Hold the main unit's front panel STOP button depressed while pressing the cursor down button to switch the output to Interlaced (525i).●When set to progressive scan (525P), no video image is output to connectors other than the component output.●When [Composite Out] is set to "Source Monitor", during stop mode or otherwise when no image in input to the composite input, no image will be output to the composite output connector. In the same way no sound will be output at the RCA output connectors if no audio is input to the RCA inputs.●Check your TV system mode setting. | 165432 |
| After closing disc table, it opens automatically, or playback will not begin. | ●Insert the disc correctly in the disc table.●Insert disc is with correct up-down orientation.●Clean the disc.●Confirm that the disc region number is proper for the player.●Confirm that the type of disc is proper for the player.●Check and eliminate any condensation inside the unit.●A disc created on the PRV-LX1 that contains many titles may take dozens of seconds to recognize when loaded. The DISC indicator flashes and the disc recording and playback cannot be started during disc recognition. | 7985 |
| Can't record. | ●Confirm that the HDD/DVD have adequate remaining capacity. If HDD are full, erase unneeded titles to add available space.●Confirm that you are not attempting to record copy-protected material.●With DVD-R/RW (video mode) discs, images which are designated as "copy once only" cannot be recorded.●Check your TV system mode setting. | 62, 67 |
| Can't record in video mode on DVD-RW. | ●Recording to Ver.1.0 DVD-RW discs is not supported. Be sure to use discs labeled as Ver.1.1 or later (version number can be found on disc jacket). | |
| Image is elongated vertically or horizontally. | ●If a disc's playback image appears elongated vertically or horizontally, use the [Aspect] command to change the aspect ratio for your video monitor. If the setting cannot be made at the recorder, use your video monitor controls. | 50 |
| External input images are distorted. | ●When using components that output images encoded with analog copy protection signals, connect the component directly to the video monitor as well. | |
| During playback image is distorted or dark. | ●This unit supports analog copy protection systems. Some discs contain analog copy protection signals, and when such discs are played through a VTR, or recorded onto a VTR and then played back, the copy protection signals may make proper playback impossible. For these reasons, the PRV-LX1 should be connected directly to the video monitor as well as to other components. | |
| Cannot playback on DVD player / other DVD recorders. | ●When discs recorded in video mode are to be played back on other players, be sure to finalize them after recording (however, some discs may be unplayable on other players even after finalization). | 44 |
| Image stops during playback, or commands are disabled. | ●Press theEJECTbutton once and then start playback again. | |
| Main unit command buttons don’t work. | ●Hold theSTANDBY/ONbutton depressed for 4 seconds or more to set unit to standby condition. If theSTANDBY/ONbutton also doesn’t work, turn off the main power switch on the rear panel. | |
| Can’t output 96 kHz audio in digital. | ●Some discs prohibit digital output of 96 kHz linear PCM audio. In this case, even if the unit’s [96 kHz PCM OUT] command is set to “96 kHz”, the signal will be converted to 48 kHz for output. | 50 |
| Remote control unit doesn’t work. | ●Operate remote within proper range (7 m).●Change to new batteries. | 1717 |
| Television malfunctions. | ●Video monitors with wireless remote control functions may malfunction when the PRV-LX1’s remote control unit is used. In such cases, separate the television monitor and the PRV-LX1. | |
| Memory settings are erased. | ●If manual disconnection of the power cord or a power failure occurs when the unit is turned on, previously input settings may be erased. Before disconnecting the power plug, always press the unit’sSTANDBY/ON(POWER) button and wait until the display’s[POWER-OFF] display disappears, then set the rear panel’s power switch to OFF. | 6 |
| No sound from speakers, or distorted sound. | ●If video monitor or AV amplifier’s sound volume is set to minimum, raise the sound volume.●When using audio input from external input connector, set the [Audio Level] command.●Check and confirm that all audio cables are connected properly.●Check that all cable plugs are inserted securely in their connectors or jacks.●Clean any dirt from connection plugs and jacks.●No sound is produced during still, frame advance, and slow playback.●DTS audio is output only from unit’s digital audio output connectors. To listen to DTS audio from a DVD disc, the unit’s digital audio output connectors must be connected to the digital audio input connectors of a DTS compliant amplifier, and the [DTS OUT] command must be set to “ON”. If the connected amplifier does not support DTS audio, use the remote control unit’sAUDIObutton or the disc menu to select an audio format other than DTS. | 3750 |
| When a professional VTR is connected to this unit’sDVconnectors, the appear cannot be viewed on a video monitor, or no sound is produced. | ●Connect this unit directly to the professional VTR.●Check that the DV cable is connected properly.●Turn on the power again to the professional VTR.●Turn the power to the PRV-LX1 OFF then ON again. | |
| DVD playback images cannot be viewed on the screen of the professional VTR connected to theDVconnectors, or no sound is produced. | ●Connect this unit directly to the professional VTR.●Check that the DV cable is connected properly.●Try stopping playback and then starting it again.●Turn on the power again to the professional VTR.●Turn the power to the PRV-LX1 OFF then ON again.●The video and audio of DVDs labeled “copying prohibited” or “copy once only” cannot be output.●The audio/video of a component connected to an external input connector cannot be output.●No video or audio signals are output during recording or during recording pause.●Set [DV OUT] to “Enabled”. | 52 |
| An error occurred and data back up or restore operation from the USB HDD failed. | ● Errors may in rare cases occur when used with FTP.Do not use FTP during backup or restore operations. | 76 |
| During loading of DV, the screen stops, and controls are disabled. | ● The screen may freeze and controls may fail to respond if the DV link is disconnected. Hold the STANDBY/ON button depressed for 4 seconds or more to set to the standby mode, then turn on the power once again. | |
| Several seconds of noise occurs when inputting DV. | ● Several seconds of noise may occur if the DV link is disconnected. If the noise does not stop after several seconds, stop the recording and try reconnecting the DV cable, or reconnect the main unit's power cord. | |
| Recorded image has visible noise. | ● If the TV system setting is changed after beginning recording, noise may be occur in the image. | 33 |
| Cannot confirm USB HDD. | ● Use a hub supporting USB 2.0. |
Malfunctions may be caused by static electricity or other external sources. In such cases, normal operation may be restored by disconnecting the power cord and then reconnecting it again. If problem persist, consult your dealer.
Specifications
General:
Power rating: AC 120 V, 50/60 Hz
Power consumption: Maximum 2.0 A
Power consumption during idling: 6.5 W
Weight:
Single-DVD-drive model About 13.8 kg (30 lb 7 oz)
Twin-DVD-drive model About 15.1 kg (33 lb 5 oz)
External dimensions: 427 (W) x 179.5 (H) x 539.5 (D) mm (including projecting parts)
16-13/16 (W) × 7-1/16 (H) × 21-1/4 (D) in (including projecting parts)
Ambient temperature during use: +5 °C to +35 °C (+41 °F to +95 °F)
Ambient humidity during use: 5 – 85% RH (without condensation)
Recording:
Recording format: DVD: DVD-Video
HDD: VOB FILE
Recordable discs: DVD-R
DVD-RW
Video recording format:
Sampling frequency: 13.5 MHz
Compression: MPEG
Audio recording format:
Sampling frequency: 48 kHz
Compression format: Dolby Digital and Linear PCM (non-compressed)
Recording time
DVD-R/RW (manual rate) : About 1 - 6 hours
HDD (manual rate): About 23 – 100 hours
Playback:
playable discs:
DVD-Video, DVD-R, DVD-RW (CD-R, CD-RW, and CD-ROM are supported for data read only)
Video input:
Composite: BNC x 1, 1.0 Vp-p, 75 Ω
B-Y: 0.486/0.700 Vp-p selectable (NTSC), 0.525 Vp-p (PAL), 75 Ω (with 75% color bar)
R-Y: 0.486/0.700 Vp-p selectable (NTSC), 0.525 Vp-p (PAL), 75 Ω (with 75% color bar)
Video Output:
Composite: BNC x 1, 1.0 Vp-p, 75 Ω
L, R: unbalanced: Pin jack x 2, 2 Vrms (0 dBfs), 22 kΩ (or more)
CH1 (L), CH2 (R): balanced: XLR (female) x 2, +4 dBu, 600 Ω
Audio output:
L, R: unbalanced: Pin jack x 2, 2 Vrms (0 dBfs), 1.5 kΩ (or less)
Frequency response: 4 Hz to 22 kHz (DVD fs: 48 kHz)
S/N ratio: More than 80 dB
Distortion (THD+N): Less than 0.02 %
CH1 (L), CH2 (R): balanced: XLR (male) x 2, 0 dBu, 600 Ω load, low-impedance
Frequency response: 4 Hz to 22 kHz (DVD fs: 48 kHz)
S/N ratio: More than 80 dB
Distortion (THD+N): Less than 0.02 %
Digital: unbalanced: Pin jack x 1, 0.5 Vp-p, 75 Ω
External Sync Input:
BNC x 2, black burst, 0.286 Vp-p (NTSC), 0.300 Vp-p (PAL), 75 Ω (ON/OFF)
Other:
DV input/output: 4 pin (i.Link/IEEE 1394 compatible) x 1
LTC input: BNC x 1, 0.5 - 8 Vp-p, 3 kΩ
Remote input: D-sub 9-pin (female) RS-422A compatible x 1 (Inch threads)
Remote output: D-sub 9-pin (female) RS-422A compatible x 1 (Inch threads)
UPS control: D-sub 9-pin (male) RS-232C compatible x 1 (Inch threads)
VGA output: Mini D-sub 15-pin (female) x 1 (Inch threads)
Mouse/keyboard connectors: 4P type A (USB 2.0 compatible) x 4
Ethernet: 8P type (IEEE802.3 compatible, category 5) x 1
Accessories:
Remote control unit: 1
AA batteries: 2
Air filter replacement set: 1
Power cord: 1
Warranty: 1
Operating Instructions: 1
- Specifications and appearance are subject to change without notice.
| Language/Langue Code | Language/Langue Code | Language/Langue Code | |||
| Japanese/japonais (ja) 1001 | Hausa (ha) | 0801 | Quechua (qu) | 1721 | |
| English/anglais (en) 0514 | Hindi (hi) | 0809 | Rhaeto-Romance (rm) | 1813 | |
| French (fr) 0618 | Croatian (hr) | 0818 | Kirundi (rn) | 1814 | |
| German (de) 0405 | Hungarian (hu) | 0821 | Romanian (ro) | 1815 | |
| Italian (it) 0920 | Armenian (hy) | 0825 | Kinyarwanda (rw) | 1823 | |
| Spanish (es) 0519 | Interlingua (ia) | 0901 | Sanskrit (sa) 1901 | ||
| Dutch (nl) 1412 | Interlingue (ie) | 0905 | Sindhi (sd) | 1904 | |
| Russian (ru) 1821 | Inupiak (ik) | 0911 | Sangho (sg) 1907 | ||
| Chinese (zh) 2608 | Indonesian (in) | 0914 | Serbo-Croatian (sh) | 1908 | |
| Korean (ko) 1115 | Icelandic (is) 0919 | Sinhalese (si) | 1909 | ||
| Greek (el) 0512 | Hebrew (iw) 0923 | Slovak (sk) | 1911 | ||
| Afar (aa) 0101 | Yiddish (ji) | 1009 | Slovenian (sl) | 1912 | |
| Abkhazian (ab) 0102 | Javanese (jw) | 1023 | Samoan (sm) | 1913 | |
| Afrikaans (af) 0106 | Georgian (ka) | 1101 | Shona (sn) | 1914 | |
| Amharic (am) 0113 | Kazakh (kk) | 1111 | Somali (so) | 1915 | |
| Arabic (ar) | 0118 | Greenlandic (kl) | 1112 | Albanian (sq) | 1917 |
| Assamese (as) | 0119 | Cambodian (km) | 1113 | Serbian (sr) 1918 | |
| Aymara (ay) | 0125 | Kannada (kn) | 1114 | Siswati (ss) | 1919 |
| Azerbaijani (az) | 0126 | Kashmiri (ks) | 1119 | Sesotho (st) | 1920 |
| Bashkir (ba) | 0201 | Kurdish (ku) 1121 | Sundanese (su) | 1921 | |
| Byelorussian (be) | 0205 | Kirghiz (ky) | 1125 | Swedish (sv) | 1922 |
| Bulgarian (bg) | 0207 | Latin (la) | 1201 | Swahili (sw) | 1923 |
| Bihari (bh) | 0208 | Lingala (ln) | 1214 | Tamil (ta) 2001 | |
| Bislama (bi) | 0209 | Laothian (lo) 1215 | Telugu (te) | 2005 | |
| Bengali (bn) 0214 | Lithuanian (lt) 1220 | Tajik (tg) 2007 | |||
| Tibetan (bo) | 0215 | Latvian (lv) | 1222 | Thai (th) | 2008 |
| Breton (br) | 0218 | Malagasy (mg) | 1307 | Tigrinya (ti) | 2009 |
| Catalan (ca) | 0301 | Maori (mi) | 1309 | Turkmen (tk) | 2011 |
| Corsican (co) | 0315 | Macedonian (mk) | 1311 | Tagalog (tl) | 2012 |
| Czech (cs) 0319 | Malayalam (ml) | 1312 | Setswana (tn) | 2014 | |
| Welsh (cy) | 0325 | Mongolian (mn) | 1314 | Tonga (to) | 2015 |
| Danish (da) | 0401 | Moldavian (mo) | 1315 | Turkish (tr) | 2018 |
| Bhutani (dz) 0426 | Marathi (mr) 1318 | Tsonga (ts) | 2019 | ||
| Esperanto (eo) | 0515 | Malay (ms) | 1319 | Tatar (tt) 2020 | |
| Estonian (et) | 0520 | Maltese (mt) | 1320 | Twi (tw) | 2023 |
| Basque (eu) | 0521 | Burmese (my) | 1325 | Ukrainian (uk) | 2111 |
| Persian (fa) | 0601 | Nauru (na) 1401 | Urdu (ur) | 2118 | |
| Finnish (fi) 0609 | Nepali (ne) | 1405 | Uzbek (uz) | 2126 | |
| Fiji (fj) | 0610 | Norwegian (no) | 1415 | Vietnamese (vi) | 2209 |
| Faroese (fo) | 0615 | Occitan (oc) | 1503 | Volapük (vo) | 2215 |
| Frisian (fy) 0625 | Oromo (om) 1513 | Wolof (wo) | 2315 | ||
| Irish (ga) | 0701 | Oriya (or) | 1518 | Xhosa (xh) | 2408 |
| Scots-Gaelic (gd) | 0704 | Panjabi (pa) | 1601 | Yoruba (yo) | 2515 |
| Galician (gl) | 0712 | Polish (pl) 1612 | Zulu (zu) | 2621 | |
| Guarani (gn) | 0714 | Pashto, Pushto (ps) | 1619 | ||
| Gujarati (gu) | 0721 | Portuguese (pt) | 1620 | ||
Country Code
| Philippines (ph) 1608 | |
| Portugal (pt) 1620 | |
| Russian Federation (ru) 1821 | |
| Singapore (sg) 1907 | |
| Spain (es) 0519 | |
| Sweden (se) 1905 | |
| Switzerland (ch) 0308 | |
| Taiwan (tw) 2023 | |
| Thailand (th) 2008 | |
| United Kingdom (gb) 0702 | |
| USA (us) 2119 | |
| Argentina (ar) 0118 | |
| Australia (au) 0121 | |
| Austria (at) 0120 | |
| Belgium (be) 0205 | |
| Brazil (br) | 0218 |
| Canada (ca) 0301 | |
| Chile (cl) | 0312 |
| China (cn) | 0314 |
| Denmark (dk) 0411 | |
| Finland (fi) | 0609 |
| France (fr) | 0618 |
| Germany (de) | 0405 |
| Hong Kong (hk) | 0811 |
| India (in) | 0914 |
| Indonesia (id) | 0904 |
| Italy (it) | 0920 |
| Japan (jp) | 1016 |
| Korea, Republic of (kr) | 1118 |
| Malaysia (my) | 1325 |
| Mexico (mx) | 1324 |
| Netherlands (nl) | 1412 |
| New Zealand (nz) | 1426 |
| Norway (no) 1415 | |
| Pakistan (pk) 1611 | |
The software programs used on this component include the GNU/Linux system.
The GNU/Linux system contains software licensed for use based on the terms of a GNU General Public License. If necessary, the user may request the source code for this licensed software. In this event, please contact the Pioneer Electronics (USA) Inc. Customer Support Division.
Details of the GNU General Public License can be found at the GNU website (http://www.gnu.org).
GNU GENERAL PUBLIC LICENSE
Version 2, June 1991
Copyright © 1989, 1991 Free Software Foundation, Inc.
59 Temple Place, Suite 330, Boston, MA 02111-1307 USA
Everyone is permitted to copy and distribute verbatim copies of this license document, but changing it is not allowed.
Preamble
The licenses for most software are designed to take away your freedom to share and change it. By contrast, the GNU General Public License is intended to guarantee your freedom to share and change free software--to make sure the software is free for all its users. This General Public License applies to most of the Free Software Foundation's software and to any other program whose authors commit to using it. (Some other Free Software Foundation software is covered by the GNU Library General Public License instead.) You can apply it to your programs, too.
When we speak of free software, we are referring to freedom, not price. Our General Public Licenses are designed to make sure that you have the freedom to distribute copies of free software (and charge for this service if you wish), that you receive source code or can get it if you want it, that you can change the software or use pieces of it in new free programs; and that you know you can do these things.
To protect your rights, we need to make restrictions that forbid anyone to deny you these rights or to ask you to surrender the rights. These restrictions translate to certain responsibilities for you if you distribute copies of the software, or if you modify it.
For example, if you distribute copies of such a program, whether gratis or for a fee, you must give the recipients all the rights that you have. You must make sure that they, too, receive or can get the source code. And you must show them these terms so they know their rights.
We protect your rights with two steps: (1) copyright the software, and (2) offer you this license which gives you legal permission to copy, distribute and/or modify the software.
Also, for each author's protection and ours, we want to make certain that everyone understands that there is no warranty for this free software. If the software is modified by someone else and passed on, we want its recipients to know that what they have is not the original, so that any problems introduced by others will not reflect on the original authors' reputations.
Finally, any free program is threatened constantly by software patents. We wish to avoid the danger that redistributors of a free program will individually obtain patent licenses, in effect making the program proprietary. To prevent this, we have made it clear that any patent must be licensed for everyone's free use or not licensed at all.
The precise terms and conditions for copying, distribution and modification follow.
GNU GENERAL PUBLIC LICENSE
TERMS AND CONDITIONS FOR COPYING, DISTRIBUTION AND MODIFICATION
- This License applies to any program or other work which contains a notice placed by the copyright holder saying it may be distributed under the terms of this General Public License. The "Program", below, refers to any such program or work, and a "work based on the Program" means either the Program or any derivative work under copyright law: that is to say, a work containing the Program or a portion of it, either verbatim or with modifications and/or translated into another language. (Hereinafter, translation is included without limitation in the term "modification".) Each licensee is addressed as "you".
Activities other than copying, distribution and modification are not covered by this License; they are outside its scope. The act of running the Program is not restricted, and the output from the Program is covered only if its contents constitute a work based on the Program (independent of having been made by running the Program). Whether that is true depends on what the Program does.
- You may copy and distribute verbatim copies of the Program's source code as you receive it, in any medium, provided that you conspicuously and appropriately publish on each copy an appropriate copyright notice and disclaimer of warranty; keep intact all the notices that refer to this License and to the absence of any warranty; and give any other recipients of the Program a copy of this License along with the Program.
You may charge a fee for the physical act of transferring a copy, and you may at your option offer warranty protection in exchange for a fee.
- You may modify your copy or copies of the Program or any portion of it, thus forming a work based on the Program, and copy and distribute such modifications or work under the terms of Section 1 above, provided that you also meet all of these conditions:
a) You must cause the modified files to carry prominent notices stating that you changed the files and the date of any change.
b) You must cause any work that you distribute or publish, that in whole or in part contains or is derived from the Program or any part thereof, to be licensed as a whole at no charge to all third parties under the terms of this License.
c) If the modified program normally reads commands interactively when run, you must cause it, when started running for such interactive use in the most ordinary way, to print or display an announcement including an appropriate copyright notice and a notice that there is no warranty (or else, saying that you provide a warranty) and that users may redistribute the program under these conditions, and telling the user how to view a copy of this License. (Exception: if the Program itself is interactive but does not normally print such an announcement, your work based on the Program is not required to print an announcement.)
These requirements apply to the modified work as a whole. If identifiable sections of that work are not derived from the Program, and can be reasonably considered independent and separate works in themselves, then this License, and its terms, do not apply to those sections when you distribute them as separate works. But when you distribute the same sections as part of a whole which is a work based on the Program, the distribution of the whole must be on the terms of this License, whose permissions for other licensees extend to the entire whole, and thus to each and every part regardless of who wrote it.
Thus, it is not the intent of this section to claim rights or contest your rights to work written entirely by you; rather, the intent is to exercise the right to control the distribution of derivative or collective works based on the Program.
In addition, mere aggregation of another work not based on the Program with the Program (or with a work based on the Program) on a volume of a storage or distribution medium does not bring the other work under the scope of this License.
- You may copy and distribute the Program (or a work based on it, under Section 2) in object code or executable form under the terms of Sections 1 and 2 above provided that you also do one of the following:
a) Accompany it with the complete corresponding machine-readable source code, which must be distributed under the terms of Sections 1 and 2 above on a medium customarily used for software interchange; or,
b) Accompany it with a written offer, valid for at least three years, to give any third party, for a charge no more than your cost of physically performing source distribution, a complete machine-readable copy of the corresponding source code, to be distributed under the terms of Sections 1 and 2 above on a medium customarily used for software interchange; or,
c) Accompany it with the information you received as to the offer to distribute corresponding source code. (This alternative is allowed only for noncommercial distribution and only if you received the program in object code or executable form with such an offer, in accord with Subsection b above.)
The source code for a work means the preferred form of the work for making modifications to it. For an executable work, complete source code means all the source code for all modules it contains, plus any associated interface definition files, plus the scripts used to control compilation and installation of the executable. However, as a special exception, the source code distributed need not include anything that is normally distributed (in either source or binary form) with the major components (compiler, kernel, and so on) of the operating system on which the executable runs, unless that component itself accompanies the executable.
If distribution of executable or object code is made by offering access to copy from a designated place, then offering equivalent access to copy the source code from the same place counts as distribution of the source code, even though third parties are not compelled to copy the source along with the object code.
-
You may not copy, modify, sublicense, or distribute the Program except as expressly provided under this License. Any attempt otherwise to copy, modify, sublicense or distribute the Program is void, and will automatically terminate your rights under this License. However, parties who have received copies, or rights, from you under this License will not have their licenses terminated so long as such parties remain in full compliance.
-
You are not required to accept this License, since you have not signed it. However, nothing else grants you permission to modify or distribute the Program or its derivative works. These actions are prohibited by law if you do not accept this License. Therefore, by modifying or distributing the Program (or any work based on the Program), you indicate your acceptance of this License to do so, and all its terms and conditions for copying, distributing or modifying the Program or works based on it.
- Each time you redistribute the Program (or any work based on the Program), the recipient automatically receives a license from the original licensor to copy, distribute or modify the Program subject to these terms and conditions. You may not impose any further restrictions on the recipients' exercise of the rights granted herein. You are not responsible for enforcing compliance by third parties to this License.
- If, as a consequence of a court judgment or allegation of patent infringement or for any other reason (not limited to patent issues), conditions are imposed on you (whether by court order, agreement or otherwise) that contradict the conditions of this License, they do not excuse you from the conditions of this License. If you cannot distribute so as to satisfy simultaneously your obligations under this License and any other pertinent obligations, then as a consequence you may not distribute the Program at all. For example, if a patent license would not permit royalty-free redistribution of the Program by all those who receive copies directly or indirectly through you, then the only way you could satisfy both it and this License would be to refrain entirely from distribution of the Program.
If any portion of this section is held invalid or unenforceable under any particular circumstance, the balance of the section is intended to apply and the section as a whole is intended to apply in other circumstances.
It is not the purpose of this section to induce you to infringe any patents or other property right claims or to contest validity of any such claims; this section has the sole purpose of protecting the integrity of the free software distribution system, which is implemented by public license practices. Many people have made generous contributions to the wide range of software distributed through that system in reliance on consistent application of that system; it is up to the author/donor to decide if he or she is willing to distribute software through any other system and a licensee cannot impose that choice.
This section is intended to make thoroughly clear what is believed to be a consequence of the rest of this License.
- If the distribution and/or use of the Program is restricted in certain countries either by patents or by copyrighted interfaces, the original copyright holder who places the Program under this License may add an explicit geographical distribution limitation excluding those countries, so that distribution is permitted only in or among countries not thus excluded. In such case, this License incorporates the limitation as if written in the body of this License.
- The Free Software Foundation may publish revised and/or new versions of the General Public License from time to time. Such new versions will be similar in spirit to the present version, but may differ in detail to address new problems or concerns.
Each version is given a distinguishing version number. If the Program specifies a version number of this License which applies to it and "any later version", you have the option of following the terms and conditions either of that version or of any later version published by the Free Software Foundation. If the Program does not specify a version number of this License, you may choose any version ever published by the Free Software Foundation.
- If you wish to incorporate parts of the Program into other free programs whose distribution conditions are different, write to the author to ask for permission. For software which is copyrighted by the Free Software Foundation, write to the Free Software Foundation; we sometimes make exceptions for this. Our decision will be guided by the two goals of preserving the free status of all derivatives of our free software and of promoting the sharing and reuse of software generally.
NO WARRANTY
11.BECAUSE THE PROGRAM IS LICENSED FREE OF CHARGE, THERE IS NO WARRANTY FOR THE PROGRAM, TO THE EXTENT PERMITTED BY APPLICABLE LAW. EXCEPT WHEN OTHERWISE STATED IN WRITING THE COPYRIGHT HOLDERS AND/OR OTHER PARTIES PROVIDE THE PROGRAM "AS IS" WITHOUT WARRANTY OF ANY KIND, EITHER EXPRESSED OR IMPLIED, INCLUDING, BUT NOT LIMITED TO, THE IMPLIED WARRANTIES OF MERCHANTABILITY AND FITNESS FOR A PARTICULAR PURPOSE. THE ENTIRE RISK AS TO THE QUALITY AND PERFORMANCE OF THE PROGRAM IS WITH YOU. SHOULD THE PROGRAM PROVE DEFECTIVE, YOU ASSUME THE COST OF ALL NECESSARY SERVICING, REPAIR OR CORRECTION.
- IN NO EVENT UNLESS REQUIRED BY APPLICABLE LAW OR AGREED TO IN WRITING WILL ANY COPYRIGHT HOLDER, OR ANY OTHER PARTY WHO MAY MODIFY AND/OR REDISTRIBUTE THE PROGRAM AS PERMITTED ABOVE, BE LIABLE TO YOU FOR DAMAGES, INCLUDING ANY GENERAL, SPECIAL, INCIDENTAL OR CONSEQUENTIAL DAMAGES ARISING OUT OF THE USE OR INABILITY TO USE THE PROGRAM (INCLUDING BUT NOT LIMITED TO LOSS OF DATA OR DATA BEING RENDERED INACCURATE OR LOSSES SUSTAINED BY YOU OR THIRD PARTIES OR A FAILURE OF THE PROGRAM TO OPERATE WITH ANY OTHER PROGRAMS), EVEN IF SUCH HOLDER OR OTHER PARTY HAS BEEN ADVISED OF THE POSSIBILITY OF SUCH DAMAGES.
END OF TERMS AND CONDITIONS
How to Apply These Terms to Your New Programs
If you develop a new program, and you want it to be of the greatest possible use to the public, the best way to achieve this is to make it free software which everyone can redistribute and change under these terms.
To do so, attach the following notices to the program. It is safest to attach them to the start of each source file to most effectively convey the exclusion of warranty; and each file should have at least the "copyright" line and a pointer to where the full notice is found.
This program is free software; you can redistribute it and/or modify it under the terms of the GNU General Public License as published by the Free Software Foundation; either version 2 of the License, or (at your option) any later version.
This program is distributed in the hope that it will be useful, but WITHOUT ANY WARRANTY; without even the implied warranty of MERCHANTABILITY or FITNESS FOR A PARTICULAR PURPOSE. See the GNU General Public License for more details.
You should have received a copy of the GNU General Public License along with this program; if not, write to the Free Software Foundation, Inc., 59 Temple Place, Suite 330, Boston, MA 02111-1307 USA
Also add information on how to contact you by electronic and paper mail.
If the program is interactive, make it output a short notice like this when it starts in an interactive mode:
Gnomovision version 69, Copyright © year name of author Gnomovision comes with ABSOLUTELY NO WARRANTY; for details type `show w'.
This is free software, and you are welcome to redistribute it under certain conditions; type `show c' for details.
The hypothetical commands `show w' and `show c' should show the appropriate parts of the General Public License. Of course, the commands you use may be called something other than `show w' and `show c'; they could even be mouse-clicks or menu items--whatever suits your program.
You should also get your employer (if you work as a programmer) or your school, if any, to sign a "copyright disclaimer" for the program, if necessary. Here is a sample; alter the names:
Yoyodyne, Inc., hereby disclaims all copyright interest in the program 'Gnomovision' (which makes passes at compilers) written by James Hacker.
This General Public License does not permit incorporating your program into proprietary programs. If your program is a subroutine library, you may consider it more useful to permit linking proprietary applications with the library. If this is what you want to do, use the GNU Library General Public License instead of this License.
Should this product require service in the U.S.A. and you wish to locate the nearest Pioneer Authorized Independent Service Company, or if you wish to purchase replacement parts, operating instructions, service manuals, or accessories, please call the number shown below.
800-872-4159
Please do not ship your product to Pioneer without first calling the Customer Support Division at the above listed number for assistance.
Pioneer Electronics (USA) Inc.
Customer Support Division
P.O. BOX 1760, Long Beach,
For warranty information please see the Limited Warranty sheet included with your product.
Should this product require service in Canada, please contact a Pioneer Canadian Authorized Dealer to locate the nearest Pioneer Authorized Service Company in Canada.
Alternatively, please contact the Customer Satisfaction Department at the following address:
Pioneer Electronics of Canada, Inc.
Customer Satisfaction Department
300 Allstate Parkway, Markham, Ontario L3R OP2
(905)479-4411
1(877)283-5901
For warranty information please see the Limited Warranty sheet included with your product.
300, Allstate Parkway, Markham, Ontario L3R OP2
(905)479-4411
1(877)283-5901
Pioneer disclaims all responsibility for the integrity of contents recorded on hard disc drives or DVD discs, and for any damages resulting from the loss of such contents.
Published by Pioneer Corporation.
Copyright © 2004 Pioneer Corporation.
All rights reserved.