
CDJ-3000 - Media player PIONEER - Free user manual and instructions
Find the device manual for free CDJ-3000 PIONEER in PDF.


| Product Type | Professional DJ Media Player |
| Brand | Pioneer DJ |
| Model | CDJ-3000 |
| Dimensions (W x D x H) | 329 mm x 453 mm x 118 mm |
| Weight | 5.5 kg (12.1 lbs) |
| Power Supply | AC 100-240V, 50/60 Hz (supplied power cord) |
| Display | 9-inch touch display with jog wheel display |
| Audio Outputs | Analog RCA (2.0 Vrms), Digital Coaxial (S/PDIF) |
| Frequency Response | 4 Hz - 40 kHz |
| Signal-to-Noise Ratio | 115 dB |
| Total Harmonic Distortion | 0.0018% |
| Supported Media | SD/SDHC memory cards (up to 32 GB), USB devices (FAT16/32, HFS+), PC/Mac via USB or LAN |
| Supported Audio Formats | MP3, AAC, WAV, AIFF, Apple Lossless, FLAC |
| Connectivity | LAN (1000BASE-T) for PRO DJ LINK, USB Type-A (front) & Type-B (rear), Digital & Analog audio out |
| Key Features | rekordbox integration, PRO DJ LINK, Beat Sync, Quantize, 8 Hot Cues, Loop, Slip, Key Sync, Key Shift, Touch Preview, Beat Jump |
| Operating Temperature | +5 °C to +35 °C |
| Operating Humidity | 5% to 85% (no condensation) |
| Included Accessories | Power cord, Analog audio cable, Digital audio cable, LAN cable, Quick Start Guide, Precautions for Use |
| Maintenance | Wipe with a dry soft cloth; do not use organic solvents, acids, or alkalis |
| Safety Notes | Read the included Precautions for Use; not for commercial use without appropriate licenses |
Frequently Asked Questions - CDJ-3000 PIONEER
User questions about CDJ-3000 PIONEER
0 question about this device. Answer the ones you know or ask your own.
Ask a new question about this device
Download the instructions for your Media player in PDF format for free! Find your manual CDJ-3000 - PIONEER and take your electronic device back in hand. On this page are published all the documents necessary for the use of your device. CDJ-3000 by PIONEER.
USER MANUAL CDJ-3000 PIONEER
For FAQs and other support information for this product, visit the websites above.
Contents
Before you start....6
How to read this manual ....6
What's in the box....6
Product overview....7
PRO DJ LINK....7
Using mobile devices 10
System requirements ....11
Part names .... 14
Top panel 14
Rear panel....17
Touch display 18
Jog display 26
PC/Mac setup 27
Installation 27
Connections (basic styles) 29
PRO DJ LINK....29
Storage device connection (SD, USB) 33
SD memory card ....33
USB device 34
Track selection....35
Selecting a source....35
Selecting a track....35
Searching for a track....36
Monitoring the sound before loading a track (Touch Preview)......40
Using History....41
Using a Hot Cue Bank....42
Using the Tag List 43
Playback 46
Playback/pause....46
Playing a track from the touched point on the overall waveform......46
Reverse playback....46
Basic operations during playback 47
Adjusting the playback speed (Tempo Control) 47
Adjusting the playback speed without changing the pitch (Master Tempo)......48
Monitoring a different part of a track during playback (Touch Cue) .....48
Using the jog wheel 49
Setting the jog wheel mode....49
Jog wheel operations 49
Adjusting the weight of the jog wheel 50
Adjusting the playback and stopping speeds (for Vinyl mode)......50
Cue 51
Setting a cue point ....51
Jumping to a cue point....51
Checking a cue point (Cue Point Sampler)....52
Saving a cue point....52
Calling up a saved cue point....52
Deleting a saved cue point....53
Setting the Auto Cue 53
Loop....54
Setting a loop ....54
Fine-adjusting loop points 55
Adjusting the length of a loop....56
Using Active Loop 56
Canceling loop playback 56
Emergency Loop 57
Saving a loop ....57
Calling up a saved loop....57
Deleting a saved loop....57
Hot Cues 58
Setting a Hot Cue....58
Starting playback from a Hot Cue point 59
Deleting a Hot Cue....59
Calling up Hot Cues 59
Quantize....61
Using Quantize....61
Beat Jump/Loop Move 62
Using Beat Jump/Loop Move 62
Slip 64
Setting Slip mode 65
Beat Sync 66
Using Beat Sync....66
Changing the sync master 67
Using Instant Doubles....67
Beatgrid 68
Adjusting the beatgrid 68
Key Sync....69
Using Key Sync....69
Key Shift 70
Using Key Shift....70
Using a DJ application (MIDI/HID) 71
Controlling a DJ application 72
Settings....73
Changing the [UTILITY] settings....73
Utility settings 74
Auto standby 78
Changing the settings on the [SHORTCUT] screen....79
Setting items on the [SHORTCUT] screen....80
Saving My Settings on a storage device (SD, USB) 81
Calling up My Settings saved on a storage device (SD, USB)......82
Specifications 83
Additional information 84
Troubleshooting 84
LCD display....87
Trademarks and registered trademarks 88
Cautions on copyrights....89
Before you start
How to read this manual
- Thank you for choosing this Pioneer DJ product.
Be sure to read this manual, the “Quick Start Guide” and the “Precautions for Use” which are also included with this product. These documents include important information that you should understand before using the unit. In particular, be sure to read the IMPORTANT SAFETY INSTRUCTIONS. - In this manual the names of buttons, knobs and terminals that appear on the product, and the names of buttons, menus etc. in the software on your PC/Mac or mobile device, are indicated within square brackets ([ ]). (e.g. [File], [CUE] button)
- Please note that the software screens and their specifications, as well as the external appearance and specifications of the hardware, were still under development at the time this manual was created and may differ from the final specifications.
- Please note that depending on the operating system version, web browser settings, etc. operation may differ from the ways described in this manual.
- Please note that the language on the screens of the software described in this manual may differ from the language on your screen.
What's in the box
- Power cord
- Warranty (for some regions) *
- Digital audio cable
- Analog audio cable
• LAN cable - Quick Start Guide
- Precautions for Use
* Only products in Europe.
Products in North America and Japan include warranty information in the “Precautions for Use”.
Product overview
For the best experience, we recommend mainly playing audio tracks analyzed by rekordbox when using this unit.
rekordbox is a software application that supports music management and DJ performances. You use this unit to create professional DJ performances with audio tracks managed by rekordbox.
- You can download rekordbox for free.
- For details on rekordbox, see the rekordbox Instruction Manual, available at the URL below.
rekordbox.com/manual
Refer to the “rekordbox Introduction” to find out how to set up rekordbox, and see the “Instruction Manual” to find out how to use rekordbox.
PRO DJ LINK
You can use PRO DJ LINK functions by connecting the unit via a LAN cable to a PRO DJ LINK compatible DJ mixer and, for some modes, a PC/Mac running rekordbox.
PRO DJ LINK supports SD & USB Export, which utilizes a storage device (SD memory card or USB device), as well as rekordbox LINK Export, which utilizes a PC/Mac running rekordbox.
SD & USB Export
You can transfer audio files and management data for use on this unit using a storage device (SD, USB).
Step 1: Home or studio

Add audio files (tracks) to your rekordbox library. They will be analyzed automatically.

flowchart
graph LR
    A["rekordbox"] --> B["Device Icon"]
    B --> C["USB Port"]
Export the rekordbox data to a storage device (SD, USB).
Step 2: Club or venue

flowchart
graph TD
    A["CD Signal"] --> B["USB"]
    B --> C["Memory"]
    C --> D["Output"]
Connect the storage device (SD, USB) to a multi player.
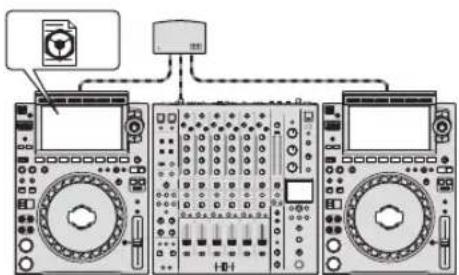
- DJ using the rekordbox tracks and data.
- Share the rekordbox data between the units in the PRO DJ LINK network.


The playback history is recorded on the storage device (SD, USB).
Step 3: Home or studio

Check and manage the playback history on rekordbox.
◆ rekordbox LINK Export
You can directly transfer audio files and management data to the unit from a PC/Mac via a LAN cable or USB cable.
Step 1: Home or studio
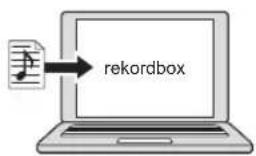
Add audio files (tracks) to your rekordbox library. They will be analyzed automatically.
Step 2: Club or venue

Connect the PC/Mac to a multi player.

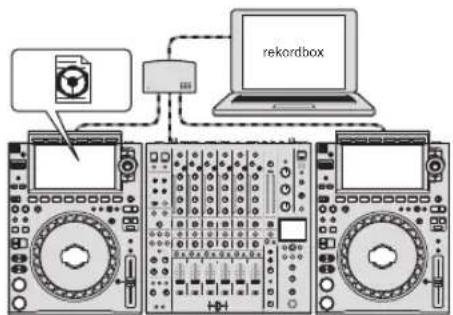
flowchart
graph TD
    A["Antenna"] --> B["Revisational Display"]
    C["Antenna"] --> D["Antenna"]
    E["Antenna"] --> F["Antenna"]
    G["Antenna"] --> H["Antenna"]
    I["Antenna"] --> J["Antenna"]
    K["Antenna"] --> L["Antenna"]
    M["Antenna"] --> N["Antenna"]
    O["Antenna"] --> P["Antenna"]
    Q["Antenna"] --> R["Antenna"]
    S["Antenna"] --> T["Antenna"]
    U["Antenna"] --> V["Antenna"]
    W["Antenna"] --> X["Antenna"]
    Y["Antenna"] --> Z["Antenna"]
    AA["Antenna"] --> AB["Antenna"]
    AC["Antenna"] --> AD["Antenna"]
    AE["Antenna"] --> AF["Antenna"]
    AG["Antenna"] --> AH["Antenna"]
    AI["Antenna"] --> AJ["Antenna"]
    AK["Antenna"] --> AL["Antenna"]
    AM["Antenna"] --> AN["Antenna"]
    AO["Antenna"] --> AP["Antenna"]
    AQ["Antenna"] --> AR["Antenna"]
    AS["Antenna"] --> AT["Antenna"]
    AU["Antenna"] --> AV["Antenna"]
    AW["Antenna"] --> AX["Antenna"]
    AY["Reckordbox"] --> Z
    AZ["Reckordbox"] --> AA
    BA["Reckordbox"] --> AB
    BB["Reckordbox"] --> AC
    BC["Reckordbox"] --> AD
    BD["Reckordbox"] --> AE
    BF["Reckordbox"] --> AG
    BG["Reckordbox"] --> AH
    BH["Reckordbox"] --> AI
    BI["Reckordbox"] --> AJ
    BJ["Reckordbox"] --> AK
    BK["Reckordbox"] --> AA
    BL["Reckordbox"] --> AB
    BM["Reckordbox"] --> AC
    BN["Reckordbox"] --> AD
    BO["Reckordbox"] --> AE
    BP["Reckordbox"] --> AA
    BQ["Reckordbox"] --> AB
    BR["Reckordbox"] --> AC
    BS["Reckordbox"] --> AD
    BT["Reckordbox"] --> AE
    BU["Reckordbox"] --> AC
    BV["Reckordbox"] --> AD
    BW["Reckordbox"] --> AC
    BX["Reckordbox"] --> AD
    BY["Reckordbox"] --> AC
- DJ using the rekordbox tracks and data.
- Share the rekordbox data between the units in the PRO DJ LINK network.
Step 3: Home or studio
Check and manage the playback history on rekordbox.
Using mobile devices
You can connect this unit to a mobile device with rekordbox installed and use the unit to play tracks from rekordbox.
- For a list of the mobile devices supported by the unit, visit the URL below.
rekordbox.com/feature/mobile/
- For details on rekordbox, visit the URL below.
rekordbox.com
System requirements
Supported audio sources
This unit supports the following sources.
- SD memory card
- USB device
- PC/Mac (page 27)
* SD memory cards, SDHC memory cards, and miniSD memory cards and microSD memory cards (use them with an SD memory card adapter) are collectively referred to as “SD memory card” in this manual.
Use SD memory cards and USB devices that support the following specifications.
| Folder hierarchy | Up to 8 levels (Files in the lower levels cannot be played with the unit.) |
| Maximum number of folders | Unlimited (Up to 10,000 folders in a folder can be displayed.) |
| Maximum number of files | Unlimited (Up to 10,000 files in a folder can be displayed.) |
File format FAT16, FAT32, HFS+ (NTFS is not supported.)
- It may take some time for the unit to read a device when it contains many folders and files.
- We accept no responsibility for loss of data from a storage device (SD, USB), or other direct or indirect problems resulting from connections to this unit.
- Some SD memory cards and USB devices may not work properly with this unit.
SD memory cards
- The unit can play audio files saved on SD memory cards that conform to SD standards.
• CPRM is not supported.
USB devices
- The unit can play audio files saved on USB mass storage class devices.
- The unit does not support the following.
- Optical disc devices such as external DVD/CD drives
- USB hubs
- If excessive current passes through the USB port on the unit, the USB indicator blinks and the unit stops the power supply to the USB device and stops communication. To restore the unit to a normal condition, disconnect the USB device from the unit. Do not use the USB device with the unit again.
If you still cannot restore the unit to a normal condition (i.e. if the unit does not communicate with a connected USB device), turn the unit off and on.
Supported file formats
The unit supports audio files in the following formats.
| Type | Extension | Format | Bit depth | Bit rate | Sampling frequency |
| MP3 .mp3 | MPEG-1AUDIOLAYER-3 | 32 to 320 kbps | 44.1 kHz,48 kHz | ||
| AAC | .m4a,aac,mp4 | MPEG-4AAC LC | 16 bit | 16 to 320 kbps | 44.1 kHz,48 kHz |
| MPEG-2AAC LC | |||||
| WAV .wav WAV | 16 bit, 24 bit — | ||||
| AIFF | .aif,aiff | AIFF | 44.1 kHz,48 kHz,88.2 kHz,96 kHz | ||
| AppleLossless | .m4a ALAC | ||||
| FLAC | .flac,fla | FLAC | |||
- Some files cannot be played with the unit even if they are in a supported format.
Part names
Top panel
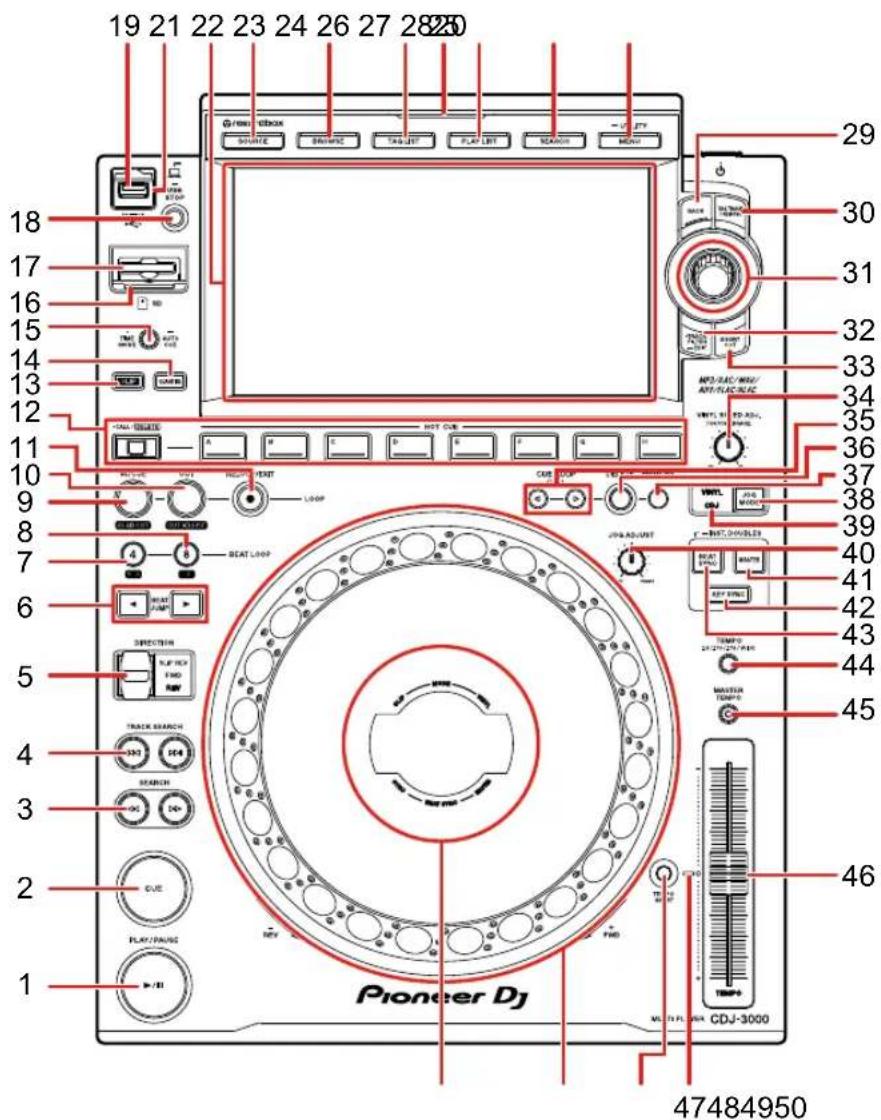
- PLAY/PAUSE ▶/II button (page 46)
- CUE button (page 51)
- SEARCH ◀◀, ▶▶ buttons (page 47)
- TRACK SEARCH ◀◀◀, ▶▶▶I buttons (page 47)
- DIRECTION FWD, REV, SLIP REV lever (pages 46, 64)
Lights up during reverse playback or Slip Reverse. -
BEAT JUMP ◀, ▶ buttons (page 62)
-
4 BEAT LOOP (1/2X) button (pages 54, 56)
- 8 BEAT LOOP (2X) button (pages 54, 56)
- LOOP IN/CUE (IN ADJUST) button (pages 51, 54)
- LOOP OUT (OUT ADJUST) button (page 54)
- LOOP RELOOP/EXIT button (pages 56, 59)
- HOT CUE (CALL/DELETE, A to H) buttons (pages 42, 58)
- SLIP button (page 65)
- QUANTIZE button (page 61)
- TIME MODE/AUTO CUE button (page 53)
Press to switch the time display between remaining time and elapsed time.
- SD memory card indicator
Blinks when communicating with a connected SD memory card.
- SD memory card slot
- USB STOP button (page 34)
- USB port
- USB indicator
Blinks when communicating with a connected USB device.
- Touch display (page 18)
- SOURCE button
Displays the [SOURCE] screen.
- BROWSE button
Displays the BROWSE screen.
- TAG LIST button
Displays the TAG LIST screen.
- SOURCE indicator
Lights up in the relevant color for the storage device (SD, USB) being used (page 18), or in standby mode.
- PLAYLIST button
Displays the PLAYLIST screen.
- SEARCH button
Displays the SEARCH screen.
- MENU/UTILITY button (page 73)
- BACK button (page 25)
-
TAG TRACK/REMOVE button (page 43)
-
Rotary selector (page 24)
- TRACK FILTER/EDIT button (page 38)
- SHORTCUT button
Displays the [SHORTCUT] screen. - VINYL SPEED ADJ. TOUCH/BRAKE knob (page 50)
- CUE/LOOP CALL ◀, ► buttons (pages 52, 57)
- DELETE button (pages 53, 57)
- MEMORY button (pages 52, 57)
- JOG MODE button (page 49)
- VINYL/CDJ indicator
Lights up to indicate the selected mode (Vinyl or CDJ) (page 49). - JOG ADJUST knob (page 50)
- MASTER button (page 66)
- KEY SYNC button (page 69)
- BEAT SYNC/INST.DOUBLES button (pages 66, 67)
- TEMPO ±6/±10/±16/WIDE button (page 47)
- MASTER TEMPO button (page 48)
- TEMPO slider (page 47)
- TEMPO RESET indicator
Lights up when Tempo Reset is turned on. - TEMPO RESET button (page 47)
- Jog wheel (-REV/+FWD), jog ring illumination (page 49)
- Jog display (page 26)
Rear panel
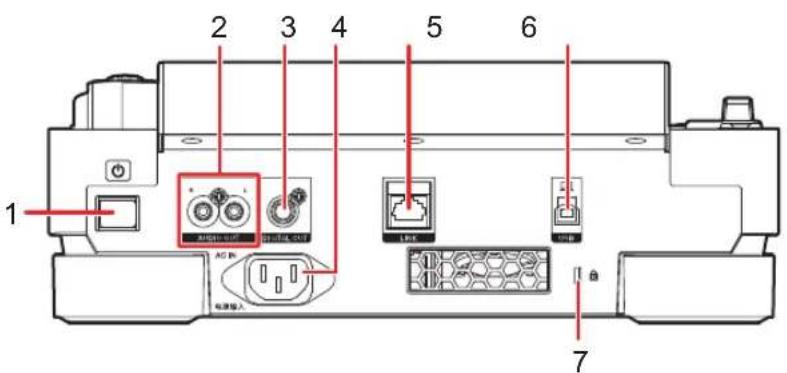
Turns the unit on and off.
- AUDIO OUT L/R terminals
Connect the supplied analog audio cable.
- DIGITAL OUT terminal
Connect the supplied digital audio cable.
- AC IN
Connect to a power outlet with the supplied power cord.
- LINK terminal
Connect the supplied LAN cable.
- USB port
Connect a PC/Mac with a USB cable.
- Kensington security slot
Connect a cable lock.
Touch display
[SOURCE] screen
Press the [SOURCE] button to display the source selection screen.

1. Device icon
Displays the connected device and the player number.
- If [BACKGROUND COLOR] is set for the device, the icon's background is displayed in the chosen color.
2. Device name
3. Device information
Displays the information for the highlighted device in the list.
- The following settings are available for storage devices (SD, USB).
- [BACKGROUND COLOR]: Sets the icon's background color (for storage devices (SD, USB) containing audio files or management data exported from rekordbox). This setting is also applied to the colors for the SD memory card indicator, USB indicator, and a part of the touch display.
- [MY SETTINGS LOAD]: Calls up the [UTILITY] and some other settings saved on the storage device (SD, USB).
Browse screen
Press the [BROWSE], [TAG LIST], [PLAYLIST], or [SEARCH] button to display the browse screen (track list).
You can browse the rekordbox library on a storage device (SD, USB) or on a connected PC/Mac.
- If you browse a storage device (SD, USB) that does not contain a rekordbox library on the BROWSE screen, the folder and track lists are displayed in a hierarchical structure.
Example: when you press the [BROWSE] button
![3 6 7 4 2 USB Playlist 001 PREVIEW TRACK ▲ [0020] ARTIST ▲ BPM ▲ KEY ▲ 1 TRACK ARTIST ALBUM BPM 001 "6AM (Original Mix) Juliet Fox 124.0 3B 002 "Can't Stop, Won't Stop (" Karuva 124.0 6A 003 "Extra Trippy (Original Mix) Danny Howard 125.0 4B 004 "Feel Alright (Original Mix) Franky Rizardo 127.0 4A 005 "Friends (Original Mix) Capa 125.0 4B 006 "Get Down (Original Mix) Eli Brown 125.0 4A 007 "In All The Fire (Original M Tinlicker 124.0 4A 008 "Kwelanga (Original Mix) Secondcity 124.0 9B 009 "Liar The Erised 131.0 6A 010 "Misidentify (Original Mix) PROFF ft. Cory Freisenhan 128.0 8A 8 HISTORY DAITADO PLAYERS 2 PENAIN 03:10 MT +10 Gm +3.20% 128.0 9](/content/2026/05/883443/images/45cb53648e168beab2520c70c883b752d3c267feeadae824935b12b20331ced5.jpg)
1. Category
Displays the categories.
• To choose which categories will be displayed, go to [Preferences] in rekordbox.
2. Device icon
Displays the icon of a device selected on the [SOURCE] screen (page 18).
3.

Displays the next higher level.
4. Name of selected folder or list
5. PREVIEW
Displays or hides the [PREVIEW] column.
6. Font size
Changes the font size.
7. INFO
Displays or hides the detailed information for the highlighted track in the list.
8. Track list
Displays a track list of the selected hierarchical level or playlist.
- Touch the title row to sort the list.
- Touch ✦ on the title row to display the sub-column selection screen and select a sub-column to be displayed. To set sub-columns you want to display in the selection list, go to [Preferences] in rekordbox.
9. Playback status display (page 21)
Displays the playback status of the loaded track.
Playback screen (Waveform screen)

1. Number of beats for a loop
Displays the number of beats set for a loop.
2. Enlarged waveform
Displays the enlarged waveform, cue points, loop points, and Hot Cue points, etc. that have been analyzed by rekordbox.
- You can change the waveform color in [WAVEFORM COLOR] on the [SHORTCUT] screen (page 80).
- Touch the overall waveform during playback to display the enlarged waveform for the touched point.
3. Beat countdown
Displays the number of bars and beats from the playback point to the closest saved cue point.
- Touch the overall waveform during playback to display the number of bars and beats from the playback point to the touched point.
4. Device icon
Displays the icon of a device selected on the [SOURCE] screen.
5. Track information
Displays the information of the loaded track.
6. i
Displays the detailed information of the loaded track.
-
BEAT LOOP (pages 55, 64)
-
KEY SHIFT (page 70)
-
BEAT JUMP (page 62)
10. Waveform/phase meter
Displays the bar and beat deviations from the sync master.
- Touch to switch between the waveform and phase meter displays. You can also switch the displays in [WAVEFORM/PHASE METER] on the [SHORTCUT] screen (page 80).
11. Zoom/Grid Adjust mode indicator
Press and hold the rotary selector to switch between Zoom and Grid Adjust modes.
- Turn the rotary selector to control the following.
- In Zoom mode: Zooms in and out of the waveform.
– In Grid Adjust mode: Adjusts the beatgrid.
12. Number of beats for Beat Jump
Displays the number of beats set for the [BEAT JUMP ◀, ▶] buttons.
- Set the number of beats in [BEAT JUMP BEAT VALUE] in the [UTILITY] settings or on the [SHORTCUT] screen (page 74).
13. Number of beats for Quantize
Displays the number of beats set for Quantize when Quantize is turned on.
- Set the number of beats in [QUANTIZE BEAT VALUE] in the [UTILITY] settings or on the [SHORTCUT] screen (page 74).
14. Player number
Displays the player number set for the unit.
- Set the player number in [PLAYER No.] in the [UTILITY] settings (page 76).
15. Track number
16. A. HOT CUE indicator
Displayed when [HOT CUE AUTO LOAD] is turned on (page 74).
17. AUTO CUE indicator
Displayed when the Auto Cue is turned on.
18. Time display (minutes, seconds, msec)
Displays the remaining time or elapsed time.
- [REMAIN] is displayed for the remaining time display.
19. SINGLE/CONTINUE indicator
Displays the playback mode for the loaded track.
- Set the playback mode in [PLAY MODE] in the [UTILITY] settings (page 75).
20. Playback speed
Displays the playback speed set by the [TEMPO] slider.
21. Playback speed adjustment range
Displays the adjustable range from the original playback speed.
22. BPM
Displays the BPM (Beats Per Minute, i.e. tempo) of the track being played.
- The measured value may differ from that measured by our DJ mixers due to differences in the measurement methods. This is not a malfunction.
23. MASTER/SYNC indicator
— MASTER: Displayed when the unit is set as the sync master.
— SYNC: Displayed when Beat Sync is turned on.
24. MT indicator
Displayed when Master Tempo is turned on.
25. Key
Displays the key of the track.
- The key is displayed in green when it is a good match with the key (related key) of a track loaded on the sync master.
26. Overall waveform (pages 46, 48)
Displays the overall waveform, cue points, loop points, and Hot Cue points, etc. that have been analyzed by rekordbox.
- You can change the waveform color in [WAVEFORM COLOR] on the [SHORTCUT] screen (page 80).
Basic operations on the touch display
Use the rotary selector or touch the screen to operate it.
◆ Using the rotary selector
1 Turn the rotary selector to move the cursor and highlight an item.


2 Press the rotary selector to confirm your selection.
- If you press the rotary selector when a hierarchical level is highlighted, the lower level is displayed.
- If you press the rotary selector when a track is highlighted, the track is loaded and the Waveform screen appears.
◆ Touch operations
1 Touch the desired item to highlight it.
2 Touch the highlighted item again to confirm your selection.
- If you touch a hierarchical level, the lower level is displayed.
- If you touch a track, [LOAD] is displayed. Touch [LOAD] to load the track and display the Waveform screen.
◆ Returning to the next higher level
1 Press the [BACK] button on the top panel, or touch [BACK] on the screen.
The next higher level (previous screen) is displayed.
- Press and hold the [BACK] button to highlight the top level in the hierarchy.
Jog display

1. SLIP indicator
Lights up when Slip mode is turned on.
2. Artwork
Displays the artwork of the loaded track.
3. SYNC indicator
Lights up when Beat Sync is turned on.
4. Playback point indicator
Indicates the playback point (turns during playback and stops when the track is paused).
5. VINYL indicator
Lights up when Vinyl mode is turned on.
6. Cue/loop/Hot Cue point indicator
Indicates the cue, loop, or Hot Cue point.
7. MASTER indicator
Lights up when the unit is set as the sync master.
PC/Mac setup
To play audio tracks stored on a PC/Mac via the unit, install the relevant driver software on your computer.
– Audio driver software (for Windows):
Driver software used for outputting the PC/Mac audio when using the unit with DJ software. You do not need to install this driver if you use a Mac.
- rekordbox (for Mac/Windows) USB connection (LINK Export) driver software:
Driver software used for connecting the unit to rekordbox (Mac/Windows) via USB (LINK Export).
- For the latest information on the system requirements, compatibility and supported operating systems, visit the URL below.
- If a PC/Mac without the driver software installed is connected to the unit, errors may occur on the PC/Mac.
- Malfunctions may occur due to incompatibility with other software installed on a PC/Mac.
Installation
Notes on installation
- Turn the unit off and disconnect the USB cable connected to the unit and the PC/Mac before installation.
- Close all applications running on the PC/Mac before installation.
- You will need admin rights to install the driver software to your PC/Mac.
- Read the License Agreement terms carefully before installation.
- If you quit the installation halfway through, perform the installation procedure from the beginning again.
Downloading the driver software
Download the dedicated driver software to your PC/Mac from the URL below.
Installing the driver software
1 Double-click the downloaded installation file.
2 Read the License Agreement terms carefully.
If you agree to the terms, mark the [Agree] check box and click [OK].
- If you do not agree to the License Agreement terms, click [Disagree] (for Mac)/[Cancel] (for Windows) to cancel the installation.
3 Follow the on-screen instructions to complete the installation.
Connections (basic styles)
Turn the unit off and disconnect the power cord before connecting other units.
Connect the power cord after all the connections are complete.
- Use the supplied power cord.
- Read the instruction manuals for the devices you are going to connect with the unit.
- Use the following products for the connections.
- Supplied LAN cable (or an STP cable (CAT5e shielded))
- Switching hub of 1 Gbps or more
- Wireless router or access point that conforms to IEEE802.11n or IEEE802.11ac
- Operation is not guaranteed on all products, even if the requirements are met.
PRO DJ LINK
- You can connect multiple multi players to a DJ mixer using a LAN cable.
- To connect multiple multi players to a DJ mixer with only one LAN port, use a switching hub (commercially available).
- You can connect up to 6 multi players to a DJ mixer using a switching hub (up to 4 when including multi players released before 2020) if the DJ mixer has enough terminals.
- Set the player number on the unit to match the channel number on the DJ mixer that the audio cable is connected to. The player number is displayed in the bottom left corner of the screen. You can change the player number in [PLAYER No.] in the [UTILITY] settings (page 76).

flowchart
graph TD
    A["PLAYER 1"] --> B["Audio cable"]
    B --> C["CH 1"]
    D["CH1"] --> E["Digital"]
    F["Phono L"] --> G["R"]
- To connect with a DJ mixer that has enough LAN ports for all the multi players you want to set up, do not use a switching hub. Instead, directly connect the cables to the ports.
-
Do not disconnect a LAN cable while sharing audio files between units in the Pro DJ LINK network.
-
Disconnect storage devices (SD, USB) before disconnecting LAN cables.
• Install the rekordbox (for Mac/Windows) USB connection (LINK Export) driver software before connecting a PC/Mac to the unit via USB (page 27).
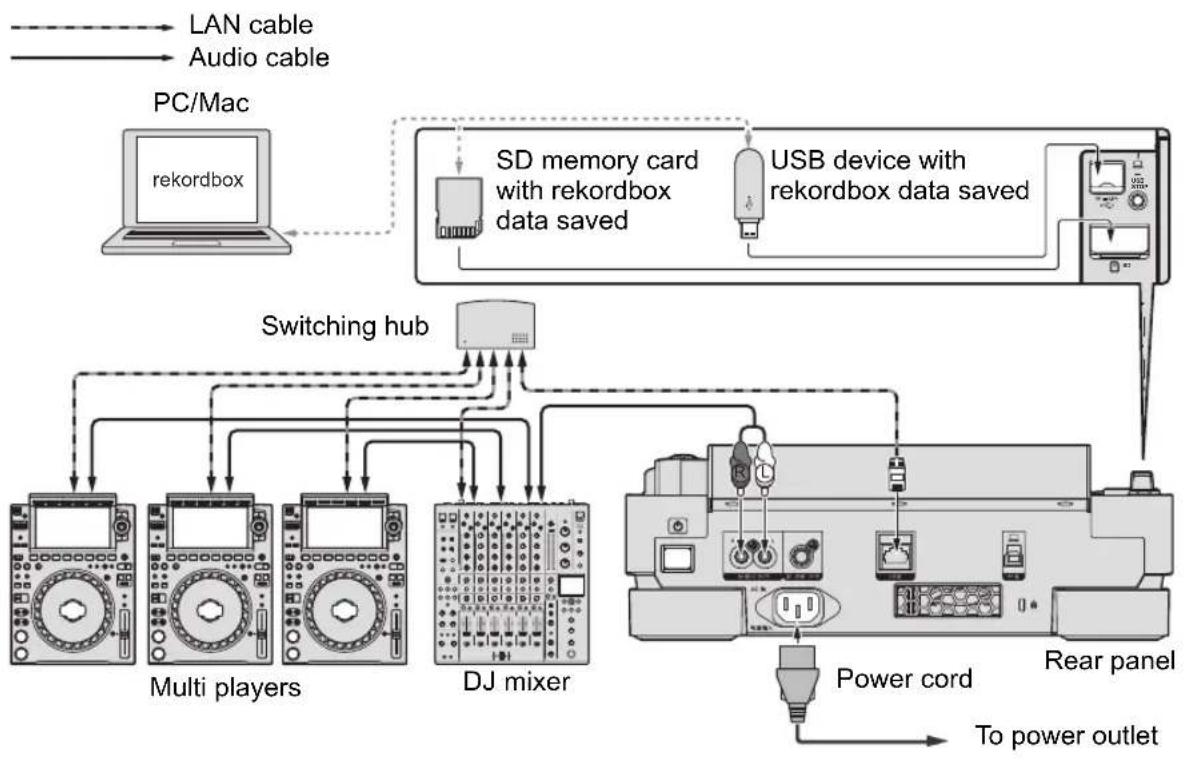
SD & USB Export
Read more: SD & USB Export (page 8)
Connection diagram (when connecting 4 multi players):
flowchart
graph TD
    A["PC/Mac"] -->|LAN cable, Audio cable| B["rekrordbox"]
    B --> C["SD memory card with rekrordbox data saved"]
    C --> D["USB device with rekrordbox data saved"]
    D --> E["Switching hub"]
    E --> F["Multi players"]
    E --> G["DJ mixer"]
    F --> H["Rear panel"]
    G --> H
    H --> I["Power cord"]
    I --> J["To power outlet"]
rekordbox LINK Export
Read more: rekordbox LINK Export (page 9)
- Connect a PC/Mac using a LAN cable, USB cable, or wireless LAN (Wi-Fi) router.
- For details on connecting mobile devices to the unit, visit the URL below.
◆ Wired LAN connection
You can connect up to 2 computers (PC/Mac).
Connection diagram (when connecting 4 multi players):

flowchart
graph TD
    A["LAN cable"] --> B["Switching hub"]
    C["Audio cable"] --> B
    D["PC/Mac PC/Mac"] --> B
    E["rekordboxrekordbox"] --> B
    B --> F["DJ mixerMulti players"]
    F --> G["Rear panel"]
    G --> H["Power cord"]
    H --> I["To power outlet"]
    F --> J["DJ mixerMulti players"]
    F --> K["DJ mixerMulti players"]
    F --> L["DJ mixerMulti players"]
    F --> M["DJ mixerMulti players"]
    F --> N["DJ mixerMulti players"]
USB connection
You can connect up to 2 computers (PC/Mac).
Connection diagram (when connecting 4 multi players):

flowchart
graph TD
    A["PC/Mac PC/Mac"] -->|rekrordbox| B["Switching hub"]
    C["PC/Mac PC/Mac"] -->|rekrordbox| B
    D["PC/Mac PC/Mac"] -->|rekrordbox| B
    E["PC/Mac PC/Mac"] -->|rekrordbox| B
    F["PC/Mac PC/Mac"] -->|rekrordbox| B
    G["PC/Mac PC/Mac"] -->|rekrordbox| B
    H["PC/Mac PC/Mac"] -->|rekrordbox| B
    I["PC/Mac PC/Mac"] -->|rekrordbox| B
    J["PC/Mac PC/Mac"] -->|rekrordbox| B
    K["PC/Mac PC/Mac"] -->|rekrordbox| B
    L["PC/Mac PC/Mac"] -->|rekrordbox| B
    M["PC/Mac PC/Mac"] -->|rekrordbox| B
    N["PC/Mac PC/Mac"] -->|rekrordbox| B
    O["PC/Mac PC/Mac"] -->|rekrordbox| B
    P["PC/Mac PC/Mac"] -->|rekrordbox| B
    Q["PC/Mac PC/Mac"] -->|rekrordbox| B
    R["PC/Mac PC/Mac"] -->|rekrordbox| B
    S["PC/Mac PC/Mac"] -->|rekrordbox| B
    T["PC/Mac PC/Mac"] -->|rekrordbox| B
    U["PC/Mac PC/Mac"] -->|rekrordbox| B
    V["PC/Mac PC/Mac"] -->|rekrordbox| B
    W["PC/Mac PC/Mac"] -->|rekrordbox| B
    X["PC/Mac PC/Mac"] -->|rekrordbox| B
    Y["PC/Mac PC/Mac"] -->|rekrordbox| B
    Z["PC/Mac PC/Mac"] -->|rekrordbox| B
    AA["PC/Mac PC/Mac"] -->|rekrordbox| B
    AB["Switching hub"] --> AC["USB cable"]
    AC --> AD["DJ mixerMulti players"]
    AD --> AE["Power cord"]
    AE --> AF["To power outlet"]
    AG["Switching hub"] --> AH["USB cable"]
    AH --> AI["DJ mixerMulti players"]
    AI --> AJ["Rear panel"]
- Insert or pull a USB cable straight into/out of the USB port on the rear panel. Be careful not to apply force in a vertical or horizontal direction.
◆ Wireless LAN (Wi-Fi) connection
You can connect up to 4 computers (PC/Mac).
Connection diagram (when connecting 4 multi players):

flowchart
graph TD
    A["PC/Mac PC/Mac"] -->|LAN cable| B["rekrordbox"]
    A -->|Audio cable| C["rekrordbox"]
    B --> D["DJ mixerMulti players"]
    C --> D
    D --> E["Rear panel"]
    E --> F["Power cord"]
    F --> G["To power outlet"]
    H["Wireless router, access point"] --> D
    H --> E
Storage device connection (SD, USB)
SD memory card
- Do not remove an SD memory card from the unit or turn the unit off while the SD memory card indicator is blinking. The unit's management data may be deleted or the SD memory card may become unreadable.
- Be careful not to press or pull the SD memory card cover with excessive force, or it may be damaged.
Inserting an SD memory card
1 Open the SD memory card cover.
2 Insert an SD memory card with the back side facing toward you and the notch facing down, and push it straight down until it stops.
3 Close the SD memory card cover.
Removing an SD memory card
1 Open the SD memory card cover.
The SD memory card indicator blinks for a few seconds.
2 After the SD memory card indicator stops blinking, push the SD memory card down.
The card pops out.
3 Pull the SD memory card out at a straight angle.
4 Close the SD memory card cover.
USB device
- Do not disconnect a USB device from the unit or turn the unit off while the USB device indicator is blinking. The unit's management data may be deleted or the USB device may become unreadable.
- Be careful not to press or pull the USB port cover with excessive force, or it may be damaged.
Connecting a USB device
1 Open the USB port cover.
2 Insert a USB device at a straight angle until it stops.
Disconnecting a USB device
1 Press and hold the [USB STOP] button until the USB indicator stops blinking.
2 Pull the USB device out at a straight angle.
3 Close the USB port cover.
Track selection
Selecting a source
1 Press the [SOURCE] button.
Devices connected to the unit are displayed on the [SOURCE] screen.
2 Select a device.
Selecting a track
Selecting a track on the browse screen
1 Open the browse screen.
A track list is displayed.
Read more: Browse screen (page 19)
2 Select a track.
- When [LOAD LOCK] is set to [LOCK] in the [UTILITY] settings, you cannot load another track while a track is playing (page 74). Set [LOAD LOCK] to [UNLOCK] or press the [PLAY/PAUSE ▶/II] button to pause playback and then load another track.
Selecting a recently played track
1 Press the [MENU/UTILITY] button on the Waveform screen.
The list of recently played tracks is displayed.
2 Select a track.
- Press the [MENU/UTILITY] or [BACK] button to close the list.
Searching for a track
Using the Search feature
The Search feature is only available when browsing the rekordbox library.
1 Press the [SEARCH] button.
The SEARCH screen appears.
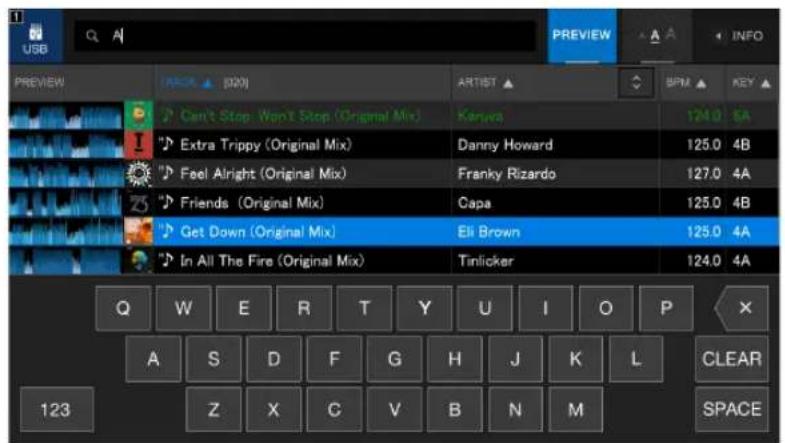
2 Enter a keyword using the keyboard.
Tracks including the keyword are displayed in the list.
- You can specify multiple keywords by separating them with a space.
Using the Jump feature
The unit supports 2 jump modes.
Alphabet Jump
1 Press and hold the rotary selector when the alphabetical order list is displayed.
Alphabet Jump mode turns on, and the first character of the highlighted track or category is displayed on the screen.
- A to Z, 0 to 9, and some symbols are displayed in Alphabet Jump mode.
2 Turn the rotary selector to scroll the screen.
The cursor jumps to the track or category whose first character is the same as the displayed character.
- The cursor does not jump when there are no tracks or categories whose first character is the same as the displayed character.
Page Jump
1 Press and hold the rotary selector when a list other than the alphabetical order list is displayed.
Page Jump mode turns on.
2 Turn the rotary selector to scroll the screen.
The cursor jumps to the fist track in the list on each page.
Using Track Filter
You can narrow down tracks by BPM, key, or the tag information added by rekordbox, etc.
The Track Filter feature is only available when browsing the rekordbox library.
You can specify the filter conditions on the Track Filter editing screen.
- Track Filter cannot be used when:
- The TAG LIST screen is displayed.
- The SEARCH screen is displayed.
- The [MATCHING] category is displayed.
- The [HOT CUE BANK] category is displayed.
- The [FOLDER] category is displayed.
- The filter conditions are saved for each storage device (SD, USB).
◆ Narrowing down tracks
1 Press the [TRACK FILTER/EDIT] button.
Tracks are narrowed down by the currently set conditions.
◆ Specifying the conditions on the Track Filter editing screen
1 Press and hold the [TRACK FILTER/EDIT] button.
The Track Filter editing screen appears.
2 Specify the filter conditions.
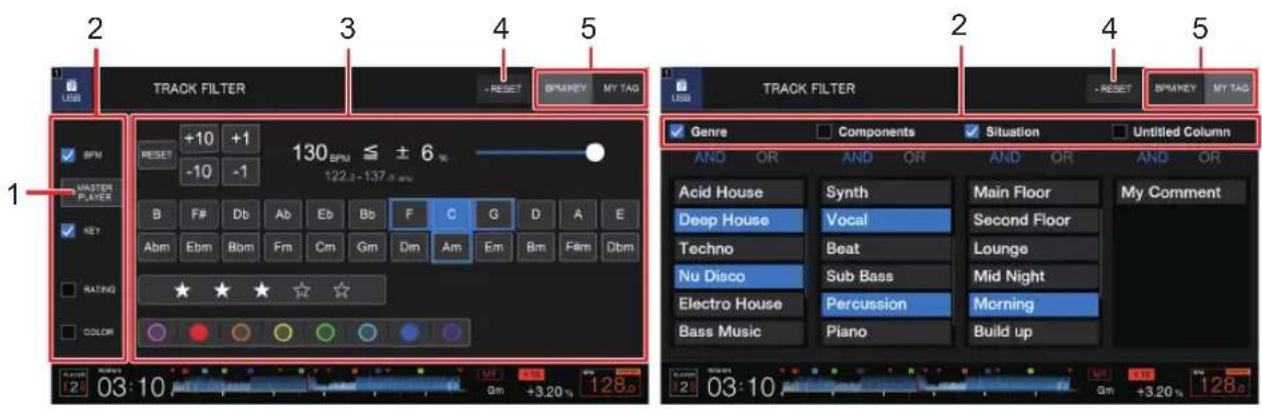
1. MASTER PLAYER
Touch to retrieve BPM and key of the track being played on the master player.
2. Check boxes
Mark the check boxes to enable the filters.
3. Filter conditions
When [BPM/KEY] is selected:
- BPM: Touch [-10], [-1], [+1], or [+10] to set BPM. Touch [RESET] to reset to the default setting (130 BPM).
• RANGE: Narrows down tracks by the BPM range (0 to 6%).
• KEY: Narrows down tracks by the related key.
• RATING: Narrows down tracks by rating.
• COLOR: Narrows down tracks by color.
When [MY TAG] is selected:
- And/Or search setting : Sets the And or Or search in the My Tag category. The search between the My Tag categories is fixed to the And search.
- My Tag display: Shows My Tags set by rekordbox. Specify My Tags to set as the filter conditions.
4. RESET
Press and hold to reset the filter conditions to the default settings.
5. BPM/KEY tab, MY TAG tab
Switches the filter conditions to use.
Monitoring the sound before loading a track (Touch Preview)
You can monitor the sound of a track via a DJ mixer before loading the track.
1 Connect the unit and a Touch Preview compatible DJ mixer via PRO DJ LINK.
2 Connect headphones to the DJ mixer.
3 Press the [LINK CUE] button on the DJ mixer.
4 Touch [PREVIEW] on the browse screen to display the waveform in the track list.
Read more: Browse screen (page 19)
5 Touch the waveform.
Monitor the sound from the touched point with your headphones.
- You can monitor a track even when outputting the sound of a track that is playing on the same player.
Using History
Tracks played for approximately 1 minute are recorded in the History (playback list).
- A new History is automatically created on a storage device (SD, USB) when it is connected to the unit.
- You can set the name of History in [HISTORY NAME] in the [UTILITY] settings (page 77).
- If you play a track more than once in succession, it may not be recorded in History.
- The information such as the name of tracks recorded in History is displayed in green (indicates that the track has been played).
- You can change the display color for the name of tracks in the [PLAYLIST] category to green (indicates that it has been played) by pressing the [MENU/UTILITY] button. If the color is changed to green, the track is recorded in History.
Viewing History
1 Press the [BROWSE] button.
The BROWSE screen appears.
2 Select [HISTORY] in the category.
The History list is displayed.
Deleting History
1 Select the History you want to delete in the History list and press the [MENU/UTILITY] button.
The deletion menu is displayed.
2 Select [DELETE] or [ALL DELETE].
— [DELETE]: Deletes the selected History.
— [ALL DELETE]: Deletes all History lists.
Using a Hot Cue Bank
You can set Hot Cues to the [HOT CUE] (A to H) buttons on the unit using a Hot Cue Bank set with rekordbox.
- Hot Cue Banks cannot be edited via the unit. You will need to use rekordbox for editing. For details, see the rekordbox Instruction Manual, available at the URL below.
rekordbox.com/manual
1 Press the [BROWSE] button.
The BROWSE screen appears.
2 Select [HOT CUE BANK] in the category.
The Hot Cue Bank list is displayed.
3 Select a Hot Cue Bank.
Hot Cues registered in the selected Hot Cue Bank are displayed.
4 Touch the Hot Cue Bank, or press the rotary selector.
Hot Cues registered in the Hot Cue Bank are set to the [HOT CUE] (A to H) buttons on the unit.
Using the Tag List
You can tag a track you want to play next or tracks you think will work well in your performance and review them via the Tag List.
- You can view the Tag List via multi players connected in the PRO DJ LINK network.
- One Tag List is created for each storage device (SD, USB). A track cannot be registered to multiple storage devices (SD, USB) connected to multi players in network.
- Up to 100 tracks can be registered to the Tag List on each storage device (SD, USB).
- A track cannot be registered to a Tag List more than once.
Registering a track to the Tag List
1 Highlight a track.
2 Press the [TAG TRACK/REMOVE] button.
A check mark is displayed for the tracks registered in the Tag List.
- Press the [TAG TRACK/REMOVE] button on the Waveform screen to register the loaded track to the Tag List.
Deleting a track from the Tag List
◆ Deleting an individual track on the Tag List screen
1 Highlight a track.
2 Press and hold the [TAG TRACK/REMOVE] button.
The track is deleted from the Tag List.
◆ Deleting an individual track on the BROWSE, PLAYLIST or SEARCH screen
1 Highlight a track.
2 Pres the [TAG TRACK/REMOVE] button.
The track is deleted from the Tag List.
◆ Deleting an individual track on the Waveform screen
1 Press the [TAG TRACK/REMOVE] button on the Waveform screen.
The track is deleted from the Tag List.
◆ Deleting all tracks at once
1 Press the [TAG LIST] button.
The TAG LIST screen appears.
2 Press the [MENU/UTILITY] button.
The [TAG LIST MENU] is displayed.
3 Select [REMOVE ALL TRACKS].
All tracks in the Tag List are deleted.
- If you delete a track that is playing from the Tag List, the track continues to play until the end. The next track will not play.
Converting the Tag List to a playlist
A playlist converted from the Tag List is displayed in the [PLAYLIST] category.
- You cannot convert the Tag List to a playlist if the rekordbox library is not saved on the storage device (SD, USB).
- If a mixture of tracks – some managed and some not managed by rekordbox – are registered in the Tag List, only the tracks managed by rekordbox are converted to a playlist.
1 Press the [TAG LIST] button.
The TAG LIST screen appears.
2 Press the [MENU/UTILITY] button.
The [TAG LIST MENU] is displayed.
3 Select [CREATE PLAYLIST].
The Tag List is converted to a playlist with the name [TAG LIST XXX].
Playback
Playback/pause
1 Press the [PLAY/PAUSE ▶/III] button.
During pause: Starts playing the loaded track.
During playback: Pauses the track.
Playing a track from the touched point on the overall waveform
1 Touch the overall waveform during pause or while pressing the top of the jog wheel in Vinyl mode.
The loaded track plays from the touched point.
- You can quickly move the playback point by sliding your finger to the point you want on the overall waveform.
Reverse playback
1 Flip the [DIRECTION FWD, REV, SLIP REV] lever to the [REV] side.
The loaded track plays in reverse.
- The operations of the jog wheel rotation are also reversed.
- You may not be able to scratch if you perform Track Search or loop playback during reverse playback.
Basic operations during playback
| Functions Descriptions | |
| Fast-forward/fast-reverse | Press the [SEARCH ▶▶] or [SEARCH ◀◀] button to fast-forward or fast-reverse. Fast-forward or fast-reverse continues until you release the button. |
| Track Search | Press the [TRACK SEARCH ▶▶▶] button to jump to the beginning of the next track.Press the [TRACK SEARCH ◀◀◀] button to jump to the beginning of the track that is playing. Press the button twice to jump to the beginning of the previous track. |
| Frame Search | Press the [SEARCH ▶▶] or [SEARCH ◀◀◀] button or turn the jog wheel during pause to move the pause position. |
| Super Fast Search | Turn the jog wheel while pressing the [SEARCH ▶▶] or [SEARCH ◀◀◀] button to fast-forward or fast-reverse with extra speed. |
| Super Fast Track Search | Turn the jog wheel while pressing the [TRACK SEARCH ◀◀◀] or [TRACK SEARCH ▶▶▶▶] button to cycle through tracks with extra speed according to the rotation direction. |
Adjusting the playback speed (Tempo Control)
1 Move the [TEMPO] slider.
To the [+] side: Increases the playback speed.
To the [-] side: Decreases the playback speed.
- The variable range of the [TEMPO] slider changes in the order of ±6 (0.02%) → ±10 (0.05%) → ±16 (0.05%) → WIDE (0.5%) each time you press the [TEMPO ±6/±10/±16/WIDE] button*.
The adjustable range of [WIDE] is ± 100% . The track stops when it is set to -100% .
* The value in parentheses indicates the adjustment unit.
- Press the [TEMPO RESET] button to play a track at its original speed regardless of the [TEMPO] slider's setting (the [TEMPO RESET] indicator lights up).
Adjusting the playback speed without changing the pitch (Master Tempo)
If you turn on Master Tempo, you can change the playback speed of a track using the [TEMPO] slider without changing the pitch.
1 Press the [MASTER TEMPO] button to turn on Master Tempo.
The button lights up when Master Tempo is turned on.
- Press the [MASTER TEMPO] button again to turn off Master Tempo.
Monitoring a different part of a track during playback (Touch Cue)
If you touch the overall waveform while a track is playing, you can monitor the sound from the touched point via a DJ mixer without affecting the output sound.
1 Connect the unit and a Touch Cue compatible DJ mixer via PRO DJ LINK.
2 Connect headphones to the DJ mixer.
3 Press the [LINK CUE] button on the DJ mixer.
4 Touch the overall waveform on the Waveform screen.
You can monitor the sound from the touched position with your headphones.
- The waveform of the touched point is zoomed in on and displayed as an enlarged waveform.
- Keep touching the waveform to monitor the sound.
Using the jog wheel
Setting the jog wheel mode
1 Press the [JOG MODE] button.
Each press switches between the following modes.
— Vinyl mode: Stops playback with a press on the top of the jog wheel and scratches a track by turning the jog wheel while pressing the top.
— CDJ mode: Does not stop playback or scratch a track with the operations of the jog wheel.
Jog wheel operations
| Functions Descriptions | |
| Pitch Bend | Turn the outer section of the jog wheel clockwise during playback to increase the playback speed, and counterclockwise to decrease it. Stop turning it to resume the normal playback speed.• In CDJ mode, you can perform the same operations by turning the jog wheel while pressing the top. |
| Scratch | Turn the jog wheel while pressing the top during playback in Vinyl mode to scratch a track.Release the jog wheel to resume normal playback. |
| Frame Search Turn the jog wheel during pause to move the pause position. | |
| Super Fast Search | Turn the jog wheel while pressing the [SEARCH ▶▶] or [SEARCH ◀◀] button to fast-forward or fast-reverse with extra speed. |
| Super Fast Track Search | Turn the jog wheel while pressing the [TRACK SEARCH ◀◀] or [TRACK SEARCH ▶▶1] button to cycle through tracks with extra speed according to the rotation direction. |
Adjusting the weight of the jog wheel
1 Turn the [JOG ADJUST] knob.
Turn clockwise: Increases the weight.
Turn counterclockwise: Decreases the weight.
Adjusting the playback and stopping speeds (for Vinyl mode)
You can adjust the following speeds.
- The speed at which playback slows down and stops after the top of the jog wheel or the [PLAY/PAUSE ▶/III] button is pressed
- The speed at which normal playback resumes after the top of the jog wheel is released
1 Press and hold the [MENU/UTILITY] button.
The [UTILITY] screen appears.
2 Select an adjustment setting in [VINYL SPEED ADJUST] in [DJ SETTING].
— [TOUCH&RELEASE]: Adjusts the speed at which playback slows down and stops, and normal playback resumes.
— [TOUCH]: Adjusts the speed at which playback slows down and stops.
— [RELEASE]: Adjusts the speed at which normal playback resumes.
3 Turn the [VINYL SPEED ADJ. TOUCH/BRAKE] knob to adjust the speed.
Turn clockwise: Increases the speed.
Turn counterclockwise: Decreases the speed.
Cue
You can quickly call up a cue point you have set previously.
Setting a cue point
During pause
1 Press the [CUE] button.
A cue point is set.
- Press the [ SEARCH ◀◀] or [SEARCH ▶▶] button or turn the jog wheel during pause to fine-adjust the pause position.
During playback
1 Press the [LOOP IN/CUE (IN ADJUST)] button.
A cue point is set.
- If you set a new cue point, the previously set cue point is cleared.
Jumping to a cue point
1 Press the [CUE] button during playback.
The track jumps to the cue point and playback is paused.
Checking a cue point (Cue Point Sampler)
1 Jump to a cue point.
Read more: Jumping to a cue point (page 51)
2 Press and hold the [CUE] button.
Playback continues until you release the [CUE] button.
Saving a cue point
1 Set a cue point.
Read more: Setting a cue point (page 51)
2 Press the [MEMORY] button.
Calling up a saved cue point
1 Load a track you have previously saved a cue point for.
2 Press the [CUE/LOOP CALL ◀] or [CUE/LOOP CALL ▶] button.
Deleting a saved cue point
1 Call up a saved cue point.
Read more: Calling up a saved cue point (page 52)
2 Press the [DELETE] button.
Setting the Auto Cue
When loading or searching for a track, a cue point can be automatically set to the position immediately before the first sound in the track (skipping any silence at the beginning).
1 Press and hold the [TIME MODE/AUTO CUE] button.
The [AUTO CUE] indicator lights up when Auto Cue is turned on.
- Press and hold the [TIME MODE/AUTO CUE] button again to turn off Auto Cue.
- The Auto Cue setting remains even if you turn the unit off.
- You can set the sound pressure level that you want to be recognized as silence in [AUTO CUE LEVEL] in the [UTILITY] settings (page 74).
Loop
You can choose a section of a track to play repeatedly.
Setting a loop
Manual setting
1 While the track is playing, press the ADJUST)] button at the point where you want to start the loop (loop-in point).
2 Press the [LOOP OUT (OUT ADJUST)] button at the point where you want the loop to end (loop-out point).
The chosen section plays in a loop.
Automatic setting
Using the [4 BEAT LOOP (1/2X)] button
1 Press the [4 BEAT LOOP (1/2X)] button during playback.
The track plays a 4-beat loop from the point where you pressed the button.
◆ Using the [8 BEAT LOOP (2X)] button
1 Press the [8 BEAT LOOP (2X)] button during playback.
The track plays an 8-beat loop from the point where you pressed the button.
Using [BEAT LOOP] on the Waveform screen
You can choose the number of beats for loop playback.
1 Touch [BEAT LOOP] on the Waveform screen.
The number of beats selection screen appears.

2 Touch the number of beats you prefer.
Loop playback starts according to the selected number of beats.
Fine-adjusting loop points
1 Press the [LOOP IN/CUE (IN ADJUST)] or [LOOP OUT (OUT ADJUST)] button during loop playback.
— [LOOP IN/CUE (IN ADJUST)]: Adjusts the loop-in point.
— [LOOP OUT (OUT ADJUST)]: Adjusts the loop-out point.
2 Press the [SEARCH ◀◀] or [SEARCH ▶▶] button or turn the jog wheel to fine-adjust the loop point.
- Press the [LOOP IN/CUE (IN ADJUST)] or [LOOP OUT (OUT ADJUST)] button again, or leave the unit without operating the controls for more than 10 seconds to resume loop playback.
Adjusting the length of a loop
Reducing a loop length by half
1 Press the [4 BEAT LOOP (1/2X)] or [CUE/LOOP CALL ◀] button during loop playback.
The loop length is reduced by half each time you press the button.
Doubling a loop in length
1 Press the [8 BEAT LOOP (2X)] or [CUE/LOOP CALL ▶] button during loop playback.
The loop length is doubled each time you press the button.
Using Active Loop
Set a saved loop as an Active Loop using rekordbox beforehand.
1 Load a track that has an Active Loop set.
After the playback point passes the set point, loop playback automatically starts.
Canceling loop playback
1 Press the [LOOP RELOOP/EXIT] button during loop playback.
Loop playback is canceled and the track continues to play as normal.
- Press the [LOOP RELOOP/EXIT] button again to start loop playback from the loop-in point.
Emergency Loop
The unit automatically plays a beat loop if it cannot start playing the next track when the end of the current is reached. This prevents situations where your performance is interrupted by silence.
- You cannot DJ during Emergency Loop playback.
- Load a track to cancel the Emergency Loop.
Saving a loop
1 Set loop points.
Read more: Setting a loop (page 54)
2 Press the [MEMORY] button.
Calling up a saved loop
1 Load a track you have previously saved a loop for.
2 Press the [CUE/LOOP CALL ◀] or [CUE/LOOP CALL ▶] button.
Deleting a saved loop
1 Call up a saved loop.
2 Press the [DELETE] button.
Hot Cues
You can quickly call up a Hot Cue point by pressing the [HOT CUE] (A to H) buttons and start playback from that point in the track.
Setting a Hot Cue
1 Press one of the [HOT CUE] (A to H) buttons at the point where you want to set a Hot Cue.
A Hot Cue is set to the button.
- If you do this during loop playback, a loop is set instead.
- You can set up to 8 Hot Cues per track.
- The [HOT CUE] (A to H) buttons light up as follows according to the set function. You can change the colors using rekordbox.
| Set functions | [HOT CUE COLOR] setting in the [UTILITY] settings |
| [OFF] [ON] |
Cue point Green Fixed button color
Loop Orange Orange
No setting No light
No light
- You cannot set a Hot Cue to any [HOT CUE] (A to H) buttons that have a one set already. To set a new Hot Cue, delete a one from a button first (page 59).
Starting playback from a Hot Cue point
1 Press one of the [HOT CUE] (A to H) buttons that have a Hot Cue set.
Playback starts from the Hot Cue point.
- Press the [LOOP RELOOP/EXIT] button to cancel playback of the loop if one was set to the button you pressed.
Deleting a Hot Cue
1 Press one of the [HOT CUE] (A to H) buttons while pressi the [CALL/DELETE] button.
The Hot Cue set to the button is deleted.
Calling up Hot Cues
Automatic call-up
You can automatically call up Hot Cues saved on a storage device (SD, USB) when a track is loaded.
1 Press and hold the [MENU/UTILITY] button or press the [SHORTCUT] button.
The [UTILITY] or [SHORTCUT] screen appears.
2 Set [HOT CUE AUTO LOAD] to [ON] or [rekordbox SETTING].
— [ON]: Automatically calls up Hot Cues from all tracks when loading them. [A. HOT CUE] lights up in red on the screen.
— [rekordbox SETTING]: Automatically calls up Hot Cues from tracks with the icon (indicates that the tracks have [HOT CUE AUTO LOAD] set using rekordbox) when you load them. [A. HOT CUE] lights up in white on the screen.
— [ O F F ] : Hot Cues are not automatically called up.
Manual call-up
You can call up a Hot Cue manually when [HOT CUE AUTO LOAD] is set to [OFF] in the [UTILITY] settings or on the [SHORTCUT] screen, or when the conditions for the automatic call-up are not met by [rekordbox SETTING].
1 Press the [CALL/DELETE] button.
The [HOT CUE] (A to H) buttons blink if they have a Hot Cue set.
2 Press one of the blinking [HOT CUE] (A to H) buttons.
The set Hot Cue is called up.
- The Hot Cue call-up mode turns off in the following conditions.
– All Hot Cues are called up.
- The [CALL/DELETE] button is pressed.
- The loaded track is replaced by another one from the storage device (SD, USB).
Quantize
Cue points, loop-in points, loop-out points, and Hot Cue points are automatically set to the closest beat position even if your timing is off the beat when you set them.
You can use Hot Cues, loop, reverse playback, and Slip without breaking the rhythm of the track you are playing.
- You cannot use the Quantize feature with tracks that have not been analyzed by rekordbox.
- You can set [QUANTIZE BEAT VALUE] in the [UTILITY] settings or on the [SHORTCUT] screen (pages 74, 80).
Using Quantize
1 Press the [QUANTIZE] button.
Quantize turns on, then [QUANTIZE] and the number of beats set for Quantize are displayed on the screen.
- Press the [QUANTIZE] button again to turn off Quantize.
Beat Jump/Loop Move
You can move a playback point by the specified number of beats from the point where the button is pressed.
Using Beat Jump/Loop Move
◆ Using the [BEAT JUMP ◀, ▶] buttons
The playback point jumps by the number of beats set in [BEAT JUMP BEAT VALUE] in the [UTILITY] settings or on the [SHORTCUT] screen (page 74).
- Press the [BEAT JUMP ◀] or [BEAT JUMP ▶] button while pressing the [CALL/DELETE] button to change the number of beats.
1 Press the [BEAT JUMP ◀] or [BEAT JUMP ▶] button during playback.
The playback point jumps forward or backward by the set number of beats from the point where you press the button.
- If you do this during loop playback, the loop moves.
Using [BEAT JUMP] on the Waveform screen
1 Touch [BEAT JUMP] on the Waveform screen.
The number of beats selection screen appears.
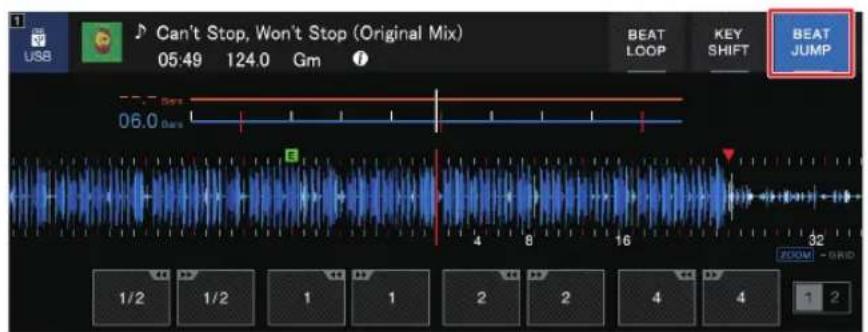
2 Touch your preferred number of beats.
The playback point jumps by the relevant number of beats from the point where you press the button.
- If you do this during loop playback, the loop moves.
Slip
If you turn on Slip mode, normal playback continues in the background (but you cannot hear it) when you perform the following operations.
When you end the operation, Slip is canceled and normal playback starts from the exact point the track would have reached. This means the original rhythm remains constant and your performance stays perfectly in time.
| Functions Descriptions | |
| Slip Pause | If you press the [PLAY/PAUSE ▶/II] button during playback in Vinyl mode (page 49), playback continues in the background during the pause. |
| Slip Scratch | If you scratch a track using the jog wheel while in Vinyl mode (page 49), normal playback continues in the background while you are scratching. |
| Slip Loop | If you start loop playback (page 54), normal playback continues in the background while the loop is playing. |
| Slip Beat Loop | If you touch [BEAT LOOP] on the Waveform screen and touch a number of beats during playback, a loop is played with the relevant number of beats (page 55) until you release the number of beats. Normal playback continues in the background during loop playback. |
| Slip Reverse | If you flip the [DIRECTION FWD, REV, SLIP REV] lever to the [REV] side during playback, playback is reversed. Normal playback continues in the background during reverse playback. You can use Slip Reverse by flipping the [DIRECTION FWD, REV, SLIP REV] lever to the [SLIP REV] side even when Slip mode is not turned on. |
| Slip Hot Cue | If you press the [HOT CUE] (A to H) buttons during playback, the playback point jumps to the Hot Cue point and continues until you release the button. Normal playback continues in the background during Hot Cue playback. |
Setting Slip mode
1 Press the [SLIP] button.
The [SLIP] button lights up when Slip mode is turned on.
• The [SLIP] button blinks while Slip is in use.
- The current playback point in Slip mode is indicated by a yellow line on the overall and enlarged waveforms on the Waveform screen.
The background playback point is indicated by a white line on the overall waveform on the Waveform screen.
- Press the [SLIP] button again or load a track to turn off Slip mode.
Beat Sync
If you turn on Beat Sync, the tempo (BPM) and beat position of the track on the unit automatically synchronize with the loaded track on the sync master in the PRO DJ LINK network.
- Beat Sync cannot be used with tracks that have not been analyzed by rekordbox.
- You can set rekordbox (PC/Mac) as the sync master. For details, see the rekordbox Instruction Manual, available at the URL below.
rekordbox.com/manual
Using Beat Sync
1 Press the [MASTER] button on the multi player you want to set as the sync master.
2 Press the [BEAT SYNC/INST.DOUBLES] button on other multi players in the PRO DJ LINK network.
Beat Sync turns on.
- When Beat Sync is in use on multi players other than the sync master, the tempo cannot be controlled with the [TEMPO] slider on those players.
- Press the [BEAT SYNC/INST.DOUBLES] button again to turn off Beat Sync. If the position of the [TEMPO] slider does not match the playback tempo (BPM), the Beat Sync tempo is maintained. To restore normal use of the [TEMPO] slider, move it until the BPM matches the playback tempo. After this, you will be able to use the [TEMPO] slider to adjust the tempo.
- If you perform Pitch Bend on a multi player other than the sync master, Beat Sync turns off and only the BPM synchronizes.
Changing the sync master
You can change the sync master in the following ways.
- Change the track on the sync master or pause playback.
- Press the [MASTER] button on the sync master.
- Press the [MASTER] button on another multi player to set it as the sync master.
Using Instant Doubles
You can use another multi player in the PRO DJ LINK network to start playback of the track that is on the sync master from the same position. This means both players are playing the same track, in the same position, simultaneously.
1 Press and hold the [BEAT SYNC/INST.DOUBLES] button.
Beatgrid
You can adjust the beatgrid.
- You cannot adjust the beatgrid for tracks that have not been analyzed by rekordbox.
Adjusting the beatgrid
1 Press and hold the rotary selector.
Grid Adjust mode turns on.
2 Turn the rotary selector to adjust the beatgrid.
- You can also adjust the beatgrid using the following buttons on the screen.
- [SNAP GRID(CUE)]: Moves the first beat position to a cue point.
- [SHIFT GRID]: Applies the settings (Pitch Bend, etc.) adjusted during synchronization.
-
[<1/2], [1/2>]: Moves the beatgrid by 1/2 beat.
-
Touch [RESET] to reset to the original beatgrid.
- Press and hold the rotary selector again to return to Zoom mode.
Key Sync
You can adjust the key of a track being played on the unit to match with the key of a track loaded on the sync master.
- You cannot adjust the key for tracks that have not been analyzed by rekordbox.
Using Key Sync
1 Press the [KEY SYNC] button when a track is loaded.
The key is adjusted to the key with the least change among the following.
— Same key
— Dominant key
— Subdominant key
— Relative key
— Relative key of dominant key
— Relative key of subdominant key
- Press the [KEY SYNC] or [MASTER TEMPO] button to reset to the original key.
Key Shift
You can shift the key of a track.
Using Key Shift
1 Touch [KEY SHIFT] on the Waveform screen.
The Key Shift screen appears.

2 Touch [-] or [+] to adjust the key.
Each press shifts the key up or down by a semitone.
- Touch [RESET] to revert to the original key.
Using a DJ application (MIDI/HID)
If you use a USB cable to connect a PC/Mac with MIDI or HID compatible software (DJ application) installed, you can control the application from the unit.

flowchart
graph TD
    A["USB cable"] --> D["DJ app"]
    B["Audio cable"] --> D
    C["DJ mixerMulti player"] --> D
    D --> E["Rear panel"]
    E --> F["Power cord"]
    E --> G["To power outlet"]
    H["PC/Mac"] --> D
    I["Power cord"] --> E
- To play audio tracks stored on a PC/Mac via the unit, install the specified audio driver software on your computer (page 27).
- For details on the unit's MIDI messages, visit the URL below.
• Install DJ application and set the audio and MIDI/HID settings on your PC/Mac beforehand.
- To use MIDI software, set the MIDI channel in [MIDI CHANNEL] in the [UTILITY] settings (page 76). The setting is not needed when using HID software.
Controlling a DJ application
1 Connect the unit and a PC/Mac.
2 Press the [SOURCE] button.
The [SOURCE] screen appears.
3 Select [CONTROL MODE].
Control mode turns on.
4 Launch a DJ application.
The unit starts communicating with the DJ application.
- Some buttons on the unit cannot be used for controlling a DJ application.
- Control mode turns off when a track is loaded to the unit from a device other than the currently communicating device.
Settings
You can change the unit settings in the [UTILITY] settings or on the [SHORTCUT] screen. If you save [MY SETTINGS] (the unit's functions settings) on a storage device (SD, USB), you can load them to the unit instantly during DJ handovers, etc.
Changing the [UTILITY] settings
1 Press and hold the [MENU/UTILITY] button.
The [UTILITY] screen appears.
![PIONEER CDJ-3000 - Press and hold the [MENU/UTILITY] button. - 1](/content/2026/05/883443/images/2967a8c0d2adcfc0dc79773ca4f5bc8e89be062ed448192785dd7450c0703086.jpg)
- Category
- Setting items and current setting value
- Options ( setting values)
2 Select a category.
Read more: Utility settings (page 74)
3 Select a setting item.
4 Select a setting value.
- Press the [MENU/UTILITY] button to close the [UTILITY] screen.
Utility settings
*: Factory setting
Categories/setting items Descriptions
DJ SETTING
| LOAD LOCK 1 | Determines whether or not you can load another track during playback. |
| • Setting values: UNLOCK *, LOCK | |
| QUANTIZE BEAT VALUE 1 | Sets the number of beats for Quantize. |
| • Setting values: 1/8, 1/4, 1/2, 1* | |
| BEAT JUMP BEAT VALUE 1 | Sets the number of beats for the [BEAT JUMP ◀, ▶] buttons. |
| • Setting values: 1/2, 1, 2, 4, 8, 16*, 32, 64 | |
| HOT CUE AUTO LOAD 1 | Determines whether or not Hot Cues are automatically called up when you load a track (page 59). |
| • Setting values: OFF, rekordbox SETTING, ON* | |
| HOT CUE COLOR 1 | Turns on and off the lighting color setting for the [HOT CUE] (A to H) buttons (page 58). |
| • Setting values: OFF*, ON | |
| AUTO CUE LEVEL 1 | Sets the sound pressure level that Auto Cue recognizes as silence. |
| • Setting values: -78dB, -72dB, -66dB, -60dB, -54dB, -48dB, -42dB, -36dB, MEMORY* | |
| • [MEMORY] sets the cue point closest to the beginning of a track to an Auto Cue point. [AUTO CUE] lights up in white on the screen. | |
| VINYL SPEED ADJUST 1 | Sets the adjustment method for the playback and stop speeds in Vinyl mode (page 50). |
| • Setting values: TOUCH&RELEASE, TOUCH*, RELEASE |
Categories/setting items Descriptions
| Sets playback mode. | |
| PLAY MODE 1 | Setting values: CONTINUE, SINGLE* |
| [CONTINUE]: Automatically loads the next track when playback reaches the end of a track. | |
| [SINGLE]: Stops playback when playback reaches the end of a track. The next track is not automatically loaded. |
DISPLAY (LCD)
| LCD BRIGHTNESS1 | Sets the brightness of the screen. Setting values: 1, 2, 3*, 4, 5 |
| JOG LCD BRIGHTNESS1 | Sets the brightness of the display on the jog wheel. Setting values: 1, 2, 3*, 4, 5 |
| LANGUAGE1 | Sets the display language. |
| SCREEN SAVER | Sets the screen saver. Setting values: OFF, ON* When set to [ON], the screen saver starts if: - You do not use the unit for more than 5 minutes when a track is not loaded. - You do not use the unit for more than 100 minutes during pause, during cue standby, or after playback reaches the end of a track. Use the unit to cancel the screen saver. |
| TOUCH DISPLAY CALIBRATION | Adjusts the touch display calibration with a touch of [+] displayed on the screen. If [+] does not move, touch it for a little longer. Do not use sharp-pointed objects such as a ballpoint pen to make the setting. |
Categories/setting items Descriptions
DISPLAY (INDICATOR)
| SLIP FLASHING1 | Determines whether the indicators blink for buttons that can be used for Slip when you press the [SLIP] button. |
| • Setting values: OFF, ON* | |
| ON AIR DISPLAY1 | Determines the display setting for when an On Air Display compatible DJ mixer is connected to the unit via PRO DJ LINK. |
| • Setting values: OFF, ON* | |
| JOG RING BRIGHTNESS1 | Sets the brightness of the jog ring illumination. |
| • Setting values: OFF, 1, 2* | |
| JOG RING INDICATOR1 | Determines whether the jog wheel ring blinks when the remaining time is running out on the track you are playing. |
| • Setting values: OFF, ON* |
PRO DJ LINK
| PLAYER No. | Sets the player number of the unit. Setting values: AUTO*, 1, 2, 3, 4, 5, 6 The setting cannot be changed when a storage device (SD, USB) is connected to the unit. |
| DUPLICATION | Copies the [UTILITY] and some other settings on the unit to multi players connected in the PRO DJ LINK network. Setting values: ALL*, PLAYER 1 to 6 This setting cannot be used for a multi player that is currently playing a track. The settings marked with 1 in this table are copied. The following settings are also copied: Time display mode, Auto Cue, jog mode, tempo range, Master Tempo, Quantize, Beat Sync, and phase meter. |
| MIDI CHANNEL | Sets the MIDI channel. Setting values: 1* to 16 |
Categories/setting items Descriptions
SYSTEM
| AUTO STANDBY | Sets the auto standby function (page 78).Setting values: OFF, ON* |
| OUTPUT ATT. | Sets the attenuation level for the sound output from the unit.Setting values: -12dB, -9dB, -6dB, -3dB, 0dB*This setting is invalid when DJ software is in use. |
| HISTORY NAME | Sets the name of the History list saved on a storage device (SD, USB).The name can contain up to 32 characters (alphanumeric and symbol).If you change the name, the number succeeding the name of the History list resets to 001 (the number is automatically added in order when a History list is created). |
| DEFAULT | Restores the settings marked with 1 in this table to the factory settings.This function is not available during playback. |
INFO
| VERSION No. | Displays the version of the software on the unit. |
| IP ADDRESS Displays the IP address. | |
| SERIAL No. Displays the serial number. | |
| LICENSE Displays the license information of the unit. | |
1 The settings are copied when you execute [DUPLICATION].
Auto standby
When [AUTO STANDBY] is set to ON], the unit enters standby mode after 4 hours without being used in the following ways.
— No storage device (SD, USB) is connected to the unit.
— No PC/Mac is connected to the unit via the USB port on the rear of the unit.
— The unit is not connected in the PRO DJ LINK network.
Use the unit to exit standby mode.
- The factory setting is [ON].
- Set [AUTO STANDBY] to [OFF] if you do not need to use the auto standby function (page 77).
Changing the settings on the [SHORTCUT] screen
1 Press the [SHORTCUT] button.
The [SHORTCUT] screen appears.

- Player settings
- Device information
- Device settings
- My Settings
2 Select a setting value.
Read more: Setting items on the [SHORTCUT] screen (page 80)
- Press the [SHORTCUT] button again to close the [SHORTCUT] screen.
Setting items on the [SHORTCUT] screen
*: Factory setting
Setting items Descriptions
Player settings
| WAVEFORM/PHASE METER | Selects the content (phase meter or waveform) to be displayed on the playback (Waveform) screen. • Setting values: PHASE METER, WAVEFORM* |
| HOT CUE AUTO LOAD | |
| LCD BRIGHTNESS | |
| JOG LCD BRIGHTNESS | Same as the Utility settings (page 74) |
| QUANTIZE BEAT VALUE | |
| BEAT JUMP BEAT VALUE |
Device information Displays the selected device and the device name.
Device settings
| WAVEFORM COLOR | Sets the waveform color. Setting values: BLUE*, RGB, 3 BAND |
| WAVEFORM CURRENT POSITION | Sets where to display the current playback point on the waveform. Setting values: CENTER*, LEFT |
MY SETTINGS
| LOAD | Calls up My Settings saved on a storage device (SD, USB) (page 82). |
| SAVE | Saves the current My Settings to a storage device (SD, USB) (page 81). |
Saving My Settings on a storage device (SD, USB)
You can save the [UTILITY] settings and some other settings on a storage device (SD, USB).
- The settings marked with 1 in the [UTILITY] settings table are saved (page 74).
- The following settings are also saved:
Time display mode, Auto Cue, jog mode, tempo range, Master Tempo, Quantize, Beat Sync, and phase meter.
- You can save the settings to rekordbox or a storage device (SD, USB) connected to a multi player in the PRO DJ LINK network.
- You can specify the unit settings using rekordbox and save them on a storage device (SD, USB), then apply the settings to other multi players.
1 Connect a storage device (SD, USB) to the unit.
Read more: Storage device connection (SD, USB) (page 33)
2 Press the [SOURCE] button.
The [SOURCE] screen appears.
3 Select a device.
4 Press the [SHORTCUT] button.
The [SHORTCUT] screen appears.
5 Touch [SAVE] in [MY SETTINGS].
The My Settings are saved on the storage device (SD, USB).
- Press the [SHORTCUT] button again to close the [SHORTCUT] screen.
Calling up My Settings saved on a storage device (SD, USB)
You can call up My Settings from a storage device (SD, USB).
- You can call up My Settings from rekordbox or a storage device (SD, USB) connected to a multi player in the PRO DJ LINK network.
1 Connect a storage device (SD, USB) to the unit.
Read more: Storage device connection (SD, USB) (page 33)
2 Press the [SOURCE] button.
The [SOURCE] screen appears.
3 Select a device.
4 Press the [SHORTCUT] button.
The [SHORTCUT] screen appears.
5 Touch [LOAD] in [MY SETTINGS].
My Settings are called up.
- You cannot call up My Settings when a track is playing. Pause the playback before calling up the settings.
- Press the [SHORTCUT] button again to close the [SHORTCUT] screen.
Specifications
Main unit weight....5.5 kg (12.1 lbs)
Max. external dimensions 329 mm (W) × 453 mm (D) × 118 mm (H)
Tolerable operating temperature....+5 °C to +35 °C
Tolerable operating humidity....5% to 85% (no condensation)
Analog audio output (AUDIO OUT L/R)
Output terminals....RCA terminal
Output level....2.0 Vrms (1 kHz)
Frequency response 4 Hz to 40 kHz
S/N ratio 115 dB
Total harmonic distortion 0.0018%
Digital audio output (DIGITAL OUT)
Output terminals....RCA terminal
Output type.... Coaxial digital (S/PDIF)
Output level 0.5 Vp-p (75 Ω)
Output format 96 kHz, 24 bit
USB downstream section (USB)
Port....Type A
Power supply....5 V/1 A or less
USB upstream section (USB)
Port....Type B
LAN (PRO DJ LINK)
Rating....1000BASE-T
SD memory card section
File system...... Conforming to SD standards
Max. memory capacity ....32 GB
Main display
Screen size 9 inch
The specifications and design of this product are subject to change without notice.
Additional information
Troubleshooting
If you think something is wrong with the unit, check the information below and refer to the [FAQ] for the CDJ-3000 at the URL below.
- Inspect devices connected to the unit.
- The unit may restore proper operation after you turn it off and on.
If the problems continue, read the “Precautions for Use” and consult Authorized Service Company or your dealer.
You cannot play an audio file.
- Check that the file is not copyright-protected (by DRM).
◆ Sound is not outputting, or it is distorted or unwanted noises occur.
- Check that the DJ mixer is properly connected to the unit.
- If the unit is placed close to a TV, turn the TV off or move the unit away from it.
The information of a file is not displayed correctly.
- Check that the language is set properly.
- Check that the information is not written in a language that is not supported by the unit. Always use a language supported by the unit when creating a file using a DJ application, etc.
◆ Track Search does not complete.
- It may take some time for Track Search to complete when Auto Cue is turned on if there are long silent parts between tracks.
- If Track Search takes more than 10 seconds, a cue point is set at the beginning of the next track.
◆ Track does not jump to a cue point.
- Check if a cue point is set.
You cannot save settings.
- Wait for at least 10 seconds to turn the unit off after changing settings. Changed settings may not be saved if you turn the unit off immediately after you make the changes.
The unit does not recognize a connected USB device.
- Check the USB device is connected properly.
- You cannot use a USB hub. Connect the USB device directly to the unit.
- Check that the USB device is supported by the unit.
- Check that the file format is supported by the unit.
- Turn the unit off and on.
You cannot save cue points/loops on a storage device (SD, USB).
- If the storage device (SD, USB) is write-protected, release the lock.
- If there is not enough free space on the storage device (SD, USB), free up some space.
- Up to 10 cue points/loop points can be saved per track on a storage device (SD, USB). If 10 points are already saved for the track, delete some points.
✿ Cue points/loop points saved for a track on a storage device (SD, USB) are not displayed.
- Cue points/loop points may not be displayed if you did not properly disconnect the USB device from the unit the last time you used it, or if you turned the unit off while the SD card memory indicator or USB device indicator was blinking.
The operation does not start immediately after you press the button for playing a Hot Cue or starting re-loop, or when you flip the lever for reverse playback.
- If Quantize is turned on, turn it off. When Quantize is turned on, a slight delay occurs as it synchronizes with the closest beat position.
The playing address does not show the remaining time.
- It may take some time to display the playing address when playing a file saved in VBR format.
It takes a long time to read a storage device (SD, USB) (flash memory or hard disk).
- It may take some time to read a storage device (SD, USB) if many folders and files are saved on the storage device (SD, USB).
- It takes some time to read a storage device (SD, USB) if files other than audio files are saved on it. Do not save files other than audio files on a storage device (SD, USB) you want to use with the unit.
You cannot browse a library.
- Save the library information on the storage device (SD, USB). If you connect a storage device (SD, USB) that does not include the library information, the folder and track lists are displayed in the hierarchical structure.
◆ History is not displayed.
- Connect a storage device (SD, USB) to the unit. History can be used only when a storage device (SD, USB) is connected.
◆ Nothing is displayed on the screen.
- If auto standby is turned on, use the unit to exit standby mode. If you do not need to use auto standby, set [AUTO STANDBY] to [OFF] (page 78).
◆ The scale is not displayed.
- The scale is not displayed if a track is longer than 15 minutes.
◆ PRO DJ LINK does not work well.
- Check if the player number is set properly (set [PLAYER No.] to [AUTO] or a different number (page 76)).
- Check if the LAN cable is properly connected to the [LINK] terminal.
- Turn on the power of the switching hub.
- Disconnect unnecessary devices from the switching hub.
The screen does not respond to touch or the response is poor. A different point from the touched point responds.
- Adjust the [TOUCH DISPLAY CALIBRATION] setting in the [UTILITY] settings (page 75).
LCD display
- Small black or shining points may appear on the LCD display. This is a phenomenon inherent to LCD displays and not a malfunction.
- When using the unit in cold places, the LCD display may be dark for a while after the power is turned on. Normal brightness will restore after a while.
- When the LCD display is exposed to direct sunlight, the light will reflect off it, making it difficult to see. Block the direct sunlight to improve visibility of the display.
Cleaning
Wipe with a dry soft cloth.
- Do not use organic solvents, acids or alkalis for cleaning.
Touch display
- Operate the touch display with your fingertip. Do not press it with excessive force.
- Do not operate the touch display with hard and sharp-pointed objects such as a ballpoint pen, mechanical pencil, or sharp fingernail.
Trademarks and registered trademarks
- rekordbox™ is a trademark or registered trademark of AlphaTheta Corporation.
• PRO DJ LINK™ is a trademark or registered trademark of AlphaTheta Corporation.
• Mac is a trademark of Apple Inc., registered in the U.S. and other countries. - Windows is a registered trademark of Microsoft Corporation in the United States and other countries.
• SD Logo is a trademark of SD-3C, LLC.

• SDHC Logo is a trademark of SD-3C, LLC.

• ASIO is a trademark of Steinberg Media Technologies GmbH.
- Wi-Fi is a registered mark of the Wi-Fi Alliance.
Other product, technology and company names, etc. mentioned herein are trademarks or registered trademarks of their respective owners.
About using MP3 files
This product has been licensed for nonprofit use. This product has not been licensed for commercial purposes (for profit-making use), such as broadcasting (terrestrial, satellite, cable or other types of broadcasting), streaming on the Internet, Intranet (a corporate network) or other types of networks or distributing of electronic information (online digital music distribution service). You need to acquire the corresponding licenses for such uses. For details, see http://www.mp3licensing.com.
Cautions on copyrights
rekordbox restricts playback and duplication of copyright-protected music contents.
- When coded data, etc., for protecting the copyright is embedded in the music contents, it may not be possible to operate the program normally.
- When rekordbox and the unit detect that coded data, etc., for protecting the copyright is embedded in the music contents, processing (playback, reading, etc.) may stop. Recordings you have made are for your personal enjoyment and according to copyright laws may not be used without the consent of the copyright holder.
- Music recorded from CDs, etc., is protected by the copyright laws of individual countries and by international treaties. It is the full responsibility of the person who has recorded the music to ensure that it is used legally.
- When handling music downloaded from the Internet, etc., it is the full responsibility of the person who has downloaded the music to ensure that it is used in accordance with the contract concluded with the download site.
The specifications and design of this product are subject to change without notice.
© 2020 AlphaTheta Corporation. All rights reserved.


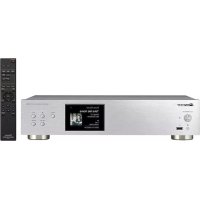

- Contents
- Before you start....6
- Product overview....7
- Part names .... 14
- PC/Mac setup 27
- Connections (basic styles) 29
- Storage device connection (SD, USB) 33
- Track selection....35
- Playback 46
- Using the jog wheel 49
- Cue 51
- Loop....54
- Hot Cues 58
- Quantize....61
- Beat Jump/Loop Move 62
- Slip 64
- Beat Sync 66
- Beatgrid 68
- Key Sync....69
- Key Shift 70
- Using a DJ application (MIDI/HID) 71
- Settings....73
- Specifications 83
- Additional information 84
- Before you start
- How to read this manual
- What's in the box
- Product overview
- PRO DJ LINK
- SD & USB Export
- ◆ rekordbox LINK Export
- Step 1: Home or studio
- Step 2: Club or venue
- Step 3: Home or studio
- Using mobile devices
- System requirements
- Supported audio sources
- SD memory cards
- USB devices
- Supported file formats
- Part names
- Top panel
- Rear panel
- Touch display
- [SOURCE] screen
- Device icon
- Device name
- Device information
- Browse screen
- Example: when you press the [BROWSE] button
- Category
- Device icon
- Name of selected folder or list
- PREVIEW
- Font size
- INFO
- Track list
- Playback status display (page 21)
- Playback screen (Waveform screen)
- Number of beats for a loop
- Enlarged waveform
- Beat countdown
- Device icon
- Track information
- i
- Waveform/phase meter
- Zoom/Grid Adjust mode indicator
- Number of beats for Beat Jump
- Number of beats for Quantize
- Player number
- Track number
- A. HOT CUE indicator
- AUTO CUE indicator
- Time display (minutes, seconds, msec)
- SINGLE/CONTINUE indicator
- Playback speed
- Playback speed adjustment range
- BPM
- MASTER/SYNC indicator
- MT indicator
- Key
- Overall waveform (pages 46, 48)
- Basic operations on the touch display
- ◆ Using the rotary selector
- Turn the rotary selector to move the cursor and highlight an item.
- Press the rotary selector to confirm your selection.
- ◆ Touch operations
- Touch the desired item to highlight it.
- Touch the highlighted item again to confirm your selection.
- ◆ Returning to the next higher level
- Press the [BACK] button on the top panel, or touch [BACK] on the screen.
- Jog display
- SLIP indicator
- Artwork
- SYNC indicator
- Playback point indicator
- VINYL indicator
- Cue/loop/Hot Cue point indicator
- MASTER indicator
- PC/Mac setup
- Installation
- Notes on installation
- Downloading the driver software
- Installing the driver software
- Connections (basic styles)
- rekordbox LINK Export
- ◆ Wired LAN connection
- USB connection
- ◆ Wireless LAN (Wi-Fi) connection
- Storage device connection (SD, USB)
- SD memory card
- Inserting an SD memory card
- Removing an SD memory card
- USB device
- Connecting a USB device
- Disconnecting a USB device
- Track selection
- Selecting a source
- Selecting a track
- Selecting a track on the browse screen
- Selecting a recently played track
- Press the [MENU/UTILITY] button on the Waveform screen.
- Select a track.
- Searching for a track
- Using the Search feature
- Press the [SEARCH] button.
- Enter a keyword using the keyboard.
- Using the Jump feature
- Alphabet Jump
- Press and hold the rotary selector when the alphabetical order list is displayed.
- Turn the rotary selector to scroll the screen.
- Page Jump
- Press and hold the rotary selector when a list other than the alphabetical order list is displayed.
- Using Track Filter
- ◆ Narrowing down tracks
- Press the [TRACK FILTER/EDIT] button.
- ◆ Specifying the conditions on the Track Filter editing screen
- Press and hold the [TRACK FILTER/EDIT] button.
- Specify the filter conditions.
- MASTER PLAYER
- Check boxes
- Filter conditions
- RESET
- BPM/KEY tab, MY TAG tab
- Monitoring the sound before loading a track (Touch Preview)
- Touch the waveform.
- Using History
- Viewing History
- Deleting History
- Using a Hot Cue Bank
- Press the [BROWSE] button.
- Select [HOT CUE BANK] in the category.
- Select a Hot Cue Bank.
- Touch the Hot Cue Bank, or press the rotary selector.
- Using the Tag List
- Registering a track to the Tag List
- Deleting a track from the Tag List
- Converting the Tag List to a playlist
- Playback
- Playback/pause
- Press the [PLAY/PAUSE ▶/III] button.
- Playing a track from the touched point on the overall waveform
- Touch the overall waveform during pause or while pressing the top of the jog wheel in Vinyl mode.
- Reverse playback
- Flip the [DIRECTION FWD, REV, SLIP REV] lever to the [REV] side.
- Basic operations during playback
- Adjusting the playback speed (Tempo Control)
- Move the [TEMPO] slider.
- Adjusting the playback speed without changing the pitch (Master Tempo)
- Press the [MASTER TEMPO] button to turn on Master Tempo.
- Monitoring a different part of a track during playback (Touch Cue)
- Using the jog wheel
- Setting the jog wheel mode
- Press the [JOG MODE] button.
- Jog wheel operations
- Adjusting the weight of the jog wheel
- Turn the [JOG ADJUST] knob.
- Adjusting the playback and stopping speeds (for Vinyl mode)
- Press and hold the [MENU/UTILITY] button.
- Select an adjustment setting in [VINYL SPEED ADJUST] in [DJ SETTING].
- Turn the [VINYL SPEED ADJ. TOUCH/BRAKE] knob to adjust the speed.
- Cue
- Setting a cue point
- During pause
- Press the [CUE] button.
- During playback
- Press the [LOOP IN/CUE (IN ADJUST)] button.
- Jumping to a cue point
- Press the [CUE] button during playback.
- Checking a cue point (Cue Point Sampler)
- Saving a cue point
- Calling up a saved cue point
- Deleting a saved cue point
- Setting the Auto Cue
- Press and hold the [TIME MODE/AUTO CUE] button.
- Loop
- Setting a loop
- Manual setting
- Automatic setting
- Using [BEAT LOOP] on the Waveform screen
- Touch [BEAT LOOP] on the Waveform screen.
- Touch the number of beats you prefer.
- Fine-adjusting loop points
- Press the [LOOP IN/CUE (IN ADJUST)] or [LOOP OUT (OUT ADJUST)] button during loop playback.
- Press the [SEARCH ◀◀] or [SEARCH ▶▶] button or turn the jog wheel to fine-adjust the loop point.
- Adjusting the length of a loop
- Reducing a loop length by half
- Doubling a loop in length
- Using Active Loop
- Canceling loop playback
- Emergency Loop
- Saving a loop
- Calling up a saved loop
- Deleting a saved loop
- Hot Cues
- Setting a Hot Cue
- Press one of the [HOT CUE] (A to H) buttons at the point where you want to set a Hot Cue.
- Starting playback from a Hot Cue point
- Press one of the [HOT CUE] (A to H) buttons that have a Hot Cue set.
- Deleting a Hot Cue
- Press one of the [HOT CUE] (A to H) buttons while pressi the [CALL/DELETE] button.
- Calling up Hot Cues
- Automatic call-up
- Press and hold the [MENU/UTILITY] button or press the [SHORTCUT] button.
- Set [HOT CUE AUTO LOAD] to [ON] or [rekordbox SETTING].
- Manual call-up
- Press the [CALL/DELETE] button.
- Press one of the blinking [HOT CUE] (A to H) buttons.
- Quantize
- Using Quantize
- Press the [QUANTIZE] button.
- Beat Jump/Loop Move
- Using Beat Jump/Loop Move
- ◆ Using the [BEAT JUMP ◀, ▶] buttons
- Press the [BEAT JUMP ◀] or [BEAT JUMP ▶] button during playback.
- Using [BEAT JUMP] on the Waveform screen
- Touch [BEAT JUMP] on the Waveform screen.
- Touch your preferred number of beats.
- Slip
- Setting Slip mode
- Press the [SLIP] button.
- Beat Sync
- Using Beat Sync
- Changing the sync master
- Using Instant Doubles
- Beatgrid
- Adjusting the beatgrid
- Press and hold the rotary selector.
- Turn the rotary selector to adjust the beatgrid.
- Key Sync
- Using Key Sync
- Press the [KEY SYNC] button when a track is loaded.
- Key Shift
- Using Key Shift
- Touch [KEY SHIFT] on the Waveform screen.
- Touch [-] or [+] to adjust the key.
- Using a DJ application (MIDI/HID)
- Controlling a DJ application
- Settings
- Changing the [UTILITY] settings
- Select a category.
- Select a setting item.
- Select a setting value.
- Utility settings
- Categories/setting items Descriptions
- Auto standby
- Changing the settings on the [SHORTCUT] screen
- Press the [SHORTCUT] button.
- Select a setting value.
- Setting items on the [SHORTCUT] screen
- Setting items Descriptions
- Saving My Settings on a storage device (SD, USB)
- Calling up My Settings saved on a storage device (SD, USB)
- Specifications
- Analog audio output (AUDIO OUT L/R)
- Digital audio output (DIGITAL OUT)
- USB downstream section (USB)
- USB upstream section (USB)
- LAN (PRO DJ LINK)
- SD memory card section
- Main display
- Additional information
- Troubleshooting
- You cannot play an audio file.
- ◆ Sound is not outputting, or it is distorted or unwanted noises occur.
- The information of a file is not displayed correctly.
- ◆ Track Search does not complete.
- ◆ Track does not jump to a cue point.
- You cannot save settings.
- The unit does not recognize a connected USB device.
- You cannot save cue points/loops on a storage device (SD, USB).
- ✿ Cue points/loop points saved for a track on a storage device (SD, USB) are not displayed.
- The operation does not start immediately after you press the button for playing a Hot Cue or starting re-loop, or when you flip the lever for reverse playback.
- The playing address does not show the remaining time.
- LCD display
- Cleaning
- Trademarks and registered trademarks
- About using MP3 files
- Cautions on copyrights
Brand : PIONEER
Model : CDJ-3000
Category : Media player