
DJM-250-W - DJ mixer PIONEER - Free user manual and instructions
Find the device manual for free DJM-250-W PIONEER in PDF.



| Product type | DJ mixer |
| Brand | PIONEER |
| Model | DJM-250-W |
| Dimensions (W × H × D) | 240 mm × 107.7 mm × 300.2 mm |
| Weight | 3.1 kg |
| Power supply | AC adapter 100-240 V, 50/60 Hz, output DC 5 V / 3 A |
| Operating temperature | +5 °C to +35 °C |
| Operating humidity | 5 % to 85 % (without condensation) |
| Number of channels | 2 channels |
| Equalizer | 3 bands (HI, MID, LOW) with isolation function |
| Filter | SOUND COLOR FILTER (low-pass/high-pass filter) |
| Crossfader | With curve selector (THRU, smooth, sharp) |
| Fader Start function | Yes, for Pioneer DJ players |
| Inputs | CD (RCA ×2), PHONO/LINE (RCA ×2), AUX (RCA ×2 + 3.5 mm minijack ×1), MIC (6.3 mm jack ×1) |
| Outputs | MASTER 1 (XLR), MASTER 2 (RCA), PHONES (6.3 mm stereo jack), CONTROL (3.5 mm minijack ×2) |
| Maintenance and cleaning | Clean with a damp cloth; avoid liquid, aerosol, or alcohol-based products |
| Safety | Do not expose to water, do not block ventilation, use only the supplied adapter |
| Warranty | Warranty card included (refer to manual for conditions) |
| Supplied accessories | AC adapter, power cord, warranty card, user manual |
Frequently Asked Questions - DJM-250-W PIONEER
User questions about DJM-250-W PIONEER
0 question about this device. Answer the ones you know or ask your own.
Ask a new question about this device
Download the instructions for your DJ mixer in PDF format for free! Find your manual DJM-250-W - PIONEER and take your electronic device back in hand. On this page are published all the documents necessary for the use of your device. DJM-250-W by PIONEER.
USER MANUAL DJM-250-W PIONEER
The Pioneer website shown above offers FAQs, information on software and various other types of information and services to allow you to use your product in greater comfort.
Operating Instructions
Mode d'emploi
Bedienungsanleitung
Thank you for buying this Pioneer product. Please read through these operating instructions so you will know how to operate your model properly. After you have finished reading the instructions, put them away in a safe place for future reference.
In some countries or regions, the shape of the power plug and power outlet may sometimes differ from that shown in the explanatory drawings.
However the method of connecting and operating the unit is the same.
WARNING
This equipment is not waterproof. To prevent a fire or shock hazard, do not place any container filled with liquid near this equipment (such as a vase or flower pot) or expose it to dripping, splashing, rain or moisture.
D3-4-2-1-3_A1_En
WARNING
Before plugging in for the first time, read the following section carefully.
The voltage of the available power supply differs according to country or region. Be sure that the power supply voltage of the area where this unit will be used meets the required voltage (e.g., 230 V or 120 V) written on the side panel.
D3-4-2-1-4*A1_EN
WARNING
To prevent a fire hazard, do not place any naked flame sources (such as a lighted candle) on the equipment.
D3-4-2-1-7a_A1_En
Operating Environment
Operating environment temperature and humidity: +5 ^ to +35 ^ ( +41 ^ to +95 ^ ); less than 85% RH (cooling vents not blocked)
Do not install this unit in a poorly ventilated area, or in locations exposed to high humidity or direct sunlight (or strong artificial light)
D3-4-2-1-7c*A1_EN
This product is for general household purposes. Any failure due to use for other than household purposes (such as long-term use for business purposes in a restaurant or use in a car or ship) and which requires repair will be charged for even during the warranty period.
K041_A1_En
If the AC plug of this unit does not match the AC outlet you want to use, the plug must be removed and appropriate one fitted. Replacement and mounting of an AC plug on the power supply cord of this unit should be performed only by qualified service personnel. If connected to an AC outlet, the cut-off plug can cause severe electrical shock. Make sure it is properly disposed of after removal.
The equipment should be disconnected by removing the mains plug from the wall socket when left unused for a long period of time (for example, when on vacation).
D3-4-2-2-1a_A1_En
CAUTION
The ON/OFF switch on this unit will not completely shut off all power from the AC outlet. Since the power cord serves as the main disconnect device for the unit, you will need to unplug it from the AC outlet to shut down all power. Therefore, make sure the unit has been installed so that the power cord can be easily unplugged from the AC outlet in case of an accident. To avoid fire hazard, the power cord should also be unplugged from the AC outlet when left unused for a long period of time (for example, when on vacation).
D3-4-2-2-2a*A1_En
POWER-CORD CAUTION
Handle the power cord by the plug. Do not pull out the plug by tugging the cord and never touch the power cord when your hands are wet as this could cause a short circuit or electric shock. Do not place the unit, a piece of furniture, etc., on the power cord, or pinch the cord. Never make a knot in the cord or tie it with other cords. The power cords should be routed such that they are not likely to be stepped on. A damaged power cord can cause a fire or give you an electrical shock. Check the power cord once in a while. When you find it damaged, ask your nearest PIONEER authorized service center or your dealer for a replacement.
S002*A1En

If you want to dispose this product, do not mix it with general household waste. There is a separate collection system for used electronic products in accordance with legislation that requires proper treatment, recovery and recycling.
Private households in the member states of the EU, in Switzerland and Norway may return their used electronic products free of charge to designated collection facilities or to a retailer (if you purchase a similar new one).
For countries not mentioned above, please contact your local authorities for the correct method of disposal.
By doing so you will ensure that your disposed product undergoes the necessary treatment, recovery and recycling and thus prevent potential negative effects on the environment and human health.
K058b_A1_En
Contents
How to read this manual
The names of displays, menus, and buttons in this manual are enclosed in brackets. (e.g. [MASTER] channel, [ON/OFF], [File] menu)
Before start
Features 4
System setup example 4
What's in the box 4
12 Connections
Names of Parts 5
Connecting the input/output terminals. 6
About the AC adapter. 7
Operation
Control panel. 9
About the power switch of this unit 9
Basic operations (mixer section) 10
Using the filter function (filter section) 11
Selecting the crossfader's curve characteristics
(crossfader section) 11
Starting playback of a Pioneer DJ player using the fader
(fader start section) 11
Monitoring the sound over headphones (headphones section) 12
Using a microphone or external device (MIC/AUX section) 12
14 Additional information
Troubleshooting 13
Block Diagram 13
About trademarks and registered trademarks 14
Specifications. 14
Before start
Features
This unit is a DJ mixer that carries over the technology of the Pioneer DJM series, the world standard in club sound. It is a standard type unit equipped with the basic functions required for mixing, enabling full-fledged DJ play easily.
SOUND COLOR FILTER
Each channel is equipped with a SOUND COLOR FILTER function by which filter effects can be achieved simply by turning a large control. This lets you arrange and mix tracks intuitively for DJ performances.
3-BAND EQUALIZER
This unit is equipped with a 3-band equalizer allowing the volume of the high, medium and low frequency ranges to be adjusted separately. Not only can the tone be adjusted to your tastes, the sound for a certain range can be turned completely off by turning the control all the way counterclockwise (isolator function).
MIC/AUX INPUT
This unit is equipped with three sets of AUX inputs for input of audio signals from external devices (computers, portable audio sets, TVs, synthesizers, etc.), as well as a microphone input. It can be used not only for DJ performances, but also as a pre-amp to appreciate music.
XLR OUTPUT
This unit is equipped with XLR balanced outputs featuring little loss of audio signal quality, enabling DJ performances with high sound quality. Also, it can be connected to powered speakers or other devices supporting XLR inputs without any changes to the terminals.
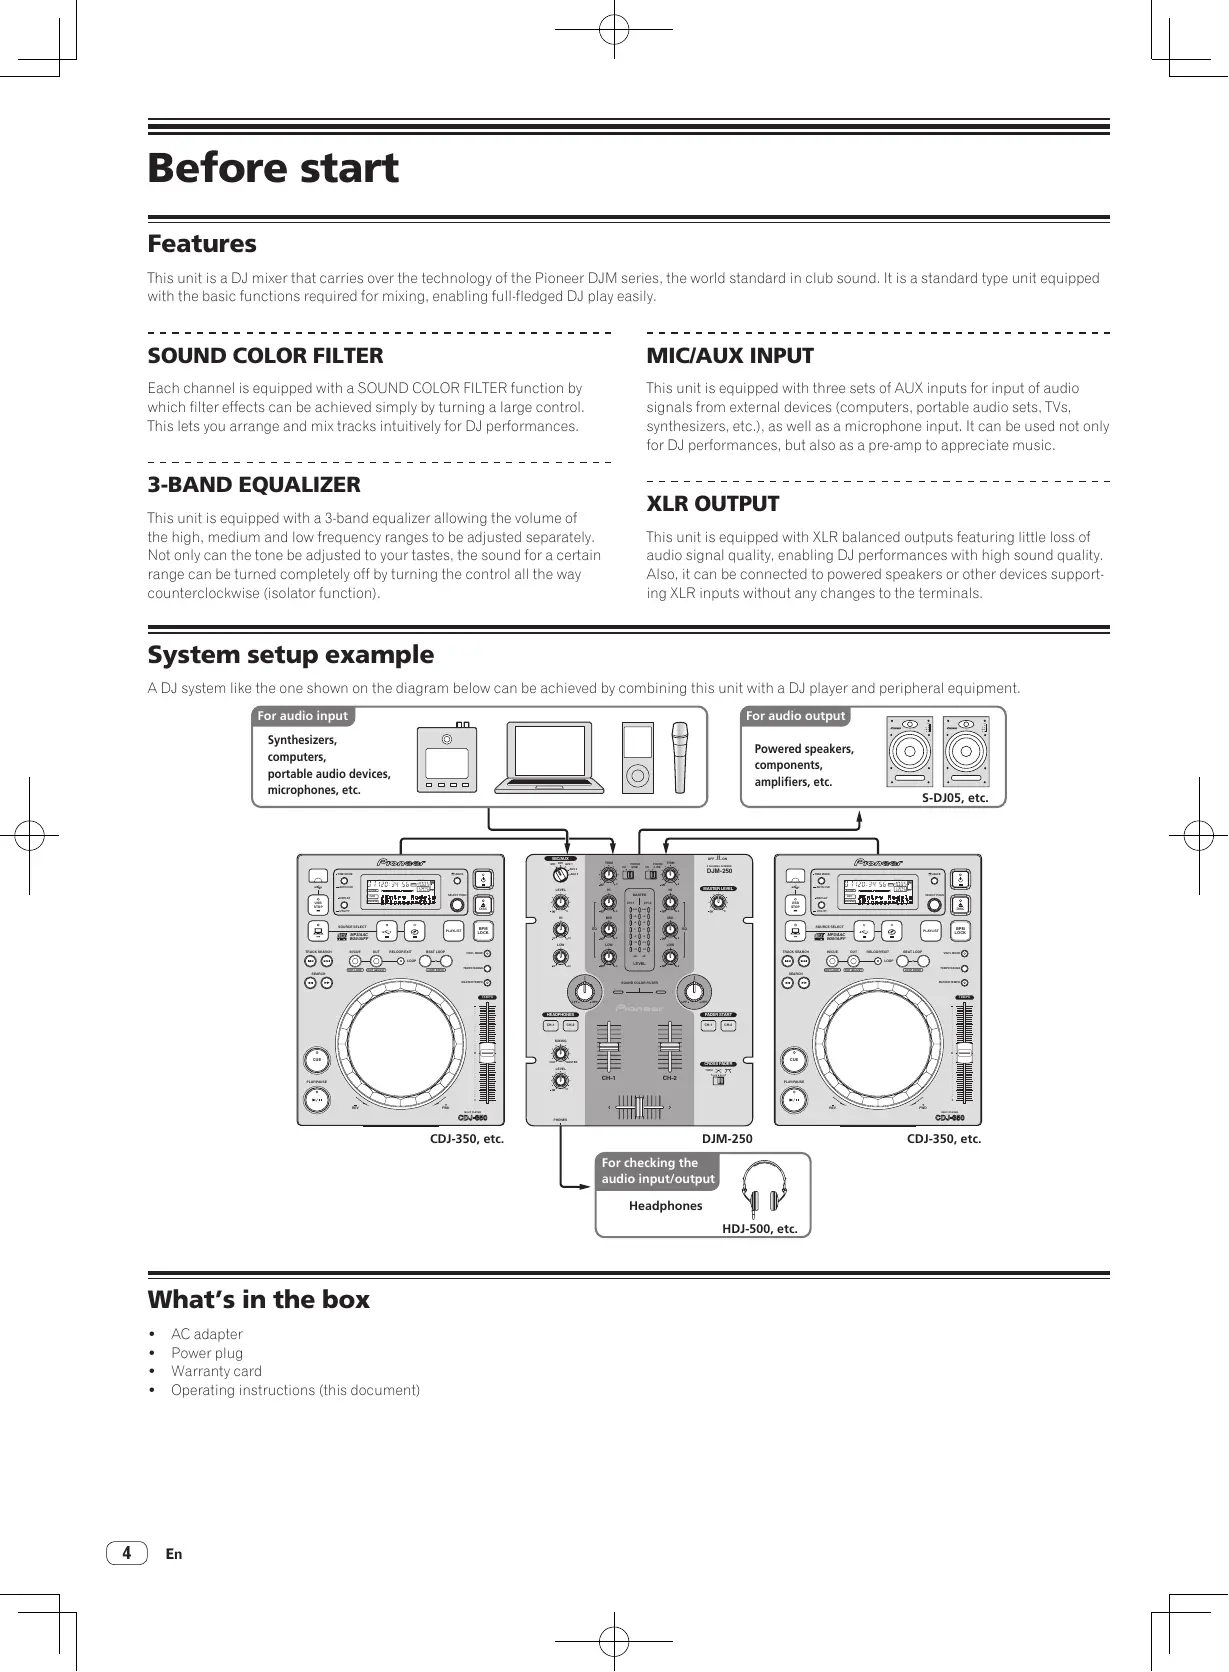
System setup example
A DJ system like the one shown on the diagram below can be achieved by combining this unit with a DJ player and peripheral equipment.
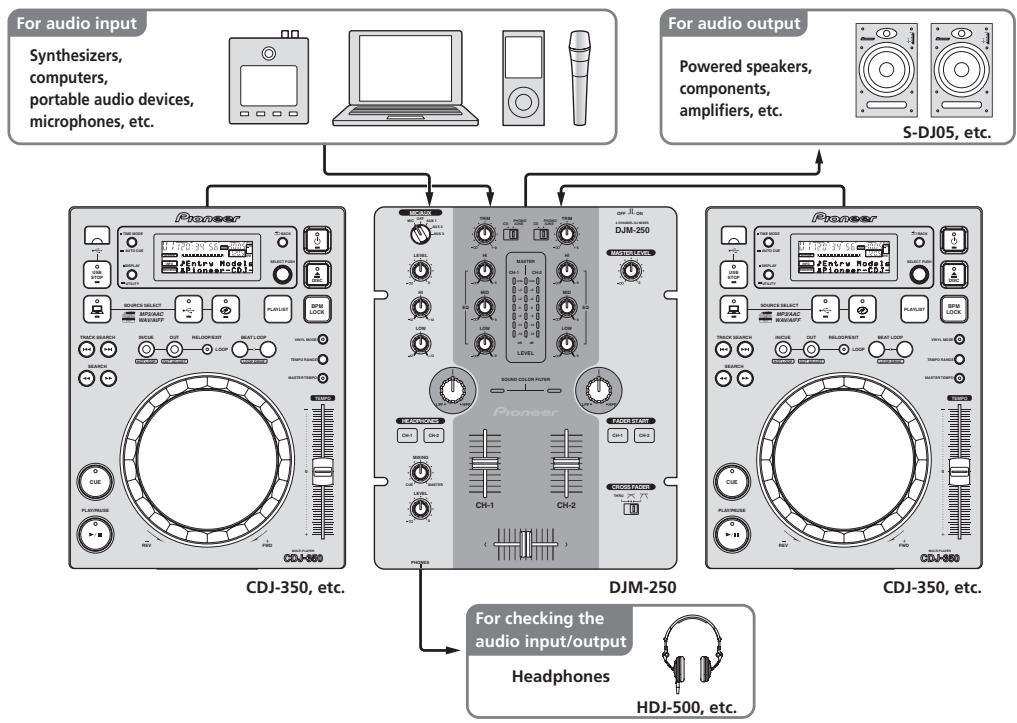
What's in the box
AC adapter
Power plug
Warranty card
- Operating instructions (this document)
Connections
Be sure to turn off the power and unplug the AC adapter from the power outlet before making or changing connections between devices.
Wait until all connections between devices have been completed before connecting the AC adapter.
Only use the AC adapter included with this unit.
Refer to the operating instructions for the component to be connected.
Names of Parts
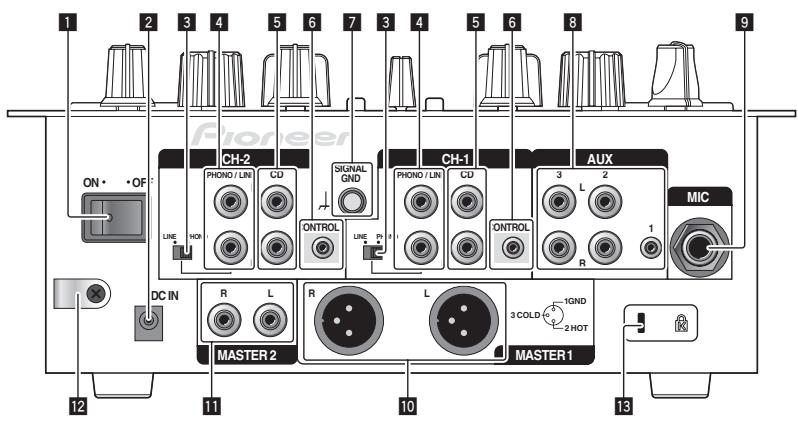
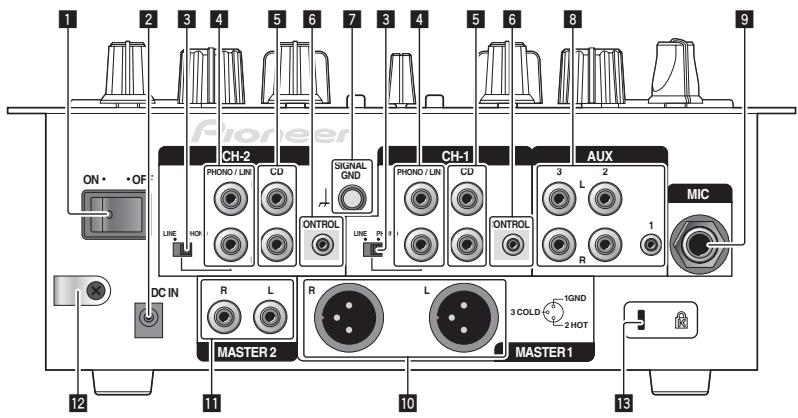
Rear panel, front panel
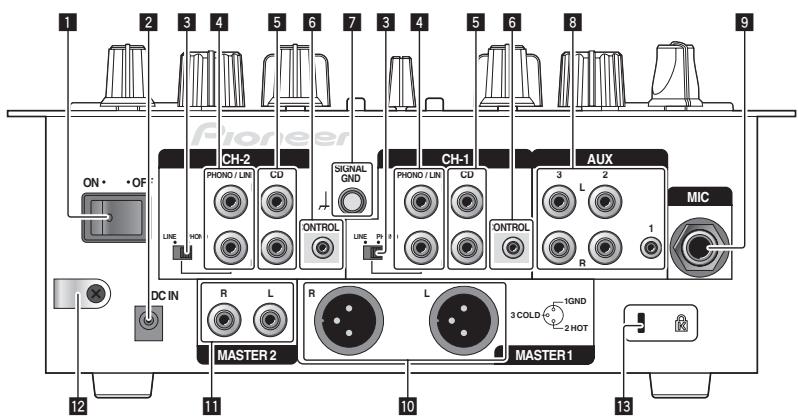

1 ON/OFF switch (page 9)
Turns this unit's power on and off.
2 DC IN terminal
Connect to a power outlet using the included AC adapter (with the power plug mounted).
Wait until connection of all equipment is completed before connecting the AC adapter.
Only use the included AC adapter.
3 PHONO/LINE selector switch (page 6)
Switches the function of the [PHONO/LINE] terminals.

CAUTION
When switching the [PHONO/LINE] selector switch, set [MASTER LEVEL] to [- ] . Note that noise may be generated and sound output at a high volume.
4 PHONO/LINE terminals (page 6)
Connect a phono level output device (analog player (for MM cartridges), etc.) or a line level output device (DJ player, etc.) here. Switch the terminals' function according to the connected device using the [PHONO/LINE] selector switch on this unit's rear panel.
5 CD terminals (page 6)
Connect to a DJ player or other line level device.
6 CONTROL terminal (page 6)
Connect using a control cord (included with Pioneer DJ players).
7 SIGNAL GND terminal (page 6)
Connect an analog player's ground wire here. This helps reduce noise when the analog player is connected.
8 AUX terminals (page 6)
Connect to the output terminals of external devices (computers, portable audio sets, TVs, synthesizers, etc.).
9 MIC terminal (page 6)
Connect to a microphone.
10 MASTER 1 terminals (page 6)
Connect powered speakers, etc., here.
- Compatible with XLR connector type balanced outputs.
11 MASTER 2 terminals (page 6)
Connect powered speakers, etc., here.
- Compatible with RCA pin-jack type unbalanced outputs.
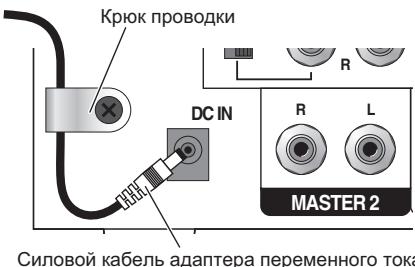
12 Cord hook
Hook the AC adapters' power cord here.
13 Kensington security slot
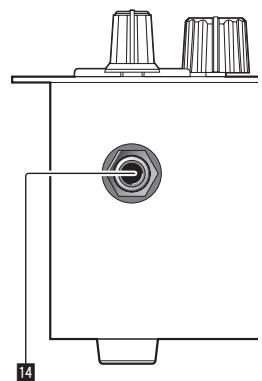
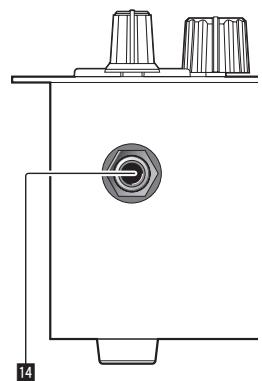
14 PHONES jack (page 6)
Connect headphones here.
Connecting the input/output terminals
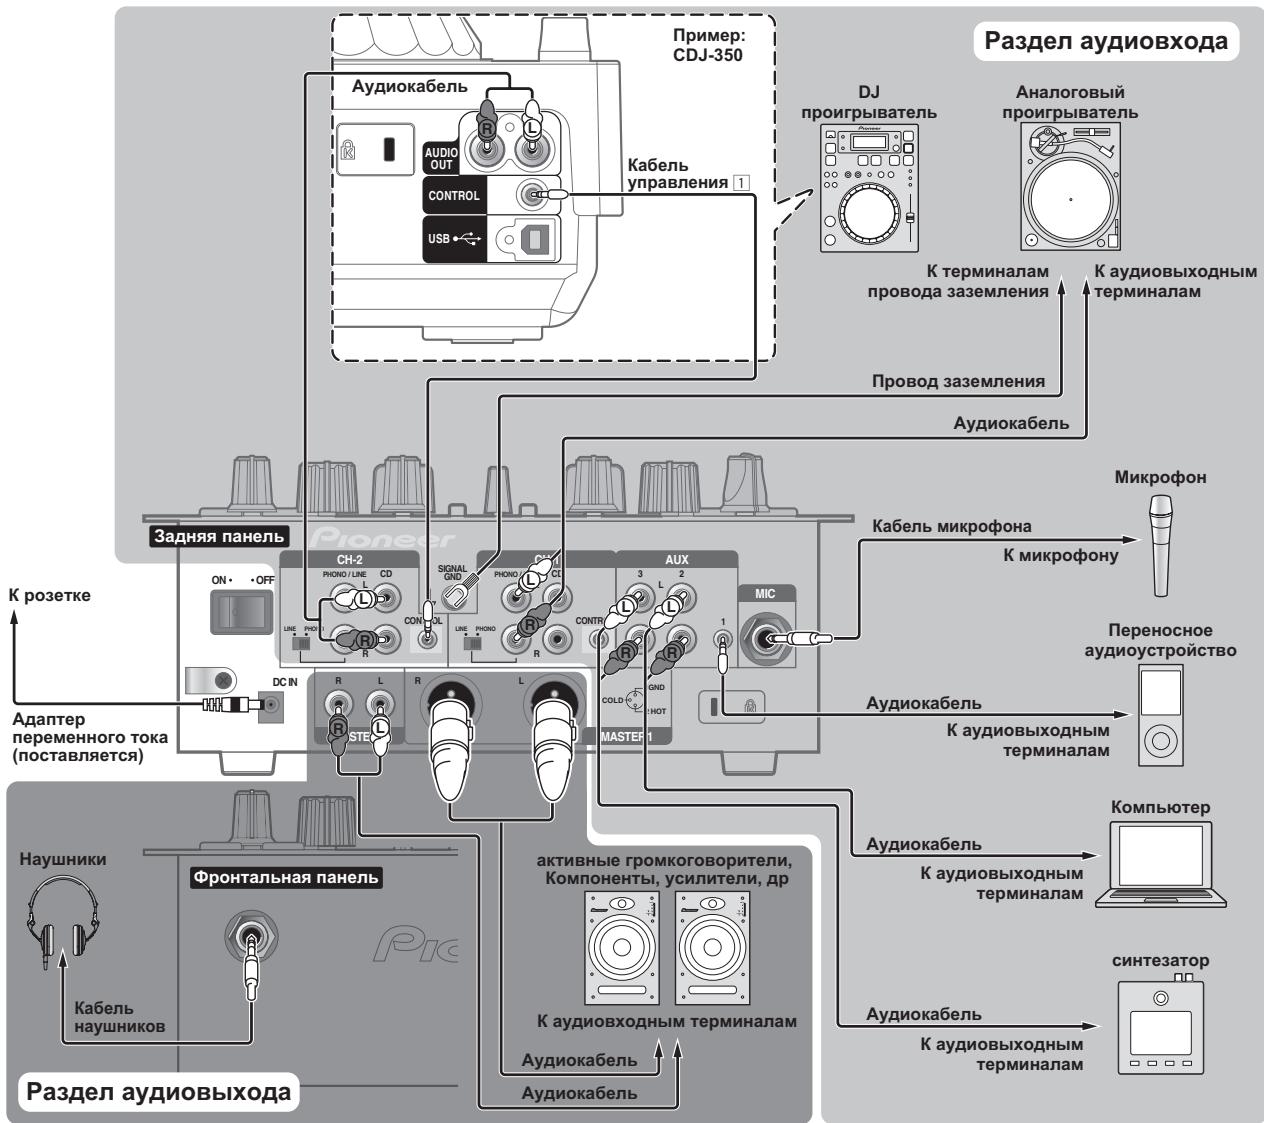
- When creating a DVS (Digital Vinyl System) combining a computer, audio interface, etc., be careful in connecting the audio interface to this unit's input terminals and in the settings of the input selector switches.
Also refer to the operating instructions of the DJ software and audio interface.
Rear panel, front panel
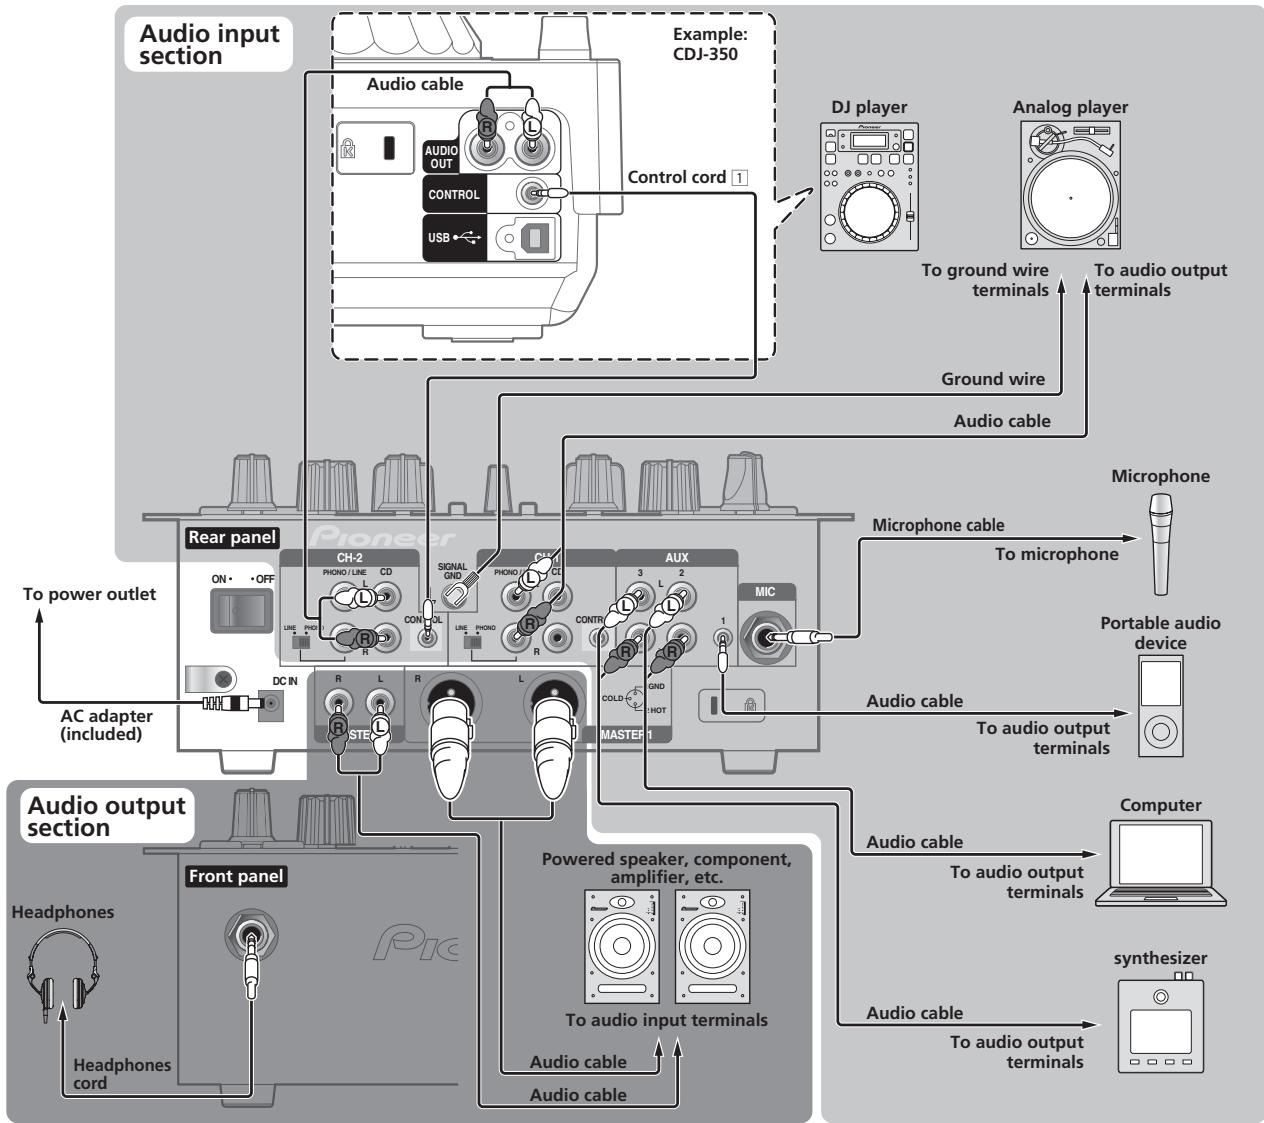
1 To use the fader start function, connect a control cord (page 11).
The fader start function can only be used when connected to a Pioneer DJ player.
Cord hook
Loosen the cord hook's screw and pinch the AC adapters' power cord under the hook.
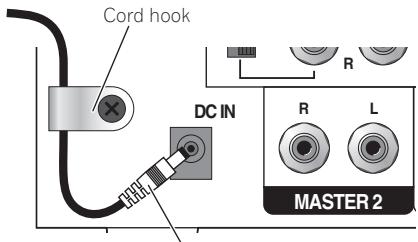
AC adapter's power cord
- Place the cord hook out of reach of children. If a child should swallow it, contact a physician immediately.
About the AC adapter
Safety instructions
To ensure your personal safety and to maximize the full operating potential of your unit, read and follow these safety instructions.
Read & Retain Instructions
Read all operating and user information provided with this product.
Cleaning
Use a damp cloth to clean the exterior housing. Avoid using any fluids including liquid, aerosol or alcohol-based cleaning products.
Water or Moisture
Avoid operating or locating this product near water or other sources of fluid.
Accessories
Do not place this product on an unstable cart, stand, or table. The product may fall and be seriously damaged.
Ventilation
Do not block or cover this product in use. This unit should not be placed in a built-in installation unless properly ventilated.
Environment
Avoid placing this product in a location with exposure to large quantities of dust, high temperatures, high humidity, or subject to excessive vibrations or shocks.
Power Sources
Operate this product only from the recommended power sources. If you are unsure of the power source, consult an authorized Pioneer representative.
Power-Cord Protection
When unplugging the unit, pull on the plug - not on the cord. Do not handle the cord or plug with wet hands; doing so could cause an electric short or shock. Do not allow anything to pinch or rest on the power cord and do not place in a walkway.
Power
Turn OFF the system before installing this or any other hardware device.
Overloading
Avoid connecting too many devices to a single wall socket or power source as this can cause fires or short circuits.
Object & Liquid Entry
Never push inappropriate objects in to the device. Avoid spilling any liquids in to or on the outside of the drive.
Servicing
Opening or removing the cover exposes you to possible electrical shock or other danger. Contact a Pioneer authorized service representative for repairing this product (refer to the enclosed Service & Support Card).
Damage Requiring Service
Unplug the unit and refer servicing to qualified service personnel in the following situations:
- When the power cord, plug, or chassis is damaged.
If liquid has been spilled, or objects have fallen into the product.
If the product has been exposed to rain or water. - If the product does not operate normally when the operating instructions are followed. Adjust only those controls that are covered by the operating instructions. Improper adjustment of other controls may result in damage and can require extensive work by a qualified technician to restore the unit to its normal operation.
- When the product exhibits a distinct change in performance – this indicates a need for service.
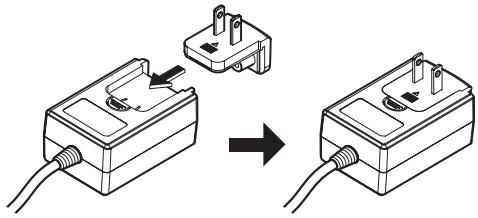
Check that there are no irregularities with the AC adapter or power plug, then insert the power plug into the specified position of the AC adapter using the specified procedure until a click is heard. For details, see Mounting the power plug on page 8.
If there are irregularities with the AC adapter or power plug, ask your nearest Pioneer authorized service center or your dealer to carry out repair work.
- Do not place the AC adapter cord around your neck. Doing so could result in suffocation.
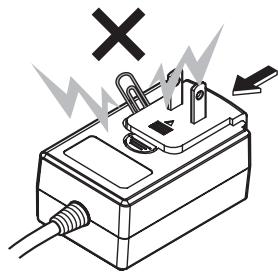
- Do not use this unit with a coin, paper clip or other metal object stuck between the AC adapter and power plug. Doing so could cause a short circuit, leading to fire or electric shock.
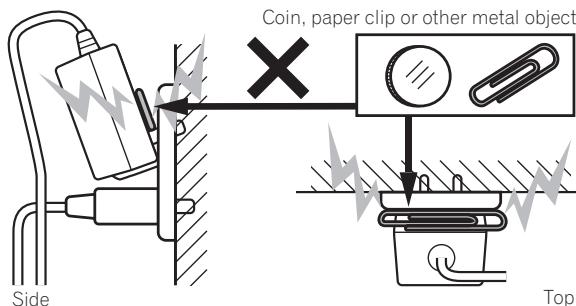
- When mounting the AC adapter on a wall outlet, make sure there is no space between the AC adapter and the wall outlet. Faulty contact or a coin, paper clip or other metal object getting stuck in the space could cause a short circuit, leading to fire or electric shock.
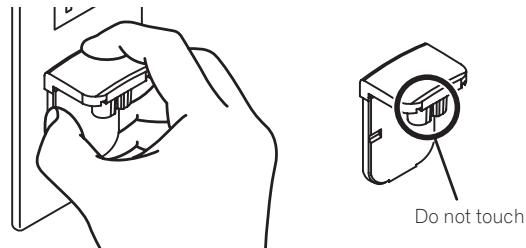
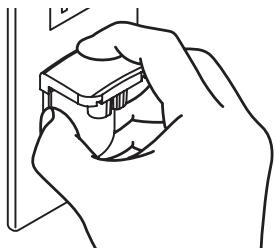
- The power plug could come detached from the AC adapter and remain in the power outlet if someone trips on the AC adapter's power cord or if something hits the AC adapter. If this happens, remove the power plug remaining in the outlet with dry hands, holding it as shown on the diagram below and without touching metal parts. Do not use any tools to remove it.
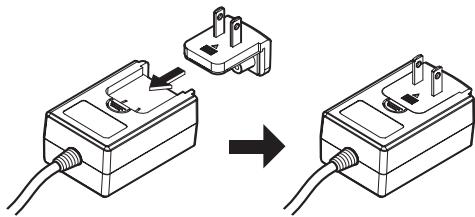
Mounting the power plug
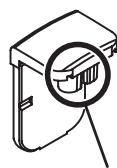
Slide the power plug along the guide rails in the AC adapter unit as shown on the diagram below, then press in until a click is heard.
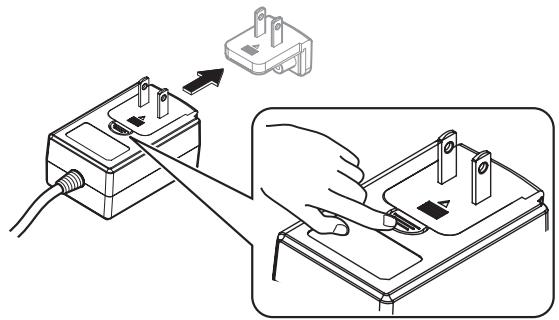
Removing the power plug
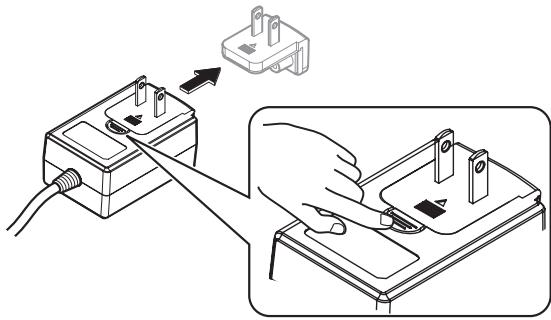
While pressing the [PUSH] button on the AC adapter unit, slide the power plug away from the adapter as shown on the diagram below to remove it.
Once the power plug is mounted, there is no need to remove it.
Power plug
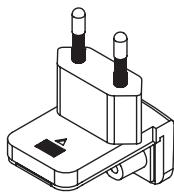
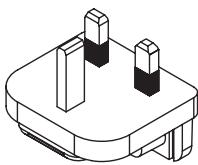
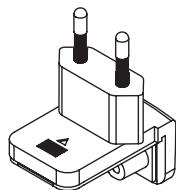
This product comes with the types of power plugs shown below. Use the appropriate power plug for the country or region you are in.
Type 1 (for Europe)
Type 2 (for the UK)
Operation
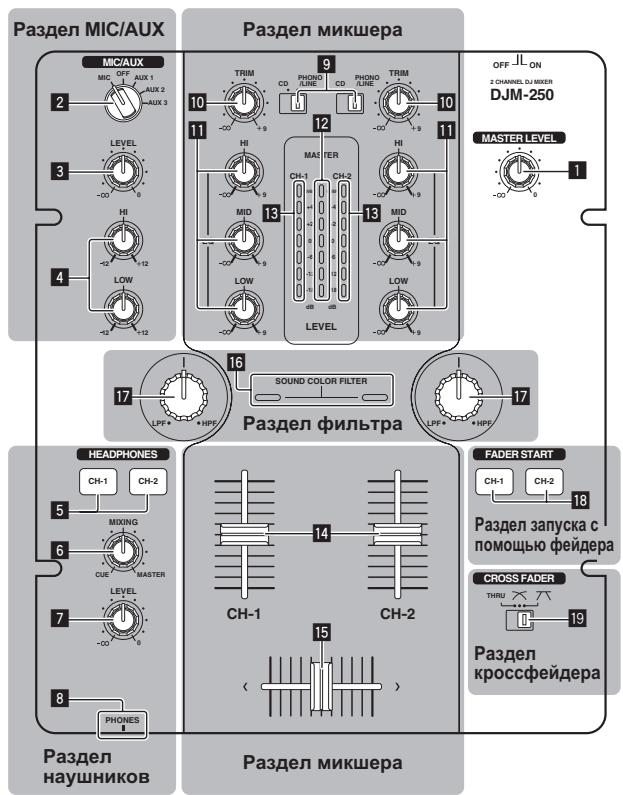
Control panel
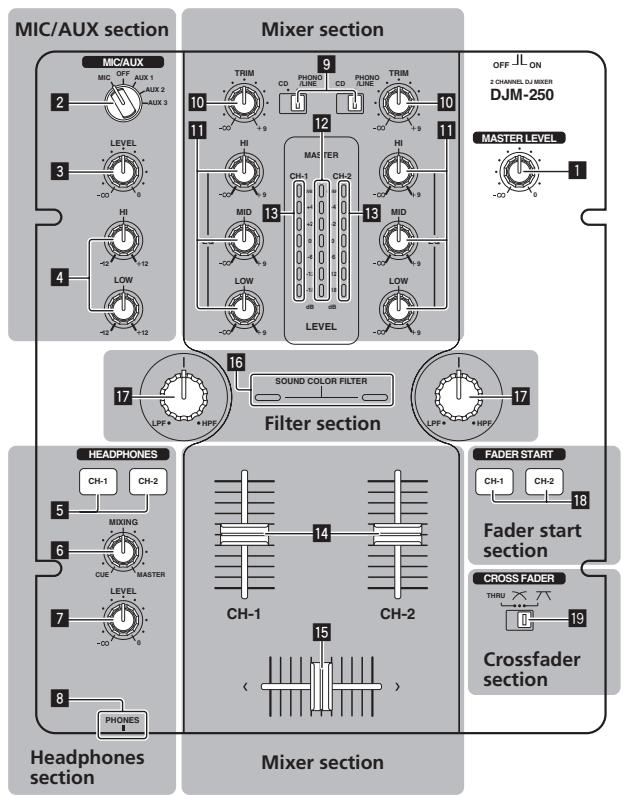
1 MASTER LEVEL control (page 10)
MIC/AUX section
This section handles the sound of microphones or external devices (computers, portable audio sets, TVs, synthesizers, etc.) (page 12).
MIC, OFF, AUX 1, AUX 2, AUX 3 input selector switch
LEVEL control (MIC/AUX section)
HI, LOW controls
Headphones section
The sound being input to this unit can be checked over headphones (page 12).
CH-1, CH-2 buttons (headphones section)
6 MIXING control
LEVEL control (headphones section)
8 PHONES jack
Mixer section
Two sets of audio signals can be adjusted separately for basic DJ mixing (page 10).
9 CD, PHONO/LINE input selector switch
10 TRIM control
EQ (HI, MID, LOW) control
12 Master level indicator
13 Channel level indicator
14 Channel fader
15 Crossfader
Filter section
16 SOUND COLOR FILTER indicator
17 SOUND COLOR FILTER control
Fader start section
18 CH-1, CH-2 buttons (fader start section)
Crossfader section
19 THRU, 六 6 (crossfader curve selector switch)
About the power switch of this unit
To turn the power on
Set the [ON/OFF] switch on this unit's rear panel to [ON]. This turns this unit's power on (page 5).
Basic operations (mixer section)
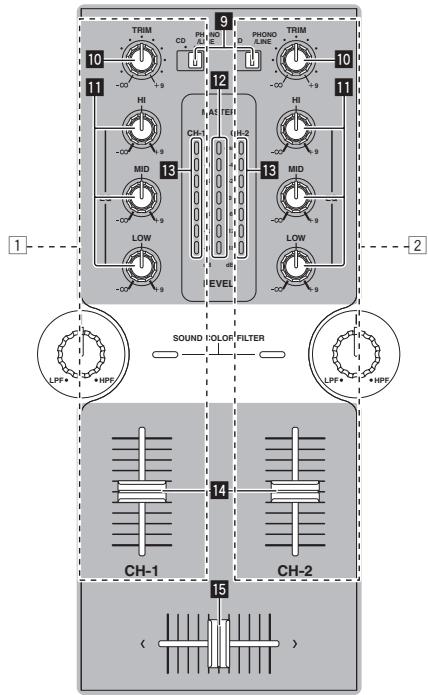
Outputting sound
Check that this unit is properly connected to the DJ player, etc., before outputting sound. For instructions on connections, see Connecting the input/output terminals on page 6.
Set the volume of the powered speakers connected to the [MASTER 1] and [MASTER 2] terminals to a suitable level. Note that sound will be output at a high volume if the volume is set too high.
For instructions on monitoring the sound, see Monitoring the sound over headphones (headphones section) on page 12.
To output the sound of channel 1 [CH-1]
To output the sound of channel 2 ([CH-2]) [2], perform the procedure below replacing [CH-1] with [CH-2].
1 Switch the [CH-1] [CD, PHONO/LINE] input selector switch 9.
Select the input source for [CH-1] from among the devices connected to this unit.
- [CD]: Selects the DJ player connected to the [CD] terminals.
- [PHONO/LINE]: Selects the device connected to the [PHONO/LINE] terminals.
2 Turn the [CH-1] [TRIM] control 10 clockwise.
Adjusts the audio level input to the [CH-1] terminal.
The [CH-1] channel level indicator 18 lights when audio signals are being properly input to [CH-1].
Adjust the [TRIM] control so that the orange indicator lights where the track's volume is highest (at the climax, etc.)
Be careful that the red indicator does not light, or the sound could be distorted.
3 Move the [CH-1] channel fader away from you.
The level of the sound output from the [CH-1] terminals is adjusted.
4 Switch [THRU, 六 6] (the crossfader curve selector switch) 19.
This switches the crossfader's curve characteristics. For details, see Selecting the crossfader's curve characteristics (crossfader section) on page 11.
5 Move the crossfader 15.
Switch the channel whose sound is output from the speakers.
- Left edge: The [CH-1] sound is output.
Center position: The sound of [CH-1] and [CH-2] is mixed and output.
Right edge: The [CH-2] sound is output.
- This operation is not necessary when the [THRU, , ] (cross-fader curve selector) switch is set to [THRU].
6 Turn the [MASTER LEVEL] control 1 clockwise.
Sound is output from the speakers.
The master level indicator 12 on the control panel lights.
Adjust [MASTER LEVEL] so that the orange indicator lights at the point in the track where the volume is loudest (the climax, etc.).
Be careful that the red indicator does not light, or the sound could be distorted.
Adjusting the sound quality
Turn the [CH-1] 1 or [CH-2] 2 EQ (HI, MID, LOW) control
Refer to Specifications on page 14 for the range of sound that can be adjusted by each control.
- The sound for that range can be turned completely off by turning the control all the way counterclockwise (isolator function).
Mixing using the faders
Prepare the unit in advance so that the sound of [CH-1] 1 is being output from the speakers. For instructions on preparation, see Outputting sound on page 10.
Mixing using the channel faders
1 Set [THRU, 六 (the crossfader curve selector switch) to [THRU].
2 Switch the [CH-2] [CD, PHONO/LINE] input selector switch 9.
3 Turn the [CH-2] [TRIM] control 10 clockwise.
4 Press the [CH-2] button 5 in the headphones section. The sound of [CH-2] is monitored from the headphones.
5 Turn the [MIXING] control 6.
Adjust the monitor volume balance of the sound output from the [MASTER 1] or [MASTER 2] terminals (the [CH-1] sound) and the [CH-2] sound.
6 Operate the DJ player connected to the [CH-2] terminals.
While checking the sound over the headphones, adjust the tempo of [CH-2] track to match the tempo of [CH-1] track.
7 While moving the [CH-2] ② channel fader to the back, move the [CH-1] ① channel fader to the front.
While checking the sound output from the speakers, operate the channel faders to substitute the sound of [CH-1] with the sound of [CH-2]. Mixing is completed once only the [CH-2] sound is being output from the speakers.
Mixing using the crossfader
1 Set [THRU, 空 ,(the crossfader curve selector switch)to[or]
2 Operate [CH-2] ②.
Operate as described in steps 2 to 6 under Mixing using the channel faders on page 10.
3 Move the crossfader 15 gradually towards the right. While checking the sound output from the speakers, operate the cross-fader to substitute the sound of [CH-1] with the sound of [CH-2]. Mixing is completed once only the [CH-2] sound is being output from the speakers.
Using the filter function (filter section)
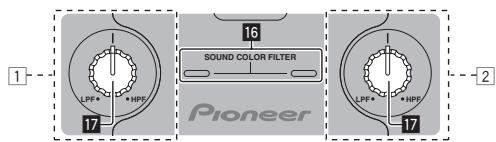
Each channel is equipped with a SOUND COLOR FILTER function by which filter effects can be achieved simply by turning a large control. The treble or bass sound can be removed by turning the [SOUND COLOR FILTER] control 17.
Turn the [CH-1] ① or [CH-2] ② [SOUND COLOR FILTER] control ⑦.
The effect is applied to the sound and the indicator's color changes. The effect type and indicator color differs according to the direction in which the [FILTER] control is turned, as shown on the table below.
| Direction of rotation | Description of effect | Indicator |
| Left | Applies the effect of the treble sound fading out. (LPF: low pass filter) | Red (flashing) |
| Center | — | Orange (lit) |
| Right | Applies the effect of the bass sound fading out. (HPF: high pass filter) | Green (flashing) |
Mixing using the SOUND COLOR FILTER control
Prepare the unit in advance so that the sound of [CH-1] 1 is being output from the speakers. For instructions on preparation, see Outputting sound on page 10.
For instructions on monitoring the sound, see Monitoring the sound over headphones (headphones section) on page 12.
1 Operatethecrossfaderand[CH-2]2.
Operate as described in steps 2 to 6 under Mixing using the channel faders on page 10.
2 Turn the [CH-2] [SOUND COLOR FILTER] control fully clockwise.
3 Move the [CH-2] channel fader away from you.
4 While turning the [CH-1] [SOUND COLOR FILTER] control 7 counterclockwise from the center, turn the [CH-2] [SOUND COLOR FILTER] control 7 towards the center.
While checking the sound output from the speakers, operate the [SOUND COLOR FILTER] controls 17 and replace the [CH-1] and [CH-2] sound.
Move the [CH-1] channel fader towards the front. Mixing is completed once only the sound of [CH-2] is output from the speakers.
Selecting the crossfader's curve characteristics (crossfader section)

- [THRU]: Choose this when you do not want to use the crossfader.
- N: Set here for a curve that rises gradually.
— [7]: Set here for a curve that rises steeply. (When the crossfader moves away from either the left or right edge, the sound is immediately output from the opposite side.)
Starting playback of a Pioneer DJ player using the fader (fader start section)
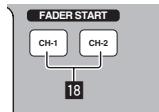
If you connect a Pioneer DJ player using a control cable (supplied with a DJ player), you can start playback of control other operations of the DJ player with the fader of this unit.
The fader start function can only be used when connected to a Pioneer DJ player.
Connect this unit and Pioneer DJ player beforehand. For instructions on connections, see Connecting the input/output terminals on page 6.
To start playback using the channel faders
1 Set [THRU, 六 6] (the crossfader curve selector switch) to [THRU].
2 Press the [CH-1] or [CH-2] button in the fader start section.
Turn the fader start function on.
3 Move the channel fader to the very front.
4 Set the cue on the DJ player.
The DJ player pauses playback at the cue point.
5 Move the channel fader away from you.
Playback starts on the DJ player.
- If you set the channel fader back to the original position, the player instantaneously returns to the cue point already set and pauses playback (back cue).
To start playback using the crossfader
1 Set [THRU, 六 6] (the crossfader curve selector switch) to [or [
2 Press the [CH-1] or [CH-2] button in the fader start section.
Turn the fader start function on.
3 Move the crossfader 15.
Move the crossfader to the opposite edge from the channel for which you want to use the fader start function.
4 Set the cue on the DJ player.
The DJ player pauses playback at the cue point.
5 Move the crossfader 13.
Playback starts on the DJ player.
- If you set the crossfader back to the original position, the player instantaneously returns to the cue point already set and pauses playback (back cue).
Monitoring the sound over headphones (headphones section)
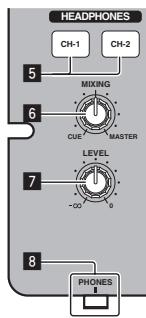
1 Connect headphones to the [PHONES] terminal.
For instructions on connections, see Connecting the input/output terminals on page 6.
2 Press the [CH-1] or [CH-2] button 5 in the headphones section.
Select the channel you want to monitor.
- [CH-1]: The sound of [CH-1] is monitored.
- [CH-2]: The sound of [CH-2] is monitored.
This operation is not necessary to monitor the [MASTER 1] or [MASTER 2] (master channel) sound.
3 Turn the [MIXING] control 6.
- When turned counterclockwise: The volume of [CH-1] and [CH-2] becomes relatively louder.
Center position: The volume of the [CH-1] and [CH-2] sound is the same level as the [MASTER 1] and [MASTER 2] sound. - When turned clockwise: The volume of [MASTER 1] and [MASTER 2] become relatively louder.
4 Turn the [LEVEL] control 7 in the headphones section clockwise.
Sound is output from the headphones.
- When the [CH-1] or [CH-2] button in the headphones section is pressed again, monitoring is canceled.
- [MASTER 1] and [MASTER 2] monitoring cannot be canceled.
Using a microphone or external device (MIC/AUX section)
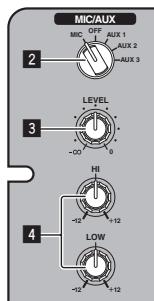
1 Switch the [MIC, OFF, AUX 1, AUX 2, AUX 3] input selector switch 2.
- [MIC]: The microphone connected to the [MIC] terminal is selected.
[AUX1-3]: Selects the external device connected to the [AUX1-3] terminals.
2 Turn the [LEVEL] control 3 in the MIC/AUX section clockwise.
The sound of the microphone or external device is output from the speakers.
Adjusting the sound quality
Turn the [HI] or [LOW] control 4 in the MIC/AUX section.
Refer to Specifications on page 14 for the range of sound that can be adjusted by each control.
Additional information
Troubleshooting
Incorrect operation is often mistaken for trouble or malfunction. If you think that there is something wrong with this component, check the points below. Sometimes the trouble may lie in another component. Inspect the other components and electrical appliances being used. If the trouble cannot be rectified after checking the items below, ask your nearest Pioneer authorized service center or your dealer to carry out repair work.
This unit may not operate properly due to static electricity or other external influences. In this case, proper operation may be restored by turning the power off, waiting 1 minute, then turning the power back on.
| Problem | Check | Remedy |
| The power is not turned on. | Is the included AC adapter properly connected? | Connect the included AC adapter properly to the power outlet. (page 6) |
| Properly attach the included AC adapter's power cord to this unit's cord hook. (Page 6) | ||
| Is the [ON/OFF] switch for power supply set to [ON]? | Set the [ON/OFF] switch for power supply to [ON]. (Page 9) | |
| No sound or small sound. | Is the [CD, PHONO/LINE] input selector switch set to the proper position? | Switch the [CD, PHONO/LINE] input selector switch to the channel's input source. (Page 10) |
| Is the [PHONO/LINE] selector switch on this unit's rear panel set to the proper position? | Switch the terminals' function using the [PHONO/LINE] selector switch on this unit's rear panel. (Page 5) | |
| Are the [TRIM], [channel fader], [crossfader] and [MASTER LEVEL] controls set to the proper positions? | Set the [TRIM], [channel fader], [crossfader] and [MASTER LEVEL] controls to the proper positions. (Page 10) | |
| Are the connected powered speakers, etc., properly set? | Properly set the external input selection, volume, etc., on the powered speakers, etc. | |
| Are the connection cables properly connected? | Connect the connection cables properly. (page 6) | |
| Are the terminals and plugs dirty? | Clean the terminals and plugs before making connections. | |
| Distorted sound. | Is [MASTER LEVEL] set at the proper position? | Adjust the [MASTER LEVEL] control so that the master level indicator's orange indicator lights at the peak level. (Page 10) |
| Is [TRIM] set at the proper position? | Adjust the [TRIM] control so that the channel level indicator's orange indicator lights at the peak level. (Page 10) | |
| Can't crossfade. | Is the [THRU, X, A] (crossfader curve selector) switch set to [TRU]? | Set the [THRU, X, A] (crossfader curve selector) switch to a position other than [TRU]. (Page 10) |
| Can't fader start a DJ player. | Is the [CH-1] or [CH-2] button in the fader start section set to the off position? | Set the [CH-1] or [CH-2] button in the fader start section to the on position. (page 11) |
| Is the control cord properly connected? | Connect this unit and DJ player with a control cord. (page 6) | |
| Are the audio cables properly connected? | Connect this unit to the audio output terminal of a DJ player with an audio cable. (page 6) | |
| Sound is distorted when an analog player is connected to this unit's [PHONO/LINE] terminals. Or, lighting of the channel level indicator does not change even when the [TRIM] control is turned. | Have you connected an analog player with a built-in phono equalizer? | If the analog player is equipped with a built-in phono equalizer, connect it to the [CD] terminals. (page 6) |
| If the analog player with built-in phono equalizer has a PHONO/LINE selector switch, switch it to PHONO. | ||
| Is an audio interface for computers connected between the analog player and this unit? | If the computer audio interface's output is line level, connect it to the [CD] terminals. (page 6) | |
| If the analog player has a PHONO/LINE selector switch, switch it to PHONO. |
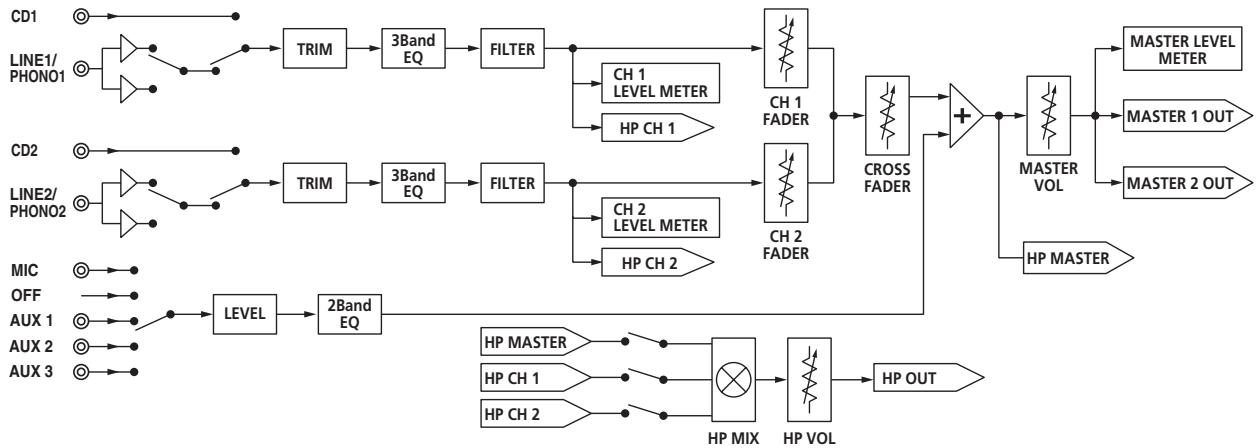
Block Diagram
About trademarks and registered trademarks
- Pioneer is a registered trademark of PIONEER CORPORATION.
- The names of companies and products mentioned herein are the trademarks of their respective owners.
- When playing music files you have acquired on this unit, we kindly ask you to respect copyrights.
Specifications
AC adapter
Power.. AC 100 V to 240 V, 50 Hz/60 Hz
Rated current. 800 mA
Rated output. DC 5 V, 3 A
General - Main Unit
Main unit weight 3.1 kg
Max. external dimensions 240 mm (width) x 107.7 mm
height) × 300.2mm depth
Tolerable operating temperature +5^ to +35^
Tolerable operating humidity. 5% to 85% (no condensation)
Audio Section
Sampling rate. 48 kHz
A/D, D/A converter 24 bits
Frequency characteristic
CD/LINE/AUX/MIC 20 Hz to 20 kHz
S/N ratio (rated output)
CD 91 dB
LINE 91 dB
PHONO 86 dB
MIC 80 dB
Total harmonic distortion (CD - MASTER 1) 0.007 %
Standard input level / Input impedance
CD. -12 dBu/10 kΩ
LINE -12 dBu/47 kΩ
PHONO. 48 dBu/47 kΩ
MIC .52 dBu/10 kΩ
AUX 1. -12 dBu/10 kΩ
AUX 2,3 -12 dBu/10 kΩ
Standard output level / Load impedance / Output impedance
MASTER 1. +6dBu / 10k /330
MASTER 2. +2dBu / 10k /1k
PHONES +2 dBu/32 /33
Rated output level / Load impedance
MASTER 1. +22dBu / 10k
MASTER 2. +18dBu / 10k
Crosstalk (CD) 74 dB
Channel equalizer characteristic
HI. - to +9 dB (13 kHz)
MID. -to + 9 dB (1 kHz)
LOW -to +9 dB (70 Hz)
MIC/AUX equalizer characteristics
HI. -12 dB to +12 dB (10 kHz)
LOW -12 dB to +12 dB (100 Hz)
Input/output terminals
CD input terminal
RCA pin jack. 2 sets
PHONO/LINE input terminals
RCA pin jack. 2 sets
MIC input terminal
Phone jack (6.3 mm) 1 set
AUX input terminal
RCA pin jack. 2 sets
Mini phone jack (0 3.5 mm) .1 set
MASTER output terminal
RCA pin jacks. 1 set
BALANCED OUTPUT output terminal
XLR connector. 1 set
PHONES output terminal
Stereo phone jack (6.3 mm) 1 set
CONTROL terminal
Mini phone jack (0 3.5 mm) 2 sets
- The specifications and design of this product are subject to change without notice.
© 2011 PIONEER CORPORATION. All rights reserved.
AVERTISSEMENT
(Section MIC/AUX) 12
LOW -a +9 dB (70 Hz)
WAARSCHUWING NETSNOER
Panel posterior, panel frontal
Panel posterior, panel frontal
Gire el control [CH-1] 0 [CH-2] EQ (HI, MID, LOW) 11.
Blaorapm Bac 3a noknydaHnoro n3dienra Pioneer. Ioxayncta, BHNMaTeIbNo n3yUte daHbIe nHCTpyKuIN no kcnPyaTaun dna HndpeKa-
IeO nCIOJIb3OBAHn DaHHo Moei. IIO 3abepeHIO n3yEHNr INcTpyKuIN, xpaHIne IN B HAdexHOM MeTe dIa cnpabOK b6dyueM.
In some countries or regions, the shape of the power plug and power outlet may sometimes differ from that shown in the explanatory drawings.
However the method of connecting and operating the unit is the same.
PPEyPPEKDEHNE
Данhoe obopydobAHne He YBJIeTcR BOIOHepnoHuaembIM.Bo n36exaHne noXapa nIIN nopaxeHnI 3JIeKTPnuecknM TOKOM He NOMEuAITe pYDM C obopydOBaHnEM EMKOCTN C KUdKOCTMaN (HaPnMep, Ba3bl, ZBeTOUHbIe rOpShk) n He dOnyckaIte IonaadHnHa Hero KaIeIb, 6pbI3r, DoJxra nIIN BnArn.
D3-4-2-1-3_A1_Ru
PPEyIPEXDEHNE
Ipepepebim EKIOUeHEmobopyoBaHua
EHumamembno npoumme cneoyuuz pa3den.
HaipjxHe B 3NEkTPOCeTN MoKeT 6bITb pa3HbIM
Bpa3NnHybIX CTpaHax N perNoHax. Y6eInTeCb, yTO
ceTEBoE HaipjxHeB MecTHOcTH, rJe 6yEdT
HCNOJIb3OBAbCBaAHHO yCTpOINCTBO,
COOTBeTCTByET Tpe6yEMOMy HapjxHeHIO
(HanpImep,230 B nJIn 120 B), yKa3aHHOMy Ha
6OKOBoi naHEn.
D3-4-2-1-4*A1Ru
PPEyIPEXDEHNE
Bo n36eKaHne noXapa He npi6mJaTe K o6OpyOBOAHnIO nCToUHnKoTkpyIToR OrHa (HaNPImep, 3axKeHHbIe CBeu).
D3-4-2-1-7a_A1_Ru
YcnoBna 3KcnnyaTaun
I3dJIne 3KcNpyaTnpyETc npn cIeNyUoX N TeMnepaTy n BlaJxHocTn:
+5°C Do +35°C; BλαχHQocTh MeHee 85% (He 3acNoHЯTe OXlaJxJaIouIne BeHTnJIrTopbl)
He yctaHaBJIbAaTe n3dJeNBe B pIIOxo npOBeTpBaemOM NOpMeUeHn INB MecTe C BbICOKo BJIaxHOCTbIO,OTKpbITOM IJPRMOrO COJIHeHORO CBeta (ININ CNJIbHOrO NCKycCTBeHORO CBeta).
D3-4-2-1-7c*A1Ru
Данhoeинденипрданautheо Дял NCNoIb3OBaHnB O6uix xO3ЯNCTBeHHbIX ZeIax. B Clyuae BO3HNKHOBEHnJIIO6O HeNCpabHocTH, CB3aHHoC HcNoIb3OBaHnEM B DpyInx, HeKeIIN XO3ЯNCTBeHHbIX ZeIax (TakIx, KAKДЛNTeJIbHoE NcNoJIb3OBaHnE B KOMMepuecknx ZeIax B pectopane ИИВ aBTOMO6Hle, ИИН Ha Kopa6Ie) n Tpe6yIoUeI pemOnTa, Tako pemOH TOCyIeCTBJIaETcR 3a ПIaTy,ДаЖe B TeueHne rapaHTHnHorO cPoka.
K041_A1_Ru
EcIn BnIka shHpa nntaHna n3deHna He COOTBeTCTByET NmEHOuEc 3JNEKTPOPo3eTke, BNJIky CJeNyET 3aMeHNTb Ha NOxOJaUy KoP0eTke. 3aMeHa uYctaHOBKa BnIKn DOJIKhI pOn3BOuNTbcr TOJbKO KBaINΦuNpOBAHHbIM TEXHkOM.
OTcoeHHeHHa OT Ka6eBn BUNka, NOKJIIOHeHHa K pO3eTKe, MOKeT BbI3BaT bTJKeJIoe NopaKeHne 3JIeKtpnueckm TOKom. IocJIe ydaJIeHHa BUNknyTNIN3npyTe ee DoJKNbIM O6pa3OM.
ObopydobAHne cIeJyET OTKIIOHaTb OT 3NeKTPocetn, n3BNEkA Bnky Ka6eJI NITaHnI N3 po3EtKn, ecN OHO He 6ydt EICNOJB3OBAtcbc B TeHeHne DOnrTO BpemHn (HanpIMep, ecN Bbl ye3Xaete B OTnyCK).
D3-4-2-2-1a_A1_Ru
BHIMAHNE
BbIKHouateJIb ON/OFF daHHoro yctpoiCTBa He noJHOCtBJO 0TKIIOUaET erO ot 3JeKTPocetN. YTo6bl noJHOCtBJo OTKIIIOUHTb NITaHne yCTPOiCTBA, BbITAUNTE BnIKy Ka6eIaNTHIN3 3JeKTPopo3eTkn. IooTOMy yCTPOiCTBO cNeIyET UCTAHABINBaTb TAK, YTO6bl BnIKy Ka6eIaNTHIN3 MOXHO 6blIO JeKO BbTAUnTIb IN3 pO3eTKIN B ue3BbUaHbIX o6cTOrTeNbCTbax. Bo n3BeXaHne IOXkapa cNeIyET n3BLeKeATb BnIKy Ka6eIaNTHIN3 PO3eTKIN, eCNI yCTPOiCTBO He 6yDet NCNOJIb3OBaTbcR B TeueHHe dONrO TopeMeHN (HaNPIMep, eCNBIye3KaaeT B OTnyCK).
D3-4-2-2-2a*A1Ru
MEPbI IPEIOCTOPOXHOCTN PNI OBPAUENC CETEBIM UHYPOM
ДерхиTe cTeBoi shHyp 3a BnIky. He bItacKnBaIte BnIky, B38Bwncb 3a shHyp, n HNKoRda He kacaIteCb cTeBOro shHpya, ecIn Baun pyKu BnaxKhble, taK ka3To MoKxet npINBeCTN K KOPOTKOMy 3ambKaHnIO nInnopaxeHHIO 3JekTPnueckm TOkOM. He cTAbTe annapat, ppeMtebl Me6Enn t.D. Ha cTeBOi shHyp, He 3axKmaiTe erO. He 3abY3bBAiTe y3IOB ha shHype n He CBz3bBAiTe erO cDpyHMn shHypm. CTeBbIe shHypbl DOnXHbl JekTaTak, YTObbl Ha HIX HeJIb3a 6blIO hAcTynITb. NObpeKdEHHbI cTeBOi shHyp MoKxet cTaTb npUHHoB BO3HNKHOBEHn IOxapa nII npa3ntb Bac 3JekTPnueckm TOkOM. BpeMra O T BpeMeHn IpOBepaIte cTeBOi shHyp. B cnyuae obHapyKeHn IOBpeKdEHHa o6paTntcB 3a 3AmHoB B 6bnJaWn oOpuHaJIbHbI cepBnChbI ceHTP fnpMbI PIONEER nIn K BaWeMy dUnepy.
S002*A1Ru

Ecnn Bbl jxnaeTe ytnn3npoBaTb daHno n3dene, He bblpaCbBAIte erO BMcTe C obhHbIM 6blTOBbIM MycOpom. CyuceCTbyET OTdeNbH aNCTema c6bopa IcNoJb30aBHHbIX 3JIeKTPoHHbIX n3denn B COOTBeTCTBm C 3aKHOdaTeJIbCTBOM, KOTOPa NpeDnlaercoOTBETCTByIOUe eobpaSeHne, Bo3Bpat n nepepaBoTky.
YacthbIe KIneHtbl-B CtpaHax-UneHax EC, B WBeiZapm HOpBertn MOryt 6ecnlaTHO Bo3Bpaaatb NcNoJb3OBAHHbIe 3JIeKTPoHHbIe n3dJIINr B COOTBETCTByUzme npHKtbl c6opar nnDnepy (pnpokynke cxOnHoro HOBOr n3dJIINr).
B ctpaHax, He nepeuicneneHHbix Bblse, Ira noluyehna HOpmaun O npabInbHbix cnocobax ytnin3auun o6paauTecb B COOTBeCTByouane yupexdennia.
IocTynar TAKIM O6pa3OM, Bbl MoKTe 6b1b yBepEnb I TOM, YTO yTNIN3npyEmb n npOyKT 6yET COOTBeTCTByIOUM o6pa3OM o6pa6oTaH, nepeDaH B COOTBeTCTByIOU nnyKT n nepepa6oTaH 6e3 BO3MOXhBx HEratINBhIx NocLeDCTBn DnIg OKpyKaIOUe CpeBIs IzdoPobBja IIOJe.
K058b_A1_Ru
Copepkne
Kak cneyuET uHaTaB daHHe pykoBOcTBo
Ha3BaHnIg 3KpaHOB, MeHIO N KHOJOK B DaHHOM pyKOBoDCTBe yKa3aHbIB Cko6kax. (HaNPmEpMep, KaHaJI [MASTER], MeHIO [ON/OFF], [File])
01 Do hauana
CboiCTBa 4
IoiKJIIOUeHHe BxOxDhIx/BbIXOdHbIX TepMHaNoB. 6
O6 aanTepe nepemehnHoro Toka. 7
03 ynpaBneHne
Panaelb ynpablenia 9
O nepeknoateJe nTaHn daHoro annapata. 9
OchOBHoe ynpaBHeHne (pa3JeI MmKsepa) 10
IcnoJIb3OBAHnE yHKuIN FInIbTpa (pa3deI nnIbTpa) 11
Bb6op xapaKTepeNtIK KpIBoI KpOcCpeiJepa (pa3JeI KpOcCpeiJepa). 11
3anycb Bocnpn3BedeHn DJ npoIrpblBaTeTner Pioneer c nomoubOeIepa (3anycc n omooubOeIepa)............11
UnpaBHeHne 3ByaHmE Ypee3 HauShnKn (pa3dJI HauShnKOB) 12
IcnoJIb3OBAHne MmKpOΦoHa IIN BHeUHero yCTpoCTBa (pa3dEn MIC/AUX) 12
14 DonoJIHnTeJIbHaI INHΦopMaun
Bo3MOxHbIe HeINcPpABHOCTn IN cNoCobI IN yCTpaHeHn 13
CTpykTyphar cxema 14
O Toprobix Mapkax 3apeRnCTpnpoBaHHbIX Toprobix Mapkax.....14
Texnueckne xapaKtepcntu. 14
CBOHCTBa
DAnHHb annapat aBnEeTcA DJ MmKHepom, cOepjkaunm TexHOnorHc cepn DJM oT Pioneer, mPoBOro cTaNdapTa B KnybHcm 3ByaHm. DAnHHb annapat cTaNdAPTHORO Tnna C OCHOBhIMn FyHKUmaN dIe MmKUnpoBaHnno, nO3BOJnouIm JERKO bInOpHrTo NolHOceHoe BocPon3BeDeHne DJ.
SOUND COLOR FILTER
Kakdik kaanl o6opdyoanfynkuee SOUNDCOLOR FILTER, no3BOJRAOe ne noyunTb fInIbtpuOuine 30fKeTbI, npocTo nobopaYBaB 6oIbSyu pyky.3To no3BOJraTe ynpaOnuHtB mNKUnpoBaTb dopokKn nHTynBHO dJa DJ nCpONHeHn.
CMOTPnTe HNCTpyKuIN NO 3KcNpYatauIN K NODKJIycaEMOMY KOMNOHEHTy.
Ha3BaHnHa cTaTei
3aHnaHeIb, npeDnra naHeJIb
5 TepMHaJIbI CD (cTp. 6)
Поdkлочи Te DJ npoirpbyaTeH no nI IN dpyromy yctpoiCTBy liNeHOrOуypOBH.
6 TepmHaJ CONTROL (ctp. 6)
Поdkлочи Te chepe3 ka6eIb ynpablenia (noctablaetcra c DJ npo-urpbibateJIIM Pioneer).
7 TepmHaJI SIGNAL GND (ctp. 6)
IpoKnIOUHTe cOJa npOBo3a3eMJeHnA aHaIOrOBo rpoIrpBbTaTeN. 3To I03BOINr yMehBwITb Wym npI npKIOUHeHn aHaIOrOBo rpoIrpBbTaTeN.
3 TepMNHaJIbAUX (ctp. 6)
ПодклочиTe K Bыховим Термнанam Bheшнх устор CTB (KOMnblOTepbl,пөрEOCHье aydnoуctpoCTBA,телевзорbl, снHTe3a-Topbl,др.).
9 TepMNHaI MIC (ctp. 6)
IopKJIIOUHTe cOda aKTINBHeI rIpOMKOrOpTeHn,dp.
- Cobmectmblc CnMMeTpHbIMN BbIXOaMn C KOHHeKTopamn Tuna XLR.
11 TepMNHaJIbI MASTER 2 (ctp. 6)
IopKIOHnTe cOJa aKTINBHeI rPOMKOrOpuTeJI, np.
- CobmecTnMbI c HecmmMeTpHbIMN bIXOaMn C rHe3dAmu TbipkOBoro Tnna RCA.
12 Kpok npoBokn
Iopdbcebte cioa cnlobo Ka6eB aanTepa nepemehoro toka.
13 Cnot 3aMka KeHcHrToHa
14 THe3do PHONES (CTp. 6)
IoiKnIOUHTe CIOda HauuHnKn.
Подкlioуене BXODhbIX/BbIXOHDbIX TepMHaJIOB
- Ppi cozdaHn DVs (Digital Vinyl System), coctoJeu n3 KOMbIepa, aydnoHNterpeca, np., 6yIbTe BHNMaTeIbHb npri pNDKIOHeHHn aydnONHTepceca K BXODHm TepMHaIam daHoro annapaTn npri yCTaHOKx nepeKJIuOaTeJe CEIEKTOPOB BXOJa. TaKke cmToPte INCtpykun no 3KcPnyataunn K nporpaMMHomy oecneueHIO DJ n K aydoINHTepcecy.
3aHnaHeIb, npeDnHa naHeIb
1Дяингльзованяфункци залуcke acnomoшьфeidepa,podknHOnTe Ka6eIb ynpaBHeHn (cTp.11).Функци залуcke cnomoшьфeidepa moKET nCnoIb3OBAb7c8ToIbko npn noDknUChENKDJ nponrpblBaTeJIPO Pioneer.
KpOK npoBokn
Ocbo6oInde BnHT Kpoka npoBoDKn 3aKmTe nOd KpOk CInOBoi Ka6eJb aanTepa nepemEHoro Toka.
PacnoIooNtke kpoK npOboKn B MeCTaX, HeIOcTynHbIX DeTAM. B cnyae, ecn pe6eHok npOrToHn erO, cpaay-Ke o6paTneTecb K bpaHy.
06 aДаNTepeпepeMeHHoro toka
ПравILA 6e3oNaChOCTn
Дя obecneueHЯ Лчнов Бeэоноасхoctи И Дя МakcmaJIbHorO IcnoJb30BaHЯ BO3MOxHocTe aInpaTa BHNMaTeIbHO nPoTuTITe I cIeDyIte DaHHbIM npabUam BeEoNoaHocCTn.
PpOHTte u COxpaHnTe HNCTpyKznn
IpoHTe BcIO INHΦOpMaIIO NO ynpaBJIeHIIO INHΦOpMaIIO IINb3OBAteIe, INpIJaraEMyIO K daHOMy I3dIeIIO.
OuInCTka
Пиочпсke BHeIeHNe CTOpOHy IcNoJIb3yIte CmoUeHHUToTkaHb.ИЗбeraIte IcNoJIb3OBAHnЯ JIObIx KIuJkNx, aApO3OJIbHbIX NIIINCO3aHa OCHOBe CInrTa YIcTЯuIX CpeIcTB.
Boda nIbn BJIaXHoCTb
He nCnoJIb3yIte nn pacnolaraIe daHHOe I3dEIne BO3ne BObI nn dpyIIN xNCTOCHIKOB XmIDKoCTn.
Akecccyapbl
He pacnojarate daHHOe n3dene Ha HeyctOuHBOI TeLeKKe, cToKe nn CTone. N3dene moKet ynpactb n nobpeDntbcra.
Bentnla
He 6Iokpyte IIN 3aKpbBaTe DaHnOe N3dJIne BO BpEmr NcNoJIb-3OBaHn. DAnHbI aNnapaT He DoJnxH yCTaHaBnBaTbC8 B 3aKpbITbIX MeCTax, rIe He oEcbneuBaTc HndNeXaUaB BeHTnIaIyIa.
Cpega
He pacnojarai Te daHnoe n3dene B cInuKOM nbIbHbIX, XapKnx, BnaKbIX MeCTax, INI MecTax, NOBepKeHHbIX IN3nUHei Bn6paun INI TOJtKAM.
NCTOCHKINITAHNA
IcnoIb3yIe TaHHOe I3dJIeN ToIbKO O tpeKoMeHIOBaOHbIX NCTOCHIOKOB NITAHIA.EcIN Het YbepeHHocTN B NCTOCHNIe NITAHIA,OBpaTInTeCB K ABTOpN3OBAHHOe NpeDCTaBtJeBtBO Pioneer.
3aunTe cnJIOBOrO ka6eJa
Pn oTcoeHHeHn annapata BbITrMaBaiTe, ydepxNBA 3a BNkUy, a He 3a Ka6bIe. He npKacaaTebc K Ka6eHIO IINu BNKe MOKpbIMu pykAmu, TAK Kc3TO MoKet Bb3BaTb 3JIeKtPoWOk INu KOpOTkoe 3aMbKaHne. He 3aueMnIte Ie NkaJInTe HnHero Ha CnIOBOJ Ka6eIb, He npKoJaDbI-BaIte ero HnNyTI.
Питане
Ipepe yctaHOBKO daHHoro INI JIObOro dpyrOro obOpydoBaHnO 0TKJIQUHTe PINTaHne CNTEmbl.
Neperpyzka
He nodklouaTe cnnuKOM MHOro ycTpoiCTB K OndHoi po3e NINNCTOCHNKI\PITAHnA, TAK KaK 3TO MOKeT PnIBecTN K NOxApy INI KOpOTKIM 3aMbIkaHnM.
PonadaHne npedMeTOB JxNdkoTei
HnKoIa He 3aTaNbai Te HecOoTBcTByUOuIne PpeMTeB ByCTpoi-CTBO. N36eRaIte npolnbAHnJIIO6bIX XnDkoCTe BHyTpB nIHa yCTpoiCTBO.
06cnyxmbHne
Пи ргкьвани пп OTOCoEДнEHи КрБИКВОЗнKAeТ рСК 3ЕКТROSHAОWA ПДУРС ИОЧСTe. OTHOCHTeHо PMOHTA DAHNORO n3delenOBpaaItecB в АТOPIN3OBAHhoe cepBUCHoe ppeCTaBN-TebSTBO Pioneer (CMOTPte npULAraOuSyOcK KapTochny no obCnyuBaHnIO nOndepRkke).
MoHeTbI,CKpeKnNJIN dpYrne MeTaJIInueeckne IpeDMtB
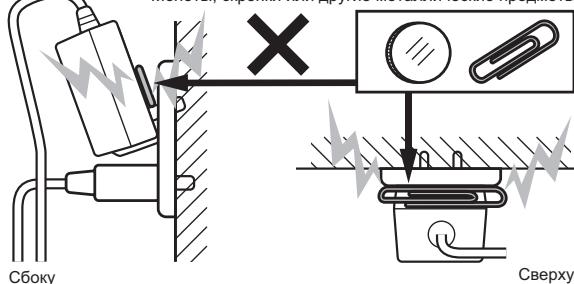
BnIka nITaHnRA MOKET OTcoeDHNITbCRAOT aadTepa nepemehHORO TOKA I OCTabatcra NODKNIOUeHHoN K PO3eTKe,ecNI KTO-H6yDb 3aDeHET CINIOBO KAben b adTepa nepemehHORO TOKA INI YTOH6yDb 3aDeHET aadTep a nepemehHORO TOKA. B TakOM clyuae N3BNeKInTe BnIKy nITaHnRA N3 PO3eTKN cyxIMn pykAMN, ydepXNBaRae KAK OTOBpaKeHO Ha pncyHKe HIXe N63 pniKocHOBeHnRA K MeTaIIJIueckmI qactrM.He npImeHraIte HnKaKIN IHCTpyMeHToB DnI IN3BLeueHHn.
He npikacaiTecb
YCTaHOBKa BnIka NITaHnA
3aADBnHbTe BnKny nHTaHnCneDy HnPaBnIOUm NNoO3kAm BHyTpN aAnTepa nepemEHORo TOKa KaO OTo6paXKeHO hpcuYHKe HNXe, 3aTeM HaxMITE Ha Hee Do UeJIyka.
U3BVeHHe BnJIKN NtTaHn
YdepxnBaHaxaToH KOnky [PUSH] Ha aAnTepe nepemEHoro TOKa, BbIDBnHbTe BNJky NItaHnI n3 aAnTepa KaK OTobpaxeHo Ha pncyHke HnKe nN3BNeKIne ee.
Kak Tobilko yctaHOBneHa BnIka NITaHna, HeT Heo6XoDMOCTN 3BVeKaTb ee.
Bvlka nHTaHn
K daHhomy 3dennio npnilarataotc Tnbl BUNOK nITAHN, OTObpaKeHNbI Hnke. IcnoJIb3yIte BUNKy nITAHN, COOTBETCTByIOUBOBaWeI CTpaHe nn pereHOy.
Tn1 (dna Ebpnb)
Tn2 (Dna CoeHHeHHoro KoponeBCTBa BeNko6pntAHnn n CeBepHoN npJHaundn)

YnpabJIeHne
PanieIb ynpaBneHnA
1 PyuKa MASTER LEVEL (ctp. 10)
Pa3dJI MIC/AUX
Даннbi pa3dien ynpabJIeT 3ByaHnEM OT MKNpOFOHOB IIN BHEuHnx yCTPOICTB (KOMMbIOTePbI, nepeHOChIbe ayDINOyCTPOICTBa, TeNeBn-3Opbl, CInTe3aTObpI, np.) (Ctp.12).
2Переклочаель селектора Вхда MIC, OFF, AUX 1, AUX 2,AUX 3
3 Puyka LEVEL (pa3dien MIC/AUX)
4 Puykn HI, LOW
Pa3dJI HayuHnKOB
C NOMOJIbI HAYUHNIKOB MOXHO IPOCSlyuTaB 3ByuHHe, NOCTyNAIOUe Ha daHHb annapaT (CTp. 12).
5 Khonkn CH-1,CH-2 (pa3dien HayshnkoB)
6 PyuKa MIXING
7 PyuKa LEVEL (pa3deJn HayshnKOB)
8 THe3do PHONES
Pa3delen Mnkwepa
BbIBoD 3ByuHaHnKaHaHa 1 [CH-1]
Для ВьЮда 3БУЧАЯ КАHA经2([CH-2])②,ВьЮЛНITE пpoцEDуРу нixе иЗаменITE [CH-1] на [CH-2].
1ПepeknHouNte nepeKnHouaTeJIb ceJeKTopa BXOda[CH-1] [CD,PHONO/LINE] 9.
Из полкюechьх Кдан_HOMу annapatу устpoи CBыберпге Источ-NИК пиема дян [CH-1].
- [CD]: Bélibop DJ npoinrpblBaTeTn, noDknIoueHHoro K TepMHaJIaM [CD].
- [PHONO/LINE]: Bébop yctpoiCTBa, noɪkJIuOeHHoR O K TepMnHaIam [PHONO/LINE].
2 Повернштуку [CH-1] [TRIM] no уасовь CTpeJIke.
Perynupobkayobn3BvauHnnoctynaJUeHOHaTepmHnA[CH-1].KordaaydnocnHnblbndnexkaunmOpaZoM noCtynaIOT Ha[CH-1],BbICBeuHBaetcNndnKaTOp yOBnKaHana[CH-1]
OtperynpyIte pyky [TRIM] TaKIM o6pa3OM, YTO6bHa cAMOM rpoM KOM MeCTe BHYTpN DOpOxKn BlyICBeuHBaJcR opaHKeBb INHdNKaTOp (B HAnBbICSeW ToKHe, dp.)
Co6HNoJaTe IpeoOCTOPOKHOCTb, YTO6bI He BbICBeTnCk PacHbI INHdkATOp, INI 3BvUaHHe MOKET 6bIT NCKaKeHo.
BpaaTe pyuKy [CH-1] ① nnn [CH-2] ② EQ (HI, MID, LOW) ③.
По диапазону 3ычанne, PeryunipуемOMу кадыm PeryuЯторom, CMOTPnTe TexHnueckne xapaKtepnCTnKu Na CTp.14.
3ByuHHe IaTakOro DnnaIana3OHa MOxHO NOnHOCtBIO OTKIIouHTb, NOBepHyB pykUdo KOHcA npOTNB YacOBoi CTpeJIKN (fynKcJra pa3beDInHITeJ).
MnKshnpobHne c nOmoIbI OeIepOB
3apaHe noIroToBbTe annapaT taKIM o6pa3OM, yTO6bl 3ByaHne [CH-1] BbIOdIIIOc bT rpoMKoROBOpNTeJI. IIOpO6Hee o6 onepaCmOTpntE BbIOd 3ByaHnHa Ha cTp. 10.
MnKUnpoBaHne c nOmoUbI OeIepOB KaHaIob
1 YctaHOBnTe [THRU, 六 6] (nepeKlnHouaTeIb ceJIeKTopa KpINBOk PocccpeIepa) 19 Ha [THRU].
2ПepeKJIHOUHTe pepeKJIHOaTeJIb ceJIeKTopa BXOda [CH-2] [CD,PHONO/LINE] 9.
3 ПовернITE ручу [CH-2] [TRIM] no уасови CTpeJIke.
4 Haxmnte KhoNky [CH-2]В pa3dene HayuHnKOB 5. 3ByuHnE [CH-2] KOHTpOInpyETcY uepe3 HauuHnK.
5 BpauaIte pyky [MIXING] 6.
OtperynpyTe 6aIaHc KOthpOJIbHO yPObHЯ rIpOMKocTn 3ByuHaHЯ, BbIOJIMoro OT TepMHaIIOB [MASTER 1] nIN [MASTER 2] (3ByuHaHne [CH-1]) n 3ByuHaHЯ [CH-2].
6 YnpabnayTe DJ npoirpbIbATEneM, NOdkHoueHHbIM K TepmHaJAm [CH-2].
BoBpemKaKoHTpOJI3BvUaHnIepe3HayuHnIKN,OTpeRyIpyTe TEmn DOpOxKn[CH-2],YTObblOHCoBnAanclCTeMnOMDopOxKn[CH-1].
2 YnpabnIe [CH-2] 2.
UnpabnIe KaK OINcAno B 7arax 2-6B MmKUnpObaHne c nOMOuH ofeiepob KaHaIOB Ha ctp.10.
3 NocTeHNO nepemEuMaTe KpOcCpeiDep 15 BnpaBO. KOHTpOnIpyr 3ByuHaNe OT rpoKMOrOBOpIeNeY,ynpaBJIy KpOcCpei- depAMn, 3aMeHtE 3ByuHaNc [CH-1] Ha 3ByuHaNc [CH-2].
MknwnpoBaHnne 3aBepuaeTcra, KaK TOnbKO 3ByaHnne [CH-2]HaunHaet BbIBOuNTbcrO TpOMKOROBOpTeJe.
IcnoJIb3OBAHne yHKUnn nnbTpa (pa3delen nBtpa)

Kakdyk kaanl obopyoBaan fynHkneiSound COLOR FILTER, no3BOJyIooien pOlyuHTb fInbTpyUOme 3fpeKtbl, npocTo nobopauHBA8 60JIbSyIpoIky.
Bpaia pyky [SOUND COLOR FILTER] 17, moKHO y6paTb 3ByaHne BepxHnx INI HIXHnx YACTOT.
BpaaaiTe pyky [CH-1] 1 nIIn [CH-2] 2 [SOUND COLOR FILTER] 17.
K 3ByaHnIO npImMeHReTcR 3ΦΦeKT N MeHReTc R CBET INDnKaTopa.
Bo3MOxHbIe HEnCnpaBHOCTN n CnOCo6bl Nx yCTpaHeHHa
3aayactyHnepabInbHoe cpaabaBaeHne OoHIOOohHO BOCnpHHMaETcra 3a HeNoIaKn IIN HeNCpABHOCTe. EcnBb CHTaTe, YTO HmeeTcKaKaj-Ni6o HncnpabHOCTb Ha daHOM KOMNOHEHe, N3uyHe IHΦOpMaUHO HIXe. B HeKToBbX cnyaXH HenoJa Ka MoJet CoepKaTaBcHa NaDpyrom KomnoHeTe. IpOBepBe DpyrIe KOMNoHEnTb, a TaKke IcNOnb3yEmbIe 3JeKtPonpni6Opbl. Ecn HeBO3MOxHO 6blIO yctpaHITb Hnc-pABHOCTb Pocne N3yuHEnry NpyKTob HIXe, ObpaTntecB b 6InxKaIsh ABTopu3OBAHbI cepBcHbI ceHP T Pioneer INI K dInnepy IpnpoBeHnHpeM0HTa.
Дань annapat moket He cpaabaBbBaT coOBtETCTByIOIIM oba3OM NO npuHHe CTaTHeCKTO 3JIeKTPnCtBA IIN NO dpyHM BHeSHN mnpuHAM. B TAKOM cnuyae, obuHnyo pa6Oy MOKHO BO30bHOBNtB, OTKIOUH NITaHne, OBOXdAB 1 MInTy n 3aTEM CHOBA BKIOUYB NITaHne.
TepmHaJIbI BxOda/BbIXOda
Bxodnoi TepminHaJ CD ⅢbipkoBoe rHe3do RCA. 2 ha6opa
Bxodnbte TepmHaJIb PHONO/LINE ⅢtbpbkoBoe rHe3do RCA. 2 ha6opa
BxodnoTepminanMIC THe3oHayuHnKOB(6,3MM) 1Ha6op
BxodnoTepminHaAUX ⅢbipkoBoe Ihe3do RCA. 2 ha6opa THe3Do MmHn-DkeK (03,5MM) 1 ha6opa
BbIXoHNoTepMnHaI MASTER
UtbipbKobIe rHe3da RCA 1 ha6op
BbIXoHNoTepMnHaI BALANCED OUTPUT
KoHHeKTOp XLR 1 ha6op
BixodnoTepmnaHn PHONES CtepeofoHneCKoe rHe3do HayuHnKOB (6,3 MM) 1 ha6op
TepmHn CONTROL Tne3o mHH-nJkek (0 3,5 MM) 2 na6opa
TexHnueckneXapakTepncTknKoHcTpkyuiaDaHHOrO n3deJnMOryTn3MeHnTBc8be3YBeDoMJIeHn.
PIONEER CORPORATION, 2011. Bce npaba 3aunuenebl.
Приимеанne:
B cootbetCTbN co cTaTbei 5 3aKaOHa Pocncko Foepaun "O 3auntpe npab Notpe6nte" uYka3aHneM PpaNTbctBa Pocncko Foepaun N720 ot 16 nOJra 1997 roJa Kopnpaun Pioneer Europe NV yCTaHaBnBaet ycNoBHe Na CJIeDyUOu IpoDoJnxTeJBHoCTb Cpoka cnUxkbI OfNiuaJIbHO nOCTabJIeMbIX Ha Pocnnckn pbIHok ToBapOB.
Aydno n BnDeoo6opyObaHne:7 let
Ipehenochoe aydnoo6opydoBaHne: 6 let
© 2011 PIONEER CORPORATION.
All rights reserved.
© 2011 PIONEER CORPORATION.