USER MANUAL X-HM10-S PIONEER
Discover the benefits of registering your product online at http://www.pioneer.co.uk (or http://www.pioneer.eu).
The lightning flash with arrowhead symbol, within an equilateral triangle, is intended to alert the user to the presence of uninsulated "dangerous voltage" within the product's enclosure that may be of sufficient magnitude to constitute a risk of electric shock to persons.
CAUTION
RISK OF ELECTRIC SHOCK DO NOT OPEN
CAUTION:
TO PREVENT THE RISK OF ELECTRIC SHOCK,DO NOT REMOVE COVER (OR BACK).NO USER-SERVICEABLE PARTS INSIDE.REFER SERVICING TO QUALIFIED SERVICE PERSONNEL.

The exclamation point within an equilateral triangle is intended to alert the user to the presence of important operating and maintenance (servicing) instructions in the literature accompanying the appliance.
D3-4-2-1-1_A1_En
WARNING
This equipment is not waterproof. To prevent a fire or shock hazard, do not place any container filled with liquid near this equipment (such as a vase or flower pot) or expose it to dripping, splashing, rain or moisture.
D3-4-2-1-3_A1_En
WARNING
Before plugging in for the first time, read the following section carefully.
The voltage of the available power supply differs according to country or region. Be sure that the power supply voltage of the area where this unit will be used meets the required voltage (e.g., 230 V or 120 V) written on the rear panel.
D3-4-2-1-4*A1En
WARNING
To prevent a fire hazard, do not place any naked flame sources (such as a lighted candle) on the equipment.
D3-4-2-1-7a_A1_En
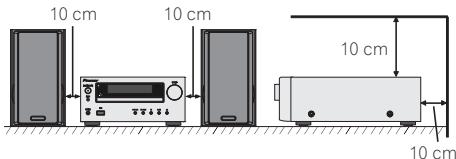
VENTILATION CAUTION
When installing this unit, make sure to leave space around the unit for ventilation to improve heat radiation (at least 10cm at top, 10cm at rear, and 10cm at each side).
WARNING
Slots and openings in the cabinet are provided for ventilation to ensure reliable operation of the product, and to protect it from overheating. To prevent fire hazard, the openings should never be blocked or covered with items (such as newspapers, table-cloths, curtains) or by operating the equipment on thick carpet or a bed.
D3-4-2-1-7b*A1_En
Operating Environment
Operating environment temperature and humidity: +5^ to +35^ (+41^ to +95^) less than 85% RH (cooling vents not blocked)
Do not install this unit in a poorly ventilated area, or in locations exposed to high humidity or direct sunlight (or strong artificial light)
D3-4-2-1-7c*A1_EN
If the AC plug of this unit does not match the AC outlet you want to use, the plug must be removed and appropriate one fitted. Replacement and mounting of an AC plug on the power supply cord of this unit should be performed only by qualified service personnel. If connected to an AC outlet, the cut-off plug can cause severe electrical shock. Make sure it is properly disposed of after removal.
The equipment should be disconnected by removing the mains plug from the wall socket when left unused for a long period of time (for example, when on vacation).
D3-4-2-2-1a A1_En
CAUTION
The STANDBY/ON switch on this unit will not completely shut off all power from the AC outlet. Since the power cord serves as the main disconnect device for the unit, you will need to unplug it from the AC outlet to shut down all power. Therefore, make sure the unit has been installed so that the power cord can be easily unplugged from the AC outlet in case of an accident. To avoid fire hazard, the power cord should also be unplugged from the AC outlet when left unused for a long period of time (for example, when on vacation).
D3-4-2-2-2a*A1_EN
This product is for general household purposes. Any failure due to use for other than household purposes (such as long-term use for business purposes in a restaurant or use in a car or ship) and which requires repair will be charged for even during the warranty period.
K041_A1_En
(Symbol for equipment)

Symbol examples for batteries


Pb
These symbols on the products, packaging, and/or accompanying documents mean that used electrical and electronic products and batteries should not be mixed with general household waste.
For proper treatment, recovery and recycling of old products and used batteries, please take them to applicable collection points in accordance with your national legislation.
By disposing of these products and batteries correctly, you will help to save valuable resources and prevent any potential negative effects on human health and the environment which could otherwise arise from inappropriate waste handling.
For more information about collection and recycling of old products and batteries, please contact your local municipality, your waste disposal service or the point of sale where you purchased the items.
These symbols are only valid in the European Union.
For countries outside the European Union:
If you wish to discard these items, please contact your local authorities or dealer and ask for the correct method of disposal.
K058a_A1_En
CAUTION
This product is a class 1 laser product classified under the Safety of laser products, IEC 60825-1:2007, but this product contains a laser diode higher than Class 1. To ensure continued safety, do not remove any covers or attempt to gain access to the inside of the product. Refer all servicing to qualified personnel.
The following caution label appears on your unit.
Location: Inside of the unit
CAUTION
ATTENTION
CLASS 3B VISIBLE AND INVISIBLE LASER RADIATION WHEN OPEN, AVOID EXPOSURE TO THE BEAM. RADIATIONS LASER VISIBLIES ET INVERBIS DES CLASSES 3B QUAND OLVERT. EVITEZ TOUT EXPOSION AU FAIRECAU.
ADVARSEL
KLASSE 38 SYNLIG OL USYNLIG LASERSTRALING VED ABBING. UNDAU USSDETSELE FOR STRALING.
WARNING
CLASS 38 SYNLONG OHG OSYNLG LASERSTRAÑING NAR DENNA DEL OR APNNDN. UNIVTD INV UTSATTAID FOR STRALEN.
VORSICHT
BE GOFENFRIA BEDECKING ST IS BICHE AND UNSICHTBARE LERASTRAHUNG DER KLASSE 3B IM GERAETIERENVORHANDEDN. NICHMENT LE PLEARSTRAHLUASSENTZI
PRECAUCION
CUANO SE ABRE HAY RADIACION LASER DE CLASE 3B VISIBLE E INVISIBLE. EVITE LA EXPISOCAON A LOS RAVYOS LASER.
VARO!
VAATEASSA OLCTAHNA KNYAVALLEJA NKYMAITOMALLELUOKAN 38 LASERSATELYLE.AKA SATOSATESEEN.
CLASS 1 LASER PRODUCT
D58-5-2-2b*_B1_En
Condensation
If the player is moved suddenly from a cold place into a warm room (in winter, for example) or if the temperature in the room in which the player is installed rises suddenly due to a heater, etc., water droplets (condensation) may form inside (on operating parts and the lens). When condensation is present, the player will not operate properly and playback is not possible. Let the player stand at room temperature for 1 or 2 hours with the power turned on (the time depends on the extent of condensation). The water droplets will dissipate and playback will become possible. Condensation can also occur in the summer if the player is exposed to the direct wind from an air-conditioner. If this happens, move the player to a different place.
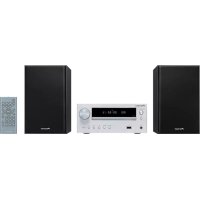
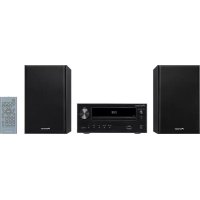
X-HM10/X-HM20 CD Receiver System consisting of main unit and speaker system.
Introduction
Thank you for purchasing this PIONEER product. To obtain the best performance from this product, please read this manual carefully. It will guide you in operating your PIONEER product.
Special Note
Supply of this product does not convey a license nor imply any right to distribute content created with this product in revenue-generating broadcast systems (terrestrial, satellite, cable and/or other distribution channels), revenue-generating streaming applications (via Internet, intranets and/or other networks), other revenue-generating content distribution systems (pay-audio or audio-on-demand applications and the like) or on revenue-generating physical media (compact discs, digital versatile discs, semiconductor chips, hard drives, memory cards and the like). An independent license for such use is required. For details, please visit http://mp3licensing.com MPEG Layer-3 audio coding technology licensed from Fraunhofer IIS and Thomson.
Accessories
Please confirm that the following accessories are included.
| iPhone adaptors x 3
(X-HM20 only) | Remote control x 1 | “AA” size battery x 1 | AM loop aerial x 1 |
| FM aerial x 1 | Power cord
Warranty card
These operating instructions |
CONTENTS
| Page | USB |
| General Information | | Listening to USB mass storage |
| Precautions | 5 | device/MP3 player. 16 - 17 |
| Controls and indicators | 5 - 6 | Advanced USB playback. 17 |
| Preparation for Use | | Radio |
| System connections | 7 - 8 | Listening to the radio. 18 |
| Remote control | 8 | |
Basic Operation
General control 9 Using the Radio Data System (RDS) 19-21 Setting the clock (Remote control only) 9-10 Timer and sleep operation (Remote control only) 21-22
iPod, iPhone and iPad
Listening to the iPod, iPhone or iPad (X-HM20 only). 10-12
CD or MP3/WMA disc Playback
Listening to a CD or MP3/WMA disc 13
Advanced CD or MP3/WMA disc playback. 14 - 15
MP3/WMA folder mode
(only for MP3/WMA files) 15-16
Radio
Listening to the radio 18
References
Using the Radio Data System (RDS) 19-21
Troubleshooting chart 24-25
Maintenance 25
Specifications 26
Notice 27
General
- Use the unit on a firm, level surface free from vibration.
- Place the speakers at least 30~cm away from any CRT TV to avoid colour variations across the TV screen. If the variations persist, move the speakers further away from the TV. LCD TV is not prone to such variation.
- Keep the unit away from direct sunlight, strong magnetic fields, excessive dust, humidity and electronic/electrical equipment (home computers, facsimiles, etc.) which generate electrical noise.
- Do not place anything on top of the unit.
- Do not expose the unit to moisture, to temperatures higher than 60^ (140°F) or to extremely low temperatures.
- If your system does not work properly, disconnect the AC power lead from the wall socket. Plug the AC power lead back in, and then turn on your system.
- In case of an electrical storm, unplug the unit for safety.
- Hold the AC power plug by the head when removing it from the wall socket, as pulling the lead can damage internal wires.
The AC power plug is used as a disconnect device and shall always remain readily operable.
- Do not remove the outer cover, as this may result in electric shock. Refer internal service to your local PIONEER service facility.
The ventilation should not be impeded by covering the ventilation openings with items, such as newspapers, tablecloths, curtains, etc.
No naked flame sources, such as lighted candles, should be placed on the apparatus.
- Attention should be drawn to the environmental aspects of battery disposal.
The apparatus is designed for use in moderate climates.
Warning:
The voltage used must be the same as that specified on this unit. Using this product with a higher voltage other than that which is specified is dangerous and may result in a fire or other type of accident causing damage. PIONEER will not be held responsible for any damage resulting from use of this unit with a voltage other than that which is specified.
Volume control
The sound level at a given volume setting depends on speaker efficiency, location, and various other factors. It is advisable to avoid exposure to high volume levels. Do not turn the volume on to full at switch on. Listen to music at moderate levels. Excessive sound pressure from earphones and headphones can cause hearing loss.
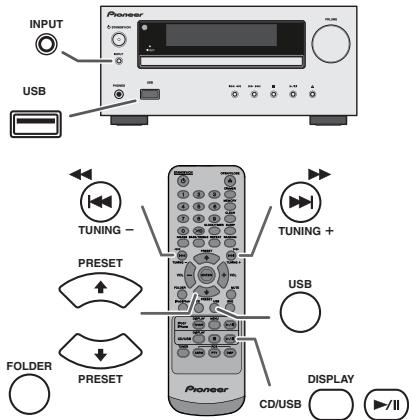
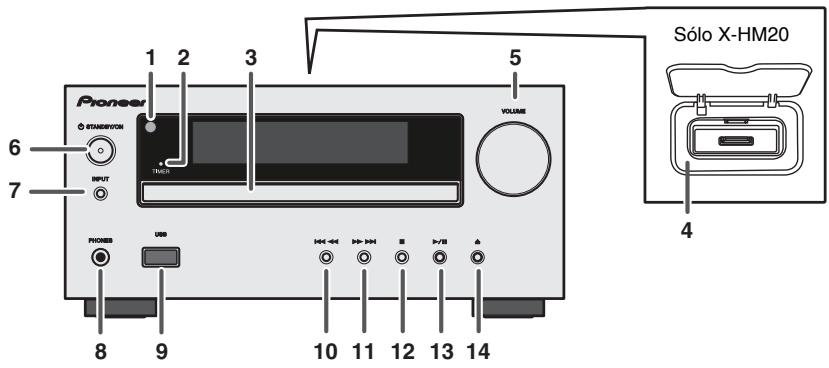
Controls and indicators
iPod/iPhone functions are only available for X-HM20.
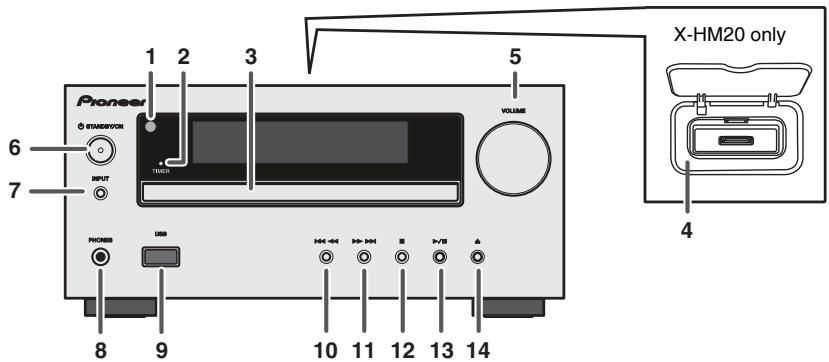
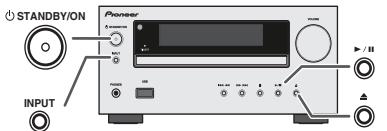
Front panel
Page
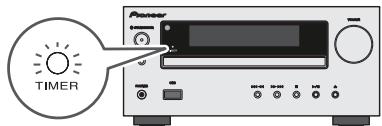
- Remote sensor 8
- Timer indicator 22
3.Disc Tray 13
- Docking Station for iPod or iPhone 11
- Volume Control 9
6.STANDBY/ONButton 11,13,18
- INPUT Button 9,11,13,16,18
- Headphone Socket 23
- USB Terminal 16
Page
- Tuner Preset Down, CD/USB Track Down, iPod/iPhone Skip Down 12, 13
- Tuner Preset Up, CD/USB Track Up, iPod/iPhone Skip Up 12, 13
- Disc/USB Stop Button 12, 13
- Disc/USB/IPod/iPhone Play or Pause Button 12, 13
- Disc Tray Open/Close Button 13
*11, 13, 31, 32 buttons are only available for X-HM20.
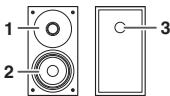
Speaker system
- Tweeter
- Woofer
- Bass Reflex Duct
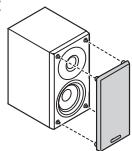
Speaker grilles are removable (X-HM20 only)
Make sure nothing comes into contact with the speaker diaphragms when you remove the speaker grilles.
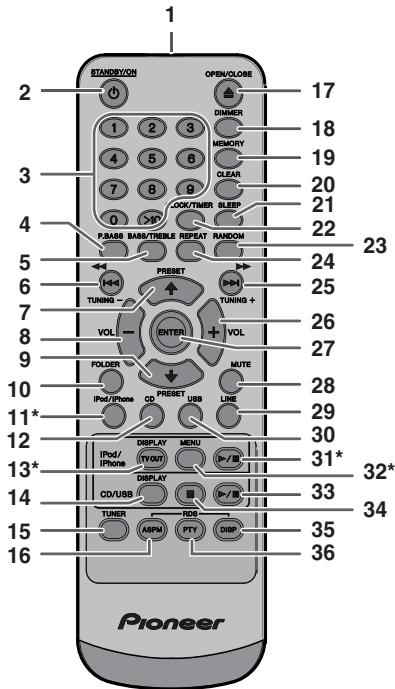
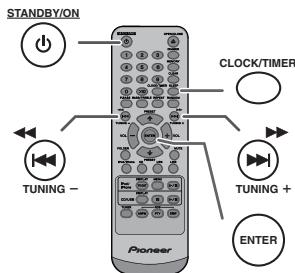
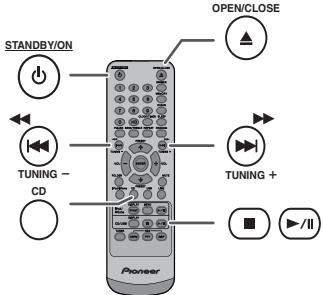
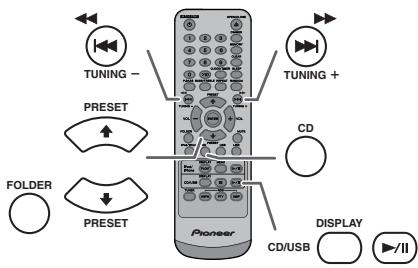
Remote control
Page
- Remote Control Transmitter 8
2.STANDBY/ON Button. 9,11,13,21
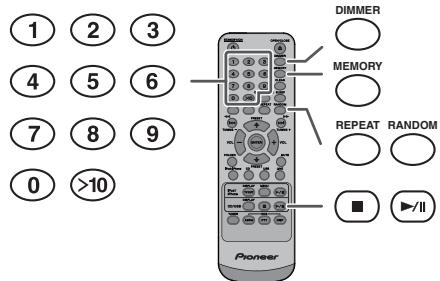
- Numeric Buttons 14
- P.Bass Button 9
5.Bass/TrebleButton 9
- Tuning Down, Skip Down, Fast Reverse, Time Down Button . . . 9, 12, 13, 16, 18, 19, 21
- Tuner Preset Up Button, iPod Cursor Up. 11, 12, 16, 18
- Volume Down Button 9
- Tuner Preset Down Button, iPod Cursor Down 11, 12, 16, 18
- Folder Button 16
- iPod/iPhone Button 11
12.CDButton 13
- iPod/iPhone DISPLAY TV OUT Button . . . . . . 11, 12
- CD/USB DISPLAY Button. 16
15.TunerButton. 18,19
16.RDS ASPM Button 19
- Open/Close Button. 13
- Dimmer Button 9
- Memory Button. 14, 18
- Clear Button 14, 18
- Sleep Button 23
- Clock/Timer Button 9, 22
23.RandomButton 12,14
- Repeat Button. 12, 14
- Tuning Up, Skip Up, Fast Forward, Time Up Button .......9, 12, 13, 16, 18, 19, 21
- Volume Up Button 9
- Enter Button 9, 11, 12
28.Mute Button 9
29.LineButton. 8,25
- USB Button 16
- iPod/Phone Play/Pause Button 12
- iPod/iPhone Menu Button 12
- CD/USB Play/Pause Button 12, 13, 14
34.CD/USB Stop Button 13,14
35.RDSDisplayButton 19
36.RDS PTY Button. 19
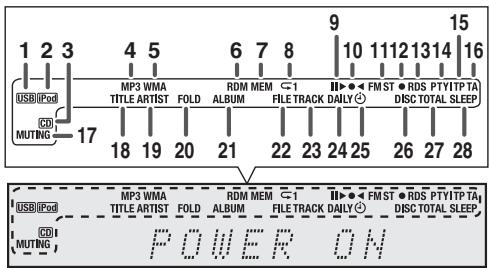
Display
Page
- USB Indicator 16
- iPod Indicator 10
3.CD Indicator 13
4.MP3 Indicator 13
5.WMA Indicator 13
6.RDM (Random) Indicator. 14
- MEM (Memory) Indicator 14
- Repeat Indicator 14
- Play/Pause Indicator 12
10.Tuning FM/AM Indicator 18
11.FM Stereo Mode Indicator. 18
- Stereo Station Indicator. 18
13.RDS Indicator 19
- PTY Indicator 19
- TP Indicator 19
- TA Indicator 19
17.Muting Indicator. 9
- Title Indicator 16
- Artist Indicator 16
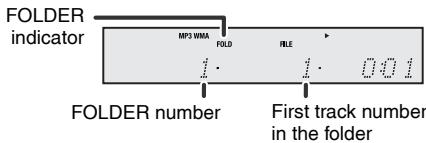
- Folder Indicator 16
- Album Indicator 16
- File Indicator 16
- Track Indicator 14
- Daily Timer Indicator 21
25.Once Timer Indicator. 21
- Disc Indicator 13
- Total Indicator. 16
- Sleep Indicator 23
Before making or changing the connections, switch off the power and disconnect the power cord from the AC outlet.
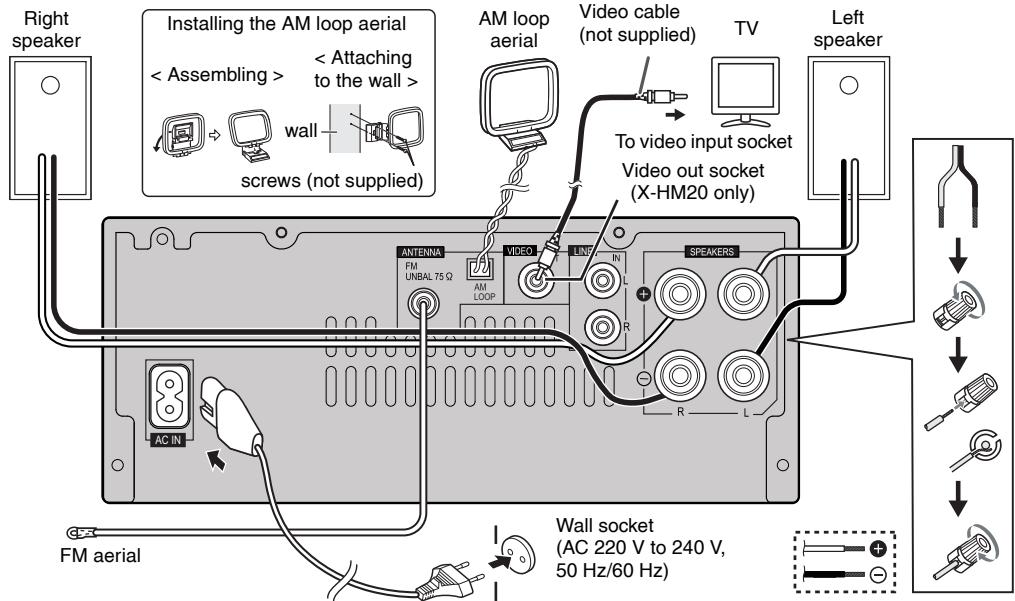
Aerial connection
Supplied FM aerial:
Connect the FM aerial wire to the FM 75 ohms socket and position the FM aerial wire in the direction where the strongest signal can be received.
External FM aerial:
Use an external FM aerial (75 ohms coaxial cable) for better reception. When an external FM aerial is used, disconnect the supplied FM aerial wire.
Supplied AM loop aerial:
Connect the AM loop aerial to the AM terminal. Position the AM loop aerial for optimum reception. Place the AM loop aerial on a shelf, etc., or attach it to a stand or a wall with screws (not supplied).
Note:
Placing the aerial on the unit or near the AC power lead may cause noise pickup. Place the aerial away from the unit for better reception.
Speaker connection
- Twist exposed wire strands together.
- Connect the red wire to the plus (+) terminal, and other wire to the minus (-) terminal.
Use speakers with an impedance of 4 ohms ohms, as lower impedance speakers can damage the unit.
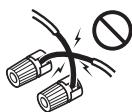
Incorrect
These speaker terminals carry HAZARDOUS LIVE voltage. To prevent the risk of electric shock when connecting or disconnecting the speaker cables, disconnect the power cord before touching any uninsulated parts.
- Do not attach these speakers to the wall or ceiling, as they may cause injury in the event of a fall.
- Do not mistake the right and the left channels. The right speaker is the one on the right side when you face the unit.
- Do not let the bare speaker wires touch each other.
- Do not allow any objects to fall into or to be placed in the bass reflex ducts.
- Do not stand or sit on the speakers. You may be injured.
- Connecting iPod or iPhone to TV (X-HM20 only)
Photo and video files from iPod or iPhone can be viewed by connecting the system to TV/monitor.
If the TV/monitor has a video input, connect it to theVIDEO OUT socket at the back of the unit and set the TV Out on the iPod or iPhone unit to "ON" position.
Note:
Please make sure to set iPod unit to either NTSC or PAL to match your TV signal. Please visit Apple's homepage for further information.
AC power connection
After checking all the connections have been made correctly, plug the AC power lead of this unit into the wall socket.
Note:
Unplug the AC power lead from the wall socket if the unit will not be in use for a prolonged period of time.
Caution:
- Handle the power cord by the plug part. Do not pull out the plug by tugging the cord, and never touch the power cord when your hands are wet, as this could cause a short circuit or electric shock. Do not place the unit, a piece of furniture, or other object on the power cord or pinch the cord in any other way. Never make a knot in the cord or tie it with other cables. The power cords should be routed so that they are not likely to be stepped on. A damaged power cord can cause a fire or give you an electric shock. Check the power cord once in a while. If you find it damaged, ask your nearest Pioneer authorized independent service company for a replacement.
- Do not use any power cord other than the one supplied with this unit.
- Do not use the supplied power cord for any purpose other than that described above.
- Connecting a TV, etc.
Connect to the TV using an audio cable.
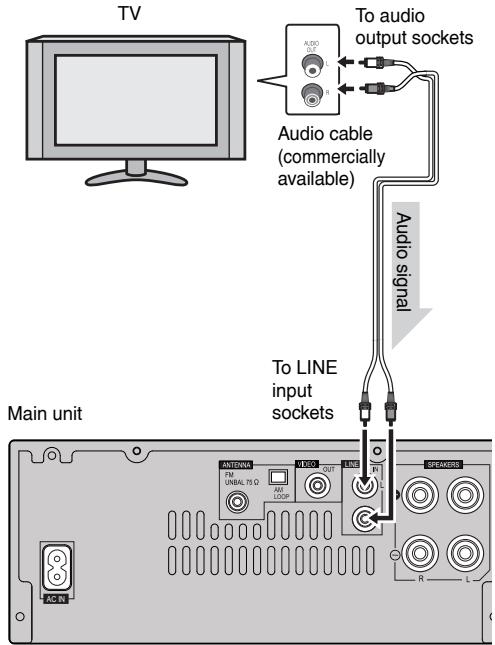
To select Line In function:
- On main unit: Press INPUT button repeatedly until Line In is displayed.
- On remote control: Press LINE button repeatedly until Line In is displayed.
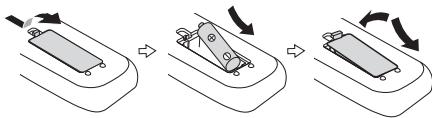
Battery installation
1 Open the battery cover.
2 Insert the supplied battery according to the direction indicated in the battery compartment.
When inserting or removing the battery, push it towards the (-) battery terminal.
3 Close the cover.
WARNNIG:
- Do not use or store battery in direct sunlight or other excessively hot place, such as inside a car or near a heater. This can cause the battery to leak, overheat, explode or catch fire. It can also reduce the life or performance of battery.
Caution:
- Remove the battery if the unit will not be used for a long period of time. This will prevent potential damage due to battery leakage.
- Do not use rechargeable battery (nickel-cadmium battery, etc.).
- Installing the battery incorrectly may cause the unit to malfunction.
Notes concerning use:
- Replace the battery if the operating distance is reduced or if the operation becomes erratic. Purchas an "AA" size battery.
Periodically clean the transmitter on the remote control and the sensor on the unit with a soft cloth.
- Exposing the sensor on the unit to strong light may interfere with operation. Change the lighting or the direction of the unit if this occurs.
- Keep the remote control away from moisture, heat, shock, and vibrations.
- When disposing of used battery, please comply with governmental regulations or environmental public instruction's rules that apply in your country or area.
Test of the remote control
Check the remote control after checking all the connections. Point the remote control directly at the remote sensor on the unit. The remote control can be used within the range shown below:
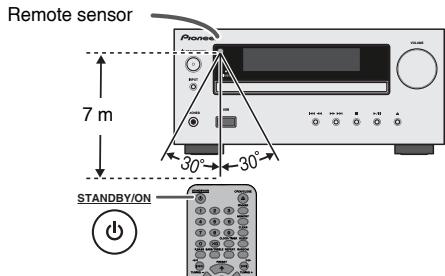
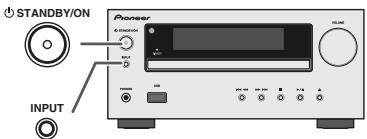
To turn the power on
Press the STANDBY/ON button to turn the power on.
After use:
Press the STANDBY/ON button to enter the power stand-by mode.
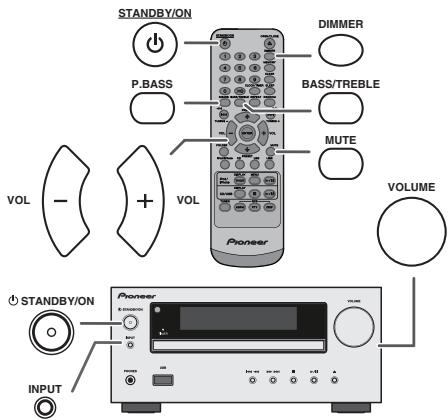
Display brightness control
To dim the display brightness, press the DIMMER button on the remote control.

Volume auto set-in
If you turn off and on the main unit with the volume set to 17 or higher, the volume starts at 16.
Volume control
Turn the volume knob towards VOLUME (on main unit) or press VOL + / - (on remote control) to increase or decrease the volume.
Auto power on function
When you press any of the following buttons, the unit turns on.
- iPod / iPhone, CD, USB, LINE, TUNER on the remote control: Selected function is activated.
- button on the main unit: The unit turns on and playback of the last function will start (CD, TUNER, USB, iPod, LINE IN)
Auto power off function
The main unit will enter the stand-by mode (when iPod/Phone is not docked) after 15 minutes of inactivity during:
iPod/iPhone: No connection.
CD / USB: In the stop mode.
LINE IN:No detection of input signal or very low sound audibility.
Note:
X-HM20 only: However, if iPod/iPhone is docked, the unit will begin charging.
"Charge Mode" will be displayed during standby mode.
Muting
The volume is muted temporarily when pressing the MUTE button on the remote control. Press again to restore the volume.
P.Bass control
When the power is first turned on, the unit will enter the Pbass mode which emphasises the bass frequencies. To cancel the P.bass mode, press the P.BASS button on the remote control.
Bass control
1 Press the BASS/TREBLE button to select "Bass".
2 Within 5 seconds, press the VOL (+ or -) button to adjust the bass.

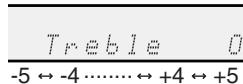
Treible control
1 Press the BASS/TREBLE button to select "Treble".
2 Within 5 seconds, press the VOL (+ or -) button to adjust the treble.
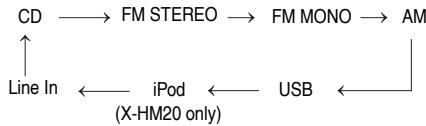
Function
When the INPUT button on main unit is pressed, the current function will change to different mode. Press the INPUT button repeatedly to select desired function.
Note:
The backup function will protect the memorised function mode for a few hours should there be a power failure or the AC power lead becomes disconnected.
Setting the clock (Remote control only)
In this example, the clock is set for the 24-hour (00:00) display.
1 Press the STANDBY/ON button to turn the power on.
2 Press the CLOCK/TIMER button.
3 Within 10 seconds, press the ENTER button. To adjust the day, press the or button and then press the ENTER button.
Setting the clock (Remote control only) (continued)
4 Press the 口 or button to select 24-hour or 12-hour display and then press the ENTER button.
“0:00” The 24-hour display will appear.
↓ (00:00 - 23:59)
"AM 12:00" The 12-hour display will appear. (AM 12:00 - PM 11:59)
5 To adjust the hour, press the 口 or button and then press the ENTER button. Press the 口 or button once to advance the time by 1 hour. Hold it down to advance continuously.
6 To adjust the minutes, press the 口 or button and then press the ENTER button. Press the 口 or button once to advance the time by 1 minute.
To confirm the time display:
Press the CLOCK/TIMER button. The time display will appear for about 5 seconds.
Note:
When power supply is restored after unit is plugged in again or after a power failure, reset the clock (page 9).
To readjust the clock:
Perform "Setting the clock" from step 1. If the "Clock" does not appear in step 2, step 4 (for selecting the 24-hour or 12-hour display) will be skipped.
To change the 24-hour or 12-hour display:
1 Clear all the programmed contents. [Refer to "Factory reset, clearing all memory" on page 25 for details.]
2 Perform "Setting the clock" from step 1 onwards.
Note:
The timer setting will reset if the power cord is pulled out or when there is a blackout.
Listening to the iPod, iPhone or iPad (X-HM20 only)
Supported iPod, iPhone and iPad models:
- iPad
iPhone 4
iPhone 3GS
iPhone 3G
iPhone
- iPod touch (4th generation)
- iPod touch (3rd generation)
- iPod touch (2 ^nd generation)
- iPod touch (1st generation)
- iPod classic
- iPod nano (6th generation)
- iPod nano (5th generation)
- iPod nano (4th generation)
iPod nano (3^rd generation)
- iPod nano (2nd generation)
Notes:
This system has been developed and tested for the software version of iPod/iPhone/iPad indicated on the website of Pioneer (http://pioneer.jp/homeav/support/ios/eu).
- Installing software versions other than indicated on the website of Pioneer to your iPod/iPhone/iPad may result in incompatibility with this system.
- Charging terminal for iPod, iPhone and iPad:
| Condition | Docking station | USB terminal |
| USB function | NO | YES |
| Other function | YES | NO |
| Stand-by | YES | NO |
The message "This accessory is not made to work with iPhone" or similar, may appear on the iPhone screen when:
-battery is low.
- the iPhone is not properly docked (eg. slanting). if this occure, remove and re-dock the iPhone.
- This product is made for iPhone. To prevent random interference when iPod/Phone is docked, the headphone output is disabled and "HP INVALID" will be displayed.
You may also experience brief audio interference during incoming calls.
iPad connection (USB Terminal)
1 Insert the connector to the the iPod, iPhone or iPad.
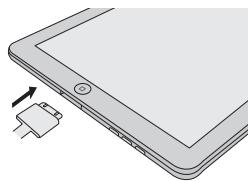
2 Connect the iPad to the unit via USB connector.
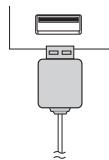
Note:
USB connector do not support VIDEO out.
- iPod, iPhone or iPad Playback (USB Terminal)
1 Press the STANDBY/ON button to turn the power on.
2 Press the USB button on the remote control or INPUT button repeatedly on the main unit to select USB friction.
3 Connect iPod, iPhone or iPad to the unit. "iPod" will appear.
4 Press the / (CD/USB / ) button to start playback.
Note:
Stop button (■) is invalid during iPod, iPhone or iPad playback.
- iPod and iPhone adaptor connection (Docking Station)
Note:
Please use the adaptor supplied with your iPod or iPhone unit.
| iPhone Adaptor No. | iPhone Description | Capacity |
| 12 | iPhone | 4GB & 8GB & 16GB |
| 15 | iPhone 3G, iPhone 3GS | 8GB & 16GB & 32GB |
| 19 | iPhone 4 | 16GB & 32GB |
To insert adaptor for iPod or iPhone (Docking Station)
1 Open the docking station for iPod and iPhone by pulling up.

2 Insert the adaptor for iPod and iPhone into unit and connect your iPod or iPhone.
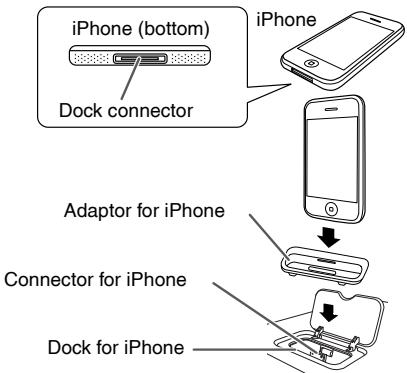
Caution:
Unplug all accessories from the iPod or iPhone before inserting it into the dock.
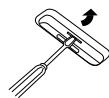
To remove adaptor for iPod or iPhone (Docking Station)
Insert the tip of a screwdriver ("-” type, small) into the adaptor hole as shown and lift upward to remove.
iPod or iPhone playback (Docking Station)
1 Press the STANDBY/ON button to turn the power on.
2 Press the iPod/iPhone button on the remote control or INPUT button repeatedly on the main unit to select iPod function.
3 Insert iPod or iPhone unit in iPod dock of main unit.
4 Press the / u (iPod/iPhone / u ) button to start playback.

iPhone playback
Sound will only switch from iPhone to the main unit after authentication process is completed in approximately 10 seconds.
- Incoming calls will pause the playback.
- Once the calls are answered, the conversation can only be heard through the built-in iPhone speaker. Turn on the iPhone speaker or undock the iPhone to start conversation.
To disconnect iPod, iPhone or iPad
Simply remove the iPod or iPhone from the docking station or iPad from USB terminal. It is safe to do so even during playback.
- Watching videos on a TV connected to iPod or iPhone
1 Press the DISPLAY TV OUT button for more than 2 seconds. "TV Display" will appear on display.
2 Press the ENTER button to start playback.
Notes:
- If the TV Out setting is already turned on at video menu, the video is automatically displayed on the TV screen when ENTER key is pressed.
- TV out display is not support through USB terminal. (iPad)
To return to watching video on iPod or iPhone screen, press the MENU button to enter video menu. Then press the DISPLAY TV OUT button for more than 2 seconds until "iPod Display" appears.
- During iPod or iPhone video playback, pressing the DISPLAY TV OUT button will not toggle video out display between iPod and TV.
Caution:
- Unplug all accessories for the iPod or iPhone before inserting it into the iPod docking station.
- Stop button (■) at main unit is invalid during iPod function.
1 Press the iPod/iPhone MENU button to view the menu on iPod, iPhone or iPad unit. Press it again to go back to previous menu.
2 Use the PRESET (or ) button to select an item on the menu and then press ENTER button.
Note:
When navigating the iPod, iPhone or iPad menu with remote control, do not operate any of the buttons on the iPod or iPhone unit. The volume level is adjusted by pressing the VOL (+ or -) button on the main unit or the remote control. Adjusting the volume on the iPod, iPhone or iPad units give no effect.
iPod and iPhone operations:
The operations described below depend on the generation iPod and iPhone you are using.
System on operation:
When the main unit is powered on, iPod, iPhone or iPad units will automatically power on when docked in the unit.
System off (stand-by operation):
When the main unit is turned to stand-by mode, the docked iPod, iPhone or connected iPad unit will automatically turn to stand-by mode.
Various iPod, iPhone and iPad functions
| Function | Main unit | Remote control | Operation |
| Dock | USB |
| Play | ▶/|| | iPod/iPhone | CD/USB | Press in the pause mode. |
| Pause | ▶/|| | iPod/iPhone | CD/USB | Press in the playback mode. |
| Track up/down | TUNING→TUNING+ | TUNING→TUNING+ | TUNING→TUNING+ | Press in the playback or pause mode. If you press the button in the pause mode, press the▶/||button to start the desired track. |
| Fast forward/reverse | TUNING→TUNING+ | TUNING→TUNING+ | TUNING→TUNING+ | Press and hold down in the playback mode. Release the button to resume playback. |
| Display | — | iPod/iPhone DISPLAY TV OUT | — | Press for more than 2 seconds to toggle the video out display between iPod or TV. |
| Repeat | — | REPEAT | REPEAT | Press to toggle repeat mode. |
| Shuffle | — | RANDOM | RANDOM | Press to toggle shuffle mode. |
| iPod Menu | — | iPod/iPhone MENU | iPod/iPhone MENU | Press to view the iPod menu during iPod function. |
| iPod Enter | — | ENTER | ENTER | Press to confirm the selection. |
| iPod Cursor Up/Down | — | RESET PRESET | RESET PRESET | Press to select the iPod menu. |
This system can play back a standard CD, CD-R/RW in the CD format and CD-R/RW with MP3 or WMA files, but cannot record on them. Some audio CD-R and CD-RW discs may not be playable due to the state of the disc or the device that was used for recording.
MP3:
MP3 is a form of compression. It is an acronym which stands for MPEG Audio Layer 3. MP3 is a type of audio code which is processed by significant compression from the original audio source with very little loss in sound quality.
- This system supports MPEG 1 Layer 3 and VBR files.
- During VBR file playback, time counter in the display may differ from its actual playback time.
- Bitrate which is supported by MP3 is 32 kbps to 320 kbps.
WMA:
WMA files are Advanced System Format files that include audio files which are compressed with Windows Media Audio codec. WMA is developed by Microsoft as an audio format file for Windows Media Player.
- "MP3" and "WMA" indicator will light up after the unit reads information on an MP3 or WMA disc.
- Bitrate which is supported by WMA is 64 kbps to 160 kbps.
Disc playback
1 Press the STANDBY/ON button to turn the power on.
2 Press the CD button on the remote control or INPUT button repeatedly on the main unit to select CD function.
3 Press the button to open the disc tray.
4 Place the disc on the disc tray, label side up.
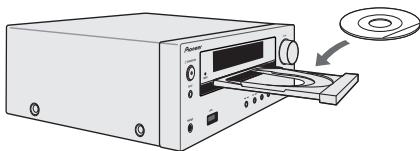
5 Press the button to close the disc tray.
6 Press the / (CD/USB / ) button to start playback. After the last track is played, the unit will stop automatically.
Caution:
- Do not place two discs in one disc tray.
- Do not play discs of special shapes (heart, octagon, etc). It may cause malfunctions.
- Do not push the disc tray whilst it is moving.
- If the power fails whilst the tray is open, wait until the power is restored.
- If TV or radio interference occurs during CD operation, move the unit away from the TV or radio.
- Be sure to place 8cm disc in the middle of the disc tray.
- Due to the structure of the disc information, it takes longer to read an MP3/WMA disc than a normal CD (approximately 20 to 90 seconds).
Various disc functions
| Function | Main unit | Remote control | Operation |
| Play | ▶/II | CD/USB | Press in the stop mode. |
| Stop | ■ | CD/USB | Press in the playback mode. |
| Pause | ▶/II | CD/USB | Press in the playback mode. Press the▶/II button to resume playback from the paused point. |
| Track up/down | ←/→→ | ←TUNING→TUNING+ | Press in the playback or stop mode. If you press the button in the stop mode, press the▶/II button to start the desired track. |
| Fast forward/reverse | ←/→→ | ←TUNING→TUNING+ | Press and hold down in the playback mode. Release the button to resume playback. |
Direct track search
By using the Numeric buttons, the desired tracks on the current disc can be played.
Use the Numeric buttons on the remote control to select the desired track whilst playing the selected disc.
The Numeric buttons allow you to select up to number 9.
- When selecting number 10 or higher, use the “>10” button.
A. For example, to choose 13
1 Press the >10 button once.
2 Press the "1" button.
3 Press the "3" button.

Selected track number
B. For example, to choose 130
1 Press the >10 button twice.
2 Press the "1" button.
3 Press the "3" button.
4 Press the "0" button.
Notes:
- A track number higher than the number of tracks on the disc cannot be selected.
- During random play, direct search is not possible.
To stop playback:
Press the CD/USB button.
Repeat play
Repeat play can play one track, all tracks or a programmed sequence continuously.
To repeat one track:
Press the REPEAT button repeatedly until "Repeat One" appears. Press the / (CD/USB / ) button.
To repeat all tracks:
Press the REPEAT button repeatedly until "Repeat All" appears. Press the / (CD/USB / ) button.
To repeat desired tracks:
Perform steps 1 - 5 in "Programmed play" section on this page and then press the REPEAT button repeatedly until "Repeat All" appears.
To cancel repeat play:
Press the REPEAT button repeatedly until "Normal" appears and " " disappears.

Note:
During repeat play, random play is not possible.
Random play
The tracks on the disc can be played in random order automatically.
To random play all tracks:
Press and hold down RANDOM button on the remote control until "Random" appears. Press the / (CD/USB / ) button.
To cancel random play:
Press the RANDOM button until "RDM" indicator disappears.

Notes:
- If you press the button during random play, you can move to the track selected next by the random operation. On the other hand, the button does not allow you to move to the previous track. The beginning of the track being played will be located.
- In random play, the unit will select and play tracks automatically. (You cannot select the order of the tracks.)
- During random play, repeat play is not possible.
Caution:
After performing repeat play, be sure to press the (CD/USB) button. Otherwise, the disc will play continuously.
Programmed play (CD)
You can choose up to 32 selections for playback in the order you like.
1 Whilst in the stop mode, press the MEMORY button on the remote control to enter the programming save mode.

2 Press the or buttons on the remote control to select the desired track.

Selected track number
3 Press the MEMORY button to save the track number.
Advanced CD or MP3/WMA disc playback (continued)
4 Repeat steps 2 - 3 for other tracks. Up to 32 tracks can be programmed. If you want to check the programmed tracks, press the MEMORY button repeatedly. If you make a mistake, the programmed tracks can be cleared by pressing the CLEAR button.
5 Press the / (CD/USB / ) button to start playback.
Programmed play (MP3/WMA)
1 Whilst in the stop mode, press the MEMORY button to enter the programming save mode.

2 Press the PRESET (or ) button on the remote control to select the desired folder.

Then press the or button on the remote control to select the desired tracks.

3 Press the MEMORY button to save the folder and track number.
4 Repeat steps 2 - 3 for other folder/tracks. Up to 32 tracks can be programmed.
5 Press the / u (CD/USB / u ) button to start playback.
To cancel the programmed play mode :
During programmed stop mode, press the CD/USB button. The display will show "Memory Clear" and all the programmed contents will be cleared.
Adding tracks to the programme:
If a programme has been previously stored, the "MEM" indicator will be displayed. Press the MEMORY button. Then follow steps 2 - 3 to add tracks.
Notes:
- When a disc is ejected, the programme is automatically cancelled.
- If you press the STANDBY/ON button to enter the stand-by mode or change the function from CD to another, the programmed selections will be cleared.
- During the programme operation, random play is not possible.
MP3/WMA folder mode (only for MP3/ WMA files)
There are many music sites on the internet that you can download MP3/WMA (Windows Media Audio) music files. Follow the instructions from the website on how to download the music files. You can then play back these downloaded music files by burning them to a CD-R/RW disc.
- Your downloaded song/files are for personal use only. Any other usage of the song without owner's permission, is against the law.
About folder playback order
If MP3/WMA files are recorded in several folders, a folder number will be set to each folder automatically.
These folders can be selected by the FOLDER button on the remote control. If there is no supported file formats inside the selected folder, the folder is skipped and the next folder will be selected.
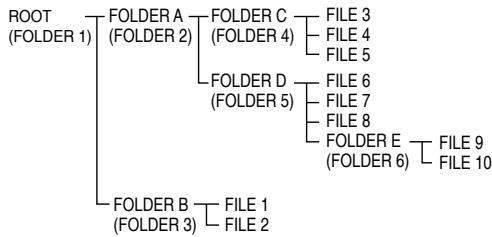
Example: How to set folder number if MP3/WMA format files are recorded as below figure.
1 ROOT folder is set as folder 1.
2 As for folders inside ROOT folder (Folder A and Folder B), the folder which is recorded earlier on the disc will be set as folder 2 and folder 3.
3 As for folder inside Folder A (Folder C and Folder D), the folder which is recorded earlier on the disc will be set as folder 4 and folder 5.
4 Folder E that is inside Folder D will be set as folder 6.
- The folder and file order information which is recorded on the disc depends on the writing software. There may be possibilities that this unit will playback the files not according to our expected playback order.
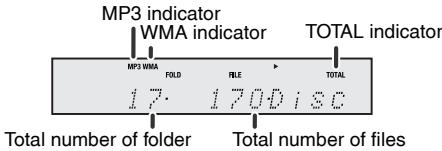
For CD MP3/WMA, 99 numbers of folders and 999 files inclusive of the folders which have non playable files can be read.
Folder mode on/off can be operated by the FOLDER button on the remote control. Files that are played when folder mode is set to the on position, may differ from those played back when folder mode is turned off.
MP3/WMA folder mode (only for MP3/ WMA files) (continued)
Procedure to playback MP3/WMA disc with folder mode on
To play back CD-R/RW.
1 Press the CD button, and load an MP3/WMA disc. Press the FOLDER button and disc info will be displayed.
2 Press the PRESET (or ) button to select desired playback folder. (Folder mode on)
3 Select desired file to be played back by pressing the or button.
4 Press the / (CD/USB / ) button. Playback will start and file name will be displayed.
- Title, Artist and Album name are displayed if they are recorded on the disc.
In case of playback with the folder mode on, press the PRESET (or ) button, and the folder can be selected even though it is in playback/pause mode. It will continue playback/pause mode in the 1st track of the selected folder.
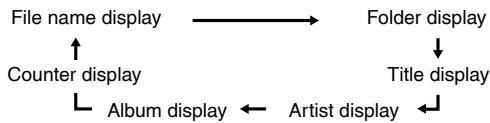
- Display content can be changed by pressing the CD/USB DISPLAY button.
Note:
If "Not Support" is displayed, it means "Copyright protected WMA file" or "Not supported playback file" is selected.
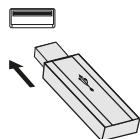
Listening to USB mass storage device/MP3 player
Notes:
This product is not compatible with MTP and AAC file systems from USB mass storage device or MP3 player.
- Some external storage devices may not operate with this system.
Operation of external storage devices (USB memory devices, external hard disks, etc.) is not guaranteed.
To play back USB/MP3 player with folder mode off
1 Press the USB button on the remote control or INPUT button repeatedly on main unit to select USB function. Connect the USB memory device that has MP3/WMA format files on the unit. When the USB memory is connected to the main unit, the device information will be displayed.
2 Select desired file to be played back by pressing the 口 or 口 button.
3 Press the / (CD/USB / ) button. Playback will start and the file name will be displayed.
- Title, Artist and Album name are displayed if they are recorded in the USB memory device.
- Display content can be changed by pressing the CD/USB DISPLAY button.
Note:
To pause playback:
Press the / / (CD/USB / / ) button.
Listening to USB mass storage device/MP3 player (continued)
To play back USB/MP3 player with folder mode on
1 Press the USB button on the remote control or INPUT button repeatedly on main unit to select USB function. Connect the USB memory device that has MP3/WMA format files on the unit. When the USB memory is connected to the main unit, the device information will be displayed.
2 Press the FOLDER button, and press the PRESET (or ) button to select desired playback folder. To start playback with folder mode on, go to step 4. To change the playback folder, press the PRESET (or ) button to select another folder.
3 Select desired file to be played back by pressing the or button.
4 Press the / (CD/USB / ) button. Playback will start and the file name will be displayed.
- Title, Artist and Album name are displayed if they are recorded in the USB memory device.
- Display content can be changed by pressing the CD/USB DISPLAY button.
To remove USB memory device
1 Press the (CD/USB) button to stop playback.
2 Disconnect USB memory device from the USB terminal.

Notes:
PIONEER will not be held liable for the loss of data whilst the USB memory device is connected to the audio system.
- Files compressed in MP3 and/or WMA format can be played back when connected to the USB terminal.
- This USB memory's format supports FAT 16 or FAT 32.
PIONEER cannot guarantee that all USB memory devices will work on this audio system.
- USB cable is not recommended for use in this audio system to connect to USB memory device. Use of the USB cable will affect the performance of this audio system.
- This USB memory cannot be operated via USB hub.
- The USB terminal in this unit is not intended for a PC connection but is used for music streaming with a USB memory device.
- External HDD-storage cannot be played back via USB terminal.
- If the data inside the USB memory is large, it may take longer time for the data to be read.
- This product can play WMA and MP3 files. It will automatically detect the file type being played. If unplayable file is played on this product, "Not Support" is indicated and the file will be automatically skipped. This will take a few seconds. If abnormal indications appear on the display due to the unspecified file, turn off the unit and then turn it on again.
This product relates to USB mass storage devices and MP3 players. It may however face some irregularities due to various unforeseen reasons from some devices. Should this happen, turn off the unit and then turn it on again.
The USB port is only intended for direct connection to a USB memory device without any cable.
During CD function, MP3 player will not be charging.
- "Not support" will be displayed if you connect an iPod to USB terminal when the USB function is selected.
Advanced USB playback
The following functions are the same as CD operations:
Page
Direct track search 14
Repeat play 14
Random play 14
Programmed play (MP3/WMA). 15
Notes:
- If USB memory device is not connected, "USB No Media" will be shown on the display.
This unit only supports "MPEG-1 Audio Layer-3" format. (Sampling Frequency is 32 kHz, 44.1 kHz, 48 kHz)
- Playback order for MP3 files may differ depending on the writing software used during file download.
- Bitrate which is supported by MP3 is 32 kbps to 320 kbps, WMA is 64 kbps to 160 kbps.
For MP3/WMA files, please put ".MP3" ".WMA" extension. Files cannot be played back if there is no MP3/WMA extension.
- Playlists are not supported on this unit.
This unit can display Folder Name or File Name up to 32 characters.
Maximum total number of MP3/WMA files is 999.
Total number of folders read is 99 including folder with non-playable file. However, the display shows only folder with MP3 files.
- The display playback time may not be displayed correctly when playing back a variable bitrate file.
- The ID3TAG information supported are TITLE, ARTIST and ALBUM only. Title name, artist name and album name can be displayed by pressing the DISPLAY button during file playback or pause mode.
WMA meta tag also supports title, artist and album name which are recorded in WMA files. Copyright protected WMA files cannot be played back.
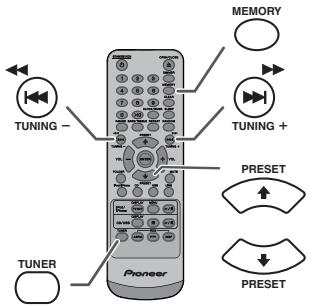
Tuning
1 Press the STANDBY/ON button to turn the power on.
2 Press the TUNER button repeatedly to select the desired frequency band (FM or AM).
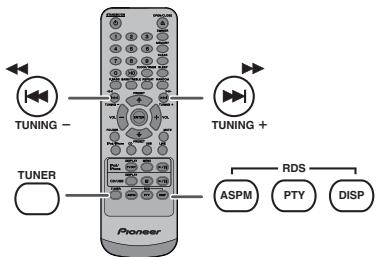
3 Press the TUNING + or - button on the remote control to tune in to the desired station.
- Manual tuning:
Press the TUNING + or - button repeatedly to tune in to the desired station.
- Auto tuning:
When the TUNING + or - button is pressed for more than 0.5 seconds, scanning will start automatically and the tuner will stop at the first receivable broadcast station.
Notes:
- When radio interference occurs, auto scan tuning may stop automatically at that point.
- Auto scan tuning will skip weak signal stations.
- To stop the auto tuning, press the TUNING + or - button again.
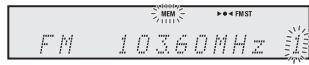
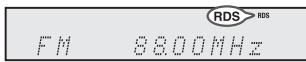
- When an RDS (Radio Data System) station is tuned in, the frequency will be displayed first, and then the RDS indicator will light up. Finally, the station name will appear.
Full auto tuning can be achieved for RDS stations "ASPM", see page 19.
To receive an FM stereo transmission:
Press the TUNER button to select stereo mode and "ST" indicator will be displayed. and will appear when an FM broadcast is in stereo.
- If the FM reception is weak, press the TUNER button to extinguish the "ST" indicator. The reception changes to monaural, and the sound becomes clearer.
■ Memorising a station
You can store 40 AM and FM stations in memory and recall them at the push of a button. (Preset tuning)
1 Perform steps 1 - 3 in "Tuning".
2 Press the MEMORY button.
3 Within 30 seconds, press the PRESET (or ) button to select the preset channel number. Store the stations in memory, in order, starting with preset channel 1.
4 Within 30 seconds, press the MEMORY button to store that station in memory. If the "MEMORY" and preset number indicators disappear before the station is memorised, repeat the operation from step 2.
5 Repeat steps 1 - 4 to set other stations, or to change a preset station. When a new station is stored in the memory, the station previously memorised for that preset channel number will be erased.
Note:
The backup function protects the memorised stations for a few hours should there be a power failure or the AC power lead become disconnected.
To recall a memorised station
1 Press the PRESET (or ) button for less than 0.5 seconds to select the desired station.
To scan the preset stations
The stations saved in the memory can be scanned automatically. (Preset memory scan)
1 Press the PRESET (or ) button for more than 0.5 seconds. The preset number will flash and the programmed stations will be tuned in sequentially, for 5 seconds each.
2 Press the PRESET (or ) button again when the desired station is located.
To erase entire preset memory
1 Press the TUNER button on remote control or press the INPUT button on main unit repeatedly to select Tuner function.
2 In Tuner function, press the CLEAR button until "Tuner Clear" appears.

Tuner Clear
RDS is a broadcasting service which a growing number of FM stations provide. These FM stations send additional signals along with their regular programme signals. They send their station names, and information about the type of programme such as sport, music, etc.
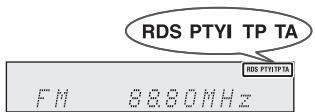
When tuned to an RDS station, "RDS" and the station name will be displayed.
"TP" (Traffic Programme) will appear on the display when the received broadcast carries traffic information, and "TA" (Traffic Announcement) will appear whilst a traffic information is on air.
"PTYI" (Dynamic PTY Indicator) will appear whilst the Dynamic PTY station is received.
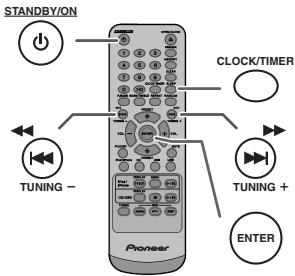
You can control the RDS by using the buttons on the remote control only.
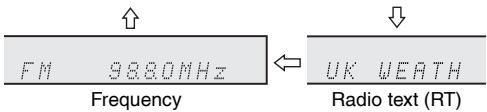
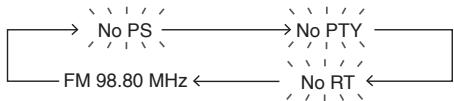
Each time the RDS DISPLAY button is pressed, the display will switch as follows:

When tuning in to a station other than an RDS station or to an RDS station which sends weak signal, the display will change in the following order:
Using the Auto Station Programme Memory (ASPM)
Whilst in the ASPM operation mode, the tuner will automatically search for new RDS stations. Up to 40 stations can be stored.
If you have already stored some stations in memory, the number of new stations you can store will be less.
1 Press the TUNER button on the remote control or INPUT button repeatedly on the main unit to select TUNER function.
2 Press and hold down the RDS ASPM button on the remote control.
1 After "ASPM" has flashed for about 4 seconds, scanning will start (87.50 - 108.00 MHz).

2 When an RDS station is found, "RDS" will appear for a short time and the station will be stored in memory.
3 After scanning, the number of stations stored in memory will be displayed for 4 seconds, and then "END" will appear for 4 seconds.

To stop the ASPM operation before it is complete:
Press the RDS ASPM button whilst it is scanning for stations.
The stations which are already stored in memory will be kept there.
Notes:
- If the same station is broadcasting on different frequencies, the strongest frequency will be stored in memory.
- Any station which has the same frequency as the one stored in memory will not be stored.
- If 40 stations have already been stored in memory, the scan will be aborted. If you want to redo the ASPM operation, erase the preset memory.
- If no station have been stored in memory, "END" will appear for about 4 seconds.
- If the RDS signals are very weak, station names may not be stored in memory.
The same station name can be stored in different channels.
- In a certain area or during certain time periods, the station names may temporarily be different.
Notes for RDS operation
If any of the following events occur, it does not mean that the unit is faulty:
- "PS", "No PS" and a station name appear alternately, and the unit does not operate properly.
- If a particular station is not broadcasting properly or a station is conducting tests, the RDS reception function may not work properly.
- When you receive an RDS station whose signal is too weak, information like the station name may not be displayed.
- "No PS", "No PTY" or "No RT" will flash for about 5 seconds, and then the frequency will be displayed.
Notes for radio text:
The first 14 characters of the radio text will appear for 4 seconds and then they will scroll across the display.
- If you tune in to an RDS station which is not broadcasting any radio text, "No RT" will be displayed when you switch to the radio text position.
- Whilst radio text data is received or when the text contents change, "RT" will be displayed.
To recall stations in memory
To specify programmed types and select stations (PTY search):
You can search a station by specifying the programme type (news, sports, traffic programme, etc. ... see page 20) from the stations in memory.
1 Press the TUNER button on the remote control or INPUT button repeatedly on the main unit to select TUNER function.
2 Press the RDS PTY button on the remote control.
SELECT

PTT
"SELECT" and "PTY TI" will appear alternately for about 6 seconds.
3 Within 6 seconds, press the or button to select the programme type.

Each time the button is pressed, the programme type will appear. If the button is held down for more than 0.5 seconds, the programme type will appear continuously.
4 Whilst the selected programme type is flashing (within 6 seconds), press the RDS PTY button again.
NEWS

SEARCH
After the selected programme type has been lit for 2 seconds, "SEARCH" will appear, and the search operation will start.
Notes:
- If the display has stopped flashing, start again from step 2. If the unit finds a desired programme type, the corresponding channel number will lit for about 8 seconds, and then the station name will remain it.
- If you want to listen to the same programme type of another station, press the RDS PTY button whilst the channel number or station name is flashing. The unit will look for the next station.
- If no station can be found, "NOT FOUND" will appear for 4 seconds.
If you select the traffic programme:
If you select the traffic programme (TP) in step 3, "TP" will appear.
(This does not mean that you can listen to the traffic information at that time.)
When the traffic information is broadcast, "TA" will appear.
Descriptions of the PTY (Programme Type) codes, TP (Traffic Programme) and TA (Traffic Announcement)
You can search for and receive the following PTY, TP and TA signals.
| NEWS | Short accounts of facts, events and publicly expressed views, reportage and actuality. |
| AFFAIRS | Topical programme expanding or enlarging upon the news, generally in different presentation style or concept, including debate, or analysis. |
| INFO | Programmes whose purpose is to impart advice in the widest sense. |
| SPORT | Programme concerned with any aspect of sport. |
| EDUCATE | Programme intended primarily to educate, of which the formal element is fundamental. |
| DRAMA | All radio plays and serials. |
| CULTURE | Programmes concerned with any aspect of national or regional culture, including language, theatre, etc. |
| SCIENCE | Programmes about the natural sciences and technology. |
| VARIED | Used for mainly speech-based programmes usually of light-entertainment nature, not covered by other categories. Examples include: quizzes, panel games, personality interviews. |
| POP M | Commercial music, which would generally be considered to be of current popular appeal, often featuring in current or recent record sales charts. |
| ROCK M | Contemporary modern music, usually written and performed by young musicians. |
| EASY M | Current contemporary music considered to be “easy-listening”, as opposed to Pop, Rock or Classical, or one of the specialised music styles, Jazz, Folk or Country. Music in this category is often but not always, vocal, and usually of short duration. |
| LIGHT M | Classical music for general, rather than specialist appreciation. Examples of music in this category are instrumental music, and vocal or choral works. |
| CLASSICS | Performances of major orchestral works, symphonies, chamber music, etc., and including Grand Opera. |
| OTHER M | Musical styles not fitting into any of the other categories. Particularly used for specialist music of which Rhythm & Blues and Reggae are examples. |
| WEATHER | Weather reports and forecasts and meteorological information. |
| FINANCE | Stock Market reports, commerce, trading, etc. |
| CHILDREN | For programmes targeted at a young audience, primarily for entertainment and interest, rather than where the objective is to educate. |
Using the Radio Data System (RDS) (continued)
Timer and sleep operation (Remote control only)
| SOCIAL | Programmes about people and things that influence them individually or in groups. Includes: sociology, history, geography, psychology and society. |
| RELIGION | Any aspect of beliefs and faiths, involving a God or Gods, the nature of existence and ethics. |
| PHONE IN | Involving members of the public expressing their views either by phone or at a public forum. |
| TRAVEL | Features and programmes concerned with travel to near and far destinations, package tours and travel ideas and opportunities. Not for use for announcements about problems, delays, or roadworks affecting immediate travel where TP/TA should be used. |
| LEISURE | Programmes concerned with recreational activities in which the listener might participate. Examples include, Gardening, Fishing, Antique collecting, Cooking, Food & Wine, etc. |
| JAZZ | Polyphonic, syncopated music characterised by improvisation. |
| COUNTRY | Songs which originate from, or continue the musical tradition of the American Southern States. Characterised by a straightforward melody and narrative story line. |
| NATION M | Current Popular Music of the Nation or Region in that country's language, as opposed to International "Pop" which is usually US or UK inspired and in English. |
| OLDIES | Music from the so-called "golden age" of popular music. |
| FOLK M | Music which has its roots in the musical culture of a particular nation, usually played on acoustic instruments. The narrative or story may be based on historical events or people. |
| DOCUMENT | Programme concerned with factual matters, presented in an investigative style. |
| TEST | Broadcast when testing emergency broadcast equipment or receivers. |
| ALARM | Emergency announcement made under exceptional circumstances to give warning of events causing danger of a general nature. |
| TP | Broadcasts which carry traffic announcements. |
| TA | Traffic announcements are being broadcast. |
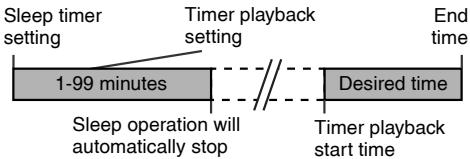
Timer playback:
The unit turns on and plays the desired source (CD, TUNER, USB, iPod, LINE IN) at a preset time.
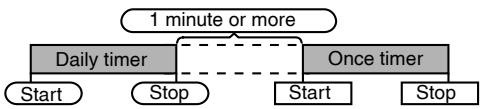
This unit has 2 types of timer: ONCE TIMER and DAILY TIMER.
Once timer:
Once timer play works for one time only at a preset time. ("⊙" indicator).
Daily timer:
Daily timer play works at the same preset time every day that we set. For example, set the timer as a wake-up call every morning.
("DAILY" indicator).
Using the once timer and daily timer in combination:
For example, use the once timer to listen to a radio programme, and use the daily timer to wake up.
1 Set the daily timer (page 21).
2 Set the once timer (page 21).
Timer playback
Before setting timer:
- Check that the clock is set to the correct time (refer to page 9). If it is not set, you cannot use the timer function.
For timer playback: Plug in USB or load discs or dock iPod to be played.

1 Press the STANDBY/ON button to turn the power on.
2 Press and hold the CLOCK/TIMER button.
3 Within 30 seconds, press the or button to select "Once" or "Daily", and press the ENTER button.
4 Within 30 seconds, press the or button to select "Timer set", and press the ENTER button.
5 To select the timer playback source (CD, TUNER, USB, iPod, LINE IN), press the or button. Press the ENTER button.
When you select the tuner, select a station by pressing the or button, and then press the ENTER button. If a station has not been programmed, "No Preset" will be displayed and timer setting will be cancelled.
6 To adjust the day, press the or button and then press the ENTER button.
7 Press the ENTER button to adjust the hour. Press the or button and then press the ENTER button.
8 To adjust the minutes, press the or button and then press the ENTER button.
9 Set the time to finish as in steps 7 and 8 above.
10 Adjust the volume using the VOL (+ or -) button, and then press the ENTER button. Do not turn the volume up too high.
11 Press the STANDBY/ON button to enter the power stand-by mode. The "TIMER" indicator lights up and the unit is ready for timer playback.
12 When the preset time is reached, playback will start. The volume will increase gradually until it reaches the preset volume. The timer indicator will blink during timer playback.
13 When the timer end time is reached, the system will enter the power stand-by mode automatically.
Once timer:
The timer will be cancelled.
Daily timer:
The timer operates at the same time every day. It will continue until the daily timer setting is cancelled. Cancel the daily timer when it is not in use.
Notes:
- When performing timer playback using another unit connected to the USB terminal, select "USB" or "LINE IN" in step 5.
- This unit will turn on or enter the power stand-by mode automatically. However, the connected unit will not turn on or off. To stop the timer playback, follow step "Cancelling the timer setting" of this page.
Checking the timer setting:
1 Turn the power on and press and hold down the CLOCK/TIMER button.
2 Within 30 seconds, press the or button to select "Once" or "Daily", and press the ENTER button.
3 Within 30 seconds, press the or button to select "Timer Call", and press the ENTER button.
Cancelling the timer setting:
1 Turn the power on and press and hold down the CLOCK/TIMER button.
2 Within 30 seconds, press the or button to select "Once" or "Daily", and press the ENTER button.
3 Within 30 seconds, press the or button to select "Timer Off", and press the ENTER button. Timer will be cancelled (the setting will not be cancelled).
Reusing the memorised timer setting:
The timer setting will be memorised once it is entered. To reuse the same setting, perform the following operations.
1 Turn the power on and press and hold down the CLOCK/TIMER button.
2 Within 30 seconds, press the or button to select "Once" or "Daily", and press the ENTER button.
3 Within 30 seconds, press the or button to select "Timer On", and press the ENTER button.
4 Press the STANDBY/ON button to enter the power stand-by mode.
Note:
The clock setting will reset if the power cord is pulled out or when there is a blackout.
Timer and sleep operation (Remote control only) (continued)
Sleep operation
The radio, compact disc, iPod, USB and Line In can all be turned off automatically.
1 Play back the desired sound source.
2 Press the SLEEP button.
3 Within 5 seconds, press the Numeric button to set the time (1 minute - 99 minutes)
4 "SLEEP" will appear.
5 The unit will enter the power stand-by mode automatically after the preset time has elapsed. The volume will be turned down 1 minute before the sleep operation finishes.
To confirm the remaining sleep time:
1 Whilst "SLEEP" is indicated, press the SLEEP button.
To cancel the sleep operation:
Press the STANDBY/ON button whilst "SLEEP" is indicated. To cancel the sleep operation without setting the unit to the stand-by mode, proceed as follows.
1 Whilst "SLEEP" is indicated, press the SLEEP button.
2 Within 5 seconds, press the "0" button twice until "SLEEP 00" appears.
To use timer and sleep operation together
Sleep and timer playback:
For example, you can fall asleep listening to the radio and wake up to CD in the next morning.
1 Set the sleep time (see above, steps 1 - 5).
2 Whilst the sleep timer is set, set the timer playback (steps 2 - 9, page 22).
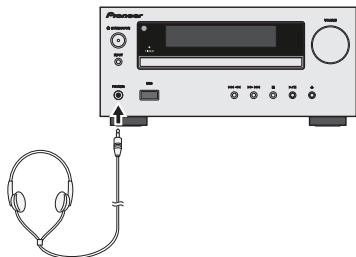
Headphones
- Do not turn the volume on to full at switch on and listen to music at moderate levels. Excessive sound pressure from earphones and headphones can cause hearing loss.
- Before plugging in or unplugging the headphone, reduce the volume.
- Be sure your headphone has a 3.5 ~mm diameter plug and impedance between 16 and 50 ohms. The recommended impedance is 32 ohms.
- Plugging in the headphone disconnects the speakers automatically. Adjust the volume using the VOLUME control.
X-HM20 only: Audio from the iPod/iPhone cannot be heard via the headphones connected to the unit. "HP INVALID" will be displayed if you connect the headphones when the iPod/iPhone function is selected.
Many potential problems can be resolved by the owner without calling a service technician.
If something is wrong with this product, check the following before calling your authorized PIONEER dealer or service centre.
General
| Symptom | Possible cause |
| ● The clock is not set to the correct time. | ● Did a power failure occur? Reset the clock. (Refer to page 9) |
| ● When a button is pressed, the unit does not respond. | ● Set the unit to the power stand-by mode and then turn it back on.
● If the unit still malfunctions, reset it. (Refer to page 25) |
| ● No sound is heard. | ● Is the volume level set to "Min"?
● Are the headphones connected?
● Are the speaker wires disconnected? |
CD player
| Symptom | Possible cause |
| ●Playback does not start.●Playback stops in the middle or is not performed properly. | ●Is the disc loaded upside down?●Does the disc satisfy the standards?●Is the disc distorted or scratched? |
| ●Playback sounds are skipped, or stopped in the middle of a track. | ●Is the unit located near excessive vibrations?●Is the disc very dirty?●Has condensation formed inside the unit? |
Remote control
| Symptom | Possible cause |
| ● The remote control does not operate. | ● Is the AC power lead of the unit plugged in?● Is the battery polarity correct?● Is the battery dead?● Is the distance or angle incorrect?● Does the remote control sensor receive strong light? |
Tuner
| Symptom | Possible cause |
| ● The radio makes unusual noises continuously. | ● Is the unit placed near the TV or computer?● Is the FM aerial or AM loop aerial placed properly?Move the aerial away from the AC power lead if it is located nearby. |

USB
| Symptom | Possible cause |
| ● Device cannot be detected. | ● Is there any MP3/WMA file available?● Is the device properly connected?● Is it an MTP device?● Does the device contain AAC file only? |
| ●Playback does not start. | ● Is it a copyright protected WMA file?● Is it a false MP3 file? |
| ● Wrong time display.● Wrong file name display. | ● Is Variable Bitrate file being played back?● Is the File Name written in Chinese or Japanese characters? |

iPod and iPhone (X-HM20 only)
| Symptom | Possible cause |
| ● No sound is produced. No image appears on the TV/monitor. | ● The iPod or iPhone is not playing. ● The iPod or iPhone is not properly connected to the unit. ● Is the AC power lead of the unit plugged in? ● The video cable is not properly connected. ● The TV/monitor's input selection is not properly set. ● The iPod TV out feature has not been set to output video. ● Audio from the iPod/iPhone cannot be heard via the headphones connected to the unit. |
| ● iPod or iPhone will not charge. | ● The iPod or iPhone is not making full contact with the connector. ● Using iPod (3rdgeneration). ● The iPod or iPhone is not supported. Refer to page 10 for compatible models. ● The iPod or iPhone unit cannot be charged whilst the main unit is in USB mode. |
| ● “This accessory is not made to work with iPhone” or “This accessory is not supported by iPhone” appears on iPhone screen. | ● The iPhone battery is low. Please charge the iPhone. ● iPhone is not properly docked. |
Troubleshooting chart (Continued)
Condensation
Sudden temperature changes, storage or operation in an extremely humid environment may cause condensation inside the cabinet (CD pickup, etc.) or on the transmitter on the remote control. Condensation can cause the unit to malfunction. If this happens, leave the power on with no disc in the unit until normal playback is possible (about 1 hour). Wipe off any condensation on the transmitter with a soft cloth before operating the unit.
If problem occurs
When this product is subjected to strong external interference (mechanical shock, excessive static electricity, abnormal supply voltage due to lightning, etc.) or if it is operated incorrectly, it may malfunction.
If such a problem occurs, do the following:
1 Set the unit to the stand-by mode and turn the power on again.
2 If the unit is not restored in the previous operation, unplug and plug in the unit again, and then turn the power on.
Note:
If neither operation above restores the unit, clear all the memory by resetting it.
Factory reset, clearing all memory
1 Press the STANDBY/ON button to turn the power on.
2 Press the LINE button button on the remote control or INPUT button repeatedly on the main unit to select LINE IN function.
3 In LINE IN function, press the button on the main unit press and hold the button until "RESET" appears.

Caution:
This operation will erase all data stored in memory including clock, timer settings, tuner preset, and CD programme.
Before transporting the unit
Remove the iPod, USB memory device and disc from the unit. Then, set the unit to the power stand-by mode. Carrying the unit with iPod or USB memory device left docked or discs left inside might damage the unit.
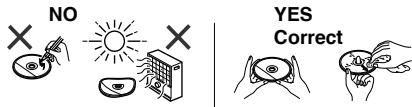
Care of compact discs
Compact discs are fairly resistant to damage, however mistracking can occur due to an accumulation of dirt on the disc surface. Follow the guidelines below for maximum enjoyment from your CD collection and player.
- Do not write on either side of the disc, particularly the non-label side from which signals are read. Do not mark this surface.
- Keep your discs away from direct sunlight, heat, and excessive moisture.
Always hold the CDs by the edges. Fingerprints, dirt, or water on the CDs can cause noise or mistracking. If a CD is dirty or does not play properly, clean it with a soft, dry cloth, wiping straight out from the centre, along the radius.
Maintenance
Cleaning the cabinet
Periodically wipe the cabinet with a soft cloth and a diluted soap solution, then with a dry cloth.
Caution:
- Do not use chemicals for cleaning (petrol, paint thinner, etc.). It may damage the cabinet.
- Do not apply oil to the inside of the unit. It may cause malfunctions.
As part of our policy of continuous improvement, PIONEER reserves the right to make design and specification changes for product improvement without prior notice. The performance specification figures indicated are nominal values of production units. There may be some deviations from these values in individual units.
General
| Power source | AC 220 V to 240 V, 50 Hz/60 Hz |
| Power consumption | Power on:
45 W (X-HM20)
30 W (X-HM10)
Power stand-by: 0.4 W |
| Dimensions | Width: 215 mm
Height: 99 mm
Depth: 300 mm |
| Weight | 3.8 kg (X-HM20)
3.7 kg (X-HM10) |
Amplifier
| Output power | RMS: 15 W + 15 W (1 kHz, 10 % T.H.D., 4 ohms) |
| Output terminals | Speakers: 4 ohms 20 Hz to 20 kHz Video output (X-HM20 only): 1 Vp-p Headphones: 16 ohms (recommended: 32 ohms) |
| Input terminals | Line in (Analog input): 500 mV/47 k ohms |
CD player
| Type | Single disc multi-play compact disc player |
| Signal readout | Non-contact, 3-beam semiconductor laser pickup |
| D/A converter | Multi bit D/A converter |
| Frequency response | 20 Hz to 20 000 Hz |
| Dynamic range | 90 dB (1 kHz) |

USB
| USB host interface | ● Complies with USB 1.1 (Full Speed)/2.0 Mass Storage Class.
● Support Bulk only and CBI protocol. |
| Support file | ● MPEG 1 Layer 3
● WMA (Non DRM) |
| Bitrate support | ● MP3 (32 kbps to 320 kbps)
● WMA (64 kbps to 160 kbps) |
| Other | ● Maximum total number of MP3/WMA files is 999.
● Maximum total number of folders is 99 INCLUSIVE of root directory.
● The ID3TAG information supported are TITLE, ARTIST and ALBUM only.
● Supports ID3TAG version 1 and version 2. |
| File system support | ● Support USB devices with Microsoft Windows/DOS/FAT 12/FAT 16/FAT 32.
● 2 kbyte block length for sector. |
Tuner
| Frequency range | FM: 87.5 MHz to 108 MHz
AM: 522 kHz to 1,620 kHz |
| Preset | 40 (FM and AM station) |
Speaker
| X-HM20 |
| Type | 2-way type speaker system
5 cm Tweeter
10 cm Woofer |
| Maximum input power | 15 W |
| Impedance | 4 ohms |
| Dimensions | Width: 132 mm
Height: 260 mm
Depth: 173 mm |
| Weight | 2.0 kg/each |
| X-HM10 |
| Type | 2-way type speaker system Piezoelectric Tweeter 10 cm Woofer |
| Maximum input power | 15 W |
| Impedance | 4 ohms |
| Dimensions | Width: 132 mm Height: 260 mm Depth: 158 mm |
| Weight | 1.6 kg/each |
About iPod/iPhone/iPad:
Made for

iPod iPhone iPad
"Made for iPod", "Made for iPhone" and "Made for iPad" mean that an electronic accessory has been designed to connect specifically to iPod, iPhone, or iPad, respectively, and has been certified by the developer to meet Apple performance standards. Apple is not responsible for the operation of this device or its compliance with safety and regulatory standards. Please note that the use of this accessory with iPod, iPhone, or iPad may affect wireless performance.
iPad, iPhone and iPod are trademarks of Apple Inc., registered in the U.S. and other countries.
© 2011 PIONEER CORPORATION.
All rights reserved.
IMPORTANT

CLASS 3B VISIBLE AND INVISIBLE LASER RADIATION WHEN OPEN. AVOID EXPOSURE TO THE BEAM.
ATTENTION
RADIATIONS LASER VISIBLES ET INVISIBLES DE CLASSE 3B QUAND
OUVERT. EVITEZ TOUT EXPOSITION AU FAISCEAU.
ADVARSEL
KLASSE 3B SYNLIG OG USYNLIG LASERSTRALING VED ABNING.
UNDGA UDSEETTELSE FOR STRALING.
WARNING
KCLASS 3B SYNLIG OCH OSYNLIG LASERSTRALNING NAR DENNA DEL
VORSIGHT
AR OPPNAUD, UNDVIK AIT OTSATTADIG FOR STRALEN
VORSlicht
Lecture repeteee. 14
© 2011 PIONEER CORPORATION.
CLASS 3B VISIBLE AND INVISIBLE LASER RADIATION WHEN OPEN. AVOID EXPOSURE TO THE BEAM.
RADIATIONS LASER VISIBLES ET INVISIBLES DE CLASSE 3B QUAND
OUVERT. EVITEZ TOUT EXPOSITION AU FAISCEAU
KLASSE 3B SYNLG OG USYNLG LASERSTRALING VED ABNING.
UNDGA UDSAETTELSE FOR STRALING.
KCLASS 3B SYNLIG OCH OSYNLIG LASERSTRALNING NAR DENNA DEL
AR OPPNAD, UNDVIK ATT UTSATTADIG FOR STRALEN.
USB/ player MP3 16-17
Lasmerican Organization of International Organization (OII) has developed a new system for the use of the U.S. National Institute of Health (NIH) to measure the number of patients who have been treated with an opioid drug in the past 12 months.
Panel frontal
Pagina
CLASS 3B VISIBLE AND INVISIBLE LASER RADIATION WHEN OPEN. AVOID EXPOSURE TO THE BEAM.
RADIATIONS LASER VISIBLES ET INVISIBLES DE CLASSE 3B QUAND
OUVERT. EVITEZ TOUT EXPOSITION AU FAISCEAU.
ADVARSEL
KLASSE 3B SYNLG OG USYNLG LASERSTRALING VED ABNING.
UNDGAUDSAETTELSEFORSTRALING
WARNING
KCLASS 3B SYNLIG OCH OSYNLIG LASERSTRALNING NAR DENNA DEL
VORSICHT
AR OPPNAD. UNDVIK ATT UTSATTA DIG FOR STRALEN.
PRECAUCION
Uber iPod/iPhone/iPad
Made for

iPod iPhone iPad
© 2011 PIONEER CORPORATION.
CLASS 38 VISIBLE AND INVISIBLE LASER RADIATION WHEN OPEN. AVOID EXPOSURE TO THE BEAM.
RADIATIONS LASER VISIBLES ET INVISIBLES DE CLASSE 3B QUAND
OUVERT. EVITEZ TOUT EXPOSITION AU FAISCEAU.
ADVARSEL
KLASSE 3B SYNLIG OG USYNLIG LASERSTRALING VED ABNING.
WARNING
UNDGA UDSETELSE FOR STRALING:
WARNING
KCLASS 3B SYNLG OCH OSYNLIG LASERSTRALNING NAR DENNA DEL
VORSICHT
(solo per file MP3/WMA) 15-16
USB
© 2011 PIONEER CORPORATION.
CLASS 3B VISIBLE AND INVISIBLE LASER RADIATION WHEN OPEN. AVOID EXPOSURE TO THE BEAM
RADIATIONS LAR VISIBLES ET INVERVISES DE CLASSE 38 QUAND OUVERT. EVITEZ TOUT EXPOSITION AU FAISCEAU
KLASSE 38 SYNGLG USYNLG LASERSTRALING VED ABNING. UNDAUGSUTELLE FOR STRALING
KCLASS 38 SYLING OHG OSYNLG LASERSTRALING NAR DENNA DEL AORPNDN. UNIVTD ATT SUATTA-DIG FOR STRALEN.
BE GOFFENTE BAOCKING IF S T I S BARE UNI AND UNSIBLIRE. TASERRAUZHUNG LE KLASSE 38 M. GERAEINENRIN VOHANDEN. NOND EMET LASERSTA RAUSSETZEN!
CUANDO SE ABRE HAY RADIACION LASED DE CLASE 3B VISIBLE E INVISIBLE. EVITE LA EXPOJIONA A LOS RYOS LASEL.
VAATTAESALET ALITTHA NAKYVALLEJA NKYMAITOMALLELUOKAN 38 LASERSATEYLEL.AKAL KATO SATESEEN.
JIa3EPHbI IPOdYKT KlACC 1
D58-5-2-2b* B1Ru
OKoHdEhcaun
Ecn npnirpbbateBh3aHNO nepemeuec H cXoNDHO
MeCTA B TENIyIO KOMHATy (HaNPIMep, 3MMO) INIe ECNI
TEMpepaTBy a KOMHATE, rge yCTaHOBNeH npOnIrpbBaTeB,
Bh3aHNo NOBbcNpBc np NiCtOJIb3OBAHN IO6OrpeBaTeN,
DP,BHTrPn (Ha pa6OuHx DetJAnx NInH3E) MOyT
O6pa3OBatcBc BOJHbYe KaIIIN (KOHDeHCAZr).PiN
O6pa3OBAHN KOJDeHCAznn pOnIrpbBaTeB He 6yDet
Cpa6aTbBaBcoOTBcETCTBuOUIm M6pa30m I
BOcnpOni3BVeDeneH He 6yDet npOni3BDoITCb. OctAbte
PnOnIrpbBaTeB npi KOMHaTHoN Tempepatye Ha 1 INn 2
Uaca npn BVKnUoyehHom PntAHN (BPEMa 3aBcNt OT obEma
KOHDeHCAznn).
BoJHbIe KaJIINcNapTcra N MoKHO 6yTeT BOCnpoN3BODnTb. KOHNcaJMQEOTAKTe XeOpa2OBaTcBcNETOM,ecnn npOnIrPbIbATEnb NOpBeRjDeH pIrMMyo bDvBaHnO t KOHNzIOHepaBOZdXya. B TAKOM cUYae OTOpBnHe
CnCTema pecnBepa CD X-HM10/X-HM20 coctOH n3 oCHOBHOrO 6IOka n CnCTeMbI rPOMKOROBOpTeJIeJ.
BVeDHeHc
BlaIaOdAPmH BAC 3a IIpHOBpeTeHHe 3TOrO I3JIeII KOMIIaHHI PIONEER. IJIA IIIOUyEHn HAIUYuIHx pa6OHyX xapAKeTpHCTK 3TOrO I3JIeII BHNMaTeJIbHO IIPOHTte DAHHoe pykoBOcTBo. B DAHHOM pykoBOcTBe COJIepKaTc HNCTpyKIIIN IO 3KcIIyataaIIIN BaIIero I3JIeII PIONER.
CneuaJIbHoe npImeHaHne
C nocTabkO nnHoro IpoJyKtHe nepeJaetc JInIeH3n H He aetc npaBo Ha pacipoctpaneHHe co3dAnHORo C 3TNm IpoJyKtOM KOHTeHTa NO KOMMepeeckHM (PnHOCsHMM DoxOI) ChCTeMaM BEEAHHa (Ha3eMHbM, cNytHKnKOBbM, Ka6eJIbHbM n/HII pyrHM KanaIaAM peEJaUHn HHOpmauH), IO KOMMepeeckHM cpeCTBOM NIOKOBO PepeaH (Yepe3 HHTepHET, INTPaHET n/HII pyrHe CETH), IO pTyHM KOMMepeeckHM ChCTeMaM pacippeJeHnna KOTeHTA (PiHIOKeHnM PIIATHO AayHO nII ayHIOIporpamMaM IO 3Anpocsy H.T.I.) HnHa NaPiHochIXH DoXOI dHnHcckHX HOCHTeJX HHOpmaHH (KOMiAKT-INCKax, IHOpOBbX yHNBePcAIBbIX INChkax, POJIYIpOboDnIKoBbX YNHnx, JeCtKHX INCKax, KapTKA PAmAYr T.I.N.). DnIPOIoBOHO HcNOIb3OBAHn HneOEOxOIMHa OTdeJIbHn AInIeH3N.ДЯ NOIyueHn EoJIe NOIpOboHn HHOpmaaHm CM. http://mp3licensing.com
TexhoIogna KoInpoBaHn 3Byka MPEG Layer-3 IIO JInueH3HH Fraunhofer IIS n Thomson.
PpHaJdJIeXHoCTn
Y6eIHTecb HNaJIuHnB KOMIIJIeKTE cJIeDyIOUHX IIpHnAJIeXHOctTe.
IoproTOBka K nCNoJIb3OBAHnIO
CoeHHHeHnCnCTembl 7-8
IyJIbT dHCTaHtioHHOrO yIpaBHeHn8
OchOBHbIe onepaun
O6iue yipraBJIeHne 9
YcTaHOBka YacOB (TOJIbKO c IIyIbTa IY) 9-10
iPod, iPhone u iPad
emKocTH USB/MP3-IIeepa 16-17
YcoBepIeHCTBOBaHHoe BocIIpoH3BeJeHHe USB 17
Papno
IIpocnyuHbAHne paHnopepa.. 18
DononHntelbHbIe cyHKcM
HcnoIb3OBAHHe cHCTeMb paIHOaHHbIX (RDS) 19-21
Pa6ota c TaHMePOM H CnIaII pekHM
(TOJIbKO c IIyJIbTa IY) 21-23
HayunHKn 23
CnpaBoUHbIe MaTePnaJIbI
Ta6JIuHa HeHcIpaBHoCtei 24-25
ObJyKbAHHe 25
Cneunfkaaenn 26
IpeDyipexJHHe 27
06üne cBedeHn
UctanabHJbIaRte yCtpoIcTBo HA TBePIOI,POBHOIOBepxHOCTN 63bHbpaun.
PacnoiIaraiTePROMOBOPHTJIHnPaCtOTHHHMHHHMMY30CMOTJIO6OToJI-TEJEBHOBA BO H36eKaHHeN OTKIOHEHH B IIBeTe HA KpAe TEJEBHOBA.PIIHnHaINHn OKIOHEHH,OTDHNBHeTPEROMOTOBPHTJINoJAJIbIEOte JTEJEBHOBA.JK-TEJEBHOsOp HeIOBepKeh TAKHM BHOpaIHMM.
IpeoxpanHre yctpoHCTBO TOB3eIHCTBNH IpMOrO coJIHeuHOROBcTa, CIIbHbIX MaHTHHbIX POJIe, Upe3MePHoIN BIIIN, BIAKHOCTN HAnEeTPOHnFO/3JKeTPnCeCKoO OOpbyoBaHH (DOMaIHHEKOMIBIOtePbI, QAcbkU, H.T.I.). CO3dJIauHToE KIEtPKrTHeCKHe NlOEMx.
He pa3meiuihe HnKaKHX npEIMetOB Ha BepXHen cTropoHe yctpOCTBA.
He IIOBderpaIe TycPOIcTbO BO3JIcTBNO BlaHn, TEMpePaTy BII60 C^0 HINCBepXH3KHXTEMpePApTy.
EcHn ChTeMa pa6oTaET HeipabHbHo, OTOeHHHe Ta6eJI HHTaHHIpeMeHHORO ToKa oT cTeBoi PO3EtK. ChoBa IOcEOHHHe Ta6eJI HHTaHHIpeMeHHORO ToKa H 3aTeM BKIIHOHTe CCHTeMy.
- PnH rpo3e, OTKIIOHTHe yCTPOHCTBO OT cETn IIN 6e3OIIaHOCHTN.
- PnH oTcOeJIHHEHHN BHIKN KAbEJI NITAHNII NpeMeHHO TOKA O t cTeBOH PO3EtKH, IepJHKTeB 3a BHUK, TAK KAK PnH BYITI HBAHH 3a Ka6b JMOKET NIOPEITbC BHYTPENH IIPOBOJKA.
BbJIka Ka6eJI INIaHIIe NpeMeHHOro TOKa HcIOJIb3yETcKa Ka4Ba3cIINHTeJIb I IOJIkHa BcETJa HAXOJIITbcB pa6OcHc COCTOHNH.
He CHMaimTe HapxKyIO KpbIbKy, TAK KAK 3TO MOKeT npMeCTN K nopaxEHNO 3NEKTPUeCKHM TOKOM. O6paNTec3a BHYTpEHNM 0cCJyKNBaHnEM B MeTthCBepBnCHbIeHTP PIONEER.
He 6JIOKpyIte BEHTHJIaIHHO 3aKpbITHeM BeHTHJIaIOHOHBIX
OTBcETNI KaKHMnJIHb IpneJMeTaMn, HanIpHMep, r3aTeTAMn, CKaTERTMn, IIITOPAMn H.T.I.
He pa3meuaite Ha annapate HctOHHKn OTKpbTTOrO hnaHHPmE, 3aJxKeHNbIe CbeH.
0BaPaaIeB HBNHMeHE NaKoIOJIrHcKeNcA cNKeTbYtINH3aIIHN H aJdJIENHNCNIOJI3BOAHHH6B4aTeR.
AmpapatIpeHbHa3HueeH JI HcNoJIb3OBAHnB YbcLOBHX ymepeHHOrO KJHMATA.
PpeynpexdneH:
HcnoIb3yeMoHe HnprjKeHHe DoJHKHO cobnaatb c HnprjKeHHem, yka3aHHbM HA 3OM anPiapate. HcnoIb3oBaHne 3TOr H3JeHII npn HnprjKeHHN BbIe Hya3aHHOraBJIaeTcR OiAnhch M MoKet pnbEcht K IIOKApuy HIN dpyTOMy HeCuaTHOMy CUYaIO, Bb3bBAIOUeMy IOBpeKdHeHc. KomnAHnPIONEER He bdyet HeCTN OTBeTCTBHeHocTb 3a IIoo6e NOBpeKdHeHn, BbITKeAIOUee H3 HcNoIb3oBAHnH 3TOr AnPiapata npn HnprjKeHHn, OTInuHOM OT yka3aHHOrHa anPiapate.
PerynipoBaanr rpomkoctn
YpOBeHb 3Byka IIpn 3aJdAHHOH HAcTpoKe rPOMKocTH 3aBHCNT OI KII pRPMKOFOROBOpTeJIe, PaIIOJIQeHHa IpyTHX paJIINHbIX fakTropOB. PeKomeHJyETcN 36eRaTb 03JeCTBnBa BlyCOKHx yPoBHe rPOMKocTH. IIpn bKIOHeHHy UyTOPhCTBa H BKIOHaiTe rPOMKocTB Ha IIOIHyo MOIHOCTh. CUYIaHTe My3bIKy IIpn cpeJdHHx YPOBHX rPOMKocTH. H36bIToOHoe 3BYkoBOE DAJIteHE N HAYUHNKO B IOLOBhIX TeLEFOHOH MOKet BB3BAbTb NotepHO CIYxa.
OprAhbI ynpabJIeHnI nHdNkaTOpbl
- KhoNka Hn3Knx/BoICOKx YactOT 9
6.KhONKa HAcTPOKm BHN3, npOnyCKa Ha3ad, 6bICTPOH nepeMOTKn Ha3ad,yCTaHOBKn BPemEnn Ha3ad.9,12,13,16,18,19,21
-
KONKIA NACTPOKM TIOHEPA BBEXP, YNPABENHUY KypcopoM iPod BBeXP. 12, 16, 18
-
Khonka yMeHbSeHn rPOMKocTn.. 9
K. Honkja NahtpOkn TIOHePA BHM3, ynpaBNeHnkycpocom P0d BHN3. 11, 12, 16, 18
10.Khonka nankn 16
-
Khonka iPod/iPhone 11
-
Khonka CD 13
-
Khonka iPod/iPhone DISPLAY TV OUT 11, 12
-
Khonka CD/USB DISPLAY 16
15.KHONKa HAcTPOkN THOhepa. 18,19
-
Khonka RDS ASPM 19
-
Khonka OKpbTn/3akpbTn.. 13
18.KhONka HacTpoKn 3aTeMHeHna. 9
19.Khonka 3anomnHaHna 14,18
20.KhONKa cTnpaHnA 14,20
21.Khonka nepexoda B cnaui pekm 23
-
Khonka yctaHObKn YacOB/TaIMepa. 9, 22
-
Khonka BocnpnOBeDemn B cnyaHNO nocNoBObATEbHOCTn 12,14
-
Khonka NOBTOPHORO BOCPON3BeHnra. 12, 14
25.KhONKa HAcTPOKnBBePx, npOyncKa BnpePeD, 6bIcTpoN nepeMOTKn BnpePeD,yCTaHOBKn BpEmHn BnpePeD. 9,12,13,16,18,19,21
26.Khonka yBelenueHnraPOMKocTn 9
- Khonka Enter 9, 11, 12
28.KhONka OTKIOUeHn3ByKa 9
29.KhONka NnHeHoro BXOda 8,25
30.Khonka USB 16
- Khonka BocnpoBBeDnHnay3bl iPod/iphone 12
- Khonka MeHIO iPod/iPhone 12
- KhoNka BocnponBaDeHnnaay3bl CD/USB 12, 13, 14
34.KhONka ocTaHOBKn CD/USB 13,14
35.Khonka ducnner RDS 19
- Khonka RDS PTY 19
Dincpnei
Ctp.
1.Инд�示ТOPUSB 16
2.ИндikaTop iPod 10
3.ИнданкоторКOMпakT-ДиСka 13
4.ИндIKETop MP3 13
5.ИндIKEtop WMA. 13
M.NIkhakotop RDM (BOCNPOM3BDeEHeNBE CnuyaHNO nocNobOATENBHOCTN) 14
7.ИндкатOP MEM (namrtb) 14
8.Инданкот поветopa.. 14
9.Индкатop Bocnpoun3BedeHnay3bl 12
10.Индikatop NaCTpoKn FM/AM. 18
11.Индikatop pexima cTepeo FM.. 18
12.Индikatop ctaциВ ctepeopexmme 18
13.ИндikatopRDS 19
14.Индikatop PTY. 19
15.Индikatop TP 19
16.Индikatop TA 19
17.Индikatop npurnyeHna 3Byka .9
18.Индикатop Ha3BaHЯ 16
19.ИндikatopиспнHTeЯ.. 16
20.Индкатор пankn 16
21.Индкатop anb6oma 16
22.Индikatopфайla 16
23.Индикатор Дорожки 14
24.Индикатор exkeДневHoro TaIMepa.. 21
25.ИнданаTop OndHopa3OBOTo TaMepa.. 21
26.ИндikatopДиcka 13
27.CymMapHbI INdNkAtOp. 16
28.Индикатopсяцeropeхима 23
IpepeBbIOnJIHeHnEMIIIN3MeHeHnEM CoeHNHeHn OTKJIIOHTe NITaHne NOTCoeHNHTe Ka6eIb NITaHnO TPO3ETKN IepemEHNO TOKA.
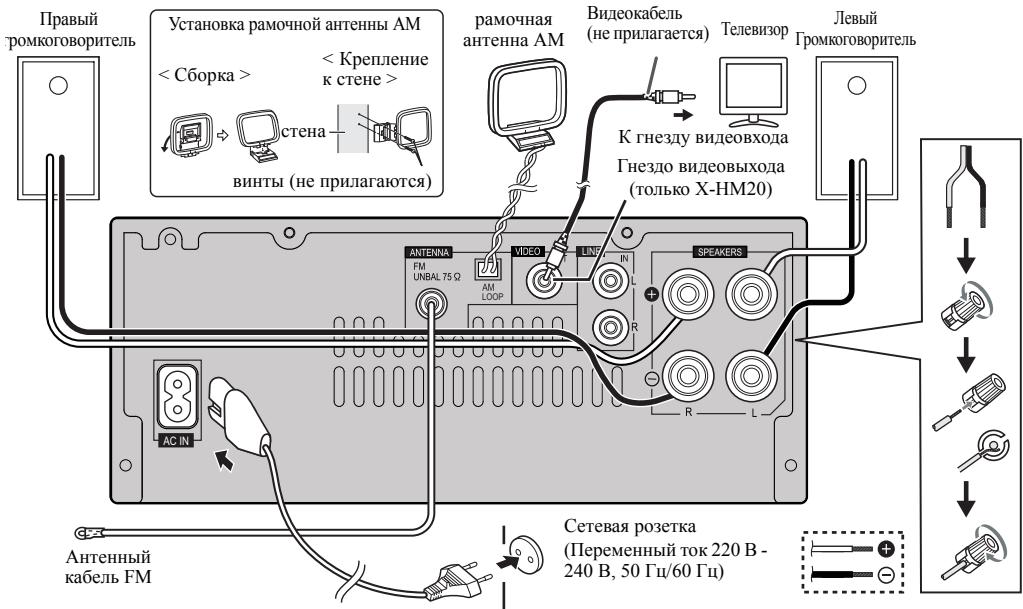
POncOeDInHeHne aHTeHHbI
NoctabJrEmaB KOMJIeKTe aHTehHa FM:
IIOcoedHHTHe aHTHeHY FM K rHe32y FM C cOpotnHBJeHHem 75 OM n pacIOIOHHTe aHTHeYY FM B TakOM HaipBaJIeHHN, KOJDA BO3MOKeH INPHECMATO CnBHOFO CHHJA.
Bheunra aHTehHa FM:
Дя ушенипma HeMa HCIOJIb3yIte BHeIIHIO aHTeHHy FM (KoAChJIbHbN Ka6JIb c conpoTHJIeHHem 75 Om).Пин HcIOJIb3OBAHHB HeIIb e aHTeHHb FM oTOcoEDHHTE NOCTABJREMYU b KOMIIJIeTe aHTeHHY FM.
IocTabnemar B KOMnKeTe pamOuHa aHTeHHa AM:
IIOJcoeHNHITRE pAMOHyU aHTeHHy AM K 3aJHMY AM. PacIOIOJIHKe pAMOHyU aHTeHHy AM IJIOBecpeHHeN OHIIbHOrO IPIHMeVA tAHOBHTE pAMOHyU aHTeHHy AM HA IOJIke N.T.II INI pINKpeINTe ee Ha cTOnky IIN CTeHH BYNTAHM (He pINJIaIAOTcR).
PoiKJIIOUeHHe NITaHnI nepemEnHOro ToKa
IIPOBEPIN IpABINHOCHTbIINIOHEHH BCEX COEINHENH, BCTABTE Ka6eJIb INHTAHNIE INPEMeHHORO TOKA 3T0R yCTPOHCTBA B cETEBYIO PO3ETKY.
Приимechanical:
OTcoeHNHTe Ka6EJIb IITaHnH NpeMeEHNO TOKA OT cTeB0I pO3eTKH,ecIIH anIIapat He 6yET HcIOJIb3OBaTbc8 dJIteJIbHb IIepHO BPEMeHH.
PpeynpekdeHne:
- Dejkhte Ka6eJb IIHTAHH 3a Bnky. BbIHMaB HNIky H3 3JIeKTPPOPOETKHI, HNKOJIa HE THeHtE 3a CamKa6eJb, HNKOJIa He IOTpArHBAIcTe bO Ka6eJIb IIITAHHIN BIAKHHMpykAMH, TAK KAK 3TO MoKet cTAtb PnUHHoH KOPTKTOI 3AmbKaHHN IN OPAKeHHe N 3JIeKTPHueCkHM TKOM. He CTABte Ha Ka6eJIb IIITAHH yCTPOHCTBO, Me6eJIb HIN JpyTHe IpeIMeTb H RE 3AkhMaaH Te 0KAKmJInHO HbMOBpa3OM. 3Anpe7aEcTc 3aBz3BaBAT y3bHa H Na Ka6eJIb IIITAHH N HIN CBZ3BaBAT eO C npYHMn Ka6eJIb. Ka6eJIb IIITAHH CneDyET pOKJaDbHbAT B TAKHX MecTAX, IJe Bo3MOxHocTb HAcTyIIHTb Ha HNX 6yEt MaIOBepoTHOH. IIOBpeKHeHHb Ka6eJIb IIITAHH CneDyET pOKJaDbHbAT B TAKHX MecTAX, IJe Bo3MOxHocTb HAcTyIIHTb Ha HNX 6yEt MaIOBepoTHOH. IIOBpeKHeHHb Ka6eJIb IIITAHH CneDyET pOKJaDbHbAT B TAKHX MecTAX, IJE Bo3MOxHocTb HAcTyIIHTb Ha HNX 6yEt MaIOBepoTHOH. IIOBpeKHeHHb Ka6eJIb IIITAHH CneDyET pOKJaDbHbAT B TAKHX MecTAX, IJE Bo3MOxHocTb HAcTyIIHTb Ha HNX 6yEt MaIOBepoTHOH. IIOB peKHeHH BcAIBCHMn cepBHCHTP Pioneer.
HcnoJIb3yueTOJIbKKa6BeIITAHNA, BXOJHINBI KOMJIeTtNCTABKN DAHHORO YCtPOBCTBA.
HcnoJIb3yue pIhlaeamaJI kAeJI bITaanHe TIOI BO IEOI PpOMHy HA3auHENIO, KAK OIIHCAO BIIIE.

PoiKIIouHe NteIeBn3opa n dp.
PoiKIIIOHNTecb K TeJIeBHy3Opy, HcIOJIb3yayIINoka6eJIb.
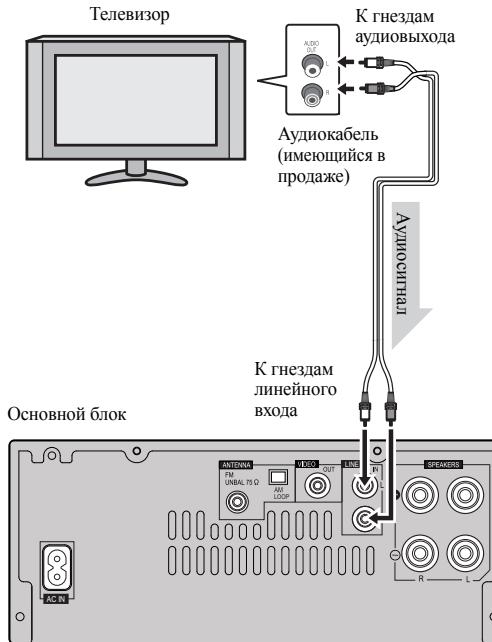
3 3akpoIte KpbIIkiy.
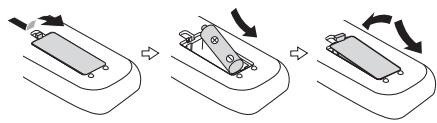
PNEyIPEKDEHNE:
He hcnIb3yIte H He xpaHnTe 6atapeHN HIOB3JIeCTBHEM INP8bIX COJIHEhBX JUYeH NIN BNOIIeHNN C BbICOKT TemIEpATpyO, HAIHPmE, BABTOMO6HNE HIN P4OM C 6o0rpeBaTeJEM. 9TO MoKET Bb3BATb TeB 6atapeek, IpeperpeB, B3pIB NIN BO3rOpAHne. 3To TaKke OTPiAteJIbHO BInJeT Ha cPoK CIyKObbl HIN paBOtocNco6HOct batapeek.
PpeDynpexkdeHne:
H3BJIeKHTe 6aTapeEKN,ecIIH aIINAPaT He 6yET HcIOJIb3ObTaBcB B TceHHe IJITJIbIbHOI nepHOJA BpeMeHH. 3TO IIPEJOTBaPTHT BO3MOKHOIE NOBpeKJDeHNE BCJIeCTBHe yTeKH 3JIeKToJIHTa H3 6batapeek.
He HcnoJIb3yIte nepe3apJkaembe 6atapEni (HnKeJIbKAImJEB6aTepaer n.T.I).
HePiabAHbHa yCTaHOBa Ka 6atapee MoKET BBJ3BAtb HEnCIIpABHObct aiIapata.
PpmeHnno nCNoB3OBaHIO:
3aMeHHTe 6aTapeiHK IIpH cHJIkeHHIpa6oHeRo paCtOHaHHI HIN HeCTa6HbHoi paOte. IIOkyIaIte 6aTapeiHK pa3Mepa «AA).
IepnoDnueckCNouiAHTeMgKoT KAnhBoDatuHKnHaNyIbTe IV nDatunHn anPiaparate.
-Пиадане на датчнк aiaparata nHTeHcNBHOrO cBera мoket co3dabt bnomexn npn paobre. Ecln ETO pnoHOniIeT, HOMeHJIte oceBSeHHe nHn haippaJIeHne pacIOIOKeHHa annapara.
IpejoxaapanrteIybnJHcctaHnHOrHOynpaBHeHHoTbAunH, nepereBa, yIapOB HnBapaa
- Ipn3B0DHTe yTHINH3aHUN HcNIOJIb3OBoAHbIX OaTapeek B COOTBETCTBNN CJeIeTBYHOUIMM B cTpaHE HII INPEHOHE ROCyadPCTBEHHBM NIOCTaHOBJIEHMAH HIN INpABHJAMN IO OXPaHE OKpyKaHOUIe CpeDb.

PpOBepka npIbTa dNCTaHcUHOHorO ynpabLeHn
IpoBepaTe npIbT dy nocJe npOBePK BCex coeINHeHn.
HnpaBraIte IyIbT IV npMaHO HaatNk IV Haanapare. IIyIbT IV MOKHO HcIOJIb3OBAIT B yKa3aHHOM HnKe JHaIa3OHe:
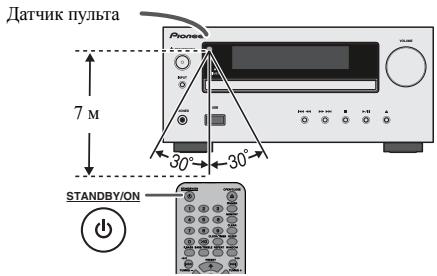
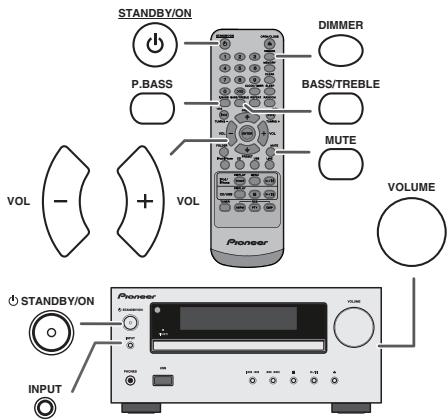
ДяВКЛЮЧЕНЯПИТАнЯ
HaKMHTe KHOIIky STANDBY/ON, TIO6bI BKIOHHTb IITaHHe.
Pocne nCnoB3ObaHnA:
HaKMnte KhoIIky STANDBY/ON, TTo6bI BOITN BpeKIM OKeIaHIN.
PerynpoBaHne npKocTn ducnner
PerynpoBaHne BbICOKNX YactOT
1 HaKmTe KhoNkY BASS/TREBLE, TTo6bI bB6pTaB npaMetr «Treble».
2B TeueHHe 5 ckyHn HaaKMHTe KhoNkV VOL (+ HIN-),TO6bIOTpeYHHPOBATb BcCOKHe qACToTB.

Ha3haueHne
Пин Нжатин KhoIGNK INPUT ha OschOBHOM bIoKe Teykuizai
функши ИмсEHITcRa ha npIyoу рекHM. HaxMHTe HeckoiIbko
pa3 kHonky INPUT,TO6bI bIbOpat JekjaeMyUФунКИю.
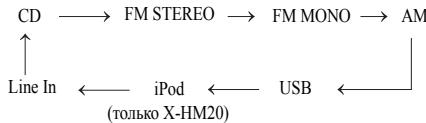
Приимейанно:
PnI abapHHOM OTKIOHcEHHN IITAHN H NIO OTOOEJIHHEN KaeJIe IITAHNIE PEPeMHHO TOKa 0yHKIIIN pe3epBHpOBAHN 3aIHHTT 3aHeeeHHB II PAAMrB paoOHJpEKHM Ha NEcOJIbKO YAcOB.
YcTaHOBka YacOB (ToJIbKO C npIbTa D)

B 3TOM IIpHMepe, YacbI NaCTpoEhBa Ha 24-YacOBn (00:00) Ioka3 BpeMeHH.
1 HaKmHe KHOIIky STANDBY/ON, YTO6bI BKJIIOHTb IITAHHe.
2 HaKMMTe KHOIIky CLOCK/TIMER.
3 B TeueHHe 10 cekyHn HauKMITE KhoIky ENTER. IJIa peryIHHOPBKN IJHe HauKMITE KhoIky IIH IN H 3aTeM HauKMITE KhoIky ENTER.
YctaHObKa YacOB (ToJIbKO c npJIbTa Dy) (npoJOnKeHne)
4 HaKMMTE KHOIIKU KHOIIH YTO6b MyBb6pTaB 24-vaCOOB HIN 12-vaCOOB NOKa3 BpeMeHH, H 3aTeM HaKMMTE KHOIIKY ENTER.
“0:00” Ha IhcIJIeoe OTo6pa3HITc 24-1acOBoi Ioka3 BpemeHH. (00:00 - 23:59) “AM 12:00” Ha IhcIJIeoe OTo6pa3HITc 12-1acOBoi Ioka3 BpemeHH. (AM 12:00 - PM 11:59)
5ДяperyIINPbOKn YacOB HaKmTe KHOIIKy IHIN H 3ATeM HaKmTe KHOIIKY ENTER.HaKmTe KHOIIKY IHN OIHN pa3,YTO6bl HMeHTB BpEmHa 1 lac.ДepKHTe ee HaKaTOrJ DnHEnpepbBHOrO H3MeHENH.
6ДЯperyIINPBOKNMHHTaHKMHTeKHOIKY HJIH 3aTeMHaKMHTe KHOIKY ENTER. HaKMHTe KHOIKY HJIH OJINH pa3,ТУБоИЗМЕнгttb ВРм ha I MHNyT.
I Odklnuoyene (DK-CTaHcYnA)
Примочаня:
IcnoJIb3yIte aIaIITeP, IocTaeJIeMBI KOMIIeKTe C yctpOcTBOM iPod HIN iPhone.
| Адамтер iPhone No. | Наименованны iPhone | Емкость |
| 12 | iPhone | 4GB & 8GB & 16GB |
| 15 | iPhone 3G, iPhone 3GS | 8GB & 16GB & 32GB |
| 19 | iPhone 4 | 16GB & 32GB |
Ipepe yctaHOBKO B DOK-CTaHIO OTOCEOHHTE BCE npHaJIeJXHOCTN OT iPod HIN iPhone.
Длснгтуаадпетадя iPod iPhone (dok-ctanza)
BCTabIbe HAKOCHHNK OTBETPKH ( ) TINa,MAJIbI) BOTBepCTeAaTepRaKAPOKA3aHO hPCyHKe, HIOHNHTE BBEPx CHTHNI.
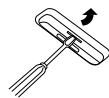
Bocnpon3BeDeHne iPod nIi iPhone (DOK-CTaHnIa)
1 HaKMMTe KhoNky STANDBY/ON, YTO6bI BKJIOHHTb IITaHHe.
2 Haxmte KhoIky iPod/iPhone Ha IyIbIe IY HIN HeckoiIbKO pa3 KhoIky INPUT ha OCHOBHOM 6IOKe, YTO6bI Bb6pTaB cyHKIOHO iPod.
3.YaONABHOITEyTOBIOPOIPINIPHINiPhoneBIOK-CTAHINIOIPOD OCHOBHORIO BIOKA.
4 HαχmHTe KHOIIky / (iPod/iPhone / ), ηΤΟ𝑏ι ὅνατβθ BOCΠρΟΗΒεδΕΝΗ.
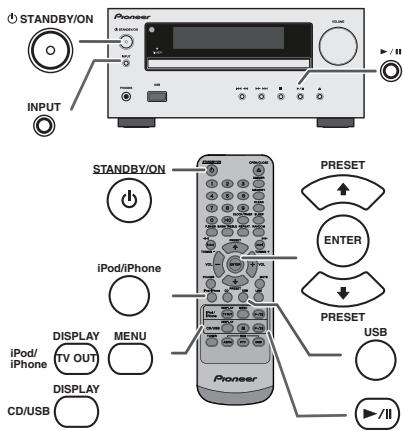
Bocnpon3BedeHne iPhone
3ByK 6yET peKeKIIIOHATbC c IPhone Ha OCHOBH0 6IOK ToIbKO HocJIe 3aBepiEeHHI pOecca ayTeHTnHkAaHH IPhMEpHO B TeueHHI 10 cekyH.
BxOJaIiHe BbIOBb6yTt PnHOcTaHaBJIHbAtb BocPOn3BeJeHHe.
IocJeOTBETAHbBbObblpa3rOBOpMOKHOcJIbIHATbTolbkoYepe3 BCTpoehnblrpoMkOrOBOpHTeJIbIPhone.HTo6bHaHATbpa3rOBOp, BKIOHHTePpOMKOrOBOpHTeJIbIPhone HINOTcoEHHHTe IPhone OT JOK-CTAHIIHN.
Для ото Bears Heia iPod, iPhone nIi iPad
B. Hanpimep, yTo6bI Bb6paTb Homep 130
1 HαχmHTe έBa pa3a KhoNkY «>10».
2 Haxmte KhoNkY 1
3 HaKMHTe KHOINKy 3
4 Haxmte KhoIky 0
Приимechanical:
Helenby BlybapthomepdojokknipbeHHaOHnIHcIO dojokkeK HnDCke
BoBPEMBOCIOHN3EIDENH BCUJAYOHIO CIOJEIOBATEIJOHCNTN PIMPOH IOINCK HEOB3MOKHEJ.
Дя OCTaHOBKIN BOCPON3BedeHnA:
HaxmTe KhoNky (CD/USB).
Nobtophoe Bocpon3BedeHne
IIpnIOBTOPHOMBOIPOH3BEDeEHMHMOKHO HEINpepBJBHO BOIPOH3BOOHTbOHy BOCIOPOKKHNJINDOPOKKNB 3aONPAMPMOBHANNOCIEJIOBATEJEIBHOCTN.
Mokho CdeIaB IO 32 Bb6OpOB DIIA BocIpOn3BeJeHHN B JeIaEMO IIcJIeIOBaTeJIbHOCTH.
1 B peJHMe octAHOBKN, HauKMITE KHOIIky MEMORY Ha IyJIbTe IV, YTO6bI BOHTB B peJHM COxpaHeHHI pIPOpAMMbI.

2 HaKMMTE KHOIIKN HIN HA NpIbTe IV, TTO6bI BbIopatb JEAeMyO IOpOKy.

BbI6paHHbI HOMep IOpOKKn
3 HauKMHTe KhoIky MEMORY, YTo6bI coXpaHnTb Homep IOpOxKN.
YcoBepueHCTBOBaHHoe BocnpoN3BeJeHne IncKOB CD nJIM MP3/WMA (npoDoJIxKeHne)
1 B peKHMe OCTaHOBKN, HauKMHe KhoIky MEMORY, YTO6bI BOITN B peKHM coXpaHEHn IPOrPAMMbI.

2 HαKmHTe KHOIIpy PRESET (HIN)HaIyIbTe IY, YTO6bIbIpaIbJεJIaEmyIOIaIKy.

3aTeMaHaxMITE KHOKNy IHa NynIte YU, TTo6bI BbI6paT bKeNaeMbIe DOpOxKn.

3 HαχKMHTe KHOIIky MEMORY, ηTObI coXpaHITb NaIKy H OHomep DOpOJKH.
4Повторгichteигн2и3дядугхи панok/дорожek.Mожно 3anpoigpammmpoBaT do 32 dopojek.
5 HaKMMTe KHOJIky / / (CD/USB / / ), YTo6bI HauaTb BocIpOn3BVeJeHne.
Длг OTмньл ржима 3anporpammpoBaHHoro BOCPON3BedeHn:
Bo BP8a peKHMa 3aIporpamMPOBAnHOBn octahOBKn, HauKMITE KHOIIKY (CD/USB). Ha nCJIeJe IOBHTc INHINkaIaIgN «Memory Clear», H BCze 3aIporpamMPOBAnHOe CoIepKHMOe 6JyET cTePO.
IobabHeHne DopoKek K nporpaMMe:
EcnH nprrpamma 6bIJI pIeIBaHPteIbHO coXpaHeNA B IAMnH,HaIChIJIee OTObpa3HTcN HIIHKatop KEMEM. NaKmHrTe KhoHN KY MEMORY 3aTeM BbIOHNIHTIe HUN-2-3, TcO6bI IOabABITDpoKoKN.
Приимechanical:
-Пин ИЗБЛЕЧЕНИД NИСКА ПИОPGРМА АВТOMATЧЕСКИ OTМЕHRETС.
-Пин haЖATIHn KhoIKN STANDBY/ON JIJI BxOla b peJxHM OxHdAHH N HmI3MeHeHH yHkUHH c CD Ha npTyIO yHkuHIO, bIbOPaHHeN IporpamMbI 6bUTy CTHpaTbCJ.
Ipa pa6o7eIpoPammbIOBcNPOH3BEHeHBe CJIyauHOBIOJEOBATEJBHOCTHEB03MOKHO.
Pexim pankn MP3/WMA (ToIbKO dJaФaIIOB MP3/WMA)
B INHTRPHETE HMeEeTcM HMOFOr MBy3kAJIbHbI KaiTob, Ige Bb MoKete 3a py3y3Kn My3kAJIbHbI KaiTb B FOPMATE MP3/WMA (Windows Media Audio).ДиЯЗpy3KN My3kAJIbHbI KaiTb CJIeYIte HnCTpyKIIHM Ha Be6-caiTe. 3aTeM Bbl CMoKete BOcPiIOB3EChT 3TH aRpyKeHHbIe My3kAJIbHbIe KaiIbI, 3aINcAB Hx Hn DnCK CD-R/RW.
3a pykceHHie KOMIO3HINH/phiJIbI pIeHa3HaueHbToJIbKO JIIYHORO POIB3OBaHHJIo6oe HHOE HcIOB3OBAHHe KOMIO3HINH 6e3 pa3peIeHH BlaJeJIbIa 3aIpeIeHO 3AKOHOM.

O nopädke Bocnpon3BedeHnnaKn
Ecln faiIbMy MP3/WMA 3aIIHcAHy B HecKOJIbKHX IIaIKaX,TOIJI KAKIOI IaIKH bYET ABTOMATHueeCKH 3aJlABaTbC8HOMep IIaIKH.
37THnpanKMOHbBb6pabTb KHOIOK FOLLHER NaIyIbte JY.CEIN BHYtPr Nb6paHHOI pANK He TPOJdePknBaembx φOpMAtOB paHIOB,TO napanKa pponykaCtA, uHyTe bBb6paTbCbeLdOyua npana.
Hapmep: KaK 3aIaTb HOpE pIaIKH, ecJIH faiJIb foMpTa MP3/WMA 3aIIHCbIAIOTcA, KaK Ioka3aHO Ha pChyHKe HHe.
2 HaKMHTe KHOIky PRESET (HJH H), YTOb6b Bb6p8t JKeJaemyIOIaIKy IJIaBOcIIPOH3BEdEHN. (BKLIOHpeKHM IIaIKH)
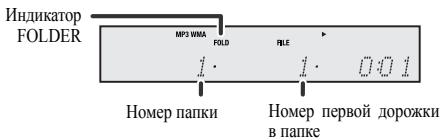
3B6ePrtre Jekaembl qaiI Dua BocpoH3BeHEnH, HAKAB KHONKY
4 HaKMHTe KHOIIky / (CD/USB /). HauHETcBocIpOH3BeJeHHe, H oTo6pa3HTcH MHaJla.
OTo6PakAOTcH Na3BaHHe necHH, HmH cHIOJIHTeJI H Na3BaHHeJIbIb6OMa, eCNH OHN 3aHNcHauHa NdHCke.
-Пин BOCПОн3BeДENH C BKNIOHEnHbIMpeKHMOMaIKH NAKMITE KONIpy PRESET(NHN,HMOKHO Bb6pabT NaIKY,Dakce ecIN OHa HAOJITCB PekHMe BOCIIPOH3BcEDENH/Nay3b.By. Byet IPOOJIKaTcBcpeKHM BOCIIPOH3BcEDENH/Nay3b Ha 1-oi DOPOKKe Bb6paHHo NAIKN.
CodelphKMOEIOJIJIeMOKHOH3MeHHTb,HaaBKHONKY CD/USB DISPLAY.

JIyIaay3bI BOCIpOHN3BeJeHHN:
HαKMHTe KHOIIKy /II (CD/USB /II).
Ecln KhoNKA TUNNG+HIN-HaNaKMaTaC8 T BteHeH6 BoJeE 0,5 ckyHbI, ABToMaTHueCK3 3aYcTHTcR cKaHNpOBaHHe NTOHeP octahOBITCT HnIEBPO PPINHMAeMO PAHIOCTAHIIH.
Приимechanical:
- IIpi IIOBJIeHHH paIHOIIOMEx HAcTPOHka cABOTOMaTHcckHM CsHAnIOBbAHHeM MOKET ABOTOMaTHcckKN OCTaHOBBtCB B 3OTOM MecTe.
HactpoHa c ATOmatuHuecKHM cKaHnPoBaHHem 6ydet IponykuBt cTAUHHIO CcAaJIbM CRHJAHOM.
JIIOCTAOHOBKNABOTMATHuecKNOHCTPOKNIOBTOPOHAKMOHTKHOIKNYTUNING+HJN-
- IpiH hactpoiKe Ha ctaHnHO RDS (ChcTeMa padHaDAnHHbX), ChauJa 6yIet OToOppaKatbC yactOTa, a 3aTeM 3aOpHtCn HnHkAtop RDS. HaKoHei, IIOBHTcN H3BaHNe ctaHnII.
ПлIHО АВТМАТУСКИ НАСТРДКМОЖИ ДСТПЕД RAHMSP,СМ.ст.р.19.
KaKdIbpa3,KoIaHaxImaTeC KHOJaRDS DISPLAY,ДИСПЕМБуETpeKlnOuTbcs cIeIyOuIM o6Ba3OM:
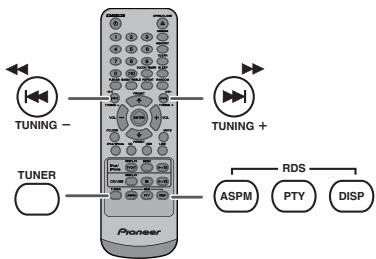

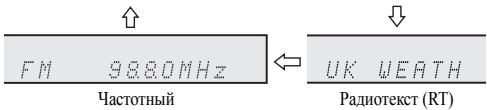
PnHaTpoIke Ha staHUnO, OTHUHyOo t cTaunH RDS, IIN Ha staHUnO RDS, KOTOPA NpeeAdet CIA6bI CNHJIaI, HcNJIeIe 6yET hMEnHtBcB CJIeYIOUeM OPOJKe:
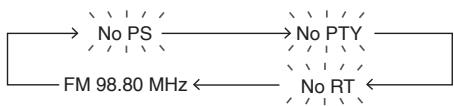

IcnoIb3OBAHnE IporpaMMbl ABOtMAUeCKoTO COxPAHeHnB IaMRTI cTaAnu (ASPM)
Bo Bpempa6ooyero peKHMAsPMMTOHep 6yIeT aBTOMaTHueckn BoIIIOHHTbNOHbIXtAnuRiRD.SMOKHOcoxpaHHTBnHAMrTHdo 40 stanui.
Ecln HeKOTOpbIe cTaNHH yKe coXpaHeHb I PAmTHy, NcCIO HOBbIX cTaNHH, KOtOpbIE MOKHO coXpaHHTb, BdET MeHbIIe.
1 HaKMMTe KHOIIky TUNER Ha NJIbIte IV HIN HeCKoJIbKO pa3 KHOIIky INPUT Ha OCHOBHOM 6IOke, YTObIbYbIbpaTb FyHKIIHIO TUNER.
2 HaKMMHe HyeepKHBaiTe KhoIky RDS ASPMaHpyIbTe IV.
1 IocIe MnHaHn HnHnKaaHnN N ASPM》B TeueHeN EpnMepHo 4 cekyHd,3aynctTcN cKaanHpObaHne (87,50-108,00Mg)

2 IIph 6bHApyKeHH cTaNHH RDS,Ha KOpOTKoe BpeMIOBHTcH HnIHKaIIHg «RDS», H cTaNHH 6byET coXpAHeHa B IAMTH.
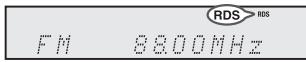
3 Tocie ckanipoBAHnHA, HnCIIeBBE THeHne 4 cekyHn bSyET OTObpaKaTbcNcIIO CTaHIN, COxpaHeHHbX BnAMrTH, H 3aTeM H4 cekyHn bIOBHTTC INHJKAHN (END).

Bocnpon3BeDHeNc Taimepom:
YcTpoHCTBO BkIIOHaeTCEH N BOCIpHOH3B0DHT JeJIaEMb HcTOHHK (CD, TUNER, USB, iPod, LINE IN) B 3aJAHHOe Bpem.
3To yctpoCTBO IMeET 2 Tnna Taimepa: ODHOPA3OBBI TAIMEP IN EXEKDEHBbl TAIMEP.
Ondopa3OBbI TaMep:
OdnopazobIy TaHmep cpa6aTbIbAeT OINH pa3 ToJIbKO B 3aJaHHoe BpeM.
(Инданкатор «⊗»).
ExeIHeBbI TaMep:
EkeHHeBn TaiMeP cpa6aTbIbAeT B OJHO H TO Jze 3aDaHHoe BpemB A KaJIb YcTaHOBJLeHHN IeHb. HanpHMeP, yctAHOBITE TaiMeP KAK 3B0HOK 6yDIIbHbHKaKaJIOe yToPo. (HdIKaTOP «DAILY»).
HcnoJIb3OBAHHe OJHOpa3OBOr TaIMepa B coYeTaHHn cEKeJHeBbIM TaMepOM:
HanpHmep, HcnoIb3yIte OIHpOa3OBbT TaHMeP IJIIOpcIJYINBaHHa paIHOIIporpAMMb, a EKeJHeBbT TaHMeP IJIIO6yJdEHn.
1 YctaHOBHTe EKeJHeBn TaiMeP (cTp. 21).
2 YctaHOBHTe OJHopa3OBbl TaiMeP (cTp. 21).
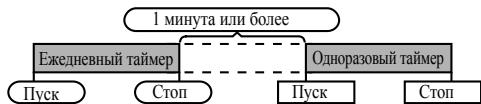
Bocnpon3BeDHe nC TaMepom
Ipeed yctahOBkTaimepa:
Y6eHITcB,HTO cAsb yCTaHOBJHe Hn IpaBNbHoe BpEm (cm. ctp. 9). EcIb He yCTaHOBJHe, fHyHKINo TAHMeHIOJIb3OBaTb HeJIb3.
-ДиьBOCIPON3BDEHnC TAIHMEPO:ПОКЛIOHHTe yCTpoIcTBO USB,3aPyr3Hte HNCHIN YCTaHOBHTE B JOK-CTAUNHIO BOcIPON3BODHmoe YCKnY IcTHoIpO iPod.

1 HaKMMte KHOIIky STANDBY/ON, YTO6bI BKJIHOHTb IINTaHHe.
2 HaKMHTe HypeKHBaTe KHOIIky CLOCK/TIMER.
3 B TeueHHe 30 cekyHn HauKMHTe KhoIky I< HJN >, TTO6bbl6paTb npaMeTp «Once» HIN «Daily», HauKMHTe KhoIky ENTER.
4 B TeueHHe 30 cekyHn HauKMHTe KHOINKU I< HIN ,TTO6bI BbOpaTb Napametp «Timer set), HauKMHTe KHOINKY ENTER.
5 JIbI bIb6opa HcTOHnHa BOCIIPOH3BeEHnC taiMePOM (CD, TUNER, USB, iPod, LINE IN) HauKMHTe KhoHKy I< HJIN >1. HaKmTRe KhoHKy ENTER.
PnB bIbOpe TIOhepa, BbIbepHrte cTAnHHo, HaJbK KhoNky IHN H, n3aTeM hKnMHTe KhoNky ENTER. EcHn CTaanHHe He 6bJa 3aIporpAMMHPOBaHA, Ha NcHIIe PIOBHTcR HINHKaIHnA (No Preset), uYctahOBKa TAImepa 6dyET OTMeHeHa.
6ДяperyIHPOBKINdHaeiHaKMITE KHOIIKY HJIH H3ATEM HaKMITE KHOIIKY ENTER.
7 HaKMMTE KHOIIky ENTER yctaHOBKH acob. HaKMMTE KHOIIky HJIN H 3atem HaKMMTE KHOIIky ENTER.
8ДяperyIINPBOKH MHHYt HaKMHTe KHOHKy I HIN H 3aTeM HaKMHTe KHOHky ENTER.
9 YctahOBHTe OKOHaTeJIbHO BpeM, KaO OIIHcAHO B IIIaRaX 7 I8 BbIe.
10 OrperyIHyIe rpoMkoCTb c HMOIOIO kHOIH K VOL (+HIN) - H 3aTeAMKHIte HOIKY ENTER. He HactpaHbaIte rpoMkoCTb do CIIHKKM BcKOKOTO YPOBHJ.
11 HaMHTE KHOIky STANDBY/ON, YTO6bI BOITN B pEZH MOKHdaHn. 3aRaopctc HnIHkATOP TIMER , H yCTPOHCTBO rotOBO K BOCIPON3BDEHINo C tAIHEPMo
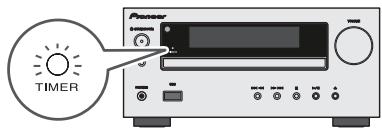
12IphdoCTHKeHH3aHaHHOroBpeMeHHaHHeTcBocnpoH3BeHeHHe. IpOMoKcTb6dTeYBEJIuHbATcbNocTeHHeHO,IOKaHE DoCTHHTe 3aHaHHOro3HaueHH.NHIIHKatOp TaHmepa bdyet MHRat BO BpeMBOBCoPOn3BBeHHeCtaHMePOM.
13Пин Достпжени Врemeи OOKУанн� ПО Таймepy, снчетам abTomathueckn BOДдТВ ржHM OKINДанн.
Ondopa30bT TaMep:
Taimep6ydtOTMeHEn.
ExeIeHBbI TaMep:
Tahmep cpaabltbaet B OIOH n To JxE bPemk kaxbln. EhJ. 0bOyET npoioljatbc Do Tx npoc, NOb He oyET oTmeHne yctaHOBka Tahmepo. OTeHNHeEeJeDHBnT Mahmp, eCnOH He HcNIOIb3yETc.
Примочаня:
-ПиBbIIOJIHeHHH BOCIIPOIN3BeDEHnC TaIIMePOM c NMOIIbIOIpyrTOYUyCTPOHCTBA,IOKIIIOueHHORO Kpa3bemy USB,BbIePeHTc HNI B IIaare 5.
3To yctpoictBOA bOTAMtHueckn BKJIOHTc HIN BOIT BpeKHM OKHaJAHN. OJHAKO, IIOcEOJIHeHHeHoe yctpoictBO He 6ydtB KBJIOATbC HIN BblKIOHTbC. TQo6Ib octaHOBITb BOCIIPOH3BeJEHHe C TaIIMePOM, BblIOJIInHeI pIoneDpy «OTmeha YCTaHOBKn TaIIMePa» Ha 3ToI cTpaHHIE
http://www.pioneer.co.uk
http://www.pioneer.fr
http://www.pioneer.es
http://www.pioneer.de
http://www.pioneer.it
http://www.pioneer.nl - http://www.pioneer.be
http://www.pioneer-rus.ru
http://www.pioneer.eu
© 2011 PIONEER CORPORATION.
All rights reserved.
© 2011 PIONEER CORPORATION.
PIONEER ELECTRONICS (USA) INC.
P.O. BOX 1540, Long Beach, California 90801-1540, U.S.A. TEL: (800) 421-1404
PIONEER ELECTRONICS OF CANADA, INC.
340 Ferrier Street, Unit 2, Markham, Ontario L3R 2Z5, Canada TEL: 1-877-283-5901, 905-479-4411
PIONEER EUROPE NV
Haven 1087, Keetberglaan 1, B-9120 Melsele, Belgium TEL: 03/570.05.11
PIONEER ELECTRONICS ASIACENTRE PTE. LTD.
253 Alexandra Road, #04-01, Singapore 159936 TEL: 65-6472-7555
PIONEER ELECTRONICS AUSTRALIA PTY. LTD.
5 Arco Lane, Heatherton, Victoria, 3202, Australia, TEL: (03) 9586-6300
PIONEER ELECTRONICS DE MEXICO S.A. DE C.V.
Blvd.Manuel Avila Camacho 138 10 piso Col.Lomas de Chapultepec, Mexico, D.F. 11000 TEL: 55-9178-4270
K002_B4_Ru