
PDK-LS01 - Electronic device stand PIONEER - Free user manual and instructions
Find the device manual for free PDK-LS01 PIONEER in PDF.

| Product Type | Plasma TV Floor Stand |
| Brand | Pioneer |
| Model | PDK-LS01 |
| Dimensions (W x H x D) | 620 mm x 797 mm x 407 mm |
| Weight | 14 kg |
| Materials | Metal and tempered glass |
| Maximum Load Capacity | Approximately 34 kg for 50-inch model, 30 kg for 42-inch model |
| Compatibility | Specific Pioneer plasma TVs (PDP-LX508D, PDP-5080XA, etc.) |
| Safety | Anti-tip device included, wall mounting recommended |
| Included accessories | Base, column, brackets, screws, tools, anti-tip device, cable clip |
| Installation | Requires at least two people, simple assembly with hex key |
| Maintenance | Clean with a soft dry cloth, avoid abrasive products |
| Note | The glass shelf can support up to 10 kg |
Frequently Asked Questions - PDK-LS01 PIONEER
User questions about PDK-LS01 PIONEER
0 question about this device. Answer the ones you know or ask your own.
Ask a new question about this device
Download the instructions for your Electronic device stand in PDF format for free! Find your manual PDK-LS01 - PIONEER and take your electronic device back in hand. On this page are published all the documents necessary for the use of your device. PDK-LS01 by PIONEER.
USER MANUAL PDK-LS01 PIONEER
Operating Instructions
Mode d'emploi
Bedienungsanleitung
Thank you for buying Pioneer's product.
Please read through the Operating Instructions to learn how to operate your model safely and properly.
Please be advised to keep the Operating
Instructions in your place for future reference.
Installation
- Consult your dealer if you encounter any difficulties with this installation.
- Pioneer is not liable for any damage resulting from improper installation, improper use, modification, or natural disasters.
IMPORTANT NOTICE
Record the model number and serial number of this equipment below.
Model No.
Serial No.
Keep these numbers for future use.
Contents
Cautions 2
Checking the Standard Accessories 3
Specifications 3
Assembling the Stand 4
Attaching the Plasma Television 5
Installing the Product on a Rack etc. 7
Preparing the Cables 7
Preventing Equipment from Falling Over .... 8

CAUTION
This symbol refers to a hazard or unsafe practice which can result in personal injury or property damage.
Cautions

This product is a table top stand exclusively designed for plasma televisions (PDP-LX508D / PDP-LX5080D / PDP-5080XA / PDP-5080XD / PDP-508XD / PDP-SX508D / PDP-4280XA / PDP-4280XD / PDP-428XD / PDP-SX428D) from Pioneer.
Use with other model is capable of resulting in instability causing possible injury. For further information, please contact the store where you purchased your display.
Do not install or modify the product other than specified.
Do not use this stand for a Plasma television other than those designated and do not modify it or use it for other purposes.
- Do not scratch or strike the glass.
- Do not use it if the glass is cracked or broken. If you use it in that condition, it might fall over and break, causing an injury.
Installation Location
- Select a location that is strong enough to support the weight of the stand and the displays.
- Make sure to place it in a level and stable location.
- Do not install it outdoors, at a hot spring, or near a beach.
- Do not install the stand where it may be subjected to vibration or shock.
Assembling and Installation
- Assemble the stand in accordance with the assembly instructions and securely attach all screws at the designated locations.
There have been cases where unforeseen accidents such as the equipment breaking or falling over occurred after the installation of the display because the stand was not installed as instructed.
- The display must always be installed by two or more people to assure it is installed safely.
- Before installation, turn off the power for the display and peripheral devices then remove the power cord plug from the power outlet.
- When installing and assembling the stand, be careful not to apply a load on the glass.
Prevent accidents caused by the product falling over by taking reliable measures to prevent it from falling over (see Page 8).
Checking the Standard Accessories
Check to make sure that you have all the standard accessories before assembly and installation.
- Base x 1

- Column x 1
- Tooling x 1
- Operating instructions (this document) x 1

Accessories 1
- Attachments x 2 For 50 inch model (side speakers): black

- Installation screws (M8 x 30 mm) x 2

-
Installation screws (M8 x 20 mm) x 2
-
Screws (M5 x 15 mm) x 2
-
Falling prevention hardware × 1

- Cable clamp x 1


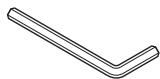
- Hexagonal wrench x 1 (Opposite side 5 mm for M8 use)
Accessories 2

For 50 inch model (under speaker): gray x 2
- This attachment is used only when installing a 50 inch model (under speaker) or a 42 inch model.

For 42 inch model: white x 2
The attachment is used only with one of three models: it is not used with the other two models.
Specifications
External dimensions: 620~mm (W) × 797~mm (H) × 407~mm (D)
Weight: 14kg
- The above specifications and exterior may be modified without prior notice to improve the product.
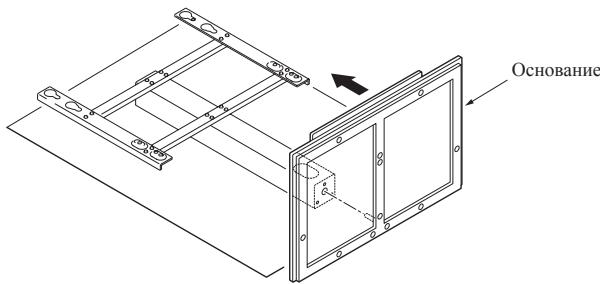
Assembling the Stand
Assembly Procedure
- Align the long holes in the tooling and in the column and lay them on their side.
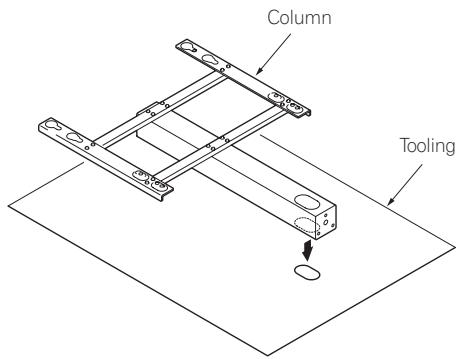
-
Attach the stand by aligning the screw hole on the bottom of the column with the protrusion on the base.
-
Be careful that you do not strike the glass.
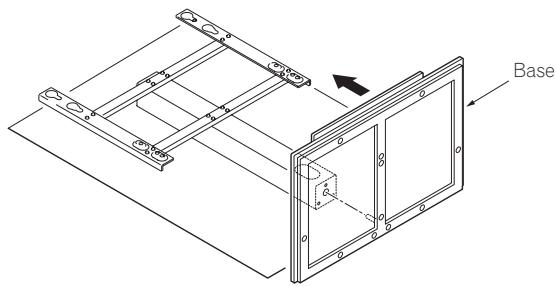
- Tighten the screws on the back surface of the base with a hexagonal wrench (three locations).
Firmly tighten all three locations.
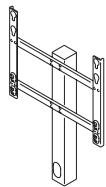
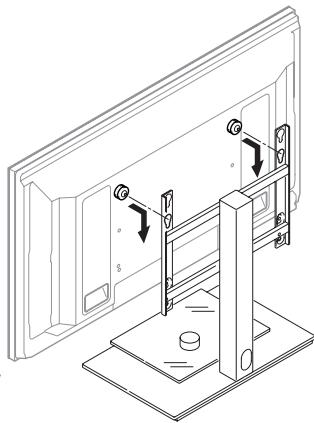
Attaching the Plasma Television

Caution
The weight of a 50 inch model (without speakers) is about 34kg , that of 42 inch model is about 30kg , they have no depth, and are unstable.
Therefore, at least two people must assemble and install them.
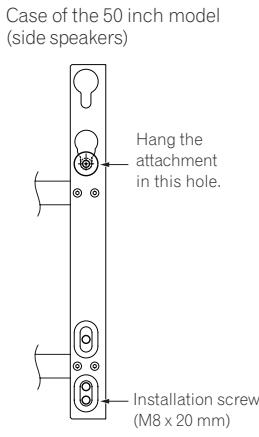
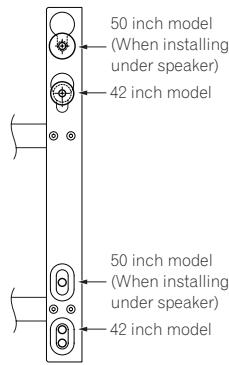
1. Attach the attachments to the plasma television with installation screws (M8 x 30 mm).
- In the case of the 50 inch model (side speakers), prepare black attachments.
- Attach it to the screw hole beside the letter "W (top side)" on the back surface of the plasma television.
Firmly tighten the screws.
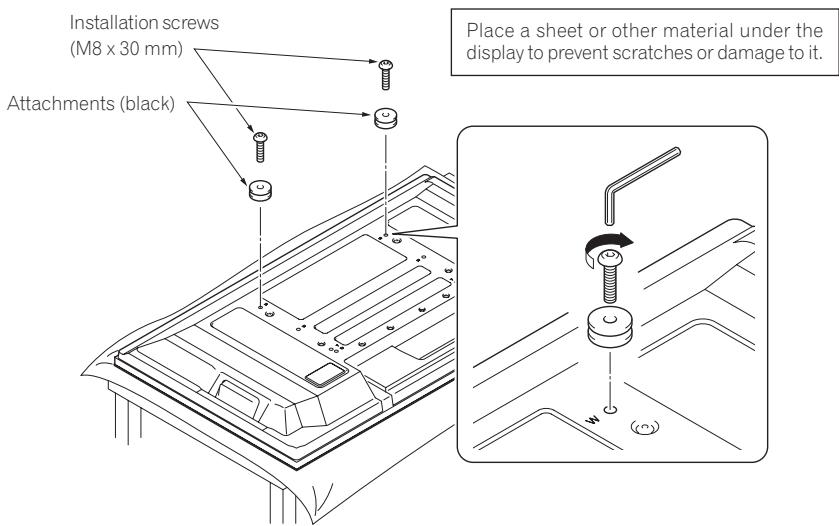
-
The size of the attachment that is used varies according to your plasma television, so be careful about its size.
-
For 50 inch model (side speakers): black
- For 50 inch model (under speaker): gray
- For 42 inch model: white
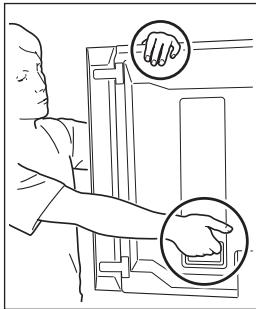
2. Lift the plasma television with the attachments attached and hang it on the stand.
- The position the plasma television is hung varies according to the type of plasma television you have.
- Make sure that nothing is placed on top of the glass plate.
Case of the 50 inch model (under speaker) or 42 inch model
This illustration shows the case of a 50 inch model (side speakers)
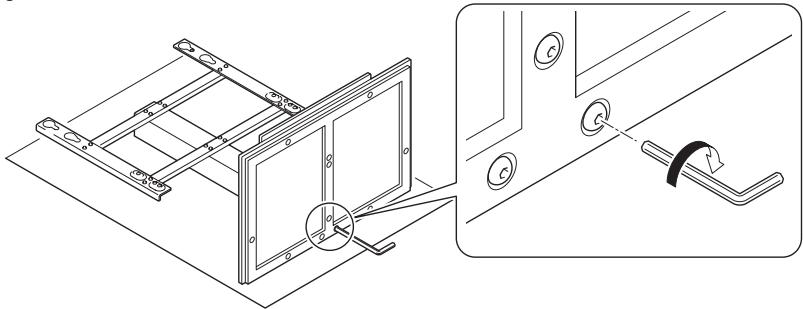
3. Fix the stand and plasma display firmly in place with installation screws (M8 x 20 mm).
Firmly tighten the screws.

This illustration shows the case of a 50 inch model (side speakers)
Installing the Product on a Rack etc.

Caution
- When installing on a rack etc., please be sure that the plasma television is held by two or more people.
- Please do not hold the plasma television by the speakers or stand. Doing so may damage the product.
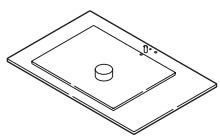
- The load bearing capacity of the glass shelf is 10kg . Do not place any object heavier than 10kg on it.
- Do not apply excess load on the glass shelf by, for example, climbing on it or placing your hands on it. If you do, you might break it, knock it over, or cause another unexpected accident.
- Do not hold the glass shelf to move it. If you do, you might break it, knock it over, or cause another unexpected accident.
- Do not attach or remove a plasma television with any equipment or object placed on the glass shelf.
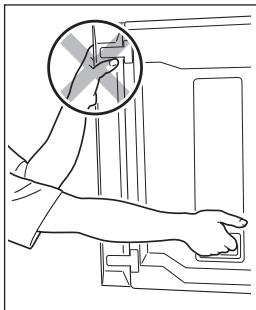
Hold the plasma television by its handles and from the top.
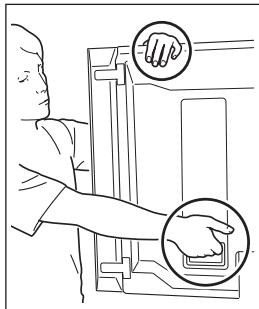
When the side speakers are installed
Do not hold the plasma television and the stand by the speakers.
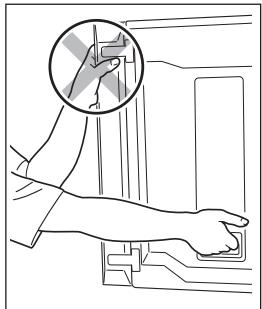
When the side speakers are installed
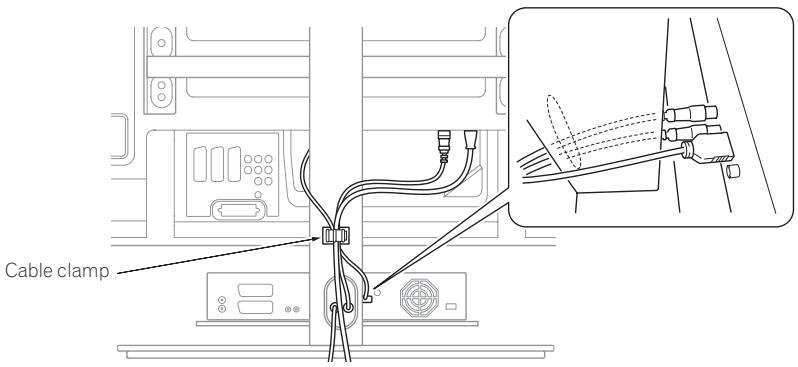
Preparing the Cables
Use the enclosed cable clamp to bind the cables.
Note
Be very careful not to apply force to the bases of the cables.
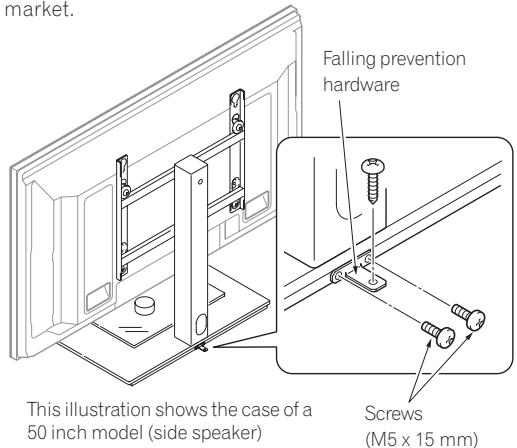
Preventing Equipment from Falling Over
- After installing the stand, be sure to take special care to ensure that the equipment will not fall over.
- Secure the plasma television to both the rack and the wall surface.
Stabilizing on a rack etc.
Fix the plasma television using the screws (M5 x 15 mm) and falling prevention hardware as shown in the diagram.
Fix the racks etc. using screws for sale on the market.
Note
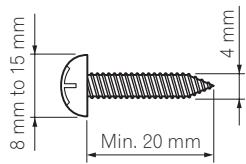
To stabilize the equipment on a table, use screws that have a nominal diameter of 4mm and that are at least 20mm long.
Using a wall for stabilization
- Attaching falling prevention bolt (hook) to the column.
- Using strong cord to firmly stabilize it appropriately and firmly to a wall, pillar, or other sturdy element.
Note
Use hook, cord, and fitting that are available on the market.
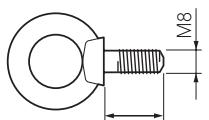
Recommended hook:
Nominal diameter M8
Length 12mm to 15mm
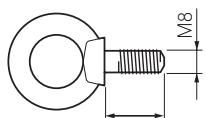
12 mm to 15 mm
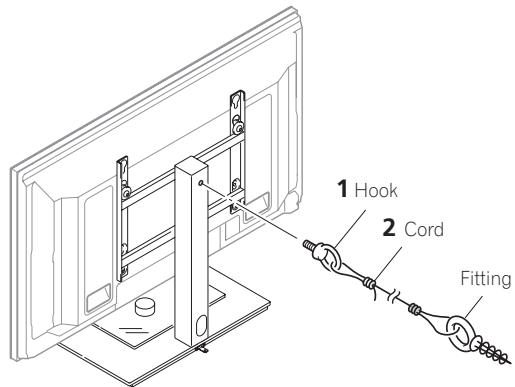
This illustration shows the case of a 50 inch model (side speaker)
Lieud'st installation
Publication de Pioneer Corporation.
© 2007 Pioneer Corporation.
Installing the Product on a Rack etc. 28
Installing the Product on a Rack etc.

Attenzione
Copyright © 2007 Pioneer Corporation.
Nominate diameter M8
Lenght 12 mm tot 15 mm
12 mm tot 15 mm
Copyright © 2007 Pioneer Corporation.
Copyright © 2007 Pioneer Corporation.
He yctanabIbaiTe HIN He moHΦIuPyTe IpoJyKT KaKHM-JIN6O JpyTm CnOc6oM, KpOme Yka3aHHoro.
He HcnoIb3yIte 3Ty IIOCTaBky IJIaIIa3MeHHbIX TeIeBb3OpOB, 3a HckIIIOUeHHem Yka3aHHbIX H He MoIHΦHnpyIte ee IJIa HcNoIb3OBAHn BpyTHx ΒJIeJX.
- He iapaapanaiTe Hne ydapayTe IIO ctekJy.
He HcHIOJIb3yIte TpeCyHToe HJIN paCKOJIOTOE cTeKJI0. EcJIN HcHIOJIb3OBAITb cTeKJI0 B TaKOM COCTOHHN, OHO MOKeT BbIIaCTb H pa36HTbca, IIpNHHHB TpaBMY.
MecTo yctaHObKn
- BbIbepHte IocTaTOHIO IpOuHoe MeCTo, KOTOpoe BbIePjHT BeC IOJICTaBKN H INCIJIeEB.
- Y6eIHTecb, YTO 3TO MecTo pOBHoe H yCTOuHBOe.
- He yctaHabJIbHaBte ee chapyKn IOMeIeHnEr, BO3JIe TEIIIOBOJHORO HcTOHHKa, IIIN BO3JIe IIJIgKa.
He yctaHabJIHbAteIIOCTaBky TaM, Ie OHa MoKet IOIDBepratbce Bn6paunH HIN COTPcEHHM.
C60pka n yctaHOBka
Cobepnte noctabky B COOTBeCTBnH n C HCTpyKunmno c6opke n HadeXhblM 0bpa3OM BvINTHe BCE BVHTbI b HndJeXaune na3bl. ImeOTc CnyaH HenpeBnDeHHbx NOBpeXdEHn, TaNX kak NOJOMKa 0bOpyObaHn nn NaedHne NoCye YCTaHBKn DnCnNe I3-3a TORO, YTO DNcNne He 6blY cTahOBnE H COOTBeCTBnC nHCTpyKunmN.
-Дисплг BCERda DOJXHbI yCTaHaBnBaTb DBOe IIOde IЯ obecneueHn ero 6e3onachOn yCTaHOBKn.
- Пелед установков, оTKлочи-te петанец,
диспеги и песфершиеснх устюпств, 3atem
Бынтышур петашии ИЗ розтк петашия.
- Pn yctaHOBKe n c6bOpKe nOcTaNk 6yNbTe oCtOpOxHbI, YTO6bI He npKnaDbIBaTb Harpy3ky Ha CTekNo.
IIpeIOIbTbpATHTe IOBpeKJHeHnI, CBZaAHNbIe C IaJIeHNHE mpoDyKTa, IIpeIINPnHbI HaNJIeKHbIe MepbI JIJI
IIpeIOITbpAkeHnI NaJIeHNr (cM. cTpaHnIy 50).
Пюверka стандартнoro набopa Комплектуюших
Ipei c6bOpKoi N yctaHOBKO yIOCTOBePbTeCb, YTO y BAC HMeOTcB Cce CTaNdAPTHbIe KOMIIJIeKTIyIOIIHe.
- OchOBaHHe x 1
- CToiKa x 1

-KpeneKnaJnlaCTnHaX1
- ByIbTe oCtOPOKHNbI, qTO6bI He yIaPArTb IIO CTekNly.
- 3aTAYHnTe BnHTbI Ha o6paTHoN NOBepXHOCTN OCHOBaHnJ IeCTnIRpaHHbIM KJIIOyOM (3 MecTa).
KpeIko 3aTaNHTe BCE TPN BnHTa.

Прикpenлени пла3мehного телеви3opa

BHMaHne
KpeIko 3aTAHNTe BnHTbI.

Ha 30TnIJIIOCTpaIIIN NIOKA3AH BAPHAHT 50-IOHMOBIO MOJELI (6OKOBIE rpoMkoROBOPIEJI)
YcTaHOBka IpoIyKta Ha IIOdCTaBky, I T.I.

BhIMaHne
- Pn yctaHOBKe npOyKtHa nOCTaBky, nT.D., NoXaanyCTa y6eIntecb, YTO nPa3MeHHbI TeIeBn3Op NOpDePKNBaIOT DBOE HIN 60nee IIOdei.
- PtoxayuYCTa He DePexKITe Nla3MeHHbI TeJeBn3Op 3a rPOMKOROBOPHTeIN NIn 3a NOCTaBky. 3TO MOKeT HaHeCTN NOBpeXdEHe NpOdykTy.
- Donyckaemar Harpy3ka Ha CTeknHHyo nonky coctabniet 10 Kr. He Knaite Ha Hee npedMeTb TReKeJee 10 Kr.
- He npnknaIbIaIte Ype3MepHoi Harpy3Kn Ha cTeKlnHHUo NOKy, HanpIMep, BJIe3aHa Hee INn 6bnokauHbAcb Ha Hee pykAm. B 3tOM cnYuae Bbl MoKeTe pa3bIb ee, ONpOKHyTb INN BblBaTb HIOE HenpeBVDHeHoe IpOcSWeCTBne.
He depjntecb 3a cTeKJIaHHyIO nonky, YTO6bl IpepeBnHyTb ee. B 3Tom cnlyae Bbl MOKeTe pa36HbTb ee, ONpOKnHyTb nIIb Bbl3BaTb INHOe HnepeBnDeHHOe npOcScheTBE.
-Пин haIynchИ Na CTeKJIaHHo nOJIke KaKOro-лб6O obOpdyOBaHnI nIIN ppeMTeHa CTaBbTe nIIN He ChImaTe nIla3MeHbI TeJIeBu3Op.
Дерхит e
ПлазMeHHbI
TeLeBn3Op 3a pyuKn 3a BepXHIOU qACTb.
Korla yctahOBJIeHb60KobIe rpoMkoROBOpHTeJIH
He depknte
Пла3МeHHын
TeJIeBn3Op N
Noctabky 3a
rpoMkoROBOpHTeJI.
Korla yctahOBJIeHb60KobIe rpoMkoROBOpHTeJIN
Iodrotobka ka6eJe
H3daHO Pioneer Corporation.
3aunneHO aBTOckHM npabOM ©. 2007 Pioneer Corporation.
Bce npaba coxpaheMb.
Приимechanical:
B COOTBECTBm co ctaTbe 5 3aKaHa Pocncko Fepaun "O 3aunTe npab nortpebtey I YkaaHMeI PpaBteLcBa Pocncko Fepaun Ne 720 ot 16 noHra 1997 roda kopnpauia Pioneer Europe NV yctanbae TycnoBne Ha cnedyuoy npdoJnxTe bHOctb cpoa cnykbbl ophiunlbo NOCTABnEMbix Ha Pocsnckn pboK TOBABOP.
Aydnoи видаообудане:7лет
Ipehenochoe aydnoo6opyObaHne: 6 let
Дуго obopydobAHne (HayuHnK, MnkpofoH n T.D.): 5 let
AByTomO6nIbHna 3NeKtpOnHka:6JIeT
D3-7-10-6_A_Ru
AFTER-SALES SERVICE FOR PIONEER PRODUCTS
Please contact the dealer or distributor from where you purchased the product for its after-sales service (including warranty conditions) or any other information. In case the necessary information is not available, please contact the Pioneer's subsidiaries (regional service headquarters) listed below:
PLEASE DO NOT SHIP YOUR PRODUCT TO THE COMPANIES at the addresses listed below for repair without advance contact, for these companies are not repair locations.
AMERICA
PIONEER ELECTRONICS (USA) INC.
CUSTOMER SUPPORT DIVISION
P.O. BOX 1760, LONG BEACH, CA 90801-1760, U.S.A.
CUSTOMER SERVICE HOTLINE:(800)421-1625
EUROPE
PIONEER EUROPE NV
EUROPEAN SERVICE DIVISION
HAVEN 1087, KEETBERGLAAN 1, B-9120 MELSELE, BELGIUM
ASEAN
PIONEER ELECTRONICS ASIACENTRE PTE. LTD.
SERVICE DEPARTMENT
253, ALEXANDRA ROAD #04-01 SINGAPORE 159936
JAPAN AND OTHERS
PIONEER CORPORATION (HEAD OFFICE)
CUSTOMER SUPPORT CENTER
Published by Pioneer Corporation.
Copyright © 2007 Pioneer Corporation.
All rights reserved.
Publication de Pioneer Corporation.
© 2007 Pioneer Corporation.
PIONEER ELECTRONICS (USA) INC.
P.O. BOX 1540, Long Beach, California 90801-1540, U.S.A. TEL: (800) 421-1404
PIONEER ELECTRONICS OF CANADA, INC.
300 Allstate Parkway, Markham, Ontario L3R 0P2, Canada TEL: 1-877-283-5901, 905-479-4411
PIONEER EUROPE NV
Haven 1087, Keetberglaan 1, B-9120 Melsele, Belgium TEL: 03/570.05.11
PIONEER ELECTRONICS ASIACENTRE PTE. LTD.
253 Alexandra Road, #04-01, Singapore 159936 TEL: 65-6472-7555
PIONEER ELECTRONICS AUSTRALIA PTY. LTD.
178-184 Boundary Road, Braeside, Victoria 3195, Australia, TEL: (03) 9586-6300
PIONEER ELECTRONICS DE MEXICO S.A. DE C.V.
Blvd. Manuel Avila Camacho 138 10 piso Col.Lomas de Chapultepec, Mexico,D.F. 11000 TEL: 55-9178-4270