AF-S DX NIKKOR 18-105MM F-3.5-5.6G ED VR - Camera lens NIKON - Free user manual and instructions
Find the device manual for free AF-S DX NIKKOR 18-105MM F-3.5-5.6G ED VR NIKON in PDF.
| Product type | NIKKOR DX AF-S Zoom Lens type G |
| Focal length | 18-105 mm |
| Maximum aperture | f/3.5-5.6 |
| Optical construction | 15 elements in 11 groups (1 aspherical lens, 1 ED lens) |
| Angle of view | 76° - 15°20' |
| Mount | Nikon bayonet mount (DX format) |
| Focus | Autofocus with SWM silent wave motor, manual focus possible |
| Focus system | Internal (IF) |
| Vibration reduction (VR) | Yes, optical (VCM), approximately 3 stops advantage |
| Minimum focus distance | 0.45 m (at all focal lengths) |
| Diaphragm | 7 blades (circular), full aperture |
| Aperture range | f/3.5 - f/22 (18 mm) / f/5.6 - f/38 (105 mm) |
| Filter diameter | 67 mm (pitch 0.75 mm) |
| Dimensions (diameter × length) | Approx. 76 mm × 89 mm |
| Weight | Approx. 420 g |
| Accessories supplied | Front cap LC-67, rear cap LF-1, lens hood HB-32, soft case CL-1018 |
| Care and cleaning | Blower or brush, soft damp cloth (ethyl alcohol), avoid organic solvents |
| Safety | Do not disassemble, avoid flammable gases, do not look at the sun, keep out of reach of children |
| Spare parts and repairability | Repairs by authorized Nikon service center; incompatible accessories: teleconverter, extension rings, bellows |
Frequently Asked Questions - AF-S DX NIKKOR 18-105MM F-3.5-5.6G ED VR NIKON
User questions about AF-S DX NIKKOR 18-105MM F-3.5-5.6G ED VR NIKON
0 question about this device. Answer the ones you know or ask your own.
Ask a new question about this device
Download the instructions for your Camera lens in PDF format for free! Find your manual AF-S DX NIKKOR 18-105MM F-3.5-5.6G ED VR - NIKON and take your electronic device back in hand. On this page are published all the documents necessary for the use of your device. AF-S DX NIKKOR 18-105MM F-3.5-5.6G ED VR by NIKON.
USER MANUAL AF-S DX NIKKOR 18-105MM F-3.5-5.6G ED VR NIKON
User's Manual PP.12-19
Notes on Safety Operations

Do not disassemble
Touching the internal parts of the camera or lens could result in injury. Repairs should be performed only by qualified technicians. Should the camera or lens break open as the result of a fall or other accident, take the product to a Nikon-authorized service representative for inspection after unplugging the product and/or removing the battery.
Turn off immediately in the event of malfunction
Should you notice smoke or an unusual smell coming from the camera or lens, remove the battery immediately, taking care to avoid burns. Continued operation could result in injury.
After removing or disconnecting the power source, take the product to a Nikon-authorized service representative for inspection.
Do not use the camera or lens in the presence of flammable gas
Operating electronic equipment in the presence of flammable gas could result in an explosion or fire.
Do not look at the sun through the lens or viewfinder
Viewing the sun or other strong light sources through the lens or viewfinder could cause permanent visual impairment.
Keep out of reach of children
Particular care should be taken to prevent infants from putting the batteries or other small parts into their mouths.
Observe the following precautions when handling the camera and lens
- Keep the camera and lens unit dry. Failure to do so could result in fire or electric shock.
- Do not handle or touch the camera or lens unit with wet hands. Failure to do so could result in electric shock.
- When shooting with back-lighting, do not point the lens at the sun or allow sunlight to pass directly down the lens as this may cause the camera to overheat and possibly cause a fire.
- When the lens will not be used for an extended period of time, attach both front and rear lens caps and store the lens away from direct sunlight. Failure to do so could result in a fire, as the lens may focus sunlight onto a flammable object.
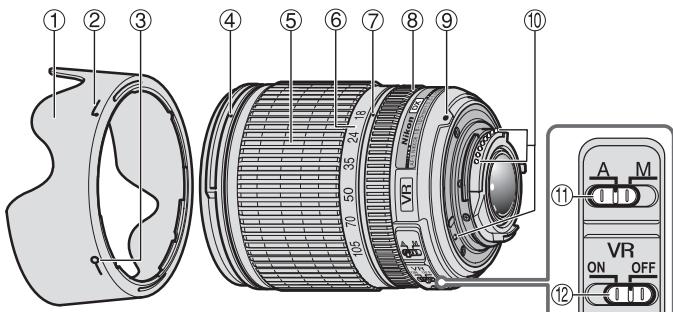
Nomenclature
():referencepage
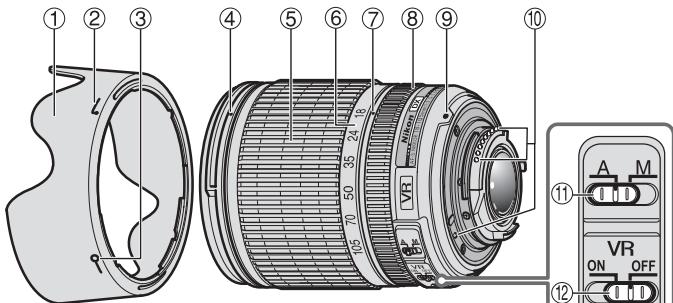
① Lens hood (P.14)
② Lens hood attachment index (P. 14)
③ Lens hood setting index (P. 14)
Lens hood mounting index (P. 14)
⑤ Zoom ring (P. 15)
⑥ Focal length scale
⑦ Focal length index
Focus ring (P. 15)
⑨ Mounting index (P. 14)
10 CPU contacts (P. 17)
11 A-M mode switch (P. 15)
Vibration reduction ON/OFF switch (P. 16)
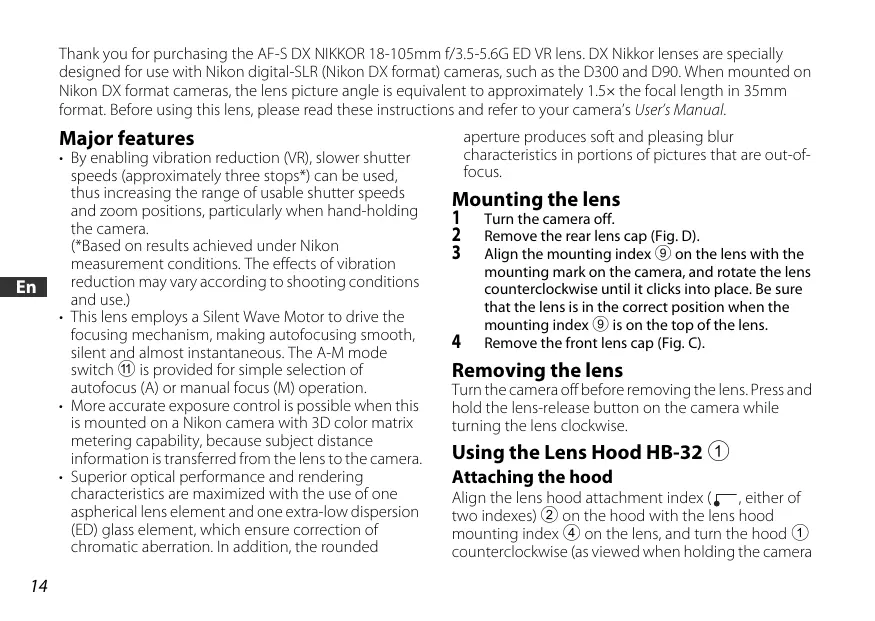
Thank you for purchasing the AF-S DX NIKKOR 18-105mm f/3.5-5.6G ED VR lens. DX Nikkor lenses are specially designed for use with Nikon digital-SLR (Nikon DX format) cameras, such as the D300 and D90. When mounted on Nikon DX format cameras, the lens picture angle is equivalent to approximately 1.5 × the focal length in 35mm format. Before using this lens, please read these instructions and refer to your camera's User's Manual.
Major features
- By enabling vibration reduction (VR), slower shutter speeds (approximately three stops*) can be used, thus increasing the range of usable shutter speeds and zoom positions, particularly when hand-holding the camera.
^* Based on results achieved under Nikon measurement conditions. The effects of vibration reduction may vary according to shooting conditions and use.)
- This lens employs a Silent Wave Motor to drive the focusing mechanism, making autofocusing smooth, silent and almost instantaneous. The A-M mode switch (11) is provided for simple selection of autofocus (A) or manual focus (M) operation.
- More accurate exposure control is possible when this is mounted on a Nikon camera with 3D color matrix metering capability, because subject distance information is transferred from the lens to the camera.
- Superior optical performance and rendering characteristics are maximized with the use of one aspherical lens element and one extra-low dispersion (ED) glass element, which ensure correction of chromatic aberration. In addition, the rounded
aperture produces soft and pleasing blur characteristics in portions of pictures that are out-of-focus.
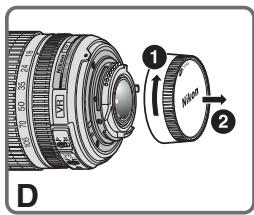
Mounting the lens
1 Turn the camera off.
2 Remove the rear lens cap (Fig. D).
3 Align the mounting index ⑨ on the lens with the mounting mark on the camera, and rotate the lens counterclockwise until it clicks into place. Be sure that the lens is in the correct position when the mounting index ⑨ is on the top of the lens.
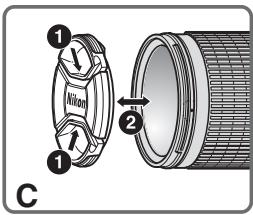
4 Remove the front lens cap (Fig. C).
Removing the lens
Turn the camera off before removing the lens. Press and hold the lens-release button on the camera while turning the lens clockwise.
Using the Lens Hood HB-32 ①
Attaching the hood
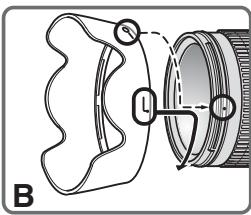
Align the lens hood attachment index ( , either of two indexes) ② on the hood with the lens hood mounting index 4 on the lens, and turn the hood ① counterclockwise (as viewed when holding the camera
with the lens facing away from you) until it clicks into place (Fig. B).
Be sure that the lens hood mounting index is aligned with the lens hood setting index (-o) ③.
If the lens hood is not correctly attached, vignetting may occur.
To facilitate attachment or removal of the hood, hold it by the base (near the lens hood attachment index) rather than its outer edge.
Detaching the hood
Hold the lens hood by the base (near the lens hood attachment index) and turn clockwise, as viewed when holding the camera with the lens facing away from you, to detach.
Focusing, zooming, and depth of field
Before focusing, rotate the zoom ring ⑤ to adjust the focal length until the desired composition is framed. If your camera has a depth-of-field preview (stop-down) button or lever, depth of field can be previewed through
the camera viewfinder. For more information, refer to your camera's User's Manual.
- This lens is equipped with the Internal Focusing (IF) system. As this focusing system differs from non-IF
lenses, focal length at closer distances decreases slightly.
Focusing (Fig. A)
Autofocus mode
Set the camera focus mode to AF-A, AF-S or AF-C and set the A-M mode switch (1) on the lens to A. Press the shutter-release button halfway to focus and completely to shoot.
Manual focusing is possible even when the lens A-M mode switch is set to A.
Set the camera's focus mode to AF-S, and press the shutter-release button halfway to initiate autofocus. Next, while pressing the shutter-release button halfway, manually rotate the lens focus ring ⑧ to fine-tune focus.
Note: Do not attempt to rotate the focus ring while autofocus is operating. If autofocus stops operating, release and press the shutter-release button halfway again.
Manual focus mode
Set the A-M mode switch 11 on the lens to M. Rotate the focus ring 8 manually to focus. Shooting is possible when camera focus mode is set to either AF or M.
| Lens A-M mode switch 11 | Camera focus mode | ||
| AF-A/AF-C | AF-S | M | |
| A | Autofocus | Autofocus manual focus) | — |
| M | Manual focus (focus assist is available) | ||
For more information on camera focus modes, refer to your camera's User's Manual.
Getting good results with autofocus
Refer to "Notes on using wide- or super wide-angle AF Nikkor lenses" (P. 19).
Vibration reduction mode (VR)
By enabling vibration reduction (VR), slower shutter speeds (approximately three stops*) can be used. Panning is also supported.
(*Based on results achieved under Nikon measurement conditions. The effects of vibration reduction may vary according to shooting conditions and use.)
Using vibration reduction
1 Set the vibration reduction ON/OFF switch ⑫ to ON. Note: Be sure to set the switch ⑫ so that the indicator is precisely aligned with ON.
2 Camera shake is reduced when the shutter-release button is pressed halfway. Autofocus and manual focusing, as well as precise framing of the subject, are simplified because camera shake visible through the viewfinder is also reduced.
3 To disable vibration reduction, set the vibration reduction ON/OFF switch 12 to OFF.
Notes on using vibration reduction
After pressing the shutter-release button halfway, wait until the image in the viewfinder stabilizes before pressing the shutter-release button the rest of the way down.
- If the camera is panned in a wide arc, compensation for camera shake in the panning direction is not performed. For example, when panning the camera in a horizontal direction, vertical camera shake is reduced. This stabilizes the image whilst allowing the desired panning effect to be realized.
- Due to the characteristics of the vibration reduction mechanism, the image in the viewfinder may be blurred after the shutter is released. This is not a malfunction.
- Do not turn the camera off or remove the lens from the camera while vibration reduction is operating. Failure to observe this note could result in the lens sounding and feeling as if an internal component is loose or broken when it is shaken. This is not a malfunction. Turn the camera on again to correct this.
- With cameras such as D300 and D40-series models, featuring a built-in flash, vibration reduction does not function while the built-in flash is charging.
- When the camera is mounted on a tripod, set the vibration reduction ON/OFF switch (12) to OFF. However, it is recommended that the switch be set to ON when using the camera on an unsecured tripod head or with monopod.
- With autofocus cameras such as D2-series and D300 models, featuring an AF-ON button, vibration reduction does not function when the AF-ON button is pressed.
Setting the aperture
Use the camera to adjust the aperture setting.
Variable maximum apertures
Zooming the lens changes the maximum aperture by up to 1^1/3 stop.
However, the camera will compensate for any change in aperture by adjusting the shutter speed so as to maintain the correct exposure value.
The built-in flash and vignetting
Vignetting is the darkening of the corners around the image that occurs when the light emitted by the flash is obstructed by the lens hood ① , or lens barrel, depending on the focal length or shooting distance.
- To prevent vignetting, do not use the lens hood (1).
- The built-in flash cannot be used over distances of less than 0.6m (2.0 ft.).
| Digital-SLR cameras | Supported focal length/shooting distance |
| D5000/D3000 | • 18mm/2.5 m (8.2 ft.) or greater • 24mm/1 m (3.3 ft.) or greater |
| D700/D300-series/D200/D100/D80 | No vignetting occurs at any focal length |
| D90/D70-series | • 18mm/1.5 m (4.9 ft.) or greater • 24mm or longer/no restrictions |
| D50 | • 18mm/1 m (3.3 ft.) or greater • 24mm or longer/no restrictions |
| D60/D40-series | • 18mm/2.5 m (8.2 ft.) or greater • 24mm/1 m (3.3 ft.) or greater • 35mm or longer/no restrictions |
The built-in flash on the D100 and D70 is compatible with focal lengths of 20mm or greater.
Vignetting occurs at a focal length of 18mm
Lens care
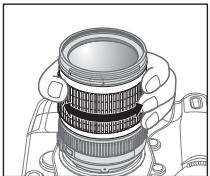
- Be careful not to allow the CPU contacts ⑩ to become dirty or damaged.
- Clean lens surfaces with a blower brush. To remove dirt and smudges, use a soft, clean cotton cloth or lens tissue moistened with ethanol (alcohol) or lens cleaner. Wipe in a circular motion from the center to the outer edge, taking care not to leave traces or touch other parts of the lens.
- Never use organic solvent such as thinner or benzene to clean the lens.
- NC filters are available to protect the front lens element. The lens hood (1) also helps to protect the front of the lens.
- When storing the lens in its flexible lens pouch, attach both the front and rear lens caps. The lens can also be stored with the lens hood ① attached in the reverse position.
- When the lens is mounted on a camera, do not pick up or hold the camera and lens by the lens hood ①.
- When the lens will not be used for an extended period of time, store it in a cool, dry place to prevent mold and rust. Be sure to store the lens away from direct sunlight or chemicals such as camphor or naphthalene.
- Do not get water on the lens or drop it in water as this will cause it to rust and malfunction.
- Reinforced plastic is used for certain parts of the lens. To avoid damage, never leave the lens in an excessively hot place.
Standard accessories
- 67mm Snap-on Front Lens Cap LC-67
Rear Lens Cap LF-1
Bayonet Hood HB-32 - Flexible Lens Pouch CL-1018
Optional accessory
67mm screw-on filters
Incompatible accessories
- Teleconverters (all models)
- Auto Ring BR-4 and all models of Auto Extension Ring PK, K Ring and Bellows focusing attachment.
- Attachment Ring SX-1
Other accessories may not be suitable for use with this lens. For details, refer to the documentation provided with accessories.
Specifications
Type of lens
G-type AF-S DX Zoom-NIKKOR lens with built-in CPU and Nikon bayonet mount (specially designed for use with Nikon digital-SLR—Nikon DX format—cameras)
Focal length
18mm-105mm
Maximum aperture
f/3.5-5.6
Lens construction
15 elements in 11 groups (1 aspherical lens and 1 ED lens elements)
Picture angle 76^ - 15^20^
Focal length scale 18,24,35,50,70,105mm
Distance Output to camera information
Zoom control Manually via separate zoom ring Focusing Nikon Internal Focusing (IF) system, Autofocus using a Silent Wave Motor; manually via separate focus ring
Vibration Lens-shift method using voice coil reduction motors (VCMs)
Closest focus 0.45 m (1.5 ft.) at all zoom settings distance
No. of diaphragm 7 pcs. (rounded) blades
Diaphragm Fully automatic
Aperture range f/3.5 to f/22 (at 18mm), f/5.6 to f/38 (at 105mm)
Exposure Via full-aperture method measurement
Attachment size 67mm (P = 0.75mm)
Dimensions Approximately 76mm (dia.) × 89mm (extension from the camera's lensmount flange)
Weight Approximately 420g (14.8 oz)
Specifications and designs are subject to change without notice or obligation on the part of the manufacturer.
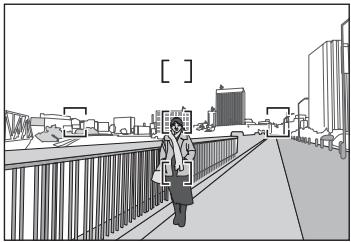
Notes on using wide- or super wide-angle AF Nikkor lenses
In the following situations, autofocus may not perform as expected when shooting with wide- or super wide-angle AF Nikkor lenses.
A person standing in front of a distant background
F A field filled with flowers
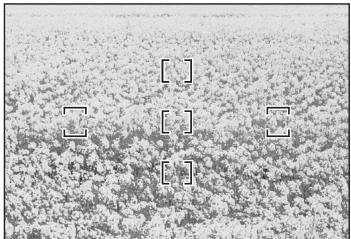
1. When the main subject in the focus brackets is relatively small
When a person standing in front of a distant background is positioned within the focus brackets, as shown in Fig. E, the background may be in focus, while the subject is out of focus.
2. When the main subject is a finely patterned subject or scene
When the subject is finely patterned or of low contrast, such as a field filled with flowers, as shown in Fig. F, focus may be difficult to acquire using autofocus.
Responses to these types of situations
(1) Focus on a different subject located at the same distance from the camera, apply focus lock, recompose, and shoot.
(2) Set the camera's focus mode to manual focus and focus manually on the subject.
Refer to "Getting Good Results with Autofocus" in the camera's User's Manual.
18,24,35,50,70,105mm
Informations de distance
Forvara utom rackhall for barn
He pa3bnpaTe foToKamepy
PnIKoCHOBHeH K BHTpeHHM qACTrM fOTOKaMEpbI nnObEeKTHBA MOXET pNBEcTNI K NOJyueHIO TpaBM. PEmOH DOnJxH ePON3BODNTBCaTobko KBaJIuΦnUPOBaHbIMn CneuAnCTAMn. B cNyae NOBpeKJeHnKOpNcya fOTOKaMEpbI nnObEeKTHBA BE3yIbTaTe naDEHn IIN dpyrTO rponCueCTBnA OTKIOHTe CeTEBO 6bOK NtAHn W/nn N3BKeTne 6atapeo IO NoCTabBe NTdJeIe nIPOBepKn B ABTOPIOBaHbN H cepNcHbI CEHTp Nikon.
B cnyae HeNCnpaBHOCTn HeMeJeHHO BbIKJIouHTe FOToKamepy
PnI NOBENHIMbIMaI INI HeOBbHNOrO 3anaxA, IcXoJdAeIO n3ΦOTOKaMEpbI Nm OBekTbNAb, HemeIDeHNo M3BNeKtMe bSapTe, CTapBaRb HE ONDcTbMb OOKOrB. PpOdoJIKeHne paOBoTb C yCTpoiCTbOM MoKET npINBeCTM K NOyUHeNIO TpaBM. TocNe I3BNeCHeNIA BApTe Nm OTKnIOUeHN IcTOUYnKa NITAHNIO DocTaBbTe N3dEme IJeIPOBepK B 6bnkAunSh ABOpT3OBAHNN CepVBChbNZeHTP KOMNaHNI NikOn.
He noJIb3yIteScb foToKamepo nJIn oBSeKTHBOM npn HAIChuN B BO3DyXeJeIKBOOCnIaMeHHOUxxCra3OB
Pa6Oba c 3eKTePOHbHM 6OpOyDobAHnEM pRi HAnuHn B BO3dyXe IeKoBOcPnIaMeHIOUxNCr Ra3OB MOKeT pNBeCTK N B3pbIBy UINI NOXApY.
He cmOTpIte Ha coJIHcE uepe3 oBbektNB nII BnOncKaTeJIb
ECNI CMOTPetb HA CONHNE IINI DpyrNIE NCTOHNIKI JRPOKOBETaYepe3 OObeKtIVB INI BINOICKaTeNB,TO 3TO MOKETBb3BaTHe NObePIMOE yUxDSeHne 3PENH.
XpaHnTe B HeNoCTynHom IJRA TeTMeCTe
PIMMTe OOCbIe Mepbl pTeODCTOPOXHOCTN BO 136EzHMeNoPiADAnBbTaapeu N DpynIX He60JIbXIN XpEmETOB DETM B POT.
CobIouaTe CneUOuHne Mepb npedocToPOKHOCTN BO Bpemr 3KcPnPyataun FOtOKaMepeN IOBekTnBa
He donyckaTe nonaDaHnBaBoI Ha foToKamepu I o6bekTIB. HecobnOeHne 3tOro Tpe6BaHnMoXeT npInBeCTN K noxapay nIIN nopaxeHnIO 3NeKtpueCeKM TOKOM.
He\PnKacaiTecb K oToKampeI IIO bKeBtYH MOKpbIMyPKaMn.HecObIIOJeHne3TOrO Tpe6oBaHnIA MOKET pINBecTHN K npAkeHHIO 3eKeTPrUeCkMn TOKOM.
- Пи сбемке садим ИСБЕSUHEM He HApPABLЯТe
ОБьektнв на солпuce, a ТAKGE He ДОпуСКАтЕ
ПONаДИЗН COЛЧЕHOrO CBETA В OБьektNВ, TAK KAк 3TO
MOжETnpINBECTN K PerpeRpeBy ФотOKamEpbl ee
BOЗгоранIO.
- Ecπn obβeKTHB He oγdET NcNoIb3ObaTbC8 B TceHne
Длгпьногу ВЕмени,ПрИКрелпге РEpEДнЮи
ЗаднUG KpbIshк OBeKTHBAи H OCTaBЯltke
obβeKTHB NOД пямБИМ COЛЧЕЧНБIM Lγam.
Heco6ПиDEHeme 3TORO yCNOIBЯ MOKET ПпВECTN K
ВОграПано, NOCKOLьКу obβeKTHB MOJET
СосрEdOTOnHTb COЛЧЕЧНБе LγиHa KaKOM-ПИБО
ЛетКВОсРламЕнJOUSSEMCR ПпдМТe.
0603HaueHnHa HnJIIOCTpaun
OCHOBHbIE BO3MOXHOCTN
- Pπν Bκιλούηην Φυκύμιν ποδαβλεήνην ἀνβραύμιν (VR) Mθκύν ΜκόΠβοδαβγθ δόπες Ππιπελθήν Βελίβερχκη (πρισβιπελθήν Α τρι στυγην), τέμι Σκαβμιν yβενιμίναν έπαραδηθ Καῦτην Ευβερχκη Ιγμελγκη (οςθεόθου πρι ρυηθ ΒεΜκε). (OchosobaΗ πο βεύγλταλτας, πούγηνΗχιν εγζονΒαχιν Θεμερην κόμανηςΝικ. Peεύλταβιν ποδαβνηνην ἀνβραύμιν ΜΟγτ 3Δακεῖτβο τοςταύμινιν Α γκονΒαχιν ΒεΜκε.)
-Данн布局 obekTINB nCOnIb3yeT becUymHbI BOHOBO npBod Silent Wave Motor dЯуnpabLeHnMexAHm3MO mФOKYCIPOBKN,чTO DeIaET pOcEcc ABToΦOKYCIPOBKN nIaBHBIM, b6eUWMhIM nPpaTNUeCKM rHOBeHHbIM.пepeknHocateIbe pexKIMOB A-M ⑪ nCOnIb3yeTcДЯ yD6HOro nepeKInHouEnH MEXdY ABOTMaTNUeCKM (A)ИpyuHbIM (M) pexkMaMnФOKYCIPOBKN. - ПгИ снорьзовимс obektebra c Фотokampeмам Nikon c
функейд 3D с爱你того матриного замера обсячима за
боже точький кOTРь о КСКОЗМИ, ТAK каданьу о рас��огим
д д obekета поедадотс с obektebra на Фотokampeу.
BnaOpaI nCnOJIb3OBAHnIO OJHOAcFepUWeckOIINH3bI yOnHO INH3bI CO CBePHXnIKoDInCepeNcEi (ED),KOTOpIE oEcbecuHaOT KOPeKlIO XoPOMaTHeCKNx Abeppauiy, yUyUaHTocr IpeBOcXoHDyIe ONTIeCKNe XapAKeTpeNTkN i BO3MOxHOCTn NepeDaHi. KpOme TORO,CKpyIeHNHa DAnDFpaMa oEcbecuHaBT eOJIee XpAcNbIe MReKHe N HeCHbIe OePeTANH Te xactei CHMkA, KOTOpIE HAXoDITcB BHe FokyCa.
YctaHOBka o6bekTnBa
1 BbIKIOHTe FOToKAmepy.
2 CHNMMTe 3aHIOIO KpbIuKy O6bKeTnBa (Pnc. D).
3 CoBMeCTHcYctaHOBOHyIO METky ⑨ Ha o6bekTnBe c YctaHOBOuHryoM KETKHa H aTOKOMapeH u NOBEPHTe O6bekTNB nPOTnBa cOABoOBy CTePNKn DoIeNJa. Y6eNTcE, yTO o6bekTnB YcTaHOBnH npAbaHbNo, pIri 3TOM YcTAHOBOyHAR METKa ⑨ DOnJXhA HxOaITbCS B BEPXHEM NLOXEHHN.
4 CHINMITE nepeDHHIOKpbIHKy o6bekTnBa (Pnc.C).
ChyTne o6bekTuBa
Peped CHTNEOM oBekTBA BbKIOHnTE oToKamepy. HauKMTe u yepKmBaHTe KNOHY OTOcEINHeHnO bokTbaHa oToKamepeu NOBEPHnTE oBekTINo NaCobon CTpeKeIe.
Иснользоваиме 6лeнды HB-32 ① Установka 6лeнды
CObMecTbV yCTaHOBOUHYO MEtky(,JIIO6aI3DByX MeTOK) ② Ha bIeNHeDe C yKa3aTeIeM KpeIeHnIe (4)Ha oBSeKtMbte, NOBOpAaBaIe 6IeHy I ① npOTb VacOBoI CTpeKn (depka FOtOKamepy oBekTbMeO tCe8) Do nIOH OfIKCaun (PiC.B). Y6BeIMTeCb, YoY cTaHOBOuHMyETMa 6OBeKtNBa COBnaJaAeT C yKa3aTeIeM KpeIeHnIe 6IeHdbI (一○) ③. Ecnn bIeNda YcTAHOBJIeHa H a bEKeTb HenaJNeXaUIM bOAp30AM, MOKet BO3NHKNYb 3ΦΦeKT BIVbETnpOBaHnI. DnIg bOErueHnY cTaHOBKn NIN CHTNa 6IeHdbI UyepKbuaIe Ye 3a OCHOBAHRe (pADOM c YcTAHOBOUHO MToKo 6IeHdbI), a He 3a BHEUHIO KpOMKy.
ChyTne 6JeHdbI
YtOb6IOTcOeDNHHTb6bnHdY, yDePckBaIte ee 3a OCHOBaHE (pAOM C yCTAHOBQHOn MeTkoB 6bnHdI) n NOBepHITNo YacOB0C TcpeKHe, yDePckBaI@TOKAMpey oBekTtBMoT O cEB.
ФokycnpOBka, yBelenueHne n rJy6bHa pe3KoCTn
PereBblnoHHeHemFokyCupOBKn
NoBpHHeNKeTkoJIbO 3yMMPOBOAHNA ⑤
IINa HAcTPOIKM FokyCHO
pacTOHHNIO, NOKA He 6yEdt BvDeneHa
HeoXoDMAR KOMNO3uJRA.
EcINn FOToKAMepa OChauSeHa
KNHOKOn IIN pbUaHKOM
IpoCMOTra fHybNHbPe3KoCTn
(3aTeMHHeHne), To rHybHNy
pe3KoCTN MOEHOIPOeBHTy Chee3 BIDONCKATEb
FOtOKaMepb. IJnIOnyueHnI DOONHTeNbHbIX
CBedENCM.PYKOBOCTBO NIOJ3OBeTMA FOtOKaMepb.
B 3OTOM oBekTINBE npIMeHena CnCTema BHytpeHne
fokcynpOBk (IF). Tak Ka 3Ta CnCTema fokcynpOBk
OTNIuAETCR O5oBekTINOB, He IMMeUxH cx FyHKLIO
IF,TO fokCyoHae pacctOHNr np CbeMke C 6bn3KNX
pacctOHN HEMHOYMeHbuaTcR.
Фokycиropовka(Pnc.A)
Pexim aBTOΦOKyCnOBKn
YcTaHOBnTe HaΦoTOKaMepe pexMMΦokyCnPOBKn AF-A, AF-S HIN AF-C n YcTaHOBnTe nepeKInouateNB peXmMBOA-M ⑪ Na ObkeTnBe B nIoJKeHneA HaxMMte cnyKOByo hONky 3aTbopa HaNoBOnHy dIraΦokyCnPOBKn I nIOHocByIO dIra CbeMKN.
PyuhyoФokycnpoBkyMOxHO BbIIOHNHtJaXeB TOM Cnyae,ecnIaPexmaOMoBeKTHBaM-YcTHeNBO 3NaueHMeA. YCTaOHOBHTaHΦOTKAmepepeXeMHΦOyCkUPOBKn AF-S N HAKMITE cNcyCKByO KHOKNY 3aTbOPa HAnIOBnHy, YTObIbIbIOHNITb ABTOΦOKCYnPOBKy. 3aTeM UyepKXBraCnCkOByO KHOKNY 3aTbOPa HAKaTOn HAnIOBnHy, BpyHuO NoBepHerTE KOnbIooΦokycnPOBKn OObEKBHa 8J IaI ToCHOn HAcPToIKoΦocyKa
PnmuemauHne. He nIaTaeBc NobopaunBaT KoNbIcOfokCypOBKm BO BvpeMraPabOtblFyHKMNABTOFOkCa. TnOaBeRHeHM PabOtbl FyHKMNABTOFOkCa OTNCTHE m CHOBA HAKMITE cTnyCKoByIO KHONKY 3aTBoPA HANOBOMHY.
Puyho npexm fokycnpobkn
YctahOBITE nepeKIOHouateIb pexkIMOB A-M ⑪ Ha oBbEeKTHBe B NOJIOEXHE M.ДЯвиьнOLHINJIФ qOxCKUPOBKM BPAaUIte POKCYCPUOUE KONbSO (8) BPuHyO. CbEMKy MOXHO BbINOPHTb, ecN yCTaOHOBJIEN pekM OOKCUPOBKM QOTOKaMEpb AF IIN M.
IcnoIb3OBAHne fynKcnn IoDaBnEHHa Bn6paun
1 UcTaHOBInTe NepeKIOuOaTeNb IOnaBnEnHn Bn6BaPauINN ON/OFF ② B noLoXeHNe ON. PtImMeUaHnE. O63aTeNbIO yCTaHOBtNE TepeKIOuOaTeNb ② TAK, YTO6bI HNDiKaTOp TOHNO CCBNAIC METKoN.
2 IoIaBHeHne Bn6paun foToKamepbI BInIOJIHReTc npH aKaTHn CnYCKOBoi KHOJIK 3aTBopa HAnONoBHny. ABTomATueCeKAr NpyHae fOkyCpOBKa, a TAKKe ToUHoe KaIrpObaHne oBeKtA cbeMKN, BInIOJIHOTc npocTo, TaK KaBn6paun foTOKaMepbI, HAbIoJaEMbIe B BVIOONckatene, TAKKe IIOaBNIOTcN.
3ДуOTKIOUHENIPEXIMMA NOdABLEHNA Bn6paCmYcTaHOBNTe nepeKNOHTeN NOdABLHeNBA N6paCmON/OFF ②B noJoxKeHne OFF.
PpimcuaHIOIcnoB3OBAHNIOIpaBnEINBa6paun
Iocne HAKATYNA CNYCKOBH KONKIN 3aTbOPA HANOIOBHyNEO6XIDMO DAaTcBaCTaBnJH3aCUNI N3o6paeXeHHB YBDOMCKATENEpeTe TEM, KAK HAKATN CNYCKOBYIO KONKINy3aTbOPA DO KOHua.
-Пин Сьемки Нарамьл NOОПКОТражТори NOДавлие ВИБрацIMФOTOKМЕРБИНЕ ВИБРАLENHIMСВЕМКИ ПАногамь He bудет BынOLТЯС.Нарпим,在пэногам�рован IMOTOKмрБИ BROP3OTANbHOMнвтайгелIMNOДавлJOTCе BИБрацIM NO BEVIKAKIN.ЗТОП3OBNIAETCTABININIOPAPBITI N3OБАХЕNE,a TAKKE JOCTMЛЧУнЖНOrO 3ФФЕКТАногамьОВHAJI.
BcneCTBeNoOCO6EHNOCTeXaAPKeTNECTKMeXAHm3Ma NOaBAnEHHa BnOpaun NoCtreTO, KAc bEydt OTNtuJHcA KNOpKa cNcyKa 3aTbOpA, H03o4aKeHMeB V BINOvCKATEJ MOKeOT Kk3aTbCya CMA3aHbIM.
He bkyIIOUaIe foTOkAmepy I He ChIMaIte C foTOkAmebl oBeKtBn pR paOBeT B Pekimme NODaJIbENH YA6bpau. Ecnn pNehe6peBy 3Tm pNImEaHMeM, To pR cOTpReCEHN MObEeKTHBa MOKET NOCBIuIbTaCB 3ByK, Ka nP rTOCoEINHEn HIN NII ONOMKe BNYTPHENX KOMHOENTOB. 3To HE JBIETCA HEMCNPABHOCTbI. Iy yCTpaHEnr 3ToI cyTuayi CHOB BAJIOHTe foTOkAmeY.
PcHIOJIbOBAHmOJDoJIeN POToKApMe D300 nD40, OCHaENHHBx BCTPOeHNBOBcIbIKo, pnp 3apJe BcIbUckyHKnCnIOJaabLeHnBnOpaCmHe paObaTeT.
Ecln foTOkAmepa yCTaHOBHeHa Ha 7tATINB, yCTaHOBITE nepeKIOUATEb NODAeHnBaIHN BIOpaIIN ON/OFF (2) B noJIOHEMNE OFF. OHaNko 3OT peKIOUATEb peKOMEnyTecY cTAYAOHBt B NOJIOXEHNE ON pRNCNOL3BOAHNI FOTOKAMepbl HA 7tATINBE C He3aKpENIIHHO rONOBKO INHn HA MOHONoDE.
- Пи сюлбьовану тахи дд зд
- Рсссгдддддддддддддддддддддддддддддддддддддддддддддддддддддддддддддддддддддддддддд
- Мошелу серси D2 и D300, сочашихи khoнкй AF-ON, phунлочи
- поалдаении вьбацяи не себурота рпн нахати кhoнкй AF-ON.
UcTaHOBkaDnaΦpaRmbI
HaΦoToKampe MoXHO NaCTponb NapaMeTpbl DnαφpaRmbI.
N3MeHeHne MaKcMaJIbHorO 3NaYeHn DaαPpArMbI
Ppi 3yMMIOBaHN ObBeKTHBa MaKcMaJIbHoE
3NaYeHne DnαPpArMbI N3MeHReTc H a 1/3 CTyneHn.
Ondako foToKoAmepa KOMNEHcyETIIObIe IImMeHENH 3aHuEHNI dNtApMbl nyTepyHrOPOBAHBaIbDEpKxH, YTOb6 ObecneHTP npABInBHOe 3AHAeHNc3KnO3mUIN.
BcTpoeHHa BCnbIiKa n BnHbEtIPOBaHne
BnHbTeIPOBaHHe -3TO 3aTeMHeHne yrIbON uO6paXeHnna, BO3NkaIOoEe npi 3aRpaXeHnnc CBtA BCblIKn 6BeHDoO obKetuBA IINr EO npaBOB a 3aBNCIMOCTo NT oKcHOrO paccTOnHn n pacCTOnHnCbEMKn.
Дпгпрдтбрашения отого явсянения He nCToIb3yIte 6bleHny obekTeBa ①.
BCTPOEHNYO BCblIbU KHeIb3a IcNIOJIb3OBaTbДЯ CbeMknCpacSTOJHm Mehee 0,6 m.
DOnOpHnTeBhIe npHaadJeXHOCTN
BvHnHbBaIOUneCg HnIbTpbl DnAmEtPOM 67MM
Hecobmectmbie npHaJnxKHOCTN
TeJIeKoHBePtepeBb (BcE MoJeN)
- ABTomatmyeCKoe KOJbIO BR-4 I N Bce MoJeIN abTomatmyeCKeO KOJIbua yBVeIyuEHHa PK, KOJIbIO K N oKocycnpoBOuHbI MEX.
- 3akpenjiaouee konbco SX-1
Ipyrne npHnAdJIeXHOCTM MOrYT He IIOJXDOnITb IINCIOJIb3OBAHnA C DaHbIM OBeKtNBOM.
Дононтеловсбдемс.ВДOKум entaUM, npnnaeMoK nPnHaNdlexHoCTM.
TexHnueckne xapaKTepeNCTNKU
TnN obTeKnBa TnG AF-S DX 3ym-ObTeKnB NIKKOR co BCTpoeHbIM CPU n baiOnHeTHoI onpaboi Nikon (pa3pa6ToHa cnEuaJIbHO dJa IcNoJIb3OBAHnC uΦpOBbIMn φOTokaMepaMn Nikon SLR φopMaTaNikon DX)
Φokychoe 18MM-105MM
pacctoHne
MakchmehbHoe f/3,5-5,6 3aHeuMeIeNdApaPbMarly
CTpyktypa 15JeMeHToB V 11rpynnax o6bektnBa (1 acpeHcEeKsA nIiHa3 u I IIN3a ED)
Yron 76^ - 15^20^
1306paXeHnA
Ukana φούκυχότο 18,24,35,50,70,105MM paccctonHH
HΦopMaunu O BbXoJ Do ΦOTKaMepbl paCtOHHn Do oBekTa
Unpablen He PyHoe, c NOMOULIO OTDeIbHorO 3YMOM KOJIbDa YBEInuHHeN
ФokycnpoBka Cntema BHytpenHnefokycnpOBkN Nikon (IF), ABTOFOKCYC C INcnoIbOBAHnEM 6eCuUMyHOrO BOHOBORP npIBoDA;pyuHaA qocYcnpOBKa c NOMOUIBO TOnDElbHOrO KOnbua FokCyncPOBKn
IpaBneHMe MeToD nepeMeueHnIe nIc pmoOuIb B6paunn 3NeKTPoDBIratepenC IineHHeHoI o6MTOK (VCM)
Ham60one 6bn3koe 0,45 m npn Bcex napaMeTpax 3yma pacCToHHe dIpy fOkyCIOBKN
YnIeNoJeNEcTkoB 7 JeNecTkoB (OKpyrIaI) dnaFpaBmIy
DnaΦparma ΠONHOCTbIO aBTOMaTnuecka
Ukana ot f/3,5do f/22 (pnp 18MM), OT f/5,6do dnaΦparmbly f/38 (pnp 105MM)
N3mepHne C NOMOuIbMo MeToDa NOHIOKCN03nUd INaDpArMgI
Pa3mep hacaKn 67 MM (P = 0,75 MM)
18,24,35,50,70,105mm
丛 莫
首主峰 莳之的中之同在通中
No reproduction in any form of this manual, in whole or in part (except for brief quotation in critical articles or reviews), may be made without written authorization from NIKON CORPORATION.
NIKON CORPORATION
FUJI BLDG., 2-3, MARUNOUCHI 3-CHOME, CHIYODA-KU
Printed in Thailand 7MAA54C2-02 G01