
40085 HTFB 85 - Remote control WELLTECH - Free user manual and instructions
Find the device manual for free 40085 HTFB 85 WELLTECH in PDF.


User questions about 40085 HTFB 85 WELLTECH
0 question about this device. Answer the ones you know or ask your own.
Ask a new question about this device
Download the instructions for your Remote control in PDF format for free! Find your manual 40085 HTFB 85 - WELLTECH and take your electronic device back in hand. On this page are published all the documents necessary for the use of your device. 40085 HTFB 85 by WELLTECH.
USER MANUAL 40085 HTFB 85 WELLTECH
Order and safety instructions
Model 40085/HTFB 85
Table of contents
Device overview 4
Scope of delivery 5
Safety 6
Proper use as intended.
Symbols used in these instructions
Batteries 7
Laser 7
Device damage. 8
Disposal.
Preparations 8
Unpacking the device
Installing batteries 9
Controls 10
LCD display.
Keys 11
SYSTEM-SETUP - System configurations... 15
VOL/MUTE SETUP 15
MODE VOL. SET 15
VOL/MUTE RESET 16
TIMESETUP 17
DATE SETUP. 18
BACKLIGHT SETUP 19
SYSTEMRESET 20
CODE SETUP - device code 20
LIST CODES 20
CODE ENTRY 22
CODE SEARCH 23
MANUFACTURER CODES 25
Code entry for combined devices 27
Control of combined devices 27
Display of device code 273
TIMER SETUP - Timer functions 281
SLEEP TIMER. TV.
TIMER SETUP 30
- LEARN SETUP - Learning functions
MODE LEARN 32
MODE CLEAR 34
ALL LEARN CLEAR. 34
MACRO SETUP - Macro functions 35
MACRO SET 36
MACRO CLEAR 37
Maintenance and service.
Changing batteries
Cleaning the device 38
Troubleshooting
Technical specifications 39
Manufacturer keys 39
Personal macros. 40
Personal device codes 41
Manufacturer and compliance 42
Warranty 43
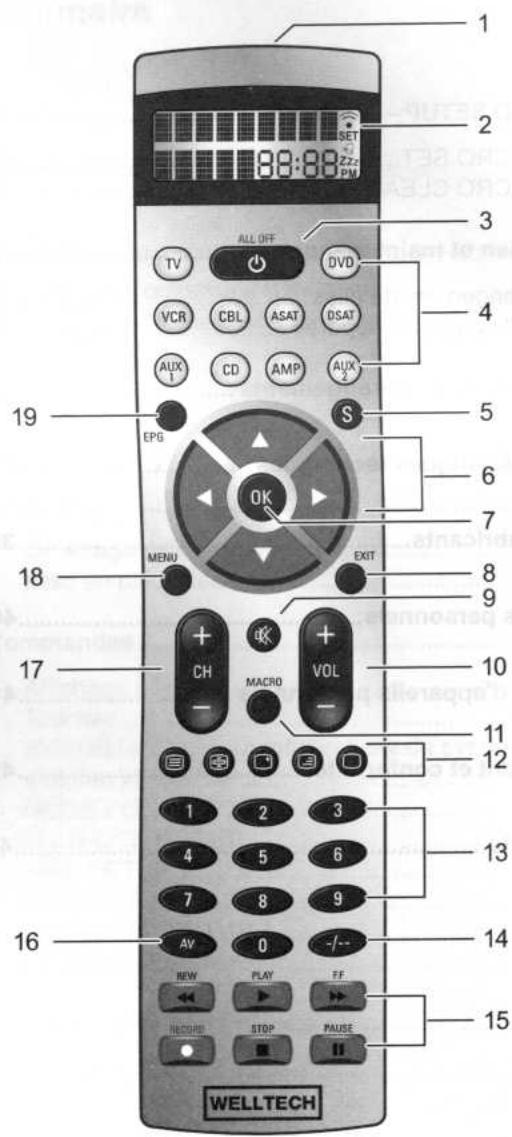
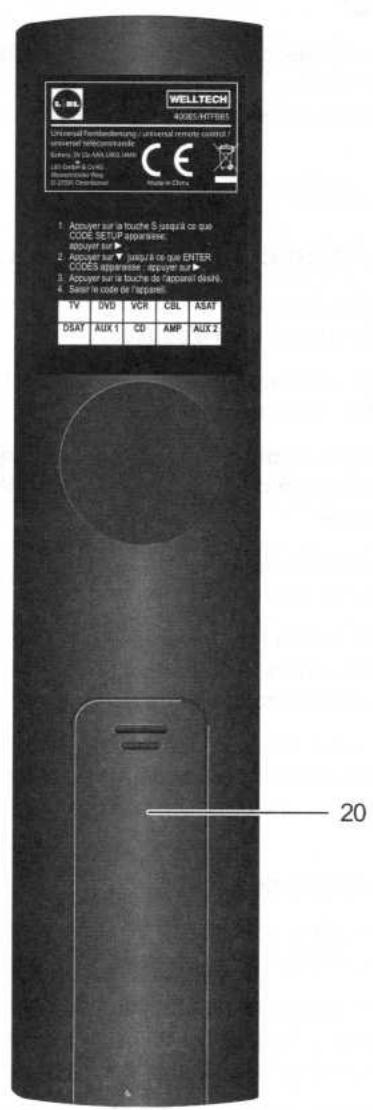
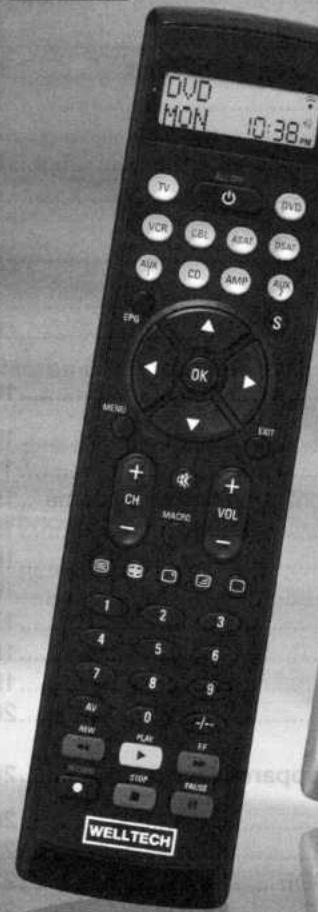
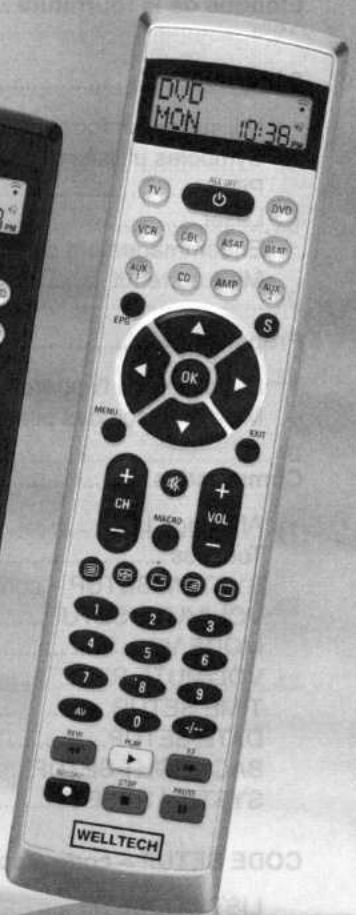
Device overview
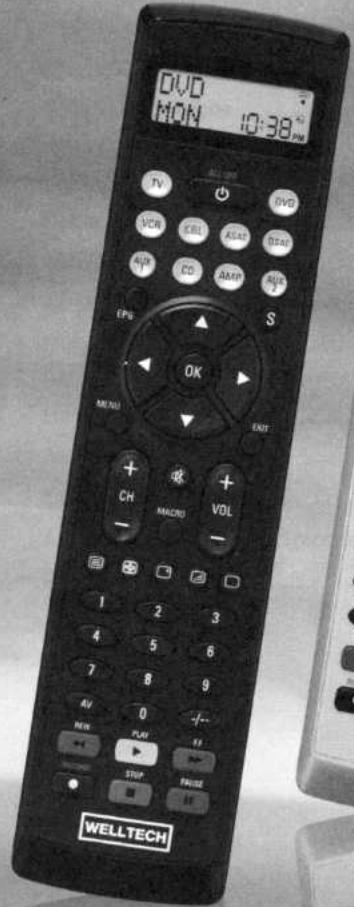
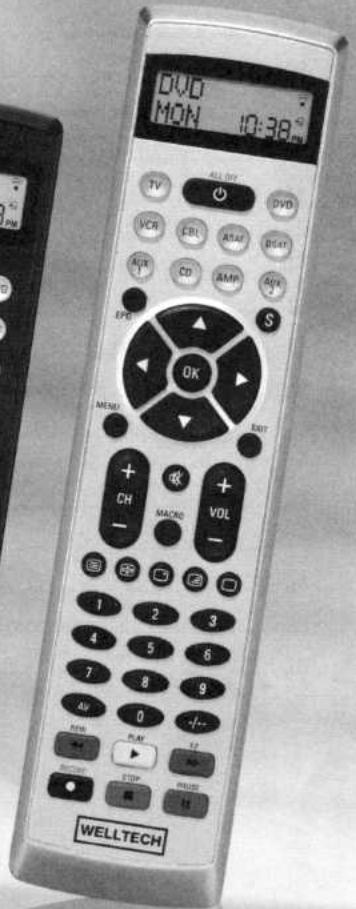
1 Infrared transmitter/receiver 2 LCD display with text field, number field and icon field 3 ALL OFF key 4 Keys corresponding to devices 5 S key 6 Arrow keys 7 OK key 8 EXIT key
9 Speaker key 10 VOL key 11 MACRO key 12 Teletext keys 13 Number keys 14 Key for program numbers in one/two positions 15 Playback keys and function keys 16 AV key 17 CH key 18 MENU key 19 EPG key
Scope of delivery
- Universal remote control
- Service instructions
- Device code list
We are pleased that you have chosen a 10in1 universal remote control. We hope this device will serve you well for many years.
Proper use as intended
Children should only use the remote control under adult supervision.
The universal remote control can replace a maximum of ten remote controls.
It can only be used for entertainment electronics devices with an infrared receiver.
The functions are those of the original remote controls.
It is intended for use in the private domain only. It is not suitable for professional use.
Any other use is not considered proper use. The manufacturer is not responsible for any damage resulting from improper use.
Service instructions
- Read these instructions in their entirety before using the device.
Symbols used in these instructions
Important safety instructions are particularly characterized by symbols. Strictly observe these instructions to prevent accidents and device damage:

Warning
Indicates risks to persons and highlights potential injury hazards.

Caution
Indicates potential material damage.

Note
Tips and useful information for handling the device.

Risk of injury from improper battery handling
Batteries must be handled with particular care.
Please follow the following safety instructions:
- Remove batteries from their compartment as soon as they are used up.
- Do not throw batteries in the fire.
- Do not expose batteries to high temperatures.
- Remove batteries from the device if you do not use it for an extended period to prevent them from discharging. Risk of explosion! Batteries must not be recharged.
- Do not open or short-circuit batteries.
- Electrolyte leaking from a battery can cause skin irritation. Rinse with plenty of water in case of skin contact. If liquid gets in the eyes, do not rub them, but rinse with water and seek immediate medical attention.
Laser
The universal remote control has a class 1 infrared diode. A safety system prevents dangerous laser rays from escaping during operation.
Do not manipulate or damage the safety system of the device to avoid eye injury.
Device damage
- When the device is defective, do not attempt to repair it yourself. In case of damage, contact the manufacturer or its hotline service (see Warranty chapter). If liquid has entered the device or it has been damaged in any other way, it must be checked by the manufacturer or its hotline service. Contact the manufacturer or its hotline service (see Warranty chapter).
Disposal

Devices bearing this symbol are subject to European Directive 2002/96/CE. No used electrical or electronic device should be thrown in household waste. Proper disposal of a used device helps prevent
environmental pollution and endangering human health. For more information on the disposal of used devices, contact your local authority, waste disposal service or the store where you purchased the product.

Batteries should not be considered household waste! They contain toxic heavy metals and are considered special waste. Return used batteries to
a waste disposal center.

Warning
Risk of suffocation! Keep packaging away from children!
Playing with packaging presents a risk of suffocation.
- Unpack the device and its accessories.
- Check the scope of delivery (see chapter "Device overview").
- Remove the protective film from the LCD display (2).

Transport damage
If you notice transport damage, please contact After-Sales Service (see Warranty chapter).

Note
The universal remote control should only operate with 1.5 Volt batteries.
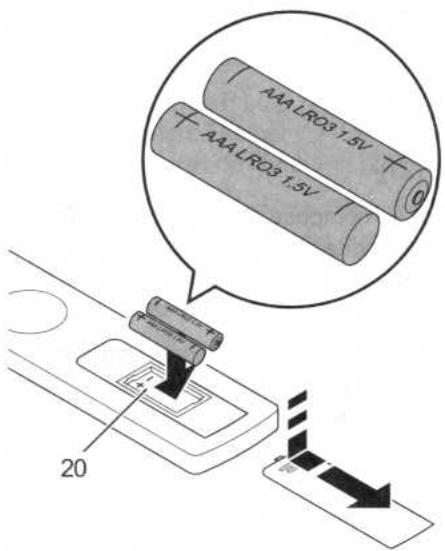
- Open the battery compartment (20) in the direction of the arrow.
- Insert the batteries as shown in the illustration and close the battery compartment.
The LCD display (2) is active as long as batteries are installed.
The illustration below shows the LCD display (2) after the batteries have been installed or replaced.
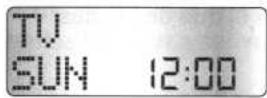
If the LCD display (2) remains off, check the battery polarity or install new batteries.
The LCD display (2) is explained in the chapter "LCD Display (2)".
LCD Display
The LCD display (2) is divided into fields.
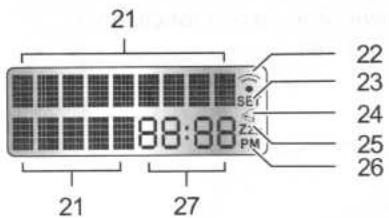
Text field (21)
The text field consists of two parts. The first line shows the current device, for example DVD, TV or VCR. The second line shows the day of the week or the device code.
The information shown in the second line of the LCD display (2) is presented on one line in these instructions.
Example:
| LCD Display | Service instructions |
| SYSTEM SETUP | "SYSTEM SETUP" |
Infrared symbol (22)
Each time a key is pressed, an infrared signal is sent and the infrared symbol lights up.
SET symbol (23)
The "SET" symbol indicates that the remote control is in "SETUP" mode and device codes can be entered.
Timer symbol (24)
The Timer symbol indicates that a timer function has been set and is active.
ZSS symbol (25)
The TV's "SLEEPTIMER" function is active. The television will turn off once the time has elapsed.
AM/PM symbol
If the time is set to 24-hour format, hours are displayed between 12:00 and 24:00 for the afternoon. (See chapter SYSTEM SETUP - system configurations).
Number field (27)
Display of time, date and device code.
Standard display
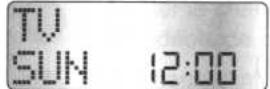
The standard LCD display (2) consists of information about the current device "TV".
The settings for the day are described in the chapters DATE SETUP and TIME SETUP.
Lighting
The LCD display (2) lights up as soon as you press a key on the remote control. The lighting turns off automatically.
The lighting time can be adjusted. See chapter "BACKLIGHT SETUP". The default time is 10 seconds.
All Off key (3)
Power on/off the device.
Device keys (4)
These keys allow you to select the device you want to use. The "TV" key is preset; all others can be freely assigned.

Television (TV)

DVD player (Digital Versatile Disc)

Video cassette recorder (VCR)

Cable connection

Analog satellite receiver (Analog Satellite)

Digital satellite receiver (Digital Satellite)

CD player (Compact Disc)

Amplifier

Access to "SETUP" menu or activation of the "SHIFT" function.
Arrow keys (6)
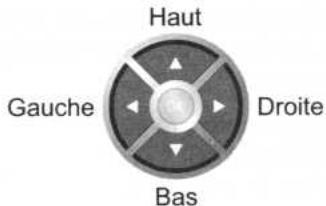
Navigate up, right, down and left in the menus.
OK key (7)

The OK key is used to confirm a menu selection.
EXIT key (8)

Exit the menu.
Speaker key (9)

Mute/unmute audio.
VOL key (10)
Volume adjustment (Volume).
MACRO key (11)
MACRO
The MACRO key (11), followed by a number key (12) 1, 2 or 3, activates stored commands.
Teletext keys (12)

Activate teletext.

Stop automatic page change of teletext when there are multiple pages.

Display information about the selected device.

- Simultaneous display of teletext and television program.

Turn off teletext.
Number keys (13)


Identification of program and device code.


program and


Key for program numbers in one/two positions (14)

Key for program numbers in one/two positions
For two-digit program numbers, first press the key (14), then enter the program number using the number keys (13).
Playback keys and function keys
The playback keys REW, PLAY, F.F, RECORD, STOP and PAUSE control devices such as DVD, VCR and CD player.
The colored function keys provide access to topics in the offered teletext pages.

REW - fast rewind, teletext, red topic.

PLAY - playback, teletext, yellow topic.

F - fast forward, teletext, blue topic.

RECORD - recording. Press twice to record.

STOP - stop playback, teletext, green topic.

PAUSE - freeze frame, teletext, magenta topic.
AV key (16)

Change video input source (SCART).
CH key (17)
Television channel change.
MENU key (18)
MENU
To access the menu.

EPG key (19)

The EPG key activates the following functions depending on the selected device:
TV: Access to electronic program guide for satellite television.
DVD: Access to title menu.
VCR: Access to ShowView.

Note
Check in your video cassette recorder service instructions whether the "ShowView" function is supported.
System Setup - System configurations
Allow you to adjust:
- "VOL/MUTE SETUP" for volume adjustment at device startup.
- "TIME SETUP" for time format and time.
- "DATE SETUP" for date, year and day of the week.
- Background lighting of the LCD display "BACKLIGHT SETUP".
- Reset all settings to factory defaults "SYSTEM RESET"
See the "SYSTEM SETUP Overview" diagram.
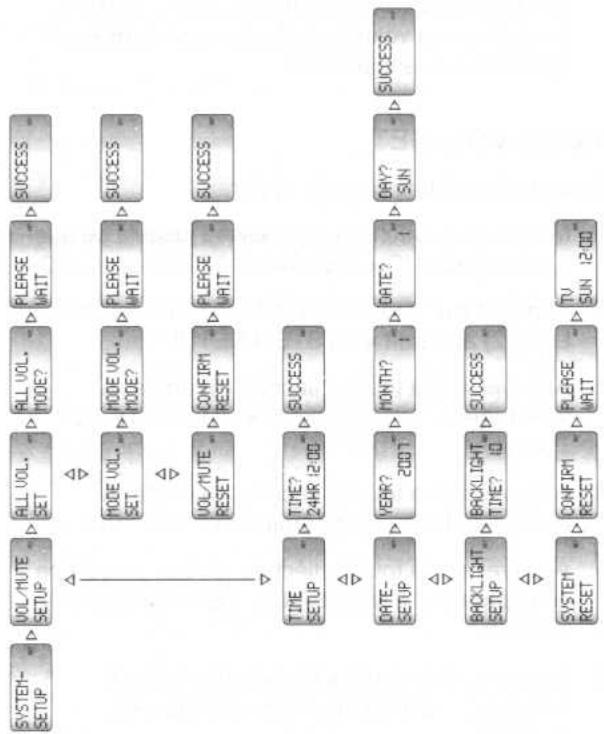
SYSTEM SETUP Overview
All devices use their own volume setting as long as they have one.
If a playback device such as a video cassette recorder or DVD player does not have its own volume setting, this setting is automatically switched to that of the television (function "Punch Through").
The "VOL/MUTE SETUP" function allows you to adjust the volume through another device such as the television.
- Hold down the S key (5) until "CODE SETUP" appears on the LCD display.
- Press the arrow key (6) down to display "SYSTEM SETUP".
- Press the arrow key (6) right to display "VOL/MUTE SETUP"
- Press the arrow key to display "ALL VOL. SET"
- Press the arrow key to display "ALL VOL. MODE?"
- Press the desired key (4) such as "TV". The LCD display shows "PLEASE WAIT". Volume adjustment is performed for all devices via the television.
Mode vol. set
Volume adjustment for a single device.
- Hold down the S key (5) until "CODE SETUP" appears on the LCD display.
- Press the arrow key (6) down to display "SYSTEM SETUP".
- Press the arrow key (6) right to display "VOL/MUTE SETUP"
- Press the arrow key to display "ALL VOL. SET"
- Press the arrow key (6) down until "MODE VOL. SET" appears on the LCD display (2).
- Press the arrow key (6) right. The LCD display (2) shows "MODE VOL. MODE?"
- Press the desired key (4) such as "DVD". The LCD display shows "PLEASE WAIT". Volume is adjusted via the selected device. Automatic switching of volume adjustment to the television is disabled.
Reset all VOL/MUTE settings to factory defaults.
- Hold down the S key (5) until "CODE SETUP" appears on the LCD display.
- Press the arrow key to display "SYSTEM SETUP".
- Press the arrow key (6) right to display "VOL/MUTE SETUP"
- Press the arrow key (6) right. The LCD display (2) shows "ALL VOL. SET"
- Press the arrow key (6) down until "MODE VOL. RESET" appears on the LCD display (2).
- Press the arrow key (6) right. The LCD display (2) shows "CONFIRM RESET"
- Press the arrow key to first display "PLEASE WAIT" then "SUCCESS". The remote control has been reset to factory defaults.
Time format and time adjustment.

Note
Press the arrow key (6) up or down to select the 12-hour display. All other settings are explained based on the 24-hour display example.
- Hold down the S key (5) until "CODE SETUP" appears on the LCD display (2).
- Press the arrow key (6) down to display "SYSTEM SETUP".
- Right to display "VOL/MUTE SETUP".
- Press the arrow key (6) down until "TIME SETUP" appears on the LCD display (2).
- Right. The LCD display (2) shows "TIME? 24HR 12:00". "24HR" is flashing.

Note
Press the arrow key (6) up or down to set the 12-hour display. All other settings are explained based on the 24-hour display example.
- Right. The LCD display (2) shows "TIME? 24HR 12:00". The hours are flashing.
- Press the arrow key (6) up or down to adjust the hours.
- Press the arrow key (6) right. The minutes are flashing.
- Press the arrow key (6) up or down to adjust the minutes.
- Right. The LCD display (2) shows "SUCCESS".
- Press the EXIT key (8) until the standard LCD display appears.

Note
If no input is made for approximately 30 seconds, "TIMEOUT" appears on the LCD display (2). It then automatically returns to the standard display.
Adjustment of year, month, day and day of the week.
- Hold down the S key (5) until "CODE SETUP" appears on the LCD display (2).
- Press the arrow key (6) down to display "SYSTEM SETUP".
- Press the arrow key (6) right to display "VOL/MUTE SETUP".
- Down until "DATE SETUP" appears on the LCD display (2).
- Right. The LCD display (2) shows "YEAR? 2006". The year digits are flashing.
- Up or down to adjust the year.
- Right. The LCD display (2) shows "MONTH? 1". The month is flashing.
- Press the arrow key (6) up or down to adjust the month.
- Right. The LCD display (2) shows "DATE? 1". The date is flashing.
- Up or down to adjust the day.
- Press the arrow key (6) right. The LCD display (2) shows "DAY? SUN". The day of the week letters are flashing.
- Press the arrow key (6) up or down to adjust the day of the period.
- Right. The LCD display (2) shows "SUCCESS".
- Press the EXIT key (8) until the standard LCD display appears.

Note
If no input is made for approximately 30 seconds, "TIMEOUT" appears on the LCD display (2). It then automatically returns to the standard display.
Backlight setup
Adjustment of the LCD display lighting time. The lighting time can be changed in 5 second increments.
- Hold down the S key (5) until "CODE SETUP" appears on the LCD display (2).
- Press the arrow key (6) down to display "SYSTEM SETUP".
- Press the arrow key (6) right to display "VOL/MUTE SETUP".
- Press the arrow key (6) down until "BACKLIGHT SETUP" appears on the LCD display (2).
- Right. The LCD display (2) shows "BACKLIGHT TIME?". The seconds are flashing.
- Press the arrow key (6) up or down to adjust the seconds.
- Right. The LCD display (2) shows "SUCCESS".
- Press the EXIT key (8) until the standard LCD display appears.

Note
If no input is made for approximately 30 seconds, "TIMEOUT" appears on the LCD display (2). It then automatically returns to the standard display.
System Reset
The remote control can be reset to factory defaults.

Note
All device codes, all system configurations, learned functions and macros are deleted.
- Hold down the S key (5) until "CODE SETUP" appears on the LCD display (2).
- Press the arrow key (6) down to display "SYSTEM SETUP".
- Press the arrow key (6) right to display "VOL/MUTE SETUP".
- Press the arrow key (6) down until "SYSTEM RESET" appears on the LCD display (2).
- Press the arrow key (2) shows "CONFIRM RESET".
- Press the arrow key to display "PLEASE WAIT". All system configurations have been reset to factory defaults.
Code setup - device code
In order to control a device with the remote control, a code must be entered for each device.
Device codes are entered as follows:
With "LIST CODES" from the remote control's internal device list. With "ENTER CODES" from the additional manual "device code list". By automatic or manual search via "SEARCH CODES". With "BRAND CODES" from the "Manufacturer Keys" table.
See the "CODE SETUP Overview" diagram.
Code List
Select the device code from the remote control's internal list: TV, VCR, LD, DVD, etc.

Note
To end the entry, press the EXIT key (8).
- Turn on the device you want to program the remote control for.

Note
For the television, press the TV button (4), then continue to step 7.
- Press the arrow button (6) up or down. On the LCD display (2) appears the next device.
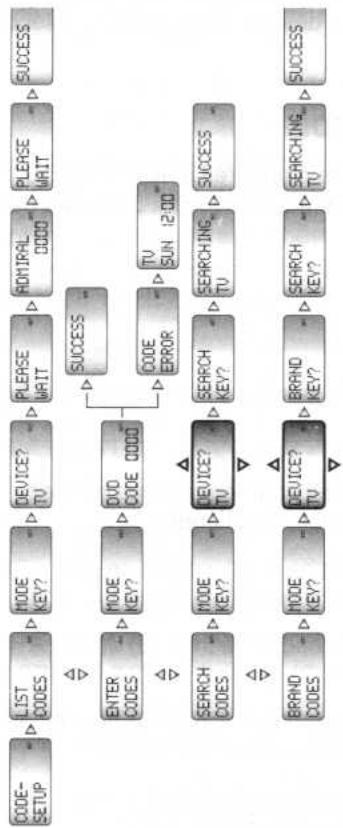
You will find all entries in the device list in the "CODE SETUP Overview" diagram.
- Confirm the selection with the OK button (7) displays first "PLEASE WAIT" then the first entry in the manufacturer list, for example "ADMIRAL 0000".
- Press the arrow button (6) up or down displays the next manufacturer and its device code.
- Press different buttons on the remote control to test the functions. The device responds if you have selected the correct device code. Continue to step 12.
- Press the arrow button (6) to the left or right. The next device code of the same manufacturer appears on the LCD display (2).
- Repeat step 9.
- Press the OK button (7). The device code is saved. On the LCD display first appears "PLEASE WAIT" then "SUCCESS".
Repeat all steps 1 to 12 for all devices you wish to control with the remote control.
Code Entry
Search for the device code for "ENTER CODES" in the attached manual "Device Code List".

Note
To end code entry, press the EXIT button (8).
- Turn on the device you wish to program with the remote control.
- Hold the S button (5) until "CODE SETUP" appears on the LCD display (2).
- Press the arrow button (6) right displays "LIST CODES".
- Press the arrow button (6) down displays "ENTER CODES".
- Press the arrow button displays "MODE KEY?"
- Press the desired device button (4). On the LCD display (2) appears for example "CODE 0001"
- Search for the device code in the manual "Device Code List".
- Enter the device code with the number buttons (13). On the LCD display (2) appears "SUCCESS". "CODE ERROR" appears on the display when the entered device code is incorrect. Repeat steps 2 to 8.
Repeat steps 1 to 8 for all devices you wish to control with the remote control.
Automatic Search
Perform automatic search for the device code in the internal list of the remote control.

Note
To end the search, press the EXIT button (8).
- Turn on the device for which you wish to program the remote control.
- Hold the S button (5) until "CODE SETUP" appears on the LCD display (2).
- Press the arrow button (6) right. On the LCD display (2) appears "LIST CODES".
- Press the arrow button (6) down until "SEARCH CODES" appears on the LCD display (2).
- Press the arrow button (6) right displays "MODE KEY?"
- Press the desired device button (4) displays "DEVICE? TV"

Note
For the television, press the TV button (4), then continue to step 8.
- Press the arrow button (6) up or down displays the next device.
- Confirm the selection with the OK button (7) displays "SEARCH KEY?"
The remote control changes device code every second and sends an infrared signal. To set this time interval to 3 seconds, press twice in the next step.
- Press once. On the LCD display (2) appears "SEARCHING". The remote control automatically searches for the device code.

Note
The remote control searches forward in the device list. To change the search direction, press the "minus" button on CH (17). To search forward again, press the "plus" button on CH (17).
- Press the OK button (7) as soon as your device responds. The device code is saved. On the LCD display (2) appears "SUCCESS".
- For verification, press any buttons on the remote control. If your device only responds partially, repeat the steps with the next device code.
Manual Search
Manual search for the device code in the internal list of the remote control.

Note
To end the search, press the EXIT button (8).
- Turn on the device for which you wish to program the remote control.
- Hold the S button (5) until "CODE SETUP" appears on the LCD display (2).
- Press the arrow button (6) right. On the LCD display (2) appears "LIST CODES".
- Press the arrow button (6) down until "SEARCH CODES" appears on the LCD display (2).
- Press the arrow button displays "MODE KEY?"
- Press the desired device button (4). On the LCD display (2) appears "DEVICE? TV"

Note
For the television, touch the TV button (4), then continue to step 8.
- Press the arrow button (6) up or down displays the next device.
- Confirm the selection with the OK button (7) displays "SEARCH KEY?".

Note
The remote control searches forward in the device list. To change the search direction, press "minus" on the CH button (17). To search forward again, press "plus" on the CH button (17).
- Press the CH button (17) "plus" until your device responds.
- Press the OK button (7). The device code is saved. On the LCD display (2) appears "SUCCESS".
- For verification, press a few buttons on the remote control. If your device only responds partially, repeat the steps with the next device code.
Manufacturer Codes
Select a manufacturer key in the "Manufacturer Keys" table. You will find this table at the end of the service instructions.

Note
To end code entry, press the EXIT button (8).
- Turn on the device for which you wish to program the remote control.
- Hold the S button (5) until "CODE SETUP" appears on the LCD display (2).
- right. On the LCD display (2) appears "LIST CODES".
- Press the arrow button (6) down until "BRAND CODES" appears on the LCD display (2).
- right. On the display appears "MODE KEY?"
- Press the desired device button (4). On the LCD display (2) appears "DEVICE? TV"

Note
For the television, touch the TV button (4), then continue to step 8.
- Press the arrow button (6) up or down.
The next device in the list is displayed.

Note
You will find all the maintenance of the device list in the overview diagram.
- Confirm the selection with the OK button (7). On the LCD display (2) appears "BRAND CODES".
- Search for a manufacturer key in the "Manufacturer Keys" table in the appendix of the service instructions.
- Enter the manufacturer key with the number buttons (13). On the LCD display appears "SEARCH KEY?". Press the OK button (17) until the device responds. On the LCD display (2) appears "SEARCHING".

Note
To change the search direction, press the CH button (17) marked "minus".
- Press the OK button (7). The device code is saved. On the LCD display appears "SUCCESS".
- Press different buttons on the remote control to test the functions. If your device only responds partially, try with another manufacturer code from the table.
Repeat steps 1 to 11 for all devices you wish to control with the remote control.
Code Entry for Combined Devices
For combined devices such as TV/VCR or DVD/VCR, a code must be entered for each device.
Control of Combined Devices
Some combined devices, such as TV/VCR or DVD/VCR, have distinct buttons on their original remote control.
- Press the device button (4) "DVD". The DVD signal is sent.
- Press the S button (5). On the LCD display (2) appears "DVD (S) DATE 1:1".
- Press the device button (4) "DVD". The VCR signal is sent.

Note
Not all devices support switching between two devices with the S button (5).
Display of Device Code
The device code can be displayed for each device.
- Press and hold the device button (4) pressed. On the LCD display (2) appears for example "DVD CODE 0768".

Note
Note the device codes found in the "Personal Device Codes" table at the end of the service instructions.
Timer Setup - Timer Functions
Set automatic TV-off "SLEEPTIMER" and program automatic turn-on "TIMER".
See "TIMER SETUP Overview" diagram.
automatically turns off the television once the time has elapsed.
can be set between 1 and 90 minutes.
Program the "SLEEP TIMER" function.
- Turn on the television.
- Hold the S button (5) until "CODE SETUP" appears on the LCD display (2).
- Press the arrow button (6) down until "TIMER SETUP" appears on the LCD display (2).
- Press the arrow button (6) right. On the LCD display (2) appears "SLEEPTIM. TV".
TIMER SETUP
- Press the arrow button displays "TV SLEEP TIME?". The minutes flash.
- Press the arrow button displays "TV SLEEP TIME?". The minutes flash.

Note
Make a choice between 1 and 90 minutes.
- Press the arrow button (6) up or down to set the minutes.
- right. On the LCD display (2) appears "SUCCESS", the Zzz symbol (25) appears in addition.
- Direct the remote control toward the television. Once the number of minutes has elapsed, the remote control is linked to the television.
- Press the EXIT button (8) until the standard LCD display appears.

Note
If no entry has been made for approximately 30 seconds, "TIMEOUT" appears on the LCD display (2). It then automatically returns to the standard display.
Disable the "SLEEP TIMER" function of the television.
- Hold the S button (5) until "CODE SETUP" appears on the LCD display (2).
- Press the arrow button (6) down until "TIMER SETUP" appears on the LCD display (2).
- Press the arrow button (6) right. On the LCD display (2) appears "SLEEPTIM. TV"
- Press the arrow button displays "TV SLEEP CLEAR".
- Press the arrow button (6) right. On the LCD display (2) appears "CONFIRM CLEAR"
- Press the arrow button displays "SUCCESS".
- Press the EXIT button (8) until the standard LCD display appears.
If no entry has been made for approximately 30 seconds, "TIMEOUT" appears on the LCD display (2). It then automatically returns to the standard display.

Note
If a "TIMER" is already programmed, it must first be deleted. See chapter "TIMER X CLEAR".
The remote control can be programmed with four "TIMER". Each "TIMER" can turn on a device. Each "TIMER" can be programmed with up to three buttons in succession one after the other.
TimerXset
Program "TIMER X". The "X" is a wildcard and replaces 1, 2, 3 or 4. All settings are described using the example of "TIMER 1".
- Hold the S button (5) until "CODE SETUP" appears on the LCD display (2).
- Press the arrow button (6) down until "TIMER SETUP" appears on the LCD display (2).
- right. On the LCD display (2) appears "SLEEPTIM. TV".
- Press the arrow button (6) down until "TIMER 1 SETUP" appears on the LCD display (2).
- 1) appears "TIMER 1 SETUP".
- displays "TIMER 1 TIME? 0:00". The hours flash.
- Press the arrow button (6) up or down to set the hours.
- right. The minutes flash.
- Press the arrow button (6) up or down to set the minutes.
- right displays "TIMER 1 MODE?"
- Press the desired device button (4) displays "TIMER 1 KEY 1".
To save fewer than three buttons, press the OK button (7).
- Press the desired buttons. On the LCD display (2) appear one after the other the displays "TIMER 1 KEY2", "TIMER 1 KEY3", "SUCCESS" then "CODE SETUP".
- Press the EXIT button (8) until the device, day of the week and time appear on the LCD display (2). The timer symbol (24) appears in addition.
- Direct the remote control toward the set device. Once the time has elapsed, the remote control turns on the device and executes the series of buttons in memory.
Turn off the "TIMER X" program.
The "X" corresponds to 1, 2, 3 or 4.
- Hold the S button (5) until "CODE SETUP" appears on the LCD display (2).
- Press the arrow button (6) down until "TIMER SETUP" appears on the LCD display (2).
- right displays "SLEEPTIM. TV".
- Press the arrow button (6) down. On the LCD display (2) appears "TIMER 1 SETUP"
- Press the arrow button (6) down until the desired "TIMER" appears on the LCD display (2).
- Press the arrow button (6) right. On the LCD display (2) appears "CONFIRM CLEAR"
- Press the arrow button displays first "SUCCESS" then "CODE SETUP".
- Press the EXIT button (8) until the standard LCD display appears.

Note
If no entry has been made for approximately 30 seconds, "TIMEOUT" appears on the LCD display (2). It then automatically returns to the standard display.
Learn Setup - Learning Functions
The universal remote control is able to learn the key signals from an original remote control.
Please note the following points:
- The learning function cannot learn more than 150 key signals. Use fresh batteries for the universal remote control and the original remote control.
- Observe at least one meter distance from other light sources. Light sources can interfere with infrared transmission.
- The learning function allows you to extend the set device codes.
- Place the universal remote control and the original remote control at a distance of 15 to 50 mm from each other on a flat surface. See "Distance between remote controls" diagram.
Distance between remote controls
Functions are available in the "LEARN SETUP" menu.
- Learn button signals from a device in "LEARN" mode,
- "MODE CLEAR" - delete learned buttons for a device,
- "ALL LEARN clear all devices.
See "LEARN SETUP Overview" diagram.

Note
Execute "ALL LEARN CLEAR" before executing "MODE LEARN" for the first time. See chapter "ALL LEARN CLEAR".
Learn the key signals from an original remote control.
- Hold the S button (5) until "CODE SETUP" appears on the LCD display (2).
- Press the arrow button (6) down until "LEARN SETUP" appears on the LCD display (2).
- right. On the LCD display (2) appears "MODE LEARN".
- Press the arrow button displays "MODE LEARN"
- Press the desired device button (4). displays "LEARN KEY?"
- Press the desired button on the universal remote control. For example the play button (14) "PLAY". displays "LEARNING".
Press the "LEARN SETUP" button
If "LEARNING ERROR" appears on the LCD display (2), repeat the learning function from step 5.
- Hold the button pressed on the original remote control until first "SUCCESS" then "LEARN MORE?" appears on the LCD display (2).

Note
To end learning, press the EXIT button (8).
- Press the right arrow button (6) On the LCD display (2) appears "LEARN MORE?".
Repeat steps 5 to 7
Delete learned buttons from a device.
- Hold the S button (5) until "CODE SETUP" appears on the LCD display (2).
- Press the arrow button (6) down until "LEARN SETUP" appears on the LCD display (2).
- right. On the LCD display (2) appears "MODE LEARN".
- Press the arrow button (6) down until "MODE CLEAR" appears on the LCD display (2).
- right. On the display appears "MODE KEY?"
- Press the desired device button (4) displays "CONFIRM CLEAR".
- Press the arrow button (6) right displays first "PLEASE WAIT" then "SUCCESS".
Delete learned buttons from all devices.
- Hold the S button (5) until "CODE SETUP" appears on the LCD display (2).
- Press the arrow button displays "MODE LEARN".
- Press the arrow button (6) down until "ALL LEARN CLEAR" appears on the LCD display (2).
- Press the arrow button (6) right. On the LCD display (2) appears "CONFIRM CLEAR"
- Press the arrow button displays first "PLEASE WAIT" then "SUCCESS". The standard display then appears.
Macro Setup - Macro Functions
The macro function allows you to save a series of button presses. The MACRO button (11) and the number buttons (13) 1, 2 or 3 allow you to access the saved macro. The saved series of buttons is automatically executed.
Example of a series of buttons:
turn on the television, change the television channel, turn on the VCR, record a program.
The macro function allows you to save three different macros. Each macro can save a maximum of ten buttons.
See the "MACRO SETUP Overview" diagram.
3 10
MACRO SETUP Overview
Program and save a macro.
- Hold the S button (5) until "CODE SETUP" appears on the LCD display (2).
- Press the arrow button (6) down until "MACRO SETUP" appears on the LCD display (2).
- Press the arrow button (6) right. On the LCD display (2) appears "MACRO SET"
- Press the arrow button displays "MACRO KEY?"
- Press the number button (12) 1, 2 or 3 displays for example "MACRO 1 MODE?".
- Press the desired device button (4) displays "MACRO 1 KEY?".

Note
The macro is automatically saved after ten button presses.
Press the MACRO button (11) to save the macro.
- Press the desired series of buttons. With each button press, the counter moves to the next number: "MACRO 1 KEY? 03", "MACRO 1 KEY? 04", etc. The macro is saved after the tenth button press and "SUCCESS" appears on the LCD display (2).

Note
Note the programmed macros in the "Custom Macros" table at the end of the service instructions.

Note
The remote control must remain directed toward the devices.
- Press the MACRO button (11). On the LCD display (2) appears "MACRO KEY?"

Note
On the LCD display (2) appears for example "MACRO 1. VOID" when no macro has been saved under 1. 2. Press the number button (12) 1, 2 or 3. On the LCD display (2) appears for example "MACRO 1". The infrared symbol (22) flashes and the saved series of buttons is sent.
Delete a macro from memory.
- Hold the S button (5) until "CODE SETUP" appears on the LCD display (2).
- Press the arrow button (6) down until "MACRO SETUP" appears on the LCD display (2).
- Press the arrow button (6) right. On the LCD display (2) appears "MACRO SET"
- Press the arrow button (6) down displays "MACRO CLEAR".
- Press the arrow button (6) right displays "MACRO KEY?"
- Press the number button (12) 1, 2 or 3 displays "CONFIRM CLEAR".
- Press the arrow button (6) right displays first "PLEASE WAIT" then "SUCCESS".

Memory Function
Device codes and learned buttons are retained when batteries are changed.
Are immediately deleted
the time data, as well as the backlight time of the LCD display (2).
The data must be entered again after a battery change.
Change the batteries once a year or when the LCD display (2) is difficult to read,
or when the remote control does not respond to button presses.

Material Damage Due to Detergents.
Do not use corrosive solvents or household detergents.
Clean the device with a damp cloth. Make sure that no liquid enters the device, especially through the keyboard.
Elimination of Disturbances
| Disturbance | Possible Cause | Remedy |
| The universal remote control does not respond. | The device (e.g. TV) is defective. | Check the operation of the device (e.g. TV) with the original remote control. |
| The batteries are inserted incorrectly. | Place the batteries with the correct polarity in their compartment. | |
| The batteries are discharged. | Install new batteries. | |
| Device codes are not saved. | The batteries are discharged. | Install new batteries. |
| LCD display (2) is weak. | Batteries discharged. | Install new batteries. |
| The device only responds partially to a button press. | The device code is incorrect. | Enter another device code from the manufacturer. |
| Search for the device code with the "AUTO-SEARCH" function. |
| Disturbance | Possible Cause | Remedy |
| The buttons of an original remote control cannot be learned. | The distance between the remote controls is too large or too small. | Change the distance. |
| The button of the original remote control does not work. | Check the operation of the original button. Does the device respond to a button press of the original remote control? |
Technical Specifications
| Manufacturer | L & S GmbH & Co. KG | |
| Device Type | Universal Remote Control 10in1 | |
| Model | 40085/HTFB85 | |
| Controllable Devices | 10 | |
| Dimensions | Length/Width/Height | 200 mm/48 mm/22 mm |
| Weight | 92 g | |
| Infrared Transmitter | Frequency | >100 kHz |
| Range | 8 m | |
| Angle | 50° | |
| Laser Class | 1 | |
| Power Supply | Battery: 3 V | 2x AAA, LR03, UM4 |
Manufacturer Keys
A manufacturer key is valid for multiple manufacturers. For example, enter key 3 for a Sharp device.
| Button | Manufacturer |
| 1 | Medion, Tchibo |
| 2 | Eye, Philco, Philips, Pye, Radiola |
| 3 | Akai, Daewoo, JVC, Panasonic, Sharp, Sony, Toshiba |
| 4 | Brandt, Fergusson, Thomson |
| 5 | Nordmende, Saba, Telefunken |
| 6 | Blaupunkt, Grundig |
Personal Macros
| Steps | Macro Buttons | ||
| 1 | 2 | 3 | |
| 1 | |||
| 2 | |||
| 3 | |||
| 4 | |||
| 5 | |||
| 6 | |||
| 7 | |||
| 8 | |||
| 9 | |||
| 10 | |||
Personal Device Codes
| Button | Device | Device Code |
| TV | ||
| DVD | ||
| VCR | ||
| CBL | ||
| ASAT | ||
| DSAT | ||
| AUX 1 | ||
| CD | ||
| AMP | ||
| AUX 2 |
Manufacturer and Compliance
Name of the distributor of product 40085/HTFB85 and all its accessories, as well as the person responsible according to the German device and product safety law (GPSG) and the person responsible for compliance with the directives for the use of the CE mark:
L&S GmbH & Co. KG
Westermoller Weg
25591 Ottenbüttel
Germany
You can request the declaration of conformity via the hotline service.
Any reproduction, duplication or translation, even partial, is prohibited without the written permission of the manufacturer.

Warranty Certificate Valid Only with Receipt
In case of a problem covered by warranty, please first contact our emergency number. Otherwise, free repair is no longer guaranteed.
3 Year Warranty

After-Sales Service
Hotline: 00800 456 654 45
(free - local landline network only)

L&S After-Sales Service
(free - local landline network only)
40085/HTFB85_08/07_FR-V1.0
Universal
L&S GmbH & Co. KG
Westernoer Weg
D-25591 Othenbittel

Universal Remote Control

Operating Instructions and Safety Guidelines
Model 40085/HTFB 85
Universal
L&S GmbH & Co. KG
Westmoller Weg
D-25591 Ottenbüttel
EN UNIVERSAL REMOTE CONTROL BE Code List Model 40085/HTFB 85
Televisions. 4
TV-VCR Combos 9
VCR. 9