
Latitude D505 - Laptop DELL - Free user manual and instructions
Find the device manual for free Latitude D505 DELL in PDF.


| Product Type | Laptop Computer |
| Brand | Dell |
| Model | Latitude D505 |
| Processor | Intel Pentium M or Celeron |
| Memory | DDR SDRAM (user-upgradeable) |
| Storage | Internal Hard Drive |
| Display | 14.1-inch or 15-inch TFT |
| Battery | Lithium-Ion, user-replaceable |
| AC Adapter | Dell-approved, 65W or 90W |
| Weight | Approximately 2.5 kg (5.5 lbs) |
| Dimensions | Approximately 315 x 260 x 33 mm |
| Wireless | Optional Dell TrueMobile or Bluetooth |
| Modem | Integrated 56K V.92 |
| Operating System | Windows XP or Windows 2000 |
| Diagnostics | Dell Diagnostics on hidden partition |
| Safety | ESD precautions, battery safety, ergonomic guidelines |
| Maintenance | Clean with soft cloth dampened with water |
| User-Replaceable Parts | Battery, memory, Mini PCI card, modem, Bluetooth, reserve battery |
| Regulatory | FCC, EMC compliant |
| Year of Manufacture | 2003 |
Frequently Asked Questions - Latitude D505 DELL
User questions about Latitude D505 DELL
0 question about this device. Answer the ones you know or ask your own.
Ask a new question about this device
Download the instructions for your Laptop in PDF format for free! Find your manual Latitude D505 - DELL and take your electronic device back in hand. On this page are published all the documents necessary for the use of your device. Latitude D505 by DELL.
USER MANUAL Latitude D505 DELL
Notes, Notices, and Cautions
NOTE: A NOTE indicates important information that helps you make better use of your computer.
NOTICE: A NOTICE indicates either potential damage to hardware or loss of data and tells you how to avoid the problem.
CAUTION: A CAUTION indicates a potential for property damage, personal injury, or death.
Abbreviations and Acronyms
For a complete list of abbreviations and acronyms, see the User's Guide (depending on your operating system, double-click the User's Guide icon on your desktop, or click the Start button, click Help and Support Center, and then click User and system guides).
If you purchased a Dell ^™ n Series computer, any references in this document to Microsoft ^® Windows ^® operating systems are not applicable.
Information in this document is subject to change without notice. © 2003 Dell Inc. All rights reserved.
Reproduction in any manner whatsoever without the written permission of Dell Inc. is strictly forbidden.
Trademarks used in this text: Dell, the DELL logo, TrueMobile, and Latitude are trademarks of Dell Inc.; Intel, Pentium, and Celeron are registered trademarks of Intel Corporation; Microsoft and Windows are registered trademarks of Microsoft Corporation; Bluetooth is a trademark owned by Bluetooth SIG, Inc. and is used by Dell Inc. under license.
Other trademarks and trade names may be used in this document to refer to either the entities claiming the marks and names or their products. Dell Inc. disclaims any proprietary interest in trademarks and trade names other than its own.
Model PP10L
October 2003 P/N N1212 Rev. A01
Contents
CAUTION: Safety Instructions 5
SAFETY: General 5
SAFETY: Power 6
SAFETY: Battery. 6
SAFETY: Air Travel 6
SAFETY: EMC Instructions 7
When Using Your Computer 7
SAFETY: Ergonomic Computing Habits 8
SAFETY: When Working Inside Your Computer 8
SAFETY: Protecting Against Electrostatic Discharge 8
SAFETY: Battery Disposal 9
Finding Information for Your Computer 10
Setting Up Your Computer 13
About Your Computer 15
Front View 15
Left View 16
Right View 16
Back View 17
Bottom View 17
Removing a Battery 18
Removing and Installing a Reserve Battery 19
Installing a Battery 20
Dell Diagnostics 21
When to Use the Dell Diagnostics 21
Regulatory Notices 24

CAUTION: Safety Instructions
Use the following safety guidelines to help ensure your own personal safety and to help protect your computer and working environment from potential damage.
SAFETY: General
- Do not attempt to service the computer yourself unless you are a trained service technician. Always follow installation instructions closely.
- If you use an extension power cable with your AC adapter, ensure that the total ampere rating of the products plugged in to the extension power cable does not exceed the ampere rating of the extension cable.
- Do not push objects into air vents or openings of your computer. Doing so can cause fire or electric shock by shorting out interior components.
- Do not store your computer in a low-airflow environment, such as a carrying case or a closed briefcase, while the computer is turned on. Restricting airflow can damage the computer or cause a fire.
- Keep your computer away from radiators and heat sources. Also, do not block cooling vents. Avoid placing loose papers underneath your computer; do not place your computer in a closed-in wall unit or on a bed, sofa, or rug.
- Place the AC adapter in a ventilated area, such as a desk top or on the floor, when you use it to run the computer or to charge the battery. Do not cover the AC adapter with papers or other items that will reduce cooling; also, do not use the AC adapter inside a carrying case.
- The AC adapter may become hot during normal operation of your computer. Use care when handling the adapter during or immediately after operation.
- Do not allow your portable computer to operate with the base resting directly on exposed skin for extended periods of time. The surface temperature of the base will rise during normal operation (particularly when AC power is present). Allowing sustained contact with exposed skin can cause discomfort or, eventually, a burn.
- Do not use your computer in a wet environment, for example, near a bath tub, sink, or swimming pool or in a wet basement.
- If your computer includes an integrated or optional (PC Card) modem, disconnect the modem cable if an electrical storm is approaching to avoid the remote risk of electric shock from lightning via the telephone line.
- To help avoid the potential hazard of electric shock, do not connect or disconnect any cables or perform maintenance or reconfiguration of this product during an electrical storm. Do not use your computer during an electrical storm unless all cables have been disconnected and the computer is operating on battery power.
- If your computer includes a modem, the cable used with the modem should be manufactured with a minimum wire size of 26 American wire gauge (AWG) and an FCC-compliant RJ-11 modular plug.
- Before you open the memory module cover or the Mini PCI card cover on the bottom of your computer, disconnect all cables from their electrical outlets and disconnect the telephone cable.
- If your computer has both a modem RJ-11 connector and a network RJ-45 connector, which look alike, make sure you insert the telephone cable into the RJ-11 connector, not the RJ-45 connector.
- PC Cards may become very warm during normal operation. Use care when removing PC Cards after their continuous operation.
- Before you clean your computer, disconnect the computer from the electrical outlet. Clean your computer with a soft cloth dampened with water. Do not use liquid or aerosol cleaners, which may contain flammable substances.
SAFETY: Power
- Use only the Dell-provided AC adapter approved for use with this computer. Use of another AC adapter may cause a fire or explosion.
- Before you connect the computer to an electrical outlet, check the AC adapter voltage rating to ensure that the required voltage and frequency match the available power source.
- To remove the computer from all power sources, turn the computer off, disconnect the AC adapter from the electrical outlet, and remove any battery installed in the battery bay or module bay.
- To help prevent electric shock, plug the AC adapter and device power cables into properly grounded power sources. These power cables may be equipped with 3-prong plugs to provide an earth grounding connection. Do not use adapter plugs or remove the grounding prong from the power cable plug. If you use a power extension cable, use the appropriate type, 2-prong or 3-prong, to mate with the AC adapter power cable.
- Be sure that nothing rests on your AC adapter's power cable and that the cable is not located where it can be tripped over or stepped on.
- If you are using a multiple-outlet power strip, use caution when plugging the AC adapter's power cable into the power strip. Some power strips may allow you to insert the plug incorrectly. Incorrect insertion of the power plug could result in permanent damage to your computer, as well as risk of electric shock and/or fire. Ensure that the ground prong of the power plug is inserted into the mating ground contact of the power strip.
SAFETY: Battery
- Use only Dell™ battery modules that are approved for use with this computer. Use of other types may increase the risk of fire or explosion.
- Do not carry a battery pack in your pocket, purse, or other container where metal objects (such as car keys or paper clips) could short-circuit the battery terminals. The resulting excessive current flow can cause extremely high temperatures and may result in damage to the battery pack or cause fire or burns.
- The battery poses a burn hazard if you handle it improperly. Do not disassemble it. Handle a damaged or leaking battery pack with extreme care. If the battery is damaged, electrolyte may leak from the cells and may cause personal injury.
- Keep the battery away from children.
- Do not store or leave your computer or battery pack near a heat source such as a radiator, fireplace, stove, electric heater, or other heat-generating appliance or otherwise expose it to temperatures in excess of 60^ C ( 140^ F). When heated to excessive temperatures, battery cells could explode or vent, posing a risk of fire.
- Do not dispose of your computer's battery in a fire or with normal household waste. Battery cells may explode. Discard a used battery according to the manufacturer's instructions or contact your local waste disposal agency for disposal instructions. Dispose of a spent or damaged battery promptly.
SAFETY: Air Travel
- Certain Federal Aviation Administration regulations and/or airline-specific restrictions may apply to the operation of your Dell computer while you are on board an aircraft. For example, such regulations/restrictions may prohibit the use of any personal electronic device (PFD) that has the capacity for intentional transmission of radio frequency or other electromagnetic signals while on an aircraft.
- In order to best comply with all such restrictions, if your Dell portable computer is equipped with Dell TrucMobile™ or some other wireless communication device, please disable this device before you board the aircraft and follow all instructions provided by airline personnel with regard to such device.
- Additionally, the use of any PED, such as a portable computer, may be prohibited in aircraft during certain critical phases of flight, for example, takeoff and landing. Some airlines may further define the critical flight phase as any time the aircraft is below 3050m (10,000 ft). Please follow the airline's specific instructions as to when the use of a PED is allowed.
SAFETY: EMC Instructions
Use shielded signal cables to ensure that you maintain the appropriate electromagnetic compatibility (FMC) classification for the intended environment. For parallel printers, a cable is available from Dell. If you prefer, you can order a cable from Dell at its worldwide website at www.dell.com.
Static electricity can harm electronic components inside your computer. To prevent static damage, discharge static electricity from your body before you touch any of your computer's electronic components, such as a memory module. You can do so by touching an unpainted metal surface on the computer's input/output panel.
When Using Your Computer
Observe the following safe-handling guidelines to prevent damage to your computer:
- When setting up the computer for work, place it on a level surface.
- When traveling, do not check the computer as baggage. You can put your computer through an X-ray security machine, but never put your computer through a metal detector. If you have the computer checked by hand, be sure to have a charged battery available in case you are asked to turn on the computer.
- When traveling with the hard drive removed from the computer, wrap the drive in a nonconducting material, such as cloth or paper. If you have the drive checked by hand, be ready to install the drive in the computer. You can put the hard drive through an X-ray security machine, but never put the drive through a metal detector.
- When traveling, do not place the computer in overhead storage compartments where it could slide around. Do not drop your computer or subject it to other mechanical shocks.
- Protect your computer, battery, and hard drive from environmental hazards such as dirt, dust, food, liquids, temperature extremes, and overexposure to sunlight.
- When you move your computer between environments with very different temperature and/or humidity ranges, condensation may form on or within the computer. To avoid damaging the computer, allow sufficient time for the moisture to evaporate before using the computer.

NOTICE: When taking the computer from low-temperature conditions into a warmer environment or from high-temperature conditions into a cooler environment, allow the computer to acclimate to room temperature before turning on power.
- When you disconnect a cable, pull on its connector or on its strain-relief loop, not on the cable itself. As you pull out the connector, keep it evenly aligned to avoid bending any connector pins. Also, before you connect a cable make sure both connectors are correctly oriented and aligned.
- Handle components with care. Hold a component such as a memory module by its edges, not its pins.
- When preparing to remove a memory module from the system board or disconnect a device from the computer, turn off the computer, disconnect the AC adapter cable, remove any battery installed in the battery bay or module bay, and then wait 5 seconds before proceeding to help avoid possible damage to the system board.
- Clean the display with a soft, clean cloth and water. Apply the water to the cloth; then stroke the cloth across the display in one direction, moving from the top of the display to the bottom. Remove moisture from the display quickly and keep the display dry. Long-term exposure to moisture can damage the display. Do not use a commercial window cleaner to clean your display.
- If your computer gets wet or is damaged, follow the procedures described in "Solving Problems" in your User's Guide. If, after following these procedures, you confirm that your computer is not operating properly, contact Dell (see "Getting Help" in your User's Guide for the appropriate contact information).
SAFETY: Ergonomic Computing Habits

CAUTION: Improper or prolonged keyboard use may result in injury.

CAUTION: Viewing the display or external monitor screen for extended periods of time may result in eye strain.
For comfort and efficiency, observe the ergonomic guidelines in the "Appendix" of your online User's Guide when setting up and using your computer.
This portable computer is not designed for continuous operation as office equipment. For extended use in an office, it is recommended that you connect an external keyboard.
SAFETY: When Working Inside Your Computer
Before removing or installing memory modules, Mini PCI cards, or modems, perform the following steps in the sequence indicated.

NOTICE: The only time you should ever access the inside of your computer is when you are installing memory modules or a Mini PCI card, modem, Bluetooth™ card, or reserve battery.

NOTICE: Wait 5 seconds after turning off the computer before disconnecting a device or removing a memory module, Mini PCI card, modem, Bluetooth card, or reserve battery to help prevent possible damage to the system board.
1 Shut down your computer and turn off any attached devices.
2 Disconnect your computer and devices from electrical outlets to reduce the potential for personal injury or shock. Also, disconnect any telephone or telecommunication lines from the computer.
3 Remove the main battery from the battery bay and, if necessary, the second battery from the module bay.
4 Ground yourself by touching any unpainted metal surface on the back of the computer.
5 While you work, periodically touch the unpainted metal surface to dissipate any static electricity that might harm internal components.
SAFETY: Protecting Against Electrostatic Discharge
Static electricity can harm electronic components inside your computer. To prevent static damage, discharge static electricity from your body before you touch any of your computer's electronic components, such as a memory module. You can do so by touching any unpainted metal surface on the back of the computer.
As you continue to work inside the computer, periodically touch any unpainted metal surface on the back of the computer to remove any static charge your body may have accumulated.
You can also take the following steps to prevent damage from electrostatic discharge (ESD):
- When unpacking a static-sensitive component from its shipping carton, do not remove the component from the antistatic packing material until you are ready to install the component. Just before unwrapping the antistatic packaging, be sure to discharge static electricity from your body.
- When transporting a sensitive component, first place it in an antistatic container or packaging.
- Handle all sensitive components in a static-safe area. If possible, use antistatic floor pads and workbench pads.
SAFETY: Battery Disposal

Your computer uses a lithium-ion battery and a lithium coin-cell battery. For instructions about replacing the lithium-ion battery in your computer, see "Removing a Battery" on page 18. The lithium coin-cell battery is a long-life battery, and it is very possible that you will never need to replace it. However, should you need to replace it, see "Removing and Installing a Reserve Battery" on page 19.
Do not dispose of the battery along with household waste. Contact your local waste disposal agency for the address of the nearest battery deposit site.
Finding Information for Your Computer
What are you looking for? Find It Here
• A diagnostic program for my computer
- Drivers for my computer
• My computer documentation
• My device documentation
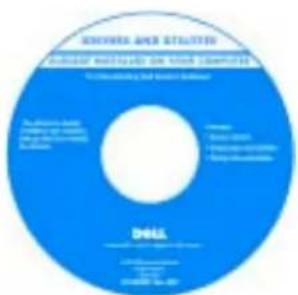
Drivers and Utilities CD (also known as the ResourceCD)
Documentation and drivers are already installed on your computer. You can use the CD to reinstall drivers, run the Dell Diagnostics, or access your documentation.
Readme files may be included on your CD to provide last-minute updates about technical changes to your computer or advanced technical-reference material for technicians or experienced users.
• How to set up my computer
- Warranty information
- Safety instructions
Dell™ System Information Guide
NOTE: This document is available as a PDF at support.euro.dell.com.
User's Guide
Microsoft ^® Windows ^® XP Help and Support Center
1 Click the Start button and click Help and Support. 2 Click User's and system guides and click User's guides.
Windows 2000
Double-click the User's Guides icon on your desktop.
What are you looking for? Find It Here
• Service Tag and Express Service Code
- Microsoft Windows License Label
Service Tag and Microsoft Windows License
These labels are located on your computer.
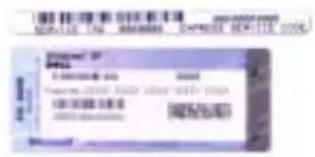
- Use the Service Tag to identify your computer when you use support.euro.dell.com or contact technical support.
- Enter the Express Service Code to direct your call when
contacting technical support. The Express Service Code is not available in all countries.
- Use the number on the Microsoft Windows License Label if you reinstall your operating system.
- Latest drivers for my computer
• Answers to technical service and support questions
• Online discussions with other users and technical support
• Documentation for my computer
Dell Support Website — support.euro.dell.com
The Dell Support website provides several online tools, including:
- Solutions — Troubleshooting hints and tips, articles from technicians, and online courses
• Community — Online discussion with other Dell customers - Upgrades — Upgrade information for components, such as memory, the hard drive, and the operating system
- Customer Care — Contact information, order status, warranty, and repair information
- Downloads — Drivers, patches, and software updates
- Reference — Computer documentation, product specifications, and white papers
Dell Premier Support Website — premiersupport.dell.com
The Dell Premier Support website is customized for corporate, government, and education customers. This website may not be available in all regions.
• Service call status and support history
• Top technical issues for my computer
• Frequently asked questions
- File downloads
• Details on my computer configuration
• Service contract for my computer
• How to use Windows XP
• Documentation for my computer
- Documentation for devices (such as a modem)
Windows Help and Support Center
1 Click the Start button and click Help and Support.
2 Type a word or phrase that describes your problem and click the arrow icon.
3 Click the topic that describes your problem.
4 Follow the instructions on the screen.
What are you looking for? Find It Here
• How to reinstall my operating system
Operating System CD
The operating system is already installed on your computer. To reinstall your operating system, use the Operating System CD. See your User's Guide for operating-system reinstallation instructions.
After you reinstall your operating system, use the Drivers and Utilities CD to reinstall drivers for the devices that came with your computer.
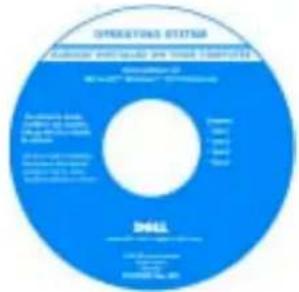
Your operating system product key label is located on your computer.
Setting Up Your Computer

CAUTION: Before you begin any of the procedures in this section, follow the safety instructions at the beginning of this document.
1 Unpack the accessories box.
2 Set aside the contents of the accessories box, which you will need to complete the setup of your computer.
The accessories box also contains user documentation and any software or additional hardware (such as PC Cards, drives, or batteries) that you have ordered.
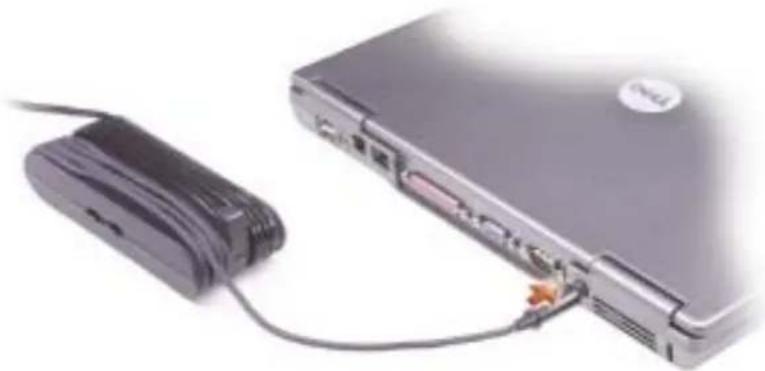
3 Connect the AC adapter to the AC adapter connector on the computer and to the electrical outlet.
natural_image
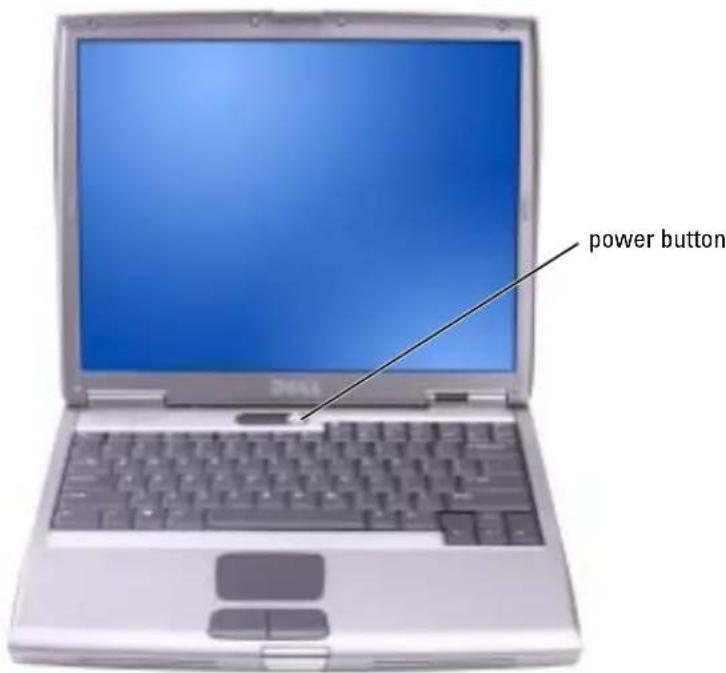
Close-up of a laptop connected to a cable with an attached USB port (no visible text or symbols)4 Open the computer display and press the power button to turn on the computer.
NOTE: Do not connect the computer to the docking device until the computer has been turned on and shut down at least once.
About Your Computer
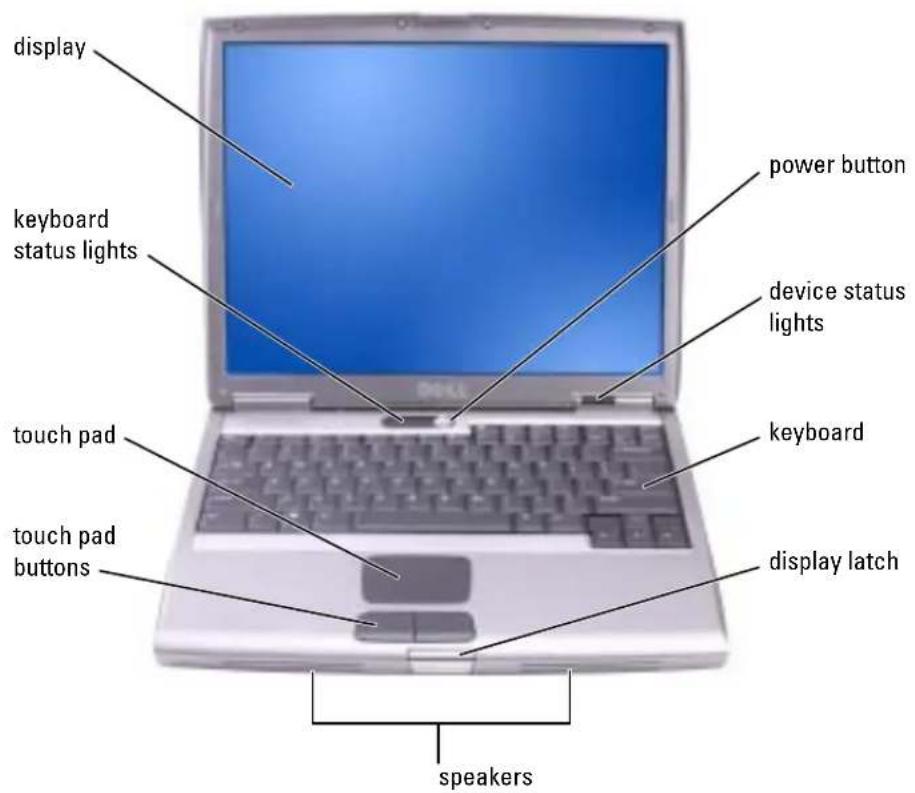
Front View
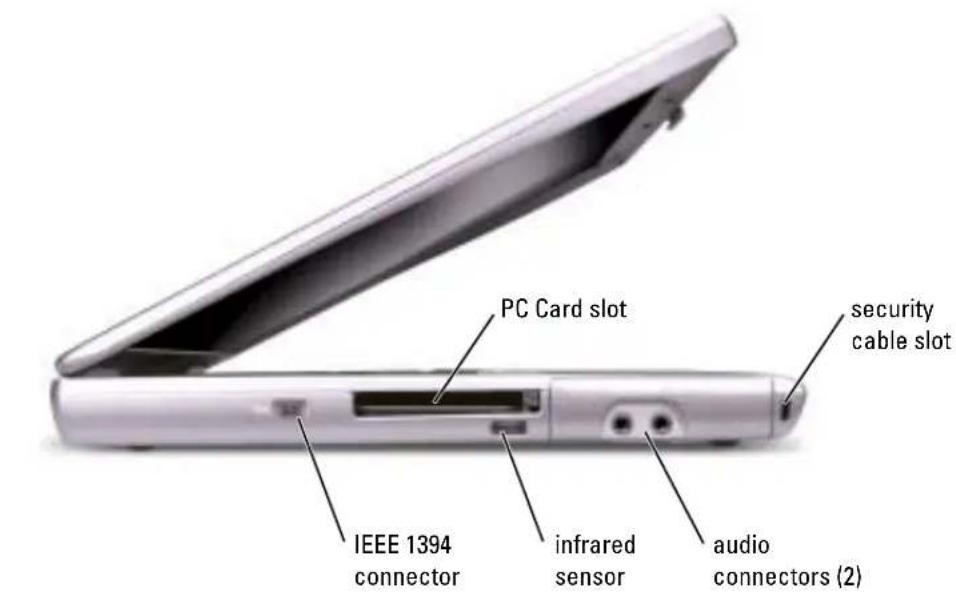
Left View
Right View
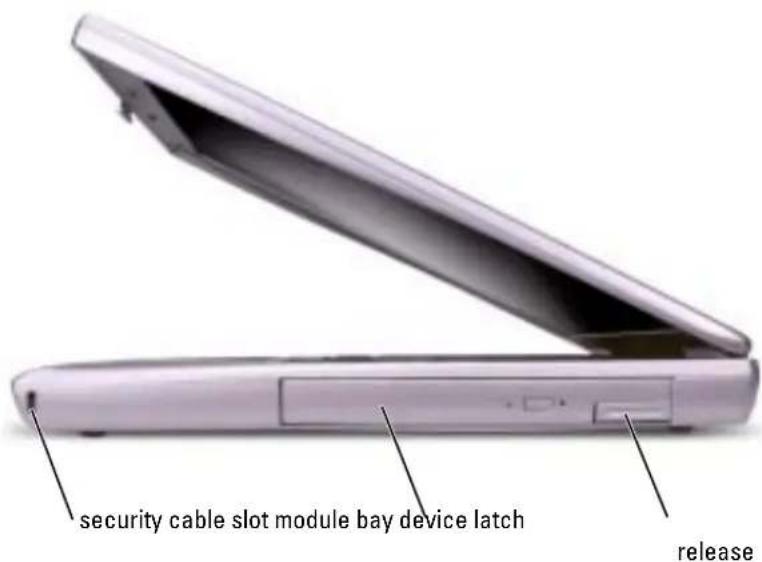
Back View

CAUTION: Do not block, push objects into, or allow dust to accumulate in the air vents. Do not store your computer in a low-airflow environment, such as a closed briefcase, while it is running. Restricting the airflow can damage the computer or cause a fire.
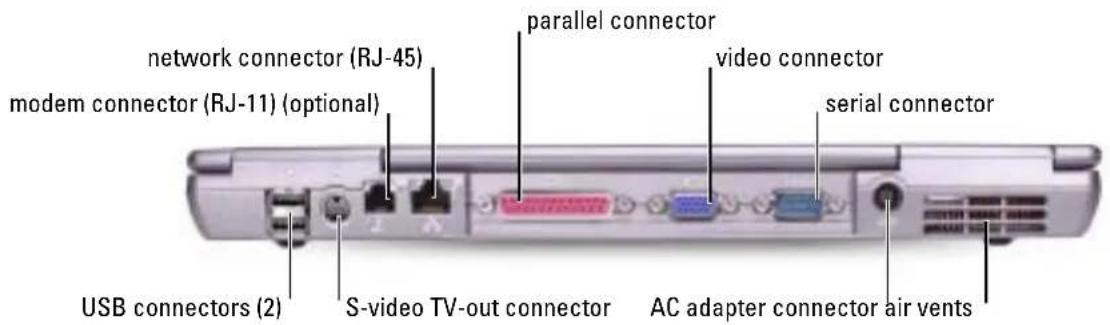
Bottom View
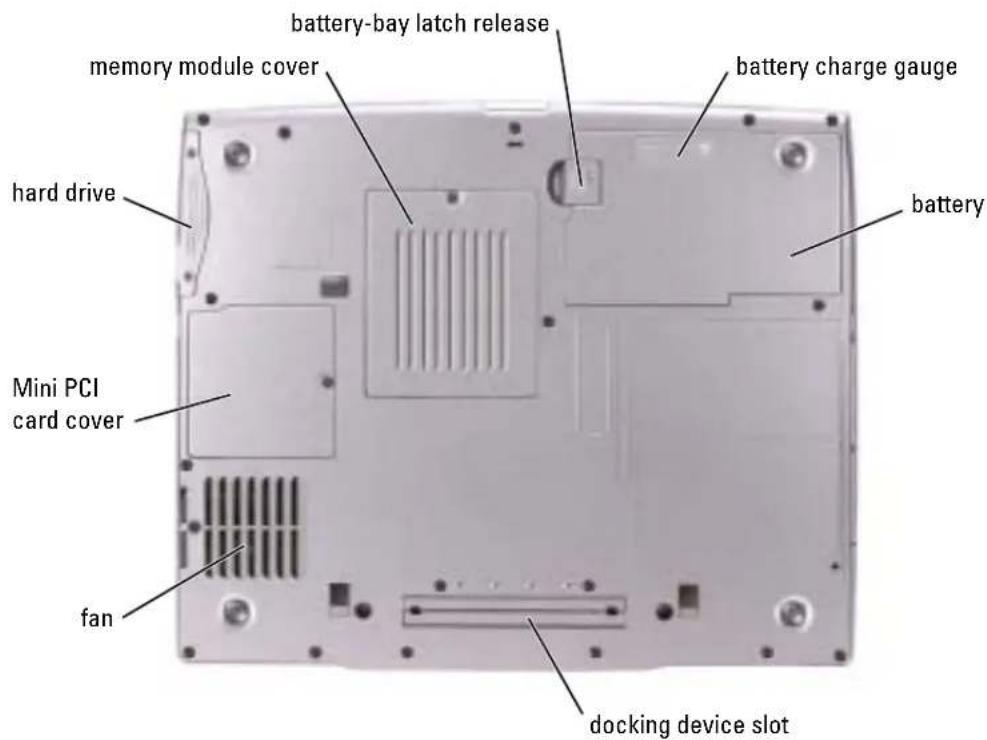
Removing a Battery
For more information about removing the second battery, see "Using the Module Bay" in your online User's Guide.

CAUTION: Before performing these procedures, turn off the computer, disconnect it from the electrical outlet, and disconnect the modem from the telephone wall jack.

NOTICE: If you choose to replace the battery with the computer in standby mode, you have up to 90 seconds to complete the battery replacement before the computer shuts down and loses any unsaved data.
1 Ensure that the computer is turned off, disconnected from an electrical outlet, and disconnected from the telephone wall jack.
2 If the computer is connected to a docking device (docked), undock it. See the documentation that came with your docking device for instructions.
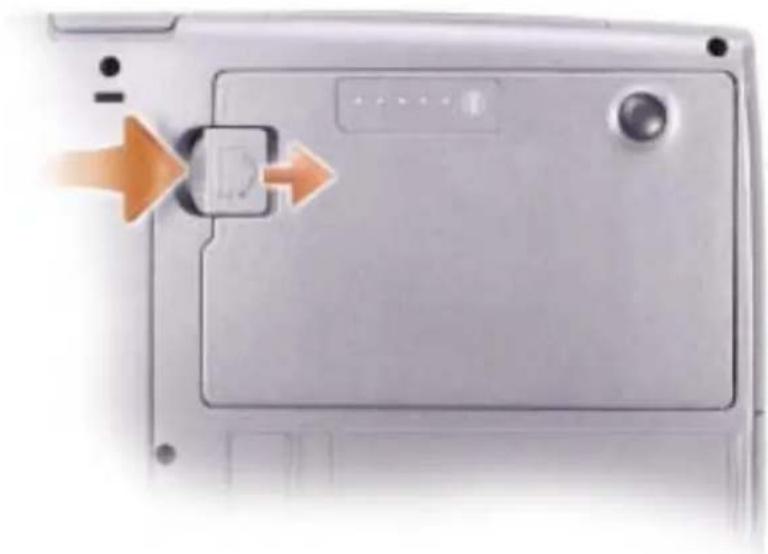
3 Slide and hold the battery-bay latch release on the bottom of the computer, and then remove the battery from the bay.
natural_image
Top-down view of a silver laptop with a scroll wheel and control panel, showing a close-up of the screen (no text or symbols visible)Removing and Installing a Reserve Battery
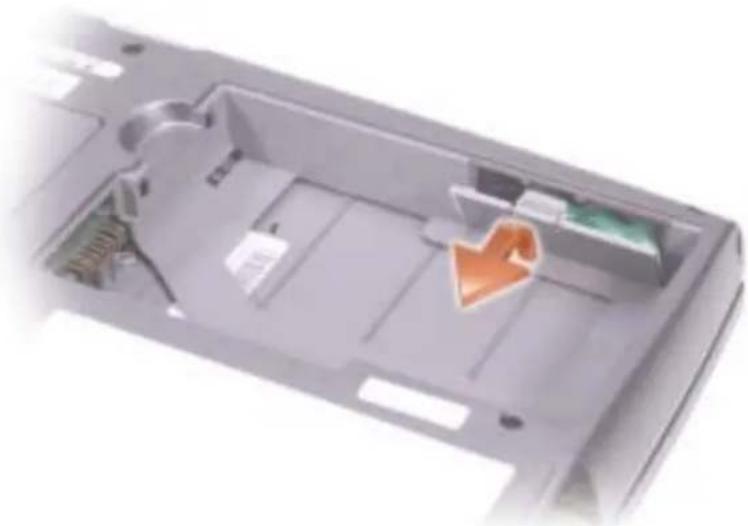
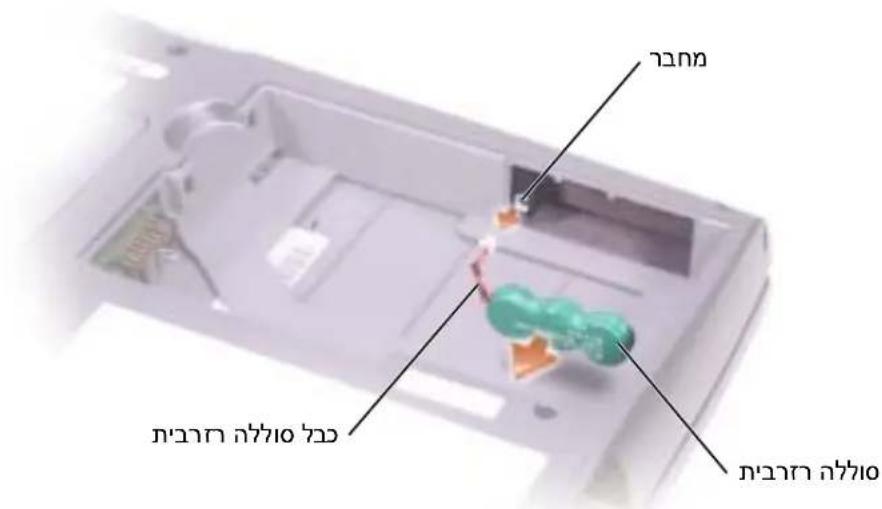
1 Remove the battery.
2 Remove the reserve battery cover.
natural_image
Interior view of a gray electronic device casing with internal compartments and a highlighted orange arrow (no text or symbols)3 Slide the reserve battery toward the connector, and pull the battery out of its compartment.
4 Disconnect the reserve battery cable from the connector.
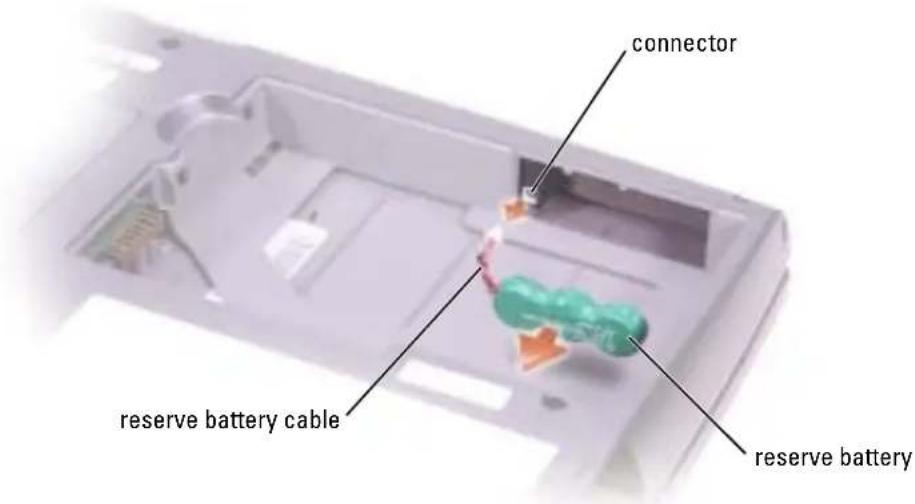
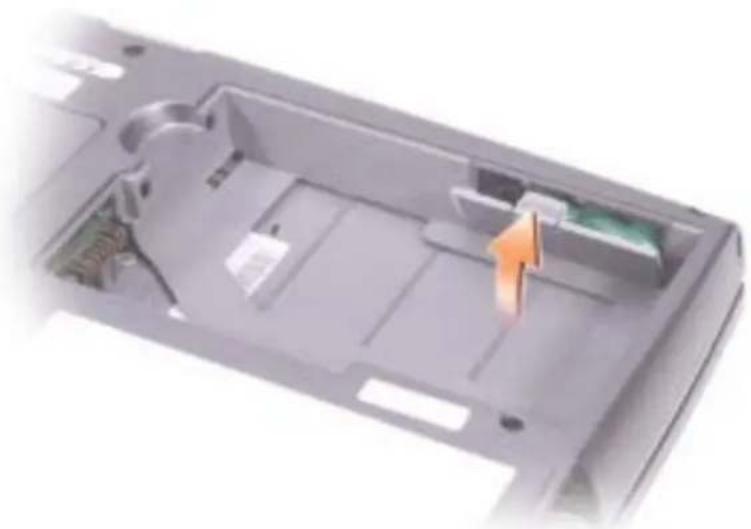
5 Connect the reserve battery cable to the connector in the reserve battery compartment.
6 Place the reserve battery in the compartment, and replace the reserve battery cover.
natural_image
Interior view of a computer case with an orange arrow indicating a component (no text or symbols visible)Installing a Battery
Slide the battery into the bay until the latch release clicks.
For more information about installing the second battery, see "Using the Module Bay" in your online User's Guide.
Dell Diagnostics

CAUTION: Before you begin any of the procedures in this section, follow the safety instructions at the beginning of this document.
When to Use the Dell Diagnostics
If you experience a problem with your computer, perform the checks in "Solving Problems" in your User's Guide and run the Dell Diagnostics before you contact Dell for technical assistance.
It is recommended that you print these procedures before you begin.

NOTICE: The Dell Diagnostics works only on Dell™ computers.
The Dell Diagnostics is located on a hidden diagnostic utility partition on your hard drive.

NOTE: If your computer cannot display a screen image, contact Dell (see "Getting Help" in your User's Guide for the appropriate contact information).
1 Shut down the computer.
2 If the computer is connected to a docking device (docked), undock it. See the documentation that came with your docking device for instructions.
3 Connect the computer to an electrical outlet.
4 Turn on the computer. When the DELL ^™ logo appears, press

NOTE: If you cannot see anything on your display, press and hold

NOTE: If you see a message stating that no diagnostics utility partition has been found, run the Dell Diagnostics from your Drivers and Utilities CD.
If you wait too long and the Microsoft ^® Windows ^® logo appears, continue to wait until you see the Windows desktop. Then shut down your computer through the Start menu and try again.
5 When the boot device list appears, highlight Diagnostics and press
The computer runs the Pre-boot System Assessment, a series of initial tests of your system board, keyboard, hard drive, and display.
- During the assessment, answer any questions that appear.
- If a failure is detected, the computer stops and beeps. To stop the assessment and restart the computer, press
; to continue to the next test, press ; to retest the component that failed, press .
- If failures are detected during the Pre-boot System Assessment, write down the error code(s) and contact Dell (see "Getting Help" in your User's Guide for the appropriate contact information) before continuing on to the Dell Diagnostics.
If the Pre-boot System Assessment completes successfully, you receive the messageBooting Dell Diagnostic Utility Partition. Press any key to continue.
6 Press any key to start the Dell Diagnostics from the diagnostics utility partition on your hard drive.
7 When the Dell Diagnostics Main Menu appears, select the test you want to run.
Dell Diagnostics Main Menu
1 After the Dell Diagnostics loads and the Main Menu screen appears, click the button for the option you want.
Option Function
| Express Test Performs a quick test of devices. This test typically takes 10 to 20 minutes and requires no interaction on your part.Run Express Test first to increase the possibility of tracing the problem quickly. |
| Extended Test Performs a thorough check of devices. This test typically takes an hour or more and requires you to answer questions periodically. |
| Custom Test Tests a specific device. You can customize the tests you want to run. |
| Symptom Tree Lists the most common symptoms encountered and allows you to select a test based on the symptom of the problem you are having. |
2 If a problem is encountered during a test, a message appears with an error code and a description of the problem. Write down the error code and problem description and follow the instructions on the screen.
If you cannot resolve the error condition, contact Dell (see "Getting Help" in your User's Guide for the appropriate contact information).

NOTE: The Service Tag for your computer is located at the top of each test screen. If you contact Dell, technical support will ask for your Service Tag.
3 If you run a test from the Custom Test or Symptom Treeoption, click the applicable tab described in the following table for more information.
Tab Function
| Results Displays the results of the test and any error conditions encountered. |
| Errors Displays error conditions encountered, error codes, and the problem description. |
| Help Describes the test and may indicate requirements for running the test. |
| Configuration Displays your hardware configuration for the selected device.The Dell Diagnostics obtains configuration information for all devices from system setup, memory, and various internal tests, and it displays the information in the device list in the left pane of the screen. The device list may not display the names of all the components installed on your computer or all devices attached to your computer. |
| Parameters Allows you to customize the test by changing the test settings. |
4 When the tests are complete, close the test screen to return to the Main Menu screen. To exit the Dell Diagnostics and restart the computer, close the Main Menu screen.
Regulatory Notices
Electromagnetic Interference (EMI) is any signal or emission, radiated in free space or conducted along power or signal leads, that endangers the functioning of a radio navigation or other safety service or seriously degrades, obstructs, or repeatedly interrupts a licensed radio communications service. Radio communications services include but are not limited to AM/FM commercial broadcast, television, cellular services, radar, air-traffic control, pager, and Personal Communication Services (PCS). These licensed services, along with unintentional radiators such as digital devices, including computers, contribute to the electromagnetic environment.
Electromagnetic Compatibility (EMC) is the ability of items of electronic equipment to function properly together in the electronic environment. While this computer has been designed and determined to be compliant with regulatory agency limits for EMI, there is no guarantee that interference will not occur in a particular installation. If this equipment does cause interference with radio communications services, which can be determined by turning the equipment off and on, you are encouraged to try to correct the interference by one or more of the following measures:
• Reorient the receiving antenna.
- Relocate the computer with respect to the receiver.
- Move the computer away from the receiver.
- Plug the computer into a different outlet so that the computer and the receiver are on different branch circuits.
If necessary, consult a Dell Technical Support representative or an experienced radio/television technician for additional suggestions.
For additional regulatory information, see the online User's Guide that accompanied your computer. To access the User's Guide, see page 10.
BEZPEČNOST: Pokyny EMC
natural_image
Close-up of a laptop connected to a cable with an attached USB port (no visible text or symbols)natural_image
Close-up of a silver computer rear panel with a scroll and control knob, showing a close-up of the screen (no text or symbols visible)natural_image
Interior view of a gray electronic device casing with internal compartments and a highlighted orange heart-shaped component (no text or symbols visible)natural_image
Interior view of a gray electronic device casing showing internal compartments and a highlighted component (no text or symbols visible)Instalace baterie
Dell™ Systeminformation
Dell Support website — support.euro.dell.com
natural_image
Close-up of a laptop connected to a cable with an orange connector (no visible text or symbols)natural_image
Top-down view of a silver computer monitor with a scroll wheel and control panel, showing a close-up of the screen (no text or symbols visible)natural_image
Interior view of a gray plastic electronic device casing with internal compartments and a highlighted orange arrow (no text or symbols)natural_image
Interior view of a gray electronic device casing with internal compartments and a highlighted orange arrow indicating a specific component (no text or symbols visible)Dell Diagnostics (Dell Diagnosticing)

Dell Diagnostics Main Menu (Hovedmenu for Dell Diagnosticing)
natural_image
Close-up of a laptop connected to a cable with an attached port, no visible text or symbolsnatural_image
Close-up of a silver laptop front panel with a scroll icon and orange arrows pointing to its side (no text or symbols visible)natural_image
Interior view of a gray electronic device casing with internal compartments and a highlighted orange heart-shaped component (no text or symbols visible)natural_image
Interior view of a gray electronic device casing with internal compartments and a highlighted orange arrow indicating a specific component (no text or symbols visible)Akun asennus
natural_image
Close-up of a laptop connected to a USB cable, with a black USB drive visible (no text or symbols)natural_image
Close-up of a silver laptop front panel with a scroll wheel and control buttons, showing a close-up of the screen (no text or symbols visible)natural_image
Interior view of a gray electronic device casing with a highlighted orange heart-shaped component (no text or symbols visible)natural_image
Interior view of a gray electronic device casing with internal compartments and a highlighted orange arrow indicating a specific component (no text or symbols visible)natural_image
Laptop connected to a cable with an attached port, no visible text or symbolsnatural_image
Top-down view of a silver laptop with a scroll and control panel, showing a close-up of its screen (no text or symbols visible)natural_image
Interior view of a gray electronic device casing with internal compartments and a highlighted orange heart-shaped component (no text or symbols visible)natural_image
Interior view of a gray electronic device casing with internal compartments and a highlighted orange arrow indicating a specific component (no text or symbols visible)• Hvordan du kan konfigurere datamaskinen
• Garantiinformasjon
• Sikkerhetsinstruksjoner
natural_image
Close-up of a laptop connected to a cable with an attached port, no visible text or symbolsnatural_image
Close-up of a silver computer rear panel with a scroll and control knob, showing a close-up of the screen (no text or symbols visible)natural_image
Interior view of a gray electronic device casing with internal compartments and a highlighted orange heart-shaped component (no text or symbols visible)natural_image
Interior view of a gray electronic device casing showing internal components and a highlighted orange arrow (no text or symbols)Sette i et batteri
Diagnostic Utility Partition (starter Dells
natural_image
Laptop connected to a cable with an attached USB port (no visible text or symbols)natural_image
Top-down view of a laptop with a scroll wheel and control panel, showing a close-up of the screen (no text or symbols visible)natural_image
Interior view of a gray electronic device casing with internal compartments and a highlighted orange arrow (no text or symbols)natural_image
Interior view of a gray electronic device casing with internal compartments and a highlighted component (no text or symbols visible)natural_image
Close-up of a laptop connected to a USB cable, with a black plastic device attached nearby (no visible text or symbols)natural_image
Close-up of a silver laptop front panel with a scroll icon and control buttons, showing no visible text or symbols.natural_image
Interior view of a gray electronic device casing with internal compartments and a highlighted orange arrow (no text or symbols)natural_image
Interior view of a gray electronic device casing showing internal compartments and a highlighted component (no text or symbols visible)Dell Support Website — support.euro.dell.com
Dell Premier Support Website — premiersupport.dell.com
Windows Help and Support Center
natural_image
Close-up of a laptop connected to a cable with an attached USB port (no visible text or symbols)natural_image
Close-up of a silver laptop back panel with a scroll icon and orange arrows pointing to the screen (no text or symbols visible)natural_image
Interior view of a gray electronic device casing with internal compartments and a highlighted orange heart-shaped component (no text or symbols visible)natural_image
Interior view of a gray electronic device casing with internal compartments and a highlighted component (no text or symbols visible)Inštalácia batérie
natural_image
Close-up of a laptop connected to a cable with an attached USB port (no visible text or symbols)natural_image
Close-up of a silver laptop back panel with a scroll icon and control buttons, showing no visible text or symbols.natural_image
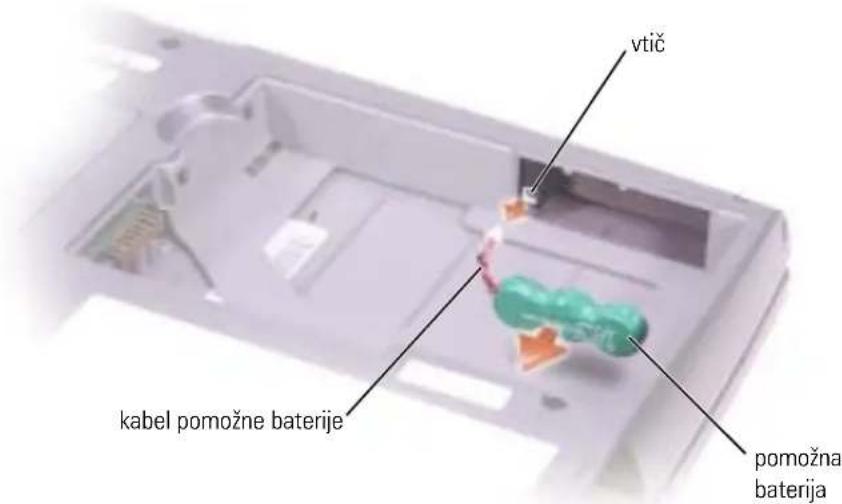
Interior view of a gray electronic device casing with internal compartments and a highlighted orange heart-shaped component (no text or symbols visible)3 Potisnite pomožno baterijo proti priključku in jo previdno izvlecite iz prostora zanjo.
4 Iztaknite kabel pomožne baterije iz priključka.
natural_image
Interior view of a gray electronic device casing with internal compartments and a highlighted component (no text or symbols visible)natural_image
Close-up of a laptop connected to a cable with an orange connector (no visible text or symbols)natural_image
Top-down view of a silver laptop with a scroll and control panel, showing a device icon (no text or symbols visible)natural_image
Interior view of a gray remote control box with an orange arrow pointing to a component (no text or symbols visible)natural_image
Interior view of a gray remote control box with internal compartments and a highlighted orange arrow indicating a specific area (no text or symbols visible)Symptom Tree in Custom Test
:הכלהה,הכלהה,הכלהה,Pre-boot System Assessment -הכלהה Booting Dell Diagnostic Utility Partition. Press any key to Dell 100% (100%) continue. (100%)
- Men in the World War, Israel, Israel, Israel, Israel, Israel, Israel, Israel, Israel, Israel, Israel, Israel, Israel, Israel, Israel, Israel, Israel, Israel, Israel, Israel, Israel, Israel, Israel, Israel, Israel, Israel, Israel, Israel, Israel, Israel, Israel, Israel, Israel, Israel, Israel, Israel, Israel, Israel, Israel, Israel, Israel, Israel, Israel, Israel, Israel, Israel, Israel, Israel, Israel, Israel, Israel,
(הכלהה) Drivers and Utilities Dell (הכלהה)
Microsoft Windows ^® Windows ^® Start
.
natural_image
Interior view of a gray electronic device casing showing internal compartments and a highlighted component (no text or symbols visible)תַלְרָה בְּרָה
natural_image
Interior view of a computer case with visible internal components and a highlighted orange arrow (no text or symbols)3
4
natural_image
Close-up of a silver laptop back panel with a scroll wheel and control buttons, showing a close-up of the screen (no text or symbols visible)תַעָה בְרִי
natural_image
Close-up of a laptop connected to a cable with an orange connector (no visible text or symbols)| # | ? | |
| Windows 76-10-20-21-22-23-24-25-26-27-28-29-30-31-32-33-34-35-36-37-38-39-40-41-42-43-44-45-46-47-48-49-50-51-52-53-54-55-56-57-58-59-60-61-62-63-64-65-66-67-68-69-70-71-72-73-74-75-76-77-78-79-80-81-82-83-84-85-86-87-88-89-90-91-92-93-94-95-96-97-98-99-100-101-102-103-104-105-106-107-108-109-110-111-112-113-114-115-116-117-118-119-120-121-122-123-124-125-126-127-128-129-130-131-132-133-134-135-136-137-138-139-140-141-142-143-144-145-146-147-148-149-150-151-152-153-154-155-156-157-158-159-160-161-162-163-164-165-166-167-168-169-170-171-172-173-174-175-176-177-178-179-180-181-182-183-184-185-186-187-188-189-190-191-192-193-194-195-196-197-198-199-200-201-202-203-204-205-206-207-208-209-210-211-212-213-214-215-216-217-218-219-220-221-222-223-224-225-226-227-228-229-230-231-232-233-234-235-236-237-238-239-240-241-242-243-244-245-246-247-248-249-250-251-252-253-254-255-256-257-258-259-260-261-262-263-264-265-266-267-268-269-270-271-272-273-274-275-276-277-278-279-280-281-282-283-284-285-286-287-288-289-290-291-292-293-294-295-296-297-298-299-300-301-302-303-304-305-306-307-308-309-310-311-312-313-314-315-316-317-318-319-320-321-322-323-324-325-326-327-328-329-330-331-332-333-334-335-336-337-338-339-340-341-342-343-344-345-346-347-348-349-350-351-352-353-354-355-356-357-358-359-360-361-362-363-364-365-366-367-368-369-370-371-372-373-374-375-376-377-378-379-380-381-382-383-384-385-386-387-388-389-390-391-392-393-394-395-396-397-398-399-400-401-402-403-404-405-406-407-408-409-410-411-412-413-414-415-416-417-418-419-420-421-422-423-424-425-426-427-428-429-430-431-432-433-434-435-436-437-438-439-440-441-442-443-444-445-446-447-448-449-450-451-452-453-454-455-456-457-458-459-460-461-462-463-464-465-466-467-468-469-470-471-472-473-474-475-476-477-478-479-480-481-482-483-484-485-486-487-488-489-490-491-492-493-494-495-496-497-498-499-500-501-502-503-504-505-506-507-508-509-510-511-512-513-514-515-516-517-518-519-520-521-522-523-524-525-526-527-528-529-530-531-532-533-534-535-536-537-538-539-540-541-542-543-544-545-546-547-548-549-550-551-552-553-554-555-556-557-558-559-560-561-562-563-564-565-566-567-568-569-570-571-572-573-574-575-576-577-578-579-580-581-582-583-584-585-586-587-588-589-590-591-592-593-594-595-596-597-598-599-600-601-602-603-604-605-606-607-608-609-610-611-612-613-614-615-616-617-618-619-620-621-622-623-624-625-626-627-628-629-630-631-632-633-634-635-636-637-638-639-640-641-642-643-644-645-646-647-648-649-650-651-652-653-654-655-656-657-658-659-660-661-662-663-664-665-666-667-668-669-670-671-672-673-674-675-676-677-678-679-680-681-682-683-684-685-686-687-688-689-690-691-692-693-694-695-696-697-698-699-700-701-702-703-704-705-706-707-708-709-710-711-712-713-714-715-716-717-718-719-720-721-722-723-724-725-726-727-728-729-730-731-732-733-734-735-736-737-738-739-740-741-742-743-744-745-746-747-748-749-750-751-752-753-754-755-756-757-758-759-760-761-762-763-764-765-766-767-768-769-770-771-772-773-774-775-776-777-778-779-780-781-782-783-784-785-786-787-788-789-790-791-792-793-794-795-796-797-798-799-800-801-802-803-804-805-806-807-808-809-810-811-812-813-814-815-816-817-818-819-820-821-822-823-824-825-826-827-828-829-830-831-832-833-834-835-836-837-838-839-840-841-842-843-844-845-846-847-848-849-850-851-852-853-854-855-856-857-858-859-860-861-862-863-864-865-866-867-868-869-870-871-872-873-874-875-876-877-878-879-880-881-882-883-884-885-886-887-888-889-890-891-892-893-894-895-896-897-898-899-900-901-902-903-904-905-906-907-908-909-910-911-912-913-914-915-916-917-918-919-920-921-922-923-924-925-926-927-928-929-930-931-932-933-934-935-936-937-938-939-940-941-942-943-944-945-946-947-948-949-950-951-952-953-954-955-956-957-958-959-960-961-962-963-964-965-966-967-968-969-970-971-972-973-974-975-976-977-978-979-980-981-982-983-984-985-986-987-988-989-990-991-992-993-994-995-996-997-998-999-1000 | ||
| (###) Help and Support (###) Help and Support (###) Help and Support (###) Help and Support (###) Help and Support (###) Help and Support (###) Help and Support (###) Help and Support (###) Help and Support (###) Help and Support (###) Help and Support (###) Help and Support (###) Help and Support (###) Help and Support (###) Help and Support (###) Help and Support (###) Help and Support (###) Help, and Support (###) Help and Support (###) Help and Support (###) Help and Support (###) Help and Support (###) Help and Support (###) Help and Support (###) Help and Support (###) Help and Support (###) Help and Support (###) Help and Support (###) Help and Support (###) Help and Support (###) Help and Support (###) Help and Support (###) Help and Support (###) Help and Support (######) Help and Support (######) Help and Support (######) Help and Support (######) Help and Support (######) Help and Support (######) Help and Support (######) Help and Support (######) Help and Support (######) Help and Support (######) Help and Support (######) Help and Support (######) Help and Support (######) Help and Support (######) Help and Support (######) Help and Support (######) Help and Support (######) Help and Supply (######) Help and Support (######) Help and Support (######) Help and Support (######) Help and Support (######) Help and Support (######) Help and Support (######) Help and Support (######) Help and Support (######) Help and Support (######) Help and Support (######) Help and Support (######) Help and Support (######) Help and Support (######) Help and Support (######) Help and Support (######) Help and Support (######) help and Support (######) help and Support (######) help and Support (######) help and Support (######) help and Support (######) help and Support (######) help and Support (######) help and Support (######) help and Support (######) help and Support (######) help and Support (######) help and Support (######) help and Support (######) help and Support (######) help and Support (######) help and Support (######) help and Support (n##) help and Support (n##) help and Support (n##) help and Support (n##) help and Support (n##) help and Support (n##) help and Support (n##) help and Support (n##) help and Support (n##) help and Support (n##) help and Support (n##) help and Support (n##) help and Support (n##) help and Support (n##) help and Support (n##) helps and Support (n##) helps and Support (n##) helps and Support (n##) helps and Support (n##) helps and Support (n##) helps and Support (n##) helps and Support (n##) helps and Support (n##) helps and Support (n##) helps and Support (n##) helps and Support (n##) helps and Support (n##) helps and Support (n##) helps and Support (n##) helps and Successor (n##) helps and Support (n##) helps and Support (n##) helps and Support (n##) helps and Support (n##) helps and Support (n##) helps and Support (n##) helps and Support (n##) helps and Support (n##) helps and Support (n##) helps and Support (n##) helps and Support (n##) helps and Support (n##) helps and Support (n##) helps and Support (m#) helps and Support (m#) helps and Support (m#) helps and Support (m#) helps and Support (m#) helps and Support (m#) helps and Support (m#) helps and Support (m#) helps and Support (m#) helps and Support (m#) helps and Support (m#) helps and Support (m#) helps and Support (m#) helps and Support (m#) helps and Support (m#) help and Support (m#) helps and Support (m#) helps and Support (m#) helps and Support (m#) helps and Support (m#) helps and Support (m#) helps and Support (m#) helps and Support (m#) helps and Support (m#) helps and Support (m#) helps and Support (m#) helps and Support (m#) helps and Support (m#) helps and Support (m#) helps andSupport (m#) helps and Support (m#) helps and Support (m#) helps and Support (m#) helps and Support (m#) helps and Support (m#) helps and Support (m#) helps and Support (m#) helps and Support (m#) helps and Support (m#) helps and Support (m#) helps and Support (m#) helps and Support (m#) helps and Support (m#) helps and Support (n##) helps and Support (n##) helps and Support (n##) helps and Support (n##) helps and Support (n##) helps and Support (n##) helps and Support (n##) helps and Support (n##) helps and Support (n##) helps and Support (n##) helps and Support (n##) helps and Support (n##) helps and Support (n##) helps and Support (n##) help and Support (n##) helps and Support (n##) helps and Support (n##) helps and Support (n##) helps and Support (n##) helps and Support (n##) helps and Support (n##) helps and Support (n##) helps and Support (n##) helps and Support (n##) helps and Support (n##) helps and Support (n##) helps and Support (n##) helps andSupport (n##) helps and Support (n##) helps and Support (n##) helps and Support (n##) helps and Support (n##) helps and Support (n##) helps and Support (n##) helps and Support (n##) helps and Support (n##) helps and Support (n##) helps and Support (n##) helps and Support (n##) helps and Support (n##) helps and Support (n##) helps and Support (p#) helps and Support (p#) helps and Support (p#) helps and Support (p#) helps and Support (p#) helps and Support (p#) helps and Support (p#) helps and Support (p#) helps and Support (p#) helps and Support (p#) helps and Support (p#) helps and Support (p#) helps and Support (p#) helps and Support (p#) helps and Support (p#) help and Support (p#) helps and Support (p#) helps and Support (p#) helps and Support (p#) helps and Support (p#) helps and Support (p#) helps and Support (p#) helps and Support (p#) helps and Support (p#) helps and Support (p#) helps and Support (p#) helps and Support (p#) helps and Support (p#) helps and Support (p#) helps andSupport (p#) helps and Support (p#) helps and Support (p#) helps and Support (p#) helps and Support (p#) helps and Support (p#) helps and Support (p#) helps and Support (p#) helps and Support (p#) helps and Support (p#) helps and Support (p#) helps and Support (p#) helps and Support (p#) helps and Support (p#) helps and Support (n##) helps and Support (n##) helps and Support (n##) helps and Support (n##) helps and Support (n##) helps and Support (n##) helps and Support (n##) helps and Support (n##) helps and Support (n##) helps and Support (n##) helps and Support (n##) helps and Support (n##) helps and Support (n##) helps and Support (n## ) helps and Support (n##) helps and Support (n##) helps and Support (n##) helps and Support (n##) helps and Support (n##) helps and Support (n##) helps and Support (n##) helps and Support (n##) helps and Support (n##) helps and Support (n##) helps and Support (n##) helps and Support (n##) helps and Support (n##) helps and Support (n##) helpsand Support (n##) helps and Support (n##) helps and Support (n##) helps and Support (n##) helps and Support (n##) helps and Support (n##) helps and Support (n##) helps and Support (n##) helps and Support (n##) helps and Support (n##) helps and Support (n##) helps and Support (n##) helps and Support (n##) helps and Support (n##) helps and Support( n##) helps and Support (n##) helps and Support (n##) helps and Support (n##) helps and Support (n##) helps and Support (n##) helps and Support (n##) helps and Support (n##) helps and Support (n##) helps and Support (n##) helps and Support (n##) helps and Support (n##) helps and Support (n##) helps and Support (n##) helps and Support (n## ) help and Support (n##) helps and Support (n##) helps and Support (n##) helps and Support (n##) helps and Support (n##) helps and Support (n##) helps and Support (n##) helps and Support (n##) helps and Support (n##) helps and Support (n##) helps and Support (n##) helps and Support (n##) helps and Support (n##) helps and Support (n##) helps l# ) help and Support (n##) helps and Support (n##) helps and Support (n##) helps and Support (n##) helps and Support (n##) helps and Support (n##) helps and Support (n##) helps and Support (n##) helps and Support (n##) helps and Support (n##) helps and Support (n##) helps and Support (n##) helps and Support (n##) helps and Support (n##) help andSupport (n##) helps and Support (n##) helps and Support (n##) helps and Support (n##) helps and Support (n##) helps and Support (n##) helps and Support (n##) helps and Support (n##) helps and Support (n##) helps and Support (n##) helps and Support (n##) helps and Support (n##) helps and Support (n##) helps and Support (n##) helps andSupport (n##) helps andSupport (n##) helps andSupport (n##) helps andSupport (n##) helps andSupport (n##) helps andSupport (n##) helps andSupport (n##) helps andSupport (n##) helps andSupport (n##) helps andSupport (n##) helps andSupport (n##) helps andSupport (n##) helps andSupport (n##) helps andSupport (n##) helps andSupport ( n## ) helps and Support ( n## ) helps and Support ( n## ) helps and Support ( n## ) helps and Support ( n## ) helps and Support ( n## ) helps and Support ( n## ) helps and Support ( n## ) helps and Support ( n## ) helps and Support ( n## ) helps and Support ( n## ) helps and Support ( n## ) helps and Support ( n## ) helps and Support ( n## ) helps and Support ( n## ) helps and Support (n## ) helps and Support ( n## ) helps and Support ( n## ) helps and Support ( n## ) helps and Support ( n## ) helps and Support ( n## ) helps and Support ( n## ) helps and Support ( n## ) helps and Support ( n## ) helps and Support ( n## ) helps and Support ( n## ) helps and Support ( n## ) helps and Support ( n## ) helps and Support ( n## ) helps and Support ( n## )(n## ) helps and Support (n## ) helps and Support (n## ) helps and Support (n## ) helps and Support (n## ) helps and Support (n## ) helps and Support (n## ) helps and Support (n## ) helps and Support (n## ) helps and Support (n## ) helps and Support (n## ) helps and Support (n## ) helps and Support (n## ) helps and Support (n## ) helps and Support (n## ) helps and Support (n# ) helps and Support (n## ) helps and Support (n## ) helps and Support (n## ) helps and Support (n## ) helps and Support (n## ) helps and Support (n## ) helps and Support (n## ) helps and Support (n## ) helps and Support (n## ) helps and Support (n## ) helps and Support (n## ) helps and Support (n## ) helps and Support (n## ) helps and Support (n## ) help andSupport (n## ) helps and Support (n## ) helps and Support (n## ) helps and Support (n## ) helps and Support (n## ) helps and Support (n## ) helps and Support (n## ) helps and Support (n## ) helps and Support (n## ) helps and Support (n## ) helps and Support (n## ) helps and Support (n## ) helps and Support ( |
in Bluetooth o'or, O'or, Mini PCI o'or, O'or, O'or, O'or, O'or, O'or, O'or, O'or, O'or, O'or, O'or, O'or, O'or, O'or, O'or, O'or, O'or, O'or, O'or, O'or, O'or, O'or, O'or, O'or, O'or, O'or,

1
P/N N1212 Rev. A01 2003
Dell™ Latitude™ D505 Series
- Notes, Notices, and Cautions
- Abbreviations and Acronyms
- Contents
- CAUTION: Safety Instructions 5
- When Using Your Computer 7
- Finding Information for Your Computer 10
- Setting Up Your Computer 13
- About Your Computer 15
- Removing a Battery 18
- Removing and Installing a Reserve Battery 19
- Installing a Battery 20
- Dell Diagnostics 21
- Regulatory Notices 24
- CAUTION: Safety Instructions
- SAFETY: General
- SAFETY: Power
- SAFETY: Battery
- SAFETY: Air Travel
- SAFETY: EMC Instructions
- When Using Your Computer
- SAFETY: Ergonomic Computing Habits
- SAFETY: When Working Inside Your Computer
- SAFETY: Protecting Against Electrostatic Discharge
- SAFETY: Battery Disposal
- Finding Information for Your Computer
- What are you looking for? Find It Here
- Drivers and Utilities CD (also known as the ResourceCD)
- Dell™ System Information Guide
- User's Guide
- Service Tag and Microsoft Windows License
- Dell Support Website — support.euro.dell.com
- Dell Premier Support Website — premiersupport.dell.com
- Windows Help and Support Center
- Operating System CD
- Setting Up Your Computer
- About Your Computer
- Front View
- Back View
- Bottom View
- Removing a Battery
- Removing and Installing a Reserve Battery
- Installing a Battery
- Dell Diagnostics
- When to Use the Dell Diagnostics
- Dell Diagnostics Main Menu
- Regulatory Notices
- BEZPEČNOST: Pokyny EMC
- Instalace baterie
- Dell Diagnostics (Dell Diagnosticing)
- Dell Diagnostics Main Menu (Hovedmenu for Dell Diagnosticing)
- Akun asennus
- Sette i et batteri
- Inštalácia batérie
- תַלְרָה בְּרָה
Brand : DELL
Model : Latitude D505
Category : Laptop