HEA108X - Oven Ardo - Free user manual and instructions
Find the device manual for free HEA108X Ardo in PDF.


| Product Type | Built-in Electric Oven |
| Brand | Ardo |
| Model | HEA108X |
| Energy Efficiency Class | A+ |
| Gross Capacity | 72 Liters |
| Number of Functions | 8 (including conventional, grill, fan-assisted, etc.) |
| Heating Elements | Top, bottom, grill, fan with ring element |
| Control Type | Electronic with touch or rotary knobs |
| Display | Digital LED |
| Temperature Range | 50°C - 250°C |
| Cleaning Type | Easy-clean enamel interior |
| Interior Light | Yes |
| Safety Features | Child lock, automatic switch-off, cool door |
| Dimensions (H x W x D) | 595 x 595 x 575 mm |
| Net Weight | Approx. 30 kg |
| Electrical Connection | 220-240 V, 50-60 Hz, 3000 W |
| Included Accessories | 1 baking tray, 1 wire shelf, 1 grill grid |
| Repairability Index | 8.0 / 10 (estimated) |
| User Manual Languages | CS, EN, HU, IT, LT, LV, PL, RU, SK, UK |
Frequently Asked Questions - HEA108X Ardo
User questions about HEA108X Ardo
0 question about this device. Answer the ones you know or ask your own.
Ask a new question about this device
Download the instructions for your Oven in PDF format for free! Find your manual HEA108X - Ardo and take your electronic device back in hand. On this page are published all the documents necessary for the use of your device. HEA108X by Ardo.
USER MANUAL HEA108X Ardo
natural_image
Illustration of kitchen appliances including ovens and ovens with hand-drawn sketches (no text or symbols)natural_image
Technical diagram showing three labeled components (A, B, C) of a grid-like structure with a striped base and rectangular plate (no text or symbols beyond labels)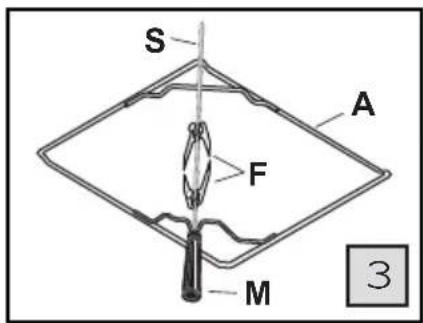
natural_image
Line drawing of a kitchen tray with star patterns, no text or symbols present1. MANUÁLNÍ ČINNOST BEZ NASTAVENÍ
2. MANUÁLNÍ ČINNOST S POČÍTADLEM MINUT
natural_image
Illustration of a hand placing a white sheet on an oven with arrows indicating process flow (no text or symbols)
natural_image
Close-up of a mechanical component with a magnified inset showing internal details (no text or symbols visible)
natural_image
3D diagram of a fluid flow system inside a container with internal channels and flow arrows (no text or symbols)461307409 (RS-000)
OCHRANNÝ FILTR VENTILÁTORU TROUBY (obr. 12)
CO JE TŘEBA DĚLAT, KDYŽ...

The appliance was designed and made in accordance with the European standards listed below:
• EN 60 335-1 and EN 60 335-2-6 (electrical) plus relative amendments
The appliance complies with the prescriptions of the European Directives as below:
• 2006/95 EC concerning electrical safety (BT).
• 2004/108 EC concerning electromagnetic compatibility (EMC)
and reports on both its label and its packaging the CE symbol.
Oven accessories that could come into contact with foodstuffs are made with materials that comply with the provisions of the 89/109 EC directive dated 21/12/88.
This product complies with EU Directive 2002/96/EC.
The crossed-out dustbin symbol reported on the appliance indicates that the appliance must be disposed of separately from other domestic refuse at the end of its useful life. It must therefore be delivered to a waste recycling centre specifically for electric and electronic equipment or returned to the retailer at the moment of purchase of a new equivalent appliance.
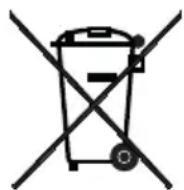
The user is responsible for delivering the appliance to the appropriate collection centre at the end of its useful life, Failure to do so may result in a fine, as provided for by laws governing waste disposal.
Differential collection of waste products for eventual recycling, treatment and environmentally friendly disposal helps reduce possible negative effects on the environment and health, and also enables the materials making up the product to be recycled.
For more detailed information on the available refuse collection systems, refer to the local Municipal Solid Waste disposal centre or the shop where the product was purchased.
Producers and importers are responsible for fulfilling their obligations as regards recycling, treatment and environmentally friendly disposal by directly or indirectly participating in the collection system.
CONTENTS
ASSISTANCE AND SPARE PARTS 4
IMPORTANT NOTES AND PRECAUTIONS FOR USE 5
INSTRUCTIONS FOR THE USER 6-22
TROUBLESHOOTING 23
TECHNICAL FEATURES 23
INSTRUCTIONS FOR THE INSTALLER 24-25
GB ASSISTANCE AND SPARE PARTS
Before this appliance left the factory it was tested and fine-tuned by specialised expert personnel in order to guarantee its best functioning results.
Any subsequent repairs or adjustments that may be necessary must be done with the maximum of care and attention by qualified personnel.
For this reason we recommend you always contact our Service Centre specifying the brand, the model, its serial number and type of problem you are facing with it. All pertinent details are printed on a label affixed on the side of the appliance and are also given in the manual.
A duplicate data label is contained in this booklet also. Please attach this label on the manual or to an accessible surface near by the appliance for easy reference.
This information enables the technical assistant to come and visit you with the correct spares and guarantee a prompt and suitable service.
You will only find original spare parts at our Service Centre and authorised dealers.
SPACE FOR DATA LABEL
You have purchased one of our appliances for which we thank you. We are confident that this modern, functional and practical new model, produced with top quality materials, will meet all your expectations. Although this appliance is very simple to use, we strongly recommend reading this handbook thoroughly and carefully. It provides information for safe installation, use and maintenance. Keep this handbook in a safe place for future reference.
The manufacturer reserves the right to make modifications to its products that it deems necessary or useful, or to meet the consumer interest, without prejudicing its essential functional and safety characteristics.
The manufacturer cannot be held responsible for any inaccuracies due to printing or transcription errors that may be found in this handbook.
N.B.: the illustrations shown in this handbook are purely indicative.
- The installation and maintenance listed in the section» «INSTRUCTIONS FOR THE INSTALLER» must be carried out exclusively by qualified personnel.
- The appliance must only be used for its original purpose, that is, cooking for domestic use. Any other use is considered improper and, as such, dangerous. The manufacturer cannot be held responsible for any damages to persons or properties resulting from incorrect installation, maintenance or use of the appliance.
- Once all external and internal packaging/wrappings have been removed, check that the appliance is intact. In case of doubt, do not use the appliance and turn to qualified personnel.
- All packaging materials used (cardboard boxes, bags, polystyrene foam, nails, etc.) must be kept out of the reach of children, as they are a potential hazard source. All packaging materials used are environmentally-friendly and recyclable.
- The electrical safety of this appliance is only guaranteed if it is correctly connected to a suitable earth system, as prescribed by the electrical safety standards. The manufacturer disclaims all responsibility if these instructions are not followed. Should you have any doubts, seek the assistance of a qualified electrician to test your electricity plant.
- Before plugging in the appliance, make sure that the rating data label complies to that of the electricity mains (see section «TECHNICAL FEATURES»).
A list of few basic rules that must be observed when using any kind of electrical appliance:
Never touch any electrical appliance if hands or feet are wet or damp.
Never use the appliance bare footed.
Do not pull the power lead to force the plug out of the socket.
Never leave the appliance in the outside weather conditions.
Do not allow children or unskilled hands to use the appliance unattended.
- Before cooking for the first time, ensure the oven is empty and its door closed, heat the oven at maximum temperature for about 2 hours to ensure all bad smells deriving from packaging are gone. Ensure adequate ventilation during this process.
- During cooking and for a while after use, the crystal glass of the oven door and accessible parts can be very hot, so keep children at a distance.
- Keep the appliance clean. Food deposits can cause fire risk.
- Avoid using the oven as a larder or as a saucepan cupboard when you are not using it for cooking: if the oven is turned on accidentally it could cause damage and accidents.
- If you are using an electrical socket near the appliance, make sure that the cables are not touching the oven and are far enough away from all hot parts.
- Once you have fi nished using the oven make sure that all controls are turned off or in closed position.
- Before proceeding with cleaning or servicing your oven, unplug it from the socket.
- In the case of a failure or malfunction, turn the oven off and unplug it. Avoid trying to fi x it. All repairs and fi ne-tuning must be carried out with maximum care and the proper attention of a qualified person. For this reason we recommend you to report to your the nearest Service Centre explaining the trouble you are facing and details of your appliance.

CONTROL PANEL
A. Function keys or cooking programme area
B. Programming key area
C. Time and programme display
NOTES ON THE TOUCH-CONTROL KEYPAD
The Touch-control keypad has to be used with particular care to avoid unwanted interpretations of the keys. The typical example is the hand inadvertently placed on the front glass or slightly touching it.
To better cover these abnormal situations the electronic card:
- Only interprets one key at a time (one on the right-hand keypad and one on the left-hand keypad).
- After 9 seconds from the last valid pressure on a key, a 2-second delay for the interpretation of any other key is activated. So when you wish to change oven settings you need to keep the key pressed for 2 seconds and then set all the rest within 9 seconds from the last pressure otherwise the 2-second delay is reset.
INTRODUCTION
The multifunction electric oven allows both natural convection and fan assisted cooking, to let you choose the most suitable heating method for the dishes prepared.
The oven is fitted with side guides (fig. 1) for positioning the following accessories at different heights:
- oven rung (A) (fi g. 2)
- drip tray (B) (fi g. 2)
- baking or pizza tray (C) (fi g. 2)
- spit holder (A) + spit (S) + forks (F) + handle (M) (fig. 3)
The oven also has telescopic guides to mount on the appliance (see enclosed kit). These guides make it easier to take the accessories out without the risk of them overturning and they also avoid accidental contact with the heating elements inside the oven. PLEASE NOTE: DO NOT USE THEM IF YOU ARE USING THE SPIT.
If the output of the electric mains system is over 3kW, it is possible to increase the power rating for the sole "COOKING BREAD PIZZA" function, from 2100 W to 3100 W, using the connector of the electronic card (see enclosed kit). Power increase will speed up the baking of pizza.


natural_image
Technical diagram showing three labeled components: a rectangular plate with internal divisions, a striped base, and a square with internal divisions (no text or symbols present)
The main safety features of the oven are described as follows for optimum, safe usage:
- TEMPERATURE LIMITER OR SAFETY THERMOSTAT. This device is activated in the event of main thermostat malfunction. When activated, the power supply to the oven is temporarily switched off to prevent overheating. Never try to rectify a problem yourself. Switch off the oven and contact your local authorised service centre.
- COOLING OR TANGENTIAL FAN. This cools the control panel, the knobs, the oven door handle and the electrical components. It is activated automatically whenever the oven is used with a set temperature of at least 100^ C, to prevent overheating and to speed up cooling times. It continues running for approximately 8 minutes after turning the oven off.
- OVEN AIR TEMPERATURE PROBE safety system:
- If the probe is short circuited, as soon as you try starting a programme the oven issues an error message for 4 seconds (acoustic alarm + the flashing error message “Err” is shown in the clock area) and the programme will not start.
- If the probe circuit is open, the system checks that the oven temperature has reached at least 40^ C after 10 minutes of operation. If this is not the case, the oven is switched to alarm mode, the programme is stopped and the error condition displayed (the “Err” message flashes in place of the clock plus an acoustic alarm signal sounds). The acoustic signal stops after 60 seconds or by pressing any key. The “Err” message remains until the programme is reset with the ☐ key. Note that this is a safety function that also triggers if the door is left open accidentally during use. This safety function is disabled for function 1 (room temp. air defrost).
-
COOKING TEMPERATURE PROBE safety system (if fi tted):
-
If the probe is short circuited, as soon as you try starting a programme the oven issues an error message for 4 seconds (acoustic alarm + the flashing error message “Err” is shown in the clock area) and the programme will not start.
- If the probe circuit is open, it will not be detected by the software, therefore, even if fitted, the above symbol will not be displayed. Use of the probe is not allowed in programmes that use the GRILL: □ and ▶
- If you attempt to start a GRILL programme when the probe is working, an acoustic alarm signal sounds for 3 seconds accompanied by the error message "Err" on the display. The programme will not start.
- If you start the probe while a Grill programme is on, the error message “Err” appears on the display accompanied by the acoustic alarm signal. This signal has a timeout of 60 seconds while the “Err” message remains until the probe is turned off or the programme reset with the ◆ key.
- During the alarm, all the electrical utilities are switched off (except for the light).
- COMMANDS LOCK. This function is turned on by keeping keys 📁 and ▶pressed for 3 seconds. When the COMMANDS LOCK function is working the ┌ symbol is shown on the display. From that moment all keys are inactive except for the 📁 and ▶combination which, if pressed for 3 more seconds, allows you to exit the COMMANDS LOCK function.
DESCRIPTION OF THE PROGRAMMING BUTTONS

ON/OFF BUTTON
Active only after a cooking function has been selected. Initially keep it pressed for about 3 seconds. Press to activate all programmes. The relative symbol appears on the display once confirmed. Keep it pressed for about 2 seconds to turn all programmes off.

INCREASE TIME SETTING BUTTON
Not active when only the clock is displayed and when the programme has finished. It normally increases the temperature set or the numbers flashing on the display. It optimises the visual from the top when in the Contrast Adjust mode. Press and hold for approximately 1 seconds to increase value more rapidly.

DECREASE TIME SETTING BUTTON
Not active when only the clock is displayed and when the programme has finished. It normally reduces the temperature set or the numbers flashing on the display. It optimises the visual from the top when in the Contrast Adjust mode. Press and hold for approximately 1 seconds to decrease value more rapidly.

COOKING TIME BUTTON
Active when a cooking function is selected.
Press once to select (flashing value) the cooking time, press again to deactivate. While the numbers are fl ashing, the cooking time may be adjusted by pressing + and/or -

STOP COOKING BUTTON
Activated only after setting the cooking time with the relative button 📄. Pressing the button sequentially cycles through the following: flashing hours, flashing minutes, no values flashing. The flashing value may now be adjusted by pressing + and/or -

CLOCK + TIMER BUTTON
Active in any condition except for when cooking with a set time. Press and hold for 2 seconds to select SET CLOCK mode. This function is described later. Pressing the button briefly selects TIMER mode, described later.

OVEN LIGHT BUTTON
It is always active. Press to turn the oven light on and off.
SET TIME
The oven is equipped with a digital clock indicating hours and minutes. After connecting the oven to the mains, and if no cooking programme is selected, set the current time as follows:
- Press and hold the button for per a few seconds until a beep is heard. The hour value starts ashing when the button is released.
- Set the hour value with the + and/or - buttons.
- Press the button again The minutes value starts flashing when the button is released
- Adjust the minutesvalue with the + and/or buttons.
- Press the button △ again to confirm. The display now shows the set hour and minute values with a flashing cursor to indicate that the operation has been completed successfully.

natural_image
Simple diagram with three identical square symbols and radiating lines, no text or labels present.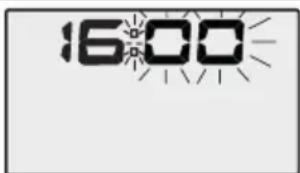

N.B. The above procedure must be started within 7,5 seconds, after which the values stop flashing and the oven exits SET TIME mode.
SET TIMER
The timer can be set in all modes, except during programmed cooking, as the values used for the timer are the same as the COOKING TIME setting.
For this reason if the TIMER is set it will be cancelled as soon as the 📄 button is pressed. The TIMER is completely separate from cooking modes so it can also be used as an “alarm clock” or to show the time (e.g. for cooking pasta on the gas ring).
- Press the button △The relative symbol and the "0" value for the minutes start fl ashing
- Set the minutes with the ⊕ and/or □ buttons (max 199).
- Press △ again to confirm. The display now shows only the symbol △ and a countdown timer starts from the set minute value. Once the set time has elapsed, a beeper sounds for 1 minute. Press any button to mute the beeper.
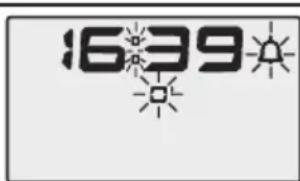

N.B. The TIMER may be deactivated ahead of time by pressing
CONTRAST SETTING
Set the display contrast for the correct viewing angle, which depends on the height of the oven from the floor and the stature of the user:
MOVE THE VIEWING ANGLE UPWARDS
- Keep the + and buttons pressed simultaneously. The message "CON" is displayed and you will hear a beep; the viewing angle is moved one step upwards.
- While keeping the ☐ button pressed, release the ☐ button and press it again for each upward adjustment step wanted.
MOVE THE VIEWING ANGLE DOWNWARDS
- Keep the ☐ and ☐ buttons pressed simultaneously. The message “CON” is displayed and you will hear a beep; the viewing angle is moved one step downwards.
- While keeping the — button pressed, release the button and press it again for each downward adjustment step wanted.
PLEASE NOTE: There are 11 contrast adjustment steps. When turning the oven on the default contrast value is 6 (optimised for a viewing angle of about 30^ upwards).
So you then have 5 steps available to increase the angle and 5 to reduce it.
The CONTRAST SETTING function is active only when there is no ongoing programme.
DISPLAY
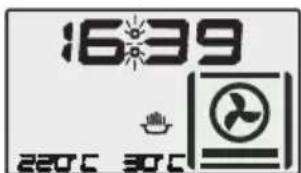
| In all cases, starting from the STANDBY mode where only the clock is shown on the display, the COMMANDS LOCK function can be set or the TIMER and OVEN LAMP used. Alternatively it is possible to set one of the cooking programmes by using the right-hand keypad and then change the temperature or percentage given if wanted using the + and - buttons. |  |
| When one of the programme buttons is pressed its symbol is shown on the display and: | |
| In programmes with no grill function, the values for TEMPERATURE SETTING and OVEN AIR TEMPERATURE are also displayed, which vary while the oven is operating. |  |
| In programmes with grill function, the value for PERCENTAGE GRILL POWER is displayed instead. |  |
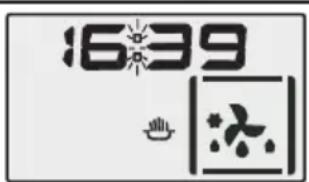
| With the Defrost Programme selected only the Clock and the Programme symbol are displayed. |  |
The oven is initially programmed with default temperatures or percentages which can be changed according to the programme selected. The minimum temperature that can be set is 50^ C.
The maximum temperature that can be set varies depending on the cooking programme.
POWER CUTS
If there is a power failure during a cooking programme which lasts less than 13-15 minutes, all the oven functions will resume working normally.
If the power failure lasts longer than 15 minutes, when power returns you will notice that the clock displayed has been reset so you will have to reset the current time, the cooking function and any programming that was interrupted.
NOTES CONCERNING SAFETY:
- Never leave the oven unattended during use. Keep children away from the oven.
- Always grip the middle of the door handle when opening the oven. Do not exert excessive force on the door when open.
- Condensation may form on the door and on the interior of the oven when in use. This is normal and is not reason for concern. This does not compromise the functions of the oven.
- When opening the door, beware of scalding steam.
- The oven becomes very hot during use. Take care not to touch the heating elements inside the oven. Always use oven gloves to transfer containers to or from oven.
- When handling dishes, take care not to spill excessive quantities of food on the oven floor, as oils and fats are easily in! ammable when hot.
- Only use containers suitable for the temperature indicated on the thermostat knob.
- Never cover the oven floor or the grill elements with aluminium foil or any other materials as this interferes with the correct cooking process.
- Always use the drip tray to collect juices released from meat when grilling, as specified in the section "COOKING TIPS".
• After use, ensure that all controls are turned off. - WARNING! Keep children away from the oven during and after use, as the window glass and other external parts of the oven may be very hot.
IMPORTANT! When using the oven or grill, the door must always be closed
FIRST USE
Check that the programme selector knob is set to manual mode then, to disperse the typical smell of the glass wool insulating material, heat the empty oven to maximum temperature, with the door closed, for approximately two hours.
Vacate the room and keep windows open during the above process. After two hours, allow the oven to cool, then clean the interior with hot water and a mild detergent.
Also clean all accessories (grill, oven dish, drip tray, spit, etc.) before using.
Before cleaning, disconnect the oven from the mains.
FUNCTIONS
Using the right-hand keypad (A) you can choose out of 10 different cooking functions that are shown on the display by pressing the corresponding buttons for 2 seconds.
| 1. ROOM TEMPERATURE AIR DEFROSTWith this function, the fan alone is switched on, which circulates air over frozen food, to defrost it very slowly. The time necessary to defrost depends on the quantity and type of food.Note: Turn the oven light on if you want to speed up defrosting. |  |
| 2. CONVENTIONAL OVENWith this function, the upper and lower heating elements are switched on, distributing heat over the food from above and below. This is suitable for cooking all types of food (meat, fi sh, bread, pizza, cakes, etc.). |  |
| 3. FAN ASSISTED CONVENTIONAL OVENWith this function, the upper and lower heating elements are switched on and the irradiated heat is distributed by the fan. This mode is particularly suitable for cooking rapidly and evenly on different racks simultaneously (fig. 4). | 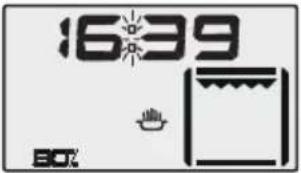 |
| 4. HOT AIR DEFROST AND WARMWith this function, the lower warming element is switched on and the irradiated heat is distributed by the fan. This function is particularly suitable for defrosting and warming ready made dishes. |  |
| 5. FAN ASSISTED OVEN WITH REAR ELEMENTWith this function, the rear element is switched on and the heat is circulated by the fan. The heat is therefore evenly and rapidly distributed throughout the oven, allowing different dishes on different racks to be cooked simultaneously (fig. 4). | 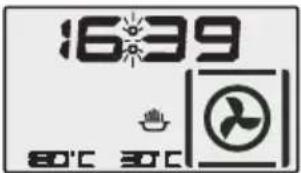 |
| 6. PIZZA - BREAD OVENWith this function, the lower and rear heating elements are switched on and the irradiated heat is distributed by the fan. This function is ideal for baking a perfect pizza, making it crispier underneath and softer on top. If upon installation, the connector has been used to increase the output of this function, cooking times indicated in table of page 19 will decrease. |  |

natural_image
Line drawing of a kitchen tray with star patterns, no text or symbols present7. BROWNING WITH THE UPPER ELEMENT
With this function, the outer top element is switched on, which distributes heat directly onto the food. This function is ideal for delicately browning the top of a dish or toasting bread.

With this function, the lower element is switched on. This function is particularly suitable for dishes that require less heat on top (e.g. cakes topped with fruit or jam, cheesecakes and dishes to be gratinated later) or to complete cooking dishes that are already browned to perfection. This function is also ideal for warming ready made dishes.

9. GRILL + ROTISSERIE
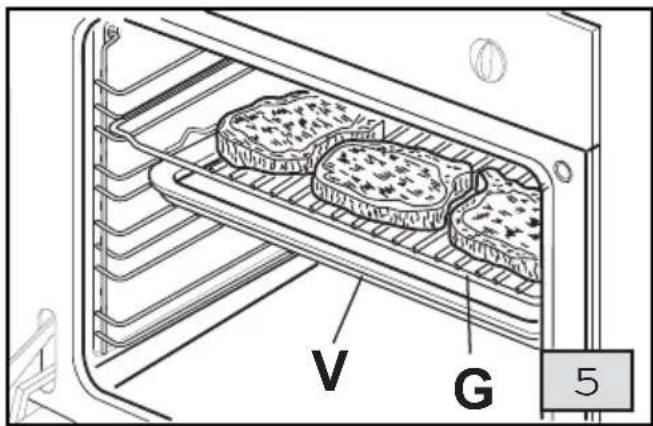
With this function, the middle top element is switched on, which distributes heat directly onto the food (fig. 5). The rotisserie is automatically switched on together with the grill (see separate instructions).
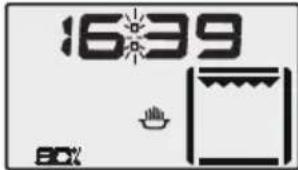
10. FAN ASSISTED GRILL
With this function, the middle top element is switched on and the irradiated heat is distributed by the fan. This function is ideal for dishes requiring a lighter grilling, as the fan moderates the direct heat from the upper element, and the resulting lower temperature allows even and crispy browning. Ideal for roasts and chicken.

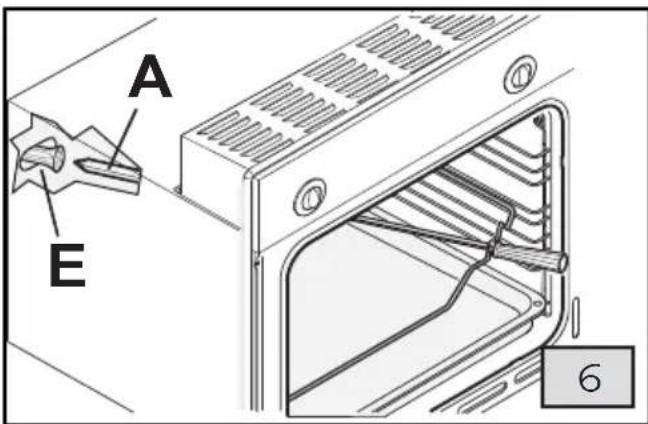
USING THE ROTISSERIE (fi g. 6)
- Slide the chicken or meat onto the spit. Secure tightly between the forks and make sure that the weight is evenly balanced, to prevent unnecessary strain on the motor.
- After fitting the support into the guide rack 2, mount the spit onto the support and fit the end (A) into the relative motor socket (E). NOTE: DO NOT USE THE TELESCOPIC GUIDES.
- Always use the drip tray to collect meat juices, as described in the section "COOKING TIPS".
- Unscrew and remove the spit handle, close the oven door and start the relative cooking function.
USING THE COOKING TEMPERATURE PROBE (if fi tted optional)
The COOKING TEMPERATURE PROBE is used to keep the temperature inside the food under control so you can keep a check on the degree of cooking of food that takes a long time. The temperature measured by this probe is shown in the area normally used for displaying oven temperature.
WARNING! Use the probe only for large pieces of preferably boneless meat, as bone interferes with the measurement.
The probe is preset to indicate when 3 specific temperature values are reached within the meat:
- 50 - 60°C - roast beef or fillet
- 70^ C - roast veal
-
90^ C – roast adult beef or pork
-
Insert the probe into the meat.
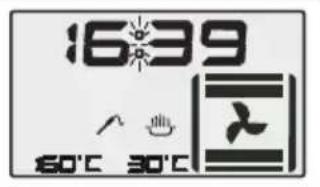
- Lift the probe socket cover and connect the plug (see fig. 7). The now lights up on the display.and the temperature shown is that of the Probe.
- Check that the probe is not in contact with the oven walls, then start the required cooking function.
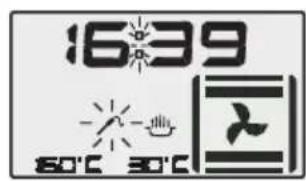
- During cooking, when an internal temperature of 50 - 60°C is reached, a beeper sounds and the probe symbol ↗ starts fl ashing slowly.
- When 70°C is reached, a different beeper sounds and the probe symbol fl ashes at double speed.
- When 90°C is reached, a different beeper sounds and the probe symbol fl ashes at triple speed.
N.B. The use of the probe is not permitted for programmes using the grill: and .
When programmes using the GRILL are selected and the probe is connected an alarm sounds for 3 seconds accompanied by the error message "Err" on the display and the programme will not start.
If the probe is connected while a grill programme is in progress the error message "Err" is shown on the display accompanied by the acoustic alarm signal. The acoustic signal has a timeout of 60" while the "Err" message remains until the probe is disconnected or the programme reset with the ◆ button.
All electrical functions (except for the lamp) are disabled while the alarm sounds.

USING THE MULTIFUNCTION OVEN
Four different operating modes may be selected for this electric oven:
-
MANUAL OPERATION WITH NO PROGRAMME The oven may be used with no programme, and cooking is started and stopped (switching on and off) manually.
-
Select the required function with the right-hand keypad (A).
- If necessary, use + and/or - to set the cooking temperature in programmes not using the GRILL (2,3,4,5,6,7,8) or the percentage grill power in grill programmes (9, 10)
- Press ⏻ to start the function. A beeper sounds to confirm and the 🔊 symbol turns on.
- During cooking, in programmes that do not use the GRILL, the temperature can be changed in 10°C steps between 50°C and the maximum temperature allowed for that particular programme. In programmes where the GRILL is used the percentage can be changed between the values 10% and 100%.
- Cooking continues until the ◆ button is pressed or when the MAX cooking timeout - set at 199 minutes - has elapsed. A beeper sounds to confirm that the oven is off.

The oven works manually in this mode but the timer is set. An acoustic signal sounds at the end of the time set on the timer.
This signal warns the user that the time set is finished but it has absolutely no influence on cooking, for which the considerations in paragraph "1. MANUAL OPERATION WITH NO PROGRAMME" are applicable.
| Press the button △The relative symbol and the “0” value for the minutes start fl ashing.Set the minutes with the + and/or buttons (max 199). |  |
| Press △ again to confirm. The display now shows only the symbol △ and a countdown timer starts from the set minute value. Once the set time has elapsed, a beeper sounds for 1 minute. Press any button to mute the beeper. | 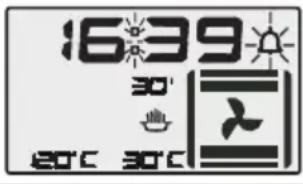 |
N.B. The TIMER may be deactivated ahead of time by pressing
3. OPERATION WITH PROGRAMMED COOKING TIME
The oven may also be programmed to start at a later time. In this case, the oven is switched on and off automatically.
| Select the required function with right-hand keypad (A).If necessary, use and/or to adjust the cooking temperature in programmes not using the GRILL (2,3,4,5,6,7,8) or the percentage grill power in programmes using the grill (9,10).Press the button. The figure “60” flashes on the display. |  |
| Set the time with the and/or buttons (max 199).Press the button again to confirm. The cooking time value now stops flashing. Alternatively, after 7,5 seconds the figure stops flashing automatically and the previous setting is automatically reselected. |  |
| Press the button to enable the function. A beeper sounds to confirm. If the programme is not started with the button, after 10 seconds the display clears automatically (only the clock is displayed).The symbol starts flashing indicating that the programme is in progress. The END OF COOKING TIME is displayed, calculated by adding the CURRENT TIME + COOKING TIME setting and a countdown timer starts. | 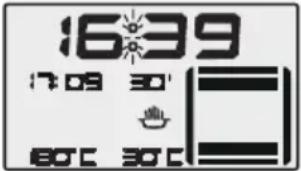 |
| Cooking continues until the button is pressed or once the SET COOKING TIME has elapsed. In the latter case the oven is switched off automatically. The end of cooking time is confirmed by a beeper and the blinking bar appears on the icon.Note: once the programme is finished, the numerical value of the time taken (0) is no longer displayed while all the other information is still visible. In this way the user can verify how much time has passed from the end of the programme and by how much the temperature has gone down in the meantime. |  |
Press the button to reset the oven.
4. OPERATION WITH PROGRAMMED START AND END OF COOKING TIMES
The oven may also be programmed to start at a later time. In this case, the oven is switched on and off automatically.
- Select the required function with the right-hand keypad (A).
- If necessary, use the + and/or - to adjust the cooking temperature in programmes not using the GRILL (2,3,4,5,6,7,8) or the percentage grill power in programmes using the GRILL (9,10).
- Press the button. The figure "60" flashes on the display.
- Set the time with the + and/or buttons (max 199).
- Press the button again to confirm. The cooking time value now stops flashing.
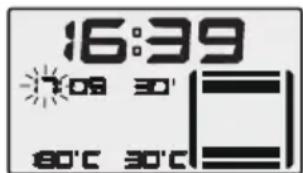
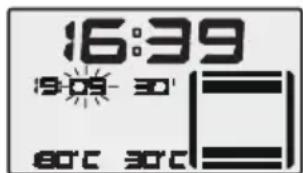
- Press the button. The END OF COOKING TIME is displayed, calculated by adding the CURRENT TIME + COOKING TIME setting with the hour values \f\ ashing.
- Set the time with the + and/or buttons.
- Press the 📄 button again. The hour value stops flashing and the MINUTES value starts flashing.
- Set the MINUTES with the + and/or - buttons.
- Press the 📄 button again to confirm. The cooking time value now stops flashing. Alternatively, after 7,5 seconds the figure stops flashing automatically and the previous setting is automatically reselected.
- Press the ◆ button to enable the function. A beeper sounds to confirm. If the programme fails to start with the ◆ button, when 10 seconds have gone by the display clears automatically (only the clock is displayed).
- The 🔊 symbol starts flashing indicating that the programme is in progress.
- The 🔊 symbol stops flashing once the cooking programme starts, specifically when the end of cooking time coincides with the sum of the CURRENT TIME value + the set COOKING TIME value, and a countdown timer starts.
- Cooking continues until the ◆ button is pressed or after the SET COOKING TIME has elapsed. In this case the oven is switched off automatically. A beeper sounds to confirm cooking has finished and the blinking bar 🎨 appears on the XXX icon 🎨.
Note: once the programme is finished, the numerical value of the time taken (0) no longer displayed while all the other information is still visible. In this way the user can verify how much time has passed from the end of the programme and by how much the temperature has gone down in the meantime.

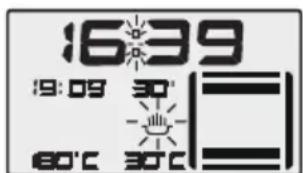

Press the button to reset the oven.
N.B. If the 📄 button is pressed before the COOKING TIME value is set, the function remains inactive. A safety system prevents conflicts between the CURRENT TIME value, the COOKING TIME setting and the END OF COOKING TIME setting. The COOKING TIME setting has priority over all other settings.
COOKING TIPS
Cakes and bread:
- Before starting to bake cakes or bread, preheat the oven for at least 15 minutes.
- Do not open the door while baking, as the cold air from outside will interrupt the raising process.
- After baking, turn the oven off and leave the cake to rest in the oven for about 10 minutes.
- Do not use enamelled oven dishes or the drip tray supplied with the oven to bake cakes.
- How can you recognise when a cake is baked? About 5 minutes before the end of the baking time, prick the top of the cake with a toothpick. If the toothpick comes out clean, the cake is ready.
- If the cake "fl ops". Next time you bake a cake, use less liquid or lower the temperature by 10 °C.
- The cake is too dry. Prick small holes in the top of the cake with a toothpick and pour a few drops of fruit juice or liqueur over the cake. Next time, try increasing the temperature by 10 °C and reducing the baking time.
- The cake is too dark on top. Next time, place the cake on a lower rack, reduce the temperature and use a longer baking time.
- The cake is burnt on top. Cut off the burnt part and sprinkle icing sugar on top or decorate with cream, jam, custard, etc.
- The cake is too dark underneath. Next time, place the cake on a higher rack and reduce the temperature.
- The bread or cake is well cooked outside but raw inside. Next time, use less liquid, reduce the temperature and use a longer baking time.
- The cake sticks to the mould. Carefully separate the cake from the edge of the mould with a knife. Cover the cake with a damp cloth and upturn the mould. Next time, grease the mould well and dust with a little fl our or breadcrumbs.
- The biscuits stick to the baking tray. Put the tray back in the oven for a while and detach the biscuits before they cool down. Next time, use oven paper.
First courses and main courses:
- When cooking dishes with cooking times longer than 40 minutes, switch the oven off for the last 10 minutes and make use of the residual heat (saving energy).
- Roasts will be juicier if cooked in closed ovenware and will have crispier browning if cooked in open ovenware.
- White meats, poultry and fish generally require moderate temperatures (less than 200 °C).
- For a rare red meat roast, cook at a high temperature (over 200 °C) for a short period of time.
- Lard and season the meat for a tastier roast.
- The roast is tough. Next time, use more tender meat.
- The roast is too dark on top or underneath. Next time, place on a lower or higher rack, reduce the temperature and use a longer roasting time.
- The roast is not completely cooked. Cut in slices, place in a dish with its own juices and fi nish cooking in the oven.
Grilling:
- Lightly oil and season foods before grilling.
- Always use the drip tray when grilling to collect the juices released by the meat. Place the tray under the grill or on the oven floor when using the rotisserie. Always add a little water to the drip tray. Water stops fats from burning, which creates unpleasant smells and smoke. Add more water while cooking to prevent it from drying up.
- Turn food over halfway through the cooking time.
- When cooking fatty poultry (e.g. goose), pierce the skin under the wings after about an hour to allow the fat to drain.
Aluminium corrodes easily if it comes into contact with the natural acids in food during cooking (e.g. vinegar, lemon, etc.). Never place foods directly in contact with aluminium or enamelled accessories and always use oven paper.
OVEN COOKING TIMES
| FOOD | Weight Kg | No. of racks from below | NATURAL CONVECTION OVEN FAN | ASSISTED OVEN | ||
| Temperature in °C | Cooking time in minutes | Temperature in °C | Cooking time in minutes | |||
| MEATS | ||||||
| Roast veal | 1 | 1 - 2 | 200-220 | 90-100 | 200-220 | 90-100 |
| Roast pork | 1 | 1 - 2 | 200-220 | 100-120 | 200-220 | 100-120 |
| Roast beef | 1,15 | 1 - 2 | 220 | 60 | 200-220 | 40-50 |
| Roast lamb | 1 | 1 - 2 | 230 | 165 | 200-220 | 100-120 |
| POULTRY | ||||||
| Roast chicken | 1 | 1 - 2 | 200-220 | 90-100 | 200-220 | 90-100 |
| Roast turkey | 6 | 1 - 2 | 220 | 150 | 200 | 150 |
| Roast duck | 1,5 | 1 - 2 | 200-220 | 150-120 | 200-220 | 150-120 |
| FISH | ||||||
| Baked fi sh | 1 | 2 | 200 | 30-35 | 170-190 | 25-30 |
| Steamed fi sh | 1 | 2 | 175 | 20-25 | 160-170 | 15-20 |
| BAKED PASTA | ||||||
| Lasagne | 2.5 | 2 | 210-225 | 60-75 | 225 - Max | 30-40 |
| Cannelloni | 2.5 | 2 | 210-225 | 60-75 | 225 - Max | 30-40 |
| PIZZA | 1 2 225 - Max 25-30= | 220 25-30 | ||||
| BREAD | 1 2 200-220 20-27 220 20 | |||||
| PASTRIES | ||||||
| Biscuits | 2 | 180 | 20-25 | 190 | 15 | |
| Short pastry | 2 | 200 | 20 | 190-200 | 15-20 | |
| Muffi ns | 2 | 180 | 30-35 | 160-170 | 20-25 | |
| CAKES | ||||||
| Angel cake | 2 | 190 | 52 | 190 | 45 | |
| Jam tart | 2 | 190 | 50 | 190 | 45 | |
| Strudel | 1 - 2 | 200-210 | 25-30 | 200-210 | 20-25 | |
| Savoury pie | 1 - 2 | 200-210 | 30-35 | 200-210 | 25-30 | |
IThe values given in the tables (temperatures and cooking times) are indicative and may vary depending on personal preferences. THE TABLE GIVES COOKING TIMES ON ONE RUNG ONLY. When cooking in fan assisted ovens, if more than one rung is used, they must be placed either on the 1st and 3rd or on the 2nd and 4th guides and cooking times must be increased by about 5-10 minutes.
GRILL COOKING TIMES
| FOOD | Weight Kg | No. of racks from below | NATURAL CONVECTION OVEN FAN ASSISTED OVEN | |||||
| Percentage grill power | Cooking time in minutes | Percentage side power | Cooking time in minutes | |||||
| 1st side 2nd | side 1st side 2nd | |||||||
| MEATS | ||||||||
| T-bone | 0,50 | 3 - 4 | 100 % | 12-15 | 12-15 | 60 % | 15 | 10 |
| Steak | 0,15 | 3 - 4 | 60 % | 5 | 5 | 60 % | 5 | 5 |
| Half chicken | 1 | 2 - 3 | 100 % | 20 | 20 | 60 % | 18 | 18 |
| FISH | ||||||||
| Trout | 0,42 | 3 | 60 % | 18 | 18 | 60 % | 10 | 10 |
| Sea bass | 040 | 3 | 60 % | 15 | 15 | 60 % | 10-12 | 10-12 |
| Sole | 0.20 | 3 - 4 | 60 % | 10 | 10 | 60 % | 8-9 | 8-9 |
| BREAD | ||||||||
| Toast 3 - 4 | 50 % | 2-3 | 2-3 50 % 2-3 | 2-3 | ||||
| Rotisserie (*) | ||||||||
| CHICKEN | 1.3 | 2 | 100 % | 90-80 | = | = | ||
(*) Only fitted or available on certain models. Do not use the telescopic guides.
The values given in the tables (temperatures and cooking times) are indicative and may vary depending on personal preferences. With meat in particular, these values depend largely on individual tastes.
CLEANING AND MAINTENANCE
- Prior to any maintenance work or cleaning, disconnect the appliance from the electricity mains.
- Do not use a steam cleaner to clean this appliance.
- Do not wash the parts if they are still hot
- Never use abrasive powders, pads or corrosive spray products.
- Do not leave vinegar, coffee, milk, salty water or the juice of lemon or tomato on the surface for any length of time.
EXTERIOR PARTS
All the parts of the oven exterior (stainless steel, side panels, door glass) must be cleaned frequently with a mild detergent and a little water and then dried with a soft cloth.
Do not use rough or abrasive materials or sharp metal scrapers to clean the oven glass doors as they could scratch and cause the glass to break.
On painted or stainless steel surfaces, do not use aromatic or aliphatic solvents to remove spots or label adhesive.
INTERIOR PARTS
We recommend cleaning the oven after every use to remove all residues of food, grease and sugar, which may burn with subsequent use, causing permanent stains and unpleasant smells. Always clean the oven when slightly warm with soapy water. Rinse and dry all surfaces thoroughly. Always wash all accessories used.
Do not spray or wash the electric heating elements nor the thermostat with acid-based detergents (check the information label on the product you are using). The manufacturer cannot be held responsible for any damages caused by incorrect cleaning.
OVEN DOOR SEAL
The oven door seal keeps hot air inside and is vital for the correct operation of the oven. We recommend:
- cleaning carefully, using no abrasive sponges or products.
- checking the condition of the seal regularly.
If the seal has become hardened or damaged, contact your local authorised service centre and do not use the oven until the seal has been replaced.
REMOVING AND MOUNTING THE OVEN DOOR (fi g. 8)
To facilitate cleaning the oven, the oven door can be removed by completing the following steps:
- Open the oven door and insert either a nail or rivet (R) in the hinge hole (F).
- Partially close the door while simultaneously forcing it slightly upwards so as to free the stop lug and the hinge segment.
- Once the hinge has been released, pull the door forwards, bending it slightly upwards at the same time to free the segment.
- Remount the door following the above instructions in the reverse order, taking care to put the segments back in their right places.

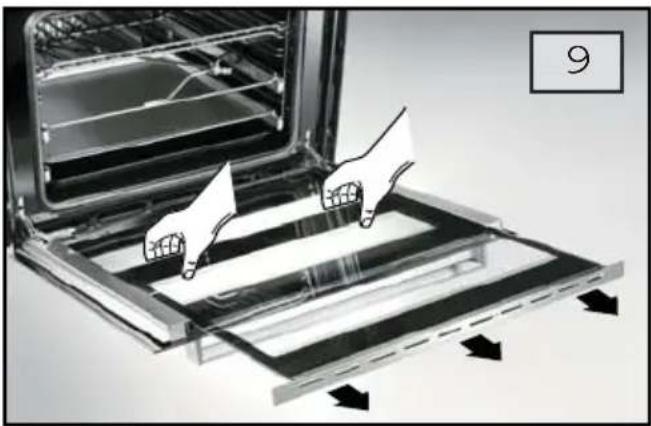
INTERNAL OVEN DOOR WINDOW (fi g. 9)
A special feature of our ovens is the fact that the internal oven door window can be easily removed by the user, for perfect cleaning. Simply open the door and remove the window glass support.
WARNING! This operation may also be carried out with the door mounted on the appliance but in this case be careful when pulling the glass part out – the force of the hinges could make the door shut suddenly.
natural_image
Illustration of a hand placing paper into an oven with arrows indicating airflow or movement (no text or symbols)DROP DOWN GRILL
To make cleaning of the top of the oven cavity easier this oven is fitted with a drop down grill element.
To lower the front of the grill, gently press the wire retaining rod towards the back of the oven (fi g. 10) and lower the grill down (fi g. 11).
After cleaning the top of the oven raise the grill and clip the retaining rod back into position.

natural_image
Close-up of a mechanical component with a magnified inset showing internal details (no text or symbols visible)
natural_image
3D diagram of a fluid flow inside a container with internal channels and a curved pipe, labeled '11' in corner (no text or symbols on diagram itself)461307409 (RS-000)
OVEN FAN FILTER (fi g. 12)
The oven is fitted with a fan protector filter to prevent excessive airborne fat from clogging the fan.
After each use, we recommend cleaning the filter thoroughly (by hand or in the dishwasher).
To remove, push the tab (F) upwards.
To refit, repeat the above in reverse order, taking care that the rear tabs are seated in the relative holes at the back of the oven.
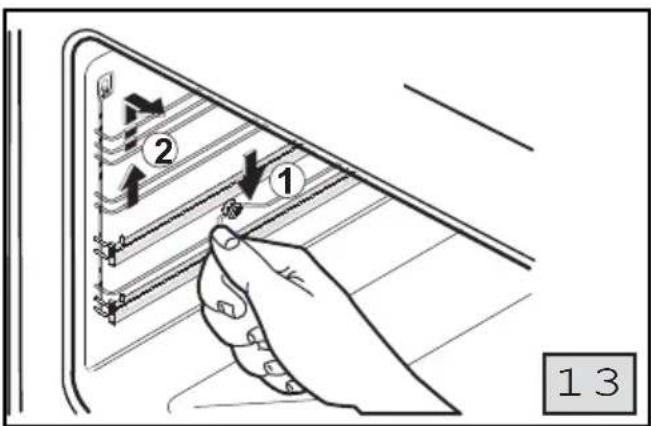
OVEN SIDE GRILLES (fi g. 13)
These can be removed as follows to clean the oven more thoroughly:
- Press on the last rack with a finger to release the grille from the locking pin (1).
- Lift and slide out the grille (2).
• To refi t the grille, repeat the above in reverse order.
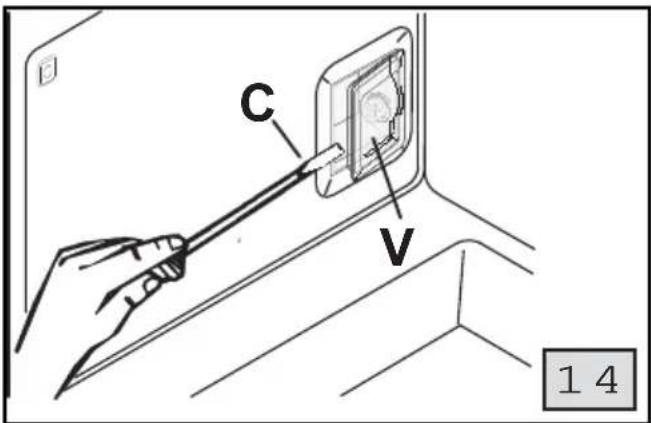
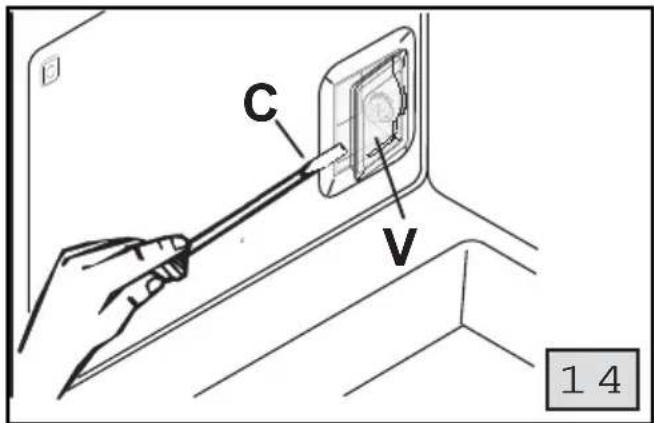
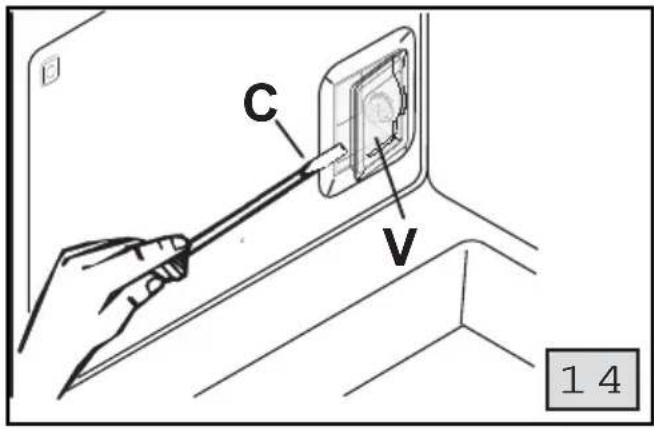
CHANGING THE OVEN LAMP (fi g. 14)
CAUTION! Disconnect oven from mains before replacing the lamp bulb.
Should it be necessary to replace one or both of the oven lamps, use only bulbs with the following characteristics: 40W - 230V \~ - 50Hz – high temperature resistant (300°C).
Replace the lamp as follows:
- Remove the oven side grilles as described above.
- Remove the lamp cover glass (V) by levering up with a screwdriver (C) inserted between the cover and the oven interior wall.
- Replace the bulb and repeat the above procedure in reverse order.


Some problems may be caused by simple maintenance issues or oversights and can be easily resolved without professional help.
| PROBLEM | SOLUTION |
| The oven doesn’t work | Check that the mains plug is correctly connectedCheck the safety circuit breakers (trip switches) in your home’s electrical system. If the problem is due to your electrical system, contact an electrician.Make sure that the commands lock is disabled or that no safety device has triggered (see page 7). |
| The oven light does not come on | Check that the oven lamp bulb is screwed in correctlyPurchase a high temperature bulb from our service centre and install following the instructions given on page 22. |
TECHNICAL SPECIFICATIONS
MINIMUM DIMENSIONS FOR BUILT-IN UNIT SPACE (fig. 15)
| Height mm | Width mm | Depth mm | Volume dm3 |
| 570 | 560 | 550 | 50 |
ELECTRICAL COMPONENTS
| Description | Rated specifications |
| lower oven element | 170 + 800 W |
| upper oven-grill element | 800 +1800 W |
| rear oven element | 2000 W |
| oven lamp | 40 W - T 300 |
| rotisserie motor | 4 W |
| tangential fan | 18..22 W |
| electric fan | 25..29 W |
| mains power cable | H05 RR-F 3x 1.5 mm ^2 |

TECHNICAL INFO
The installation and maintenance procedures described as follows may only be carried out by qualified personnel.
The manufacturer cannot be held responsible for damage or injury caused by incorrect installation.
INSTALLATION
- After removing the external packaging and internal packing for moving parts, check that the oven is undamaged. If in doubt, do not use the oven and contact your local authorised service centre.
- Some parts are fitted onto the oven with a protective plastic film. It is very important that this film is removed before using the oven. Cut the edges of the film with a sharp blade or pierce with a pin.
- Do not use the oven door handle to lift or drag the oven.
Packing materials (cardboard boxes, bags, polystyrene, screws, etc.) are potentially hazardous and must not be left within the reach of children.
To protect the environment, only ecological and recyclable packing materials are used (all wood used is untreated). 80% of cardboard used is made from 100% recycled paper. Bags are made from polyethylene (PE), tape is made from polypropylene (PP) and fi ller is made from CFC free polystyrene (PS). Correct waste treatment and reuse reduce raw material usage and cuts down refuse volume. The packing may be returned to the shop where you bought the appliance or taken to a refuse collection facility for reuse. Contact your local authorities for the address of your nearest refuse collection facility.
IMPORTANT
- The walls next to and surrounding the oven must be capable of withstanding overtemperatures of 70 K.
- The adhesive used to apply the plastic laminate to the kitchen unit must be resistant to a temperature of at least 150^ to prevent the laminate coating from peeling off.
INSTALLING AND SECURING THE OVEN
The oven may be installed in a column unit or a base unit by cutting an aperture into the unit to house the appliance, as shown in fig. 15.
To ensure adequate ventilation for the oven, remove the rear panel of the base unit or cut an aperture (A), as shown in fig. 15.
- Slide the oven into the aperture in the unit.
- Open the door and secure the oven with the relative screws (V) (fi g. 16).
The surface supporting the oven must be capable of withstanding the weight of the oven itself, as the bolts are used solely to secure the oven in the unit.

ELECTRICAL CONNECTIONS
Connection to mains electricity must be made in compliance with applicable legislation.
Before connecting, ensure that:
- The electrical power rating of your home's electrical system and sockets is adequate for the oven specifications indicated on the identification label located on the side of the appliance and in the manual.
N.B.: If the output of the electric mains system is over 3kW, it is possible to increase the power rating for the sole function 6 COOKING BREAD PIZZA, from 2100 W to 3100 W, using the connector of the electronic card. In this case, it is necessary to remove the protection box (S) (fi g. 17) and insert the connector in the plug of the card, marked with "CNB - 1 and 2" (see instructions enclosed in the kit supplied with the appliance). - The mains socket or electrical system is equipped with an earth line compliant with applicable legislation. The manufacturer cannot be held responsible for injury or damage caused by failure to comply with the above.
- The omnipolar socket or switch used must be easily accessible with the oven installed.
With mains connections via a wall socket:
- If not already present, fi t a normalised plug onto the mains lead that is suitable for the load indicated on the identification label. Connect the wires as follows, and leave the earth wire a little longer than the others:
letter L (phase) = brown wire
letter N (neutral) = blue wire
symbol ⊕ (earth) = green/yellow wire
- The power cable must be routed so that no point along its length is ever exposed to a temperature of 75^ C.
- Never use adaptors or multiple plugs as these can lead to short circuiting and dangerous overheating.
With the appliance wired directly to the mains:
- Install an omnipolar power switch between the appliance and the mains grid of adequate power rating and with a minimum contact gap of 3 mm. Remember that no switch must be installed along the earth line.
MAINTENANCE
Always disconnect the appliance from the mains before replacing any part.
REPLACING ELECTRICAL COMPONENTS
- To replace the oven lamp bulb, see the instructions on page 22.
- To access all other electrical components, the oven must be removed from the unit by unscrewing the screws (V) (fi g. 16). Once the oven has been removed, the terminal board is easily accessible for maintenance work (fi g. 17).
- When replacing the power cable, remember that the earth wires must be left longer than the other wires and follow the instructions given in the section “ELECTRICAL CONNECTIONS”.
- Remove the rear cover (Q) to access the ratio motor, the elements and the temperature limiter (fi g. 17).
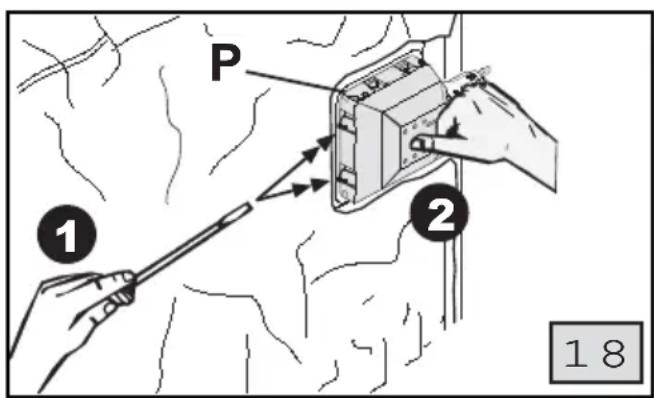
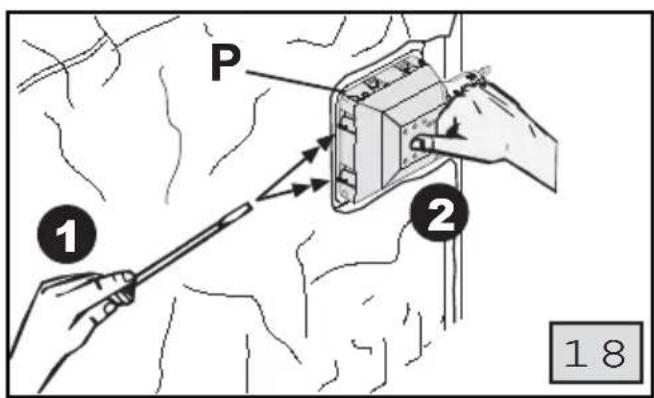
- To replace the lamp mounting (P), remove the cover (A) and side plate, then lever off the two securing tabs with a screwdriver (see fig. 18) and pull the lamp mounting out.
- To replace the thermostat, the switch and the electronic board, remove the cover box (S) (fi g. 17). Then remove the screws underneath to release the components to be replaced.


natural_image
Technical diagram showing three labeled components (A, B, C) of a grid-like structure with a striped base and rectangular plate (no text or symbols beyond labels)
natural_image
Line drawing of a kitchen tray with star patterns, no text or symbols present
natural_image
Illustration of a hand placing paper sheets into an oven with arrows indicating airflow or movement (no text or symbols)natural_image
Close-up of a mechanical component with a magnified inset showing internal details (no text or symbols visible)
natural_image
3D technical diagram of a mechanical component with internal channels and a curved arrow indicating motion (no text or symbols)461307409 (RS-000)
VENTILLÁTORLAPÁT VÉDŐFILTERE (12. ábra)


natural_image
Blue icon of a stylized open pill with coins and wings (no text or symbols)Servizio clienti
199 28 55 11*
natural_image
Technical diagram showing three labeled components (A, B, C) of a grid-like structure with a striped base and rectangular plate (no text or symbols beyond labels)
natural_image
Line drawing of a kitchen tray with star patterns, no text or symbols presentnatural_image
Illustration of a hand placing paper into an oven with arrows indicating airflow or movement (no text or symbols)
natural_image
Close-up of a mechanical component with a magnified inset showing internal details (no text or symbols visible)
natural_image
3D technical diagram of a mechanical component with internal channels and a curved arrow indicating motion (no text or symbols)461307409 (RS-000)
IT ISTRUZIONI PER L'UTENTE


natural_image
Technical diagram showing three labeled components: a rectangular tray with internal grid, a striped base, and a square plate with internal structure (no text or symbols)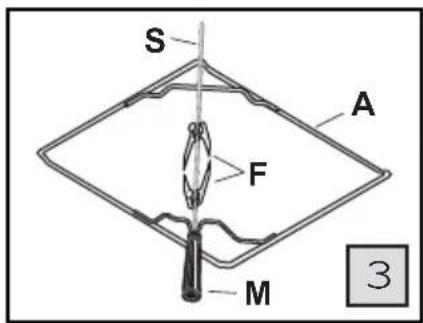
natural_image
Line drawing of a kitchen tray with three plates and decorative patterns, no text or symbols presentnatural_image
Illustration of a hand placing paper into an oven with arrows indicating airflow or movement (no text or symbols)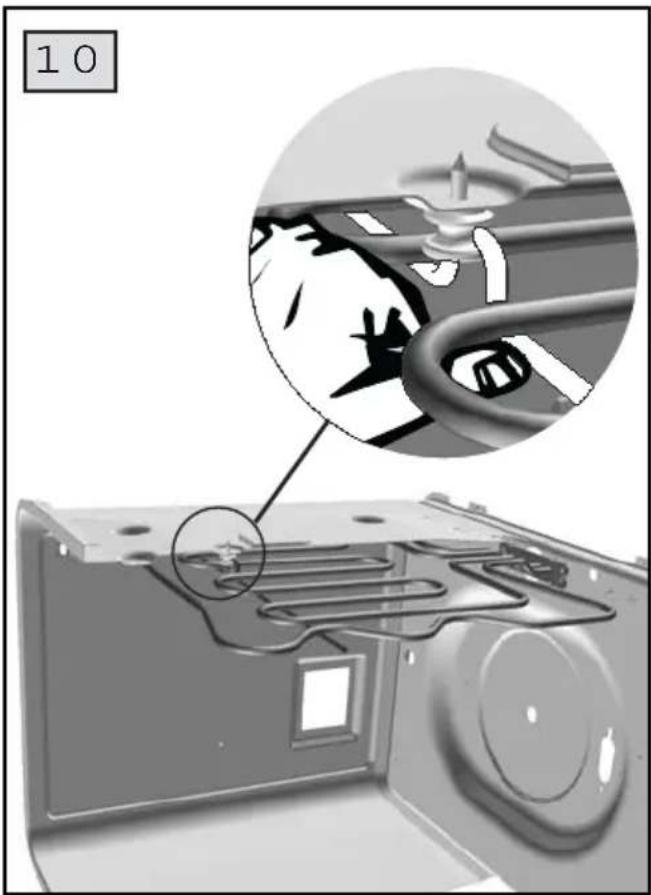
natural_image
Close-up of a mechanical component with a magnified inset showing internal details (no text or symbols visible)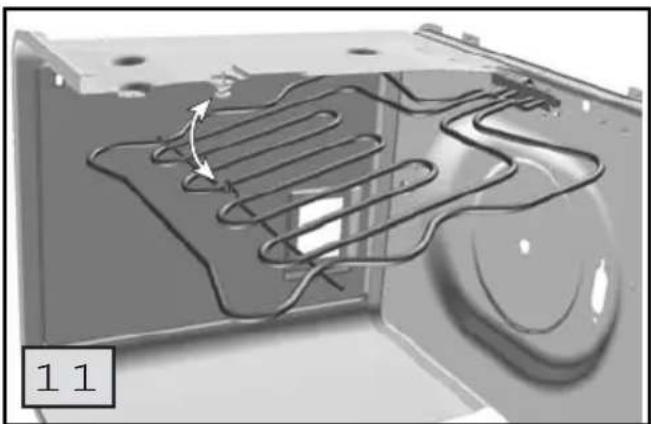
natural_image
3D technical diagram of a mechanical component with internal channels and a curved feature, labeled '11' (no text or symbols beyond label)461307409 (RS-000)
APSAUGINIS ORKAITÈS VENTILIATORIAUS FILTRAS (12 pav.)
natural_image
Technical diagram showing three labeled components: a rectangular plate with internal divisions, a striped base, and a square component labeled A, B, C (no text or symbols beyond labels)



natural_image
Line drawing of a kitchen tray with star patterns, no text or symbols presentTABULA CEPŠANAI UZ GRILA
| EDIENI | Svars kg | Vadsliede no apakšas | CEPEŠKRASNS AR DABISKO KONVEKCIJU | FORNO A CONVEZIONE FORZATA (con l'ausilio del ventilatore) | ||||
| Cepšanas procents | Cepšanas laiks minūtēs | Cepšanas procents | Cepšanas laiks minūtēs | |||||
| 1. puse 2. puse 1. puse 2. puse | ||||||||
| GAŁA Karbonāde | 0,50 | 3 - 4 | 100 % | 12-15 | 12-15 | 60 % | 15 | 10 |
| Bifsteks | 0,15 | 3 - 4 | 60 % | 5 | 5 | 60 % | 5 | 5 |
| Vista (uz pusi sagriezta) | 1 | 2 - 3 | 100 % | 20 | 20 | 60 % | 18 | 18 |
| ZIVIS Forele | 0,42 | 3 | 60 % | 18 | 18 | 60 % | 10 | 10 |
| Kefale | 040 | 3 | 60 % | 15 | 15 | 60 % | 10-12 | 10-12 |
| Bute | 0.20 | 3 - 4 | 60 % | 10 | 10 | 60 % | 8-9 | 8-9 |
| MAIZE Tostermaizes | 3 - 4 | 50 % | 2-3 | 2-3 | 50 % | 2-3 | 2-3 | |
| IESMS (*) | ||||||||
| VISTA | 1.3 | 2 | 100 % | 90-80 | = | = | ||
natural_image
Illustration of a hand placing paper into an oven with arrows indicating airflow or movement (no text or symbols)APGĀŽAMĀ GRILA SILDELEMENTS
natural_image
Close-up of a mechanical component with a magnified inset showing internal details (no text or symbols visible)
natural_image
3D diagram of a fluid flow inside a container with internal channels and a curved pipe, labeled '11' in corner (no text or symbols on diagram itself)461307409 (RS-000)
CEPEŠKRĀSNS SPĀRNU RATA AIZSARGFILTRS (12. att.)


natural_image
Technical diagram showing three labeled components: a rectangular plate with internal divisions, a striped base, and a square plate with internal divisions (no text or symbols present)
natural_image
Line drawing of a kitchen tray with star patterns, no text or symbols presentWSKAZÓWKI DLA UŻYTKOWNIKA
natural_image
Illustration of a hand placing paper into an oven with arrows indicating airflow or movement (no text or symbols)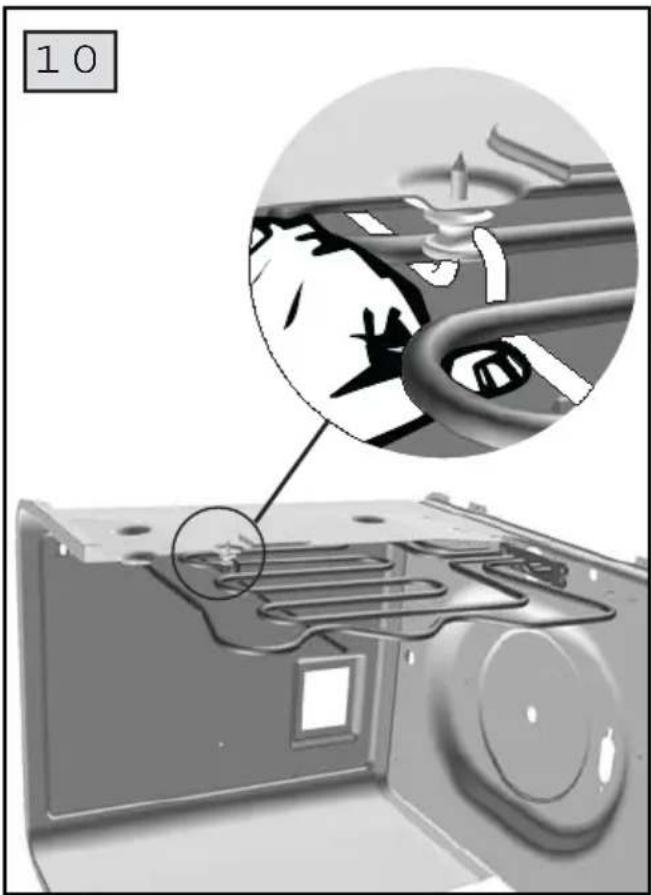
natural_image
Close-up of a mechanical component with a magnified inset showing internal details (no text or symbols visible)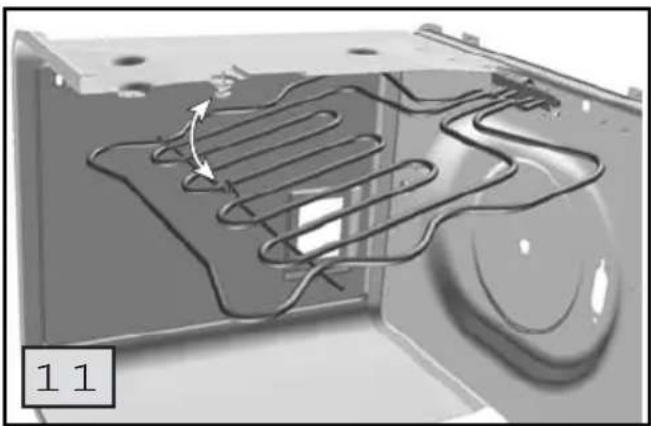
natural_image
3D diagram of a mechanical component with internal channels and a curved arrow indicating motion (no text or symbols)461307409 (RS-000)
FILTR OCHRONNY WIRNIKA PIEKARNIKA (rys. 12)
CO ROBIĆ, JEŚLI...
natural_image
Technical diagram showing three labeled components (A, B, C) of a grid-like structure with a striped base and rectangular plate (no text or symbols beyond labels)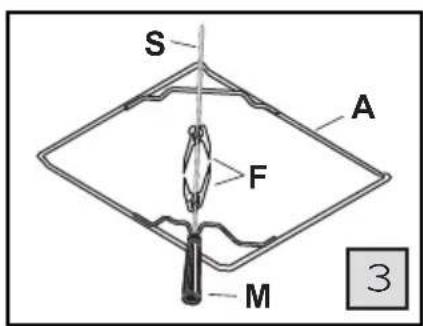
natural_image
Line drawing of a kitchen tray with star patterns, no text or symbols presentnatural_image
Illustration of a hand placing paper onto an oven with arrows indicating airflow or movement (no text or symbols)
natural_image
Close-up of a mechanical component with a magnified inset showing internal details (no text or symbols visible)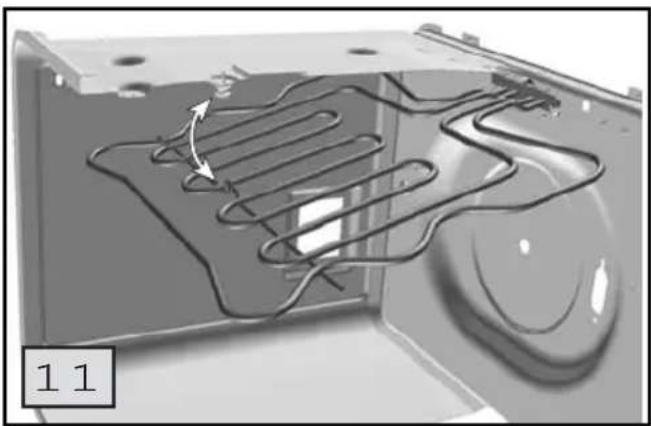
natural_image
3D technical diagram of a mechanical component with internal channels and a curved arrow indicating motion (no text or symbols)461307409 (RS-000)


natural_image
Technical diagram showing three labeled components: a rectangular tray with internal grid, a striped base, and a square plate (no text or symbols)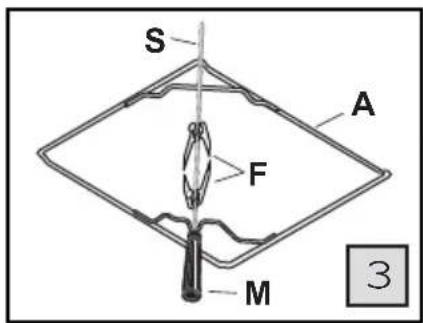
Ak zvolíte rozmrazovací program, zobrazia sa len hodiny a symbol programu.
4. ROZMRAZENIE A OHREV TEPLÝM VZDUCHOM
natural_image
Line drawing of a kitchen tray with star patterns, no text or symbols present7. OPEČENIE DO RUŽOVA S POUŽITÍM HORNÉHO REZISTORU
1. MANUÁLNA ČINNOST BEZ NASTAVENIA
2. MANUÁLNA ČINNOST S POČÍTADLOM MINÚT


Pre resetovanie rúry stlačte tlačidlo
4. NASTAVENIE SPUSTENIA A UKONČENIA PEČENIA
natural_image
Illustration of a hand placing paper into an oven with arrows indicating airflow or movement (no text or symbols)VYTIAHNUTEL'NY REZISTOR GRILU
natural_image
Close-up of a mechanical component with a magnified inset showing internal details (no text or symbols visible)
natural_image
3D diagram of a mechanical component with internal channels and a curved arrow indicating rotation (no text or symbols)OCHRANNÝ FILTER VENTILÁTORA RÚRY (obr. 12)


natural_image
Technical diagram showing three labeled components: a rectangular tray with internal grid, a striped base, and a square plate with internal structure (no text or symbols)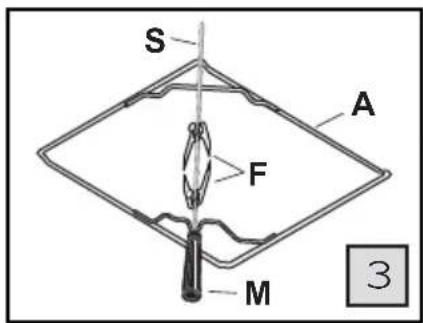
natural_image
Line drawing of a kitchen tray with star patterns, no text or symbols presentnatural_image
Illustration of a hand placing paper into an oven with arrows indicating airflow or movement (no text or symbols)natural_image
Close-up of a mechanical component with a magnified inset showing internal details (no text or symbols visible)
natural_image
3D technical diagram of a mechanical component with internal channels and a curved arrow indicating motion (no text or symbols)461307409 (RS-000)


- MANUÁLNÍ ČINNOST BEZ NASTAVENÍ
- MANUÁLNÍ ČINNOST S POČÍTADLEM MINUT
- OCHRANNÝ FILTR VENTILÁTORU TROUBY (obr. 12)
- CO JE TŘEBA DĚLAT, KDYŽ...
- CONTENTS
- GB ASSISTANCE AND SPARE PARTS
- A list of few basic rules that must be observed when using any kind of electrical appliance:
- Never touch any electrical appliance if hands or feet are wet or damp.
- Never use the appliance bare footed.
- Do not pull the power lead to force the plug out of the socket.
- Never leave the appliance in the outside weather conditions.
- Do not allow children or unskilled hands to use the appliance unattended.
- CONTROL PANEL
- NOTES ON THE TOUCH-CONTROL KEYPAD
- INTRODUCTION
- DESCRIPTION OF THE PROGRAMMING BUTTONS
- ON/OFF BUTTON
- INCREASE TIME SETTING BUTTON
- DECREASE TIME SETTING BUTTON
- COOKING TIME BUTTON
- STOP COOKING BUTTON
- CLOCK + TIMER BUTTON
- OVEN LIGHT BUTTON
- SET TIME
- SET TIMER
- CONTRAST SETTING
- MOVE THE VIEWING ANGLE UPWARDS
- MOVE THE VIEWING ANGLE DOWNWARDS
- POWER CUTS
- NOTES CONCERNING SAFETY:
- FIRST USE
- FUNCTIONS
- BROWNING WITH THE UPPER ELEMENT
- GRILL + ROTISSERIE
- FAN ASSISTED GRILL
- USING THE ROTISSERIE (fi g. 6)
- USING THE COOKING TEMPERATURE PROBE (if fi tted optional)
- N.B. The use of the probe is not permitted for programmes using the grill: and .
- USING THE MULTIFUNCTION OVEN
- OPERATION WITH PROGRAMMED COOKING TIME
- OPERATION WITH PROGRAMMED START AND END OF COOKING TIMES
- COOKING TIPS
- Cakes and bread:
- First courses and main courses:
- Grilling:
- CLEANING AND MAINTENANCE
- EXTERIOR PARTS
- INTERIOR PARTS
- OVEN DOOR SEAL
- REMOVING AND MOUNTING THE OVEN DOOR (fi g. 8)
- INTERNAL OVEN DOOR WINDOW (fi g. 9)
- DROP DOWN GRILL
- OVEN FAN FILTER (fi g. 12)
- OVEN SIDE GRILLES (fi g. 13)
- CHANGING THE OVEN LAMP (fi g. 14)
- TECHNICAL SPECIFICATIONS
- TECHNICAL INFO
- INSTALLATION
- IMPORTANT
- INSTALLING AND SECURING THE OVEN
- ELECTRICAL CONNECTIONS
- Before connecting, ensure that:
- With mains connections via a wall socket:
- With the appliance wired directly to the mains:
- MAINTENANCE
- REPLACING ELECTRICAL COMPONENTS
- VENTILLÁTORLAPÁT VÉDŐFILTERE (12. ábra)
- IT ISTRUZIONI PER L'UTENTE
- APSAUGINIS ORKAITÈS VENTILIATORIAUS FILTRAS (12 pav.)
- APGĀŽAMĀ GRILA SILDELEMENTS
- CEPEŠKRĀSNS SPĀRNU RATA AIZSARGFILTRS (12. att.)
- WSKAZÓWKI DLA UŻYTKOWNIKA
- FILTR OCHRONNY WIRNIKA PIEKARNIKA (rys. 12)
- CO ROBIĆ, JEŚLI...
- ROZMRAZENIE A OHREV TEPLÝM VZDUCHOM
- OPEČENIE DO RUŽOVA S POUŽITÍM HORNÉHO REZISTORU
- MANUÁLNA ČINNOST BEZ NASTAVENIA
- MANUÁLNA ČINNOST S POČÍTADLOM MINÚT
- NASTAVENIE SPUSTENIA A UKONČENIA PEČENIA
- VYTIAHNUTEL'NY REZISTOR GRILU
- OCHRANNÝ FILTER VENTILÁTORA RÚRY (obr. 12)
Brand : Ardo
Model : HEA108X
Category : Oven