HX065X - Oven Ardo - Free user manual and instructions
Find the device manual for free HX065X Ardo in PDF.


| Brand | Ardo |
| Model | HX065X |
| Product Type | Built-in Electric Oven |
| Oven Type | Multifunctional (conventional, fanned, grill, defrost) |
| Minimum Housing Dimensions (HxWxD) | 570 x 560 x 550 mm |
| Oven Volume | 53 L |
| Power Supply | 230 V ~ 50 Hz (typical, verified from cable rating) |
| Connected Load | Approx. 2800 W (sum of heating elements) |
| Supply Cable | H05 RR-F 3x1.5 mm² |
| Lower Heating Element Power | 1400 W |
| Top Heating Element Power (oven-grill) | 700 + 1800 W |
| Rear Heating Element Power | 2000 W |
| Grill Heating Element Power | 1800 W |
| Oven Lamp | 15 W, E14, T300°C |
| Cooling Fan | 18–22 W (tangential) |
| Rear Heating Fan | 25–29 W |
| Functions | Traditional cooking, fan-assisted, grill, fan grill, defrost, top/bottom heat, browning |
| Control Type | Knobs (selector, thermostat, timer) and optional digital programmer |
| Safety Features | Safety temperature device, thermostat warning light, child lock (indirect by supervision) |
| Cleaning | Manual cleaning with mild detergent; avoid abrasive products; wipe interior after each use |
| Accessories Included | Oven shelf, drip tray, cake/pizza tray (may vary by model) |
| Installation | Built-in; requires proper ventilation; must be installed by qualified personnel |
| Energy Efficiency | Not specified in manual; typical class A |
| Weight | Not specified explicitly, estimated ~30 kg |
Frequently Asked Questions - HX065X Ardo
User questions about HX065X Ardo
0 question about this device. Answer the ones you know or ask your own.
Ask a new question about this device
Download the instructions for your Oven in PDF format for free! Find your manual HX065X - Ardo and take your electronic device back in hand. On this page are published all the documents necessary for the use of your device. HX065X by Ardo.
USER MANUAL HX065X Ardo
natural_image
Illustration of kitchen appliances including ovens, a washing machine, and a showerhead against a solid blue background (no text or symbols)- INFORMACJE OGÓLNE ORAZ INSTRUKCJA UŻYTKOWANIA 4-5
- OPIS URZADZENIA 6-9
- INSTRUKCJE DLA UŻYTKOWNIKA 10-15
- CO ROBIĆ, GDY PIEKARNIK ŽLE FUNKCJONUJE 16
- CHARAKTERYSTYKA TECHNICZNA 16
- INSTRUKCJA DLA INSTALATORA 17-18
WSZYSTKIE RYSUNKI ZNAJDUJA SIE NA OSTATNIEJ STRONIE
SERWIS TECHNICZNY
UWAGA! - GWARANCJA
natural_image
Line drawing of a toaster oven with two bread rolls inside, no text or symbols presentPL 3. INSTRUKCJE DLA UŻYTKOWNIKA
JAK UŻYWAĆ PIEKARNIK WIELOFUNKCYJNY

ROZMRAŻANIE W TEMPERATURZE POKOJOWEJ
RADY PRAKTYCZNE PRZY PIECZENIU
Ciasta i chleb:
- DŮLEŽITÉ POZNÁMKY A POKYNY K POUŽITÍ 4-5
- CO DĚLAT, KDYŽ NĚCO NEFUNGUJE 16
- TECHNICKÉ PARAMETRY 16
-
POKYNY K INSTALACI 17-18
-
POPIS SPOTŘEBIČE 6-9
-
POKYNY PRO UŽIVATELE 10-15
TECHNICKÉ ZAJIŠTĚNÍ A NÁHRADNÍ DÍLY
natural_image
Line drawing of a toaster oven with two bread slices inside, no text or symbols presentCZ 3. POKYNY PRO UŽIVATELE
JAK POUŽÍVAT MULTIFUNKČNÍ TROUBU
ROZMRAZOVÁNÍ VZDUCHEM PROSTŘEDÍ
4. CO DĚLAT, KDYŽ NĚCO NEFUNGUJE
OBSAH
SK
- DÔLEŽITÉ POZNÁMKY A ODPORÚČANIA PRE OBSLUHU 4-5
- POPIS SPOTREBIČA 6-9
- POKYNY PRE SPOTREBITEL'A 10-15
- ČO ROBIŤ, AK NIEČO NEFUNGUJE 16
- TECHNICKÉ PARAMETRE 16
- POKYNY PRE INŠTALATÉRA 17-18
TECHNICKÝ SERVIS A NÁHRADNÉ DIELY
natural_image
Line drawing of a toaster oven with two bread rolls inside, no text or symbols presentAKO POUŽÍVAŤ MULTIFUNKČNÚ RÚRU
ROZMRAZOVANIE PRI IZBOVEJ TEPLOTE
PRAKTICKÉ RADY PRI PRÍPRAVE JEDÁL
Zákusky a chlieb:
4. ČO ROBIT, KEĐ NIEČO NEFUNGUJE
СОДЕРЖАНИЕ
RU
natural_image
Line drawing of a toaster oven with two bread slices inside, no text or symbols presentПОЛЬЗОВАНИЕ
ПРАКТИЧЕСКИЕСОВЕТЫПОПРИГОТОВЛЕНИЮ БЛЮД
3MICT
UA
natural_image
Line drawing of a toaster oven with two bread slices inside, no text or symbols presentTURINYS
LT
- SVARBI INFORMACIJA IR NURODYMAI 4-5
- PRIETAISO APRAŠYMAS 6-9
-
EKSPLOATAVIMO INSTRUKCIJOS 10-15
-
GEDIMAI IR JU ŠALINIMAS 16
-
TECHNINÉS SAVYBÈS 16
-
INSTRUKCIJOS MONTUOTOJUI 17-18
TECHNINIS APTARNAVIMAS IR ATSARGINÉS DALYS
natural_image
Line drawing of a toaster oven with two bread rolls inside, no text or symbols presentKAIP NAUDOTIS DAUGIAFUNKCE ORKAITE

ATITIRPDYMAS KAMBARIO TEMPERATÜROJE
KEPIMO PATARIMAI
- SVARIGAS PIEZIMES UN LIETOŠANAS INSTRUKCIJA 4-5
- IERİCES APRAKSTS 6-9
- LIETOTÄJA INSTRUKCIJA 10-15
- BOJĀJUMU NOVĒRŠANA 16
- TEHNISKIE RAKSTURLIELUMI 16
- UZSTĀDĪŠANAS INSTRUKCIJAS 17-18
PALİDZİBA UN REZERVES DALAS
natural_image
Line drawing of a toaster oven with two bread rolls inside, no text or symbols presentKÄ LIETOT DAUDZFUNKCIONÄLU KRÄSNI
ATKAUSĒŠANA ISTABAS TEMPERATŪRĀ
EDIENA GATAVOŠANA UZ GRILA DARBINOT VENTILATORU
PADOMI ĖDIENA GATAVOŠANAI
- FONTOS MEGJEGYZÉSEK ÉS HASZNÁLATI ELŐÍRÁSOK 4-5
- A KÉSZÜLÉK LEÍRÁSA 6-9
- HASZNÁLATI UTASÍTÁSOK 10-15
- TENNIVALÓK, HA VALAMI NEM MÜKÖDIK 16
- MÜSZAKI JELLEMZÖK 16
- UTASÍTÁSOK A FELSZERELÓNEK 17-18
natural_image
Line drawing of a toaster oven with two bread rolls inside, showing tray and side shelves (no text or symbols)A MULTIFUNKCIONÁLIS SÜTŐ HASZNÁLATA

ENGEDÉS SZOBAHÖMÉRSÉKLETEN
- IMPORTANT NOTES AND INSTRUCTIONS FOR USE 4-5
- DESCRIPTION OF THE APPLIANCE 6-9
- USER INSTRUCTIONS 10-15
- TROUBLESHOOTING 16
- TECHNICAL FEATURES 16
- INSTALLER INSTRUCTIONS 17-18
ASSISTANCE AND SPARE PARTS
Before this appliance left the factory it was tested and fine-tuned by specialised expert personnel in order to guarantee its best functioning results.
Any subsequent repairs or adjustments that may be necessary must be done with the maximum of care and attention by qualified personnel.
For this reason we recommend you always contact your local Dealer or our nearest Service Centre, specifying the brand, the model, its serial number and type of problem you are facing with it. All data related to your appliance are printed the model label at the side of the appliance as well as on its original packaging.
A duplicate data label is contained in this booklet also. Please attach this label on the handbook or to an accessible surface near by the appliance for easy reference.
This information enables the technical assistant to come and visit you with the correct spares and guarantee a prompt and suitable service.
You will only find original spare parts at our Technical Assistance Centres and authorised dealers.
SPACE FOR DATA LABEL
The appliance was designed and made in accordance with the European standards listed below:
• EN 60 335-1 and EN 60 335-2-6 (electrical) plus relative amendments
The appliance complies with the prescriptions of the European Directives as below:
• 2006/95 EC concerning electrical safety (BT).
- 89/336 + 92/31 + 93/68 EC concerning electromagnetic compatibility (EMC)
and reports on both its label and its packaging the

symbol.
Oven accessories that could come into contact with foodstuffs are made with materials that comply with the provisions of the 89/109 EC directive dated 21/12/88.
This product complies with EU Directive 2002/96/EC.
The crossed-out dustbin symbol reported on the appliance indicates that the appliance must be disposed of separately from other domestic refuse at the end of its useful life. It must therefore be delivered to a waste recycling centre specifi cally for electric and electronic equipment or returned to the retailer at the moment of purchase of a new equivalent appliance.

The user is responsible for delivering the appliance to the appropriate collection centre at the end of its useful life, Failure to do so may result in a fine, as provided for by laws governing waste disposal.
Differential collection of waste products for eventual recycling, treatment and environmentally friendly disposal helps reduce possible negative effects on the environment and health, and also enables the materials making up the product to be recycled.
For more detailed information on the available refuse collection systems, refer to the local Municipal Solid Waste disposal centre or the shop where the product was purchased.
Producers and importers are responsible for fulfi lling their obligations as regards recycling, treatment and environmentally friendly disposal by directly or indirectly participating in the collection system.
You have purchased one of our appliances for which we thank you. We are confident that this modern, functional and practical new model, produced with top quality materials, will meet all your expectations. Although this appliance is very simple to use, we strongly recommend reading this handbook thoroughly and carefully. It provides information for safe installation, use and maintenance. Keep this handbook in a safe place for future reference.
The manufacturer reserves the right to make modifications to its products that it deems necessary or useful, or to meet the consumer interest, without prejudicing its essential functional and safety characteristics.
The manufacturer cannot be held responsible for any inaccuracies due to printing or transcription errors that may be found in this handbook.
N.B.: the illustrations shown in this handbook are purely indicative.
- The installation and maintenance listed in the section "6. INSTALLER INSTRUCTIONS" must be carried out exclusively by qualified personnel.
- The appliance must only be used for its original purpose, that is, cooking for domestic use. Any other use is considered improper and, as such, dangerous. The manufacturer cannot be held responsible for any damages to persons or properties resulting from incorrect installation, maintenance or use of the appliance.
- Once all external and internal packaging/ wrappings have been removed, check that the appliance is intact. In case of doubt, do not use the appliance and turn to qualified personnel.
- All packaging materials used (cardboard boxes, bags, polystyrene foam, nails, etc.) must be kept out of the reach of children, as they are a potential hazard source. All packaging materials used are environmentally-friendly and recyclable.
- The electrical safety of this appliance is only guaranteed if it is correctly connected to a suitable earth system, as prescribed by the electrical safety standards. The manufacturer disclaims all responsibility if these instructions are not followed. Should you have any doubts, seek the assistance of a qualified electrician to test your electricity plant.
- Before plugging in the appliance, make sure that the rating data label complies to that of the electricity mains (see section "5. TECHNICAL FEATURES").
A list of few basic rules that must be observed when using any kind of electrical appliance:
Never touch any electrical appliance if hands or feet are wet or damp.
Never use the appliance bare footed.
Do not pull the power lead to force the plug out of the socket.
Never leave the appliance in the outside weather conditions.
Do not allow children or unskilled hands to use the appliance unattended.
- Before cooking for the first time, ensure the oven is empty and its door closed, heat the oven at maximum temperature for about 2 hours to ensure all bad smells deriving from packaging are gone. Ensure adequate ventilation during this process.
- During cooking and for a while after use, the crystal glass of the oven door and accessible parts can be very hot, so keep children at a distance.
- Keep the appliance clean. Food deposits can cause fire risk.
- Avoid using the oven as a larder or as a saucepan cupboard when you are not using it for cooking: if the oven is turned on accidentally it could cause damage and accidents.
- If you are using an electrical socket near the appliance, make sure that the cables are not touching the oven and are far enough away from all hot parts.
- Once you have finished using the oven make sure that all controls are turned off or in closed position.
- Before proceeding with cleaning or servicing your oven, unplug it from the socket.
- In the case of a failure or malfunction, turn the oven off and unplug it. Avoid trying to fi x it. All repairs and fi ne-tuning must be carried out with maximum care and the proper attention of a qualifi ed person. For this reason we recommend you to report to your the nearest Service Centre explaining the trouble you are facing and details of your appliance.
GB 2. DESCRIPTION OF THE APPLIANCE

CONTROL PANELS
A. Commutator/thermostat knob for conventional oven
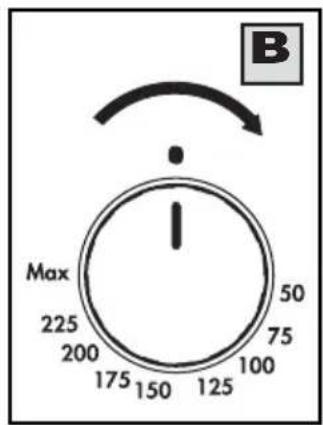
B. Oven thermostat knob
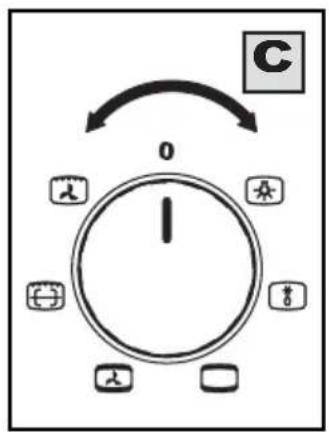
C. Function selector knob
D. Warning light indicating oven thermostat activation
E. Timer knob
F. Timer with cooking time
G. Electronic programmer
CONTROLS
COMMUTATOR/THERMOSTAT KNOB FOR CONVENTIONAL OVEN (ref. A)
Oven functions are selected by turning the knob clockwise:
0 = Oven off
= Oven light on, (stays on for all functions)
50^ to Maxi = Oven temperature selection
= Grill + spit heating element on (*)
☐ = Top heating element on
OVEN THERMOSTAT KNOB (ref. B)
Turning the oven knob clockwise selects and sets the oven baking temperature (50°C to maximum heat).
FUNCTION SELECTOR KNOB FOR CONVENTIONAL OVEN (ref. C)
Turning the oven knob either clockwise or anti-clockwise, the following function symbols are available:
0 = Oven off
☐ = Top and bottom heating elements on
☐ = Top heating element on
☐ = Bottom heating element on
= Grill + spit heating element on (*)
N.B.: The oven light remains on with each function.
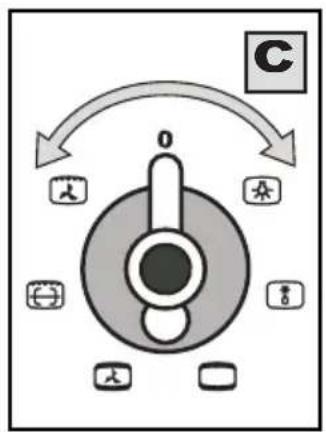
FUNCTIONS SELECTOR KNOB FOR FANNED OVEN (ref. C)
Turning the oven knob either clockwise or anti-clockwise, the following function symbols are available:
0 = Oven off
= Oven lights on (stays lit with all functions)
= Fan on
= Rear heating element and fan on
= Grill heating element on
(*) Available only on certain oven models.




FUNCTIONS SELECTOR KNOB FOR MULTIFUNCTIONAL OVEN (ref. C)
Turning the oven knob either clockwise or anti-clockwise, the following function symbols are available:
0 = Oven off
= Oven lights on (stays lit with all functions)
= Fan on
☐ = Top and bottom heating elements on
= Top and bottom heating elements on plus fan
= Grill + spit heating element on (*)
= Grill heating element on plus fan
(*) Available only on certain oven models.
WARNING LIGHT INDICATING THERMOSTAT ACTIVATION (ref. D)
When lit it indicates that the oven or the grill is in use. During cooking time the warning turns off each time the temperature set is reached. It is therefore common that the warning /yellow light turns on and off several times according to re-heating process.
TIMER KNOB (ref. E)
To set cooking time, first wind the timer up by turning it completely once from left to right and then back to the number of minutes you want. The timer will ring when the set time has elapsed.
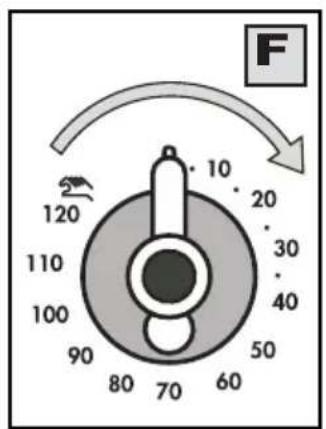
TIMER WITH COOKING TIME (ref. F)
This accessory has a dual function: it signals how much cooking time has elapsed and it also turns the oven off automatically. N.B.: When the pointer of the knob is on «•» position, the oven cannot work. If you use the oven without any programming, check that the timer is on the manual position.
Semi-automatic operation
After having selected a cooking, to set cooking time, first wind the timer up by turning it completely once from left to right and then back to the number of minutes you want, from 0 to 120 minutes: the oven will switch on. Once the programmed time has elapsed the buzzer will ring and the end of cooking time device triggers.
Manual operation
It the cooking time is more than 2 hours, or if you want to use the oven without the timer, turn knob from right to left until the pointer is on the symbol.
When the food is cooked do not forget to move the knob pointer round to position «•».


DIGITAL PROGRAMME (ref. G)
This accessory operates the following features:
- Clock (set by keys 2 and 3)
- Timer (set by key 1)
- Cooking time (set by key 2)
- End of cooking time (set by key 3)
- Manual operation settings (set by keys 2 and 3)
- Setting time backwards (set by key 4)
- Setting time forward (set by key 5)
The digital display always shows the time and can be set to show cooking time or end of cooking count-down simply by pressing the corresponding key.
Please Note: When the cooking session is over the programme automatically turns off the oven (except for the timer). Should you wish to proceed manually next time you use the oven, make sure you set the manual operation function (see instructions further on).
Time setting (0:01 to 24:00 = hh, mm)
When plugging in the appliance the first time or subsequent a power cut, the display shows both "A" and "0.00" (or the minutes past the power failure) signs flashing.
To reset the time push keys 2 and 3 simultaneously then press key 4 or 5 till you reach the exact current time. When done, the "A" symbol turns off and the manual operation symbol is lit.
Manual operation
Each time the time is set, the programme sets automatically on manual working order. The only other case when this occurs is when an automatic programme reaches completion, or has been cancelled by pressing keys 2 and 3 at the same time. The "A" symbol disappears and the 📄 turns on.
Timer setting (0:01 to 0:59 = hh, mm)
Press key 1 and select cooking time by pushing key 4 or 5. Symbol turns on. Once the time set is expired the acoustic alarm rings and ☑ turns off.
Semi-automatic working order (cooking period from 0:01 to 23:59 = hh, mm)
Press key 2 and set cooking time by keys 4 or 5; both symbols "A" and 📋 are lit. Once the set period is over, 📋 turns off, "A" fl ashes and the buzzer rings.

Semi-automatic working order (setting end of cooking from 0,01 to 23,59 = hh,mm)
Press key 3 and set the end of your cooking session by key 5; both symbols "A" and ☐ on. Once the set hour is reached, ☐ turns off, "A" fl ashes and the buzzer rings.
Automatic operation (with a delayed start)
Set the cooking period first ("A" and turn on) then set the end of cooking time (turns off) as previously described. Symbol turns on again when at the start of cooking session. When cooking time is over, turns off, "A" fl ashes and the buzzer will advice cooking completion.
Buzzer
The buzzer starts ringing when a cooking session has reached its completion or the timer countdown is over. It can ring up to 7 minutes. Press any function key to make it stop beforehand.
Programme start and control
The programme starts immediately after setting. To check settings of the programme press the corresponding key.
Modify or Cancel programme setting
In case the current time displayed on the clock is within the cooking period set, an error in the automatic function occurs, and both the buzzer ring and the flashing «A» draw your attention. Such error in the set up can be amended by varying the cooking time length or its end. Any programme set can be modified at any time by pressing first its corresponding programme key and then key 4 or 5. To cancel a programme, correct the time set bringing it to a value of "0.00". When functioning time is cancelled the end of functioning is cancelled too and vice versa. The oven turns off automatically and the "A" symbol fl ashes.
GENERAL DESCRIPTION
To prevent the oven from overheating it has been equipped with a safety temperature device, which automatically turns on in case the main thermostat fails to work. In such an event, the electricity is temporarily cut off: do not try to fix the failure yourself, instead turn the appliance off and report to your local Dealer or Service Centre.
Furthermore, some models are equipped with a fan or tangent to cool the front control panel, the knobs, the oven door handle and the electrical components.
The oven walls have rungs for housing the following accessories (fi g. 1). The type and the quantity of accessories vary according to the model (fi g. 2):
- Oven / grill shelf (A)
• Drip tray or drip pan (B) (*) - Cake or pizza tray (C)
(*) only certain versions


GENERAL NOTES ON SAFETY
- Do not leave the oven unattended during baking. Ensure that children do not play with the appliance.
• Always grip the centre of the oven door when opening. DO NOT practice excessive pressures on the door when it is open. - Do not worry if condensation forms on the door and on the inside walls of the oven during use. This does not affect its working order.
- Mind hot steam when opening the oven door
- The appliance becomes very hot during use. Do not touch the heating elements inside the oven. Wear oven gloves when placing or removing pans from the oven.
- In placing foods into or removing them from the oven, make sure sauces do not drip to the hot plate of the oven (overheated oils and fats can easily ignite).
- Use only ovenware resistant to the temperatures indicated on the thermostat knob.
- During baking, avoid cover the bottom plate of the oven or its grills with tin foil or other material.
- When using the grill, always place the dripping plate to collect sauces and fats as suggested in the "USEFUL COOKING TIPS" section.
• After use of the appliance, make sure that all the controls are set to the off position and closed. - IMPORTANT WARNING: During and after use the oven crystal door and all surfaces may be very hot. Keep children away from the oven!
IMPORTANT!! The oven door must stay closed when using both the oven and the grill.
HOW TO USE THE OVEN FOR THE FIRST TIME
Before cooking for the first time, make sure the cooking programme, if present, is set to manual mode, then heat the empty oven at maximum temperature for 2 hours, door closed, to allow dispersion of all packaging smells. During this time do not stay in the room and keep windows open.
When done, leave the oven to cool down and then clean its interior with hot water and a mild detergent. All accessories should be washed prior to use (grill, tray, drip pan, spit..).
Before proceeding with any cleaning, disconnect the appliance from the mains.
HOW TO USE THE CONVENTIONAL OVEN

TRADITIONAL COOKING
Turn the selector knob (ref. C) to the symbol and set the thermostat knob (ref. B) or position the commutator/thermostat knob (ref. A) to the desired temperature. If pre-heating is recommended wait till the thermostat yellow led turns off before placing foods inside the oven.
This option turns on both bottom and top heating units, evenly distributing heat on your foods.
This type of cooking is ideal for all kind of foods (meats, fi sh, bread, pizzas, cakes..).

BROWNING WITH THE TOP HEATING ELEMENT
Turn the selector knob (ref. C or A) to the symbol □ and set the thermostat knob (ref. B), if there is one, to the maximum temperature.
The top peripheral heating element is turned on that distributes heat directly onto the food.
This function is particularly suitable for delicately browning the top of food or for toasting bread.

BAKING WITH THE BOTTOM HEATING ELEMENT
Turn the selector knob (ref. C) to the symbol ☐ and set the thermostat knob (ref. B) to the temperature required. Wait 10 minutes before putting the food in. The bottom heating element is turned on.
This function is particularly suitable for cooking food that requires a moderate surface heat (e.g.: open jam or fruit tarts, cheese cakes, browning) or to give the fi nal touch without compromising the already perfect browning. It is also ideal for heating pre-prepared dishes.

CONVETIONAL GRILL COOKING
Turn the selector knob (ref. C or A) to the symbol 📊 and set the thermostat knob (ref. B), if there is one, to the desidered temperature.
Selecting this function the top central heating element turns on and heat is distributed directly on food surface (fi g. 3). Apart from grilling, this function is ideal to add a golden roast to your recipes or to toast bread slices.
The grill function automatically activates the eventual spit. When you use the grill, do not forget to place the drip pan beneath it to collect any sauce dripping, as suggested in the "USEFUL COOKING TIPS" section.
HOW TO USE THE FANNED OVEN

DEFROSTING AT ROOM TEMPERATURE
Turn the selector knob (ref.C) to the symbol 📁 and place the food you want to defrost inside the oven.
The length of time required depends on the quantity and type of food.
Selecting this function will only activate the fan. Mild air circulation around frozen food will slowly defrost it. It is particularly suitable for fruit and cakes.

FAN + REAR HEATING COMBINED COOKING
Turn the selector knob (ref. C) to the symbol 📂 and set the thermostat knob (ref. B) to the desired temperature, then place your food the oven. If oven needs pre-heating wait till the thermostat yellow led turns off before placing foods inside it.
This function activates the rear heating unit and the fan distributes the heat produced. This combination allows for a fast and even cooking of several different foods placed on the diverse levels of the oven (fi g. 4).

CONVETIONAL GRILL COOKING
Turn the selector knob (ref.C) to the symbol and set the thermostat knob (ref. B) to the desired temperature.
Selecting this function the top central heating element turns on and heat is distributed directly on food surface (fi g. 3). Apart from grilling, this function is ideal to add a golden roast to your recipes or to toast bread slices.
When you use the grill, do not forget to place the drip pan beneath it to collect any sauce dripping, as suggested in the "USEFUL COOKING TIPS" section.

natural_image
Line drawing of a toaster oven with two bread rolls inside, no text or symbols presentHOW TO USE THE MULTIFUNCTION OVEN

DEFROSTING AT ROOM TEMPERATURE
Turn the selector knob (ref. C) to the symbol ⚙ and place the food you want to defrost inside the oven. The length of time required depends on the quantity and type of food.
Selecting this function will only activate the fan. Mild air circulation around frozen food will slowly defrost it. It is particularly suitable for fruit and cakes.

TRADITIONAL COOKING
Turn the selector knob (ref. C) to the symbol and set the thermostat knob (ref. B) to the desired temperature. If pre-heating is recommended wait till the thermostat yellow led turns off before placing foods inside the oven.
This option turns on both bottom and top heating units, evenly distributing heat on your foods.
This type of cooking is ideal for all kind of foods (meats, fi sh, bread, pizzas, cakes..).

COMBINED TRADITIONAL + FAN COOKING
Turn the selector knob (ref. C) to the symbol and set the thermostat knob (ref. B) to the desired temperature. If pre-heating is recommended wait till the thermostat yellow led turns off before placing foods inside the oven. This option turns on both bottom and top heating units, and heat is distributed by fan ventilation.
This combination is suitable for rapid cooking and allows for the use of more plates positioned on the different levels of the oven (fi g. 4).

CONVETIONAL GRILL COOKING

Turn the selector knob (ref. C) to the symbol and set the thermostat knob (ref. B) to the desired temperature. Selecting this function the top central heating element turns on and heat is distributed directly on food surface (fi g. 3). Apart from grilling, this function is ideal to add a golden roast to your recipes or to toast bread slices.
The grill function automatically activates the eventual spit. When you use the grill, do not forget to place the drip pan beneath it to collect any sauce dripping, as suggested in the "USEFUL COOKING TIPS" section.

FAN GRILL COOKING

Turn the selector knob (ref. C) to the symbol and set the thermostat (ref. B) to the temperature as indicated on the table found at page 14. Selecting this function the top central heating element turns on and heat is distributed by the fan. This procedure mitigates the direct heat on food surface and uses milder temperatures. It is therefore recommended for an even golden and crispy fi nish touch, ideal for whole fi sh and poultry.
When you use the grill, do not forget to place the drip pan beneath it to collect any sauce dripping, as suggested in the "USEFUL COOKING TIPS" section.

USEFUL COOKING TIPS
Cakes and bread:
- Heat the oven for at least 15 minutes before you start cooking bread or cakes.
- Do not open the door during baking because the cold air would stop the yeast from rising.
- When the cake is cooked turn the oven off and leave it in for about 10 minutes.
- Do not use the enamelled oven tray or drip pan, supplied with the oven, to cook cakes in.
- How do you know when the cake is cooked? About 5 minutes before the end of cooking time, put a cake tester or skewer in the highest part of the cake. If it comes out clean the cake is cooked.
- And if the cake sinks? The next time use less liquids or lower the temperature 10^ .
- If the cake is too dry: Make some tiny holes with a toothpick and pour some drops of fruit juice or spirits on it. The next time, increase the temperature 10°C and set a shorter cooking time.
- If the cake is too dark on top: the next time put the cake on a lower shelf, cook it at a lower temperature and longer.
- If the top of the cake is burnt: cut off the burnt layer and cover with sugar or decorate it with cream, jam, confectioner's cream, etc..
- If the cake is too dark underneath: the next time place it on a higher shelf and cook it at a lower temperature.
- If the cake or bread is cooked nicely outside but is still uncooked inside: the next time use less liquids, cook at a lower temperature and longer.
- If the cake will not come out of the tin: slide a knife around the edges, place a damp cloth over the cake and turn the tin upside down. The next time grease the tin well and sprinkle it with fl our or bread crumbs.
- If the biscuits will not come away from the baking tray: put the tray back in the oven for a while and lift the biscuits up before they cool. The next time use a sheet of baking parchment to prevent this happening again.
Meat:
- If, when cooking meat, the time needed is more than 40 minutes, turn the oven off 10 minutes before the end of cooking time to exploit the residual heat (energy saving).
- Your roast will be juicier if cooked in a closed pan; it will be crispier if cooked without a lid.
- Normally white meat, poultry and fish need medium temperatures (less than 200°C).
- To cook "rare" red meats, high temperatures (over 200^ ) and short cooking times are needed.
- For a tasty roast, lard and spice the meat.
- If your roast is tough: the next time leave the meat to ripen longer.
- If your roast is too dark on top or underneath: the next time put it on a higher or lower shelf, lower the temperature and cook longer.
- Your roast is underdone? Cut it in slices, arrange the slices on a baking tray with the gravy and fi nish cooking it.
Grilling:
- Sparingly grease and fl avour the food before grilling it.
- Always use the drip pan to catch any dripping from the meat during grilling (fi g. 3). Always pour a little water in the drip pan. It will prevent grease and sauces from burning avoiding burnt smells and smoke. Add more water during cooking to compensate for evaporation.
- Turn the food half way through cooking.
The aluminium can be easily corroded if it comes into contact with organic acids present in the foods or added during baking (vinegar, lemon juice). Therefore it is advised not to put directly the foods on aluminium or enamelled trays, but ALWAYS use the proper oven paper.
COOKING / BAKING TIMETABLE
| FOODS | Weight kg | Position of the oven shelf from the bottom | COOKING BY NATURAL CONVECTION | COOKING BY FORCED CONVECTION (with fan) | NOTES | ||
| Temperature in °C | Cooking Time in minutes | Temperature in °C | Cooking Time in minutes | ||||
| MEAT | Roasting tin or other pan on oven shelf | ||||||
| Roast veal | 1 | 2 | 200-225 | 100-120 | 190 | 100-120 | |
| Roast beef | 1 | 1 | 200-225 | 40-50 | 190 | 40-50 | |
| Roast pork | 1 | 2 | 200-225 | 100-120 | 190 | 100-120 | |
| Roast lamb | 1 | 1 | 200-225 | 100-120 | 190 | 100-120 | |
| GAME | |||||||
| Roast hare | 1 | 2 | 200-Max | 50-60 | 200-Max | 50 | |
| Roast pheasant | 1 | 2 | 200-Max | 60-70 | 200-Max | 60 | |
| Roast partridge | 1 | 2 | 200-Max | 50-60 | 200-Max | 50 | |
| POULTRY | |||||||
| Roast chicken | 1 | 2 | 200-225 | 80-90 | 190 | 70-80 | |
| Roast turkey | 1 | 2 | 200-225 | 100-120 | 190 | 90-110 | |
| Roast duck | 1 | 2 | 200-225 | 90-110 | 190 | 80-100 | |
| FISH | |||||||
| Roast fi sh | 1 | 2 | 200 | 30-35 | 170-190 | 25-30 | |
| Casseroled fi sh | 1 | 2 | 175 | 20-25 | 160-170 | 15-20 | |
| BAKED PASTA | |||||||
| Lasagne | 2,5 | 1 | 210-225 | 60-75 | 225-Max | 30-40 | |
| Cannelloni | 2,5 | 1 | 210-225 | 60-75 | 225-Max | 30-40 | |
| PIZZA | 1 2 22 | 5-Max 25-30 | 25-Max 20-25 | ||||
| BREAD | 1 2 22 | 5-Max 20-25 | 20 20 | ||||
| PASTRIES | Baking tray on oven shelf | ||||||
| Biscuits in general | 2 | 190 | 15 | 170-190 | 15 | ||
| Shortcrust pastry | 2 | 200 | 20 | 190-200 | 20 | ||
| Victoria sponge 0,8 | 2 | 200 | 40-45 | 190-200 | 40-45 | ||
| CAKES | Cake tin on oven shelf | ||||||
| Angel cake | 0,8 | 2 | 190 | 52 | 170-190 | 45 | |
| Fruit cake | 0,8 | 2 | 200 | 65 | 190-200 | 65 | |
| Chocolate cake | 0,8 | 2 | 200 | 45 | 190-200 | 45 | |
The values given in the tables (temperatures and cooking times) are approximate and may vary according to each person's cooking habits. This table gives cooking times on only one shelf. If you are cooking with a fan oven and you are using more than one shelf (placing the shelves on the 1st and 3rd position) cooking time will be about 5 to 10 minutes longer.
GRILLING TIMETABLE
| FOODS | Weight kg | Position of the oven shelf from the bottom | COOKING BY NATURAL CONVECTION | COOKING BY FORCED CONVECTION (with fan) | ||||
| Temperature in °C | Cooking Time in minutes | Temperature in °C | Cooking Time in minutes | |||||
| 1^st side 2 | nd side 1 | st side 2 | nd side | |||||
| MEAT | ||||||||
| Chop | 0,50 | 2-3 | 225-Max | 12-15 | 12-15 | 200 | 10 | 10 |
| Beefsteaks | 0,15 | 2-3 | 225-Max | 5 | 5 | 200 | 5 | 5 |
| Half chicken | 1 | 2-3 | 225-Max | 20-25 | 20-25 | 200 | 18 | 18 |
| FISH | ||||||||
| Trout | 0,42 | 2-3 | 225-Max | 18 | 18 | 200 | 10 | 10 |
| Sole | 0,20 | 2-3 | 225-Max | 10 | 10 | 200 | 7 | 7 |
| BREAD | ||||||||
| Toast | 3 225-Max | 2-3 2-3 200 | 2-3 2-3 | |||||
Values indicated in the tables (temperatures and cooking times) are approximate and may vary according to each person's cooking habits. More specifically, when grilling meat cuts the values are subject to the thickness of the slice or loaf and to personal taste as well.
CLEANING AND MAINTENANCE
- Prior to any maintenance work or cleaning, disconnect the appliance from the electricity mains.
- Do not use a steam cleaner to clean this appliance.
- Do not wash the parts if they are still hot
- Never use abrasive powders, pads or corrosive spray products.
- Do not leave vinegar, coffee, milk, salty water or the juice of lemon or tomato on the surface for any length of time.
EXTERIOR PARTS
All the parts of the oven exterior (stainless steel, side panels, door glass) must be cleaned frequently with a mild detergent and a little water and then dried with a soft cloth.
Do not use rough or abrasive materials or sharp metal scrapers to clean the oven glass doors as they could scratch and cause the glass to break.
On painted or stainless steel surfaces, do not use aromatic or aliphatic solvents to remove spots or label adhesive.
INTERIOR PARTS
We recommend cleaning the oven after every use to remove all residues of food, grease and sugar, which may burn with subsequent use, causing permanent stains and unpleasant smells. Always clean the oven when slightly warm with soapy water. Rinse and dry all surfaces thoroughly. Always wash all accessories used.
Do not spray or wash the electric heating elements nor the thermostat with acid-based detergents (check the information label on the product you are using). The manufacturer cannot be held responsible for any damages caused by incorrect cleaning.
OVEN SEAL
The condition of the oven seal is vital for the correct functioning and performance of the oven.
We recommend you:
- Clean it, avoiding abrasive tools or products.
- Check its condition occasionally.
In case the seal has stiffened or presents damages, contact your nearest Service centre and avoid using the oven until it has been repaired.
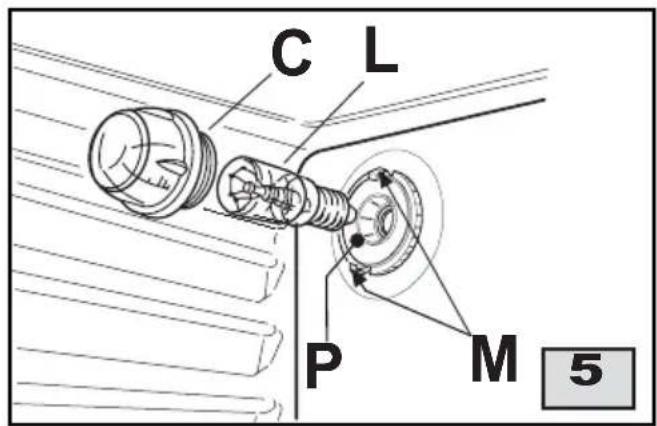
CHANGING THE OVEN LAMP (fi g. 5)
Attention!! Ensure the appliance is switched off before replacing the lamp to avoid the risk of electric shock.
If the oven lamp (L) has to be changed the new lamp must have the characteristics indicated on page 16 and resistant to high temperatures (300°C). Turn glass protection cap (C) counterclockwise and change the lamp. Put the cap back on taking care to insert the notches in the locking tangs and turn clockwise.
Some problems can be caused either as the results of simple maintenance operations or by incorrect selection of settings. Prior to contacting a Service Engineer please check the following chart.
| PROBLEM occurring | SOLUTION envisaged |
| The oven does not work | Check that the plug is connected.Check that the programmer / clock is set for manual operation.Check the electrical system (fuse electricity board). If there is failure in the system call an electrician. |
| During cooking the thermostat led does not turn back on | Turn the thermostat round to a hotter temperature.Turn the selector round to a different function. |
| The oven light does not switch on | Turn the selector round to a different functionCheck that the oven bulb is properly fittedIf it has blown, buy a bulb specifically for high temperatures at a Service Centre and fit it following the instructions given on page 15. |
5. TECHNICAL FEATURES
MINIMUM DIMENSIONS OF THE UNIT TO HOUSE THE OVEN (fig. 6)
| Height mm | Width mm | Depth mm | Volume dm3 |
| 570 | 560 | 550 | 53 |
ELECTRICAL COMPONENTS
| Description | Nominal data |
| Lower heating element of the oven | 1400 W |
| Top heating element of the oven-grill | 700+1800 W |
| Rear heating element of the oven | 2000 W |
| Grill heating element | 1800 W |
| Oven lamp | 15 W - E 14 - T300 |
| Tangential or cooling fan | 18..22 W |
| Fan of the rear heating element | 25..29 W |
| Supply cable | H05 RR-F 3x 1.5 mm ^2 |

TECHNICAL INFORMATION
All instructions related to installation and maintenance operations listed in this section must be carried out only by authorised personnel.
The manufacturer cannot be held responsible for any damage to persons or property resulting from an incorrect installation of the appliance.
UNPACKING YOUR APPLIANCE
- Once the packaging has been removed, thoroughly check that the appliance is in perfect condition. If you have any doubts do not use the appliance and call our Service Centre.
- Some parts mounted on the appliance are protected by a plastic fi lm. This protection must be removed before using the appliance. We recommend slitting the plastic fi lm along the edges with a sharp knife or pin.
- Do not move the appliance by the handles.
All packaging materials used (cardboard boxes, bags, polystyrene foam, nails, etc.) must be kept out of the reach of children, as they are a potential hazard source. All packaging materials used are environmentally-friendly and recyclable (wooden bits are free from chemicals, cardboard is 80-100% recycled, protective bags are made in polyethylene (PE), bands in polypropylene (PP) and padding in polystyrene foam (PS) without chloro-fl uoro-carbides. Waste materials can undergo treatment and be recycled saving on new raw materials and on the amount wasted volumes. For this purpose we suggest you take the packaging material back to the shop you bought the appliance or to a collecting service. Ask your local service for the nearest service.
WARNINGS
- As this is a built-in oven, please ascertain that the walls or panels surrounding the appliance can withstand a temperature of over 70 K.
- Also make sure that the glue that joins the laminated plastic coat to the unit can withstand a temperature of around 150°C, to avoid the laminated coat to unglue.
INSTALLING AND FIXING THE OVEN
The oven can be housed into a cabinet or into a base module, making room for its volumes as shown in fi g. 6.
To guarantee proper aeration of the heat remove the rear panel of the base module or make an escape opening (A), as shown in fig. 6.
Fit the appliance in place and secure it with the screws supplied (V) (fi g. 7).
The oven must stand on a solid platform that will withstand its full weight, as screws are only used to secure the appliance inside its cabinet housing.

ELECTRICAL CONNECTION
Electrical connection must be carried out in accordance with current standards and normative.
Before connecting the oven check out the following list:
- The system and electrical sockets amperage is adequate for the appliance maximum power (see data label affi xed on the back of the oven and in the appliance handbook)
- The socket or system has an effective earth connection in accordance with current standards and prescriptions of the law. All responsibility is disclaimed if this is not complied with.
- When positioning the appliance, make sure that the plug or multipolar switch are easily accessible.
When connecting to the mains with a socket:
- Fit a standard plug, suitable for the load, which is indicated on the rating plate, to the power cable. Connect the wires making sure they match the indications below. Pay attention to the earth wire, which must be longer than the phase wires:
letter L (phase) = brown wire
letter N (neutral) = blue wire
symbol (earth) = green/yellow wire
- The power cable must be laid far from heat sources and its temperature should stay below 75^ .
- Avoid using adapters or shunts as they could cause false contacts resulting in hazardous overheating.
When connecting directly to the mains:
- Install a multipolar switch that can withstand the appliance's load, with a minimum opening between the contacts of 3 mm. Remember that the earth wire must not be cut out by the switch.
MAINTENANCE
Before replacing any spare parts it is vital to disconnect the appliance from the electricity mains.
REPLACING ELECTRICAL COMPONENTS
- To replace the oven lamp please refer to instructions on page 15.
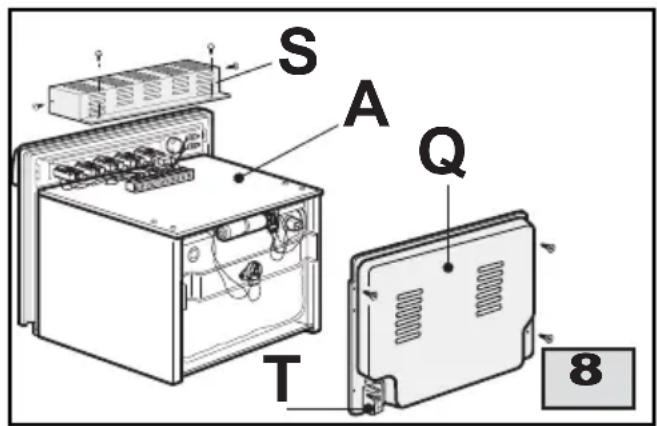
- To access other electrical components the oven will have to be removed from its housing unit by unscrewing it (V) (see fi g. 7). Oven extraction allows access to the terminal board (T) (fi g. 8).
- If the power cable needs replacing always keep the earth wire longer than the phase wires and do follow all instructions given in the "ELECTRICAL CONNECTION" section.
- Remove the rear protection panel (Q) to have access to the gear motor, heating elements, temperature limiting device and lamp holder (fi g. 8).
- To change the lamp-holder (P) (fi g. 5), unscrew the protective glass cap (C), force the tabs of blockage (M) and take the lamp-holder toward the outside of the oven.
- To replace the thermostat, the commutator, the programmer and the indicator lights, remove protection box (S) (fi g. 8). Remove the knobs and undo the screws underneath to front panel to free the components that need replacing.
- NOTE IMPORTANTI E PRESCRIZIONI D'USO 4-5
- DESCRIZIONE APPARECCHIO 6-9
- ISTRUZIONI PER L'UTENTE 10-15
- COSA FARE, SE QUALCOSA NON FUNZIONA 16
- CARATTERISTICHE TECNICHE 16
- ISTRUZIONI PER L'INSTALLATORE 17-18
ASSISTENZA TECNICA E RICAMBI
natural_image
Line drawing of a toaster oven with two bread rolls inside, no text or symbols presentCLEANING AND MAINTENANCE
- SERWIS TECHNICZNY
- UWAGA! - GWARANCJA
- PL 3. INSTRUKCJE DLA UŻYTKOWNIKA
- JAK UŻYWAĆ PIEKARNIK WIELOFUNKCYJNY
- ROZMRAŻANIE W TEMPERATURZE POKOJOWEJ
- RADY PRAKTYCZNE PRZY PIECZENIU
- Ciasta i chleb:
- TECHNICKÉ ZAJIŠTĚNÍ A NÁHRADNÍ DÍLY
- CZ 3. POKYNY PRO UŽIVATELE
- JAK POUŽÍVAT MULTIFUNKČNÍ TROUBU
- ROZMRAZOVÁNÍ VZDUCHEM PROSTŘEDÍ
- CO DĚLAT, KDYŽ NĚCO NEFUNGUJE
- OBSAH
- SK
- TECHNICKÝ SERVIS A NÁHRADNÉ DIELY
- AKO POUŽÍVAŤ MULTIFUNKČNÚ RÚRU
- ROZMRAZOVANIE PRI IZBOVEJ TEPLOTE
- PRAKTICKÉ RADY PRI PRÍPRAVE JEDÁL
- Zákusky a chlieb:
- ČO ROBIT, KEĐ NIEČO NEFUNGUJE
- СОДЕРЖАНИЕ
- ПОЛЬЗОВАНИЕ
- ПРАКТИЧЕСКИЕСОВЕТЫПОПРИГОТОВЛЕНИЮ БЛЮД
- 3MICT
- UA
- TURINYS
- TECHNINIS APTARNAVIMAS IR ATSARGINÉS DALYS
- KAIP NAUDOTIS DAUGIAFUNKCE ORKAITE
- ATITIRPDYMAS KAMBARIO TEMPERATÜROJE
- KEPIMO PATARIMAI
- PALİDZİBA UN REZERVES DALAS
- KÄ LIETOT DAUDZFUNKCIONÄLU KRÄSNI
- ATKAUSĒŠANA ISTABAS TEMPERATŪRĀ
- EDIENA GATAVOŠANA UZ GRILA DARBINOT VENTILATORU
- PADOMI ĖDIENA GATAVOŠANAI
- A MULTIFUNKCIONÁLIS SÜTŐ HASZNÁLATA
- ENGEDÉS SZOBAHÖMÉRSÉKLETEN
- ASSISTANCE AND SPARE PARTS
- Never touch any electrical appliance if hands or feet are wet or damp.
- Never use the appliance bare footed.
- Do not pull the power lead to force the plug out of the socket.
- Never leave the appliance in the outside weather conditions.
- Do not allow children or unskilled hands to use the appliance unattended.
- GB 2. DESCRIPTION OF THE APPLIANCE
- CONTROL PANELS
- CONTROLS
- COMMUTATOR/THERMOSTAT KNOB FOR CONVENTIONAL OVEN (ref. A)
- OVEN THERMOSTAT KNOB (ref. B)
- FUNCTION SELECTOR KNOB FOR CONVENTIONAL OVEN (ref. C)
- FUNCTIONS SELECTOR KNOB FOR FANNED OVEN (ref. C)
- FUNCTIONS SELECTOR KNOB FOR MULTIFUNCTIONAL OVEN (ref. C)
- WARNING LIGHT INDICATING THERMOSTAT ACTIVATION (ref. D)
- TIMER KNOB (ref. E)
- TIMER WITH COOKING TIME (ref. F)
- Semi-automatic operation
- Manual operation
- DIGITAL PROGRAMME (ref. G)
- Time setting (0:01 to 24:00 = hh, mm)
- Timer setting (0:01 to 0:59 = hh, mm)
- Semi-automatic working order (cooking period from 0:01 to 23:59 = hh, mm)
- Semi-automatic working order (setting end of cooking from 0,01 to 23,59 = hh,mm)
- Automatic operation (with a delayed start)
- Buzzer
- Programme start and control
- Modify or Cancel programme setting
- GENERAL DESCRIPTION
- GENERAL NOTES ON SAFETY
- HOW TO USE THE OVEN FOR THE FIRST TIME
- HOW TO USE THE CONVENTIONAL OVEN
- TRADITIONAL COOKING
- BROWNING WITH THE TOP HEATING ELEMENT
- BAKING WITH THE BOTTOM HEATING ELEMENT
- CONVETIONAL GRILL COOKING
- HOW TO USE THE FANNED OVEN
- DEFROSTING AT ROOM TEMPERATURE
- FAN + REAR HEATING COMBINED COOKING
- HOW TO USE THE MULTIFUNCTION OVEN
- COMBINED TRADITIONAL + FAN COOKING
- FAN GRILL COOKING
- USEFUL COOKING TIPS
- Cakes and bread:
- Meat:
- Grilling:
- CLEANING AND MAINTENANCE
- EXTERIOR PARTS
- INTERIOR PARTS
- OVEN SEAL
- CHANGING THE OVEN LAMP (fi g. 5)
- TECHNICAL FEATURES
- TECHNICAL INFORMATION
- UNPACKING YOUR APPLIANCE
- WARNINGS
- INSTALLING AND FIXING THE OVEN
- ELECTRICAL CONNECTION
- Before connecting the oven check out the following list:
- When connecting to the mains with a socket:
- When connecting directly to the mains:
- MAINTENANCE
- REPLACING ELECTRICAL COMPONENTS
- ASSISTENZA TECNICA E RICAMBI
Brand : Ardo
Model : HX065X
Category : Oven