AR 638 - Appareil de cuisine CLATRONIC - Notice d'utilisation et mode d'emploi gratuit
Retrouvez gratuitement la notice de l'appareil AR 638 CLATRONIC au format PDF.

| Type de produit | Autoradio avec lecteur CD/MP3 |
| Marque | CLATRONIC |
| Modèle | AR 638 |
| Alimentation | DC 13,8 V (12 V automobile) |
| Consommation | 7 A max. |
| Puissance de sortie | 4 x 35 W PMPO |
| Plage FM | 87,6 - 108,0 MHz |
| Sensibilité FM | 3 µV |
| Fréquence intermédiaire | 10,7 MHz |
| Formats CD pris en charge | CD, CD-R, CD-RW, MP3 |
| Dimensions (L x H x P) | 178 x 50 x 165 mm |
| Poids | Environ 0,5 kg |
| Fonctions principales | Radio FM avec mémorisation automatique, lecteur CD/MP3 avec modes aléatoire, répétition, intro, recherche par fichier et par caractère, panneau détachable, fonction MUTE, LOUDNESS |
| Entretien et nettoyage | Nettoyer le CD avec un chiffon doux sans solvant ; ne pas utiliser de benzène ou diluant |
| Sécurité | Panneau avant détachable, vis de transport à retirer avant installation, arrêt automatique en cas de retrait du panneau, fusible 7 A |
| Accessoires inclus | Kit de montage (vis, supports, cadre), outil d'extraction, câbles ISO |
| Garantie | 24 mois |
FOIRE AUX QUESTIONS - AR 638 CLATRONIC
Questions des utilisateurs sur AR 638 CLATRONIC
0 question sur cet appareil. Repondez a celles que vous connaissez ou posez la votre.
Poser une nouvelle question sur cet appareil
Téléchargez la notice de votre Appareil de cuisine au format PDF gratuitement ! Retrouvez votre notice AR 638 - CLATRONIC et reprennez votre appareil électronique en main. Sur cette page sont publiés tous les documents nécessaires à l'utilisation de votre appareil AR 638 de la marque CLATRONIC.
MODE D'EMPLOI AR 638 CLATRONIC
CtC CAtRONIC
Bedienungsanleitung/Garantie
Gebruksaanwijzing/Garantie • Istruzioni per l'uso/Garanzia Instruction Manual/Guarantee • Instrukcia objostugi/Gwarancja A hasznalati utasitas/garancia
Autoradio mit CD-Player
Autoradio met CD-speler • Autoradio conlettore CD Car radio with CD player • Radio samochodowe z odtwarzaczem CD Autorádio CD-lejatszóval
AR 638 CD / MP3
C E
Inhalt
Inhoud · Indice · Contents · Spis tresci · Tartalom
D Übersicht Bedienelemente .Seite 3
Bedienungsanleitung .Seite 4
Garantie . 15
NL Overzicht bedieningselementen.. 3
Gebruiksaanwijzing .Pagina 16
Garantie 27
Descrizione dei singoli peszzi . 3
Istruzioni per l'uso .28
Garanzia . 40
GB Control element overview..Page 3
Instruction Manual .Page 41
Guarantee 52
PL Przeglade elementów obslugu . Strona 3
Instrukcja obslugi . Strona 53
Gwarancja .64
A hasznalt elementk megtekintese Oldal 3
A hasznalatiutasitas .Oldal 66
Garancia .72
Übersicht der Bedienelemente
Overzicht van de bedieningselementen • Beste同时也是 commande
Indicación de los elementos de manejo • Elementi di commande
Overview of the Components • Przegl d elementów obsugi
Přehled ovladacích prvkú
D
Allgemeine Sicherheitshinweise
Um das Risiko von Feuer oder einem elektrischen Schlag zu vermeiden, sollen den Sie das Gerät nicht Regen oder Feuchtigkeit aussetzen. Das Gerät nicht in unmittelbarer Höhe von Wasser betreiben (z.B. Badezimmer, Schwimmbecken, feuchte Keller).
Verwenden Sie das Gerät nur für den vorgesehenen Zweck.
Das Gerät ausschließlich an eine vorschrifsmäßig installierte Steckdose anschließen. Achten Sie darauf, dass die angegebene Spannung mit der Spannung der Steckdose übereinstimmt.
Bei Verwendung von externen Netzeiten auf die richtige Polarität und Spannung achten, Batterien stets richtigherum einlagen.
Das Gerät so aufstellen, dass vorhandene Lüftungsöffnungen nicht verdeckt werden.
Niemals das Gehäuse des Gerätes öffnen. Durch unsachgemäße Reparaturen konnen erhebliche Gefahren für den Benutzer entstehen. Bei Beschädigung des Gerätes, insbesondere des Netzkabels, das Gerät nicht mehr in Betrieb besteht, sondern von einem Fachmann reparieren让他们. Netzkabel regelmäßig auf Beschädigungen prüfen.
Ein defektes Netzkabelarf nur vom Hersteller, unserem Kundendienst oder einerähnlich qualifizierten Person durch ein gleichwertiges Kabel ersetzt werden, umGeführungen zu vermeiden.
Benutzen Sie das Gerät langere Zeit nicht,ziehen Sie den Netzstecker aus der Steckdose, bzw. entnehmer Sie die Batterien.
These Symbole können sich ggfs. auf dem Gerät befinden und sollen Sie auf folgenden hinweisen:

Das Blitz-Symbol soll den Benutzer auf Teile im Inneren des Gerätes hinweisen, die gefährlich hohe Spannungen führen.

Das Symbol mit Ausrufezeichen soll den Benutzer auf wichtige Bedienungs- oder Wartungs-Hinweise in den Begleitpapieren hinweisen.

Geräte mit thisem Symbol arbeiten mit einem „Klasse 1-Laser“ zur Abtastung der CD. Die eingebauten Sicherheitsschalter sollen verhindern, dass der Benutzer gefährlichem, für das menschliche Auge nicht sightbarrem Laserlicht ausgesetzt wird, wenn das CD-Fach geöffnet ist.
These Sicherheitsschafter sollen auf keine Fall überbrukt oder manipuliert werden, sonst besteht die Gefahr, dass Sie sich dem Laser-Licht aussetzen.
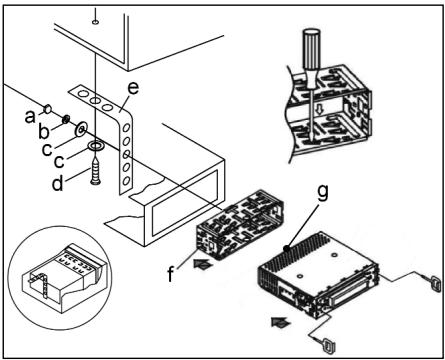
Installation
Montieren Sie das Radiogerät gemäß folgender Darstellungen

a Mutter
bFederscheibe
c Unterlegscheibe
d Schraube
e Montagewinkel
f Einschubgehause
Gewindebolzen
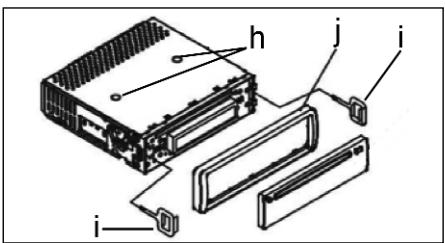
Achtung!
h Schrauben der Transportsicherung (Bitte vor der Montage entnehmen)
i Ausziehwerkzeug (Schlussel für die Demontage)
j Blendrahmen

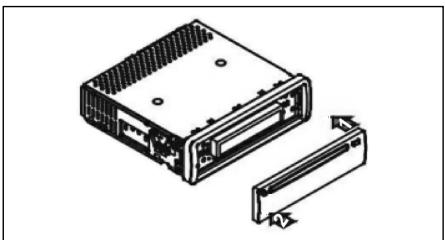
Setzen Sie die Bedienblende erst an der rechten Seite an und rasten Sie, sie dann auf der linken Seite ein.

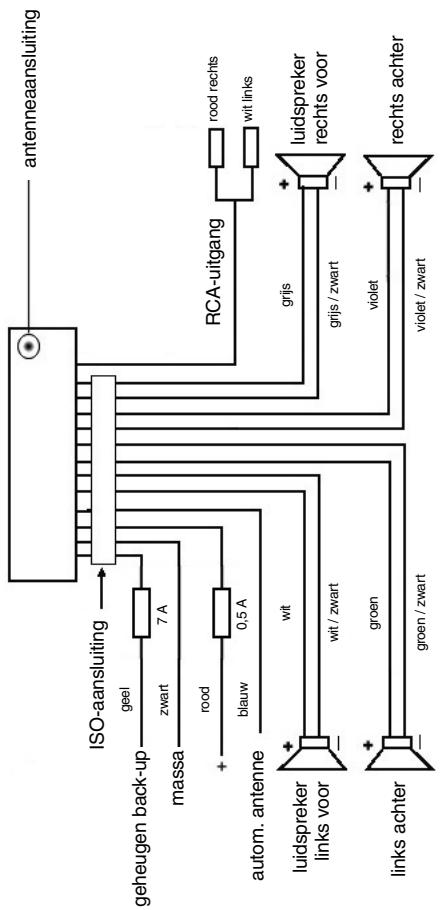
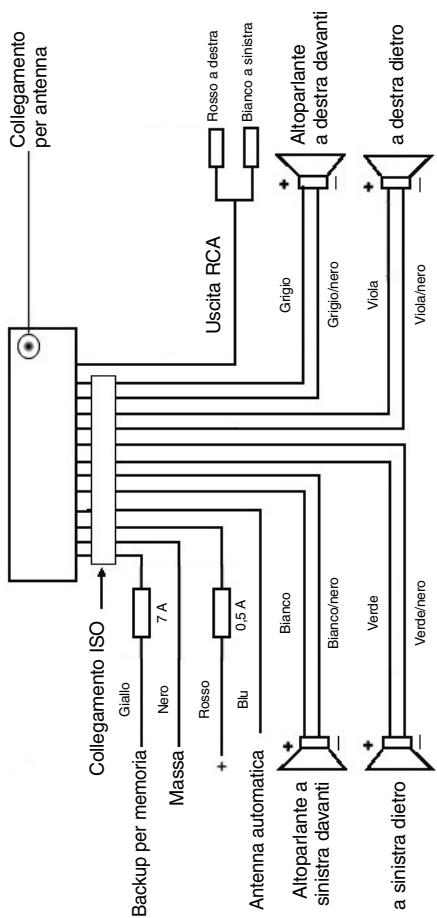
Anschluss
Stellen Sie die Anschlüsse gemäß des Schaubildes her.
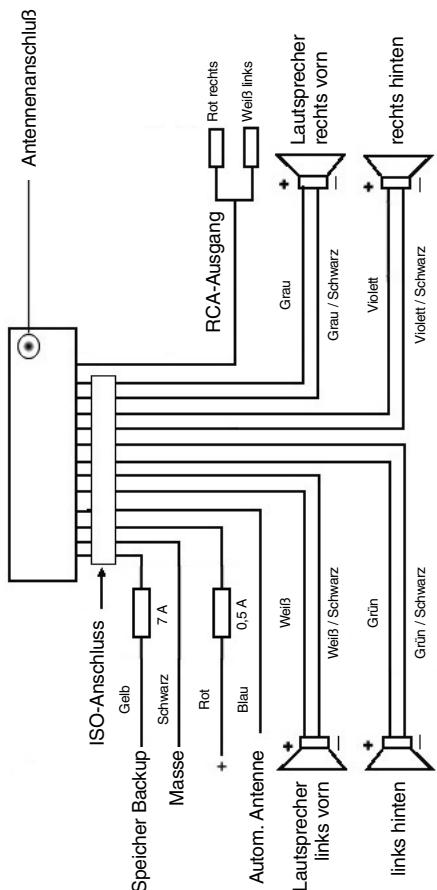
Achtung
D
- Setzen Sie das abnehmbare Bedienfeld erst nach dem Anschluss der Kabel auf.
- Verwenden Sie Laufsprecher mit einer Impedanz von 4 Ohm.
Wichtige Zusammenformation zum Einbau Ihr's Autoradios!
- Bite bechten Sie beim Einbau/Anschluss Ihres Gerätes, dass Ihr Auto über einen originalen "ISO ANSCHLUSS" verfügt. Dieser ist das Gegenstück zu dem am Geräteausgang verhandensten Stecker (ISO ANSCHLUSS).
Bei der Belegung des "DAUER +" (Backup) kann es je nach Fahrzeugtyp zu Abweichungenkommen.
Wenden Sie sich in diesen Fällenitte an eine autorisierte KFZ Werkstatt, da eine permanente/dauerhafte Stromversorgung Ihres Radios sonst nicht gewährleistet ist. (Diese ist jedoch für die Speicherung Senderstationen notwendig).
- Je nach Fahrzeugtyp konnen in Ausnahmefällen Störgeräusche im Radio/CD Betrieb auftreten. Diese lessen sich mit einem zusätzlichen Entstörfilter entsprechend beseitigen. Ihr Gerat AR 638 CD ist bereits seriennbig mit einem Entstörfilter ausgerüstet. Trotzdem kann es fahrzeugbedingt zu Beeinträchtigungenkommen.
Entstörfilter erhalten Sie im Autozubehörhandel und/oder bei ihrer KFZ Werkstatt.
Bei technischen Fragen wenden Sie sichitte an unsere Hotline.
Vorsichtsmaßnahmen und Wartung
- Die Schrauben (h) der Transportsicherungitte vor der Montage entfernen, da sonst die CD nicht eingezogen werden kann.
- Das Gerät ist für den Minuspol der Batterie ausgelegt, der an die Fahrzeugkarosserie angeschlossen sein muss. Diesitte vor Installation überprüfen.
- Wenn die vordere Bedientafel während des Radio- oder CD-Betriebs abgenommen wird, wird das Gerät automatisch ausgeschelt.
- Fehlfunktion. Nach dem Wiedereinseten der vorderen Bedientafel erscheint in der LCD-Anzeige eine Fehlermeldung (ERROR). Drücken Sie mit Hilfe eines Drahtes o.ä die Taste RESET, um die Elektronik wieder zurückzustellen (RESETEN). Diese Taste finden Sie bei abgenommenem Bedienfeld rechtsiben dem Display.
- Wenn das Fahrzeuginnere extrem heißt ist, z. B. nach einer längeren Parkdauer in praller Sonne, den Player nicht einschalten, bis das Fahrzeug nach einer kurzen Fahrzeit im Inneren etwas abgekühlt ist.
- Um das abnehmbare Bedienteil sicher aufzubewahren, stets die davon vorgesehene Schutzhülle verwenden.
D
Bedienung
1 REL-Taste
Drucken Sie die REL-Taste zum Herausnehmer des vorderen Bedienfeldes.
2 +/--Tasten
Im normalen Spielbetrieb dienen die Tastenz zur Einstellung der Laufstärke. In Verbindung mit der zuvor gedrückten SEL-Taste konnen Änderungen in den Menus z.B. bei FADER oder BALANCE vorgenommen werden.
3 SEL-Taste (Auswahl)
a) Drücken Sie die SEL-Taste kurz, um in das Auswahlmenü des Schallmodus zu gelangen. Im Display erscheidt „VOL“ zur Einstellung der Lautstärke. Durch wiederholtes Drücken der SEL-Taste können Sie nun die einzelnen Menüpunkte wie VOLUME, BASS, TREBLE, BALANCE und FADER anwahlen. Sieändern die Einstellungen der einzelnen Menüpunkte mit Hilfe der „+“ oder „-“Taste. Hinweis: Sind unter DSP Equalereinstellungen wie z. B. POP, ROCK gewählt, können BASS und TREBLE nicht eingestellt werden.
b) Drucken Sie die SEL-Taste lang, um in das Auswahlen DSP OFF, BEEP ON/OFF, SEEK 1/2, VOL LAST/ADJ zu gelangen. Im Display erscheint „DSP OFF". Durch wiederholtes Drucken der SEL-Taste konnen Sie nun die einzelnen Menüpunkte anwahlen. Sieändern die Einstellungen der einzelnen Menüpunkte mit Hilfe der „+“- oder „-“-Taste.
- DSP Im DSP können Sie die Equalizereinstellungen POP M; ROCK M, CLASS M und FLAT M wahlen. Wahlen Sie DSP OFF um eigene Einstellungen vorzunehmen. Siehe auch Pkt. 3a.
- BEEP ON/OFF Bestätigungston Den Bestätigungstom beim Tastendruck konnen Sie in zwei Arten wahren. BEEP ON: Der Bestätigungston erfolgt bei jedem Tastendruck. BEEP OFF: Der Bestätigungston ist abgeschelt.
- SEEK 1, SEEK 2 (Nur im Radiobetrieb wahlbar)
Suchfunktion mit den I-I-Tasten im Radiobetrieb
SEEK 1: Halten Sie die I-I-I-Tasten gedrück und das Radio wird bei der nthsten erreichenbaren Sendestation stoppen.
SEEK 2: Solange Sie die I-I-I-Tasten gedrück halten wird der Suchlauf im Frenzband weiter geführt.
VOL LAST/VOL ADJ
VOL LAST: Das Radio schaltet sich mit der zuletzt tatsächlich eingestallen Lautstärke ein.
VOL ADJ: Mit Hilfe der ++ und - Tasten wahren Sie eine gleichbleibende Einschaltlautstärke vor.
4 POWER-Knopf
Zum Ein- bzw. Ausschalten des Gerätes diese Taste drucken.
5 LCD-Display (Flüssigkristallanzeige)
6 BAND-Taste
Drücken Sie kurz die BAND-Taste, um zwischen den drei FM- (UKW) Ebenen umzuschalten. Die Bezeichnung der entsprechenden Ebene F1, F2, F3 wird in der LCD-Anzeige angezeigt.
7/8 I- /▶I-Tasten TUNE, SEEK, TRACK, SKIP UP/DOWN
a) Im Radiomodus: Drücken Sie kurz die I- oder I-Taste, um manuell einen gewündsten Radiosender einzustellen.
Halten Sie die I- oder I-Taste gedrück, um die Sueche nach einem Radiosender zu starten.
Siehe auch die Funktion SEEK 1 / SEEK 2.
b) Im CD-Modus: Zum Vor- bzw. Rückwartsspringen die Taste I< bzw.>I kurz drücken. Zum Spulen von Titeln die Pfeiltaste I< bzw.>I gedrück halten.
9 MODUS-Taste
Drücken Sie diese Taste zur Auswahl des CD-Player- bzw. Radio-Modus.
10 MUTE-Taste
Drücken Sie die MUTE-Taste, um die Lautsprecher für kurze Zeit stumm zu schalten. Drücken Sie diese Taste erneut, um diese Funktion wieder aufzugeben.
11 AP-Taste (Automatische Senderspeicherung)
Im Radio-Modus:
a) Speicherfunktion:
Drücken Sie die AP-Taste länger als eine Sekunde, um die automatische Senderspeicherung zu aktivieren.
Das Gerät sichert innerhalb des aktuellen Frenzbandes z. B. FM 1 nach den größten Signalstarkepegel bis der Suchzyklus abgeschlossen wird. Die sechs stärksten Sender werden den entsprechenden Speicherplatzzen zugeordnet.
Die nun gespeicherten Sender werden jeweils ca. 3 sek. lang angespield und danach wird der Sender des ersten Speicherplatzes eingestellt.
Möchten Sie noch weitere Sender im FM-Banduchen drucken Sie die BAND-Taste um auf das FM2 bzw. FM3 Band zu wechseln. Drucken Sie die AP-Taste erneut länger als eine Sekunde, um die weitere Suche zu starten.
b) Anspielfung:
Nach kurzem Drucken der AP-Taste spiel das Radio alle voreingestellten Sender des Frequenzbandes an.
Hinweis: Die Anspielfung endet automatisch wieder bei dem Speicherplatz von dem aus sie gestartet wurde.
D
AP-Taste als Suchfunktionen im MP3 Betrieb
Sind beim Erstellen einer CD im MP3-Format entsprechende Daten angelegt worden, können diese über folgenden Funktionen gesucht werden:
a) Direkteingabe der Titelnummer bei CD's im MP3-Format:
- Drucken Sie 1X die AP-Taste. Im Display erscheidt „TRK SCH".
- Drücken Sie kurz die SEL-Taste. Im Display erscheint „TRK SCH 001". Die Einerstelle blinkt.
- Mit Hilfe der + / - Tasten haben Sie nun die Möglichkeit an der Einerstelle eine Titelnummer von 0 bis 9 einzugeben.
- Drücken Sie erneut kurz die SEL-Taste. Die Zehnerstelle blinkt. Verfahren Sie wie unter Pkt. 3 beschreiben.
- Drücken Sie erneut kurz die SEL-Taste, um ggf. eine Hundererstelle einzugeben.
- Schließen Sie die Eingabe der Titelnummer durch längeres Drucken(1 sek.) der SEL-Taste ab. Unmittelbar danach wird der gewählte Titel abgespielt.
b) Dateisuchfunktion bei CD's im MP3-Format:
- Drucken Sie 2X die AP-Taste. Im Display erscheidt „FILE SCH".
- Drücken Sie kurz die SEL-Taste, um den ersten ausgewählten Ordner im Display anzuzeigen.
- Mit Hilfe der + / - Tasten haben sie nun die Möglichkeit die verschiedene Denorder auf der CD anzuwahlen.
- Drücken Sie die SEL-Taste länger (1 sek.). Der gewählte Ordner wird vom ersten Lieed an abgespiel. Drucken Sie die SEL-Taste kurz und Sie konnen mit Hilfe Tasten einen Titel im Ordner auswahlen.
- Schließen Sie die Eingabe durch längeres Drücken (1 sek.) der SEL-Taste ab. Unmittelbar danach wird der gewährte Titel abgespielt.
c) Stichwortsuchfunktion bei CD's im MP3-Format:
- Drücken Sie 3X die AP-Taste. Im Display erscheidt „CHAR SCH".
- Drücken Sie kurz die SEL-Taste. Links im Display erscheid ein „A".
- Durch das wiederholte Drücken der + / - Tasten können Sie nun an der ersten Stelle des Displays einen Buchstaben von A bis Z oder eine Ziffer von 0 bis 9 eintragen.
Hinweis: Die Eintragung der weiteren Ziffern und Buchstaben erfolgt von links nach rechts.
- Drucken Sie die SEL-Taste kurz. Auf der zweiten Stelle des Displays erscheint ein „A". Verfahren Sie bei der Eintragung von Ziffern und Buchstaben wie unter Pkt. 3 beschrieben.
- Wiederholen Sie die Tätigkeiten unter Pkt. 2 und Pkt. 3 solange bis Sie ihren mehrstelligen Suchbegriff eingegeben haben.
Hinweis: Löschen Sie die letzte Eintragung durch das Drücken der AP-Taste.
- Schließen Sie die Eingabe durch längeres Drücken (1 sek.) der SEL-Taste ab. Unmittelbar danach wird der gewählte Titel abgespielt.
Hinweis: Die Wiedergabe anwenderseitig erstellter CD kann durch die Vielzahl der verfügbaren Software und CD-Medien nicht garantiert werden.
Beim normalen Spielbetrieb vom CD's im MP3-Format kann mit den I-bzw.▶I-Tasten um jeweils einen Titel auf oder runter gesprungen werden. Mit den Stationstasten 5 bzw. 6 kann um jeweils 10 Titel herunter bzw. herself gesprungen werden.
12:17 als Stationstaten (1-6) vorgewähler Sender und als 1TOP-, 2INT-, 3RPT-, 4RDM-Tasten im CD Betrieb
a) Radio-Betrieb
Durch kurzes Drücken wird über diese Tasten ein voreingestellter Radiosender direkt angewählt. Werden diese Tasten länger als eine Sekunden gedrückt, wird der aktuell eingestellte Sender unter der gewährten Stationstaste gespeichert.
b) CD-Betrieb
- Drücken Sie die 1TOP-Taste, um das Abspielen der CD zu unterbrenchen (Pausenfunktion). Drücken Sie diese Taste erneut um diese Funktion wieder aufzehben.
- Drucken Sie die 2INT-Taste. Jeder Titel der CD wird jeweils 10 Sekunden lang angespielt. Drucken Sie diese Taste erneut, um die Suche abzubrechen. Der aktuell angewährte Titel wird abgespielt.
- Drücken Sie die 3RPT-Taste. Der aktuelle gespiefte Titel wird wiederholt. Drücken Sie diese Taste erneut um diese Funktion wieder aufzuheiten.
- Drücken Sie die 4RDM-Taste. Die CD Titel werden in zufälliger Reihenfolge abgeschpielt. Drücken Sie diese Taste erneut, um diese Funktion wieder aufzufühben.
18 ST-Taste
STEREO/MONO Umschaltung (Nur im Radiobetrieb wahlbar).
19 CLK-Taste
- Uhrzeit anzeigen: Drücken Sie kurz die CLK-Taste, um die Uhrzeit anzuzeigen.
- Uhrzeit einstellen: Drücken Sie die CLK-Taste zweimal und halten Sie diese dann beim zweiten Mal gedrückt, bis die Anzeige im Display blinkt. Drücken Sie die +--Taste, um die Stunden einzustellen. Drücken Sie die -- Taste, um die Minuten einzustellen.
20 LOUD ON/LOUD OFF
Ein- und Ausschalten der LOUDNESS-Funktion.
Im niedrigen Lautstärkebereich wird mit der Funktion LOUDNESS (LOUD) das Klangbild erweitert. Höhen und Basse werden angehoben.
21 CD-Schlitz
22 Auswurfaste (EJECT)
Zum Auswerfen der CD diese Taste drücken.

23 Blinkende LED-Anzeige (ohne Abbildung)
Beim Abnehmer der vorderen Bedientafel blinkt diese Anzeige.
24 RESET-Taste (ohne Abbildung)
Zum Wiederherstellen des gestörten Programms diese Taste drücken. Diese Taste finden Sie bei abgenommenem Bedienfeld rechts besoin dem Display.
Technische Daten
Allgemeines
Netzspannung
DC 13,8 V
Stromverbrauch
7A Max.
Leistung
4x35WPMPO
FM-Bereich
Frequenzbereich
87,6 MHz bis 108,0 MHz
Nutzbare Empfindlichkeit
3 V
I.F. Freqenz
10,7 MHz
Ausgangsleistung (Wahlweise)
Ausgang
bei CD max. 1200mV
CD-Player
System
CD-Gerat
Verwendbare CDs
CD/CDR/CDRW/MP3 Disks
Signalformat
Anzahl der Quantizierungsbits 1 bit.
Frequenzcharakteristika
Musterfrequenz 44,1 KHz
Signal-Rausch-Verhältnis
20 - 100Hz≤ 5dB
Anzahl der Kanäle
10 - 20KHz≤ 5dB
Gehäuseabmessungen
50 dB (1KHz)
2 Stereo-Kanäle
178 B x 50 H x 165 T
Störungsbehebung
D
Bevor Sie die Checkliste durchgehen,itte zunachst den Anschluss fertig stellen. Wenn nach erfolgtem Durchprüfer den Checkliste immer noch Fragen offen sind, wenden Sie sichitten ihre nachstgelegene Kundendienstelle.
| Fehlersymptom | Grund | Lösung |
| Nach Einlagen in das Gerät lauft die CD oder Kassette nicht. | Der Lautstärkeregler ist zu leise eingestellt. Die Anschlüsse sind nicht korrekt ausgeführct. | Den Lautstärkeregler höher einstellen. Den +12V- sowie den Masseanschluss überprü-fen. |
| Der Ton des CD-Players hupft. | Die Straßeiberfläche ist rauh. Das Gerät ist nicht fest eingebaut. | Zum Abspielen der CD warten, bis die Straße glatter wird. Das Gerät fest einbauen. Sicherstellen, dass die hin-tere Befestigung verwen-det wird, wenn das Fahrzeug keine geeignete Aufnahme für den hinteren Gerästteil bietet. |
| Die CD ist defekt. | Eine andere CD auspro-bieren. Wenn diese korrekt lauft, ist die erste CD wahrrscheinlich beschädigt. | |
| Die CD ist verschmutzt. | Die CD reinigen. | |
| Kein Strom. | Die Zündung ist ausgeschaltet. Die Sicherung ist durchgebrannt. | Den Zündschlüssel auf „ON“ oder „ACC“ drehen. Die Sicherung durch eine andere 7 A-Sicherung ersetzen. |
| Das Gerät funkctioniert nicht richtig (EJECT, LOAD, PLAY). | Der Microcomputer wurde durch elektrisches Rau-schen in Mitleidenschaft gezogen. | Die CD oder Kassette her-ausnehmen und wieder einlagen. Das Gerät aus- und dann wieder einschalten. |
| Kein Radioempfang. | Das Antennenkabel ist nicht angeschlossen. | Das Antennenkabel fest in die Antennenbuchse des Gerätes stecken. |
| Im automatischen Such-modus stoppt das Radio bei keiner Sende-station. | Die Sendesignale sind zu schwach. | Manuell eine Sendestation einstellen. |
D
| Fehlersymptom | Grund | Lösung |
| CD's werden nur bis zur Hälfte in den CD Schacht eingezogen. | Die Schrauben der Transportsicherung sind nicht entfrert worden. | Entfernen Sie die Schrauben der Transportsicherung. |
AbspieleneinerCD
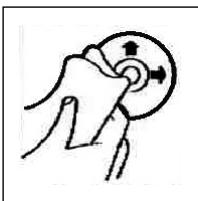
Reinigen der CD
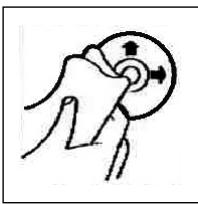
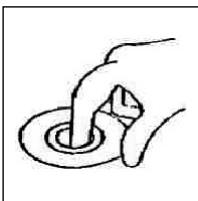
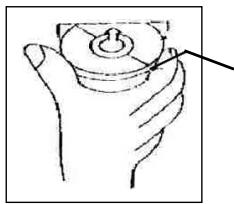
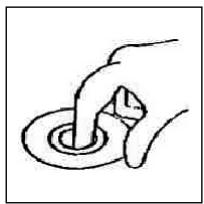
Vor dem Abspielien, die CD mit einem sauberen, staubfreien Reinigungstuch abwischen. Die CD in Pfeilrichtung abziehen.
Hinweis: Keine Lösungsmittel wie Benzin oder Verdünner verwenden. Die allgemein erhältliche Reinigungsmittel oder Anti-Statiksprays beschädig das Gerät.
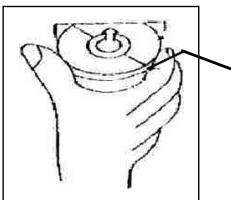
Wenn die CD mit dem Aufdruck nach unten eingelegt wird, kann das Gerät beschädigt werden.
CD immer mit dem Label nach oben einlagen
Hinweis: Wenn sich bereits eine CD im CD-Schlitz befindet, nicht versuchen, eine weitere CD einzulegen. Dies kann zu Schäden am Gerät führen. Die CD stets am Rand anfassen. Um die CD sauber halten, nicht an der Oberfläche anfassen.
Keine Aufkleber oder Klebeband auf die CD kleben.
Die CD nicht direkter Sonneneinstrahlung oder Wärmequellen wie Heizungsrohren ausseten und sie auch nicht im Auto halten, wenn diese in praller Sonne gekaprt wird, da dies zu einem betrachtlichen Temperaturanstieg führt.
Dieses Gerat wurde nach allen zuteffenden, aktuellen CE-Richtlinien geprüft, wie z.B. elektromagnetische Vertriebsgleichheit und Niederspannungsdirektive und wurde nach den neuesten Sicherheitstechnischen Vorschriften gebaut.
Technische Änderungen vorbehalten!
Garantie
D
Wir übernehmen für das von uns vertriebene Gerät eine Garantie von 24 Monaten ab Kaufdatum (Kassenbon).
Innerhalb der Garantiezeit beseitigen wir unentgeltlich die Mängel des Gerätes oder des Zubehörns ^4 , die auf Material- oder Herstellungsehler beruhen, durch Reparatur oder, nach unserem Ermessen, durch Umtausch. Garantieleistungen bewirken weder eine Veränderung der Garantiefrist, noch beginnt dadurch ein Anspruch auf eine neue Garantie!
Als Garantienachweis gilt der Kaufbeleg. Ohne diesen Nachweis kann ein kosten-loser Austausch oder eine kostenlose Reparatur nicht erfolgen.
Im Garantiefall geben Sieitte das Grundgerät in der Originalverpackung zusammen mit dem Kassenbon an ihren Handler.
*) Schäden an Zubehörteilen führen nicht automatisch zum kostenlosten Umtausch des kompletten Gerätes. Wenden Sie sich in desem Fallitte an unsere Hotline! Glasbruchschäden bzw. Brüche von Kunststoffeilen sind grundsätzlich kostenpflichtig!
Sowohl Defekte an Verbrauchszubehör bzw. Verschleißeiten (z.B. Motorkohlen, Knethaken, Antriebssriemen, Ersatzfernbediierung, Ersatzzahnbürsten, Sägebättern usw.), als auch Reinigung, Wartung oder der Austausch von Verschleißeiten, fallen nicht unter die Garantie und sind deshalb kostenpflichtig!
Die Garantie erlischt bei Fremdeingriff.
Nach der Garantie
Nach Ablauf der Garantiezeit können Reparaturen kostenpflichtig vom entsprechen-den Fachhandel oder Reparaturservice ausgeführrt werden.
Service für unsere Haushaltsartikel und Unterhaltungselektronik
Zu technischen Fragen oder zur Bestellung von Verschleibteilen (soweit diese nicht vom Fachmann ausgewechseit werden müssen), wie z.B. Ersatzkannen, Staubsaugerfilterbeutel, Fernbedienung usw. konnen Sie sich, mit Angabe des Geräteypes, an unsere Hotline-Adresse wenden:
hotline@clatronic.de
Interessieren Sie sich für weitere Clatronic-Produkte? Besuchen Sie noch einmal unsere Homepage unter
www.clatronic.de oder www.clatronic.com
NL
Algemene veiligheidsinstructies
Voorkom risico's voor brand en elektrische schokken en stel het apparaat Niet bloot aan regen o vocht. Gebruik het apparaat Niet in de directe nabijheid van water (bijv. badkamer, zwembad, ochtige kelder).
Gebruik het apparaat uitsluitend voor het waarvoort bestemde doel.
Sluit het apparaat uitsluietend aan op een correct geinstalleerde contactdoos. Let op dat de aangegeven spanning overeenstent met de spanning van de contactdoos. Let bij het gebrueig van externde adapters op de juiste polariteit en spanning en plaats batterijen.altijd in de juiste richting.
Plaats het apparaat zodenig dat de aangebrachte luchtopeningen nicht worden afge- dekt.
Open nooit de behuizing van het apparaat. Door ondeskundige reparations können aanzienlijke bevaren voor de gebruiker ontstaan. Neem het apparaat Niet meer in gebruik wonneer het apparaat - en in het bijzonder de kabel - beschadigingen vertoont, maar het eerst door een vakman repareren. Controllerer de kabel regelmatin op beschadigingen.
Een defecte kabel mag alleen door de fabrikant, once technische Dienst of een soortgelijk gekwalificeerd persoon worden verrangen. Alleen zo konnen bevaren vermeden worden.
Onderbreek de stroomtoevoer of verwijder de batterijen wanneer u denkt, het apparaat langere tijd Niet te gebruiken.
Volgende symbolen können op uw apparaat+zijn aangebracht. Zij hebben de vol-gende betekenis:

Het blinksemsjymbol wijst de gebruiker op onderdelen in het inwendige van het apparaat die gevaarlijk hoge spanning voeren.

Het symbol met het uitroepteken verwijst maar belangrijke bedienings- en onderhoudsinstructies in de begeleidende documentatione.

Apparaten met dit symbool werken met een „klasse 1-laser_, voor de aftsting van de CD. De ingebouwde veilheidsschakelaars要去en voorkomen dat de gebruiker worden blootgesteld aan gaervaarlijke, voor het menselijk oog onzichtbaar laserlicht wonneer het CD-vak geopend is.
Deze veiligheidsschakelaars mogen in geen geval overbrugd of gemanipuleerd worden.ovdat u anders gevaar loopt, aan het laserlicht te worden blootgesteld.
Installatie
NL
Monteer het radioapparaat volgens de onderstaande afbeeldingen

a Moer
b Veerring
c Onderlegplaatje
d Schroef
e Montagehoek
f Inschuifbehuzing
g Schroefdraadbout

Let op!
h Schroeven van de transportbevelling (a.u.b. vór de montage verwilderen)
i Uitrekgereedschap (sleutel voor de demontage)
j Raamwerk

Zet het bedieningselement eerst aan tegen de rechterzijde en klik het verwolgens aan de linkerzijde in.

Aansluiting
Breng de aansluiting tot stand volgens de afbeelding.
Opgelet
NL
- Plaats het verwijderbare bedieningselement pas na de aansluiting van de kabels.
- Gebruik luidsprekers met een impedantie van 4 Ohm.
Belangrijke aanvullende informatie voor de montage van uw autoradio!
- Let bij de montage/aansluiting van uw apparaat op dat uw auto over een origi-nele "ISO ANSCHLUSS" moet beschikken. Deze aansluiting is de tegenhanger van de aan de apparaatui tung gang aangebrachte steker (ISO ANSCHLUSS). Bij de toewijzing van de "DAUER ^+ " (back-up) kurenECHTER al naargelang het voertuigtypefe wijkingen optreden.
Neem in deze geallen a.u.b. contact op met een geauthoriseerde autogarage waar dat een permanente/constante stroormverzorging van uw radio anders nicht gewaarborgd is. (Dit isECHTER noodzakelijk voor de opslag van de zenderstations).
- Al naargelang het voertuigtype hunnen in uitzonderingsgevallen stoorgeluiden in de radio/CD-modus optreden. Deze hunnen worden verholpen met een extra ontstooffilter. Uw apparaat AR 638 CD is standard reeds uitgerust met een ontstooffilter. Desondanks hunnen er afhankelijk van het voertuigtype storingen optreden.
Ontstoorfilters zijn verkrijgbaar=kunt in een zaak voor autotoebehoren en/of bij uw garage.
Veiligheidsmaatregelen en onderhoud
- Verwijder vór de montage a.u.b. de schroeven (h) van de transportbeveiliging ompdat in het andere geval de CD Niet kan worden geladen.
- Het apparaat is geconcipcieerd voor de minpool van de accu die aan de carros-serie van het voertuig dient te zijn aangesloten. U dient dit vór de installment te controeren.
- Wonneer het voorste bedieningselementijdens de radio- en CD-modus worden verwijderd, worden het apparaat automatischuitgeschakeld.
- Functiestoring. Na hetervoogplaatsen van het voorste bedieningselement verschijt op het LC-display een foumtelding (ERROR). Druk met behulp van een draad of iets dergelijkde toets RESET in om de elektronica waar terug te zieten (RESETTEN). Deze toets Aunt u bij verwijderd bedieningsveld rechts naast het display vinden.
- Wanner het extreem heel in het voertuig is, bijv. nadat de auto gedurende een langereijd in dezon geparkeerd stond, dient u de CD-speler pas in te schakenadat het na een korte rijduur een beetje is afgekoeld.
- Gebruik steeds de voorhanden beschemhoes om het afneembare bedienings-element veilig te bewaren.
NL
Bediening
1 REL-toets
Druk op de REL-toets om het voorste bedieningselement te verwijderen.
2 +/--toetsen
In de normale spelimodus zijn deze toetsen bedoeld voor het instellen van de geluidssterkte.
In combinatie met de tevoren ingedrukte SEL-toets{kennen veranderingen in de menu's, bijv. bij FADER of BALANCE worden uitgevoerd.
3 SEL-toets (selectie)
a) Druk kort op de SEL-toets om maar het selecti菜单 van de klankmodus te schakenen. Op het display beschijnt "VOL" voor de instelling van de geluidssterkte. Door herhaaldelijk op de SEL-toets te drukken kut u nu de afzonderlijke menupunten zoals VOLUME, BASS, TREBLE, BALANCE en FADER selectoren. U kut de instelleningen van de afzonderlijke menupunten veranderen met behulp van de "+"- of "-"toets.
Opmerking: wanneer onder DSP equalizerinstallingen zoals bijv. POP, ROCK geselecteerd zichn, können BASS en TREBLE nicht worden ingesteld.
b) Druk lang op de SEL-toets om maar het selectienu DSP OFF, BEEP ON/OFF, SEEK 1/2, VOL LAST/ADJ te schaken. Op het display verschijnt "DSP OFF"
Door herhaaldelijk op de SEL-toets te drukkenUNT u nu de afzonderlijke menuputen selecteren. U sunt de instellening van de afzonderlijke menuputen veranderen met behulp van de "+"- of "-"toets.
DSP
In het DSP kutn de equalizerinstellenen POP M, ROCK M, CLAAS M en FLAT selecteren. Selecteer DSP OFF om eigien instellenen uit te voeren. Zie hiervoor ook punt 3a.
BEEP ON/OFF bevestigingsgeluid
Voor het bevestigingsgeluid bij het indrukken van toetsen hebt u twee keuzemogelijkheden.
BEEP ON: het bevestigingsgeluid klinkt na iedere druk op de toets.
BEEP OFF: het bevestigingsgeluid is uitgeschakeld.
- SEEK 1, SEEK 2 (kan alléén in radiomodus worden geselecteerd)
Zoekfungtiet met de I / I-toetsen in radiomodus
SEEK 1: houd de I▶/▶I-toetsen ingedrukt en de radio stopt bij het volgende ontvangbare zenderstation.
SEEK 2: houd de I▶/▶I-toetsen ingedrukt totdat de Zoekfungtie in de freiendentieband worden voortgezet.
VOL LAST/VOL ADJ
VOL LAST: de radio schakelt in met de op het staat ingestelde geluids-sterkte
VOL ADJ: met behulp van de +- en -toetsenkest u een gelijkblijven de geluidssterkte vooraf instellen.
NL
4 POWER-knop
Druk op deze toets om het apparaat in- of uit te schakelen.
5 LC-display (vloeibaar-kristaldisplay)
6 BAND-toets
Druk kortstandig op de BAND-toets om:tussen de drie FM- (UKW) niveaus heen en wee ter schaken. De benaming van de desbeteffende niveaus FI, F2, F3 wordt op het LC-display weergegeven.
7/8 I< / I-toetsen TUNE, SEEK, TRACK, SKIP UP/DOWN
a) In de radiodomus: druk kortstandig op de I of EELtoets om een radiozender handmatig in te stellen.
Houd de I← of >I-toets ingedrukt om het zoekenaar een radiozender te starten.
Zie hiervoor ook de functie SEEK 1 / SEEK 2.
b) In de CD-modus: druk kortstondig op de toetsen I of EEE om voorruit ofchteruit te springen. Om titels vooruit ofchteruit te spoelen houdt u de pijttootsen I of ingedrukt.
9 MODUS-toets
Druk op deze toets om de CD-speler- of de radiomodus te selecteren.
10 MUTE-toets
Druk op de MUTE-toets om de luidsprekers kortstondig uit te schakelen. Druk de toets opniew in om de functie wee te deactiveren.
11 AP-toets (automatische zenderopslag)
In de radiomodus:
a) Opslagfunctie: druk langer dan 1 seconde op de AP-toets om de automatische zenderopslag te activeren. Het apparaat zoekt binnen de actuèle frequentieband bijv. FM 1 waar de grootste signalsterktepegel totdat de Zoekyclus worden gestopt. De zes sterkste zenders worden toegewezen aan de Dienovereenkomstige geheugenplaatsen.
De nu opgeslagen zenders worden telkens ca. 3 seconden lang aangespeeld en daarna worden de zender van de eerste geheugenplaats ingesteld. Indien u nog更是 zenders op de FM-band wilt zoeken, drukt u op de BAND-toets om maar de FM2-of FM3-band over schakelen. Druk opnieuw langer dan 1 Seconde op de AP-toets om verdter te zoeken.
b) Aanspeelfunctie:\ nadat u de AP-toets kort hebt ingedrukt, speelt de radio alle Vooringestelde\ zenders van de freiendentieband aan.
Opmerking: de aanspeelfunctie eindigt automatisch weeR bij de geheugenplaats waarop deze werden gestart.
NL
AP-toets voor Zoekfunctie in de MP3-modus
Wonneer bij het producreren van een CD in MP3-formaat dienovereenkomstige geevens werden aangelegd, hunnen deze met behulp van de volgende functies worden gezocht.
a) Directe invoer van het titelnummer bij CD's in MP3-formaat:
- druk 1x op de AP-toets. Op het display verschijnt "TRK SCH".
- druk kortstandig op de SEL-toets. Op het display verschijnt "TRK SCH 001". Het LASTE cijfer vór de komma knippert.
- Met behulp van + / - toetsen hebt u nu de möglichkheid om als laatste lijfer vór de komma een titelnummer van 0 t/m 9 in te voeren.
- Druk opnieuw kortstondig op de SEL-toets. Het op een na laatste cijfer voor der komma knippert. Ga te werk als onder punt 3 beschreiben.
- Druk opniewu kortstandig op de SEL-toets om eventueel nog het op twee na LASTe cijfer vór de komma in te voeren.
- Sluit de invoer van het titelnummer af door langer (1 sec.) op de SELtoets te drukken. Onmiddelijk daarna worden de geselecteerde titel afgespeed.
b) Zoekfunctie voor bestanden bij CD's in MP3-formaat
- Druk 2x op de AP-toets. Op het display verschijnt "FILE SCH".
- Druk kortstandig op de SEL-toets om de eerste geselecteerde map op het display waar te gezven.
- Met behulp van de + / - toetsen hebt u nu de mogelijkheid om de verschillende ordners op de CD te selecteren.
- Druk langer op de SEL-toets (1 sec.). De geselecteerde map worden vanaf de eerste titel afgespeeld.
Druk kortstondig op de SEL-toets en u=kunt met behulp van de + /toetsen een titel in de map selecteren.
- Sluit de invoer af door langer (1 sec.) op de SEL-toets te drukken. Onmiddelijk daarna worden de geselecteerde titel afgespeeld.
c) Zoekfunctie voor sleutelwoorden bij CD's in MP3-formaat:
- Druk 3x op de AP-toets. Op het display verschijnt "CHAR SCH".
- Druk kortstondig op de SEL-toets. Links op het display verschijnt een "A".
- Door herhaaldelijk indrukken van de + / - toetsen kutn u nu op de eerste plaats van het display een letter van A t/m Z of een cijfer van 0 t/m 9 invoeren.
Opmerking: het invoeren van verdere cijfers en letters geschiedt van links maar rechts.
- Druk kortstondig op de SEL-toets. Op de tweede plaats van het display verschijnt een "A". Ga bij het invoeren van cijfers en letters te werk als beschrenen onder punt 3.
- Herhaal de stappen van punt 2 en punt 3 totdat u uw Zoekbegrip hebt ingevoerd.
Opmerking: wis de LASTe invoer door het indrukken van de AP-toets.
- Sluit de invoer af door langer (1 sec.) op de SEL-toets te drukken. Onmiddelijk daarna worden de geselecteerde titel afgespeeld.
Opmerking: de weergave van een door de gebruiker gemaakte CD kan opgrund van de vele beschikbare programma's en CD-media nicht worden gegarandeerd.
In de normale afspeelmodus van CD's in MP3-formaat kutn u met de I- toetsen telkens eén titel omhoog of orlaag springen. Met de stationstoetsen 5 en 6 kutn u telkens 10 titels omlaag of omhoog springen.
12:17 als stationstoetsen (1-6) van voorgeseleeteerde zenders en als 1TOP-, 2INT-, 3RPT-, 4RDM-toetsen in de CD-modus
a) Radio-modus
Door kortstondig indrukkenkest u via deze toetsen een voorgeseleeteerde radiozender direct selecteren. Wanneer u deze toetsen langer dan een seconde indrukt, worden de actuelin ingestelde zender onder de geseleeteer de stationstoets opgeslagen.
b) CD-modus
- Druk op de 1TOP-Taste om het afspelen van de CD te onderbreken (pauzefunctie). Druk de toets opnieuw in om de functie weir te deactiveren.
- Druk op de 2INT-toets. Ledere titel van de CD wordt gedurende 10 seconden afgesield. Druk opniewu op deze toets om de Zoekfunctie af te breken. De actuel geseleterde titel worden afgesield.
- Druk op de 3RPT-toets. De actuèle titel worden herhaald. Druk de toets opnieuw in om de functie wee ter deactiveren.
- Druk op de 4RDM-toets. De CD-titels worden in willekeurige volgorde afgespeeld. Druk de toets opnieuw in om de functie wee ter deactiveren.
18 ST-toets
STEREO/MONO-omschakeling (allén selecteerbaar in radiomodus).
19 CLK-toets
- Kloktijd weergeven: druk kortstondig op de CLK-toets om de kloktijd waar te geven.
- Kloktoi: instellen: druk twee ker op de CLK-toets en houdt deze bij de twede ker ingedrukt totdat de weergave op het display knippert. Druk op de +toets om de uren in te stellen. Druk op de “-”-toets om de minutes in te stellen.
20 LOUD ON/LOUD OFF
Aan- en uitschakelen van de LOUDNESS-functie.
In het lagere volumebereik worden door middel van de functie LOUDNESS (LOUD) het geluidsbeeld uitgebraid. Hoogten en bassen worden versterkt.
21 CD-sleuf

NL
22 Uitwerptoets (EJECT)
Druk op deze toets om de CD uit te werpen.
23 Knipperende LED-weergave (zonder afbeelding)
Deze weergave knippert wanner u het voorste bedieningselement verwijdert.
24 RESET-toets (zonder afbeelding)
Druk op deze toets om een storende zender te herstellen. Deze toets kutu bij verwijderd bedieningsveld rechts naast het display vinden.
Technische gegevens
Algemeen
Netspanning
DC 13,8 V
Stroomverbruik
7A Max.
Stroomverbruik
4×35WPMPO
FM-bereik
Frequentiebereik
87,6 MHz tot 108,0 MHz
Effectieve gevoeligkeit
3 V.
IF-frequentie
10,7 MHz
Uitgangsvermogen (selecteerbaar)
Uitgang
bij CD max. 1200mV
CD-speler
Systeme
CD-apparaat
Afspeelbare CD's
CD/CDR/CDRW/MP3 disks
Signaformaat
Aantal kwantificeringsbits 1 bit.
Frequentiekarakteristiek
Monsterfrequentie 44,1 KHz
Signaal-ruis-verhouding
20 - 100Hz≤ 5dB
Aantal kanalen
10 - 20KHz≤ 5dB
Apparaatbehuiizing
50 dB (1KHz)
2 stereokanalen
178 B x 50 H x 165 D
Verhelpen van storingen
NL
Voer eerst alle aansluitingen uit voordat u de checklist doorloopt. Wanner u na controle aan de hand van de checklist nog steeds vragen hebt, neem dan a.u.b. contact op met de dichtstbijzende klantenservice.
| Storingssymptom | Reden | Oplossing |
| Na hetplaatsen in hetapparaat loopt de CD ofde cassette nicht. | De volumeregelaar is tezacht ingesteld.De aansluitingen zichnicht correct uitgevoerd. | Stel de volumeregelaarhoger in.Controleer de +12V- en demassa-aansluiting. |
| Het geluid van de CD-spe-ler springt. | Hetwegdek is ruw.Het apparaat is Niet vastgemonteerd. | Wacht met het afspelenvan de CD totdat het wedg-dek vlakker worden.Bouw het apparaat vast in.Waarborg dat de acheiterstebevestiging wordt gebruiktwanneer het voertuig Nietover een geschikte opana-me voor het acheitersteapparaatgedeelte beschikt. |
| De CD is defect. | Probeer een andere CD.Wenneer deze correct functioneert is de eerste CDwaarschijnlijk beschadigm.Dreinig de CD. | |
| De CD is verontreinigd. | ||
| Geen stroom. | De ontsteking is uittgeschakeld.Dezekering is doorge-brand. | Draai ontstekingsstreutelnaar de stand "ON" of"ACC".Vervang dezekering dooreen andere 7 A-zekering. |
| Het apparaat functioneertniet correct(EJECT, LOAD,PLAY). | De microcomputer werddoor elektrisch ruisenbeschadigm. | Verwijder de CD of casset-te en plaats deze weeSchakel het apparaat uiteneer in. |
| Geen radio-ontvangst. | De antennekabel is nietaangesloten. | Steek de antennekabelvast in de antennabus vanhet apparaat |
| In de automatische Zoek-modus stocht de radio nicht bij zenderstation(s). | De zendersignalen zichtzwak. | Stel het zenderstationhandmatig in. |
NL
| Storingssymptom | Reden | Oplossing |
| CD's worden maar tot de helft in de CD-sleuf getrokken. | De schroeven van de transportbeveiliging werden Niet verwijderd. | Verwijder de schroeven van de transportbeveiliging. |
Afpelen van een CD
Reinigen van de CD
Reinig de CD vór het afspelen met een schone, stofvrijne reinigingsdoek. Verwijder het stof van de CD in pijrichting.
Opmerking: gebruik gelein oplosmiddelen zoals benzine of verdunner. De algemeen verkrigbare reinigings-middelen of antistatische sprays beschaden het apparatus.

Wanner de CD met de opdruk maar beneden worden geplaatst, kan het apparatusat beschadigd worden.
Plaats de CD algijd met het label maar boven.
Opmerking: tracht nicht, een Cd teplaaten wonneer zich reeds een CD in de CD-sleuf bevindt. Hierdoor kan het apparaat worden beschadigd.
Grijp de CD alsd aan de rand vast. Om de Cd schoonte honden, mag u deze Niet aan het oppervlak vastpakken.

Plak geen papier of plakband op de CD.
Stel de CD Niet bloot aan directe zoninstraling of warmtebronnen zoals verwarmingsbuizen en LAST de CD ook Niet in de auto litgen wanner deze in de zon geparkeerd staat maar dit een aanzienlijke temperatuurstijging tot gezolg heeft.
Dit apparaat is gekeurd conform de op dit moment van toepassing[zijnde CE-richtlijnen zoals bijvoorbeeld elektromagnetische compatibiliteit en laagspanningsvoorschriften en is geconstrueree volgens de{niewste verilgheidstechnische voorschriften.
Technische wijzigingen voorbehonden!
Garantie
NL
Voor het door ons geleverde apparaat verlenen wij een garantie van 24 maanden vanaf koopdatum (kassabon).
Eventuele gebreken aan het apparaat of aan het toebehoren*) die zich ontstaan door productie- of materiaalfouten verhelpen wij binnen dezeperiode kosteloos door middel van reparatie of, maar ons oordeel, door verranging. Eventuele garantiegevallen verlungen noch de geldigheidsduur van de garantie, noch begint daardoor een neue garantieperiode!
Het koopbewijs geldt als garantiebewijs. Zonder dit bewijs kan geen kostenoze reparatie of verranging plaatsvinden.
Geef in geval van garantie het apparaat met de kassabon en in de originele verpakking af bij uw handelaar.
*) Schade aan onderden leidt nicht automatisch tot kosstoloze verwanging van het complete apparaat. Neem in dit geval contact op met once holster! De reparatie van glasbreuk of breuk van kunststofonderden wordt alotijd berekend!
Niet defecten aan de hulpstukken of aan de slijtende onderdelen (bijv. koolborstels, deeghaken, driffriemen, reserveafstandsbediening, reservoirandenborstels, zaagbladen enz.), maar ook reiniging, onderhoud of de verranging van slijtende delen vallen nicht onder de garantie en geschieden.altijd gegen berekening! Bij ingrepen door derden komt de garantieverlening to verrallen.
Na de garantieperiode
Na afloop van de garantieperiode konnen reparaties gegen berekening worden uitgevoerd door de betreffende vakhandelaar of de technische Dienst.

Avvertenze generali per la sicurezza
Per evitare il rischio di incendio o di scosse, non si deve mai tenere l'apparecchio sulla pioggia o in ambienti umidi. Quindi non usare l'apparecchio nelle immeditate vicinanze di acqua, per esempio in prossimità di una vasca, di una piscina o in una cantina umida.
Utilizzato l'apparecchio solo per l'uso previsto.
Collegare l'apparecchio esclusivamente ad una presa installata a norma. Fare attenzione a che la tensione indica corrisponda alla tensione della presa. Se si impiegano alimentatori esterni, fare attenzione all'esattezza di polarità e di tensione, inseire le batterie sempre correttamente.
Collocare l'apparecchio in modo che le aperture per l'airazione esistenti non ven-gano coperte.
Non togliere mai la protezione dell'apparecchio. Riparazioni non a regola d'arte possono causare notevoli pericoli per l'utente. Se l'apparecchio presenta danni, soprattutto nella zona del cavo di collegamento, non metterlo più in funzione, ma farlo riparare prima da un esperto. Esaminare regolarmente il cavo di collegamento alla rete per verificare che non ci siano danni.
Un cavo di collegamento difettoso può essere sostituito con un cavo equivalente solo dal produttore, dal quello servizio assistenza o da persona similmente qualificale, all fine di evitare pericoli.
Se l'apparecchio non viene usato per un periodo di tempo prolongato, togliere il blocchetto alimentatore alla presa ovvero estrarre le batterie.
Questi symboli possono trovarsi eventualmente sull'apparecchio e rimandano ai seguenti elementi:

Il significato del lampo fa presente all'utente la presenza di pezzi all'interno dell'apparecchio che sono produrre alte tensioni pericolose.

Il significato con il punto esclamativo fa presente all'utente la presenza di importanti averventenze per l'uso e la manutenzione nei fogli di accompagnamento dell'apparechio.

Gli apparecchi dotati di quello symbolo lavorano con un „Laser classe 1" per produrre i CD. Gli interrotturi di sicurezza integrati hanno lo scopo di impedire che l'utente venga esposto alla luce non visibile del laser, pericolosa per l'occhio umano, aggiardo lo scomparto per i CD.
Questi interruttori di sicurezza non devono mai essere cavallottati né manipolati perché altrimenti sussiste il rischio di esposizione alla luce del laser.
Installazione
Montare la radio operando conformamente alle illustrazioni seguenti
a Dado
b Rosetta elastica
c Rondella
d Vite
e Squadra di montaggio
f Alloggiamento di inserimento
g Tirante filettato

Attenzione!
h Viti delsystemadi sicurezza per il trasporto(da rimuovere prima del montaggio)
Dispositivo di estrazione (chiave per le operezioni di smontaggio)
j Fissaggio
Appoggiare prima il frontalino con i comandi sul lato destro e poi innestarlo in posizione sul latosinistro.


Allacciamento
Realizzare l'allcianto conformmente a quanto indicato dal grafico.
Attenzione
- Il pannello di lavoro rimovibile deve essere montato soltanto dopo aver effettuito l'allacciamento del cavo.
- Si consiglia di utilizzato altoparlanti con un'impedenza pars a 4 ohm.
Informazioni importanti per il montaggio della vostra autoradio!
- Tenete presente che durante nella fase di montaggio/smontaggio del vosto apparecchio la vostra machina deve disparre di un „ISO ANSCHLUSS" origine. Questa è la controparte alla spina presente all'uscita dell'apparecchio (ISO ANSCHLUSS).
Nel caso di backup „DAUER+“, a seconda del tipo di veicolo possono esserci differenze.
In questo caso rivolgetevi ad un'officina autorizzata perché un'alimentazione permanente della vostra radio altrimenti non è garantita. (Questo è necessario per memorizzare le stazioni emittenti).
- A seconda del tipo di veicolo in casi eccezionali possono presentarsi disturbi nel funzionamento Radio/CD. Questi si possono eliminare con un filtro anti-disturbo supplementare. Malgrado il vosto apparecchio AR 638 CD sua ricerca do tato in series di un filtro antidisturbo, possono esserci uqualmente limiti dovuti alla vettura.
Potete ave loamento.
Potete ave loamento.
Misure di prevenzione e manutenzione
- Le viti della sicura di trasporto (h) devono essere rimosse prima del montaggio altrimenti il CD non entra.
- L'apparechio è configurato per il polo negativo della batteria, il quale deve essere collegato alla carrozzeria del veicolo. Accertarsene prima di procedere all'installazione.
- Nel caso in cui il quadro comandi anteriore venga rimioso durante il funzionamento della radio o dellettore CD, l'apparecchio si disattiva automaticamente.
- Funzione errata. Dopo aver inserto il pannello frontale appeare nel display LCD il messaggio dimostrante un erre (ERROR). Con l'auto di un filo di ferro o similmi premere il tasto RESET, per ripartire l'elettronica dello stato originale. (RESETTEN). Questo tasto si trova sul Campo di lavoro staccato a destra accanto al display.
- Nel caso in cui la temperatura all'interno dell'abitacolo del veicolo sua particolaremente elevata, per esempio quando il veicolo sua rimasto parcheggiato a lungo al sole, si consiglia di non attivare illettore finché la temperatura dell'abitacolo non sua diminuita in seguito a un breve periodo di marcia.
- Affinché l pannello di dato rimovibile possa essere conservato in condizioni di sicurezza, si consiglia di utilizzare a tale scopo l'involucro protettivo appositamente previsto allo scopo.


Funzionamento
1 Pulsante REL
Premere il tastingo REL per staccare il Campo di lavoro anterioe.
2 Pulsanti +/-
Durante il funzionamento dell'apparecchio, quosti pulsanti servono ai fini della regolazione del volume.
In collegamento con il tasto SEL prima premuto si possono apporre modifiche ai menu, per esempio in FADER o BALANCE.
3 Pulsante SEL (selezione)
a) Premere brevamente il pulsante SEL per aprie il menu di selezione della modalità acustica. Sul display viene visualizzato "VOL" ai fini dell'impostazione del volume. Azionando ripetutamente il pulsante SEL, è quindi possibile selezionale le singole opzioni di menu quali, per esempio, VOLUME, BASS, TREBLE, BALANCE e FADER. Per poter modificare le impostazioni delle varie opzioni di menu, è sufficiente servisi dei pulsanti "+" oppure "-". Nota: se sono state selezionate impostazioni dell'equalizzatore in DSP, p.e. POP, ROCK, non si sono impostare BASS e TREBLE.
b) Tenere premuto a lungo il pulsante SEL per aprire il menu di selezione DSP OFF, BEEP ON/OFF, SEEK1/2, VOL LAST/ADJ. Sul display viene visualizzato il messaggio "DSP OFF". Azionando ripetutamente il pulsante SEL, è quandì possibile selezionare le varie opzioni di menu. Per poter modificare le impostazioni delle varie opzioni di menu, è sufficiente servirsi dei pulsanti "+" oppure "-".
DSP
In DSP si possono selezionare le impostazioni dell'equalizzatore POP M; ROCK M, CLASS M e FLAT M. Per insertire impostazioni personali selezionare DSP OFF. V.anche il punto 3a
- BEEP ON/OFF segnale acustico di conferma
Si più selezionare il segnale di conferma in due modi premendo i tasti.
BEEP ON: il segnale acustico di conferma viene genrato igniqualvolta si azioni un pulsante.
BEEP OFF: il segnale acustico di confirma è disattivato.
SEEK 1, SEEK 2 (selezionabile solo nella modalità radio)
Funzione di ricerca con i tasti 1 1 / nella modalità radio.
SEEK 1: tenendo premuti tasti I/ / e la radio, si raggiunge la prima stazione emittente raggiungible.
SEEK 2: finché si tengono premuti i tasti 1 / , la ricerca nella banda di frequenza continua.
VOL LAST/VOL ADJ
VOL LAST: la radio si accende con il volume impostato per ultimo.
VOL ADJ: con l'auto dei tasti +- e - si selezione un volume d'accensione permanente.
4 Pulsante POWER
Premere quello pulsante per attivare e disattivare l'appareccchio.
5 Display LCD (display a cristalli liquidi)
6 Pulsanti BAND
Premere per un attimo il tasting BAND per passare tra i tre livelli FM (UKW). La denominazione del corrispettivo piano F1, F2, F3 viene visualizzata nel display LCD.
7/8 Pulsanti I▶/▶ITUNE, SEEK, TRACK, SKIP UP/DOWN
a) Nella modalità radio:
Premere per un attimo i tasti I or per impostare manualmente una stazione emittente a scelta.
Tenere premuto il tasto I o per dare avvio alla ricerca di un'emittente radio.
V.anche la funzione SEEK1/SEEK2.
b) Nella modalità CD: per avanzare o tornare indietro, premere brevemente il pulsante I< >oppure I. Per poter scorrere i titoli, tenere premuto il tasto direzionale I< >oppure I.
9 Pulsante Modus
Premere quello pulsante per selezionare illettore CD o la modalità radio.
10 Tasto MUTE
Premere il tastinge per disattivare il volume per un breve lasso di tempo. Premere di nuovo quello tastingo per ripristinare il volume.
11 Pulsante AP (memorizzazione automatica dell'emittente)
Nella modalità radio:
a) Funzione di memoria:
Per attivare la funzione di memorizzazione automatica dell'emittente, è necessario premere il pulsante AP per più di un secondo.
L'apparecchio ricerca il livello di segnale con maggiore intensità all'interno della banda di frequenza corrente, per esempio FM 1, sino alla conclusione del ciclo di ricerca stesso. Le sei emittenti caratterizzate da segnale a intensità più elevata vengono abbinate alle correspondenti positioni di memoria.
Le emittenti ora memorizzate vengono avviare per ca. 3 secondi e poi viene impostata l'emittente della prima posizione di memoria.
Se si desidera cercare ancora autres emittenti nella banda FM, premere il tasto BAND per passare a FM 2 o FM 3. Tenere di nuovo premuto per più di un secondo il tasto AP per dare avvio alla successiva ricerca.
b) Funzione Intro-Scan:
Dopo aver premuto per un attimo il tasto AP, la radio d'avvio a tutte le emittenti pre-impostate della banda di frequenza attuale.
Nota: la funzione Intro-Scan termina automaticamente alla posizione di memoria da cui si è partiti.


Pulsante AP per le funzioni di ricerca nella modalità MP3
Se nella creazione di un CD in formato MP3 sono stati inserti i corrispettivi dati, questi si possono cercare mediante le seguenti funzioni:
a) Inserimento diretto del numero del titolo per i CD con fornato MP3:
- Premere 1x il tasting AP. Nel display appeare "TRK SCH".
- Premere per un attimo il tasto SEL. Nel display appara "TRK SCH 001". La posizione dell'unità lampeggia.
- Ora con I'auto dei tasti +/- è possible insere un numero di brano da 0 a 9.
- Premere di nuovo per un attimo il tasting SEL. La posizione delle decine lampeggia. Procedere come descririto al punto 3.
- Premere di nuovo per un attimo il tasting SEL per inseire eventualmente una posizione per le centinaia.
- Chidere l'inserimento del numero dei brani tenendo premuto il tasto SEL per secondo. Immediamente aftero ha inizio la riproduzione del brano correspondente al titolo selezionato.
b) Funzione di ricerca di file per i CD con formatting MP3:
- Premere 2x il tasting AP. Nel display appeare "FILE SCH".
- Premere per un attimo il tastinge SEL per visualizzare nel display il primo raccoglitore selezionato.
- Ora con l'aiuto dei tasti +/- è possibile selezionare i vari raccogliatori sul CD.
- Tenere premuto il tasting SEL per 1 secondo. Il raccoglitore selezionato viene riproduotto a partire dal primo brano.
Premere per un attimo il tasting SEL: con l'aiuto dei tasting +/- è possibile selezionare un brano nel raccoglitore.
- Conclude l'insertimento tenendo premuto il tasto SEL per 1 secondo. Immediamente后再o ha inizio la riproduzione del brano corrispondente al titolo selezionato.
c) Funzione Intro-Scan nei CD in fornato MP3:
- Premere 3x il tasting AP. Nel display appea "CHAR SCH".
- Premere per un attimo il tasting SEL. A sinistra nel display appeare una "A".
- Ora premendo più volte i tasti +/- si può insertire nella prima posizione del display una lettera da A a Z o una cifa da 0 a 9.
Notea: l'inserimento delle altre cifre o lettere si esegue da sinistra a destra.
- Premere per un attimo il tasto SEL. Nella seconda posizione del display appara una "A". Procedure nell'inserimento di cifre e letterre come descritto al punto 3.
- Ripetere le operazioni del punto 2 e 3 finché non avete inserto il termine di ricerca a più positioni desiderato.
Nota: cancellare ora l'ultimo inserimento premendo il tasto AP.
- Conclude l'insertimento tenendo premuto il tasto SEL per 1 secondo. Immediamente后再o ha inizio la riproduzione del brano corrispondente al titolo selezionato.
Nota: la riproduzione di CD creati dall'utente non più essere garantita alla moltiplicità di software disponibili e media CD.
Durante la normale modalità di riproduzione di CD con formatting MP3 è possible passare al titolo precedente o al titlo supremiore mediante i pulsanti l1 e > I. Azionando i tasti di stazione 5 e 6 si può incere scorrire rispettovamente a 10 titoli più in basso o più in alto.
12:17 Tasti di stazione (1-6). Emittente preselezionata e pulsanti 1TOP, 2INT, 3RPT, 4RDM in modalità conlettore CD
a) Modalità radio
Azionando brevamente quosti pulsanti è possibile selezionare direttamente una stazione radio precedentemente impostata. Qualora questi pulsanti vengano premuti per più di un secondo, l'emittente currentemente impostata viene memorizzata in corrispondenza del tasto di stazione selezionato.
b) Modalità CD/MP3
- Premere il pulsante 1TOP allo scopo di interrimpere la riproduzione del CD (funzione di pausa). Per avviare nuovamente la riproduzione del CD, azionare nuovamente questo pulsante.
- Premere il pulsante 2iNT. Ognuno dei brani del CD viene riprodotto per 10 secondi. Per interrompere la ricerca, azionare nuovamente quello pulsante. Viene in quello modo riprodotto il brano corrispondente al titolo corremente selezionato.
- Premere il pulsante 3RPT. Il brano corrispondente al titolo presente viene ripetu. Per annullare esta funzione, premere nuovamente quello pulsante.
- Premere il pulsante 4RDM. I brani corrispondenti ai titoli del CD vengono riprodotti in una sequenza casuale. Per annullare esta funzione, premere nuovamente questo pulsante.
18 Pulsante ST
STEREO/MONO commutazione (selezionabile solo nel funzionamento radio)
19 Pulsante CLK
- Visualizzare l'ora: per visualizzare l'ora premere per un attimo il tasting CLK.
- Impostare l'ora: premere il tasto CLK due volte e la seconda volta tenerlo premuto finché le cifre nel display lampeggiano.
Per impostare l'ora premere il tasto ++. Per impostare i minuti premere il tasto --.
20 LOUD ON/LOUD OFF
Accendere e spagnere della funzione LOUDNESS.
Con la funzione LOUDNESS (LOUD) si espandono le catratteristiche del suono quando il volume è basso; si augmentanoosi gli alti e bassi.
21 Apertura per CD
22 Pulsante di espulsione (EJECT)
Premere quello pulsante per estrarre il CD.
23 Display luminoso (LED) lampeggiante (senza imagine)
Allorché si rimuove il quadro comandi anteriore, quello display lampeggia.


24 Pulsante RESET (senza imagine)
Premere quello pulsante per ripristinare il programma disturbato.
Dati tecnici
Generalità
Tensione di rete
DC 13.8 V
Consumo di corrente
7A Max.
Potenza
4×35WPMPO
Ambito FM
Ambito di frequenza
87,6 MHz - 108,0 MHz
Sensibilità utile
3 V
Frequenza I.F.
10,7 MHz
Potenza d'uscita
Uscita
per CD max. 1200mV
Lettore CD
Sistema
Apparecchio CD
CDutilizzabili
CD/CDR/CDRW/MP3 Disk
Numero di bit di quantificazione 1 bit.
Formato del segnale
Frequenza modello 44,1 KHz
Caratteristica di frequenza
20-100Hz≤5dB
10K-20KHz≤5dB
Rapporto segnale-disturbo
50 dB (1KHz)
Numero di canali
2 canali stereo
Dimensioni dell'alloggiamento
178 L x 50 H x 165 P
Eliminazione delle anomalie
Prima di esaminare la lista di risconto, completare in primo luogo l'allciamamento. Nel caso in cui vi siano oncara domane in seguito alla verifica sulla base della lista di risconto, si consiglia di rivolgersi al centro di assistenza tecnica più vicino.
| Anomalie | Causa | Soluzione |
| In seguito all'inserimento nell'apparecchio, il CD o la cassetta non funziona. | Il regolatore del volume è impostato su un valore troppo basso. Gli allaccia-menti non sono stati effetuati in modo corretto. Controllare l'allacciamento. | Impostare un valore più elevato per il regolatore del volume.Controllare il collegamento da +12V e il collegamento di massa. |
| Il tono dellettore CD tremola. | La superficie della strada aspra.L'apparecchio non è stato montato in modo saldo. | Prima di mettere in funzione il CD attendere che la strada diventi piana.Montare l'apparecchio saldamente.Accertarsi che venga utilizzato il systemadi fis-saggio posteriore nel caso in cui il veicolo non dis-ponga di supporti appro-priati per la parte posterio-re dell'apparecchio.Provare con un'alto CD.Qualora quest'ultimo non presenti anomalie, il CD precedente è probabilit-mente danneggiato.Pulire il CD. |
| Il CD è difettoso. | ||
| Il CD è sporco. | ||
| Assenza di corrente. | Il sistemi adcessione è disattivato. | Ruotare la chiave diccessione su "ON" oppu-re "ACC". |
| Il dispositorio di sicurezza è bruciato. | Sostituire il dispositorio di sicurezza con un'alto da 7A. | |
| L'apparecchio non funzio-na correttamente (EJECT, LOAD, PLAY). | Il rumore elettrico coinvolgeanche il microcompu-ter. | Estrarre il CD o la cassetta in oggetto, quindi effetuare nuovamente l'inseri-mento.Disattivare l'apparecchio e riattivarlo nuovamente. |


| Anomalie | Causa | Soluizione |
| Non vi è alcuna ricezione radio. | Il cavo dell'antenna non è collegato. | Inserire correttamente il cavo dell'antenna nella presa correspondente dell'-apparecchio. |
| Nella modalità di ricerca automatica la radio non si arrresta su alcuna stazione radiofonica. | I segnali di emissione sono troppo deboli. | Impostare una stazione radiofonica manually. |
| I CD's vengono inserti solo fino a metà nel vano CD. | Le viti e la sicura per il trasporto non sono stati rimossi. | Rimuovere le viti e la sicura per il trasporto. |
Riproduzione di un CD

Pulizia dei CD
Prima di attivare illettore CD, pulire il CD con un panno pulito e privo di polvere. Tirare il CD nel sensoindicato alla freccia.
Avvertenza: non utilizzato solventi quali la benzina o diluenti. I comuni detergenti o gli spray antistatici dannegliano l'apparechio.
Se si inserisce il CD con le scritte rivolte versus il basso, l'apparecchio più essere danneggiato.
Inserire sempre i CD con l'etichetta rivolta verso l'alto.
Avvertenza: nel caso in cui nell'apposita aperture per CD sua più presente un CD, si raccomanda di non tentare di insereire un ulteriore CD. In caso contrario, si potrebbe danneggiare l'apparecchio.
I CD devono essere afferrati sempre sul bordo. Affinché i CD possano mantenersi puliti, non affarrarli sulla superficie.
Non incollare etichette o nastri adesivi sui CD.
Non esporre i CD ai raggi solari o a fonti di calore quali, per esempio, i tubi di riscaldamento. Non lasciarli inoltre in auto, quando quest'ultima è parcheggiata al sole, poiché si potrebbe verificare un considerevole aumento della temperatura.
Questo apparecchio è stato controllato sulla base di tutte le direttive CE attuali in vigore in quello settore, quali per esempio la normativa in materia di compatibilità elettromagnetica e la direttiva in materia di bassa tensione, ed è stato costruito conformmente alle norme di sicurezza più moderne.
Con riserva di apportare modifiche tecniche.

Garanzia
Per l'apparecchio da moiMESSO in commercio ci assumiamo una garanzia di 24 mesi alla data di acquisto (scontrino).
Durante la garanzia noi ci impegniamo ad eliminare Gratisamente i quasti dell'appareccchio o degli accessori*, dovuti a difetti di materiale o di fabbricazione, riparandoli o, a mia discrezione, sostuendoli. Le prestazioni in garanzia danno luogo a una proraga della garanzia né danno diritto ad una nuova garanzia!
Per la garanzia è sufficiente lo scontrino di acquisso. Senza quello scontrino non sussiste il diritto né ad una sostituzione né ad una riparazione gratuite.
In caso di garanzia consegnare al vostro rivenditore l'apparecchio base nell'imbal-laggio originale unitamente allo scontrino.
*) Danniagliaccessori non giustificano automaticamente lo scambio Gratisito dell'apparechio completo. S prega di mettersi in contatto con la nostra centrale Telefonica.Dannale alle partidetrovotpprefrattaeai pezzi di materia plastica sono obligatoriamente spese del cliente.
La riparazione di pezzi d'uso overo soggetti a logoramento (cursori, ganci impastatori, cinghie di trasmissione, telecomandi di ricambio, spazzolini di ricambio, lame di seghe ecc.) come andere operazioni di pulizia e manutenzione o la sostituzione di pezzi soggetti a logoramento non rientano nella garanzia e quindi sono a pagamento!
La garanzia si annulla nel caso di intervento da parte di terzi.
Dopo la garanzia
Al termine della garanzia le riparazioni possono essere eseguite dietro lavoro dal corrispettivo negotio specializzato o servizio riparazioni.
General safety instructions
GB
To avoid the risk of fire or an electric shock, you should not expose the device to rain or moisture. Consequently, do not use the device in the immediate vicinity of water - for example near a bath tub, a swimming pool or in a damp cellar.
Use the device only for the intended purpose.
Only connect the device at a properly installed plug socket. Pay attention that the specified voltage corresponds to the voltage of the plug socket.
When using external mains supply, pay attention to the correct polarity and voltage.
Always place the batteries in the correct direction.
Assemble the device in such a way that the available ventilation openings are not covered.
Never open the housing of the device. Incorrect repairs can constitute a considerable risk for the user. Should the device become damaged, in particular the mains supply cable, do not operate the device any longer, but rather have it repaired by an expert. Check the mains supply cable regularly for damage.
For safety reasons a broken or damaged mains lead may only be replaced by an equivalent lead from the manufacturer, our customer service department or a similar qualified person.
If the device is not used for a longer period, remove the plug connector from the plug socket or take out the batteries.
These symbols may be found on the machine and are intended to indicate the following:

The lightning symbol should advise the user of parts in the inside of the device which carry dangerously high voltage levels.

The symbol with an exclamation mark should advise the user of important operation or maintenance instructions in the accompanying documentation.

Devices bearing this symbol work with a „class 1 laser“ for tracing the CD. The built-in safety switches should prevent the user being exposed to dangerous laser light, which is invisible to the human eye, when the CD compartment is opened.
Under no circumstances should these safety switches be bypassed or manipulated, as this could result in a danger of exposure to the laser light.
GB
Installation
Please install the car radio as shown below

a Nut
b Spring washer
c Plain washer
d Screw
e Mounting bracket
f Slide-in housing
g Threaded bolt
Note:
h Retaining screws during transport (please remove before installation)
I Extraction tool (spanner for dismantling)
j Frame

First place the operating panel in position on the right-hand side and then lock it into place on the left.
Connection
Connect the device as shown in the diagram.
GB
GB
Note:
- Do not attach the removable control panel until after connection of the cables.
- Please use loudspeakers with an impedance of 4 ohm.
Important Information for installing your CARRADIO!
- For proper instalment of your car radio, please make sure that your car provides an original "ISO JACKET". This is prepared as the counter part of the "ISO JACKET" of your car radio.
Depending on the specific car type, different wiring connection of the Backup wire are available.
In these case please contact your authorized car dealer. (However, this is necessary for storing the radio stations).
- Depending on the specific car type, interferences can be possibly arise during radio/CD operation. These interferences can avoided easily with an additional Interferences filter. (Your car radio AR 638 CD is originally prepared with an Interference Filter already).
In these case, please contact your authorized car dealer.
Precautionary Measures and Maintenance
- The screws (h) of the transport locking device should be removed before installation, as otherwise the CD cannot be inserted.
- The device is designed for the minus pole of the battery, which must be connected to the body of the vehicle. Please check this before installation.
- If the front control panel is removed while the radio or CD is on, the device is automatically switched off.
- Error. After the front panel has been reinserted an error message (ERROR) appears in the display. Use a piece of wire or similar item to press the RESET button in order to return the electronics to its original state. When the operating panel is removed this button is to be found on the right next to the display.
- If the interior of the vehicle becomes very hot, for example after standing in direct sunlight for a prolonged period, do not switch on the player until the inside of the vehicle has cooled down a little after you have been driving for a few minutes.
- In order to keep the removable control panel in a safe place you should always use the protective case provided.
Operation
GB
1 REL Button
Press the REL button to remove the front operating panel.
2 +/- Button
During normal playback these buttons are used to set the volume.
After the SEL button has been pressed it is possible to make changes in the various menus, e.g. under FADER or BALANCE.
3 SEL Button (Select)
a) Press the SEL button briefly to access the selection menu of the sound mode. The letters "VOL" appear in the display for setting the volume. By repeatedly pressing the SEL button you can now select the individual menu items such as VOLUME, BASS, TREBLE, BALANCE and FADER. The settings of the individual menu items are changed using the "+" or "-" button.
Note: If equaliser settings such as POP and ROCK have been selected under DSP it is not possible to adjust the BASS and TREBLE.
b) Press the SEL button for a longer time to access the selection menu DSP OFF, BEEP ON/OFF, SEEK1/2, VOL LAST/ADJ. The letters "DSP OFF" appear in the display. Repeatedly pressing of the SEL button now brings up the individual menu items. The settings of the individual menu items are changed using the "+" or "-" button.
DSP
In DSP mode you can select the equaliser settings POP M, ROCK M, CLASS M and FLAT M. Select DSP OFF to carry out your own adjustments. See also section 3a.
- BEEP ON/OFF Confirmation Beep
You can select two types of confirmation beep when a button is pressed.
BEEP ON: The confirmation beep is heard whenever a button is pressed.
BEEP OFF: The confirmation beep is switched off.
SEEK 1, SEEK 2 (only available during radio operation)
Seek function with the I< / buttons during radio operation.
SEEK 1: Keep the I / buttons pressed down and the radio will stop at the next station that is reached.
SEEK 2: As long as the / buttons are pressed down the search function will continue in the frequency band.
VOL LAST/VOL ADJ
VOL LAST: The radio switches on at the actual volume it had when it was last switched off.
VOL ADJ: Using the + and - buttons you can pre-select a constant switch-on volume.
4 POWER Button
Press this button to switch the device on and off.
GB
5 LCD (liquid crystal display)
6 BAND button
Press the BAND button briefly to switch between the three FM levels. The designation of the corresponding level - F1, F2 and F3 - is shown in the LCD.
7/8 I▶/▶I Buttons TUNING, SEEK, TRACK, SKIP UP/DOWN
a) In radio mode:
Press the I or button briefly to tune into a radio station manually.
Keep the I< or button pressed down in order to start searching for a radio station.
See also the function SEEK 1 / SEEK 2.
b) In CD mode: Press the I or button briefly to jump forwards or backwards. If you would like to scroll the titles of the tracks keep the arrow button pressed.
9 Mode Button
Press this button to select the CD player or radio mode.
10 MUTE Button
Press the MUTE button to switch off the loudspeakers for a short time. Press this button again to cancel this function.
11 AP Button (Autostore - Automatic Station Storage)
In radio mode:
a) Memory function :
Press the AP button for longer than one second to activate automatic station storage. The radio searches within the current frequency band, e.g. FM 1, for the strongest signal level until the search cycle has finished. The six strongest stations are then allocated to the corresponding storage locations.
The stations that have now been stored are played for approximately 3 seconds each and then the station of the first storage location is set. If you would like to search for more stations in the FM band, press the BAND button in order to change to the FM 2 or FM 3 band. Press the AP button again for more than one second in order to start the continued search.
b) Scan Function:
After the AP button has been pressed briefly the radio plays all the pre-set stations in the current frequency band for a short time.
Note: The scan function ends automatically when it reaches the storage location from which it started.
AP button as a search function during MP3 playback
If the corresponding data were created when a CD was made in MP3 format, these can be searched for using the following functions:
a) Direct input of the track number for CDs in MP3 format:
- Press the AP button once. The letters "TRK SCH" appear in the display.
- Press the SEL button once. The letters "TRK SCH 001" appear in the display. The units place flashes.
- With the help of the +/- buttons it is now possible to put in a track number from 0 to 9 in the units place.
- Press the SEL button briefly once more. The tens place flashes. Proceed as described under 3 above.
- Press the SEL button briefly once more to put in a hundreds place if necessary.
- Press the SEL button for 1 second to complete entry of the track numbers. Immediately after this the selected track is played.
b) File search function for CDs in MP3 format:
- Press the AP button twice. "FILE SCH" appears in the display.
- Press the SEL button briefly to show the first directory that has been selected in the display.
- Using the +/- buttons it is now possible to select the various directories on the CD.
- Press the SEL button for 1 second. The selected directory is played starting with the first song.
Press the SEL button briefly and you can select a track in the directory using the +/- buttons.
- Complete entry of the titles by pressing the SEL button for 1 second. Immediately after this the selected track is played.
c) Keyword search function for CDs in MP3 format:
- Press the AP button three times. The letters "CHAR SCH" appear in the display.
- Press the SEL button briefly. The letter "A" appears on the left of the display.
- By repeatedly pressing the + / - buttons you can now enter a letter from A to Z or a number from 0 to 9 in the first position of the display.
Note: The following letters and numbers are entered from left to right.
- Press the SEL button briefly. An "A" appears in the second position of the display.
Proceed as for the entry of numbers and letters as described under 3 above.
- Repeat the process described under 2 and 3 above until you have entered your search term.
Note: The last entry can be deleted by pressing the AP button.
- Complete entry of the search term by pressing the SEL button for 1 second. Immediately after this the selected track is played.
Note: It is not possible to guarantee that CDs created by the user can be played back due to the large variety of software and CD media available.
GB
During the normal playback of CDs in MP3 format the I and buttons can be used to move up or down one track. Station buttons 5 and 6 can be pressed to move up and down 10 tracks at a time.
12:17 Station buttons (1-6) of preselected stations and as 1 TOP, 2INT, 3RPT and 4RDM buttons during CD operation
a) Radio Operation
Pressing these buttons briefly directly selects a preset radio station. If these buttons are pressed for more than one second, the station currently being listened to is stored under the selected station button.
b) CD/MP3 Operation
- Press the 1TOP button to interrupt playback of the CD (pause function). Press this button again to continue listening to the CD/MP3.
- Press the 2INT button. Each track on the CD is played for 10 seconds. Press this button again to stop searching. The currently selected track is played.
- Press the 3RPT button. The track currently being played is repeated. Press this button again to cancel this function.
- Press the 4RDM button. The CD tracks are played at random. Press this button again to cancel this function.
18STButton
STEREO/MONO switching (only possible during radio operation)
19 CLK Button
- Displaying the clock: Briefly press the CLK button to display the time.
- Setting the clock: Press the CLK button twice and keep it pressed the second time until the display begins to flash. Press the + button to set the hours and the - button to set the minutes
20 LOUD ON/LOUD OFF
Switching the LOUDNESS function on and off.
When the volume is low the LOUDNESS function (LOUD) expands the sound characteristics by increasing the treble and bass sounds.
21 CD Slit
22 Eject Button (EJECT)
Press this button to eject the CD.
23 Flashing LED (not shown)
When the front control panel is removed this display flashes.
24 RESET Button (not shown)
Press this button to reset the programme on which there is interference.
Technical data
GB
General
Supply voltage
DC 13.8 V
Power consumption
max. 7 A
Power
4x35WPMPO
FM band
Frequency range
87.6 MHz to 108.0 MHz
Effective sensitivity
3 uV.
I.F. frequency
10.7 MHz
Output Power
Output
at CD max. 1200mV
CD player
System
CD device
Suitable CDs
CD/CDR/CDRW/MP3 disks
Signal format
number of quantising bits - 1 bit
Frequency characteristics
Sampling frequency 44.1 KHz
Signal-to-noise ratio
20 - 100Hz≤ 5 dB
Number of channels
10K-20KHz≤5dB
Housing dimensions
50 dB (1 KHz)
2 stereo channels
178 x 50 x 165 (W x H x D)
GB
Troubleshooting
Before going through the checklist please make all the connections first. If you still have questions after going through the checklist, please consult your local customer service representative.
| Fault Symptoms | Cause | Solution |
| After being inserted into the device the CD or cassette does not turn. | The volume control is set too low. The device has not been correctly connected. Check the connections. | Turn up the volume. Check the +12V and earth connection. |
| The sound of the CD play-er "jumps". | The surface of the road is uneven. The device is not firmly installed. | Wait until the road becomes smoother before playing the CD. Install the device firmly. Ensure that the rear attachment is used if the vehicle does not have any suitable retainer for the rear section of the device. Try another CD. If this works correctly, the first CD is probably damaged. Clean the CD. |
| The CD is damaged. | ||
| The CD is dirty. | ||
| There is no power. | The ignition is switched off. The fuse has blown. | Turn the ignition key to "ON" or "ACC". Replace the fuse by another 7A fuse. |
| The device does not work correctly (EJECT, LOAD, PLAY). | The microcomputer has been affected by electrical interference. | Remove the CD or cassette and reinsert it. Switch the device off and on again. |
| No radio reception. | The antenna cable is not connected. | Insert the antenna cable firmly into the antenna socket of the device. |
| In automatic search mode the radio does not stop at a transmitting station. | The transmission signals are too weak. | Tune in to a radio station manually. |
| CDs are drawn only half way into the CD tray. | The transport screws have not been removed. | Remove the transport screws. |
Playing a CD
GB
Cleaning the CD
Before playing a CD, wipe it off with a clean, dust-free cleaning cloth. Pull out the CD in the direction of the arrow.
Note: Do not use any solvents such as petrol or thinning agents. Commercially available cleaning substances or antistatic sprays will damage the device.
If the CD is inserted with the printed side facing downwards, the device may be damaged.
Always insert the CD with the label facing upwards.
Note: If there is already a CD in the CD slit, do not try to insert a second CD. This may damage the device. Always hold CDs by the edge. In order to keep the CD clean do not touch the surface.
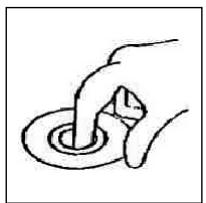
Do not attach any stickers or adhesive tape to the CD.
Do not expose the CD to direct sunlight or sources of heat such as heating pipes. Do not leave CDs in the car if it is parked in direct sunlight as this will lead to a considerable rise in the temperature inside the car.
This device has been tested according to all relevant current CE guidelines, such as electromagnetic compatibility and low voltage directives, and has been constructed in accordance with the latest safety regulations.
Subject to technical changes without prior notice!
GB
Guarantee
The device supplied by our Company is covered by a 24 month guarantee starting on the date of purchase (receipt).
During the life of the guarantee any fault of the device or its accessories *) ascribable to material or manufacturing defects will be eliminated free of charge by repairing or, at our discretion, by replacing it. The guarantee services do not entail an extension of the life of the guarantee nor do they give rise to any right to a new guarantee!
Proof of the guarantee is provided by the proof of purchase. Without proof of purchase no free replacement or repair will be carried out.
For repairs or replacement during the life of the guarantee return the device in its original packing together with the proof of purchase to your dealer.
*) Damage to accessories does not mean automatic free replacement of the whole machine. In such cases please contact our hotline. Broken glass or breakage of plastic parts are always subject to a charge.
Defects to consumables or parts subject to wearing (e.g. motor pistons, kneading blades, drive shafts, spare remote control, spare toothbrushes, saw blades, etc.) as well as cleaning, maintenance or the replacement of said parts are not covered by the guarantee and hence are to be paid!
The guarantee lapses in case of unauthorized tampering.
After the expiry of the guarantee
After the expiry of the guarantee repairs can be carried by the competent dealer or repair service against the payment of the ensuing costs.
Ogólne wskazówki związane z bezpiecznych obstuga
PL
Urzadzenie chronić nalezy przy deszczem i wilgocia, aby zapobiec grozbie pozaru lub porazeniu pradem. Nie nalezy gowc uzywac w povlizu wody, aWiec przykjadowo w povlizu wanny, basenu lub w zawilgoconej piwnicy.
Urzadzenie nalezy uzywac tylko zgodnie z loro przyznaczeniem.
Urzejdenie nalezy podźycy tylko i wyłącznie do przypeśwo zamontowanego oniazdka.
Prosze zwrociu wage na to, zby podane napiecie zgadza to sie z napieciw wigniazdo.
W przypadku uzywania oddzielnych zasilaczyNSEZWROcUwage na biegunowo s i napieci, baterie musz zostac wfozone do uradzenia zgodnie z oznaczona biegunowość.
Urzadzenia naleź w taki sposob ustawic, zȩby istniejeść otwory wentylacyjne nie zostymi przykryte.
Nigdy nie wolno otwierać obudowy urzadzenia. Niefachowo przechrowadzone naprawy moga byc gożne w skutkach dl a uzytkownika. Przy uzskodzeniu urzadzenia, w szczególnosci kabla siediociego, urzadzenia nie要去 byc uzywane dopóki ne zichanost naprawione przy osobě z wymaganymi uprawieniami. Przewód zasilajczy naleź regularnie sprawdzać, czy nie jest uzskodzony.
W razine awari proszne naprawiac urzadzenia samenu lecz skorzystac z pomocy autoryzowanego spezialisty. Jezeli przewod zasilajacy niedzaczaly ulegnie uszkodzeniu, to powinien on byc wymieniony u wytworcy lub w spezialnym zakladzie naprawczym albo przyze wykwalifikowana osobe w celu unikienia zagrozenia.
Ježeli urzadzenie nie bedzie przydruźsy czas uzywane, naleź wyciagnac wyczke zgniazdka lub wyjac baterie.
Ponieszne symbole moga znajdocuć sie na urzadzeniu i majorzwracć Państwa uwage na:

Symbol błyskawy mac zwróci uwage uzytkownika naznajdujace sie we wétrzu urzadzenia;cęsci, kto're są pod niebeźpiecznie wysokim napiȩciem.

Symbol z wyrkzynikiemi ma Zwrocić uwage uzytkownika na znajdujuce sie w zańczony documentsch wazne wskazówki zwiazane z obstęg i konserwacja uradzzenia.

Urzadzenia z tym symbolism uzywaj do odczytywania dzwieku z płyty kompaktowej „Lasera klasy A". Wbudowy wytagznik bezpiecznychwa za napobiecen, zbye uzytkownik w czasie otworiania kieszeni odtwarzacza płyt kompaktowych zostawi poddany niebepiecznemu dla ludzkich oczu oddziatwyaniu niewidocznego swiatka lasera.
PL
Wyćznika要去clarew zadnym wypadku zmostkować lub teź przy nim manipulowac, poniewaź grozi to niebepiecznychwem, ze uzytkownik poddany zostanie oddziatywaniu niebepiecznego dla ludzkich oczu niewidocznego swiatka lasera.
Instalacja
Radioodbiornik nalezy zamontowac zgodnie z ponijsza ilustracja
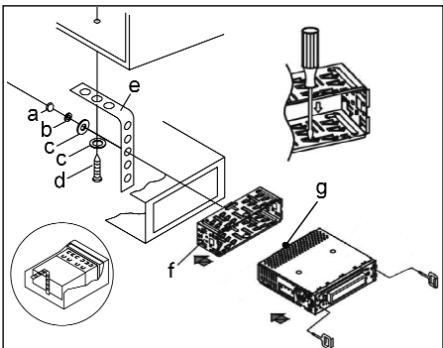
a nakretka
b podkfadka sprezysta
c podk✝adka
d sruba
e katownik montażowy
f wsuwana obudowa
g kofti gwintowane
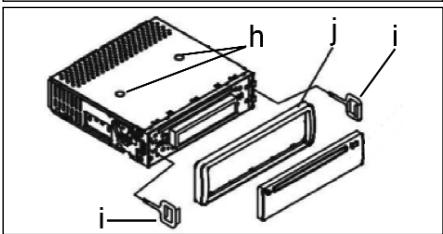
Uwaga!
h s Ruby zabepezcajace na czas transportu (przed montazem usunać)
i narędzie do wysuwania sprzȩtu (klucz do demontazu)
j Ramka przesłony
Zaslepke panelu sterowania prosze przytozyc napjierw po prawej stro- nie i wcisnac ja, az zaskoczy po stroje lewej.
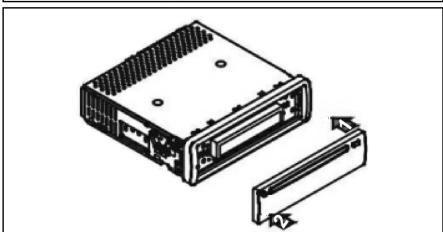
Podłaczenia
Wykonac połaczenia zgodnie ze schematem.
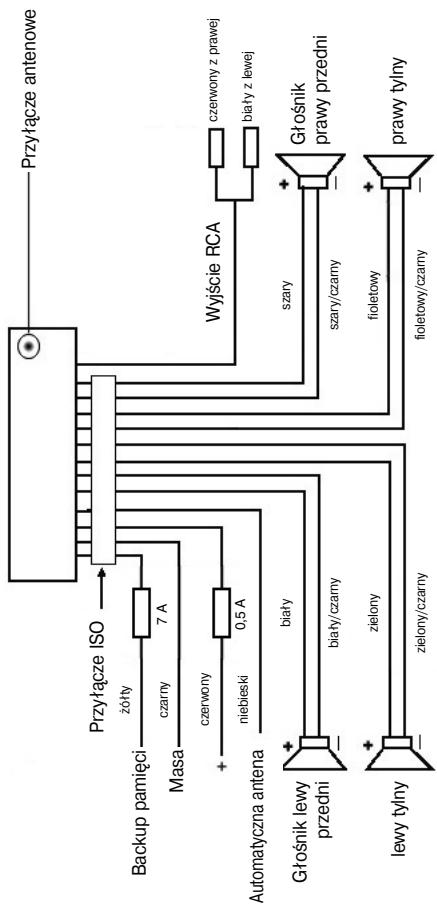
PL
PL
Uwaga
- Zdejmowany panel obstugi nalezy załozyc dopiero po pod.§aczeniu kabli.
- Nalezy stosować gólsniki o impedancji 4 ohm.
Wañne informações dodatkowe, dotyczé instalacji Waszego radioodbiornika samochodowej!
- Podczas instalacji / przyłączenia urzadzenia prosze zworćic uwage na to,Bezierby Wasz samochod dysponowat orginalnym połaczeniem „ISO PODŁAÇZENIE".Jest on opdowiednikiem wtyczykznajdujece są wyjsciu aparatu (ISO PODŁAÇZENIE).Przyzejci „DAUER +“ (Backup),w zależnosci od typo pojazdu, moźdość do odchylen.W tych przypadkach prosze są zwracać do autoryzowanego warsztatu samochodowo, gdyż inaczej nie jest zagwarantowane ciąfte/ state zasi-lanie przem Waszego radia (Potrzebne"Justak do zapisywania staci nadawczych do pamięci).
- Wazoleński od typo pojazdu w wyjtkowych sytuacjach moga wystapić szumy zakłocajce w trybie RADIO/CD. Można je odpowiednio usṇȩcz przyez dodatkowy filtr przyciewczak Łoceniewy. Mimo togo,ź Wasz aparat AR 638 CD juz seryjnie wyposañony jest w filtr przyciewczak Łoceniewy, to wazoleński od pojazdu要去 dojsć do pogorszonego odbioru. Otrzymaja je Panstwo w handlu z akcesoriami samochodwymi i/lub w Waszym warsztacie samochdowym.
Środki ostrożnosci i konserwacja
- Š Ruby (h) zabezieczajace w transporcie prosze usunac przy montazem, gdyż inaczej CD nie bedzie wciagana.
- Urzadzenie dostosowane jest do podlączenia do ujemnégo bieguna akumuladora, ktitley musi być podlączony do karoserii pojazdu. Prosimy o sprawdzenia tego przy instalacja.
- Jezeli podczas przy w trybie radia lub CD zestanie zdjęty panel przydni, nastapi automatyczne wyłączenia urzadzenia.
- Wadliwe dziatanie. Po zafozeniu z powrotem przydniego panelu obstugi w wyswietlaczu ciektokrystaliczynm pojawia sie meldunek o będzie (ERROR). Przy pomocy drucika lub podobnego przydmiotu prosze wciąć przyczisk RESET, by elektroniki sprowadzic do stanu wyjsciwoego (ZRESETOWAC). Ten przyczisk znajdź Państwo po zdęciu panelu sterowania z sprawej strony obok wyswietlacza.
- Ježeli wnétrze pojazdu jest很开心AGRZANE, np. na skutek džuSzego parkovawia w moćno naslonecznonym mięscu, to nie nały wówczas wącza odtwarczac CD, do momentu ochodzenia są wnétrzwa w trackie jazyd.
- W celu bezpiecznego przechowywnia panela przydniego, naleź stosowej przyeznaczone do tego celu etui.
Obstuga
PL
1 Przycisk REL
Prosze wcisnac przycisk REL w celu wyjcia przydniego panelu sterowania.
2 Przyciski +/-
Podczas normalego trybu odtwarzania przyciski te słuź do ustawiania gólnosci.
W połaczenia i wciński temwcieśćj przyciskiem SEL można dokonywaćzmian w menu, np. w FADER czy w BALANCE.
3 Przycisk SEL (wybor):
a) Aby otworzyc menu charakterystyki dzwieku, nalezy krótko nacinacja przymisc KEL. Kiedy na wyswietlaczu LCD pojawie sie „VOL" możemy ustawic głosność. Ponowne naciȩść przymiscu KSL pozwala nam na wybranie jegno z punktów menu, jak: VOLUME, BASS, TREBLE BALANCE i FADER. Ustawienie posczególnych punktów menu zmiezenia za pamocę przymiscu „+“ lub „-". Wskazowej: Jeźeli pod DSP wybrane zostymiustawiania korektora czestotłowosci, takie jak np.: POP, ROCK, to nie myznja ustawic BASS i TREBLE.
b) Poprzej naciść i przytrzymanie przycisku SEL owieramy menu wyboru DSP OFF, BEEP ON/OFF, SEEK1/2, VOL LAST/ADJ. Na wyświetlaczu pojawia sie „DSP OFF". Po ponownym naciśćci przymiscu SEL możemy wybiać poszcęgólne punktymi menu. Zmień w zakresie poszcęgólnych punktów menu wpoprawazamy za pomoczą przycisku „+“ lub „-”.
DSP
W DSP moga, Paanstwo wybrać ustawenia korektora czestotiwość: POP M; ROCK M; CLASS M i FLAT M. Prosze wybrać DSP OFF, by dokonać wlasnych ustawien. Patrz równeź Pkt. 3a.
- BEEP ON/OFF doit potwierdenia.
Ton potwierdzajacy przy wciȩśću klawiszma wybrać w dwóch rodzajach:
BEEP ON: dzwiek potwierdzenia pojawia sie przy kaźdym naciśću przycisku.
BEEP OFF: dzwiek potwierdzenia jest wyłaczony.
SEEK 1, SEEK 2 (do wyboru tylko w trybie „radio")
Funkcja szukania przyciskami 1 / w trybie „radio".
SEEK1: Prosze trzyma wcińskiowy przycisk I▶/▶I a radio zatrzyma sie na najbliszsej odbieranej staci.
SEEK2: Póki trzymaja Państwo wcińskije przyciski 1/▶, odbywa sie dalsze szukanie staci w danym paśmie czestot-liwość.
PL
VOL LAST/VOL ADJ
VOL LAST: Radio węcza są z ostatnio ustawiona faktczną gośnosćia.
VOL ADJ: Przy pomocy klawisz n^+^n i -^n ustawiaja Państwo gól矯nosc niedziemnią przy wączaniu.
4 Przycisk POWER
Do węączania/wyȩczania odiornika.
5 Wyswietlacz LCD (wyswietlacz ciekłokrystaliczny)
6 Przyciski BAND
Prosze wicsnac krtoko przycisk BAND, by prerzactyc na inny (jeden spostród trzech) poizom FM (UKF). Oznaczenia opdowiedninger goziomi F1, F2, F3 ukazuje sie w wyświetlaczu ciektkocrystaliznym.
7/8 Przyciski I/TUNE, SEEK, TRACK, SKIP UP/DOWN
a) W trybie „radio":
ProszewcisnackrtooprzyciskI< lub I,byustawicrecznie pozadana,stacione radiowa.
Prosze trzymać wcińskią przycisk I▲ lub▶, by Rozpoczamy szukanie staci radiowych.
Patrz tez fungoja SEEK1/SEEK2.
b) W trybie CD: W celu przeskoczenia do przodu lub do tytu nalezy nacinac przyczisk I lub W celu przewijania utworow nalezy nacinac i przytrzymaftyprzyczisk ze strzaftka I lub
9 Przycisk Modus (tryb)
Nacisnac w celu dokonania wyboru pracy w trybie radia lub CD.
10 Przycisk MUTE
Prosę wicznę przycisk MUTE, by wyciszć na krótko gośniki. Prosȩ ponownie wicznę ten przycisk, by powyźsa funkȩ z powrotem skasowej.
11 Przycisk AP (automatyczne zapamietywanie staci)
W trybie radia:
a) Funkcja pamięci:
aby aktywować automatyczny tryb zapamietywnia staci, naleź y nasinac i przytrzymać przycisc AP przydz użej nit jeder sekunde.. Odbiornik - w ramach aktualné pasma czestotliwość np. FM 1 -wyszka stace o najwyźsym poziomie sygnatu. Szesć staci o najsilniejszym sygnale zostanie zapamietyanych w kolejność rosnących czestotliwość i zostanā im przypisane kolejne numery.'
Teraz każda zapisana do pamięci stacja wącza sie na ok. 3 sekund, a nastepnie wybrana zostaje staća utrwalona na pierwzej poźycji wAMIJIeJeli chca Państwo szukać dalszych staci w zakresie FM, to prosze wcisnólcz przycisk BAND, by przyeść do FM2 lub FM3. Prosze ponownie wcisnólcz przycisk AP na dŁuzej nied sekunde, by Rozpoczć dalsze szukanie.
b) Funkcja krótkiego węczania staci:
Po krótkim wciśnocy przycisku AP radio wącza na krótko wzystkie ustawione stacjeactualnégo pasma czestotliwość.
Wskazówka: Funkcja krótkiego wączania staci konczy są automatyczne zchwilą dojscia do pozycji wAMIci, z ktorej została wystartowana.
Przycisk AP jakofunkcja wyszukiwania wtrybie MP3
Jesli przy zestawianiu płyty CD w formacie MP3 zostaly wpisane oppowiednie dane, toMZna je odszukac droga,natestpujczyh funkci:
a) bezpośrednie wpwadzenie numeru utworu na póltyach CD w formacie MP3:
- Prosze wcisnć jeder raz przycisk AP. W wyświetlaczu pojawia są „TRK SCH".
- Prosze wcisnac krótko przycisk SEL. W wyswietlaczu pojawia sie „TRK SCH 001". Pozycja jedynek miga.
- Przy pomocy przycisków +/- mAja teraz Państwo moziwość podania numeru tytuło od 0 do 9 w pozycji jedynek.
- Prosę ponownie wciść na krótko przycisk SEL. Pozycja dziesiatek miga. Dalej prosȩ postępowć zgodnia z opisem w pkt. 3.
- Prosę pönownie wcisć na krótko przycisk SEL, by ewentualnie dokonać wpisu w pozycji setek.
- Wpisywanie numeru tytu pro prose zakończyć przyez dźuzszechwcsiśćcie (1 sek.) przyczysku SEL. Bezposrednio po tym zestanieodtworzony utwor o wybranyl someone.
b) Funkcja wyszukiwania pliku na płytach CD w formacie MP3:
- Proszé wcisnám dwa razy przycisk AP. W wyświetlaczu pojawia są "FILE SCH".
- Prosze wciśnac krótko przycisk SEL, by w wyświetlaczu pokazaź sie pierwszy wybrany katalog.
- Przy pomocy przycisków +/-major teraz Państwo moziwość wybrania roźnych katalogów na płycie CD.
- Prosze wcisnac d'huzej (1 sek.) przyczisk SEL. Wybrany katalog odtwartany jest od pierwsej piosenki. Prosze wcisnac krótko przyczisk SEL i przy pomocy przyczisków +/-moga Pański wybrać jaksi tytu⁺ w katalogu.
- Prozę zakończyc wipsywanie przyźchu sze wciȩcie (1 sek.) przyczysku SEL. Bezpośrednio po tym zestanie odtrworzy utwor o wybrany numerze.
c) Funkcja szukania wg hasla, dotczy p'ty CD w formacie MP3:
- Prozwo wiscnac trzy razy przycisk AP. W wyswietlaczu pojawia sie "CHAR SCH".
- Prosę wcisnąć krótko przycisk SEL. W wyświetlaczu z lewej strony pojawia sie „A".
- Wciskajc wielokrotnie przyciski +/- moga teraz Paanstwo wpisac w pierszzej pozycji wyswietlacza litere od A do Z lub cyfre od 0 do 9.
PL
Wskazówka: Wpisywanie nastepnych cyfr i liter odbywa sie od strony lewej do sprawej.
- Prozę wcznsć krótko przycisk SEL. W drugiej pozycji wyswietlacza pojawia sie „A". Wpisujuc cyfry i litery prosze postegowac zgodnia z opistem w pkt. 3.
- Prosze powtarac czyność w pkt. 2 i 3 tak dl胶囊, aż wispacja. Państwo poszukiwane pojjecie wiedzak国家战略.
Wskazówka: Ostatni wpis prosze kasowej przy czȩsiść klawiszata AP.
- Prosze zakończyc wispyawanie przyduszne wcijsniecie (1 sek.) przycisku SEL. Bezposrechnio po tym zestanie odtworzony utwor o wybranym numerze.
Wskazówka: Otdwarzania pht CD, nagranych przy pomocy dowolnego oprogramwomania, nie maya zagwarantowa ze wględu na duza. licze istniejacych programów imediow CD.
W normalnym trybie odtrwarziania pfyt CD w formacie MP3 przyna za pomocą przyczysków I▲ lub▶przeskoczyc o jedem utwor w gořl lub w do. Za pomocą przyczysków staci 5 lub 6 przyda zadorzowo przyszyskoczyc o 10 tytuław w gořl lub w do!.
12-17Przyciski (1-6) zapisanych staci oraz jako przyzyciski 1TOP, 2INT, 3RPT, 4RDM w trybie CD.
a) Tryb radia
Krotkie nacișnięcie tych przycisków spowoduje bezpoșredni wyborwczejnej zapiansej staci radiowej. Jeźeli dany przycisk zostanie przytrzymany d使用寿命 sekunde, to wówczas do danego przycisku zostanie przypizsana aktualse uzastawonia stacja.
b) Tryb CD/MP3
- W celu przerwania odtwarzania CD nacinsqr zprcysk 1TOP (pauza). Ponowne naciniepiegeto prercysku wznow odtwarzanie pty.
- Nacisnac przycisk 2INT. Kazdy tytuł bedzie odtrwarzy przyze 10 sekund. Ponowne naciśmie przyciscy oznaca przyerwanie procesu wyszukiwania i odworzony zostanieactualnie wybrany utwor.
- Nacisnac przycisk 3RPT. Aktualnie odtdwarzany utwor zostanie powtorzony. Ponowne naciśćtego przycisku spowoduje uniewaźniazenia tej funkci.
- Nacisnaj przycisk 4RDM. Utwory besteht odtrwarzane w przypadikowej kolejnosci. Ponowne naciśćtie unto przycisku spowoduje unieważnienie tej funkcjci.
18 Przycisk ST
Przelacznie STEREO/MONO (do wyboru tylko w trybie,radio")
19 Przycisk CLK
-
Wskazanie czasu: Proszewcisnac krtok przycisk CLK, by wyswietlic czas.
-
Ustawianie czasu: Prozę wcisnac dwa razy przyczisk CLK i przytrzymać go za drugim razem wcińskipty, az wskazanie w wyswietlaczu zacznie migac.
Prosze wcisnac przycisk + , by ustawic godziny. Prosze wcisnac przycisk --, by ustawic minuty.
PL
21 Otwör na pty CD
22 Przycisk wysuwania (EJECT)
Aby wysunac ptye CD nalezy nacisnac ten przycisk.
23 Migajca dioda LED (bez ilustraciji)
Dioda ta miga przy zdejmowaniu panela przydniego.
24 Przycisk RESET (bez ilustraciji)
W celu przywrocenia zakfoconego programu nalezy nacisnac ten przycisk.
Dane techniczne
Ogólne
napiecezasilania
DC 13.8 V
pobór pradu
7 A max.
moc
4×35WPMPO
Zakres FM
zakres czestotliwość
87,6 MHz do 108,0 MHz
czuftyć uzywalna
3 uV
czechotliwość posrednia
10,7 MHz
Moc na wyjsciu
wyjscie
W przypadku CD maks. 1200mV
Odtwaracz CD
system
odtwarzac CD
czytane formaty
pfty CD/CDR/CDRW/MP3
ilosc bitow kwantowania 1 bit.
format sygnatu
44,1 KHz
20 - 100Hz≤ 5 dB
10K - 20KHz≤ 5 dB
stosunek sygnafu do szumow
50 dB (1 KHz)
ilosc kanałow
2 kana'ty stereo
wymiaru obudowy
178 szer. x 50 wys. x 165 gteb.
PL
Usuwanie usterek
Przed skorzystaniem z listy kontrlnej sąȩzy najpiern sprawdzić,czy urzadzenia jest wąsckiwo podłęczone. Jeźeli po sprawdzeniu calęj listy kontrlnej usterka nie zostanie w peński usunieta, sąȩzy skonsultowa sąź najblźyszym punktem serwisowym.
| Oznaki usterki | Powód | Sposob usuniecia usterki |
| Brak odztwarzania po wędzeniu do odztwarzacza płyty CD lub kasety. | Za mały poziom gołosnosci ustawionej na regulatorze. Nieprawidławowo wykona- ne przyłącza. Sprawdzic podȩczenie. | Zwięszyść poziom gołosnosci. Sprawdzic przyłącze +12V i masę. |
| Dźwią odztwarzacza CD przesekakuje. | Powierzchnia drogi jest nierówna. Urzadzenia nie jest zamontowane na state. | Welu odztworzenia CD zaczekość aż droga stanie są bardziej równa. Zabadowej urzadzenia na state. Upewnić są, ze w przy padku, gdy pojadź nie oferuju odpowiedniego podparcia dla tylnej;czenia urzadzenia, zastosowano tylne mocowa-Nie. Sprawdzic inną płyte CD. Jeźeli;będzie ona;dzie sączne prawnówto, to byćMZe poprzednia CD jest uz-kodzona. Wycyscić CD. |
| Uszkodzona płyta CD. Brudna płyta CD. Wączyń zapłon. Spalony bezpiecznik. | Uzysdzone prętka CD. Jeźeli;będzie ona;dzie sączne prawnówto, to byćMZe poprzednia CD jest uz-kodzona. Wycyscić CD. Obrócić kluczymi zapłonu w Pozycje „ON” lub „ACC". Wymienić bezpiecznik na inny bezpiecznik 7A. | |
| Brak zasilania. | Na skutek szumów elektrycznych zostaw zaata-kowyany mikrokomputer. | Wyȩć i ponownie wȩzyć CD lub kasetę. Wyȩczyć i ponownie wȩczyć odiornik. |
| Urzadzenia nie dwiała prawnówto (EJECT, LOAD, PLAY). | ||
| Oznaki usterki | Powód | Sposob usunięcia usterki |
| Brak odbioru radiowego. | Niepodȩczony kabel antenowy. | Mocno wetakné kabel antenowy w zącze ante-nowe na urzemdeniu. |
| W trybie wyszukiwania automatycznych radio-odbiornik nie zatrzymuju sie przyźadnej staci. | Nadawane sygnaty są zbyt szabe. | Wybrać stȩje w trybie ręcznym. |
| Płyty kompaktowe wymi-gane są do otworu na CD tylko do połowy. | srbuy zabezmieczące w transporcie nie zostaść usunięte. | Prosze usunuć szuby zabezmieczące w transporcie. |
PL
Odtwarzanie CD

Czyszczenie CD
Przed odtworzeniem, płyte CD nalezy przytrzejczysta, niedakurzonca chusteczka do czyszczenia.
Uwaga: nie stosowac zadnych ropszczalników jak benzyny lub subsistence roczenciacja. Powszechnie dostepne sądki czyszczace lub spraye antystatyczne powodujus uszkodzenia urzędzenia.
Wtozenie pty CD zadrukowan stron do dofu moze spowodowac uszkodzenie urzadzenia.
CD nalezy zawsze wiktadać etykieta zwrocona do góry.
Uwaga: jezeli w kieszeni CD znajduce sie juz phtya, nie naley usiowac wklaadac tam kolenej phty, poniewaz要去 spowodawc uszkodzenia urzadzenia. Phty CD naley zawsze chwtyza krawedzie.aby zapewnic czystość phty, nie naley dotykaiej powierzchni.
PL
Nie naklejac na phtach CD zadnych naklejek, ani taśm kleączych.
Nie wystawiać pły t CD na bezpośrednie dziatanie promiensi s-tonecznych lub zródeł ciepta jak rury grzewcze oraz nie pozostawiać ich w samochodzie, jeźeli pojadź jest parkowy w sącie snstonecznionym, ponieważ powoduje to znaczny wzrost temperatury.
Ninieje}sze urzadzenie odpowa di wymaganiom normy bezpieczehstwa uzytkowania oraz spełnia wymagania dyrektywy niskonapięciowej i kompatybilnosci elektramagnetycznej.
Zastrzega sie prawo dozmian technicznych!
WARUNKI GWARANCJI
Przyznajemy 24 mieszpie gwarancji na produkt liczac oddating zakupu.
W tym okresie bedziemy bezpłatnie uswuć w terminie 14 dni oddating dostarczenia wadliwoego sprętuz karta gwarancyjna do mięska zakupu wszystkie uzzkodzenia powstaż w tym urzadzeniu na skutek wady materiały lub wadliwogo wykonania, naprawiazć oraz wymiennaić wadliwo sąsci lub (jesli uzamy za stosowne) wymiennaić sączne na nowe.
Sprzet do naprawy powinien byc dostarczony w komplecie wraz z dowodem zakupu oraz z zażna karta gwarancjna do sprezedawyw miaręMZIwiwość w oryginalnym opakowani lub innm odpowiednim dla zabepeziczenia przydzukodziezniem. W riazie braku kompletnego opakowania fabrzczego, ryzyko uszkodzenia sprzȩtu podczas transporte do i zjejca zakupu ponsi reklamujucy.
Naprawa gwarancjna nie dotycz czynosci przywiedzianych w instrukcji obslugi, do wykonania ktorych zobowych jest uzytkownik we wąsnych zakresie i na wąsny koszt.
Gwarancja nie obejmujee:
- mechanicznych, termicznych, chemicznych uszkodzen sprzętu i wywołyanych nimi wad,
- uszkodzen powstałych w wyniku dziatania sǐt zewétrznych takich jak wyładowania atmosferyczne,zmiana napiecia zasilania i innych zdarzen losowych,
- nieprawidówego ustawenia wartosci napiecia elektrycznégo, zasilanie z niedopowieciegniazda zasilania,
- sznurów połęczeniowych, sieciowych, zarowek, baterii, akumulatorów,
usztkodzen wyrobu powstańch wDyniku niewaosciwego lub niedzgodnego z instrukcja为其 uzytkowania, przechowywania, konserwaczji, samowolnego zrywnia plomb oraz wszelkich prebróbek izmian konstrukcyjnych dokonanych przyez uzytkownika lub osoby niedzogno
roszczén z tytułu paramétrów technicznych wyrobu, o ile są one zgodne z podanymi przyez produkta,
- prawidówego zuźycia i uszkodzeń, króre są nieistotny wptyw na wartosć lub dziatanie tego urzadzenia.
Karta gwarancyjna bez pieczatki sklepu, daty sprezazy, nie wypeftniona, zle wypeftniona, ze sladami popraweik, nicczytelna wskutek zniszczenia, bez moziwo ci utalenia要比jsca sprezazy oraz dozaczonego dowodu zakupu jest niewazna. Korzystanie z usfug gwarancyjnych nie jest moziwe po upywie datedy waznosci gwarancji. Gwarancja na czeci lub cate urzadzionie, ktore sa wymieniane kończy sie, wraz z koncem gwarancjna to urzadzionie.
Wszystkieinne roszczenia, wiccajacw to odszkodowania sa wykluczone chyba, ze prawo przewiduje inaczej Rosczcenia wykraczajce poza ta umowe nie sq uwzglcdniane przy t gwarancje.
Gwarancja na sprzedany towar konsumpyjny nie wyłacza, nie ogranicza ani nie zawiesza uprawnien kupujacego wynikajacych zNiegodnosci towaru z umowa.
Gwarancja oraz zawarte w nied warunki obowiazuja na terenie Rzekzpospolitej Polskiej.
H
ÁltalánosBiztonsárgirendszbályok
A tuzkeletkezegy avaruties kockazatanak eklerulse vegt ne tegey ki a keszulket esonek yagv nedvesssegnek! Ne mukodtese a keszulket viz kozvetlen kozeluben (pl. furdosobabuan, uzomedence mellett, nedves pincbeb).
Csak arra a celra hasznalja a keszüléket, mire keszült!
MindigCsak elorasszeruen szerelt konnektorba csatlakoztassa készuléket! Ügyeljen rá, hogy a megadott feszültseg egyezzen a halózati feszültseggel!
Külsö aramforras hasznalata eseten ügyeljen a megfelelo polaritársra és fesztültsegre, az elementek mindig jo irányban helyezze be!
Ugy allitsa fel a keszuléket, hogy ne záródkanak el a meglévo szellozonyilások!
Soha ne nyissa ki a készülék burkolatāt! A szakszerülten javitásk jelentós veszely forrásai lehetnek a hasznalók szamára. Ha a készülék, kūlónösen a halózati cstlatakozó kabel megserült, a készüléket nem szabad üzembe helyezni, hanem ellobb szakemberrel meg kell javittnati. Rendszeresen ellenorizendó, hogy a halózati cstlatakozó kabelen nincs-e sérüles.
Veszelyhelyzetek eklerulése végett a hibás csatlakoź kábelt szak a gyartóval, a mi vevszolgálatunkkal vagy haslon szakképetzétsgu más személlyr szabad potoltatni azonos értékú kabell.
Ha hosszabb idón at nem használá y készüléket, húzza ki a csatlakozó dugaszta a konnektorból, ill. vegye ki belöle az elementek!
Adott esetben a készüléken az alábbi szimbólumokat lathatja, amelyek a következőkre hívák fel az Öl figyelmét:

A villam-szimbolum olyan alkatreszekre figyelmeztet a keszülk belsejuben, amelyek vszélyesen nagy feszültseget verzetnek.

A felkialtojellellatott szimbolum kiseropapirokan talalhatofontos kezelsisi vagy karbantartasi utmutatasokra hivja fel a hasznalof figyelmét.

Az ezzel a szimbólmmal jelzett keszülkek „ 1. osztályu lézerrel" mūkódev tapogatják le a CD-t. A beepitetBiztonsági kapsolók megakadályozzák, hagy a használó emberi szemmel nem lathó, veszelyes lézersugárzs hatásanak legyen kitéve, amikor a CD-rekesz fel van nyitva.
Ezeket aBiztonsagi kapisolókat semmi esetre sem szabad „megpatkolni" vagy mas módon manipulánlni, kulönben On lézersugárhatás veszélýenek teheti ki magát.
Installació
Szerelje össze a radiokészüléket a kovetkező abráknak megfeleloen!

a anya
b rugos alatet
c csavaralatét
d csavar
e szerelési szögvas
f betolható doboz
g menetes csapszeg

Figyelem!
h szallitasiBiztosito csavarok (az osszeszerelés elott eltavoliftand6)
i kihuzo eszkoz (a leszereléshez)
j vakkeret

Az elolapot a jobb oldalon kezdejfelhelyezni, azt ankattintsa be a bal oldalon!

Csatlakoztatás
A keszüléket az ábra szerint csatlakoztassa!
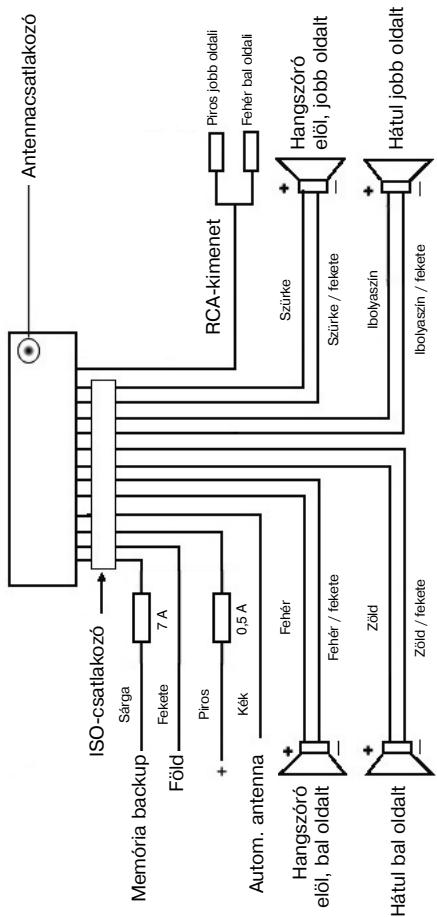
Figyelem
- A levehető elolapotCsak a kábelek csatlakoztatasa után helyezze fel!
- 4 ohm impedanciájú hangszóró t használjon!
Fontos kiegészítő informáciok az autórádio beszereléséhez!
- A keszülék beszerelésekor / csatlakoztatašakor vegye figyelembe, hogy az autójaban van eredeti ISO cstlakozó, mely a keszülékkimeneten talalhato dugaszhoz (ISO cstlakozó) ilik.
A "DAUER ^+ (Backup) kialakitasa jarmutipusonkest entero lehet. Ilyen esetben forduljon engedelyel rendelkezo autoszerelohoz, mert a radoi allandofyamatosaramellatasa kulonben nincsbiztositva.Ami a radoialomasok menteshez elengchedeteten.
2. Autotipustól fuggöen kiveteles esetakben a rádio/CD mukodésé kobenzavaró hangok lephetnek fel. Ezeket egy kiegésizó zavarszürövel meg lehet szüntetni. Az AR 638 CD keszülkben mar gyarilag talhalto zavarszuro, ennek ellénéj rámütól fuggöen adódnatkat narovak. Zavarszürôt aoalkatrész-szakületben és/vagy autószerelöjénl vasárolhat. Múszaki kerdesekel kérjuk, forduljon a forró drótos ügfélszolgálatunkhoz!
Ovintézkédèsek és karbantartás
- A szällitási biztosító csavarokat (h) a beszerelés elött távolitsa el, különben a CD-t nem tutja behúzni a keszülék.
- A keszülek az akkumulator negativ polusahoz van méretéze, amelynek a jarmu karossériájohoz kel csatlakoztatva lennie. Beszerelés elott ellenorizze, hógy igy van-e!
- Ha a leveheto elolapot a radio vagy a CD mukodese kozben leveszi, a keszülk automatikusan kikapcsolódk.
- Mūkōdési hiba. A levehetō elolap vissahelyezese után az LCD kijelzón hibauzenet (ERROR) jelenik meg. A keszülék elektronikájanak helyreallitása érdekében nyomja meg RESET gombot (pl. egy dróttal). Ezt a gombat a levehetō elolap alatt jobbra a kijelzō meltt talájia.
- Ha a jarmu belseje nagyon forro, pl. ha sakkaig parkolt a tuzo napon, ne kapsolja be a keszuléket addig, amig a jarmu beseje kis eltevel valamelyest le nem hult.
- A levehetō elolapBiztonsagos tárolasa érdekében mindig használja az arraszánt védótokot.

H
Hasznalat
1 REL gomb
A levehetō elolap levételéhez nyomja meg a REL gombot.
2 +/ - gombok
Normal üsemmodban ezekkel a gombokkal a hangerot lehet beallitani. Ha elzetesen lenyomta a SEL gombat, valtoztathat a menukben, pl. a FADER vagy BALANCE beallitasoknál.
3 SEL gomb (kivaliasztás)
a) A hangbeällitask kivaslaszto menüjenek eleresehez nyomja le röviden a SEL gombot. A kijelzon „VOL" lathato, beallithatja a hangeró. Ha ismét megnyomja a SEL gombot, valsazthat az egyes menüpontok, mint pl.
VOLUME, BASS, TREBLE, BALANCE és FADER bözött. Az egyes menüpontok beallitásait a „vagy „-“ gombbal valtoztathatja.
Figyelem: ha a DSP kiegyenlito beallitasok (pl. POP, ROCK) valamelyike aktivalva van, a BASS és a TREBLE MODot nem lehet beallitani.
b) A DSP OFF, BEEP ON/OFF, SEEK 1/2, VOL LAST/ADJ kivalaszto menuü eleréséhz nyomja meg a SEL gombat.
A kijelzón „DSP OFF“ jelenik meg.
A SEL gomb ismetelt lenyomásával vázaszthat az egyes menüpontok kozú. Az egyes menüpontek beallitásait a „vagy „ gombbal valtoztathatja.
DSP
A DSP-ben vałaszthata POP M; ROCK M, CLASS M és FLAT M kiegyenlito beällatasok koszött. Egyeni beällatasokhoz valassa a DSP OFF-ot! Ld. meg a 3.a pontot.
- BEEP ON/OFF visszaigazoló hang
A gombok lenyomásakor hallhato sipoló hangot kétféleképpen lehet beallitl.
BEEP ON: A sipoló hang minded gomb lenyomásakor hallható.
BEEP OFF: A sipoló hang ki van kapcsolva.
SEEK 1, SEEK 2 (csak rádiohasználatkor választhato)
Kereso funkcio az I / gombokkal radohasznalatkor.
SEEK 1: Tartsa lenyomva az I▶/▶gombokat, és a rádio a következő befogható rádioallomásnal megál.
SEEK 2: Amig az I 丨 丨 丨 丨 丨 gombokat lenyomva tartja, a frekven-ciasávban folytatódik a keresés.
VOL LAST/VOL ADJ
VOL LAST: a rádio a legutóbb beallitott hangeróvel kapcsolódk be.
VOL ADJ: a + és - gombbal állandó bekapcsolási hangerőt allithat be.
4 POWER gomb
A keszülék be- ill. kikapcsolásához ezta gombot nyomja le.
5 LCD (folyadékkristályos) kijelző
6 BAND gomb
A harom FM- (URH) sav koztiti valtashoz nyomja meg rovden a BAND gombat. Az LCD kijelzon az adott sav megnevezese FI, F2, F3 latho.
7/8 I▲/▶I gombok TUNE, SEEK, TRACK, SKIP UP/DOWN
a) Rádio üzemmodban: a kivist rádioallomás manuális beallitásához nyomja meg roviden az l▲ vagy az >gombat.
Rádioálomás-kereséshez tartsa a lenyomva az l«vagy az gombot.
Ld. meg a SEEK 1/SEEK2funkciot.
b) CD üzemmodban: elore-, ill. visszaugrashoz roviden nyomja meg az!
ill. az gombot. Zeneszámok átugrásához tartsa lenyomva az illl. az gombot.
9 MODUS gomb
A CD-lejátszó, ill. a rádio üzemmod választásához nyomja meg a gombot.
10 MUTE gomb
A hangszóróléméritáshoz nyomja meg a MUTE gombot. A funkció feloldásához ismét nyomja meg a gombot.
11 AP gomb (automatikus allyomásmentés)
Rádio üzemódban:
a) Mentés funkcio:
Az automatikus allomásmentés aktivaláhsazoh 1 masodperçnél hosszabb ideig nyomja le az AP gombot! Az aktualiis frekvenciasávban (pl. FM1) a készülek a keresési cíklus vegéig a legerösebb jelszinteket keresi. A hat legerösebb allomst hazzärendeli a megfelelo memoriahelyhez. Az igy elmentert allomásokat a készülek kb. 3 masodpercig bejátssza, és eztan beallitja az also memoriahely allomásat.
Ha további allomásokat szeretne keresni az FM savban, az FM2, ill. FM3 savba történő valtáshoz nyomja meg a BAND gombot!
A további keresés elinditásához az AP gombot ismét nyomja le 1 masod-percnél hosszabb ideig!
b) Bejatszás funkció:
Az AP gomb rovid megnyomása után a radió a frekvenciasáv összes elore beallitott allomását bejatssza.
Figyelem: a bejatszás funkció automatikusan annál az állomásnál áll meg, amelyikné elindította.

H
AP gomb mint kereső funkció MP3 lejátszásakor
Ha MP3 formatumu CD rogzitesekor elmentett megfelelo adatokat, a kovetkezofunkciok segitsegével tudja megkeresni oket:
a) A zeneszámok számának kóvetlen megadása MP3 formátumú CD esétén:
- Nyomja meg egyszer az AP gombat. A kijelzón „TRK SCH“ jelenik meg.
- Nyomja meg roviden a SEL gombot. A kijelzón „TRK SCH 001“ jelenik meg. Az egyesek helye villog.
- A + / - gombokkal az egyesek helyén most 0-9 kozott meg tudja adni egy zeneszám számát.
- Ismét nyomja meg roviden a SEL gombot! A tizesek helye villog. A 3. pontban leirtak szerint járjon el!
- Ha esetleg a százasok helyén akar megadni egy számot, nyomja meg ismét röviden a SEL gombot!
- A zeneszám szamánek megadását a SEL gomb hosszabb lenyomásal (1 másodperc) tudyba befejezní. Kozvetlen üztan a kivalasztott zeneszámot lejátssza a készülék.
b) Fajlkereső fungció MP3 formátumú CD esétén
- Nyomja meg kétser az AP gombot. A kijelzön „FILE SCH" olvasható.
- Az elso kivasztott album kijelzón történő megjelenitéshez nyomja meg röviden a SEL gombat!
- A + / - gombokkal valaszhat a CD-n talalhato kulonboz o albumok kozul.
- Nyomja le a SEL gombot egy masodpercnél hosszabb ideig! A kivalasztott albumot az elso szamtol kezdve lejáttsa a keszülék. Nyomja meg rovienden a SEL gombot, és a + / - gombbal kivalaszthata z albumból egy notát.
- A SEL gomb hosszabb (1 másodperc) lenyomával fejeze be a kivalaszstáft. Kővetlenül ezután a kivalasztott zeneszmôt lejátssza a készülek.
c) Címszó szerinti keresés MP3 formátumú CD esétén:
- Nyomja meg háromszor az AP gombat. A kijelzón „CHAR SCH“ jelenik meg.
- Nyomja meg roviden a SEL gombat! A kijelzö bal oldalán „A“ lathato.
- A + / - gombok ismetelt megnyomásával a kijelzó elso helyén megadhat egy betút (A-Z) vagy egy számot (0-9).
Figyelem: további számokat és betúket balrój jobbra haladva lehet megadni.
- Nyomja meg róviden a SEL gombot. A kijelzó második helyén „A" lát-ható. A szamok és betük bevitelekor a 3. pontban leirtástón járjon el!
- A 2. és a 3. pontban leirt lépéseket addig ismetelje, amig meg nem adta a tobb karakterból allo címszó!
Figyelem: a legutolsó bejegyzést az AP gomb lenyomásával törölje!
- A bevitelt a SEL gomb hosszabb (1 másodperc) lenyomásaval fejezheti be. Kozvetlenül ezután a kivalasztott zeneszámot lejtatsza a készülék.
Figyelem: mivil szamtalan kulönboz szoftver és CD-iró LTEzik, nincs arra garancia, hogy a felhasznaló ALTAL ir CD-t a készülék lejátsza.
MP3 formatumú CD normal lejatszásakor az I es az EEF gombokkal lehet egy-egy számmal elore-, ill. visszaugrani. Az 5s 6 allomasgombokkal 10-10 számmal lehet elore-, ill. visszaugrani.

12:17 elmentett radioialomások allomásgombjai (1-6) és 1TOP, 2INT, 3RPT, 4RDM gombok CD-hasznalatkor
a) Rádiohasznalat
A 1-6 gombok rövid megnyomásával kózvetlenú kivalaszthata eyg már elmentett radioállomást. Ha egy masodperncél hosszabb ideig tartja lenyomva a gombat, akor az éppen beallitott allomást menti el a kivalasztott allomásgombhoz.
b) CD-hasznalat
- A CD-lejatszás megszakításhoz (szunetfunkció) nyomja meg a 1TOP gombat. A funkció feloldásához ismét nyomja meg ezta gombat.
- Ha megnyomja a 2INT gombat, a CD minded számából 10 masod-percnyit lejatszik a keszülék. A keresés megszakitáshoz istmét nyomja meg a gombat! A keszülék az eppen kivalasztottnotát jatsza je.
- Ha megnyomja a 3RPT gombot, a lejatszó megismétli az éppen jatszottnotat. A funkció feloldásához ismét nyomja meg a gombot!
Ha megnyomja a 4RDM gombot, a CD-n talalhato notakat veletlenszeru sorrenden jatssza le a keszulek. A funkcio feloldasahoz nyomja meg ismet a gombot!
18 ST gomb
STEREO/MONO valtas (csak a rado hasznalatakor valaszthato)
19 CLK gomb
- Az ora megjelenitèse: az ora megjelenitéséhez nyomja meg röviden a CLK gombot!
- Az idō beallītāsā: nyomja meg kétśer a CLK gombot, és masodszort tarta addig lenyomva, amig a kijelzon az ora vilgogni nem kezd. A + gombal allitlsa be az orát, a - gombbal a percert.
20 LOUD ON/LOUD OFF
Az elnémítías funkció be- és kikapcsolása.
Kis hangero eseten az LOUDNESS (LOUD) funkcio javitja a hangképet. A funkcio kiemeli a magas és a mely hangokat.
21 CD-nyilas

22 Kivető gomb (EJECT)
A CD kivetéséhez ezt a gombot nyomja meg!
23 VilgoLED felirat (abra nélkūl)
Ha leveszi a leveheto elolapot, ez a felirat villog.
24 RESET gomb (ábra nélkül)
Zavar eseten a program helyreállitáshoz nyomja meg a RESET gombat, amelyet a levehető elólap alatt jobbra a kijelző mellett talál.
Muszaki adatok
Általános
Hálozati feszültseg
DC 13,8 V
Fogyasztás
7A Max.
Teljesitmény
4x35WPMPO
FM-tartomány
Frekvenciartomány
87,6 MHz tol 108,0 MHz-ig
Hasznalható érzekenység
3 V
I.F. frekvencia
10,7 MHz
Kimenő teljesítény (választhato)
Kimenet
CD-nél max. 1200mV
CD-lejátszó
Rendszer
CD-lejátsz keszülk
Hasznalhato CD-k
CD/CDR/CDRW/MP3 Disks
Jelformátum
Erzekelheto bitszam: 1 bit
Frekvenciajellemzok
mintavételi frekvencia 44,1 KHz
Jel/zaj arany
20 - 100Hz≤slant 5dB
Csatornák száma
10 - 20KHz≤slant 5dB
A doboz ház méretei
50 dB (1KHz)
2 sztereó csatorna
szelesseg 178 x magassag 50 x
mélység 165
Hibaelhárítás

Mielott az Ellenőrő listat átolvasna, eloször fejezze be a keszülek csatlakoztatásat. Ha ez Ellenőrő lista attanlumyozása utan vannakMeg nyitott kerdései, forduljön az Onhölgkeöblebb taláhtóvevösztalgalathoz.
| Hibák | Ok | Megoldás |
| A behelyezés után a keszülékmem viszi a CD-t vagy a kazet-tát. | A hangerő-szabályozó túl hal-ka van beállíva.ACsatlakoztatáskom negfelelők. | Allitsa magasabbraa hangerőszabályzótt. Ellenőrìze a +12V- valamint afödelés csatlakozótt. |
| A CD-lejátszó hangja ugrál. | Durva az ú felülete.A keszülék nincs stabilan beépítve.Rossz a CD.Szennyezett a CD. | Várjon a CD lejátszásával, mig simàbbnem lesz az ú.Stabilan szerelje be a keszüléket.Ha a järmüben nincs alkalmas rögítő a keszülék hátso résé-zének a megartásához, használini kell a hatsó rögztöelemet.Probóljon ki egy másik CD-t!Ha ennek lejátszásával nincs probléma, valószinüleg az elso CD-vel van baj.Tiszüttsa meg a CD-t! |
| Nincs áram. | Nincs gyújtás.Abiztositék kiégett. | Forditsa az indítokulcsot „ON" vagy „ACC" pozicióba!Cseréljé ki aBiztositékot egy;másik 7 A-biztositékra! |
| A keszülék nem működkim megfelelően.(EJECT, LOAD,PLAY). | Elektromos zavarok miatt károsodott a mikrokomputer. | A CD-t vagy kazettát vegye ki,és tegye be üjra.A keszülékkapcsoljáki, majd kapcsoljbe ismét. |
| Nincs rádiovétel. | Az antenna kábele nincs csat-lakoztatva.A rádóllomás jelei túsgyengék. | Stabilan dugja be az antenna kábelét a keszülék antenna-bemenétébe!Állitson be manuálisan egy rádóadó! |
| Automaticus keresés mídbananá rádio ném ally meg eygétlen állomásnál sem. |
H
| Hibák | Ok | Megoldás |
| A CD-ketCsak félig húzza be a készülék a CD-nylíásba. | A szállításiziBiztosító csavaro-kat nem tívolította el. | Távolítsa el szállításizi biz-tosító csavarokat! |
CD lejatszasa

CD tiszítása
A lejatszás elott törölje meg a CD-t tiszta, pormentes kendövel. A CD-t a nyil irányában húzza vegig!
Figyelem: Ne hasznaljon semmilyen oldoszt, pl. benzint vagy higitoszt. Az altalanosan kapható tiszitószerek vagy antisztatikus spray-k kárositják a készüléket.

A keszüléket károsithatja, ha a CD-t a feliratos felevel lefelé helyezi a lejatszóba.
A CD-t mindig a feliratos felével felfelé tegye a lejatszóba!
Figyelem: Ha van már egy CD a CD-nylåsban, ne probáljon meg, meg eGYet behelyezi. Ez hibákat okozhat a készülékben.
A CD-t mindig a szélén fogja meg. Hogy a CD tiszta maradjon, ne fogja meg a felületét.

Ne ragasszon a CD-re matricát vagy ragasztószalagot!
Ne tegye ki a CD-t kozvetlen napfenynek es hohatasnak (pl. futocsovek), es ne hagyja a tuzo napon parkoló autoban, mert ilyenkor jelentosen felmelegszik az auto.
Ezt a keszüléket az Europa Tanács minded vonatkoža aktuális irányelve szerint (pl. elektrémagnesessagg-eliselö képesség vagy kifeszültşeg-eliselö képesség) ellőnőrtűk, és a legujabb biztonságtechnikai előirások szerint szüztl.
Megegyezzuk az esetleges mszaki valtozásokat!
Garancia

Garancialis igenyeivel forduljon, kérem, a szerzódéses kereskedjohéze!
A garancia igazolására a pénztár niyuγta szolgál. E nélkül az igazolás nélkül sem djimentes csere, sem djitalan javītas nem végezhető.
Garancialis esetben eredeti csomagolásában adja át az alapkészüléket a pénztáriBizonylattal együtt annak a kereskedonek, akitól a keszüléket vásárolta!
*) A tartozék hibái nem eredményezik automatikusan az egész készülék djtalan cserejét. Iyen esetekben forduljon, „orro vonalunkhoz!"! Az üvegrórból, ill. a muyag alkatrészek töréséból eredő hibák megszüntetése mindenkor terítesköteles.
Sem az elhasznalódtartozékokban, ill.kopó alkatreszekben (pl.szénkefe, dagasztohorog,hajtószij, pottávezérlo,pófogkefe,fureszlap sb.) bekövetkezhibák, sem a tiszitías, karbantartas vagy a kopo alkatreszek cseréje nem esik a garancia hatalya alá, kovetkezésköpp teritésköteles.
Illetéktelen beavatkozas a garancia megszūnését eredményezi.
A garancialis ido utan
A garancialis ido etelte utan a megfelelo szakkerskedesben vagy javitoszol-galatnál végétzethet teritěsköteles javítsokat.
Bitte führen Sie das ausgediente Gerä einer umweltgerechten Entsorgung zu.

C4TRONICINTERNATIONAL GMBH
D-47906 Kempen/Germany · Industriering Ost 40 Internet: http://www.clatronic.de · email: info@clatronic.de