Dorota 686 - Food processor Zelmer - Free user manual and instructions
Find the device manual for free Dorota 686 Zelmer in PDF.


| Type | Electric meat mincer / food processor |
| Model | Dorota 686 |
| Brand | Zelmer |
| Power Supply | 230 V AC, 50/60 Hz |
| Insulation Class | II (double insulation, no earthing required) |
| Maximum Continuous Operation | 10 minutes |
| Required Break | 30 minutes before next use |
| Noise Level (LWA) | 80 dB/A |
| CE Mark | Yes |
| Included Accessories | Mincing set (feed screw, cutter knife, 4mm & 8mm screens), sausage stuffer, separator, shredder with 4 drums (fine, coarse, slicing, pureeing), food tray, pusher |
| Mincing Set Components | Mincing chamber, feed screw with coupling, cutter knife, screen (4 mm), ring collar |
| Shredder Drums | Fine grating, coarse grating, slicing, pureeing |
| Safety Feature | Mechanical coupling that breaks under overload to protect motor |
| Material Construction | Plastic casing, metal mincing parts (aluminum? not specified) |
| Cleaning | Drive unit: damp cloth; plastic parts: warm water with dish soap; metal parts: hot water with dish soap, dry and oil to prevent rust |
| Dishwasher Safe | No (metal parts not dishwasher safe) |
| Repairability | Only by qualified service personnel; contact service center for defects |
| Warranty | Not specified in manual |
| Weight | Not specified |
| Dimensions | Not specified |
Frequently Asked Questions - Dorota 686 Zelmer
User questions about Dorota 686 Zelmer
0 question about this device. Answer the ones you know or ask your own.
Ask a new question about this device
Download the instructions for your Food processor in PDF format for free! Find your manual Dorota 686 - Zelmer and take your electronic device back in hand. On this page are published all the documents necessary for the use of your device. Dorota 686 by Zelmer.
USER MANUAL Dorota 686 Zelmer
| RBC. | MASC. | LIC. | PACIFICARIA | TOMATO | VIVATI | VOCOPERA | VOCOPERA | HOMA | HOMA | |
| MASC. | LIC. | VOCOPERA | VOCOPERA | VOCOPERA | VOCOPERA | VOCOPERA | HOMA | HOMA | ||
| TY. | 100% | TY. | 100% | TY. | TY. | TY. | TY. | TY. | ||
| TY. | 100% | TY. | 100% | TY. | TY. | TY. | TY. | TY. | ||
| TY. | 100% | TY. | 100% | TY. | TY. | TY. | TY. | TY. | ||
| TY. | 100% | TY. | 100% | TY. | TY. | TY. | TY. | |||
| TY. | 100% | TY. | 100% | TY. | TY. | TY. | TY. | |||
| TY. | 100% | TY. | 100% | TY. | TY. | TY. | TY. | |||
| TY. | 100% | TY. | 100% | TY. | TY. | TY. | TY. | |||
| TY. | 100% | TY. | TY. | TY. | TY. | |||||
| TY. | 100% | TY. | TY. | TY. | TY. | |||||
| TY. | 100% | TY. | TY. | TY. | TY. | |||||
| TY. | 100% | TY. | TY. | TY. | TY. | |||||
| TY. | 100% | TY. | TY. | TY. | TY. | |||||
| TY. | 100% | TY. | TY. | TY. | TY. | |||||
| TY. | 100% | TY. | TY. | TY. | TY. | |||||
| TY. | 100% | TY. | TY. | TTY. | TY. | |||||
| TY. | 100% | TY. | TY. | TY. | TY. | |||||
| TY. | 100% | TY. | TY. | TY. | TY. | |||||
| TY. | 100% | TY. | TY. | TY. | TY. | |||||
| TY. | 100% | TY. |
natural_image
Product assembly of industrial cutting machines and components (no visible text or labels)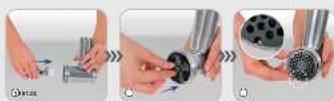

natural_image
Mechanical assembly diagram showing a motor, screwdriver, and housing components (no text or labels visible)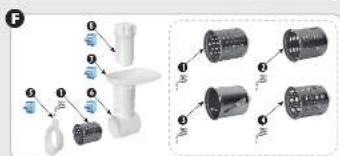
PL
Szanami Island!
Pruchy o wiatne pruchy zalo nijekj strukl obstak dazopalna snau na kdy stupol vizatlanom buzko cylase (wiatna tege pruchy zaozka, the Pabava c. in karyce sna u lada pachnaya t a vana.
The following table is in English:
prove
d/swobepodzij jcn to s/o p#u m#e##
The following words in the English
a.
The following table is in English:
(1) _i (2)
The following table provides the original text: "the first part of the text is a reference to the previous part of the text."
(www)*reepie.cirratac.edu.cn;
The following table is in English:
The following table is a simple formula:
mycet spat chagct od 2nd an a Pand conponcnis sorgell, w##s odl g###d
The following table is provided in the image.
2016年1月1日
Theorem 1.2.1 and Rule 1.3. (A)
The following table is in English:
[Unreadable due to severe distortion and noise]
5
Mies prostracce na telenia or felsce koi, boc
2、(5) 深圳市
[Unreadable Text]
to the same, it is a good
The following table is provided in the image.
pochodzava voda,
[Illegible Text]
In this case, the results of the
(2) 1904 年 10 月 1 日
[1]
2019.11
to 1,2
A. 2017
The following table is a simple formula:
The following table is provided in the image.
in the case of the
The following table is a simple formula:
n
The following table is provided in the image.
[Unreadable]
(4)2516(1)
Notes
TYPY MASZYNEK ZELMER
We kindly ask you to read the following user manual carefully. Pay special attention to the indications concerning the security. Keep the user manual, so that you will be able to use it also during the future use of the appliance.
The meat mincer is to be used within the household. It is a multifunctional appliance, which can be used for quick and effortless mincing of: meat, cheese, vegetables, poppy, as well as for manufacturing sausages and meat products. When an additional appliance of the meat mincer is used – that is the shredder, it is possible to slice vegetables into: salads, fresh vegetable salads and preserves.
Indications concerning safety and the proper use of the meat mincer
Do not pull the plug out from the network supply socket by pulling the cord.
The appliance can be connected only to the 230 V alternating current.
Do not actuate the meat mincer, if the power cord is damaged or the encapsulation is visibly damaged.
If the non-detachable part of the cord is damaged, it should be replaced by the producer or at a proper service point or by a qualified person in order to avoid any hazards.
The appliance can only be repaired by qualified service personnel. Improper servicing may cause a serious hazard to the user. In case of defects please contact a qualified service center.
When the work is finished, pull the power cord out from the network supply socket.
Do not expose the meat mincer or its equipment to the temperature over 60°C. By doing that you can damage the meat mincer.
- be extremely careful when operating the appliance in the presence of children.
This appliance is not intended for use by persons (including children) with reduced physical, sensory or mental capabilities, or lack of experience and knowledge, unless they have been given supervision or instruction concerning use of the appliance by a person responsible for their safety.
●children should be supervised to ensure that they do not play with the appliance.
Turn off the device and unplug it from an outlet before replacing the equipment or approaching moving parts during use.
Before cleaning the meat mincer always pull the power cord out from the network supply socket.
order to push use the pusher. Using other staffs may result in damaging the meat mincer and its drive.
Do not overload the appliance with excessive amount of the product, or by pushing the product too hard (with the use of the pusher).
assemble the mincing set accurately, as the improperly screwed mincing set can result in poor mincing quality, as well as it can cause blunting of the cutter knife and the screen. Blunt cutter knife and blunt screen should be replaced with a new one.
Turn the meat mincer off before any change of equipment or before bringing near any parts being in move during the operation.
When the meat mincer is operating, do not cover the ventilation holes in the casing.
When the machine does not start – contact the service point and leave the machine for servicing.
Separate the meat, which is to be minced, from bones, tendons, cartilages and veins.
Before mincing, cut bigger parts into smaller elements.
Do not mince dry poppy. Before mincing, the poppy needs to be washed with hot water and soaked in water – up to several hours (a dozen or so).
Never immerse the drive unit of the meat mincer in water. Never wash it under the running water.
Do not wash the equipment assembled within the drive unit.
Do not use aggressive detergents in the form of emulsion, milk, paste, etc. in order to wash the casing. Among others, they can remove the informative graphic symbols placed on the meat mincer, such as: scales, marks, warning signs, etc.
Use a soft brush in order to wash the metal parts.
Do not wash the metal parts in the dishwasher. Aggressive cleaning agents used in these appliances can cause darkening of the above-mentioned parts. Wash them manually, with the means of traditional dishwashing liquids.
Technical data
Technical parameters are given on the product's data plate.
Allowed time of continuous work of the meat mincer 10 minutes
Required break before following use of the meat mincer 30 minutes
Noise of the meat mincer (LWA):
Type 586 and 686 80 dB/A
Meat mincers type: 586 and 686 are built within the II insulation class, they do not require earthing ☐.
ZELMER meat mincers meet the requirements of the following applicable standards.
The meat mincer complies with the requirements of the following directives:
– Low voltage device (LVD) – 2006/95/EC.
– Electro-magnetic compatibility (EMC) – 2004/108/EC.
The product has been marked with the CE mark on the data plate.
TYPES OF ZELMER MEAT MINCERS
Below, you can see an assortment of equipment anticipated for the meat mincers, which the user manual refers to.
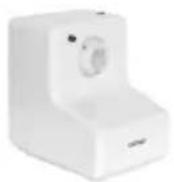
| Drive unit | Typ Cutter knife | Screen | Sausage stuffer | Pasta and pastry set | Shredder | |||
| 2,7 4 8 | ||||||||
 | 586.5 | ● ○ ● | ● ● ○ ○ | |||||
| 586.54 | ● ○ ● | ● ● ○ ● | ||||||
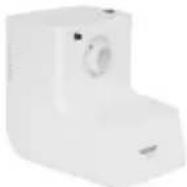 | 686.5 | ● ○ ● | ● ● ○ ○ | |||||
| 686.54 | ● ○ ● | ● ● ○ ● | ||||||
| 686.8 | ● ○ ● | ● ● | - | ○ | ||||
| 686.84 | ● ○ ● | ● ● | - | ● | ||||
| ● - basic accessories, ○ - additional equipment, which can be bought in shops, household appliances stores, - unavailable accessories | ||||||||
The mincer is equipped with one mincing unit.
Description (Fig. A)
The meat mincer consists of:
1 Drive unit – each drive of the machine is adjusted to the assembly of each of the mincing set and the shredder produced by ZELMER. There are some ventilation inlets in rear casing of the 586 and 686 drives.
Mincing set, which consists of:
2 Mincing chamber
3 Feed screw with assembled coupling
4 Cutter knife
5 Screen with 4mm holes
6 ring collar
7 Food tray
8 Pusher
Equipment, which includes:
9 Screen with 8 mm holes
10 Sausage stuffer
11 Separator
Mechanical safety device for the motor (Fig. B)
1 Scroll
2 Clutch
3 Screw M5x20
The meat mincer is equipped with mechanical protection, which secures the motor against any damage – teeth of the coupling break, when the meat mincer is overloaded (f. ex. when bones have entered into the mincing chamber).
The broken coupling should be replaced with a new one:
●nscrew the coupling from the feed screw,
Remove the broken coupling,
put on the new coupling and screw it.
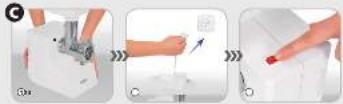
Preparing the meat mincer to work and the actuation of the appliance (Fig. C)
① Place the drive unit close to the power network socket, on a firm surface so as not to cover the ventilation holes within the casing.
Before the first use of the meat mincer, wash the equipment elements.
assemble the appropriate equipment and join it with the drive unit.
② Put the power cord into the supply network socket.
③ Turn the meat mincer on with the main switch.
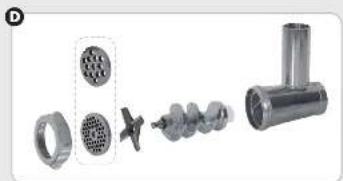
Operating the mincing set (Fig. D)
Put the following elements into the mincing chamber:
① Feed screw with the coupling towards the middle.
② Put the cutter knife on the feed screw end, with the sharp edges facing outside.
③ Put the screen so that the chamber's protrusion enters the rut of the screen.
④ Tighten all the elements of the mincing set – until home.
⑤ Put the assembled unit onto the drive unit and turn into the position, when you hear click of the safety lock.
⑥ Put the food tray onto the mincing chamber.
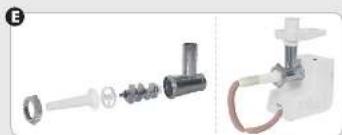
Operating the sausage stuffer (Fig. E)
Put the following elements into the mincing chamber:
- bed screw with the coupling towards the middle,
● separator on the feed screw end,
the sausage stuffer,
tighten all the elements of the mincing set – until home.
Before placing the sausage intestine (intestine wrapper) soak it in warm water for about 10 minutes.
But the wet sausage intestine onto the sausage stuffer, paying attention not to cover the venting holes within the sausage stuffer.
The meat mass filling the intestine cannot be “too rare”. Large amount of fluids can cause their leakage and permeating to the interior of the mincing machine.
Shredder (Fig. F)
1 Fine grating disc
2 Coarse grating disc
3 Slicing disc
4 Pureeing disc
5 Locking tab
6 Body
7 Tray
8 Pusher
The shredder is equipped with two drums to grate into small and bigger chips (cheese, carrot, celery, baked beetroots, etc.). The third grating drum (slicing drum) is used to grate vegetables (potatoes, onion, cucumbers, etc.). The fourth grating drum (pulping drum) is used to mash vegetables (potatoes, beetroots, etc) and fruit.
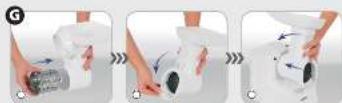
Operating the shredder (Fig. G)
① Recline the catch and put one of the drums with the clutch facing the middle of the chamber.
② Snap the catch.
③ Assemble the chamber of the shredder just as like mincing chamber.
●ut large products into smaller elements, which you can easily put into the mincing chamber.
Do not mash soft fruits containing stones.
When the work is finished pull the power cord out from the network supply socket.
Remove the food remaining in the shredder chamber or on the grater with a wooden spoon.
Blades of the drums do not require any regeneration.
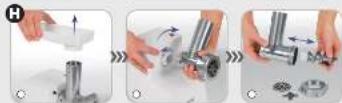
After the work has been finished (Fig. H)
Turn the meat mincer off and pull the power cord out from the network supply socket,
① Remove the pusher and remove the food tray off the mincing chamber or the shredder chamber.
② Press the safety lock and turn the mincing set or the grating chamber into right and take it off.
③ Take apart all the elements of the mincing set, the chamber with the sausage stuffer or the shredder.
Cleaning and maintenance
Clean the drive with a wet cloth, with an addition of dishwashing liquid.
Wash the plastic parts in warm water, with addition of the dishwashing liquid.
Wash the metal parts in hot water, with addition of the dishwashing liquid.
Carefully dry the washed elements.
- rease the screens and the cutter knife with edible oil in order to secure them against rusting.
assemble the dry parts of the mincing chamber or the shredder.
Meat, vegetable and fruit dishes
In order to maintain the most of the nutrition value of the vegetable and fruit dishes, familiarise yourself with the methods of preparing them. Do not hold vegetables or fruits in water and mash them just before serving and eating.
Minced pork chops
50 dag of pork meat, 6 dag of stale bread, 5 dag of onion, 2 dag of fat, 1 egg, 4 dag of crumbs, oil for frying, salt and pepper.
Soak the bread in water and drain.
Cut the onion in slices, fry until it reaches a golden colour. Rinse the meat with water, cut into pieces.
Mince bread, onion and meat twice in the meat mincer, using the screen with 4 mm holes. Add the egg, salt, pepper and carefully mix into unified mass. Form 8 oval pork chops, 1.5 cm thick, which then cover with crumbs. Fry on hot oil.
Pâté made of mixed meat
50 dag of pork meat, 50 dag of veal, 40 dag of pork fat, 50 dag of liver, 30 dag of onion, 20 dag of wheat bun, 4 eggs, salt and pepper, nutmeg.
Braise the meat with pork fat and onion. Clean the liver, peel the membranes off, dice. When the meat is soft, add the liver, bun and braise together for a short time. Let the ingredients cool down and mince them twice in the meat mincer, using the strainer with 4 mm holes. To the prepared mass add eggs, salt, peppr, nutmeg and carefully mix.
Grease the form with lard, put the pâté into the form and bake for abour 40 minutes.
Homemade sausage
Semi fat pork meat 4,5 kg, pork fat 0,5 kg, bone stock 1 glass, salt 6-7 teaspoons, saltpetre 1 flat teaspoon, pepper 1 teaspoon (ground pepper), allspice 12-15 grains (grind), garlic 5-6 cloves (mince), sausage intestine 7 m.
Mince the meat using the strainer with 8 mm holes. Mix the salt with the saltpetre and spices, and add them to the minced meat, and mix them, gradually adding the bone stock. Put it in a cool place for 24 hours. Place the sausage stuffer on the mincing chamber. Fill in the intestine, about 1 m long, forming segments, which are 30–40 cm long. Pay special attention not to cover the venting holes within the attachment.
Dry the sausage for about 6 hours. Smoke with warm smoke for about 14 hours or hot smoke for about 2,5 hours.
Red cabbage fresh salad
40 dag of red cabbage, 20 dag of apples, 2 teaspoons of oil, lemon juice, salt and sugar.
Clean the red cabbage and slice it in a shredder, using the drum for slicing or thick chips. Mix the sliced cabbage with mashed apples, adding oil lemon juice, salt and sugar, according to one's own taste.
Celery salad
40 dag of celery, 20 dag of apples, 2 spoons of oil or cream, lemon juice, salt, pepper.
Slice the celery into small chips. Add cream or oil according to one's own taste. Add sugar, lemon juice and salt.
Ecology – Taking care of the environment!
All users can contribute to environmental protection. It is neither difficult nor too expensive.
To do that:
Put the cardboard box into paper drop. – Put plastic bags into plastic waste – container.
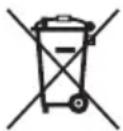
Give used device to appropriate storage – yard, as dangerous components of the device can pose a threat to the environment.
Do not throw it out together with household garbage!!!
The manufacturer does not accept any liability for any damages resulting from unintended use or inappropriate handling.
The manufacturer reserves his rights for modifying the product any time in order to adjust it to law regulations, norms, directives, or due to construction, trade aesthetic or other reasons, without notifying it in advance.
Notes
- PL
- Szanami Island!
- TYPY MASZYNEK ZELMER
- Indications concerning safety and the proper use of the meat mincer
- Technical data
- TYPES OF ZELMER MEAT MINCERS
- Description (Fig. A)
- Mechanical safety device for the motor (Fig. B)
- Preparing the meat mincer to work and the actuation of the appliance (Fig. C)
- Operating the mincing set (Fig. D)
- Operating the sausage stuffer (Fig. E)
- Shredder (Fig. F)
- Operating the shredder (Fig. G)
- After the work has been finished (Fig. H)
- Cleaning and maintenance
- Meat, vegetable and fruit dishes
- Minced pork chops
- Pâté made of mixed meat
- Homemade sausage
- Red cabbage fresh salad
- Celery salad
- Ecology – Taking care of the environment!
- Notes
Brand : Zelmer
Model : Dorota 686
Category : Food processor