
MMC1000SCB - Food processor GORENJE - Free user manual and instructions
Find the device manual for free MMC1000SCB GORENJE in PDF.


| Product Type | Food Processor with Multi-Attachment System |
| Model | MMC1000SCB |
| Brand | Gorenje |
| Power Consumption | 1000 W (estimated) |
| Speed Settings | 12 speeds plus pulse (P) |
| Display | Digital speed and time display, scale display with tare and on/off |
| Bowl Capacity | 4.5 L (estimated stainless steel) |
| Blender Capacity | 1.5 L (glass jar) |
| Included Accessories | Dough hook, whisk, beater, stainless steel bowl, blender, meat grinder with cutting knives (fine/medium), sausage horn, kubbe kit, food tray, pusher |
| Functions | Mixing, kneading, whisking, blending, mincing, sausage making, kubbe |
| Maximum Continuous Operation | 24 minutes (mixer) / 30 seconds (blender idle) / refer to manual for specific attachments |
| Rest Period | 15 minutes before next use |
| Overheating Protection | Yes, automatic shut-off until cool |
| Safety Features | Automatic shut-off when head is raised, overloading protection (E1 error), child lock? not specified |
| Material Bowl | Stainless steel |
| Material Blender | Glass |
| Noise Level | 78 dB(A) |
| Dimensions (approx.) | 400 x 300 x 350 mm (estimated) |
| Weight (approx.) | 7 kg (estimated) |
| Power Cord Length | 1.2 m (estimated) |
| Cleaning | Detachable parts dishwasher safe (hand wash recommended for sharp parts); motor unit wiped with damp cloth |
| Warranty | Standard manufacturer warranty (refer to guarantee leaflet) |
| Voltage Rating | 220-240 V ~ 50/60 Hz (typical) |
Frequently Asked Questions - MMC1000SCB GORENJE
User questions about MMC1000SCB GORENJE
0 question about this device. Answer the ones you know or ask your own.
Ask a new question about this device
Download the instructions for your Food processor in PDF format for free! Find your manual MMC1000SCB - GORENJE and take your electronic device back in hand. On this page are published all the documents necessary for the use of your device. MMC1000SCB by GORENJE.
USER MANUAL MMC1000SCB GORENJE
MMC1000SCB
SL Navodila za uporabo ....4
HR; BIH Upute za uporabu 10
SRB MNE BIH Uputstvo za upotrebu 16

3.

Mešalnik

Namestitev:
Pritisnite pokrov na svoje mesto. Namestite posodo v napravo.
I. Obrnite notranji pokrov nasprotni smeri urinega kazalca.

3.


Blender

Postavljanje:


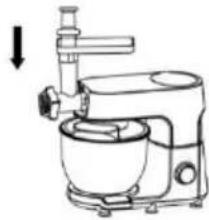
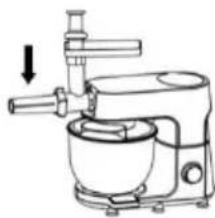
- Pritisnite dugme za podizanje glave, glava će se automatski podići, kao na slici 1, zatim čvrsto pritisnite nastavak za mešanje prema gore i okrenite ga u smeru kazaljke na satu do izbočine pogonske osovine, a zatim možete
direktno ukloniti nastavak za mešanje. Kao na slici 2
3.

Instalacija:
- Spustite glavu uređaja u horizontalni položaj, dugme za podizanje glave automatski se diže i zaključava glavu. Otvorite gornji poklopac.
- Držite ručku staklene posude u izlaznom priključku na uređaju i okrećite je u smeru kazaljke na satu dok se ne bude mogla više okretati.
Usmerite kobasicu koja izlazi iz uređaja na pleh za pečenje. Zatim isecite kobasicu na delove/trake i rasporedite ih preko pleha za pečenje.
Isecite voće na male komadiće, stavite ga u posudu za mešanje, dodajte odgovarajuću količinu vode ili mleka i drugih tečnosti i pokrijte poklopac.


Pritisnite poklopac na mesto. Postavite posudu na bazu.


Saveti: Dok motor radi, ako želite da dodate sastojke, možete:
I. Okrenite unutrašnji poklopac poklopca u smeru suprotnom od kazaljke na satu.all. Dodajte sastojke u posudu kroz otvor u poklopcu.


3.
Блендер
Инсталација:
- Top cower (blender)
- Blender connector
- Body housing
- Speed control switch (rotating)
- START STOP button
- Release button for multifunction head
- Scale display
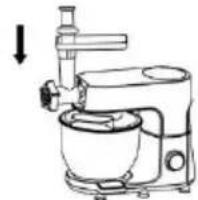
- Release button for grinder
- Removable cover for mincer power outlet
- Food doser on transparent cower
- Stainless steel bowl
- Whisk
- Mixer blade
- Dough hook
ACESSORIES:
Meat grinder:
- Fixing ring
- Cutting knife (fine)
- Cutting knife (medium)
- Knife
- Snake
- Cutter housing
- Food tray
- Pusher
- Stuffing tube
- Kubbe kit
- Blender
Danger
Do not immerse the motor unit in water nor rinse it under the tap.
Warning
- Carefully read the instructions before using your appliance.
- Switch off the appliance before fitting and removing the attachment.
- Keep your fingers away from moving parts and the opening on the attachment.
- Only use the appliance for its intended domestic use. The manufacture will not accept any liability if the appliance is subject to
improper use or failure to comply with these instructions.
- Check that the voltage rating of the appliance matches that of your electrical system.
- Any connection error will nullify the guarantee.
- The appliance must be plugged into an earthed electrical socket.
- If you have to use an electrical extension lead, it must be earthed and you should make sure that noone can trip over it.
- Unplug the appliance as soon as you have finished using it and before cleaning it.
- Don't use your attachment and/or appliance if it has been damaged. Contact an approved service centre.
- Any work on the appliance other than normal care and cleaning by the customer must be carried out by an approved service centre.
- Do not immerse the appliance, the power cord or the plug in water or in any other liquid.
- Do not allow the power cord to hang within the reach of children, to come close to or into contact with hot parts of your appliance, any other source of heat or any sharp edge.
- Switch off the appliance and disconnect it from power supply
before changing accessories or approaching any moving parts.
- Do not touch the whisk, mixer blade or kneading hook while the appliance is in operation.
- Only use one attachment at a time.
- Do not operate the appliance continuously for more than 24 minutes at a time. Allow 15 minutes rest before next use.
- Appliances can be used by persons with reduced physical, sensory or mental capabilities or lack of experience and knowledge if they have been given supervision or instruction concerning use of the appliance in a safe way and if they understand the hazards involved.
- Children should be supervised to ensure that they do not play with the appliance.
- If the supply cord is damaged, it must be replaced by the manufacturer, service agent or a similarly qualified person, in order to avoid a hazard.
- This appliance may not be used by children. Keep the appliance and its cord out of reach of children.
• Children may not play with the appliance. - Children may not clean the appliance or perform user maintenance tasks on it without supervision.
-
This appliance is intended to be used in household and similar applications.
-
There is a potential injury from misuse. Please handle it with care.
- Care should be taken when handling the sharp cutting blades, emptying the bowl and during cleaning.
- WARNING: AFTER DETACHING THE ACCESSORY, DO NOT TOUCH THE MOVING SHAFT.
- Be careful if hot liquid is poured into the blender as it can be ejected out of the appliance due to a sudden steaming.
- Always disconnect the appliance from the supply if it is left unattended and before assembling, disassembling or cleaning.
- The appliance should be cool down to the room temperature after each process.
- Noise level: 78 dB(A)
- During mixing, please don't use the scraper or other tools to concentrate the material in the mixing container, it may cause involvement or injury.
- Be sure to press the display to make sure the product is turned off and unplugged before installing, removing, or cleaning accessories, or injury may result.
- The machine motor comes with overheating protection, when the machine overheats, it will automatically stop running until it cools down before running again.
- When one of the output ports is operating, please make sure to
remove the parts or components that are connected to the other output ports and be installed a protective cover.
- Do not use the product unsupervised, if you do have to leave, turn off the switch or unplug it first.
- Do not plug the machine into the power supply without installing the required accessories.
- Danger of overloading! Do not use the accessories and the mixing function at the same time.
This appliance is marked according to the European directive 2012/19/EU on Waste Electrical and Electronic Equipment (WEEE). This guideline is the frame of a European-wide validity of return and recycling on Waste Electrical and Electronic Equipment.
Caution
Always place the appliance on a flat, stable surface.
Do not use the citrus press longer than 24 minutes without interruption.
This appliance is intended for household use only.
Never use any accessories or parts from other manufacturers unless they are authorized by Gorenje. In case you use these accessories, the warranty will be canceled.
Before use
Clean all detachable parts before using the appliance for the first time (see chapter 'Cleaning').
Make sure the appliance is assembled properly (see chapter 'General description') before you plug it in the wall socket.
Put the plug in the wall socket.
Using the appliance
The standard parts of this machine are composed of dough hook, whisk, beater and stainless steel bowl, totaling four parts.

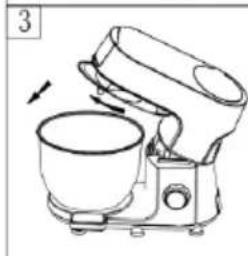
Installation (refer to figure A):
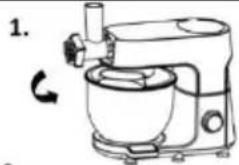
- Press the head-up button, the head will automatically pop up, this time the machine is in a state of power failure as shown in Figure 1.
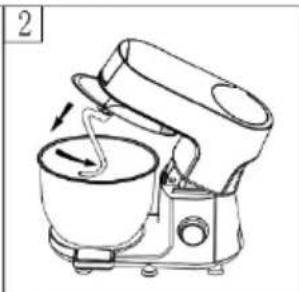
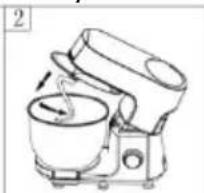
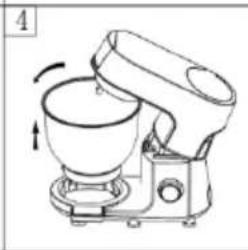
- Put the bottom of the stainless steel pot pot nail against the product below the gap, put down, and then turn clockwise clockwise until it can not be rotated, as shown in Figure 2.
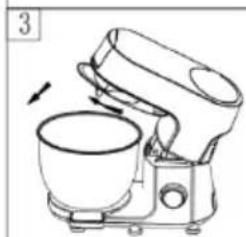
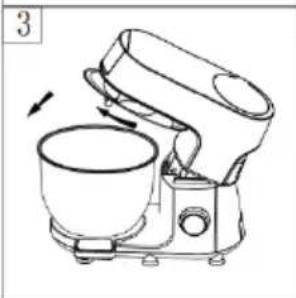
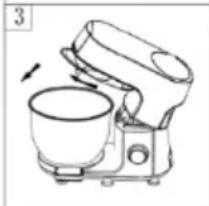
- Put the transparent pot cover on the head, and then turn clockwise until it can not be rotated as shown in Figure 3.
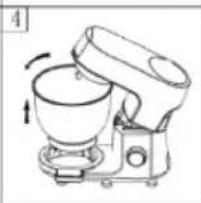
- Insert the notch at the top end of the stirring rod into the drive shaft and then force the stirring rod upwards and turn it counterclockwise until it cannot turn as shown in Fig. 4.
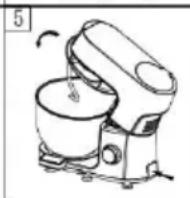
- After installing the above parts, press the head button again.
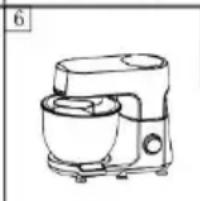
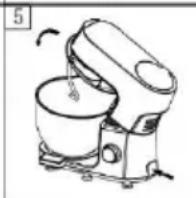
Press the head gently back to the original position, so that the product can start to work as shown in Figure 5-6.
Disassembly (refer to Figure B)

- Press the head up button, the head will pop up automatically, as in Fig. 1, then press the stirring stick firmly upward and rotate it clockwise to the drive shaft bump, then you can directly remove the stirring stick. As Figure 2
- Turn the transparent lid counterclockwise until it can not be turned, the lid can be removed as shown in Figure 3.
SWITCH KNOB DISPLAY FUNCTION

- When the power is turned on, the speed position is displayed as "00", and the time is displayed as "PUSH". The speed and time display lights flashes.
- Press the display, the product starts, default speed 1 start. At the same time, the time will start to time, rotate the speed control knob, you can choose the speed. During the use of the product, even if the speed is changed, the time will continue until the display is pressed again, or the speed is switched back to "00", the product will stop working.
- Rotate the speed control knob, select the desired speed, then press the display, the product will start according to the speed.
- The speed control knob can rotate 360 degrees, with "01", "02", "03", "04", "05", "06", "07", "08", "09", "10", "11", "12", "12" is the largest speed, "01" is the smallest speed.
- When the product is running, suddenly press the head-up button, which causes the product to raise its head automatically, the display will show "E1".
At this time, you only need to press the head up button again, press the head down, long press the display, the product can start normally.
Or product operation, due to put too much material to cause motor blockage, the display will also show "E1". At this time, you need to take out some ingredients, and then long press the display, the product can start normally.
The maximum running time of the product is 30 minutes, 30 minutes after the product automatically stop.
SCALE DISPLAY FUNCTION
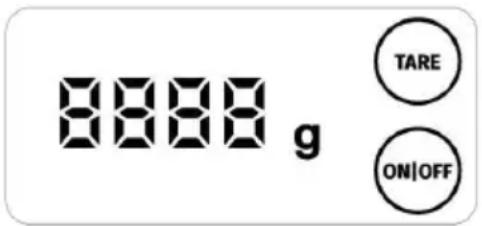
- After turning on the power, touch the "ON/OFF" button, the weighing display will light up, and the weighing function will start.
- Place the pan directly on the base, and then touch the "Tare" button, at this time the weight is zeroed, and then place the desired material directly on the base to be weighed.
MIXER BLADE/ WISK/ DOUGH HOOK
- Place the product in a safe, stable, neat and dry location.
- Hold the head of the machine with one hand and press the head up button with the other hand, the head of the product will be lifted automatically, you can use your hand to assist the head of the product to lift to the maximum position and install the transparent lid.
- Follow the above stirring bar installation method to install the required stirring bars to the designated position.
- Place the stainless steel pan in the designated position and lock it clockwise.
- Load up the items to be stirred - do not overload, please refer to the attached table for the maximum load capacity of the machine.
- When ready, press the product head down to lock (the head-up button pops up automatically) to bring the product head back to the horizontal position.
- Rotate rotation knob, set the desired speed and pres START / STOP button.
- Adjust the speed knob as required.
- When the mixture has reached the desired level of mixing, press the display to turn off the product and unplug it from the power supply.
- Turn the stainless steel pan counterclockwise and remove it from the machine.
- Remove the mixture from the pot.
- For cleaning of parts, refer to the method described in "Cleaning and Maintenance".
| Accessory | Food | Maximum amount | Operation time | Speeds | Preparation |
| Whisk | Cream (38% fat) | 500 ml | 10 minutes | 5-6 | / |
| Egg white | 12 pcs | 3 minutes | 5-6 | / | |
| Dough hook | Flour | 450 g | Operation 1 minute and 30 seconds at MIN speed, and then 3 minutes and 30 seconds at I speed. Don't operate the appliance for more than 5 minutes. | / | |
| Salt | 5 g | ||||
| Yeast | 7 g | ||||
| Sugar | 3 g | ||||
| Water(43°C) | 312 ml | ||||
| Lard | 7 g | ||||
| Mixer blade | Flour | 200 g | 5 minutes | 3-4 | / |
| Caster sugar | 200 g | ||||
| Margarine | 200 g | ||||
| Eggs | 4 pcs | ||||
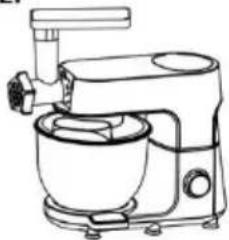
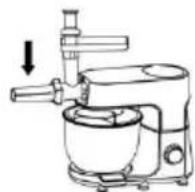
Mincing meat - tips and warnings
- Make sure the cutting edges of the cutter unit are pointing outwards.
- Make sure the notch of the grinding disc fits onto the projection of the cutter housing.
• Never use frozen meat! - Do not overload the appliance during use by pushing too much meat into the cutter housing.
- Cut the meat into 10cm-long, 2cm-thick strips.
- Remove bones, gristles and sinews as much as possible.
- Put the prepared meat on the feeding tray.
- Press the on/off button to switch the appliance on.
- Use the pusher to gently push the meat into the cutter housing.
- For steak tartare, mince the meat with the medium grinding disc twice.
![graph TD A["1. Initial mixing setup"] --> B["2. Covering device"] B --> C["3. Packaging step"] C --> D["Final packaging"]](/content/2026/05/909090/images/0b63bb0cd4d97388c30a256b6d358372ee508858092646e0f7a74b492029c6c8.jpg)
Making sausages - tips and warnings
Always mince the meat first.
- Let the sausage skin soak in lukewarm water for 10 minutes. Then slide the wet skin onto the sausage horn. Do not block the air outlet grooves of the horn.
- Put the minced meat of the feeding tray. Press Speed control switch to the appliance on.
- If the skin gets stuck on the sausage horn, wet it with some later.

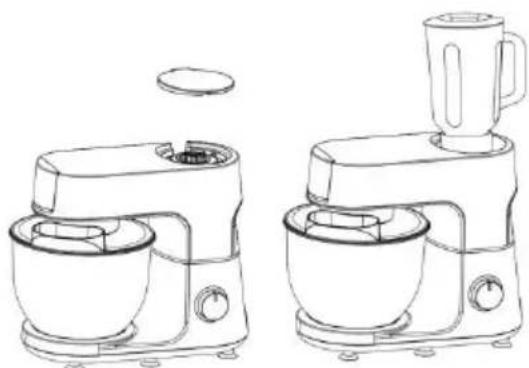
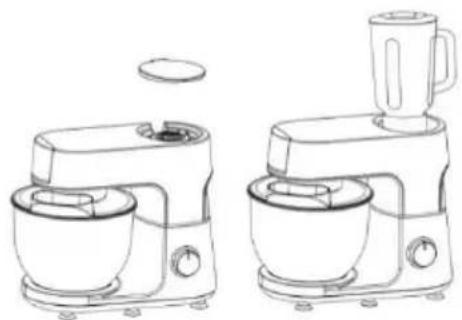
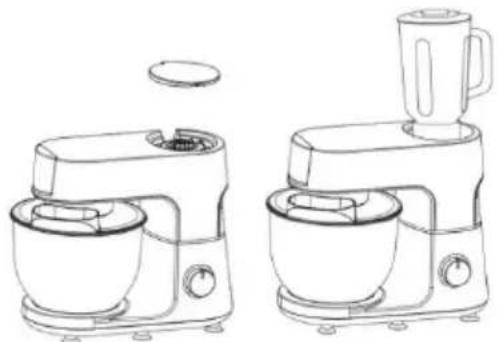
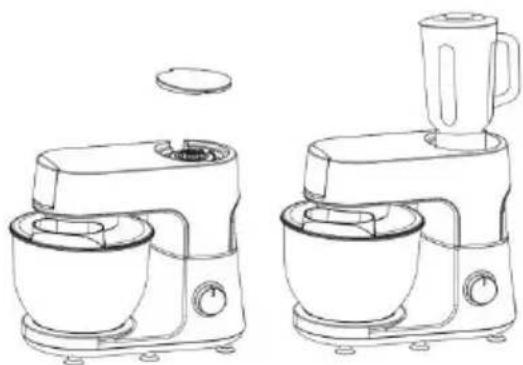
Blender


Installation:
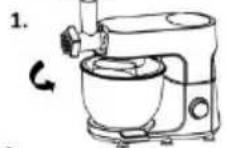
- Lower the machine head to a horizontal position, is the head-up knob automatically pops up and locks the head. Open the top cover.
- Hold the glass jar handle into the output port on the machine and turn clockwise until it can not be turned. Guide the dough sausage coming out of the appliance
onto a baking plate. Then cut the sausage into slices or strips and distribute them over the baking plate.
Cut the fruits into small pieces, put them into the mixing cup, add the right amount of water or milk and other liquids, and cover the lid.

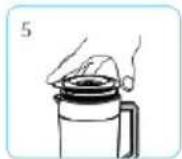
Press the lid into place.
Install the jar onto the base.

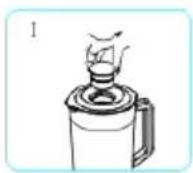
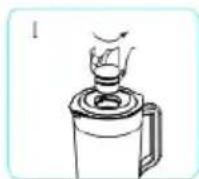
Tips: While the motor is running, if you want to add ingredients you can:
I: Turn the inner lid off the lid in the direction of anticlockwise

II. Add the ingredients into the jar through the opening in the lid
After you have done you work, push "START / STOP button", unplug the appliance, and pour out the content.
Attention:
-
Before installing the juice cup, please make sure the product is disconnected from the power supply.
-
P-speed operation can not stay for a long time, you can repeat the operation many times.
- Please do not idle the glass for more than 30 seconds.
- Please do not add more than the capacity of the ingredients.
- The juice cup is made of glass, do not use more than 40 °C water scalding.
Cleaning
Unplug the appliance.
Never immerse the motor unit in water or put it under running water. Wipe it with a soft dry or slightly damp cloth.
For easier cleaning, quickly rinse the accessories after use. Completely dismantle the mixer attachment. Handle the blades with care, as some have sharp cutting edges.
If your accessories are discoloured by food (carrots, oranges etc.), rub them gently with a kitchen towel dipped in cooking oil and then clean in the usual way.
Environment
This marking indicates that this product should not be disposed of with other household waste throughout the EU. To prevent possible harm to the environment

or human health from uncontrolled waste disposal, recycle it responsibly to promote the sustainable reuse of material resources. To return your used device, please use the return and collection systems or contact the retailer where the product was purchased. They can take this product for environmentally safe recycling.
Guarantee & service
If you need information or if you have a problem, please contact the Gorenje Customer Care Centre in your country (you find its phone number in the worldwide guarantee leaflet). If there is no Customer Care Centre in your country, go to your local Gorenje dealer or contact the Service department of Gorenje domestic appliances.
For personal use only!
GORENJE
WISHES YOU A LOT OF PLEASURE
WHEN USING YOUR APPLIANCE
We reserve the right to any modifications!


Инсталиране (вж. фигура А):


3.

Блендер

Инсталиране:





3.
Blender

Instalare:




Turmixgép

Összeállítás:


Blender

Instalacja:

3.

Mixér

Inštalácia:
Zatlačte veko na miesto.


Mixér
Instalace:


Mixer
Aufstellung:


Блендер

Встановлення:
Притисніть кришку.


3.

Блендер
Установка


Блендер

Курастыру:
Какпакты басыңыз. Контейнерді үяшыкка орнатыңыз.

Blenderi

Montimi:


- MEŠALNIK
- NAMESTITEV
- BLENDER
- POSTAVLJANJE
- INSTALACIJA
- БЛЕНДЕР
- ИНСТАЛАЦИЈА
- ACESSORIES
- MEAT GRINDER
- DANGER
- WARNING
- CAUTION
- BEFORE USE
- USING THE APPLIANCE
- INSTALLATION (REFER TO FIGURE A)
- SWITCH KNOB DISPLAY FUNCTION
- SCALE DISPLAY FUNCTION
- MIXER BLADE/ WISK/ DOUGH HOOK
- MINCING MEAT - TIPS AND WARNINGS
- MAKING SAUSAGES - TIPS AND WARNINGS
- ALWAYS MINCE THE MEAT FIRST
- INSTALLATION
- ATTENTION
- CLEANING
- ENVIRONMENT
- GUARANTEE & SERVICE
- GORENJE
- WISHES YOU A LOT OF PLEASURE
- WHEN USING YOUR APPLIANCE
- WE RESERVE THE RIGHT TO ANY MODIFICATIONS
- ИНСТАЛИРАНЕ (ВЖ. ФИГУРА А)
- ИНСТАЛИРАНЕ
- INSTALARE
- TURMIXGÉP
- ÖSSZEÁLLÍTÁS
- INSTALACJA
- MIXÉR
- INŠTALÁCIA
- INSTALACE
- MIXER
- AUFSTELLUNG
- ВСТАНОВЛЕННЯ
- УСТАНОВКА
- КУРАСТЫРУ
- MONTIMI
Brand : GORENJE
Model : MMC1000SCB
Category : Food processor