BFM900BY - Food processor GORENJE - Free user manual and instructions
Find the device manual for free BFM900BY GORENJE in PDF.

User questions about BFM900BY GORENJE
0 question about this device. Answer the ones you know or ask your own.
Ask a new question about this device
Download the instructions for your Food processor in PDF format for free! Find your manual BFM900BY - GORENJE and take your electronic device back in hand. On this page are published all the documents necessary for the use of your device. BFM900BY by GORENJE.
USER MANUAL BFM900BY GORENJE
Multichef blender and cooker
Blender i parowar w jednym
natural_image
Line drawing of a compact electric shaver with labeled 'Multichef' at the bottom (no other text or symbols)BFM900BY
| Navodila za uporabo | SI |
| Upute za uporabu | HR |
| Uputstvo za upotrebu | SRB-MNE |
| Instruction manual | GB |
| Instrukcja obsługi | PL |
| Manual de utilizare | RO |
| Návod na obsluhu | SK |
| Használati utasítás | HU |
| Інцтрукція з експлуатації | UA |
| Инструкции за употреба | BG |
| Руководство по эксплуатации | RUS |
| Упатства за употреба | MKД |
| Návod k obsluze | CS |
| Gebrauchsanweisung | D-AT |
NAVODILA ZA UPORABO SI
Splošni opis
text_image
Labeled diagram of a blender with numbered parts for identification- Dekorativni pokrov
- Pokrov rezervoarja vode
- Osnovna enota
- Nož
- Tesnilo noža
- Zapah noža
- Posoda za mešanje
- Pokrov košare za parno kuhanje
- Pokrov posode za mešanje
- Košara za parno kuhanje – velika
- Mrežica – srednja
- Košara za parno kuhanje – srednja
- Mrežica – mala
- Košara za parno kuhanje – mala
- Izvlečni predal
- Zaščita pred polivanjem
Pomembno
text_image
Diagram showing two-step assembly process with labeled steps ① and ②, depicting a mechanical or electrical component setup.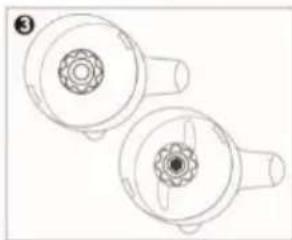
natural_image
Technical line drawing of two mechanical components with no visible text or symbols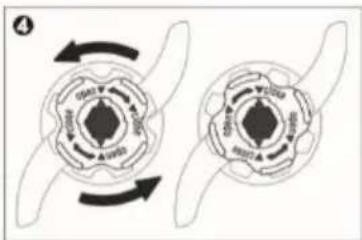
text_image
Diagram illustrating a biological or mechanical process with labeled components and directional arrows indicating rotation or movement.Parno kuhanje
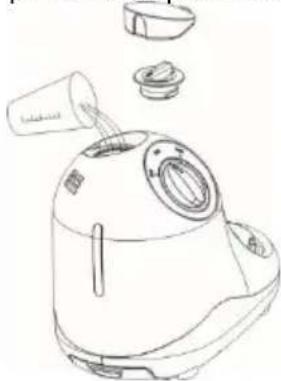
Rezervoar napolnite z vodo. Pazite, da ne presežete oznake MAX.
natural_image
Line drawing of a kitchen blender with lid, spout, and accessories (no text or symbols)natural_image
Line drawing of a kitchen appliance with a cup and side panel, showing step-by-step assembly (no text or symbols)natural_image
Diagram of a blender with lid and handle, showing internal structure and rotation arrow (no text or symbols)natural_image
Two circular diagrams showing internal patterns with arrows indicating rotation or movement (no text or symbols)- Srednjo košaro z vstavljeno mrežico namestite na veliko, malo košaro pa namestite na srednjo. Košare zaprite s pokrovom za košare(8).
flowchart
graph TD
    A["Top Cover"] --> B["Top Cover with Granules"]
    B --> C["Lower Cover with Granules"]
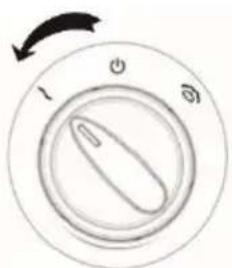
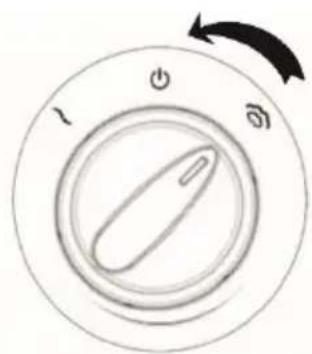
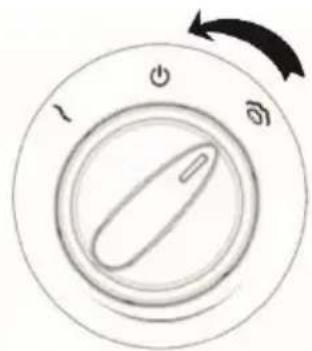
- Za pričetek kuhanja prestavite stikalo na znak za kuhanje.
natural_image
Circular dial indicator with clockwise arrow and power symbol (no text or numbers)Pod znakom za parno kuhanje se prižge lučka.
Kuhanje se avtomatsko konča, ko se porabi vsa voda v rezervoarju (lučka pod znakom za parno kuhanje se ugasne) ali pa, ko stikalo prestavite nazaj na izklop.
natural_image
Circular dial indicator with three labeled buttons (l, e, o) and an arrow, no text or symbols beyond labelsnatural_image
Line drawing of a kitchen blender with a lid, cup, and pot being inserted (no text or symbols)natural_image
Circular dial with rotary knob and pointer, no text or symbols visibletext_image
Labeled diagram of a kitchen appliance with numbered parts for identification- Dekorativni pokrov
- Pokrov spremnika vode
- Osnovna jedinica
- Nož
- Brtva noža
- Zasun noža
- Posuda za miješanje
- Pokrov košare za parno kuhanje
- Pokrov posude za miješanje
- Košara za parno kuhanje - velika
- Mrežica - srednja
- Košara za parno kuhanje - srednja
- Mrežica - mala
- Košara za parno kuhanje - mala
- Pretinac
- Zaštita od prolijevanja
Važno:
Prije početka uporabe uređaja detaljno se upoznajte s korisničkim priručnikom i sačuvajte ga za možebitno kasnije korištenje.
Opasnost
text_image
Diagram illustrating two steps of a mechanical or electrical component assembly, labeled ① and ②.
natural_image
Technical line drawing of two mechanical components with no visible text or symbols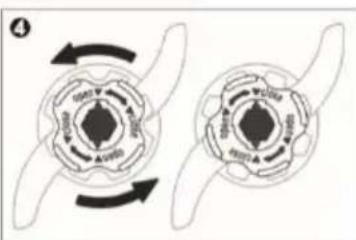
chemical
Diagram of a molecular structure showing two circular arrangements with labeled atoms and directional arrows indicating rotation or interaction.Parno kuhanje
Spremnik napunite vodom. Pazite da razina vode pri tome ne premaši oznaku MAX.
natural_image
Line drawing of a kitchen appliance with lid, handle, and socket (no text or symbols)| Vrijeme kuhanja možete odrediti količinom vode u spremniku | ||||
| Vrijeme kuhanja | 5 min | 10 min | 15 min | 20 min |
| Količina vode (ml) | 75 | 150 | 225 | 300 |
| Hranu koju namjeravate kuhati narežite na manje kockice, neka ne budu veće od 2-3 cm. | ||||
Na osnovnu jedinicu namjestite posudu za miješanje (7) s montiranim nožem.
natural_image
Line drawing of a kitchen appliance with a cup, showing step-by-step assembly from top to bottom (no text or symbols)Hranu možete kuhati na pari na jednoj, dvije ili tri razine.
- U veliku košaru za parno kuhanje (10) dodajte sastojke, i košaru stavite u posudu za miješanje (7). Pokrijte s pokrovom posude (9).
natural_image
Diagram of a blender with lid and handle, showing internal structure and rotation arrow (no text or symbols)natural_image
Two circular diagrams showing a lid and a perforated inner plate with directional arrows indicating rotation (no text or symbols)flowchart
graph TD
    A["Top lid with cube-shaped contents"] --> B["Step 1: Down arrow"]
    B --> C["Step 2: Down arrow"]
    C --> D["Step 3: Down arrow"]
- Za početak kuhanja okrenite prekidač na znak za parno kuhanje.
natural_image
Circular dial indicator with clockwise arrow and power symbol (no text or numbers)natural_image
Circular diagram showing a rotary switch with three buttons and an arrow indicating rotation (no text or symbols)Ukoliko utvrdite da hrana nije dovoljno kuhana, a u spremniku nema više vode, učinite slijedeće:
- Izborni prekidač okrenite u položaj za isključenje.
- Pričekajte 5 minuta da se uređaj ohladi.
• U spremnik dolijte vodu. - Nastavite s kuhanjem, sve dok hrana ne bude kuhana.
Miješanje
natural_image
Line drawing of a kitchen appliance with a lid, cups, and a pot, showing a step-by-step assembly from the base to the top (no text or symbols present)Miješanje započinjete okrenuvši izborni prekidač na znak za miješanje.
natural_image
Circular dial indicator with clockwise arrow and three rotary buttons (no text or symbols)Kada prekidač ispustite, on će se automatski vratiti u osnovni položaj.
Čišćenje
text_image
Labeled diagram of a blender with numbered parts for identificationtext_image
Diagram illustrating two steps of a mechanical or electrical component assembly, labeled ① and ②.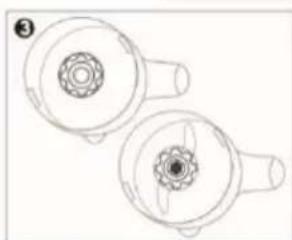
natural_image
Technical line drawing of two mechanical components with no visible text or symbols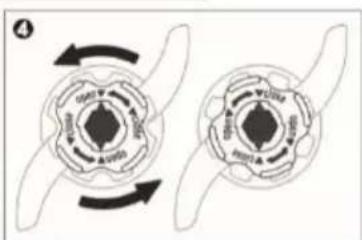
chemical
Diagram of a molecular structure showing rotational and conformational changes in a cyclic compound with labeled atoms and bondsParno kuvanje
Rezervoar napunite vodom. Pazite da nivo vode pri tome ne prevaziđe oznaku MAX.
natural_image
Line drawing of a kitchen appliance with lid, wheels, and accessories (no text or symbols)natural_image
Line drawing of a kitchen appliance with a cup and handle, showing a step-by-step assembly (no text or symbols)natural_image
Diagram of a mechanical device with a lid and internal components, showing rotational movement (no text or symbols)- Za kuvanje na više nivoa, u srednju (12) i u malu košaru (14) najpre umetnite odgovarajuću mrežicu (11 ili 12). To ćete uraditi kako je prikazano na donjim slikama.
natural_image
Two circular diagrams showing a lid and a perforated plate with directional arrows indicating rotation (no text or symbols)- Srednju košaru sa uglavljenom mrežicom namestite na veliku košaru. Na vrh stavite još i malu košaru. Gornju (malu) košaru pokrijte poklopcem za košare (8).
flowchart
graph TD
    A["Top Cover"] --> B["Add Granular to Box"]
    B --> C["Add Granular to Box with Granular"]
    C --> D["Add Granular to Box with Granular"]
natural_image
Circular diagram showing a switch with power and ground labels, no text or symbols presentIspod znaka upali se signalno svetlo.
natural_image
Line drawing of a kitchen blender with a lid, cup, and pot being inserted (no text or symbols)Mešanje započinjete obrnuvši kontrolno dugme na znak za mešanje.
natural_image
Circular dial with three rotary buttons labeled 1, 2, and 3, showing a single knob (no text or symbols beyond labels)Kada dugme ispustite, on će se automatski vratiti u osnovni položaj.
Čišćenje
Aparat i njegovi delovi nisu primereni za pranje u mašini za pranje sudova.
Aparat temeljito očistite nakon svake upotrebe. Očistite ga i kada ga niste koristili duže vreme.
text_image
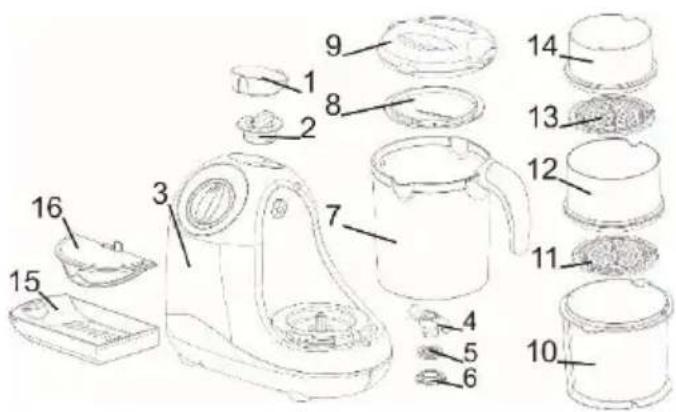
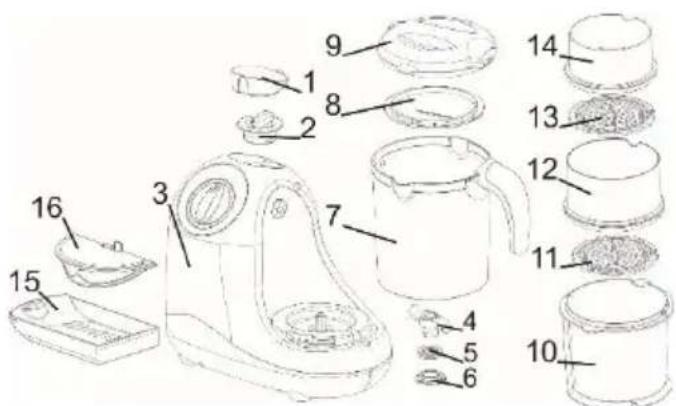
Labeled diagram of a kitchen appliance with numbered parts for identification- Decorative cover
- Water tank cover
- Base unit
- Blade
- Blade gasket
- Blade lock
- Blender bowl
- Steamer basket cover
- Blender bowl cover
- Steamer basket – large
- Perforated disc – medium
- Steamer basket – medium
- Perforated disc – small
- Steamer basket – small
- Pull-out drawer
- Spilling protection
Important
Before using the appliance for the first time, carefully read this instruction manual and save it for future reference.
Danger
Do not immerse the unit with the motor in water and do not wash it under running water.
Warning
Before connecting the appliance to the power mains, make sure the voltage specified on the bottom of the appliance matches the voltage of the power mains in your home. If the
power cord is damaged, it may only be replaced by Gorenje, Gorenje's authorized service and repair centre, or an adequately trained professional. Do not use the appliances, of the plug, power cord, or any other component is damaged.
The appliance should not be used by children or persons with impaired physical or psychological skills, or persons with lacking experience and knowledge, unless such persons are supervised or advised by a person responsible for their safety. Do not let the children play with the appliance. Before cleaning, unplug the appliance from the power mains and wait for the appliance to cool down.
Always empty the water tank after use.
Do not open the water tank during steam cooking, as this may cause boiling water to spurt out of the tank. Before feeding your child, make sure the food temperature is suitable.
Regular cleaning of limescale will extend the appliance useful life. We recommend using soft water.
Be extra careful when removing and cleaning the blade, to avoid any injuries. The blade is very sharp.
To avoid hazard, do not connect the appliance to an external timer or a remote control system.
This equipment is labelled in compliance with the European Directive 2012/19/EC on waste electric and electronic equipment – WEEE. The Directive specifies the requirements for collection and management of waste electric and electronic equipment effective in the entire European Union.
Caution
Place the appliance on a level and stable surface. The appliance is intended solely for household use.
Do not use attachments or spare parts by other manufacturers unless they are expressly recommended by Gorenje. In case of use of such attachments or accessories, the warranty shall be void.
Preparation for use
Remove the packaging
Clean the appliance as instructed in the section "Cleaning".
Using the appliance
Removing and replacing the blade
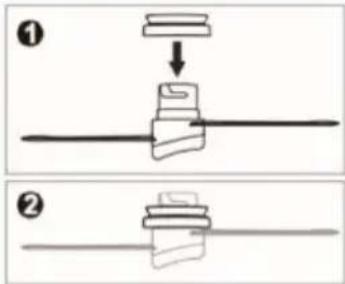
- Place the gasket over the blade as shown in Figure 1. Make sure the flat part of the gasket is facing the blade.
- Insert the blade into the opening in the blender bowl and attach it with the blade lock (6).
- To remove the blade, observe the reverse order.
text_image
Diagram showing two-step assembly steps of a mechanical component, labeled ① and ② with directional arrows.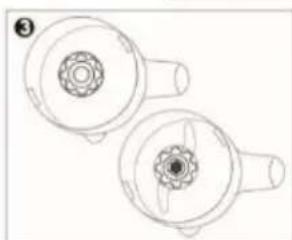
natural_image
Technical line drawing of two circular mechanical components with internal gear-like features (no text or symbols)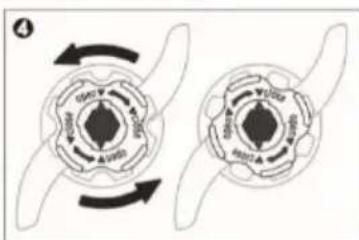
natural_image
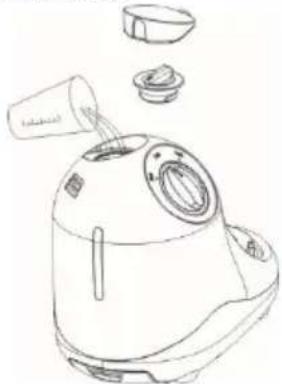
Two circular diagrams showing rotational symmetry with arrows indicating direction (no text or symbols)Steam cooking
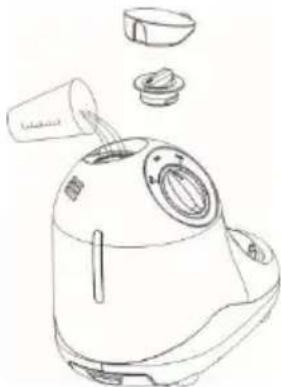
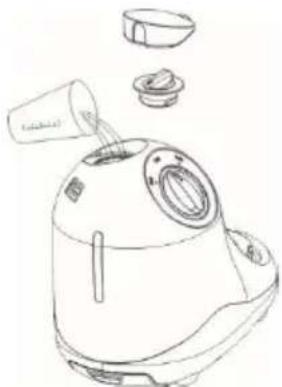
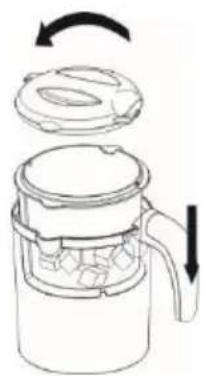
Fill the tank with water. Make sure you do not exceed the MAX marking.
natural_image
Line drawing of a kitchen appliance with lid, handle, and spout (no text or symbols)| Cooking time can also be controlled with the amount of water in the tank. | ||||
| Cooking time | 5 min | 10min | 15min | 20min |
| Amount of water (ml) | 75 | 150 | 225 | 300 |
| Cube the food to be cooked. The cubes should not be larger than 2 or 3 centimetres. | ||||
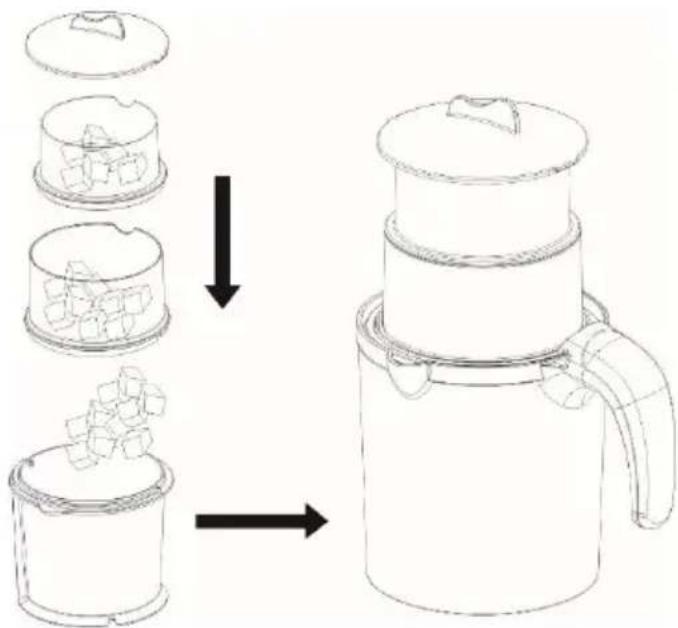
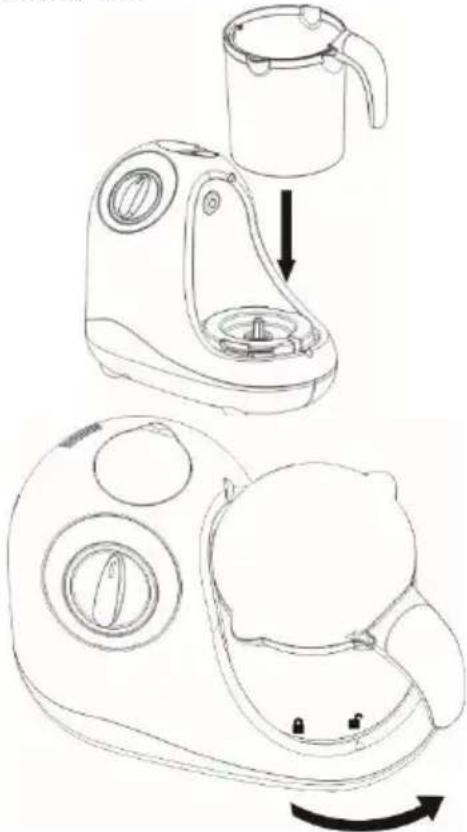
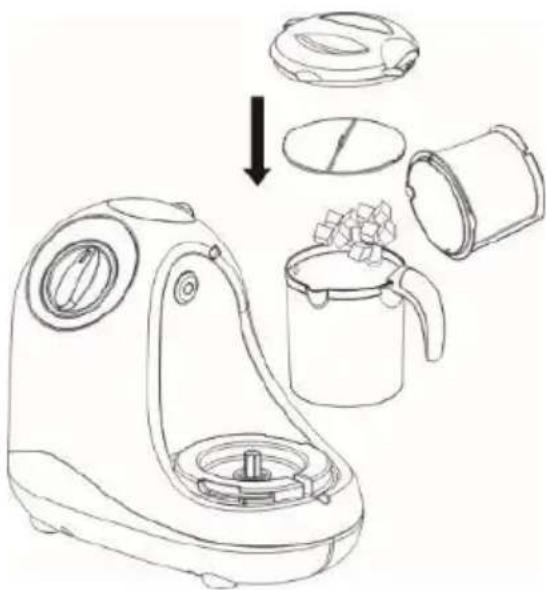
Place the blender bowl (7) with the blade in place over the base unit.
natural_image
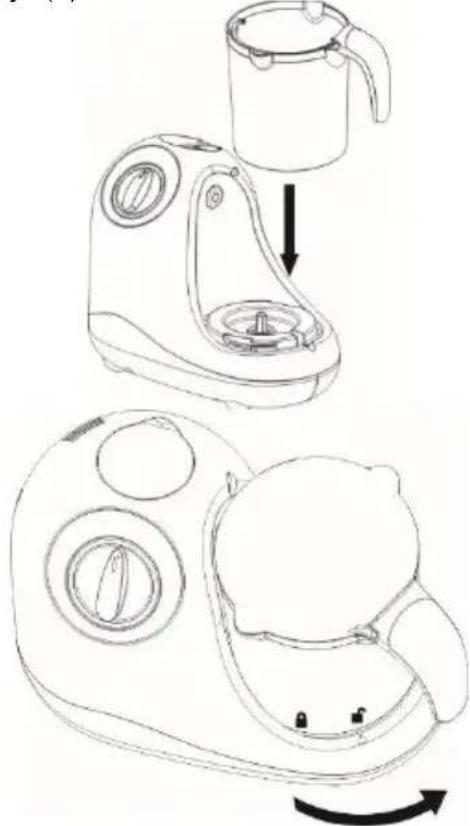
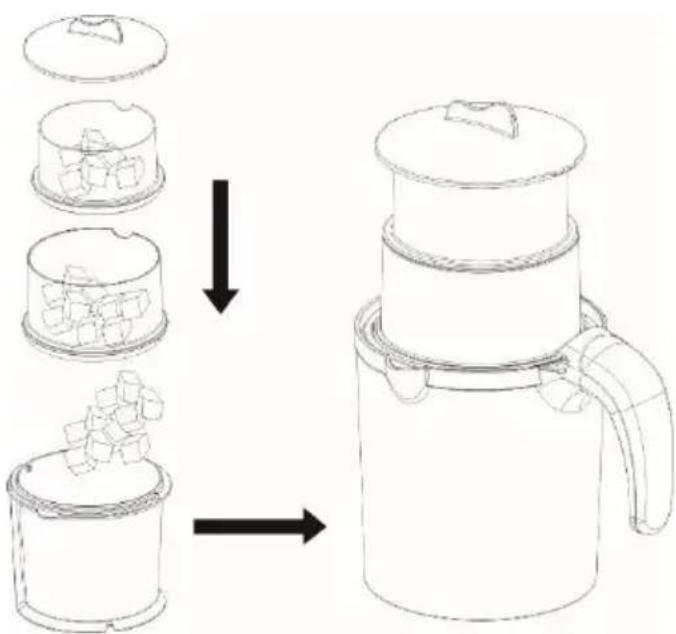
Line drawing of a kitchen appliance with a cup and handle, showing a step-by-step assembly (no text or symbols)Food can be steamed in one, two, or three tiers.
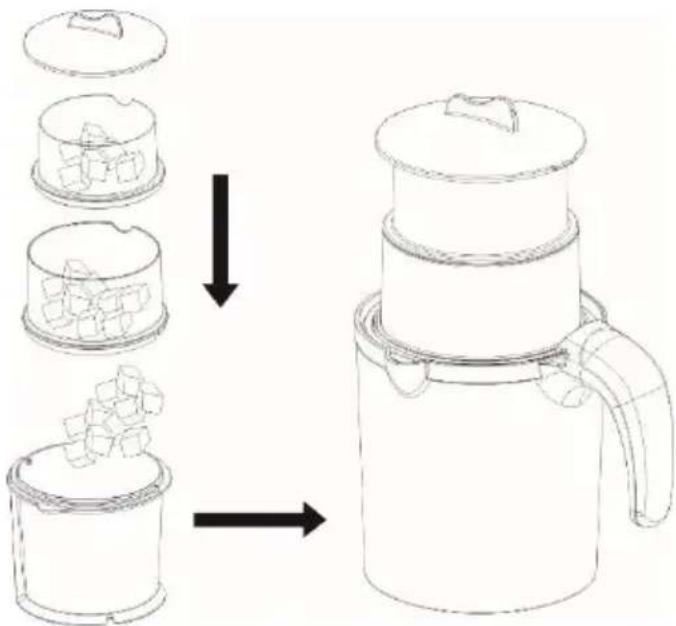
- Place the ingredients to be steamed into the large steamer basket (10) and place the basket into the mixer bowl (7). Then, close the bowl with the bowl cover (9).
natural_image
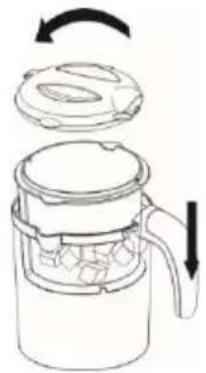
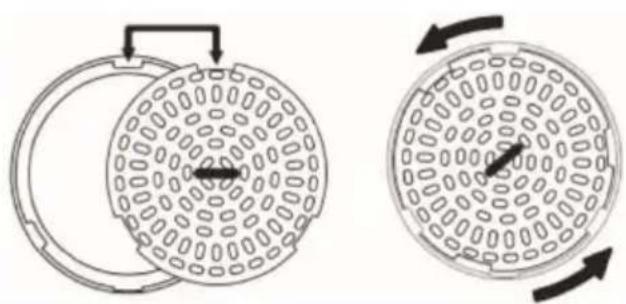
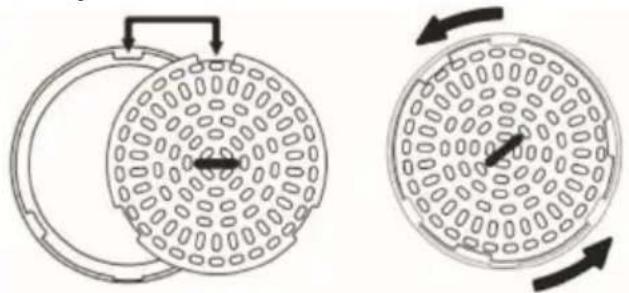
Diagram of a blender with lid and handle, showing internal structure and rotation arrow (no text or symbols)- To cook in several tiers, first place the perforated disc (11 or 12) over the medium (12) or small (14) basket, as shown in the figure below.
natural_image
Two circular diagrams showing internal components with arrows indicating rotation or movement (no text or symbols)- Place the medium basket with the perforated disc in place over the large basket, and place the small basket over the medium one. Close the baskets with the steamer basket cover (8).
flowchart
graph TD
    A["Top lid with cube"] --> B["Step 1: Box contains cubes"]
    B --> C["Step 2: Box contains cubes inside lid"]
    C --> D["Step 3: Box contains cubes inside lid with cube at bottom"]
    D --> E["Step 4: Box contains cube inside lid with handle"]
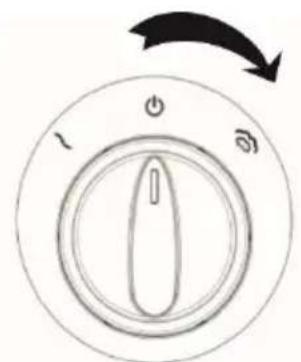
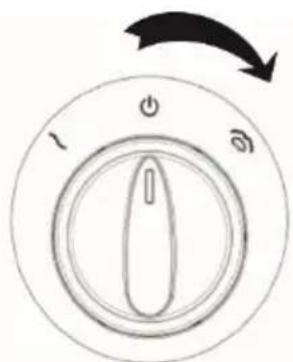
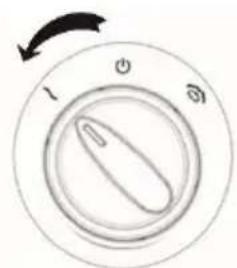
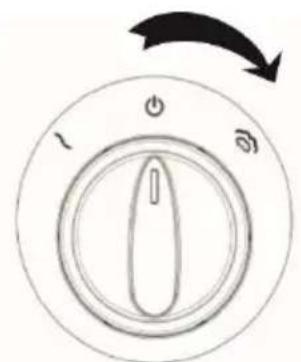
- To start cooking, set the switch to the cooking symbol.
natural_image
Circular dial indicator with power and ground control buttons, no text or symbols presentA signal light will light up under the steam cooking symbol.
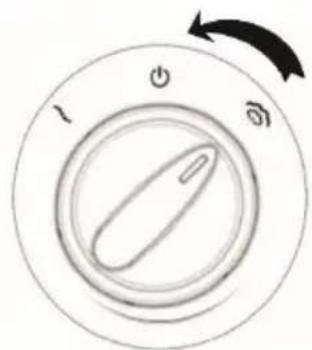
The cooking stops automatically when the water in the tank runs out (light under the steam cooking symbol will go out) or when the switch is set back to the "off" position.
text_image
1 + ∞If the food is not done yet and there is no more water in the tank, do the following:
- move the switch to the off position,
- wait for 5 minutes for the appliance to cool down,
- add water to the tank,
• continue cooking until the food is done.
Blending
Place the blender bowl with the knife in place over the base unit, and add cooked or raw ingredients to the bowl.
Place the spill protection (16) into the bowl and close it with the blender bowl cover.
natural_image
Line drawing of a kitchen blender with a lid, cup, and pot being inserted (no text or symbols)To start blending, set the switch to the blending symbol.

text_image
I Φ ΦWhen the switch is released, it returns automatically to the "off" position.
Cleaning
The appliance and its parts are not dishwasher safe.
Thoroughly clean the appliance after each use, as well as before use if it hasn't been used for a while.
- Before cleaning, unplug the appliance from the power mains and let it cool down.
- Clean all appliance parts with lukewarm water and some liquid detergent; then rinse and dry thoroughly.
- Wipe the housing with a damp cloth. Do not wash the housing under running water and do not immerse it in water.
Descaling
Depending on water quality, limescale residue may accumulate in the water tank after using the appliance several times.
Before cleaning the appliance, make sure it has been disconnected from the power mains.
To descale the water tank, add 100 ml of hot water and 100 ml of wine vinegar into the water tank. Let the mixture take effect for 3 minutes, then empty the tank and wipe it with a soft cloth.
Add 200 ml of fresh water to the appliance tank, attach an empty steamer bowl, and let the appliance steam cook until it automatically switches off.
Do not use any chemicals to remove the limescale from the appliance.
Storage
Store the appliance in a safe and dry place.
Environment
After the expiry of its useful life, do not discard the appliance with common household waste. Take is to an authorized recycling centre. This will help preserve the environment.
Warranty and repair
For more information or in case of problems, please contact Gorenje Call Centre in your country (phone number listed in the International Warranty Sheet). If there is no such centre in your country, please contact the local Gorenje dealer or Gorenje's small domestic appliance department.
For personal use only!
GORENJE WISHES YOU A LOT OF PLEASURE IN USING YOUR APPLIANCE.
We reserve the right to modifications.
INSTRUKCJA OBSŁUGI PL
Opis ogólny
text_image
Labeled diagram of a kitchen appliance with numbered parts for identificationtext_image
Diagram showing two steps of a mechanical or electrical component assembly, labeled ① and ②, with arrows indicating direction.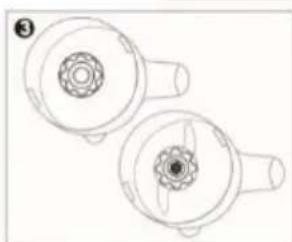
natural_image
Technical line drawing of two mechanical components with no visible text or symbols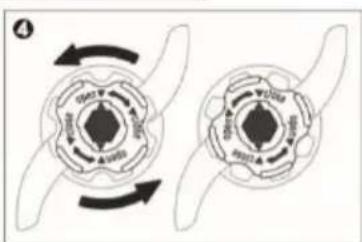
text_image
Diagram illustrating a biological or mechanical process with labeled components and directional arrows indicating rotational or feedback motion.Gotowanie na parze
natural_image
Line drawing of a kitchen appliance with liquid pouring from a container (no text or symbols)natural_image
Line drawing of a kitchen appliance with a cup, showing step-by-step assembly from fan to sink (no text or symbols)natural_image
Diagram of a microwave oven with lid and side arm, showing internal components and rotation arrow (no text or symbols)natural_image
Two circular diagrams showing internal patterns of a lid and a grid-patterned outer ring, with arrows indicating rotation (no text or symbols)flowchart
graph TD
    A["Top Box with lid"] --> B["Step 1: Stacking with cubes"]
    B --> C["Step 2: Stacking with cubes"]
    C --> D["Step 3: Stacking with cubes"]
    D --> E["Final Box with lid"]
natural_image
Circular diagram showing a switch with power and ground labels, no text or symbols presenttext_image
Diagram of a rotary switch with labeled buttons and an arrow indicating rotation directionnatural_image
Line drawing of a kitchen blender with a lid, cup, and pot being inserted (no text or symbols)text_image
Labeled diagram of a kitchen appliance with numbered parts for identificationtext_image
Diagram showing two steps of a mechanical assembly or disassembly process, labeled ① and ② with directional arrows.
natural_image
Technical line drawing of two circular mechanical components with internal gears and shafts (no text or symbols)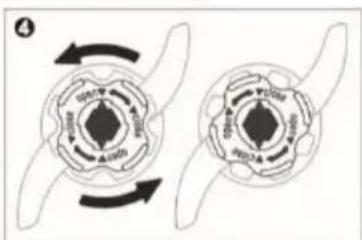
text_image
Diagram showing two circular cellular structures with labeled components and directional arrows indicating rotation or interaction.Gătitul cu aburi
natural_image
Line drawing of a kitchen appliance with lid, drawer, and sink (no text or symbols)natural_image
Line drawings of a kitchen appliance with a lid, showing step-by-step assembly from top to bottom (no text or symbols)natural_image
Diagram of a mechanical device with a lid and handle, showing internal components and directional arrows (no text or symbols)natural_image
Two circular diagrams showing a manhole cover and its side view with directional arrows indicating rotation (no text or symbols)flowchart
graph TD
    A["Top lid"] --> B["Top container with granular material"]
    B --> C["Down arrow"]
    C --> D["Bottom container with granular material"]
natural_image
Circular diagram showing a switch with power and ground indicators, no text or symbols presentnatural_image
Circular dial with power and ground control buttons, no text or symbols presentnatural_image
Line drawing of a kitchen appliance with a lid, cups, and a pot, showing a step-down assembly (no text or symbols)natural_image
Circular dial indicator with clockwise arrow and three rotary buttons (no text or symbols beyond basic design)text_image
Labeled diagram of a kitchen appliance with numbered parts for identificationtext_image
Diagram illustrating two-step assembly or cleaning process with labeled steps ① and ②
natural_image
Technical line drawing of two circular mechanical components with internal gear-like features (no text or symbols)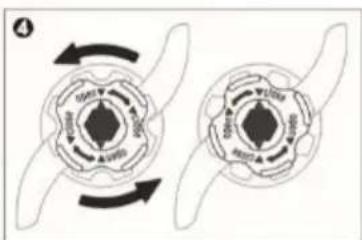
text_image
Diagram illustrating two circular cellular structures with labeled components and directional arrows indicating rotation or movement.Varenie na pare
natural_image
Line drawing of a kitchen blender with lid, spout, and side compartments (no text or symbols)natural_image
Line drawing of a kitchen appliance with a kettle and side panel, showing step-by-step assembly (no text or symbols)natural_image
Diagram of a blender with lid and handle, showing internal structure and rotation arrow (no text or symbols)natural_image
Two circular diagrams showing a manhole cover and its internal structure with directional arrows (no text or symbols)natural_image
Circular diagram showing a rotary switch with power and ground indicators, no text or symbols present.Pod značkou varenia na pare sa rozsvieti kontrolka.
Varenie sa automaticky preruší, ked' sa minie všetka voda v nádobe (kontrolka pod značkou varenia na pare sa vypne), alebo ked' sa tlačidlo otočí spät do polohy „VYP“.
natural_image
Circular dial with control knob and rotary buttons, no text or symbols presentnatural_image
Line drawing of a kitchen blender with a lid, cup, and pot, showing the process from an open lid to a filled cup (no text or symbols present)text_image
Labeled diagram of a kitchen appliance with numbered parts for identificationtext_image
Diagram illustrating two steps of a mechanical or electrical component assembly, labeled ① and ②.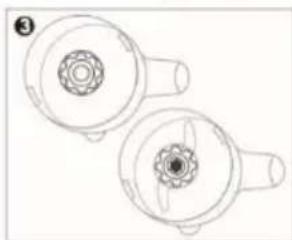
natural_image
Technical line drawing of two mechanical components with no visible text or symbols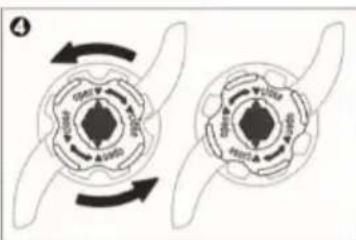
chemical
Diagram of a chemical reaction or molecular transformation showing two circular structures with labeled atoms and directional arrows indicating rotation or equilibrium.Párolás
natural_image
Line drawing of a kitchen appliance with lid, spout, and accessories (no text or symbols)natural_image
Line drawing of a kitchen appliance with a cup and handle, showing a step-by-step assembly (no text or symbols)natural_image
Diagram of a blender with lid and side arm, showing internal components and rotation arrows (no text or symbols)natural_image
Two circular diagrams showing internal components with arrows indicating rotation or movement (no text or symbols)natural_image
Circular diagram showing a rotary switch with three buttons and an arrow indicating clockwise rotation (no text or symbols)natural_image
Circular dial with three labeled buttons (l, o, o) and an arrow indicating rotation (no text or symbols beyond labels)natural_image
Line drawing of a kitchen blender with a lid, cup, and pot being inserted (no text or symbols)text_image
Labeled diagram of a kitchen appliance with numbered parts for identificationtext_image
Diagram showing two steps of a mechanical assembly or disassembly process, labeled ① and ② with directional arrows.
natural_image
Technical line drawing of two mechanical components with no visible text or symbols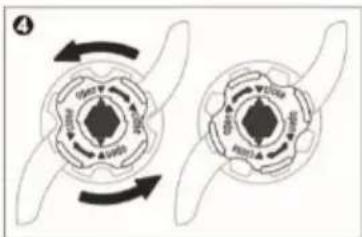
natural_image
Two circular diagrams showing rotational symmetry with arrows indicating direction (no text or symbols)Готування на парі
natural_image
Line drawing of a kitchen appliance with lid, drawer, and accessories (no text or symbols)natural_image
Line drawing of a kitchen appliance with a cup, showing step-by-step assembly from top to bottom (no text or symbols)natural_image
Diagram of a mechanical device with a lid and internal components, showing rotational arrows (no text or symbols)natural_image
Two circular diagrams showing internal patterns with arrows indicating rotation or movement (no text or symbols)natural_image
Circular diagram showing a switch with power and signal icons, no text or symbols presentnatural_image
Line drawing of a kitchen blender with a lid, cup, and pot being inserted (no text or symbols)text_image
Labeled diagram of a kitchen appliance with numbered parts for identificationtext_image
Diagram showing two-step assembly steps of a mechanical component, labeled ① and ② with directional arrows.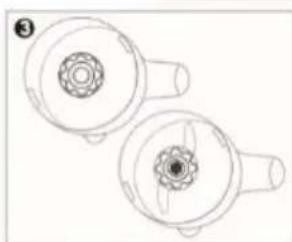
natural_image
Technical line drawing of two mechanical components with no visible text or symbols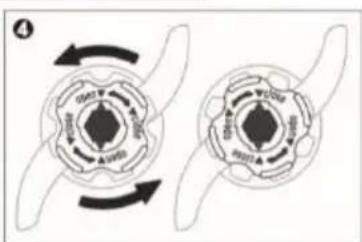
text_image
Diagram illustrating a biological or mechanical process with labeled components and directional arrows, likely representing a system or transformation.Готвене на пара
natural_image
Line drawing of a kitchen appliance with lid, drawer, and accessories (no text or symbols)natural_image
Line drawing of a kitchen appliance with a cup, showing step-by-step assembly from top to bottom (no text or symbols)natural_image
Diagram of a blender with lid and handle, showing internal components and rotation arrow (no text or symbols)natural_image
Two circular diagrams showing internal patterns of a lid and a grid-patterned outer ring, with arrows indicating rotation (no text or symbols)flowchart
graph TD
    A["Top lid with cube-shaped container"] --> B["Step 1: mixing with cubes"]
    B --> C["Step 2: mixing with cube-shaped container"]
    C --> D["Step 3: mixing with cube-shaped container"]
    D --> E["Back to blender"]
natural_image
Circular diagram showing a rotary switch with power and ground indicators, no text or symbols present.natural_image
Line drawing of a kitchen blender with a lid, cup, and pot being inserted (no text or symbols)text_image
Labeled diagram of a kitchen appliance with numbered parts for identificationtext_image
Diagram showing two-step assembly steps of a mechanical component, labeled ① and ② with directional arrows.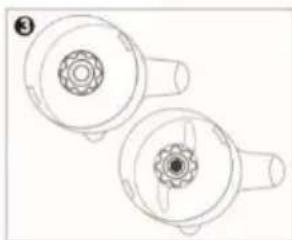
natural_image
Technical line drawing of two mechanical components with no visible text or symbols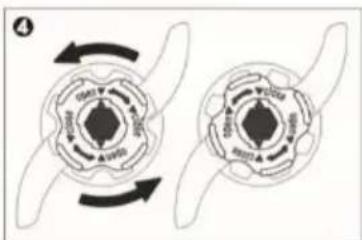
text_image
Diagram illustrating the interconversion of a circular structure with labeled components and directional arrows, likely representing a biological or chemical process.natural_image
Line drawing of a kitchen appliance with lid, handle, and socket (no text or symbols)natural_image
Line drawing of a kitchen blender with a cup and handle, showing the process from opening to rotating (no text or symbols)natural_image
Diagram of a mechanical device with a lid and handle, showing internal components and directional arrows (no text or symbols)natural_image
Two circular diagrams showing internal components with arrows indicating rotation or movement (no text or symbols)natural_image
Circular diagram showing a switch with power and signal icons, no text or symbols presenttext_image
Diagram of a rotary switch with labeled buttons and an arrow indicating rotation directionnatural_image
Line drawing of a kitchen blender with a lid, dropping funnel, and pouring into a cup (no text or symbols)text_image
Labeled diagram of a kitchen appliance with numbered parts for identificationtext_image
Diagram showing two-step assembly steps of a mechanical component, labeled ① and ② with directional arrows.
natural_image
Technical line drawing of two mechanical components with no visible text or symbols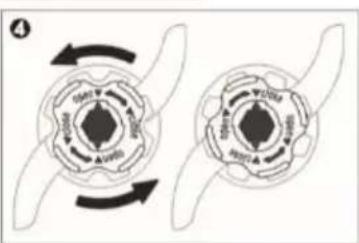
text_image
Diagram illustrating a biological or mechanical process with labeled components and directional arrows, likely representing a system or cycle.Готвење на пареа
natural_image
Line drawing of a kitchen blender with lid, spout, and side bowl (no text or symbols)natural_image
Line drawing of a mechanical device with a cup and internal components, showing a step-by-step assembly (no text or symbols)natural_image
Diagram of a microwave oven with lid and side arm, showing internal components and rotation arrows (no text or labels)natural_image
Two circular diagrams showing a lid with internal patterns and directional arrows, no text or symbols present.natural_image
Circular diagram showing a rotary switch with power and ground indicators, no text or symbols present.natural_image
Circular dial with power and ground control buttons, no text or symbols presentnatural_image
Line drawing of a kitchen blender with a lid, cup, and pot being inserted (no text or symbols)natural_image
Circular dial with three rotary buttons labeled 1, 2, and 3, showing a single knob (no text or symbols beyond labels)text_image
Labeled diagram of a kitchen appliance with numbered parts for identificationtext_image
Diagram showing two steps of a mechanical assembly or disassembly process, labeled ① and ② with directional arrows.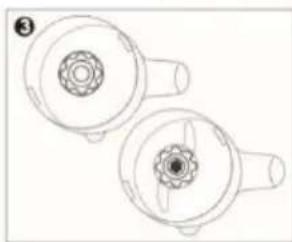
natural_image
Technical line drawing of two mechanical components with circular features and shafts (no text or symbols)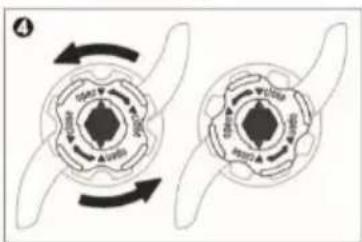
text_image
Diagram illustrating a biological or mechanical process with labeled components and directional arrows, likely representing a system or transformation.Vaření v páře
natural_image
Line drawing of a kitchen appliance with lid, handle, and spout (no text or symbols)natural_image
Line drawing of a kitchen appliance with a cup and side panel, showing a step-by-step assembly (no text or symbols)natural_image
Diagram of a mechanical device with a lid and internal components, showing rotational movement (no text or symbols)natural_image
Two circular diagrams showing internal components with arrows indicating rotation or movement (no text or symbols)flowchart
graph TD
    A["Top Cover"] --> B["Top Cover with Box"]
    B --> C["Bottom Cover with Box"]
    C --> D["Top Cover with lid"]
natural_image
Circular diagram showing a rotary switch with three buttons and an arrow indicating clockwise rotation (no text or symbols)natural_image
Circular dial with three rotary buttons labeled 1, 2, and 3, showing a stylized icon (no text or symbols beyond labels)natural_image
Line drawing of a kitchen blender with a lid, cup, and pot being inserted (no text or symbols)text_image
Labeled diagram of a kitchen appliance with numbered parts for identificationtext_image
Diagram showing two steps of a mechanical assembly or disassembly process, labeled ① and ② with directional arrows.
natural_image
Technical line drawing of two mechanical components with no visible text or symbols
text_image
Diagram illustrating cellular structure with labeled components and directional arrows, likely representing a biological or mechanical system.Dampfgaren
natural_image
Line drawing of a kitchen appliance with lid, handle, and accessories (no text or symbols)natural_image
Line drawing of a kitchen appliance with a side view showing the process from opening to rotating (no text or symbols)natural_image
Diagram of a mechanical device with a lid and handle, showing internal components and directional arrows (no text or symbols)natural_image
Two circular diagrams showing internal patterns of a manhole or drain, with arrows indicating rotation (no text or symbols)flowchart
graph TD
    A["Top Cover"] --> B["Stacked Cover with Cubic Panels"]
    B --> C["Add Box to Cover"]
    C --> D["Final Container with Box"]
