
CROSS REVERSE - Stroller JANE - Free user manual and instructions
Find the device manual for free CROSS REVERSE JANE in PDF.
| Product type | Reversible stroller |
| Brand | JANE |
| Model | CROSS REVERSE |
| Weight capacity | Up to 15 kg |
| Recommended age | From 6 months (with approved accessories from birth) |
| Light power supply | 2 AAA 1.5 V batteries |
| Main functions | Reversible hammock facing road or parent, swivel front wheels with directional lock, parking brake on rear wheels, 5-point safety harness, safety lighting (3 light effects) |
| Adjustments | Backrest 3 positions, leg rest 4 positions, handle 5 positions |
| Folding | Compact, with hammock in the direction of travel recommended |
| Safety | Parking brake, 5-point harness, safety light, PRO-FIX locks for accessories, removable guardrail with covers |
| Maintenance | Wash plastic parts with warm soapy water; do not expose the cover to sunlight; removable rain cover |
| Maximum basket weight | 4 kg |
| Compatible accessories | Nacelle Pro, Strata and Rebel Pro car seats (via PRO-FIX system) |
Frequently Asked Questions - CROSS REVERSE JANE
User questions about CROSS REVERSE JANE
0 question about this device. Answer the ones you know or ask your own.
Ask a new question about this device
Download the instructions for your Stroller in PDF format for free! Find your manual CROSS REVERSE - JANE and take your electronic device back in hand. On this page are published all the documents necessary for the use of your device. CROSS REVERSE by JANE.
USER MANUAL CROSS REVERSE JANE
natural_image
Two identical orange and black stroller models with black handles, displayed side by side (no text or symbols on the models themselves)español 19
english 27
français 35
deutsch 43
italiano 51
português 59
nederlands 67
norsk 75
svenska 83
русский 91
dansk 99
polski 107
slovenščina 115
slovensko 123
český 131
magyar 139
natural_image
Illustration of a hand using a tool to adjust or install a mechanical component, with red arrows indicating motion (no text or symbols present)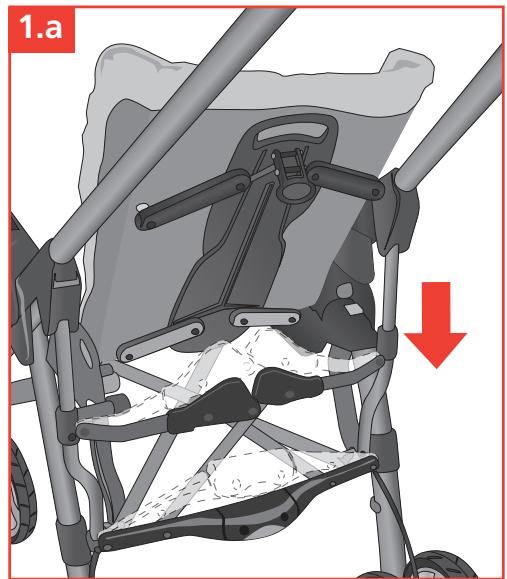
natural_image
Illustration of a baby stroller with mechanical arms and a red downward arrow indicating motion (no text or symbols)3
natural_image
Illustration of a stroller with hand operating the hood and rotor, showing red motion arrows (no text or symbols)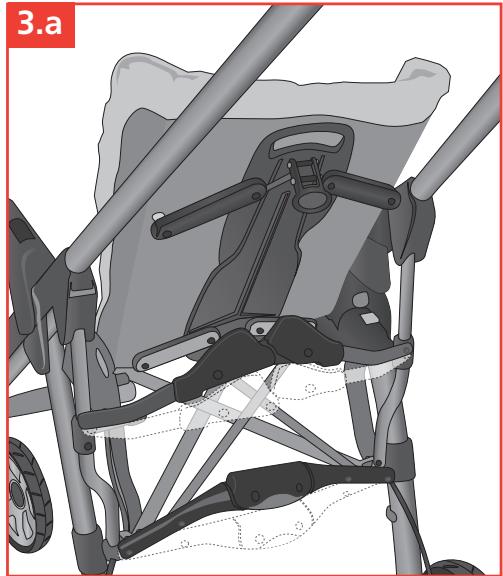
natural_image
Mechanical assembly diagram of a children's stroller with visible frame, legs, and support brackets (no text or symbols)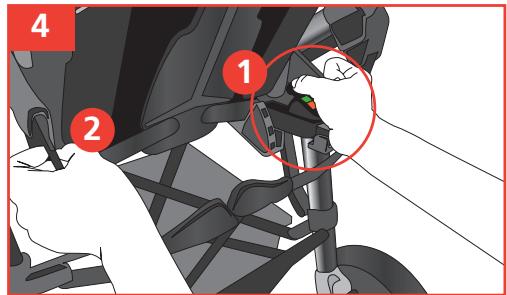

natural_image
Illustration of a hand using a camera to adjust the camera lens (no text or symbols visible)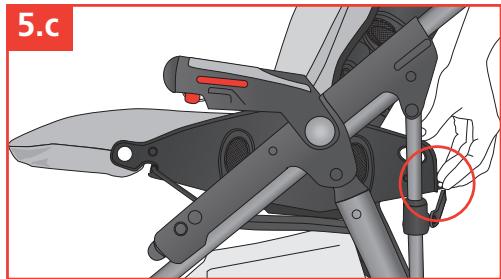
natural_image
Mechanical assembly diagram showing a tool interacting with a mechanical component (no text or symbols visible)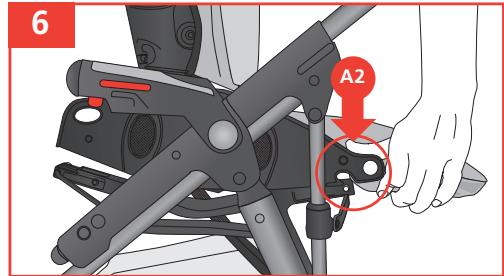


natural_image
Mechanical assembly diagram showing a tool interacting with a mechanical component (no text or symbols visible)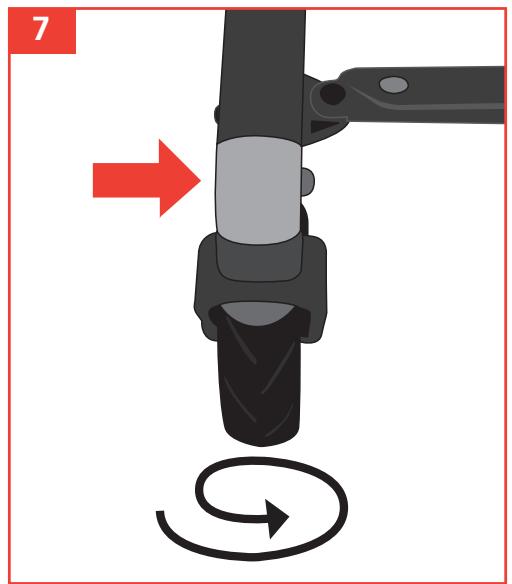
natural_image
Mechanical diagram showing a lever mechanism with a curved arrow indicating rotational motion (no text or symbols)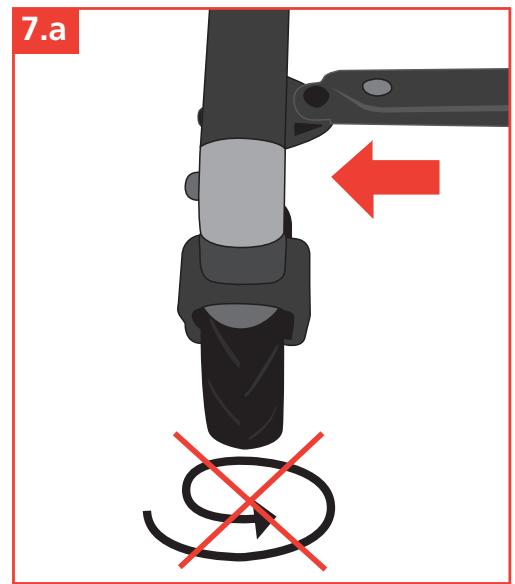
natural_image
Mechanical assembly diagram showing a tire and brake caliper (no text or symbols)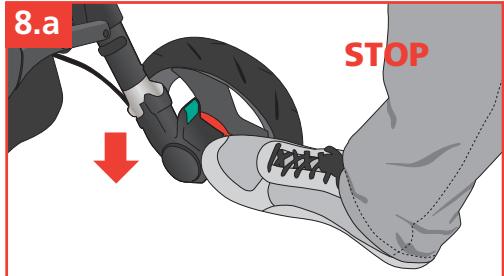
9
natural_image
Illustration of a car seatbelt device with two red circles highlighting the seat (no text or symbols present)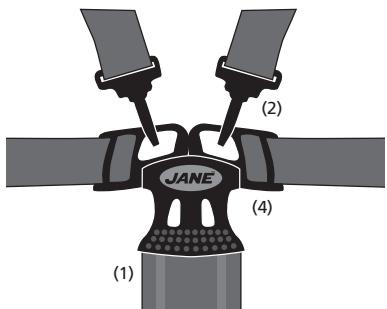
natural_image
Illustration of a hand holding a JANE-branded object, no text or symbols present10
natural_image
3D rendering of a black handheld device with red sensor array and circular handle (no text or symbols)10.a
natural_image
Illustration of a hand inserting a red connector into a black device (no text or symbols visible)10.b
natural_image
3D rendering of a black mechanical device with red accent and control buttons (no text or symbols visible)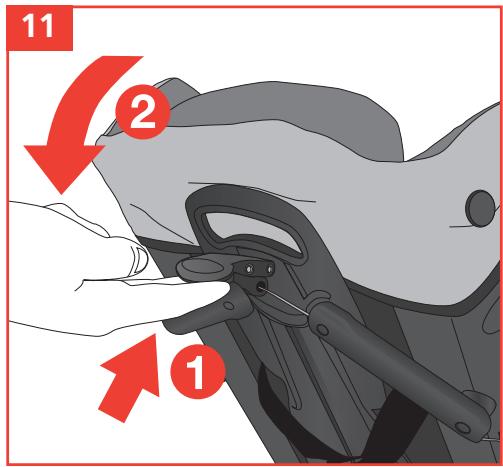
natural_image
Close-up of a hand turning a mechanical component with a red arrow indicating rotation (no text or symbols)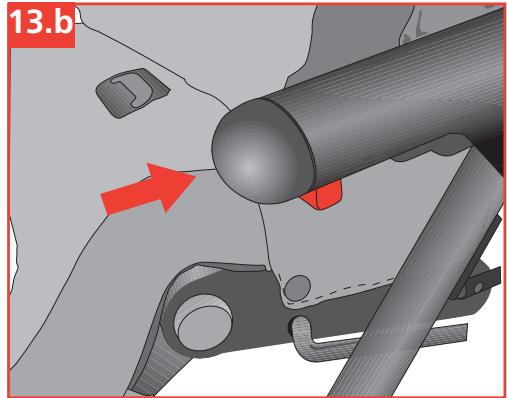
natural_image
Mechanical assembly diagram showing a lever and bracket with red arrow indicating motion (no text or symbols)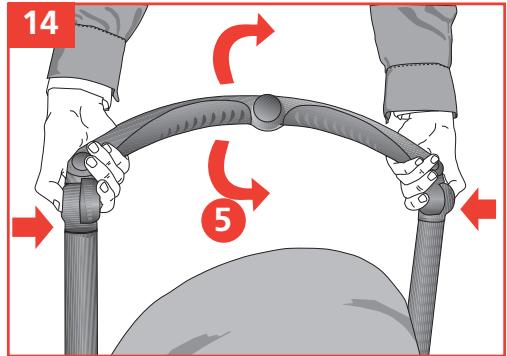
15
natural_image
Illustration of hands adjusting a stroller with red arrows indicating motion (no text or symbols)15.a
natural_image
Illustration of a child in a stroller with wheels and legs, no text or symbols present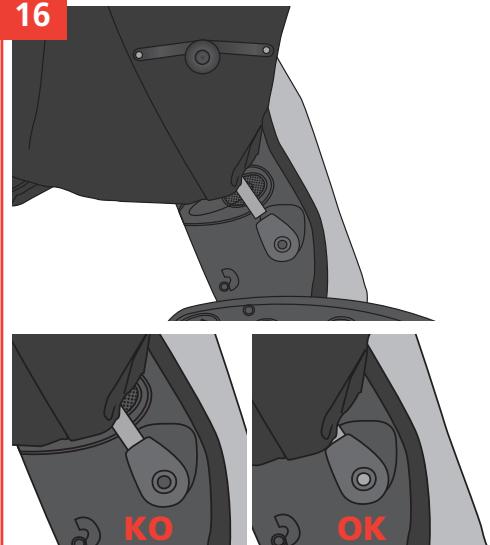
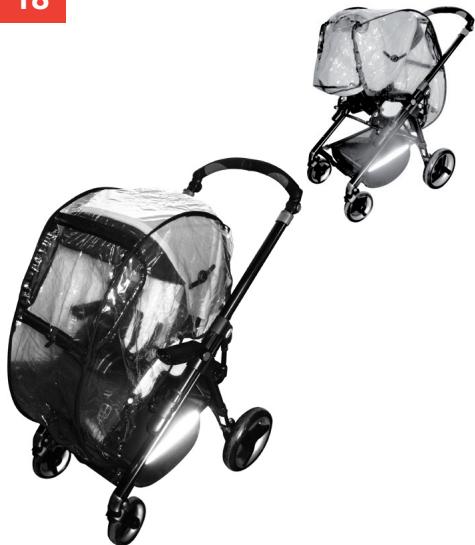
18
natural_image
Two baby strollers with transparent coverings, one larger and one smaller, displayed against a white background (no text or symbols visible)CROSS _R
INDICE
Advertencias 20
Desplegado 22
Sistema Pro-Fix 22
Reversible Pushchair Functioning 30
How to Remove the Hammock 30
How to fit the Hammock Facing Forwards 31
How to fit the Hammock Facing Backwards 31
Swivel Wheels 31
Brakes 31
Seat Belt 32
Adjusting the Suspension 32
Adjusting the Backrest 32
Adjusting the Footrest 32
Protector 32
Adjusting the Position of the Handlebar 33
Removing the rear wheels 33
Folding 33
Fitting and Adjusting the Hood 34
Maintenance 34
Rain Cover 34
WARNING
Read these instructions carefully before use and keep them for future reference. Your child's safety may be affected if you do not follow these instructions.
This vehicle is intended for children from 6 months and up to 15 kg.
Suitable for children under 6 months old only with accessories approved by JANÉ.
Keep this instruction book for future reference.
WARNING: It may be dangerous to leave your child unattended. WARNING: Ensure that all the locking devices are engaged before use.
WARNING: Use a harness as soon as your child can sit unaided.
WARNING: This seat is not suitable for children under 6 months. WARNING: Any load hanging from the handlebar will affect the stability of the pushchair.
WARNING: Always use the crotch strap in combination with the waist belt.
WARNING: Check that the pram body or seat unit attachment devices are correctly engaged before use.
WARNING: This seat is not suitable for running or skating.
The maximum amount carried in the basket must never exceed the weight indicated on the basket (4 kg).
This pushchair may only be used by a child.
Never use accessories that have not been approved by JANÉ, S.A.
The two side fastening points of the seat can be used to fasten a supplementary harness (see section 9).
WARNING: The child should be kept away from the mobile parts when the responsible adult is handling these. The appearance of cutting, compression and pinch points are inevitable during these operations.
WARNING: It is important to make sure that the child is kept away from the pushchair while it is being folded or unfolded. The appearance of cutting, compression and pinch points are inevitable during these operations.
WARNING: Never leave the child in the pushchair when going up or down stairs or when travelling in any mode of transport. WARNING: Never allow the child to stand up on the footrest or footboard.
WARNING: Do not put weight on top of the hood.
WARNING: When the brake is on make sure that the pushchair has braked correctly. It may be necessary to push the pushchair slightly for the brake to be fully activated.
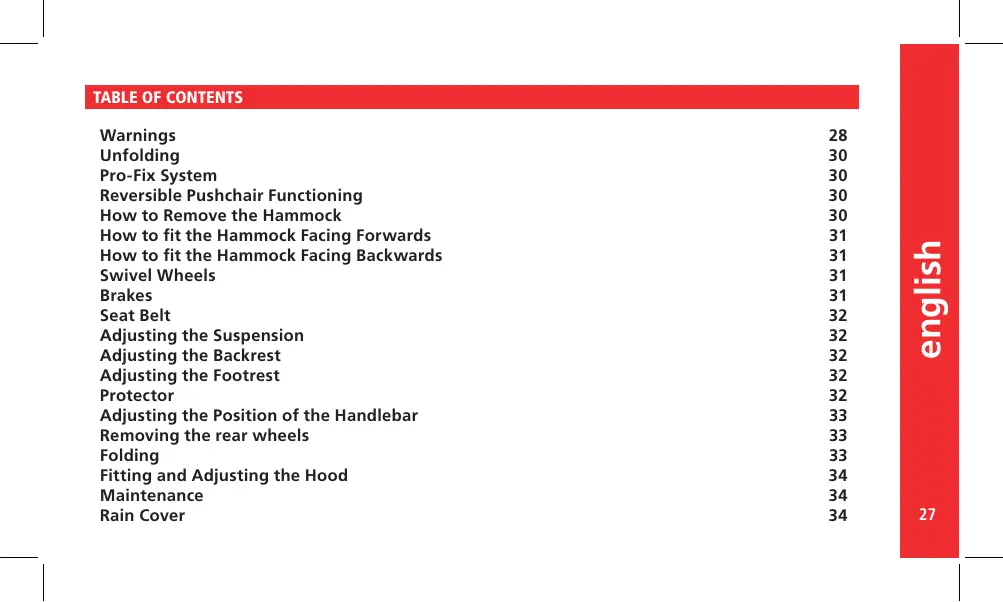
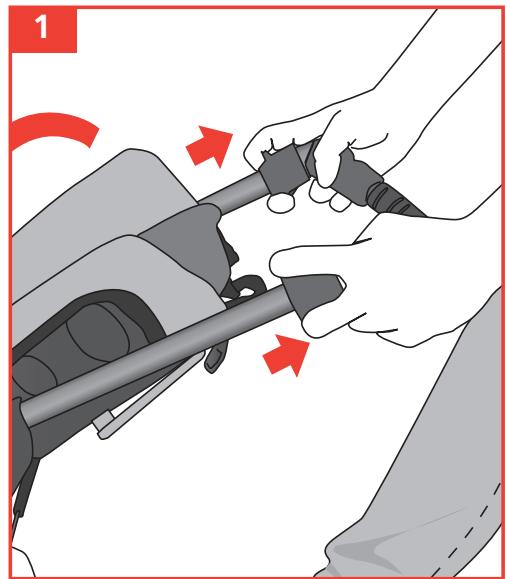
1.- UNFOLDING
To unfold your CROSS REVERSE pushchair simultaneously pull the buttons on the handlebar. 1
Once it is unfolded make sure that the cross on the back is completely taut, as this locks the pushchair so that it does not accidentally fold up. 1.a
Note: When unfolding the pushchair with the hammock in the reversible position, make sure that the footrest does not get caught on the cross on the back as it could break it.
WARNING: It is important to make sure that the child is kept away from the pushchair while it is being folded or unfolded.
WARNING: The appearance of cutting, compression and pinch points are inevitable during these operations.
2.- PRO-FIX SYSTEM
The chassis of your pushchair includes the PRO-FIX system, ready to fit the following baby carriers: the Capazo Pro, as well as the baby carriers Strata, Rebel Pro. The PRO FIX system makes it easy to fasten and remove these accessories onto and off the chassis, in a quick, simple and safe way, with them securely fastened onto the chassis. To do this, follow the instructions for these accessories carefully. To access the PRO-FIX system zone raise the two covers that cover it.
3.- REVERSIBLE PUSHCHAIR FUNCTIONING
Your CROSS REVERSE pushchair is fitted with a reversible hammock so your child can sit facing forwards or facing you. When your child is small he will like to sit facing you, and as he grows he will become more curious and want to sit facing forwards. 3
It is advisable to have the rear compass loose when you are turning the hammock. Remember to tighten it whenever you use the pushchair. 3.a
It is advisable to completely fit one side of the hammock before starting to fit the other, this makes it easier.
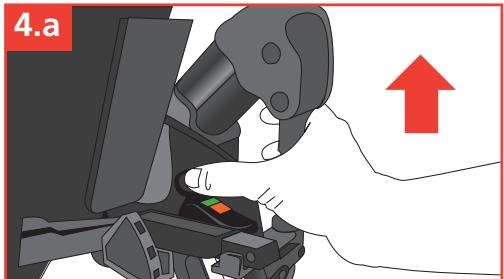
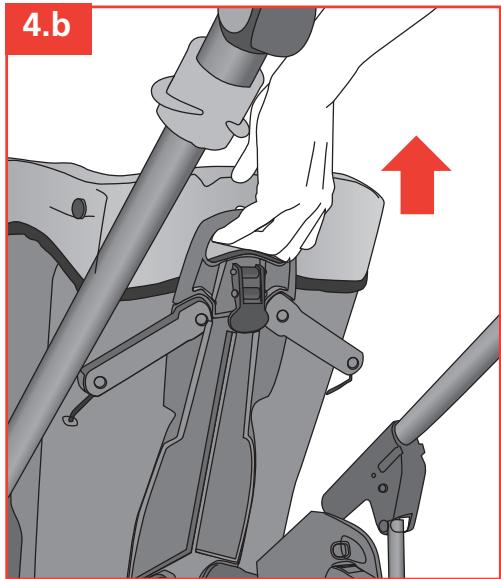
4.- HOW TO REMOVE THE HAMMOCK
Press the two grey buttons simultaneously and lift the hammock by the holes in the sides of it. 4 4.a When it is released pull the handle on the backrest upwards.
4.b
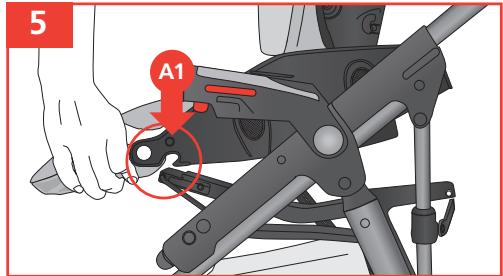
5.- HOW TO FIT THE HAMMOCK FACING FORWARDS
Fit the opening in the hammock into the A1 front fastener.
5 | 5.a
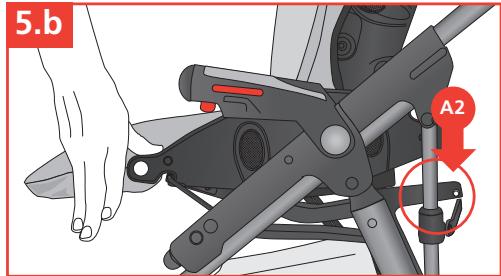
With the hammock supported in A1 lower the rear part until it fits into A2.
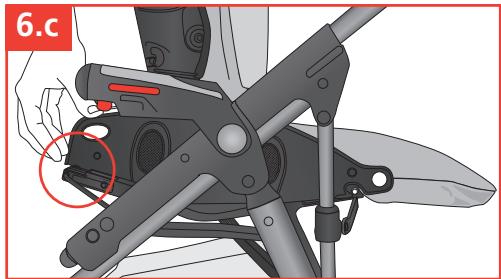
When one side is fitted repeat the operation with the other side. 5.b 5.c
Fit the cog in the hammock into the A2 fastener. 6 6.a
With the hammock supported in A2 lower the rear part until it fits into A1. 6.b 6.c
When one side is fitted repeat the operation with the other side.
7.- SWIVEL WHEELS
Your CROSS REVERSE has front swivel wheels that can be steered or the steering can be locked.
To lock it press the button and once the wheels are aligned with the longitudinal axle of the pushchair they will automatically lock. 7
To unlock the steering press the button in the opposite direction. 7.a
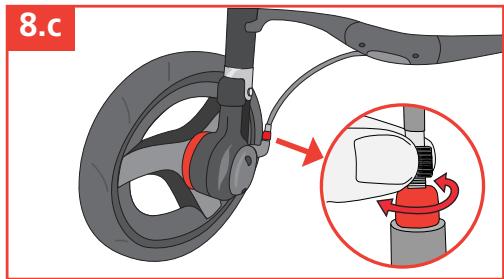
8.- BRAKE
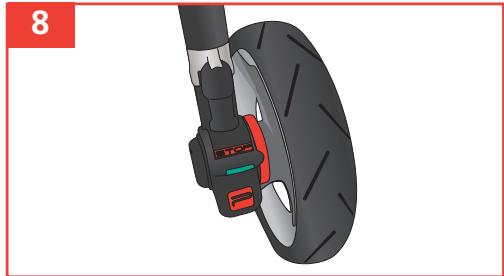
Your CROSS REVERSE has a braking system that acts simultaneously on both rear wheels. Use it as a parking brake whenever you can, it is an important safety element.
Press the brake lever to put the brake on. 8.a Push the lever upwards to release the brake. 8.b
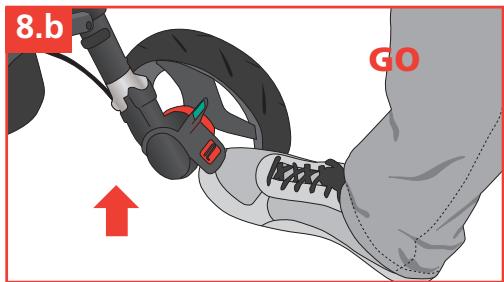
To adjust the brake:
If you need a more precise adjustment follow the indications in figure. 8.c
WARNING: When the brake is on make sure that the pushchair has braked correctly. It may be necessary to push the pushchair slightly for the brake to be fully activated.
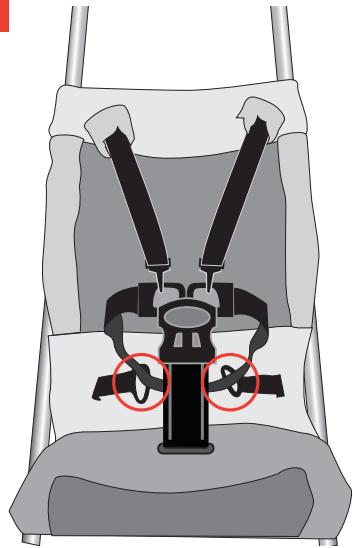
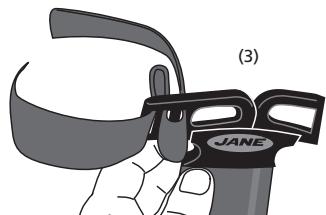
9.- SEAT BELT
Your CROSS REVERSE has a safety harness so that your child is always safe. 9
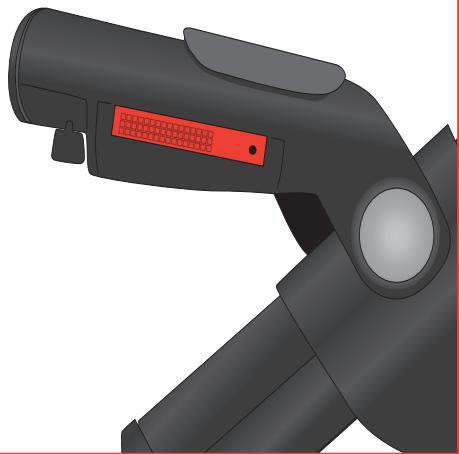
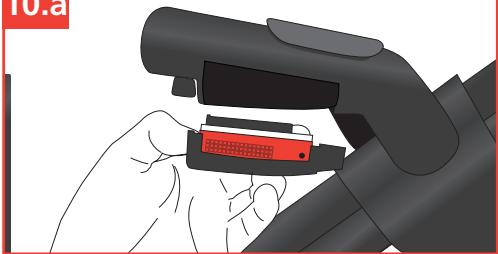
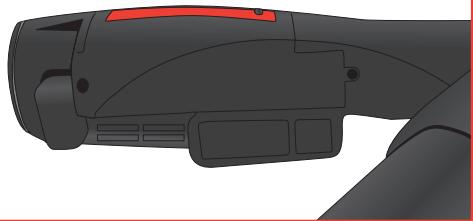
10.- SAFETY LIGHTS
It is possible to activate the safety lights on your CROSS REVERSE so you can be seen in poor visibility conditions.
Press the button to activate this device. 10
There are 3 types of light sequences programmed to be activated each time you press the button.
(Flashing - Permanent light - Sequential.)
The fourth time you press the button the lights will turn off.
If the level of lighting is low you should change the batteries.
To do this remove the screws on the cover and replace the 1.5
V AAA batteries. 10.a 10.b
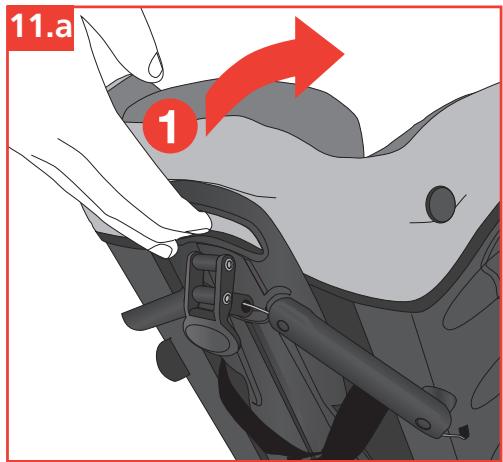
The backrest of the CROSS REVERSE can be reclined to make the child more comfortable. The reclining system has 3 positions.
Pull the rear lever while you lower the backrest. 11
To raise it there is no need to press the lever, simply push the backrest as it is fitted with a free movement mechanism.
11.a
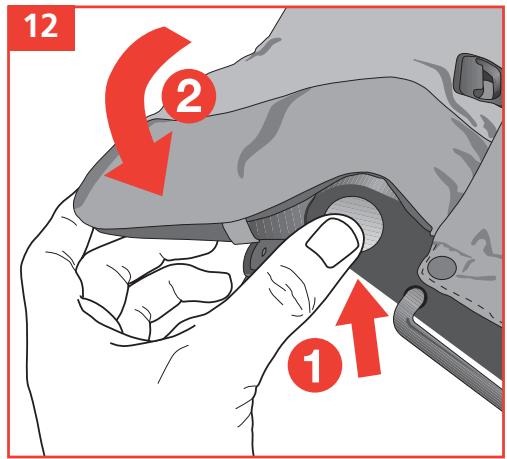
12.- ADJUSTING THE FOOTREST
The position of the footrest can also be adjusted to suit the child's position. It has 4 different positions.
Press button A situated on the footboard on both sides of the pushchair while you move the footrest downwards. 12
To move it upwards you don't need to press the button as it has a free movement mechanism. 12.a
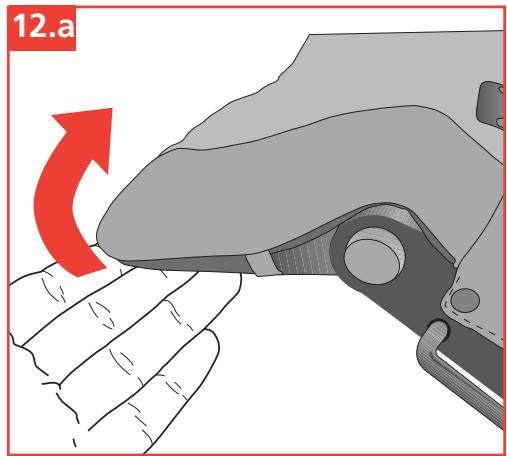
13.- PROTECTOR
To get the protector out, press the button situated on the lower part of the armrest. 13 13.a
Once it is out, put the covers in place designed to cover up the holes of the protector.
These covers have two functions, an aesthetic one as they hide the hole and a safety one as they prevent the child from putting his fingers in the hole. 13.b
Do not use the protector when the hammock is in the reversible position, as the pushchair can not be folded in this position with the protector on.
WARNING: The child should be kept away from the mobile parts when the responsible adult is handling these. The appearance of cutting, compression and pinch points are inevitable during these operations.
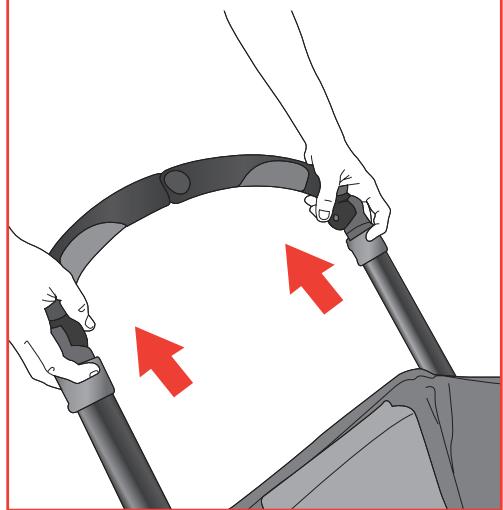
14.- ADJUSTING THE POSITION OF THE HANDLEBAR
Your CROSS REVERSE has a system making it possible to adjust the position of the handlebar to use it more comfortably.
Press the button and keep it pressed while you adjust the position of the handlebar. It has 5 positions so you can choose the one that suits you best. 14
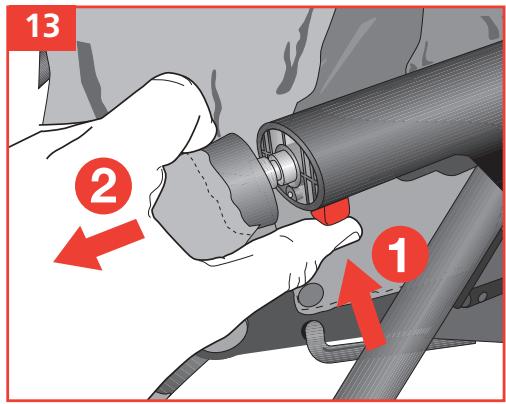
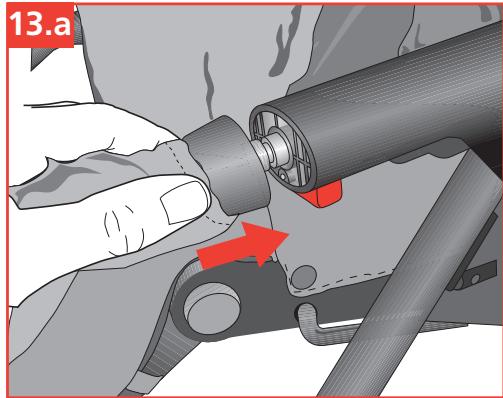
15.- REMOVING THE REAR WHEELS
To take the rear wheels off hold the button on the axle down and pull the wheel.
Fit the rear wheels onto the chassis, pressing the central button on the wheel.
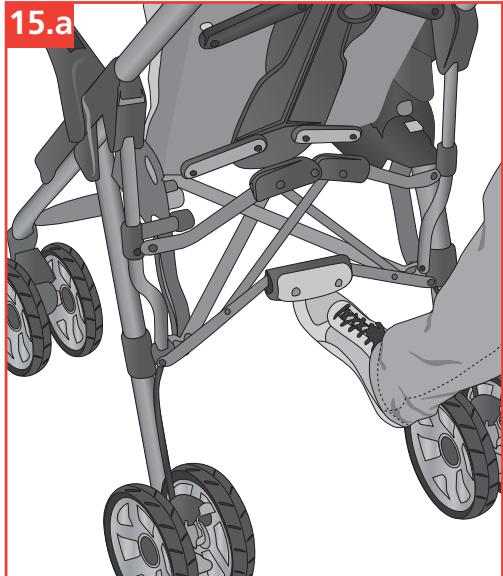
16.- FOLDING
When folding the pushchair it is advisable to fold it with the hammock facing forwards. The pushchair will be more compact like that and it will be easier to unfold. It is also possible to fold the pushchair with the hammock facing the mother, but folding it in this position is not optimal.
Simultaneously pull the 2 handles on the handlebar upwards while raising the pedal on the lower compass as shown in the diagram. 15 15.a
Then push the handlebar downwards so the pushchair folds up.
Lastly, use the backrest adjustment mechanism so that your CROSS REVERSE is left in the most compact folded position.
Note: If you fold the pushchair up with the hammock in the reclined position the hood may come loose.
When unfolding the pushchair with the hammock in the reversible position, make sure that the footrest does not get caught on the cross on the back as it could break it.
WARNING: It is important to make sure that the child is kept away from the pushchair while it is being folded or unfolded.
WARNING: The appearance of cutting, compression and pinch points are inevitable during these operations.
17.- FITTING AND ADJUSTING THE HOOD
Insert the end of the hood into the hole situated on the side of the pushchair. To fit it correctly insert the end until it completely covers the hole of the adjuster. When the hood has been fitted the position can be adjusted by using the part on the side of the pushchair, to fold the hood, unfold it and put on or take off the parasol. 16
WARNING: Do not put any weight on top of the hood.
18.- MAINTENANCE
Do not expose the cover to sunlight for long periods.
Wash the plastic parts with warm water and soap and carefully dry all the components after.
The cover can be removed for washing.
19.- RAIN COVER
The rain cover for your CROSS REVERSE is very easy to fit into place, simply cover the hammock and fit the hooks to the chassis to fasten it. It has a small window that can be rolled up and secured with Velcro strips so the child is free to investigate his surroundings. 18
INDEX
Avertissement 36
Dépliage 38
Système Pro-Fix 38


- CROSS _R
- INDICE
- WARNING
- 1.- UNFOLDING
- 2.- PRO-FIX SYSTEM
- 3.- REVERSIBLE PUSHCHAIR FUNCTIONING
- 4.- HOW TO REMOVE THE HAMMOCK
- 5.- HOW TO FIT THE HAMMOCK FACING FORWARDS
- 7.- SWIVEL WHEELS
- 8.- BRAKE
- 9.- SEAT BELT
- 10.- SAFETY LIGHTS
- 12.- ADJUSTING THE FOOTREST
- 13.- PROTECTOR
- 14.- ADJUSTING THE POSITION OF THE HANDLEBAR
- 15.- REMOVING THE REAR WHEELS
- 16.- FOLDING
- 17.- FITTING AND ADJUSTING THE HOOD
- 18.- MAINTENANCE
- 19.- RAIN COVER
- INDEX
Brand : JANE
Model : CROSS REVERSE
Category : Stroller