
BDS100 - Detector BLACK & DECKER - Free user manual and instructions
Find the device manual for free BDS100 BLACK & DECKER in PDF.


| Product Type | Stud Detector |
| Brand | Black & Decker |
| Model | BDS100 |
| Power Supply | 2 LR03 (AAA) batteries, 3 V |
| Weight | 0.175 kg |
| Operating Temperature | 0 °C to 40 °C |
| Indicators | Red/green LED + audible alarm |
| Intended Use | Domestic, stud detection in partitions |
| Calibration | Automatic upon startup |
| Maintenance | Clean with a dry cloth, no solvents |
| Safety | Do not expose to rain, keep out of reach of children |
| Warranty | 24 months |
| Certifications | EN 50144, EN 55014 |
| Recycling | Separate collection, return to recycling center or an authorized repairer |
| Spare Parts | LR03 batteries (not included) |
Frequently Asked Questions - BDS100 BLACK & DECKER
User questions about BDS100 BLACK & DECKER
0 question about this device. Answer the ones you know or ask your own.
Ask a new question about this device
Download the instructions for your Detector in PDF format for free! Find your manual BDS100 - BLACK & DECKER and take your electronic device back in hand. On this page are published all the documents necessary for the use of your device. BDS100 by BLACK & DECKER.
USER MANUAL BDS100 BLACK & DECKER
B
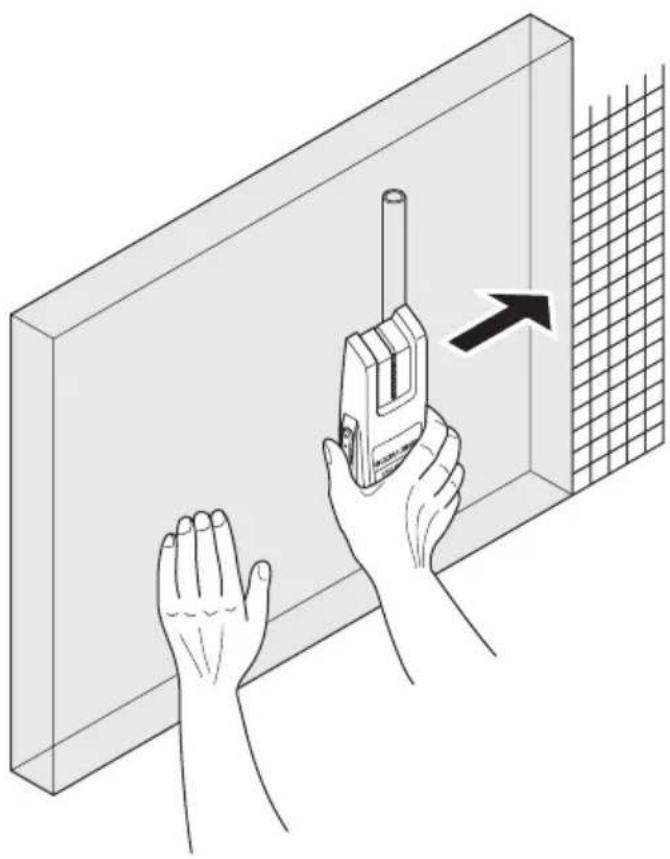
natural_image
Illustration of hands holding a walkie-talkie inside a wall-mounted device, with an arrow indicating motion (no text or symbols present)Intended use
This Black & Decker tool has been designed to detect studs covered by wall boards. This tool is intended for consumer use only.
Safety instructions
◆Warning! When using battery-powered tools, basic safety precautions, including the following, should always be followed to reduce the risk of fire, leaking batteries, personal injury and material damage.
◆Read all of this manual carefully before operating the tool.
◆Retain this manual for future reference.
Keep work area clean
Cluttered areas and benches can cause accidents.
Consider work area environment
Do not expose the tool to rain. Do not use the tool in damp or wet conditions. Keep the work area well lit. Do not use the tool where there is a risk of causing fire or explosion, e.g. in the presence of flammable liquids and gases.
Keep children away
Do not allow children, visitors or animals to come near the work area or to touch the tool.
Dress properly
Do not wear loose clothing or jewellery, as these can be caught in moving parts.
Preferably wear rubber gloves and non-slip footwear when working outdoors. Wear protective hair covering to keep long hair out of the way.
Personal protection
Always use safety glasses. Use a face or dust mask whenever the operations may produce dust or flying particles. Wear ear protection whenever the sound level seems uncomfortable.
Do not overreach
Keep proper footing and balance at all times.
Stay alert
Watch what you are doing. Use common sense.
Do not operate the tool when you are tired.
Secure workpiece
Use clamps or a vice to hold the workpiece. It is safer and it frees both hands to operate the tool.
Use appropriate tool
The intended use is described in this instruction manual.
Do not force small tools or attachments to do the job of a heavy-duty tool. The tool will do the job better and safer at the rate for which it was intended. Do not force the tool.
Warning! The use of any accessory or attachment or performance of any operation with this tool other than those recommended in this instruction manual may present a risk of personal injury.
Check for damaged parts
Before use, carefully check the tool for damage.
Check for misalignment and seizure of moving parts, breakage of parts, damage to guards and switches and any other conditions that may affect its operation. Ensure that the tool will operate properly and perform its intended function. Do not use the tool if any part is damaged or defective. Do not use the tool if the switch does not turn it on and off. Have any damaged or defective parts repaired or replaced by an authorised repair agent. Never attempt any repairs yourself.
Avoid unintentional starting
Do not carry the tool with a finger on the on/off switch.
Store idle tools
When not in use, tools and batteries should be stored in a dry, locked up or high place, out of reach of children.
Maintain tools with care
Keep cutting tools sharp and clean for better and safer performance. Follow the instructions for maintenance and changing accessories. Keep handles and switches dry, clean and free from oil and grease.
Repairs
This tool complies with relevant safety requirements.
Repairs should only be carried out by qualified persons using original spare parts; otherwise this may result in considerable danger to the user.
Additional safety instructions for non-rechargeable batteries
◆Never attempt to open for any reason.
◆Do not store in locations where the temperature may exceed 40 °C.
- When disposing of batteries, follow the instructions given in the section "Protecting the environment". Do not incinerate the batteries.
◆Under extreme conditions, battery leakage may occur. When you notice liquid on the batteries, proceed as follows: - Carefully wipe the liquid off using a cloth. Avoid skin contact.
Features
- On/off switch
- LED indicators
Assembly
Fitting the batteries (fig. A)
◆Depress the release button (4) and slide the battery cover (3) off the tool.
◆Insert the batteries into the tool in the orientation as shown.
◆Refit the cover and let it click into place.
Use (fig. B)
◆Place the tool flat against the wall as shown.
◆Keep the on/off switch (1) depressed.
ENGLISH
The red LED indicator (2) will light up and the buzzer will sound once while the tool is calibrating. After calibration is completed:
- Slowly slide the tool in a horizontal direction. Make sure not to tilt or lift the tool.
When the red LED indicator (2) lights up, slow down and slide the tool further until the buzzer sounds and the top green LED indicator is on.
This position indicates the one edge of the stud.
◆Mark this position using the centre of the tool as a reference point.
◆Move the unit further until the LED indicators are off.
◆While still keeping the on/off switch (1) depressed, move the tool in the opposite direction.
When the red LED indicator (2) lights up, slow down and slide the tool further until the buzzer sounds and the top green LED indicator is on.
This position indicates the other edge of the stud.
◆Mark this position using the centre of the tool as a reference point.
The centre of the stud is between the two marks.
Protecting the environment

Separate collection. This product must not be disposed of with normal household waste.
Should you find one day that your Black & Decker product needs replacement, or if it is of no further use to you, do not dispose of it with household waste. Make this product available for separate collection.

Separate collection of used products and packaging allows materials to be recycled and used again. Re-use of recycled materials helps prevent environmental pollution and reduces the demand for raw materials.
Local regulations may provide for separate collection of electrical products from the household, at municipal waste sites or by the retailer when you purchase a new product.
Black & Decker provides a facility for the collection and recycling of Black & Decker products once they have reached the end of their working life. To take advantage of this service please return your product to any authorised repair agent who will collect them on our behalf.
You can check the location of your nearest authorised repair agent by contacting your local Black & Decker office at the address indicated in this manual. Alternatively, a list of authorised Black & Decker repair agents and full details of our after-sales service and contacts are available on the Internet at: www.2helpU.com
Batteries

At the end of their useful life, discard batteries with due care for our environment.
◆Remove the batteries as described above.
◆Place the batteries in a suitable packaging to ensure that the terminals cannot be short-circuited.
◆Take the batteries to a local recycling station.
Technical data
BDS100
Voltage V 3
Battery size LR03
Operating temperature °C 0 - 40
Weight kg 0.175
EC declaration of conformity
BDS100
Black & Decker declares that these products conform to: EN 50144, EN 55014
Peter Holmes, Director of Engineering
Black & Decker, 56 Bai Yu Road
Suzhou Industrial Park
Suzhou, Jiangsu, 215021
1-12-2004
Guarantee
Black & Decker is confident of the quality of its products and offers an outstanding guarantee. This guarantee statement is in addition to and in no way prejudices your statutory rights. The guarantee is valid within the territories of the Member States of the European Union and the European Free Trade Area.
If a Black & Decker product becomes defective due to faulty materials, workmanship or lack of conformity, within 24 months from the date of purchase, Black & Decker guarantees to replace defective parts, repair products subjected to fair wear and tear or replace such products to ensure minimum inconvenience to the customer unless:
◆The product has been used for trade, professional or hire purposes;
◆The product has been subjected to misuse or neglect;
◆The product has sustained damage through foreign objects, substances or accidents;
◆Repairs have been attempted by persons other than authorised repair agents or Black & Decker service staff.
To claim on the guarantee, you will need to submit proof of purchase to the seller or an authorised repair agent. You can check the location of your nearest authorised repair agent by contacting your local Black & Decker office at the address indicated in this manual. Alternatively, a list of authorised Black & Decker repair agents and full details of our after-sales service and contacts are available on the Internet at:
www.2helpU.com
Please visit our website www.blackanddecker.co.uk to register your new Black & Decker product and to be kept up to date on new products and special offers. Further information on the Black & Decker brand and our range of products is available at www.blackanddecker.co.uk
Peter Holmes, Director of Engineering BDCI, 4/F, 2 Dai Wang Street Tai Po Industrial Estate Tai Po NT, Hong Kong 1-12-2004
Garantie
Peter Holmes, Director of Engineering
BDCI, 4/F, 2 Dai Wang Street
Tai Po Industrial Estate
Tai Po NT, Hong Kong
1-12-2004
Garantie
Peter Holmes, Director of Engineering BDCI, 4/F, 2 Dai Wang Street
Tai Po Industrial Estate
Tai Po NT, Hong Kong
1-12-2004
ITALIANO
Garanzia
Peter Holmes, Director of Engineering BDCI, 4/F, 2 Dai Wang Street
Tai Po Industrial Estate
Tai Po NT, Hong Kong
1-12-2004
Garantie
Peter Holmes, Director of Engineering BDCI, 4/F, 2 Dai Wang Street Tai Po Industrial Estate Tai Po NT, Hong Kong 1-12-2004
Garantía
Peter Holmes, Director of Engineering
BDCI, 4/F, 2 Dai Wang Street
Tai Po Industrial Estate
Tai Po NT, Hong Kong
1-12-2004
Garantia
Peter Holmes, Director of Engineering
BDCI, 4/F, 2 Dai Wang Street
Tai Po Industrial Estate
Tai Po NT, Hong Kong
1-12-2004
Reservdelar / reparationer
Internet, adress: www.2helpU.com
Peter Holmes, Director of Engineering
BDCI, 4/F, 2 Dai Wang Street
Tai Po Industrial Estate
Tai Po NT, Hong Kong
1-12-2004
Peter Holmes, Director of Engineering
BDCI, 4/F, 2 Dai Wang Street
Tai Po Industrial Estate
Tai Po NT, Hong Kong
1-12-2004
Reservedele / reparationer
Peter Holmes, Director of Engineering
BDCI, 4/F, 2 Dai Wang Street
Tai Po Industrial Estate
Tai Po NT, Hong Kong
1-12-2004
Peter Holmes, Director of Engineering BDCI, 4/F, 2 Dai Wang Street Tai Po Industrial Estate Tai Po NT, Hong Kong 1-12-2004
Εγγύηση
as was ad asal taca al limnacao, v a migen
• A.U.D. on trade appreciation in
apparized failure signal retention
◆ Data protection act: Tick the box if you prefer

Cat. no.:
The image contains no text or characters.
No Nein Non No Need
◆ Sim Ja Ja Ja Kylia Naol
Yes Ja Out Si Ja
The image contains no text or content.
Dealer addresses Date of purchase
Handelardeesse Kaufatum
◆ is this tool a gift? ◆ lst dieses Great etin
The image contains a single, solid horizontal line, which is a stylistic or background element (like a rule line on paper). According to Rule 2, such lines must be ignored by the OCR result. Therefore, the corrected OCR text is:
[Empty]
◆ Address ◆ Adverse ◆ Adverse ◆ indirizzo ◆
Adres ◆ Direction ◆ Morada ◆ Address ◆
Adresse ◆ Adresse ◆ Oosite ◆ Activuven:
- No - N£in - Non - No - N£e
♦ No ◆ Na _2 ◆ Ne! ◆ Ne! Ne!
No NaO
1X0 ◆ 13 ◆
□
◆ Town ◆ Out ◆ Ville ◆ Citta ◆ Plaats
♦ Ciudad ♦ Localidade ♦ Ort ♦ BY ♦ BY
▶ Perpilese | ▼ Perpil.
◆ Town ◆ Out ◆ Ville ◆ Citta ◆ Plaats
◆ Town ◆ Out ◆ Ville ◆ Citta ◆ Plaats
◆ Town ◆ Out ◆ Ville ◆ Citta ◆ Plaats
◆ Town ◆ Out ◆ Ville ◆ Citta ◆ Plaats
◆ Town ◆ Out ◆ Ville ◆ Citta ◆ Plaats
◆ Town ◆ Out ◆ Ville ◆ Citta ◆ Plaats
◆ Town ◆ Out ◆ Ville ◆ Citta ◆ Plaats
◆ Town ◆ Out ◆ Ville ◆ Citta ◆ Plaats
◆ Town ◆ Out ◆ Ville ◆ Citta ◆ Plaats
◆ Town ◆ Out ◆ Ville ◆ Citta ◆ Plaats
◆ Town ◆ Out ◆ Ville ◆ Citta ◆ Plaats
◆ GUARANTEE CARD ◆ GARANTIEKARTE ◆ CARTE DE GARANTIE ◆ TAGLIANDO DI GARANZIA ◆ GARANTIEKAART ◆ TARJETA DE GARANTÍA ◆ CARTÃO DE GARANTIA ◆ GARANTIBEVIS ◆ GARANTI KORT ◆ GARANTI KORT ◆ TAKUUKORTTI ◆ KAPTA EΓΓΥΗΣΗΣ
English Please complete this section immediately after the purchase of your
tool and send it to Black & Decker in your country. If you live in Australia or New Zealand, please register by using the alternative
guarantee card supplied.
Black & Decker in uw land.

- Intended use
- Safety instructions
- Keep work area clean
- Consider work area environment
- Keep children away
- Dress properly
- Personal protection
- Do not overreach
- Stay alert
- Secure workpiece
- Use appropriate tool
- Check for damaged parts
- Avoid unintentional starting
- Store idle tools
- Maintain tools with care
- Repairs
- Additional safety instructions for non-rechargeable batteries
- Features
- Assembly
- Fitting the batteries (fig. A)
- Use (fig. B)
- ENGLISH
- Protecting the environment
- Batteries
- Technical data
- EC declaration of conformity
- Guarantee
- www.2helpU.com
- Garantie
- ITALIANO
- Garanzia
- Garantía
- Garantia
- Reservdelar / reparationer
- Reservedele / reparationer
- Εγγύηση
- Cat. no.:
- ◆ GUARANTEE CARD ◆ GARANTIEKARTE ◆ CARTE DE GARANTIE ◆ TAGLIANDO DI GARANZIA ◆ GARANTIEKAART ◆ TARJETA DE GARANTÍA ◆ CARTÃO DE GARANTIA ◆ GARANTIBEVIS ◆ GARANTI KORT ◆ GARANTI KORT ◆ TAKUUKORTTI ◆ KAPTA EΓΓΥΗΣΗΣ
Brand : BLACK & DECKER
Model : BDS100
Category : Detector