
DPC10QTC-QS - Compressor DEWALT - Free user manual and instructions
Find the device manual for free DPC10QTC-QS DEWALT in PDF.


| Product Type | Air Compressor |
| Brand | DEWALT |
| Model | DPC10QTC-QS |
| Supply Voltage | 230 V / 50 Hz |
| Motor Power | 1.75 HP (1.3 kW) |
| Maximum Tank Pressure | 13.8 bar (200 psi) |
| Tank Capacity | 10 L |
| Air Displacement | 176 L/min (6.2 cfm) |
| Air Delivery at 7 bar | 82 L/min (2.9 cfm) |
| Rotation Speed | 2450 rpm |
| Weight | 18.8 kg |
| Protection Type | IP20 |
| Duty Cycle | S3-75% (2.5 min ON / 7.5 min OFF) |
| Operating Ambient Temperature | 0°C to +35°C |
| Sound Level (LwA) | 97 dB(A) |
| Safety Valve | Factory set, do not modify |
| Pressure Regulator | Yes, with manometer |
| Tank Drain | Drain valve under tank |
| Daily Maintenance | Check safety valve, drain tank |
| Recommended Accessories | DEWALT pneumatic tools |
| Warranty | Consult authorized service center |
Frequently Asked Questions - DPC10QTC-QS DEWALT
User questions about DPC10QTC-QS DEWALT
0 question about this device. Answer the ones you know or ask your own.
Ask a new question about this device
Download the instructions for your Compressor in PDF format for free! Find your manual DPC10QTC-QS - DEWALT and take your electronic device back in hand. On this page are published all the documents necessary for the use of your device. DPC10QTC-QS by DEWALT.
USER MANUAL DPC10QTC-QS DEWALT
English SAFETY & OPERATING INSTRUCTIONS MANUAL
(original instructions) 11
Français MANUEL D'INSTRUCTIONS DE SÉCURITÉ ET D'UTILISATION
natural_image
Front view of a white portable device with wheels and handle, labeled with number 2 (no text or symbols on the device itself)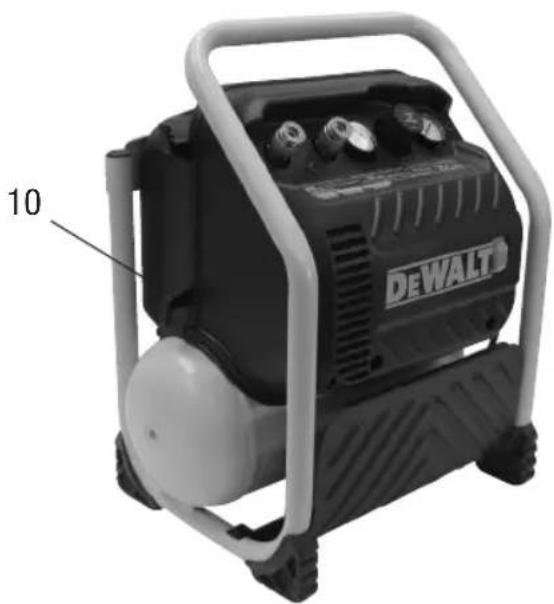
natural_image
Exterior view of a black and white industrial air purifier unit (DAWALT) with no visible text or symbols on the device body.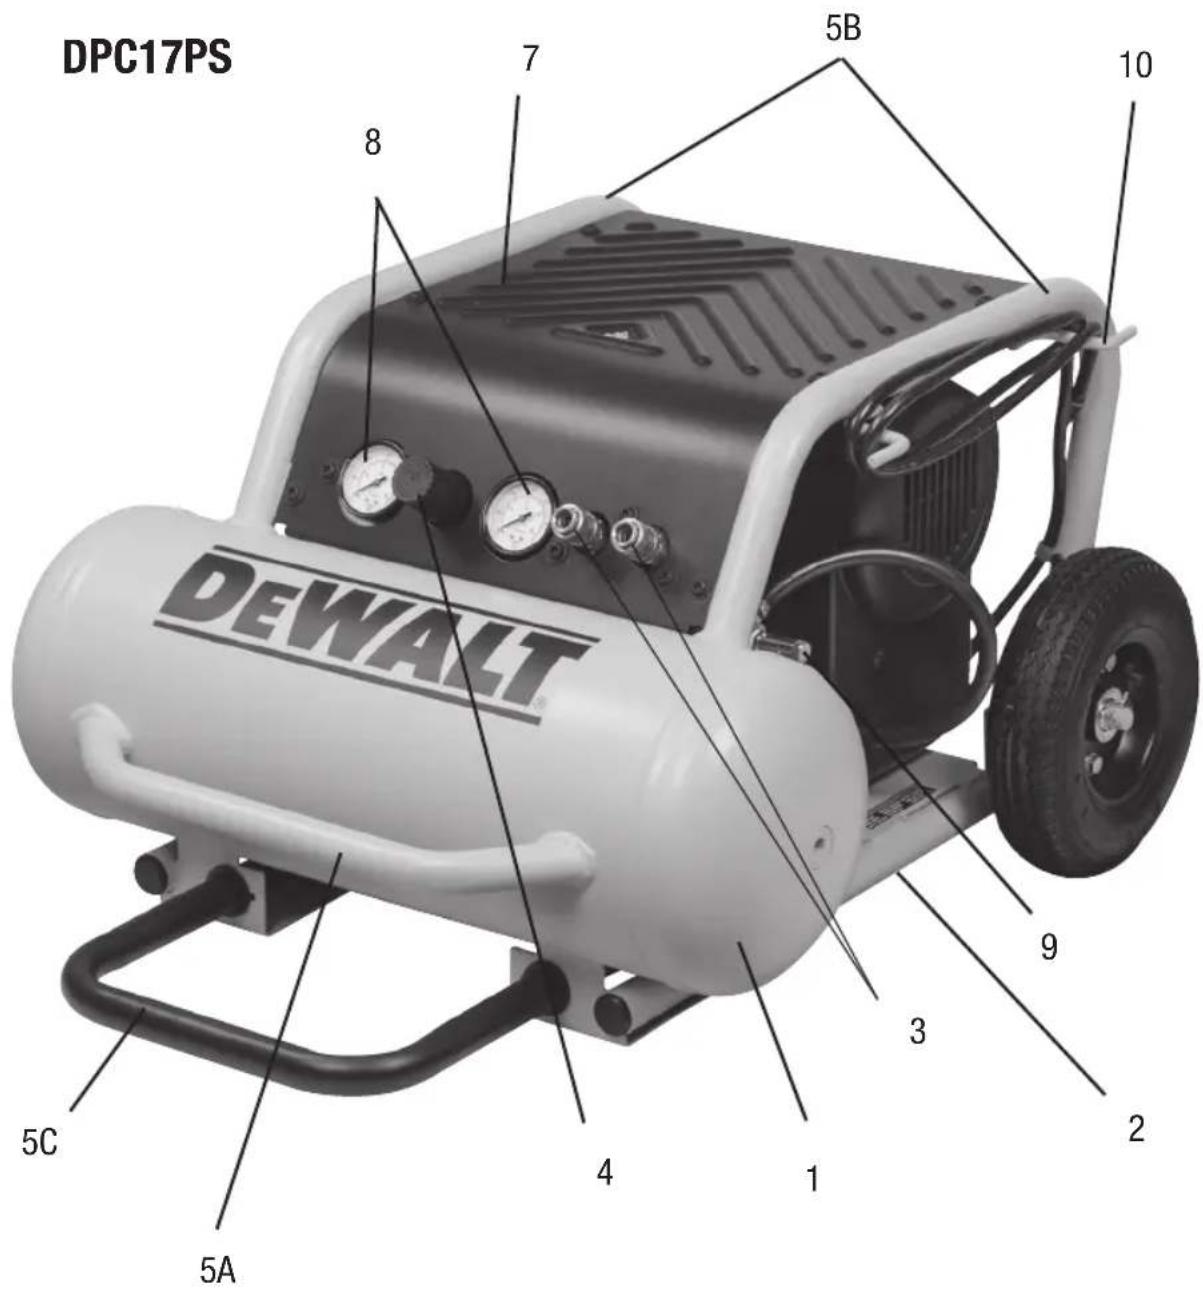
natural_image
Line drawing of a person pushing a small cart with a circular head (no text or symbols)| GBFRDENL | ||||
| 1 | TANK RÉSERVOIR KESSEL TANK | |||
| 2 | DRAIN VALVE DRAIN VALVE ABLASSVENTIL AFVOERKLEP | |||
| 3 | COMPRESSED AIR OUTLET SORTIE AIR COMPRIMÉ DRUCKLUFTAUSGANG AFVOER PERSLUCHT | |||
| 4 | PRESSURE REDUCER | RÉDUCTEUR DE PRESSION DRUCKMINDERER | DRUKREGELAAR | |
| 5 | HANDLE POIGNÉE GRIFF HANDVAT | |||
| 6 | ON/ OFF SWITCH BOUTON ON/OFF EIN-/AUS-SCHALTER | AAN/UIT-SCHAKELAAR | ||
| 7 | GUARD | CARTER DE PROTECTION | SCHUTZVERKKLEIDUNG | SCHERM |
| 8 | PRESSURE GAUGE | MANOMÈTRE MANOMETER MANOMETER | ||
| 9 | SAFETY VALVE | SAFETY VALVE | SICHERHEITSVENTIL | VEILIGHEIDSKLEP |
| 10 | CABLE AND HOSE TIDY | SYSTEME POUR LE CABLE ET LE TUYAU | KABEL- UNDSCHLAUCHAUFWICKLUNG | KABEL- EN SLANGHASPEL |
| DK | GR | IT | ES | |
| 1 | BEHOLDER | ΔΕΞΑΜΕΝΗ | SERBATOIO | DEPÓSITO |
| 2 | AFL∅BSVENTIL | ΒΑΛΒΙΔΑ ΑΠΟΣΤΡΑΓΓΙΣΗΣ | VALVOLA DI DRENAGGIO | VÁLVULA DE DRENAJE |
| 3 | UDGANG FOR TRYKLUFT | ΣΤΟΜΙΟ ΕΞΟΔΟΥ ΠΕΠΙΕΣΜΕΝΟΥ ΑΕΡΑ | SCARICO ARIA COMPRESSA | SALIDA DE AIRE COMPRIMIDO |
| 4 | TRYKBEGRÆNSER | ΑΠΟΣΥΜΠΙΕΣΤΗΣ | RIDUTTORE DI PRESSIONE | REDUCTOR DE PRESIÓN |
| 5 | GREB | ΛΑΒΗ | MANIGLIA | MANGO |
| 6 | TAEND/SLUK | ΔΙΑΚΟΠΤΗΣ ΟΝ/OFF | INTERRUTTORE ΟΝ/OFF | INTERRUPTOR DE ENCENDIDO/APAGADO |
| 7 | AFSKÆRMNING | ΠΕΡΙΒΛΗΜΑ ΠΡΟΣΤΑΣΙΑΣ | PROTEZIONE | COBERTURA DE PROTECCIÓN |
| 8 | TRYKMÅLER | ΜΕΤΡΗΤΗΣ ΠΙΕΣΕΩΣ | MANOMETRO | MANÓMETRO |
| 9 | SIKKERHEDSVENTIL | ΒΑΛΒΙΔΑ ΑΣΦΑΛΕΙΑΣ | VALVOLA DI SICUREZZA | VÁLVULA DE SEGURIDAD |
| 10 | KABEL OG SLANGE OPRULNOPTFISE | ΤΑΚΤΟΠΟΙΗΣΗ ΚΑΛΩΔΙΩΝ ΚΑΙ ΣΩΛΗΝΩΝ | CONTENIMENTO CAVO E MANICHETTA | RECOGECABLES Y MANGUERA |
| 1 | TANK DEPÓSITO SÄIWIÖ TANK | |||
| 2 | AVTAPPINGSVENTIL VÁLVULA DE DRENAGEM TYHJENNYSVENTTIILI DRÄNERINGSVENTIL | |||
| 3 | TRYKKLUFTUTGANG SAÍDA DE AR COMPRIMIDO PAINEILMALÄHTÖ TRYCKLUFTSUTGÄNG | |||
| 4 | TRYKKFORMINSKER REDUTOR DE PRESSÃO PAINEENALENTAJA | TRYCKLUFTSREDUCERARE | ||
| 5 | HÄNDTAK PEGA KAHVA HANDTAG | |||
| 6 | PÄ/AV-BRYTER INTERRUPTOR DE LIGAR/DESLIGAR VIRTAKYTKIN PÄ/AV-KNAPP | VIRTAKYTKIN | PÄ/AV-KNAPP | |
| 7 | VERNEINNRETNING PROTEÇÃO SUOJUS SKYDD | |||
| 8 | TRYKKMÄLER INDICADOR DE PRESSÃO PAINEMITTARI TRYCKMÄTARE | INDICADOR DE PRESSÃO | PAINEMITTARI | |
| 9 | SIKKERHETSVENTIL VÁLVULA DE SEGURANÇA VAROVENTTIILI SÄKERHETSVENTIL | VÁLVULA DE SEGURANÇA | VAROVENTTIILI SÄKERHETSVENTIL | |
| 10 | KABEL- OG SLANGEHOLDER ENROLADORES DO CABO E DA MANGUEIRA KAAPELEIDEN JA LETKUJEN SIISTIMINEN SLANG- OCH KABELVINDA | ENROLADORES DO CABO E DA MANGUEIRA | KAAPELEIDEN JA LETKUJEN SIISTIMINEN SLANG- OCH KABELVINDA | |
| PL | CZ | SK | HU | RO | |
| 1 | ZBIORNIK | NÁDRŽ | TLAKOVÁ NÁDOBA | TARTÁLY | REZERVOR |
| 2 | ZAWÓR SPUSTOWY | ODTAH KONDENZÁTU | VÝPUSTNÝ VENTIL | LEERESZTŐSZELEP | SUPAPĂ DE DRENARE |
| 3 | DYSZA WYLOTOWA | VÝSTUP STLAČENÉHO VZDUCHU | VÝVOD STLAČENÉHO VZDUCHU | SÜRÍTETTLEVEGŐ- KIMENET | ORIFICIU DE EVACUARE AER COMPRIMAT |
| 4 | REGULATOR CIŚNIENIA | REDUKTOR TLAKU | REGULÁTOR TLAKU | NYOMÁSCSÖKKENTŐ | REDUCTOR DE PRESIUNE |
| 5 | RĄCZKA | RUKOJEŤ | RUKOVÄŤ | MARKOLAT | MÃNER |
| 6 | WŁĄCZNIK ON/OFF | VYPÍNAČ ON/OFF | SPÍNAČ/VYPÍNAČ | BE/KI KAPCSOLÓ | COMUTATOR PORNIT/ OPRIT |
| 7 | POKRYWA | OCHRANA | KRYT | VÉDŐ | PROTECTIE |
| 8 | MANOMETR | TLAKOMĚR | MANOMETER | NYOMÁSMĚRŐ MŰSZER | MANOMETRU |
| 9 | ZAWÓR BEZPIECZENSTWA | POJISTNÝ VENTIL | POISTNÝ VENTIL | BIZTONSÁGI SZELEP | SUPAPĂ DE SIGURANȚĂ |
| 10 | SCHOWEK NA KABEL I PRZEWÓD | DRŽÁK NA KABEL A HADICI | SCHRÁNKA NA KÁBEL A HADICU | KÁBEL- ÉS TÖMLŐTARTÓ | SISTEM PENTRU CABLU ȘI FURTUN |
GB TECHNICAL DATA: PLEASE, REFER TO THE LABEL STUCK ONTO THE FIRST PAGE OF THIS MANUAL
FR CARACTERISTIQUES TECHNIQUES : SE RÉFÉRER À L'ÉTIQUETTE APPLIQUÉE SUR LA PREMIÈRE PAGE DU MANUEL
DE TECHNISCHE DATEN: SIE SIND DEM ETIKETT ZU ENTNEHMEN, DAS AN DER ERSTEN SEITE DES HANDBUCHS ANGEBRACHT IST
NL TECHNISCHE GEGEVENS: RAADPLEEG HET ETIKET DAT IS AANGEBRACHT OP DE EERSTE PAGINA VAN DEZE HANDLEIDING
DK TEKNISKE DATA: SE MÄRKATEN, DER ER SAT PÅ F∅RSTE SIDE AF DENNE MANUAL
FI TEKNISET TIEDOT: TIEDOT LÖYTYVÄT KÄYTTÖOPPAAN ENSIMMÄISELLÄ SIVULLE KIINNITETYSTÄ ETIKETISTÄ
GR
TEXNIKA ΣTOIXEIA: ANATPEETE ΣTHN ETIKETA ΠΟΥ ΕΦΑΡΜΟΖΕΤΑΙ
ΣΤΗΝ ΠΡΩΤΗ ΣΕΛΙΔΑ ΤΟΥ ΕΓΧΕΙΡΙΔΙΟΥ
IT DATI TECNICI: FARE RIFERIMENTO ALL'ETICHETTA
APPLICATA SULL'PRIMA PAGINA DEL MANUALE
NO TEKNISKE DATA: DET VISES TIL ETIKETTEN FESTET TIL FÖRSTE SIDE I DENNE MANUALLEN
PT DADOS TÉCNICOS: POR FAVOR, CONSULTE O RÓTULO APLICADO NA PRIMEIRA PÁGINA DESTE MANUAL
ES DATOS TÉCNICOS: CONSULTE LA ETIQUETA
APLICADA EN LA PRIMERA PÁGINA DEL MANUAL
SE TEKNISKA DATA: SE ETIKETTEN APPLICERAD PÅ FÖRSTA SIDAN I DENNA MANUAL
PL DANE TECHNICZNE: ODNOSI SIĘ DO ETYKIETKI ZNAJDUJĄCEJ SIĘ NA PIERWSZEJ STRONY INSTRUKCJI OBSŁUGI
CZ TECHNICKÉ ÚDAJE: INFORMACE NALEZNETE NA ŠTÍTKU NALEPENÉM NA PRVNÍ STRANĚ MANUÁLU
SK TECHNICKÉ ÚDAJE: INFORMÁCIE NÁJDETE NA ŠTÍTKU NALEPENOM NA PRVEJ STRANE TEJTO PRÍRUČKY
HU MÜSZAKI ADATOK: LÁSD A KÉZIKÖNYV ELSŐ OLDALÁRA RAGASZTOTT CÍMKÉT
RO DATE TEHNICE: VĂ RUGĂM SĂ CONSULTAȚI ETICHETA
LIPITĂ PE PRIMA PAGINĂ A ACESTUI MANUAL
GB: FACSIMILE PRODUCT IDENTIFICATION PLATE
FR: FAC-SIMILÉ PLAQUETTE SIGNALÉTIQUE DU PRODUIT
DK: ILLUSTRATION AF MÆRKEPLADE
FI: TUOTTEEN ARVOKILVEN NÄKÖISKOPIO
Before positioning, operating or adjusting the compressor, read the instruction book carefully.
Save the safety warnings and instruction for future reference! Pass on your power tool only together with these documents. You and all other users must be able to inform yourselves at any time.
MARKINGS ON TOOL
The following pictograms are shown on the tool:
RISK OF ELECTRIC SHOCK:

CAUTION: before doing any work on the compressor, it must be disconnected from the power supply.
RISK OF HIGH TEMPERATURES:

CAUTION: the compressor contains some parts which might reach high TEMPERATURES.

RISK OF ACCIDENTAL START-UP:
ATTENTION: the compressor could start automatically in case of a black-out and subsequent reset.

RISK OF BURSTING:
Failure to properly drain tank may result in excessive tank corrosion causing air tank rupture or an explosion.

HEARING, EYE AND RESPIRATORY PROTECTION MUST BE WORN

IMPORTANT INFORMATION
Read and understand all of the operating instructions, safety precautions and warnings in the Instruction Manual before operating or maintaining this compressor. Most accidents that result from compressor operation and maintenance are caused by the failure to observe basic safety rules or precautions. An accident can often be avoided by recognizing a potentially hazardous situation before it occurs, and by observing appropriate safety procedures. Basic safety precautions are outlined in the "SAFETY" section of this Instruction Manual and in the sections which contain the operation and maintenance instructions. Hazards that must be avoided to prevent bodily injury or machine damage are identified by WARNINGS on the compressor and in this Instruction Manual.
SAVE THESE INSTRUCTIONS AND MAKE THEM AVAILABLE TO OTHER USERS OF THIS TOOL!
INTENDED USE
This tool is used for the generation of compressed air for professional pneumatic nailing tools and tyre inflators. Always ensure that the tool you are connecting has a suitable air pressure value.
DO NOT use under wet conditions or in presence of flammable liquids or gases.
The use in the medical and food sector as well as refilling of oxygen tanks is not permitted.
This unit is a professional compressor. DO NOT let children come into contact with the compressor. Supervision is required when inexperienced operators use this tool.
This product is not intended for use by persons (including children) suffering from diminished physical, sensory or mental abilities; lack of experience, knowledge or skills unless they are supervised by a person responsible for their safety. Children should never be left alone with this product.
MEANINGS OF SIGNAL WORDS
⚠ DANGER: indicates a potentially hazardous situation which, if ignored, will result in serious personal injury.
⚠ WARNING: indicates a potentially hazardous situation which, if ignored, could result in serious personal injury.
⚠️ CAUTION: indicates a hazardous situation which, if ignored, could result moderate personal injury.
NOTE: emphasizes essential information
Safety instructions
IMPORTANT SAFETY INSTRUCTIONS FOR USE OF THE COMPRESSOR.
⚠ WARNING: DEATH OR SERIOUS BODILY INJURY COULD RESULT FROM IMPROPER OR UNSAFE USE OF COMPRESSOR. TO AVOID THESE RISKS, FOLLOW THESE BASIC SAFETY INSTRUCTIONS.
READ ALL INSTRUCTIONS
-
NEVER TOUCH MOVING PARTS Never place your hands, fingers or other body parts near the compressor's moving parts.
-
NEVER OPERATE WITHOUT ALL GUARDS IN PLACE
Never operate this compressor without all guards or safety features in place and in proper working order. If maintenance or servicing requires the removal of a guard or safety features, be sure to replace the guards or safety feature before resuming operation of the compressor.
-
ALWAYS WEAR EYE PROTECTION Always wear safety goggles or equivalent eye protection. Compressed air must never be aimed at anyone or any part of the body.
-
PROTECT YOURSELF AGAINST ELECTRIC SHOCK
Prevent body contact with grounded surfaces such as pipes, radiators, ranges and refrigeration enclosures. Never operate the compressor in damp or wet locations. Never leave the compressor exposed to adverse weather conditions.
ENGLISH
5. DISCONNECT THE COMPRESSOR WHEN NOT IN
USE Always disconnect the compressor from the power source and remove the compressed air from the air tank before servicing, inspecting, maintaining, cleaning, replacing or checking any parts.
-
AVOID UNINTENTIONAL STARTING Do not carry the compressor while it is connected to its power source or when the air tank is filled with compressed air. Be sure the ON/OFF switch is in the OFF position before connecting the compressor to its power source.
-
STORE COMPRESSOR PROPERLY When not in use, the compressor should be stored in dry place. Keep out of reach of children. Lock-out the storage area.
-
KEEP WORK AREA CLEAN Cluttered areas invite injuries. Clear all work areas of unnecessary tools, debris, furniture etc.
-
KEEP CHILDREN AWAY Do not let visitors contact compressor extension cord. All visitors should be kept safely away from work area.
-
DRESS PROPERLY Do not wear loose clothing or jewellery. They can be caught in moving parts. Wear protective hair covering to contain long hair.
-
DON'T ABUSE CORD Never yank it to disconnect from receptacle. Keep cord from heat, oil and sharp edges.
-
MAINTAIN COMPRESSOR WITH CARE Inspect cords periodically and if damaged, have repaired by authorized service facility. Inspect extension cords periodically and replace if damaged.
-
OUTDOOR USE EXTENSION CORDS When compressor in used outdoors, use only extension cords intended for use outdoors and so marked.
-
STAY ALERT Watch what you are doing. Use common sense. Do not operate compressor when you are tired. Compressor should never be used by you if you are under the influence of alcohol, drugs or medication that makes you drowsy.
15. CHECK FOR DAMAGED PARTS AND AIR LEAKS
Before further use of the compressor, carefully check the guard and other parts for damage to make sure that it will operate properly and perform its intended function. Check for alignment of moving parts, binding of moving parts, breakage of parts, mounting, air leak, and any other conditions that may affect its operation. A guard or other part that is damaged should be properly repaired or replaced by an authorized service centre unless otherwise indicated elsewhere in this Instruction Manual. Have defective pressure switches replaced by authorized service centre. Do not use compressor if switch does not turn it on and off. Never attempt to repair a leaking or damaged air tank. Replace tank immediately at an authorized service centre.
-
NEVER USE COMPRESSOR FOR APPLICATIONS OTHER THAN THOSE SPECIFIED Never use compressor for applications other than those specified in the Instruction Manual. Never use compressed air for breathing or respiration. Never stand on the compressor.
-
HANDLE COMPRESSOR CORRECTLY Operate the compressor according to the instructions provided herein. Never allow the compressor to be operated by children, individuals unfamiliar with its operation or unauthorised personnel.
-
KEEP ALL SCREWS, BOLTS AND COVERS TIGHTLY IN PLACE Keep all screws, bolts, and plates tightly mounted. Check their conditions periodically.
-
KEEP MOTOR AIR VENT CLEAN The motor air vent must be kept clean so that air can freely flow at all times. Check for dust build-up frequently.
20. OPERATE COMPRESSOR AT THE RATED VOLTAGE
Operate the compressor at voltages specified on their nameplates. If using the compressor at a higher voltage than the rated voltage, it will result in abnormally fast motor revolution and may damage the unit and burn out the motor.
21. NEVER USE A COMPRESSOR WHICH IS DEFECTIVE OR OPERATING ABNORMALLY If the compressor
appears to be operating unusually, making strange noises, or otherwise appears defective, stop using it immediately and arrange for repairs by an authorized service centre.
22. DO NOT WIPE PLASTIC PARTS WITH SOLVENT
Solvents such as gasoline, thinner, benzine, carbon tetrachloride, and alcohol may damage and crack plastic parts. Do not wipe them with such solvents. Wipe plastic parts with a soft cloth lightly dampened with soapy water and dry thoroughly.
23. USE ONLY GENUINE REPLACEMENT PARTS
Replacement parts not original may void your warranty and can lead to malfunction and resulting injuries. Genuine parts are available from your dealer.
- DO NOT MODIFY THE COMPRESSOR Do not modify the compressor. Always contact the authorized service centre any repairs. Unauthorised modification may not only impair the compressor performance but may also result in accident or injury to repair personnel who do not have the required knowledge and technical expertise to perform the repair operations correctly. Unauthorised modifications may increase the risk of injury to the user or the risk of property damage.
25. TURN OFF THE SWITCH WHEN THE COMPRESSOR
IS NOT USED When the compressor is not used, turn the switch OFF, disconnect it from the power source and open the drain cock to discharge the compressed air from the air tank.
- NEVER TOUCH HOT SURFACE To reduce the risk of burns, do not touch tubes, heads, cylinder and motors.
- DO NOT DIRECT AIR STREAM AT BODY Risk of injury, do not direct air stream at persons or animals.
- DRAIN TANK DAILY OR AFTER EACH USE. Open the drain valve and tilt compressor to completely empty accumulated water. Failure to properly drain tank may result in excessive corrosion, which may cause sudden air tank rupture or explosion.
- DO NOT STOP COMPRESSOR BY PULLING OUT THE PLUG Use the ON/OFF switch.
- USE ONLY RECOMMENDED AIR HANDLING PARTS ACCEPTABLE FOR PRESSURE NOT LESS THAN 13.8 BAR
(200 PSI) Risk of bursting. Use only recommended air handling parts acceptable for pressures not less than 13.8 bar (200 psi).
- WEAR PROPER HEARING AND HEAD PROTECTION
Suitable protective clothing must be worn when operating the compressor and connected tool or accessory. Consult the tool / accessory manual and adhere to any safety requirements.
- MAKE ALLOWANCE FOR ENVIRONMENTAL
CONDITIONS Never leave the compressor in the rain. Never use the compressor in damp or wet conditions. Provide good lighting. Never use the compressor near combustible liquids or gases.
- DO NOT OPERATE IN EXPLOSIVE ATMOSPHERES, SUCH AS IN THE PRESENCE OF FLAMMABLE LIQUIDS, GASES OR DUST. Compressors can create sparks which may ignite the dust or fumes.
REPLACEMENT PARTS
When servicing use only identical replacement parts. Repairs should be conducted only by authorized service centre.
EXTENSION CORD
Use only three-wire extension cords that have three-prong grounding type plugs and three-pole receptacles that accept the compressor's plug. Replace or repair damaged cord. Make sure your extension cord is in good condition. When using an extension cord, be sure to use one heavy enough to carry the current your product will draw. An undersized cord will cause a drop in line voltage resulting in loss of power and overheating. Table shows the correct size to use depending on cord length and name plate ampere rating. If in doubt, use the next heavier gage. The smaller the gage number, the heavier the cord.
When operating a power tool outdoors, use an extension cord suitable for outdoor use. Use of a cord suitable for outdoor use reduces the risk of electric shock.
SECTION VALID FOR A MAX LENGTH OF 20m SINGLE-PHASE
Power / HP Power / kW 220/230V mm ^2 110/120V mm ^2
| 0.75-1 | 0.65-0.7 | 1.5 | 2.5 | |
| 1.5 | 1.1 | 2.5 | 4 | |
| 2 | 1.5 | 2.5 | 4-6 | |
| 2.5-3 | 1.8-2.2 | 4 | - |
⚠ WARNING: Avoid electrical shock hazard. Never use this compressor with a damaged or frayed electrical cord or extension cord. Inspect all electrical cords regularly. Never use in near water or in any environment where electric shock is possible.
SAFETY VALVE
This compressor is equipped with a safety valve that is set to avoid over-pressurization of the air tanks. This valve is factory pre-set and will not function unless tank pressure reaches this pressure.
⚠ WARNING: DO NOT ATTEMPT TO ADJUST OR ELIMINATE THIS SAFETY DEVICE. ANY ADJUSTMENTS TO THIS VALVE COULD CAUSE SERIOUS INJURY. If
this device requires service or maintenance, see an Authorized DEWALT Service Centre.
Attachments and Accessories:
For any attachment or accessory you will be using with this compressor, the maximum allowable recommended pressure should be clearly marked on the product or should be clearly noted within the operations manual. Exceeding the pressure rating of these attachments (including, but not limited to: air tools, air operated accessories, spray guns, air hose, air hose connections, tires and other inflatables) could cause them to fly apart or explode and could result in serious injury.
- Never exceed the maximum allowable pressure recommended by the manufacturer of any attachment or accessory you use with this compressor.
DUTY CYCLE:
To ensure long life of your DEWALT air compressor, do not operate on more than the duty cycle indicated on the technical data plate and in the Technical Data table.
To avoid overheating of the electric motor, this compressor is designed for intermittent operation as indicated on the technical dataplate (for example, S3-25 means 2.5 minutes ON, 7.5 minutes OFF).
ENGLISH
NOTE: The information contained in this Instruction Manual is designed to assist you in the safe operation and maintenance of the compressor. Some illustrations in this Instruction Manual may show details or attachments that differ from those on your own compressor.
INSTALLATION
Remove the compressor from its packing, make sure it is in perfect condition, checking if it was damaged during transport, then carry out the following operations:
Fit the Air Filter. Position the compressor on a flat surface or with a maximum permissible inclination of 10^ , in a well aired place, protected against atmospheric agents and not in a place subject to explosion hazard.
If the surface is inclined and smooth, check if the compressor moves while in operation - if it does, secure the wheels with two wedges. If the surface is a bracket or a shelf top, make sure it cannot fall, securing it in a suitable way.
To ensure good ventilation and efficient cooling, the compressor must be at least 100 cm from any wall. Compressors fitted on the tank, with fixed feet, should not be rigidly secured to the ground. In this case, we advise you to fit 4 anti-vibration supports. Verify that the tanks have been drained and are clear of any moisture or dirt.
ELECTRICAL CONNECTION
Do not abuse the cord. Never use the cord for carrying, pulling or unplugging the power tool. Keep cord away from heat, oil, sharp edges or moving parts.
Damaged or entangled cords increase the risk of electric shock.
Single-phase compressors are supplied with an electrical cable and a two-pole & earth plug. The compressor must be connected to a grounded power socket.
IMPORTANT: Never use the ground socket instead of the neutral wire. The ground connection must be made to meet safety standards (EN 60204). The plug of the power cable must not be used as a switch, but must be fitted in a power socket controlled by a suitable differential switch (thermal breaker).
⚠ DANGER: RISK OF ELECTRICAL SHOCK. IMPROPER GROUNDING CAN RESULT IN ELECTRICAL SHOCK.
Do not modify the plug provided. If it does not fit the available outlet, a correct outlet should be installed by a qualified electrician.
Repairs to the cord set or plug MUST be made by a qualified electrician.
PREPARATION FOR USE
PRE-START CHECKLIST
- Ensure the On/Off switch (6) is in the OFF position.
- Plug the power cord into the correct branch circuit receptacle. See Electrical Connection (above).
- Ensure air tank is drained, see Draining Air Tank under Maintenance.
- Ensure the drain valve (2) is closed.
- Ensure safety valve (9) is functioning properly, see Checking Safety Valve under Maintenance.
- Turn regulator knob (4) anticlockwise until fully closed. Ensure regulated pressure gauge reads 0 bar (0 psi).
- Attach hose and accessories.
⚠ WARNING: Risk of unsafe operation. Firmly grasp hose in hand when installing or disconnecting to prevent hose whip.
- Ensure all covers and labels are in place, legible (for labels) and securely mounted. Do not use compressor until all items have been verified.
⚠ WARNING: Risk of bursting. Too much air pressure causes a hazardous risk of bursting. Check the manufacturer's maximum pressure rating for air tools and accessories. The regulator outlet pressure must never exceed the maximum pressure rating.
INITIAL SET-UP
⚠ WARNING: Do not operate this unit until you read and understand this instruction manual for safety, operation and maintenance instructions.
STARTING
Check that the mains power matches that indicated on the electrical data-plate - the permissible tolerance range is +/-5%. Turn or press into position "0". Fit the plug in the power socket and start the compressor, moving the On/Off switch into position "1".
The compressor is fully automatic, and is controlled by the pressure switch which stops it when tank pressure reaches maximum value and restarts it when it falls to minimum value. The pressure difference between maximum and minimum values is usually about 2.4 bar (35 psi). E.g.: the compressor stops when it reaches approximately 13.8 bar (200 psi) - maximum operating pressure) and restarts automatically when the pressure inside the tank drops to 11.4 bar (165 psi).
After connecting the compressor to the power line, run it to maximum pressure and check exactly how the machine is operating.
⚠ WARNING: The head/cylinder/delivery tube unit can reach high temperatures. Take care when working near
these parts, and do not touch them to avoid possible burns.
IMPORTANT
The electro-compressors must be connected to a power socket protected by a suitable differential switch (thermal breaker). The motor is equipped with a thermal overload protector located inside the winding - this stops the compressor when motor temperature reaches excessively high values. If the thermal overload protector is tripped, place the switch in the "Off" (0) position. Unplug the compressor until it has completely cooled. When cool, reattach the plug to the power supply and move the switch to the "On" (1) position. The compressor should start normally. If not contact your nearest service centre immediately.
You do not have to use the maximum operating pressure at all times. On the contrary, the pneumatic tool being used often requires less pressure. On compressors supplied with a pressure reducer, operating pressure must be correctly adjusted.
Adjust pressure to the required value by turning the knob (4) clockwise to increase pressure and anti-clockwise to reduce it. When you have obtained optimum pressure, lock the knob by pressing it downward. For pressure reducers equipped without a pressure gauge, the set pressure can be seen on the graduated scale located on the reducer body.
On pressure reducers equipped with a pressure gauge, pressure can be seen on the gauge itself.
NOTE: Some pressure regulators do not have "push to lock", therefore simply turn the knob to adjust the pressure.
STOPPING THE COMPRESSOR
-
Press the switch into position "0" (according to the type of pressure switch fitted on the compressor). DO NOT turn off the unit by switching off at the socket or pulling out the plug.
-
Turn regulator knob (4) anticlockwise until fully closed. Ensure regulated pressure gauge reads 0 bar (0 psi).
-
Remove hose and accessory.
- Drain the air tank, see Draining Air Tank under Maintenance. Ensure air tank pressure gauge reads 0 bar (0 psi).
MOTOR OVERLOAD PROTECTOR
The motor has a thermal overload protector. If the motor overheats for any reason, the overload protector will shut off the motor. The motor must be allowed to cool down before restarting. To restart:
- Set the On/Off switch (A) to OFF and unplug unit.
- Allow the motor to cool.
- Plug the power cord into the correct branch circuit receptacle.
- Set the On/Off switch to ON position.
Maintenance
⚠ WARNING: To reduce the risk of injury, turn unit off and disconnect machine from power source and remove the compressed air from the air tank (Ensure air tank pressure gauge reads 0 bar (0 psi)) before installing and removing accessories, before adjusting or changing setups.
An accidental start-up can cause injury.
The following procedures must be followed when maintenance or service is performed on the air compressor.
NOTE: Allow air compressor to cool down before starting service.
NOTE: All compressed air systems contain maintenance parts (e.g., oil, filters, separators) that are periodically replaced. These used parts may contain substances that are regulated and must be disposed of in accordance with local, state, and federal laws and regulations.
NOTE: Take note of the positions and locations of parts during disassembly to make reassembly easier.
NOTE: Any service operations not included in this section should be performed by a DEWALT factory service centre or a DEWALT authorized service centre.
| MAINTENANCE CHART | ||
| Procedure Daily Weekly | ||
| Check safety valve | X | |
| Drain air tank | X | |
| Check for unusual noise/vibration | X | |
| Check for air leaks* | X | |
| Clean compressor exterior | X | |
| * To check for air leaks apply a solution of soapy water around joints. While compressor is pumping to pressure and after pressure cuts out, look for air bubbles to form. | ||
DRAINING AIR TANK
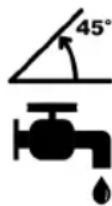
NOTE: All compressed air systems generate condensate that accumulates in any drain point (e.g., tanks, filter, aftercoolers, dryers). This condensate contains lubricating oil and/or substances which may be regulated and must be disposed of in accordance with current regulations.
The condensation in the tank must be drained daily by opening the drain valve (2) under the tank. Take care if there is compressed air inside the cylinder, as water could flow out with considerable force.
- Verify that the compressor is turned "Off".
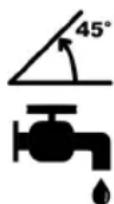
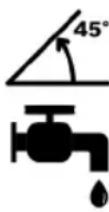
- Holding the handle, tilt the compressor toward the drain valve so it is positioned at the bottom of the tank.
- Turn the drain valve to open.
- Keep the compressor tilted until all moisture has been removed.
CHECKING SAFETY VALVE (9)
⚠ WARNING: Hot surfaces. Risk of burn. Outlet tube, pump head, and surrounding parts are very hot, do not touch. Allow compressor to cool prior to servicing.
⚠ WARNING: Risk of bursting. If the safety valve does not work properly, over-pressurization may occur, causing air tank rupture or an explosion.
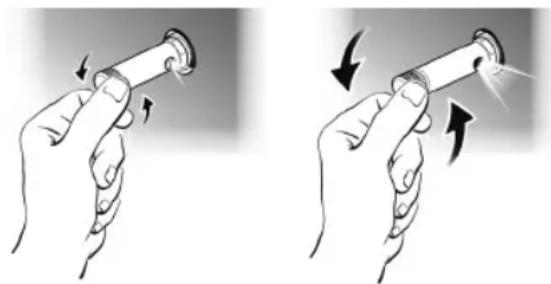
The safety valve has been set for the highest permitted pressure of the pressure vessel. It is prohibited to adjust the safety valve. Actuate the safety valve from time to time to ensure that it works when required.
Turn the nut until you can hear the compressed air being released. Then screw it back on. Always keep the safety valve and the surrounding area clean and free of obstructions.
natural_image
Illustration of two hands holding a cylindrical object with arrows indicating motion or force (no text or symbols)WHAT TO DO IF SMALL MALFUNCTIONS OCCUR
Air losses
These can be caused by poor tightness of a union - check all unions, wetting them with soapy water.
Compressor not starting
If the compressor has trouble starting, check the following :
- Does mains power match that of the data-plate?
- Are power cable extensions of adequate diameter or length?
- Is the work environment too cold? (under 0°C)
- Is power supplied to the electrical line?
- Are sockets properly connected?
- Are the thermal breaker and fuses in good condition?
Compressor not stopping
- If the compressor does not stop when maximum pressure is reached, the tank safety valve comes into operation. A compressor with a faulty safety valve must NEVER be used - contact your nearest service centre immediately.
IMPORTANT
- Do not on any account unscrew any connection while the tank is pressurised.
- Always check if the tank is pressure free.
- Do not drill holes, weld or purposely deform the compressed air tank.
- Do not do any maintenance on the compressor unless you have disconnected the power plug.
- Temperature in operating ambient: 0°C to +35°C.
- Do not aim jets of water or inflammable liquids on the compressor.
- Do not place flammable objects near the compressor.
- During down-times, turn the switch to position "0" (OFF).
- Never aim the air jet at people or animals.
- Do not transport the compressor while the tank is pressurised.
- Be careful with regard to some parts of the compressor such as the head and delivery tubes, as they can reach high temperatures. Do not touch these parts to avoid burns.
- Transport the compressor, lifting or pulling it with the appropriate grips or handles.
- Keep children and animals well away from the machine operating area.
- If using the compressor for painting: a) Do not work in closed environments or near to naked flames b) Make sure there is adequate exchange of air at the place of work c) Protect your nose and mouth with an appropriate mask. Consult the tool / accessory manual and adhere to any safety requirements.
- If the electrical cable or plug are damaged, do not use the compressor and contact an authorised service
centre to replace the faulty element with an original spare part.
- If the compressor is located on a shelf or on a top above floor height, it must be secured to prevent it falling while in operation.
- Do not put objects or your hands inside the protective grilles to avoid injury to yourself or damaging the compressor.
- Do not use the compressor as a blunt object toward things or animals, to avoid serious damage.
- When you have finished using the compressor, always remove the plug from the power socket.
For efficient operation of the machine at full continuing load and at maximum operating pressure, make sure the temperature of the work environment indoors does not exceed +25°C.
STORING THE PACKED AND UNPACKED COMPRESSOR
For the whole time that the compressor is not used before unpacking it, store it in a dry place at a temperature between +5°C and +45°C and sheltered away from weather. For the whole time that the compressor is not used after unpacking it, disconnect from the mains supply, drain the air tank, place sheets over it to protect it from dust, which may settle on the components.
TRANSPORTING THE COMPRESSOR
When transporting the compressor in a vehicle, trailer, etc. ensure that the air tank is drained and the unit is secured and placed on a flat horizontal surface. Use care when driving so to avoid tipping the unit over in the vehicle. Damage can occur to the unit or surrounding items if unit is tipped.
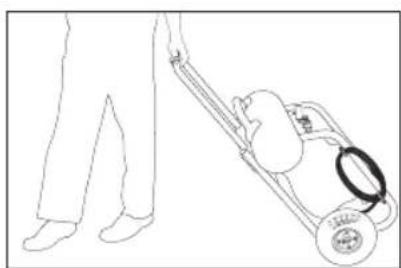
LIFTING THE DPC17PS
Always use two people when lifting and lift from the recommended lift point handles (5A & 5B).
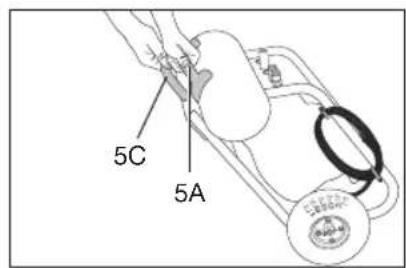
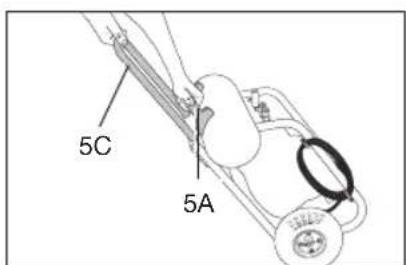
MOVING THE DPC17PS
- Grasp handle (5A) to support compressor.
- Pull handle (5C) until fully extended (lock position). WARNING: Risk of unsafe operation. Ensure proper footing and use caution when rolling compressor so that unit does not tip or cause loss of balance.
- To move, roll compressor on tires using handle (5C) as shown above.
Store compressor in a vertical or horizontal position.
PNEUMATIC CONNECTIONS
Make sure you always use pneumatic tubes for compressed air with maximum pressure characteristics that are adequate for the compressor. Do not attempt to repair tubes if faulty.
WE RESERVE THE RIGHT TO MAKE ANY MODIFICATIONS WITHOUT PRIOR NOTICE WHENEVER NECESSARY.
CLEANING
⚠ WARNING: Blow dirt and dust out of the main housing with dry air as often as dirt is seen collecting in and around the air vents. Wear eye protection when performing this procedure.
⚠ WARNING: Never use solvents or other harsh chemicals for cleaning the non-metallic parts of the tool. These chemicals may weaken the materials used in these parts. Use a cloth dampened only with water and mild soap. Never let any liquid get inside the tool; never immerse.
OPTIONAL ACCESSORIES
⚠ WARNING: Since accessories, other than those offered by DEWALT, have not been tested with this product, use of such accessories with this tool could be hazardous. To reduce the risk of injury, only DEWALT recommended accessories should be used with this product.
PROTECTING THE ENVIRONMENT

Separate collection. This product must not be disposed of with normal household waste.
Should you find one day that your DEWALT product needs replacement, or if it is of no further use to you, do not dispose of it with household waste. Make this product available for separate collection.

Separate collection of used products and packaging allows materials to be recycled and used again. Re-use of recycled materials helps
prevent environmental pollution and reduces the demand for raw materials.
Local regulations may provide for separate collection of electrical products from the household, at municipal waste sites or by the retailer when you purchase a new product.
DEWALT provides a facility for the collection and recycling of DEWALT products once they have reached the end of their working life. To take advantage of this service please return your product to any authorised repair agent who will collect them on our behalf.
You can check the location of your nearest authorised
ENGLISH
repair agent by contacting your local DEWALT office at the address indicated in this manual. Alternatively, a list of authorised DEWALT repair agents and full details of our after-sales service and contacts are available on the Internet at: www.2helpU.com.
TROUBLESHOOTING GUIDE
This section provides a list of the more frequently encountered malfunctions, their causes and corrective actions. The operator or maintenance personnel can perform some corrective actions, and others may require the assistance of a qualified DEWALT technician or your dealer.
Problem
Code
Excessive air tank pressure-safety valve pops off 1,2
Air leaks
Air leaks in air tank or at air tank welds 4
Air leaks between head and valve plate 5
Air leaks from safety valve
Knocking Noise 6
Pressure reading on the regulated pressure gauge drops when an accessory is used 7
Compressor is not supplying enough air to operate accessories 8, 9, 10, 11, 12
Regulator knob has continuous air leak 13
Regulator will not shut off air outlet 13
Motor will not run 11, 14, 15, 16, 17,
18, 19, 20
| CODE | POSSIBLE CAUSE | POSSIBLE SOLUTION |
| 1 | Pressure switch does not shut off motor when compressor reaches cut-out pressure | Set the On/Off switch to OFF (0), if the unit does not shut off contact a DEWALT factory service center or a DEWALT authorized service center. |
| 2 | Pressure switch cut-out too high | Contact a DEWALT factory service center or a DEWALT authorized service center. |
| 3 | Tube fittings are not tight enough | Tighten fittings where air can be heard escaping. Check fittings with soapy water solution. Do Not Overtighten. |
| 4 | Defective air tank | Air tank must be replaced. Do not repair the leak.⚠ WARNING: Risk of bursting. Do not drill into, weld or otherwise modify air tank or it will weaken. The air tank can rupture or explode. |
ENGLISH
| CODE | POSSIBLE CAUSE POSSIBLE SOLUTION | |
| 5 | Leaking seals | Contact a DEWALT factory service center or a DEWALT authorized service center. |
| 6 | Defective safety valve | Contact a DEWALT factory service center or a DEWALT authorized service center. |
| 7 | Regulator is not adjusted correctly for accessory being used | It is normal for some pressure drop to occur when an accessory is used, adjust the regulator as instructed in 'Adjusting Operating Pressure' if pressure drop is excessive.NOTE: Adjust the regulated pressure under flow conditions while accessory is being used. |
| 8 | Prolonged excessive use of air Decrease amount of air usage. | |
| 9 | Compressor is not large enough for accessory | Check the accessory air requirement. If it is higher than the CFM or pressure supplied by your air compressor, a larger compressor is needed to operate accessory. |
| 10 | Hole in air hose Replace air hose. | |
| 11 | Check valve restricted | Contact a DEWALT factory service center or a DEWALT authorized service center. |
| 12 | Air leaks Tighten fittings. | |
| 13 | Regulator is damaged | Contact a DEWALT factory service center or a DEWALT authorized service center. |
| 14 | Motor overload protection switch has tripped | See Motor Overload under 'Motor Overload Protector'. |
| 15 | Extension cord is wrong length or gauge | Check for proper gauge wire and cord length. See table under 'Extension Cords'. |
| 16 | Loose electrical connections | Contact a DEWALT factory service center or a DEWALT authorized service center. |
| 17 | Possible defective motor | Contact a DEWALT factory service center or a DEWALT authorized service center. |
| 18 | Paint spray on internal motor parts | Contact a DEWALT factory service center or a DEWALT authorized service center. Do not operate the compressor in the paint spray area. See flammable vapor warning. |
| 19 | Fuse blown, circuit breaker tripped | Check fuse box for blown fuse and replace as necessary. Reset circuit breaker. Do not use a fuse or circuit breaker with higher rating than that specified for your particular branch circuit.Check for proper fuse. Use only a time delay fuse.Check for low voltage conditions and/or proper extension cord.Disconnect the other electrical appliances from circuit or operate the compressor on its own branch circuit. |
| 20 | Tank pressure exceeds pressure switch cut-in pressure | Motor will start automatically when tank pressure drops below cut-in pressure of pressure switch. |
ENGLISH
| Model | DOC6MRC-05 | DOC100TC-05 | DOC100TC-05 | DOC100TC-LXDPC17PS-05 |
| Tank Size (1) 6.9.4 10 10 17 | ||||
| Volts (ac V) 230 230 110 230 | ||||
| Power peak HP / KW 1.5 / 1.1.175 / 1.3.2.0 / 1.5.2.0 / 1.5.2.5 / 1.8 | ||||
| Current (A) 5.6.9.7.1.13.5 8 | ||||
| Pump Type Oil-Free Oil-Free Oil-Free Oil-Free | ||||
| Noise / uncertainty, LwA / Kwa (dB) | 97 / 1.5 | 89 / 1.5 | 97 / 1.5 | 97 / 1.0 |
| Noise / uncertainty, LgA / KPa @ 4m (dB) | 77 / 1.5 | 69 / 1.5 | 77 / 1.5 | 77 / 1.0 |
| Outdoor Noise, measured, LwA m (dB) | 94.5 | 87.4 | 95.5 | 94.3 |
| Outdoor Noise, guaranteed, LwA (dB) | 97.89 97.97 | 8 / 116 | 8 / 116 | 8 / 116 |
| Maximum Limited Working Pressure (bar / psi) | 8 / 116 | 8 / 116 | 8 / 116 | 8 / 116 |
| Maximum Tank Pressure (bar / psi) | 8 / 116 | 13.8 / 200 | 10 / 145 | 13.8 / 200 |
| Air Displacement (L/min / cfm) | 170 / 6 | 176 / 6.2 | 206 / 7.3 | 292 / 10.2 |
| Air Delivery (L/min / cfm) @ 7 bar) | 75 / 1.7 | 82 / 2.9 | 82 / 2.9 | 130 / 4.6 |
| Air Delivery (L/min / cfm) @ 90 PS(I) | 81 / 2.9 | 89 / 3.1 | 89 / 3.1 | 141 / 4.9 |
| Compressor speed in 1/min (rpm) | 3100 | 2450 | 3750 | 1800 |
| Weight (kg) | 12.3 | 18.8 | 16.8 | 18 36 |
| Motor protection Type | Automatic reset thermal protection | Automatic reset thermal protection | Self-hold Thermal Protection | Self-hold Thermal Protection |
| General compressor protection | IP20 | IP20 | IP20 | IP20 |
| Duty Cycle | S3 25% | S3 75% | S3 15% | S3 15% |

natural_image
Illustration of a hand holding a cylindrical object with directional arrows indicating rotation (no text or symbols)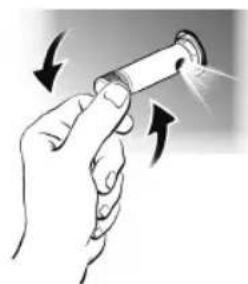
natural_image
Illustration of a hand holding a cylindrical object with arrows indicating motion or force direction (no text or symbols)PROCÉDURES D'INTERVENTION EN CAS DE PETITES ANOMALIES
Fuites d'air
natural_image
Illustration of two hands holding a cylindrical object with arrows indicating motion or force (no text or symbols)OPSCHRIFTEN OP GEREEDSCHAP
natural_image
Illustration of two hands holding a cylindrical object with arrows indicating motion or force (no text or symbols)WAT TE DOEN BIJ KLEINE AFWIJKINGEN Luchtverlies
OPTIONELE HULPSTUKKEN
Strøm / Strøm / 220/230V 110/120V
| HK | kW | ^2 | mm mm ^2 | ||
| 0.75-1 | 0.65-0.7 | 1.5 | 2.5 | ||
| 1.5 | 1.1 | 2.5 | 4 | ||
| 2 | 1.5 | 2.5 | 4-6 | ||
| 2.5-3 | 1.8-2.2 | 4 | - |
DRÆNING AF LUFTBEHOLDER
natural_image
Illustration of a hand holding a small mechanical component with directional arrows indicating motion (no text or symbols)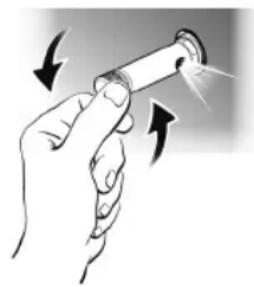
natural_image
Illustration of a hand holding a cylindrical object with arrows indicating motion or force (no text or symbols)UDBEDRING VED MINDRE FUNKTIONSFEJL Luftlækager
ILMANPAINESÄILIÖN TYHJENNYS
natural_image
Illustration of a hand holding a cylindrical object with directional arrows indicating movement (no text or symbols)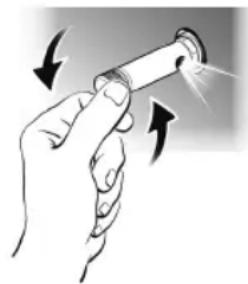
natural_image
Illustration of a hand holding a pen with arrows indicating motion or force (no text or symbols)MITEN TOIMIA PIENEN HÄIRIÖN SATTUESSA
Ilmavuodot
VALINNAISET LISÄLAITTEET
natural_image
Illustration of two hands holding a cylindrical object with arrows indicating motion or force (no text or symbols)ATTACCHI E ACCESSORI:
natural_image
Illustration of two hands holding a cylindrical object with arrows indicating motion or force (no text or symbols)MERKING PÅ PRODUKTET
JUSTERING AV ARBEIDSTRYKKET
natural_image
Illustration of a hand holding a cylindrical object with directional arrows indicating motion (no text or symbols)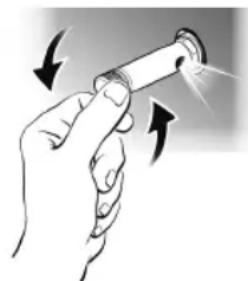
natural_image
Illustration of a hand holding a cylindrical object with arrows indicating motion or force (no text or symbols)UTBEDRING AV MINDRE FEILFUNKSJONER Luftutslipp
natural_image
Illustration of two hands holding a cylindrical object with arrows indicating motion or force (no text or symbols)COMO INTERVIR EM PEQUENAS ANOMALIAS
Fugas de ar
natural_image
Illustration of two hands holding a cylindrical object with arrows indicating motion or force (no text or symbols)QUÉ HACER SI SE PRODUCEN FALLOS PEQUEÑOS
Pérdidas de aire
El motor no funciona 11, 14, 15, 16, 17,
3
6
18,
19,
20
RISK FÖR OFRIVILLIG START
OBS: understryker viktig information.
Säkerhetsinstruktioner
VIKTIGA INSTRUKTIONER FÖR ETT SÄKERT BRUK AV KOMPRESSORN.
⚠ EN FELAKTIG ANVÄNDNING OCH ETT DÅLIGT UNDERHÅLL AV DENNA KOMPRESSOR KAN FÖRORSAKA FYSISKA KROPPSSKADOR PÅ ANVÄNDAREN FÖR ATT UNDVIKA DESSA RISKER, BER VI DIG ATT LÄSA FÖLJANDE INSTRUKTIONER NOGA
LÄS ALLA INSTRUKTIONER
FÖRBEREDELSER INNAN ANVÄNDNING CHECKLISTA INNAN START
natural_image
Illustration of two hands holding a cylindrical object with motion arrows indicating movement (no text or symbols)SVENSKA
HUR MAN LÖSER SMÄRRE PROBLEM
Luftläckage
natural_image
Illustration of two hands holding a cylindrical object with arrows indicating motion or force (no text or symbols)natural_image
Illustration of two hands holding a cylindrical object with arrows indicating motion or force (no text or symbols)CO DĚLAT V, PŘÍPADĚ ZJIŠTĚNÍ NESPRÁVNE FUNKCE
Ztráta vzduchu
natural_image
Illustration of a hand holding a cylindrical object with directional arrows indicating rotation (no text or symbols)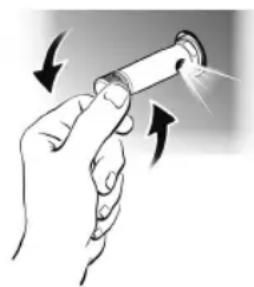
natural_image
Illustration of a hand holding a cylindrical object with arrows indicating motion or force (no text or symbols)ČO ROBIT, AK SA NA KOMPRESORE VYSKYTNÚ MALÉ PORUCHY
Únik vzduchu
Motor nebeží 11, 14, 15, 16, 17,
18, 19, 20
13
natural_image
Illustration of two hands holding a cylindrical object with arrows indicating motion or force (no text or symbols)CONEXIUNEA ELECTRICĂ
natural_image
Illustration of two hands holding a cylindrical object with arrows indicating motion or force (no text or symbols)CE TREBUIE SĂ FACETI DACĂ SE PRODUC MICI DEFECTIUNI
Pierderile de aer
DEWALT® and the DEWALT® logo are registered trade marks of Stanley Black & Decker, Inc. or an affiliate thereof and are used under license.
Manufactured by:
FNA S.p.A. - Via Einaudi 6, Robassomero (TO) Italy.
- English SAFETY & OPERATING INSTRUCTIONS MANUAL
- Français MANUEL D'INSTRUCTIONS DE SÉCURITÉ ET D'UTILISATION
- MARKINGS ON TOOL
- IMPORTANT INFORMATION
- SAVE THESE INSTRUCTIONS AND MAKE THEM AVAILABLE TO OTHER USERS OF THIS TOOL!
- INTENDED USE
- MEANINGS OF SIGNAL WORDS
- Safety instructions
- READ ALL INSTRUCTIONS
- ENGLISH
- DISCONNECT THE COMPRESSOR WHEN NOT IN
- CHECK FOR DAMAGED PARTS AND AIR LEAKS
- OPERATE COMPRESSOR AT THE RATED VOLTAGE
- NEVER USE A COMPRESSOR WHICH IS DEFECTIVE OR OPERATING ABNORMALLY If the compressor
- DO NOT WIPE PLASTIC PARTS WITH SOLVENT
- USE ONLY GENUINE REPLACEMENT PARTS
- TURN OFF THE SWITCH WHEN THE COMPRESSOR
- REPLACEMENT PARTS
- EXTENSION CORD
- SECTION VALID FOR A MAX LENGTH OF 20m SINGLE-PHASE
- SAFETY VALVE
- Attachments and Accessories:
- DUTY CYCLE:
- INSTALLATION
- ELECTRICAL CONNECTION
- ⚠ DANGER: RISK OF ELECTRICAL SHOCK. IMPROPER GROUNDING CAN RESULT IN ELECTRICAL SHOCK.
- PREPARATION FOR USE
- PRE-START CHECKLIST
- INITIAL SET-UP
- STARTING
- IMPORTANT
- STOPPING THE COMPRESSOR
- MOTOR OVERLOAD PROTECTOR
- Maintenance
- DRAINING AIR TANK
- CHECKING SAFETY VALVE (9)
- WHAT TO DO IF SMALL MALFUNCTIONS OCCUR
- Air losses
- Compressor not starting
- Compressor not stopping
- STORING THE PACKED AND UNPACKED COMPRESSOR
- TRANSPORTING THE COMPRESSOR
- LIFTING THE DPC17PS
- MOVING THE DPC17PS
- PNEUMATIC CONNECTIONS
- WE RESERVE THE RIGHT TO MAKE ANY MODIFICATIONS WITHOUT PRIOR NOTICE WHENEVER NECESSARY.
- CLEANING
- OPTIONAL ACCESSORIES
- PROTECTING THE ENVIRONMENT
- TROUBLESHOOTING GUIDE
- PROCÉDURES D'INTERVENTION EN CAS DE PETITES ANOMALIES
- Fuites d'air
- OPSCHRIFTEN OP GEREEDSCHAP
- WAT TE DOEN BIJ KLEINE AFWIJKINGEN Luchtverlies
- OPTIONELE HULPSTUKKEN
- DRÆNING AF LUFTBEHOLDER
- UDBEDRING VED MINDRE FUNKTIONSFEJL Luftlækager
- ILMANPAINESÄILIÖN TYHJENNYS
- MITEN TOIMIA PIENEN HÄIRIÖN SATTUESSA
- Ilmavuodot
- VALINNAISET LISÄLAITTEET
- ATTACCHI E ACCESSORI:
- MERKING PÅ PRODUKTET
- JUSTERING AV ARBEIDSTRYKKET
- UTBEDRING AV MINDRE FEILFUNKSJONER Luftutslipp
- COMO INTERVIR EM PEQUENAS ANOMALIAS
- Fugas de ar
- QUÉ HACER SI SE PRODUCEN FALLOS PEQUEÑOS
- Pérdidas de aire
- Säkerhetsinstruktioner
- VIKTIGA INSTRUKTIONER FÖR ETT SÄKERT BRUK AV KOMPRESSORN.
- LÄS ALLA INSTRUKTIONER
- FÖRBEREDELSER INNAN ANVÄNDNING CHECKLISTA INNAN START
- SVENSKA
- HUR MAN LÖSER SMÄRRE PROBLEM
- Luftläckage
- CO DĚLAT V, PŘÍPADĚ ZJIŠTĚNÍ NESPRÁVNE FUNKCE
- Ztráta vzduchu
- ČO ROBIT, AK SA NA KOMPRESORE VYSKYTNÚ MALÉ PORUCHY
- Únik vzduchu
- CONEXIUNEA ELECTRICĂ
- CE TREBUIE SĂ FACETI DACĂ SE PRODUC MICI DEFECTIUNI
- Pierderile de aer
Brand : DEWALT
Model : DPC10QTC-QS
Category : Compressor