
PBKS 53 A1 - Service après-vente PARKSIDE - Free user manual and instructions
Find the device manual for free PBKS 53 A1 PARKSIDE in PDF.


| Product type | Petrol chainsaw |
| Brand | Parkside |
| Model | PBKS 53 A1 |
| Displacement | 53 cm³ |
| Engine power | 2.0 kW (according to ISO 7293) |
| Cutting length (bar) | 45 cm (18 inches) |
| Max. chain speed | 22.1 m/s |
| Weight (with cutting equipment) | Approx. 6.8 kg |
| Fuel tank | 0.55 L |
| Chain oil tank | 0.26 L |
| Fuel | Unleaded petrol (RON 95/98) mixed with 2-stroke oil (40:1) |
| Ignition | Spark plug L8RTC |
| Chain type | Oregon 21LPX072X (8.25 mm / 0.325") |
| Bar type | Oregon PRO AM 18" 188PXBK095 |
| Sound pressure level | 98.3 dB(A) (K=3 dB) |
| Guaranteed sound power level | 117 dB(A) |
| Vibrations (rear handle) | 6.4 m/s² (K=1.5 m/s²) |
| Vibrations (front handle) | 6.96 m/s² (K=1.5 m/s²) |
| Main functions | Wood cutting (felling, limbing, cross-cutting) |
| Safety | Chain brake, front hand guard, throttle lock, kickback protection |
| Routine maintenance | Air filter cleaning, chain tensioning and lubrication, sharpening |
| Wear parts | Saw chain, guide bar, sprocket, air filter, spark plug |
| Warranty | 3 years (non-professional use) |
| Delivery contents | Chainsaw, bar and chain pre-assembled, bar cover, mixing bottle, bio chain oil 500 ml, safety goggles, hearing protection, spark plug wrench/screwdriver |
Frequently Asked Questions - PBKS 53 A1 PARKSIDE
User questions about PBKS 53 A1 PARKSIDE
0 question about this device. Answer the ones you know or ask your own.
Ask a new question about this device
Download the instructions for your Service après-vente in PDF format for free! Find your manual PBKS 53 A1 - PARKSIDE and take your electronic device back in hand. On this page are published all the documents necessary for the use of your device. PBKS 53 A1 by PARKSIDE.
USER MANUAL PBKS 53 A1 PARKSIDE
natural_image
Black-and-white photo of a Oregon Pro-AM 325" chain saw (no visible text or symbols beyond branding)
BENZIN-KETTENSÄGE PBKS 53 A1 PETROL CHAINSAW PBKS 53 A1 TRONÇONNEUSE A ESSENCE PBKS 53 A1
GB IE
PETROL CHAINSAW
Operating and Safety Instructions
Translation of Original Operating Manual
READ CAREFULLY BEFORE USE AND STORE SAFELY FOR LATER USE.
FR BE
Before reading, unfold the page containing the illustrations and familiarise yourself with all functions of the device.
DE AT CH
GB / IE Operating and Safety Instructions Page 01
natural_image
Technical line drawing of a mechanical device with an arrow indicating direction (no text or symbols present)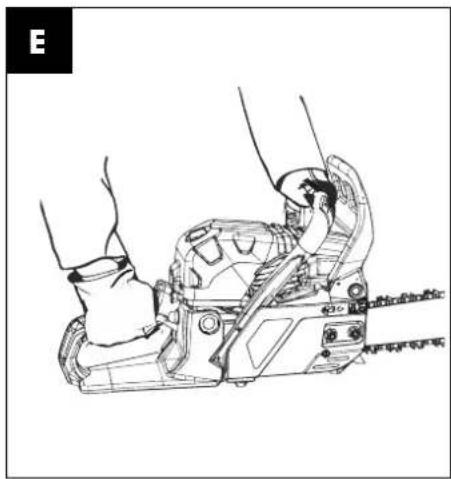
natural_image
Line drawing of a person using a chain-link robotic device (no text or symbols)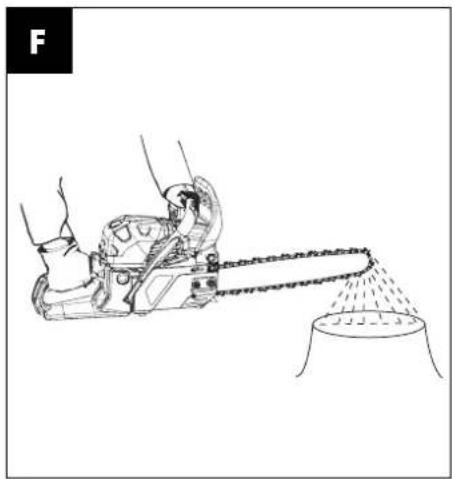
natural_image
Line drawing of a person using a chainsaw to spray or spray onto a small cylindrical object (no text or symbols)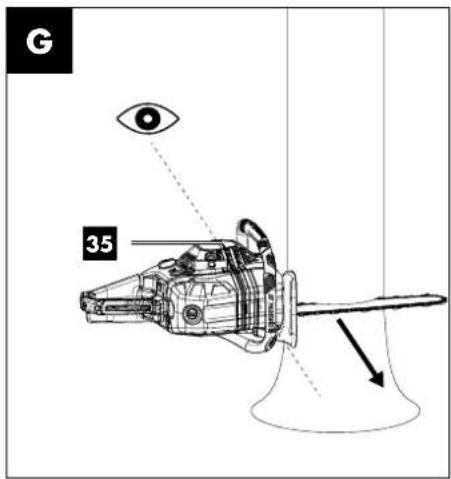
natural_image
Diagram of a chain drive system with motion arrows and a circular arrow indicating direction (no text or symbols)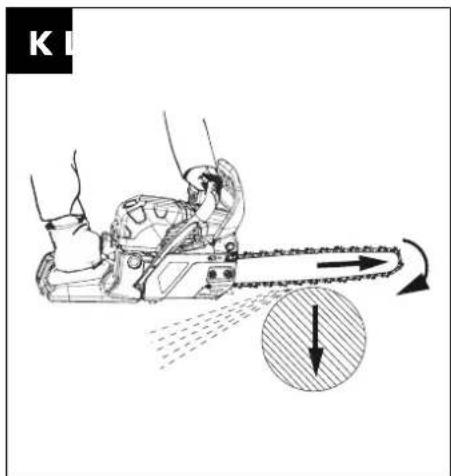
natural_image
Diagram of a chain-linking machine with motion arrows indicating speed and direction (no text or symbols)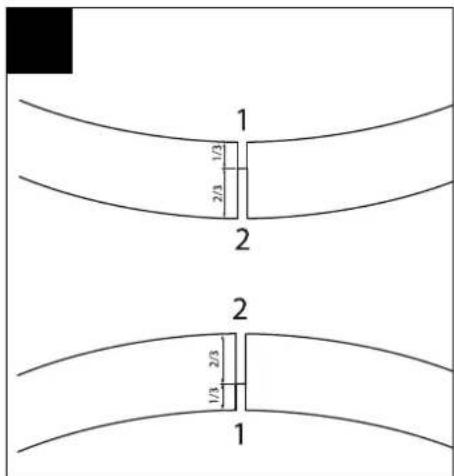
natural_image
Line drawing of a person walking with a chainsaw (no text or symbols)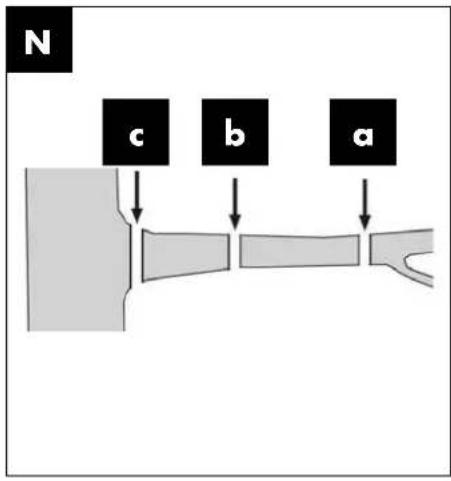
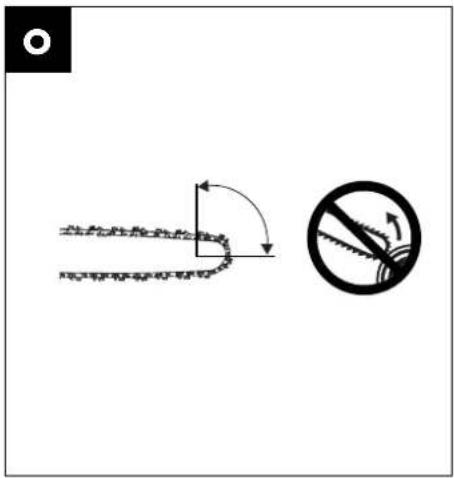
Table of contents: Page:
- Explanation of the symbols on the equipment 2
- Introduction......5
- Device description (fig. A - O) 5
- Scope of delivery 5
- Intended use 5
- Safety instructions .... 6
- Technical details....8
- Before use....9
- Use....10
- Basic working procedures when felling trees....11
- Working with wood that is under tension....12
- Transport....12
- Cleaning and maintenance....13
- Storage 15
- Disposal and recycling 15
- Troubleshooting....15
- Warranty certificate 16
- Declaration of conformity....159
1. Explanation of the symbols on the equipment

GB IE
Read these operating instructions thoroughly before using the appliance for the first time and retain them for future reference.

GB IE
WARNING! Special safety precautions are required when working with the chainsaw. Read and observe all warnings!

GB IE
Wear snugly fitting protective clothing with a cut-resistant lining.

GB IE
Wear a hard hat with a visor or safety goggles and ear muffs.

GB IE
Wear protective gloves!

GB IE
Wear non-slip safety shoes!

GB IE
WARNING! Risk of kickback. Protect yourself from kickback from the chainsaw and avoid all contact with the rail tip.

GB IE
Always operate the chainsaw with both hands.
GB IE
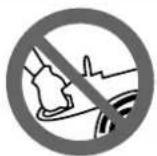
Do not work with the chainsaw in one hand.

GB IE
Press the fuel pump (primer) 6x
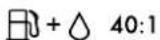

Fuel tank; Mixing ratio: 40 parts petrol to 1 part oil

Petrol: ROZ 95 / ROZ 98


2-stroke motor oil: ISO-L-EGD/JASO FD


Open flames or smoking in the vicinity of the appliance is strictly prohibited!


Guaranteed sound power level of the appliance


Attention! Hot surface
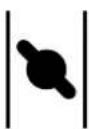

Start lever (choke) "cold start"


Protect the tool from getting wet!.


Running direction of the chain


Chain brake (open/closed)
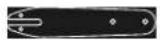
Type of guide rail


Chain lubrication setting
2. Introduction
Manufacturer:
scheppach
Günzburger Straße 69
D-89335 Ichenhausen
Dear customer,
we hope your new tool brings you much enjoyment and success.
Note:
According to the applicable product liability laws, the manufacturer of the device does not assume liability for damages to the product or damages caused by the product that occurs due to:
- Improper handling,
• Non-compliance of the operating instructions, - Repairs by third parties, not by authorized service technicians,
• Installation and replacement of non-original spare parts,
• Application other than specified.
We recommend:
Read through the complete text in the operating instructions before installing and commissioning the device.
The operating instructions are intended to help the user to become familiar with the machine and take advantage of its application possibilities in accordance with the recommendations. The operating instructions contain important information on how to operate the machine safely, professionally and economically, how to avoid danger, costly repairs, reduce downtimes and how to increase reliability and service life of the machine. In addition to the safety regulations in the operating instructions, you have to meet the applicable regulations that apply for the operation of the machine in your country.
Keep the operating instructions package with the machine at all times and store it in a plastic cover to protect it from dirt and moisture. Read the instruction manual each time before operating the machine and carefully follow its information.
The machine can only be operated by persons who were instructed concerning the operation of the machine and who are informed about the associated dangers. The minimum age requirement must be complied with.
In addition to the safety instructions contained in this operating manual and the specific regulations of your country, the technical rules generally accepted for the operation of machines of the same type must be observed.
We accept no liability for damage or accidents which arise due to non-observance of these instructions and the safety information.
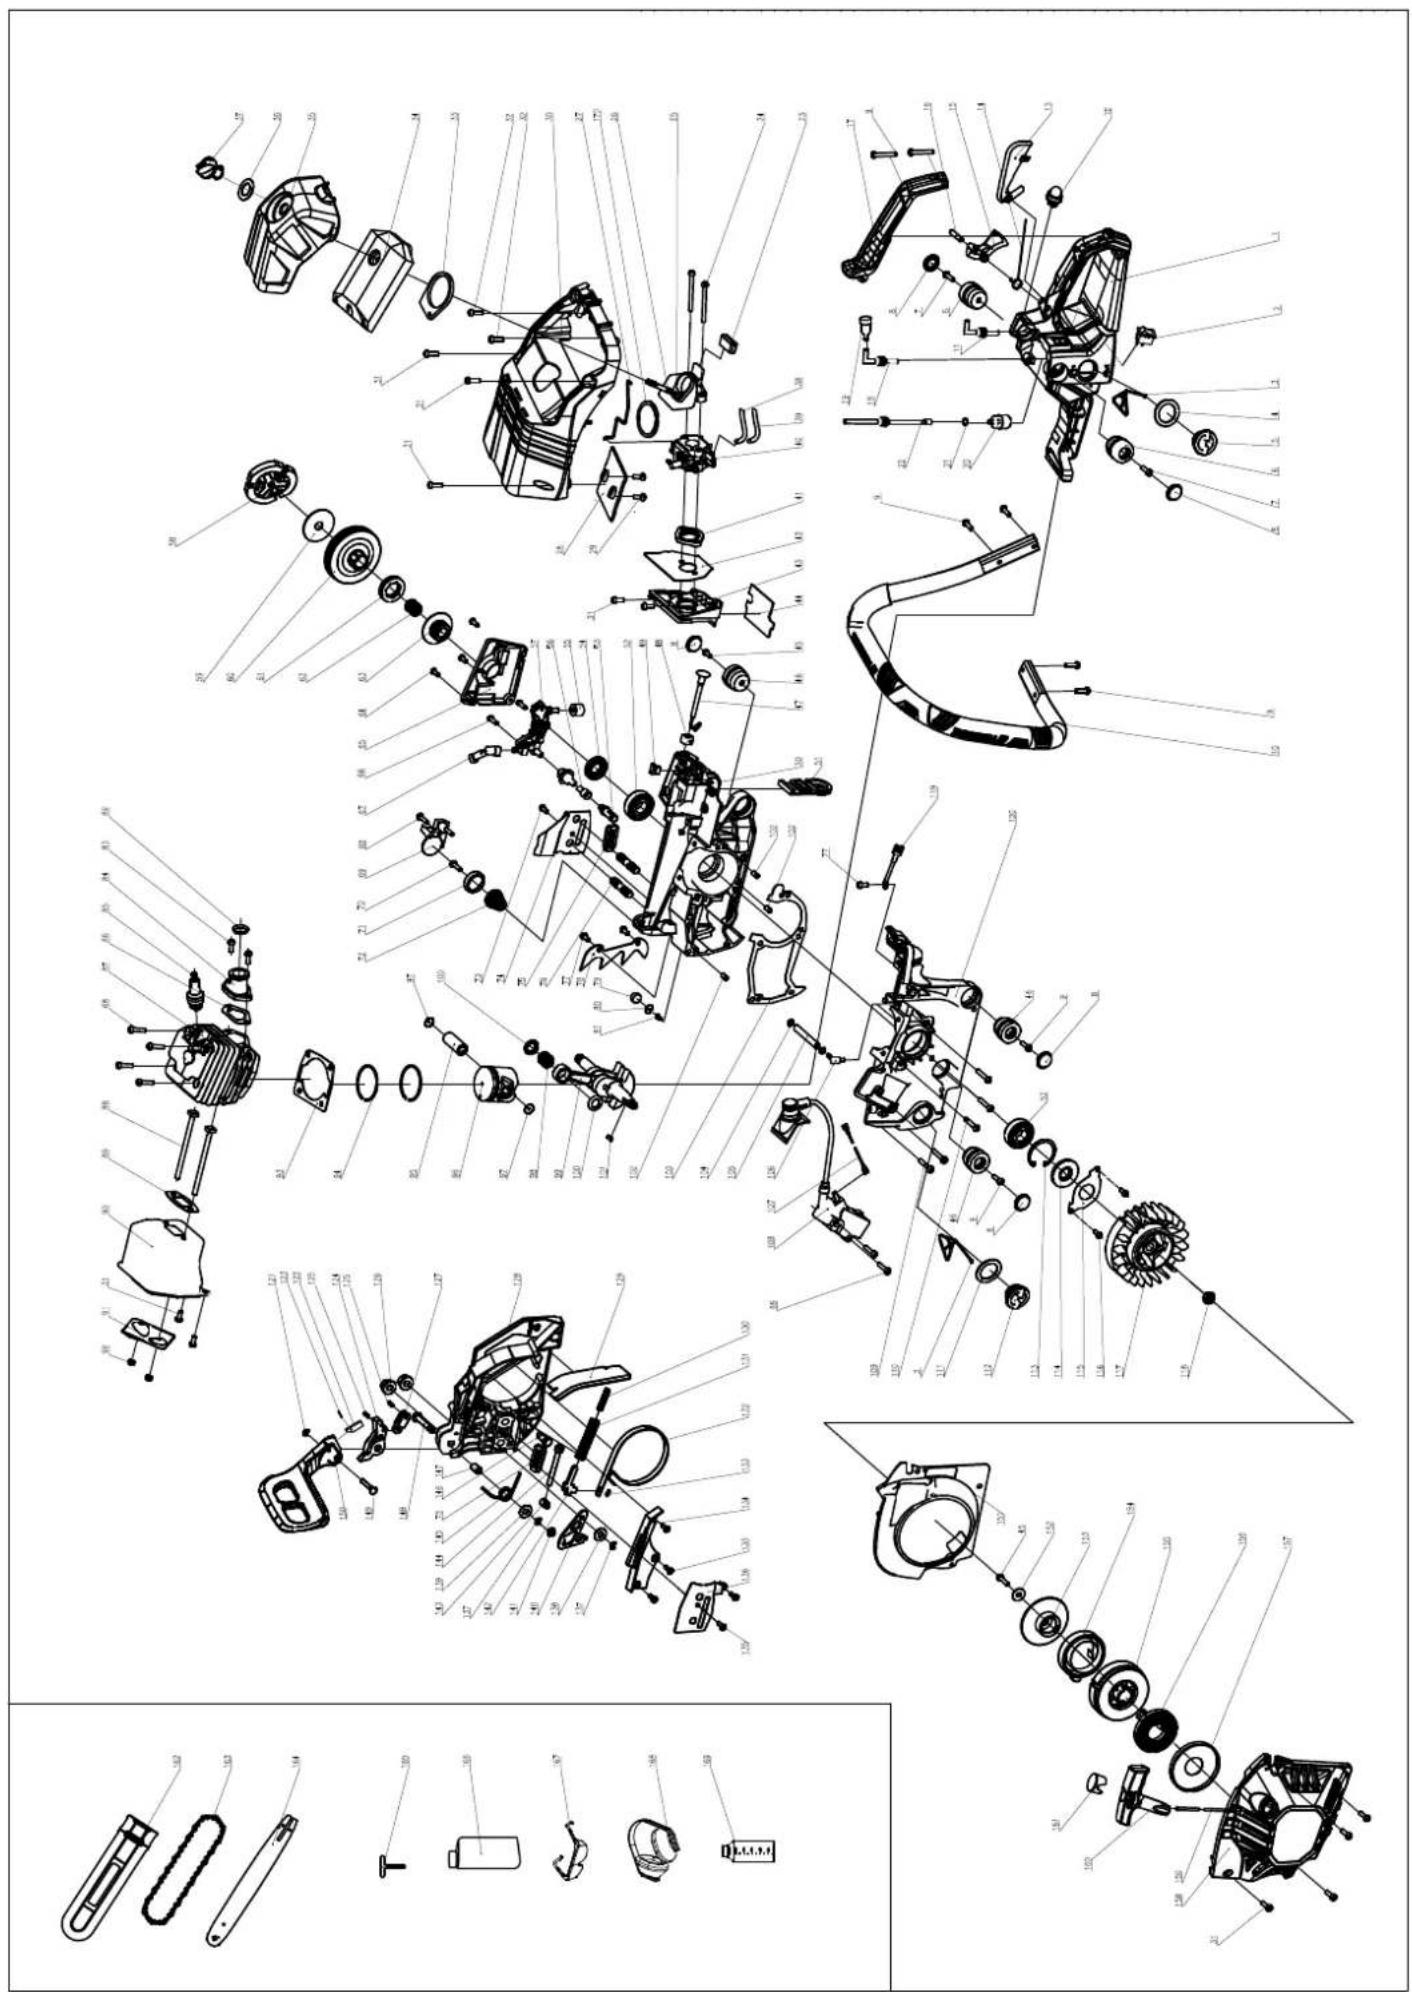
3. Device description (fig. A - O)
- Front hand guard
- Front handle
- Air filter cover
- Starter pull cord
- Cap for the air filter cover
- On/Off switch
- Fuel pump (primer)
- Cold start lever (choke)
- Throttle control lock
- Throttle control
- Rear handle
- Rear hand guard
- Fuel tank cap
- Chain oil tank cap
- Spiked bumper (pre-assembled)
- Guide rail (pre-assembled)
- Saw chain (pre-assembled)
- Grinder support
- Oil adjusting screw
- Locking nut
- Chain-tensioner screw
- Sprocket cover
- Chain tensioner pin
- Chain catcher
- Hole for the chain tensioner pin
- Chain sprocket
- Guide rail cover
- Ear muffs RYE001
- Safety goggles RYF001
- Mixing container
- Spark plug wrench/flat-blade screwdriver
- Organic chain oil
- Air filter
- Spark plug connector
- Felling marks
4. Scope of delivery
• 1 chain saw (pre-assembled)
• 1 spark plug wrench/flat-blade screwdriver
• 1 cover for the guide rail (chain guard)
- 1 mixing container
- 500 ml organic chain oil (Made in Germany)
• 1 pair of safety goggles RYF001
• 1 set of ear muffs RYE001
• 1 set of operating instructions
5. Intended use
The chainsaw is only for sawing lumber outdoors. The chainsaw may not be used for other purposes.
Do not make any modifications to the chainsaw. This can compromise safety. The user/operator is liable for any resulting damage or injuries of any kind and not the manufacturer.
Please note that this appliance is not designed for commercial use according to its intended purpose.
We accept no warranty liability if the appliance is used in commercial, manual trade or industrial operations or equivalent activities.
First-time users must seek training to familiarise themselves with the characteristics of the appliance. For your safety, visit a state-sponsored chainsaw training session.
Please note that our equipment has not been designed for use in commercial, trade or industrial applications. Our warranty will be voided if the equipment is used in commercial, trade or industrial businesses or for equivalent purposes.
5.1 Unauthorised operators:
Adults who are not familiar with these operating instructions, children, adolescents, and people under the influence of alcohol, drugs or medications must not operate this appliance. National regulations may restrict the use of the appliance.
6. Safety instructions
IMPORTANT! READ CAREFULLY BEFORE USE AND STORE SAFELY FOR LATER USE.
DANGER
For an imminently dangerous situation which will result in serious bodily injury or death.
WARNING
For a potentially dangerous situation which could result in serious bodily injury or death.
CAUTION
Indicates a potentially dangerous situation that can result in minor injury.
ATTENTION
Indicates a potentially dangerous situation that can result in property damage.
6.1 General safety instructions
WARNING
Stay alert, watch what you are doing and use common sense when operating the appliance. Do not use the appliance while you are ill, tired or under the influence of drugs, alcohol or medication. A moment of inattention while operating the appliance may result in serious personal injury.
Avoid improper use. Use the appliance only as described in the section "Intended use".
■ Before using the appliance for the first time, read the operating instructions and pay close attention to the safety instructions.
■ The warning and safety signs on the appliance provide important information for safe operation.
In addition to the notices in these operating instructions, all general safety and accident prevention legislation must also be complied with.
- Keep plastic wrapping away from children. There is a risk of suffocation!
■ Insufficiently informed operators can be a danger to other people and themselves due to improper use. The operator is responsible for third parties.
■ Be very careful when handling the appliance. Use common sense when working and play close attention to what you are doing.
■ Do not work for longer than 10 minutes in one session. We recommend taking a break of 10–20 minutes between working sessions.
■ Lend the appliance only to users who have experience with the appliance. Hand over the operating instructions at the same time.
■ Some cutting tasks require special training and particular skills. If in doubt, please consult an expert.
■ First-time users must seek training to familiarise themselves with the characteristics of the appliance. For your safety, visit a state-sponsored chainsaw training session.
■ When not in use, the appliance must be secured to ensure that it is not a risk to anyone else. Secure against unauthorised access.
■ The user of the appliance is responsible for all accidents and risks that cause injury or damage to other people's property.
■ Children, adolescents and people with reduced physical, sensory or mental capabilities must not use the chainsaw. The only exception to this are young people over the age of 16 who are being trained by a specialist.
The appliance's electrical ignition system generates a small electromagnetic field. If you have a heart pacemaker or similar implants, consult a doctor about possible health risks before using the appliance.
■ Note that improper maintenance, the use of non-approved spare parts, or the removal or modification of the safety equipment can lead to damage to the appliance and severe injuries to the operator.
6.2 Personal protective equipment (PPE)
DANGER
Wear personal protective equipment (PPE)!
- Wear a hard hat with a visor or safety goggles and ear muffs.
- Wear snugly fitting protective clothing with a cut-resistant lining.
- Wear non-slip safety shoes!
- Wear protective gloves!
■ Avoid loose-fitting clothing that can get caught.
■ Do not wear a scarf, tie or any jewellery!
■ If you have long hair, wear a hairnet!
■ Always wear a helmet when working in wooded areas. This offers protection from falling branches. Check the helmet regularly for damage. Replace it after 5 years at most. Use only approved protective helmets.
■ The face shield/safety goggles protect the user from wood chips and splinters. To prevent eye injuries, always use a face shield or safety goggles while working with the appliance.
■ Always wear ear muffs. The noise produced by the appliance can damage your hearing.
■ Wear robust protective gloves made of a durable material, e.g. leather.
■ Wear a dust mask when sawing dry wood. Sawing can generate sawdust.
6.3 Storage and transportation
■ Switch off the chainsaw before moving it anywhere, even short distances. Engage the chain brake and put on the chain guard.
■ Always use the chain guard for transportation and storage.
■ Protect the machine during transport (also in vehicles) against tipping over to prevent fuel loss, damage or injuries.
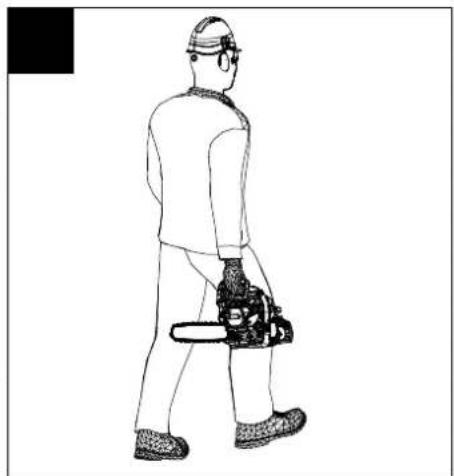
- Carry the appliance by the front handle only. The guide rail then faces to the rear, away from your body (see fig. M).
■ Hold the hot exhaust silencer away from your body. There is a risk of burns!
■ Clean and maintain the chainsaw before storage.
■ Store the appliance in a secure and dry location. Secure it against unauthorised access.
6.4 Environmental safety
■ National and/or local regulations may restrict the use of noise-generating, motor-driven appliances during certain times. Ask at your local authority.
■ Do not operate the appliance in confined spaces or other poorly ventilated areas. Risk of suffocation from poisonous exhaust fumes/lubricating oil vapours.
■ Work only in daylight.
■ Do not work in inopportune weather conditions, such as rain or wind. This will lead to an increased risk of accidents.
- Keep work area clean and tidy.
- Keep children, other people and animals at a distance before and during the work. Distractions can cause you to lose control.
■ Before starting work, ensure that no people, animals or valuable property are inside the danger zone.
■ Do not work in the vicinity of wire fences or areas with loose old wire.
■ If you are working in a combustible environment, e.g. on dry grass, have a fire extinguisher on hand. There is a risk of fire!
6.5 Adding fuel
■ Petrol is highly flammable! When filling the tank, keep at a distance from open flames and do not smoke. There is a risk of fire!
■ Ensure that you do not spill any petrol. Do not allow petrol and chain oil to get into the soil. Lay down suitable tarpaulins or similar.
■ Fill up the tank only in well-ventilated areas. Petrol vapours are highly inflammable and can explode.
■ Switch off the engine before refuelling and allow the appliance to cool down. If you spill any petrol, clean the affected area immediately. Do not allow petrol to come into contact with your clothing. If this happens, get changed immediately.
■ Avoid skin or eye contact with petrol or lubricants (oil).
■ Do not inhale any petrol/lubricating oil vapours.
- Check for leaks. If petrol leaks out, do not start the engine. There is a risk of burns.
■ Be careful when removing the petrol cap so that any pressure can escape slowly and no petrol sprays out.
6.6 Before use
WARNING
Always carry out checks before use and with the engine switched off.
Prior to each use and after it has been dropped, check that your device is safe to operate.
Check whether moving parts work properly. Many accidents are caused by poorly maintained tools. Have any damage repaired by qualified specialists.
Use the chainsaw and accessories only as described in these instructions, taking into account the working conditions and the work to be performed. Use of machine tools for operations different from those intended could result in a hazardous situation.
- Check the chain brake is in good working order regularly (front hand guard, see fig. E).
■ Check that the guide rail is correctly fitted.
■ Check that the saw chain is correctly tensioned. Follow the instructions for lubrication, chain tension and changing accessories. An incorrectly tensioned or lubricated chain can break or increase the risk of kickback. - Keep cutting tools sharp and clean. Sharpen them regularly and replace worn parts promptly. Properly maintained cutting tools with sharp cutting edges are less likely to bind and are easier to control.
■ Check the throttle control and the throttle control lock for freedom of movement. The throttle control must spring back into the start position. - Check whether there is enough fuel and chain lubrication oil in the tank.
- Check whether the handles are clean, dry and free of oil and dirt.
■ Never carry out the work alone. In case of emergency, someone should be close by.
■ Use the chainsaw only if you are standing on firm, safe and even ground. Do not overreach. Slippery ground or unstable standing surfaces (e.g. on a step ladder) can lead to a loss of balance or loss of control of the chainsaw. Keep proper footing and balance at all times. This enables better control of the chainsaw in unexpected situations.
■ Do not work with the chainsaw in a tree. When working in a tree there is a risk of injury.
■ Never saw above shoulder height.
■ Always hold the chainsaw with your right hand on the rear handle and your left hand on the front handle (see fig. E). Holding the chainsaw in an inverted working posture increases the risk of injuries and is prohibited.
■ When the chainsaw is running, keep all body parts away from the saw chain. Before starting the chainsaw, make sure that the saw chain is not touching anything. When working with a chainsaw, a moment of inattentiveness can lead to clothing or body parts getting caught in the saw chain.
■ Switch the chainsaw off immediately if you notice any changes in the way the appliance behaves.
■ If the chainsaw hits a stone, nails or other hard objects, stop the engine immediately and check the saw chain and the guide rail for damage.
■ Do not drop the chainsaw, knock it against obstructions and do not use the guide rail as a lever.
■ Use the chainsaw only for sawing wood.
■ When sawing a branch that is under tension, expect it to spring back. Once the tension in the wooden fibres is released, the branch can hit the operator and/or knock the chainsaw out of his hands.
■ Be extremely careful when cutting brushwood and young trees. The thin material can catch in the saw and fly in your direction or knock you off balance.
6.7 Vibrations
⚠ WARNING
You can reduce the vibration risk, e.g. the risk of Raynaud's phenomenon (circulatory problems), by taking regular breaks during which you rub your hands together.
■ Always wear protective gloves and ensure your hands are warm.
■ Make sure that the chain is always sharp.
■ Take regular work breaks.
6.8 Precautions against kickback
WARNING
Be aware of the danger of kickback when working with the appliance. There is a risk of personal injury. You can avoid kickbacks by being careful and using the correct sawing technique.
■ Contact with the tip of the rail can, in some cases, lead to an unexpected rearwards reaction resulting in the guide rail flying upwards towards the operator (fig. O).
■ Kickbacks can occur if the tip of the guide rail touches an object or if the wood bends and the saw chain gets caught in the cut.
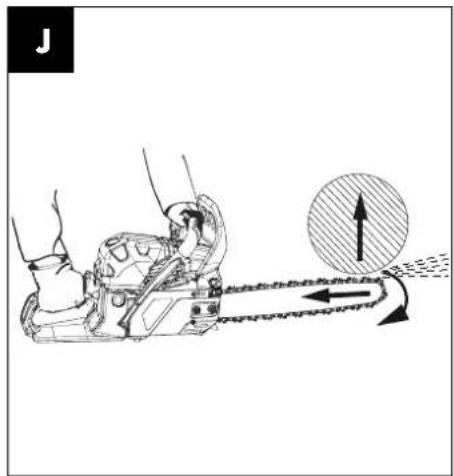
■ If the saw chain jams in the upper edge of the guide rail, the rail can kick back violently towards the operator (see fig. J).
■ If the saw chain jams in the lower edge of the guide rail, the rail can jerk violently away from the operator (see fig. K).
■ Be extremely careful when reapplying the chain of the chainsaw to a cut you have already begun.
■ Do not saw any branches or pieces of wood that can move their position during sawing or in which the cut could close during sawing.
■ Any such reaction can lead to you losing control over the saw and possibly injuring yourself. Do not rely solely on the chainsaw's built-in safety devices. As the user of a chainsaw, you can take a number of measures to avoid accidents and injury.
A kickback is caused by incorrect use or misuse. It can be avoided by taking proper precautions as given below.
■ Hold the saw firmly with both hands, with your thumb and fingers around the handles of the chainsaw. Hold your body and arms in a position in which you can withstand kickback forces. If suitable measures are taken, the operator can control the recoil forces. Never let go of the chainsaw (see fig. E).
■ Avoid an abnormal posture and do not saw over shoulder height. This will prevent inadvertent contact with the tip of the rail and allows a better control of the chainsaw in unexpected situations.
■ Always use the replacement rails and saw chains specified by the manufacturer. Incorrect replacement rails and saw chains can lead to a tearing of the saw chain and/or kick-back.
■ Follow the manufacturer's instructions for sharpening and maintenance of the saw chain. Setting the depth limiter too low can increase the risk of kickback.
■ Do not saw with the tip of the blade. This can lead to a kickback.
■ Make sure that there are no nails or pieces of metal in the cutting area. Pay particular attention to nails and pieces of iron in the area of the cut. Also be careful when cutting hardwoods in which the chain could jam. This can lead to a kickback.
■ Start the cut using full power and keep the chainsaw at top speed while sawing.
■ Ensure that there are no objects on the ground that you can trip over.
6.9 Remaining risks
DANGER
RISK OF INJURY!
Contact with the saw-chain can lead to fatal cutting injuries. Never put your hands into the running saw-chain.
RISK OF KICKBACK!
Kickback can lead to fatal cutting injuries.
RISK OF BURNING!
The chain and the guide bar heat up during operation.
7. Technical details
Weight empty tank, no cutting equipment approx. .....5.7 kg Weight empty tank, with cutting equipment approx. .....6.8 kg Fuel tank .......approx. 550 cm ^3 (0.55 l) Tank for chain lubrication oil .......approx. 260 cm ^3 (0.26 l)
Usable cutting length*/guide rail 45 cm (18")
Max. chain speed ....22.1m/s Chain pitch ....8.25 mm (0.325") Drive link thickness ....1.5 mm (0.059") Saw chain model (pre-assembled) ....Oregon 18" 21LPX072X Guide rail model Oregon PRO AM 18" 188PXBK095 (pre-assembled) ....(516481) Number of teeth/division ....7 teeth/8.255 mm (0.325")
Cylinder capacity .... 53 cm³ Max. motor output according to ISO 7293 .... 2.0 kW Idle speed n₀ .... 3100 ± 300 rpm Speed n_max .... 11500 rpm Spark plug .... L8RTC
* The actual cutting length may be lower than the specified cutting length.
Noise
Sound pressure level L_pA according ISO 22868 98.3 dB(A)
Uncertainty K_pA .....3 dB
Sound power level L_WA according ISO 22868 ....117.0 dB(A)
Uncertainty K_WA 3 dB
Wear hearing protection.
The effects of noise can cause a loss of hearing.
The above-mentioned noise emission values were measured in accordance with a standardised test procedure and can be used to compare one power tool with another.
The above-mentioned noise emission values can also be used for the preliminary assessment of exposure.
Vibration
Vibration value on the
rear handle according ISO 22867 6.4 m/s ^2
Vibration value on the
front handle according ISO 22867 ....6.69 m/s²
Uncertainty K 1.5 m/s ^2
⚠ WARNING
You can reduce the vibration risk, e.g. the risk of Raynaud's phenomenon (circulatory problems), by taking regular breaks during which you rub your hands together.
8. Before use
- Open the packaging and remove the device carefully.
- Remove the packaging material as well as the packaging and transport bracing (if available).
- Check that the delivery is complete.
- Check the device and accessory parts for transport damage.
- If possible, store the packaging until the warranty period has expired.
ATTENTION
The device and packaging materials are not toys! Children must not be allowed to play with plastic bags, film and small parts! There is a risk of swallowing and suffocation!
- Remove the quick start guide from the start pull cord (4).
8.1 Mixing fuel
The engine must be operated with a mixture of petrol and motor oil.
⚠ WARNING
Avoid direct skin contact with fuel and inhaling fuel vapours.
Always use a mixture of unleaded petrol (at least RON 95) and special 2-stroke engine oil (JASO FD/ISO-L-EGD). Mix up the fuel mix according to the fuel mixing table.
Pour the correct amount of petrol and 2-stroke oil into the supplied mixing container (30) (see "Fuel mix table"). Then shake the mixing container (30) gut durch.
8.1.1 Fuel mix table
Mixing process: 40 parts petrol to 1 part oil
Petrol 2-stroke oil
0.5 litres 12.5 ml
8.2 Adding fuel
WARNING
Fill the fuel tank only when the engine is switched off and cooled down. There is a risk of fire!
- Always clean the area around the fuel tank cap (13) before filling to prevent dirt getting into the tank. Use a dry, lint-free cloth to do this.
- Lay the appliance on its side so that the fuel tank cap (13) is facing upwards.
- Turn the fuel tank cap (13) anticlockwise and remove it. The fuel tank cap (13) is connected to the fuel tank with an anti-loss device and cannot fall down.
- Fill the tank with the fuel mix. Do not spill any fuel while filling the tank and do not fill the tank to overflowing.
- Wipe up any spilled fuel immediately.
- Turn the fuel tank cap (13) clockwise to close it.
NOTE
When filling the fuel tank, also check the chain oil.
8.3 Adding chain oil
⚠ WARNING
Fill the chain oil only when the engine is switched off and cooled down. There is a risk of fire!
Never work without chain lubrication! If the saw chain runs dry, the cutting equipment may become irreparably damaged in a short time.
Always check chain lubrication before starting work.
NOTE
Use only saw chain oil. Preferably biodegradable. Do not use waste oil, motor oil, etc.
While working, check whether the chain lubrication is working correctly.
- Always clean the area around the chain oil tank cap (14) before filling to prevent dirt getting into the chain oil tank. Use a dry, lint-free cloth to do this.
- Lay the appliance on its side so that the chain oil tank cap (14) is facing upwards.
- Turn the chain oil tank cap (14) anticlockwise and remove it. The chain oil tank cap (14) is connected to the chain oil tank with an anti-loss device and cannot fall down.
- Add the supplied organic chain oil to the chain oil tank. Do not spill any chain oil while filling the chain oil tank and do not fill the tank to overflowing.
- Wipe up any spilt chain oil immediately.
- Turn the chain oil tank cap (14) clockwise to close it.
8.4 Tightening and checking the saw chain
⚠ WARNING
Wear protective gloves! There is a danger of injury from the sharp cutting teeth!
Check the chain tensioning before every use.
- Before tensioning, slightly loosen both locking nuts (20) using the spark plug spanner (31).
- Turn the chain-tensioner screw (21) in a clockwise direction using the flat-blade screwdriver (31) to increase the tension.
- Tighten the two locking nuts (20) firmly using the spark plug spanner (31).
- The saw chain (17) must lie against the underside of the blade. Check whether the saw chain (17) (chain brake off, pull front hand guard (1) to the rear) can be drawn over the guide rail (16) by hand.
NOTE
A new saw chain (17) stretches and must be tightened more regularly.
9. Use
CAUTION
Please pay attention to the statutory provisions in the relevant noise protection regulations.
Before starting the appliance, always check that:
• The fuel system is not leaking.
- The protective equipment and cutting equipment is complete and in perfect working order.
- All screw connections are firmly tightened.
- All moving parts can move smoothly and freely.
Working procedures
Get to know the chainsaw before you start to use it.
9.1 Starting the engine
CAUTION
Always pull the starter pull cord (4) straight out. Hold the handle of the starter pull cord (4) firmly when the starter pull cord (4) retracts. Do not allow the starter pull cord (4) to whip back.
9.1.1 Starting when the engine is cold
⚠ WARNING
Engage the chain brake before every use (push hand guard (1) forwards).
CAUTION
Never allow the starter pull cord (4) to whip back. This could cause damage.
- Remove the cover (27) from the guide rail (16).
- Place the chainsaw on a firm, level surface. The saw chain (17) must not touch the ground.
- Push the front hand guard (1) forwards until it clicks into place. The saw chain (17) will be locked by the chain brake.
- Press the fuel pump "Primer" (7) 6 times.
- Switch the On/Off switch (6) to "ON".
- Pull the choke (8) out (|).
- Place the tip of your shoe into the rear hand guard (12) (see fig. C).
- Hold the chainsaw firmly by the front handle (2) and pull the starter pull cord (4) slowly until you feel resistance.
-
Now pull the starter pull cord (4) quickly so that the engine starts. If the engine does not start, repeat the process. As long as the choke (8) is out (1), the engine will only run for a short time and then switch off.
-
As soon as the engine is off, press the throttle control lock (9) and the throttle control (10) simultaneously. The choke (8) automatically jumps to the "warm start" operating position.
- Now pull the starter pull cord (4) quickly again so that the engine starts.
If the engine does not start after several attempts, read the "Troubleshooting".
NOTE
At very high outdoor temperatures it is possible that even a cold engine has to be started without using the choke!
- Release the chain brake by pulling the front hand guard (1) backwards (see fig. D). CAUTION! The chain brake is now released. If the throttle (10) is actuated together with the throttle interlock (9), the saw chain (17) starts up.
9.1.2 Starting when the engine is hot (The appliance has been turned off for less than 15–20 minutes)
⚠️ WARNING
Engage the chain brake before every use (push hand guard (1) forwards).
- Push the front hand guard (1) forwards until it clicks into place. The saw chain (17) will be locked by the chain brake.
- Switch the On/Off switch (6) to "ON".
- The choke lever (8) does not need to be pulled out to start a warm motor.
- Place the tip of your shoe into the rear hand guard (12) (see fig. C).
- Hold the chainsaw firmly by the front handle (2) and pull the starter pull cord (4) slowly until you feel resistance.
- Now pull the starter pull cord (4) quickly. The appliance should start after 1–2 pulls. If the appliance still hasn't started after 6 pulls, repeat the process as described in "Starting when the engine is cold".
9.2 Turning the engine off
9.2.1 Emergency stop sequence
If you need to stop the appliance immediately, switch the On/Off switch (6) to "OFF".
9.2.2 Normal sequence
- Release the throttle control (10). The engine idles.
- Then switch the On/Off switch (6) to "OFF".
9.3 Operating while idle
CAUTION
When idling, the saw chain (17) should not move. If the saw chain (17) moves, you need to adjust the idling speed!
NOTE
If the saw chain (17) moves when it is idling or the engine goes out when you release the throttle, you need to adjust the carburettor (see section "Maintaining the carburettor settings").
- Lift the chainsaw.
- Hold the front handle (2) firmly in your left hand.
- Hold the rear handle (11) firmly in your right hand. The ball of your hand now lies on the throttle control lock (9) and your index finger operates the throttle control (10) (see fig. E).
• After pulling the throttle (10), once, the engine should idle. - Run the engine to warm it up.
9.4 Checking and adjusting the chain lubrication
CAUTION
- Never work without chain lubrication! If the saw chain runs dry, the cutting equipment may become irreparably damaged in a short time.
• Always check chain lubrication before starting work.
Note
Use only saw chain oil preferably biodegradable. Do not use waste oil, motor oil, etc.
While working, check whether the chain lubrication is working correctly.
With the chainsaw running at a medium speed, hold it over a sawn off tree stump or a suitable ground sheet. If the lubrication is adequate, a light film of oil will form on the tree stump or the ground sheet (see fig. F).
- If required, the chain lubrication can be increased or decreased using the oil adjusting screw (19).
• To do this, use the supplied flat-head screwdriver (31): - Press and then turn the oil adjusting screw (19) clockwise to decrease the chain lubrication.
- Press and then turn the oil adjusting screw (19) anticlockwise to increase the chain lubrication.
9.5 Checking the chain brake
WARNING
You must check the chain brake before every use.
The chain brake stops the saw chain in the event of a kickback.
- Make sure that the front hand guard (1) is free of dirt and moves freely.
- Start the chain saw and accelerate the saw chain to full speed.
- With the saw chain running, press the front hand guard (1). The chain brake must slow down and lock the saw chain at maximum speed.
⚠ WARNING
High engine revs over a long period with the engine brake engaged will damage the engine and the chain drive.
If the saw chain (17) moves anyway, contact Customer Service.
10. Basic working procedures when felling trees
⚠ WARNING
Risk of injury!
Sawing and felling work as well as all associated tasks may only be carried out by properly trained operators.
Note
Note your country's laws regarding felling work and contact the appropriate authority for more information.
- Make sure that no one can be injured by falling branches and trees.
- Only the required personnel should be in the working area.
- Keep the area around the trunk free and tidy to ensure secure footing for the operators.
- Keep all escape routes free and tidy to ensure that the working area can be evacuated quickly.
- Do not carry out any felling work in strong wind, poor weather or bad visibility.
- Keep a distance of at least 2 12 tree lengths from next working area.
10.1 Use and handling
- Never start the appliance before the guide rail (16), saw chain (17) and sprocket cover (22) have been fitted correctly.
- Do not cut any wood that is lying on the ground and do not attempt to saw roots that are protruding from the soil. Never immerse the saw chain (17) in the soil, as this could blunt the saw chain (17).
- If the appliance accidentally comes into contact with a solid object, turn off the engine immediately and inspect the appliance for damage.
- Service the appliance carefully. Check for misalignment or binding of moving parts, breakage of parts and any other damage that may impair the tool's operation. If damaged, have the appliance repaired before use. Many accidents are caused by poorly maintained tools.
- Keep cutting tools sharp and clean. Properly maintained cutting tools with sharp cutting edges are less likely to bind and are easier to control.
- Have the appliance checked by qualified specialists. Use only the replacement parts recommended by the manufacturer.
10.2 Creating the notch cut
Note
The kerf determines the direction that the tree will fall in.
Place the kerf at right angles to the fall direction.
Saw as close the ground as possible.
Support the chainsaw using the bumper spike (15).
10.2.1 Determining the felling direction - with marks on the device (fig. G)
The chainsaw is equipped with felling marks (35) which aid you with the direction of the chainsaw.
Place the chainsaw against the trunk. The felling marks (35) show you the probable felling direction of the tree.
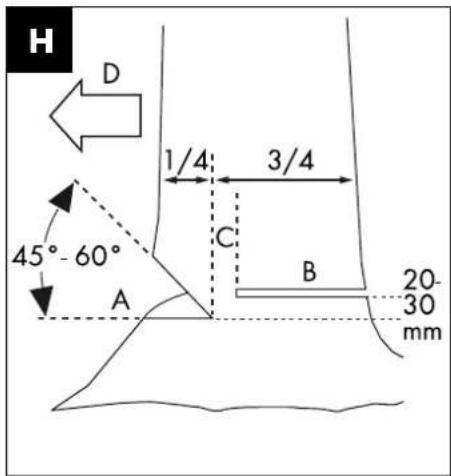
10.2.2 Creating the notch cut (fig. H)
- Start with the first kerf cut A. The depth of the kerf should be about 1/4 of the diameter of the tree and at an angle of 45^ - 60^ .
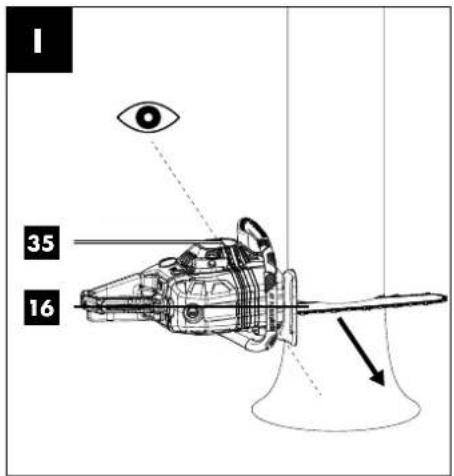
10.2.3 Checking the felling direction (fig. 1)
Place the chainsaw with the guide rail (16) at the bottom of the notch cut.
The felling marks (35) show the probable felling direction. If necessary, recut the notch cut accordingly.
10.3 Carrying out the felling cut (fig. H)
- Make the felling cut B around 2–3 centimetres higher than the horizontal kerf cut A. Ensure that the felling cut B is perfectly horizontal.
- Leave around 1/10 of the tree diameter, the hinge C, in front of the felling cut B. The hinge C guides the tree to the ground - like a door hinge - and prevents premature falling.
WARNING
Risk of accidents!
Do not saw the hinge C at the same time as the felling cut B, otherwise the tree could fall in an unexpected direction! Be prepared that the tree can slip uncontrollably when it falls onto the cut.
Be prepared that the tree can jump uncontrollably in an unexpected direction when it hits the ground
- To prevent the chainsaw from getting caught in the felling cut B, push aluminium or plastic wedges into the cut B. Do not use iron wedges.
CAUTION
Property damage!
Make sure that the wedge does not come into contact with the saw chain (17). This can severely damage it.
10.4 Branch removal
- Be aware of the danger of branches flying back.
- Do not stand on the trunk while removing branches.
- Do not saw with the tip of the blade.
- Never saw several branches at once.
- Support the chainsaw where possible using the bumper spike (15).
- Make sure that the chainsaw cannot swing through at the end of the cut due to its own weight. If it is no longer supported in the cut, hold something appropriate against it.
- Make sure you have firm, stable and secure footing when de-branching.
10.4.1 Saw in sections
Trim long or thick branches before you make the final cut (see fig. N). Otherwise, the saw chain (17) can easily catch.
11. Working with wood that is under tension
It is important to carry out the working steps in the correct order when working with wood that is under tension. Otherwise the saw chain (17) could jam or there could be a kickback. Wood under pressure should always be worked first on the 'push' side. Only then can a separating cut be made on the 'pull' side. This helps to prevent the saw chain (17) from jamming.
CAUTION
Property damage!
Horizontal lumber may not touch the ground on the underside of the cut, otherwise the saw chain (17) could be damaged.
Kickback (fig. J)
- If the saw chain (17) jams on the upper edge of the guide rail (16), the chainsaw can kick back violently towards the operator.
Drawing in (fig. K)
- If the saw chain (17) jams on the lower edge of the guide rail (16), the rail can jerk violently away from the operator.
Working safely
- Keep the appliance in good working order to prevent injury.
- If the appliance has been dropped, check for significant damage or defects.
- Do not use the appliance while standing on a ladder or with unsteady footing.
- Do not be tempted into making a poorly considered cut. You could endanger yourself and others.
- Change your working position regularly. Using the appliance for a long time can lead to vibration-related circulation disorders of the hands. You can extend the usage duration by using appropriate gloves or by taking regular breaks. Note that any personal predisposition to poor blood circulation, low external temperatures or large prehensile forces can reduce the usage period.
11.1 Trunk is bent downwards
- Start by making a relief cut 1 (approx. 1/3 of the trunk diameter) on the push side (see fig. L).
- Then make a separating cut 2 (approx. 2/3 of the trunk diameter) on the pull side (see fig. L).
11.2 Trunk is bent upwards
- Start by making a relief cut 1 (approx. 1/3 of the trunk diameter) on the push side (see fig. L).
- Then make a separating cut 2 (approx. 2/3 of the trunk diameter) on the pull side (see fig. L).
12. Transport
• Always use the cover for the guide rail (27) during transport.
- Switch off the chainsaw before moving it anywhere, even short distances. Protect the machine during transport (also in vehicles) against tipping over to prevent fuel loss, damage or injuries.
- Carry the appliance by the front handle (2). only. The guide rail then faces to the rear, away from your body (see fig. M).
- Hold the hot exhaust silencer away from your body. There is a risk of burns!
13. Cleaning and maintenance
WARNING
Risk of injury!
Always switch off the appliance before cleaning and disconnect the spark plug connector (34).
(see section 13.4 Maintaining the spark plug)
Note
Clean the appliance thoroughly after every use.
Carry out the cleaning and maintenance work only as described in these instructions. Any more extensive work has to be carried out by specialist personnel.
Maintenance work must be carried out regularly (see section "Maintenance intervals").
13.1 Cleaning the engine unit
⚠ WARNING
Risk of burns!
Do not touch the hot exhaust silencer, cylinder or cooling fins.
- Keep all protective equipment, air vents and the engine housing as free of dust and dirt as possible. Blow it out with low-pressure compressed air.
- Clean the appliance regularly with a damp cloth and a mild detergent. Make sure that no water can penetrate into the interior of the appliance.
13.2 Cleaning the air filter
Contaminated air filters reduce the engine output due to low air supply to the carburettor.
Regular inspection is essential. The air filter (33) must be inspected regularly and cleaned if necessary.
The air filter (33) must be checked more frequently if the air is dusty.
- Remove the cap for the air filter cover (5) by turning it in an anticlockwise direction.
- Remove the air filter cover (3).
- Remove the air filter (33).
- Clean the air filter (33) by tapping or blowing it out (with compressed air).
Assembly is done in the reverse order.
CAUTION
Never clean the air filter (33) with petrol or flammable solvents.
13.3 Cleaning the chain drive
WARNING
Risk of injury!
Always wear protective gloves when handling the saw chain (17). There is a danger of injury from the sharp cutting teeth!
Note
Clean the chain drive after each use.
- Place the chainsaw on a level and stable surface.
- Pull the front hand guard (1) backwards as far as the stop to release the chain brake (see fig. D).
- Remove the two locking nuts (20) using the spark plug spanner (31).
- Remove the sprocket cover (22).
- Carefully remove the saw chain (17) from the guide rail (16) and the chain sprocket (26).
- Remove the guide rail (16). Clean it with a brush.
- Now clean the entire chain drive area and the saw blade cover (22) with a brush or by blowing it out with compressed air.
Assembly is done in the reverse order.
13.4 Maintaining the spark plug
- Remove the air filter (33) as described in 13.2 "Cleaning the air filter".
• Pull off the spark plug connector (34). - Remove the spark plug using the enclosed spark plug spanner (31).
- Assembly is done in the reverse order.
Electrode gap = 0.6 mm (distance between the electrodes between which the ignition spark is generated). Check the spark plug for contamination after the first 10 hours of operation and clean it with a copper wire brush if required.
Afterwards, service the spark plug after every 50 hours of operation.
13.5 Maintaining the chain lubrication
- See the section "Checking and adjusting the chain lubrication".
13.6 Maintaining the carburettor settings
- If the saw chain (17) moves when the engine is idling or the engine goes out when you release the throttle, you need to adjust the carburettor.
Note
Have the carburettor adjustment (e.g. adjusting the idling speed) carried out by qualified specialists only to prevent engine damage.
13.7 Maintaining the guide rail
- Remove any remaining burrs on the edge of the rail using a metal file.
- Clean the guide rail (16) groove using a brush or with compressed air. Replace the guide rail (16) as soon as the groove is worn.
- Turn the guide rail (16) after every use to ensure even wear.
- Check that the sprocket at the tip of the guide rail (16) moves freely. Lubricate it if necessary with a little bearing oil.
13.8 Fitting the guide rail and tensioning the saw chain
WARNING
Always switch the engine off before fitting parts.
⚠ WARNING
Risk of injury!
Always wear protective gloves when handling the saw chain (17). There is a danger of injury from the sharp cutting teeth!
Note
A new saw chain (17) stretches and must be tightened more regularly. Check the chain tension regularly after every cut and adjust this as required.
Depending on wear, the guide rail (16) can be turned.
- Place the chainsaw on a level and stable surface.
- Pull the front hand guard (1) backwards as far as the stop to release the chain brake (see fig. D).
- Remove the two locking nuts (20) using the spark plug spanner (31).
- Remove the sprocket cover (22).
- Push the slotted hole of the guide rail (16) over the two protruding bolts.
- Lay the saw chain (17) over the teeth of the chain sprocket (26). Guide the saw chain (17) precisely in the direction indicated on the guide rail (16). There is a guide wheel at the tip of the guide rail (16) in whose teeth the saw chain (17) must be laid.
- Lightly pull the guide rail (16) to pre-stress the saw chain (17).
- Put the sprocket cover (22) back on. Make sure that the chain tensioner pin (23) on the inside fits into the appropriate hole (25) on the guide rail (16). Adjust the chain-tensioner screw (21) as required using the flat-head screwdriver (31).
- Tighten the two locking nuts (20) hand tight. Do not tighten them too firmly.
- Use the flat-head screwdriver (31) to turn the chain-tensioner screw (21) clockwise until the lower part of the saw chain (17) slides into the guide rail (16). The saw chain (17) must lie against the underside of the rail. When the chain brake is released, you should be able to pull the saw chain (17) over the guide rail (16) by hand.
Note
A new saw chain (17) stretches and must be tightened more regularly.
- Tighten the two locking nuts (20) with the spark plug wrench (31).
13.9 Sharpening and caring for the saw chain
⚠ WARNING
Risk of injury!
Always wear protective gloves when handling the saw chain (17). There is a danger of injury from the sharp cutting teeth!
Note
A properly maintained and sharpened saw chain reduces the amount of bodily effort and level of wear and produces a better result.
Clean, maintain and sharpen the saw chain regularly.
Check the saw chain regularly for cracks and damaged rivets. A grinder can be attached to the grinder support (18) for a secure grip during grinding.
Use only special ∅ 4.8 mm (3/16") round files for saw chains for the supplied saw chain.
You will find detailed information on sharpening in a sharpening set, e.g. an Oregon set.
Alternatively, you can use an electrical saw chain sharpening device and follow the instructions of the manufacturer.
If you have any doubts about carrying out the work, the saw chain should be replaced.
If necessary, have the sharpening of the saw chain (17) carried out by a specialist workshop.
- Required parts (not supplied):
- ∅ 4.8 mm (3/16") round file for saw chains
- Flat file
- Depth limit setter
- File using forwards movements only to remove material.
- File at an angle of around 25^ at an inclination of 10^ to the guide rail (16).
- Check the clearance of the depth limiter with a depth limit setter.
- The correct clearance of the depth limiter should be 0.6 mm (0.024").
13.10 Maintenance intervals
The figures given here are based on normal operating conditions. In the event of more difficult conditions, such as strong dust generation and longer daily working hours, the given intervals are to be reduced correspondingly.
| Appliance part | Action | Before starting work | Weekly | In the event of an error | In the event of damage | As required |
| Chain lubrication | Checking | X | ||||
| Saw chain (17) | Check and note sharpness | X | ||||
| Check chain tension | X | |||||
| Sharpen | X | |||||
| Guide rail (16) | Check (wear, damage) | X | ||||
| Cleaning X X | ||||||
| Replace X X |
13.11 Service information
Please note that the following parts of this product are subject to normal or natural wear and that the following parts are therefore also required for use as consumables.
Wear parts*: chain, guide bar, chain sprocket, chain oil, engine oil, claw stop, chain catch, spark plug, air filter, fuel filter, chain oil filter
* Not necessarily included in the scope of delivery!
14. Storage
• Always use the cover for the guide rail (27) during storage.
- Always clean and maintain the appliance before storage, see section "Cleaning and maintenance".
- Switch off the chainsaw before moving it anywhere, even short distances. Protect the machine during transport (also in vehicles) against tipping over to prevent fuel loss, damage or injuries.
• Empty the oil and fuel tanks using a suction pump.
⚠ WARNING
Do not remove the fuel in enclosed rooms, in the vicinity of fire or while smoking. Gas vapours can cause explosions or fire.
- Start the engine and leave it running until the remaining petrol has been used up.
15. Disposal and recycling
The equipment is supplied in packaging to prevent it from being damaged in transit. The raw materials in this packaging can be reused or recycled.
The equipment and its accessories are made of various types of material, such as metal and plastic. Defective components must be disposed of as special waste. Ask your dealer or your local council.

The packaging is wholly composed of environmentally-friendly materials that can be disposed of at a local recycling centre.
Contact your local refuse disposal authority for more details of how to dispose of your worn-out electrical devices.
Fuels and oils
Fuel residues, oils and liquids used for cleaning must be disposed of in an environmentally friendly manner! Leere Öl- und Empty oil and fuel tanks must be disposed of in an environmentally friendly manner.
Dispose of liquids and containers at appropriate collection centres.
16. Troubleshooting
| Problem Possible cause | Remedy | |
| The engine does not start In | correct start-up process Follow the instructions regarding starting. | |
| The engine starts but does not run at full power | Contaminated air filter (33) Clean the air filter (33) | |
| The engine does not run smoothly | Incorrect spark plug gap Clean the spark plug and adjust the spark plug or replace the spark plug | |
| Soot deposits or wetness on the spark plug | Incorrect carburettor adjustment Have the carburetor adjusted and, if necessary, clean the spark plug or replace it with a new one. | |
17. Warranty certificate
Dear Customer,
All of our products undergo strict quality checks to ensure that they reach you in perfect condition. In the unlikely event that your device develops a fault, please contact our service department at the address shown on this guarantee card. Of course, if you would prefer to call us then we are also happy to offer our assistance under the service number printed below. Please note the following terms under which guarantee claims can be made:
- These guarantee terms cover additional guarantee rights and do not affect your statutory warranty rights. We do not charge you for this guarantee.
- Our guarantee only covers problems caused by material or manufacturing defects, and it is restricted to the rectification of these defects or replacement of the device. Please note that our devices have not been designed for use in commercial, trade or industrial applications. Consequently, the guarantee is invalidated if the equipment is used in commercial, trade or industrial applications or for other equivalent activities. The following are also excluded from our guarantee: compensation for transport damage, damage caused by failure to comply with the installation/assembly instructions or damage caused by unprofessional installation, failure to comply with the operating instructions (e.g. connection to the wrong mains voltage or current type), misuse or inappropriate use (such as overloading of the device or use of non-approved tools or accessories), failure to comply with the maintenance and safety regulations, ingress of foreign bodies into the device (e.g. sand, stones or dust), effects of force or external influences (e.g. damage caused by the device being dropped) and normal wear resulting from proper operation of the device.
The guarantee is rendered null and void if any attempt is made to tamper with the device.
- The guarantee is valid for a period of 3 years starting from the purchase date of the device. Guarantee claims should be submitted before the end of the guarantee period within two weeks of the defect being noticed. No guarantee claims will be accepted after the end of the guarantee period. The original guarantee period remains applicable to the device even if repairs are carried out or parts are replaced. In such cases, the work performed or parts fitted will not result in an extension of the guarantee period, and no new guarantee will become active for the work performed or parts fitted. This also applies when an on-site service is used.
- In order to assert your guarantee claim, please contact the service partner shown below. If the complaint is within the guarantee period, we will provide you with a return slip, with which you can return your defective device free of charge to us. It would help us if you could describe the nature of the problem in as much detail as possible. If the defect is covered by our guarantee then your device will either be repaired immediately and returned to you, or we will send you a new device.
Of course, we are also happy offer a chargeable repair service for any defects which are not covered by the scope of this guarantee or for units which are no longer covered. To take advantage of this service, please send the device to our service address.
Service-Hotline (GB/IE):
+800 4003 4003
(0,00 EUR/Min.)
Service-Email (GB):
service.GB@scheppach.com
Service-Email (IE):
service.IE@scheppach.com
Service Address (GB/IE):
Forest Park & Garden
Coed Court, Taffsmead Road
Treforest, Ind. Estate, Pontypridd CF375SW

At www.lidl-service.com you can download this and many more manuals, product videos plus installation software.
The QR code takes you directly to the Lidl service page (www.lidl-service.com) and you can open your operating manual by entering the article number (IAN) 354705_2010.
Inhalt: Seite:
Günzburger Straße 69
D-89335 Ichenhausen
Verehrter Kunde,
Service-Adresse (DE):
Günzburger Straße 69
D-89335 Ichenhausen
Cher Client,
Service-hotline (BE):
+800 4003 4003
(0,00 €/Min.)
Email du service (FR):
service.FR@scheppach.com
E-mailadres (BE):
service.BE@scheppach.com
Scheppach France Strassburg
2, Impasse Jean Millot
FR - 6700 Strasbourg
Serviceadres (BE):
Günzburger Straße 69
D-89335 Ichenhausen
Geachte klant,
service.NL@scheppach.com
E-mailadres / Email du service (BE):
service.BE@scheppach.com
Serviceadres / Adresse du service (NL/BE):
Günzburger Straße 69
D-89335 Ichenhausen
Vážený zákazníku,
Günzburger Straße 69
D-89335 Ichenhausen
Szanowny Kliencie,
SK Smer chodu refaze

Günzburger Straße 69
D-89335 Ichenhausen
Vážený zákazník,
Günzburger Straße 69
D-89335 Ichenhausen
Estimado cliente,
Günzburger Straße 69
D-89335 Ichenhausen
Kære kunde,
CE Declaration of Conformity
Translation of the original CE declaration of conformity
Standard references:
EN ISO 11681-1:2011; EN ISO 14982:2009
This declaration of conformity is issued under the sole responsibility of the manufacturer.
Subject to change without notice
Documents registrar: Thomas Schuster
Günzburger Str. 69, D-89335 Ichenhausen
CE
natural_image
Line drawings of two smart glasses with a 3D headframe, one showing front and side views, the other with front and side views, alongside a QR code (no text or symbols on the devices themselves)
PERSÖNLICHE SCHUTZAUSRÜSTUNG PERSONAL PROTECTIVE EQUIPMENT ÉQUIPEMENT DE PROTECTION INDIVIDUELLE

PERSONAL PROTECTIVE EQUIPMENT
Operating and Safety Instructions
Translation of Original Operating Manual

ÉQUIPEMENT DE PROTECTION INDIVIDUELLE
OSOBNÉ OCHRANNÉ PROSTRIEDKY
Pokyny pre obsluhu a bezpečnostné pokyny
Before reading, unfold the page containing the illustrations and familiarise yourself with all functions of the device.
DEATCH
GB / IE Operating and Safety Instructions Page 01
Table of contents: Page:
- Introduction......2
- Scope of delivery 2
- Intended use 2
- Safety instructions .... 2
- Technical data 3
- Unpacking....4
- Adjustment and use....4
- Cleaning and storage 4
- Disposal and recycling 4
- Warranty certificate....5
- Declaration of conformity....50
1. Introduction
MANUFACTURER:
Jinhua Royal Technology Co., Ltd.
NO 500 Caihong Road, Wucheng District,
Jinhua City, Zhejiang Province,
China
IMPORTER:
scheppach
Günzburger Straße 69
D-89335 Ichenhausen
DEAR CUSTOMER,
We hope you enjoy using the accessory.
NOTE:
According to the applicable product liability laws, the manufacturer of the accessory does not assume liability for damages to the accessory or damages caused by the accessory that occurs due to:
- Improper handling
• Non-compliance of the operating instructions
• Repairs by third parties, not authorized service technicians
• Application other than specified
Please observe the following:
Read through the complete text in the operating instructions before assembling and using the accessory.
The operating instructions are intended to help the user to become familiar with the accessory and take advantage of the application possibilities in accordance with the recommendations.
The operating instructions contain important information on how to use the accessory safely, professionally and economically, how to avoid danger, costly repairs, reduce downtimes and how to increase reliability and service life of the accessories.
In addition to the safety regulations in the operating instructions, you have to meet the applicable regulations that apply for the use of the accessory in your country.
Keep the operating instructions package with the accessory at all times and store it in a plastic cover to protect it from dirt and moisture. Read the instruction manual each time before using the accessory and carefully follow its information.
In addition to the safety instructions contained in this operating manual and the specific regulations of your country, the technical rules generally accepted for the use of accessories of the same type must be observed.
We accept no liability for damage or accidents which arise due to non-observance of these instructions and the safety information.
2. Scope of delivery
• 1 pair of safety goggles
- 1 set of ear muffs
• Translation of original operating manual
3. Intended use
The accessory is allowed to be used only for its prescribed purpose. Any other use is deemed to be a case of misuse. The user/operator and not the manufacturer will be liable for any damage or injuries of any kind resulting from such misuse.
An element of the intended use is also the observance of the safety instructions as well as the assembly instructions and operating information in the operating manual.
In addition, the applicable accident prevention regulations must be strictly observed.
Other general occupational health and safety-related rules and regulations must be observed.
The liability of the manufacturer and resulting damages are excluded in the event of modifications of the accessory.
Please note that the accessory has not been designed for use in commercial, trade or industrial applications. Our warranty will be voided if the accessory is used in commercial, trade or industrial businesses or for equivalent purposes.
Safety goggles
The safety goggles are designed for eye protection.
The product complies with EN 166, safety class F and optical grade 1.
The protective glass is clear. Safety class F means that the product has high resistance to impacts from small particles with low energy and a high speed of 45 m/s.
If the lenses and wearing parts do not have the same abbreviations S, F, B and A, the entire eye protection device must be assigned the lower range of use. For extremely sensitive persons, skin contact with certain materials may cause allergic reactions under certain circumstances. No spare parts or accessories are available for these safety goggles. If the safety goggles are damaged, do not use them any more. If the safety goggles are worn over prescription glasses, mechanical effects (e.g. impacts) can be transmitted and thus represent a hazard. If mechanical protection at extreme temperatures is required, the eye protection device must bear the additional marking T (e.g. FT, BT, AT). Otherwise, the eye protection device may only be used at room temperature to protect against high velocity particles.
Ear muffs
The ear muffs protect the wearer against noise and distracting sounds.
The ear muffs can be adjusted to sizes S, M and L.
4. Safety instructions
In these operating instructions, we have used the following symbol to mark sections concerning your safety: △.
⚠ WARNING! Read all safety warnings and all instructions.
Save all warnings and instructions for future reference.
Safety goggles
a) The safety goggles and packaging material are not toys. Keep them out of the hands of children.
b) Never leave the packaging material unattended. It could be a danger if children play with it.
c) Protect the safety goggles from extreme temperatures, direct sunlight, shocks, high humidity, wetness, flammable gases, vapours and solvents.
d) Treat the safety goggles carefully. They can be damaged by bumps, impacts or a fall from a low height.
e) Note that the safety goggles can transmit the energy of impacts from high velocity particles (when worn over corrective glasses) and thus represent a danger to the user.
f) Note that some materials may trigger allergic reactions upon contact with sensitive skin.
Ear muffs
Please pay close attention to the following information and safety instructions to ensure the best possible protection and comfort:
a) Please adhere to all instructions and tips regarding assembly, adjustment and maintenance of the ear muffs.
b) The ear muffs are intended to protect your ears in noisy areas.
c) The ear muffs should be worn at all times when in high-noise areas.
d) The ear muffs can show signs of wear over time. Examine them for tears or loose spots after each use.
⚠ WARNING! Failure to comply with the safety instructions provided for the ear muffs can seriously compromise their protective effect.
e) Do not clean or disinfect the ear muffs with chemicals or substances that are harmful to the wearer.
f) Certain chemical substances can damage this product. Detailed information is available from the manufacturer.
g) Ear muffs and especially their ear cushions can wear down over time. Examine them regularly for tears, loose spots and other signs of wear.
h) Covering the ear cushions with "hygiene covers" can compromise the acoustics of the ear muffs.
Residual risks
Despite all precautions having been met, some non-obvious residual risks may still remain. These can be minimised if the "Safety instructions" and the "Intended use" are observed along with the whole of the operating instructions.
5. Technical data
Safety goggles
Type.....RYF001
Standard......EN166:2001
Safety class....F (low energy .... impact at 45 m/s)
Optical class....1 (continual use ....without filter effect)
Protective class type......clear
Material:
Goggle lens.....Polycarbonate
Frame ....Nylon
Manufacturer identification .... ROYAL
Goggle lens......ROYAL 1 F CE
Frame ....ROYAL 166 F CE
Ear muffs
Type......RYE001
Standard......EN352-1:2020
Weight.....approx. 150 g
Material: Headband of the ear muffs ..... POM
Capsule for ear cushions....PVC
Ear cushions....ABS
Damping values of the ear muffs
| Frequency (Hz) 63 | 125 | 250 | 500 | |
| Median valueMf (dB) | 13.6 | 8.3 | 12.1 | 17.8 |
| Standarddeviation Sf (dB) | 5.5 | 3.8 | 5 | 4.7 |
| Assumedprotection valueAPV (dB) | 8.1 | 4.5 | 7.1 | 13.1 |
| Frequency (Hz) | 1000 | 2000 | 4000 | 8000 |
| Median valueMf (dB) | 25.1 | 29.1 | 32.2 | 31.5 |
| Standarddeviation Sf (dB) | 3.5 | 5.2 | 5.5 | 6.7 |
| Assumedprotection valueAPV (dB) | 21.6 | 24.0 | 26.6 | 24.8 |
| H (dB)* | M (dB)* | L (dB)* | SNR (dB)* | |
| Minimum requirements | 12 | 11 | 9 | |
| Value | 24.2 | 16.6 | 9.9 | 19.3 |
| Average value | 28.3 | 20 | 13.5 | 22.6 |
| Standard deviation | 4 | 3.4 | 3.6 3.4 |
* H value (high level), M value (medium level), L value (low level), SNR value (single number rating)
6. Unpacking
- Open the packaging and remove the accessory carefully.
- Remove the packaging material as well as the packaging and transport bracing (if available).
- Check that the delivery is complete.
- Check the accessory for transport damage.
ATTENTION
The device and packaging materials are not toys! Children must not be allowed to play with plastic bags, film and small parts! There is a risk of swallowing and suffocation!
7. Adjustment and use
Safety goggles
⚠ WARNING! Check and clean the goggles before use. Scratched or damaged protective glasses impair visibility and offer only a reduced protective effect. Safety goggles with scratched or damaged protective glasses should be replaced immediately.
- Adjust the extensible headband of the safety goggles to fit your head.
- Ensure that they fit comfortably and securely.
- When wearing the safety goggles, ensure that they fit comfortably.
Ear muffs
- Adjust the ear muffs to the largest head size by pushing the muffs downwards to the end of the headband.
- Pull the muffs apart a little to put them on.
- Adjust the ear muffs to the optimal size and a comfortable fit by pushing the muffs at the end of the headband up or down. The muffs must completely encapsulate the ears.
8. Cleaning and storage
Safety goggles
- Use a soft, damp and clean lens cloth to clean the safety goggles. Never use petrol, solvents or cleansers which can damage plastic.
- To disinfect the safety goggles, use only cleaning agents that do not contain solvents or aggressive substances.
- Do not exert strong pressure on the surfaces, as this can cause scratches.
- After use, store and transport the safety goggles in a clean, dry and UV-proof environment, e.g. in a suitable spectacle case (not supplied).
Ear muffs
- Examine the components for damage and signs of wear before each use.
- Use a moistened cloth to clean the ear muffs. Never use petrol, solvents or cleansers which can damage plastic.
- To disinfect the ear muffs, use only cleaning agents that do not contain solvents or aggressive substances.
- Store the ear muffs in a clean, dry environment away from UV rays.
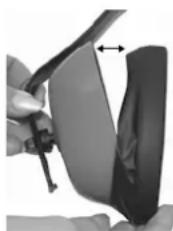
- If the ear cushions can no longer be cleaned or are damaged, they should be disposed of and replaced.
- Remove the old ear cushions from the muffs and replace them with new ones (see fig. 1).
- Order number: 391 0108 025
natural_image
Close-up of hands holding a car seatbelt with a small arrow indicating motion (no text or symbols visible)fig. 1
Service information
Please note that the following parts of this product are subject to normal or natural wear and that the following parts are therefore also required for use as consumables.
Wear parts*: ear cushions
*Not necessarily included in the scope of delivery!
9. Disposal and recycling
The accessory is supplied in packaging to prevent it from being damaged in transit. The raw materials in this packaging can be reused or recycled.
The accessory is made of various types of material, such as metal and plastic. Defective components must be disposed of as special waste. Ask your dealer or your local council.

The packaging is wholly composed of environmentally-friendly materials that can be disposed of at a local recycling centre.
Contact your local refuse disposal authority for more details of how to dispose of your worn-out accessory.
10. Warranty certificate
Dear Customer,
All of our products undergo strict quality checks to ensure that they reach you in perfect condition. In the unlikely event that your device develops a fault, please contact our service department at the address shown on this guarantee card. Of course, if you would prefer to call us then we are also happy to offer our assistance under the service number printed below. Please note the following terms under which guarantee claims can be made:
- These guarantee terms cover additional guarantee rights and do not affect your statutory warranty rights. We do not charge you for this guarantee.
- Our guarantee only covers problems caused by material or manufacturing defects, and it is restricted to the rectification of these defects or replacement of the device. Please note that our devices have not been designed for use in commercial, trade or industrial applications. Consequently, the guarantee is invalidated if the equipment is used in commercial, trade or industrial applications or for other equivalent activities. The following are also excluded from our guarantee: compensation for transport damage, damage caused by failure to comply with the installation/assembly instructions or damage caused by unprofessional installation, failure to comply with the operating instructions (e.g. connection to the wrong mains voltage or current type), misuse or inappropriate use (such as overloading of the device or use of non-approved tools or accessories), failure to comply with the maintenance and safety regulations, ingress of foreign bodies into the device (e.g. sand, stones or dust), effects of force or external influences (e.g. damage caused by the device being dropped) and normal wear resulting from proper operation of the device.
The guarantee is rendered null and void if any attempt is made to tamper with the device.
- The guarantee is valid for a period of 3 years starting from the purchase date of the device. Guarantee claims should be submitted before the end of the guarantee period within two weeks of the defect being noticed. No guarantee claims will be accepted after the end of the guarantee period. The original guarantee period remains applicable to the device even if repairs are carried out or parts are replaced. In such cases, the work performed or parts fitted will not result in an extension of the guarantee period, and no new guarantee will become active for the work performed or parts fitted. This also applies when an on-site service is used.
- In order to assert your guarantee claim, please contact the service partner shown below. If the complaint is within the guarantee period, we will provide you with a return slip, with which you can return your defective device free of charge to us. It would help us if you could describe the nature of the problem in as much detail as possible. If the defect is covered by our guarantee then your device will either be repaired immediately and returned to you, or we will send you a new device.
Of course, we are also happy offer a chargeable repair service for any defects which are not covered by the scope of this guarantee or for units which are no longer covered. To take advantage of this service, please send the device to our service address.
Service-Hotline (GB/IE):
+800 4003 4003
(0,00 EUR/Min.)
Service-Email (GB):
service.GB@scheppach.com
Service-Email (IE):
service.IE@scheppach.com
Service Address (GB/IE):
Forest Park & Garden
Coed Court, Taffsmead Road
Treforest, Ind. Estate, Pontypridd CF375SW

At www.lidl-service.com you can download this and many more manuals, product videos plus installation software.
The QR code takes you directly to the Lidl service page (www.lidl-service.com) and you can open your operating manual by entering the article number (IAN) 354705_2010.
Inhalt:
Seite:
NO 500 Caihong Road, Wucheng District,
Jinhua City, Zhejiang Province,
China
EINFÜHRER:
scheppach
Günzburger Straße 69
D-89335 Ichenhausen
VEREHRTER KUNDE,
* H-Wert/H Value (High Level), M-Wert/M Value (Medium Level), L-Wert/L Value (Low Level), SNR-Wert/SNR Value (Single Number Rating)
6. Auspacken
natural_image
Close-up of a hand holding a black object with an arrow indicating a measurement or adjustment (no visible text or symbols)Abb. 1
service.AT@scheppach.com
service.CH@scheppach.com
Service-Adresse (DE):
NO 500 Caihong Road, Wucheng District,
Jinhua City, Zhejiang Province,
Chine
IMPORTATEUR:
scheppach
Günzburger Straße 69
D-89335 Ichenhausen
CHER CLIENT,
natural_image
Close-up of a hand holding a mechanical component with an arrow indicating a motion or assembly (no visible text or symbols)fig. 1
Service-hotline (BE):
+800 4003 4003
(0,00 €/Min.)
Email du service (FR):
service.FR@scheppach.com
E-mailadres (BE):
service.BE@scheppach.com
Scheppach France Strassburg
2, Impasse Jean Millot
FR - 6700 Strasbourg
Serviceadres (BE):
NO 500 Caihong Road, Wucheng District,
Jinhua City, Zhejiang Province,
China
INVOERING:
scheppach
Günzburger Straße 69
D-89335 Ichenhausen
GEACHTE KLANT,
* H-waarde/H Value (High Level), M-waarde/M Value (Medium Level), L-waarde/L Value (Low Level), SNR-waarde/SNR Value (Single Number Rating)
6. Uitpakken
service.NL@scheppach.com
E-mailadres / Email du service (BE):
service.BE@scheppach.com
Serviceadres / Adresse du service (NL/BE):
NO 500 Caihong Road, Wucheng District,
Jinhua City, Zhejiang Province,
Čína
DOVOZCE:
scheppach
Günzburger Straße 69
D-89335 Ichenhausen
VÁŽENÝ ZÁKAZNÍKU,
* Hodnota H / H Value (High Level), hodnota M / M Value (Medium Level), hodnota L / L Value (Low Level), hodnota SNR / SNR Value (Single Number Rating)
6. Rozbalení
natural_image
Close-up of a hand holding a dark object with an arrow indicating a change, no visible text or symbolsobr. 1
Servisní informace
NO 500 Caihong Road, Wucheng District,
Jinhua City, Zhejiang Province,
Chiny
DYSTRYBUTOR:
scheppach
Günzburger Straße 69
D-89335 Ichenhausen
SZANOWNY KLIENCIE,
natural_image
Close-up of a hand holding a black object with an arrow indicating a measurement or adjustment (no visible text or symbols)rys. 1
NO 500 Caihong Road, Wucheng District,
Jinhua City, Zhejiang Province,
Čína
DOVOZCA:
Scheppach
Günzburger Straße 69
D-89335 Ichenhausen
VÁŽENÝ ZÁKAZNÍK,
natural_image
Close-up of a hand holding a dark object with an arrow indicating a change, no visible text or symbolsObr. 1
Servisné informácie
NO 500 Caihong Road, Wucheng District,
Jinhua City, Zhejiang Province,
China
IMPORTADOR:
scheppach
Günzburger Straße 69
D-89335 Ichenhausen
ESTIMADO CLIENTE,
* Valor H/H Value (High Level), valor M/M Value (Medium Level), valor L/L Value (Low Value), valor SNR/SNR Value (Single Number Rating)
6. Desembalaje
natural_image
Close-up of a hand holding a black mechanical component with an arrow indicating a motion or assembly (no visible text or symbols)fig. 1
NO 500 Caihong Road, Wucheng District,
Jinhua City, Zhejiang Province,
King
IMPORT∅R:
Scheppach
Günzburger Straße 69
D-89335 Ichenhausen
KÆRE KUNDE
natural_image
Close-up of a hand holding a black mechanical component with an arrow indicating a motion or change (no visible text or symbols)Fig. 1
Serviceinformationer
CE Declaration of Conformity
Translation of the original CE declaration of conformity
Hersteller - manufacturer:
Jinhua Royal Technology Co., Ltd.
NO, 500 Caihong Road, Wucheng District
Jinhua City, Zhejiang Province,
China
Einführer - importer:
Standard references:
EN 352-1:2020;
This declaration of conformity is issued under the sole responsibility of the manufacturer.
Subject to change without notice
Documents registrar: Sophia Gong
NO, 500 Caihong Road, Wucheng District,
Jinhua City, Zhejiang Province, China
CE Declaration of Conformity
Translation of the original CE declaration of conformity
Hersteller - manufacturer:
Jinhua Royal Technology Co., Ltd.
NO, 500 Caihong Road, Wucheng District
Jinhua City, Zhejiang Province, China
Einführer - importer:
Standard references:
EN 166:2001;
This declaration of conformity is issued under the sole responsibility of the manufacturer.


- BENZIN-KETTENSÄGE PBKS 53 A1 PETROL CHAINSAW PBKS 53 A1 TRONÇONNEUSE A ESSENCE PBKS 53 A1
- PETROL CHAINSAW
- Table of contents: Page:
- Explanation of the symbols on the equipment
- Introduction
- Manufacturer:
- scheppach
- Dear customer,
- Note:
- We recommend:
- Device description (fig. A - O)
- Scope of delivery
- Intended use
- Unauthorised operators:
- Safety instructions
- IMPORTANT! READ CAREFULLY BEFORE USE AND STORE SAFELY FOR LATER USE.
- DANGER
- WARNING
- CAUTION
- ATTENTION
- General safety instructions
- Personal protective equipment (PPE)
- Storage and transportation
- Environmental safety
- Adding fuel
- Before use
- Vibrations
- ⚠ WARNING
- Precautions against kickback
- Remaining risks
- RISK OF INJURY!
- RISK OF KICKBACK!
- RISK OF BURNING!
- Technical details
- Noise
- Wear hearing protection.
- Vibration
- Before use
- Mixing fuel
- Fuel mix table
- Adding fuel
- NOTE
- Adding chain oil
- Tightening and checking the saw chain
- Use
- Working procedures
- Starting the engine
- Starting when the engine is cold
- Starting when the engine is hot (The appliance has been turned off for less than 15–20 minutes)
- ⚠️ WARNING
- Turning the engine off
- Emergency stop sequence
- Normal sequence
- Operating while idle
- Checking and adjusting the chain lubrication
- Checking the chain brake
- Basic working procedures when felling trees
- Use and handling
- Creating the notch cut
- Determining the felling direction - with marks on the device (fig. G)
- Creating the notch cut (fig. H)
- Checking the felling direction (fig. 1)
- Carrying out the felling cut (fig. H)
- Risk of accidents!
- Property damage!
- Branch removal
- Saw in sections
- Working with wood that is under tension
- Kickback (fig. J)
- Drawing in (fig. K)
- Working safely
- Trunk is bent downwards
- Trunk is bent upwards
- Transport
- Cleaning and maintenance
- Cleaning the engine unit
- Risk of burns!
- Cleaning the air filter
- Cleaning the chain drive
- Maintaining the spark plug
- Maintaining the chain lubrication
- Maintaining the carburettor settings
- Maintaining the guide rail
- Fitting the guide rail and tensioning the saw chain
- Sharpening and caring for the saw chain
- Maintenance intervals
- Service information
- Storage
- Disposal and recycling
- Fuels and oils
- Troubleshooting
- Warranty certificate
- Inhalt: Seite:
- Verehrter Kunde,
- Cher Client,
- Geachte klant,
- Vážený zákazníku,
- Szanowny Kliencie,
- Vážený zákazník,
- Estimado cliente,
- Kære kunde,
- CE Declaration of Conformity
- Standard references:
- EN ISO 11681-1:2011; EN ISO 14982:2009
- PERSÖNLICHE SCHUTZAUSRÜSTUNG PERSONAL PROTECTIVE EQUIPMENT ÉQUIPEMENT DE PROTECTION INDIVIDUELLE
- PERSONAL PROTECTIVE EQUIPMENT
- ÉQUIPEMENT DE PROTECTION INDIVIDUELLE
- OSOBNÉ OCHRANNÉ PROSTRIEDKY
- Introduction
- IMPORTER:
- Please observe the following:
- Scope of delivery
- Intended use
- Safety goggles
- Ear muffs
- Safety instructions
- ⚠ WARNING! Read all safety warnings and all instructions.
- ⚠ WARNING! Failure to comply with the safety instructions provided for the ear muffs can seriously compromise their protective effect.
- Residual risks
- Technical data
- Unpacking
- Adjustment and use
- Cleaning and storage
- Service information
- Disposal and recycling
- Warranty certificate
- Inhalt:
- Seite:
- EINFÜHRER:
- Auspacken
- IMPORTATEUR:
- Service-hotline (BE):
- Email du service (FR):
- E-mailadres (BE):
- Serviceadres (BE):
- INVOERING:
- Uitpakken
- DOVOZCE:
- Rozbalení
- Servisní informace
- DYSTRYBUTOR:
- DOVOZCA:
- Servisné informácie
- IMPORTADOR:
- Desembalaje
- IMPORT∅R:
- KÆRE KUNDE
- Serviceinformationer
- Jinhua Royal Technology Co., Ltd.
- EN 352-1:2020;
- EN 166:2001;
Brand : PARKSIDE
Model : PBKS 53 A1
Category : Service après-vente