
N4 - Uncategorized Lamax - Free user manual and instructions
Find the device manual for free N4 Lamax in PDF.


| Product Type | Discreet dashcam with WiFi |
| Video Resolution | Full HD (1920×1080) @ 30 fps |
| Field of View | 140° |
| Video Format | MP4, H.265 compression |
| Photo Resolution | Up to 2 MP |
| Photo Format | JPEG |
| Audio | Built-in microphone with mute option |
| Memory Card Support | MicroSD up to 128 GB (Class 10 or higher) |
| Connectivity | WiFi, Micro USB |
| Power Source | Supercapacitor (powers via cigarette lighter adapter) |
| Dimensions | 90 × 58 × 36 mm |
| Mounting Method | 3M adhesive pad on windshield, optional electrostatic sticker |
| Loop Recording | Yes (1-5 minute segments, overwrites oldest files) |
| G-Sensor | Yes (auto-protects recordings on impact) |
| File Protection | Manual via button or WiFi app |
| WiFi App | Yes (for settings, preview, file transfer) |
| Optional GPS Module | Yes (adds speed and location data) |
| Firmware Update | Via microSD card download |
| Operating Temperature | 20°C to 40°C (for mounting) |
Frequently Asked Questions - N4 Lamax
User questions about N4 Lamax
0 question about this device. Answer the ones you know or ask your own.
Ask a new question about this device
Download the instructions for your Uncategorized in PDF format for free! Find your manual N4 - Lamax and take your electronic device back in hand. On this page are published all the documents necessary for the use of your device. N4 by Lamax.
USER MANUAL N4 Lamax
Discreet dashcam with WiFi

natural_image
Black LAMAX 2D driver camera with sensor and control panel (no visible text or symbols on body)EN - USER MANUAL
DE - BENUTZERHANDBUCH
CS - UŽIVATELSKÁ PŘÍRUČKA
SK - POUŽÍVATELŠKÁ PRÍRUČKA
PL - INSTRUKCJA OBŁUGI
HU - FELHASZNÁLÓI KÉZIKÖNYV
SL - UPORABNIŠKI PRIROČNIK
HR - KORISNIČKI PRIRUČNIK
LAMAX
ELECTRONICS
N4
Discreet dashcam with WiFi

natural_image
Black LAMAX 2D driver head camera with sensor and control panel (no visible text or symbols on body)CONTENTS
- BOX CONTENTS....2
- CAMERA INTRODUCTION / CONTROLS....2
- FIRST USE....3
- PLACEMENT ON WINDSCREEN .... 3
- BASIC FUNCTIONS....4
- WIFI APPLICATION....4
- FULL SETTINGS....5
- SPECIFICATIONS....6
- FIRMWARE UPDATES....6
- SAFETY GUIDELINES AND PRECAUTIONS....7
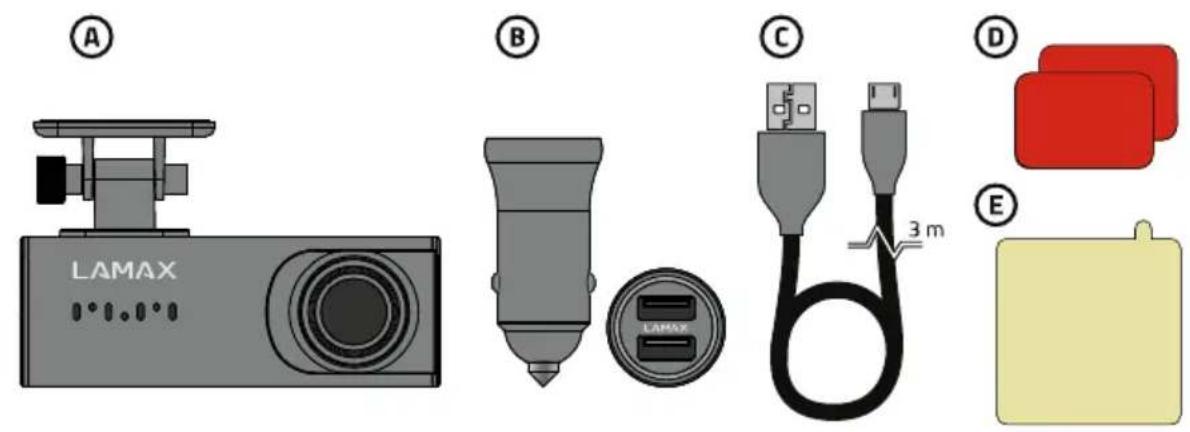
1. BOX CONTENTS

A LAMAX N4 dashcam
B Cigarette lighter adapter with extra USB port
© Micro USB power cable
D Spare 3M adhesive pad
E Electrostatic sticker
2. CAMERA INTRODUCTION / CONTROLS


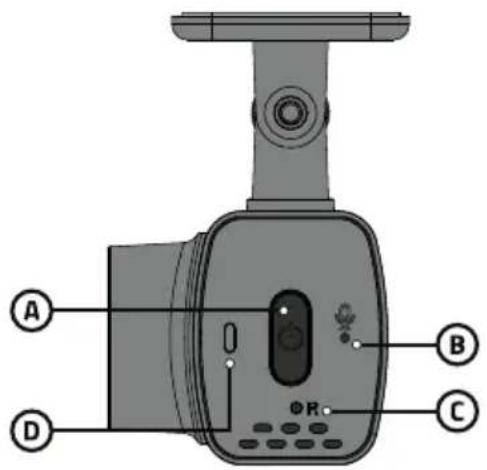
A Multifunction button
B Microphone
© RESTART button
D LED indicator
(Blue = camera is on, flashing red = camera is recording,
red = recording protected)
E Input for GPS module (optional)
F Power input
© Memory card slot
CONTROLS:
Press multifunction button Protect recording
Hold multifunction button Turn camera on / off
Press RESTART button with paperclip Restart the camera
3. FIRST USE

flowchart
graph LR
    A["Input GPS"] --> B["Sensor"]
    B --> C["Output R indicator"]
Ⓐ Insert the microSD card into the camera.
Use branded cards from reputable manufacturers of class 10 and higher with a capacity of up to 128 GB.
Only remove the card when the camera is turned off.
Format the card directly in the camera the first time you use it, and repeat the formatting at least once a month to ensure proper operation of the camera.
B Plug the adapter into the car cigarette lighter and use the USB cable to connect it to the camera. The camera is designed to operate only when connected to power.
Instead of a battery, the camera contains a supercapacitor, which provides power and has a longer lifespan than a conventional battery.
© When connected to the power, the camera will automatically turn on and start recording.
In some vehicles, it is first necessary to turn the key in the ignition.
4. PLACEMENT ON WINDSCREEN

flowchart
graph LR
    A["Car intake"] --> B["Air intake with exhaust"]
    B --> C["Refrigeration device with thermometer"]
    C --> D["Refrigeration device with valve"]
    D --> E["Refrigeration device with valve"]
    E --> F["Refrigeration device with exhaust"]
A The ideal place to mount the dashcam is the space between the windshield and the rearview mirror so that it does not obstruct the driver's view.
When installing, ensure the cable does not interfere with safety features in the car (e.g. airbag).
B Make sure the glass is clean and dry at the attachment point.
The ideal temperature for bonding is 20 ^ - 40 ^ .
© Peel off the film from the 3M adhesive pad on the camera mount.
(D) Before attaching it to the glass, turn on the camera and point it so that it has a good view.
E Attach the camera with the 3M pad to the glass and hold for a while.
For easier removal of the mount, you can apply an electrostatic sticker between the 3M pad and the windscreen.
Finally, adjust the direction of the lens so that part of the bonnet is visible in the frame.
5. BASIC FUNCTIONS
Loop recording
The camera automatically splits the recording into shorter video files and starts overwriting the oldest unprotected files with new ones when the SD card is full. This way you don't have to worry about running out of space on the card.
File protection
You can protect the currently recorded video manually by pressing the multifunction button or through the app. When the recording is protected, a tone will sound and the LED indicator will turn red.
G-sensor
Thanks to the G-sensor, the camera can identify an impact, such as in a traffic accident. Once an impact is detected, the camera immediately protects the current recording from being overwritten. (CAUTION, formatting the card will also delete the protected files).
Caution, high sensitivity settings and driving on uneven surfaces may cause the files to lock themselves, completely filling up the MicroSD card.
6. WIFI APPLICATION
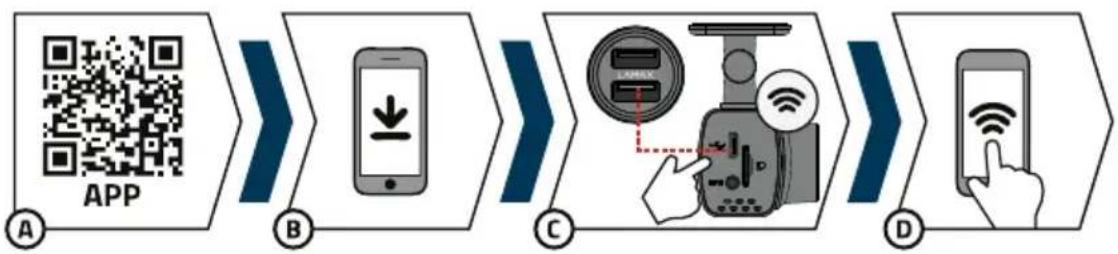
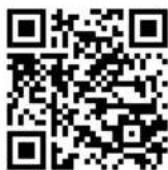
To use the full range of features of this camera, download the app to your smartphone. This app is used for precise camera setup and to save videos and photos to your phone. Scan the QR code below to install the app.
flowchart
graph LR
    A["APP"] --> B["手机"]
    B --> C["支付图标"]
    C --> D["手机操作界面"]
    D --> E["手部按钮与信号"]
Ⓐ Scan the QR code or enter the URL – lamax-electronics.com/n4/app
B Install the app on your smartphone or tablet.
© Plug the power into the camera. When the camera turns on, the Wifi will automatically turn on.
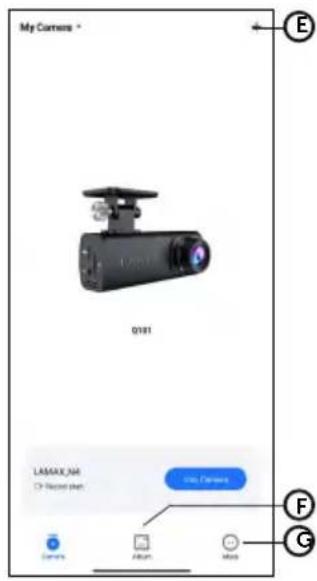
On your smart device, connect to the WiFi network that has the name of the camera, enter the password (default 12345678), run the app, and click the „Add Camera” button to connect the camera.
APP CONTROLS:
WITHOUT CONNECTION
E Connect the dashcam
F Download files to smart device
© App information
AFTER CONNECTION
(H) Camera settings (see chapter 7)
① Camera preview
J Take a photo
K Switch to full screen mode
L Camera files
M Start/stop recording
N Turn audio recording on/off

7. FULL SETTINGS
| Sound recording | Microphone on/off |
| Speaker Volume | Volume of sound from the speaker |
| Loop Record Options | This is where you set the length of each recording. The camera will loop video of 1–5 minutes in length. If the memory card fills up, the camera will start overwriting the oldest recordings. The individual videos follow each other seamlessly. |
| Exposure compensation | Allows you to adjust the camera exposure to optimize the brightness of the video. |
| Speed watermark | With the optional GPS module, you can also add speed and location data to your video. |
| GPS Coordinate | Allows you to adjust the display of the GPS coordinate watermark in the video (only works with the GPS module). |
| Collision Sensing | Thanks to the G-sensor, the camera can detect a collision, for example in a traffic accident. Once the camera detects a collision, it immediately protects the currently recorded footage against being overwritten. |
| Wi-Fi Name | Set the WiFi name of the device. |
| Wi-Fi Password | Set the WiFi password. |
| Firmware Version | Here you can get information about the currently installed Firmware version. |
| Format SD Card | This function deletes all photos and videos on the camera. Caution, this even includes the protected ones! We recommend formatting at least once a month. |
| Default Settings | Allows you to restore the camera settings to factory defaults. |
8. SPECIFICATIONS
| Video resolution Full HD (1920×1080) @ 30 fps |
| Field of view 140° |
| Video format MP4, H.265 compression |
| Photo resolution Up to 2 Mpx |
| Photo format JPEG |
| Audio Built-in microphone with mute option |
| Memory MicroSD up to 128 GB |
| Connectivity WiFi, Micro USB |
| Optional accessories With the optional GPS module, you can add speed and location data to your video |
| Power Supercapacitor |
| Dimensions 90 × 58 × 36 mm |
Specifications are subject to change by replacing any part of the device or updating the software.
9. FIRMWARE UPDATES

flowchart
graph LR
    A["QR Code"] --> B["Input Image"]
    B --> C["Image Icon with Down Arrow"]
    C --> D["Computer Download"]
The latest camera firmware can be found in the „Downloads“ section of the product website:
https://www.lamax-electronics.com/n4
UPDATING
1) Prepare a MicroSD card and format it on your PC/Mac.
2) Download and open the .zip file containing the folders „ota_update“ and „update“. Do not change the file names.
3) Copy the files to the formatted microSD card.
4) Insert the microSD card into the switched off dashcam. Plug the dashcam into the power supply and make sure the dashcam is powered throughout the update. The update should start automatically when it starts.
5) Wait for the update to complete completely. Then format the memory card in the computer.
Don't forget to register your product on our website:
lamax-electronics.com/n4/reg
As soon as we update the firmware, we'll let you know!
By registering the product, you will also get access to news and discounts!
10. SAFETY GUIDELINES AND PRECAUTIONS
The consumer is required to learn the principles of safe use of the product before first use.
PRECAUTIONS AND NOTICES
- For your own safety, do not use the camera's controls while driving.
- A window mount is needed when using the recorder in a car. Make sure that you place the recorder in an appropriate place, so as not to obstruct the driver's view or deployment of airbags.
- Make sure that no object is blocking the camera lens and no reflective material is placed near the lens. Please keep the lens clean.
- If the car windscreen is tinted or heated, it may limit the quality of the recording and, above all, the GPS signal.
- Make sure that the legislation of the country where you operate the vehicle allows the use of dashcams.
SAFETY PRECAUTIONS
- Use only the charger supplied with your device. Use of another type of charger may result in malfunction and/or danger.
- Do not use the charger in high moister environment. Never touch the charger when your hands or feet are wet.
- Allow adequate ventilation around the charger when using it to operate the device or to charge the battery. Do not cover the charger with paper or other objects that will reduce cooling. Do not use the charger while it is inside a carrying case.
- Connect the charger to a proper power source. The voltage requirements are found on the product case and/or on the packaging.
- Do not use the charger if it is visibly damaged. In case of damage, do not repair the equipment yourself!
– In case of device overheating, immediately disconnect the power source.
– Charge the device under supervision only.
- Packaging contains small pieces, that can be dangerous for children. Store the product always out of reach of children. Bags or many of the pieces containing may cause suffocation after swallowing.
- For pluggable equipment, the socket-outlet shall be installed near the equipment and shall be easily accessible.
SAFETY NOTICES FOR POWER SUPPLY
- For charging only use chargers, that is specified for this camera.
– Use standard cables for charging, otherwise it could damage the device. -
Do not use any damaged adapter or charger.
-
Power at room temperature, never charge at a temperature below 0^ or at a temperature higher than 40^ .
- Do not expose the charger to moisture, water, rain, snow or any kind of various liquids.
- Never leave the camera unattended during power-up, short-circuiting or accidental overcharging can cause aggressive chemicals to leak, explode, or cause a fire!
– In the case of excessive heating of the camera, immediately disconnect it from the power supply. - Do not place charger on or near flammable objects. Beware of curtains, carpets, tablecloths etc.
- If the device is not being used for an extended period of time, charge the battery to half capacity every 30 days. Failure to do so may result in permanent damage to the battery, which may not be recognized as grounds for warranty repair.
CARING FOR YOUR DEVICE
- Taking good care of your device will ensure trouble-free operation and reduce the risk of damage.
- Keep your device away from excessive moisture and extreme temperatures and avoid exposing your device to direct sunlight or strong ultraviolet light for extended periods of time.
- Do not drop your device or subject it to severe shock.
- Do not subject your device to sudden and severe temperature changes. This could cause moisture condensation inside the unit, which could damage your device. In the event of moisture condensation, allow the device to dry out completely before use.
- The screen surface can easily be scratched. Avoid touching it with sharp objects.
- Never clean your device when it is powered on. Use a soft, lint-free cloth to wipe the screen and the exterior of your device. Do not use paper towels to clean the screen.
- Never attempt to disassemble, repair or make any modifications to your device. Disassembly, modification or any attempt at repair could cause damage to your device and even bodily injury or property damage and will void any warranty.
- Do not store or carry flammable liquids, gases or explosive materials in the same compartment as your device, its parts or accessories.
- To discourage theft, do not leave the device and accessories in plain view in an unattended vehicle.
- Overheating may damage the device.
OTHER INFORMATION
1) For households: This marking indicates that this product should not be disposed with other household wastes throughout the EU. To prevent possible harm to the environment or human health from uncontrolled waste disposal, recycle it responsibly to promote the sustainable reuse of material resources. To return your used device, please use the return and collection systems or contact the retailer where the product was purchased. They can take this product for environmental safe recycling. In case of incorrect disposal of this kind of wastes user can be fined according to national laws. User information for disposal of electric and electronic devices in countries outside the EU: The symbol stated above (crossed recycle bin) is valid only in countries in European Union. For correct disposal of electric and electronic devices ask your city hall or distributor of these devices. Everything is expressed by the symbol of crossed recycle bin on product, cover or printed materials.
2) Please contact your dealer for warranty repairs. In case of technical problems and questions, please contact your dealer who will inform you of the next steps to be taken. Observe the rules for working with electrical equipment. The user is not authorised to disassemble the equipment or replace any of its components. There is a risk of electric shock if the covers are opened or removed. Incorrect assembly and reconnection of the equipment also exposes you to the risk of electric shock.
The warranty period for the products is 24 months unless otherwise stated. The warranty does not cover damage caused by non-standard use, mechanical damage, exposure to harsh conditions, handling contrary to the manual and normal wear and tear. The warranty period is 24 months for the battery and 6 months for its capacity. For more information on the warranty, please visit www.elem6.com/warranty
Neither the manufacturer, importer nor distributor shall be liable for any damage caused by the installation or improper use of the product.
EU DECLARATION OF CONFORMITY
elem6 s.r.o. hereby declares that the LAMAX complies with the essential requirements and other relevant provisions of Directive 2014/30/EU and 2014/53/EU. All LAMAX products are intended for sale without restriction in Germany, the Czech Republic, Slovakia, Poland, Hungary and other EU member states. The full Declaration of Conformity can be downloaded from www.lamax-electronics.com/support/doc
– Frequency band(s) in which the radio equipment operates: 1227.6–1575.42 MHz and 2412–2484 MHz.
- Maximum radio-frequency power transmitted in the frequency band(s) in which the radio equipment operates: 14,93 dBm.
MANUFACTURER
elem6 s.r.o.,
Printing errors and changes in manual and safety instructions reserved.
N4
natural_image
Black LAMAX 2D driver head camera with sensor and control panel (no visible text or symbols on body)INHALT
© Micro-USB-Ladekabel
flowchart
graph LR
    A["Step A: Tool placement"] --> B["Step B: Discharge or drop-off"]
    B --> C["Step C: Display panel with indicator lights and a light bulb"]
flowchart
graph LR
    A["Car intake"] --> B["Control panel with temperature gauge"]
    B --> C["Air intake control with valve"]
    C --> D["Air intake control with valve"]
    D --> E["Air intake control with valve"]

flowchart
graph LR
    A["QR Code"] --> B["Input Image"]
    B --> C["Download Icon"]
    C --> D["Computer Download"]
https://www.lamax-electronics.com/n4
AKTUALISIERUNGSVORGANG
lamax-electronics.com/n4/reg
natural_image
Black LAMAX 2D driver head camera with sensor and control panel (no visible text or symbols on body)OBSAH
- OBSAH BALENÍ....2
- SEZNÁMENÍ S KAMEROU / OVLÁDÁNÍ....2
- PRVNÍ ZAPNUTÍ....3
- UMÍSTĚNÍ NA SKLO....3
- ZÁKLADNÍ FUNKCE....4
- WIFI APLIKACE....4
- ÚPLNÉ NASTAVENÍ......5
- SPECIFIKACE....6
- AKTUALIZACE FIRMWARE....6
- BEZPEČNOSTNÍ ZÁSADY A UPOZORNĚNÍ......7
1. OBSAH BALENÍ

(A) Autokamera LAMAX N4
B Adaptér do autozapalovače s extra USB portem
© Napájecí Micro USB kabel
flowchart
graph LR
    A["APP"] --> B["Download"]
    B --> C["Payment Device"]
    C --> D["Hand Interaction with Phone"]

7. ÚPLNÉ NASTAVENÍ
https://www.lamax-electronics.com/n4
POSTUP AKTUALIZACE
lamax-electronics.com/n4/reg
Jakmile aktualizujeme firmware, hned vás informujeme!
natural_image
Black LAMAX 2D driver head camera with sensor and control panel (no visible text or symbols on body)OBSAH
- OBSAH BALENIA....2
- ZOZNÁMENIE S KAMEROU / OVLÁDANIE ...... 2
- PRVÉ ZAPNUTIE....3
- UMIESTNENIE NA SKLO....3
- ZÁKLADNÉ FUNKCIE 4
- WIFI APLIKÁCIA....4
- ÚPLNÉ NASTAVENIE....5
- ŠPECIFIKÁCIE 6
- AKTUALIZÁCIA FIRMVÉRU 6
- BEZPEČNOSTNÉ ZÁSADY A UPOZORNENIA 7
1. OBSAH BALENIA

A Autokamera LAMAX N4
B Adaptér do autozapal'ovača s extra USB portom
© Napájací Micro USB kábel
flowchart
graph LR
    A["Car intake"] --> B["Air intake with exhaust"]
    B --> C["Reactor with valve, valve, and thermometer"]
    C --> D["Reactor with valve, valve, and thermometer"]
    D --> E["Reactor with valve, valve, and thermometer"]
    E --> F["Reactor with valve, valve, and thermometer"]
7. ÚPLNÉ NASTAVENIE
flowchart
graph LR
    A["QR Code"] --> B["Input Image"]
    B --> C["Image Icon with Down Arrow"]
    C --> D["Computer Download"]
https://www.lamax-electronics.com/n4
POSTUP AKTUALIZÁCIE
lamax-electronics.com/n4/reg
natural_image
Black LAMAX 2D driver head camera with sensor and control panel (no visible text or symbols on body)SPIS TREŚCI
- ZAWARTOŚĆ ZESTAWU 2
- ZAPOZNANIE Z KAMERA / OBSŁUGA....2
- PIERWSZE WŁACZENIE....3
- ZAMONTOWANIE NA SZYBIE....3
- PODSTAWOWE FUNKCJE 4
- APLIKACJA WIFI ....4
- KOMPLETNE USTAWIENIE....5
- SPECYFIKACJA....6
- AKTUALIZACJA FIRMWARE....6
- ZASADY BEZPIECZEŃSTWA I OSTRZEŻENIA....7
1. ZAWARTOŚĆ ZESTAWU

flowchart
graph LR
    A["Car Inlet"] --> B["Air Inlet"]
    B --> C["Control Panel"]
    C --> D["Drain Valve"]
    D --> E["Air Transport"]
    E --> F["Control Panel with Arrow Down"]
flowchart
graph LR
    A["APP"] --> B["Download"]
    B --> C["Payment"]
    C --> D["Scan with Wi-Fi icon"]
    D --> E["Phone with hand icon"]
7. KOMPLETNE USTAWIENIE
flowchart
graph LR
    A["QR Code"] --> B["Input Image"]
    B --> C["Image Icon with Down Arrow"]
    C --> D["Computer Download Icon"]
lamax-electronics.com/n4/reg
natural_image
Black LAMAX 2D driver head camera with sensor and control panel (no visible text or symbols on body)TARTALOM
- A CSOMAGOLÁS TARTALMA ....2
- MEGISMERKEDÉS A KAMERÁVAL / KEZELÉS ......2
- ELSÖ BEKAPCSOLÁS....3
- ELHELYEZÉS A SZÉLVÉDÖN ....3
- ALAPFUNKCIÓK....4
- WIFI ALKALMAZÁS....4
- TELJES BEÁLLÍTÁS 5
- MÜSZAKI ADATOK....6
- FIRMWARE FRISSITÉS ....6
- BIZTONSÁGI ALAPELVEK ÉS FIGYELMEZTETÉSEK....7
1. A CSOMAGOLÁS TARTALMA

flowchart
graph LR
    A["Car intake"] --> B["Car air intake with hand, thermometer, and valve"]
    B --> C["Car air intake control with lever, valve, and sensor"]
    C --> D["Car air intake control with valve, valve, and sensor"]
    D --> E["Car air intake control with air intake controller"]
7. TELJES BEÁLLÍTÁS
flowchart
graph LR
    A["QR Code"] --> B["Input Image"]
    B --> C["Image Icon with Down Arrow"]
    C --> D["Computer Download"]
https://www.lamax-electronics.com/n4
FRISSÍTÉSI FOLYAMAT
lamax-electronics.com/n4/reg
natural_image
Black LAMAX 2D driver head camera with sensor and control panel (no visible text or symbols on body)VSEBINA
- VSEBINA PAKIRANJA 2
- SPOZNAJTE KAMERO / UPRAVLJANJE 2
- PRVI VKLOP .... 3
- NAMESTITEV NA STEKLO....3
- OSNOVNE FUNKCIJE ....4
- APLIKACIJA WIFI ....4
- CELOTNE NASTAVITVE....5
- TEHNIČNI PODATKI 6
- POSODOBITEV STROJNE PROGRAMSKE OPREME....6
- VARNOSTNA NAČELA IN OPOZORILA....7
1. VSEBINA PAKIRANJA

A Avto kamera LAMAX N4
B Avtomobilski adapter z dodatnim USB-vhodom
© Napajalni kabel Micro USB
D Nadomestna nalepka 3M
E Elektrostaticna nalepka
2. SPOZNAJTE KAMERO / UPRAVLJANJE

A Večopravilni gumb
B Mikrofon
© Gumb RESTART
D Prikazovalna dioda LED
flowchart
graph LR
    A["Car intake"] --> B["Car air intake with temperature gauge"]
    B --> C["Car air intake control with hand gesture"]
    C --> D["Car air intake control with valve and directional arrow"]
    D --> E["Car air intake control with sensor and motor"]
flowchart
graph LR
    A["APP"] --> B["手机"]
    B --> C[" Payment Interface with Wi-Fi icon"]
    C --> D["Phone with finger pointing at payment interface"]
7. CELOTNE NASTAVITVE
flowchart
graph LR
    A["QR Code"] --> B["Image Icon with 'i' and 'down' icon"]
    B --> C["Camera Icon with '↓' symbol"]
    C --> D["Computer Icon with '↓' symbol"]
lamax-electronics.com/n4/reg
natural_image
Black LAMAX 2D driver head camera with sensor and control panel (no visible text or symbols on body)SADRŽAJ
- SADRŽAJ PAKIRANJA 2
- UPOZNAVANJE S KAMEROM / UPRAVLJANJE 2
- PRVO UKLJUČIVANJE....3
- PRIČVRŠĆIVANJE NA STAKLO ....3
- OSNOVNE FUNKCIJE ....4
- APLIKACIJA ZA BEŽIČNI INTERNET....4
- POTPUNO POSTAVLJANJE....5
- SPECIFIKACIJE 6
- AKTUALIZACIJA UGRAĐENOG SOFTVERA....6
- SIGURNOSNA PRAVILA I UPOZORENJA 7
1. SADRŽAJ PAKIRANJA
Ⓐ Kamera za automobil LAMAX N4
B BAdapter za upaljač za automobil s dodatnim USB ulazom
© Mikro USB kabel za napajanje
D Rezervna 3M naljepnica
E Elektrostaticka naljepnica
2. UPOZNAVANJE S KAMEROM / UPRAVLJANJE


A Višefunkcionalni gumb
B Mikrofon
© Gumb za PONOVNO POKRETANJE
Ⓐ LED dioda za pokazivanje stanja
(Svijetli plavo = kamera je uključena, treperi crveno = kamera snima, svijetli crveno = zapis je zaštićen)
E Utor za GPS modul (dodatno)
F Utor za napajanje
© Utor za pametnu karticu
OVLÁDÁNÍ:
flowchart
graph LR
    A["Car intake"] --> B["Air intake control"]
    B --> C["Control panel with hand, valve, and thermometer"]
    C --> D["Air intake control with valve, valve, and thermometer"]
    D --> E["Air intake control with valve, valve, and thermometer"]
    E --> F["Air intake control with valve, valve, and thermometer"]
flowchart
graph LR
    A["APP"] --> B["Download"]
    B --> C["Payment"]
    C --> D["Scan with Wi-Fi icon"]
    D --> E["Phone with hand icon"]
Ⓐ Učitajte QR kod ili unesite URL – lamax-electronics.com/n4/app
7. POTPUNO POSTAVLJANJE
| Sound recording | Uključivanje/isključivanje mikrofona |
| Speaker Volume | Glasnoća zvučnika |
| Loop Record Options | Ovdje se postavlja duljina pojedinačnih zapisa. Kamera snima u petlji videozapise duljine 1–5 minuta. U slučaju da je memorijska kartica puna, kamera počinje zapisivati nove zapise preko najstarijih zapisa. Pojedinačni videozapisi slijede odmah jedan iza drugoga. |
| Exposure compensation | Omogućuje podešavanje ekspozicije kamere za optimizaciju svjetline videozapisa. |
| Speed watermark | S dodatnim modulom za GPS videozapisima možete dodati i podatke o brzini i lokaciji. |
| GPS Coordinate | Omogućuje postavljanje prikaza vodenog žiga GPS koordinata u videozapisu. (funkcionalno samo s modulom za GPS). |
| Collision Sensing | Zahvaljujući G-senzoru, kamera može snimiti sudar, npr. kod prometne nesreće. Čim kamera prepozna sudar, odmah štiti aktualno snimljeni zapis od presnimavanja. |
| Wi-Fi Name | Podešavanje naziva uređaja za bežičnu vezu. |
| Wi-Fi Password | Podešavanje lozinke za bežičnu vezu. |
| Firmware Version | Ovdje ćete dobiti informacije o trenutačno instaliranoj verziji ugrađenog softvera. |
| Format SD Card | Ova funkcija uklanja sve fotografije i videozapise s kamere. Pozor – to uključuje i one zaštičene! Preporučamo da formatiranje radite barem jedanput mjesečno. |
| Default Settings | Omogućuje vraćanje postavki kameri na tvorničke postavke. |
8. SPECIFIKACIJE
| Razlučivost videozapisa Puna visoka razlučivost (1920×1080) pri 30 sličica u sekundi |
| Kut snimanja 140° |
| Oblik videozapisa MP4, kompresija H.265 |
| Razlučivost fotografija do 2 Mpx |
| Oblik fotografije JPEG |
| Zvuk Ugrađeni mikrofon s mogućnošću isključivanja |
| Memorija mikroSD do 128 GB |
| Povezivost WiFi, Micro USB |
| Dodatna oprema S dodatnim modulom za GPS videozapisima možete dodati i podatke o brzini i lokaciji. |
| Napajanje Superkondenzator |
| Dimenzije 90 × 58 × 36 mm |
https://www.lamax-electronics.com/n4
POSTUPAK AŽURIRANJA
1) Pripremite mikroSD karticu koju ćete formatirati na osobnom računalu / računalu Mac.
2) Preuzmite i otvorite .zip datoteku u kojoj ćete pronaći mape „ota_update“ i „update“. Ne mijenjajte nazive datoteka.
3) Kopirajte datoteke na formatiranu mikroSD karticu.
4) Umetnite mikroSD karticu u isključenu kameru. Priključite kameru na napajanje i provjerite je li kamera uključena cijelo vrijeme tijekom ažuriranja. Ažuriranje bi trebalo početi automatski nakon pokretanja.
5) Pričekajte da ažuriranje potpuno završi. Zatim formatirajte memorijsku karticu na računalu.
lamax-electronics.com/n4/reg
Čim aktualiziramo integrirani softver, odmah ćemo vas obavijestiti!



- Discreet dashcam with WiFi
- LAMAX
- ELECTRONICS
- N4
- CONTENTS
- BOX CONTENTS
- CAMERA INTRODUCTION / CONTROLS
- CONTROLS:
- FIRST USE
- PLACEMENT ON WINDSCREEN
- BASIC FUNCTIONS
- Loop recording
- File protection
- G-sensor
- WIFI APPLICATION
- APP CONTROLS:
- WITHOUT CONNECTION
- AFTER CONNECTION
- FULL SETTINGS
- SPECIFICATIONS
- FIRMWARE UPDATES
- UPDATING
- SAFETY GUIDELINES AND PRECAUTIONS
- PRECAUTIONS AND NOTICES
- SAFETY PRECAUTIONS
- SAFETY NOTICES FOR POWER SUPPLY
- CARING FOR YOUR DEVICE
- OTHER INFORMATION
- EU DECLARATION OF CONFORMITY
- MANUFACTURER
- INHALT
- AKTUALISIERUNGSVORGANG
- lamax-electronics.com/n4/reg
- OBSAH
- OBSAH BALENÍ
- ÚPLNÉ NASTAVENÍ
- POSTUP AKTUALIZACE
- OBSAH BALENIA
- ÚPLNÉ NASTAVENIE
- POSTUP AKTUALIZÁCIE
- SPIS TREŚCI
- ZAWARTOŚĆ ZESTAWU
- KOMPLETNE USTAWIENIE
- TARTALOM
- A CSOMAGOLÁS TARTALMA
- TELJES BEÁLLÍTÁS
- FRISSÍTÉSI FOLYAMAT
- VSEBINA
- VSEBINA PAKIRANJA
- SPOZNAJTE KAMERO / UPRAVLJANJE
- CELOTNE NASTAVITVE
- SADRŽAJ
- SADRŽAJ PAKIRANJA
- UPOZNAVANJE S KAMEROM / UPRAVLJANJE
- OVLÁDÁNÍ:
- POTPUNO POSTAVLJANJE
- SPECIFIKACIJE
- POSTUPAK AŽURIRANJA
Brand : Lamax
Model : N4
Category : Uncategorized