
M0230 - Multimeter Emos - Free user manual and instructions
Find the device manual for free M0230 Emos in PDF.


| Product Type | Digital Multimeter |
| Model | M0230 |
| Brand | Emos |
| Display | 3 ½ digit LCD, max. 1,999 |
| Dimensions | 155 × 75 × 35 mm |
| Weight | 232 g (including battery) |
| Power Supply | 3 × 1.5 V AAA batteries (alkaline only) |
| Safety Category | CAT III 600 V, pollution degree 2 |
| Overvoltage Protection | 600 V DC/AC rms |
| Fuse Protection | 500 mA/600 V (F, 5×20 mm) for 200 mA range; 10 A/600 V (F, 5×20 mm) for 2 A and 10 A ranges |
| DC Voltage Ranges | 2 V, 20 V, 200 V, 600 V |
| DC Voltage Accuracy | ±(0.8% + 5) for 2 V-200 V; ±(1% + 5) for 600 V |
| AC Voltage Ranges | 200 V, 600 V (40-400 Hz, True RMS) |
| AC Voltage Accuracy | ±(1.2% + 8) |
| DC Current Ranges | 200 mA, 2 A, 10 A |
| AC Current Ranges | 200 mA, 2 A, 10 A (40-400 Hz, True RMS) |
| Resistance Ranges | 200 Ω, 2 kΩ, 20 kΩ, 200 kΩ, 2 MΩ |
| Temperature Measurement | -40 °C to 1,370 °C (with type K thermocouple, included for -40 to 300 °C) |
| Additional Functions | Continuity test (<50 Ω beeper), diode test, battery test (1.5 V/9 V), data hold, screen illumination |
| Operating Environment | 0 °C to 40 °C, relative humidity < 80% |
| Storage Environment | -10 °C to 50 °C, relative humidity < 85% |
| Maintenance | Clean with damp cloth and mild detergent; replace batteries when low battery icon appears; use only specified fuses |
| Safety Markings | Double insulation, CE, warning symbols |
Frequently Asked Questions - M0230 Emos
User questions about M0230 Emos
0 question about this device. Answer the ones you know or ask your own.
Ask a new question about this device
Download the instructions for your Multimeter in PDF format for free! Find your manual M0230 - Emos and take your electronic device back in hand. On this page are published all the documents necessary for the use of your device. M0230 by Emos.
USER MANUAL M0230 Emos
Read this instruction manual thoroughly before you begin using the M0230. It contains particularly important passages concerning occupational safety principles when using the device. Such passages are highlighted. Reading the manual will prevent potential injury by electric current or damage to the device.
The multimeter was designed in accordance with standard EN 61010-1, applying to electronic measuring instruments belonging to category CAT III 600 V, pollution degree 2. CAT III is intended for measuring circuits powered by fixed wiring installations, such as relays, sockets, distribution boxes, feeder lines and short branching circuits and lighting systems in large buildings.
Do not use the multimeter to measure ranges that fall into the category IV!
Warning:
Use the M0230 multimeter only in the manner specified below. Other uses may cause damage to the device or endanger your health.
Comply with the following instructions:
- Before measuring resistance, diodes or current, disconnect the circuits from the power supply and discharge any high-voltage capacitors. Use a function appropriate for the given measurement. Before changing the range (or switching functions) disconnect the conductors from the circuit that is being measured.
- Make sure the device is undamaged before you begin using the multimeter. If you find obvious signs of damage on the body of the device, do not make any measurements! Check that the surface of the multimeter does not have scratches and that the side joints are not coming apart.
- Also check the insulation on the measuring probes. Damaged insulation may result in injury by electric current. Do not use damaged measuring probes!
- Do not measure voltages above 600 V! If you intend to measure current, check the multimeter's fuse and turn off the power supply to the circuit before you connect the multimeter. Before
measuring, make sure the circular switch for setting measuring range is in the correct position. Under no circumstances should you make any changes to the measuring range (by moving the circular switch for changing measuring programmes) while measuring! Doing so could damage the device. When you are measuring, first connect the black conductor (probe) and then the red conductor (probe). When disconnecting the testing conductors, disconnect the red one first.
- If you find that the multimeter is making abnormal measurements, stop using it. The fuse may be damaged. If you are unsure of the cause of the defect, contact a service centre.
- Do not measure voltages higher than listed on the front panel of the multimeter. Risk of injury by electric current or damage to the multimeter!
- Check that the multimeter is working properly before use. Test on a circuit with known electrical values.
- Before you connect the multimeter to a circuit you intend to measure, turn off the power to the circuit.
- Do not use or store the multimeter in environments with high temperature, dust or humidity. It is also not recommended to use the device in environments with potentially strong magnetic fields or risk of explosion or fire.
- When changing parts of the multimeter (e.g. the battery or fuse) use spare parts of the same type and specifications. Change parts only when the multimeter is disconnected and turned off.
- Disconnect the testing conductors from the tested circuit before opening the rear casing of the device.
- Do not alter or otherwise interfere with the internal circuitry of the multimeter!
- Be extra careful when measuring voltages higher than 30 V AC rms, 42 V peak or 60 V DC. Risk of injury by electric current!
- When using measuring tips, make sure you are holding them behind the finger barriers.
- Do not perform measurements if the multimeter's casing is removed or loose.
- Once the screen shows the low battery icon 📄, replace the batteries. Otherwise, subsequent measurements may be inaccurate. Incorrect measurements may then result in injuries by electric current! Use alkaline batteries only; do not use re-chargeable batteries.
Maintenance Instructions
Attention
Do not attempt to repair or modify the multimeter in any way if you are not qualified to do so or do not have access to the necessary calibration equipment. Make sure that water does not get into the multimeter – prevents injury by electric current!
- Disconnect the measuring tips from the tested circuit before opening the casing of the multimeter.
- Regularly clean the body of the multimeter with a moist cloth and a mild detergent. Perform cleaning only when the multimeter is disconnected and turned off.
- Do not use solvents or abrasive agents for cleaning!
- If you will not be using the multimeter for an extended period of time, turn it off and remove the battery.
- Do not store the multimeter in places with high humidity and temperature or in environments with strong magnetic fields!
Changing Batteries
When the symbol appears on the screen, it indicates the batteries are close to depletion and must be immediately replaced. To replace the batteries, unfasten the screw at the rear of the casing and remove the casing. Replace the flat batteries with new ones of the same type (1.5 V, AAA) and make sure to observe the correct polarity. Replace the rear casing.
Electrical Symbols
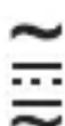
Alternating current (AC)
Direct current (DC)
Alternating and direct current (AC/DC)
Risk of injury by electric current

Warning symbol, hazard. Pay particular attention to sections of the manual marked with this symbol.


Fuse

Earthing
Double insulation

The product complies with applicable EU standards

Batteries low

Continuity test
°C Celsius temperature unit
°F Fahrenheit temperature unit

Automatic switch-off

Data hold
Description of the Device (see Fig. 1)
The M0230 is a compact, 3 12 digit, digital multimeter with manual range adjustment for measuring DC and AC voltage, DC and AC current, resistance and temperature, and for testing continuity and diodes.
1 - protective casing
2 - screen
3 - select button
4 - hold button
5 – circular switch for changing measuring range/choosing a function
6 - INPUT socket - for the plug at the end of the red (positive) tipped measuring conductor for measuring voltage, resistance, diodes, continuity, temperature and current up to 200mA
7 – COM socket – for the plug at the end of the black (negative) tipped measuring conductor
8 – 10 A socket – for the plug at the end of the red (positive) tipped measuring conductor for measuring current in a current range of 10 A AC/DC
9 - removing the probe cover
Technical Information
Screen: 3 ½ digit LCD with a maximum displayable value of 1,999
Negative polarity indication: the screen automatically displays „-“
Overload indication: the screen displays „OL“
Reading frequency: approx. 2× a second
Temperature measurement range: -40 °C to 1,370 °C (-40 °C to 300 °C with the enclosed thermocouple)
Power supply: 3× 1.5 V AAA batteries
Operating temperature: 0 °C to 40 °C, relative humidity < 80 %
Storage temperature: -10 °C to 50 °C, relative humidity < 85 %
Dimensions: 155 × 75 × 35 mm
Weight: 232 g including battery
Measurement Accuracy
Accuracy is specified for the duration of one year after calibration and at a temperature of 23 °C (±5 °C) and air humidity up to 80 %.
Accuracy specifications are:
±[(% of reading) + (lowest valid digits)]
DC Voltage
| Range Resolution Accuracy | ||
| 2 V 1 mV | ±(0.8 % + 5)20 V 10 mV | |
| 200 V 100 mV | ||
| 600 V 1 V ±(1 % + 5) | ||
Overload protection: 600 V DC or 600 V rms
AC Voltage
| Range Resolution Accuracy | ||
| 200 V 100 mV | ±(1.2 % + 8) | |
| 600 V 1 V | ||
Frequency range: 40 Hz to 400 Hz
⚠️ Maximum input voltage: 600 V AC or 600 V rms
Response: True RMS, corresponding to a calibrated effective value of a sine wave.
Direct Current (DC)
| Range Resolution Accuracy | ||
| 200 mA 100 μA | ±(1.2 % + 8)2 A 1 mA | |
| 10 A 10 mA | ||
Overload protection:
200 mA range: 500 mA/600 V fuse, type F, ∅ 5 × 20 mm.
2 A and 10 A range: 10 A/600 V fuse, type F, ∅ 5 × 20 mm.
⚠️ Maximum input current: INPUT socket max. 200 mA; A socket max. 10 A (when measuring current above 5 A; the measurement duration must be max. 10 seconds and further measurement may only be made after 15 minutes)
Voltage drop: 200 mV for 200 mA/10 A range, 20 mV for 2 A range
Alternating Current (AC)
| Range Resolution Accuracy | ||
| 200 mA 100 μA | ±(1.5 % + 10) | |
| 2 A 1 mA | ±(2 % + 10) | |
| 10 A 10 mA | ||
Overload protection:
200 mA range: 500 mA/600 V fuse, type F, ∅ 5 × 20 mm.
2 A and 10 A range: 10 A/600 V fuse, type F, ∅ 5 × 20 mm.
⚠️ Maximum input current: INPUT socket max. 200 mA; A socket max. 10 A (when measuring current above 5 A; the measurement duration must be max. 10 seconds and further measurement may only be made after 15 minutes)
Frequency range: 40 Hz to 400 Hz
Response: True RMS, corresponding to a calibrated effective value of a sine wave.
Voltage drop: 200 mV for 200 mA/10 A range, 20 mV for 2 A range
Resistance
| Range Resolution Accuracy | |
| 200 Ω 0.1 Ω | |
| 2 kΩ 1 Ω | |
| 20 kΩ 10 Ω | |
| 200 kΩ 100 Ω | |
| 2 MΩ 1 kΩ |
Overload protection: 250 V DC/AC rms
Battery Test
| Range Resolution Electrical load | |
| 1.5 V 1 mV approximately 20 mA | |
| 9 V 10 mV approximately 5 mA |
Continuity Test
| Symbol | Description Note | |
 | The built-in buzzer will ring constantly if resistance is lower than 50 Ω. | Voltage of an open circuit: approximately 1 V |
Overload protection: 250 V DC/AC rms
Diode Test
| Symbol | Description Note | |
 | The approximate voltage of the diode in the direction of the current flow will appear on the screen. | Voltage of an open circuit: approximately 2.2 V |
Overload protection: 250 V DC/AC rms
Temperature Measurement
| Range Resolution Accuracy | ||
| -40 °C to 150 °C | 1^ | ±(1 % + 4) |
| 150 °C to 1,370 °C ±(1.5 % + 15) | ||
| -40 °F to 302 °F | 1^ | ±(1 % + 4) |
| 302 °F to 1,999 °F ±(1.5 % + 15) | ||
Measuring outside of the range may damage the thermocouple and result in major deviations in measurement accuracy.
DATA HOLD function
After the H button is pressed, the currently measured value will remain on the screen and a H con will appear. Pressing the button again will cancel the function and the icon will disappear.
Screen Illumination
Long-pressing the button illuminates the screen for approx. 15 seconds; illumination then turns off again automatically.
Operating Procedure
AC Voltage/DC Voltage Measurement
Connect the plug of the black (negative) tipped measuring conductor into the COM socket and the plug of the red (positive) conductor for measuring voltage into the INPUT socket. Use the circular switch to select the DC voltage function, marked with the V symbol, or the AC voltage function, marked with the V\~ symbol. Select the voltage range.
Place the measuring tips onto to spot you want to measure. The voltage value and polarity (for DC voltage) will appear on the screen. If you do not know the voltage range beforehand, set the largest possible range and gradually reduce it as you measure. Connect the measuring tips to the device or circuit where you will be measuring voltage. Turn on the device you want to measure. The voltage value will appear on the screen.
Note: To prevent electric shock and damaging the device, do not connect the multimeter to voltages higher than 600 V.
Alternating Current/Direct Current Measurement
Note:
When measuring current up to 200 mA, connect the plug of the black (negative) tipped measuring conductor into the COM socket and the plug of the red (positive) for measuring voltage into the INPUT socket. Switch to the function marked as A and select the range. Repeatedly pressing the Select button switches between measuring direct current (DC) or alternating current (AC). When measuring current up to 10 A, first select the 10 A measuring range and then connect the plug of the black (negative) tipped measuring conductor into the COM socket and the plug of the red (positive) for measuring voltage into the A socket. If you do not know the current range beforehand, set the highest range possible and gradually reduce it as you measure. Connect the measuring tips to the device or circuit where you will be measuring current. Turn on the device you want to measure. The screen will display the current value and polarity (for DC) relative to the red measuring tip.
Continuity Test
Connect the plug of the black (negative) tipped measuring conductor to the COM socket and the plug of the red (positive) conductor for measuring voltage into the INPUT socket. Switch to the function marked with ⚪. Press the Select button repeatedly to select the ⚪ function. Connect the measuring tips to the circuit you want to measure. If the resistance of the measured circuit is lower than 50 Ω, you will hear a buzzer.
Note: Before testing, disconnect all power supply from the circuit you want to test and thoroughly discharge all capacitors.
Resistance Measurement
Connect the plug of the black (negative) tipped measuring conductor into the COM socket and the plug of the red (positive) conductor for measuring voltage into the INPUT socket. Switch to the function marked as ☐ and select the range. Connect the measuring tips to the object you want to measure (resistor). The measured resistance value will appear on the screen. If the „OL“ symbol appears on the screen, switch to a higher range. If the circuit is open, the „OL“ symbol will appear, same as when measuring range is exceeded. Before making measurements, disconnect power from the tested circuit and thoroughly discharge all its capacitors.
Diode Measurement
Connect the plug of the black (negative) measuring conductor into the COM socket and the plug of the red (positive) measuring tip for measuring diodes into the INPUT socket. Switch to the function marked with ⚙️. Press the Select button repeatedly to select the ⚪ function. Connect the red measuring tip to the anode of the diode and the black measuring tip to the cathode of the diode. Approximate voltage in the direction of the flow of current will appear on the screen. „OL“ will appear on the screen if the polarity is reversed.
Battery Testing
Connect the plug of the black (negative) measuring conductor into the COM socket and the plug of the red (positive) measuring tip for measuring diodes into the INPUT socket. Switch to the BATT function and choose the measuring range according to the type of battery.
Connect the measuring tips to the battery so that the red tip is connected to the positive pole and the black to the negative pole of the battery. The measured value will appear on the screen.
Note: When measuring is finished, disconnect the measuring tips from the tested battery.
Temperature Measurement
- Switch to the °C function and repeatedly press the Select button to choose between measuring in °C or °F.
- Connect the black plug (minus) to the COM socket and the red plug (plus) of the type K thermocouple to the INPUT socket.
- Carefully touch the end of the thermocouple onto the measured object. The object must not be live; be mindful of any rotating parts on various devices. The screen will show the measured temperature after a few moments.
Note:
The type K thermocouple included with the multimeter is designed for measuring temperatures between -40 °C and 300 °C. Measuring temperatures above 300 °C may cause damage to the thermocouple and the multimeter! If you want to measure higher temperatures, use a different thermocouple with a higher measurement range! This device is not intended for use by persons (including children) whose physical, sensory or mental disability or lack of experience or knowledge prevents them from using it safely. Such persons should be instructed in how to use the device and should be supervised by a person responsible for their safety. Children must always be supervised to ensure they do not play with the device.
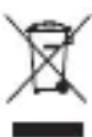
Do not dispose with domestic waste. Use special collection points for sorted waste. Contact local authorities for information about collection points. If the electronic devices would be disposed on landfill, dangerous substances may reach groundwater and subsequently food chain, where it could affect human health.
You can request technical assistance from the supplier:
Mjerenje temperature
| Raspon Rezolucija Točnost | ||
| od -40 °C do 150 °C | 1^ | ±(1 % + 4) |
| 150 °C do 1.370 °C ±(1,5 % + 15) | ||
| -40 °F do 302 °F | 1^ | ±(1 % + 4) |
| 302 °F do 1.999 °F ±(1,5 % + 15) | ||
Mjerenje izvan raspona može oštetiti termoelement i rezultirati velikim odstupanjima u točnosti mjerenja.
Funkcija ZADRŽAVANJE PODATAKA
Mjerenje temperature
- Prebacite se na funkciju °C Vše puta pritisnite gumb Odabir za odabir između mjerenja u °C ili °F.
- Crni utikač (minus) spojite na COM utičnicu, a crveni utikač (plus) termoelementa tipa K na ULAZNU utičnicu.
- Pažljivo dodirnite kraj termoelementa na mjereni predmet. Objekt ne smije biti pokrenut; imajte na umu sve rotirajuće dijelove na raznim uređajima. Zaslon će poslije nekoliko trenutaka prikazati izmjerenu temperaturu.
⚠️ Napomena:
Termoelement tipa K koji dolazi s multimetrom projektiran je za mjerenje temperatura između -40 °C i 300 °C. Mjerenje temperature iznad 300 °C može oštetiti termoelement i multimetar! Ako želite mjeriti više temperature, upotrijebite drugi termoelement s većim mjernim rasponom!


- Warning:
- Comply with the following instructions:
- Maintenance Instructions
- Attention
- Changing Batteries
- Electrical Symbols
- Description of the Device (see Fig. 1)
- Technical Information
- Measurement Accuracy
- Alternating Current (AC)
- Resistance
- DATA HOLD function
- Screen Illumination
- Operating Procedure
- AC Voltage/DC Voltage Measurement
- Alternating Current/Direct Current Measurement
- Note:
- Continuity Test
- Resistance Measurement
- Diode Measurement
- Battery Testing
- Temperature Measurement
- You can request technical assistance from the supplier:
- Funkcija ZADRŽAVANJE PODATAKA
- Mjerenje temperature
- ⚠️ Napomena:
Brand : Emos
Model : M0230
Category : Multimeter