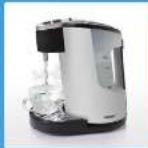
Hot Cup CK1000 - Kettle Zelmer - Free user manual and instructions
Find the device manual for free Hot Cup CK1000 Zelmer in PDF.

| Product Type | Electric Kettle |
| Brand | Zelmer |
| Model | Hot Cup CK1000 |
| Capacity | 1.7 L |
| Power Rating | 1850 - 2200 W |
| Voltage | 220 - 240 V |
| Frequency | 50 / 60 Hz |
| Body Material | Stainless Steel |
| Heating Element | Concealed stainless steel |
| Auto Shut-Off | Yes |
| Boil-Dry Protection | Yes |
| Cord Length | 0.75 m |
| Weight | 1.0 kg |
| Dimensions (W x D x H) | 22 x 15 x 20 cm |
| Lid Opening | One-hand push-button |
| Spout Filter | Removable mesh filter |
| Water Level Indicator | Yes (transparent window) |
| Base Type | 360° rotational power base |
| Cleaning Recommendation | Descale regularly with citric acid or vinegar |
| Safety Certifications | CE, RoHS |
| Warranty | 2 years |
Frequently Asked Questions - Hot Cup CK1000 Zelmer
User questions about Hot Cup CK1000 Zelmer
0 question about this device. Answer the ones you know or ask your own.
Ask a new question about this device
Download the instructions for your Kettle in PDF format for free! Find your manual Hot Cup CK1000 - Zelmer and take your electronic device back in hand. On this page are published all the documents necessary for the use of your device. Hot Cup CK1000 by Zelmer.
USER MANUAL Hot Cup CK1000 Zelmer
- Measurement of the quantity of acting water in the range of 150-300 ml
SR: Kichmali nastaven mochravý volatná vocy v čarsany. 150 300 m.
MIL 10.2017, 1983
150.2% at www.niuni.com
(6) Perusahaan S.A. (2017) 10,000 tons
PL For kog STOP net yamir in pocnerle wuzy
(2) Vennini, 1980, 34 (AP-2)
- 31 February 2024
UA B####
EN. 06 cu pereyersky und poay Z a
GNT7-060-482
zelmer
www.zeimertel
www.ajm.com
zelmer

CK1000
natural_image
White and black industrial water dispenser with glass cup, no visible text or symbols on device or background| C | NAVO K POGUJI ELEKTRICKA KONVICE Typ CK1000 | 5-7 | MD | HATRYAN T. FASTAS ELEKTRONOS VIZFORALO CK1000 Typa | MD | HATRYAN T. NA VOTRERA ELEKTRINCECA KAIA Typ CK1000 | 27-30 |
| MD | KEKTURUM OF UTILNZE RERBATOR ELECTRIC Typ CK1000 | MD | HOTYKIRUS ZEKTUTRAHRI ELEKTPROVAPHIN Typ CK1000 | 31-34 | |||
| D | NAVO K GESLARJ ELEKTRICA KAIVICA Typ CK1000 | 9-11 | MD | HEKTURUM FOR CNTNATALNI ELEKTPROCKIM VAHIN Typ CK1000 | MD | HOTYKIRUS ZEKTUTRAHRI ELEKTPROVAPHIN Typ CK1000 | 30-30 |
CK1000
Czajnik Elektryczny
Electric kettle
zelmer
www.teimercl
www.jnlmer.com
A
B
©
D


Szanowni Klienci!
Congratulations on your choice of Zelmer electric kettle, and welcome among the users of Zelmer products.
In order to achieve best results, we recommend using only original Zelmer accessories. They have been specially designed for this product.
Please read this user manual carefully. Special attention should be paid to the safety precautions. Please keep this manual safe for future reference.
Safety precautions and instructions on the proper use of the electric kettle
Read this entire manual carefully before using the appliance.
Make sure that you understand the below safety precautions.
Danger! / Warning! Risk of injury
Special attention is necessary when the kettle is used in the presence of children.
Do not operate the appliance if the power cord is damaged or the kettle body is visibly damaged.
“the non-detachable part of the cord is damaged, it should be replaced by the producer or at a proper service point or by a qualified person in order to avoid any hazards.
The appliance can only be repaired by qualified service personnel. Improper servicing may cause a serious hazard to the user. In case of defects please contact a qualified service center.
Do not touch the metal body of the kettle when in use; move the kettle only using the handle.
Do not fill the kettle beyond the maximum fill indicator „max“ – water might spatter out of the kettle.
- Be careful not to wet the plug of the connecting cord.
Mind the steam coming out of the kettle while water is boiling.
Allow the kettle to cool completely before cleaning it.
This appliance is not intended for use by persons (including Children) with reduced physical, sensory or mental capabilities, or lack of experience and knowledge, unless they have been given supervision or instruction concerning use of the appliance by a person responsible for their safety.
Children should be supervised to ensure that they do not play with the appliance.

Warning! Risk of property damage
Always plug the appliance to the mains (AC only) with voltage corresponding to that indicated on the rating plate.
always place the kettle on a stable, smooth, flat surface; the power cord must not hang loosely off the edge of a table (or any other work surface) or touch a heated surface.
Do not remove the plug from the outlet by pulling by the cord.
The kettle can only be operated with the original power base, each base is type-specific.
Use the kettle for boiling water only.
Do not open the lid immediately after water has boiled – steam might condense and appear on the exterior of the kettle.
Do not place the kettle on or near hot objects.
Do not immerse the kettle or the power base in water when filling or washing the electric kettle.
the event that water gets into the inside electric elements of the kettle, or onto the power base, carefully dry these elements before plugging the kettle into the mains.
Do not operate the kettle when empty.
Do not use the kettle with the lid open – the automatic shut off will not work then.
Do not use any abrasive cleaning agents such as emulsions, creams, pastes, etc for cleaning the kettle body. They might remove graphic information symbols such as: scales, marks, warning signs, etc.
The appliance is not intended to be operated by means of an external timer or separate remote-control system.
Product information and tips on use
The kettle is intended for household use only.
Technical data
The technical parameters are given on the data plate of the product.
2 liter capacity.
Zelmer electric kettles are built in I class insulation and they are equipped with supplying cord with grounding wire and grounding plug.
The ZELMER kettle meets the requirements of the standards in force.
The appliance is compliant with the requirements of the following directives:
The Low Voltage Directive (LVD) - 2006/95/EC.
Electromagnetic Compatibility (EMC) - 2004/108/EC.
The product is affixed with a CE Mark on the data plate.
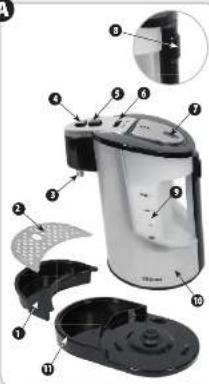
Identifying the Parts (Fig. A)
① Removable drip tray
2 Removable stainless steel drip tray cover
3 Dispensing nozzle
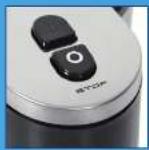
4 Stop button
5 Start button
6 Volume selector control
7 Lid
8 Lid release button
9 Water reservoir with level indication
10 Heating chamber
11 Power base
Before using your Hot Cup for the first time
Remove your Hot Cup carefully from the box. Remove any packaging and promotional material and position your Hot Cup on a dry, level, secure work surface away form the edge.
Follow the instructions below on using your Hot Cup and discard the first five measures of boiling water (i.e. the first full tank of water). This will remove any residues that may remain from the manufacturing process.
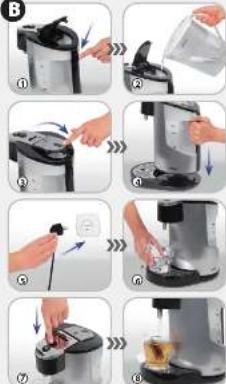
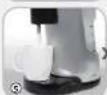
Using your Hot Cup (Fig. B)
Always position your Hot Cup in such a way that the start button cannot be accidentally operated, especially by children. As you use your Hot Cup, a certain portion of the water boiled will be transferred back to the water reservoir. This will mean reservoir may become hot. Always use care when handling your Hot Cup.
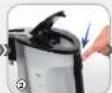
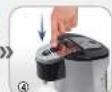
① Press the lid release button.
② Fill the water reservoir from your cold tap. The water level should be between the MIN and MAX markings.
Do not boil the water if it is below the minimum level or beyond - the maximum level on the indicator.
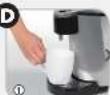
③ Closed the lid and press the stop button. This will make sure that your hot cup will not immediately start a boil cycle when you place it onto the power base.
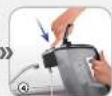
④ Place the kettle on the power base.
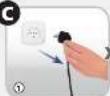
⑤ Connect your Hot Cup to a mains supply socket.
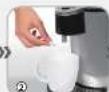
⑥ Place a suitable cup or container with a tea bag, coffee, sugar, etc. below the dispensing nozzle. Never operate your hot cup without a cup or suitable container placed below
the dispensing nozzle. Adjust the volume selector control to the required setting. The control adjusts the quantity of boiling water dispensed by your hot cup. For smaller cups
like teacups, set control toward the MIN setting (out 150 ml); for larger cups like coffee mugs, set the control
towards the MAX setting (about 300 ml). If you are not sure which setting to use, it is best to use a lower setting until you gain experience using your Hot Cup or start with a large mug.
⑦ Press the start button. The button will light up red and your Hot Cup will start to boil.
⑧ The selected quantity of boiling water will be dispensed into the cup and it will automatically Switch-Off. Your Hot Cup is now ready to use again. You may need to wait a few seconds for the Hot Cup to reset.
Stopping your Hot Cup
If you have started the boil procedure and then decide you want to stop your Hot Cup for any reason, simply press the stop button. You can also stop water that is being dispensed by pressing the stop button. The boiled water will be safely transferred back into the water reservoir.
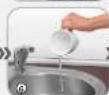
Emptying yourHot Cup
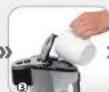
① After your Hot Cup has completely cooled down, unplug it form the mains supply socket.
② Press the lid release button.
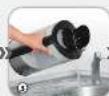
③ Hold your Hot Cup over the sink and pour the water out.
④ Still holding your Hot Cup over the sink, turn it the right way up and allow any water to drain out of the dispensing nozzle. If no water drains out of the nozzle, it may be because the stop button has been accidentally or intentionally pressed. Press the start button to allow water to drain from the nozzle.
Repeat steps 3 and 4 until all the water has been emptied from your Hot Cup.
If your Hot Cup will not be used for an extended period (e.g. if you are on holiday), we recommend that you first empty it. Before using your Hot Cup again, carry out several boil cycles discarding the water each time.
Cleaning
Clean the exterior surface of your Hot Cup with a damp cloth and then polish it with a soft, dry cloth.
Never immerse the base unit, power cord or plug in water or any other liquid.
Always switch off and unplug your Hot Cup and allow it to completely cool before cleaning.
Do not use harsh abrasives, chemicals or oven cleaners.
Descaling
To maintain it is performance, your Hot Cup will require descaling once every three months or so. You may need to descale your Hot Cup more frequently if you live in a hard water area.
① Fill your Hot Cup to the Max fill level and place an empty cup on the drip tray. Select a suitable setting for the dispensing control and press the start button. Wait for the water to be dispensed into the cup.
② Add a citric acid-based proprietary descaling product to the hot water in the cup and stir.
③ Tip the contents of the cup into your Hot Cup and close the lid.
④ Pace the empty cup on the drip tray and press the start button.
⑤ Wait for the water to be dispensed into the cup.
⑥ Discard the water from the cup.
⑦ Repeat steps 4, 5 and 6 until the water level is at the MIN mark. Open the lid and empty any remaining water into the sink. Rinse your Hot Cup by filling it with clean water and emptying it into the sink. Fill your Hot Cup with fresh water to the MAX fill level and place an empty cup on the drip tray.
⑧ Press the start button and wait for the water to be dispensed into the cup.
Discard the water in the cup.
Repeat steps 8 and 9 until the water level is at the MIN mark. Open the lid and empty any remaining water into the sink.
Troubleshooting
| Problem Possible Cause Solution | ||
| The start switch will not stay in the on position. | Your Hot Cup has not reset itself after the boiling cycle. | Your Hot Cup is still too hot after the last boil cycle. Wait a few seconds for it to cool slightly before trying again. |
| The water tank does not illuminate and your Hot Cup does not dispense boiling water. | Your Hot Cup is not plugged in. •Your Hot Cup is not positioned correctly •on its power base.The fuse has blown. •Your Hot Cup has boiled dry. • | Check your Hot Cup is plugged in and switch on at the supply socket.• Check that the dispensing nozzle is positioned centrally over the drip tray•Check the fuse in the plug.• Allow your Hot Cup to cool down completely then refill it with water. |
| Your Hot Cup does not dispense a full cup of water. | •Your Hot Cup has excessive scale.• The dispensing control may be set too low. | •Descale your Hot Cup.•Adjust the dispensing control. |
| Your Hot Cup produces excess steam but does not dispense boiling water. | The water level has dropped below the MIN level.•Your Hot Cup has excessive scale. | • Fill with water between the MIN and MAX markings then restart the boil cycle.•Descale your Hot Cup. |
| Your Hot Cup makes a noise and there is a ‘clunk’ sound after water has been dispensed. | This is the sound of the internal valve operating after the boil cycle finishes. | This is normal operation. |
| Water drips from the dispensing nozzle after the boil cycle has finished. | There is a residual amount of water left inside your Hot Cup after the boil cycle. | This is normal operation. |
| Steam comes out from the behind the start button and behind the dispensing nozzle. | Steam is being vented in a controlled manner through designed vents. | This is normal operation. |
| The water reservoir is getting hot. | Hot water is being returned to the water reservoir. | This is normal operation. |
| Your Hot Cup immediately turns itself on when it is placed on the power base. | Your Hot Cup is already switched on. | Press the stop button. |
Ecology – environment protection
Each user can protect the natural environment. It is neither difficult nor expensive.
In order to do it: put the cardboard packing into recycling paper container; put the polyethylene (PE) bags into container for plastic.
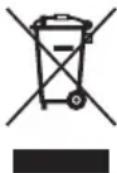
When worn out, dispose the appliance to particular disposal centre, because of the dangerous elements of this appliance, which can be hazardous for natural environment.
Do not dispose into the domestic waste disposal!!!
The manufacturer/importer does not accept any liability for any damages resulting from unintended use or improper handling.
The manufacturer/importer reserves his rights to modify the product any time in order to adjust it to law regulations, norms, directives or due to construction, trade, aesthetic or other reasons, without notifying in adv
Notes
Notes
- zelmer
- CK1000
- Szanowni Klienci!
- Safety precautions and instructions on the proper use of the electric kettle
- Danger! / Warning! Risk of injury
- Warning! Risk of property damage
- Product information and tips on use
- Technical data
- Identifying the Parts (Fig. A)
- Before using your Hot Cup for the first time
- Using your Hot Cup (Fig. B)
- Stopping your Hot Cup
- Emptying yourHot Cup
- Cleaning
- Descaling
- Ecology – environment protection
- Notes
Brand : Zelmer
Model : Hot Cup CK1000
Category : Kettle