
Drive C5 - Dash Cam Lamax - Free user manual and instructions
Find the device manual for free Drive C5 Lamax in PDF.


| Product Type | Dual Car Camera (Front & Rear) |
| Brand | Lamax |
| Model | Drive C5 |
| Display | 4.3" HD LCD |
| Viewing Angle | 140° |
| Front Camera Video Resolution | 1920 x 1080 (interpolated) |
| Rear Camera Video Resolution | 1280 x 720 HD |
| Video Format | MOV / H.264 |
| Photo Resolution | Up to 8 MP |
| Photo Format | JPG |
| Memory Card | Micro SDHC, Class 10 or higher, up to 32 GB |
| G-Sensor | Yes (adjustable sensitivity) |
| Loop Recording | Yes (1, 2, 5 min sequences or off) |
| Parking Mode | Yes (up to 24 hours) |
| Motion Detection | Yes |
| IR Light | Yes |
| Power Supply | Car charger with switch, mini USB |
| Mounting Type | Rubber bands on rearview mirror; rear camera with 3M stickers |
| Operating Temperature | 0°C to 50°C |
| Storage Temperature | -30°C to 70°C |
| Battery | Built-in (for parking mode, not replaceable) |
| Certification | CE |
| Warranty | 2 years |
Frequently Asked Questions - Drive C5 Lamax
User questions about Drive C5 Lamax
0 question about this device. Answer the ones you know or ask your own.
Ask a new question about this device
Download the instructions for your Dash Cam in PDF format for free! Find your manual Drive C5 - Lamax and take your electronic device back in hand. On this page are published all the documents necessary for the use of your device. Drive C5 by Lamax.
USER MANUAL Drive C5 Lamax
natural_image
LAMAX rear mirror with a remote camera and green landscape background (no text or symbols on main subject)CONTENT
Introduction ....1
LAMAX DRIVE C5 Dual car camera features and functions ....1
Pack contents....1
Product picture....1
Product installation....2
Quick functions....2
Icons annotation....2
Using the LAMAX DRIVE C5 Dual car camera....2
1) Inserting a micro SDHC card ....2
2) Power 2
3) Turning the camera on and off....2
4) Changing modes and menu navigation....3
5) Recording / taking photos / gallery....3
6) Deleting the entries on the camera....3
7) Protecting the files on the camera....3
8) Connecting to a PC....3
9) Switching the view between front and back camera 3
LAMAX DRIVE C5 Dual car camera settings....3
1) Video Quality....3
2) Photo Quality....3
3) Video Time .... 3
4) Move Detect....3
5) Park Monitor....4
6) Impact Sensitivity....4
7) White Balance 4
8) Contrast....4
9) Exposure....4
10) Power ON Record....4
11) Screen Timeout....4
12) Auto Shut Off....4
13) Record Voice 4
14) Date....4
15) Language 4
Safety measures....5
Precautions and notices 5
Safety precautions 6
Carying for your device 6
Other information 6
Declaration of Conformity 7
Introduction
Thank you for purchasing the LAMAX DRIVE C5 Dual car camera. You are now the owner of a reliable companion for your car journey. A complete multilingual manual can be downloaded from the product page at www.lamax-electronics.com.
LAMAX DRIVE C5 Dual car camera features and functions
- Interpolated full HD video 1920 x 1080 (front camera) and HD 1280 x 720 (back camera)
-G-sensor - Loop recording
- Parking mode
- Motion sensor
- Multilingual menu
- Dual camera
- IR light
-4,3" display - Power-Off delay
Pack contents
- Front camera
- Back camera
- USB cable
- Car charger with switch
– Cable for connecting the front camera, rear camera - Rubber bands
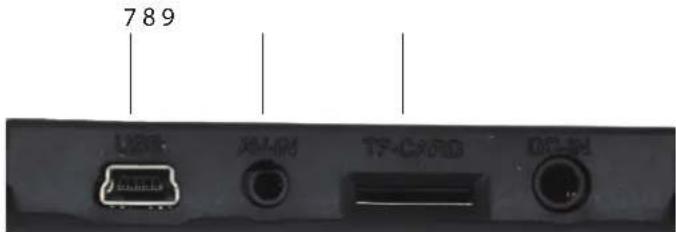
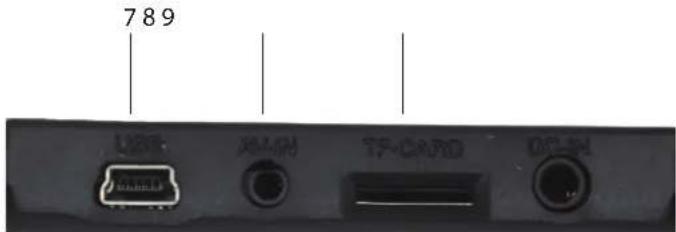
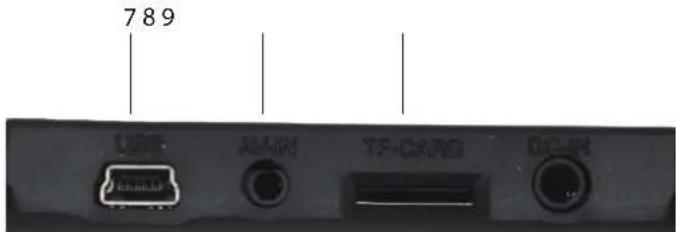
Product picture
- ON/OFF
- Menu
- Mode
- Arrow left
- Arrow right
- OK (shutter)
- Power connector (mini USB)
- Back camera connector
- Micro SDHC card slot
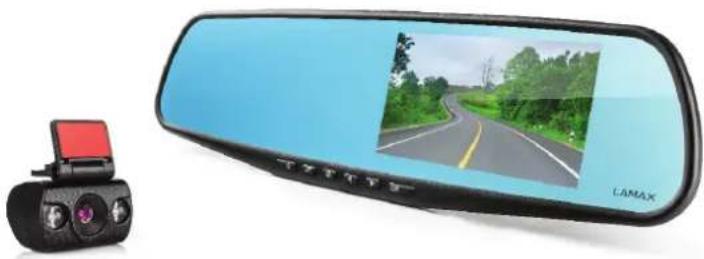
natural_image
Side mirror with a red camera and green road scene, no visible text or symbols on the main components
Product installation
1) Connect the power cable to the cigarette lighter. Ensure the cable is placed around the windscreen so as not to obstruct the driver's view and then fix it securely in place. Attach the device on the rear-view mirror by rubber bands. This will give you the optimal picture.
2) Attach back camera with 3M stickers on rear window.
3) Connect back and front camera using A/V cable (connector 8). Place the cable along the chassis of the car, nowhere to obstruct to avoid any damage during vehicle operation.
4) Some vehicles continue to supply power to the cigarette lighter, even when the engine is turned off. In this case, before leaving the vehicle, unplug the cable from the cigarette lighter.
5) When using the device for the first time, the battery may be low. If you cannot switch on the device due to low power, manually connect the external power cable to charge the battery.
6) Use only a high-quality micro SDHC card of class 10 or higher. For optimal recording use, we recommend cards with a capacity of at least 8GB up to a maximum of 32GB. If this is the first use of the card, we recommend formatting it first.
Quick functions
1) Switching between front and back camera - tap arrow LEFT
2) Turn off the display – tap the ON/OFF button
3) File lock – when recording video, lock the current recording by tapping the "MODE" button.
4) Delete file – tap the MENU button in „gallery“ mode.
Icons annotation
| [0XXC] | Battery status | Battery is charging |  | |
| [XYH8] | Parking mode Track recording |  | ||
| [0Y64] | Motion detection | [4A43] | Mem card detectedMem card not detected | |
 | Sound On Sound Off |  | ||
Using the LAMAX DRIVE C5 Dual car camera
1) Inserting a micro SDHC card
Insert or remove the micro SDHC card from the card slot only when the camera is turned off and not connected to a computer or power supply.
2) Power
a) Camera can be powered using a USB cable connected to a computer or using the car cigarette lighter.
b) Camera is designed to be powered continuously. Built-in battery can not be removed or replaced.
c) Integrated battery is primarily for use in parking mode.
3) Turning the camera on and off
a) To switch on the camera, press and hold the ON/OFF button for 3-5 seconds.
b) Cameras automatically turns on when connected to a power supply.
c) To switch off the camera, press and hold the ON/OFF button for 3-5 seconds.
d) Camera automatically turns off after disconnecting the power supply.
4) Changing modes and menu navigation
a) Repeatedly tap the "MODE" button to toggle between video/camera/gallery.
b) For enter into the menu and exit from the menu tap the MENU button. For move inside the menu user arrows LEFT/RIGHT. For confirmation of your choice tap OK button.
c) To go back a level use the "MODE" button.
5) Recording / taking photos / gallery
a) To start the camera recording press the "OK" button. Press it again to stop recording. The camera must be in record mode.
b) Automatic recording starts after connecting the camera to a power supply. If the car's power only starts after the ignition is turned on then the camera turns on and starts recording when the car is started.
c) Automatically start/stop recording – the camera automatically stops recording and turns off after the engine is turned off and the power cut. In some cars the cigarette lighter is powered permanently. In this case, be sure to unplug the cable from the cigarette lighter.
d) Take photos by pressing the "OK" button. The camera must be in photo mode.
e) After switching to the gallery, which displays a list of recorded videos and photos, navigate between these using the "LEFT" and "RIGHT" arrows. To start and stop a recording press the "OK" button. To get back to gallery mode tap the MODE button during playback. Locked files are marked as a key symbol.
6) Deleting the entries on the camera
Deleting material directly on the camera – can be done in the gallery. After pressing the "MENU" button confirm your choice by tap of arrows and OK button.
7) Protecting the files on the camera
Locking the current entry – can be done in the gallery after pressing the "MODE" button.
8) Connecting to a PC
Camera can be connected to a PC via the supplied mini USB cable. Once connected some options appear.
a) USB Storage – connect the camera to your computer, using the "LEFT" and "RIGHT" arrows select "USB Storage" and press "OK". Camera now acts like a plug, n' play device.
b) Charging – connect camera to PC and choose „charging“ with arrows LEFT and RIGHT. To confirm tap OK button.
9) Switching the view between front and back camera
When connected correctly, the front camera displays as the main view and back camera as picture-in-picture in top right corner of the display. Both views can be exchanged. It is also possible to display the view only from front or only from rear camera. Switching between views can be done by tap of the LEFT arrow.
LAMAX DRIVE C5 Dual car camera settings
Car camera LAMAX DRIVE C5 Dual has a wide range of settings. To change setting tap MENU button. For menu navigation use LEFT and RIGHT arrows and select by pressing OK. Denial your selection by pressing MODE button.
1) Video Quality
Resolution of video from front camera can be set in Video Quality section (full HD 1080i, HD 720p and VGA.
2) Photo Quality
Resolution of photo from front camera can be set in Photo Quality section (8 MB, 5 MB, 2 MB a 1 MB).
3) Video Time
Camera records are divided into sequences, whose lengths can be manually adjusted or turned off completely. The length of sequences can be 1, 2 nebo 5 minut. Sequences can be turned off. The length depends on technical possibilities of cameras.
4) Move Detect
When motion detection is activated it automatically starts recording the moment movement is detected in the visual field of the lens. The camera stops recording after motion ceases.
5) Park Monitor
Turn on parking mode and the camera starts recording when there is a collision or attempted break-in. Parking mode can be enabled for 24 hours without recharging.
6) Impact Sensitivity
It is associated with other functions of black box. It can be set in several different sensitivities (low, medium, high). Sensitivity affects the functionality of other camera features. For proper functionality of „Parking Mode“ we recommend a higher sensitivity to monitor even minor impacts (during parking, vandalism). For proper functionality of „File Lock“ we recommend a lower sensitivity to prevenet unwanted file lock on rough terrain for example.
7) White Balance
Sets the white balance when taking a photo or capturing a video – automatic, daylight, cloudy, tungsten, fluorescent.
8) Contrast
The contrast of the recording (0 – the lowest contrast, 5 – the highest contrast).
9) Exposure
Lets you adjust the exposure as needed. Video recording or photo exposure can be adjusted from -3 - +3.
10) Power ON Record
When it is ON, camera automatically turns on and starts recording after connect to power.
11) Screen Timeout
Sets the display to automatically turn off after 10 s, 30 s or 1 minute. Screen Timeout can be turned off.
12) Auto Shut Off
Sets the camera to automatically turn off after 1, 2 or 5 minutes. Auto Shut Off can be turned off.
13) Record Voice
Sets the camera to turn on/off the microphone during recording to prevent unwanted voice recording.
14) Date
Sets the date and time on the device.
15) Language
Sets the menu language.
16) Time Watermark
Date and time can be inserted into the recording.
17) Format
Formats the micro SDHC card.
18) Factory Reset
Sets the camera to original factory settings.
19) Firmware Info
Inform about currently installed firmware.
LAMAX DRIVE C5 Dual car camera parameters
| Display 4,3" HD LCD | |
| Angle of view 140° | |
| Video resolution | Front camera 1920x1080 – interpolated, back camera 1280x720 |
| Video format MOV / H.264 | |
| Photo resolution to 8 Mpx | |
| Photo format jpg | |
| Memory Micro SDHC to 32 GB | |
| Storage temperature -30°C — 70°C | |
| Operating temperature 0°C — 50°C | |
| Operating humidity 16 — 65% RH | |
| Operating system compatibility MS Windows, iOS | |
Note: Specifications are subject to change when a device component has been changed or the software updated.
Note that some European Union countries have specific laws governing recording with a car camera. Therefore we recommend that before each trip abroad find out about the local legislation, ideally from local car clubs. The camera may be used as evidence, even when dealing with the police. Again we recommend getting to know the legal rights in each individual country. Please note that recorded material can also be used against the author of the recording. The brand LAMAX Electronics is not responsible for the illegal use of cameras or material recorded by these cameras.
Safety measures
- Do not drop camera or subject it to physical shocks or anything which may lead to mechanical damage.
- Do no place the camera near objects with a strong magnetic field, such as magnets or electric motors. Do not place the camera too close to buildings emitting strong radio waves such as antennas. Strong magnetic fields and radio waves can cause damage to the camera or damage to the captured images and audio recordings.
- Do no expose the camera to high temperatures or direct sunlight.
- Use only micro SDHC cards from reputable brands. Cards from generic manufacturers do not guarantee proper data storage functioning.
- Do no place the micro SDHC card near a magnetic field or a source of static electricity. This will prevent the loss of stored data.
- In the event that the device overheats whilst charging, gives off smoke or a suspicious odour, unplug the device immediately and stop charging.
- Whilst charging, keep the device out of reach of children. Power cable can cause electric shock or asphyxiation to a child.
- Store in a cool, dry and dust-free environment.
Precautions and notices
- For your own safety, do not use the camera's controls while driving.
- A window mount is needed when using the recorder in a car. Make sure that you place the recorder in an appropriate place, so as not to obstruct the driver's view or deployment of airbags.
- Make sure that no object is blocking the camera lens and no reflective material is placed near the lens. Please keep the lens clean.
- If the car's windshield is tinted or coated, it may impact the recording quality.
Safety precautions
- Use only the charger supplied with your device. Use of another type of charger may result in malfunction and/or danger.
- Do not use the charger in high moister environment. Never touch the charger when your hands or feet are wet.
- Allow adequate ventilation around the charger when using it to operate the device or to chargé the battery. Do not cover the charger with paper or other objects that will reduce cooling. Do not use the charger while it is inside a carrying case.
- Connect the charger to a proper power source. The voltage requirements are found on the product case and/or on the packaging.
- Do not use the charger if it is visibly damaged. In case of damage, do not repair the equipment yourself!
– In case of device overheating, immediately disconnect the power source.
– Charge the device under supervision only.
Carying for your device
- Taking good care of your device will ensure trouble-free operation and reduce the risk of damage.
- Keep your device away from excessive moisture and extreme temperatures and avoid exposing your device to direct sunlight or strong ultraviolet light for extended periods of time.
- Do not drop your device or subject it to severe shock.
- Do not subject your device to sudden and severe temperature changes. This could cause moisture condensation inside the unit, which could damage your device. In the event of moisture condensation, allow the device to dry out completely before use.
- The screen surface can easily be scratched. Avoid touching it with sharp objects.
- Never clean your device when it is powered on. Use a soft, lint-free cloth to wipe the screen and the exterior of your device. Do not use paper towels to clean the screen.
- Never attempt to disassemble, repair or make any modifications to your device. Disassembly, modification or any attempt at repair could cause damage to your device and even bodily injury or property damage and will void any warranty.
- Do not store or carry flammable liquids, gases or explosive materials in the same compartment as your device, its parts or accessories.
– To discourage theft, do not leave the device and accessories in plain view in an unattended vehicle. - Overheating may damage the device.
Other information
1) For households: This marking indicates that this product should not be disposed with other household wastes throughout the EU. To prevent possible harm to the environment or human health from uncontrolled waste disposal, recycle it responsibly to promote the sustainable reuse of material resources. To return your used device, please use the return and collection systems or contact the retailer where the product was purchased. They can take this product for environmental safe recycling. In case of incorrect disposal of this kind of wastes user can be fined according to national laws. User information for disposal of electric and electronic devices
in countries outside the EU: The symbol stated above (crossed recycle bin) is valid only in countries in European Union. For correct disposal of electric and electronic devices ask your city hall or distributor of these devices. Everything is expressed by the symbol of crossed recycle bin on product, cover or printed materials.

2) You can determine a warranty service at the place of purchase. In case of technical problems or queries contact your dealer who will inform you about the following procedure. Follow the rules for work with electric devices. User is not allowed to disassembly the device neither replace any of its components. To reduce the risk of electric shock, do not remove or open the cover. In case of incorrect setup and plug in of device you will expose yourself risk of electric shock.
Declaration of Conformity
Hereby, elem6 s.r.o., declares that all LAMAX products are in compliance with the essential requirements and other relevant provisions of Directive 2004/108/EC. Products are intended for sale without any restriction in Germany, Czech Republic, Slovak Republic, Poland, Hungary and other EU countries. Products are covered for two years warranty, unless otherwise stated. You can download the Declaration of Conformity from the website: www.lamax-electronics.com.
CE
Exclusive importer of LAMAX products in EU:
elem6 s.r.o.,
Misprints and changes in the manual are reserved.
LAMAX
ELECTRONICS
BenUTzerHanDBUCH
LAMAX DRIVE C5 Dual

natural_image
LAMAX rear mirror with a remote camera shown on the left, against a rural landscape background (no text or symbols on the main subject)INHALTSVERZEICHNIS
Einleitung ....1
natural_image
Rear view of a blue mirror with a red camera and green landscape background (no text or symbols visible)Verbindungsstecker


Produktinstallation
natural_image
LAMAX rear mirror with a remote camera shown on the left, against a rural landscape background (no text or symbols on the main subject)OBSAH
Úvod ....1
natural_image
Side mirror with a red camera and green road scene, no visible text or symbols on the main components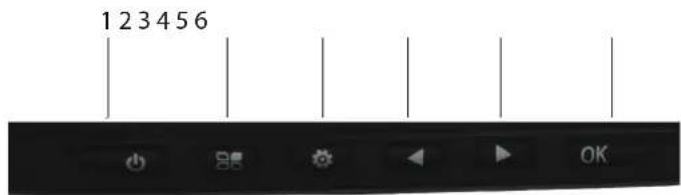

Instalace produktu
natural_image
LAMAX rearview mirror with a remote camera shown on the left side, both displaying a scenic road scene (no text or symbols on the main image)OBSAH
Úvod ....1
Autokamera LAMAX DRIVE C5 Dual má tieto vlastnosti a funkcie ....1
Obsah balenia ....1
Nákres produktu ....1
natural_image
Side mirror with a red camera and green road scene, no visible text or symbols on the main components
Inštalácia produktu
natural_image
LAMAX rear mirror with a remote camera shown on the left, against a rural landscape background (no text or symbols on the main subject)SPIS TREŚCI
Wstep 1
natural_image
Rear view of a blue mirror with a red camera and green road scene, no visible text or symbols on the main subject.
Instalacja produktu
natural_image
LAMAX rearview mirror with a remote camera and a green road scene, no visible text or symbols on the main subject.TARTALOM
Bevezető 1
natural_image
Side mirror with a red camera and green road scene, no visible text or symbols on the main components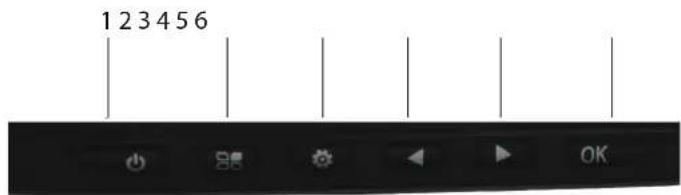

A termék telepítése
natural_image
LAMAX rear mirror with a remote camera and green landscape background (no text or symbols on main subject)TURINYS
lvadas....1
natural_image
Side mirror with a red camera and green road scene, no visible text or symbols on the main components
Produkto instaliacija


- CONTENT
- Introduction
- LAMAX DRIVE C5 Dual car camera features and functions
- Pack contents
- Product picture
- Product installation
- Quick functions
- Icons annotation
- Using the LAMAX DRIVE C5 Dual car camera
- 1) Inserting a micro SDHC card
- 2) Power
- 3) Turning the camera on and off
- 4) Changing modes and menu navigation
- 5) Recording / taking photos / gallery
- 6) Deleting the entries on the camera
- 7) Protecting the files on the camera
- 8) Connecting to a PC
- 9) Switching the view between front and back camera
- LAMAX DRIVE C5 Dual car camera settings
- 1) Video Quality
- 2) Photo Quality
- 3) Video Time
- 4) Move Detect
- 5) Park Monitor
- 6) Impact Sensitivity
- 7) White Balance
- 8) Contrast
- 9) Exposure
- 10) Power ON Record
- 11) Screen Timeout
- 12) Auto Shut Off
- 13) Record Voice
- 14) Date
- 15) Language
- 16) Time Watermark
- 17) Format
- 18) Factory Reset
- 19) Firmware Info
- Safety measures
- Precautions and notices
- Safety precautions
- Carying for your device
- Other information
- Declaration of Conformity
- Exclusive importer of LAMAX products in EU:
- LAMAX
- ELECTRONICS
- LAMAX DRIVE C5 Dual
- INHALTSVERZEICHNIS
- Produktinstallation
- OBSAH
- Instalace produktu
- Inštalácia produktu
- SPIS TREŚCI
- Instalacja produktu
- TARTALOM
- A termék telepítése
- TURINYS
- Produkto instaliacija
Brand : Lamax
Model : Drive C5
Category : Dash Cam