23Z010 - Air-conditioner Zelmer - Free user manual and instructions
Find the device manual for free 23Z010 Zelmer in PDF.

| Product Type | Portable Air Conditioner |
| Brand | Zelmer |
| Model | 23Z010 |
| Functions | Cooling, Dehumidifying, Fan |
| Temperature Setting Range | 17°C to 30°C (62°F to 88°F) |
| Timer | 0.5 to 24 hours for auto on/off |
| Air Filter | Washable, clean every two weeks |
| Water Container | Removable, with full indicator (P1) |
| Continuous Drainage | Yes, via hose |
| Window Slider Kit Range | 67.5 cm to 123 cm |
| Duct | Adjustable, recommended minimal and horizontal |
| Power Supply | AC 220-240V, 50Hz |
| Safety Features | Grounded plug, overheat protection, compressor delay |
Frequently Asked Questions - 23Z010 Zelmer
User questions about 23Z010 Zelmer
0 question about this device. Answer the ones you know or ask your own.
Ask a new question about this device
Download the instructions for your Air-conditioner in PDF format for free! Find your manual 23Z010 - Zelmer and take your electronic device back in hand. On this page are published all the documents necessary for the use of your device. 23Z010 by Zelmer.
USER MANUAL 23Z010 Zelmer
natural_image
White electric air conditioner unit with black ventilation slots and 'zelmer' branding (no additional text or symbols visible)PL
2-7
Instructions for use Portable air conditioner Type 23Z010
Spis treści
Uwagi wstępne 2
natural_image
Technical diagram of a mechanical device with internal components and a directional arrow (no text or symbols)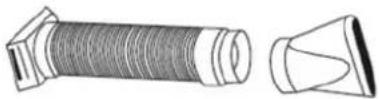
natural_image
Diagram showing a device with a switch crossed out by a diagonal line, next to a pipe or duct (no text or symbols present)natural_image
Simple line drawing of a device with two downward arrows and a left-pointing arrow inside, no text or symbols present.natural_image
Line drawing of a portable air conditioner unit with control panel and ventilation slots (no text or symbols)Okno pionowe
natural_image
Pure diagram of a door with directional arrows and a handle, no text or symbols presentZestaw do uszczelniania okna: Min: 67,5cm Max: 123cm
natural_image
Line drawing of an air conditioner unit with control panel and door, no text or symbols presentFUNKCJE KLIMATYZATORA
natural_image
Illustration of a portable air purifier with a digital display and a separate box, showing no text or symbols.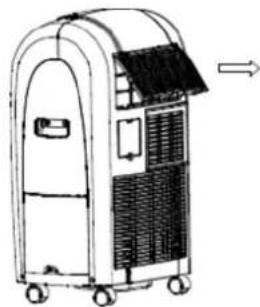
natural_image
Line drawing of a portable air conditioner unit with wheels and ventilation slots (no text or symbols)natural_image
Illustration of a portable electronic device with wheels and a mounted panel (no text or symbols visible)WYKRYWANIE I USUWANIE USTEREK
natural_image
Technical line drawing of a mechanical device with internal components and a separate exploded view of a threaded component (no text or symbols)natural_image
Diagram showing a device with a switch crossed out by a diagonal line, next to a curved pipe or duct (no text or symbols present)natural_image
Simple line drawing of a device with two downward arrows and an internal arrow (no text or symbols)natural_image
Line drawing of a portable air conditioner unit with control panel and ventilation slots (no text or symbols)natural_image
Pure diagram of a door with directional arrows indicating movement, no text or symbols presentnatural_image
Line drawing of an air conditioner unit with a door and ventilation system (no text or symbols)natural_image
Line drawing of a portable air conditioner unit with a side panel and a separate box, showing no text or symbols.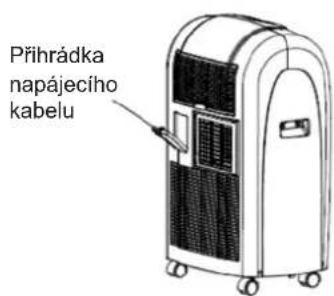
PRAVIDELNÉ PROHLÍDKY PŘÍSTROJE
natural_image
Technical illustration of a portable air conditioner unit with internal tubing and a separate side view showing its cable (no text or symbols present)natural_image
Diagram showing a device with a switch crossed out by a diagonal line, no text or symbols present.Sada pre instaláciu do okien
natural_image
Simple line drawing of a device with two downward arrows and a left-pointing arrow inside, no text or symbols present.Sada na utesnenie okna:
Min: 67.5 cm
Max: 123 cm
natural_image
Line drawing of a portable air conditioner unit with control panel and ventilation duct (no text or symbols)Zvislé okno

natural_image
Pure diagram of a door with directional arrows indicating movement, no text or symbols presentSada na utesnenie okna:
Min: 67.5cm
Max: 123cm

natural_image
Line drawing of an indoor air conditioner unit with a door and ventilation system (no text or symbols)natural_image
Line drawing of a portable air conditioner unit with a side panel and a separate box, showing no text or symbols.natural_image
Illustration of a portable air conditioner unit with no visible text or symbols
natural_image
Technical diagram of a portable air conditioner unit with internal tubing and ventilation slots, plus a separate illustration of its cable (no text or labels)natural_image
Diagram showing a device crossed out by a diagonal line, with no text or symbols present.natural_image
Simple line drawing of a container with two downward arrows and an internal arrow (no text or symbols)natural_image
Line drawing of a portable air conditioner unit with control panel and ventilation slots (no text or symbols)Függöleges ablak
natural_image
Pure diagram of a door with directional arrows and a vertical measurement on the right side (no text or symbols)natural_image
Line drawing of an air conditioner unit with cooling fan and ventilation slots (no text or symbols)natural_image
Line drawing of a portable air purifier with a digital display and a separate box, showing no text or symbols.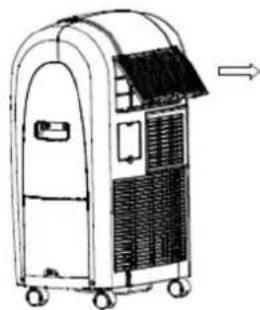
natural_image
Line drawing of a portable air conditioner unit with wheels and ventilation slots (no text or symbols)natural_image
Line drawing of a portable air purifier with control panel and wheels (no text or symbols)natural_image
Simple line drawing of a storage unit with two downward arrows and a side panel (no text or symbols)natural_image
Line drawing of an air conditioner unit with control panel and cooling unit (no text or symbols)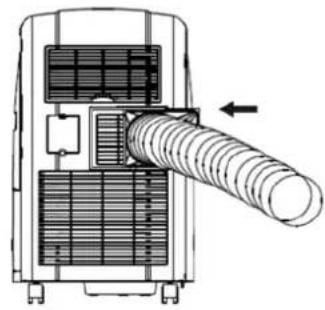
natural_image
Technical diagram of a mechanical device with internal components and a directional arrow indicating motion (no text or symbols present)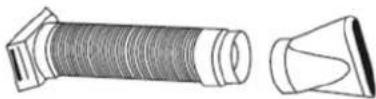
natural_image
Diagram showing a device with a crossed-out pipe and a cross symbol, no text or labels present
natural_image
Pure diagram of a door with directional arrows and a vertical measurement scale (no text or symbols)natural_image
Line drawing of an air conditioner unit with control panel and ventilation slots (no text or symbols)natural_image
Line drawing of a portable air conditioner unit with a side panel and a separate box, showing no text or symbols.natural_image
Diagram showing two types of household appliances: a water dispenser with a cross symbol and a portable kitchen unit with airflow direction arrow (no text or labels)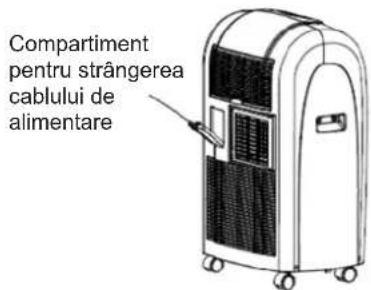
natural_image
Technical line drawing of a portable air conditioner unit with internal tubing and a separate exploded view of its cable (no text or symbols)natural_image
Pure diagram of a device with a diagonal line crossing through it, no text or symbols presentnatural_image
Simple line drawing of a device with two downward arrows and a left-side arrow, no text or symbols present.natural_image
Line drawing of a portable air conditioner unit with control panel and ventilation duct (no text or symbols)Вертикальное окно
natural_image
Pure diagram of a door with directional arrows and a handle, no text or symbols presentnatural_image
Line drawing of an air conditioner unit with a door and ventilation system (no text or symbols)natural_image
Line drawing of a portable air purifier with a digital display and a separate box, showing no text or symbols.natural_image
Simple line drawing of a gas stove with a faucet and no text or symbols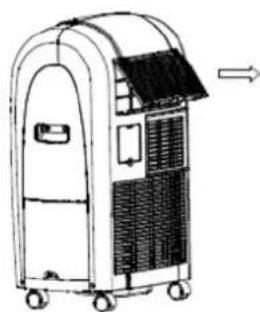
natural_image
Line drawing of a portable air conditioner unit with wheels and ventilation slots (no text or symbols)natural_image
Line drawing of a portable electronic device with wheels and a curved top (no text or symbols)natural_image
Technical diagram of a portable air conditioner unit with internal tubing and a separate connector (no text or symbols)natural_image
Diagram showing a device with a cross-shaped line crossing over a curved pipe or duct (no text or symbols present)natural_image
Simple line drawing of a storage unit with two downward arrows and a double-headed arrow inside (no text or symbols)natural_image
Line drawing of a portable air conditioner unit with control panel and ventilation slots (no text or symbols)Вертикален прозорец

natural_image
Pure diagram of a door with directional arrows and a handle, no text or symbols presentnatural_image
Line drawing of an air conditioner unit with cooling fan and control panel (no text or symbols)natural_image
Line drawing of a portable air purifier with a digital display and a separate box, showing no text or symbols.natural_image
Simple line drawing of a water dispenser with a faucet and no text or symbols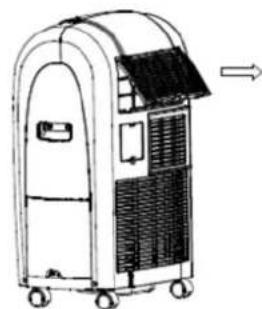
natural_image
Line drawing of a portable air purifier with a curved roof and wheels, showing airflow direction (no text or symbols)natural_image
Illustration of a portable electronic device with wheels and internal compartments (no text or symbols)ПРЕДИ ПРИКЛЮЧВАНЕ НА СЕЗОНА
natural_image
Technical diagram of a portable air conditioner unit with internal tubing and a separate side view showing its flexible hose (no text or labels)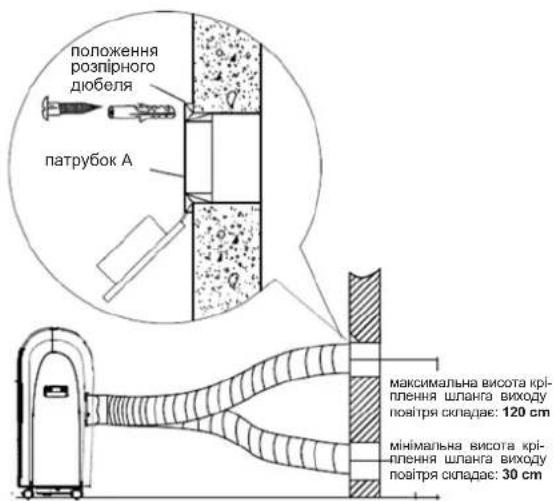
natural_image
Diagram showing a device with a crossed-out line and a curved pipe or duct, no text or symbols present.natural_image
Simple line drawing of a device with two downward arrows and an arrow pointing left (no text or symbols)natural_image
Line drawing of a portable air conditioner unit with control panel and ventilation slots (no text or symbols)Вертикальне вікно
natural_image
Pure diagram of a door with directional arrows indicating movement, no text or symbols presentnatural_image
Line drawing of a portable air conditioner unit with control panel and ventilation slots (no text or symbols)natural_image
Line drawing of a portable air purifier with a digital display and a separate box, showing no text or symbols.natural_image
Simple line drawing of a suitcase with a faucet and no text or symbols
natural_image
Line drawing of a portable industrial machine with wheels and ventilation slots (no text or symbols)
Safety instructions .... 50
Technical parameters 50
Appliance features....51
Names of parts 51
Control panel 51
Installation 52
Air conditioner functions 53
Automatic switch on/ switch off....53
Water drainage methods 53
Water container protection 54
Cleaning and maintenance....54
Before the start of the season 54
Before the end of the season....54
Troubleshooting....55
Periodic inspection of the appliance 55
Ecology – environmental protection .... 55
Dear Customers
Please read this instruction manual carefully. Pay special attention to important safety instructions in order to prevent accidents and/or avoid damage to the appliance. Keep this instruction manual for future reference.
INTRODUCTION
- A portable air conditioner is an expensive appliance, therefore it is recommended that the appliance is installed by an experienced installer. Otherwise not only material damage may occur, but the air conditioner may also function improperly and its efficiency may be decreased.
– Zelmer S.A. shall not be held liable for failures of air conditioners that have not been properly installed.
SAFETY INSTRUCTIONS
- Please read the whole instruction manual before operating the air conditioner.
Plug the air conditioner only to a grounded AC electrical outlet with a voltage in accordance with the voltage provided on the rating label.
Always place the appliance on a flat, even surface.
– Unplug the air conditioner when not in use and before cleaning. - Do not unplug by pulling on cord.
– Never operate the air conditioner if it has a damaged cord or if the housing of the heating assembly is visibly damaged.
If the supply cord is damaged, it must be replaced by a qualified service agent in order to avoid a hazard.
The appliance can only be repaired by qualified service personnel. Improper servicing may cause a serious hazard to the user. In case of defects please contact an authorized service center.
Do not use the appliance in the following locations: -
- next to a source of water or in an area where the appliance may have direct contact with water,
- in an area where oil is likely to splash,
• in an area exposed to direct sunlight,
• in the greenhouse.
– Never insert your fingers or any foreign objects into the air outlet. Take special care to warn children of these dangers.
- Always store the unit upright in order to maintain the compressor in a proper condition.
– There is a risk of overheat if the appliance is covered. Never block the ventilation openings during operation.
- Do not use abrasive detergents such as emulsions, cream cleaners, polishes, etc. to clean the housing. They may remove the graphic information symbols such as: scales, marks, warning signs etc.
- This appliance is not intended for use by persons (including children) with reduced physical, sensory or mental capabilities, or lack of experience and knowledge, unless they have been given supervision or instruction concerning use of the appliance by a person responsible for their safety.
– Children should be supervised to ensure that they do not play with the appliance.
Make sure the above instructions have been understood.
TECHNICAL PARAMETERS
The technical parameters are indicated on the rating label.
The air conditioner is a class I appliance equipped with a cord with a grounding wire and a grounding plug.
The air conditioner fulfills the requirements of the existing norms.
The appliance is in conformity with the requirements of the directives:
- Low voltage appliance (LVD) – 2006/95/EC.
- Electromagnetic compatibility (EMC) - 2004/108/EC.
The appliance was marked by the CE sign on the rating label.
APPLIANCE FEATURES
The portable air conditioner enables to maintain the desired temperature and to lower the air humidity. Thanks to its flexible features it can be used on various occasions and in various rooms. Its multiple functions include to cooling, dehumidifying and fanning ventilation. This model has been specially designed for household or office use.
NAMES OF PARTS

A. Control panel with display.
B. Horizontal swinging fins.
C. Carrying handle
D. Water container
E. Caster
F. Air inlet grill with filter.
G. Power cord compartment (pull the projection to open the cover; the power cord and the plug are behind the cover.
H. Air outlet.
I. Air inlet

ACCESSORIES
| Part Part's name Quantity | ||
 | Duct. | 1 |
 | Adaptor A (for permanent duct mounting). | 1 |
| [35DS] | Adaptor B (for temporary duct mounting). | 1 |
 | Expansion plug. | 4 |
 | Window slider kit. | 1 |
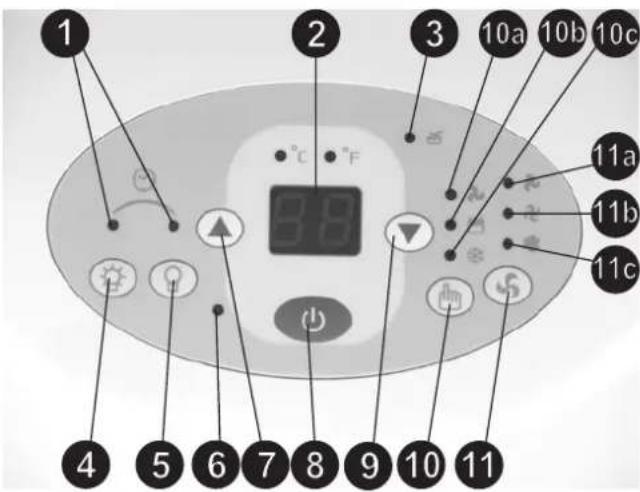
CONTROL PANEL
-
Timer on/off indicator
-
Digital display
-
Water full indicator and displaced water container indicator.
-
TIMER ON button – used to initiate the AUTO ON start time and to adjust the auto timer settings.
-
TIMER OFF button – used to initiate the AUTO OFF stop time and to adjust the auto timer settings.
-
Power indicator
-
Temperature adjustment button (temperature increase by 1°C/2°F).
-
On/Off button
-
Temperature adjustment button (temperature decrease by 1°C/2°F).
-
Mode selection button: 10a – ventilation, 10b – dehumidifying operation, 10c – cooling operation.
-
Fan speed button: 11a – low, 11b –med, 11c – high. Fan options: cooling (3 speeds), dehumidifying operation (1 speed), ventilation (3 speeds).
Note: This appliance allows to set the temperature in “Celsius” or “Farenheit”. To change the temperature display simultaneously press the buttons (7) and (9) to alternate between the °C and °F scale. The Celsius scale allows adjustments of 1°C increments; the Fahrenheit scale allows adjustments of 2°F increments.
| Temperature conversion chart | |||||||||||||||||||||||||
| °C | 10 | 11 | 12 | 13 | 14 | 15 | 16 | 17 | 18 | 19 | 20 | 21 | 22 | 23 | 24 | 25 | 26 | 27 | 28 | 29 | 30 | 31 | 32 | 33 | |
| °F | 45 | 50 | 52 | 54 | 56 | 58 | 60 | 62 | 64 | 66 | 68 | 70 | 72 | 74 | 76 | 78 | 80 | 82 | 84 | 86 | 88 | 90 | 92 | 94 | |
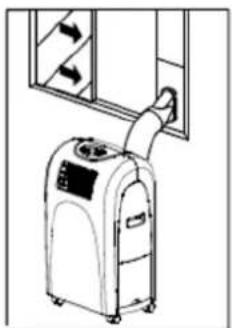
INSTALLATION
The selection of the location
Install the air conditioner on a plat surface where the air openings will not be covered. The appliance should be installed is a spacious room. A minimum clearance of 30 cm from a wall or other obstacles should be kept.
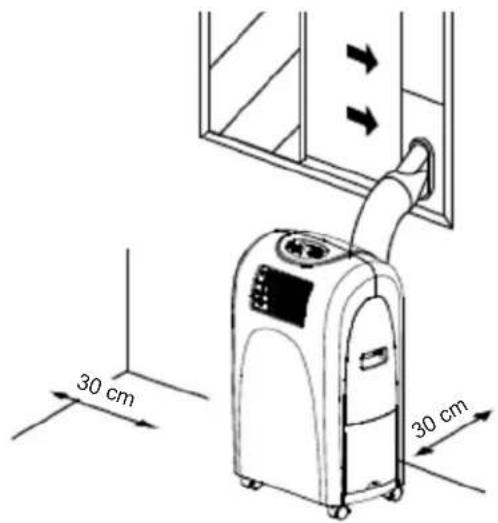
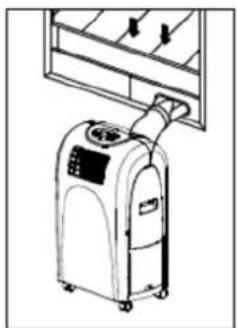
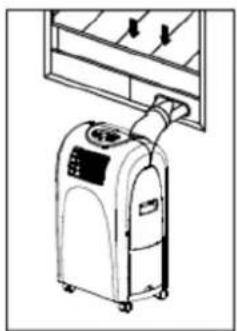
Duct installation
A) Temporary
- Attach one end of the duct to the air exhaust outlet (H) and fix it in the direction of the arrow as shown in the picture. Be sure to fix thoroughly.
- Attach the other end of the duct to adaptor B (as show in the picture).
- Put the end of the duct /outlet/ to nearby window.
The length of the duct can be altered by extending or compressing it. It is recommended to keep the duct length to a minimum. Keep the duct in a horizontal position during installation, do not extend the duct or attach other air outlets. Failure risk.
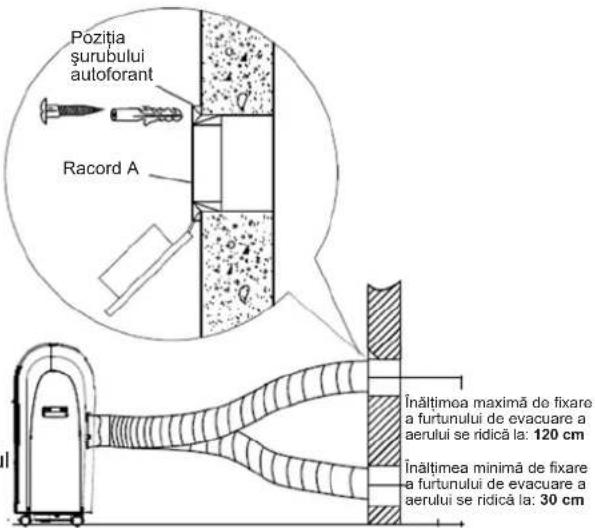
B) Permanent
- Attach one end of the duct to the air exhaust outlet (H) and fix it in the direction of the arrow as shown in the picture. Be sure to fix thoroughly.
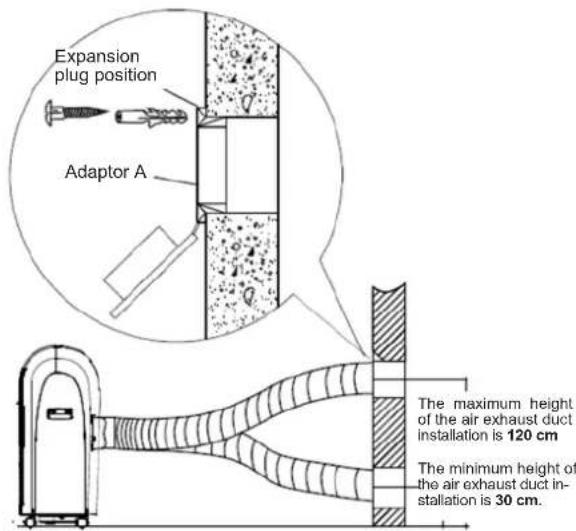
- Install the adaptor A onto the wall using 4 expansion plugs and screws. Be sure to fix thoroughly. (See picture).
- Attach the other end of the duct to adaptor A.
- Cover the hole using the adaptor cap when not in use.
Properly installed ducts are shown in the picture (if you install the ducts onto a wall, the height of the installation should be between 30 and 120 cm).
NOTE: Do not over bend the duct.
An example of an improperly installed duct. This may cause failure of the air conditioner or its improper functioning.
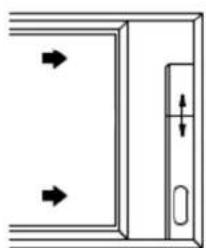
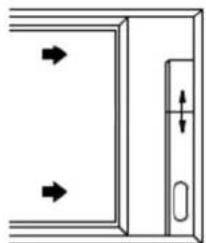
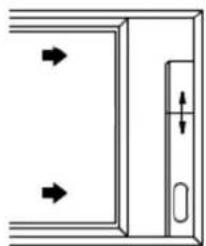
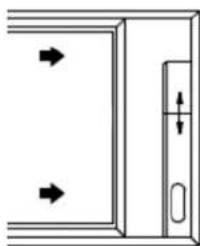
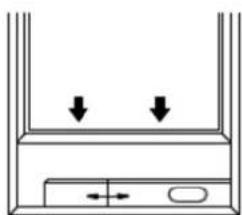
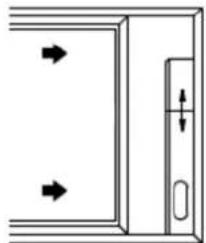
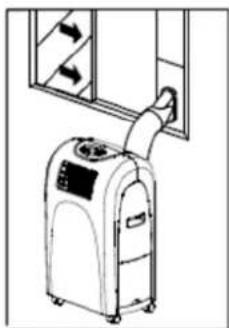
Window installation kit
The air conditioner set is equipped with a window slider designed to fit "vertical" or "horizontal" window applications. It facilitates the installation of the air outlet duct. However, it may be necessary to modify some aspects of the installation procedure for certain types of windows. Please follow the instructions in the pictures below concerning the minimum and maximum window openings.
Horizontal window
natural_image
Simple line drawing of a container with two downward arrows and an arrow inside, no text or symbols present.Window slider kit:
Min: 67.5 cm
Max: 123 cm
natural_image
Line drawing of a portable air conditioner unit with control panel and ventilation slots (no text or symbols)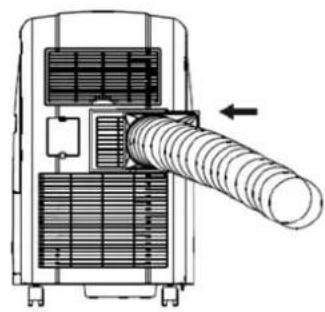
natural_image
Technical diagram of a mechanical device with internal components and a directional arrow (no text or symbols)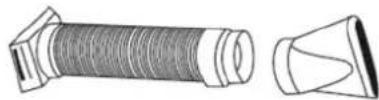

natural_image
Diagram showing a device with a crossed-out line and a curved pipe or duct, no text or symbols present.Vertical window
natural_image
Pure diagram of a door with arrows indicating direction, no text or symbols presentWindow slider kit:
Min: 67.5cm
Max: 123cm
natural_image
Line drawing of an air conditioner unit with control panel and door (no text or symbols)NOTE: If the window opening is less than the above-mentioned minimum length of the window slider kit, cut the part with the hole in it to fit for the window opening. Never cut out new holes in the window slider kit.
AIR CONDITIONER FUNCTIONS
The air conditioner has three functions: cool, dry, and fan ventilation.
Introduction
- Make sure the water container (D) is properly installed. Otherwise the appliance will not operate.
- Plug the appliance only to a grounded AC socket connected to a protection circuit.
- Do not connect the appliance to a multiple socket outlet which is also being used for other electrical appliances.
- Insert the plug into a power source and Press the ON/OFF (8) button on the control panel for the appliance to start operating.
Cooling operation
- Press the MODE button (10) several times until the "COOL" indicator light comes on: cooling operation (10c).
- Press the "TEMP SETTING" buttons (7) and (9) to select the desired room temperature. The temperature can be set within a range of 17^ - 30^ / 62^ - 88^ .
- Press the "FAN SPEED" button (11) to select the fan speed: low (11a), med (11b) or high (11c).
NOTE: In order to improve the cooling efficiency follow the instructions below:
- Draw the curtains if the room is directly exposed to the sun.
- Do not place the air conditioner near other heat sources.
Dehumidifying operation
- Press the MODE button (10) several times until the "DRY" indicator light comes on: dehumidifying operation (10b).
– During the dehumidifying mode the fan speed and the temperature cannot be adjusted. The fan motor operates at high speed. - Keep windows and doors closed for best dehumidifying effect.
- Do not put the duct to the window.
CAUTION: If the compressor cycle is interrupted during the cooling or dehumidifying mode (appliance unplugged, power failure) and reinstated immediately thereafter, a compressor protection circuit is automatically self-affected. The compressor cannot operate during a compressor protection condition. It may take about 3 minutes before the protection circuit deactivates (this is a normal situation).
Ventilation
- Press the MODE button (10) several times until the "FAN" indicator light comes on: ventilation (10a).
- Press the "FAN SPEED" button (11) to select the fan speed: low (11a), med (11b) or high (11c).
- The temperature cannot be adjusted.
- Do not put the duct to the window.
AUTOMATIC SWITCH ON / SWITCH OFF
Timer operation (setting the on timer)
- Press the TIMER ON (4) button when the appliance is plugged in to a power source.
- Press and hold or keep pressing the TIMER ON (4) button to set the time after which the appliance will automatically switch on. The time is programmed as: 0,5 - 1,0 - 1,5 - 2,0 - 2,5 - 3,0 - 3,5 - 4,0 - 4,5 - 5,0 - 5,5 - 6,0 - 6,5 - 7,0 - 7,5 - 8,0 - 8,5 - 9,0 - 9,5 - 10 - 11 - 12 - 13 - 14 - 15 - 16 - 17 - 18 - 19 - 20 - 21 - 22 - 23 - 24 - 0,0 hours
- The starting time is adjustable from 0,0 - 24.
Timer operation (setting the off timer)
- Press the TIMER OFF (4) button when the appliance is operating.
- Press and hold or keep pressing the TIMER OFF (5) button to set the time after which the appliance will automatically switch off. The time is programmed as: 0,5 - 1,0 - 1,5 - 2,0 - 2,5 - 3,0 - 3,5 - 4,0 - 4,5 - 5,0 - 5,5 - 6,0 - 6,5 - 7,0 - 7,5 - 8,0 - 8,5 - 9,0 - 9,5 - 10 - 11 12 - 13 - 14 - 15 - 16 - 17 - 18 - 19 - 20 - 21 - 22 - 23 - 24 - 0,0 hours
- The switching off time is adjustable from 0,0 - 24.
WATER DRAINAGE METHODS
There are two possible methods of water drainage available for this appliance – water container drainage or continuous drainage.
Water container drainage
A) During cooling mode
- When the water level inside the water container (D) reaches a predetermined level, the appliance will switch off automatically. The motor fan will continue to operate.
- Carefully remove the water container (D) and dispose of the water. Replace the water container back to its original position.
B) During the dehumidifying mode
Water will accumulate in the water container (D). When the water container is full, the Water Full indicator (3) will illuminate and the dehumidification process will automatically stop. However, the fan motor will continue to operate (this is a normal situation). Carefully remove the water container and dispose of the water. Replace the water container back to its original position. The dehumidification process will automatically resume. It may take 3–5 minutes for the compressor to restart. This is a normal situation.
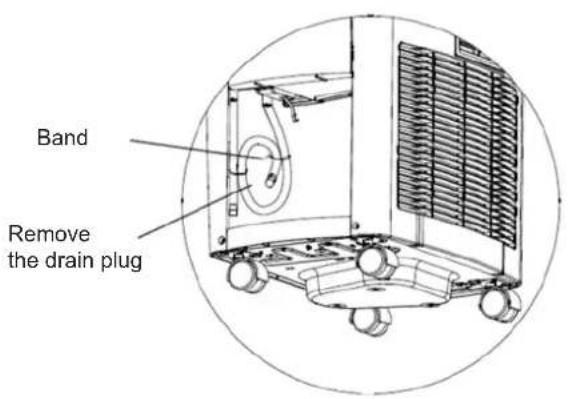
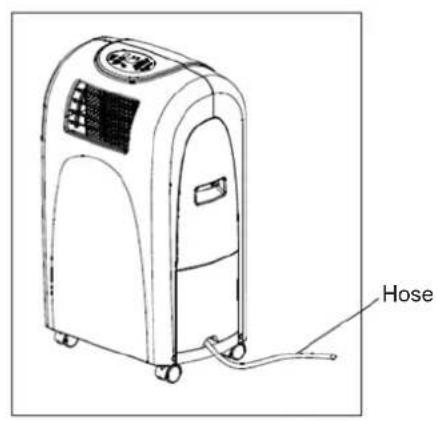
Continuous drainage
- The continuous drainage option can be selected during the cooling and dehumidifying mode. Remove the water container (D).
- Inside, beside the water container you will find a section of the hose that is plugged at the end. Release the band and remove the plug form the end of the hose.
– Replace the water container (D) back to its original position and route the hose through the hole on the bottom of the water container. - Place the other end of the hose directly over the drain area.
CAUTION: Make sure the drain hose routed through the water container does not interfere with the correct positioning of the water container. Otherwise the fail-safe switch mechanism will be activated, not allowing the appliance to operate.
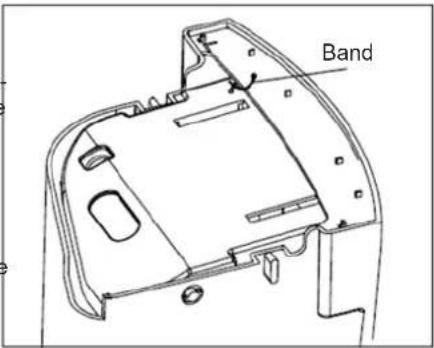
WATER CONTAINER PROTECTION
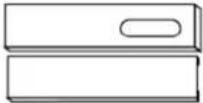
This appliance is equipped with an internal water container (D) which is fastened with a band to protect the water lever switch during transportation. Before the initial use, remove the water container from the appliance and remove the band (see picture below). Gently replace the water container back to its original position. Do not press the water container, it may cause the failure of the appliance.
When the water in the water container reaches a predetermined level, the display will show "P1: and the water full indicator will start to flash (red). Gently remove the water container and dispose of the water (see picture below). Replace the water container back to its original position. The red light will stop flashing and the "P1" symbol will disappear. The appliance will continue to operate properly.

natural_image
Line drawing of a portable air purifier with a digital display and a separate box, showing no text or symbols.Note: Remove the water container slowly to prevent water from splashing. The water full indicator will begin to flash and the display will show the symbol "P1" when the water container is removed / displaced or when the predetermined water level is reached.
CLEANING AND MAINTENANCE
- Unplug the appliance before cleaning.
- Do not use abrasive detergents such as emulsions, cream cleaners, polishes, etc. to clean the housing. They may remove the graphic information symbols.
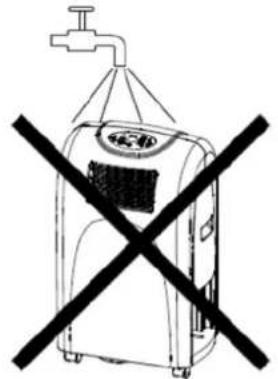
- Wipe the housing with a damp cloth. Do not wash the appliance directly under a tap or using a water hose. Electric shock risk.
- If the air filter is blocked with a large amount of dust, the air flow volume will be reduced. Clean the air filter every two weeks.
Opening and cleaning the air filter
- Remove the filter cover and take out the air filter.
- Wash the air filter by immersing it gently in warm water (about 40^ C) with a neutral detergent. Rinse the filter and dry in a shady place.
- Attach the filter to the filter cover using the attachment hooks on the inner surface of the cover.
- Put the filer cover back to the appliance.
Power cord and plug
Pull the projection to open the power cord compartment.
Keep the power cord and plug clean. Roll up the power cord and store it in the power compartment if the appliance is not used for a long time.
BEFORE THE START OF THE SEASON
- Check if the air inlets and outlets are not blocked.
- Make sure the air filter is properly installed before operating the air conditioner. If the air filter removed, dust and foreign objects may result in faulty performance of the appliance.
BEFORE THE END OF THE SEASON
- Switch off and unplug the air conditioner.
- Clean the air filter and other parts.
- Remove the water container. Beside the continuous drain hose you will find a section of hose that is plugged at the end. Remove the plug from the hose. Water from the bottom tray will be removed through the drain hose.
- Cover the appliance to protect it from dust and dirt.
natural_image
Simple line drawing of a washing machine with a faucet above it and a crossed-out black X (no text or symbols)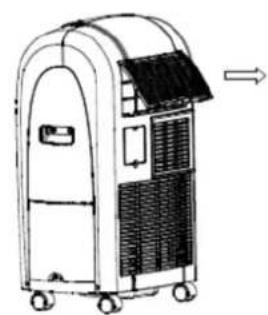
natural_image
Line drawing of a portable air conditioner unit with wheels and ventilation slots (no text or symbols)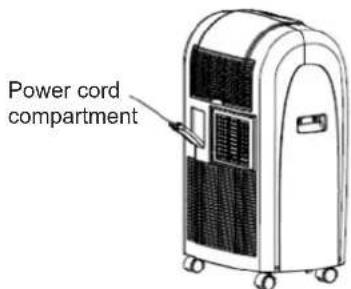
TROUBLESHOOTING
Please check the table below before contacting the service center.
| Problem Possible causes Solution | ||
| The appliance doses not operate after pressing the on/off button (8). | The water full indicator (3) flashes, the water container is full. | Empty the water container. |
| Room temperature is higher than the set temperature (cooling mode). | Reset the temperature. | |
| Not cool enough | The windows or doors in the room are not closed. | Make sure all windows and doors are closed. |
| There are heat sources inside the room. Remove the heat sources if possible. | ||
| Exhaust air duct not connected or blocked. | Connect the duct and make sure it functions properly. | |
| The set temperature is too high. Decrease the set temperature. | ||
| Air filter is blocked by dust. Clean the filter. | ||
| Gurgling sound | The sound comes from the flowing of the refrigerant inside the air conditioner. | This is a normal situation. |
| The compressor does not work and the display shows „P2” | The water container (D) is full. | Remove the bottom drain plug and empty the container. |
ATTENTION: If the air conditioner still does not work, immediately unplug the appliance and contact an authorized Arconet service center.
PERIODIC INSPECTION OF THE APPLIANCE
- Systematically perform obligatory inspections of the appliance every 10–14 months.
- Report the appliance for inspection in the authorized service center.
- The cost of the inspection is covered by the owner of the appliance.
ECOLOGY – ENVIRONMENTAL PROTECTION
Each user can protect the natural environment. It is neither difficult nor expensive.
In order to do it: put the cardboard packing into recycling paper container; put the polyethylene (PE) bags into container for plastic.
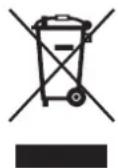
When worn out, dispose the appliance to particular disposal centre, because of the dangerous elements of this appliance, which can be hazardous for natural environment.
Do not dispose into the domestic waste disposal!!!
The terms and conditions of the warranty are pursuant to the regulations in force in the country the product is sold.
- PL
- Spis treści
- FUNKCJE KLIMATYZATORA
- WYKRYWANIE I USUWANIE USTEREK
- PRAVIDELNÉ PROHLÍDKY PŘÍSTROJE
- Sada pre instaláciu do okien
- ПРЕДИ ПРИКЛЮЧВАНЕ НА СЕЗОНА
- Dear Customers
- INTRODUCTION
- SAFETY INSTRUCTIONS
- TECHNICAL PARAMETERS
- APPLIANCE FEATURES
- NAMES OF PARTS
- ACCESSORIES
- CONTROL PANEL
- INSTALLATION
- The selection of the location
- Duct installation
- A) Temporary
- B) Permanent
- NOTE: Do not over bend the duct.
- Window installation kit
- AIR CONDITIONER FUNCTIONS
- Cooling operation
- Dehumidifying operation
- Ventilation
- AUTOMATIC SWITCH ON / SWITCH OFF
- Timer operation (setting the on timer)
- Timer operation (setting the off timer)
- WATER DRAINAGE METHODS
- Water container drainage
- A) During cooling mode
- B) During the dehumidifying mode
- Continuous drainage
- WATER CONTAINER PROTECTION
- CLEANING AND MAINTENANCE
- Opening and cleaning the air filter
- Power cord and plug
- BEFORE THE START OF THE SEASON
- BEFORE THE END OF THE SEASON
- TROUBLESHOOTING
- PERIODIC INSPECTION OF THE APPLIANCE
- ECOLOGY – ENVIRONMENTAL PROTECTION
Brand : Zelmer
Model : 23Z010
Category : Air-conditioner