
ECG6600 - Coffee maker ELECTROLUX - Free user manual and instructions
Find the device manual for free ECG6600 ELECTROLUX in PDF.


| Product Type | Coffee Maker |
| Brand | Electrolux |
| Model | ECG6600 |
| Color | Black / Stainless Steel |
| Dimensions (H x W x D) | 35 x 25 x 20 cm |
| Weight | 2.3 kg |
| Power Supply | 220-240 V, 50-60 Hz |
| Power Consumption | 1000 W |
| Capacity | 10 cups (1.5 L) |
| Water Tank | Removable, visible water level indicator |
| Filter Type | Permanent filter or paper filter (size 4) |
| Functions | Auto shut-off, keep warm function, programmable timer |
| Control Type | Button panel with LED display |
| Material | Plastic housing, glass carafe |
| Cleaning | Descaling recommended every 3 months |
| Safety Features | Auto shut-off after 2 hours, boil-dry protection |
| Accessories Included | Measuring scoop, permanent filter |
| Warranty | 2 years |
Frequently Asked Questions - ECG6600 ELECTROLUX
User questions about ECG6600 ELECTROLUX
0 question about this device. Answer the ones you know or ask your own.
Ask a new question about this device
Download the instructions for your Coffee maker in PDF format for free! Find your manual ECG6600 - ELECTROLUX and take your electronic device back in hand. On this page are published all the documents necessary for the use of your device. ECG6600 by ELECTROLUX.
USER MANUAL ECG6600 ELECTROLUX
natural_image
Line drawing of a modern kitchen setup with a blender and water dispenser (no text or symbols)PAGE
⑤ Bruksanvisning ..... 9
DK Brugsanvisning 35
N Bruksanvisning ..... 61
FIN Käyttöohje 87
GB Instruction book ..... 113
D Gebrauchsanweisung .... 139
© CZ Návod k použití ..... 167
PL Instrukcja obsługi ..... 193
H Használati útmutató .....221
SK Návod na obsluhu ..... 249
SLO Navodilo za uporabo ..... 279
HR Priručnik....309
SRB Priročnik za navodila .....339
RO Instructiuni de utilizare ....369
LV Rokasgrāmata .....397
LT Instrukcija .....429
EST Kasutusjuhend .....459
TR Kullanma kılavuzu .....489
BG Упътване за работа.....519
RUS Инструкция по эксплуатации .553
UA Інструкція з експлуатації...583




2
3

4


natural_image
Pure geometric diagram with intersecting lines and circles, no text or symbols present

4


6
natural_image
Diagram of a mechanical device with arrows indicating motion or force direction (no text or symbols)
natural_image
Line drawing of a hand opening a printer into a slot with an arrow indicating the print direction (no text or symbols present)8

natural_image
Diagram of a refrigerator with a downward arrow indicating a drop or change, no text or symbols present.
natural_image
Line drawing of a hand using a mechanical device to press or install a component (no text or symbols visible)-

natural_image
Line drawing of a hand operating a computer with an arrow indicating the process (no text or symbols present)5



1


natural_image
Simple diagram of a clock with bidirectional arrows indicating clockwise motion (no text or symbols)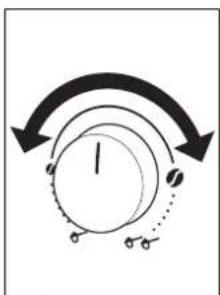
natural_image
Diagram showing a clock with arrows indicating clockwise rotation around it, no text or symbols present.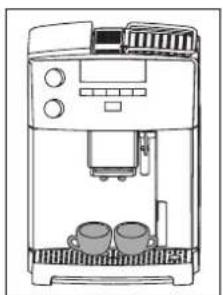
natural_image
Line drawing of a coffee machine with two cups on the side (no text or symbols)
natural_image
Line drawing of a hand inserting a device into a rack (no text or symbols)13 14 15 16

natural_image
Technical diagram of a mechanical component with a circular housing and a base mount (no text or symbols)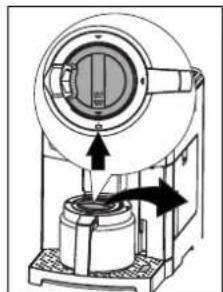
natural_image
Technical diagram of a mechanical device with arrows indicating motion or force direction (no text or symbols present)
natural_image
Mechanical component diagram showing a circular housing with internal components and a base mount (no text or symbols)17 18 19 20
natural_image
Diagram showing curved arrows and a circular path with marked points (no text or symbols)
natural_image
Line drawing of a hand using a handheld device to clean or install a machine (no text or symbols visible)
natural_image
Line drawing of a hand using a portable kitchen grater with control panel and door (no text or symbols)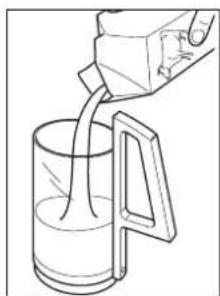
natural_image
Line drawing of a milk being poured into a glass (no text or symbols)21 22 23 24
natural_image
Line drawing of a hand using a pipette to test a small object in a container (no text or symbols)
natural_image
Line drawing of a hand mixer device with control panel and base tray (no text or symbols)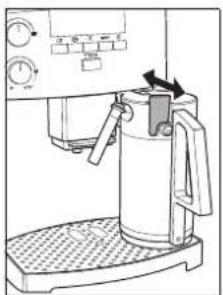
natural_image
Line drawing of a kitchen appliance with a lid and control panel (no text or symbols)
natural_image
Line drawing of a coffee maker using a cup on a tray (no text or symbols)25 26 27 28


natural_image
Line drawing of a coffee maker with a mug and stand, no text or symbols present
natural_image
Line drawing of a hand cleaning a kitchen appliance with a cloth (no text or symbols)
29 30 31 32

natural_image
Technical line drawing of a mechanical device with a magnified inset showing internal components (no text or symbols)
natural_image
Line drawing of a hand using a portable coffee maker to press or<|rotate_right|> (no text or symbols visible)
natural_image
Illustration of a hand using a digital kitchen tool to press or install a tray (no text or symbols visible)
natural_image
Diagram of a mechanical device with a downward arrow indicating force or movement (no text or symbols present)33 34 35 36


natural_image
Line drawing of a kitchen appliance with a hand holding a tool, showing interior and exterior views (no text or symbols)
natural_image
Line drawing of a kitchen appliance with a hand inserting a tool into the door (no text or symbols)37 38 39 40

natural_image
Diagram of hands holding a mechanical component with arrows indicating direction (no text or symbols)41





natural_image
Mechanical component diagram with directional arrows and a checkmark (no text or symbols)43

natural_image
Pure mechanical component diagram without any text, numbers, or symbols42 44

Bästa kund,
k Knotten "Kanne/cappuccino"
2 Kaffe og espresso
Please read this user manual carefully, paying special attention to the safety notes! Keep the manual in a safe place for later reference, and pass it on to any new owner.
Contents
1 K e y t o p i c t u 13r Menu settings 4 126
1.1 Front view (Figure 1) 114 13.1 Setting the language 126
1.2 Milk container (Figure 2) 114 13.2 Setting the coffee temperature 127
1.3 Front view with open service door 13.3 Setting the switch-off time 127
(Figure 3) 114 13.4 Setting the jug programme
1.4 Control panel (Figure 4) 114
2 Coffee and Espresso 115
(Coffee strength and filling quantity for the jug) 127
3 Safety guidelines 115 (programming the filling quantity) 128
4 Summary of menu options 117 13.6 Setting the cappuccino programme (programming the quantity of
5 Menu mode 117 milk and coffee) 129
6 Using for the first time 117 13.7 Setting the hot water programme (programming dispensing quantity) 130
6.1 Setting up appliance and connecting it 117 (programming dispensing quantity) 130 13.8 Looking up the number of coffees
6.2 Filling with water 118 dispensed, number of jugs dispensed and number of
6.3 Filling the coffee bean container 118 dispensed and number of desceling procedures (statistics) 120
6.4 Switching on for the first time 118 descaling procedures (statistics) 130
6.5 Switching on the appliance 119 13.9 Resetting the appliance to factory settings (Reset) 121
6.6 Switching off the appliance 119 factory settings (Reset) 131
6.7 Setting the water hardness 119 14 Care and cleaning 131
7 Making coffee with beans 120 14.1 Regular cleaning 131 14.2 Emphing the waste coffee
7.1 Tips for dispensing hotter coffee 122 14.2 Emptying the waste coffee container 132
7.2 Rinsing 122 Container 132 14.3 Cleaning the milk container 133
8 Making several cups of coffee 14.4 Cleaning the mill mechanism 132
with the jug function 122 14.5 Cleaning the brewing unit 132
9 Makingcoffee with ground coffee 123 14.6 Carrying out the descaling programme 133
10 Making cappuccino or hot milk (coffee and milk froth) 124 15 What to do when the display show the following messages... 135
10.1 Making cappuccino 124 16 Solvable problems, before
10.2 Frothing/heating up milk 125 calling customer services 136
10.3 Cleaning the nozzles 125 17 Technical data 138
11 Preparing hot water 125 18 Waste disposal 138
12 Setting the grind level 126 19. If service is needed 128


GB
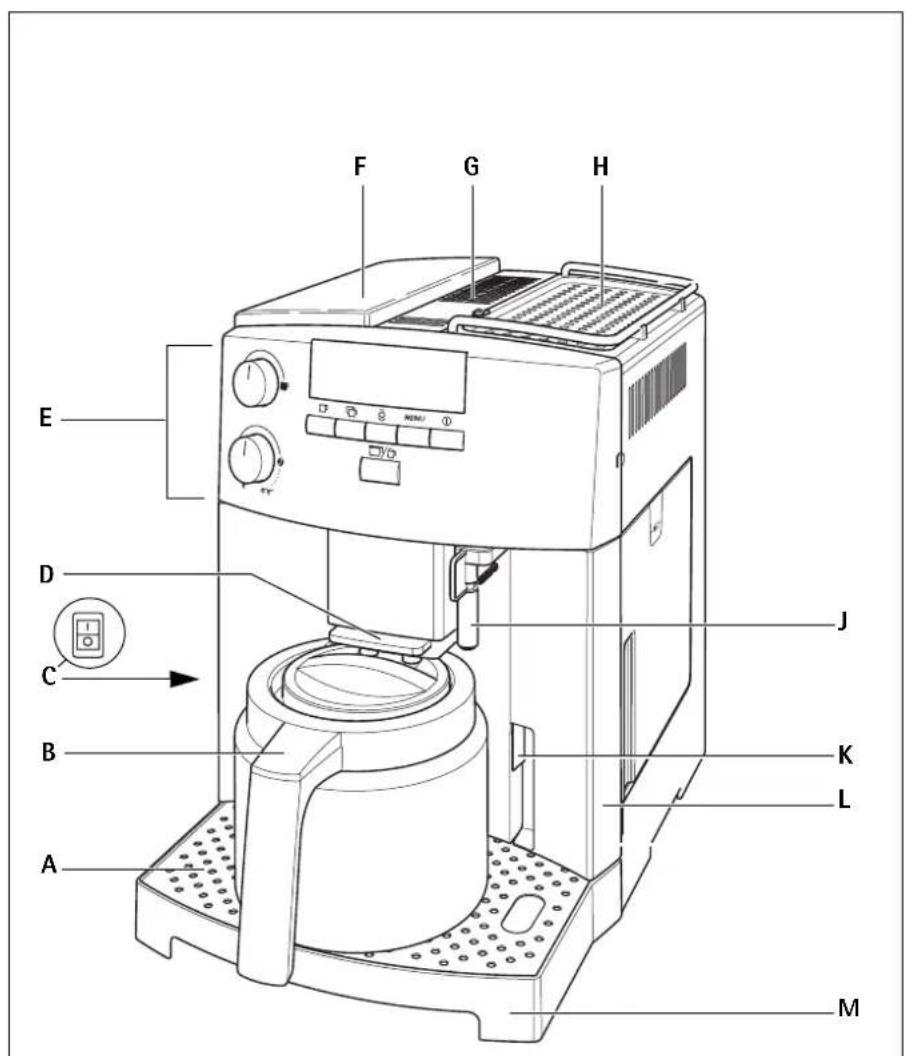
1 Key to picture
1.1 Front view (Figure 1)
A Drip tray grill
B Warming jug
C Main switch (on back of appliance)
D Height adjustable coffee dispenser
E Control panel (see Figure 3)
F Coffee bean holder cover
F Ground coffee chute cover
H Heated cup tray
J Hot water nozzle (removable)
K Button to open service door
L Water tank with maximum mark (removable)
M Drip tray with float (removable)
1.2 Milk container (Figure 2)
N Milk container
N1 Cover (removable)
N2 Slider for extra milk froth
N3 "CLEAN" button
N4 Milk dispenser pipe (removable)
N5 Suction pipe (removable)
1.3 Front view with open service door (Figure 3)
O Service door (open)
P Waste coffee container (can be taken out)
Q Swing drawer
R Brewing unit
S Button for setting grind level
T Coffee bean container
U Measuring spoon
V Filling chute for preground coffee
W Nameplate (bottom of appliance)
X Liquid descaler
Y Test strips
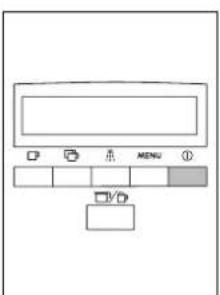
1.4 Control panel (Figure 4)
a "Coffee strength / preground coffee" knob
b "Cup size" knob
c Display
d "1 cup of coffee" button ☐
In menu mode this button is used for "scrolling" (<")
e "2 cups of coffee" button In menu mode this button is used for "scrolling" (">")
f "Hot water" button In menu mode this button confirms the menu option ("OK")
g "MENU" button MENU
In menu mode this button returns to the last level without making changes ("ESC")
h "On/Off" button ①
j "Jug/Cappuccino" button

2 Coffee and Espresso
Your fully automated machine could not be easier to operate, both for making coffee and taking care of it.
The exquisit, individualtaste is attributed to the
- pre-brewing system: before the actual brewing process starts, the ground coffee is moistened to make the most of the whole flavour,
- the individually adjustable amount of water per cup, from short espresso to "long" coffee with crema,
- the individually adjustable coffee temperature, with which the coffee is brewed,
• the choice between a normal or strong cup of coffee, - the adjustable grind level depending on the roast of the beans,
• and last but not least the guaranteed crema, that frothy head that makes espresso coffee so incomparable for connoisseurs.
By the way: The time that the water is in contact with the ground coffee is much shorter for espresso coffee than for normal filter coffee. This releases less bitterness from the ground coffee, which makes the espresso more agreeable!
3 Safety guidelines

The safety of this appliance complies with recognised technology regulations and the Equipment Safety Act. Nevertheless, as a manufacturer we see it as our duty to bring your attention to the following safety guidelines.
General safety
- The appliance must only be connected to a mains supply whose voltage, type of current and frequency match the details on the nameplate (see underneath of appliance)!
- Never bring the power lead into contact with hot parts on the appliance.
- Never pull the plug out of the socket by the power lead!
- Never use the appliance if:
- the power lead is damaged or
- the housing shows signs of damage.
- Only put the plug into the socket when the appliance is switched off.
- This appliance is not designed to be used or operated by persons (including children) who are not in a position to operate it safely due to a lack of experience or knowledge, or by persons (including children) with limited physical, sensory or mental abilities, unless they have been instructed how the appliance should be used safely by a person responsible for them and supervised by that person to start with.
Child safety
- Do not let the appliance run unsupervised and keep an eye out for children in particular!
• Children should be supervised to ensure that they do not play with the appliance. - Packaging material, such as plastic bags, should be kept away from children.
GB
Safety during operation
- Warning! Coffee spout, hot water nozzle, milk dispenser and cup tray become hot as a result of use. Keep children away!
- Warning! Risk of scalding when hot water nozzle or milk dispenser is activated! Escaping hot water or hot steam can lead to scalding. Only use the hot water nozzle or milk dispenser whilst holding a receptacle underneath.
- Do not heat flammable liquids with steam!
- Only operate the appliance when there is water in the system! Only fill the water tank with cold water, not hot water, milk or other liquids. Take note of the max. filling quantity of approx. 1.8 litres.
- Do not put frozen or caramelised coffee beans in the bean container. Use only roasted coffee beans! Remove any foreign subjects, such as small stones, from the coffee beans. Blocking or damage caused by foreign objects in the grinder might be excluded from the guarantee.
- Only put ground coffee in the ground coffee slot.
- Do not leave the appliance switched on unnecessarily.
- Do not subject appliance to the outside elements.
- When using an extension lead, only use a conventional lead with a cable diameter of at least 1.5 ~mm^2 .
- Persons with motor difficulties should never use the appliance without an accompanying person in order to prevent any hazard.
- Only operate the appliance when the drip tray, waste coffee container and drip tray grill are in place!
Safety when cleaning and servicing
• Take note of cleaning and descaling advice.
- Switch off appliance and pull plug out before cleaning and maintenance work!
- Do not immerse appliance in water.
- Do not clean appliance parts in dishwasher.
- Never put water into the mill mechanism, as this will damage the mill mechanism.
Do not try to open up the appliance or repair it. Unprofessional repair work can lead to considerable danger to the user.
Repairs to electrical appliances must only be carried out by professionals. In case of any necessary repair work, including replacing the power lead, please consult
- the dealer where you purchased the appliance, or
• the Electrolux helpline.
If the appliance is used incorrectly or for other purposes, no liability or guarantee can be assumed if any damage occurs - this also applies if the descaling procedure is not carried out immediately after the display shows «PLEASE DESCALE!» and is done in accordance with this instruction manual. Blocking or damage caused by foreign objects in the grinder might be excluded from the guarantee.
4 Summary of menu options
Below you will find a summary of the menu options, which are used to change and save the appliance's factory settings, as well as to start programmes and look up information. You will find detailed information about this in the subsequent chapters of this instruction manual.
- « CHOOSE LANGUAGE» menu Display language - there is a choice of several languages.
- « WATER HARDNESS» menu Programmable level of hardness between 1 (soft) and 4 (very hard). Factory setting: 4 (very hard).
- « TEMPERATURE» menu Programmable coffee temperature between LOW, MEDIUM and HIGH. Factory setting: HIGH
- « AUTO SHUTOFF TIME » menu Programmable switch-off time between 1 hour and 3 hours. Factory setting: 1h (1 hour).
- « JUG PROGRAM» menu Programmable filling quantity (cup size) and amount of ground coffee (coffee strength) for cups being made in the jug.
- « COFFEE PROGRAM » menu Adjust filling quantity for any cup size (espresso cup, small cup, medium cup, large cup, mug).
- « CAPPUCCINO PROGRAM» menu
Adjust quantity of milk or coffee for cappuccino.
• « HOT WATER PROGRAM» menu Adjust quantity of hot water.
• « DESCALE» menu Start the descaling procedure.
• « STATISTICS» menu Look up number of cups of coffee made, number of jugs with 4, 6, 8 or 10 cups or number of descaling procedures carried out.
- « RESET TO DEFAULT» menu Reset the changed appliance settings to factory settings.
5 Menu mode
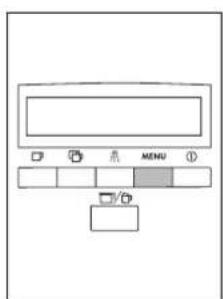
Pressing the "MENU" button (Figure 5) switches to menu mode. In menu mode, the buttons "1 cup of coffee" □, "2 cups of coffee"" □ not water" and "MENU" are used to navigate. The respective function is shown above the button in the display (Figure 6):
- «<» ("1 cup of coffee" □) and «>» ("2 cups of coffee" □) allow you to "scroll" in the menu
- « OK» ("hot water") confirms a menu option
- « ESC » ("MENU") returns to the last menu level without making any changes
6 Using for the first time
6.1 Setting up appliance and connecting it
Choose a suitable surface that is horizontal, stable, unheated, dry and waterproof.

Make sure that air can circulate well. There must be a gap of at least 5 cm at each side and behind the appliance, and at least 20 cm above the appliance.
The appliance must not be installed in areas where temperatures of 0^ C and below can arise (damage to appliance due to freezing water).

Warning! If the appliance is installed in a warm area after coming out of the cold, wait approx. 2 hours before switching on!
We recommend laying a suitable base under the appliance to prevent damage from splashes.

Only connect the appliance to an earthed socket. Do not use an unearthed socket.
GB
6.2 Filling with water
Before switching on, always make sure that there is water in the water tank and top up if necessary. The appliance needs water for the automatic rinsing processes every time it is switched on or off.
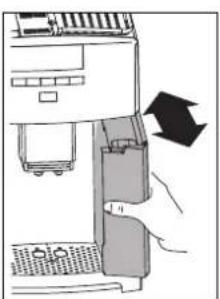
Take the water tank out of the appliance (Figure 7).
Fill the water tank with fresh cold water. Never fill the tank beyond the MAX mark.
i Only fill the water tank with cold water. Never fill it with other liquids such as mineral water or milk.
Put the water tank back in (Figure 7). Make sure that you press the tank firmly into position so that the valve on the water tank opens.
To ensure good, aromatic coffee at all times, you should:
- change the water in the water tank every day,
- clean the water tank with normal water for rinsing (not in the dish-washer) at least once a week. Then rinse off with fresh water.
6.3 Filling the coffee bean container
Flip open the cover of the coffee bean container and fill it with fresh coffee beans (Figure 8). Then put the cover back.
Note! Ensure that you use only pure coffee beans with no caramelised or aromatised additives. Do not use frozen beans. Make sure that no foreign objects, such as small stones, enter the coffee bean container. Blocking or damage caused by foreign objects in the grinder might be excluded from the guarantee.
The mill mechanism is set at the factory to a medium grind level. If necessary, you can change this setting. You can find how to change the grind level under "Setting the grind level" page 126.
The grind level can only be changed during the milling process. Changing the settings when the mill mechanism is at rest can damage the coffee machine.
The coffee machine was tested at the factory. Coffee was used to do this, so it is completely normal to find some coffee in the mill mechanism. It is definitely guaranteed that this coffee machine is new.
6.4 Switching on for the first time
When you operate the appliance for the first time, the automatic switching on process will only proceed if you have selected the desired language.
Switch the appliance on using the main switch at the back of the appliance (Figure 9).
In turn the display shows the text «PRESS MENU TO CHOOSE ENGLISH» in all available languages.
Wait until the desired language is displayed. Then press the "MENU" button to confirm (Figure 5) and keep pressing on it until the display shows «ENGLISH INSTALLED»
i After installing the appliance for the first time, you can change the language at any time, see "Setting the language" page 126.
After choosing the language the display shows «FILL TANK!».
To fill water tank, see "Filling with water" page 118.
Put the water tank back in (Figure 7). Make sure that you press the tank firmly into position so that the valve on the water tank opens.
The display now shows:
«INSERT WATER SPOUT AND PRESS MENU KEY»
Insert the hot water nozzle (Figure 10) and place a cup underneath.
Press the "MENU" button (Figure 5). After a few seconds some water comes out of the hot water nozzle and a progress bar is displayed. When the cup
GB
is filled with about 30 ml of water, the progress bar is completed.
The appliance now displays
«TURNING OFF
PLEASE WAIT...» and switches itself off.
To fill the coffee bean container with coffee beans, see "Filling the coffee bean container" page 118.
Warning! To prevent malfunctions, never fill with ground coffee, frozen or caramelised coffee beans or anything else that could damage the appliance.
Press the "On/Off" button Ⓞ on the control panel (Figure 11).
The appliance displays «HEATING UP...» on the top line of the display and on the bottom line a progress bar with a percentage
« ■ ■ ■ ■ 40%»
which shows the heating up progress.
When the appliance has finished heating up it displays:
«RINSING...» on the top line of the display and in the bottom line a progress bar with a percentage
«■■■■ ■ 40%» and does an automatic rinsing process (A little hot water comes out of the coffee dispenser and is caught in the drip tray).
The appliance now displays the basic settings, i.e. the cup size on the top line of the display and the coffee strength on the bottom line, e.g.:
«MEDIUM CUP NORMAL TASTE»
6.5 Switching on the appliance
Before switching on, always make sure that there is water in the water tank and top up if necessary. The appliance needs water for the automatic rinsing processes every time it is switched on or off.
Switch on the appliance with the "On/Off" button (Figure 11).
The appliance gets itself ready straight after switching on. The noises occurring at this time are completely normal.
During the heating up stage (approx. 120 seconds) the display shows «HEATING UP...» on the top line and on the bottom line a progress bar as a percentage
« ■ ■ ■ ■ 40%»
which shows the heating up progress. When the appliance has finished heating up it displays:
«RINSING...» on the top line of the display and in the bottom line a progress bar with a percentage
« ■ ■ ■ ■ 40%» and
does an automatic rinsing process (A little hot water comes out of the coffee dispenser and is caught in the drip tray).
The appliance is now ready to be used. The display appears, which depends on the coffee mode last selected.
6.6 Switching off the appliance
Switch off the appliance using the "On/Off" button (Figure 11).
The appliance does a rinsing procedure (display shows «RINSING...
PLEASE WAIT...») and switches itself off.
If you are not using the appliance for a long time, in addition to switching off with the "On/Off" button, you should also switch off the main switch at the back of the appliance (Figure 9).
6.7 Setting the water hardness
After installing for the first time or when using a different water quality you should set the appliance to the water hardness level that corresponds with your local water hardness. Use the enclosed test strip to determine the hardness level or ask your water company for the water hardness.
GB
Finding out the water hardness level
D
To do this, dip the test strip in cold water for about 1 second. Shake off the excess water and look up the hardness level using the pink coloured fields.

No or one pink field:
Level 1, soft
up to 1.24 mmol/l, or
up to 7° German hardness, or bis 12.6° French hardness

Two pink fields:
Level 2, medium
up to 2.5 mmol/l, or
up to 14° German hardness, or bis 25.2° French hardness

Three pink fields:
Level 3, hard
up to 3.7 mmol/l, or
up to 21° German hardness, or bis 37.8° French hardness

Four pink fields:
Level 4, very hard
over 3.7 mmol/l, or
over 21° German hardness, or over 37.8° French hardness
Setting and saving the established water hardness level
You can set 4 levels of hardness. The appliance is set to level 4 at the factory.
D
Press the "MENU" button (Figure 5) when the appliance is switched on. The menu option «CHOOSE LANGUAGE» appears.
D
Press the scrolling buttons "<" or ">" (Figure 6) until the menu option «WATER HARDNESS» appears.
[NO TEXT]
Confirm the menu option with the "OK" button (Figure 6). The display shows the current setting, e.g. «WATER HARDNESS 4»
D
Next press the scrolling buttons "<" or ">"(Figure 6) until the established hardness level is displayed.
[NO TEXT]
Confirm the selection with the "OK" button (Figure 6).
If "OK" is not pressed, the appliance automatically returns to the coffee mode after about 120 seconds without saving the entries.
![ELECTROLUX ECG6600 - [NO TEXT] - 1](/content/2026/05/846696/images/3bbd342f6399739ca385be055511de7e60e2110b5a15562cf226157eae12bdc3.jpg)
The display automatically jumps back to the menu option «WATER HARDNESS» after programming.
![ELECTROLUX ECG6600 - [NO TEXT] - 2](/content/2026/05/846696/images/ec79c7d425d601f7e108cac0b5119136646d3ef46948e31ee73923db60375ab6.jpg)
To go back to the coffee mode, press the "MENU" button (Figure 5) or wait about 120 seconds until the appliance automatically jumps back to coffee mode.
![ELECTROLUX ECG6600 - [NO TEXT] - 3](/content/2026/05/846696/images/3e28eb7dd1afa9728ebfe5af993f1c4f569ad6074ace872a4c8d2d1e84759d29.jpg)
You can carry out other menu settings, see „Menu settings" page 126.
7 Making coffee with beans
The following procedure runsfully automatically when making coffee with beans: Milling, portioning, pressing, prebrewing, brewing and disposing the brewed coffee grounds.
With the option of setting the grind level and amount of grounds, you can adjust the appliance to suit your personal taste

Ensure that you use only pure coffee beans with no caramelised or aromatised additives. Do not use frozen beans. Make sure that no foreign objects, such as small stones, enter the coffee bean container. Blocking or damage caused by foreign objects in the grinder might be excluded from the guarantee.
The appliance is preset to a medium cup size and normal coffee strength. Depending on your taste, select a "short" espresso or a "long" coffee with crema.

Select the desired cup size with the "cup size" knob (Figure 13). The selected cup size is displayed.

The appliance is set to normal quantities at the factory. You can change and save these for each cup size as you wish, see "Setting the cappuccino programme (programming the quantity of milk and coffee)" page 129.
GB
You can choose your coffee with an extra mild, mild, normal, rich or extra rich flavour.
Select the desired coffee strength with the "coffee strength" knob (Figure 14). The selected coffee strength is displayed.
Put one or two cups underneath the coffee dispenser (Figure 15). By moving the dispenser up or down, you can adjust the height of the dispenser to suit the height of your cup so as to reduce heat loss and coffee splashes (Figure 16).
If no button is pressed for a few seconds after setting the cup size or coffee strength, the appliance suggests the next step on its display: «PRESS 1 OR 2 CUPS KEY».
Press the "1 cup of coffee" button to make one cup, or the "2 cups" button for 2 cups. The appliance now mills the beans. In the coffee making process, the ground coffee is firstly sprinkled with a small amount of water for pre-brewing purposes. After a short interval the actual brewing process takes place. The coffee is dispensed into the cup, the top line of the display shows the selected cup size and the bottom line a progress bar with a percentage
« ■ ■ ■ ■ 40%».
When the progress bar is completed, the desired amount of coffee is dispensed. The appliance finishes dispensing automatically and ejects the used coffee grounds into the waste coffee container.
You can stop the coffee from dispensing at any time by pressing the previously selected "1 cup" or "2 cups" button again, or by turning the "cup size" knob (Figure 13) anti-clockwise towards "espresso cup".
As soon as the coffee has finished dispensing, you can increase the amount of coffee by pressing and holding the "1 cup" button until the desired amount of coffee is reached (the but-
ton must be pressed as soon as the progress bar reaches 100 %), or by turning the "cup size" knob (Figure 13) clockwise towards "mug".
After a few seconds the appliance is ready to be used again and you can make another coffee. The display shows the last selected coffee setting.
i If the coffee only comes out in drips or not at all, or if the coffee comes out too fast and the crema is not to your taste, you should change the grind level setting, see „Setting the grind level" page 126
When the display shows the message «FILL TANK!», you must fill the tank, otherwise the appliance cannot make any coffee. (It is normal for there to be some water left in the water tank when the message is displayed).
When the display shows the message «EMPTY WASTE COFFEE CONTAINER», it means that the waste coffee container is full and must be emptied and cleaned, see „Emptying the waste coffee container" page 132. As long as the waste coffee container is not cleaned, this message remains in place and the coffee machine cannot make any coffee.
i Never take the water tank out whilst coffee is being dispensed. If it is taken out, the coffee machine can no longer make any coffee. To bleed air from the coffee machine, please press the "hot water" button and let water run out of the hot water nozzle for a few seconds.
When installing the coffee machine for the first time you should make at least 4-5 coffees before the machine can give a satisfactory result.
GB
7.1 Tips for dispensing hotter coffee
- If you want to make enough coffee for a small cup (less than 60 ml) immediately after switching on the coffee machine, use the hot water from the rinsing procedure to preheat the cups.
- Set a higher coffee temperature in the appropriate menu, see „Setting the coffee temperature" page 127.
- If you have not dispensed any coffee for a long time with the appliance switched on, you should first rinse the system to preheat the brewing unit. Select the rinsing function from the appropriate menu (see "Rinsing" page 122). Let the water run into the drip tray underneath. You can also use this water to warm up the cup that you are using for the coffee. In this case simply let the hot water run into the cup (and then empty it).
- Do not use cups that are too thick, unless they are preheated, as they absorb too much heat.
- Use preheated cups by rinsing them out with warm water or leaving them at least 20 minutes on the heated cup tray (H) when the coffee machine is switched on.
7.2 Rinsing
Rinsing allows the brewing unit and the coffee dispenser to heat up. Rinsing only take a few seconds.
Press the "MENU" button (Figure 5). The menu option «CHOOSE LANGUAGE» appears.
Press the scrolling buttons "<" or ">"(Figure 6) until the menu option «RINSING» appears.
Confirm the menu option with the "OK" button (Figure 6). The display shows «RINSING» and a progress bar shown with a percentage
《■■■■ 40%》.
After rinsing the appliance automatically returns to coffee mode.
8 Making several cups of coffee with the jug function
Using this function you can make several cups of coffee fully automatically in the stainless steel jug supplied: Milling, portioning, pressing, pre-brewing, brewing and disposing the brewed coffee grounds as described in the preceding section.
The appliance is preset to a medium cup size and normal coffee strength. You can set your preferred cup size and coffee strength as „Setting the jug programme (Coffee strength and filling quantity for the jug)” page 127 described underneath.
Turn the lid on the stainless steel jug supplied to the removal position (Figure 17) and remove the lid. Rinse the jug and the lid.
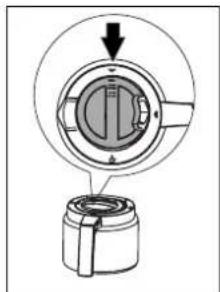
Put the lid in the pouring position (Figure 18) on the jug and place this underneath the coffee dispenser (D). The coffee dispenser must be pushed right to the tip so that the jug can be pushed into position.
The display continuously shows «FILL BEAN CONT. AND WATER TANK, EMPTY WASTE CONT., PRESS OK», reminding you of the basic steps necessary to be able to make a series of coffees in the jug.
Make sure that the water tank is full, that there are enough coffee beans in the bean container and that the waste coffee container is empty. Then press the "OK" button (Figure 6).
The display shows the coffee strength on the top line, as it is set in the "jug" menu, e.g. «EXTRA-MILD JUG». The scrolling buttons "<" or "> appear on the bottom line, as does the number of cups to be made in the jug, e.g. «< > 4».
If you want to change the coffee strength and the filling quantity for the jug function, proceed as described
below "Setting the jug programme (Coffee strength and filling quantity for the jug)" page 127.
If necessary, set the number of cups that are to be made in the jug (4, 6, 8, 10 cups) with the scrolling buttons "<" or "> " in steps of 2 cups.
If no button is pressed for a few seconds, the appliance suggests the next step in the display: «CHOOSE NUMBER OF COFFEE, PRESS JUG KEY».
When you have selected the desired number of cups, confirm this by pressing the "jug/cappuccino" button (Figure 19).
The display shows a progress bar and a percentage
《■■■■ 40%》
which shows progress of the brewing process.
When the progress bar is complete and the percentage has reached 100%, the appliance stops the brewing process and automatically returns to coffee mode.
Now remove the jug and close the lid (Figure 20) to keep the coffee warm for a long time.
i If there are not enough coffee beans in the container to complete the selected function, the appliance interrupts the process and waits until the coffee bean container is filled back up and the "jug/cappuccino" button
☐/☐ (Figure 19) is pressed. If, for example, 8 cups need making but there are only enough coffee beans for 6 cups, the appliance makes 6 cups and then stops the coffee making process. Fill up the coffee bean container and then press the "jug/cappuccino" button
☐ (Figure 19). Once this is done, the appliance only makes the last 2 cups to complete the desired number of 8 cups.
If there is either not enough water in the water tank to complete the desired function, or the waste coffee container
is full, the appliance interrupts the process. In order to fill the water tank or empty the waste coffee container, the jug must be removed; the programme that is running is interrupted at this point. Once the problem has been resolved, the programme has to be restarted. At this point the amount of coffee already in the jug must be taken into account so as not to overfill the jug.
9 Makingcoffee with ground coffee
You can use this function to brew coffee that is already ground, e.g. decaffeinated coffee.
Warning! Make sure that no ground coffee is left in the chute. Also, no foreign bodies must get into the chute. The filling chute is not a storage container, the ground coffee must go straight to the brewing unit.
Turn the "coffee strength / preground coffee" knob (Figure 21) to the required position (for 1 cup) or (for 2 cups), to select the function for preground coffee. This puts the coffee grinding mill out of action. The appliance shows e.g. «ESPRESSO CUP PRE-GROUND 1 CUP».
Open the cover on the ground coffee chute and fill it with fresh ground coffee (Figure 22).
Only use the measuring spoon supplied. Never put in more than 2 level measuring spoonfuls, otherwise the appliance either makes no coffee, the ground coffee goes all round the appliance and contaminates it, or the coffee comes out in drips and the message «GROUND TOO FINE ADJUST MILL
+ PRESS HOT WATER KEY» is displayed.
Do not insert any ground coffee during the brewing process. Only once the whole brewing process has ended and
GB
the appliance is ready again can ground coffee be inserted for the next cup. Never insert ground coffee when the machine is switched off, otherwise it will be spread all over the inside of the appliance.
!
Only use ground coffee suitable for fully automatic espresso machines. Do not put any coffee beans, any water soluble, freeze dried instant powders or any other drinking powders into the chute. Ground coffee that is too fine can lead to blockages.
i
If the filling chute is blocked (due to damp in the appliance or because more than 2 measuring spoons have been inserted), use a knife or spoon handle to push the ground coffee down (Figure 23). Next remove the brewing unit and clean it together with the coffee machine as described below "Cleaning the brewing unit" page 132".
I
Close the cover.
i
If no button is pressed for a few seconds after selecting the "preground coffee" function, the appliance suggests the next step on its display: «PRESS 1 OR 2 CUPS KEY».
D
Select the desired cup size with the "cup size" knob (Figure 13). The selected cup size is displayed.
D
Press the "1 cup of coffee" button to make one cup, or the "2 cups" button for 2 cups.
The coffee is made.
i
To return to the mode for coffee beans after making the coffee, turn the "coffee strength / preground coffee" knob (Figure 21) to any coffee strength setting (the coffee grinding mill is re-enabled).
10 Making cappuccino or hot milk (coffee and milk froth)
You can use this function to either make hot, frothy milk or cappucino in a single process.
[NO TEXT]
Unfasten the lid of the milk container with a slight clockwise turn and remove it.
[Non-Text]
Fill the container with sufficient milk (Figure 24). Do not go over the MAX line engraved on the container handle (comes to about 1000 ml).
i
Preferably skimmed or semi-skimmed milk at fridge temperature (about 5 °C) should be used.
I
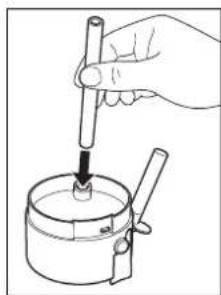
Make sure that the suction pipe is correctly inserted (Figure 25); next place the lid back on the milk container and fasten it with a slight anti-clockwise turn.
I
Pull the hot water spout off (Figure 10) and bring the milk container up to the nozzle (Figure 26). Make sure that the milk container is correctly put in place.
I
You can set the amount of froth on the milk to any level using the slider on the lid (Figure 27).
- Position "1 CAPPUCCINO": very frothy milk.
- Position "2 CAFFELATTE": not so frothy milk.
i
Once the milk container is put in place, the appliance suggests the next step on the display: «PRESS JUG KEY X1 FOR CAPPUCCINO, X2 FOR MILK ONLY».
10.1 Making cappuccino
I
Select the desired coffee strength for the cappuccino with the "coffee strength" knob (Figure 14). The selected coffee strength is displayed.
i
The cup size on the top line (e.g. «ESPRESSO CUP») has no meaning here, as the amount of coffee made is
fixed in the «CAPPUCCINO PRO- GRAM» menu.
Swing the milk dispenser pipe out (Figure 28) and place a sufficiently big cup underneath the coffee dispenser and the milk dispenser pipe.
Press once on the "jug/cappuccino" button (Figure 29).
Hot and frothy milk, then coffee, are dispensed into the cup.
The top line of the display shows «CAPPUCCINO» and on the bottom line a progress bar and percentage are displayed, e.g.
« ■ ■ ■ ■ 40%»
which shows progress of the cappuccino being made.
i The amount of milk and coffee is pre-set to normal quantities. You can change and save these to suit your taste, see „Setting the cappuccino programme (programming the quantity of milk and coffee)" page 129.
After a few seconds the appliance is ready for use again. The display shows the last selected coffee setting.
10.2 Frothing/heating up milk
Swing the milk dispensing pipe out (Figure 28) and place a sufficiently big cup underneath the milk dispensing pipe.
Press twice on the "jug/cappuccino" button (Figure 29) (within 2 seconds of each other).
Hot and frothy milk is dispensed into the cup.
The top line of the display shows «MILK FROTHING» and on the bottom line a progress bar and percentage are displayed, e.g.
« ■ ■ ■ ■ 40%»
which shows progress of the milk frothing process.
The amount of milk is preset to a normal quantity. You can change and save this to suit your taste, see "Setting the cappuccino programme (programming
the quantity of milk and coffee)" page 129.
After a few seconds the appliance is ready for use again. The display shows the last selected coffee setting.
10.3 Cleaning the nozzles
Every time after heating milk or making cappuccino, the nozzles on the milk container have to be cleaned as follows, otherwise remains of milk can set hard:
Place a container under the milk dispenser pipe and press on the "CLEAN" button on the milk container (Figure 30) for at least 5 seconds. The display shows «CLEANING».
Warning! Risk of scalding from steam and hot water escaping from the milk dispenser pipe.
Now remove the milk container and clean the nozzles on the appliance with a damp cloth (Figure 31).
Put the hot water nozzle back in (Figure 10).
When you have finished cleaning, take the milk container off and place it in the fridge. The milk should not stay out of the fridge for longer than 15 minutes.
11 Preparing hot water
Hot water can be used to warm up cups and to make hot drinks, such as tea or packet soups.
Warning! Risk of scalding when the hot water nozzle is activated! Escaping hot water can lead to scalds. Only activate the hot water nozzle when there is a receptacle under the hot water nozzle.
Put the hot water nozzle in place (Figure 10).
Place a container underneath the hot water nozzle.
Press the "hot water" button (Figure 32). Hot water is dispensed; the display shows «HOT WATER» Once the programmed amount of hot water has
GB
been dispensed, dispensing stops automatically.
For a few seconds the display shows «PLEASE WAIT...». After that the appliance is ready to make coffee again and the last selected coffee setting appears on the display.
The appliance is set to a normal quantity at the factory. You can change and save this to what you want, see "Setting the hot water programme (programming dispensing quantity)" page 130.
i It is not recommended to pour off hot water for longer than 2 minutes without a break.
You can stop hot water from dispensing at any time. To do so, press the "hot water" button again (Figure 32).
12 Setting the grind level
The mill mechanism is set at the factory to a medium grind level. If coffee is dispensed too quickly or too slowly (in drips), you can change the grind level during the milling process.
The grind level can only be changed during the milling process. Changing the settings when the mill mechanism is at rest can damage the coffee machine.
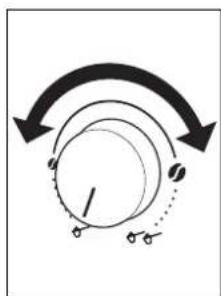
Adjust the grind level with the knob for setting the grind level (Figure 2, T) (Figure 12).
- If the coffee only comes out in drips or not at all, the knob must be turned by one position clockwise. Turn one position at a time until coffee is dispensed satisfactorily.
- If the coffee comes out too fast and the crema does not meet your taste, turn the knob by one position anticlockwise.
i Make sure that you do not turn the knob for setting the grind level too far, as otherwise coffee may come out in drips when dispensing 2 cups.
You will only notice the effect of these corrections after at least 2 more coffees have been made, however.
Removing foreign bodies in the mill mechanism.
Foreign bodies in the mill mechanism, such as small stones, can damage the mechanism. A foreign body in the coffee causes an even rattling noise. If you hear this noise during the milling process, switch the appliance off immediately and consult customer services. Blocking or damage caused by foreign objects in the grinder might be excluded from the guarantee.
13 Menu settings
13.1 Setting the language
You can choose between several languages. A different language can be selected as follows:
Press the "MENU" button (Figure 5). The menu option «CHOOSE LANGUAGE» appears.
Confirm the menu option with the "OK" button (Figure 6). The language set appears on the display.
Press the scrolling buttons "<" or ">" (Figure 6) until desired language appears.
When the desired language is displayed, confirm it with the "OK" button (Figure 6). This language is programmed in accordingly.
If "OK" is not pressed, the appliance automatically returns to the coffee mode after about 120 seconds without saving the entries.
The display automatically jumps back to the menu option «CHOOSE LANGUAGE» after programming.
To go back to the coffee mode, press the "MENU" button (Figure 5) or wait about 120 seconds until the appliance automatically jumps back to coffee mode.
13.2 Setting the coffee temperature
You can choose between three temperature levels. The coffee temperature levels are defined as follows:
«TEMPERATURE HIGH». You can change this as follows:
Press the "MENU" button (Figure 5). The menu option «CHOOSE LANGUAGE» appears.
Press the scrolling buttons "<" or ">" (Figure 6) until the menu option «TEMPERATURE» appears.
Confirm the menu option with the "OK" button (Figure 6). The display shows the current setting, e.g. «TEMPERATURE HIGH».
If necessary, select another temperature with the scrolling buttons "<" or ">" (Figure 6).
When the desired temperature is displayed, confirm it with the "OK" button (Figure 6). This temperature is programmed in accordingly.
i If "OK" is not pressed, the appliance automatically returns to the coffee mode after about 120 seconds without saving the entries.
The display automatically jumps back to the menu option
«TEMPERATURE» after programming.
To go back to the coffee mode, press the "MENU" button (Figure 5) or wait about 120 seconds until the appliance automatically jumps back to coffee mode.
13.3 Setting the switch-off time
If the appliance is not used for a while it switches itself off automatically for safety and energy saving reasons.
You can choose between 3 switch-off times (automatic switch-off after 1 to 3 hours):
«AUTO SHUTOFF TIME 1 H» «AUTO SHUTOFF TIME 2 H» «AUTO SHUTOFF TIME 3 H» The factory setting is «AUTO SHUT-OFF TIME 1 H». You can change this as follows:
Press the "MENU" button (Figure 5). The menu option «CHOOSE LANGUAGE» appears.
Press the scrolling buttons "<" or ">"(Figure 6) until the menu option «AUTO SHUTOFF TIME» appears.
Confirm the menu option with the "OK" button (Figure 6). The display shows the current setting, e.g. «AUTO SHUTOFF TIME 1 H».
If necessary, select another switch-off time with the scrolling buttons "<" or ">" (Figure 6).
When the desired switch-off time is displayed, confirm it with the "OK" button (Figure 6). This switch-off time is programmed in accordingly.
If "OK" is not pressed, the appliance automatically returns to the coffee mode after about 120 seconds without saving the entries.
The display automatically jumps back to the menu option «AUTO SHUT-OFF TIME» after programming.
To go back to the coffee mode, press the "MENU" button (Figure 5) or wait about 120 seconds until the appliance automatically jumps back to coffee mode.
13.4 Setting the jug programme (Coffee strength and filling quantity for the jug)
The jug programme is preset to normal values at the factory. You can adjust and change this to suit your taste. The coffee strength can be adjusted in 5 steps from extra mild to extra strong and the filling quantity can be adjusted in 10 steps with the aid of a graphic bar.
GB
You can change these settings as follows:
Press the "MENU" button (Figure 5). The menu option «CHOOSE LANGUAGE» appears.
Press the scrolling buttons "<" or ">"(Figure 6) until the menu option «JUG PROGRAM» appears.
Confirm the menu option with the "OK" button (Figure 6). The display shows «JUG COFFEE TASTE».
Confirm the menu option with the "OK" button (Figure 6). The display shows the current setting, e.g. «EXTRA-MILD JUG».
If necessary select a different coffee strength in 5 steps from extra mild to extra strong using the scrolling buttons "<" or ">"(Figure 6).
When the desired coffee strength is displayed, confirm it with the "OK" button (Figure 6). This coffee strength is programmed in accordingly. If "OK" is not pressed, the appliance automatically returns to the coffee mode after about 120 seconds without saving the entries.
The display automatically jumps back to the menu option «JUG COFFEE TASTE» after programming.
If you want to change and save the filling quantity for the jug, press the scrolling button ">" (Figure 5) until the menu option «JUG OR CUP LEVEL» appears.
Confirm the menu option with the "OK" button (Figure 6).
A bar appears on the display, which can be made bigger or smaller; this represents the cup filling quantity. If necessary a different filling quantity can be selected using the scrolling buttons "<" or ">" (Figure 5) in 10 steps.
When the bar if completely full, this represents the max. cup filling quantity for the jug programme of about 125 ml.
When the desired filling quantity is displayed, confirm it with the "OK" button (Figure 6). This filling quantity is now programmed in.
If "OK" is not pressed, the appliance automatically returns to the coffee mode after about 120 seconds without saving the entries.
The display automatically jumps back to the menu option «JUG OR CUP LEVEL» after programming.
To go back to the coffee mode, press the "MENU" button (Figure 5) twice or wait about 120 seconds until the appliance automatically jumps back to coffee mode.
13.5 Setting the coffee programme (programming the filling quantity)
The appliance is preset to normal quantities at the factory. You can change and save these quantities for every cup size to suit your taste. You can change the filling quantity for each of the five cup sizes «ESPRESSO CUP», «SMALL CUP», «MEDIUM CUP», «LARGE CUP», «MUG»:
Press the "MENU" button (Figure 5). The menu option «CHOOSE LANGUAGE» appears.
Press the scrolling buttons "<" or ">"(Figure 6) until the menu option «COFFEE PROGRAM» appears.
Confirm the menu option with the "OK" button (Figure 6). The display shows «ESPRESSO CUP».
If necessary, select another cup size with the scrolling buttons "<" or ">"(Figure 6).
When the desired cup size is displayed, confirm it with the "OK" button (Figure 6).
A bar appears on the display, which can be made bigger or smaller; this represents the cup filling quantity. If necessary a different filling quantity can be
selected using the scrolling buttons "<" or ">" (Figure6) in 10 steps.
When the bar is completely full, this represents the max. cup filling quantity of about 220 ml.
When the desired filling quantity is displayed, confirm it with the "OK" button (Figure 6). This filling quantity is now programmed in. If "OK" is not pressed, the appliance automatically returns to the coffee mode after about 120 seconds without saving the entries.
i After programming the display automatically jumps back to the menu option for setting the filling quantity, e.g. «ESPRESSO CUP».
To go back to the coffee mode, next press the "MENU" button (Figure 5) twice or wait about 120 seconds until the appliance automatically jumps back to coffee mode.
i It is only possible to save the cup filling quantity for 1 cup. When dispensing 2 cups the save quantity is doubled.
13.6 Setting the cappuccino programme (programming the quantity of milk and coffee)
The quantities of milk and coffee required to make a cappuccino are pre-set to normal levels at the factory. You can adjust and change these to suit your taste:
Press the "MENU" button (Figure 5). The menu option «CHOOSE LANGUAGE» appears.
Press the scrolling buttons "<" or ">"(Figure 6) until the menu option «CAPPUCCINO PROGRAM» appears.
Confirm the menu option with the "OK" button (Figure 6). The display shows «MILK VOLUME».
If you want to change and save the milk quantity used to make a cappuccino, confirm the menu option with the "OK" button (Figure 6).
A bar appears on the display, which can be made bigger or smaller; this represents the milk quantity used to make a cappuccino. If necessary a different filling quantity can be selected using the scrolling buttons "<" or ">"(Figure 6) in 10 steps.
When the bar is completely filled, this represents the max. milk quantity for the cappuccino programme of about 120-180 ml (depending on the set amount of froth, i.e. depending on the amount of air mixed in).
When the desired filling quantity is displayed, confirm it with the "OK" button (Figure 6). This filling quantity is now programmed in. If "OK" is not pressed, the appliance automatically returns to the coffee mode after about 120 seconds without saving the entries.
The display automatically jumps back to the menu option «MILK VOLUME» after programming.
If you want to change and save the coffee quantity used to make a cap-puccino, press the scrolling buttons "<" or ">"(Figure 5) until the menu option «COFFEE FOR CAPPUCC.» appears.
Confirm the menu option with the "OK" button (Figure 6).
A bar appears on the display, which can be made bigger or smaller; this represents the coffee quantity used to make a cappuccino. If necessary a different filling quantity can be selected using the scrolling buttons "<" or ">" (Figure 6) in 10 steps.
When the bar is completely full, this represents the max. coffee quantity for the cappuccino programme of about 220 ml.
When the desired filling quantity is displayed, confirm it with the "OK" button (Figure 6). This filling quantity is now programmed in.
GB
If "OK" is not pressed, the appliance automatically returns to the coffee mode after about 120 seconds without saving the entries.
The display automatically jumps back to the menu option «COFFEE FOR CAPPUCC.» after programming.
To go back to the coffee mode, press the "MENU" button (Figure 5) twice or wait about 120 seconds until the appliance automatically jumps back to coffee mode.
13.7 Setting the hot water programme (programming dispensing quantity)
The appliance is preset to a normal quantity at the factory. You can change and save this quantity:
Press the "MENU" button (Figure 5). The menu option «CHOOSE LANGUAGE» appears.
Press the scrolling buttons "<" or ">"(Figure 6) until the menu option «HOT WATER PROGRAM» appears.
A bar appears on the display, which can be made bigger or smaller; this represents the hot water quantity that is dispensed. If necessary a different filling quantity can be selected using the scrolling buttons "<" or ">"(Figure 6) in 10 steps.
When the bar is completely full, this represents the max. hot water quantity, which can be dispensed at once, of about 250-280 ml.
When the desired quantity is displayed, confirm it with the "OK" button (Figure 6). This filling quantity is now programmed in.
If "OK" is not pressed, the appliance automatically returns to the coffee mode after about 120 seconds without saving the entries.
i The display automatically jumps back to the menu option «HOT WATER PROGRAM» after programming.
To go back to the coffee mode, press the "MENU" button (Figure 5) or wait about 120 seconds until the appliance automatically jumps back to coffee mode.
13.8 Looking up the number of coffees dispensed, number of jugs dispensed and number of descaling procedures (statistics)
The appliance allows the following values to be looked up:
- the total number of coffees made with the appliance up to that point,
- the number of jugs made with 4 cups, with 6 cups, 8 cups and 10 cups.
- the number of cappuccinos made, and also
- the number of descaling procedures carried out.
If 2 cups of coffee are dispensed at the same time then these are counted as 2 cups.
Press the "MENU" button (Figure 5). The menu option «CHOOSE LANGUAGE» appears.
Press the scrolling buttons "<" or ">" (Figure 6) until the menu option «STATISTICS» appears.
Confirm the menu option with the "OK" button (Figure 6). Then number of cups dispensed until that time appears on the display, e.g. «TOT. COFFEES 135» for 135 coffees dispensed.
Repeatedly press the scrolling buttons "<" or ">"(Figure 6) to display the number of jugs dispensed for each number of cups possible in the jug programme (4 cups, 6 cups, 8 cups, 10 cups). The number of jugs made with the respective number of cups appears on the display, e.g. «JUG 4 CUPS 12 » for 12 jugs made with 4 cups.
Repeatedly press the scrolling button ">" (Figure 6) to show the number of descaling procedures carried out, e.g. «TOT. DESCALES 5» for 5 descaling procedures.
To go back to the coffee mode, press the "MENU" button (Figure 5) twice or wait about 120 seconds until the appliance automatically jumps back to coffee mode.
13.9 Resetting the appliance to factory settings (Reset)
This function resets previously changed values to the factory settings.
The following settings or saved data are affected:
- Water hardness
- Cup filling quantities
- Coffee temperature
- Switch-off time
Press the "MENU" button (Figure 5). The menu option «CHOOSE LANGUAGE» appears.
Press the scrolling buttons "<" or ">" (Figure 6) until the menu option «RESET TO DEFAULT» appears.
Confirm the menu option with the "OK" button (Figure 6). The display shows «RESET TO DEFAULT NO».
Press the scrolling button "<" (Figure 6) until «RESET TO DEFAULT YES» appears on the display.
Confirm the menu option with the "OK" button (Figure 6). The appliance is now reset to the factory settings. If "OK" is not pressed, the appliance automatically returns to the coffee mode after about 120 seconds without being reset to the factory settings.
i After programming, the appliance automatically jumps back to coffee mode.
14 Care and cleaning
Keep your appliance clean at all times to ensure that it works without problems and the coffee quality remains consistent.
14.1 Regular cleaning
Warning! Switch the appliance off before cleaning. Allow the appliance to cool off.
Warning! Never put the appliance or individual parts of the appliance into the dishwasher. Never immerse the coffee machine in water.
Warning! Never put water into the bean container as this will damage the mill mechanism.
Do not use any abrasive or caustic products. Only wipe off the inside and outside of the housing with a damp cloth.
Remove the water tank (Figure 7) every day and throw the remaining water away. Rinse the water tank with clean water. Use clean water every day.
Empty the waste coffee container every day or at least when the display asks you to do this, see "Emptying the waste coffee container" page 132.
Empty the drip tray on a regular basis. At the latest, however, when the red float on the drip tray (Figure 33) shows through the opening on the drip tray grill.
Clean on a regular basis, at least once a week, the water tank (L), drip tray (M), drip tray grill (A) and waste coffee container (P) with warm water, mild detergent and possibly asmall brush.
After every frothing process rinse off the nozzles on the milk container to clean off remains of milk, see "Cleaning the nozzles" page 125.
Clean the milk container on a regular basis, see "Cleaning the milk container" page 132.
Check that the holes on the coffee dispenser are not blocked. You can clean off dried on coffee using a needle (Figure 34).
GB
14.2 Emptying the waste coffee container
The appliance shows how many coffees have been made. After making 14 single cups (or 7 pairs) of coffee, the following message is displayed: «EMPTY WASTE COFFEE CONTAINER» notifying that the waste coffee container is full and must therefore be cleaned. As long as the waste coffee container is not cleaned, this message remains in place and the coffee machine cannot make any coffee.
I
For cleaning purposes, unfasten and open the service door by pressing on the appropriate knob (Figure 35), then remove the drip tray (Figure 36), empty it and clean it.
D
Carefully empty and clean the waste coffee container. Make sure that all the remains stuck at the bottom are removed.
Important: Every time you pull the drip tray out, the waste coffee container must also be emptied, even if it is not completely full. If this process is not carried out, it is possible for the waste coffee container to overfill when coffee is made later and for the excess coffee to block the machine.
i
When you have removed the waste coffee container, the display shows «INSERT WASTE COFFEE CONTAINER».
i
Always empty the container every day when the appliance is used daily. Always empty the waste coffee container when the appliance is switched on. Only in this way does the appliance register the emptying process.
14.3 Cleaning the milk container
[NO TEXT]
Unfasten the lid of the milk container with a slight clockwise turn and remove it.
D
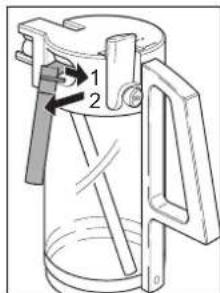
Pull off the milk dispenser pipe (Figure 25) and the suction pipe (Figure 37).
I
Carefully clean all the parts with hot water and detergent.
I
Put the suction pipe and the milk dispenser pipe back in place.
!
The milk container must not be cleaned in the dishwasher!
14.4 Cleaning the mill mechanism
Ground coffee remains can be removed from the bean container with a small soft brush or a vacuum cleaner.
!
Warning! Never put water into the mill mechanism, as this will damage the mill mechanism.
[Non-Text]
Switch the appliance off with the On/Off button (Figure 11) and the main switch (Figure 9). Pull out the power lead.
I
Remove the remaining coffee beans (e.g. use a vaccum cleaner with hose or crevice tool).
i
If a foreign body cannot be removed, consult customer services. Blocking or damage caused by foreign objects in the grinder might be excluded from the guarantee.
!
Warning! Risk of injury from rotating mill mechanism. Never switch the appliance on when you are working on the mill mechanism. This can cause serious injury. Always pull out the power lead.
[NO TEXT]
Next test that the mill mechanism is working by making a coffee with a small quantity of beans. During the first milling process or after cleaning, less ground coffee will enter the brewing unit, as the channel has to be filled. This can have an affect on the first coffee.
14.5 Cleaning the brewing unit
We recommend that you clean the brewing unit on a regular basis (depending on how much it is used). Before leaving your appliance unused for a long while (e.g. holidays), the waste coffee container and water tank have
to be emptied and the appliance thoroughly cleaned, incl. the brewing unit. Proceed as follows:
Switch the coffee machine off using the On/Off button (Figure 11) (do not pull the power lead out) and wait until the display switches off!
Unfasten and open the service door by pressing the appropriate knob (Figure 35).
Take out and clean the drip tray and waste coffee container (Figure 36).
Press on the two red locking buttons on the side of the brewing unit and towards the centre (Figure 38) and pull the brewing unit out.
i Attention: The brewing unit can only be taken out when the appliance is switched off using the On/Off button at the front of the appliance. The appliance should not be disconnected from the mains. If you try to take out the brewing unit whilst the coffee machine is switched on, this could be seriously damaged.
Clean the brewing unit under running tap water without using detergent. Never clean the brewing unit in the dishwasher.
Carefully clean the inside of the machine. Scrape off the encrusted coffee in the coffee machine using a wooden or plastic fork or something similar that will not scratch the finish (Figure 39) and then remove all the remains with a vacuum cleaner (Figure 40).
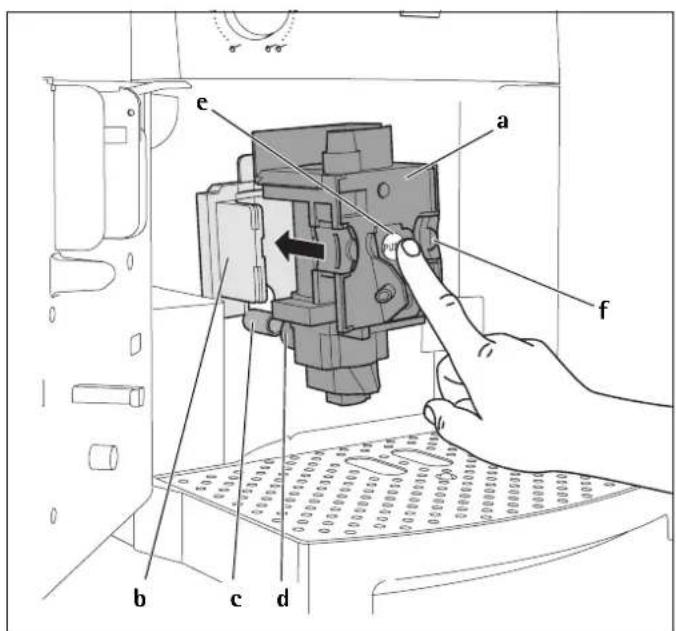
To replace, push the brewing unit (Figure 42, a) into the holder (Figure 42, b) and the pin (Figure 42, c). The pin must be introduced into the tube (Figure 42, d) at the bottom of the brewing unit.
Now push firmly where it says PUSH (Figure 42, e) until the brewing unit is heard fastening into place.
Once you have heard the unit clicking into position, make sure that the red buttons (Figure 42, f) have snapped
back out, otherwise the service door cannot be closed.
Figure 43: The two red buttons are correctly snapped out.
Figure 44: The two red buttons are not snapped out.
Put the drip tray back in place together with the waste coffee container.
Shut the service door.
If the brewing unit is not put in place correctly, i.e. if it can be heard clicking into position and the red buttons are not properly snapped back out, the service hatch cannot be closed.
i If the brewing unit can only be put into place with difficulty, it must be made into the right height (before inserting) by pressing the brewing unit firmly together from top and bottom, as shown in Figure 41.
i If it is still difficult to insert the brewing unit, shut the service door, pull the plug off the power lead out of the socket and put it back in again.
Wait until the display switches off, then open the service door and put the brewing unit back in place.
14.6 Carrying out the descaling programme
The descaling programme enables your appliance to be simply and effectively descaled. When advised to do so by the display «DESCALE», the appliance must be descaled.
Attention: Under no circumstances should you use any descaling products that are not recommended by Electrolux. If different descaling products are used, Electrolux assumes no liability for any damage. Descaling fluid can be bought at specialist shops or from the Electrolux helpline.
The descaling procedure takes approx. 45 minutes and should not be interrupted. If there is a power failure, the programme must be restarted.
GB
Before starting the descaling programme, clean the brewing unit (see "Cleaning the brewing unit" page 132).
Press the "MENU" button (Figure5). The menu option «CHOOSE LANGUAGE» appears.
Press the scrolling buttons "<" or ">" (Figure 6) until the menu option «DESCALE» appears.
Confirm the menu option with the "OK" button (Figure 6). The display shows «DESCALE NO».
Press the scrolling button "<", and the display shows «DESCALE YES».
Confirm with the "OK" button (Figure 6). The descaling programme starts.
If "OK" is not pressed, the appliance automatically returns to the coffee mode after about 120 seconds and the descaling programme is not started. The top line of the display alternates between «ADD DESCALER» and «PRESS MENU KEY» whilst the bottom of the display shows a progress bar and percentage,
0%».
Empty the water tank, fill it with at least 1 litre of water and add the des-caling agent.
Warning: Make sure that any splashes from the descaling agent do not come into contact with surfaces that are sensitive to acids, such as marble, limestone and ceramic.
Insert the hot water nozzle (Figure 10).
Put a container with a capacity of at least 1.5 litres underneath the hot water nozzle.
Press the "MENU" button (Figure 5). The descaling programmestarts and the descaling liquid runs out of the hot water nozzle. The display shows «DESCALING» and a progress bar shown with a percentage, e.g.
« ■ ■ ■ 25%».
The descaling programme automatically goes through a series of rinses
and pauses to remove limescale deposits from the inside of the coffee machine.
After about 45 minutes the water tank is empty and the top line of the display alternates between «DESCALE COMPLETE» and «PRESS MENU KEY» whilst the bottom line shows a progress bar and a percentage
« ■ ■ ■ ■ ■ ■ 50%».
Press the "MENU" button (Figure 5). The appliance is now ready for a rinsing process with clean water. The top line of the display alternates between «RINSING» and «FILL TANK!» whilst the bottom of the display shows a progress bar and percentage
« ■ ■ ■ ■ ■ 50%».
Take out the water tank, fill it with clean water and put it back in place. The top line of the display alternates between «RINSING» and «PRESS MENU KEY» whilst the bottom of the display shows a progress bar and percentage
《■■■■■ 50%》.
Empty the container under the hot water nozzle and put it back under the hot water nozzle.
Press the "MENU" button (Figure 5). A rinsing process takes place with clean water and the rinsing water runs out of the hot water nozzle. The display shows «RINSING» and a progress bar shown with a percentage, e.g.
《■■■■■ ■ 55%》.
After a few minutes the water tank is empty and the top line of the display alternates between «RINSING COMPLETE» and «PRESS MENU KEY» whilst the bottom line shows a progress bar and a percentage
«■■■■■■■■■■90%».
Press the "MENU" button (Figure 5). For a short time the top line of the display alternates between «RINSING COMPLETE» and «FILL TANK!» whilst the bottom line of the display
shows a progress bar and percentage «■■■■■■■■■■■ 100%».
After a few seconds the display just shows «FILL TANK!»
Empty the rinsing water out of the container.
Take out the water tank, fill it with clean water and put it back in place. The appliance is now ready for use again and is back to the last coffee mode selected.
i We recommend throwing the first cup of coffee away after the descaling programme.
15 What to do when the display show the following messages...
«FILL TANK»
- The water tank is empty or not properly in place.
Fill the water tank and insert it according to instructions, see „Filling with water" page 118.
- The water tank is dirty or limescale deposits have built up inside it.
Rinse out or descale the water tank.
«GROUND COFFEE TOO FINE SET GRIND LEVEL + PRESS HOT WATER KEY»
- The coffee machine cannot make any coffee.
Place a container underneath the hot water nozzle and press the "hot water" button (Figure 32).
• Coffee comes out too slowly.
Turn the knob for the grind level setting (Figure 12) clockwise by one position (see "Setting the grind level" page 126).
«EMPTY WASTE COFFEE CONTAINER»
• The waste coffee container is full.
Empty, clean and replace the waste coffee container as described in "Emptying the waste coffee container" page 132.
«INSERT WASTE COFFEE CONTAINER»
- The waste coffee container was not replaced after cleaning.
Open service door and insert the waste coffee container.
- No ground coffee was put into the filling chute after selecting the preground coffee function.
Add ground coffee as described under "Makingcoffee with ground coffee" page 123.
«FILL BEAN CONTAINER »
• There are no more coffee beans in the coffee bean container.
Fill coffee bean container, see "Filling the coffee bean container" page 118
- If the mill mechanism starts sounding very loud, this can mean that a small stone from the coffee beans has blocked the mill mechanism.
Consult customer services. Blocking or damage caused by foreign objects in the grinder might be excluded from the guarantee.
«PLEASE DESCALE!»
• Shows that the coffee machine is encrusted with limescale.
The descaling programme described in Chapter "Carrying out the descaling programme" page 133 must be carried out as soon as possible.
«CLOSE DOOR»
• The service door is open.
Close the service door. If the service door cannot be closed, make sure that the brewing unit is correctly inserted (see "Cleaning the brewing unit" page 132)
GB
«INSERT BREWING UNIT!»
- Someone probably forgot to put the brewing unit back in the coffee machine after cleaning it.
Insert the brewing unit, see "Cleaning the brewing unit" page 132
«GENERAL ALARM»
• The inside of the machine is very dirty.
Carefully clean the inside of the machine, see "Cleaning the brewing unit" page 132. If the coffee machine still shows this message once it has been cleaned, please consult customer services.
16 Solvable problems, before calling customer services
If the coffee machine does not work, you can easily find out the cause of the problem and fix it by turning to the advice in Chapter "What to do when the display show the following messages..." page 135. If, on the other hand, the coffee machine displays no message, please carry out the following checks before consulting customer services.
Coffee is not hot
• The cups were not preheated.
Preheat the cups by rinsing them out with warm water or leaving them at least 20 minutes on the heated cup tray (H) (see „Tips for dispensing hotter coffee“ page 122).
• The brewing unit is too cold.
Warm up the brewing unit with the rinsing programme before making coffee (see "Rinsing" page 122).
The coffee does not have enough crema
• The coffee is too coarsely ground.
Turn the knob for the grind level setting one position anti-clockwise (see "Setting the grind level" page 126).
• The coffee blend is not suitable.
Use a coffee blend suited to fully automated coffee machines.
Coffee comes out too slowly
• The coffee is ground too fine.
Turn the knob for the grind level setting one position clockwise (see "Setting the grind level" page 126).
Coffee comes out too quickly
• The coffee is too coarsely ground.
Turn the knob for the grind level setting one position anti-clockwise (see "Setting the grind level" page 126).
Coffee only comes out of one of the spouts on the coffee dispenser
• The holes on the spouts are blocked.
Remove the dried on coffee with a needle (Figure 29).
When the function or is selected, water comes out of the machine instead of coffee
• The ground coffee could have got stuck in the filling chute.
Remove the ground coffee blocking the filling chute with the help of a knife (see "Makingcoffee with ground coffee" page 123) (Figure 22). Then clean the brewing unit and the inside of the machine (see "Cleaning the brewing unit" page 132)
The machine does not switch on when the button is pressed
- The main switch on the back of the appliance is not switched on (Figure 8) or the mains plug is not plugged in.
Check that the main switch is in the "I" position and that the power lead is plugged in the socket properly.
The brewing unit cannot be taken out for cleaning
- The coffee machine is switched on. The brewing unit can only be removed when the machine is switched off.
Switch the appliance off and remove the brewing unit (see „Cleaning the brewing unit“ page 132).
GB
i Attention: The brewing unit can only be taken out when the appliance is switched off using the On/Off button ① at the front of the appliance. The appliance should not be disconnected from the mains. If you try to take out the brewing unit whilst the coffee machine is switched on, this could be seriously damaged.
Coffee does not come out of the spouts on the coffee dispenser but out of the service door at the side
- The holes on the coffee dispenser are blocked with dried on coffee.
Remove the dried on coffee with a needle (Figure 34).
- The swing drawer (Q) on the inside of the service hatch is blocked and will not move.
Carefully clean the swing drawer, particularly in the area around the hinges so that these continue to move.
Ground coffee was used (instead of coffee beans) and the machine will not dispense any coffee.
- Too much preground coffee was inserted.
Remove the brewing unit and carefully clean the inside of the machine as described under "Cleaning the brewing unit" page 132. Repeat the process using a maximum of 2 level measuring spoons of ground coffee.
- The "Coffee strength / preground coffee" knob was not put into position or and the appliance used both preground coffee and coffee ground by the mill mechanism.
Carefully clean the inside of the machine as described below under "Cleaning the brewing unit" page 132. Repeat the process, first by putting the "Coffee strength / preground coffee" knob in the right position as described under "Makingcoffee with ground coffee" page 123.
- Preground coffee was inserted whilst the machine was switched off.
Remove the brewing unit and carefully clean the inside of the machine as described under "Cleaning the brewing unit" page 132. Repeat the process with the machine switched on.
Milk is frothed up too much or too little
- Wrong setting of the slider on the lid of the milk container.
You can set the amount of froth on the milk to any level using the slider on the lid (Figure 27).
- Position "1 CAPPUCCINO": very frothy milk.
- Position "2 CAFFELATTE": not so frothy milk.
- If the milk is not frothy enough, the milk container may not be correctly in place.
Put the milk container correctly in place.
What should you do if the appliance is going to be transported?
- Keep the original packaging to protect it during transport. Always use the original plastic bag to protect against scratches.
- Protect the appliance and jug from being banged. No liability can be assumed for damage caused during transport.
• Empty the water tank and the waste coffee container.
- Please bear in mind where the appliance is stored, particularly during the cold part of the year. Frost damage can occur.
GB
17 Technical data
Mains voltage: 220-240 V
Power consumption: 1350 W
CE This appliance conforms with the following EC Directives:
• Low Voltage Directive 2006/95/EC
• EMC Directive 89/336/EEC with amendments 92/31/EEC and 93/68/EEC
• Materials and accessories coming into contact with food conform to EC regulation 1935/2004
18 Waste disposal

Packaging material
The packaging material is environmentally friendly and can be recycled. The plastic components are labelled, e.g. >PE<, >PS< etc. Dispose of the packaging materials in the prescribed containers at community recycling points in accordance with how they are labelled.

Old appliances
The symbol 📁 on the product or its packaging shows that this product should not be treated at normal household waste, but instead should be handed in at a collection point for recycling electrical and electronic appliances. By correctly disposing this product you are making a contribution to the environment and the health of your fellow human beings. Health and the environment are endangered by incorrect disposal. You can find out further information about recycling this product from your local council, your waste collection service or the company where you bought it.
19 If service is needed
If repairs should become necessary, including replacement of the mains cable, please contact your nearest Electrolux Customer service. Please also see service and warranty information in the separate Electrolux Warranty Booklet.
Always keep the original packaging including the foam parts. To prevent damage during transport, the appliance must be securely packaged.
When sending the appliance in, always add the jug. This is needed to test the appliance.
(RESET NA ZÁKLADNÉ NASTAVENIE - NIE).
Stlačte rolovacie tlačidlo "<" (obr. 6), pokým sa nezobrazí «RESET TO DEFAULT YES» (RESET NA ZÁKLADNÉ NASTAVENIE - ÁNO).
Cafeaua curve prea rapid
- Bästa kund,
- Kaffe og espresso
- Contents
- GB
- Key to picture
- Front view (Figure 1)
- Milk container (Figure 2)
- Front view with open service door (Figure 3)
- Control panel (Figure 4)
- Coffee and Espresso
- Safety guidelines
- General safety
- Child safety
- Safety during operation
- Safety when cleaning and servicing
- Summary of menu options
- Menu mode
- Using for the first time
- Setting up appliance and connecting it
- Filling with water
- Filling the coffee bean container
- Switching on for the first time
- Switching on the appliance
- Switching off the appliance
- Setting the water hardness
- Finding out the water hardness level
- D
- Setting and saving the established water hardness level
- [NO TEXT]
- Making coffee with beans
- Tips for dispensing hotter coffee
- Rinsing
- Making several cups of coffee with the jug function
- Makingcoffee with ground coffee
- !
- i
- Making cappuccino or hot milk (coffee and milk froth)
- [Non-Text]
- Making cappuccino
- Frothing/heating up milk
- Cleaning the nozzles
- Preparing hot water
- Setting the grind level
- Menu settings
- Setting the language
- Setting the coffee temperature
- Setting the switch-off time
- Setting the jug programme (Coffee strength and filling quantity for the jug)
- Setting the coffee programme (programming the filling quantity)
- Setting the cappuccino programme (programming the quantity of milk and coffee)
- Setting the hot water programme (programming dispensing quantity)
- Looking up the number of coffees dispensed, number of jugs dispensed and number of descaling procedures (statistics)
- Resetting the appliance to factory settings (Reset)
- Care and cleaning
- Regular cleaning
- Emptying the waste coffee container
- Cleaning the milk container
- Cleaning the mill mechanism
- Cleaning the brewing unit
- What to do when the display show the following messages...
- «FILL TANK»
- «GROUND COFFEE TOO FINE SET GRIND LEVEL + PRESS HOT WATER KEY»
- «EMPTY WASTE COFFEE CONTAINER»
- «INSERT WASTE COFFEE CONTAINER»
- «FILL BEAN CONTAINER »
- «PLEASE DESCALE!»
- «CLOSE DOOR»
- «INSERT BREWING UNIT!»
- «GENERAL ALARM»
- Solvable problems, before calling customer services
- Coffee is not hot
- The coffee does not have enough crema
- Coffee comes out too slowly
- Coffee comes out too quickly
- Coffee only comes out of one of the spouts on the coffee dispenser
- When the function or is selected, water comes out of the machine instead of coffee
- The machine does not switch on when the button is pressed
- The brewing unit cannot be taken out for cleaning
- Technical data
- CE This appliance conforms with the following EC Directives:
- Waste disposal
- Packaging material
- Old appliances
- If service is needed
- Cafeaua curve prea rapid
Brand : ELECTROLUX
Model : ECG6600
Category : Coffee maker