
VT-1764 BK - Humidifier Vitek - Free user manual and instructions
Find the device manual for free VT-1764 BK Vitek in PDF.


| Product Type | Air Humidifier (Ultrasonic) |
| Model | VT-1764 BK |
| Brand | Vitek |
| Power Supply | 220-230 V ~ 50 Hz |
| Power Consumption | 140 W |
| Water Tank Capacity | 5 L |
| Water Flow Rate | ≥ 400 ml/h |
| Humidifying Area | Up to 50 m² |
| Timer | 1-12 hours |
| Ionization Output | 2,000,000 – 3,000,000 ions/cm³ |
| Ozone Output | ≤ 0.05 PPM |
| Heating Mode | Yes, for water disinfection and easier evaporation |
| Ionization Mode | Yes, can be turned on/off |
| Automatic Humidity Maintenance | Yes, adjustable from 45% to 90% RH in 5% steps |
| Remote Control | Yes, with corresponding buttons |
| Display | Shows room temperature, humidity, settings, and indicators |
| Water Tank Backlight | Yes, helps estimate water level |
| Filter Cartridge | Includes replaceable filter-cartridge (model not specified) |
| Safety Features | Auto shut-off when tank empty; empty tank indicator; overheat protection |
| Cleaning | Weekly clean tank and sprayer; descale filter every 1000 L or as needed |
| Service Life | 3 years |
Frequently Asked Questions - VT-1764 BK Vitek
User questions about VT-1764 BK Vitek
0 question about this device. Answer the ones you know or ask your own.
Ask a new question about this device
Download the instructions for your Humidifier in PDF format for free! Find your manual VT-1764 BK - Vitek and take your electronic device back in hand. On this page are published all the documents necessary for the use of your device. VT-1764 BK by Vitek.
USER MANUAL VT-1764 BK Vitek
ENGLISH
AIR HUMIDIFIER
DESCRIPTION
- "Heating" mode on/off button
- "Timer" setting button
- Steam "Max/Min" button
- "Humidity" setting button
- "Power" on/off button
- "Ozone" mode on/off button
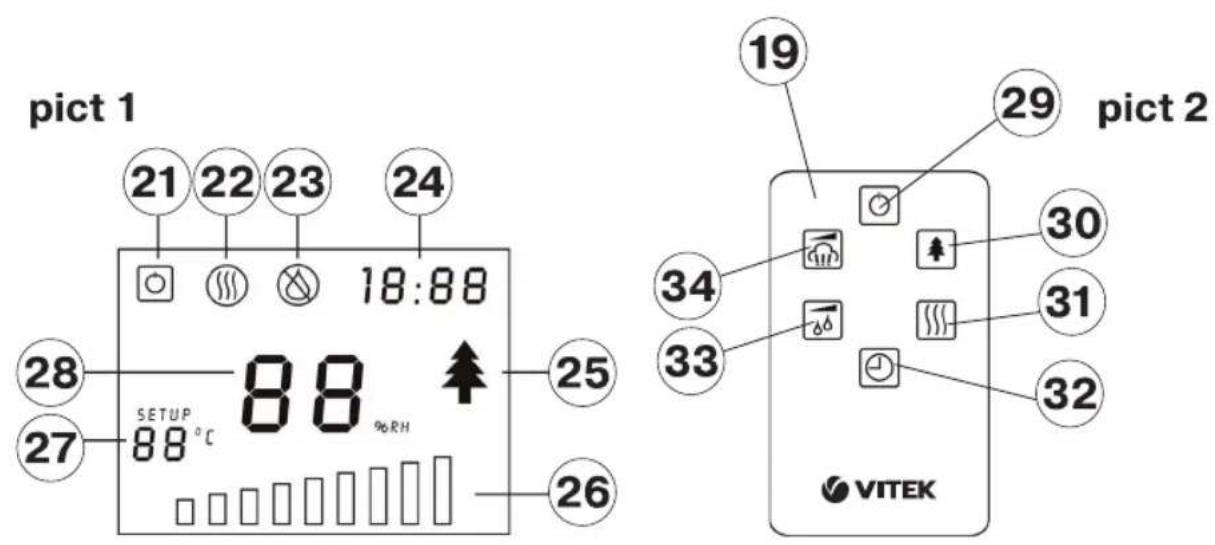
- Display (pic. 1)
- Cover with steam outlets
- Steam outlets
- Tank handle
- Water tank
- Opening for filling water
- Handle for convenient filling/carrying the tank
- Filter-cartridge
- Water tank lid
- "Sprayer"
- Body of the unit
- Water tank backlight
- Remote control (pic. 2)
- Brush for cleaning the "sprayer"
Display indications (7) (pic. 1)
- on/off indication
- water heating mode indication
- empty water tank indication
- time before the switch off indication
- ionization mode indication
- humidifying intensity indication
- room temperature indication
- current room humidity/set room humidity indication
Remote control (19) (pic. 2)
- On/off button
- Ionization mode on/off button
- Heating mode on/off button
- Timer setting button
- Room relative humidity setting button
- Outgoing steam intensity setting button
SAFETY MEASURES
Before using the unit, read these instructions carefully and keep them for future reference.
- Make sure that your home electricity supply corresponds to the voltage specified on the body of the unit.
- Place the unit on a flat, moisture-resistant surface. Distance from the walls should be not less than 15 cm.
- Do not direct the nozzle of the unit at wooden furniture, electrical appliances, books and objects, which can be damaged by moisture.
- Do not place the humidifier in places subject to direct sunlight, high temperatures, near computers or other sensitive electronic appliances.
- Do not leave the unit unattended in closed rooms otherwise condensation can appear on furniture and the walls, that is why we recommend keeping the door of the room, where the humidifier is used, half-opened.
- Never use the unit outdoors.
- Use only the removable parts which are supplied with the unit.
- Never allow children to use the unit as a toy.
- Close supervision is necessary when children or disabled persons use the unit.
- This unit is not intended to be used by children or disabled persons unless they have been given all the necessary instructions on safety measures and information about danger, which can be caused by improper usage of the unit.
- Do not operate the unit without water. Disconnect the unit from the power supply when the water tank becomes empty.
- Do not use soda water or any perfume additives.
- Unplug the unit before removing the water tank.
ENGLISH
- Do not cover the ventilation openings and avoid foreign objects getting inside them.
- Do not immerse the unit into water or other liquids.
- Do not move or tilt the unit during its operation.
- Always unplug the unit and pour out the water from the water tank when cleaning the unit or when you do not use it. Unplug the unit before moving it to another place.
- Do not touch the power plug with wet hands.
- Before using the unit, closely examine the power cord and make sure that it is not damaged. Do not use the unit, if its power cord is damaged.
- Do not disassemble the unit yourself, if any malfunction is detected, apply to the nearest authorized service center.
- Regularly clean the unit; be careful not to make any scratches on the sprayer.
- Store the unit out of reach of children.
Unpack the unit and remove the packing materials. Examine the unit for damages. Do not switch on the unit if there are any damages in it.
Note:
- if the unit was subjected to negative temperatures, before switching it on for the first time, keep it at room temperature for 30 minutes.
- use the unit at temperatures from +5 to +40°C, and relative humidity less than 80%.
- water temperature should not exceed +40°C.
Before switching on the unit, make sure that you home electricity supply corresponds to the voltage specified on the body of the unit.
- Take the handle (10) and remove the water tank (11) from the body (17).
- Turn over the tank (11); unscrew the lid (15), by turning it anti clockwise. Fill the water tank (11) with necessary quantity of water and screw the lid on (15), by turning it clockwise.
- Set the filled tank (11) on the body of the unit (17). Wait for some time, which is necessary to fill the operating chamber with water.
- Plug in the humidifier, the indication (21) will appear on the display (7); the room temperature (27) and humidity (28) will be displayed.
- Switch on the humidifier, by pressing the (5) "Power" on/off button, the indication (21) will go out, the display will switch to full brightness and the steam intensity indication (26) will light up.
Note:
- each pressing of the control buttons will be accompanied with a sound signal.
- if no button has been pressed during 30 seconds on the control panel or on the remote control, the display brightness will decrease automatically.
- To switch on the ionization mode, press the (6) "Ozone" button, the indication (25) will appear on the display (7). To switch off the ionization mode, press the (6) "Ozone" button once again, the indication (25) will disappear.
- To switch on the heating mode, press the (1) "Heating" button, the indication (22) will appear on the display (7). In this mode the evaporated water will be
ENGLISH
preliminary heated up; it disinfects water and provides its easy evaporation.
Note:
- switching on this function can to some extent change the indications of the room temperature (27) and humidity (28) on the display (7).
- You can set up operation time of the unit using the (2) "Timer" button. Press the button (2) to set the required operation time of the unit from 1 to 12 hours, it will be reflected on the display (7) by corresponding digit indication (24).
- Use the (3) steam "Max/Min" button to set the required intensity, it will be reflected on the display (7) by the changing indication (26).
Note:
- if the unit operates in the automatic humidity maintenance mode, steam intensity control will be performed automatically.
- To switch on the automatic humidity maintenance mode, press the (4) "Humidity" button, the "Setup" symbol will be flashing on the display, press the button (4) again to set the required humidity in the room (from 45 to 90%, setting step is 5%). In the automatic humidity maintenance mode the "Setup" symbol will be flashing on the display (7), temperature (27), humidity (28) and steam intensity (26) will be displayed. To view the preset humidity value, press the (4) "Humidity" button, the preset humidity value will be flashing on the display (7), in 5 seconds the information on the display will return to the previous mode.
To switch off the automatic humidity maintenance mode, press the (4)
“Humidity” button several times, when humidity value reaches 90%, the “Setup” symbol will go out.
- When you want to stop the work of the unit, switch off the unit, by pressing the (5) "Power" button, the indication (21) will appear on the display (7), the room temperature (27) and humidity (28) will be displayed.
- When the water tank becomes empty (11), the humidifier will switch off automatically, the indication (23) will light up on the display (7) and you will hear sound signals.
Note:
Water tank backlight (18) will help you estimate water quantity in the tank.
REMOTE CONTROL (19)
For convenient control of the unit, use the remote control.
If there is an isolation insert in the battery compartment, remove it, if the battery is supplied separately, remove the holder of the battery, by preliminary pressing the clamp, insert the battery in the holder, strictly following the polarity, insert the battery holder into the remote control.
Correspondence of the remote control buttons to the buttons on the control panel of the unit:
- "Power" on/off button (5).
- "Ozone" mode on/off button (6).
- "Heating" mode on/off button (1).
- "Timer" setting button (2).
- "Humidity" setting button (4).
- Steam intensity setting button - "Max/Min" (3).
CLEANING AND CARE
Warning: Always switch off and unplug the unit before cleaning it.
ENGLISH
Hard water causes the appearance of scale on the “sprayer”, on the inner parts of the body and on the water tank; it leads to improper operation of the unit and appearance of white deposit on the interior. In order to avoid it, it is necessary to clean the sprayer every day and replace water as often as possible, as well as to perform cleaning of the filter-cartridge (14).
If you are not going to use the unit for a long time: - pour out water from the tank and the operating chamber of the “sprayer”, wash the water tank, wash and clean the operating chamber of the “sprayer” and the “sprayer” itself, dry the unit and put it away for storage.
Weekly care
- Once a week carefully wash the water tank (11) and the operating chamber (11) with a neutral washing liquid solution. After that, carefully rinse them with water.
- Add 5-10 drops of the cleaning agent on the “sprayer” (16); wait about 2-5 minutes. Use the brush (20) to remove the deposit from the surface of the “sprayer” (16).
Note:
- As a cleaning agent for the "sprayer" you can use substances for scale removal in kettles.
- Do not immerse the unit into water or other liquids.
Cleaning the filter
-
Clean the filter (14) after about 1000 l of water pass through it, and when using hard water or appearance of white deposit on the furniture, clean it more often.
• Take the handle (10) and remove the water tank (10) from the body of the unit (17). -
Turn over the water tank (11), unscrew the lid (15) by turning it anti clockwise and remove the filter-cartridge (14), by turning it anti clockwise.
- Put the filter-cartridge (14) for 10 minutes into the bowl with vinegar, take out the filter-cartridge (14) and wash it under tap water.
- Place the filter-cartridge (14) back on the lid (15), by turning it clockwise.
Replacement of the filter-cartridge (14)
Replace the filter cartridge (14) when necessary.
Storage
- If you are not going to use the unit for a long time, make sure that all its parts are dry, including the operating chamber of the “sprayer”.
- Do not store the device with water in the operating chamber.
- Before you put the filter-cartridge away for storage, clean and dry it, keep the filter cartridge in a cool dark place.
Store the humidifier in a dry cool place out of reach of children.
TROUBLESHOOTING GUIDE
Before applying to the service center read about the following problems:
ENGLISH
| Problem Possible cause Solution | ||
| The humidifier does not operate | The unit is not plugged in Plug the unit | |
| The water tank is empty, the indicator light (23) is red | Fill the water tank with water | |
| Steam has an unpleasant smell | New device – it is normal | Unscrew the lid of the water tank and leave the unit for several hours in a cool dark place |
| Polluted water in the water tank | Clean the water tank and fill it with pure water | |
| Small intensity of steam output | Polluted sprayer Clean the sprayer | |
| The remote control does not operate | Obstacle between the remote control and the sensor on the unit | Remove the obstacle for proper operation of the remote control |
| Large distance between the remote control and the unit | Use the remote control in the operating zone | |
| Battery is discharged Replace the battery | ||
NOTE
Non-observance of rules for cleaning the unit parts from mineral deposits caused by hard water may affect the overall performance of the unit.
In this case clean the unit and use filtered or distilled water in the future.
SPECIFICATIONS
Power supply: 220-230 V \~ 50 Hz
Power: 140 W
Water tank: 5 l
Water flow: >= 400ml/h
Humidifying area up to 50m²
Timer for 12 hours
Ions output: 2.000.000 \~ 3.000.000 ion /cm²
Ozone output: <= 0.05 PPM
Specifications subject to change without prior notice.
Service life of appliance - 3 years
GUARANTEE
Details regarding guarantee conditions can be obtained from the dealer from whom the appliance was purchased. The bill of sale or receipt must be produced when making any claim under the terms of this guarantee.

This product conforms to the EMC-Requirements as laid down by the Council Directive 89/336/EEC and to the Law Voltage Regulation (73/23 EEC)
DEUTSCH
LUFTBEFEUCHTER
Olisdan boshqarish pulti (19) (2-rasm)
- Ishlatish/o'chirish tugmasi
- Ionlash xususiyatini ishlatish/o'chirish tugmasi
- Suv isitish xususiyatini ishlatish/o'chirish tugmasi
- Taymer vaqtini qo'yish tugmasi
- Xonadagi nisbiy namlikni belgilash tugmasi
- «Bug’» chiqish kuchini belgilash tugmasi
XAVFCIZLIK QOIDALARI
A production date of the item is indicated in the serial number on the technical data plate. A serial number is an eleven-unit number, with the first four figures indicating the production date. For example, serial number 0606xxxxxxx means that the item was manufactured in June (the sixth month) 2006.
DE

- ENGLISH
- AIR HUMIDIFIER
- DESCRIPTION
- Display indications (7) (pic. 1)
- Remote control (19) (pic. 2)
- SAFETY MEASURES
- Note:
- REMOTE CONTROL (19)
- Correspondence of the remote control buttons to the buttons on the control panel of the unit:
- CLEANING AND CARE
- Weekly care
- Cleaning the filter
- Replacement of the filter-cartridge (14)
- Storage
- TROUBLESHOOTING GUIDE
- NOTE
- SPECIFICATIONS
- Service life of appliance - 3 years
- GUARANTEE
- DEUTSCH
- LUFTBEFEUCHTER
- Olisdan boshqarish pulti (19) (2-rasm)
- XAVFCIZLIK QOIDALARI
- DE
Brand : Vitek
Model : VT-1764 BK
Category : Humidifier