
HW 250 - Mill Cocraft - Free user manual and instructions
Find the device manual for free HW 250 Cocraft in PDF.


| Product Type | Wet & Dry Bench Grinder (Combination Mill) |
| Model | Cocraft HW 250 (also known as TLG-150WG) |
| Rated Voltage | 230–240 V AC, 50 Hz |
| Rated Power | 150 W (S1 continuous) / 250 W (S2 30 min) |
| No-Load Speed (Dry Wheel) | 2850 rpm |
| No-Load Speed (Wet Wheel) | 130 rpm |
| Maximum Peripheral Speed (Dry) | 23 m/s |
| Maximum Peripheral Speed (Wet) | 1.3 m/s |
| Dry Grinding Wheel Dimensions | ∅ 150 × 20 × ∅ 12.7 mm (60 grit) |
| Wet Grinding Wheel Dimensions | ∅ 200 × 40 × ∅ 20 mm (80 grit) |
| IP Rating | IP23 |
| Weight | 11.5 kg |
| Noise Emission (Sound Pressure) | LpA = 68 dB(A), KpA = 3 dB(A) |
| Noise Emission (Sound Power) | LwA = 85.3 dB(A), KwA = 3 dB(A) |
| Overload Protection | Automatic motor shutdown when overloaded |
| Safety Features | Safety guard, spark deflector, tool rest, safety screen, emergency stop button |
| Coolant System | Water container with drain plug for wet grinding |
| Adjustable Spark Deflector & Tool Rest | Max gap 2 mm to grinding wheel |
| Mounting | Four mounting holes for secure attachment to a stable surface |
| Maintenance | Clean with soft, damp cloth and mild detergent; do not use solvents or abrasives |
| Included Accessories | Wet & dry grinding wheels, water container, tool rest, spark deflector, safety screen, clamping flanges |
| Repairability | Repairs to be carried out by qualified technician using identical replacement parts |
| Disposal | Do not dispose with household waste; recycle at designated collection point (WEEE directive) |
Frequently Asked Questions - HW 250 Cocraft
User questions about HW 250 Cocraft
0 question about this device. Answer the ones you know or ask your own.
Ask a new question about this device
Download the instructions for your Mill in PDF format for free! Find your manual HW 250 - Cocraft and take your electronic device back in hand. On this page are published all the documents necessary for the use of your device. HW 250 by Cocraft.
USER MANUAL HW 250 Cocraft
WHETSTONE AND GRINDING WHEEL
KOMBISLIPMASKIN KOMBISLIPEMASKIN YHDISTELMÄHIOMAKONE KOMBISCHLEIFMASCHINE

Important!
Read the entire instruction manual carefully and make sure that you fully understand it before you use the equipment. Keep the manual for future reference.
Viktig information:
Original instructions
Bruksanvisning i original
Originalbruksanvisning
Wet & Dry Bench Grinder
Art.no 18-3609 Model TLG-150WG
41-1024
TLG-150WG
Please read the entire instruction manual before using the product and then save it for future reference. We reserve the right for any errors in text or images and any necessary changes made to technical data. If you have any questions concerning technical problems please contact our Customer Services.
General safety instructions
Warning: When using this machine all basic safety precautions must be followed to avoid the risk of fire, electrocution and personal injury. Read these instructions carefully before using the product and keep them for future reference.
- Keep the work area tidy. Cluttered surfaces and benches invite accidents.
-
Take stock of your working environment. Do not expose the machine to rain. Do not use the machine in moist or wet areas. Keep the working area well lit. Never operate the machine near flammable liquid or gas.
-
Avoid electric shocks. Avoid body contact with earthed objects such as pipes, radiators, ovens or refrigerators.
-
Keep other people at a safe distance. Do not allow anyone, especially children, not involved in the work process to touch the machine or its electric cable. Keep children and bystanders at a safe distance from the work area.
-
Store the machine in a safe place. When the machine is not in use, keep it in a locked, dry area, away from children.
-
Do not force the machine. The machine will work better and safer at the feed rate for which it was intended.
-
Use the correct tool for the job. Do not try to use small tools to perform jobs requiring more powerful tools. Do not use a tool for a purpose for which it was not designed, e.g. using a circular saw for lopping branches off trees.
-
Dress properly. Do not wear loose-fitting clothing or jewellery; they could be caught in moving parts. Non-slip shoes are recommended for outdoor work. Wear a hairnet or similar if you have long hair.
-
Always use safetywear. Wear safety glasses. Use a dust mask or dust filter when working in dusty environments.
-
Use dust extraction equipment. If the machine is equipped with or connected to a dust extractor/collector, make sure that it is turned on and used correctly.
-
Do not abuse the mains lead. Do not pull or tug the mains lead when unplugging the machine, grip and pull the plug itself. Make sure that the mains lead does not come into contact with heat, oil, or sharp edges.
-
Firmly secure the workpiece. If possible use vices or clamps to hold the workpiece in place. This is much safer than holding the workpiece in one hand.
-
Do not overreach. Make sure that you stand steady and balanced all times.
-
Look after your machine. Make sure that your machine is clean and that any cutting edges are sharp for maximum effect and best results. Follow the instruction manual's recommendations regarding lubrication and replacement of accessories. Inspect the mains lead regularly. If it is damaged it should be replaced by a qualified service technician. Inspect all leads and cables regularly to check for any damage. Make sure that the handles and controls of the machine are clean, dry and free from oil, grease etc.
- Turn the power off. Pull out the plug and push in the emergency stop button before servicing or changing any blades, drill bits, cutters or sanding discs.
- Remove all spanners and repair tools. Make a habit of checking to make sure that the machine is free of all spanners and tools before turning the power on.
- Avoid unintentional starting. Do not walk around with your finger on the trigger of a power tool if it is plugged in. Make sure that the on/off switch is set to OFF before plugging in any power tool.
- Use the correct extension leads. If you use extension leads outdoors, only use those designed for outdoor use. Only use extension leads with thick enough diameter core wires and roll out the whole lead.
- Use common sense and be careful. Think before carrying out any task, so that it is carried out safely. Never operate the machine when you are tired, under the influence of medicine, etc.
-
Check the following before turning the machine on:
-
That all guards and other parts are whole and in working order.
- That moving parts can rotate freely and are correctly aligned.
- That no moving parts can get caught.
- That there are no visible defects.
- That no other factors have occurred that could influence the execution of your work.
Any safety guard or other part that is damaged should be repaired by a tradesman or replaced. Damaged power leads and switches must always be replaced by a tradesman. Never operate a machine if you cannot stop or start the machine comfortably.
- Use only recommended accessories. The use of non-recommended accessories can cause accidents and personal injury.
- Should only be repaired by a qualified technician. This machine conforms to current safety requirements. Repairs should only be carried out by a qualified repair person using genuine identical replacement parts. Otherwise the machine could be dangerous and cause an injury.
Specific safety rules for bench grinders
- Do not touch the mains lead if it has been damaged whilst you have been using the bench grinder. Unplug the machine immediately and have the mains lead replaced by a qualified electrician.
- Do not use the bench grinder if it is dusty and do not use it in a dusty environment.
- If used outdoors, the bench grinder should be connected to the mains via an RCD (tripping at max 30 mA within max 30 ms). If an extension lead is used outdoors, it must be of a type approved for outdoor use.
- If a dangerous situation arises, unplug the machine from the electrical supply immediately.
- Keep the mains lead to the rear of the bench grinder at all times.
• Danger of fire from flying sparks! - Grinding metal creates sparks, keep bystanders and pets out of range of any flying sparks. Make sure that there are no combustible materials in and around the workplace.
• Warning: Harmful fumes! - Working with harmful dust poses a health risk for the operator of the bench grinder and for anyone close to the workplace.
- Wear eye protection.
- Use hearing protection.
- Wear a face mask.
- Wear protective gloves.
- Risk of burns!
- The workpiece will become very hot when it is ground. Do not touch the part of the workpiece which has just been ground, let it cool first. When grinding for a long time, interrupt the process occasionally to allow the workpiece to cool before continuing. Do not use the bench grinder continuously for longer than 30 minutes.
- Only use grinding wheels recommended by the manufacturer and that are rated at the same or higher speed than the speed specified on the rating plate of the machine.
- Only use grinding wheels which are labelled with data specifying the manufacturer, type of bonding, dimensions and permissible rpm.
- Always keep grinding wheels in a dry place where the temperature is as constant as possible.
- Use only the supplied clamping flanges to mount the grinding wheels.
- The clamping flanges used must be of the same size and format. Any backing layers used between the grinding wheel and flanges must be made of elastic materials such as rubber.
- It is prohibited to enlarge the mounting hole in the grinding wheel by drilling.
- The adjustable upper guard should be adjusted regularly to compensate for wear on the wheel.
- The bench grinder must not be used without the safety guard. Make sure not to exceed the following distances: Workpiece support–grinding wheel: max 2 mm, safety guard–grinding wheel: max 2 mm. A large gap between the workpiece support and grinding wheel will increase the risk of accidents.
- The safety guard, workpiece support and transparent guard must all be fitted before the bench grinder is used.
• Always unplug the bench grinder before changing a grinding wheel.
- The maximum peripheral speed of the dry grinding wheel is: 150 = 23 m/s. The maximum peripheral speed of the wet grinding wheel is: 200 = 1.3 m/s.
- The maximum permissible motor housing temperature is 80 °C.
- Fill the water container up to the spindle shaft.
- Ensure that the bench grinder is securely fastened to a stable surface before use. Use the four mounting holes in the base.
- Adjust the spark deflector periodically to compensate for the wear of the wheel. The distance between the spark deflector and the grinding wheel should be as little as possible and should not exceed 2 mm.
- The grinding wheel must be replaced at the latest when the spark deflector and the workpiece support can no longer be set a maximum distance of 2 mm from the grinding wheel.
- Only use grinding wheels recommended by the manufacturer and that are rated at the same or higher speed than the speed specified on the rating plate of the bench grinder.
- When the grinding wheels are blocked due to abnormal feed force or a jammed workpiece during grinding, turn the machine off and disconnect it from the power supply. Remove the workpiece and ensure that both grinding wheels run freely. Turn the machine on and resume grinding with reduced feed force.
- Do not grind materials containing asbestos. Asbestos is a known carcinogen.
- Never use damaged or deformed wheels or brushes.
- Avoid contact with the moving grinding wheel.
- Hold the workpiece firmly with both hands at all times when working.
- Keep your proper footing and balance at all times.
- After you have finished grinding metal, allow the grinding wheel(s) to come to a standstill.
- When taking a break from your work, before carrying out any tasks on the device itself and when you are not using the machine, always pull the mains plug out of the mains socket.
- Handle the machine carefully and treat it with respect. Always keep the machine clean, dry and free of oil or grease.
- Remain alert at all times! Always watch what you are doing and proceed with caution. Do not use the machine if you cannot concentrate or you are feeling unwell.
- Store grinding wheels in such a way that they are not subject to mechanical loads or damaging environmental influences.
Product safety symbols

Please read the entire instruction manual before using and save it for future reference.

Always wear hearing protection.
Always wear safety glasses or a visor and breathing protection.
Description
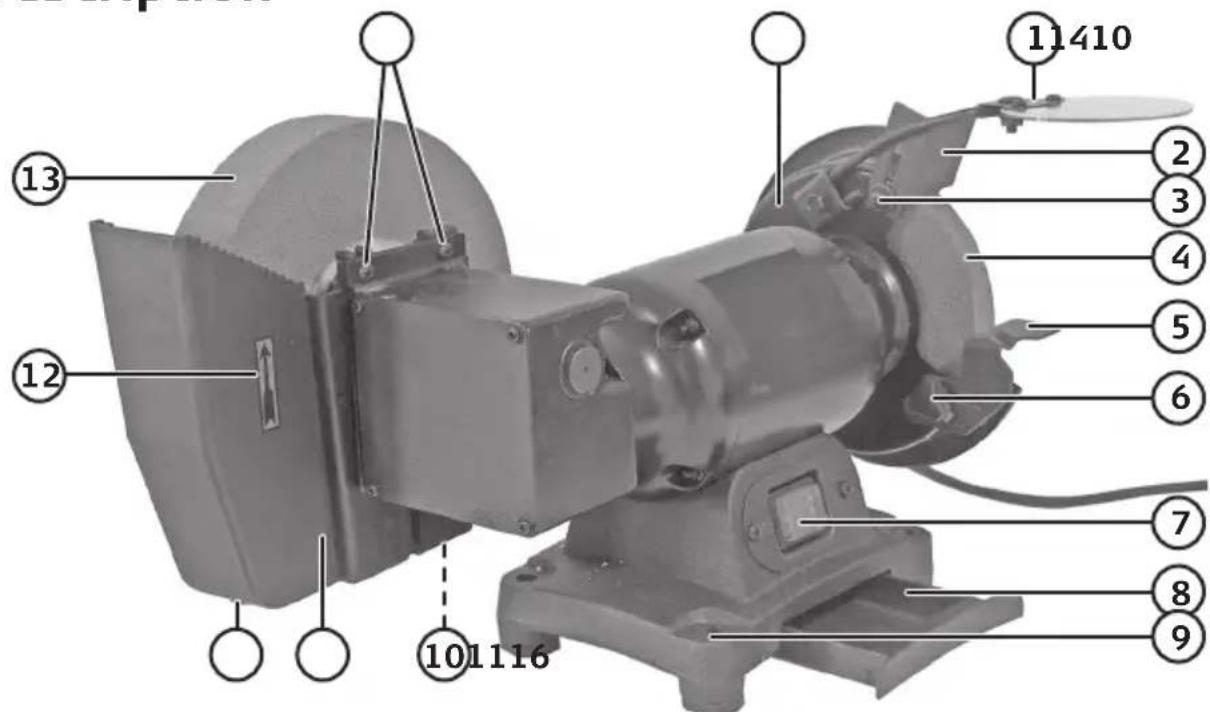
- Safety screen and holder
- Spark deflector
- Spark deflector locking screw
- Grinding wheel (60 grit)
- Tool rest / workpiece support
- Tool rest locking knob
- Power switch ON/OFF [1 - 0]
- Coolant drawer
- Mounting hole
- Water container nut and bolt
- Water container
- Rotation arrow
- Wet grinding wheel (80 grit)
- Grinding wheel safety guard
-
Drain plug
-
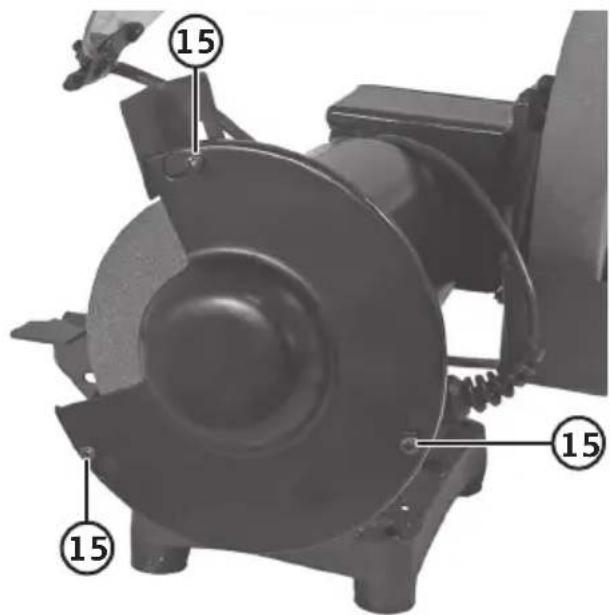
Removable safety guard fastening screws
Assembly
Caution: Plug the machine in only after completing all assembly and adjustment work and reading and understanding the user manual and safety instructions.
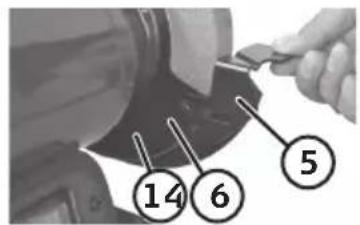
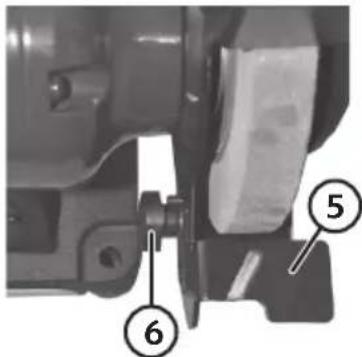
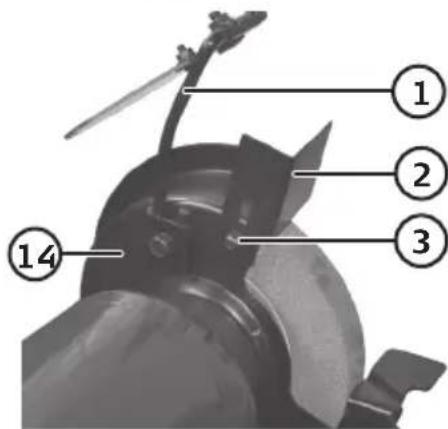
- Attach the tool rest (5) to the grinding wheel guard (14) using the locking knob (6). The gap between the grinding wheel and the tool rest should be set to a maximum of 2 mm.
-
Attach the spark deflector (2) to the grinding wheel guard (14) using the locking screw (3). The gap between the grinding wheel and the tool rest should be set to a maximum of 2 mm.
-
Attach the safety screen holder (1) to the grinding wheel guard (14) using the screws and u-washer. Set the angle and then tighten the screws.
Operating instructions
• Make sure that the grinding wheel can rotate freely before starting the machine.
- Adjust the safety screen so that you have a good view of the grinding operation.
- Remember that the grinding wheel gets smaller as it wears out; adjust the distance between the tool rest and wheel and between the spark deflector and wheel to 2 mm accordingly.
Overload protection
If the motor is overloaded, it will turn off automatically. Let it cool before attempting to turn it on again.
Using the dry grinding wheel
- Plug the mains lead into a wall socket.
- Start the bench grinder and let it get up to speed before beginning to grind.
- Hold the workpiece firmly in both hands and support it on the tool rest. Move the workpiece slowly and steadily towards the grinding wheel. Grinding can lower the speed of the grinding wheel. Reduce the pressure a little until the wheel has returned to its full speed.
- Cool the workpiece in the coolant drawer (8) if it gets too hot.
- Turn the bench grinder off using the power button and then unplug it from the wall socket.
Warning:
- Small workpieces should be held with pliers or a similar tool.
- Only ever grind on the face of the grinding wheel, never on the sides.
- As most materials get hot during grinding, you must be very careful with the workpiece.
Using the wet grinding wheel
- Pour water into the water container (11).
- Plug the mains lead into a wall socket.
- Start the bench grinder and let it run until the grinding wheel is completely wet before beginning to grind. When the grinding wheel has been saturated with water, the level of water in the container may drop and should be topped up.
- Grind the tool on the grinding wheel.
- Turn the bench grinder off using the power button and then unplug it from the wall socket.
- Empty the water container after grinding. The drain plug (16) is located on the bottom of the water container. Let the grinding wheel dry completely before putting the bench grinder away for storage.
Changing the dry grinding wheel
Warning: In order to prevent injury by accidentally starting the bench grinder, the machine must be turned off and the power plug disconnected from the socket before the grinding wheel is replaced.
- Set the power switch to 0 and unplug the grinder from the wall socket before changing the grinding wheel.
- Fold up the safety screen and its holder.
- Undo the spark deflector (2) and the tool rest (5) and move them away from the wheel to give you enough room to change the wheel.
- Undo the 3 retaining screws (15) and twist the detachable safety guard (14) clockwise to give you access to the grinding wheel.
- Hold the wheel, remove the retaining nut and outer flange from the spindle. The retaining nut is threaded opposite to the direction of rotation.
- Remove the old grinding wheel and attach a new one.
-
Assemble in reversed order.
-
Adjust the spark deflector (2) and tool rest (5) to max 2 mm from the grinding wheel and tighten.
- Make sure that the grinding wheel can rotate freely before starting the machine.
- Stand to the side of the machine. Start it and let it get up to speed to make sure the wheel is balanced before grinding.
Note:
- Do not remove the cardboard discs attached to the sides of the new grinding wheel because they aid the secure grip of the flange against the grinding wheel.
- Check the new grinding wheel for cracks or other visible damage before fitting. Never use a damaged grinding wheel.
- Do not tighten the nut too much with a spanner because the grinding wheel may break.
Changing the wet grinding wheel
- Set the power switch to 0 and unplug the grinder from the wall socket before changing the grinding wheel.
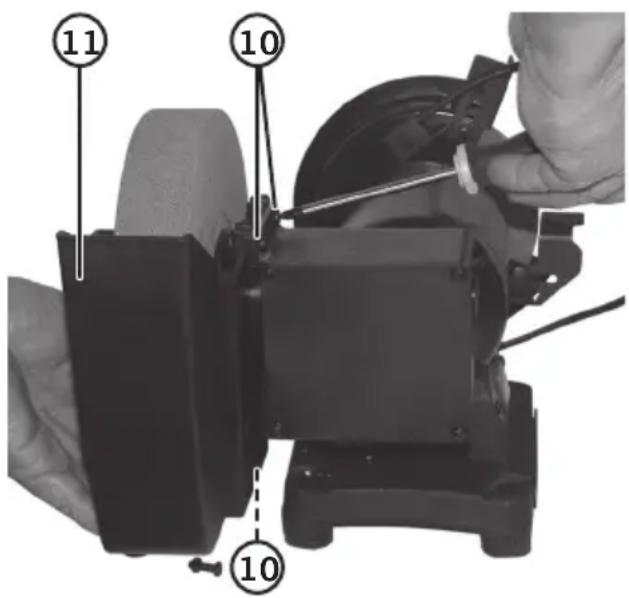
- Drain the water from the container (11). Loosen the 3 nuts and bolts (2 at the top and 1 at the bottom) holding the water container. The nuts and bolts don't need to be removed, just loosened. Push the container towards the grinding wheel and then downwards to remove it.
- Important: Hold the wet grinding wheel to prevent any load from being exerted on the gearbox when the retaining nut and flange are removed from the spindle.
- Remove the old wet grinding wheel and attach the new one.
- Assemble in reversed order.
- Stand to the side of the machine. Start it and let it get up to speed to make sure the wheel is balanced before grinding.
Care and maintenance
- Unplug the mains lead before cleaning the product.
- Clean the product using a soft, moist cloth. Use a mild detergent. Never use solvents or strong, abrasive cleaning agents.
Responsible disposal
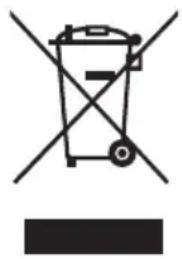
This symbol indicates that this product should not be disposed of with general household waste. This applies throughout the entire EU. In order to prevent any harm to the environment or health hazards caused by incorrect waste disposal, the product must be handed in for recycling so that the material can be disposed of in a responsible manner. When recycling your product, take it to your local collection facility or contact the place of purchase. They will ensure that the product is disposed of in an environmentally sound manner.
natural_image
Symbol of a trash bin crossed out by two crossed lines, with no text or labels present.Specifications
Rated voltage 230–240 V AC, 50 Hz
Rated power S1: 150 W, S2 (30 min) 250 W
No-load speed,
dry grinding wheel 2850 rpm
No-load speed,
wet grinding wheel 130 rpm
Max peripheral speed Wet grinding wheel 1.3 m/s,
Dry grinding wheel 23 m/s
IP rating IP23
Grinding wheels ∅ 200 × 40 × ∅ 20 mm (wet stone for sharpening edged tools)
∅ 150 × 20 × ∅ 12.7 mm (dry grinding wheel)
Noise emission data LpA = 68 dB(A), uncertainty KpA = 3 dB(A)
LwA = 85.3 dB(A), uncertainty KwA = 3 dB(A)
Hearing protection must be worn
when the sound level exceeds 80 dB(A)
Weight 11.5 kg
Kombislipmaskin
Art.nr 18-3609 Modell TLG-150WG
41-1024
TLG-150WG
Montera kombislipmaskinen
Användning
natural_image
Symbol of a trash bin crossed with no text or numbers, accompanied by a solid black rectangle below (no text or symbols present)Specifikationer
Märkspänning 230–240 V AC, 50 Hz
Märkeffekt S1: 150 W, S2 (30 min) 250 W
Varvtal, obelastad slipskiva 2850 V/min
Varvtal våtslipsten 130 V/min
Max periferihastighet Våtslipsten 1,3 m/s, slipskiva 23 m/s
Skyddsklass IP23
natural_image
Symbol of a trash bin with crossed lines indicating no waste or restriction, and a solid rectangle below (no text or labels)Spesifikasjoner
Spenning 230–240 V AC, 50 Hz
Effekt S1: 150 W, S2 (30 min) 250 W
Turtall, ubelastet slipeskive 2850 o/min
Käyttö
Kierrättäminen
natural_image
Symbol of a trash bin crossed with no text or numbers, representing waste sorting or disposal (no text present)Tekniset tiedot
Nimellisjännite 230–240 V AC, 50 Hz
Nimellisteho S1: 150 W, S2 (30 min) 250 W
Kierrosluku
Das Gerät montieren
Benutzung
natural_image
Symbol of a trash bin with crossed lines indicating no waste or restriction, and a solid rectangle below (no text or labels)Technische Daten
Declaration of Conformity
Declares that this product complies with the requirements of the following directives and standards
Machinery Directive 2006/42/EC
EN 61029-1:2009+A11:2010
EN 61029-2-4:2011
EMC Directive 2004/108/EC
EN 55014-1:2006+A1+A2
EN 55014-2:1997+A1+A2
EN 61000-3-2:2006+A1+A2
EN 61000-3-3:2008
Henrik Alfredsson
Manager Technique & Quality
Insjön, Sweden, 2016-04-25
Sverige
Postal 10 - 13 Market Place
Kingston Upon Thames
Surrey
KT1 1JZ
Deutschland
Kundenservice


- Important!
- Viktig information:
- Wet & Dry Bench Grinder
- General safety instructions
- Specific safety rules for bench grinders
- Product safety symbols
- Description
- Assembly
- Operating instructions
- Overload protection
- Using the dry grinding wheel
- Warning:
- Using the wet grinding wheel
- Changing the dry grinding wheel
- Note:
- Changing the wet grinding wheel
- Care and maintenance
- Responsible disposal
- Specifications
- Kombislipmaskin
- Montera kombislipmaskinen
- Användning
- Specifikationer
- Spesifikasjoner
- Käyttö
- Kierrättäminen
- Tekniset tiedot
- Das Gerät montieren
- Benutzung
- Technische Daten
- Declaration of Conformity
- Sverige
- Deutschland
Brand : Cocraft
Model : HW 250
Category : Mill