HRD 380 - Mill Cocraft - Free user manual and instructions
Find the device manual for free HRD 380 Cocraft in PDF.


| Product Type | Electric Mill |
| Brand | Cocraft |
| Model | HRD 380 |
| Dimensions (H x W x D) | 30 x 20 x 15 cm |
| Weight | 2.5 kg |
| Power Supply | 220-240 V, 50 Hz |
| Power Consumption | 300 W |
| Capacity | 100 g |
| Material | Stainless steel and plastic |
| Main Functions | Grinding grains, spices, and coffee beans |
| Adjustable Grind Size | Yes, coarse to fine |
| Cleaning and Maintenance | Clean with a dry cloth; do not immerse in water |
| Safety Features | Overload protection, non-slip feet, lid safety switch |
| Spare Parts Availability | Replacement blades and bowls available from Cocraft |
| Repairability | Modular design for easy part replacement |
| Warranty | 2 years |
| General Information | Ideal for home use; compact and easy to store |
Frequently Asked Questions - HRD 380 Cocraft
User questions about HRD 380 Cocraft
0 question about this device. Answer the ones you know or ask your own.
Ask a new question about this device
Download the instructions for your Mill in PDF format for free! Find your manual HRD 380 - Cocraft and take your electronic device back in hand. On this page are published all the documents necessary for the use of your device. HRD 380 by Cocraft.
USER MANUAL HRD 380 Cocraft
Read the entire instruction manual carefully and make sure that you fully understand it before you use the equipment. Keep the manual for future reference.
Viktig information:
natural_image
Blue Cocralf HRD 380 electric tool with black handle and blade, displayed on textured surface (no text or symbols on device body)Art.no Model
18-3599
RO-001
40-9903
RO-001
Ver. 20190515
Original instructions
Bruksanvisning i original
Please read the entire instruction manual before using the product and then save it for future reference. We reserve the right for any errors in text or images and any necessary changes made to technical data. In the event of technical problems or other queries, please contact our Customer Services (see address details on the back).
Safety
General Safety Instructions for Hand-Held Motor-Operated Electric Tools
Warning! Read all the instructions. Failure to adhere to the following instructions may lead to electric shocks, fires and/or serious injury. The term “electrical hand tools” in the warning text below refers to your mains operated or battery operated hand tool.
SAVE THE INSTRUCTIONS.
1) The work space
a) Keep the work space clean and well illuminated. Cluttered and poorly lit areas invite accidents.
b) Do not use electrical hand tools in explosive environments, i.e. nearby flammable liquids, gas or dust. Electrical hand tools generate sparks that could easily ignite dust or fumes.
c) Keep away from children and other spectators while using the electrical hand tool. Distractions can make you lose your concentration and control.
2) Electrical safety
a) The electrical hand tool's plug must fit correctly in the wall socket.
Never modify the plug in any way. Never use an adaptor together with earthed electrical hand tools. Unmodified plugs and suitable wall sockets decrease the risk of electric shock.
b) Avoid body contact with earthed objects, such as pipes, radiators, ovens or refrigerators. There is an increased risk of electrical shock if your body is earthed.
c) Do not expose the electrical hand tool to rain or other wet conditions. If water gets inside an electrical hand tool it increases the risk of electrical shock.
d) Do not misuse the lead. Never use the lead to carry, drag or pull the plug out of the wall socket. Keep the lead away from heat, oil, sharp edges and movable parts. Damaged or tangled leads increase the risk of electrical shock.
e) When you use an electrical hand tool outdoors; use an extension cord suitable for this purpose. Use of an extension cord for outdoor use decreases the risk of electrical shock.
3) Personal safety
a) Pay attention to what you do and use common sense when using electrical hand tools. Never use an electrical hand tool if you are tired or under the influence of drugs, alcohol or medication. One moment of not paying attention while using an electrical hand tool may result in serious injury.
b) Use protective equipment. Always use safety glasses. Using protective equipment such as a face mask, slip resistant protective shoes, a helmet and ear defenders when needed decreases the risk of injury.
c) Avoid unexpected starts. Make sure that the switch is set to OFF before you connect the device to the wall socket. Never carry an electrical hand tool with one finger on the trigger or never connect the hand tool to a wall socket when the switch is set to ON, since it may result in injury.
d) Remove all service tools/keys before switching on the hand tool. A forgotten service tool on a rotating part of the electrical hand tool may result in injury.
e) Do not overreach. Make sure you stand steady and well balanced at all times. This gives better control in unexpected situations.
f) Wear suitable clothing. Do not wear loose fitting clothes or jewellery.
Keep hair, clothes and gloves away from moving parts. Loose fitting clothes, jewellery or long hair could get caught in moving parts.
g) If the equipment for suctioning or collecting dust is available make sure it is connected and used properly. Using technical aids may reduce dust related hazards.
4) Use and maintenance of the electrical hand tool
a) Do not overload the hand tool. Use a hand tool suitable for the work you are to perform. At the correct rate of feed, the correct tool will carry out the work better and more safely.
b) Never use the electrical hand tool if the switch does not work properly to turn on and shut off the tool. All electrical hand tools that cannot be operated by the switch are dangerous and must be repaired.
c) Unplug the lead from the wall socket before making any adjustments, changing accessories or storing the electrical hand tool away. These precautions reduce the risk of the electrical hand tool starting unexpectedly.
d) Store electrical hand tools that are not being used out of children's reach. Do not let people unfamiliar with the electrical hand tool or its instructions use it. Electrical hand tools can be dangerous if they get into the hands of inexperienced users.
e) Inspect electrical hand tools regularly. Check that all settings are correct, that no moving parts are getting jammed, that no parts are broken and for other reasons that might cause the electrical hand tool to malfunction. If something is damaged it must be repaired before use. Many accidents are caused by poorly maintained electrical hand tools.
f) Keep the tools sharp and clean. Properly maintained cutting tools with sharp blades are less likely to jam and are easier to control.
g) Use the electrical hand tool, accessories and such according to the instructions and in a way suitable for the type of electrical hand tool used.
Using the electrical hand tool for work other than that for which it is intended could result in a dangerous situation.
5) Service
a) Repairs and service should only be performed by qualified persons, and only with original spare parts. This guarantees the safety of the electrical hand tool.
Specific Safety Instructions for Random Orbital Sanders
- A dust mask should always be worn whilst sanding and the use of a dust extractor connected to the machine is recommended.
- Extra caution should be taken when sanding paint containing lead or when sanding wood, metal or other material which produces toxic dust. Make sure that anyone in the vicinity of the workplace wears a dust mask.
- Wood dust can be very flammable when mixed with air in the right proportions.
Safety Symbol Guide

Please read the entire instruction manual before using and save it for future use.

Always use ear protection, safety glasses or a visor and wear a dust mask.
Product description
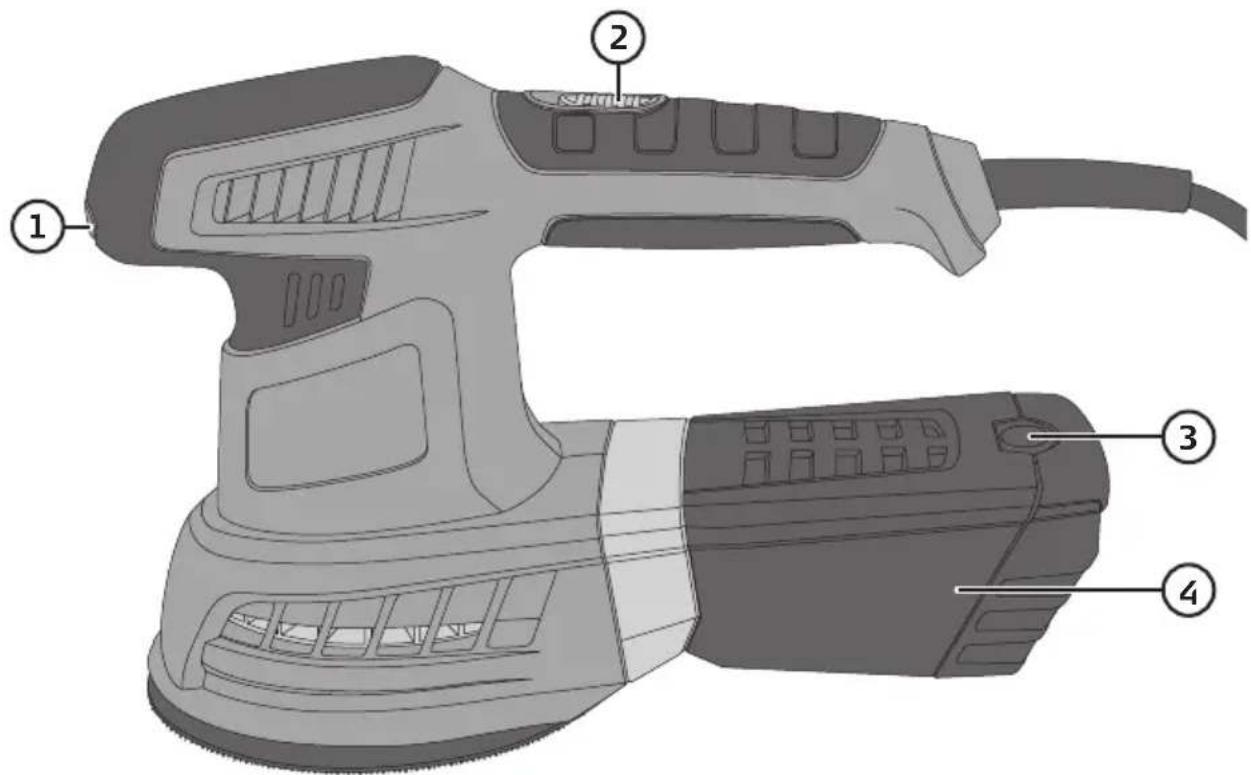
- Speed selector
- On/off switch
- Dust collector release button
- Dust collector
Use
Attaching sandpaper
- Align the holes in the sandpaper with the holes on the sanding plate.
- Securely press the sandpaper onto the sanding plate.
On/off
Note: Make sure that the power switch on the orbital sander is in the off position before plugging it into the wall socket.
- Plug the mains lead into a wall socket.
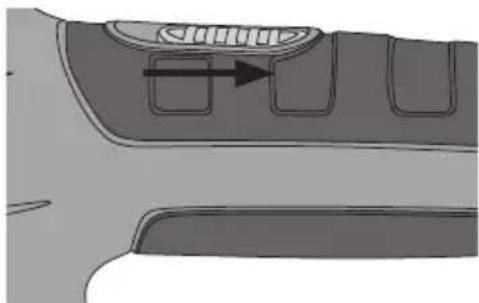
- Slide the power switch forwards to switch the sander on.
- Slide the power switch backwards to switch the sander off.
natural_image
Diagram of a vehicle's front and side panels with an arrow indicating direction (no text or symbols)Sanding
- Set the desired speed using the speed selector (1).
- Hold the sander securely with both hands.
Attaching, detaching and emptying the dust collector
Attaching
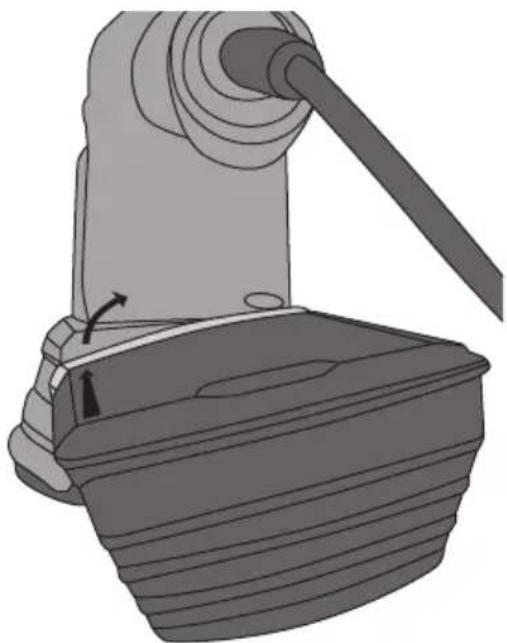
- Twist the collector slightly anti-clockwise and slide it into the attachment coupling.
- Twist the collector clockwise until it locks into place.
Detaching
Twist the collector anticlockwise and pull it from the attachment coupling and shake out any debris when necessary.
natural_image
Mechanical component diagram showing a lever and base with a curved arrow indicating motion (no text or symbols)Care and maintenance
- Unplug the sander from the wall socket before cleaning.
- Vacuum the orbital sander regularly and after using it to keep it clean.
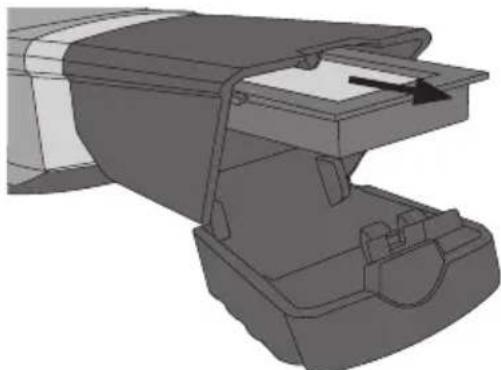
- Open the dust collector and pull out the filter (see fig.), Vacuum both the filter and collector.
- Refit the filter in the collector and close it.
- Refit the dust collector onto the sander.
natural_image
3D technical illustration of a mechanical component with no visible text or symbolsStorage
Unplug the sander and store it out of reach of children if it is not to be used for any significant period.
Responsible disposal
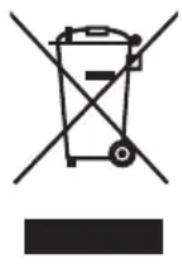
This symbol indicates that this product should not be disposed of with general household waste. This applies throughout the entire EU. In order to prevent any harm to the environment or health hazards caused by incorrect waste disposal, the product must be handed in for recycling so that the material can be disposed of in a responsible manner. When recycling your product, take it to your local collection facility or contact the place of purchase. They will ensure that the product is disposed of in an environmentally sound manner.
natural_image
Symbol of a trash bin crossed with no visible text or labelsSpecifications
Rated voltage 230–240 V AC, 50/60 Hz
Power 380 W
RPM 6000-13 000
Noise level LpA: 74 dB(A) (KpA: 3 dB)
LwA: 85 dB(A) (KwA: 3 dB)
Vibration 4.360 m/s ^2 (K: 1.5 m/s ^2 )
Weight 1.7 kg
Excenterslipmaskin
Art.nr 18-3599 Modell RO-001
40-9903 RO-001
natural_image
Diagram of a vehicle's door and seat layout with directional arrow (no text or symbols)Slipning
natural_image
Mechanical component diagram showing a lever and base with a curved arrow indicating motion (no text or symbols)natural_image
3D mechanical component diagram showing internal structure with no visible text or symbolsFörvaring
natural_image
Symbol of a trash bin crossed with no visible text or labelsSpecifikationer
Nätanslutning 230–240 V AC, 50/60 Hz
Effekt 380 W
Varvtal 6000–13000 v/min
Ljud LpA: 74 dB(A) (KpA: 3 dB)
LwA: 85 dB(A) (KwA: 3 dB)
Vibration 4,360 m/s ^2 (K: 1,5 m/s ^2 )
Vikt 1,7 kg
Eksentersliper
Art.nr. 18-3599 Modell RO-001
40-9903 RO-001
Les brukerveiledningen grundig før produktet tas i bruk, og ta vare på den for framtidig bruk. Vi reserverer oss mot eventuelle feil i tekst og bilder, samt endringer av tekniske data. Ved tekniske problemer eller spørsmål, ta kontakt med vårt kundesenter. (Se opplysninger på baksiden).
Sikkerhet
natural_image
Diagram of a vehicle's rearview and side profile showing directional arrows (no text or symbols)Sliping
- Still inn ønsket turtall med justerrattet (1).
- Hold sliperen stödig med begge hendene.
natural_image
Mechanical component diagram showing a lever and base with no visible text or symbolsnatural_image
3D technical illustration of a mechanical component with internal structure and mounting bracket (no text or symbols)Oppbevaring
natural_image
Symbol of a trash bin crossed with no visible text or labelsSpesifikasjoner
Spenning 230–240 V AC, 50/60 Hz
Effekt 380 W
Turtall 6000–13000 o/min
Lyd LpA: 74 dB(A) (KpA: 3 dB)
LwA: 85 dB(A) (KwA: 3 dB)
natural_image
Diagram of a car interior showing door, vent, and seat area with an arrow indicating direction (no text or symbols)Hionta
natural_image
Mechanical component diagram showing a lever and base with no visible text or symbolsnatural_image
3D technical illustration of a mechanical component with no visible text or symbolsSäilytys
natural_image
Symbol of a trash bin crossed with no text or numbers, representing environmental restriction (no text present)Tekniset tiedot
natural_image
Diagram of a vehicle's side profile showing vent and door components with an arrow indicating direction (no text or symbols)Schleifen
natural_image
Mechanical component diagram showing a lever and base with no visible text or symbolsPflege und Wartung
natural_image
3D technical illustration of a mechanical component with no visible text or symbolsAufbewahrung
natural_image
Symbol of a trash bin crossed with no text or numbers, representing environmental restriction (no text present)Technische Daten
Declaration of Conformity
Declares that this product complies with the requirements of the following directives and standards
Machinery Directive 2006/42/EC
EN 62841-1:2015 + AC:15
EN 62841-2-4:2014
EMC Directive 2014/30/EU
EN 55014-1: 2017
EN 55014-2: 2015
EN 61000-3-2:2014
EN 61000-3-3:2013
Low Voltage Directive 2014/35/EU
Chinor Widushim
Ellinor Wickström
Product Compliance Manager
Insjön, Sweden, 2019-05-15
CLAS OHLSON AB, SE-793 85 INSJÖN, SWEDEN
Sverige
Postal 10 - 13 Market Place
Kingston upon Thames
Surrey
KT1 1JZ
Deutschland
Kundenservice Hotline: 040 2999 78111
E-Mail: kundenservice@clasohlson.de
Homepage
www.clasohlson.de


- Viktig information:
- Safety
- General Safety Instructions for Hand-Held Motor-Operated Electric Tools
- 1) The work space
- 2) Electrical safety
- 3) Personal safety
- 4) Use and maintenance of the electrical hand tool
- 5) Service
- Specific Safety Instructions for Random Orbital Sanders
- Safety Symbol Guide
- Product description
- Use
- Attaching sandpaper
- On/off
- Sanding
- Attaching, detaching and emptying the dust collector
- Attaching
- Detaching
- Care and maintenance
- Storage
- Responsible disposal
- Specifications
- Excenterslipmaskin
- Slipning
- Förvaring
- Specifikationer
- Eksentersliper
- Sikkerhet
- Sliping
- Oppbevaring
- Spesifikasjoner
- Hionta
- Säilytys
- Tekniset tiedot
- Schleifen
- Pflege und Wartung
- Aufbewahrung
- Technische Daten
- Declaration of Conformity
- Sverige
- Deutschland
Brand : Cocraft
Model : HRD 380
Category : Mill