
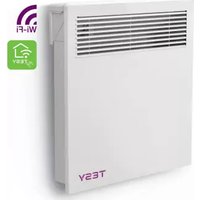
HL 243 VB W - Heating Tesy - Free user manual and instructions
Find the device manual for free HL 243 VB W Tesy in PDF.


| Product Type | Electric Convector Heater |
| Model | HL 243 VB W |
| Brand | Tesy |
| Power Supply | 220-240 V ~ 50 Hz |
| Heating Power | 2000 W |
| Heating Element | Aluminum Convector |
| Dimensions (W x H x D) | 58 x 45 x 8 cm |
| Weight | 3.5 kg |
| Temperature Control | Thermostat with 3 heat settings |
| Installation | Wall-mounted or floor-standing |
| Safety Features | Overheat protection, tip-over switch |
| Control Type | Mechanical controls |
| Maintenance | Wipe with dry cloth; clean filter monthly |
| Cleaning | Unplug before cleaning; use soft dry cloth |
| Power Cord Length | 1.5 m |
| Color | White |
| Application | Indoor use for supplementary heating |
Frequently Asked Questions - HL 243 VB W Tesy
User questions about HL 243 VB W Tesy
0 question about this device. Answer the ones you know or ask your own.
Ask a new question about this device
Download the instructions for your Heating in PDF format for free! Find your manual HL 243 VB W - Tesy and take your electronic device back in hand. On this page are published all the documents necessary for the use of your device. HL 243 VB W by Tesy.
USER MANUAL HL 243 VB W Tesy
EN FAN HEATER 3-9 Usage and Storage Instructions
HL-243VB W 220-240V\~ 50-60 Hz 1000/2000W
IMPORTANT SAFETY PRECAUTIONS:

WARNING!
- Please read this manual before operating the appliance and keep it at a safe place for future reference. In case the appliance is obtained by a new owner, it should be transferred together with its manual.
- CAUTION: Children under 3 years of age should be kept away from the appliance unless they are under constant supervision.
Children from 3 to 8 years of age are allowed to operate the on/off button ONLY, provided that the appliance is installed and ready for operation and such children have been supervised and instructed in safe operation of the appliance and they understand all related risks.
Children from 3 to 8 years of age MUST NOT: connect the plug to power sockets, make adjustments, clean it or carry out user maintenance operations.
This appliance can be used by children older than 8 years of age and by people with reduced physical, sensor and mental capabilities, as well as by people with insufficient experience and knowledge provided they are supervised or instructed in safe operation of the appliance and understand the related risks. Children should not be allowed to play with the appliance. Cleaning and user maintenance operations must not be carried out by children without supervision.
- CAUTION: Some of the appliance parts may get very hot during operation and thus cause burns to users. In case there are children and vulnerable people in the room, special attention should be paid.

• WARNING: In order to avoid
overheating, do not cover the appliance!
• The appliance should not be positioned right under a power socket!
- If the supply cord is damaged, it must be replaced by the manufacturer, its service agent or similarly qualified persons in order to avoid a hazard.
- Before connecting the fan heater, you should check if the voltage on the technical information plate corresponds to the voltage of the main electrical system of the place of use /at home or in the office/. The appliance is intended for the voltage, shown on the technical information plate.
- HL-243VB W fan heater must be installed in accordance with the good professional practices and in accordance with the legislature of the particular state (Electricity Directive of EU and requirements for special installations and places of installation including bathroom or shower box
HD60364-7-701:2007(IEC 60364-7-701:2007)).
- The heater is classified as class II and is provided with IP24 water protection. For that reason it must be mounted in position (VOLUME) 2. That prevents the chance of reach to the control board (switch and thermostat) of the fan heater by a person who is in a shower or in a bath. Minimum permissible distance between the appliance and a water source must not be less than 1 meter! The appliance is to be mounted on a wall only!

- This appliance must be used only with its main function, which it was intended for, i.e. heating of domestic premises. Every different usage is considered incorrect and hence dangerous. The manufacturer does not assume responsibility for break-downs, caused by incorrect and unreasonable usage. Non-adherence to the safety precautions will render the guarantee invalid
- Do not leave your home, while the appliance is turned on: assure that the switch is in position OFF(0) (turned-off) and the thermostat switch is in position – minimum. Always disconnect the plug of the device from the socket.
- Keep inflammable objects as furniture, cushions, bedding, paper, clothes, curtains etc. at a distance of minimum 100 cm away from the fan heater.
- Do not use the device in areas of usage and storage of inflammable substances. Do not use the device in combustible areas /for example near inflammable gases and aerosols/ - there is a great risk of explosion and fire!
- Do not insert or allow any objects to get into the ventilation openings (inlets and outlets), because that can cause break-down of the appliance or any other damages.
• The appliance is not suitable for animal breeding and is intended only for domestic use! - Keep the air outlet free from any objects: you should keep a clear distance of at least 1m in front the heater. Do not allow any objects to get into in the
EN
air inlet or outlet because that can cause electrical shock, fire or damage of the heating element.
- The most common reason for over-heating is the accumulation of dust and dirt in the appliance. You should clean regularly ventilation openings with a vacuum cleaner. Before cleaning you must disconnect the appliance from the mains. Keep the fan heater always clean.
- You should never touch the appliance with wet or moist hands – there is danger for your life!
- In order to disconnect the plug from the socket outlet when necessary the socket should be accessible all the time!
- You must never pull the electric cord or the appliance itself when disconnecting from the mains
- Warning! The air outlet gets hot when the appliance is operating (more than 80°C ).
- Do not cover the appliance. If the appliance is covered there is danger of overheating.
- The electrical system to which the appliance is connected must be provided with automatic safety fuse. The distance between the sockets and the appliance (in turned-off state) must be at least 3mm.
- Grounding is forbidden! After unpacking and before use you must check if the mechanical parts and their gear are in a good state. If you have any doubts you should not use the appliance and search advice from a qualified electrician.
- If the appliance is damaged or not functioning properly you must stop it and not try to repair it yourself. For any type of repairs you must consult the Service Center for post-sale help. There you will have your damaged part replaced with an original spare one. Not obeying this instruction will compromise the appliance safety.
- If you decide to stop using an appliance of that kind it is recommended to make it unusable as you cut the electric cord, after you have disconnected it from the mains. It is also recommended all hazards, related to the appliance to be checked. That is very important if there is a chance the discarded appliance to be used for play by children.
- You should never keep the appliance unnecessarily plugged-in. Disconnect the appliance from the mains if you do not intend to use it for a long time.
-
In order to avoid any overheating of the electric cord it is recommended to unreel the whole electric cord.
-
Warning: Do not use this appliance with a programmer, counter or another device which can automatically turn it on because if the appliance is covered or incorrectly positioned there is a danger of fire.
- Place the electric cord in such a way that it does not hamper the movement of people and not to be stepped on! You must use only approved connection blocks, which are suitable for the appliance, i.e. there is a sign of compliance!
- The electric cord must not be in touch with the hot parts of the appliance!
- You must never move the appliance by pulling it by its electric cord. You must never use the electric cord for moving of other objects.
- Do not reel the electric cord round the appliance! Do not use the appliance with its electric cord reeled – this is also valid if a cable drum is used!
- Do not press the cord and do not stretch it by sharp edges. Do not place the cord over hot plates or in open fire!
- In order to avoid a hazard for very young children, this appliance should be installed so that the lowest heated rail is at least 600 mm above the floor.

Note: This appliance is intended only for drying textiles washed in water.
PACKAGE
• After unpacking the appliance you should check if it is not damaged during transportation and if all the components are included! In case that you find out any damage or incomplete package you should connect with your authorized retailer!
- Do not discard the original packing box! It could be used to store the appliance during transportation in order damages to be avoided!
- The disposal of the packing material should be done in the appropriate way! Children should be prevented from playing with the polyethylene bags!
MOUNTING ON A WALL
- Please ensure that the walls of the installation location without wires, pipes, etc., to ensure that the device can be securely mounted on the wall
- The appliance is intended only for vertical wall mounting! Floor or ceiling mounting is forbidden!
-
Never position the appliance right below a socket outlet!
-
The appliance should be assembled and connected by a qualified electrician. The installation process should be isolated from the mains before electrical connection works are to be done.
- Position the power cord so that it does not hamper free movement of people and not to be stepped on! Use only approved extensions, which are proper to the appliance, i.e. they have a compliance sign!
- The power cord should not be in touch with hot parts of the appliance!
- Do not use the appliance in rooms smaller than 4 square meters.
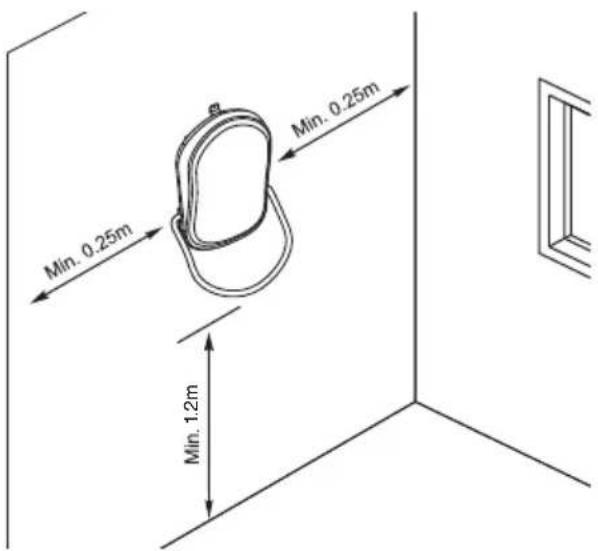
- The appliance inlet and outlet openings must not be blocked! Distance between the appliance and the ceiling is at least 0.2m. Distance on both sides of the appliance to the wall is at least 0.25m. Distance between the outlet and the bottom is min 1.2m.
MOUNTING
- Choose a good horizontal position, then mark 5 points as suggestive dimensions on the drilling position, then drill with a suitable drill holes at the marked locations in the wall. (pic 1)
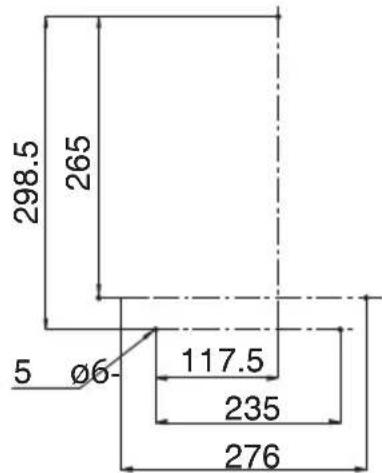
- Insert plastic anchors into the holes (pic 2)

2
- Turn two stainless steel screws into the anchors and leave 2.5 mm of the screw out (pic 3)
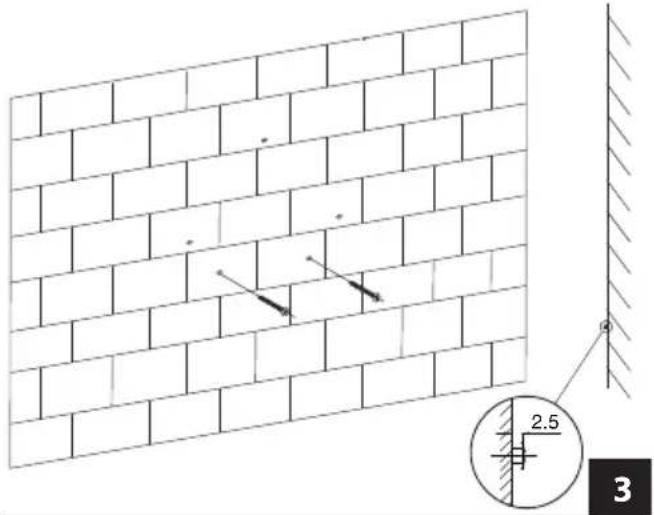
- Put the appliance to the wall, pull down until it secured. (pic 4)

- After securing it firmly to the bottom two screws, screw the last three screws as picture
EN

We thank you for choosing HL-243VB W fan heater. This is a product, which provides heating at 1000W or 2000W in cold weather in accordance with the desired temperature conditions in the room. The appliance will provide long-life service if being correctly maintained and taken care of in accordance with the manual.
OPERATION
Push the ON/OFF (0/I) button located at the back of the appliance to connect power supply. There is a "D" sound and screen will display in full for 3 seconds, then appliance enters into standby mode. Push ON/OFF (0/I) button again to disconnect power supply.
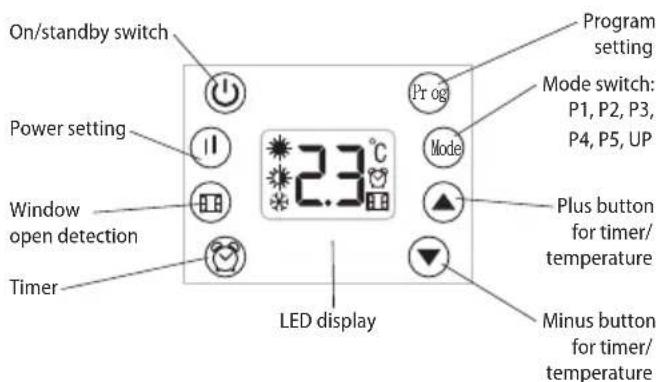
| Icon Meaning | |
| working at Full power 2000W | |
| Working at 1000W | |
| Anti-frost function | |
| Window open detection function | |
| Timer function to switch off | |
| d1, d2, d3, d4, d5, d6, d7 | Mon. Tue. Wed. Thur. Fri. Sat. Sun. |
| P1,P2,P3,P4,P5 F | Factory pre-set program |
| UP Self-program | setting |
Press , once to switch on the appliance. Press again
to switch it off.
- Set Current Day and Time:
When appliance is ON, long press for 3 seconds to activate current day setting.
1). Screen will display d1 and it flashes, then press 📂 to set Day of the week among d1, d2, d3, d4, d5, d6, d7 in cycle. Press 🌐 once to confirm the current day setting.
2). Then appliance enter into time setting. Hour icon flashes, press or to set current hour among 00-23 in cycle. Press once to confirm hour.
3). Then follow the same way to set minutes. Finally press once to confirm setting.
After setting finish, press once in standby mode to check if the current day and time setting is correct. Screen will automatically show Day, Hour, Minutes in turns within 1 second each, then switch back to temperature display.

For example, you have set today is Wed. 12:45 a.m., screen will show d3, 12:45 accordingly.

Note: At the first usage, icon will keep flashing until current day and time are set. Please finish the setting
before any other usage.
- Power Setting
Press 📁 to turn on the appliance, screen display, ✪ appliance work at full power 2000W. You may press 📋 button to switch between 📋 and . ✪
- Temperature Setting
In any working mode (except anti-frost function mode), press or to activate temperature setting and choose among 5-35°C. Long press or for 2 seconds to activate quick setting. After setting, it will save automatically in 5 seconds.
When room temperature is found to reach the set temperature, appliance will stop heating. When room temperature is found to drop 1°C below set temperature, appliance recover heating.
- Mode Switch
When appliance is ON, press MODE, to select operation mode among P1, P2, P3, P4, P5, UP in cycle.
- P1, P2, P3, P4, P5 are factory pre-set program;
- UP is customized program for end-user to set working period and mode upon their habit.
Table below shows factory pre-set program P1, P2, P3, P4, P5:
| One Week | Mode | Working mode | Remark | ||||||
| Anti-frost Comfort Anti-frost Comfort | Comfort | Anti-frost Comfort | Comfort | Anti-frost | Comfort | Anti-frost | |||
| 1-7 P1 00:00- | 24:00 | All day comfort, applicable for everyday use continuously | ||||||
| 1-5 P2 00:00- | 06:30 | 06:30-08:30 | 08:30-17:00 | 17:00-22:30 | 22:30-24:00 | Applicable for family who work in weekdays and be off at weekends | ||
| 6-7 00:00- | 07:30 | 07:30-10:00 | 10:00-12:00 | 12:00-14:00 | 14:00-17:00 | 17:00-22:30 | 22:30-24:00 | |
| 1-5 P3 00:00- | 06:00 | 06:00-17:00 | 17:00-24:00 | Applicable in office where week days work and weekends off | ||||
| 6-7 00:00- | 24:00 | |||||||
| 1-7 P4 00:00- | 06:00 | 06:00-22:00 | 22:00-24:00 | Applicable for commercial place where no day off | ||||
| 1-7 P5 00:00- | 24:00 | All anti-frost, applicable for family who go out for a long time |
**Anti-frost: appliance keep room temperature at 5°C to prevent frost.
**Comfort: upon your need to set power and temperature. (follow step 2&3)
5. Timer Setting
In P1 working mode, press twice quickly to activate timer setting. Icon flashes on the screen, then press or , to set auto-off hour among 0 to 24 hours. Long press or for 2 seconds to activate quick setting. It will save automatically in 5 seconds after setting. Icon stop flashing and appliance starts count down to turn off itself automatically.
Press twice quickly again to cancel timer setting.
6. Self-Program, UP Setting
When appliance is ON
1). Press 📂 button and choose UP mode, then press ⬆ button to activate self-program setting to set one (or up to three) working period in comfort mode.
2). Screen displays d1 to begin Monday setting, press ▲ or ▶ once.
3). Screen display 1, icon #ashes to activate the 1st working period setting. Press or , once again to select start working time among 0 to 24. Then press button to confirm setting, screen will turn to finish working time setting, press or to choose and press button to confirm. The screen will display 2, icon #ashes. In the same way, you may set the 2nd and the 3rd working period.
Note: Press Button at first instead of vmm, can skip the steps to keep the appliance in Anti-frost function.
4). Press button to confirm every setting, when d1 setting is finish, it will automatically turn to d2. In the same way, you may set d2, d3, d4, d5, d6 and d7.
5). After all setting is confirmed, icon stop flashing.
6). Long press PROG button for 3 seconds to check UP mode setting,
- press PROG button each time to check each setting in turns, for example, d1 – 1st working start time – 1st working finish time and so on.
- press button to choose among d1 to d7. Press to activate the corresponding day's working period setting.
- no operation within 2 minutes, it will quit automatically.
7. Child Lock Function
When appliance is ON, long press and at the same time for 3 seconds to activate child lock function, screen will show [] after setting and will recover to original display in 5 seconds. No button will be active during it. Once button is touch, screen will flashes [] and recover to original display in 5 seconds.
Long press and at the same time for 3 seconds again to cancel child lock function.
8. Window Open Detection Function:
When appliance is ON, press once to activate window open detection, icon flashes on the screen, press again to cancel the setting, icon disappear.
In window open detection mode, when room temperature is found to drop 5°C or more within any of 30 minutes, appliance will stop heating and window open detection function runs. icon □stop flashing and keep lighting to remind user to close the window.
Close the window before press to recover original
operation, icon flashes again.
OVERHEATING PROTECTION
The in-built overheating protection automatically turns the appliance off in case of an error! In that situation the plug must be disconnected from the mains and the control switch put in position "0". After a short period of cooling the appliance is ready for operation (in about 10-15 minutes)! If that error is repeated – consult an authorized service at your location!
CLEANING
- You must first turn off the appliance and disconnect its plug from the socket. Do not use abrasive detergents!
- Clean the body with wet cloth, vacuum cleaner or a brush!
- You must never submerge the appliance under water – there is life danger!
- If the appliance should not be used for a certain period of time it must be secured from excessive dirt and dust by placing it in its original package.
- You must never place the hot appliance in its package!

Instructions for environment protection
Electric appliances out of use contain valuable materials and hence must not be disposed in domestic dumps! We kindly ask you for cooperation and active role in preservation of natural resources by disposing the appliance to the organized buy-back locations (if there are any).
TABLE 2: INFORMATION REQUIREMENTS FOR ELECTRIC LOCAL SPACE HEATERS
Model identifier(s): 1.HL-243VB W 2000W/220-240V\~50-60Hz
| Item Symbol | Value 1. Unit Item Unit | ||
| Heat output Type of heat input for electric storage local space heaters only (select one) | |||
| Nominal heat output | Pnom | 2,00 kW Manual heat charge control, with integrated thermostat | [no] |
| Minimum heat output (indicative) | Pmin | 0,00 kW Manual heat charge control, with room and/or outdoor temperature feedback | [no] |
| Maximum continuous heat output (indicative) | Pmax,C | 2,00 kW Electric heat charge control, with room and/or outdoor temperature feedback heat charge control, with integrated thermostat | [no] |
| Auxiliary electricity consumption | Fan assisted head output [no] | ||
| At nominal heat output | elmax | 0,00 kW Type of heat output/room temperature control (select one) | - |
| At minimum heat output | elmin | 0,00 kW Single stage heat output and no room temperature control | [no] |
| In standby mode el SB 0,00 kW Two or more manual stages, no room temperature control | [no] | ||
| With mechanic thermostat room temperature control | [no] | ||
| With electronic room temperature control [no] | |||
| With electronic room temperature control plus day timer | [no] | ||
| With electronic room temperature control plus week timer | [yes] | ||
| Other control options (multiple selections possible) | |||
| Room temperature control, with presence detection | [no] | ||
| Room temperature control, with open window detection | [yes] | ||
| TESY OOD,48 Madara Blvd,Shumen, 9700,Bulgariaoffice@tesy.com | With distance control option [no] | ||
| With adaptive start control [no] | |||
| With working time limitation [no] | |||
| With black bulb sensor | [no] | ||
EN
2
- Navijte dva vijka u otvorima, ostavljajući 2,5 mm od vijka na van. (Slika 3)

- Postavite uređaj do zida, povucite dolje, sve dok je sigurno učvršćen. (Slika 4)

Zahvaljujemo da ste odabrali ventilatorsku peć HL-243VB W. Ovo je uređaj koji osigurava grijanje u hladnim danima od 1000W ili 2000W, odnosno od Vaše potrebe za komfor i udobnost u prostoriji. Ako je potrebno, jedinica se može koristiti za prisilne cirkulacije zraka u sobi. Uz pravilnu uporabu i njegu kao što je opisano u ovim uputama, uređaj će pružiti mnogo godina korisnog rada.
EKSPLOATACIJA
2
5
2
2
2
MONTĒŠANA PIE SIENAS
2
LV
2
OLULISED PREVENTIIVSED MEETMED:

TÄHELEPANU:
2
TESY
TESY Ltd - Head office
1166 Sofia, Sofia Park,
Building 16V, Office 2.1. 2nd Floor
PHONE: +359 2 902 6666,
FAX: +359 2 902 6660,
office@tesy.com


- IMPORTANT SAFETY PRECAUTIONS:
- WARNING!
- EN
- PACKAGE
- MOUNTING ON A WALL
- MOUNTING
- OPERATION
- Timer Setting
- Self-Program, UP Setting
- When appliance is ON
- Child Lock Function
- Window Open Detection Function:
- OVERHEATING PROTECTION
- CLEANING
- Instructions for environment protection
- 2
- EKSPLOATACIJA
- 5
- MONTĒŠANA PIE SIENAS
- LV
- OLULISED PREVENTIIVSED MEETMED:
- TÄHELEPANU:
- TESY
Brand : Tesy
Model : HL 243 VB W
Category : Heating